

Page 1

ADOBE® ELEMENTS ORGANIZER HELP
Page 2

Legal notices
Legal notices
For legal notices, see http://help.adobe.com/en_US/legalnotices/index.html.
Last updated 9/22/2014
Page 3

Contents
Chapter 1: What's New
What's new in Elements Organizer 13 . . . . . . . . . . . . . . . . . . . . . . . . . . . . . . . . . . . . . . . . . . . . . . . . . . . . . . . . . . . . . . . . . . . . . . . . . . . . . . . . . . .1
What's new in Photoshop Elements 13 . . . . . . . . . . . . . . . . . . . . . . . . . . . . . . . . . . . . . . . . . . . . . . . . . . . . . . . . . . . . . . . . . . . . . . . . . . . . . . . . . .3
What's new in Adobe Premiere Elements 13 . . . . . . . . . . . . . . . . . . . . . . . . . . . . . . . . . . . . . . . . . . . . . . . . . . . . . . . . . . . . . . . . . . . . . . . . . . . 10
Chapter 2: Workspace and workflow
Access your media anywhere using Online Account . . . . . . . . . . . . . . . . . . . . . . . . . . . . . . . . . . . . . . . . . . . . . . . . . . . . . . . . . . . . . . . . . . . 17
About workspaces . . . . . . . . . . . . . . . . . . . . . . . . . . . . . . . . . . . . . . . . . . . . . . . . . . . . . . . . . . . . . . . . . . . . . . . . . . . . . . . . . . . . . . . . . . . . . . . . . . . . 21
Using Elements Organizer and Adobe Premiere Elements together . . . . . . . . . . . . . . . . . . . . . . . . . . . . . . . . . . . . . . . . . . . . . . . . . . . . . 24
Viewing photos and videos in the Elements Organizer . . . . . . . . . . . . . . . . . . . . . . . . . . . . . . . . . . . . . . . . . . . . . . . . . . . . . . . . . . . . . . . . . 27
Keys for viewing photos (Elements Organizer) . . . . . . . . . . . . . . . . . . . . . . . . . . . . . . . . . . . . . . . . . . . . . . . . . . . . . . . . . . . . . . . . . . . . . . . . . 33
Keys for finding photos . . . . . . . . . . . . . . . . . . . . . . . . . . . . . . . . . . . . . . . . . . . . . . . . . . . . . . . . . . . . . . . . . . . . . . . . . . . . . . . . . . . . . . . . . . . . . . . 33
Keys for editing photos (Elements Organizer) . . . . . . . . . . . . . . . . . . . . . . . . . . . . . . . . . . . . . . . . . . . . . . . . . . . . . . . . . . . . . . . . . . . . . . . . . . 34
Chapter 3: Importing
Importing media from cameras and card readers . . . . . . . . . . . . . . . . . . . . . . . . . . . . . . . . . . . . . . . . . . . . . . . . . . . . . . . . . . . . . . . . . . . . . . 35
Importing media from files and folders . . . . . . . . . . . . . . . . . . . . . . . . . . . . . . . . . . . . . . . . . . . . . . . . . . . . . . . . . . . . . . . . . . . . . . . . . . . . . . . . 39
Importing media by searching . . . . . . . . . . . . . . . . . . . . . . . . . . . . . . . . . . . . . . . . . . . . . . . . . . . . . . . . . . . . . . . . . . . . . . . . . . . . . . . . . . . . . . . . 43
Importing photos from Scanners (Windows only) . . . . . . . . . . . . . . . . . . . . . . . . . . . . . . . . . . . . . . . . . . . . . . . . . . . . . . . . . . . . . . . . . . . . . . 47
Importing media from iPhoto library (Mac OS only) . . . . . . . . . . . . . . . . . . . . . . . . . . . . . . . . . . . . . . . . . . . . . . . . . . . . . . . . . . . . . . . . . . . . 48
iii
Chapter 4: Catalogs, folders, and albums
Creating albums and album categories . . . . . . . . . . . . . . . . . . . . . . . . . . . . . . . . . . . . . . . . . . . . . . . . . . . . . . . . . . . . . . . . . . . . . . . . . . . . . . . . 50
Creating and editing saved searches . . . . . . . . . . . . . . . . . . . . . . . . . . . . . . . . . . . . . . . . . . . . . . . . . . . . . . . . . . . . . . . . . . . . . . . . . . . . . . . . . . 54
Editing albums and album categories . . . . . . . . . . . . . . . . . . . . . . . . . . . . . . . . . . . . . . . . . . . . . . . . . . . . . . . . . . . . . . . . . . . . . . . . . . . . . . . . . 58
Troubleshooting catalog issues . . . . . . . . . . . . . . . . . . . . . . . . . . . . . . . . . . . . . . . . . . . . . . . . . . . . . . . . . . . . . . . . . . . . . . . . . . . . . . . . . . . . . . . 61
Backup or restore catalogs . . . . . . . . . . . . . . . . . . . . . . . . . . . . . . . . . . . . . . . . . . . . . . . . . . . . . . . . . . . . . . . . . . . . . . . . . . . . . . . . . . . . . . . . . . . . 63
Creating and editing catalogs . . . . . . . . . . . . . . . . . . . . . . . . . . . . . . . . . . . . . . . . . . . . . . . . . . . . . . . . . . . . . . . . . . . . . . . . . . . . . . . . . . . . . . . . . 65
Tag your me dia . . . . . . . . . . . . . . . . . . . . . . . . . . . . . . . . . . . . . . . . . . . . . . . . . . . . . . . . . . . . . . . . . . . . . . . . . . . . . . . . . . . . . . . . . . . . . . . . . . . . . . . 69
Chapter 5: Viewing and fixing photos
Tag your me dia . . . . . . . . . . . . . . . . . . . . . . . . . . . . . . . . . . . . . . . . . . . . . . . . . . . . . . . . . . . . . . . . . . . . . . . . . . . . . . . . . . . . . . . . . . . . . . . . . . . . . . . 79
View video and full-screen images . . . . . . . . . . . . . . . . . . . . . . . . . . . . . . . . . . . . . . . . . . . . . . . . . . . . . . . . . . . . . . . . . . . . . . . . . . . . . . . . . . . . 87
Fixing photos in Elements Organizer . . . . . . . . . . . . . . . . . . . . . . . . . . . . . . . . . . . . . . . . . . . . . . . . . . . . . . . . . . . . . . . . . . . . . . . . . . . . . . . . . . 95
Fixing photos and videos using other applications . . . . . . . . . . . . . . . . . . . . . . . . . . . . . . . . . . . . . . . . . . . . . . . . . . . . . . . . . . . . . . . . . . . . . 98
Grouping photos in version sets . . . . . . . . . . . . . . . . . . . . . . . . . . . . . . . . . . . . . . . . . . . . . . . . . . . . . . . . . . . . . . . . . . . . . . . . . . . . . . . . . . . . . . 98
Chapter 6: Adding metadata
Marking faces in photos and organizing people stacks . . . . . . . . . . . . . . . . . . . . . . . . . . . . . . . . . . . . . . . . . . . . . . . . . . . . . . . . . . . . . . . . 102
Adding and managing place (location) data . . . . . . . . . . . . . . . . . . . . . . . . . . . . . . . . . . . . . . . . . . . . . . . . . . . . . . . . . . . . . . . . . . . . . . . . . . 108
Creating Event stacks using Smart Events . . . . . . . . . . . . . . . . . . . . . . . . . . . . . . . . . . . . . . . . . . . . . . . . . . . . . . . . . . . . . . . . . . . . . . . . . . . . 116
Adding and managing event data . . . . . . . . . . . . . . . . . . . . . . . . . . . . . . . . . . . . . . . . . . . . . . . . . . . . . . . . . . . . . . . . . . . . . . . . . . . . . . . . . . . . 117
Last updated 9/22/2014
Page 4

ELEMENTS ORGANIZER 11
Content s
Chapter 7: Searching
Searching for media files . . . . . . . . . . . . . . . . . . . . . . . . . . . . . . . . . . . . . . . . . . . . . . . . . . . . . . . . . . . . . . . . . . . . . . . . . . . . . . . . . . . . . . . . . . . . . 121
Using the Find menu . . . . . . . . . . . . . . . . . . . . . . . . . . . . . . . . . . . . . . . . . . . . . . . . . . . . . . . . . . . . . . . . . . . . . . . . . . . . . . . . . . . . . . . . . . . . . . . . 124
Search options to find media . . . . . . . . . . . . . . . . . . . . . . . . . . . . . . . . . . . . . . . . . . . . . . . . . . . . . . . . . . . . . . . . . . . . . . . . . . . . . . . . . . . . . . . . 128
Finding media files using Timeline . . . . . . . . . . . . . . . . . . . . . . . . . . . . . . . . . . . . . . . . . . . . . . . . . . . . . . . . . . . . . . . . . . . . . . . . . . . . . . . . . . . 130
Finding media files by keyword tags . . . . . . . . . . . . . . . . . . . . . . . . . . . . . . . . . . . . . . . . . . . . . . . . . . . . . . . . . . . . . . . . . . . . . . . . . . . . . . . . . 132
Chapter 8: Photo projects
Create slideshows . . . . . . . . . . . . . . . . . . . . . . . . . . . . . . . . . . . . . . . . . . . . . . . . . . . . . . . . . . . . . . . . . . . . . . . . . . . . . . . . . . . . . . . . . . . . . . . . . . . 136
Creating slide shows (Windows only) | Elements 12 . . . . . . . . . . . . . . . . . . . . . . . . . . . . . . . . . . . . . . . . . . . . . . . . . . . . . . . . . . . . . . . . . . . 140
Elements Organizer projects overview . . . . . . . . . . . . . . . . . . . . . . . . . . . . . . . . . . . . . . . . . . . . . . . . . . . . . . . . . . . . . . . . . . . . . . . . . . . . . . . 150
Creating photo calendar . . . . . . . . . . . . . . . . . . . . . . . . . . . . . . . . . . . . . . . . . . . . . . . . . . . . . . . . . . . . . . . . . . . . . . . . . . . . . . . . . . . . . . . . . . . . 152
Chapter 9: Printing and sharing
Share photos using online services . . . . . . . . . . . . . . . . . . . . . . . . . . . . . . . . . . . . . . . . . . . . . . . . . . . . . . . . . . . . . . . . . . . . . . . . . . . . . . . . . . . 153
Share videos . . . . . . . . . . . . . . . . . . . . . . . . . . . . . . . . . . . . . . . . . . . . . . . . . . . . . . . . . . . . . . . . . . . . . . . . . . . . . . . . . . . . . . . . . . . . . . . . . . . . . . . . 153
Upload photos to Facebook . . . . . . . . . . . . . . . . . . . . . . . . . . . . . . . . . . . . . . . . . . . . . . . . . . . . . . . . . . . . . . . . . . . . . . . . . . . . . . . . . . . . . . . . . 155
Share albums for online viewing . . . . . . . . . . . . . . . . . . . . . . . . . . . . . . . . . . . . . . . . . . . . . . . . . . . . . . . . . . . . . . . . . . . . . . . . . . . . . . . . . . . . . 157
Set e-mail preferences . . . . . . . . . . . . . . . . . . . . . . . . . . . . . . . . . . . . . . . . . . . . . . . . . . . . . . . . . . . . . . . . . . . . . . . . . . . . . . . . . . . . . . . . . . . . . . . 157
Sending photos and media files by email . . . . . . . . . . . . . . . . . . . . . . . . . . . . . . . . . . . . . . . . . . . . . . . . . . . . . . . . . . . . . . . . . . . . . . . . . . . . . 158
Order printed photos using online print services . . . . . . . . . . . . . . . . . . . . . . . . . . . . . . . . . . . . . . . . . . . . . . . . . . . . . . . . . . . . . . . . . . . . . 161
Printing photos . . . . . . . . . . . . . . . . . . . . . . . . . . . . . . . . . . . . . . . . . . . . . . . . . . . . . . . . . . . . . . . . . . . . . . . . . . . . . . . . . . . . . . . . . . . . . . . . . . . . . . 164
Email photos as PDF file . . . . . . . . . . . . . . . . . . . . . . . . . . . . . . . . . . . . . . . . . . . . . . . . . . . . . . . . . . . . . . . . . . . . . . . . . . . . . . . . . . . . . . . . . . . . . 169
iv
Chapter 10: Video
Viewing video projects . . . . . . . . . . . . . . . . . . . . . . . . . . . . . . . . . . . . . . . . . . . . . . . . . . . . . . . . . . . . . . . . . . . . . . . . . . . . . . . . . . . . . . . . . . . . . . 170
Create instant movies . . . . . . . . . . . . . . . . . . . . . . . . . . . . . . . . . . . . . . . . . . . . . . . . . . . . . . . . . . . . . . . . . . . . . . . . . . . . . . . . . . . . . . . . . . . . . . . 170
Chapter 11: Exporting
Export photos to a folder . . . . . . . . . . . . . . . . . . . . . . . . . . . . . . . . . . . . . . . . . . . . . . . . . . . . . . . . . . . . . . . . . . . . . . . . . . . . . . . . . . . . . . . . . . . . 171
Last updated 9/22/2014
Page 5

Chapter 1: What's New
What's new in Elements Organizer 13
Elements Organizer 13 ships with new features and enhancements that make it easier for you to work with digital
media. Read on for a quick introduction to new features and links to resources offering more information.
Elements Organizer is available with Adobe Photoshop Elements and Adobe Premiere Elements. For information on
new features in these products, see:
• What's new in Elements Organizer 13
• What's new in Elements Organizer 13
New slideshow creation workflow
Enhanced in Elements Organizer
1
With Elements Organizer 13, you can easily create slideshows and customize them with themes, music, text, captions,
and more. After you finish putting together a slideshow, you can choose to save it as an MP4 video or share it out.
Slideshow creation in Elements 13 is available to users on both supported platforms—Mac and Windows. When you
open slideshows created in earlier versions of Elements in Elements 13, you are prompted to upgrade them.
For details, see Create slideshows.
Last updated 9/22/2014
Page 6
What's New
2
Enhanced email functionality
New in Elements Organizer
Using Elements Organizer 13, you can share files through email on all three supported platforms—32-bit Windows, 64bit Windows, and Macintosh. You can use your Gmail, Yahoo!, AOL, or Microsoft email account, or any other email
account, to share files.
For details, see Share files and slideshows by email .
Adaptive Grid
New in Elements Organizer
Elements Organizer 13 features a brand new representation of the media grid—Adaptive Grid. Adaptive Grid aligns
media edge to edge and fills the entire grid space seamlessly. Media aspect ratios are maintained at all times while
avoiding distracting gaps.
Adaptive Grid displays more media in the available grid space when compared to the normal grid. File details—such
as filename, tags, date/time, album associations, etc—are not displayed in the Adaptive Grid view.
To switch to the Adaptive Grid view, press Ctrl+D (Windows) or Cmd+D (Mac).
Last updated 9/22/2014
Page 7
What's New
3
Other enhancements
• HiDPI and Retina display support
• Support for 64-bit Windows
• Folder view improvements
• Tag panel additions
Deprecated features
• Advanced Search widget
• Photomail service
• Smart Tags
• Some functionality related to Canon/Epson/PIM printers
What's new in Photoshop Elements 13
• Photomerge Compose
• Autocrop suggestions
• eLive
• Facebook cover photos
• New Guided Edits
• Edit and refine selections
Last updated 9/22/2014
Page 8
What's New
• HiDPI display support
• Content-aware fill
• Refine edge
• Adobe Camera Raw 8.6
• Quick Edit effects
• Expert mode effects
• Enhancements:
• Scrapbooking preset
• Layer styles
• Type to ol - Scrub by sli d er
• Recently-opened files
Photomerge Compose
Create all-new scenes by pulling elements from one photo and placing them in another. Got a group photo with
someone missing? Get a picture of the missing person from another picture and insert it into the the group photo.
Watch the Photomerge Compose feature automatically adjust the color and lighting to create a scene that looks realistic
and believable. Create great looking photo remixes and mash-ups!
4
For more information on the Photomerge Compose feature that enables you to extract an object from one image and
add it into another image, see the topic
Photomerge Compose (Extract an object) .
Autocrop suggestions
Cropping a photo can be straightforward. But for times when you're not so sure, Photoshop Elements 13 can now
present you with four crop options. Quickly get a great composition by selecting from one of the four options!
Last updated 9/22/2014
Page 9
What's New
For more information on the feature, see the topic .
eLive
Elements Live view (eLive) is a concept to make content and resources available to users, visually pleasing and
integrated right into Photoshop Elements Editor and Organizer. The new eLive view displays articles, videos, tutorials,
and more - categorized into channels such as Learn, Inspire, and News. As a user, you can now access various tutorials
and articles from the application itself.
5
Facebook cover photos
Post a Facebook cover photo that sets you apart from the rest. Use the Facebook Cover feature in Photoshop Elements
13 to create a fun picture that blends your Facebook profile and cover pictures together.
For more information on the Facebook Cover feature, see the topic .
Last updated 9/22/2014
Page 10
What's New
New Guided Edits
Go retro and reimagine the world in black and white. Or, retain one dominant, eye-popping color, and turn the rest of
the photograph black and white. The new Guided Edits in Photoshop Elements 13 help you transform the mundane
into works of art with as few clicks and adjustments as possible.
For more information on the new Guided Edits in Photoshop Elements 13, see the topic .
6
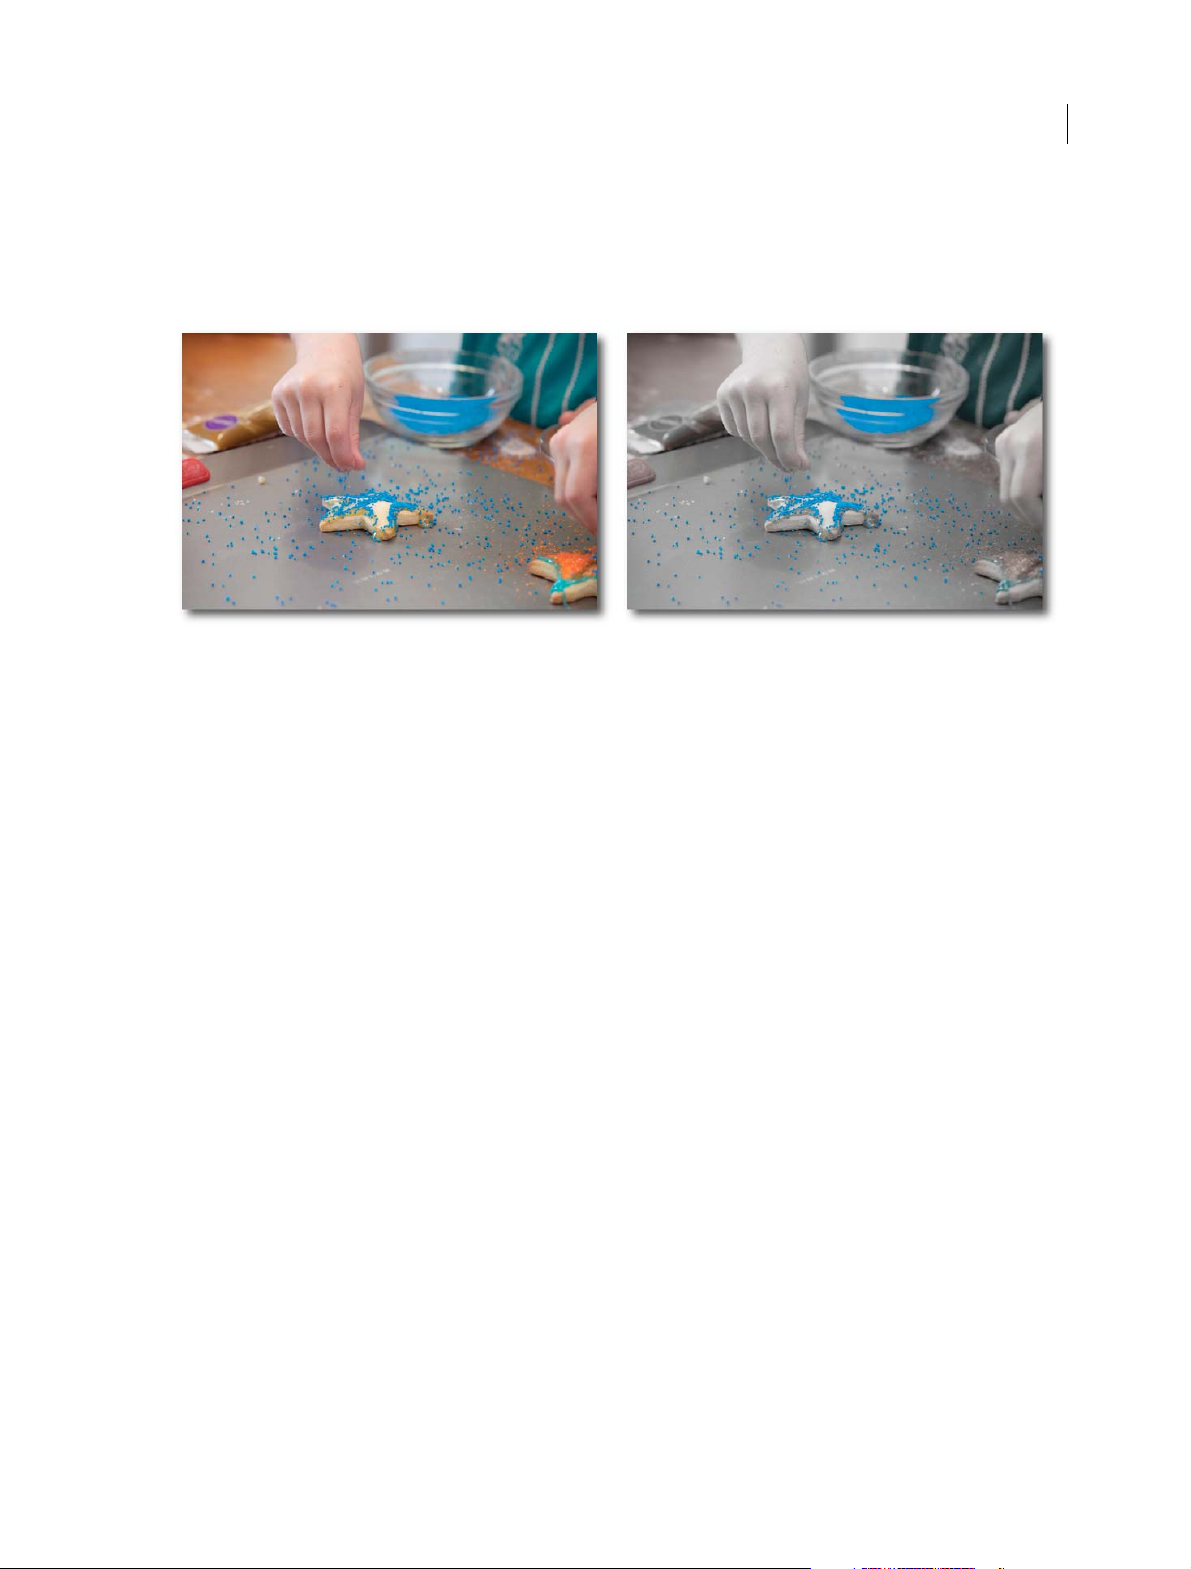
Edit and refine selections
Sel ec tio ns c an be t ri cky - esp ecial ly mak ing e xt rem ely fine ones . Fr om P hoto sho p Elem ent s 13, if yo u mak e an i ncor rect
selection, instead of starting afresh, you can make fine adjustments to the boundaries of your current selection. Nudge
the selection boundary to get perfection!
For more information on this feature, see the topic Edit and refine selections .
HiDPI display support
Photoshop Elements 13 now has native support for high-resolution display devices for the Windows (HiDPI monitors)
and Mac (Retina displays). Work on your pictures in the best possible clean and crisp resolution, with sharp and clear
icons, thumbnails, and text in the user interface.
Content-aware fill
Sometimes unwanted or unnecessary objects are captured in your photographs. You can now remove such elements
and Photohshop Elements 13 will intelligently fill the chosen areas of your photograph with content based on the
surrrounding parts of the photograph.
Last updated 9/22/2014
Page 11
What's New
7
For more information on how to intelligently fill selected portions of your photograph, see the topic Content-aware Fill
.
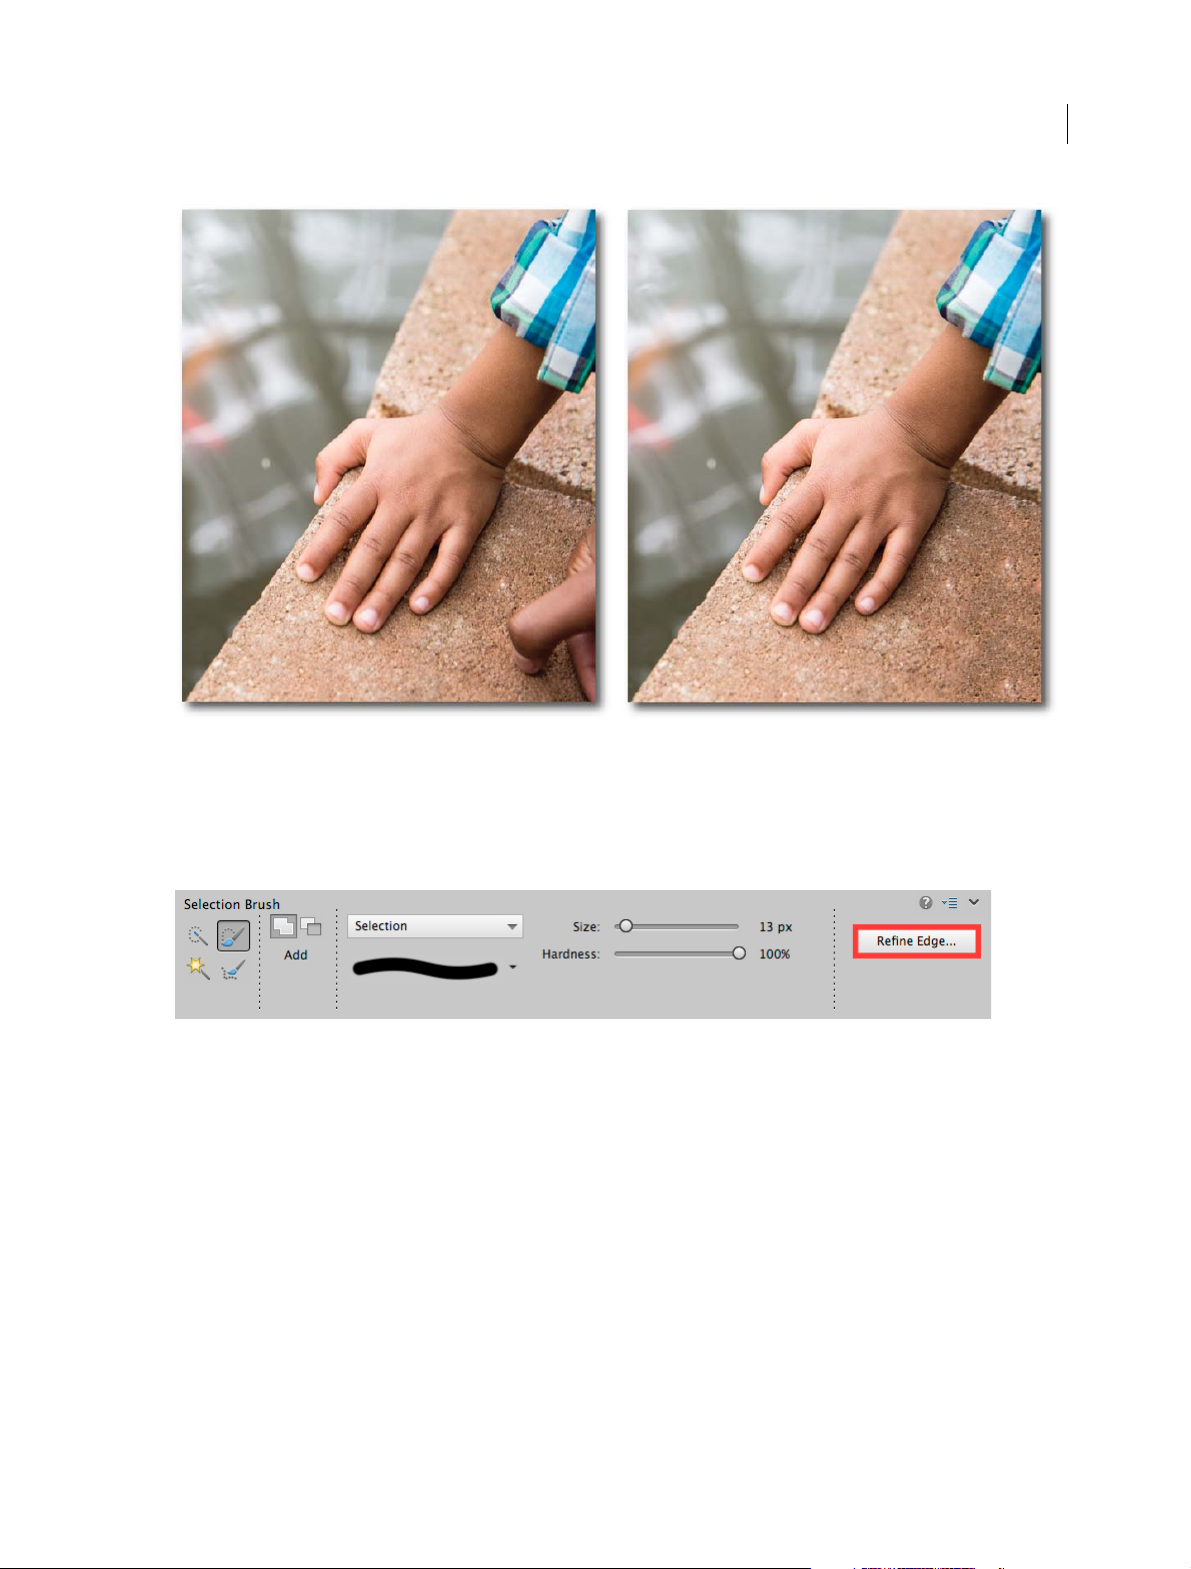
Refine edge
The options to refine the edges of a selection are more accessible through the Tool Options bar.
In Expert mode, when you choose the Selection Brush tool (A) or the Refine Selection Brush tool (A), the options to
refine selection edges are available through the conveniently placed Refine Edge button in the Tool Options bar.
Adobe Camera Raw 8.6
The latest version of Adobe Camera Raw (ACR 8.6) is integrated into Photoshop Elements 13.
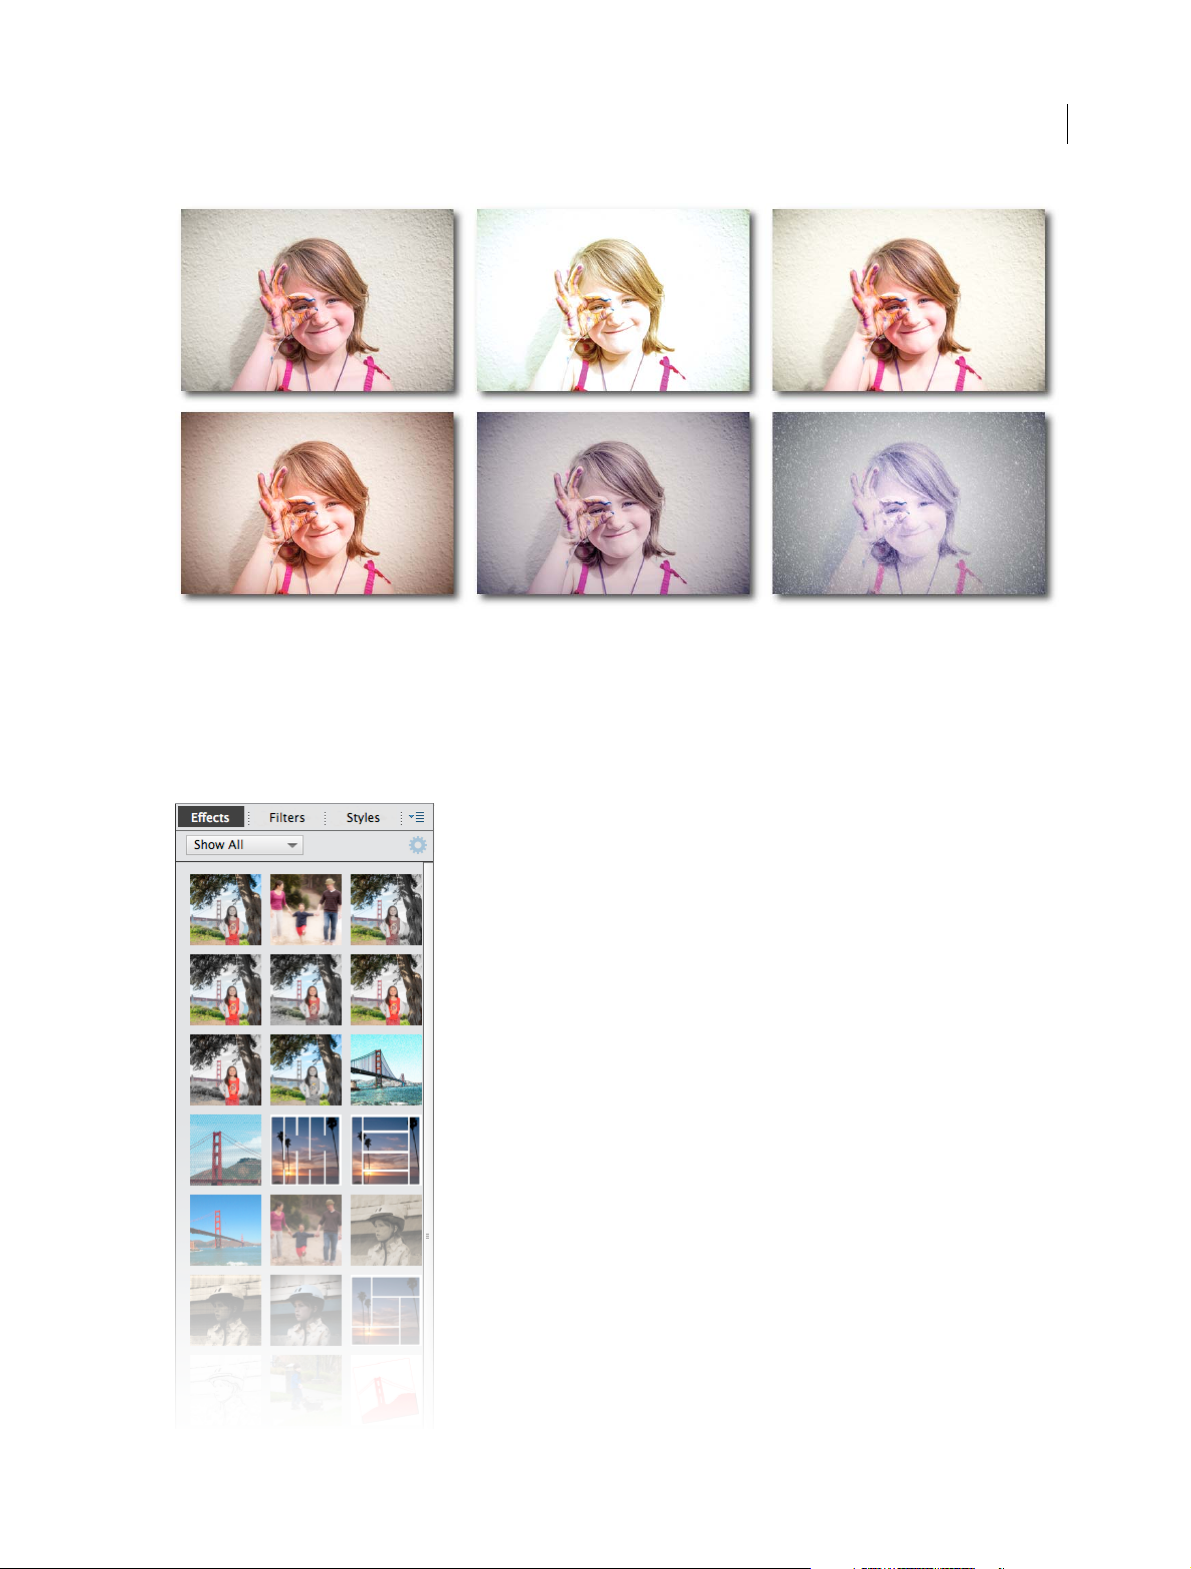
Quick Edit effects
The effects in the Quick mode have been reimagined. Each effect now displays five possible variations so that you can
choose one that is best for you.
Last updated 9/22/2014
Page 12
What's New
For more information on the Quick mode that enables you to add Effects, Textures, and Frames, see the topic Enhanced
Quick Mode .
8
Expert mode effects
Spruce up your pictures with the newly categorized and revised effects in the Effect panel (Expert mode). 19 new effects
have been added, and all thumbnails have been improved to display the Effect more clearly.
Last updated 9/22/2014
Page 13
What's New
Enhancements
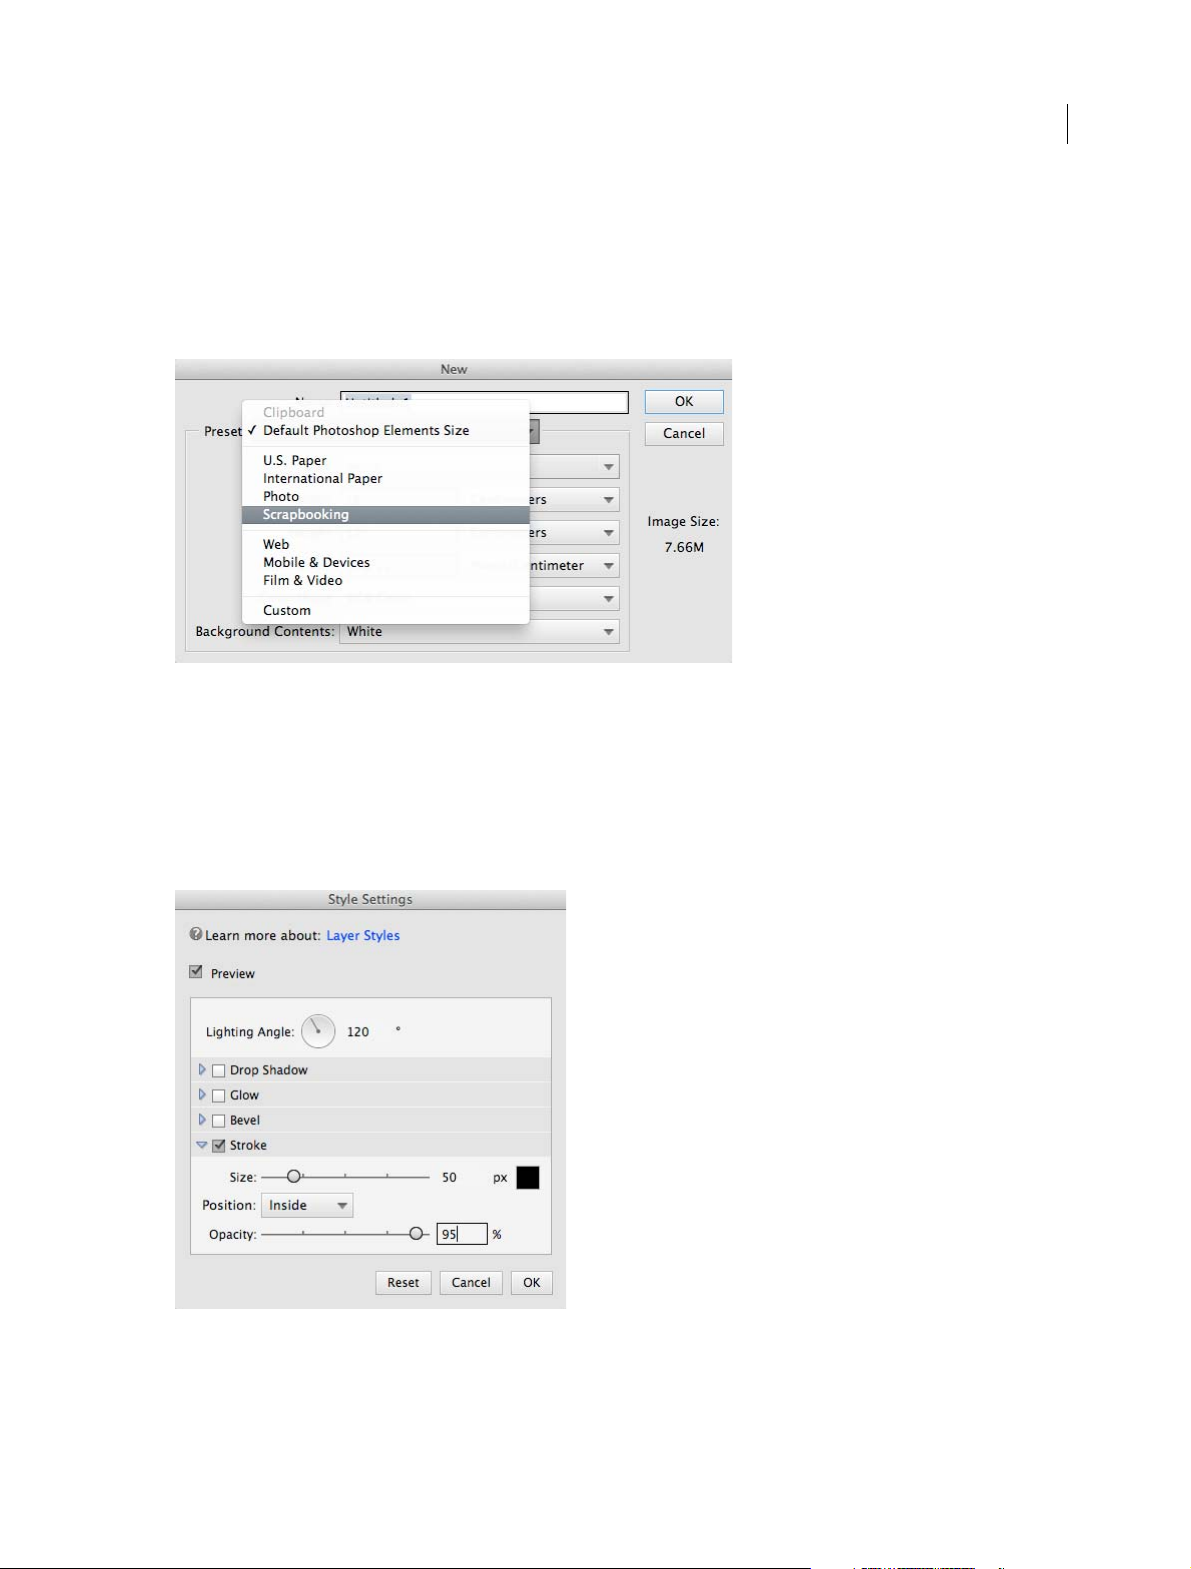
Scrapbooking preset
The preset for scrapbooking is now available for all locales and countries.
To use the preset:
9
1 In Photoshop Elements 13, click File > New > Blank File.
2 In the New dialog box, from the Preset drop-down, choose Scrapbooking.
Layer styles
In the Style Settings dialog for Layers, a new drop-down has been added for the position of the stroke. The drop-down
has values: Outside, Inside, and Center.
To use the new drop-down:
1 In Photoshop Elements 13, select a layer, and in the Layer menu, click Layer Style > Style Settings.
2 In the Style Settings dialog box, select Stroke, and then use the Position drop-down.
Last updated 9/22/2014
Page 14

What's New
Type tool - Scrubby slider
The font size now has a scrubby slider functionality. This enables you to change the font size quickly and conveniently.
To use the font size scrubby slider:
1 Select the Type tool (T).
2 In the Tool Options area, hover the mouse pointer over the text label Size.
3 When mouse pointer changes shape, left-click and drag to the left (decrease font size) or to the right (increase font
size).
Recently-opened files
• Recently-opened files are displayed in the Open drop-down and in the Files > Open Recently Edited File menu. Both
lists now display just the name of the file, instead of showing the entire folder and file name.
Removed from Photoshop Elements 13
• Edit > Remote Connection
• Enhance > Photomerge Style Match
• TWAIN plug-in: The plug-in is no longer available on 64-bit Windows computers.
10
• Crop tool: The Golden Ratio option is no longer available.
• Single core platforms are no longer supported
• Operating Systems support:
• Microsoft Windows XP
• Microsoft Windows Vista
• Mac OSX 10.7
What's new in Adobe Premiere Elements 13
Adobe Premiere Elements 13 ships with new features and enhancements that help you create amazing movies with ease.
Read on for a quick introduction to what's new, changed, or deprecated and find quick links to resources offering more
information.
Adobe Premiere Elements includes Elements Organizer, which helps you organize your assets. For information about
new features in Elements Organizer, see What's new in Elements Organizer 13What's new in Elements Organizer 13
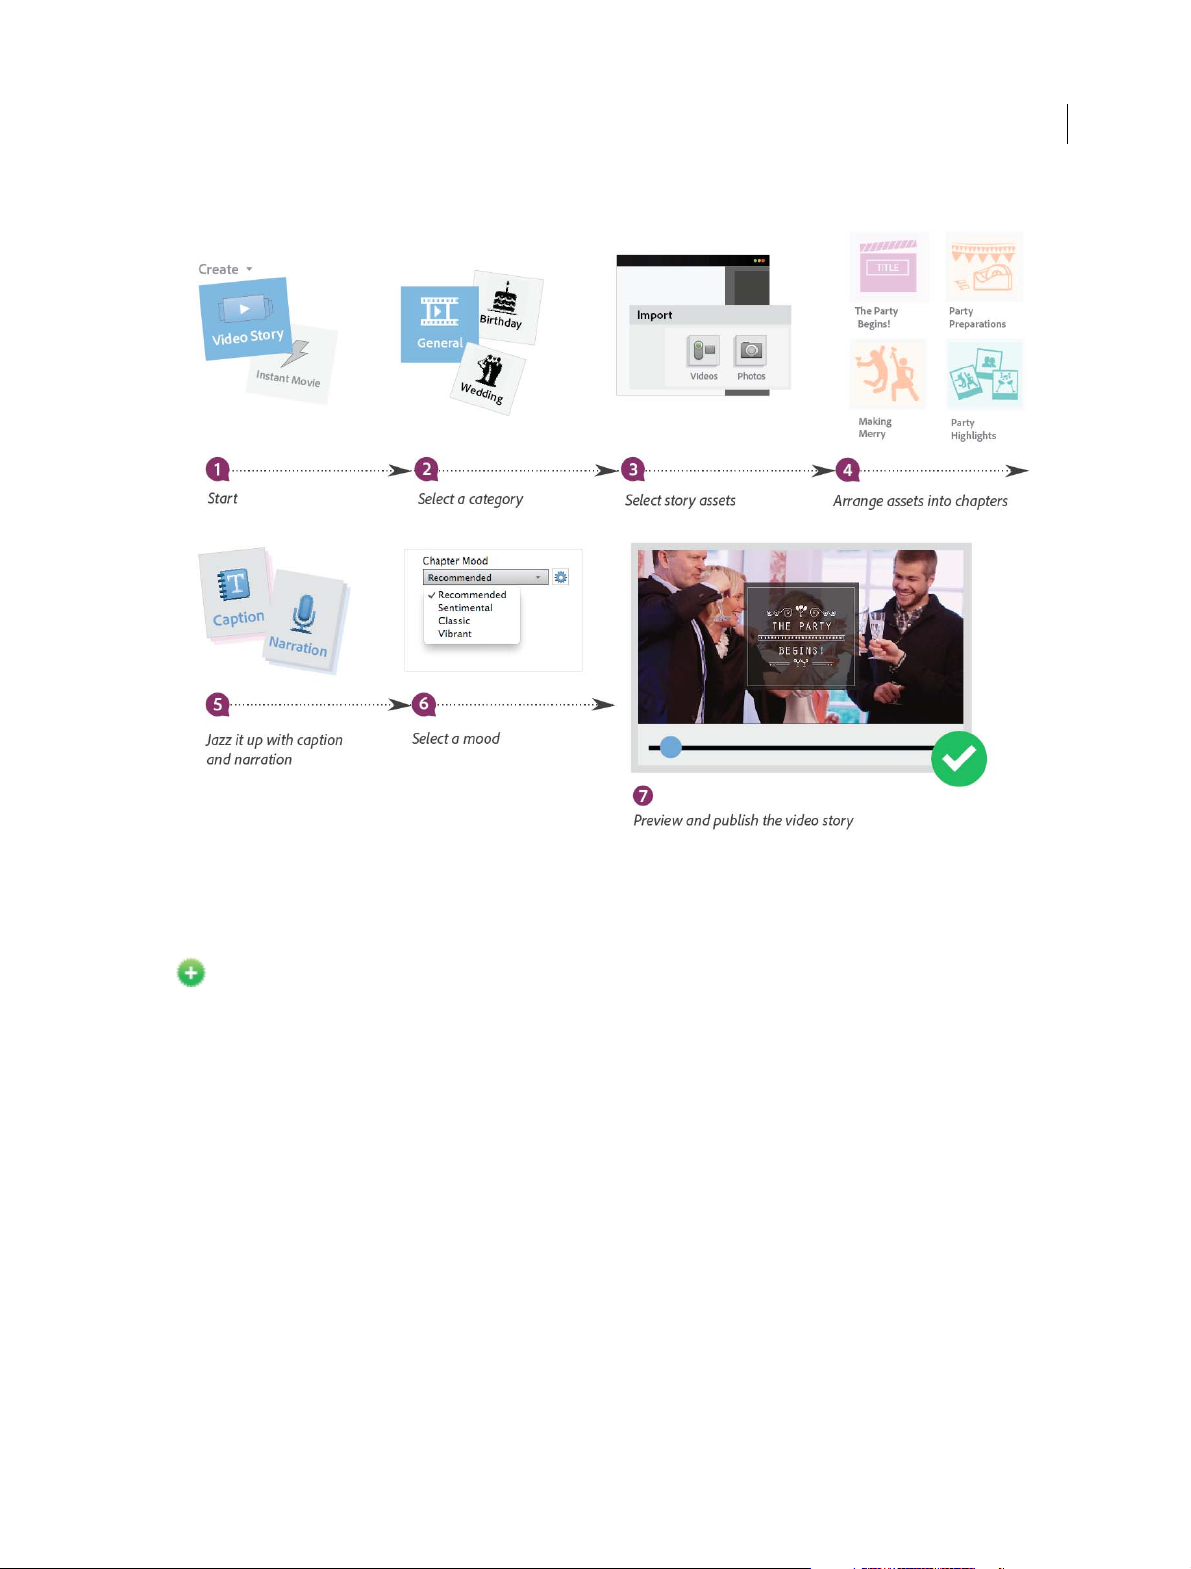
Create a video story of a life event
New in Adobe Premiere Elements 13
With the new Video Story feature, you can now create an interesting story of an event using your videos and photos.
For example, you can present a series of party videos and photos in an enticing and structured way using the Video
Story feature. Adobe Premiere Elements 13 guides you through an easy-to-follow sequence to create your video story
with narration, captions, and so on. You can also choose a predefined mood (for example, Sentimental) and look (for
example, Night) and add music to make the video come alive.
Last updated 9/22/2014
Page 15
What's New
11
For more information, see .
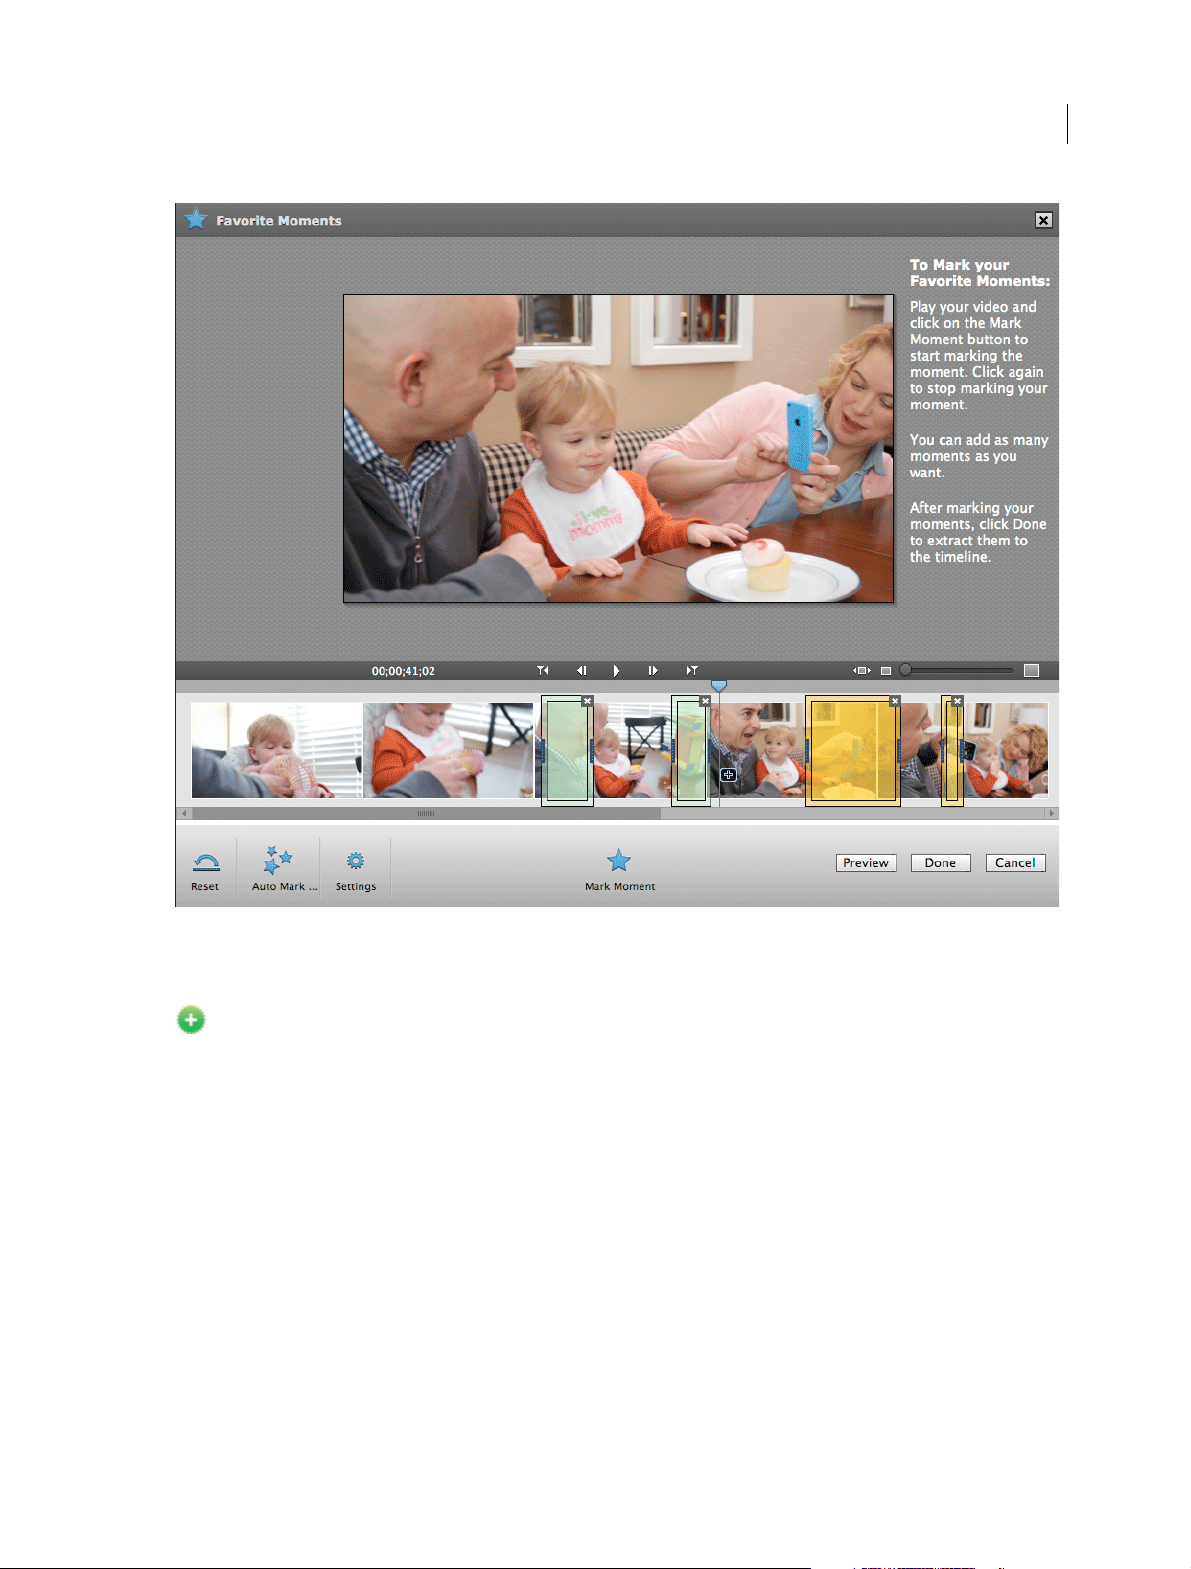
Mark and extract your favorite moments of a video
New in Adobe Premiere Elements 13
You can now mark your favorite moments in a video. Adobe Premiere Elements extracts these moments as individual
clips or a single collated clip for further editing or sharing. You can mark favorite moments in both Quick and Expert
views. If you choose the Auto Mark Moments option, Adobe Premiere Elements intelligently identifies the favorite
moments for you.
Last updated 9/22/2014
Page 16
What's New
12
For more information, see .
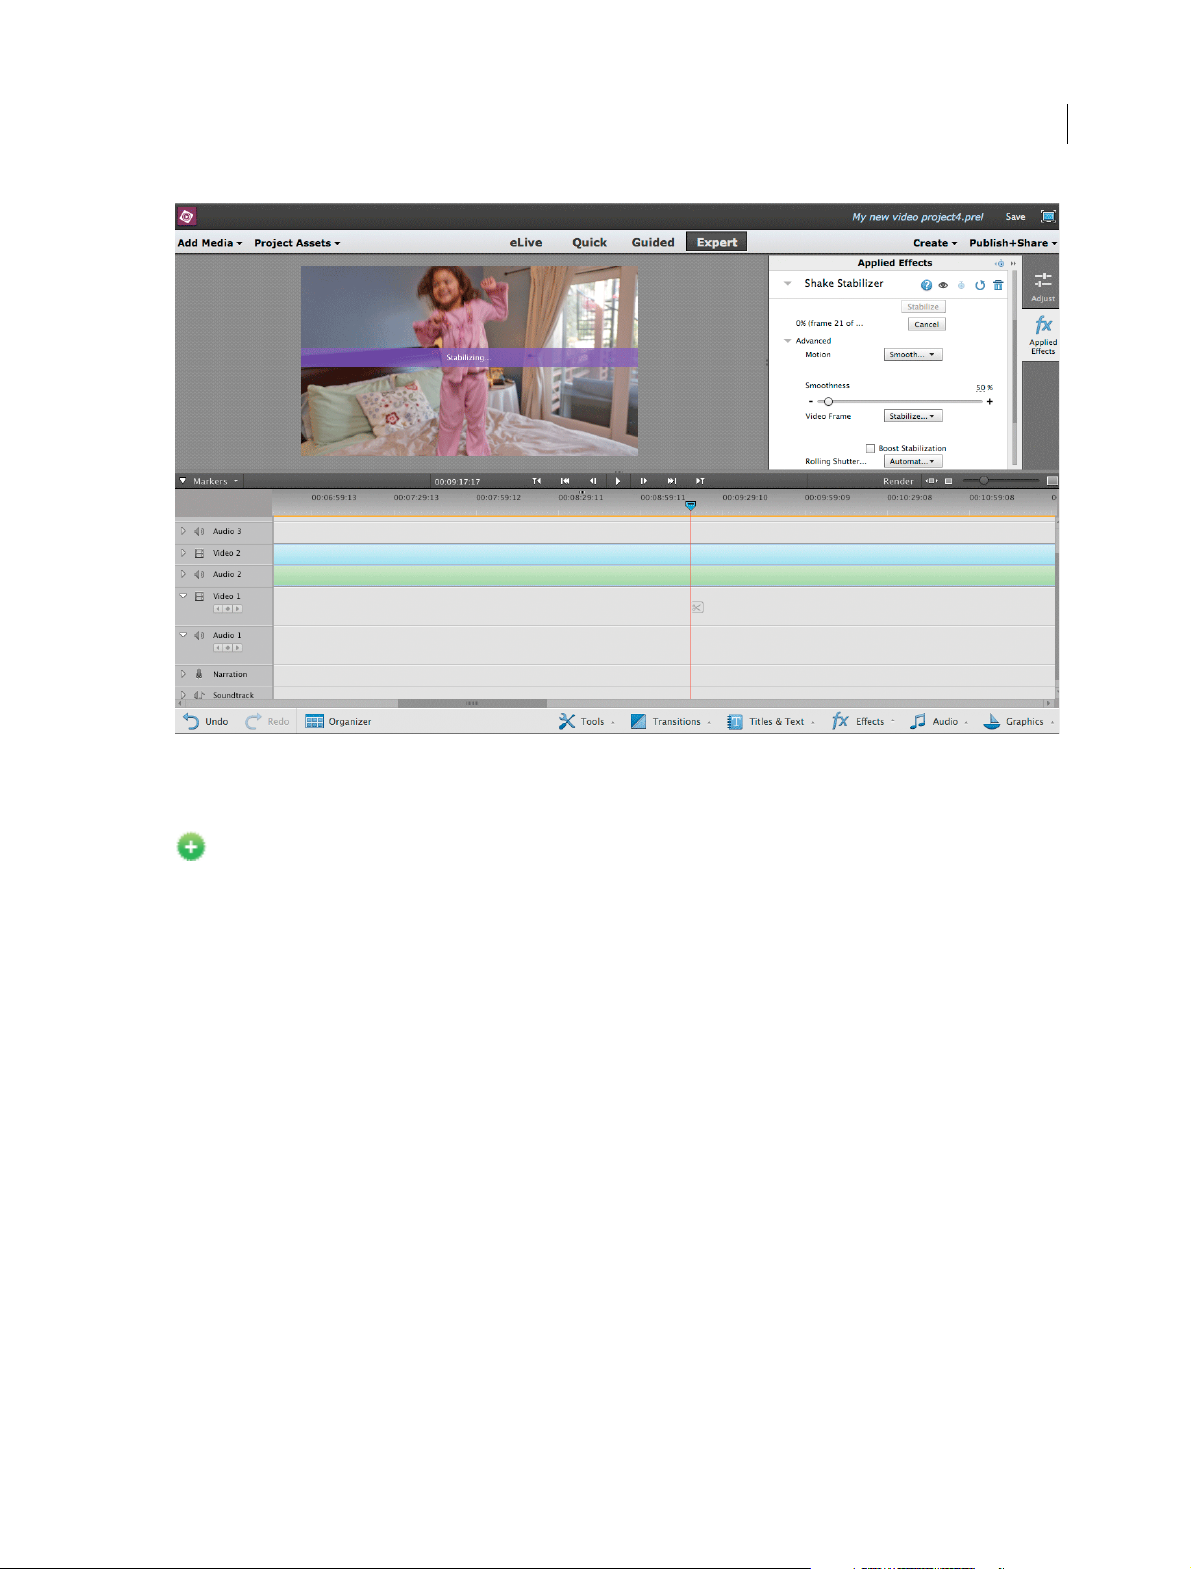
Stabilize shaky footage with Shake Stabilizer
New in Adobe Premiere Elements 13
With the Shake Stabilizer feature, you can now easily transform shaky, handheld footage into steady, smooth shots.
Shake Stabilizer removes the jitter caused by camera movements and helps you look like a professional videographer.
Click Adjust > Shake Stabilizer to start stabilizing your shaky footage.
Last updated 9/22/2014
Page 17
What's New
13
For more information, see .
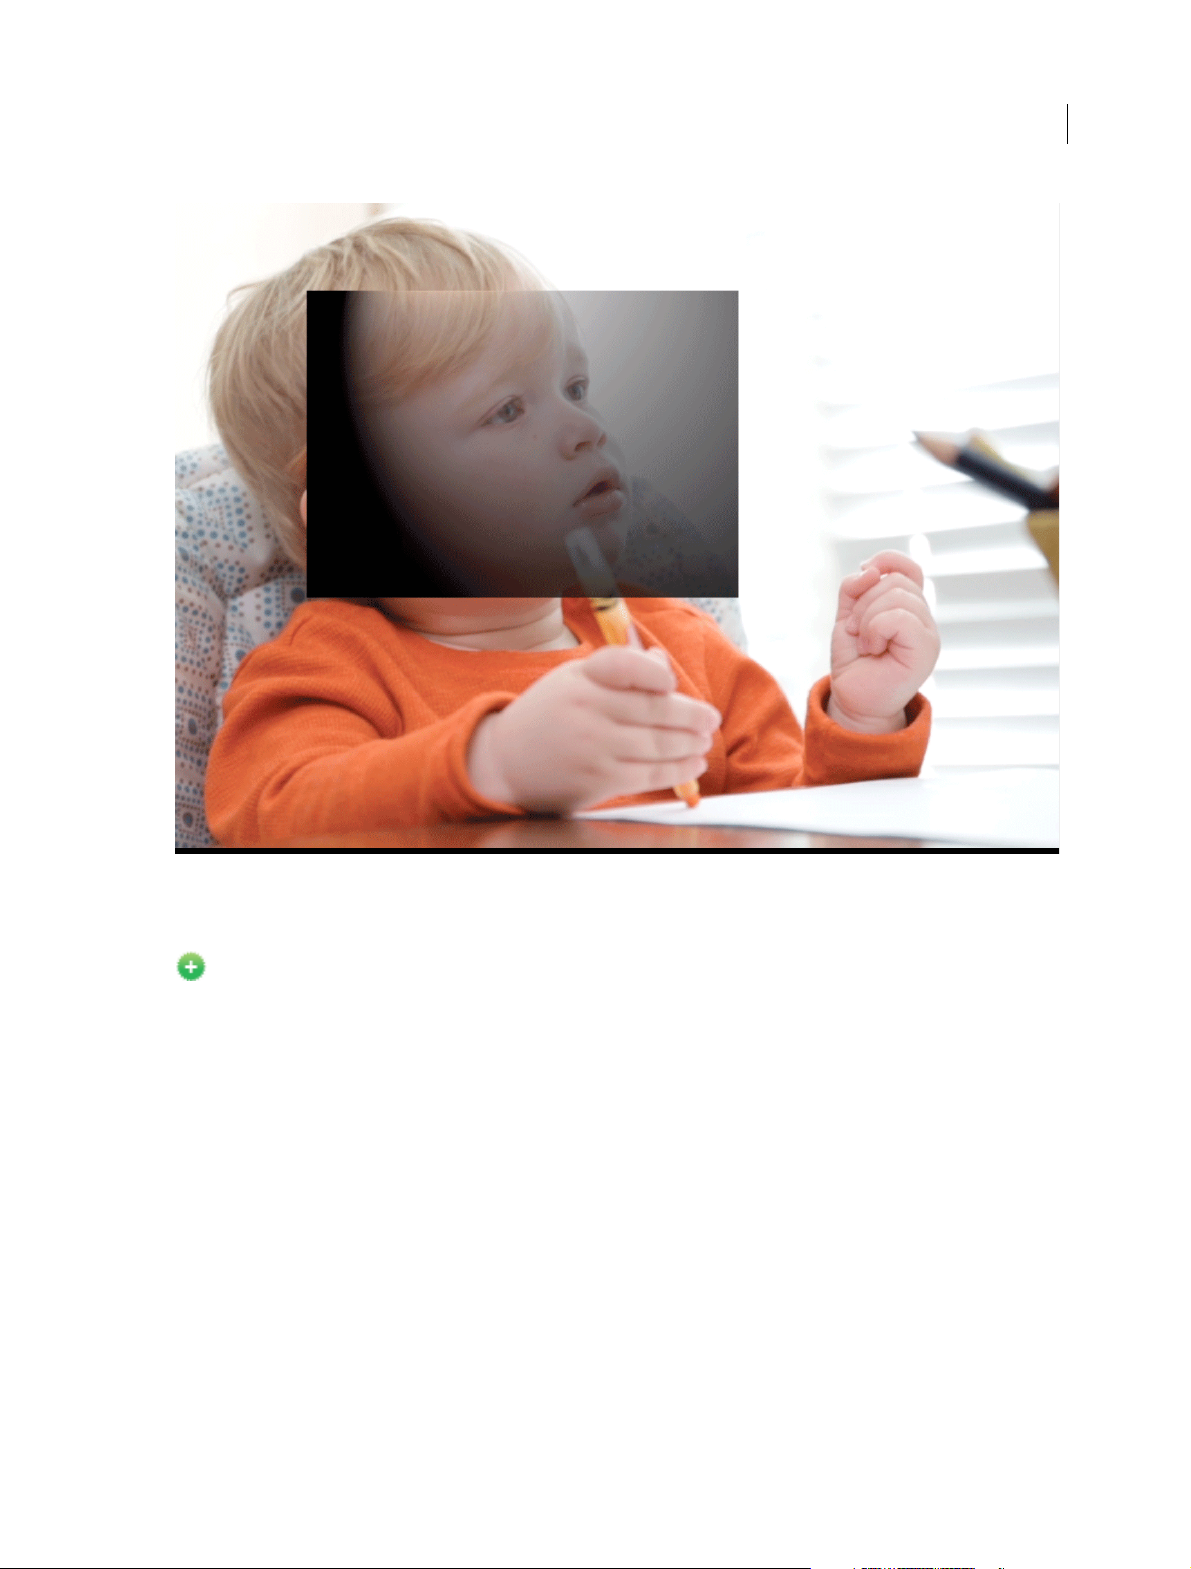
Guided Edit for adding an Effects Mask
New in Adobe Premiere Elements 13
A new Guided Edit to apply an Effects Mask helps you apply an effect to specific areas in your video. One of the
common uses of applying an Effects Mask is to blur a person's face to protect the person's identity. You can mask a
person's face by applying a Blur effect or a Mosaic effect.
The Apply an Effects Mask to your Video Guided Edit is available only in the Expert view. To start adding an Effects
Mask on your video clip, click Expert and then click Guided. Select Apply an Effects Mask to your Video option from
the list of Guided Edits.
Last updated 9/22/2014
Page 18
What's New
14
For more information, see .
Guided Edit for adding a video in the title
New in Adobe Premiere Elements 13
The new Adding Video in Title Guided Edit shows you how to add a video in a title and create an impact on the viewers.
Use this Guided Edit to add motion inside your movie titles and to add drama with effects or blurs that draw eyes to
one part of your scene.
The Add ing Vide o in Title Guided Edit is avail able onl y in the Exper t view. To st art ad ding a video in a title, c lick Expe rt
and then click Guided. Select Adding Video in Title option from the list of Guided Edits.
Last updated 9/22/2014
Page 19

What's New
For more information, see .
In-product inspiration and help from the web through eLive
New in Adobe Premiere Elements 13
Adobe Premiere Elements 13 comes with a new tab called eLive. With eLive, you can now access a stream of resources
right from your workspace to get creative ideas for your videos and become more proficient with Adobe Premiere
Elements. These resources, organized in channels, are fetched live from the web so you can stay up-to-date from within
your favorite video editing app.
15
While you play with various features of Adobe Premiere Elements and make your videos exceptional, do remember to
click the eLive tab to get inspiration, news, and help from resources that Adobe has curated for you.
Other enhancements
• Improved mobile video syncing: It’s easier than ever to sync your mobile videos with Elements to free up
memory on your phone and do fun transformations. You can now easily sync your Elements videos with your
mobile, so you can access any memory anywhere. Sharing videos via email is more convenient now—send a link to
a private web gallery where only your recipient can view.
• Enhanced slideshows: You can now create better slideshows. Tell your story from every angle with multiple
photos on each slide. Even share them as movies.
• Support for High DPI on Windows and Retina Display on Mac: You can now view your photos in full
resolution.
Removed features
The following features are no longer available in Adobe Premiere Elements 13:
• DV capture
• HDV capture
• Timelapse capture (Stop motion)
• Web DV D
• Export to FLV
Last updated 9/22/2014
Page 20

What's New
• Face as a filter in Pan & Zoom
• Operating Systems support:
Microsoft Windows XP
Microsoft Windows Vista
Mac OSX 10.7
For more information, see Removed features and unsupported file formats .
16
Last updated 9/22/2014
Page 21
Chapter 2: Workspace and workflow
Access your media anywhere using Online Account
Photoshop Elements lets you upload your media to Online Account and access it from any device. Media already
present in your Online Account libraries is downloaded into Elements Organizer, so that you can work with it.
Set up Elements Organizer to work with your Online Account
Sign in to your Online Account
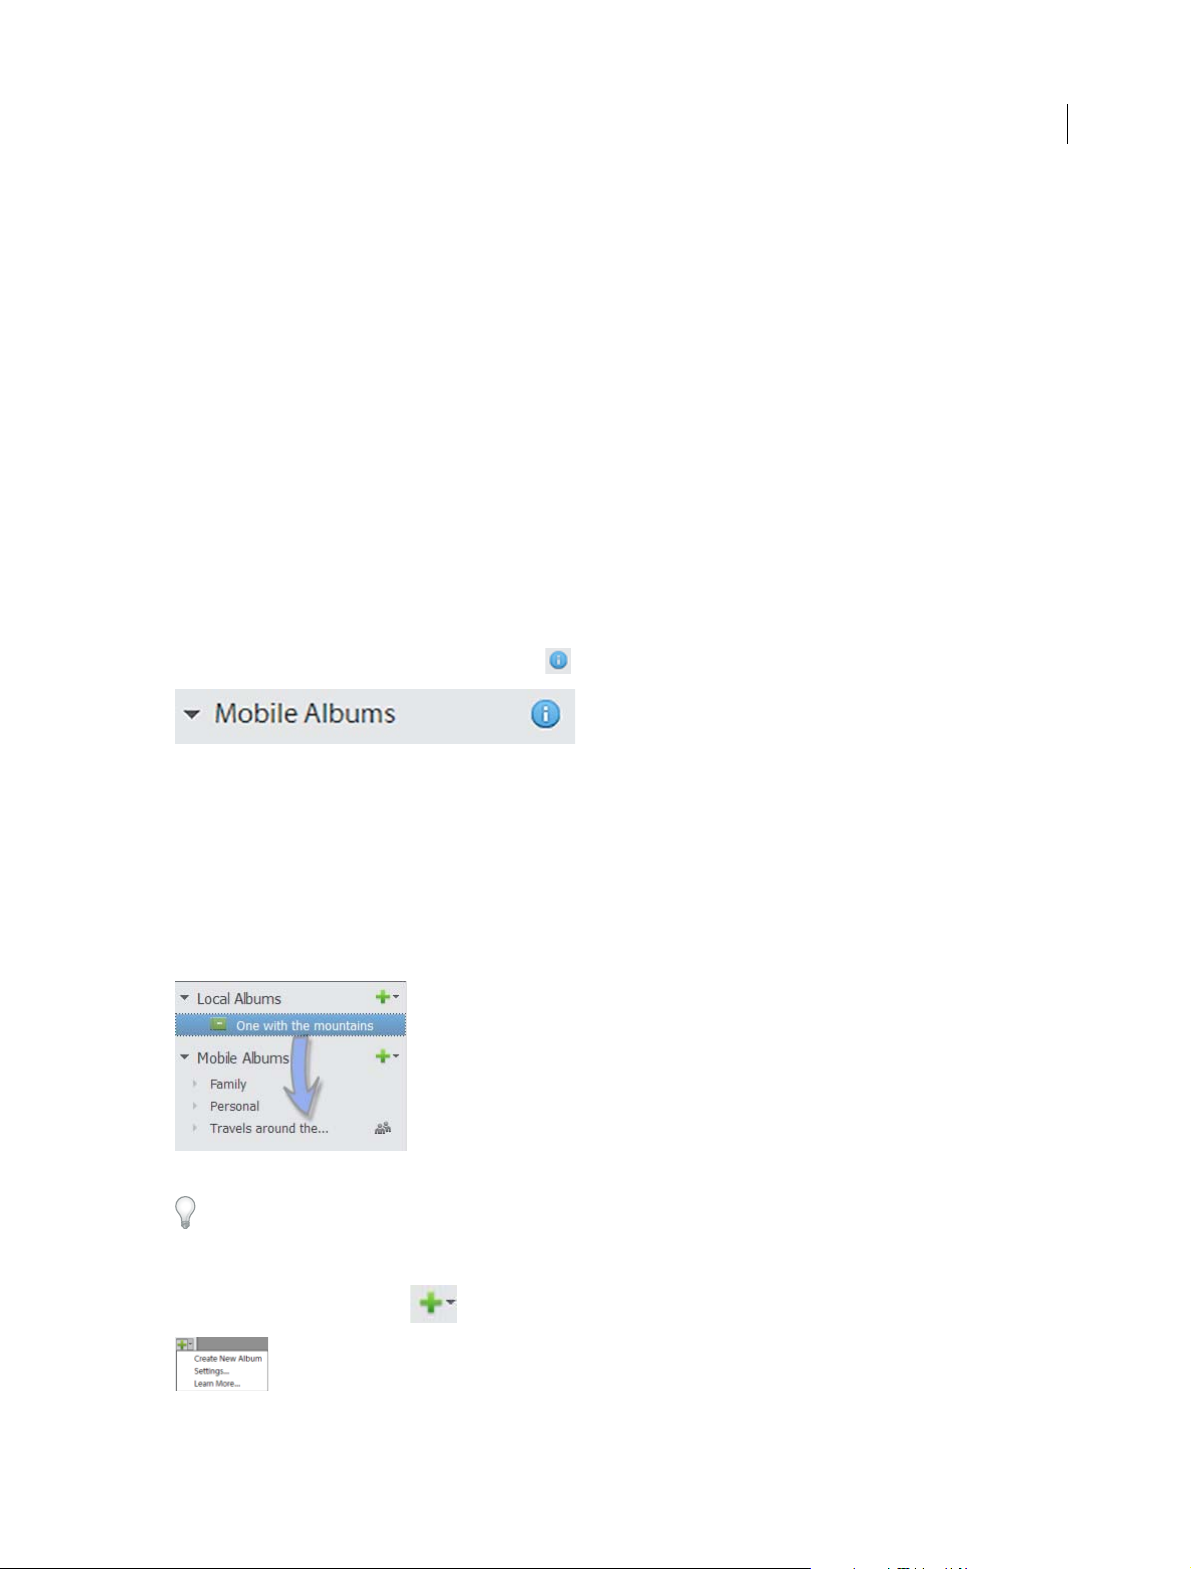
❖ In the Elements Organizer left pane, click the icon next to Mobile Albums.
17
Note: You can also sign in by selecting File > Sign In To Online Account.
1 Enter your Adobe ID and password, and then click Sign In.
2 On the screen that follows, choose one of the following options and click Next:
All My Photos And Videos Uploads all media in your Elements catalog to Online Account. Local albums are not
automatically uploaded.
Specific Photos And Videos Uploads only the media you select in your Elements catalog to Online Account. You can
drag and drop local albums onto a mobile library to upload them to Online Account.
❖ Review the instructions on the next screen and click Done.
You can drag and drop a mobile album onto a local category. Media in the mobile album is downloaded as it exists in
Online Account and stored locally. Subsequentally, the downloaded media is deleted from Online Account.
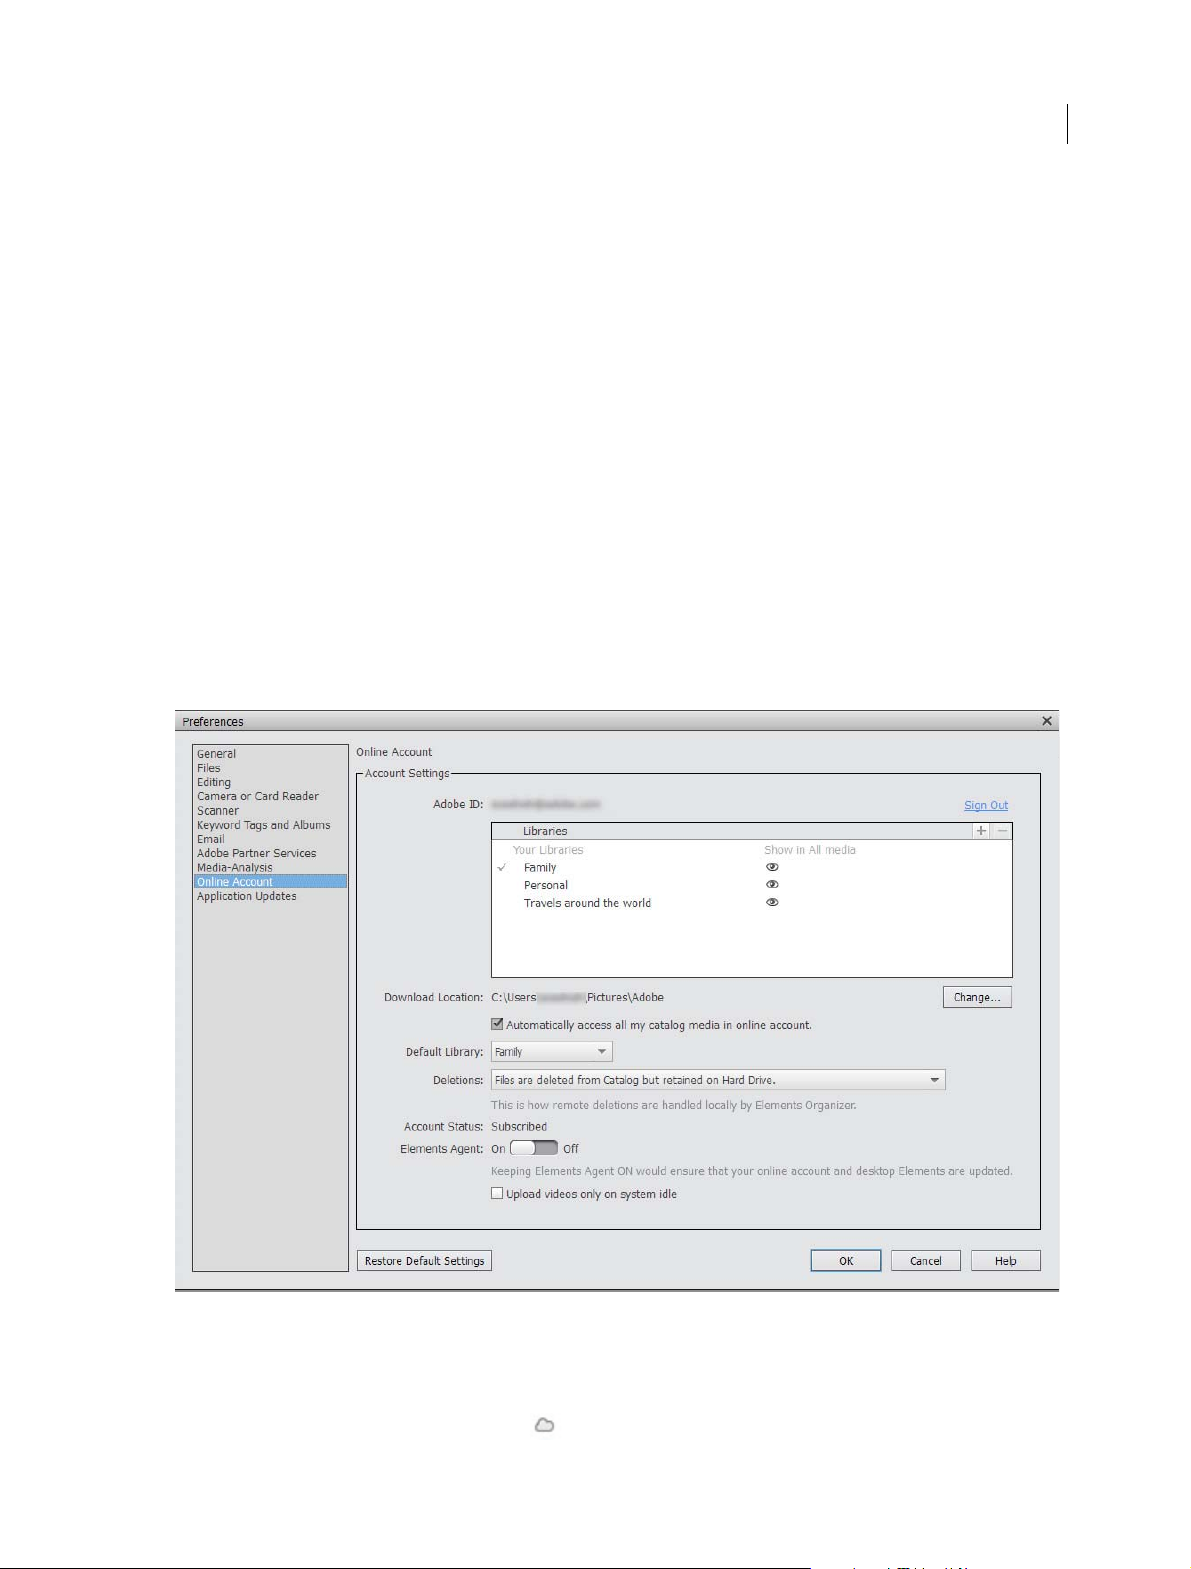
Specify Online Account settings
❖ In the left pane, expand the menu next to Mobile Albums.
1 Select Settings. Photoshop Elements displays the Online Account tab in the Preferences dialog box.
Last updated 9/22/2014
Page 22
Workspace and workflow
2 If you have a large Elements catalog, you may want to deselect Automatically Access All My Catalog Media In Online
Account. You can still manually upload photos to your Online Account by dragging and dropping them onto an
album.
3 If necessary, change the following preferences:
Download Location Download media from Online Account in a folder on your computer different from the default
folder
Default Library The library to which you want to upload media when Sync All My Photos And Videos is selected. You
can choose to upload your media to any available library.
Deletions Choose the default behavior when media is deleted by another Online Account client:
• Files are retained in the catalog
• Files are deleted from the catalog, but retained on the hard drive
• Files are deleted permanently
Elements Agent Turns on the Elements agent, which keeps your Online Account and Elements Organizer catalog
updated in real time
Upload Videos Only On System Idle Upload videos to the Online Account only when your computer is idle
❖ Click OK.
18
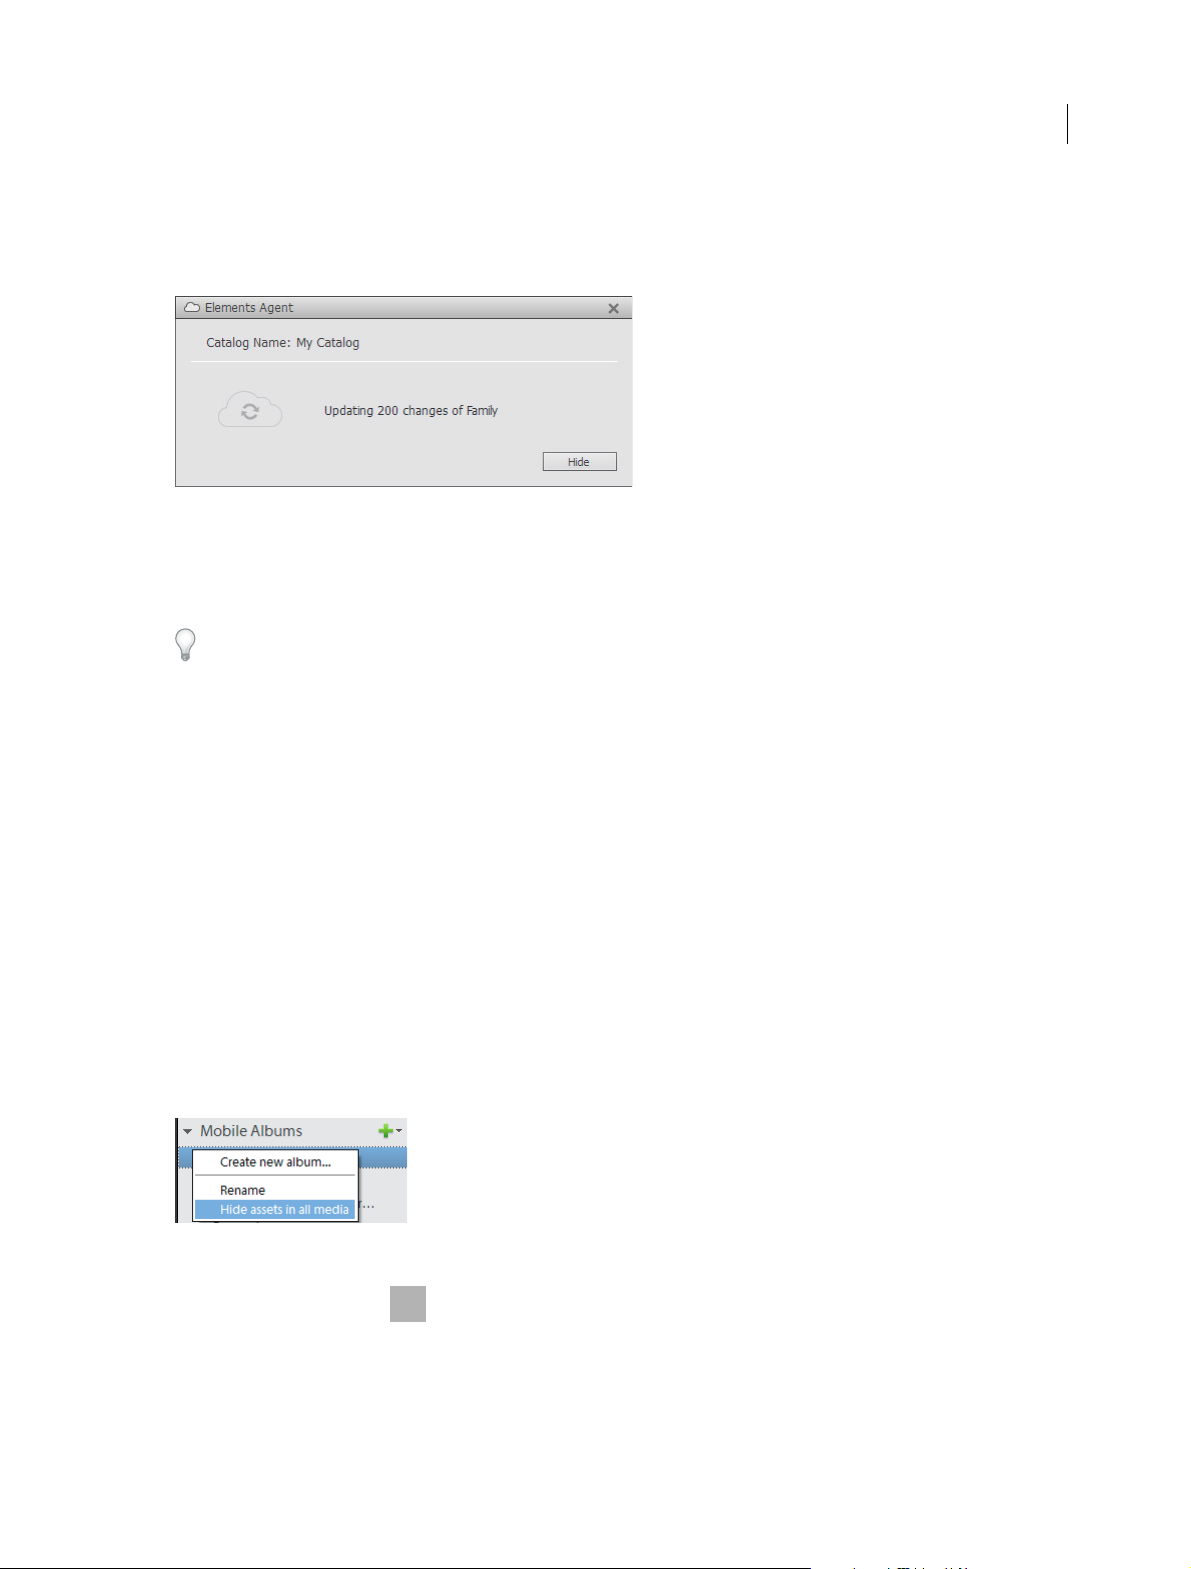
Manage the Online Account agent from the system tray
Once you've turned on the Online Account agent from the Preferences dialog, you can manage the agent from the
system tray.
1 Right-click the Online Account agent icon ( ) in the system tray.
Last updated 9/22/2014
Page 23
Workspace and workflow
2 Select one of the following options:
• View Elements Agent Status: Displays the Online Account status, including the name of the current catalog and
whether your Online Account is up to date
• Up date O nly Whe n Idle : Uploads your photos to the Online Account only when your computer has idle computing
bandwidth
• Stop Elements Agent: Stops the Elements agent
Once you stop the Elements agent, you can turn it on again from the Preferences dialog box (Edit > Preferences > Online
Account).
19
Edit media downloaded from your Online Account
Elements Organizer initially downloads lighter preview versions of photos (upto 1440 x 960 px in resolution) from your
Online Account. When you modify a downloaded photo, the high-resolution original version of the photo is
downloaded and presented for editing.
1 Right-click the photo in Elements Organizer and select Edit With Photoshop Elements Editor.
2 If prompted that you need to log in with your Adobe ID, click Sign In.
Photoshop Elements downloads the original, high-resolution photo and opens it in the Editor workspace.
Hide assets from the Media view
You can choose to hide all assets in a mobile album from the All Media view. The media becomes visible when you apply
any search operation.
1 Right-click the mobile album.
2 Select Hide Assets In All Media.
Share albums
1 In the left pane, click the icon next to the album.
2 Click Start Sharing.
3 Note down the URL displayed on the next screen. You can email this URL to friends with whom you want to share
the album.
Last updated 9/22/2014
Page 24

Workspace and workflow
20
Deselect Allow Downloads if you want these friends to only view the photos rather than download them.
Share a library
You can add other users to a library. A typical use case for adding users to a library is when several people contribute
photos of the same event.
1 In the left pane, click the icon next to the library name.
2 Enter the email address of a user and click Add. Elements adds the users and prompts you that the invite is pending
acceptance.
3 Add more users if necessary.
4 Click Done.
Access permissions for other users
Other users can add photos to the library. However, they cannot delete your photos or add more users to the library.
Accept an invitation to contribute to a library
When somebody invites you to contribute to a library, you receive an email notification as well as a notification in
Elements Organizer. The
Do the following to accept an invitation in Elements Organizer:
❖ Click the icon. Elements displays a notification dialog.
❖ Click Accept Invite. You can now contribute to the library. The library is displayed with the icon next to it under
Mobile Albums.
icon appears next to Mobile Albums when you have pending notifications.
Sign out of the Online Account
1 Select Edit > Preferences > Online Account.
2 Click Sign Out.
3 Click OK.
Sign in as a different user
If you have multiple Online Accounts, follow these steps to log in to the Elements catalog as a different user:
1 Select File > Sign In To Online Account.
2 On the next screen, click Sign In As Another User.
3 You are prompted that the catalog is being prepared for you. Any mobile albums belonging to the previous user
become local to your computer. Click OK to proceed.
4 Enter your Online Account credentials and then click Sign In.
❖ Follow any further onscreen instructions.
Last updated 9/22/2014
Page 25
Workspace and workflow
FAQ
• What if I use my Online Account to edit an image previously downloaded to the Elements catalog?
If only a preview copy of the image was earlier downloaded to the Elements catalog, the edits you make to the image
are reflected in Elements Organizer. However, if the original image was earlier downloaded to the Elements catalog,
a version set is created. The original copy and the modified copy of the image are added to the version set.
• When does Elements Organizer create a version set?
See this Help article.
• How does Elements Organizer back up my Online Account photos?
Media downloaded from the Online Account is backed up exactly as it is available in the Elements catalog.
21
• If only the preview version of a photo was downloaded into the Elements catalog, that preview version is saved
as part of the backup.
• The high-resolution version of a photo is backed up if it was previously downloaded into the Elements catalog.
• How are my Photoshop.com photos migrated into the Online Account?
See this FAQ p a ge.
About workspaces
The Welcome screen
When you start Photoshop Elements or Adobe Premiere Elements, the Welcome screen opens by default. The Welcome
screen is a convenient starting place, or hub, for major tasks.
If you want to skip the welcome screen and launch either Elements Organizer or the editor directly, click the
Settings
Select any of the following from the On Start Always Launch drop-down list:
Welcome Screen Select this option to start the Welcome screen when you launch Elements.
Organizer Select this option to skip the welcome screen and start the Elements Organizer directly.
icon.
Photo Editor Select this option to skip the welcome screen and start the Photoshop Elements Editor.
Click a button to open the workspace you need. For example, click Organize to open Elements Organizer and import,
tag, or organize your photos and media files. Or, click Photo Editor to open the Editor and enhance your media files or
add special effects.
Last updated 9/22/2014
Page 26
Workspace and workflow
You can open the Welcome screen at any time from Help > Welcome Screen. It’s not necessary to return to the Welcome
screen to open other workspaces.
Workspace
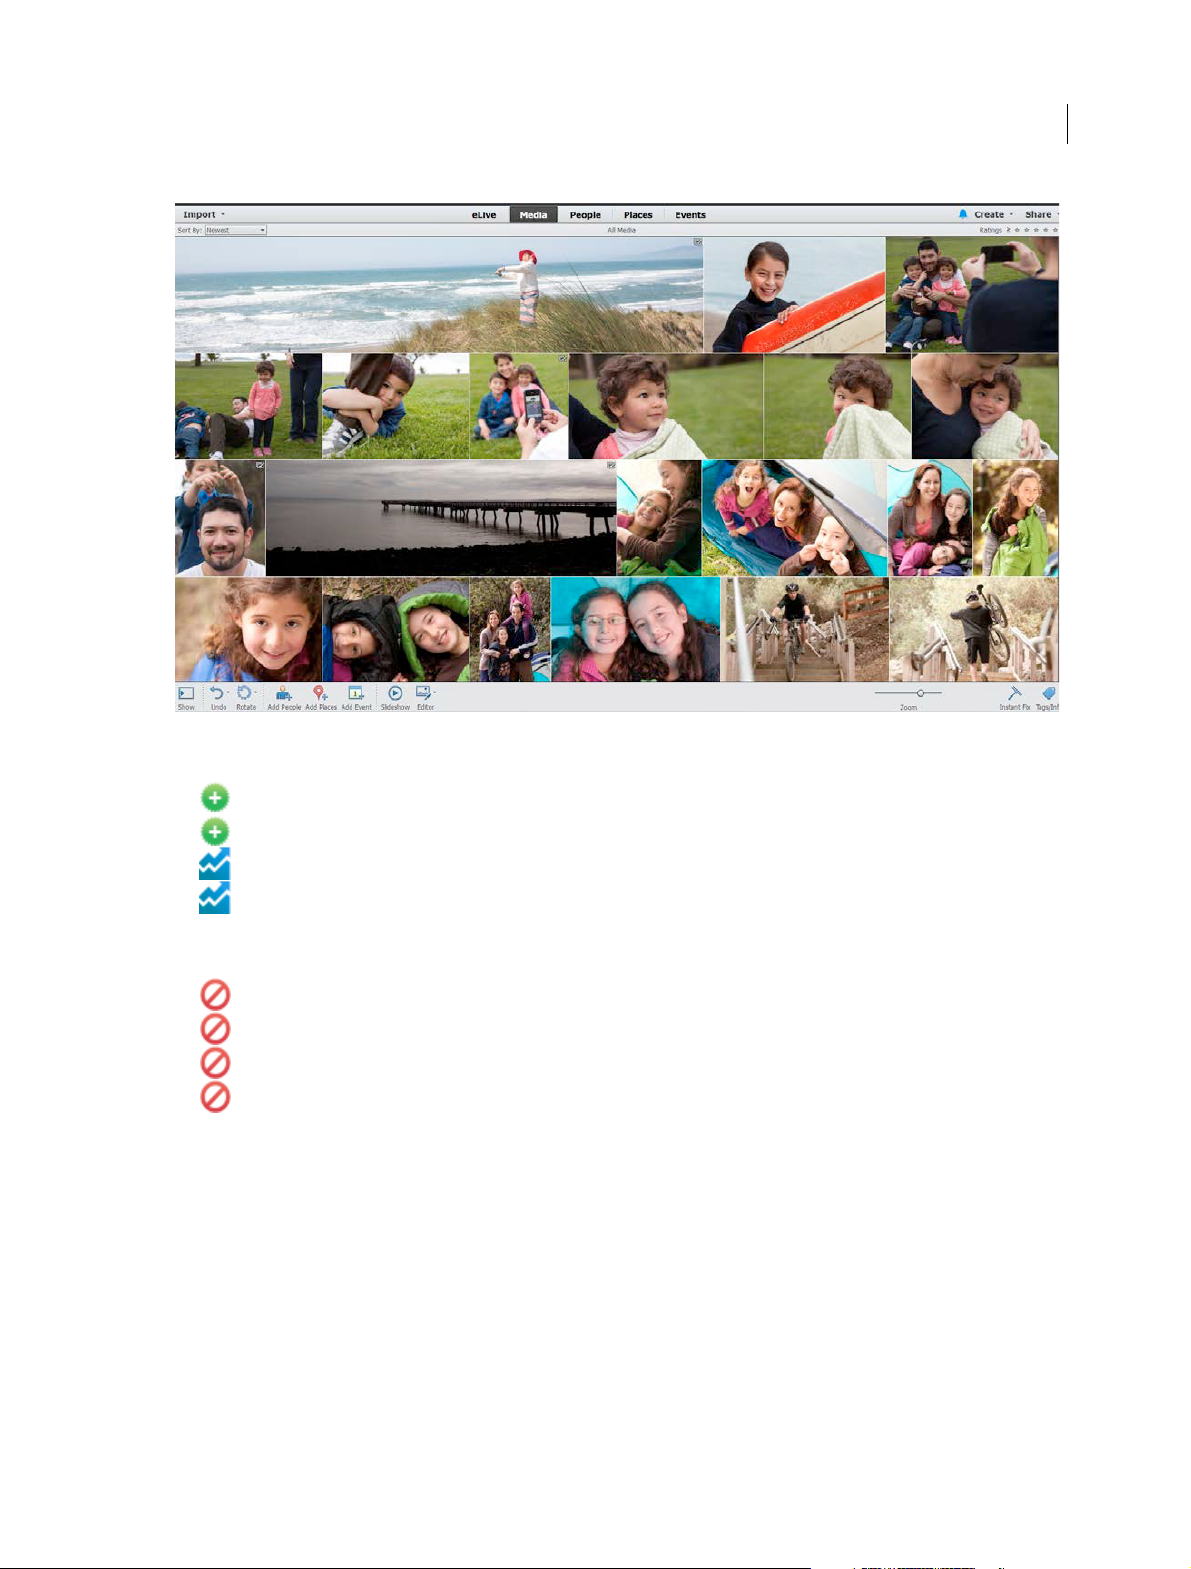
Use Elements Organizer to find, organize, and share your photos and media files. In the Media view, you can view
thumbnails of the media files you’ve imported. You can view a large thumbnail of a single media file or smaller
thumbnails of many media files. You specify the thumbnail size by using the Zoom slider.
The Media view lists all the photos, as well as videos and PDF files that you’ve imported. Imported items appear in one
comprehensive view that you can easily browse and filter. It can even show thumbnails of files stored remotely, such as
those files that you want to keep on CDs.
You can fix the most common problems in the media files by using the tools in the Instant Fix tab of the Task pane.
You can create projects, from printed photo books to computer slide shows, from the Create tab.
Finally, you can share your photos, videos, and projects with others, by using any of the tools in the Share tab of the
Task p a n e.
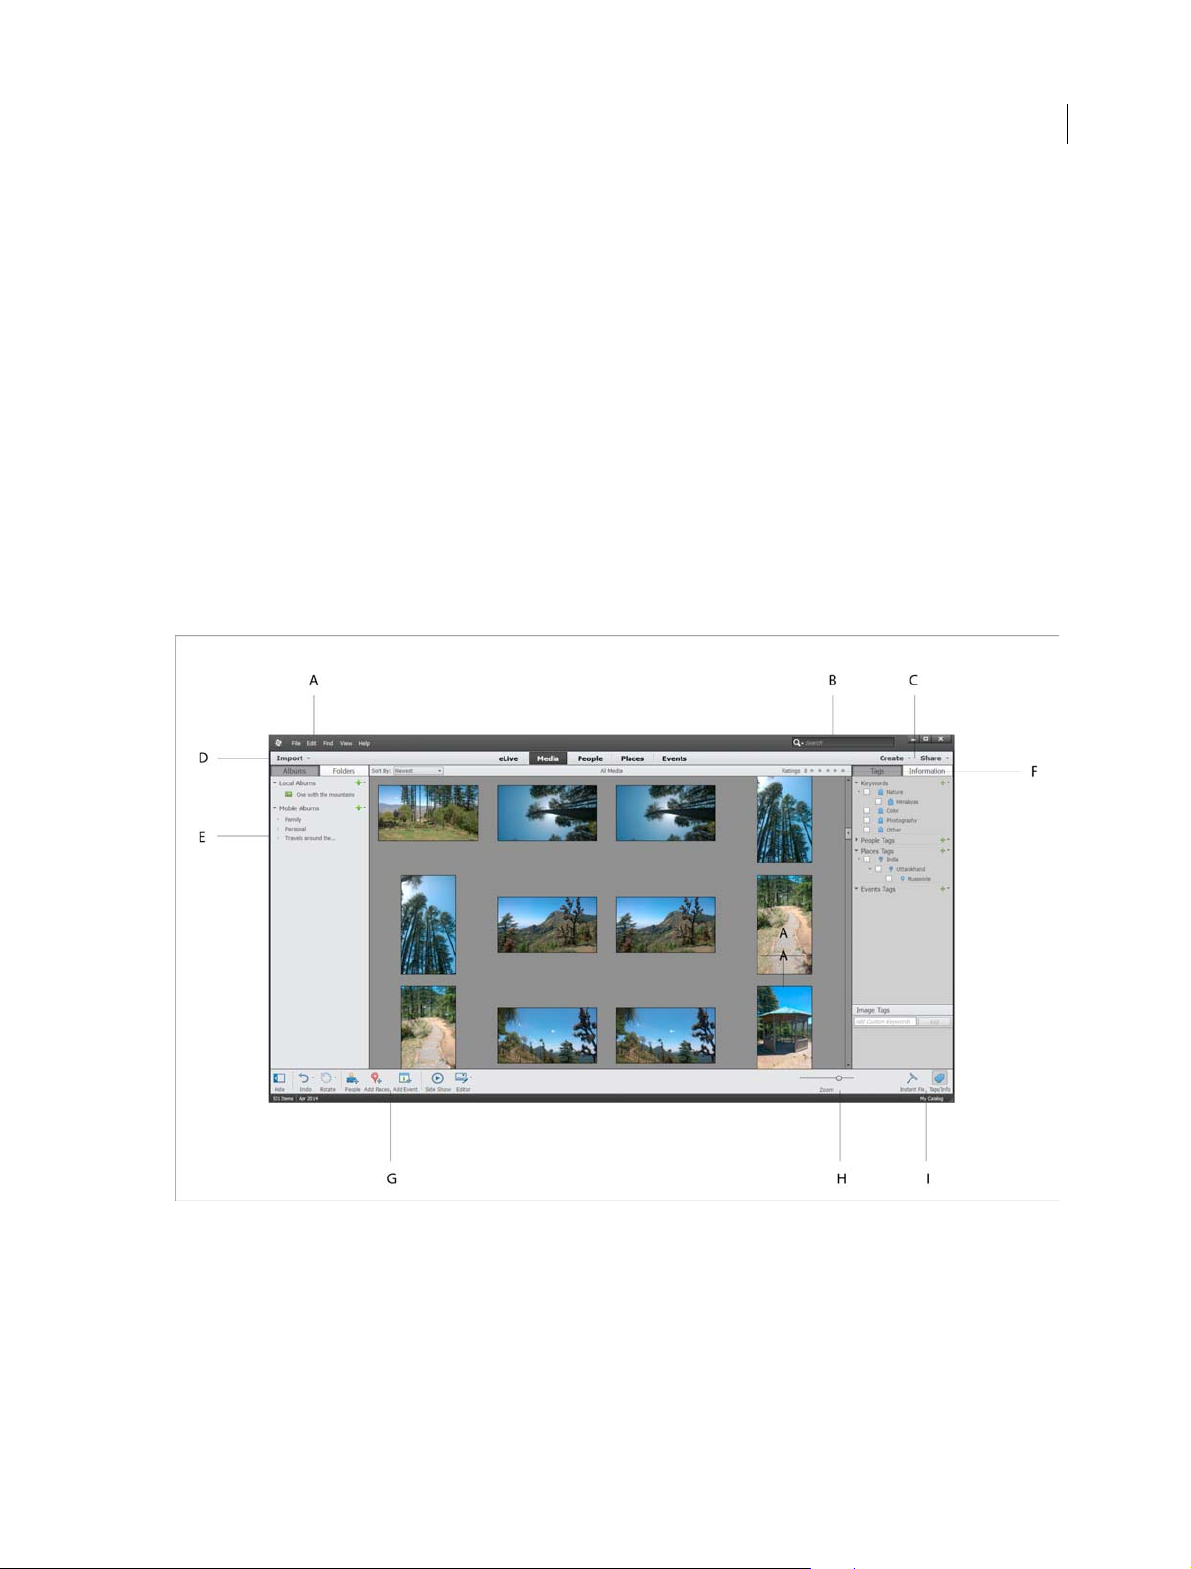
22
A Menu bar B Search bar C Create and Share tabs D Import button E Albums and Folders panel F Star ratings filter G Ta s k p a n e H Zoom
bar I
Instant Fix and Tags/Info
The Elements Organizer workspace has the following components:
Menu bar Contains menus for performing tasks. Elements Organizer organizes the menus by topic: File, Edit, Find,
View, and Help.
Search bar Enter a criteria or select a particular search from the drop-down list to search for photos or media files.
Last updated 9/22/2014
Page 27
Workspace and workflow
Create and Share Click Create to explore ways on how to create, creative projects using your media files. Click Share
to see various ways in which you can share media files with friends and family.
Import button Click Import to start importing media into Elements Organizer.
Albums and Folders panel The Albums created or imported from previous version’s catalogs are displayed in the
Albums panel. You can create albums and manage media inside the albums panel to organize media in Elements
Organizer.
The Folders panel lists all the physical folders from which you have imported media to Elements Organizer. You can
hide/show by clicking the respective buttons in the task pane.
Star ratings filter You can give a star rating to your media files. This helps you sort and organize media. For example,
you can give five stars to a photograph for various reasons such as it has your favorite subject or is an excellent
photograph.
You can later then sort all such photos with a five star rating.
Sort media You can sort media in Elements Organizer by the following parameters:
Newest: Orders the media by date from the most recent to the oldest
Oldest: Orders the media by date from the oldest to the most recent
Name:(Elements 12) Orders the media alphabetically by name (A-Z)
23
Import Batch: Orders the media by the batches in which they were imported
Album Order: Orders the media by user's choice. You can manually drag and reorder the media.
Tas k pa ne Contains buttons to add places, people, events, and create slide shows. You can also launch editors for fixing
photos and videos from the Editor button. See
Status bar In the Media view, the status bar displays the number of items selected and the number of items contained
Wo rk s pa c e for more information.
in the Media view. It also displays the number of media not displayed.
Views in Elements Organizer
There are five views in Elements Organizer. The Views tab helps you organize and view your media based on the people
present in the photos, places they were taken, and the events that are associated with the photos.
Initially, when you import media, the files are displayed in the Media view. You can then mark faces in the photos,
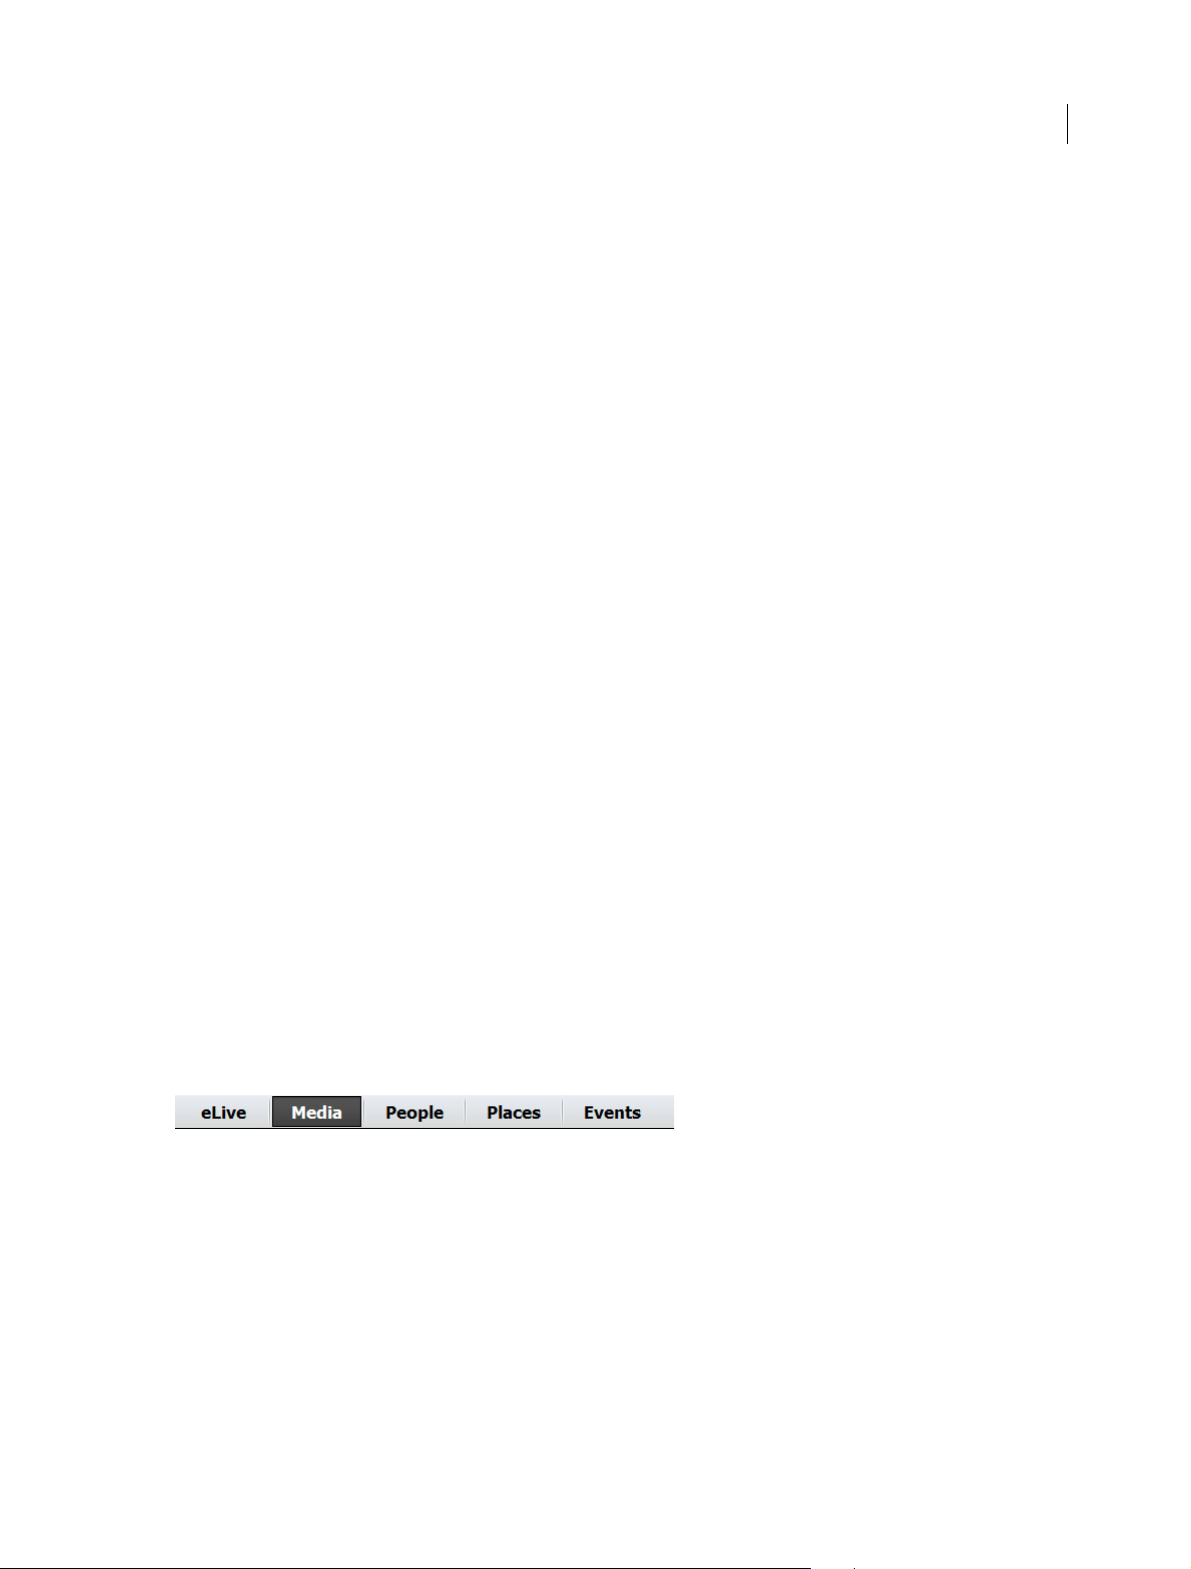
identify places the photograph was taken at, and create event stacks. The four views are listed here:
A. eLive The eLive view displays articles, videos, tutorials, and more, categorized into channels such as Learn, Inspire,
and News, right within Elements Organizer.
B. Media The various media files are displayed in this view. You can view the files in this view, fix photos using Instant
fix option, view information about specific files using Tags/info option, and perform other operations.
C. People The people appearing on your photos can be marked. People’s view helps you arrange stacks based on the
people identified in the photos.
D. Places Photographs have special association with the places they are taken at, you can tag locations to your photos
in the Places view.
E. Events You can create stacks of events containing pictures of that event. For example, you can create an event Dan’s
birthday and tag photos of that event.
Last updated 9/22/2014
Page 28

Workspace and workflow
Use context menus
You can use context menus in both the Editor and Elements Organizer workspaces. Context-sensitive menus display
commands that are relevant to the active tool, selection, or panel.
1 Position the pointer over an image or panel item.
Note: Not all panels offer context menus.
2 Right-click/Ctrl-click and choose a command from the menu.
Using keyboard commands and modifier keys
You can use keyboard shortcuts in both the Editor and Elements Organizer workspaces. Keyboard commands let you
quickly execute commands without using a menu; modifier keys let you alter how a tool operates. When available, the
keyboard command appears to the right of the command name in the menu.
Undo, redo, or cancel operations
Many operations can be undone or redone. Available memory limits your ability to use these options.
1 To undo or redo an operation, Choose Undo or Redo from the task pane.
2 To cancel an operation, hold down the Esc key until the operation in progress has stopped.
24
Exit Photoshop Elements or Adobe Premiere Elements
To exit Photoshop Elements or Adobe Premiere Elements, close each workspace—closing one does not automatically
close another.
1 In Windows®, select File > Exit. In Mac® OS, select Adobe Elements 11 Organizer > Quit Adobe Elements 11
Organizer.
2 When closing the Editors, confirm whether you want to save any of the opened files.
More Help topics
Photoshop Elements workspace
Adobe Premiere Elements workspace
Adding and managing event data
Marking faces in photos and organizingpeople stacks
Adding and managing place (location)data
Keys for navigating
Keys for selecting tools
Using Elements Organizer and Adobe Premiere Elements together
Last updated 9/22/2014
Page 29

Workspace and workflow
About Elements Organizer and Adobe Premiere Elements
Here are a few ways you can share files between Elements Organizer and Adobe® Premiere® Elements:
• Organize your photos, video files, and audio clips in Elements Organizer, and drag them onto the Adobe Premiere
Elements Project panel.
• Right-click/Control-click the media file, and select Edit With Premiere Elements.
• Create a slide show in Elements Organizer with captions, transitions, effects, music, narration, graphics, and titles.
After creating the slide show, bring the slide show into Adobe Premiere Elements for further editing. Or, bring
individual photos or video files into Adobe Premiere Elements, and create the slide show there.
• You can open Adobe Premiere Elements for editing video files using the Editor > Video Editor option in Elements
Organizer.
• Customize DVD menu templates in Elements Organizer, and use the templates in your Adobe Premiere Elements
project. (DVD templates are PSD files stored in the Adobe Premiere Elements application folder.)
• Create an Elements Organizer file with your video project’s settings, enhance it in Elements Organizer, and use it in
Adobe Premiere Elements. You can also use the Create tab in Elements Organizer to create instant movies.
Arrange your work area
To share files between Elements Organizer and Adobe Premiere Elements, it’s useful to have both programs open and
accessible on your computer monitor.
25
1 Start Elements Organizer and Adobe Premiere Elements.
2 If your screen is maximized, click the Restore button in the upper-right corner of each application window.
3 Position the application windows side by side or overlap them slightly.
However, trying to access the following options in the Share tab launches Adobe Premiere Elements:
• Burn Video/DVD BluRay
• Online Video Sharing
• Mobile Phones
Supported media file types
Elements Organizer and Adobe Premiere Elements support many of the same file types, which makes the transfer of
most files between the two programs easy and efficient. For example, you can catalog Photoshop (PSD) files in the
Elements Organizer and then add them as still images to a project in Adobe Premiere Elements.
All file types that are supported in Photoshop Elements and Adobe Premiere Elements can be imported into Elements
Organizer. The file support is irrespective of the application installed (Photoshop Elements and Adobe Premiere
Elements). The following table gives a list of the supported file types:
Images Video Audio
raw 3g2 aac
arw avi ac3
bmp 3gp aif
cr2 dv aiff
Last updated 9/22/2014
Page 30

Workspace and workflow
Images Video Audio
crw m2t m2a
srf m2ts m4a
dib m2v mp3
dng m4v wma (Windows only)
erf mpeg
wav mod
gif mov
sr2 mp4
tif mpg
jpe mts
jpeg swf
jpg tod
kdc vob
26
mef
mfw
mos
mrw
nef
orf
x3f
pdd
pdf
pef
vda
png
psd
pse
pxr
raf
rle
Last updated 9/22/2014
Page 31

Workspace and workflow
Photoshop Elements Editor, Adobe Premiere Elements, and Elements Organizer do not recognize the following file
types:
Elements Organizer Photoshop Elements Editor Adobe Premiere Elements
TIFF with LZW compression (.tif) TIFF with LZW compression (.tif) MOD (.mod; JVC Everio)
EPS (.eps) Illustrator (.ai) Illustrator (.ai)
27
Windows Media (.wmv, .wma) - not supported
on Mac OS
Adobe Illustrator (.ai) Dolby audio (.ac3)
JPEG 2000 Windows Media (.wmv, .wma) - not supported
Filmstrip (FLM)
Wireless BMP (WBM, WBMP)
PCX
Targa (TGA, VDA, ICB, VST)
Photoshop RAW (RAW)
PICT File (PCT, PICT)
Scitex CT (SCT)
Photoshop EPS (EPS)
EPS TIFF Preview (EPS)
Generic EPS (AI3, AI4, AI5, AI6, AI7, AI8, PS, EPS,
AI, EPSF, EPSP)
Mac OS only - IFF, Photoshop 2.0, Alias PIX,
PICT Resource
Flash video (.flv)
AIFF (.aiff)
on Mac OS
Note: Elements Organizer catalogs video AVI files properly and they play correctly. However, audio AVI files appear as
broken video thumbnail icons. Also, Colors created in a file’s spot channels in Photoshop are not displayed when the file is
imported into Elements Organizer.
Viewing photos and videos in the Elements Organizer
About the Media view
The Media view shows thumbnails of the media files in the central area (grid) of the Elements Organizer. You can view
media (thumbnails of photos, video files, and audio files) present in your albums, folders, and catalogs. You can select
items in the Media view to attach tags to them, add them to projects, or edit them.
The Media view is displayed by default. However, to switch back to this view from other views, click on the Media tab.
Last updated 9/22/2014
Page 32

Workspace and workflow
Set viewing preferences for Media view
1 Click the Media tab to open the Media view.
2 Do one of the following:
• (Windows) Choose Edit > Preferences > General.
• (Mac OS) Adobe Elements Organizer > Preferences > General.
3 Specify the display options as desired, such as the following:
• Print Sizes: Specify the print size of the media.
• Date (Newest First): To order pictures within a day such that the newest pictures appear first, choose Show
Newest First Within Each Day. To view older pictures first, choose Show Oldest First within Each Day.
• Date Format: Select the date format that you want displayed for the timestamp for photos. This option is not
available for some languages.
• Allow Photos To Resize: To rescale photos more than 100% of actual size and up to the maximum size of the space
available, select Allow Photos To Resize. Deselect this option to display small images in their actual size even
when more space is available for display.
• Use System Font: To display the text in the Elements Organizer user interface using fonts from your computer’s
operating system, select Use System Font.
28
• Adjust Date And Time By Clicking On Thumbnail Dates: To edit the date and time details, click to select the
photograph, select Adjust Date And Time By Clicking On Thumbnail Dates.
• Reset All Warning Dialogs: To re-enable dialog boxes that you had chosen not to display again, click Reset All
Warn i ng D i al o gs.
• Restore Default Settings: Click this button to restore the general viewing preferences to default.
Media view icons
Some of the following icons appear only when you select the Details option, and others appear at all times. Click View
> Details to view the file details.
Stack icon
Indicates that the thumbnail represents a stack of photos.
Version Set icon
Indicates that the thumbnail represents a stack of edited versions of a photo.
Video Scene Group icon
Indicates that the thumbnail represents a video scene of a video scene group.
Video icon
Indicates that the thumbnail represents a video clip.
Audio icon
Indicates that the thumbnail includes an audio caption.
Multiple Keyword Tag icon
Indicates that more than five keyword tags are attached to the media file. Place the pointer over the tag icon to see the
keyword tags attached.
Last updated 9/22/2014
Page 33

Workspace and workflow
Keyword Tag icons
Indicate the specific keyword tags that are attached to the media file.
Album icon
Indicates this is an album.
Hidden Photo icon
Indicates that the thumbnail is a hidden file.
Project icon
Indicates that the thumbnail is used in a project.
Photo Project icon
Indicates that the photo is part of a multiple page project.
Rating stars
Shows the rating of the photo, on a scale of five stars.
People tag
Shows that the people tag has been added to the photo.
29
Smart tag (Only in Elements 12 and earlier versions)
Shows that a smart tag is applied to the media file.
Sort files in Media view
❖ There are various ways in which you can view the media files in the grid by sorting them based on the options
available in the Sort By dropdown list.
Choose from the following display options in Sort By:
Import Batch Displays media files in the batches in which they were imported and shows how the media files were
imported.
Newest Displays the most recently taken or imported media files first. (Within a given day, the media files are
shown in the order they were taken, oldest first, unless otherwise specified in the Preferences dialog box.) Newestfirst order is convenient when you attach tags to the media files that you imported.
Oldest Displays media files in the order of the date stamp, the oldest imported files based on date are displayed first.
Name Displays media files in alphabetical order of name.
Hide and show media files in the Media view
You can mark media files to hide them from view in the Media view without deleting them from your hard disk.
Alternatively, you can make hidden files reappear temporarily, or unmark them so that the files always remain visible.
Hide media files by marking them
1 Select the media files you want to hide. Shift-click the first and last media file of a group of adjacent files to select
the entire group. Ctrl-click non-adjacent files to select them.
2 Choose Edit > Visibility > Mark As Hidden to mark the media files for hiding.
A Hidden icon appears in the lower-left corner of each media file selected.
Last updated 9/22/2014
Page 34

Workspace and workflow
3 To hide the selected media files in the Elements Organizer, choose Edit > Visibility, and then select Hide Hidden
Files.
You can also right-click/control-click on the thumbnails and select the Visibility command from the context menu.
Show media files marked as hidden
❖ Choose Edit > Visibility, and then choose one of the following:
Show All Files Shows hidden files along with non-hidden files.
Show Only Hidden Files Shows only hidden files in the Elements Organizer.
30
You can also right-click /control-click on the thumbnails and select the Visibility command from the context menu.
Remove the Hidden icon from the media files
1 In the Media view, show the media files marked as hidden by View > Hidden Files > Show All Files.
2 Select the media files from which you want to remove the Hidden icon.
Shift-click the first and last photo in a group of adjacent photos to select the entire group. Ctrl-click nonadjacent
photos to select them.
3 Choose Edit > Visibility > Mark As Visible.
You can also right-click/control-click on the thumbnails and select the Visibility command from the context menu.
View and manage files by folders
The My Folders panel displays folders from which media can be organized further into Albums. My Folders panel
appears in the left pane below Albums. From this panel, you can manage folders, add files to your catalog, and add or
remove folders from Watch Folders (Windows only) status.
There are two views in which the folder structure is displayed.
Tree view In the Folders panel, switch between the Tree and List views. The Tree view helps determine the physical
location of the media present in that folder. Sub-folders of a folder are not displayed by deafult in tree view. Select a
folder, right-click and select Show All SubFolders to view the Sub-folders of a folder.
Last updated 9/22/2014
Page 35

Workspace and workflow
Flat folder view this view is displayed by default in the Folders panel. The Flat folder view is a basic structure and you
can click on any of the folder to view the media available in that folder.
By default, the folder panel displays all of the folders on your hard disk from which media has been imported into
Elements Organizer.
31
Folders containing managed files have a Managed folder icon . Managed files are files that are imported into a
catalog, either manually or automatically. Watched folders have a Watched folder icon
Note: The Watched Folder option is disabled for network drives. Also, the Watched Folder functionality is available only
on Windows.
Elements Organizer automatically imports compatible files saved in watched folders. Folders that are both managed
and watched have a Watched And Managed folder icon.
You can view files in a folder and perform different operations using the options available in the My Folders panel.
1 The Folder hierarchy appears on the left side of the Organizer in the My Folders tab and the image thumbnails
appear in the grid.
2 Click on a folder to view its media files. Thumbnails for the files in that folder appear in the grid in Media view
3 To add files from a folder to an album , sele ct the folder, and drag and drop the me dia files from the g rid to an Album .
4 To manage files and folders, select a folder from My Folders and do any of the following:
• Select the folder from which you want to move a file to a different folder.
• To move the file to a different folder, drag the file’s thumbnail in the Media view to the destination folder in the
folder panel.
• To view the folder in Explorer, right-click/control-click in the folder hierarchy panel and choose Reveal In
Explorer (Windows)/Reveal in Finder (Mac OS).
• (Windows on ly) To add or remove the folder from watched-folder status, right-click in the left panel, and cho ose
Add To Watched Folders or Remove From Watched Folders.
• To rename the folder, right-click/control-click the folder and choose Rename Folder. Then type a new name.
• To delete the folder, right-click/control-click in the folder hierarchy panel and choose Delete Folder.
Last updated 9/22/2014
Page 36

Workspace and workflow
• You can create instant albums from the folder panel. All the images in the selected folder are added to the instant
album. To instantly create an album by the folder name, select the folder, right-click, and select Create Instant
Album.
Specify media types to view
❖ In the Media view, choose View > Media Types > [type of file].
Resize, refresh, or hide media thumbnails using Zoom bar
You can change the size of thumbnails of media files, or refresh them after editing the media files in another application.
In addition, you can quickly rotate the thumbnails so they appear correctly in the window.
• To incrementally change the size of the thumbnail, drag the thumbnail slider in the Zoom bar.
• To display the smallest thumbnails possible, move the zoom bar to extreme left(start) of the slider.
• To display a single media file, move the zoom bar to the right of extreme right (end) of the slider.
• To refresh the thumbnail view, choose View > Refresh.
• To rotate an image counterclockwise, click Rotate Left from the task pane; to rotate an image clockwise, click Rotate
Right
.
32
Select files in the Media view
Select a media file in the Media view to work with it. A selected thumbnail is highlighted with a dark blue outline.
❖ Do one of the following:
• To select a single item, click its thumbnail.
• To select multiple adjacent items, hold down Shift and click the first and last items you want to select.
• To select multiple nonadjacent items, hold down Ctrl-click/Cmd-click the items you want.
• To select or deselect all items in the Media view, choose Edit > Select All, or Edit > Deselect.
Display and edit media file details
You can choose to display details for each thumbnail, and also how certain details are displayed in the Media view. Also,
you can add and edit captions including audio captions, and add and edit date and time information.
Edit media file details
You can edit information related to a media file. For example, you can edit date, attached tags, filename, caption, and
audio caption.
❖ In the Media view, do one of the following:
• To edit or add a text caption, select View > Details, right-click, and select Add Caption.
• To add, listen to, or edit an audio caption, select View > Details, and double-click the photo. Click the Record
Audio Caption button
• To change the date assigned to a media file, select the thumbnail, choose Edit > Adjust Date And Time. Specify
the options from the dialog boxes that appear.
.
Last updated 9/22/2014
Page 37

Workspace and workflow
You can change dates by a single click. To enable this feature, select Edit> Preferences> General (Windows), or
Adobe Elements Organizer > Preferences > General (Mac OS). In the Preferences dialog, select. Click the date and
make the required changes.
More Help topics
The Edit workspace
About keyword tags
Find media files using the Search box
Viewing media files in full screen or side by side
Using watched folders (Windows only)
Get media files from files and folders
About keyword tags
Update an item’s thumbnail
About file information (metadata)
Change the date and time of files
33
Keys for viewing photos (Elements Organizer)
This partial list includes the most helpful shortcuts. You'll find additional shortcuts in menu commands and tool tips.
Result Shortcut (Windows) Shortcut (Mac OS)
Full Screen view F11 Cmd + F11
Side by Side view F12 Cmd + F12
Exit Full Screen or Side by Side view Esc Esc
Refresh Media view F5 Cmd + R
View/hide details Ctrl + D Cmd + D
View/hide Timeline Ctrl + L Cmd + L
Expand photos in stack Ctrl + Alt + R Cmd + Alt + R
Keys for finding photos
This partial list includes the most helpful shortcuts. You'll find additional shortcuts in menu commands and tool tips.
Result Shortcut (Windows) Shorcut (Mac OS)
Set date range Ctrl + Alt + F Cmd + Alt + F
Clear date range Ctrl + Shift + F Cmd + Shift + F
Find by caption or note Ctrl + Shift + J Cmd + Shift + J
Last updated 9/22/2014
Page 38

Workspace and workflow
Result Shortcut (Windows) Shorcut (Mac OS)
Find by filename Ctrl + Shift + K Cmd + Shift + K
Find items with unknown date or time Ctrl + Shift + X Cmd + Shift + X
Find untagged items Ctrl + Shift + Q Cmd + Shift + Q
Keys for editing photos (Elements Organizer)
This partial list includes the most helpful shortcuts. You'll find additional shortcuts in menu commands and tool tips.
Result Shortcut (Windows) Shortcut (Mac OS)
Undo last operation Ctrl + Z Cmd + Z
Redo last operation Ctrl + Y Cmd + Y
Copy Ctrl + C Cmd + C
Paste Ctrl + V Cmd + V
Select all Ctrl + A Cmd + A
34
Deselect Ctrl + Shift + A Cmd + Shift + A
Rotate 90 degrees left Ctrl + Left Arrow Cmd + Left Arrow
Rotate 90 degrees right Ctrl + Right Arrow Cmd + Right Arrow
Edit with Photoshop Elements Editor (Full
Edit)
Display Properties panel Alt + Enter Alt + Enter
Adjust date and time of photo Ctrl + J Cmd + J
Add caption Ctrl + Shift + T Cmd + Shift + T
Update thumbnails Ctrl + Shift + U Cmd + Shift + U
Set photo as desktop wallpaper Ctrl + Shift + W
Open Color Settings dialog box Ctrl + Alt + G Cmd + Alt + G
Open a file in Premiere Elements Editor Ctrl+M Cmd + M
Zoom in Ctrl + + Cmd + +
Zoom out Ctrl + - Cmd + -
OK Enter Enter
Cancel Esc Esc
Ctrl + I Cmd + I
Last updated 9/22/2014
Page 39

Chapter 3: Importing
Importing media from cameras and card readers
About cameras and card readers
You can download (copy) media files from cameras and card readers in several ways:
• Copy media files from your camera or card reader, and import them directly into Elements Organizer using the
options in the Photo Downloader dialog box. This method is recommended because it is quick and easy, and lets
you organize your media files when importing them.
• Use the software that came with your digital camera to download pictures onto your computer. Then import them
into Elements Organizer by Import > From Camera or Card Reader.
• If your camera or card reader displays as a drive in My Computer, you can drag the files and directly (drop) into the
Media view's workspace. Or you can drag them into a folder on your hard drive, and then import them into
Elements Organizer by Import > From Files And Folders.
If required, install the software driver that came with your camera before you can download media files to your
computer. Also, set the camera and card reader preferences in Elements Organizer.
35
Get media files from a digital camera or card reader
For a video about this process, see www.adobe.com/go/lrvid2311_pse10_en.
1 Connect your camera or card reader to your computer. (See the documentation that came with your device, if
necessary.)
(Windows) The Windows AutoPlay dialog box opens with a list of options for getting the photos.
Note: (Windows) If AutoPlay is enabled, the Windows AutoPlay dialog box opens with a list of options for getting the
photos. In the Windows AutoPlay dialog box, select Organize and Edit using Adobe Elements 11 Organizer. If Elements
Organizer is not already open, the Photo Downloader dialog box opens. Click Get Media. Elements Organizer opens
and imports the media files.
2 In the Windows AutoPlay dialog box, select the Elements Organizer 11 option.
The Photo Downloader dialog box opens if Elements Organizer is running. You can also click Import > From
Camera or Card Reader or cho ose File > Get Photos And Videos > From Camera Or C ard Reader to open the Photo
Downloader.
Last updated 9/22/2014
Page 40

Importing
3 In the Photo Downloader dialog box under Source, select where to copy/import from using the Get Photos From
drop-down list.
Note: Select the Refresh List option from the drop-down list to refresh the list of available cameras or card readers.
4 In the Import Settings area, set the following options:
Location Specifies the folder to which the media files are downloaded. To change the default folder location, click
Browse, and specify a new location.
Create Subfolder(s) Creates a subfolder using the naming scheme chosen from the pop-up menu. If you choose
Custom Name, type a subfolder name in the box.
36
Ti p: (Windows only) If you are using keyboard shortcuts to create subfolders (Alt+C) or rename files (Alt+R), press
the spacebar to expand the menu. Then, use the arrow keys to select an option.
Rename Files Changes the filenames using the naming scheme selected from the pop-up menu. If you want to
specify a custom Name, type a base filename and a starting number for assigning sequentially numbered filenames
to the media files.
Note: If the name you entered exists, the copied image filename is appended with “-1”, or another appropriately
numbered designator.
Preserve Current Filename In XMP Select this option to use the current filename as the filename stored in the
metadata of the media file.
Delete Options Specifies whether to leave the media files on your camera or card, verify and delete the files, or
delete the files after they are copied. Deleting the files automatically avoids having to delete the media files by using
your camera. Media files that you do not import into Elements Organizer are not deleted from the device.
Automatic Download (Windows only) Imports your media files instantly the next time Elements Organizer 11 is
selected in the Windows AutoPlay dialog box. This option uses the Automatic Download values specified in the
Camera or Card Reader preferences.
5 For more download options, click the Advanced Dialog button.
6 Click Get Media.
The media files are copied to your hard drive. If the media files you copied contain keyword metadata, the Import
Attached Tags dialog box appears; specify whether to copy the tags.
7 Click OK in the Files Successfully Copied dialog box. You can choose to show only the new files in the Media
Browser.
You can change the settings specified here at a later time. In Elements Organizer, for Windows, select Edit > Preferences
> Camera or Card Reader. In Mac OS, select Adobe Elements Organizer 11 > Preferences > Camera or Card Reader.
Last updated 9/22/2014
Page 41

Importing
Set advanced photo downloading options
The Advanced dialog box of the Adobe Photo Downloader offers all the options in the Standard dialog box plus several
additional options. For example, you can view all of the media files stored on a device or preview videos before
importing them. You can also add copyright metadata, specify an album for the imported photos, and automatically fix
red eye as the images are imported. The settings you specify in this dialog box retain their values until you reset them.
1 In the Standard Photo Downloader dialog box, click Advanced Dialog.
Thumbnail images of every file on your device appear.
2 To show or hide different file types, click the Image , Video , or Audio buttons. If the device contains
duplicate files, the Duplicate button is also available.
Note: Duplicate files are files that are already in the Elements Organizer or have already been copied to your hard disk.
If you download duplicate files, they are copied to your hard drive, but are not added to Elements Organizer.
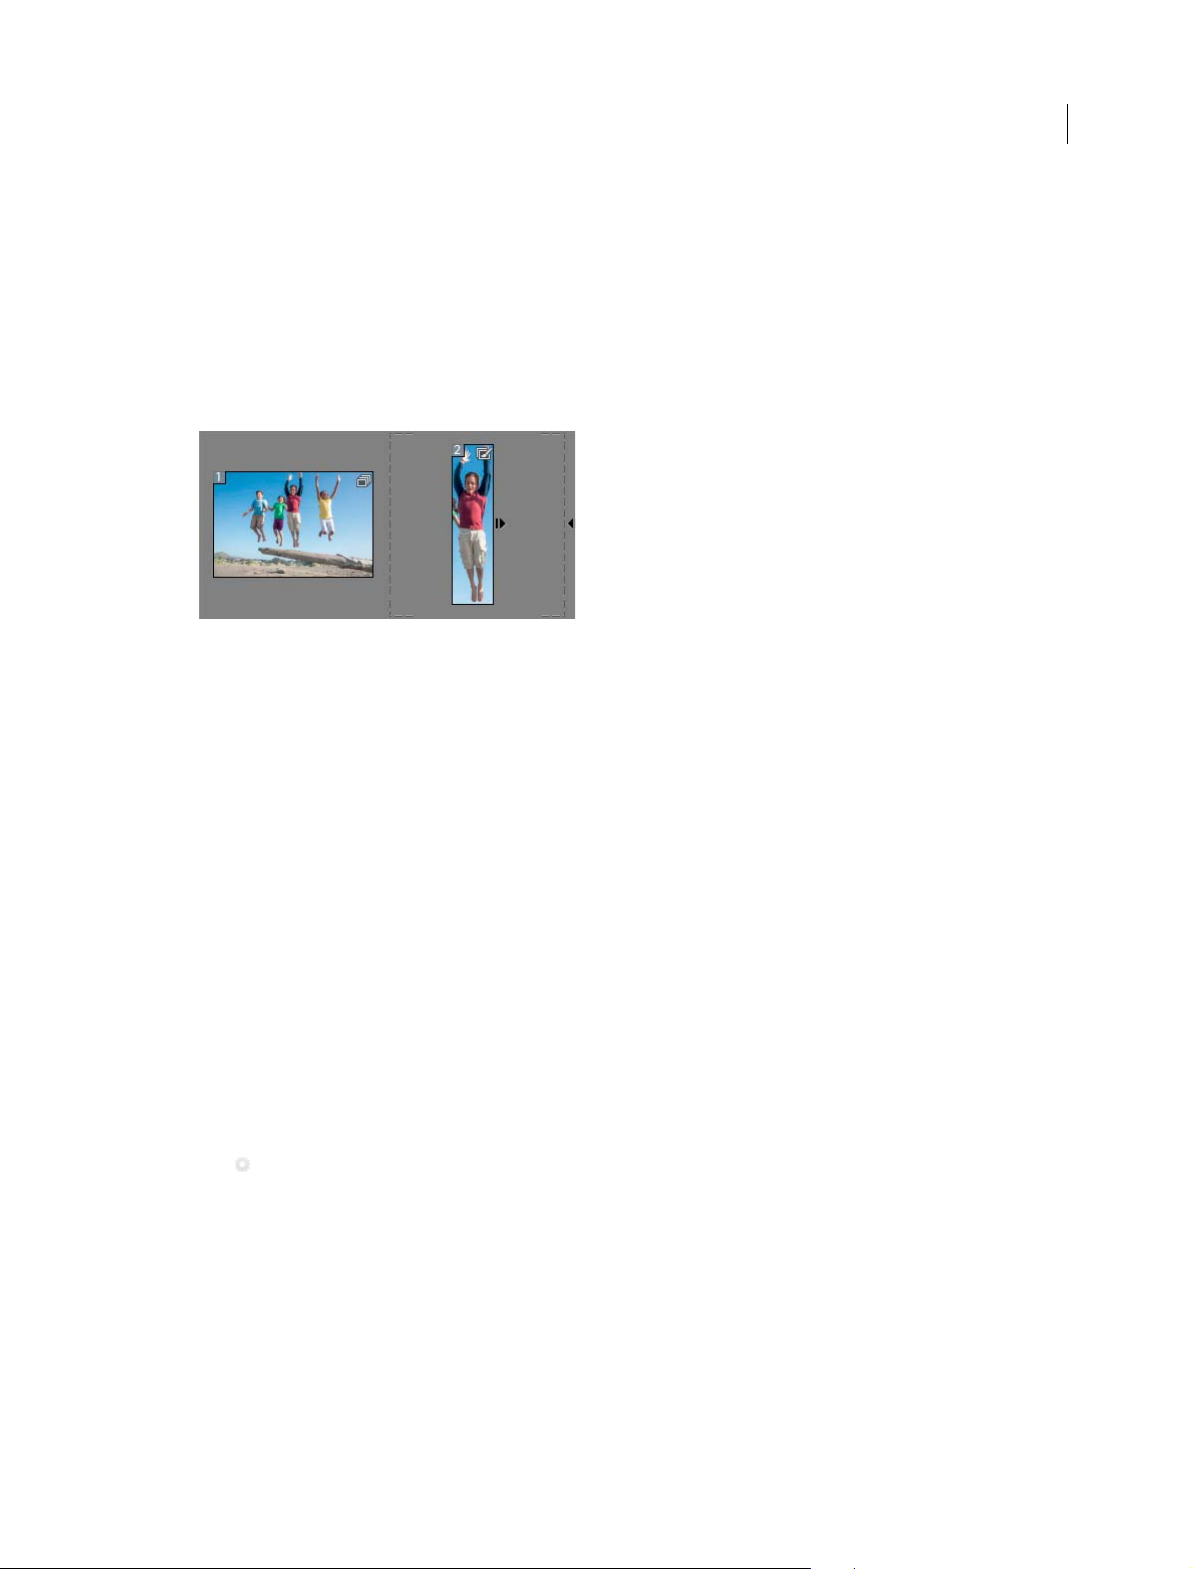
3 Select media files (photos or videos) to download by doing any of the following:
• To select individual media files, click the boxes below each thumbnail.
• To select multiple media files, drag a rectangle around their thumbnails. Then right-click/control-click and select
Check Selected, or click a box below one of the selected media files to check them all.
• To select all media files, click Check All. To deselect all images, click Uncheck All.
37
4 To rotate one or more media files, select them by clicking the media files (not the check boxes). Then, click the
Rotate Left button
5 In the Save Options section, do any of the following:
or the Rotate Right button .
• Specify a destination to copy the media files. Click Browse and navigate to the location you want.
Note: If you switch to the Standard dialog box, Custom Groups settings are lost.
• Choose an option for naming subfolders from the Create Subfolder(s) menu. The Custom Groups (Advanced)
option creates a subfolder with the group name format you select in the Group Name box. The group tag name
helps you find and distinguish photos within a category.
• Choose a naming scheme from the Rename Files menu if you want to rename the media files during import.The
Advanced Rename option lets you rename files based on a criterion. If you want to specify a custom name, type
a base filename and a starting number for assigning sequentially numbered filenames to the media files.
Note: If the name you entered exists, the copied image filename is appended with “-1” or another appropriately
numbered designator.
6 In the Advanced Options section, select any of the following:
Automatically Fix Red Eyes Applies the Fix Red Eye command to all selected photos.
Note: Automatically removing red eye on a large number of image files increases the amount of time required to
import your photos.
Automatically Suggest Photo Stacks Combines selected photos into suggested photo stacks based on visual
similarity.
Note: When downloading media files from a camera, card reader, or mobile phone, it is recommended that you organize
the media files into photo stacks during the import process.
Make Group Custom Name A Tag Applies the custom name tag of the specified group to the selected photos. Use
this option only if you have specified custom names to custom groups. Applying tags while downloading helps you
find photos more easily in Elements Organizer.
Last updated 9/22/2014
Page 42

Importing
Import Into Album Lets you specify or create an album to import the photos. Click Settings to select or create an
album and then click OK.
Note: You can import into only one album in a (one) Photo Downloader session.
7 From the menu at the bottom of the Advanced Options section, choose an option to specify what Elements
Organizer should do after copying photos: leave the original files alone, verify that the import was successful and
then delete the original files, or immediately delete the original files.
8 To add metadata, select a template to use and type in the following fields:
Creator Specifies the file creator. Information typed into this field is appended to the creator metadata in the file.
Copyright Specifies the date and other relevant information to protect your photos. Information typed into this
field overwrites any data already in the copyright metadata in the file.
9 (Optional) (Windows only) To automatically download media files in Elements Organizer after a device is
connected, select Automatic Download. Automatic download options are set in the Camera Or Card Reader
preferences.
10 Click Get Media.
Set camera and card reader preferences
Elements Organizer enables you to set preferences for a device. These preferences apply if you select the Elements
Organizer 11 option in the Windows AutoPlay dialog box that appears when a device is connected. The preferences
remain intact until you change them. If you use a different camera or card reader, make sure to set preferences
specifically for that device.
38
1 In Elements Organizer, (Windows), select Edit > Preferences > Camera Or Card Reader. In Mac OS, select Adobe
Elements Organizer 11 > Preferences > Camera Or Card Reader.
2 Set file-specific import options:
Save Files In Specifies where the files are copied to on your hard drive. Click Browse to specify a new location.
Automatically Fix Red Eyes Fixes red eye problems as the files are downloaded.
Automatically Suggest Photo Stacks Suggests photo stacks for you according to date and visual similarity.
Make Group Custom Name A Keyword Tag Applies the custom name tag of the specified group to the selected
photos. Use this option only if you have specified custom names to custom groups. Applying tags while
downloading helps you find photos more easily in Elements Organizer.
3 To edit the options for a specific device, select the device profile, and click Edit. Choose a download option from the
menu that appears, and click OK. To delete a device from this list, select it, and click Remove.
4 (Windows only) To specify default values for automatic downloads, set any of the following:
Begin Download Specifies when a download begins after a device is connected.
Create Subfolder(s) Using Specifies if and how to separate and name folders containing media files shot on different
dates.
Delete Options Specifies if and how to delete the original media files from your camera after copying them to your
hard disk.
Copy New Files Only (Ignore Already Imported Files) Causes the downloader to ignore files that are already on your
hard disk.
If you have changed the settings and are having trouble getting your media files, click Restore Default Settings to
restore the original preferences.
Last updated 9/22/2014
Page 43

Importing
Importing from mobile phones
If you have a mobile phone with a built-in camera, you can transfer the media files into your catalog. Make sure that
your phone saves media files in a file format you can import into your catalog. To find out what file format your phone
uses, see the instructions that came with the phone.
For phones that store media files on a removable flash or memory card, use Adobe Photo Downloader to import media
files into Elements Organizer 11. To determine how your phone stores photos, see the instructions that came with your
phone.
To get photos into your catalog, use one of the following methods.
Direct Term If your phone stores media files on a removable flash or memory card, you can bring media files from your
phone directly into Element Organizer 11 by using the Adobe Photo Downloader. To determine how your phone stores
photos, see the instructions that came with your phone.
Cable or wireless transfer Transfer the images to your hard disk using cable or wireless transfer. For more information,
consult the phone manufacturer or the instructions that came with your phone. After you transfer the photos to your
computer, click File > Get Photos And Videos to import media files into your catalog. For some mobile phone cameras,
the Adobe Photo Downloader appears automatically when you connect via cable or wireless.
Note: On Mac OS, the downloader is not automatically launched.
Note: Not all phones and carriers allow you to transfer media files to your computer using the methods described
above. Your carrier or phone manufacturer can tell you what options are available to you. You can also refer to the
Adobe website for the latest information.
39
More Help topics
Bringing photos and videos into the Elements Organizer
Get media files from files and folders
Designate an album during photo download
Importing media from files and folders
Import media from files and folders
You can import photos and videos from your computer, CD/DVD, removable drive, or network places into Elements
Organizer to manage them in various ways. For example, you can create albums with the photos or tag the people in
the photos.
When you import a media file, Elements Organizer creates a link to t he me dia file in a cat alog. It d oes not copy or move
the original image unless you specify it. You can import media files from a CD, DVD, or device such as a scanner,
camera, card reader, or phone. By default, Elements Organizer first copies the media file into a folder on your hard disk
and then creates a link to that copy.
Note: If you delete the original file from your hard disk, you cannot edit it, even though its thumbnail remains in a catalog.
1 Click Import.
2 Select From Files And Folders to import media from a particular file or folder location. The folder location can be
on your computer, external drive, pen drive, or network places.
Last updated 9/22/2014
Page 44

Importing
Note: Alternatively, to import media from files and folders, you can also select File > Get Photos And Videos > From
Files And Folders.
3 Select the media in the Get Photos And Videos From Files and Folders dialog box.
4 (Optional) Specify the following information:
• Automatically Fix Red Eyes: Fixes red eye problems as the files are imported.
• Automatically Suggest Photo Stacks: Suggests photo stacks for you according to date and visual similarity.
• Copy Files On Import: Makes copies of files being imported from an external drive.
• Generate Previews: Creates low-resolution copies called preview files while importing.
40
5 Click Get Media.
6 You can import keyword tags added to your media as well. Select the tags you want to import and click OK.
Last updated 9/22/2014
Page 45

Importing
Set file preferences
Setting the file preferences determines how files are managed in Elements Organizer.
1 In Elements Organizer, select Edit > Preferences > Files (Windows) or select Elements Organizer 11 > Preferences
> Files (Mac OS).
41
2 Choose any of the following options, and then click OK.
Import EXIF Caption Imports any caption that was stored with the media file in the camera. Deselect this option if
you want to delete this information, and type your own caption for each media file.
Note: Caption data may be stored in different places in a file. Deselecting this option only blocks EXIF caption data.
Automatically Search For And Reconnect Missing Files S ear ch es fo r m is si ng, dis con ne ct ed files. Select this o pt io n t o
avoid getting messages about disconnected files.
Last updated 9/22/2014
Page 46

Importing
Automatically Generate Thumbnails For Video Files Generates a preview thumbnail for the video files imported.
Automatically Prompt To Backup Files And Catalog Allows you to automatically back up files and the catalog while
importing.
Enable Multisession Burning To CD/DVD (Windows only) Allows burning (copying) files onto a disc multiple times,
enabling you to use as much free space on the disc as possible. Normally, you can only burn a CD or DVD one time,
and any unused space is lost.
Rotate JPEGs Using Orientation Metadata/Rotate TIFFs Using Orientation Metadata When these options are
selected, the orientation metadata of the image is updated to rotate the image. The image data is untouched; the
rotation is specified by just changing the metadata. Rotating an image using its metadata is a faster process than
rotating the image itself.
Not all applications recognize orientation metadata. If you plan to import your images into such applications, leave
these options deselected.
Folders For Saved Files Specifies the default folder location where projects and other saved files are stored. To
change the location, click Browse and navigate to a new location.
Preview File Size Specifies the size of preview files used by the Elements Organizer when storing media files offline.
If you have changed the settings and are having trouble importing your media files, try clicking the Restore Default
Settings button in the Preferences dialog box to restore the original preferences.
42
Import tags attached to media files
When you receive media files that contain keyword tags or keyword metadata, you can import them with the media
file. You can decide whether to keep the attached keyword tag, rename the keyword tag, or map it to one of your own
keyword tags. If you import a new keyword tag, it appears in your Keyword Tags panel, and you can use it to tag other
media files.
1 Ensure that the camera or card reader is connected to your computer, or the media files you want to import are
copied to your computer.
2 In Elements Organizer, do one of the following:
• Click Import. Select any method for getting photos and videos.
• Choose File > Get Photos And Videos, and select any method for getting photos and videos.
Note: If the media files include tags or keyword metadata, the Import Attached Keyword Tags dialog box appears.
3 Do one of the following:
• Select the tags you want to import. The tags you select are added to the Keyword Tags panel when the media files
are imported. If a tag has an asterisk (*), you already have a tag of the same name in your catalog. The existing
tag is attached to the media files.
• Click Advanced for additional options.
Last updated 9/22/2014
Page 47

Importing
4 If you selected Advanced, do any of the following, and click OK.
• Select the tags you want to import by clicking the boxes next to the tag names. When you select a tag, the options
to the right of the tag become active.
• To re name a tag you are i mpor ting, select the tags you want to impor t by c licking the boxes ne xt to the tag names.
Click the button to the right of the tag under Import As New Keyword Tag Named, and type a name in the
textbox. Elements Organizer 11 adds a tag with the new name to your catalog and attaches the tag to the imported
media files.
• To map an imported tag to an existing tag in your catalog, select the tags you want to import. Click the button in
the right column under Use An Existing Keyword Tag and choose a tag from the pop-up menu. The tag name
you choose gets attached to the imported media files instead of the original tag name.
• Click Reset To Basic to clear your changes and return to the Import Attached Keyword Tags dialog box.
Note: If the media files you are importing have many tags attached, a dialog box appears. You can choose to import all
the tags or none of them. If you prefer to select individual tags to import, close the dialog box and undo the import by
choosing Edit > Undo Import Media. You can also undo the import by selecting the entire import batch and deleting it
from the catalog. Then, reimport the media files in smaller batches.
43
Importing media by searching
Import media by searching
You can quickly find photos and videos by searching. Import by searching helps you search for media in specific
locations on your computer. While searching for media files, you can specify search criteria such as exclude files smaller
than a specific file size for example, 100 kb.
Import by searching saves considerable time as you can skip system and program folders. You can then import folders
from your hard drive to Organizer.
1 Do one of the following:
• Click Import. Select By Searching.
• Select File > Get Photos And Videos > By Searching.
2 Select a search option from the Look In menu.
3 Select options to limit your search:
Exclude System And Program Folders Excludes folders from the search that are unlikely to contain your media files.
Exclude Files Smaller Than Includes files large enough to be full-resolution photos. Enter a minimum file size, in
kilobytes, in the KB textbox.
Note: By default, removable media (such as CDs and DVDs) and network drives are not searched.
4 Click Search. The search may take a while. Click Stop Search if you want to stop the search.
The search returns all folders that contain photos and video files.
5 From the search results, click a folder to select it. To select more than one folder, press Ctrl(Win)/Cmnd(Mac OS)
and click another folder name. You can preview the items in a folder by clicking the folder name in the list.
Last updated 9/22/2014
Page 48

Importing
6 (Optional) Select Automatically Fix Red Eyes to fix photos with red eye problems as they are imported into Elements
Organizer.
7 Click Import Folders. The photos appear in the Media view.
Note: If the photos you import have tags attached to them, the Import Attached Tags dialog box appears.
Using watched folders (Windows only)
Elements Organizer automatically detects media files being added to any of its watch folders. By default, the My
Pictures folder is watched, but you can add additional folders to the watch list of Elements Organizer.
You can choose to have media files that are added to a watch folder automatically added to a catalog. Or, you can opt
to be asked before new media files are added to a catalog. When asked, either click Yes to add the media files to your
catalog, or click No to leave them out. Whether or not media files are brought into Elements Organizer, they remain in
their folders unless you delete them.
Add folders to the watched folders list
1 Choose File > Watch Folders.
2 Click Add, and then browse to the folder.
3 Select the folder, and then click OK. The folder name appears in the Folders To Watch list.
To quickly add watch folders, in the My folders panel, right-click a folder and choose Add To Watched Folders.
44
Change Watch Folders settings
1 Choose File > Watch Folders.
2 Choose one of the following options:
• Watch Folders and their Sub-Folders for New Files: This checkbox has to be selected to activate the watching
folders feature.
• Notify Me: to choose whether files are added to your catalog.
• Automatically Add Files To Elements Organizer: to have the media files added to your catalog as soon as they
are detected.
Browse to files on your computer
1 In the Elements Organizer, choose File > Get Photos And Videos > From Files And Folders from the menu.
2 In the dialog box, navigate to the folder that contains the files you want to bring into the Elements Organizer. Use
the Look In menu and the other navigation controls along the top and left.
3 Hold the pointer over a file to display information about the photo, or select it to display a preview. On Mac OS, the
Finder is used to display a preview of the photo.
Note: Raw files are not displayed in preview on Windows Vista/Win 7.
Last updated 9/22/2014
Page 49

Importing
4 Do one of the following to select photos:
• To get a single media file, select it.
• To get multiple media files, Ctrl-click/Cmd-click to select the files you want. Or, click the first file, and then Shift-
click the last file in the list that you want.
• To get all the media files in a folder, navigate up one level from your current level in the Get Photos And Videos
From Files And Folders dialog box and select the desired folder. To get photos from subfolders within the folder,
select Get Photos From Subfolders.
You can import a PDF file, or a Photoshop Elements project as a PSE file. Text in imported PDF files becomes part
of the image (you can’t edit the text).
5 Set file-specific import options:
Automatically Fix Red Eyes Fixes red eye problems as the files are downloaded.
Automatically Suggest Photo Stacks Suggests photo stacks for you according to date and visual similarity.
6 Click Get Media. The media files appear in the Elements Organizer.
Add files from specific folders
1 In the Elements Organizer, from the Import > My Folders menu, select the folder location.
The folder hierarchy panel opens on the left side of the Media view.
45
2 In the folder hierarchy panel, browse to the folder containing the files you want to import.
3 Right-click/Control-click the folder, and select Import media.
The Getting media dialog box will report whether files were imported.
4 Click OK.
If files were imported, the folder’s icon changes from an Unmanaged Folder icon to a Managed Folder icon .
About preview files
When you import photos from removable drive/CD/DVD/Network, you can choose to download to your computer
full-resolution copies of the master photos (default) or low-resolution copies, called preview files. Preview files appear
in your catalog as space-saving copies of the high-resolution originals. When you perform an operation that requires
the original photo, you are asked to insert the disc containing the offline photo. You can then decide whether to use the
preview file or bring in a full-resolution copy of the photo.
If you cho ose to us e pre view fi les, you need to assi gn an O ffl ine Volume Name to the CD or DVD c ontaining the mast er
fi les. Ensure that you w rit e th e Of flin e Volu me Nam e on the CD or DVD. Th is h elps wh en E lem ents Or ganize r reque sts
the master disc (it provides the reference name for you), you can insert the correct disc.
Set the size for preview files
1 In Elements Organizer (Windows), select Edit > Preferences > Files. In Mac OS, select Adobe Elements Organizer
11 > Preferences > Files.
2 Under Offline Volumes, choose the pixel dimensions for the preview files. A 640 x 480 size is good in most cases.
Use a smaller size if you want to conserve space on your computer, or a larger size for better display quality.
Last updated 9/22/2014
Page 50

Importing
Get photos from a CD or DVD
You can copy photos from a CD or DVD onto your hard disk and into the Elements Organizer. You can make fullresolution copies, as you might for editing purposes, or, to save disk space, low-resolution offline copies called preview
files.
1 In the Elements Organizer, select File > Get Photos And Videos > From Files And Folders.
2 Navigate to your CD or DVD drive, and select the photos you want to copy.
3 (Optional) Select either of the following:
Copy files on import Makes a full-resolution copy of the file on your hard disk.
Generate previews Makes a low-resolution copy of the file on your hard disk, saving disk space.
4 (Optional) If you’re keeping a master photo offline, type in a volume name for the CD or DVD on which it resides,
and write this name on the disc itself. This will make it easy for you to find and download the master when
prompted.
5 (Optional) Select Automatically Fix Red Eyes if you would like Elements Organizer 11 to repair red eyes as soon as
the photos are brought into the Elements Organizer 11.
Note: This option is not enabled for offline files.
6 (Optional) Select Automatically Suggest Photo Stacks if you would like Elements Organizer to group visually similar
photos, letting you decide whether to place any such groups into stacks.
46
7 Click Get Media to bring your photos into the Elements Organizer.
If the photos contain keyword metadata, the Import Attached Tags dialog box appears.
Get photos from a video
You can capture frames from your digital videos if they are saved in a file format that Elements Organizer can open,
including ASF (Windows only), AVI, MPEG, MPG, M1V, and WMV (Windows only). Captured photos are saved with
the name of the video file plus a number (for example, videoclip01, videoclip02, and so forth).
Note: To create photos from the broadest range of video formats, install the latest version of standard video software, such
as QuickTime or Windows Media Player.
1 In the Editor, choose File > Import > Frame From Video.
2 In the Frame From Video dialog box, click Browse to navigate to the video from which you want to acquire still
frames, and then click Open.
3 To s t ar t the v id e o, cl i ck P l ay .
4 To get a frame of the video as a still image, click Grab Frame or press the spacebar when the frame is visible on the
screen. You can move forward and backward in the video to capture additional frames.
Note: Some video formats don’t support rewinding or fast-forwarding. In these cases, the Rewind and Fa st Forward
buttons are not available.
5 When you have all the frames you want, click Done.
6 Select File > Save to save each still file to a folder on your computer.
More Help topics
Import tags attached to media files
Last updated 9/22/2014
Page 51

Importing
Importing photos from Scanners (Windows only)
About scanning
Elements Organizer connects to your scanner so that you can get scanned images of your photos, negatives, and slides.
You can get images from scanners in two ways:
• Use the scanner driver plug-in module that came with your scanner. This software is either compatible with 32-bit
Elements Organizer on Windows or uses the TWAIN® interface to scan and open images directly in Elements
Organizer.
Note: The TWAIN manager is supported only on Windows.
Use the standalone scanning software that came with your scanner to scan and save your images. You can then bring
the images into Elements Organizer in the following ways:
• Click Import. Select From Scanner.
• Select File > Get Photos And Videos > From Scanner.
47
Get photos from scanners
Before you try to scan and open your photos in Elements Organizer, make sure that you’ve installed all the software that
came with your scanner. Carefully read any documentation that came with your scanner to make sure that it’s
connected properly to your computer.
1 Make sure that your scanner is connected and switched on.
2 In Elements Organizer, do one of the following:
• Click Import. Select From Scanner.
• Select File > Get Photos And Videos > From Scanner.
3 In the Get Photos From Scanner dialog box, choose the name of the scanner from the Scanner menu.
Note: If you get a None Detected message in the Scanner list, make sure that the scanner is on and properly connected
to your computer.
4 Click Browse to select a location for saving the photos.
5 Cho ose a fil e format fr om t he Sav e As me nu. JPE G, t he d efaul t format, is u sua lly the bes t ch oice. If you cho ose J PEG,
drag the Quality slider to to increase or decrease the quality of the scan. The higher the quality, the larger the file size.
Last updated 9/22/2014
Page 52

Importing
6 Click OK. If you’re using a scanner with a TWAIN driver, Elements Organizer launches the driver that came with
your scanner. Follow the instructions that came with the driver software to scan your photo. Typically, you can also
select an area to scan or correct any color issues that you may see.
Note: In Windows XP, Windows Vista, or Windows 7, Elements Organizer launches the Windows XP scanning interface
if you’re using a WIA (Windows Imaging Architecture) scanner. You can find instructions in Windows online Help. In
scanners that support TWAIN, a vendor-specific user interface is launched.
After the photo is scanned, a preview of the scan is displayed in the Getting Photos dialog box. Elements Organizer
assigns the import date to the photos.
Set scanner preferences
1 In Elements Organizer, choose Edit > Preferences > Scanner.
2 Choose the name of your scanner from the Scanner drop-down list in the Import area.
Note: Each time you connect to a different scanner, you need to select the device from the list. The connected scanner is
indicated to help you identify it.
3 Cho ose a fil e format fr om t he Sav e As me nu. JPE G, t he d efaul t format, is u sua lly the bes t ch oice. If you cho ose J PEG,
drag the Quality slider to the setting you want. The higher the quality, the larger the file size.
4 Select a default location to store your scanned photos, and then click OK.
48
At any point before clicking OK, you can click Restore Default Settings.
Scan photos using a TWAIN driver
TWAIN is a software driver used for acquiring images by certain scanners, digital cameras, and frame grabbers. For
your TWAIN device to work with Elements Organizer, the manufacturer must provide a source manager and TWAIN
data source.
Before using the scanner to bring images into Elements Organizer, install the TWAIN device and its software, and then
restart your computer. (Refer to documentation from your device manufacturer for installation information.)
❖ In Elements Organizer, click Import > From Scanner or select File > Get Photos and Videos > From Scanner.
After the image is scanned, it appears in Elements Organizer.
Note: After pressing the scanning button for the first time on some scanners, such as the Canon MP960, the
scanning progress bar will open behind Photoshop Elements. You can reduce the Photoshop Elements window to
bring the progress bar forward.
Importing media from iPhoto library (Mac OS only)
iPhoto is a software application for importing, organizing, editing, printing, and sharing digital photos in Mac OS.
Elements Organizer 11 supports importing photos from iPhoto '09 (versions 8.0 – 8.1.2) and iPhoto ’11 (versions 9.0 –
9.1.3). You cannot import photos from versions previous to iPhoto '09.
Last updated 9/22/2014
Page 53

Importing
Import photos from iPhoto ‘09
Elements Organizer supports importing photos, along with their associated captions, tags, and ratings, from iPhoto '09.
You also have the option to import information such as events and albums to maintain the organization of your library.
The albums imported are visible in the Albums folder and the events can be viewed in the Events view.
1 Do one of the following:
• Import > From iPhoto.
• Select File > Get Photos And Videos > From iPhoto.
Note: The iPhoto option is not displayed if iPhoto is not installed on your computer.
2 (Opt ion al) You c an c onv ert e vent s in i Phot o to indi vidu al alb ums in Ele ment s Org ani zer. In the Imp ort From iPho to
dialog box, select Convert Events From iPhoto Into Albums.
When you import an album and event with the same name, a single album is created and all associated photos are
added to the album.
3 (Optional) Select More options if you want to choose the events and albums for import. Select the events and albums
you want to import.
4 Click Import.
49
Import photos from iPhoto ‘11
1 Do one of the following:
• Import > From iPhoto.
• Select File > Get Photos And Videos > From iPhoto.
2 Click Import.
Change default location for imported photos
When you import photos from iphoto into Elements Organizer, a copy of each photo is placed in /Users/[Your User
Name]/Pictures/Adobe/Organizer/[Catalog Name].
To change this location:
1 Select Adobe Elements Organizer > Preferences > Files.
2 Click Browse.
3 Click Files.
4 Click Browse and change the location.
Last updated 9/22/2014
Page 54

Chapter 4: Catalogs, folders, and albums
Creating albums and album categories
About albums
Albums in Elements Organizer are like physical photo albums, where you can store and organize photos in groups of
your choice. For example, you can create an album called “Ten Best Vacation Photos” and add ten of your favorite
images.
You can drag the photos within an album to arrange them in any order you want. You can add a photo to more than
one album.
50
You can organize albums in groups. You can also create multiple levels of album categories. For example, you can have
an album category titled “My Asia Trip,” containing the album “Ten Best Japan Photos,” along with another album
called “Ten Best China Photos,” and so on, for each country in Asia you visited.
Instea d of manual ly sel ecting photos for in clud ing in an album, y ou can create Saved Searche s with criteri a for selecting
photos. Each Saved Search is an album that dynamically collects photos that match the criteria specified for the Saved
Search. For example, if the criterion for a Saved Search is to collect photos with the keyword tag ‘Chiara”, you can open
the Saved Search to view all photos with the keyword tag ‘Chiara”.
Creating albums and album categories
You can create, edit, and manage albums in the Albums panel in the left pane of Elements Organizer.
• Create, edit, rename, and delete albums.
• View albums and album categories. Scroll up and down the list of albums, as needed. Click the triangle beside an
album category to expand or collapse the albums under it.
• Organize albums within album categories.
• Display photos of an album.
Create an album or an album category
You can create an album consisting of your media or a group of new albums. For example, you can create an album
category called “Vacations” and create separate albums within it, one album for each set of vacation photographs.
Create an album
1 Click the button in the Albums panel or the dropdown widget next to the in the Albums panel to open
creation workflow in the right panel.
2 In the Name box, type a name for the album.
3 (Optional) From the Category drop-down list, select a category for the album.
Last updated 9/22/2014
Page 55

Catalogs, folders, and albums
Note: To change the furigana for the album name, type a new furigana in the Furigana box.
4 There are various ways in which you can add photos to the Media bin:
• Drag photos into the Media bin, and click OK.
• Alternatively, you can also add photos by selecting them in Media view and select Add to Media Bin option from
the task bar.
• Select media in the Media view, right-click and select Add Selected Media. You can also select Add All to add all
the media present in the media view to an album.
To delete any photo, select the photo and click the trash bin icon.
The album appears in the Albums panel under the album category you specified.
Create an album category
1 Click the arrow button next to in the Albums panel, and choose New Album Category.
2 In the Album CategoryName box, type a name for the album category.
Note: To change the furigana for the album category name, type a new furigana in the Furigana box.
3 (Optional) From the Parent Album Category menu, choose a category into which you’d like to nest your album
category.
4 Click OK.
The album category appears in the Albums panel under the album category you specified.
51
Create instant albums using folder names
You can automatically create an instant album with the same name as a folder on your hard disk. Creating instant
albums this way is useful when you’ve used descriptive folder names to organize the media files on your hard disk. It
also helps to quickly add your managed media files with those same folder names.
1 In the Media view, choose the folder from My Folders list in the Albums panel.
2 In the folder tree/managed folder on the left, select the folder containing the media files you want to tag. Thumbnails
of the managed media files in that folder appear in the Media grid.
3 Right-click the folder and select Create An Instant Album.
A new album is created in the Albums panel bearing the name of the folder.
4 (Optional) To customize the properties of the newly created album, right-click/control-click the album name, and
select Edit.
Add photos to an album
1 Click the All Media button in the top-left corner of the Media view to view the media available in Organizer.
2 Do one of the following:
• Drag the photos or videos from the Media view into the album in the Albums panel.
• Drag the album from the Albums panel to the photo in the Media view.
• You can also add people/places/events stacks to an album. Select the stack and drag to the album.
Last updated 9/22/2014
Page 56

Catalogs, folders, and albums
Note: You can also add photos to an album when copying and importing images to Elements Organizer. See Designate
an album during photo download.
Add photos to multiple albums
1 Click the All Media button in the top-left corner of the Media view to view the media available in Organizer.
2 Select one or more photos. The selected photos are outlined in blue.
3 Select one or more album names in the Albums panel. Shift-click to select adjacent items or Ctrl-click/Command-
click to select nonadjacent items.
4 Add the photos to the albums by doing one of the following:
• Drag the photos into any of the selected albums in the Albums panel.
• Drag the albums from the Albums panel onto any of the selected photos.
Display photos in an album
As the same photo can be in multiple albums, you can view only one album at a time.
❖ Click an album.
To see which albums a photo is in, hold the pointer over the album icon or the tag icon (when multiple keyword
tags are attached to the album) under the photo in the Media view.
52
Sort photos in an album
You can sort the photos within an album in chronological, reverse-chronological, or album order.
1 Select an album from the Albums and Folders panel.
2 From the Sort By drop down list in the Media view, select one of the following options:
• Newest: Orders the photos by date from the most recent to the oldest
• Oldest: Orders the photos by date from the oldest to the most recent
• Name: Orders the media alphabetically by name (A-Z)
• Import Batch: Orders the photos by the batches in which they were imported
• Album Order: Orders the photos by user's choice. You can manually drag and reorder the order photos.
Customize the order of photos in an album
Apart from the default sort order (Newest/Oldest/Import batch) provided by EO, you can also customize the order in
which you want your photos.
1 Select an album from the Albums panel.
2 From the Sort By drop down list in the Media view, select any of the following option to sort:
• Newest
• Oldest
• Name (alphabetically from A-Z)
• Import Batch
• Album Order
Last updated 9/22/2014
Page 57

Catalogs, folders, and albums
3 Select one or more photos, drag the selection between any two photos in the album. You can also drag the selection
before the first or after the last photo in the album.
Note: To reset the order of items, select Newest/Oldest/Import batch from the Sort By drop down list.
Designate an album during photo download
You can designate an album to which the media is downloaded to while using the Photo downloader or the Import >
From Camera or Card Reader option. Click
procedure to reach the Photo download option.
1 Make sure that the Photo Downloader is in the Advanced Dialog mode. If necessary, click Advanced Dialog.
2 In the Advanced Options section, select Import Into Album.
Get media files from a digital camera or card readerto read about the
53
3 Click Settings and do any of the following in the Select An Album dialog box:
• To import photos into a specific album, select the album in the dialog box.
• To import photos into a new album, click Create New Album and then type a name to overwrite the generic
“New Album” name in the dialog box.
4 Click OK.
Export or import an album structure
Album structures contain the album names and album categories created by you. You can save your current set of
albums and album category names, including their organization in the Albums panel and their icons. This structure
can be shared with other users.
You can share album structures with others by exporting or importing them. For example, you have a set of albums
representing different museums you’ve visited with friends. By saving and exporting your album set, your friends, who
have also visited those museums, can import that album structure (not the photos in it) and use it for their photos.
Alternately, you can import the album structure of one of your friends and apply it to your photos.
Last updated 9/22/2014
Page 58

Catalogs, folders, and albums
Export an album structure
You can share album structures with others by exporting yours.
Note: Exporting an album does not export the photos associated with the album.
1 In the Albums panel, click the arrow next to and choose Save Albums To File.
2 Choose one of the following and click OK:
Export All Albums Creates a file that contains your entire album hierarchy.
Export Specified Album Category Creates a file that contains the hierarchy of the album category you select from
the list.
54
3 In the Save Album to File dialog box that appears, choose a location and enter a name for the file. Then click Save.
The file is saved as an XML file.
Import an album structure
You can import an existing hierarchy of album categories into the Albums panel, where you can use it for your own
photos.
Note: Importing an album does not import the photos associated with the album.
1 In the Albums panel, click the down arrow next and choose Import Albums From File.
2 Select the exported XML file in the Import Albums From File dialog box containing the album and album category
names, and click Open.
3 Browse and select the XML file that contains the album structure that you want to import. Click Open.
More Help topics
Attach keyword tags to photos in an album
Create albums from keyword tags
Creating and editing saved searches
Last updated 9/22/2014
Page 59

Catalogs, folders, and albums
About Saved Searches
Saved Searches are albums that collect media matching specified criteria. After you create a Saved Search, any media
that matches the criteria of that Saved Search appears automatically in the Saved Search results. As you add new media
to the catalog, the media items matching the Saved Search criteria also appear automatically in the Saved Search results.
Saved Searches keep themselves up-to-date.
Create a Saved Search
1 Click the Search icon. Select Saved Searches from the drop-down list.
2 In the Saved Searches dialog box, click New Search Query.
55
3 Enter the search criteria in the New Search Query dialog box and click OK.
Specify the following details in the New Search Query dialog box.
• Name: Enter the name of the Saved Search.
• Search Criteria: Select the search criteria from the drop-down lists. Enter the value (if required) in the text box.
Last updated 9/22/2014
Page 60

Catalogs, folders, and albums
• Click + to add another search query.
• Click OK.
For example, you can search for all the files with filenames starting with Dsc.
Note: You can apply more than one criterion to your selection.
56
4 Click Options in the upper-right pane to view the Saved Search options.
Click Clear to clear the search results and return to the Media view.
You can save the current search results as a new Saved Search. Click Save Search Criteria as Saved Search.
Modify Search Criteria to modify the search criteria in order to achieve the intended search results.
Hide best match results and view the other search results.
Hide the results that do not match the Saved Search to focus on the search results in the Media view.
Edit a Saved Search and create a similar Saved Search
You can edit the search criteria of a Saved Search.
1 Click the search icon. Select Saved Searches from the drop-down list.
2 In the Saved Searches dialog box, select the search you want to modify and click Open.
The Saved Search is executed, and the results are displayed in the Media view.
3 Select Options from the upper-right bar. Click Search Modify Criteria.
Last updated 9/22/2014
Page 61

Catalogs, folders, and albums
4 Edit the search criteria or add more search criteria.
Check the Save this Search Criteria as Saved Search option. Enter the name of the search. A new Saved Search is
created.
57
Remove a Saved Search
1 In the Search bar, select Saved Searches.
2 In the Saved Searches dialog box, select the Saved Search you want to delete. Click the trash icon. Click OK.
More Help topics
Find items with star ratings attached
Create an album or an album category
Last updated 9/22/2014
Page 62

Catalogs, folders, and albums
Editing albums and album categories
Editing an album
1 Select an album from the Albums panel of the Organize workspace.
2 Right-click and choose Edit.
3 In the Edit Album panel, you can edit the following:
• Name: Edit the name of the album.
• Category: Select the category from the drop-down list. Delete media by selecting a photo or video and drag to
the trash bin. You can select multiple media and drop to the trash bin too.
• Content: Drag and drop media from the Media view to the Content area.
58
Renaming an album
You can rename an album quickly. Right-click on the album in the Albums panel and select Rename.
Rename the album by entering the new name in the Rename dialog box.
Remove photos from an album
1 In the Media view, select the photos you want to remove from an album.
2 Right-click/control-click the photo, and choose Remove from Album > Select Album name of the Album from
which the photo has to be deleted. (A photo can be present in more than one album.)
• If the album icon associated with the photo is visible, right-click/control-click the icon and choose Delete [album
name] Album to delete the album. The media associated with the album is not deleted.
Last updated 9/22/2014
Page 63

Catalogs, folders, and albums
Merge albums
You can merge multiple albums into a single album, the album created contains all the photos in the merged albums.
For example, if you create a “Cars” album, and then later inadvertently create an “Automobiles” album for the same
photos, you can merge both albums into one. When you merge albums, all photos are placed into one album and the
other albums are removed. Photos are placed in the order they appear in the Albums panel. You can rearrange the order
before or after you merge.
1 In the Albums panel, select the albums you want to merge. Click the album name to select an album, Shift-click to
select contiguous albums, or Control-click(Win)/Command-click(Mac OS) to select noncontiguous albums.
2 Right-click and select Merge Albums.
59
3 From the list, choose the album into which you want to merge the selected albums, and click OK.
Delete an album or album category
Deleting an album or album category removes the album, album category, and any albums in the category, but not the
photos in them. Note that you cannot delete an album category and an album in another category at the same time.
1 In the Albums panel, click the album name to select an album or album category. Shift-click to select multiple
albums or Ctrl-click to select multiple noncontiguous albums.
2 Right click and select Delete.
Note: The media associated with the album is not deleted.
Last updated 9/22/2014
Page 64

Catalogs, folders, and albums
Reorganize albums and album categories
By default, top-level albums are listed in alphabetical order followed by album categories in alphabetical order. You can
change their order, but you can’t place albums after album categories.
1 Choose Edit > Preferences > Keyword Tags And Albums (Windows), or Elements Organizer 11 > Preferences >
Keyword Tags and albums (Mac OS).
2 Under Enable Manual Sorting Option, select Manual for Album Categories and Albums, and then click OK.
3 In the Albums panel, select one or more albums and album categories.
4 Drag the items to their new location in the albums hierarchy.
When you move an album category, the items it contains move with it.
Note: You can’t move a lower-level album or album category to the top level by dragging. Instead, change its group to
Top level in the Edit Album or Edit Album Category dialog box.
Attach keyword tags to photos in an album
Like albums, keyword tags provide a way of organizing photos and other media files. Keyword tags as well as albums
can be associated with the same item. You can apply a keyword tag to a photo even when you are viewing that photo in
its album.
60
1 In the Albums panel, click the album name to display the photos in that album.
2 Cl i c k Tags / I n fo button i n th e Ta s k pan e .
3 Either select Edit > Select All to select all the items in the Media view or click on a particular media item.
4 Select and attach the keyword tags to the photos. From the Keyword Tags pane, right click and select Apply to
selected Media. You can also drag and drop a keyword on a media item to apply that keyword tag to that media.
Create albums from keyword tags
1 In the Keyword Tags tab, click the triangle next to Keyword Tags to expand the panel.
2 Click on arrow widget to the right most side of the tag. The Media view shows all the photos with that tag attached.
3 On the Import > Albums tab, click the triangle next to Albums to expand the panel.
4 Do one of the following:
• Drag the photos into one or more albums in the Album panel.
• Create a new album and drag the photos into it.
More Help topics
About albums
Add photos to an album
Creating albums and album categories
Last updated 9/22/2014
Page 65

Catalogs, folders, and albums
Troubleshooting catalog issues
Troubleshooting catalog conversion errors
Ensure that a previous version of Elements Organizer is not open on your computer.
(Windows) Close iTunes and make sure that EXE file of iTunes (iTunes and iTunesHelper) is not running in the Task
Manager. (Mac OS), Close iTunes and make sure that EXE file of iTunes (iTunes and iTunesHelper) is not running in
the Activity Monitor.
If any of the following processes from a previous version are running on your computer, close these processes and retry.
• Auto Analyzer
To disable Auto Analyzer, select Edit > Preferences > Media-Analysis. Disable the options for running the analyzer.
After the options are disabled, verify that the EXE file of Auto-Analyzer (ElementsAutoAnalyzer) is not running in
the Task Manager.
• People Recognition
Select Edit > Preferences > Media-Analysis. Disable Analyze Photos for People Automatically.
61
Repair a catalog
If your catalog gets damaged by a power failure or technical glitch, Elements Organizer displays a message saying that
there’s a problem with the catalog. Use the Repair command to fix it.
Note: (Mac OS) You cannot access catalogs present on a network drive.
1 Close Photoshop Elements.
2 Select File > Manage Catalogs.
3 In the Catalog Manager, select the catalog you want to repair.
4 Click Repair.
5 One of the following dialog boxes are displayed.
• If a dialog box reports No Errors Were Found In The Catalog, click OK or Repair Anyway.
• If a dialog box reports that the catalog doesn’t have errors, but the thumbnail cache does, click Delete Thumbnail
Cache. Photoshop Elements deletes and regenerates the cache.
• If a dialog box reports that errors were found, click OK or Cancel. If errors were found in the thumbnail cache,
Photoshop Elements deletes the cache and regenerates it.
• If a dialog box reports that the catalog is unrecoverable, consider loading a backup of the catalog.
Reconnect missing files in a catalog
If you move, rename, or delete a file outside Elements Organizer, a missing file icon is displayed when you try to
open or change it.
By default, Elements Organizer automatically tries to reconnect missing and renamed files as it encounters them. Files
with the same name, modification date, and size as the missing files are used to reconnect them to the catalog.
Last updated 9/22/2014
Page 66

Catalogs, folders, and albums
For operations such as to print, e-mail, edit, or export the file, missing files are reported only when you try to use them.
In such instances, the Reconnect Missing Files dialog box opens.
Note: The missing icon is also displayed for large files for which the thumbnail cannot be generated.
1 Do one of the following:
• To reconnect specific files, select one or more items with the missing file icon , and select File > Reconnect
> Missing File.
• To reconnect all missing items, select File > Reconnect > All Missing Files.
2 If you know the current location of the files, click Browse. Navigate to the location in your computer containing the
missing files.
If you do not know the location of the files, wait for Elements Organizer to complete searching your computer.
3 Select one or more missing files in the Reconnect Missing Files dialog box. Shift-click to select files in a series. Ctrl-
click/Cmd-click to select noncontiguous files.
Note: If a n ex ac t ma tch isn’t fo und , cli ck B row se. I n th e Rec onn ect M iss ing Fil es di alo g box , man ual ly f ind a nd re connec t
missing files.
4 Click Reconnect.
62
Disable automatic reconnect
1 In the Elements Organizer, choose Edit > Preferences > Files, or Adobe Elements Organizer 11 > Preferences > Files
(Mac OS).
2 Deselect Automatically Search For And Reconnect Missing Files.
3 Click OK.
Handle offline files
Offline files are items in a catalog present on an external disk/drive that is currently offline (not available). The Offline
icon
When you import files from an exte rnal driv e, the impor t dial og allows you t o copy fi les to your compute r after import.
If you deselect the Copy Files On Import option, and select Generate Previews option, low-resolution copies called
preview files are created.
When you perform some operations on offline items, you are asked to insert the disk/drive containing the offline file.
Note: For some operations such as Photo Mail, email attachments, and PDF slide shows, the option Use Previews For
Offline Items is displayed in the Find Offline Files dialog. Select this option to proceed with the operation using the low
resolution preview files.
When you perform an operation on an offline file, the Find Offline Drives dialog is displayed.
You can perform one of the following actions:
• Insert the disk/drive containing the items. Offline files get connected. For network drives, ensure that you are
appears on items that are offline (stored on disk/drive, not on the local hard drive).
connected to the network, and click Refresh. If all the items in the catalog that are marked offline are restored to
their online status, you can proceed with various file operations on them.
Last updated 9/22/2014
Page 67

Catalogs, folders, and albums
Note: If you have more than one disk/drive listed in the Find Offline Drives dialog, insert all the disks/drives for connecting
all the files.
• When your selection contains a mix of connected and offline files, and you want to ignore the offline files for now,
select Skip. The selected operation is performed on all the connected files. Offline files retain their offline status, and
they remain unchanged.
• If your selection contains items that have been moved/copied to another location, select Reconnect Files. Browse to
the current location of the files, and select the items. All the reconnected offline items are connected, and the
selected operation is performed on them.
• If you have copied/moved your items to a different drive, connect the drive to your computer, and select Reconnect
Drives. Select the drive from the dropdown menu. All offline items in the catalog located on the drive are restored
to their online status, and the selected operation is performed on the connected items.
Note: Ensure that all the offline files are present in the original folder structure on the drive.
Moving catalog containing offline files across operating systems
When you restore a catalog created on Windows to a Mac OS, offline items in the catalog are not connected
automatically even after you insert the drive. When you perform an action on such items, the Find Offline Drives dialog
appears. Select Reconnect Drives, and select the drive containing the items from the dropdown menu.
63
Similarly, perform the same operation when you are trying to restore a Mac OS catalog containing offline files on
Wi nd ow s.
Backup or restore catalogs
Backup catalogs to create free space on your computer by moving rarely used media files to a CD, DVD, another drive
on your computer, or a shared network.
If you are backing up to a CD or DVD, ensure that you have a CD or DVD drive with writable media connected to your
computer. For incremental back ups, ensure that you have the media that contains the last complete back up.
Tips and pointers for backing up catalogs
Before you proceed to back up a catalog, ensure that you have noted the following information.
• It’s best to back up to a CD, DVD, or external hard drive.
If you back up to a folder on your computer’s internal hard drive, Elements Organizer renames the files with
al phanu mer ic c ode s. T his renam ing preve nts mu ltipl e fil es w ith the sam e name in t he s ame bac kup folde r. How eve r,
Elements Organizer restores the names when you restore the files.
• Backup/restore using CD/DVD is not supported on Mac OS. Also, on Mac OS, you cannot access files on a shared
network.
• To burn selected photos onto a CD or DVD for playback on computers or multiple DVD players, see Publish a slide
show (Windows only).
• (Windows only) To use all the available space on CDs and DVDs, Elements Organizer lets you burn multiple
sessions on a disc. Choose Edit > Preferences > Files, and select the Enable Multisession Burning To CD/DVD.
• When you finish, it’s a good idea to label any removable media, such as a CD with the name and date of the backup
sessions. To label a disc, create a CD and DVD label by using Elements Organizer, or use a pen specially designed
for safely writing on discs
Last updated 9/22/2014
Page 68

Catalogs, folders, and albums
Back up a catalog
1 If you have multiple catalogs, open the catalog you want to back up.
2 Select File > Backup Catalog.
3 If a dialog box appears asking if you want to reconnect missing files, do one of the following:
• Click Reconnect to check for missing files. If you clicked Reconnect, and missing files are found, the Reconnect
Missing Files dialog box appears and prompts you to reconnect the missing files.
• Click Continue to proceed with backing up files. Elements Organizer automatically performs a recover
procedure.
Note: If you choose to continue with the backup despite disconnected items,restoring this backup set yields a catalog with
the items disconnected.
4 In step 1 of the Backup wizard, select one of the following options, and click Next:
Full Backup Creates a copy of the entire catalog and all the photo files, video files, audio clips, PDFs, projects, and
other related files. Choose this option at least the first time you back up your files.
Incremental Backup Creates a copy of the catalog, all new or modified media files, PDFs, projects, and other related
files since the last full or incremental backup.
64
5 In step 2 of the Backup wizard, set the following options, and then click Save Backup:
• From the Select Destination Drive list, select the CD, DVD, or hard drive to which you want to burn the items.
• Type a name for the backup session in the Name textbox, or accept the default name.
• If you select a CD or DVD drive, choose a speed for burning the items. The highest possible speed for your drive
an d CD /DVD m edi a is cho sen by def ault. If t hat spe ed d oes n’t work , tr y pro gress ive ly low er s pee ds u nti l you f ind
one that works.
• If you selec t a har d dr ive, Back up P ath spec if ies wher e the fi les are ba cke d up on a n int erna l har d dr ive o r ne twor k
hard drive. To change the location, click Browse, and select another location.
• If you’re making an incremental backup, Previous Backup File is used to determine what has changed since the
last backup, if any. To browse to another previous backup file, click Browse, and select another file.
6 After Elements Organizer calculates the size and estimated time needed for the backup, click Save Backup. If you
selected a CD or DVD drive, you are prompted to insert writable CDs or DVDs as needed.
7 If you’re making an incremental backup, locate or insert the media containing the last full backup, or incremental
backup, and follow the on-screen directions.
As each CD or DVD is burned, Elements Organizer lets you verify the disc. Although verifying is time-consuming,
ensure that the discs are created correctly.
Restore a catalog
When you restore a catalog that has been backed up, the contents of the backup catalog are recreated on your computer.
Among other uses, restoring from a catalog helps you retrieve lost files, or move files around computers.
For example, use the Backup command to copy everything onto a writable CD or DVD. Then use the Restore command
to place the files from the CD or DVD onto the other computer.
Last updated 9/22/2014
Page 69

Catalogs, folders, and albums
Note: Backup/Restore using CD/DVD is not supported on Mac OS.
1 Do one of the following:
• If you backed up to removable media, such as a CD or DVD, insert it into your computer.
• If you backed up to an external hard drive, make sure that it’s connected to your computer.
2 Select File > Restore Catalog.
3 In Restore From, specify where the files to restore are located:
• Select CD/DVD if your backup files are on either of these media. If necessary, use the Select Drive menu to
choose the drive with the CD or DVD.
Note: If you are restoring files from a CD or DVD with multisession backup files, use the Select Drive list to select your
most recent backup.
• Select Hard Drive/Other Volume if your backup files are on your hard disk or other removable media, such as a
flash drive. Click the Browse button to locate the backup file to restore.
4 Specify a location for the restored catalog and files:
• Select Original Location to restore your catalog, photos, video files, PDFs, projects, and audio clips to their
original locations.
• Select New Location to restore the catalog and images to a new drive or folder. Click Browse to select a location.
Select Restore Original Folder Structure to preserve the hierarchy of the folders and subfolders that contain your
catalog, photos, video files, PDFs, projects, and audio clips.
65
Note: If you selected Restore From CD/DVD, Elements Organizer prompts you if more than one disc is required to
restore a catalog. Follow the onscreen instructions, which differ depending on whether you’re restoring a single backup
set or a single backup set plus one or more incremental back ups.
5 Click Restore.
Restore a catalog from a previous Windows version on Mac OS
• Restore the catalog from the previous Windows version in the current Windows version of Elements Organizer. The
catalog is converted to a format compatible with the current version, and a conversion complete message is
displayed.
• In the current Windows version, back up the catalog that you restored.
• In Mac OS, restore the backup file (.tly) in Elements Organizer.
Creating and editing catalogs
About catalogs
A catalog is a file in which Elements Organizer maintains information about imported media. When you import media,
basic info such as file name and location are updated in the file. As you keep working on the file in Elements Organizer,
the file is further updated to reflect those changes.
When you move your media files along with the catalog to another computer or another version of Elements Organizer,
all that information is retained.
Last updated 9/22/2014
Page 70

Catalogs, folders, and albums
The catalog file contains the following information:
• The path and name of the media file.
• The path and filename of any associated audio file.
• The path, filename, and volume name of the original, full-resolution file (if the original file is stored offline on a CD
or DVD).
• The path and filename of the original, unedited file (if the file has been edited).
• The name of any camera or scanner associated with the batch of imported media files.
• Captions you’ve added to a media file.
• Notes you’ve added to a media file.
• The media type—that is, whether it’s a photo, video files, audio clip, or project.
• The date and time the media file was created and whether its date is completely or only partially known.
• Keyword tags that have been applied to the media file.
• Albums in which the media file is included.
• The media file’s history: whether it is printed on a local printer, exported, shared over e-mail or online, sent to online
photo-finishing services. The history also shows whether the media file was received from an online source, and
what batch it was imported in (including import date and time).
• Edits that have been applied to the media file (such as rotation, cropping, and fixing red eye).
• The pixel dimensions of any photos and video files.
66
• Project settings (project type, whether captions are displayed, showing page numbers, and so on).
• Metadata including pixel dimensions, EXIF, copyright, IPTC information, and file format information.
Create a catalog
When you import media into Photoshop Elements, they are added to a default catalog. If you choose to use this default
catalog file for all your media, you do not have to do anything else.
However, there are times when you want to create multiple catalogs. For example, you want to create separate catalogs
for photos of your workplace and photos of your family.
1 Select File > Manage Catalogs.
2 Do one of the following:
a To choose a preset location for the catalog, select Catalogs Accessible By All Users (Windows® only) or Catalogs
Accessible By The Current User.
b To select a custom location, choose Custom Location, and click Browse. Browse to the location on your computer
for the catalog file.
3 Click New.
4 Type a name for the catalog in the Enter A Name For The New Catalog dialog box.
5 Click OK.
Locating the catalog file
• Click Help > System Info.
The location of the catalog file currently open on your computer is listed under Current catalog >Catalog Location.
Last updated 9/22/2014
Page 71

Catalogs, folders, and albums
Open a catalog
1 Select File > Manage Catalogs.
2 Select the catalog from the list in the Catalog Manager dialog box.
3 Click Open.
Note: (Mac OS) You cannot access catalogs on a shared network.
67
Moving or modifying media files
Because Elements Organizer contains references to files, avoid moving or modifying them outside of the software. If
you move or alter the file outside of Elements Organizer, you are prompted to reconnect to the file.
Use the following suggestions to move or modify files associated with a catalog.
• Move the files in your catalog with the Move command (select a file and choose File > Move).
• Rename the files in your catalog with the Rename command (select the item and choose File > Rename).
• If you’ve deleted a file, remove its listing from the catalog, so that the item no longer appears in the Media view. Fix
this from the Reconnect Missing File dialog box or with the Edit > Delete From Catalog command.
• Edit the original file in its original application by using the Edit > Edit With [Original Application] command.
To set up this command, do the following:
• Select Edit > Preferences > Editing (Windows) or Adobe Elements Organizer 11 > Preferences > Editing (Mac
OS).
• Select Use A Supplementary Editing Application, click Browse, and locate and select the application.
• Click Open.
Using this command also allows you to change the filename and file type (for example, from BMP to JPEG) without
causing a missing file error. If necessary, update the thumbnails when you’re finished editing.
Use (convert) a catalog of a previous version
When you open Elements Organizer for the first time after installation, you are prompted to convert catalogs from
previous versions. When you click Yes, catalogs from the previous version are converted and renamed.
If you have not converted catalogs earlier, use the following procedure to convert catalogs from previous versions.
Last updated 9/22/2014
Page 72

Catalogs, folders, and albums
Note: Adobe recommends that you take a backup of your previous catalog using File > Backup Catalog.
1 In the latest version of Elements Organizer, select File > Manage Catalogs.
2 Click Convert.
3 Select the catalog from the list that is displayed.
4 Click Done.
Notes for users upgrading their catalogs to Photoshop Elements 11
Enhancements to the user interface and changes to supported file formats necessitate changes to the catalog conversion
process as well. The following table helps you upgrade your catalog smoothly to Photoshop Elements 11.
Item Post migration to Photoshop Elements 11
68
People tags You can locate photos with People tags in the People panel of the
Events tag Renamed to Events (Tags)
Places tag Renamed to Places (Tags)
Smart Albums You can locate Smart Albums under Saved Searches.
Unsupported file formats The following file formats are skipped during f ile conversion: Filmstrip
Unsupported album templates Default album template is used for the online album.
Media view, or in the People view. Generic icons are used for People
tags.
To view the People panel in the Media view, select View > Show People
in Tag Panel.
Photos in sub categories are moved to the Groups section of the
People view. In the People view, click the People > Group slider to view
them..
(FLM), Wireless BMP (WBM, WBMP), PCX, Targa (TGA, VDA, ICB, VST),
Photoshop RAW (RAW), PICT File, PCT, PICT), Scitex CT (SCT),
Photoshop EPS (EPS), EPS TIFF Preview (EPS), Generic EPS (AI3, AI4, AI5,
AI6, AI7, AI8, PS, EPS.AI, EPSF, EPSP
Rename a catalog
1 Close Photoshop Elements Editor and Adobe Premiere Elements.
2 In Elements Organizer, select File > Manage Catalogs.
3 In the Catalog Manager dialog box, select the name of a catalog from the list.
4 Click Rename. Then type the new name, and click OK.
Delete a catalog
You can delete a catalog only if there is more than one catalog associated with Elements Organizer. If you have one
catalog and want to delete it, create another catalog before you proceed to delete the current catalog.
1 Close Photoshop Elements Editor and Adobe Premiere Elements.
2 Select File > Manage Catalogs.
3 Ensure that more than one catalog is listed in the Catalog Manager dialog box. Create a new catalog, if necessary.
Create a catalog.
See
4 Open a catalog other than the one you want to remove. See Open a catalog.
Last updated 9/22/2014
Page 73

Catalogs, folders, and albums
5 In the Catalog Manager dialog box, highlight the catalog that you want to remove.
6 Click Remove. Then click Yes.
Optimize catalog size
Optimizing a catalog helps reduce its size. Consequently, the time taken to open and work with files in a catalog is
reduced.
1 Close Photoshop Elements Editor and Adobe Premiere Elements.
2 Select File > Manage Catalogs.
3 In the Catalog Manager, select the catalog you want to optimize.
4 Click Optimize.
More Help topics
Publish a slide show (Windows only)
Rename a file in the Elements Organizer
Move files in a catalog
69
Remove items from the catalog
Troubleshooting catalog issues
Tag your media
Tagging makes your media easier to manage and search-friendly. You can use keyword tags to identify photos and
videos with keywords and retrieve individual media files or albums. Additionally; people, place, or events tags let you
easily organize your media.
Work with keyword tags
About keyword tags
Keyword tags are personalized keywords, such as “Dad” or “Florida,” that you attach to photos, video files, audio clips,
PDFs, and projects in the Media view. Keyword tags enable you to easily organize and find the tagged files. When you
use keyword tags, there’s no need to manually organize your media files in subject-specific folders or rename files with
content-specific names. Instead, you can simply attach one or more keyword tags to each media file. Then, you can
retrieve the media files you want by selecting one or more keyword tags in the Keyword Tags panel. You can also find
media files with specific keyword tags when you type a keyword in the Search textbox.
For example, you can create a keyword tag called “Anna” and attach it to every media file featuring your sister, Anna.
Then, to instantly find all the media files of Anna that are stored on your computer, select the tag ‘Anna’ in the Keyword
Tags p a n e l.
You can create keyword tags using any keywords you want. When media files have multiple keyword tags, you can select
a combination of keyword tags to find a particular person at a particular place or event. For example, you can search
for all “Anna” keyword tags and all “Marie” keyword tags to find all pictures of Anna with daughter, Marie. Or search
for all “Anna” keyword tags and all “Cabo” keyword tags to find all the pictures of Anna vacationing in Cabo San Lucas.
Last updated 9/22/2014
Page 74

Catalogs, folders, and albums
Using the Keyword Tags panel
You create and work with keyword tags in the Keyword Tags panel of the Organize tab.
In the Keyword Tags panel, Elements Organizer includes the following default category: Travel. In addition, if you
import media files that already have tags attached, those tags appear under an Imported Keyword Tags category. You
can organize tags under these categories and create your own categories and subcategories.
You can perform the following tasks in the Keyword Tags panel:
• View all the keyword tags, tag categories, and tag subcategories. Click the triangle next to a category or subcategory
to expand or collapse the keyword tags under it.
• Create, edit, and delete keyword tags.
• Organize keyword tags within the categories and subcategories.
• Scroll up and down the list of keyword tags.
Create a keyword tag
You can create new keyword tags, under any category or subcategory, to organize media files you’ve recently added to
your catalog. New keyword tags have a question mark icon
.
70
1 Click the New button in the Keyword Tags panel and choose New Keyword Tag.
2 In the Cre ate Keyword Tag di alog box, use the Category menu to choose a category or subcategor y in which to place
the tag.
3 In the Name box, type a name for the keyword tag.
Note: To change the furigana for the tag name, type a new furigana in the Furigana box.
4 In the Note box, type any information you want to add about the tag. (For example, you could write that the tag
represents vacation photos.)
5 Click OK.
The keyword tag appears in the Keyword Tags panel under the category or subcategory you selected.
Note: The first time you attach a keyword tag to a media file, that media file becomes the icon for that keyword tag. To
change the icon, see
Change a keyword tag icon.
Last updated 9/22/2014
Page 75

Catalogs, folders, and albums
Attach keyword tags to media files
Once you have created a keyword tag, you can attach it to media files associated with the tag. You can attach multiple
keyword tags to a media file. The first time you attach a tag to a media file, that photo becomes the icon for that tag. If
you drag multiple media files to a keyword tag, the first media file you selected becomes the icon for that tag.
1 In the Media view, select the media files to which you want to attach the tag. (To select more than one photo, Ctrl-
click/Cmd-click the media files.)
2 To attach one media file to one tag, do one of the following:
• Drag the tag from the Keyword Tags panel onto the selected media files.
• Drag the media files onto the tag in the Keyword Tags panel.
3 To attach keyword tags to multiple media files, do one of the following:
• Drag the tag from the Keyword Tags panel onto one of the selected media files.
• Select one or more keyword tags, and then drag the tags onto one of the selected media files.
• Select one or more keyword tags, and then drag the photos onto one of the selected tags in the Keyword Tags
panel.
To apply a tag to all the media files in an album, click the album in the Albums panel. Select all the media files in
the Media view. Select the keyword tag from the Keyword Tags panel, and attach the tag to them.
71
About smart tags
Note: Smart tags are no longer available in Elements 13.
Smart tags enable you to easily find media files (photos and videos) by quality and content. Auto-Analyzer assigns
smart tags to media files automatically. Auto-Analyzer enables:
• Analyzing media files.
• Identifying photographs and scenes based on a quality such as shaky, dark, or bright.
You can find the best media files and eliminate the bad ones. You can use these tags for sorting the assets based on their
quality. To view the media files that have been auto analyzed, select the Smart Tags option in Elements Organizer
interface.
Note: You cannot create, edit, or delete smart tags. However, you can remove or apply smart tags from the individual clips.
The content analysis for Auto-Analyzer can be manual or automatic. In the manual mode, you can assign smart tags to
selected assets. In the automatic mode, a background process analyzes and assigns Smart tags to the assets.
Find media files by their keyword tags
1 In the Search bar, begin typing the name of the tag in the box, a list of tags that match the typed letters is populated.
For example, if you type D, all tags beginning with the letter D are displayed. You can select the required tag.
The application finds all media files that have any of those keyword tags attached. If you select a keyword tag
category or subcategory that itself has nested subcategories, the application displays all photos in the hierarchy. For
example, assume that you have a ‘Wedding’ subcategory that contains the keyword tags ‘Bride’ and ‘Groom’. If you
select the ‘Wedding’ subcategory, Elements Organizer displays all media files tagged ‘Bride’ or ‘Groom’.
2 You can also click on the tag to search for the media associated with that tag. After you click on the tag, the advanced
search menu is displayed. You can modify the searches and select other keyword tags to search for the associated
media.
Last updated 9/22/2014
Page 76

Catalogs, folders, and albums
Create and apply tags quickly
The Keyword Tags textbox in Elements Organizer interface enables creating and applying tags quickly. This textbox
displays a subset of the list of existing tags based on the letter you type. For example, if you type the letter S, the textbox
populates a list of tags beginning with the letter S. You can view a subset of this list. You can select an existing tag from
this list and apply it to the selected set of assets or create a tag and apply it.
Create tags quickly
1 Select a media file.
2 Type the name of the tag in the Image Tags field.
3 Click Add.
72
Apply tags quickly
1 Select the assets you want to tag, and do one of the following:
• Type the name of the tag in the Keyword Tags textbox.
• Type a letter, for example, A, to view a list of tags beginning with the letter A. Select the tag you want to use.
2 Click Add.
The tags are applied to the selected assets.
Create new keyword tag category or subcategory
1 In the Keyword Tags panel of the Organize tab, click the New button and choose either New Category or New
Sub-Category.
2 Do one of the following:
• To create new category, type its name in the Category Name box. Click Choose Color and specify the color you
want to appear on the keyword tags in that category. Then click to select an icon from the Category Icon list.
• To create new subcategory, type its name in the Sub-Category Name box. Then use the Parent Category Or Sub-
Category menu to choose a category in which to place the subcategory.
3 Click OK.
The new category or subcategory appears in the Keyword Tags panel.
Note: You can edit or delete a subcategory. However, its icon always appears as a plain tag; you cannot add a photo to it.
Editing keyword tags, categories, and subcategories
Last updated 9/22/2014
Page 77

Catalogs, folders, and albums
Change a keyword tag icon
By default, Photoshop Elements creates an icon for a keyword from the first photo to which you’ve attached the tag. You
can change this icon to one that better represents the tag.
1 Select the tag in the Keyword Tags panel.
Note: This feature is not available for tags generated through Face/People Recognition
2 Click the New button , and select Edit from the menu.
3 Click Edit Icon in the Edit Keyword Tag dialog box.
4 You can edit the following properties of an icon:
• Color: Click Choose Color and select a color to change the color of the icon.
• Name: Edit the name of the keyword category in Category Name.
• Category Icon: Select the icon from the options available in Category Icon. Slide horizontally to view the other
options for icons.
73
5 Click OK.
Edit a keyword tag category or subcategory
You can change the name of a category or subcategory, or the location of the category or subcategory.
1 Select the category or subcategory in the Keyword Tags panel. Click the New button , and select Edit from the
menu or right-click/ctrl-click a category and select Edit.
2 You can edit the following properties of an icon:
• Color: Click Choose Color and select a color to change the color of the icon.
• Name: Edit the name of the keyword category in Category Name.
• Category Icon: Select the icon from the options available in Category Icon. Slide horizontally to view the other
options for icons.
Last updated 9/22/2014
Page 78

Catalogs, folders, and albums
3 Click OK.
Reorganize keyword tags, categories, and subcategories by dragging
By default, keyword tags and subcategories are listed in alphabetical order. However, you can change their order by
dragging.
1 Choose Edit > Preferences > Keyword Tags and Albums (Windows), or Adobe Elements Organizer 11 > Preferences
> Keyword Tags and Albums (Mac OS).
2 In the Enable Manual Sorting Option area, select Manual for Categories, Sub-Categories, and Keyword Tags, and
then click OK.
3 In the Keyword Tags panel, select one or more keyword tags, categories, or subcategories.
4 Drag the selected items to a new location by doing one of the following:
74
• To reorder keyword tags within a category or subcategory, drag the tag until you see a gray line, and then release
the mouse button. The tag appears directly under the gray line.
• To move a tag to a new category, drag the tag over the category you want to move it to; when the category
becomes highlighted, release the mouse button.
• To reorder categories or subcategories, drag the category or subcategory until you see a gray line. When you
release the mouse button, the category or subcategory appears directly under the gray line. When you move a
category or subcategory, the keyword tags it contains move with it.
• To embed categories or subcategories into other categories, drag them to the category or subcategory you want,
and when the destination category or subcategory becomes highlighted, release the mouse button.
Note: If you make a mistake moving a category or subcategory, making it a subcategor y or sub-subcategory, select it and
click the New button and select Edit from the menu in the Keyword Tags panel. Then specify the correct location using
the Parent Category Or Sub-category menu.
Change a keyword tag to a subcategory or vice versa
❖ Do one of the following in the Organize tab:
• Right-click/control-click a keyword tag in the Keyword Tags panel, and choose Create new subcategory.
• Right-click/control-click a subcategory in the Keyword Tags panel, and choose Create new subcategory. The
subcategory cannot have any keyword tags or subcategories under it.
Delete a category or subcategory
1 Select one or more categories or subcategories in the Keyword Tags panel.
2 Right click and choose Delete, and then click OK to confirm the deletion.
Last updated 9/22/2014
Page 79

Catalogs, folders, and albums
Remove keyword tags from photos
❖ Depending on the view in the Media view, do one of the following:
• To remove a keyword tag from one photo in thumbnail view, right-click/control-click the media file and choose
Remove Keyword Tag > [tag name].
• To remove a keyword tag from one photo in larger views, right-click/control-click a category icon under the
media file and choose Remove Keyword Tag.
Depending on your view, you can hold the pointer over the category icon to display a list of keyword tags attached
to the media file.
• To remove a keyword tag from multiple media files in any view, Ctrl-click/Cmd-click to select the media files.
Then right-click/control-click one of the selected media files and choose Remove Keyword Tag from Selected
Items> [tag name].
• Another way to remove a keyword tag from a photo is select the photo in Media view. The keyword tags appear
in the Image Tags panel. Right-click on a tag and select Remove.
Write keyword tag information into your files
When you e-mail or export tagged JPEG, TIFF, or PSD files from Elements Organizer, tag information is automatically
included as an IPTC (International Press Telecommunications Council) keyword in these output files so that when the
recipient imports the media file and is prompted to import the associated tags, the tags are attached in their version of
Elements Organizer.
75
If you want to e-mail or share a media file without using the Elements Organizer e-mail or export features, you can
manually write the tag information into the IPTC Keyword section in the header of the file.
❖ In the Media view, select one or more files and choose File > Save Metadata to Files.
Note: It also writes the people/places/event tags in addition to the keyword tags to the file.
Import and export keyword tags
Importing and exporting keyword tags can help you share media files with others of similar interests. For example,
suppose that you have created a set of keyword tags for media files related to your hobby. If you save your tag set, your
friends with the same hobby can import those tags into their Keyword Tags panel and apply them to their own media
files. Alternately, you can import your friends’ keyword tags and apply them to your own media files. You and your
friends could then use keywords you have in common to search for media files related to the hobby you share.
Export keyword tags
You can save your current set of keyword tags, including the entire hierarchy of categories and subcategories in your
Keyword Tags panel and the tag icons, so that you can share it with someone else. The exported tags file is saved as an
XML (Extensible Markup Language) file.
Note: Exporting tags does not export the photos associated with the tags.
1 Click the New button i n th e K e yword Ta g s pan e l a nd cho o se S a v e Keyw o r d Ta g s To Fi l e .
2 Choose one of the following and click OK:
Export All Keyword Tags Creates a file that contains all of the keyword tags and tag hierarchy.
Export Specified Keyword Tags Creates a file that contains all keyword tags and the tag hierarchy of the category or
subcategory you select from the list.
3 In the Save Keyword Tags To File dialog box that appears, choose a location and enter a name for the file. Then click
Save.
Last updated 9/22/2014
Page 80

Catalogs, folders, and albums
Import keyword tags from file
You can import an existing set of keyword tags (saved as an XML file using Save Keyword Tags To File), including the
entire hierarchy of categories and subcategories and the icons.
Keywo rd tags can als o be imp ort ed by impor tin g im ages th at hav e ot her tag s in the m al rea dy. For exa mple, whe n me dia
files are e-mailed, exported, and edited, or tag information is added, keyword tags are attached.
Note: Importing keyword tags does not import the photos associated with the tags.
1 In the Keyword Tags panel, click the New button and choose Import Keyword Tags From File.
2 Select t he XML (Extensible Markup Language) file in the Import Keyword Tags From Fi le dialog box containing the
keyword tags, categories, and subcategories, and then click Open.
Set preferences for the Keyword Tags and Albums panel
1 In the Elements Organizer, cho ose Edit > Preferences > Key word Tags And Albums (Windows), or Adobe Elements
Organizer 11 > Preferences > Keyword Tags And Albums (Mac OS).
2 Specify how to order keyword tags, categories, subcategories, albums, and album categories: alphabetically or
manually. If you select Manual for a tag type, you can arrange that tag type in the Keyword Tags panel in the order
you want by dragging it.
3 Specify how to display keyword tags in Keyword Tag Display: by name only or with a small or large icon in addition
to the name. Click OK.
4 To view large icons for keyword tags: Click the symbol in the keyword tags panel and select Show Large Icon. The
preference in this flyout and in the Preferences dialog remains in sync.
76
Work with people, place, or event tags | Elements 12
You can define and use people, place, and event tags to easily manage your media. You can create these tags from the
corresponding view (for example, the Places view) or from right within the Media view (for example, click Tags/Info in
the taskbar and then click Places).
If you’re working with tags in the Media view, you can drag and drop a tag onto the relevant media for quick tagging.
Create people tags
You can organize people tags into groups. Colleagues, Family, and Friends are predefined groups that you can delete if
necessary.
1 Click Tags/Info from the taskbar.
2 Expand the menu and then click New Person or New Group.
3 Follow the on-screen instructions and organize your people tags.
Create place tags
1 Click Tags/Info from the taskbar.
2 Expand the menu and then click New Place.
3 In the Add New Place dialog, search for a place.
4 When prompted, confirm that you want to assign the new location.
5 Click Done. The new location is added to the Places hierarchy.
Last updated 9/22/2014
Page 81

Catalogs, folders, and albums
Note: Place tags in Elements 12 have GPS coordinates associated with them. These coordinates are also associated with any
media tagged with these place tags.
Edit a place tag
You can edit a place to assign different GPS coordinates to it. Follow these steps:
❖ Right-click the place in the Places hierarchy and select Edit This Place.
1 On the map that appears, drag the pin corresponding to the place to its new location.
2 When prompted, confirm that you want to assign the new location.
3 Click Done. The place appears with a new name in the Places hierarchy.
77
Rename a place tag
You can change the default names of places. For example, you can rename Lincoln Ave as Home. Follow these steps:
1 Right-click the place in the Places hierarchy and select Rename.
2 Enter a new name for the place.
3 Click OK.
To delete a place from the Places hierarchy, right-click it and select Delete. Confirm that you want to delete the place.
Assign GPS coordinates to a legacy place tag
Places imported from earlier versions of Elements into Elements 12 may not have GPS coordinates associated with
them. You can assign GPS coordinates to such places:
1 Right-click the place in the Places hierarchy and select Place On Map.
2 On the map that appears, drag the pin corresponding to the place to its new location.
3 When prompted, confirm that you want to assign the new location.
4 Click Done.
Create event tags
If necessary, you can organize event tags into groups. To create an event tag, follow these steps:
1 Click Tags/Info from the taskbar.
2 Expand the menu and then click New Event.
3 Enter the following event details:
• Event name
• Event start and end dates
Last updated 9/22/2014
Page 82

Catalogs, folders, and albums
• (Optional) Event group. If you haven’t defined any event groups yet, you’ll see None selected by default for this
option.
• (Optional) Event description
4 Drag and drop some media associated with the event to the media bin.
Note: The same media may be associated with more than one event.
5 Click Done.
Note: If you’re migrating a catalog from Elements 10 or an earlier version, any event categories in the catalog are imported
as event groups.
More Help topics
Find media files using the Search box
Quick Organize panel
Search based on visual uniqueness
Using the Find menu
78
Last updated 9/22/2014
Page 83

Chapter 5: Viewing and fixing photos
Tag your media
Tagging makes your media easier to manage and search-friendly. You can use keyword tags to identify photos and
videos with keywords and retrieve individual media files or albums. Additionally; people, place, or events tags let you
easily organize your media.
Work with keyword tags
About keyword tags
Keyword tags are personalized keywords, such as “Dad” or “Florida,” that you attach to photos, video files, audio clips,
PDFs, and projects in the Media view. Keyword tags enable you to easily organize and find the tagged files. When you
use keyword tags, there’s no need to manually organize your media files in subject-specific folders or rename files with
content-specific names. Instead, you can simply attach one or more keyword tags to each media file. Then, you can
retrieve the media files you want by selecting one or more keyword tags in the Keyword Tags panel. You can also find
media files with specific keyword tags when you type a keyword in the Search textbox.
79
For example, you can create a keyword tag called “Anna” and attach it to every media file featuring your sister, Anna.
Then, to instantly find all the media files of Anna that are stored on your computer, select the tag ‘Anna’ in the Keyword
Tags p a n e l.
You can create keyword tags using any keywords you want. When media files have multiple keyword tags, you can select
a combination of keyword tags to find a particular person at a particular place or event. For example, you can search
for all “Anna” keyword tags and all “Marie” keyword tags to find all pictures of Anna with daughter, Marie. Or search
for all “Anna” keyword tags and all “Cabo” keyword tags to find all the pictures of Anna vacationing in Cabo San Lucas.
Using the Keyword Tags panel
You create and work with keyword tags in the Keyword Tags panel of the Organize tab.
In the Keyword Tags panel, Elements Organizer includes the following default category: Travel. In addition, if you
import media files that already have tags attached, those tags appear under an Imported Keyword Tags category. You
can organize tags under these categories and create your own categories and subcategories.
You can perform the following tasks in the Keyword Tags panel:
• View all the keyword tags, tag categories, and tag subcategories. Click the triangle next to a category or subcategory
to expand or collapse the keyword tags under it.
• Create, edit, and delete keyword tags.
• Organize keyword tags within the categories and subcategories.
• Scroll up and down the list of keyword tags.
Last updated 9/22/2014
Page 84

Viewing and fixing photos
Create a keyword tag
You can create new keyword tags, under any category or subcategory, to organize media files you’ve recently added to
your catalog. New keyword tags have a question mark icon
1 Click the New button in the Keyword Tags panel and choose New Keyword Tag.
2 In the Cre ate Keyword Tag di alog box, use the Category menu to choose a category or subcategor y in which to place
the tag.
3 In the Name box, type a name for the keyword tag.
.
80
Note: To change the furigana for the tag name, type a new furigana in the Furigana box.
4 In the Note box, type any information you want to add about the tag. (For example, you could write that the tag
represents vacation photos.)
5 Click OK.
The keyword tag appears in the Keyword Tags panel under the category or subcategory you selected.
Note: The first time you attach a keyword tag to a media file, that media file becomes the icon for that keyword tag. To
change the icon, see
Change a keyword tag icon.
Attach keyword tags to media files
Once you have created a keyword tag, you can attach it to media files associated with the tag. You can attach multiple
keyword tags to a media file. The first time you attach a tag to a media file, that photo becomes the icon for that tag. If
you drag multiple media files to a keyword tag, the first media file you selected becomes the icon for that tag.
1 In the Media view, select the media files to which you want to attach the tag. (To select more than one photo, Ctrl-
click/Cmd-click the media files.)
2 To attach one media file to one tag, do one of the following:
• Drag the tag from the Keyword Tags panel onto the selected media files.
• Drag the media files onto the tag in the Keyword Tags panel.
3 To attach keyword tags to multiple media files, do one of the following:
• Drag the tag from the Keyword Tags panel onto one of the selected media files.
• Select one or more keyword tags, and then drag the tags onto one of the selected media files.
• Select one or more keyword tags, and then drag the photos onto one of the selected tags in the Keyword Tags
panel.
Last updated 9/22/2014
Page 85

Viewing and fixing photos
To apply a tag to all the media files in an album, click the album in the Albums panel. Select all the media files in
the Media view. Select the keyword tag from the Keyword Tags panel, and attach the tag to them.
About smart tags
Note: Smart tags are no longer available in Elements 13.
Smart tags enable you to easily find media files (photos and videos) by quality and content. Auto-Analyzer assigns
smart tags to media files automatically. Auto-Analyzer enables:
• Analyzing media files.
• Identifying photographs and scenes based on a quality such as shaky, dark, or bright.
You can find the best media files and eliminate the bad ones. You can use these tags for sorting the assets based on their
quality. To view the media files that have been auto analyzed, select the Smart Tags option in Elements Organizer
interface.
Note: You cannot create, edit, or delete smart tags. However, you can remove or apply smart tags from the individual clips.
The content analysis for Auto-Analyzer can be manual or automatic. In the manual mode, you can assign smart tags to
selected assets. In the automatic mode, a background process analyzes and assigns Smart tags to the assets.
Find media files by their keyword tags
1 In the Search bar, begin typing the name of the tag in the box, a list of tags that match the typed letters is populated.
For example, if you type D, all tags beginning with the letter D are displayed. You can select the required tag.
The application finds all media files that have any of those keyword tags attached. If you select a keyword tag
category or subcategory that itself has nested subcategories, the application displays all photos in the hierarchy. For
example, assume that you have a ‘Wedding’ subcategory that contains the keyword tags ‘Bride’ and ‘Groom’. If you
select the ‘Wedding’ subcategory, Elements Organizer displays all media files tagged ‘Bride’ or ‘Groom’.
81
2 You can also click on the tag to search for the media associated with that tag. After you click on the tag, the advanced
search menu is displayed. You can modify the searches and select other keyword tags to search for the associated
media.
Create and apply tags quickly
The Keyword Tags textbox in Elements Organizer interface enables creating and applying tags quickly. This textbox
displays a subset of the list of existing tags based on the letter you type. For example, if you type the letter S, the textbox
populates a list of tags beginning with the letter S. You can view a subset of this list. You can select an existing tag from
this list and apply it to the selected set of assets or create a tag and apply it.
Last updated 9/22/2014
Page 86

Viewing and fixing photos
Create tags quickly
1 Select a media file.
2 Type the name of the tag in the Image Tags field.
3 Click Add.
Apply tags quickly
1 Select the assets you want to tag, and do one of the following:
• Type the name of the tag in the Keyword Tags textbox.
• Type a letter, for example, A, to view a list of tags beginning with the letter A. Select the tag you want to use.
2 Click Add.
The tags are applied to the selected assets.
Create new keyword tag category or subcategory
1 In the Keyword Tags panel of the Organize tab, click the New button and choose either New Category or New
Sub-Category.
2 Do one of the following:
• To create new category, type its name in the Category Name box. Click Choose Color and specify the color you
want to appear on the keyword tags in that category. Then click to select an icon from the Category Icon list.
82
• To create new subcategory, type its name in the Sub-Category Name box. Then use the Parent Category Or Sub-
Category menu to choose a category in which to place the subcategory.
3 Click OK.
The new category or subcategory appears in the Keyword Tags panel.
Note: You can edit or delete a subcategory. However, its icon always appears as a plain tag; you cannot add a photo to it.
Editing keyword tags, categories, and subcategories
Change a keyword tag icon
By default, Photoshop Elements creates an icon for a keyword from the first photo to which you’ve attached the tag. You
can change this icon to one that better represents the tag.
1 Select the tag in the Keyword Tags panel.
Note: This feature is not available for tags generated through Face/People Recognition
2 Click the New button , and select Edit from the menu.
3 Click Edit Icon in the Edit Keyword Tag dialog box.
4 You can edit the following properties of an icon:
• Color: Click Choose Color and select a color to change the color of the icon.
• Name: Edit the name of the keyword category in Category Name.
• Category Icon: Select the icon from the options available in Category Icon. Slide horizontally to view the other
options for icons.
Last updated 9/22/2014
Page 87

Viewing and fixing photos
5 Click OK.
Edit a keyword tag category or subcategory
You can change the name of a category or subcategory, or the location of the category or subcategory.
1 Select the category or subcategory in the Keyword Tags panel. Click the New button , and select Edit from the
menu or right-click/ctrl-click a category and select Edit.
2 You can edit the following properties of an icon:
• Color: Click Choose Color and select a color to change the color of the icon.
83
• Name: Edit the name of the keyword category in Category Name.
• Category Icon: Select the icon from the options available in Category Icon. Slide horizontally to view the other
options for icons.
3 Click OK.
Reorganize keyword tags, categories, and subcategories by dragging
By default, keyword tags and subcategories are listed in alphabetical order. However, you can change their order by
dragging.
1 Choose Edit > Preferences > Keyword Tags and Albums (Windows), or Adobe Elements Organizer 11 > Preferences
> Keyword Tags and Albums (Mac OS).
2 In the Enable Manual Sorting Option area, select Manual for Categories, Sub-Categories, and Keyword Tags, and
then click OK.
3 In the Keyword Tags panel, select one or more keyword tags, categories, or subcategories.
4 Drag the selected items to a new location by doing one of the following:
• To reorder keyword tags within a category or subcategory, drag the tag until you see a gray line, and then release
the mouse button. The tag appears directly under the gray line.
Last updated 9/22/2014
Page 88

Viewing and fixing photos
• To move a tag to a new category, drag the tag over the category you want to move it to; when the category
becomes highlighted, release the mouse button.
• To reorder categories or subcategories, drag the category or subcategory until you see a gray line. When you
release the mouse button, the category or subcategory appears directly under the gray line. When you move a
category or subcategory, the keyword tags it contains move with it.
• To embed categories or subcategories into other categories, drag them to the category or subcategory you want,
and when the destination category or subcategory becomes highlighted, release the mouse button.
Note: If you make a mistake moving a category or subcategory, making it a subcategor y or sub-subcategory, select it and
click the New button and select Edit from the menu in the Keyword Tags panel. Then specify the correct location using
the Parent Category Or Sub-category menu.
Change a keyword tag to a subcategory or vice versa
❖ Do one of the following in the Organize tab:
• Right-click/control-click a keyword tag in the Keyword Tags panel, and choose Create new subcategory.
• Right-click/control-click a subcategory in the Keyword Tags panel, and choose Create new subcategory. The
subcategory cannot have any keyword tags or subcategories under it.
Delete a category or subcategory
1 Select one or more categories or subcategories in the Keyword Tags panel.
2 Right click and choose Delete, and then click OK to confirm the deletion.
84
Remove keyword tags from photos
❖ Depending on the view in the Media view, do one of the following:
• To remove a keyword tag from one photo in thumbnail view, right-click/control-click the media file and choose
Remove Keyword Tag > [tag name].
• To remove a keyword tag from one photo in larger views, right-click/control-click a category icon under the
media file and choose Remove Keyword Tag.
Depending on your view, you can hold the pointer over the category icon to display a list of keyword tags attached
to the media file.
• To remove a keyword tag from multiple media files in any view, Ctrl-click/Cmd-click to select the media files.
Then right-click/control-click one of the selected media files and choose Remove Keyword Tag from Selected
Items> [tag name].
• Another way to remove a keyword tag from a photo is select the photo in Media view. The keyword tags appear
in the Image Tags panel. Right-click on a tag and select Remove.
Write keyword tag information into your files
When you e-mail or export tagged JPEG, TIFF, or PSD files from Elements Organizer, tag information is automatically
included as an IPTC (International Press Telecommunications Council) keyword in these output files so that when the
recipient imports the media file and is prompted to import the associated tags, the tags are attached in their version of
Elements Organizer.
If you want to e-mail or share a media file without using the Elements Organizer e-mail or export features, you can
manually write the tag information into the IPTC Keyword section in the header of the file.
❖ In the Media view, select one or more files and choose File > Save Metadata to Files.
Last updated 9/22/2014
Page 89

Viewing and fixing photos
Note: It also writes the people/places/event tags in addition to the keyword tags to the file.
Import and export keyword tags
Importing and exporting keyword tags can help you share media files with others of similar interests. For example,
suppose that you have created a set of keyword tags for media files related to your hobby. If you save your tag set, your
friends with the same hobby can import those tags into their Keyword Tags panel and apply them to their own media
files. Alternately, you can import your friends’ keyword tags and apply them to your own media files. You and your
friends could then use keywords you have in common to search for media files related to the hobby you share.
Export keyword tags
You can save your current set of keyword tags, including the entire hierarchy of categories and subcategories in your
Keyword Tags panel and the tag icons, so that you can share it with someone else. The exported tags file is saved as an
XML (Extensible Markup Language) file.
Note: Exporting tags does not export the photos associated with the tags.
1 Click the New button i n th e K e yword Ta g s pan e l a nd cho o se S a v e Keyw o r d Ta g s To Fi l e .
2 Choose one of the following and click OK:
Export All Keyword Tags Creates a file that contains all of the keyword tags and tag hierarchy.
85
Export Specified Keyword Tags Creates a file that contains all keyword tags and the tag hierarchy of the category or
subcategory you select from the list.
3 In the Save Keyword Tags To File dialog box that appears, choose a location and enter a name for the file. Then click
Save.
Import keyword tags from file
You can import an existing set of keyword tags (saved as an XML file using Save Keyword Tags To File), including the
entire hierarchy of categories and subcategories and the icons.
Keywo rd tags can als o be imp ort ed by impor tin g im ages th at hav e ot her tag s in the m al rea dy. For exa mple, whe n me dia
files are e-mailed, exported, and edited, or tag information is added, keyword tags are attached.
Note: Importing keyword tags does not import the photos associated with the tags.
1 In the Keyword Tags panel, click the New button and choose Import Keyword Tags From File.
2 Select t he XML (Extensible Markup Language) file in the Import Keyword Tags From Fi le dialog box containing the
keyword tags, categories, and subcategories, and then click Open.
Set preferences for the Keyword Tags and Albums panel
1 In the Elements Organizer, cho ose Edit > Preferences > Key word Tags And Albums (Windows), or Adobe Elements
Organizer 11 > Preferences > Keyword Tags And Albums (Mac OS).
2 Specify how to order keyword tags, categories, subcategories, albums, and album categories: alphabetically or
manually. If you select Manual for a tag type, you can arrange that tag type in the Keyword Tags panel in the order
you want by dragging it.
3 Specify how to display keyword tags in Keyword Tag Display: by name only or with a small or large icon in addition
to the name. Click OK.
4 To view large icons for keyword tags: Click the symbol in the keyword tags panel and select Show Large Icon. The
preference in this flyout and in the Preferences dialog remains in sync.
Last updated 9/22/2014
Page 90

Viewing and fixing photos
Work with people, place, or event tags | Elements 12
You can define and use people, place, and event tags to easily manage your media. You can create these tags from the
corresponding view (for example, the Places view) or from right within the Media view (for example, click Tags/Info in
the taskbar and then click Places).
If you’re working with tags in the Media view, you can drag and drop a tag onto the relevant media for quick tagging.
Create people tags
You can organize people tags into groups. Colleagues, Family, and Friends are predefined groups that you can delete if
necessary.
1 Click Tags/Info from the taskbar.
2 Expand the menu and then click New Person or New Group.
3 Follow the on-screen instructions and organize your people tags.
Create place tags
1 Click Tags/Info from the taskbar.
2 Expand the menu and then click New Place.
3 In the Add New Place dialog, search for a place.
4 When prompted, confirm that you want to assign the new location.
86
5 Click Done. The new location is added to the Places hierarchy.
Note: Place tags in Elements 12 have GPS coordinates associated with them. These coordinates are also associated with any
media tagged with these place tags.
Edit a place tag
You can edit a place to assign different GPS coordinates to it. Follow these steps:
❖ Right-click the place in the Places hierarchy and select Edit This Place.
1 On the map that appears, drag the pin corresponding to the place to its new location.
2 When prompted, confirm that you want to assign the new location.
3 Click Done. The place appears with a new name in the Places hierarchy.
Rename a place tag
You can change the default names of places. For example, you can rename Lincoln Ave as Home. Follow these steps:
1 Right-click the place in the Places hierarchy and select Rename.
2 Enter a new name for the place.
Last updated 9/22/2014
Page 91

Viewing and fixing photos
3 Click OK.
To delete a place from the Places hierarchy, right-click it and select Delete. Confirm that you want to delete the place.
Assign GPS coordinates to a legacy place tag
Places imported from earlier versions of Elements into Elements 12 may not have GPS coordinates associated with
them. You can assign GPS coordinates to such places:
1 Right-click the place in the Places hierarchy and select Place On Map.
2 On the map that appears, drag the pin corresponding to the place to its new location.
3 When prompted, confirm that you want to assign the new location.
4 Click Done.
Create event tags
If necessary, you can organize event tags into groups. To create an event tag, follow these steps:
1 Click Tags/Info from the taskbar.
2 Expand the menu and then click New Event.
3 Enter the following event details:
87
• Event name
• Event start and end dates
• (Optional) Event group. If you haven’t defined any event groups yet, you’ll see None selected by default for this
option.
• (Optional) Event description
4 Drag and drop some media associated with the event to the media bin.
Note: The same media may be associated with more than one event.
5 Click Done.
Note: If you’re migrating a catalog from Elements 10 or an earlier version, any event categories in the catalog are imported
as event groups.
More Help topics
Find media files using the Search box
Quick Organize panel
Search based on visual uniqueness
Using the Find menu
View video and full-screen images
Last updated 9/22/2014
Page 92

Viewing and fixing photos
View video files
In the Media view, the first frame of a video clip appears as the clip’s thumbnail. The filmstrip icon identifies a video
clip in the Media view.
1 Double-click the video clip in the Media view.
Note: To view QuickTime movies in Elements Organizer, you must have the QuickTime player installed on your
computer. If it is not already installed, download and run the QuickTime installer from
www.apple.com/quicktime/download.
2 When the Elements Organizer Media Player appears, click the Play button to start the video. To view it frame-by-
frame, drag the position slider. If you have a long video clip, it could jump over a few frames.
A Start and End buttons B Play button C Elapsed time D Drag the position slider through the video clip E Vol um e cont rol F Add Keyword
tags
3 Click the Close button to close the Elements Organizer Media Player.
The file formats that can be played in the Elements Organizer depend on the applications installed, as follows:Only
Photoshop Elements is installedIn this case, only file formats (video and audio) that can be played using non-
royalty based filters play in Elements Organizer. If a particular file format gets any other supported filter (for
example, QuickTime) on the system, then it plays in Elements Organizer as well. On Mac OS, the videos are played
using the codecs installed with Photoshop Elements. If the codecs are not available in the applications, QuickTime
codecs are used.Only Adobe Premiere Elements is installedIn this case, all file formats (video and audio) play in
Elements Organizer.Both Photoshop Elements and Adobe Premiere Elements are installedIn this case, all file
formats (video and audio) play in Elements Organizer.
88
Viewing media files in full screen or side by side
The Full Screen and Compare Photos Side By Side views enable viewing media files without the distraction of interface
items, such as windows and menus. You can use mouse scroll to zoom/pan media.
The View, Edit, Organize In Full Screen option displays a set of media files as a full-screen slide show. You can customize
the slide show, for example you can:
• Play an audio file as you view the images.
• Display thumbnails of the selected files in a filmstrip along the right side of the screen.
• Add effects to the media files
After deciding on the photos you want in your slide show, you can make the necessary edits to them. You can send them
directly from this view to the Slide Show Editor. To create a slide show, right-click and select the option Create >
Slideshow.
Last updated 9/22/2014
Page 93

Viewing and fixing photos
89
To view a media file in Full Screen view, do one of the following:
• Select the media file you want to view, and click the View, Edit, Organize In Full Screen Preview icon .
• Press F11/Cmd+F11.
The Compare Photos Side By Side command displays two photos simultaneously. Compare Photos Side By Side view
is useful when you want to focus on details and differences between photos. You can select two or more photos to
compare.
To Compare photos, do one of the following:
• In the upper right of the Organizer, select Display > Compare Photos Side By Side (This option is not available in
all locales.)
• Select two photos and Press F12/Cmd+F12.
In Compare Photos Side By Side view, the currently selected photo has a blue border. When you click the Next Media
button
, the selected photo changes. The next photo in the selection is displayed. If you have enabled the filmstrip
option, click any image in the filmstrip to view it in place of the selected image (the one with the blue border).
While you are in Full Screen view or Compare Photos Side By Side view, you can view the following:
Last updated 9/22/2014
Page 94

Viewing and fixing photos
Quick Edit panel
Enables you to edit the displayed media file.
Quick Organize panel
Enables you to create and apply tags to media files. It also enables adding media files to existing albums.
Control bar
Displays all the navigation icons and control icons that enable you to access the required panels and dialogs.
You can switch back and forth between views by clicking the Organize In Full Screen button or the Compare Photos
Side By Side button.
90
Last updated 9/22/2014
Page 95

Viewing and fixing photos
Quick Edit panel
While in Organize In Full Screen view or Compare Photos Side By Side view, you can edit the displayed photo using
the Quick Edit panel. The Quick Edit panel is displayed on the left side of the screen and is minimized by default. The
Quick Edit panel is also minimized when you don’t move your mouse for a couple of seconds. To maximize, move the
mouse over the panel or click the Toggle Quick Edit panel in the Full Screen preview bar. Click the Auto Hide button
to make the Quick Edit panel visible all the time.
The following table describes some of the icons in the Quick Edit panel and their functionality:
Icon Functionality
91
Smart Fix, Improves issues in images caused due to poor exposure, contrast,
Color, Improves color in the photo with Auto Color
Level, Improves tonal range of the photo with Auto Levels
Contrast, Improves contrast with Auto Contrast
Sharpen, Sharpens photos
Red Eye Removes red eye
Edit Photos, Launches Photoshop Elements Editor
Edit Videos, Launches Adobe Premiere Elements
Mark for Print, Marks the media file for printing
color balance, and color saturation
Note: Select a star to set a rating to the displayed photo. If the photo has a rating you want to clear, click the golden star
farthest to the right.
Quick Organize panel
Qu ick Org anize p anel in Ful l Sc ree n vi ew o r Co mpare Photo s Si de By Si de v iew fac ili tates cre ating and add ing key word
tags to the displayed media file. The Quick Organize panel is displayed on the left side of the screen and is minimized
by default. The Quick Organize panel is also minimized when you don’t move your mouse for a couple of seconds. To
maximize, move the mouse over the panel or click the Toggle Quick Organize panel in the Full Screen preview bar.
The Quick Organize panel has the following sub panels:
Albums panel
Displays a list of existing albums. Albums associated with the displayed media file are highlighted.
Keyword tags
Displays a list of keyword tags in the Tag Cloud view. Tags associated with the media file are highlighted.
The Quick Organize panel enables you to perform the following tasks:
• Add the displayed media file to an existing album. For example, to add the displayed media file to the album
“Disneyland” click Disneyland in the Albums sub panel.
• Create keyword tags and apply the tags to the displayed media file.
Last updated 9/22/2014
Page 96

Viewing and fixing photos
To create and apply a new tag to the displayed media file:
1 In the Key word Tags sub panel, type the name of the tag in the Tag Media textbox. For example, if you want to create
a keyword tag named Holiday, type Holiday in the textbox.
2 Click Add.
The created tag is applied to the displayed media.
To apply an existing tag to the displayed media file, click the tag name in the Keyword Tags sub panel. The tag is
highlighted.
Control bar
The Control bar contains icons for navigating through the media files, playing a media file, and so on. The control bar
disapp ears f rom view w hen you d on’t move your mouse for a couple of sec onds . (To make it reappear, move the mouse.)
The Control bar consists of the following icons:
92
Film Strip icon
Enables you to toggle between viewing and hiding images in a film strip. Click to display all the images in a strip of
thumbnails on the right side of the screen. Click again to hide the images.
Instant Fix panel
Enables you to toggle between viewing and hiding the Instant Fix panel. Click to view the Instant Fix panel on the left
side of the screen. Click again to hide the Instant Fix panel.
Quick Organize panel
Enables you to toggle between viewing and hiding the Quick Organize panel. Click to view the Quick Organize panel
on the left side of the screen. Click again to hide the Quick Organize panel.
Previous
Displays the previous media file.
Next
Displays the next media file.
Play
Plays the media file.
Open Settings Dialog
Last updated 9/22/2014
Page 97

Viewing and fixing photos
Displays the Full Screen View Options dialog box.
Tr an si ti on s
Displays the Select Transition dialog box.
Tog g le Pr o p er ti es p an el
Enables you to toggle between viewing and hiding the Properties panel.
View, Edit, Organize In Full Screen
Enables you to switch to Full Screen view from Compare Photos Side by Side view.
Compare Photos Side By Side
Enables you to switch to Compare Photos Side by Side view.
93
Sync Panning And Zooming In Side By Side View
Synchronizes panning and zooming when photos are displayed in the Compare Photos Side by Side view. For example,
if you click this icon, and use the mouse to zoom in, then both the images are simultaneously zoomed in.
Full-screen display options
Options in the Full Screen View Options dialog box
Click the Settings icon on the Control bar.
Background Music Specifies which audio file to play during a slide show. To choose a different file, click Browse, and
locate and select the file you want.
Play Audio Captions Specifies that audio captions of the selected files play during the slide show.
Page Duration Specifies how long each image displays on-screen before the next image appears or fades in.
Include Captions Displays captions at the bottom of the screen.
Allow Photos To Resize Resizes photos to fit the screen.
Allow Videos To Resize Resizes videos to fit the screen.
Show Filmstrip Displays all the selected images in a strip of thumbnails on the right side of the screen. To choose which
image is displayed in full screen, click a thumbnail.
Repeat Slide Show Plays the slide show over and over until you stop it.
Last updated 9/22/2014
Page 98

Viewing and fixing photos
Properties panel options
The properties panel displays the properties associated with a media file. Click the Toggle Properties Panel icon to
view the properties panel. It consists of the following options:
General Displays the general properties of a media file such as, filename, rating, caption, and notes.
Metadata Displays the metadata associated with the file. Click Complete to view the complete details, or click Brief to
view a limited set of metadata associated with the file.
Keywords Displays the keywords associated with the media file.
History Displays the history of the file such as, the modified date, and imported date.
Applying transitions to media files
1 Click the Theme icon in the Control bar.
2 Select one of the following options and click OK. You can move the mouse over the thumbnails to preview the
transitions.
• Classic
• Fade In/Out
• Pan And Zoom
94
• 3D Pixelate
The selected transition is applied to the displayed media file. You can view the effect.
Note: Pan and Zoom transition and 3D Pixelate transitions support only photos. For videos, they are supported only in
the first frame.
About Transitions and OpenGL
What is Open Graphics Library (OpenGL)? A cross-platform software library that computer programs can use to
communicate with your display driver.
For Pan And Zoom and 3D-Pixelate transitions, your computer should have OpenGL Version 1.2 or higher. OpenGL
version depends on the display card drivers installed on your system. If you see a warning that your system does not
support OpenGL, ensure that you have the most recent driver for your display card installed. Display card
manufacturers update many of their drivers frequently to keep up with new operating system and program features.
Before you update the drivers, determine the version of the current display driver.
Determine the version of the display driver in Windows XP
1 Right-click the desktop, and choose Properties.
2 Select Settings, and Advanced.
3 Depending on your graphics display card, different tabs display. Choose Adapter > Properties for the card data that
includes the amount of memory on the card. Choose Driver for the driver details, including the driver version.
Determine the version of the display driver in Windows Vista
1 Right-click your desktop, and choose Personalize.
2 Select Display Settings > Advanced Settings. The Adapter tab displays your card data, which includes the amount of
memory on the card.
3 Choose Properties > Driver to get the driver version.
Last updated 9/22/2014
Page 99

Viewing and fixing photos
Check the display card manufacturer's website for a more recent driver. Driver updates provide installation instructions
with the download, or the instructions are downloaded with the driver.
Determine the version of the display driver in Windows 7
1 In the Start menu, right-click Computer, and select Manage.
2 In the panel that opens, select Device Manager in the left panel.
3 Expand the Display Adapters list for information on display drivers.
4 (Optional) Right-click a display adapter, and select Properties for more information.
More Help topics
About slideshows
Fixing photos in Elements Organizer
Using the tools in the Instant Fix button in the task pane of the Elements Organizer, you can quickly correct the most
common problems in photographs. Customizable versions of some of these tools are also available in the Editor, but
the simple versions here are designed to make corrections quickly and easily.
95
To launch the Instant Fix options:
• Click Instant Fix.
• Click any of the options in the PhotoFix options pane to fix the photos.
Crop photos
You can trim photos using the Crop tool.
1 Click Instant Fix, and in the Media view, select a single photo.
2 In the Photo Fix Options tab, click Crop .
The Crop Photo window displays the photo and enables you to do the following:
• Move the crop selection over the photo are where you want to crop the photo in the Crop Photo dialog box.
• Click Preview to view the crop selection. Click Done if the crop is as intended. Click Reset if you want to return
to the previous Crop Photo dialog box.
• You can specify the aspect ratio in the dialog box. Select the aspect ratio from the Ratio dropdown list. Select
Custom Ratio to enter the height and width of the crop.
Last updated 9/22/2014
Page 100

Viewing and fixing photos
96
• Double-click the selection to crop the image.
The cropped image version is formed in the grid in Media view.
Improve contrast with Contrast
Contrast auto analyzes photos and corrects common contrast problems, such as the lack of distinction between bright
and dark areas.
1 Click Instant Fix.
2 Select one or more photos in the Media view. (Ctrl-click/Cmd-click photos to select more than one.)
3 On the Photo Fix Options tab, click Contrast.
Contrast creates copies of the selected photos, adjusts the contrast in the copies, and saves the copies in the version
sets of the photos on which they are based.
Remove red eye with Red Eye Fix
Red Eye auto finds red pupils in photo subjects and changes them to a natural black.
1 Click Instant Fix.
2 In the Media view, select one or more photos in which a subject or subjects have red pupils. (Ctrl-click/Cmd-click
photos to select more than one.)
3 On the Photo Fix Options tab, click Red Eye.
Auto Red Eye Fix creates copies of the selected photos, changes red pupils to black in the copies, and saves the copies
in the version sets of the photos on which they are based.
Last updated 9/22/2014
 Loading...