

Page 1
ADOBE ECHOSIGN FOR NETSUITE V3
ESIGNATURES AND WEB CONTRACTING SERVICE
Copyright ©2013 Adobe Systems Incorporated. All rights reserved.
Last Updated March 22, 2013
Page 2

Adobe EchoSign for NetSuite Customization Guide
Table of Contents
OVERVIEW 3
BUNDLE OVERVIEW 3
B
ENEFITS 3
V
ERSION 3 RELEASE NOTES 3
INSTALLING AND CONFIGURING THE BUNDLE 4
PREREQUISITES 4
I
NSTALLATION STEPS 4
U
PDATING THE BUNDLE - FOR EXISTING USERS 7
C
ONFIGURATION STEPS 8
C
USTOM PREFERENCES 8
A
UTOMATIC STATUS UPDATES 10
USING ADOBE ECHOSIGN FOR NETSUITE 11
CREATING AND EDITING AN ADOBE ECHOSIGN AGREEMENT 11
S
ENDING AGREEMENTS FOR SIGNATURE 13
T
RACKING STATUS AND SENDING REMINDERS 14
USING THE BUNDLE 16
ROLES AND PERMISSIONS 16
ADVANCED CUSTOMIZATION 19
USING ECHOSIGN WITH OTHER RECORDS 19
T
RANSACTION RECORDS 19
E
NTITY RECORDS 19
C
ONFIGURE ECHOSIGN AGREEMENTS FOR ADDITIONAL RECORD TYPES 20
U
NINSTALLING THE BUNDLE 20
TROUBLESHOOTING 21
DOCUMENT STATUS NOT UPDATING 21
F
ILE MIME TYPE ERROR 21
H
OW TO VIEW SCRIPT LOGS 21
SUPPORT 21
Copyright ©2013 Adobe Systems Incorporated. All rights reserved.
2
Page 3

Adobe EchoSign for NetSuite Customization Guide
OVERVIEW
BUNDLE OVERVIEW
Adobe EchoSign for NetSuite is the only eSignature system with complete integration to NetSuite delivering complete web contracting automation in NetSuite for eSignatures and fax signatures. Send
contracts directly from NetSuite, view contract history, and save signed contracts with the associated
NetSuite records - customers, estimates, and more.
Send documents, agreements, quotes and other files for electronic signature or fax signature. Create an
EchoSign agreement associated with a customer, a lead, an estimate or other NetSuite object, attach
files, specify recipients, and send for signature. Adobe EchoSign will update NetSuite with the current
status of the agreement and will store the signed contract in NetSuite once it is fully executed.
BENEFITS
Send documents for electronic and fax signatures, gain real time visibility into every agreement sent out
for signature from within NetSuite. Accelerate sales by reducing the time to get contracts signed. Get
rid of paper-based contracting workflows.
VERSION 3 RELEASE NOTES
You can find the release notes to the Adobe EchoSign for NetSuite v3 release here.
Copyright ©2013 Adobe Systems Incorporated. All rights reserved.
3
Page 4
Adobe EchoSign for NetSuite Customization Guide
INSTALLING AND CONFIGURING THE BUNDLE
PREREQUISITES
Only Administrators can install this bundle.
INSTALLATION STEPS
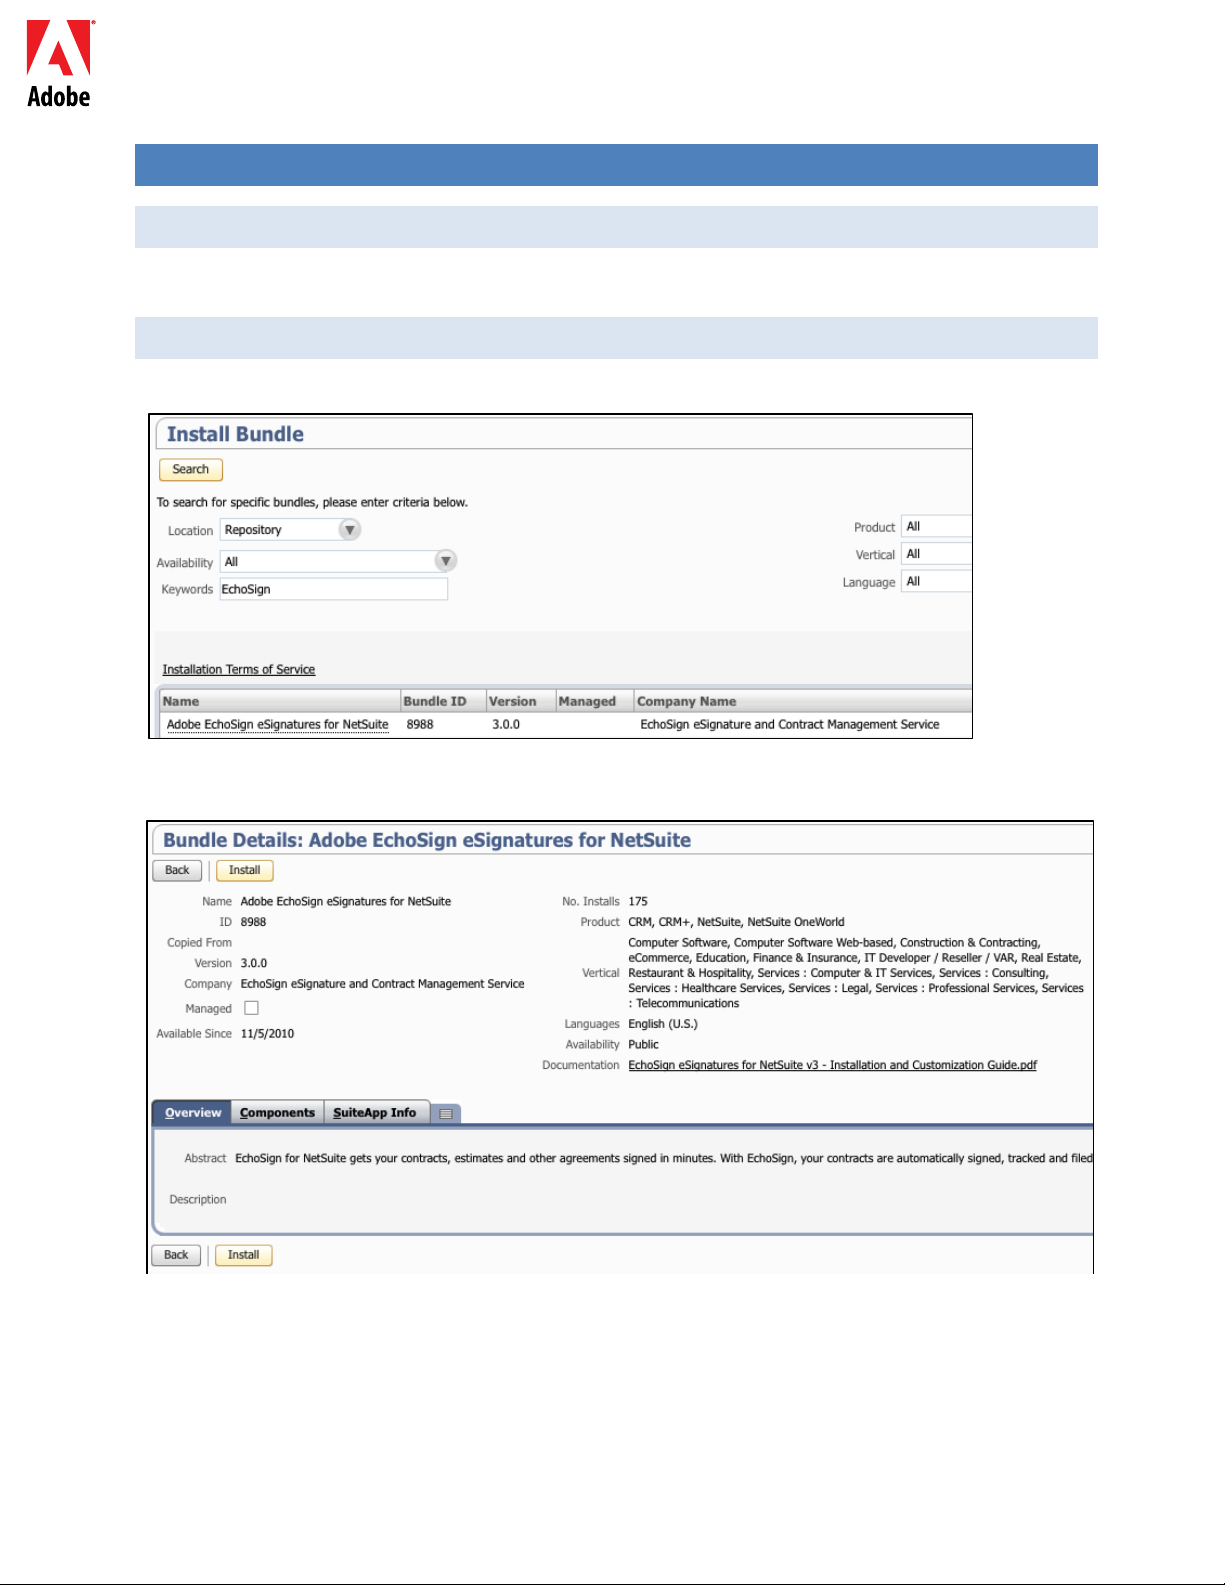
Go to Setup / Customization / Install Bundle. Under Keywords, search for ‘EchoSign’.
1.
Select the
2.
bundle ‘ Adobe EchoSign eSignatures for NetSuite’, and click ‘Install’.
ext, you will see the bundle components listed. Click ‘Install Bundle’. There is no need to change any
N
of the default values on the page.
Copyright ©2013 Adobe Systems Incorporated. All rights reserved.
4
Page 5
Adobe EchoSign for NetSuite Customization Guide
After the bundle installation is complete, ‘Adobe EchoSign eSignatures for NetSuite’’ will appear on the
Installed Bundles
page.
If you are already an Adobe EchoSign customer, continue to Step 4. If you do not have an Adobe
3.
EchoSign account, you can sign
up for a FREE 14-day trial by clicking the link below:
https://netsuiteintegration.echosign.com/public/upgrade?type=enterprise_trial&cs=ns_bundle
Follow the online registration steps until your Adobe EchoSign account is enabled.
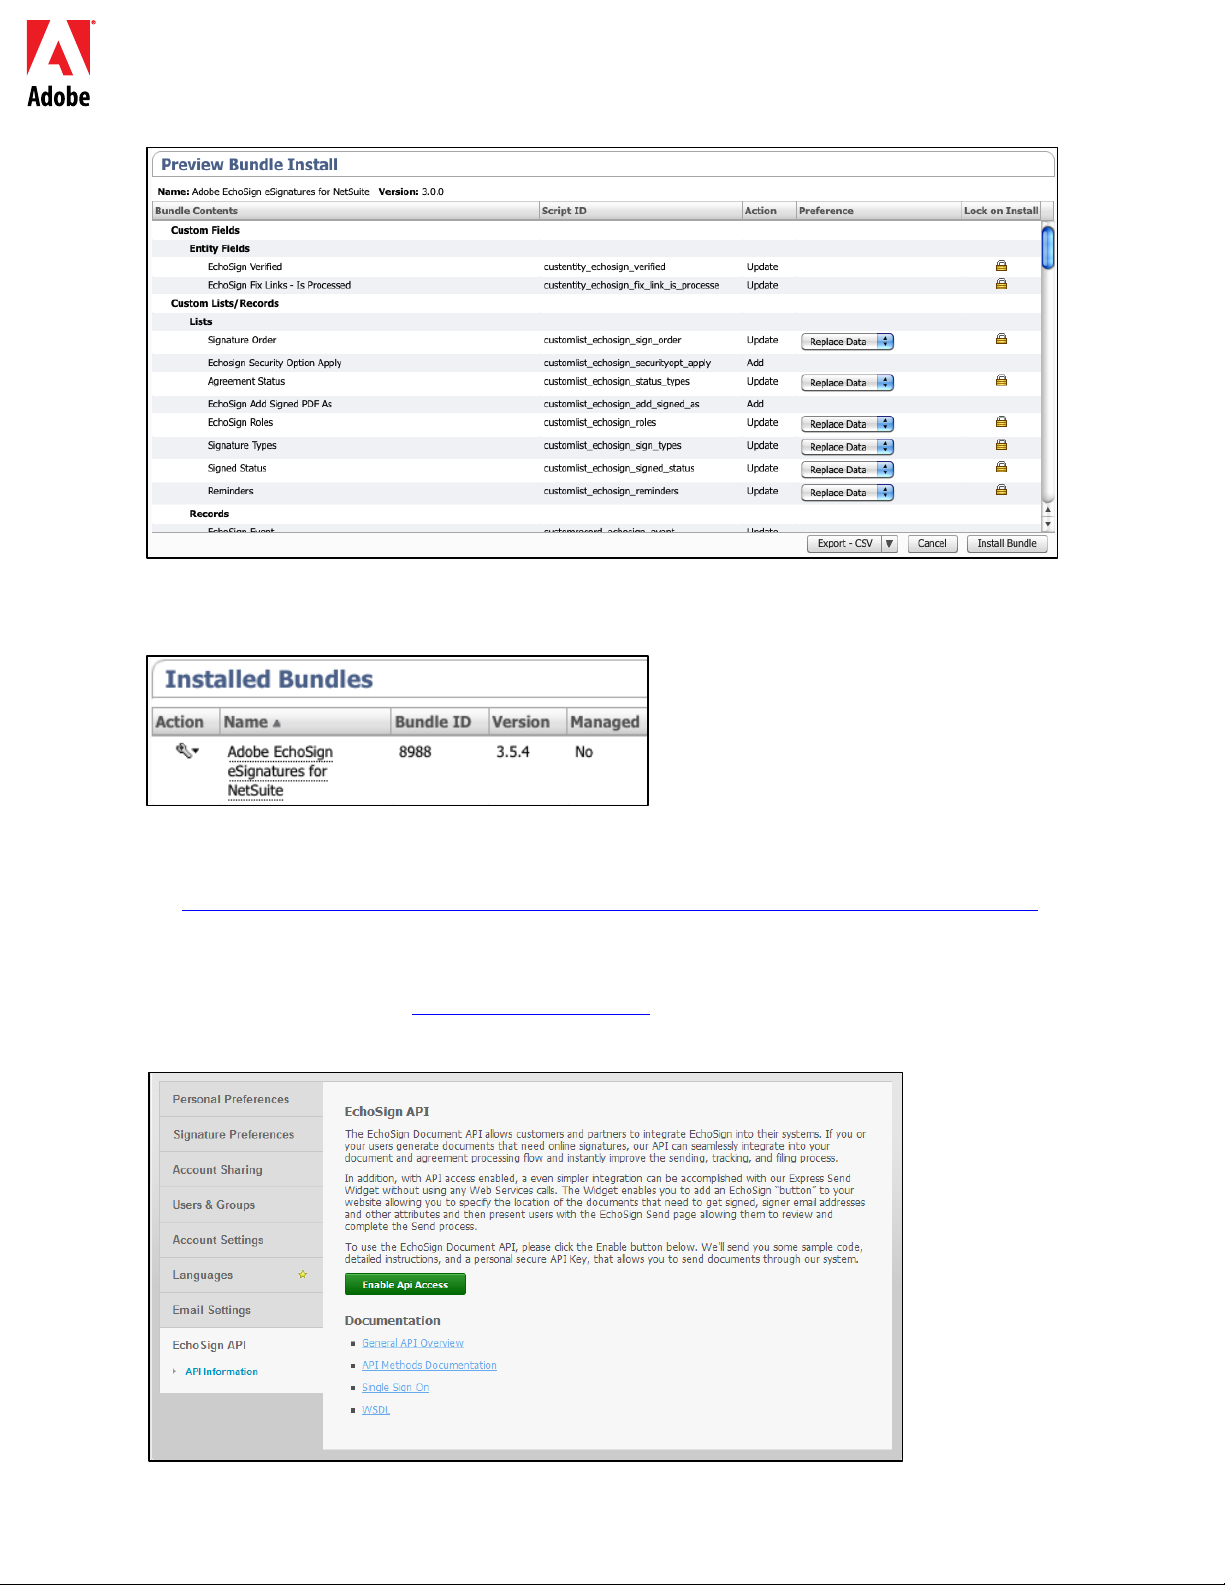
4. Sign into your account at http://www.echosign.com
and click on your ‘Account’ tab. Then select
‘EchoSign API’ on the lower left side. Click ‘Enable API Access’ and get your API key from the page.
Copyright ©2013 Adobe Systems Incorporated. All rights reserved.
5
Page 6

Adobe EchoSign for NetSuite Customization Guide
Configure your Adobe EchoSign bundle to use your account’s API key. In NetSuite, go to Setup
5.
/ Company /
General Preferences
At the bottom of the page, select the ‘Custom Preferences’ tab and copy your API key into the field
6.
labeled ‘Enter EchoSign API key for your account’. Click ‘Save’ after entering the API key.
Copyright ©2013 Adobe Systems Incorporated. All rights reserved.
6
Page 7
Adobe EchoSign for NetSuite Customization Guide
UPDATING THE BUNDLE - FOR EXISTING USERS
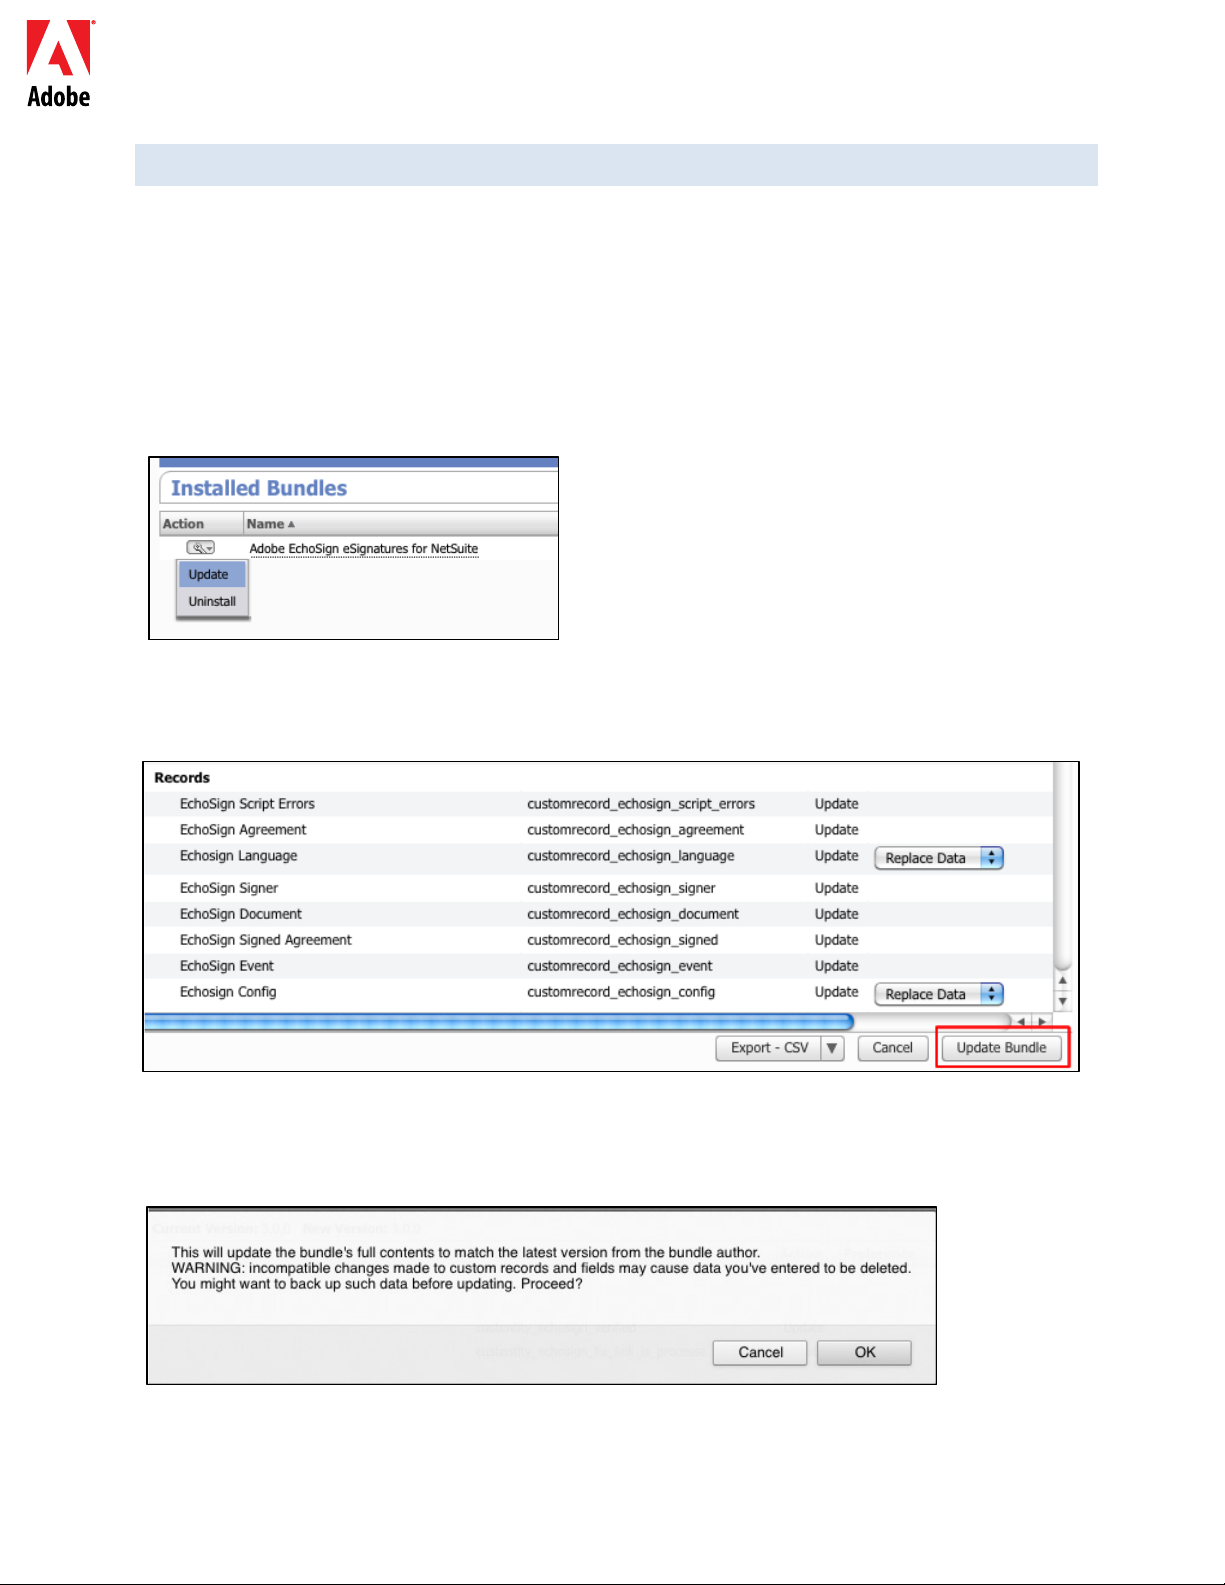
Adobe EchoSign may update the bundle from time to time. You can update to the latest version of the
bundle by going to Installed Bundles page and click on ‘Update’ in the Action column.
1. For existing users of Adobe EchoSign for NetSuite, you can easily update your bundle to the latest
version by going to
Setup / Customization / Install Bundle / List.
2. If there is a new update, you will see an exclamation point icon next to the Version number of the
current bundle you have.
3. Click on ‘Update’ in the ‘Action’ dropdown menu next to the name ‘Adobe EchoSign eSignatures for
NetSuite’.
4. Click on the ‘Update Bundle’ button without changing any of the default values displayed on the
page.
You may get the following warning when updating the bundle. If you have not made any
customization of the EchoSign records, you should be fine to proceed. If you are unsure, it would be
best to install the bundle on a Sandbox account to test it first before updating the bundle in a
production account.
After the bundle update is complete, ‘Adobe EchoSign eSignatures for NetSuite’ will appear on the
Installed Bundles
Copyright ©2013 Adobe Systems Incorporated. All rights reserved.
page.
7
Page 8

Adobe EchoSign for NetSuite Customization Guide
CONFIGURATION STEPS
CUSTOM PREFERENCES
To configure custom preferences for your Adobe EchoSign bundle, go to Setup / Company /
General
Preferences.
• Use Parent Record Contact as Signer (NEW!):
default the parent record contact as the first signer. The sender can easily remove or edit the default
signer or add additional signers to the agreement before sending. You can also turn off this functionality
by unchecking this box.
When generating an agreement, Adobe EchoSign will
• Use Trans. Contact as Signer if present (NEW!): This preference is valid only if the preference
‘Use Parent Record Contact as Signer’ is also checked. If this box is checked then when
generating an agreement from a Transaction (e.g. Quote), Adobe EchoSign will default the
primary Transaction contact as the first signer. If there is no primary transaction contact or if
sending from NetSuite object record (e.g. Customer record), the default recipient will be the
customer email. The sender can easily remove or edit the default signer or add additional
signers to the agreement before sending.
• Allow Marking Recipients as Approvers (NEW!): You can mark any of your recipients as an
approver.
to sign it. They can be required to enter data into fields.
Recipients marked as approvers review and approve the document but they are not required
• Preferred Agreement Folder Id: You can set the folder where the final signed agreements will
be stored. If you don’t set a value for this field, then the final signed agreements will be saved in
the same folder as the original document file by default.
Copyright ©2013 Adobe Systems Incorporated. All rights reserved.
8
Page 9

Adobe EchoSign for NetSuite Customization Guide
• Auto Attach Transaction PDF: Select this option if you want to automatically attach the
Transaction PDF to an agreement when creating a new agreement from a Transaction record.
• Add Signed PDF as Attachment or Link (NEW!): You have the option to automatically add the
Signed PDF as a link to the file or have it stored in NetSuite as an attachment on the Agreement
record.
• Include Audit Trail PDF with Agreement (NEW!): You have the option to automatically attach
the audit trail PDF to the Agreement record after any agreement is signed.
• Identity Verification for Signers (NEW!): You can enable or disable any of the 3 identity
verification methods for signers. By enabling the identity verification method(s), they will
appear on the EchoSign Agreement page for senders to select from when sending out an
agreement for signature. If selected by the sender, the identity verification method can be
applied to all signers or you can set them to only apply to signers outside of your EchoSign
account or only to signers internal to your account.
Verify Signer Identity - Ensure that before signers can view or sign the document, they have to
verify access to their email account AND verify their identity.
o Enable Password Required to Sign - Require signers to enter a one-time password you
specify.
o Enable Knowledge Based Authentication - Require signers to provide their name, address
and optionally the last 4 digits of their SSN and then answer a list of questions verifying the
information they provided. Powered by RSA. Available only in the United States.
o Enable Web Identity Authentication - Require signers to verify their identity by signing in to
one of the following sites: Facebook, Google, LinkedIn, Twitter, Yahoo! or Microsoft Live.
• Make the desired selections in ‘Custom Preferences’ and then click ‘Save’.
Copyright ©2013 Adobe Systems Incorporated. All rights reserved.
9
Page 10

Adobe EchoSign for NetSuite Customization Guide
AUTOMATIC STATUS UPDATES
The Adobe EchoSign bundle allows you to automatically receive status updates into NetSuite so
that the data
regarding your agreements in NetSuite will always reflect their latest status. To
enable this feature, please follow the these steps:
Go to Setup / Company / Enable Features
•
• Select the ‘SuiteCloud’ tab
• Check the ‘Custom Records’ check box
• Check the ‘Client SuiteScript’ check box and agree to the terms. Check the ‘Server SuiteScript’
check box and agree to terms.
Click ‘Save’
•
Copyright ©2013 Adobe Systems Incorporated. All rights reserved.
10
Page 11

Adobe EchoSign for NetSuite Customization Guide
USING ADOBE ECHOSIGN FOR NETSUITE
CREATING AND EDITING AN ADOBE ECHOSIGN AGREEMENT
NetSuite recommends that administrators who install a new bundle test that bundle using a NetSuite
Sandbox account first before installing on a production account.
Select or create a customer record you would like to send an agreement from or you can select
1.
another NetSuite record type that has the Agreements tab enabled. In that record, click on
the
Agreements tab and then click ‘New Agreement’.
On the Agreement page, click ‘Edit’.
2.
You may edit the agreement name, message or set advanced sending options including the following:
• Agreement Name: Enter a name for the agreement.
• Message: Include a message for the recipient.
• Signature Type: Select the type of signature accepted for the document. The options are e-
Signature and Fax Signature.
• I Also Need to Sign This Agreement: Indicate whether the sender also needs to sign the
agreement.
• Signature Order: If the previous option I Also Need to Sign This Agreement is checked, then
also select the order in which the sender and recipients should sign.
• Preview Document or Position Signatures (or form fields) (NEW!): Select this option to
preview the agreement before it is sent or to drag and drop signature fields, initial fields, or
other form fields on to the agreement before it is sent to recipients. After you have previewed
the document or dragged the fields you want on to the document, remember to click the Send
button to send the agreement to the recipient.
• Verify Signer Identity: Ensure that before signers can view or sign the document, they have to
verify access to their email account AND verify their identity.
o Password Required to Sign: Require Signers to enter a one-time password you specify.
o Knowledge Based Authentication (NEW!): Require signers to provide their name,
address and optionally the last 4 digits of their SSN and then answer a list of questions
verifying the information they provided. Powered by RSA. Available only in the United
States.
o Web Identity Authentication (NEW!): Require signers to verify their identity by signing
in to one of the following sites: Facebook, Google, LinkedIn, Twitter, Yahoo! or
Microsoft Live.
Copyright ©2013 Adobe Systems Incorporated. All rights reserved.
11
Page 12

Adobe EchoSign for NetSuite Customization Guide
• Password Required To View PDF: Indicate whether a password must be entered before a
recipient may open a PDF of the agreement or signed agreement. The PDF file that is sent to
everyone will be encrypted and this password will be required to open it. Don't lose your
password as it is not recoverable. In the event that you do lose the password, you'll need to
delete that transaction and begin again.
• Remind Recipients to Sign: Send a weekly or daily reminder to your signers.
• Language: Specify the language in which the signing page and email notifications will be
displayed to the recipients.
• Host Signing for the First Signer: Indicate whether the sender would like to host the agreement
signing in-person.
• Signing Deadline: Set a deadline for your agreements.
3. In the ‘Documents’ tab, attach a document from the file cabinet or upload a new one by clicking on
‘New EchoSign Document’ or typing in the document name of a document in your NetSuite file
cabinet. You can add multiple documents. Click ‘Add’ after adding each document.
Copyright ©2013 Adobe Systems Incorporated. All rights reserved.
12
Page 13

Adobe EchoSign for NetSuite Customization Guide
If you click on the New EchoSign Document button, you can select files from your Transaction record or
select from your File Cabinet documents list, or upload a new document.
4. In the ‘Recipients’ tab, specify a recipient by either selecting from the contact list or typing an email
address. Each of your recipients can be marked as Signer, Approver, or CC. Signers will be required
to sign the document while Approvers are not required to sign the document. Approvers will be
asked to approve the document. Recipients marked as CC will only be notified of document
updates and completion of the transaction. These recipients are not a party to the signature or
approval process. Click ‘Add’ after entering each recipient.
5. Click ‘Save’.
SENDING AGREEMENTS FOR SIGNATURE
When the agreement is ready to be sent, click the ‘Send for Signature’ button.
Recipients then receive an e-mail informing them of the documents awaiting their signature. After the
recipients have signed the document, the sender receives a notification by e-mail that the document
has been signed.
Copyright ©2013 Adobe Systems Incorporated. All rights reserved.
13
Page 14

Adobe EchoSign for NetSuite Customization Guide
If the ‘Host Signing for First Signer’ option is checked, clicking ‘Send for Signature’ opens a pop-up
window to allow the signer to sign the document with the sender present.
A ‘Host Signing for Current Signer’ link also appears next to the ‘Host Signing for First Signer’ field,
which can be accessed until the document is signed. Use this link to host agreement signing for
multiple signers, or to reopen the pop-up window if it accidentally closed.
(NEW!) If ‘Preview document or position signatures’ option is checked, clicking ‘Send for Signature’
opens a pop-up window that allows the sender to preview the document or drag form fields on to the
document before it is sent. Remember to click the ‘Send’ button in that window to send the agreement
to the recipient.
SENDING FROM A QUOTE
Adobe EchoSign has a direct integration with Quotes in NetSuite so that the PDF of the quote is
automatically generated and attached to the agreement record.
When viewing a Quote, click the button ‘Send for Signature’. The quote will be generated and
automatically attached to the agreement. See more information below about Transaction Records.
You can also add the Send for Signature button to other transaction record types. See instructions here
.
TRACKING STATUS AND SENDING REMINDERS
After you send an agreement, the document status will change to ‘Out for Signature’ and a new ‘Events’
tab will appear in the agreement record
where you can track the agreement’s status. You can see a
history of the agreement events, which includes information about when the agreement was sent,
viewed, and was signed.
After you send an agreement out for signature, you can also click the ‘Send Reminder’ button and
Adobe EchoSign will send an automatic reminder to the current signer.
An EchoSign Agreement may be canceled after it has been sent for a signature if all recipients have not
yet signed the document. A button labeled ‘Cancel Agreement’ appears in the Detail View of an
agreement after a document has been sent for signature. Click this button to cancel the agreement.
Copyright ©2013 Adobe Systems Incorporated. All rights reserved.
14
Page 15

Adobe EchoSign for NetSuite Customization Guide
After the agreement is signed, its status will change to ‘Signed’, a new ‘Signed Document’ tab will appear
allowing you to see image thumbnails of the signed document. The ‘Signed Document’ field is a link to
the signed PDF document stored in your file cabinet.
Also, you can easily link back to the Parent record for this agreement as well as download the Signed
Document or Audit Trail.
Note: After an agreement has been sent for signature, you will not be able to edit the record. This
is to preserve the record of events.
Copyright ©2013 Adobe Systems Incorporated. All rights reserved.
15
Page 16

Adobe EchoSign for NetSuite Customization Guide
USING THE BUNDLE
ROLES AND PERMISSIONS
Most NetSuite roles (Sales Rep, Sales Manager, Controller, etc.) should have permission to use EchoSign
without additional configuration.
To add permission to additional roles to view agreement records, follow the steps below:
Go to Setup / Customization / Record Types
1.
If you do not see the ‘Record Types’ item in the list, go to Setup / Company / Enable Features and select
the
Custom Record checkbox on the SuiteCloud tab.
From Setup / Customization / Record Types, set permissions for the ‘EchoSign Agreement’ record
2.
type.
For the EchoSign Agreement record type:
3.
• Set ‘Access Type’ to ‘Use Permission List’
• On the Permissions tab
Set ‘Level’ to ‘Full’.
a.
set the following permissions for the required roles
:
b. Set ‘Default Form’ to ‘Custom EchoSign Agreement Form’
c. Select ‘Restrict Form’ check box.
Copyright ©2013 Adobe Systems Incorporated. All rights reserved.
16
Page 17

Adobe EchoSign for NetSuite Customization Guide
Since the EchoSign Agreement record type is the only record type where permissions matter and is
4.
necessary, for all the other EchoSign record types set
‘Access Type’ to ‘No Permission Required’.
a. This applies to:
EchoSign Config
i.
EchoSign Document
ii.
EchoSign Event
iii.
EchoSign Language
iv.
EchoSign Script Errors
v.
EchoSign Signed Agreement
vi.
EchoSign Signer
vii.
To modify permissions to the Agreement tab or Send For Signature button:
1. Go to Setup / Customization / Scripts
2. On the next screen select ‘View’ for the script you want modify access for.
a. To modify permissions for the ‘Send for Signature’ Button, select the ‘EchoSign Estimate
Button’ script.
b. To modify permissions for the ‘Agreements’ tab, select the ‘EchoSign Agreement Loader’
Script.
Copyright ©2013 Adobe Systems Incorporated. All rights reserved.
17
Page 18

Adobe EchoSign for NetSuite Customization Guide
3. On the next screen click the ‘Deployments’ tab and select the entity that you want to modify
access for.
4. On the following screen, click the 'Edit' button.
a. On the 'Audience' tab, select the specific roles or users that you want to grant access to. If
you want to grant access to all roles or users, then check the box 'Select all'
5. Click 'Save'.
Copyright ©2013 Adobe Systems Incorporated. All rights reserved.
18
Page 19

Adobe EchoSign for NetSuite Customization Guide
ADVANCED CUSTOMIZATION
USING ECHOSIGN WITH OTHER RECORDS
The bundle already exposes the EchoSign agreement object with many standard NetSuite objects
including:
Customer, Estimate, Lead, Opportunity, and Partner records. You can use EchoSign with
other record types as well including custom records.
The agreement tab can appear with two types of NetSuite records - -- ‘Entity’ and ‘Transaction’.
For our
purpose we can usually assume that a ‘Transaction’ record is a record that can be converted into a PDF
document - -- e.g. a Quote - -- whereas an ‘Entity’ record cannot.
TRANSACTION RECORDS
If the agreement is created from a Transaction record, the first document on the agreement record will
be the PDF version of the record it came from and the first recipient will be the email address of the
record. If you don’t want the first document to be a PDF version of the record it came from, uncheck
‘Auto Attach Transaction PDF’ under Setup / Company / General Preferences / Custom Preferences.
Under Custom Preferences, you can also check the box ‘Use Transaction Contact as First Signer’ if you
want the primary transaction contact to be added automatically as the first signer.
When associated with a Transaction record, both the ‘Agreements’ tab as well as a ‘Send for
Signature’
button will appear.
ENTITY RECORDS
If the agreement is created from an Entity record the first recipient will be the email address from the
record. When associated with an Entity record, only the ‘Agreements’ tab will appear.
Copyright ©2013 Adobe Systems Incorporated. All rights reserved.
19
Page 20

Adobe EchoSign for NetSuite Customization Guide
CONFIGURE ECHOSIGN AGREEMENTS FOR ADDITIONAL RECORD TYPES
To deploy the agreements list on other records, follow the steps below.
Setup / Customization / Scripts
1.
On the next screen select ‘View’ for the script you want to deploy.
2.
To add the ‘Send for Signature’ Button, select the ‘EchoSign Estimate Button’ script.
•
• To add the ‘Agreements’ tab, select the ‘EchoSign Agreement Loader’ Script.
On the next screen click the ‘Deploy Script’ Button.
3.
On the following screen, fill out the form with the following info:
4.
Check the ‘Deployed’ checkbox
•
• Set ‘Applies To’ to the Record type you need. Set ‘Status’ to ‘Released’
• Check the ‘Execute as Admin’ checkbox
• Select the roles you want the list to show up for or check ‘select all’. Select the employees you
want the list to show up for or check ‘select all’
5. Click ‘Save’.
UNINSTALLING THE BUNDLE
To uninstall this bundle follow the steps provided in the NetSuite Help Center topic Uninstalling Bundles
into Your NetSuite Account.
Please note that uninstalling the bundle will result in losing some or all your EchoSign agreement data.
It is not recommended that you uninstall the bundle if you want to retain your agreement data.
Copyright ©2013 Adobe Systems Incorporated. All rights reserved.
20
Page 21

Adobe EchoSign for NetSuite Customization Guide
TROUBLESHOOTING
DOCUMENT STATUS NOT UPDATING
If the document status is not updating after sending agreements, try the following things:
Check the EchoSign External Update script deployment logs to see if you are receiving calls from
1.
EchoSign.
Navigate to Setup / Customization / Script Deployments. Find the EchoSign External
Update Agreement suitelet, and click ‘Edit’. Under the Execution Log tab, you should see an
‘Agreement Set For Auto Update’ entry for the agreement ID.
Check the ‘EchoSign Update Agreements’ execution log to see if there are any errors there. This is
2.
located
under Setup / Customization / Script Deployments / EchoSign Update Agreements /
Execution Log. Select Error under Type to filter the results.
Lastly, check the EchoSign Service Manager suitelet for errors. This is located under Setup /
3.
Customization >
Script Deployments / EchoSign Service Manager / Execution Log. Again, you can
filter by Type: Error to see only the errors.
FILE MIME TYPE ERROR
If you are receiving a MIME type error when attempting to send a document, this may be due to the File
Name field
which does not match the filename and extension of the uploaded file. If you leave the File
Name field blank, it will automatically be populated with the correct filename and extension.
HOW TO VIEW SCRIPT LOGS
Go to Setup > Customization > Scripts
Select View for the corresponding script development.
Click on the Execution Log tab on the page to display the script log.
SUPPORT
Go to the Adobe EchoSign support portal to access FAQs, documentation, knowledge base articles, and
contact Support:
https://www.echosign.adobe.com/en/support.html
Copyright ©2013 Adobe Systems Incorporated. All rights reserved.
21
 Loading...