

Page 1

ma cromedia
DRUMBEAT™2000
eCOMMERCE
EDITION
Users Guide
®
Page 2

Trademarks
Macromedia, the Macromedia logo, the Made With Macromedia logo, Authorware, Backstage, Director, Extreme 3D, and Fontographer
are registered trademarks, and Afterburner, AppletAce, Authorware Interactive Studio, Backstage, Backstage Designer, Backstage Desktop
Studio, Backstage Enterprise Studio, Backstage Internet Studio, DECK II, Director Multimedia Studio, Doc Around the Clock,
Drumbeat, Extreme 3D, Flash, FreeHand, FreeHand Graphics Studio, Lingo, Macromedia xRes, MAGIC, Power Applets, Priority
Access, SoundEdit, ShockRave, Shockmachine, Shockwave, Showcase, Tools to Power Your Ideas and Xtra are trademarks of
Macromedia, Inc. Other product names, logos, designs, titles, words or phrases mentioned within this publication may be trademarks,
servicemarks, or tradenames of Macromedia, Inc. or other entities and may be registered in certain jurisdictions.
Apple Disclaimer
APPLE COMPUTER, INC. MAKES NO WARRANTIES, EITHER EXPRESS OR IMPLIED, REGARDING THE ENCLOSED
COMPUTER SOFTWARE PACKAGE, ITS MERCHANTABILITY OR ITS FITNESS FOR ANY PARTICULAR PURPOSE.
THE EXCLUSION OF IMPLIED WARRANTIES IS NOT PERMITTED BY SOME STATES. THE ABOVE EXCLUSION MAY
NOT APPLY TO YOU. THIS WARRANTY PROVIDES YOU WITH SPECIFIC LEGAL RIGHTS. THERE MAY BE OTHER
RIGHTS THAT YOU MAY HAVE WHICH VARY FROM STATE TO STATE.
Copyright © 1999 Macromedia, Inc. All rights reserved. This manual may not be copied, photocopied, reproduced, translated, or
converted to any electronic or machine-readable form in whole or in part without prior written approval of Macromedia, Inc.
Part Number ZBD10ES100
Acknowledgments
Writing: Natalie Calkins, Gayle Kidder, John Darwell, John Keller
First Edition: August 1999
Macromedia, Inc.
600 Townsend St.
San Francisco, CA 94103
2
Page 3

CONTENTS
INTRODUCTION
Developing an e-Commerce Site. . . . . . . . . . . . . . . . . 7
Paths to e-Commerce Development . . . . . . . . . . . . . . . . . . . . . . . . . . . .8
A Typical e-Commerce Flow . . . . . . . . . . . . . . . . . . . . . . . . . . . . . . . . . .9
Up and Running Fast with eStore . . . . . . . . . . . . . . . . . . . . . . . . . . . . . .9
Secure Transactions . . . . . . . . . . . . . . . . . . . . . . . . . . . . . . . . . . . . . . . . .9
How to Use This Book . . . . . . . . . . . . . . . . . . . . . . . . . . . . . . . . . . . . .10
System Requirements for eStore Builder . . . . . . . . . . . . . . . . . . . . . . . .10
Installing Drumbeat 2000 eStore Builder . . . . . . . . . . . . . . . . . . . . . . .11
Drumbeat Support Center . . . . . . . . . . . . . . . . . . . . . . . . . . . . . . . . . .11
CHAPTER 1
Quick Store Tutorial . . . . . . . . . . . . . . . . . . . . . . . . . . . . 13
What You Need to Complete Quick Store. . . . . . . . . . . . . . . . . . . . . . .13
Getting Familiar with Quick Store Starting Point . . . . . . . . . . . . . . . . .14
Step 1: Adding A Shopping Cart. . . . . . . . . . . . . . . . . . . . . . . . . . . . . .23
Managing the Cart . . . . . . . . . . . . . . . . . . . . . . . . . . . . . . . . . . . . . . . .35
Step 2: Setting Up Login and Checkout . . . . . . . . . . . . . . . . . . . . . . . .47
Logging In . . . . . . . . . . . . . . . . . . . . . . . . . . . . . . . . . . . . . . . . . . . . . .47
Checking Out . . . . . . . . . . . . . . . . . . . . . . . . . . . . . . . . . . . . . . . . . . . .54
Step 3: Confirming the Order . . . . . . . . . . . . . . . . . . . . . . . . . . . . . . . .70
CHAPTER 2
Setting Up Product Pages . . . . . . . . . . . . . . . . . . . . . . 79
Setting Site Preferences . . . . . . . . . . . . . . . . . . . . . . . . . . . . . . . . . . . . .80
Setting Publishing Settings . . . . . . . . . . . . . . . . . . . . . . . . . . . . . . . . . .80
Setting up a Data Source Name to the Products Database . . . . . . . . . . .81
Creating a Query. . . . . . . . . . . . . . . . . . . . . . . . . . . . . . . . . . . . . . . . . .82
Creating Product Pages with DataForm Wizard . . . . . . . . . . . . . . . . . .83
3
Page 4

CHAPTER 3
Adding and Updating the Shopping Cart . . . . . . . . 91
Configuring the Shopping Cart’s Content. . . . . . . . . . . . . . . . . . . . . . .92
Customizing the Data-Map. . . . . . . . . . . . . . . . . . . . . . . . . . . . . . . . . .93
Adding the Shopping Cart SmartElement. . . . . . . . . . . . . . . . . . . . . .100
Adding an Add-to-Cart Button on the Shopping Page . . . . . . . . . . . .102
Displaying Shopping Cart Items on a Page . . . . . . . . . . . . . . . . . . . . .103
Updating the Shopping Cart. . . . . . . . . . . . . . . . . . . . . . . . . . . . . . . .107
Testing and Trouble Shooting the Shopping Cart . . . . . . . . . . . . . . . .109
CHAPTER 4
Creating Checkout Pages . . . . . . . . . . . . . . . . . . . . . . 111
Creating Login Pages. . . . . . . . . . . . . . . . . . . . . . . . . . . . . . . . . . . . . .112
Creating New and Update User Pages . . . . . . . . . . . . . . . . . . . . . . . . .115
Creating the Check Out Page . . . . . . . . . . . . . . . . . . . . . . . . . . . . . . .118
CHAPTER 5
Security . . . . . . . . . . . . . . . . . . . . . . . . . . . . . . . . . . . . . . .121
Linking Using HTTPS Protocol . . . . . . . . . . . . . . . . . . . . . . . . . . . . .122
Security and Databases . . . . . . . . . . . . . . . . . . . . . . . . . . . . . . . . . . . .122
Authentication and Log In . . . . . . . . . . . . . . . . . . . . . . . . . . . . . . . . .123
ASP Security . . . . . . . . . . . . . . . . . . . . . . . . . . . . . . . . . . . . . . . . . . . .123
Payment Processing SET . . . . . . . . . . . . . . . . . . . . . . . . . . . . . . . . . . .123
4
CHAPTER 6
Payment Processing . . . . . . . . . . . . . . . . . . . . . . . . . . 125
Recommended Reading . . . . . . . . . . . . . . . . . . . . . . . . . . . . . . . . . . .126
Online Transactions with CyberCash . . . . . . . . . . . . . . . . . . . . . . . . .126
Setting up CyberCash Test Account . . . . . . . . . . . . . . . . . . . . . . . . . .127
Adding the CyberCash SmartElement. . . . . . . . . . . . . . . . . . . . . . . . .128
Passing the OrderID to the CyberCash Object . . . . . . . . . . . . . . . . . .129
Setting Customer Credit Card Properties . . . . . . . . . . . . . . . . . . . . . .130
Submitting to CyberCash . . . . . . . . . . . . . . . . . . . . . . . . . . . . . . . . . .131
Storing the Transaction Results in Session Object . . . . . . . . . . . . . . . .132
Storing the Transaction Results in the Orders Recordset . . . . . . . . . . .133
Setting Up Offline Transactions . . . . . . . . . . . . . . . . . . . . . . . . . . . . .134
Contents
Page 5

CHAPTER 7
Merchandising . . . . . . . . . . . . . . . . . . . . . . . . . . . . . . . . 135
Setting Up Shopping Cart Adjustments . . . . . . . . . . . . . . . . . . . . . . .136
Setting Up Adjustments for Total Weight, Quantity or Purchase. . . . .137
Ordering Page Interactions . . . . . . . . . . . . . . . . . . . . . . . . . . . . . . . . .139
Adjustment Examples . . . . . . . . . . . . . . . . . . . . . . . . . . . . . . . . . . . . .140
CHAPTER 8
Customizing Quick Store . . . . . . . . . . . . . . . . . . . . . . 143
Customizing Templates and Media Assets . . . . . . . . . . . . . . . . . . . . . .144
Customizing the Quick Store Content . . . . . . . . . . . . . . . . . . . . . . . .148
CHAPTER 9
Shopping Cart Reference . . . . . . . . . . . . . . . . . . . . . 153
Shopping Cart SmartElement . . . . . . . . . . . . . . . . . . . . . . . . . . . . . . .153
Shopping Cart Methods . . . . . . . . . . . . . . . . . . . . . . . . . . . . . . . . . . .156
Shopping Cart Events . . . . . . . . . . . . . . . . . . . . . . . . . . . . . . . . . . . . .162
Configuring Shopping Cart Content: The Data Map . . . . . . . . . . . . .163
Modifying the Data Map Content Table . . . . . . . . . . . . . . . . . . . . . . .165
Specifying Shopping Cart Column Order. . . . . . . . . . . . . . . . . . . . . .166
Shopping Cart Display SmartElement. . . . . . . . . . . . . . . . . . . . . . . . .166
Shopping Cart Interactions . . . . . . . . . . . . . . . . . . . . . . . . . . . . . . . . .169
Shopping Cart Miscellaneous Interactions. . . . . . . . . . . . . . . . . . . . . .187
Shopping Cart Adjustments . . . . . . . . . . . . . . . . . . . . . . . . . . . . . . . .193
Shopping Cart Contracts . . . . . . . . . . . . . . . . . . . . . . . . . . . . . . . . . .194
Inventory Control. . . . . . . . . . . . . . . . . . . . . . . . . . . . . . . . . . . . . . . .209
CHAPTER 10
CyberCash SmartElement Reference . . . . . . . . . . 215
CyberCash Features Supported . . . . . . . . . . . . . . . . . . . . . . . . . . . . . .216
Contracts . . . . . . . . . . . . . . . . . . . . . . . . . . . . . . . . . . . . . . . . . . . . . .218
Shipping Calculations . . . . . . . . . . . . . . . . . . . . . . . . . . . . . . . . . . . . .221
Version 2.0 Contracts . . . . . . . . . . . . . . . . . . . . . . . . . . . . . . . . . . . . .222
Version 1.0 Contracts . . . . . . . . . . . . . . . . . . . . . . . . . . . . . . . . . . . . .228
Known Issues With Using UPS Shipping Contracts . . . . . . . . . . . . . .232
Sales Tax Interactions . . . . . . . . . . . . . . . . . . . . . . . . . . . . . . . . . . . . .233
INDEX
. . . . . . . . . . . . . . . . . . . . . . . . . . . . . . . . . . . . . . . . 237
Contents
5
Page 6

6
Contents
Page 7

INTRODUCTION
Developing an e-Commerce Site
.............................................................................................................
The development cycle for each e-Commerce project is unique. If your
e-Commerce site has been completely thought out and documented in
specifications, you will be applying those requirements and figuring out how
you will meet them using DrumbeatTM. If you come with ideas and notions of an
e-Commerce site, you will, most likely, be investigating how the features of eStore
fit in with your vision. No matter what your starting point is, one aspect of
developing a site, any site, holds true. This aspect is that the more work and
time you spend on the project, the more intricate your site will become. The
natural progression is to start simple and then add more complex functionality
and usability.
Studies found that the most significant business goals in the decision to deploy eCommerce applications are to create or maintain a competitive edge, and to
improve customer satisfaction.
To create a competitive edge, the site must be functionally sophisticated, and to
improve customer satisfaction the site must be very user friendly. Luckily, these
two goals go hand and hand. As the complexity increases, the site developer, or
team, watches and carefully plans out the user experience.
If you are working with a corporate site, you most likely have guidelines that
include a corporate identity, conventions, and deployment systems. You are
probably working with a project team that includes a mix of people with different
talents. Together you complete the project using your knowledge and expertise,
ranging from Information Technology, writing, and graphic art skills.
On the other hand, you could be the cowboy out there all alone, trying to be
cross-functional and develop the site completely on your own. You might have
knowledge in some or all of the areas that are required to develop an e-Commerce
site, or you may want to out source the skills you lack.
No matter where you fit into this spectrum, eStore will help you complete the
project rapidly.
7
Page 8

Paths to e-Commerce Development
For clarity’s sake, think of the development path as having four main aspects:
Identity
Delivery
Development
Maintenance
Identity defines the theme, colors, and conventions. Delivery defines the target
browser, server platform, security requirements, and, specifically for e-Commerce,
the payment method. Maintenance is the upkeep of the site. Of course, never
forget your audience. These are the people you want to visit and use the site. The
target audience is a parameter which affects every aspect of the path.
How you satisfy each aspect varies depending on the environment in which you
are working. For example, if you are developing a site in a corporate environment,
you probably already have the Identity, Delivery, and Maintenance requirements
laid out for you. Plus, if you are really lucky, you might even have the necessary
resources in place. On the other side of the spectrum, if you are building a
storefront for a small mom-and-pop company, you might need to consult with
your clients and work out these issues.
The document “Navigating an e-Commerce Site” contains a discussion of the
delivery and maintenance aspects of developing an e-Commerce site, with a rundown of questions you should answer before developing your site in Drumbeat.
The document is located in the Documents folder in the Drumbeat program files
directory. If you installed Drumbeat in the default location, you’ll find it at:
C:\Program Files\Drumbeat 2000\eStore Builder\Navigating.doc
There is so much to think about and do but so little time. So we want to give
you some advice on how to get up and running quickly with Drumbeat 2000
eStore Builder.
If you have never built a site in Drumbeat before, we strongly recommend that
you go through the Quick Start tutorial to become familiar with Drumbeat itself
first before attempting to build your e-Commerce site in Drumbeat.
Once you become familiar with Drumbeat, we recommend that you also go
through the Quick Store tutorial in the first section of this book. (This tutorial is
much shorter than Quick Start).
8
Introduction
Page 9

A Typical e-Commerce Flow
The Quick Store tutorial and eStore instructional media, such as DrumNotes and
Starting Points follow this very typical e-commerce flow. However, you can create
any flow you want. As e-commerce matures, there will be better flows discovered
and planned. Bear in mind that eStore is as flexible as you make it.
The site visitor enters the site and browses or searches for product items.
1
The shopper sees a desired product and adds the item to the shopping cart.
2
When finished browsing and shopping, the customer decides to proceed to the
3
check-out pages. The check-out pages are on a secure server that uses Secure
Sockets Layer (SSL) protocol.
On one of the check-out pages, the shopper is given the opportunity to change
4
the shopping cart contents and then confirms the order.
5
Returning shoppers enter their user ID and password to retrieve their account
information: billing and shipping address, credit card numbers, email address,
etc. First-time customers are taken to a page where account information is
captured in an orders database.
The order is processed using an online or offline payment mechanism. The
6
order detail is entered into the database. At this point, the product items can be
deducted from inventory.
The customer is taken to a thank-you page which includes the order details and
7
delivery information.
Up and Running Fast with eStore
The easiest way to build an e-commerce site following this e-commerce flow and
one that is advisable if you are starting a new site from scratch, is to base the site
on the QuickStoreComplete Starting Point (pre-built site file). You can read how
to do this in the User’s Guide section of this book under Customizing the Quick
Store Starting Point. When you follow the Quick Store tutorial from beginning to
end, it guides you through the mechanics of the site and the set up of secure
transactions and other functions tailored to your unique development. No matter
if you are building a site from scratch or adding e-commerce capability to an
existing site and integrating it with an existing database schema, we recommend
going through Chapter 2 Adding and Updating the Shopping Cart where you
learn how to customize the Data-Map.
Secure Transactions
Security is very important to e-business. There are several ways you can ensure a
secure application.
Developing an e-Commerce Site
9
Page 10

Encryption: Save the check-out pages on a secure server using Secure Sockets
Layer (SSL).
Database: Make sure the database is not saved in the wwwroot directory on the
server. Add a user name and password to the database.
Authentication: Protect individual files and folders on Windows NT servers
using the Challenge Response authentication.
ASP Security: Learn about the difference between server-side and client-side
code.
To learn about each of these points, see “Security” on page 121.
How to Use This Book
The Quick Store Tutorial (Chapter 1) is designed to be a basic starter guide for
new users of Drumbeat and eStore. Users who have never built a site in Drumbeat
before are strongly advised to complete the Drumbeat Quick Start tutorial first to
familiarize themselves with Drumbeat before starting this tutorial and attempting
to build an eStore site.
Chapters 2 through 8 assume you are already familiar with Drumbeat and the
basics of database-driven site design. It is assumed that you have completed the
tutorial or already built a simple eStore site on your own. These chapters include
goal-oriented instructions for using and adapting each eStore feature to your
particular project.
Chapters 9 and 10 are both a technical reference for experienced users or
programmers, and a quick reference for all users to the components in eStore.
These chapters explain how the components and contracts work together to create
e-Commerce functionality.
10
Introduction
System Requirements for eStore Builder
The recommended system for eStore development machines:
200MHz Pentium
60MB free disk space
64MB RAM
Microsoft Windows 95/98 or NT 4.0
The recommended system for deploying eStore applications:
Microsoft Internet Information Server (IIS) 4.0 for Windows NT, or Chili!ASP
by Chili!Soft or other ASP interpretive software for other servers to deploy
applications. IIS is included in Windows NT Server.
Page 11

Minimum: 166Mhz; 128 Megs RAM
ASP Enabled
SA or MS PostingAcceptor Installed
ODBC DSN Creation/Update Methodology
Installing Drumbeat 2000 eStore Builder
To install StoreBuilder from the CD:
Insert the Drumbeat 2000 with eStore Builder, or the eStore Builder CD. The
1
installation program starts automatically, and you will see the eStore Builder
Installation screen.
From the selections available, choose Install eStore Builder.
2
Note:
If you are not installing a bundled licensed copy of eStore, you will need to
complete the licensing procedure before installing the package.
Follow the instructions on the Installation screen.
3
To install eStore Builder from the Drumbeat Web Site:
Download the eStore Builder self-extracting file from the Drumbeat web site.
1
In the WinZip Self Extractor, select a folder in which to unzip the eStore
Builder installation file. Click Unzip.
Click OK. Then close the WinZip Self-Extractor.
2
3
In Windows Explorer, navigate to the folder you extracted the installation file
to. Double click the Setup.exe.
Follow the instructions on the Installation screen.
4
The installer will add the eStore Builder files to your copy of Drumbeat, including
the Starting Point for Quick Store and the sample database. The DSN for the
database will automatically be created on your system. You will need to set up the
database and the DSN on the IIS server to which you will be publishing.
Drumbeat Support Center
The Drumbeat Support Center Web site is updated regularly with the latest
information on Drumbeat, plus advice from expert users, advanced topics,
examples, tips, and updates. Check the Web site often for the latest news on
Drumbeat and how to get the most out of the program at www.macromedia.com/
support/drumbeat.
Developing an e-Commerce Site
11
Page 12

12
Introduction
Page 13

CHAPTER 1
Quick Store Tutorial
.............................................................................................................
The Quick Store tutorial walks you through the process of building an online
store using the eStore Builder components. In this tutorial, you will be building a
sample eStore site for an online computer book warehouse using the basic eStore
components. You will learn how to set up a shopping cart, capture customer
details, and calculate tax and shipping costs from tables in a database.
Once you build your online store you can customize it with additional features
available in the eStore package. The eStore User’s Guide following the tutorial
includes documentation for the features available for customizing your eStore.
On the Drumbeat web site you can find DrumNotes demonstrating how to add
various features to your eStore, such as order fulfillment and Store Manager
features. References to DrumNotes are found throughout this guide. To find these
samples, go to drumnotes.drumbeat.com. eStore specific DrumNotes are in the
500 series.
If you have never used Drumbeat before, it is strongly recommended that you go
through the Quick Start tutorial first to familiarize yourself with Drumbeat and
its many features for building database-driven web sites.
To preview the application built in the Quick Store tutorial, go to
quickstore.drumbeat.com.
1
What You Need to Complete Quick Store
To complete the Quick Store tutorial, you must have access to an ASP
compatible server.
Access Microsoft Internet Information Server 3.0 or above for Windows NT, or
Chili!ASP by Chili!Soft or other ASP compatible software on your network.
13
Page 14
Getting Familiar with Quick Store
Starting Point
A Drumbeat Starting Point is a project file that has all or part of a site already
developed. The Quick Store Starting Point has all the pages for the storefront as
well as most of the functionality set up. You will add the Shopping Cart and set up
the Login and Checkout areas.
Open the Quick Store Starting Point
To base a new site on the Quick Store Starting Point:
Launch Drumbeat from the Start menu.
1
2
From the Drumbeat Start-up dialog, select Create a New Site.
Uncheck the Use Wizard checkbox. Then, click OK.
In the New Site dialog, name the site QuickStore.
3
4
In the Site Origin field, select the Based on Starting Point radio button.
From the dropdown list, scroll down and select the QuickStoreStart file. Then
click OK.
Drumbeat will open with a new site based on the Quick Store Starting Point.
14
Chapter 1
Page 15
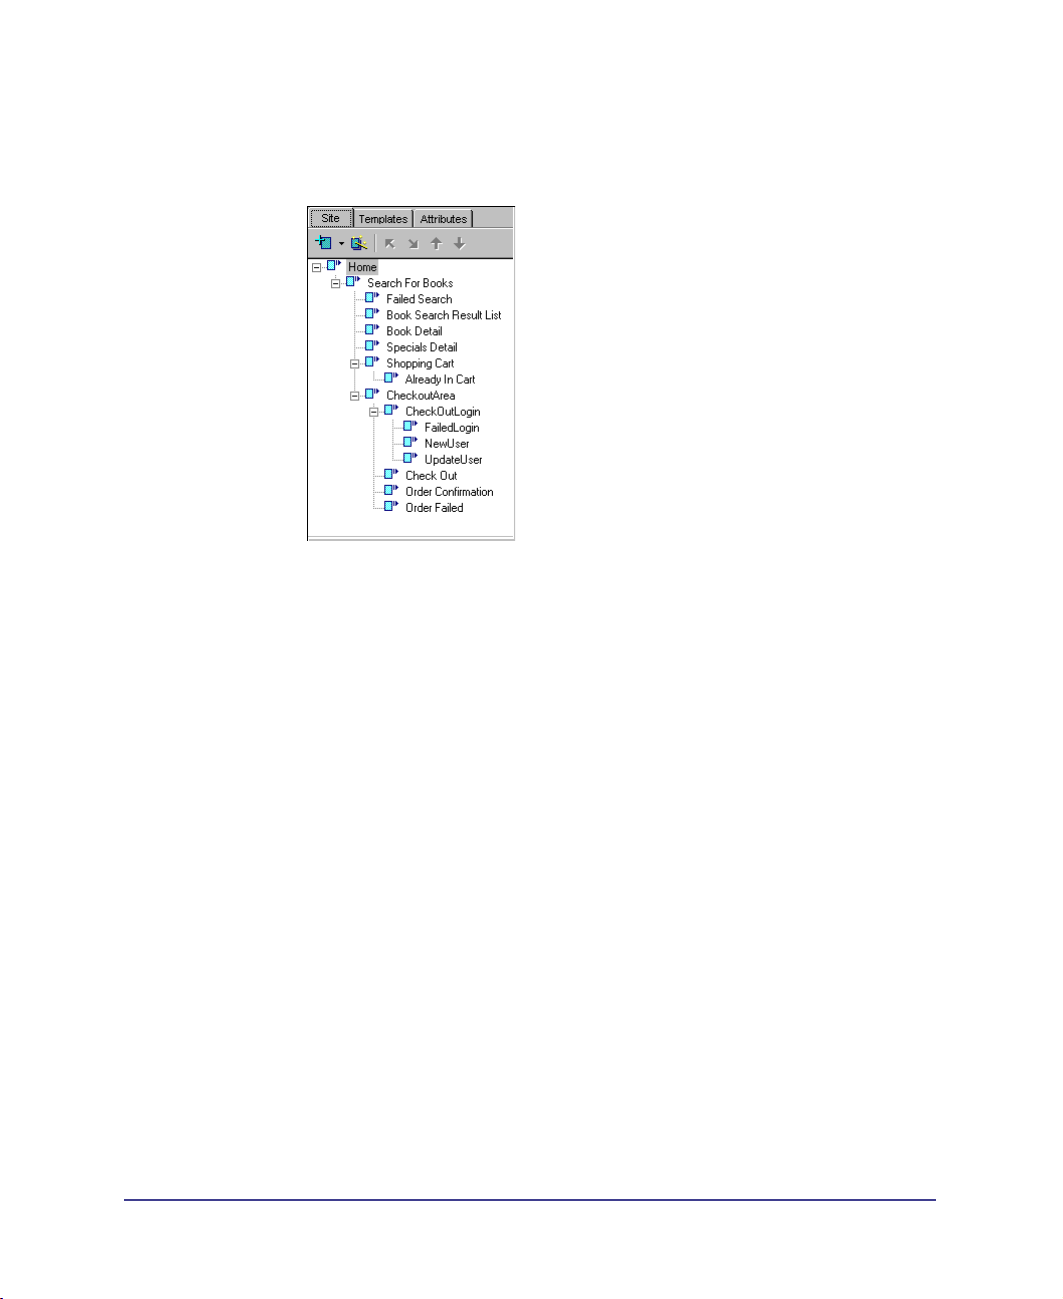
Site Structure
In the Site tab you can see the site organization. Expand the site tree to expose all
the pages in the site.
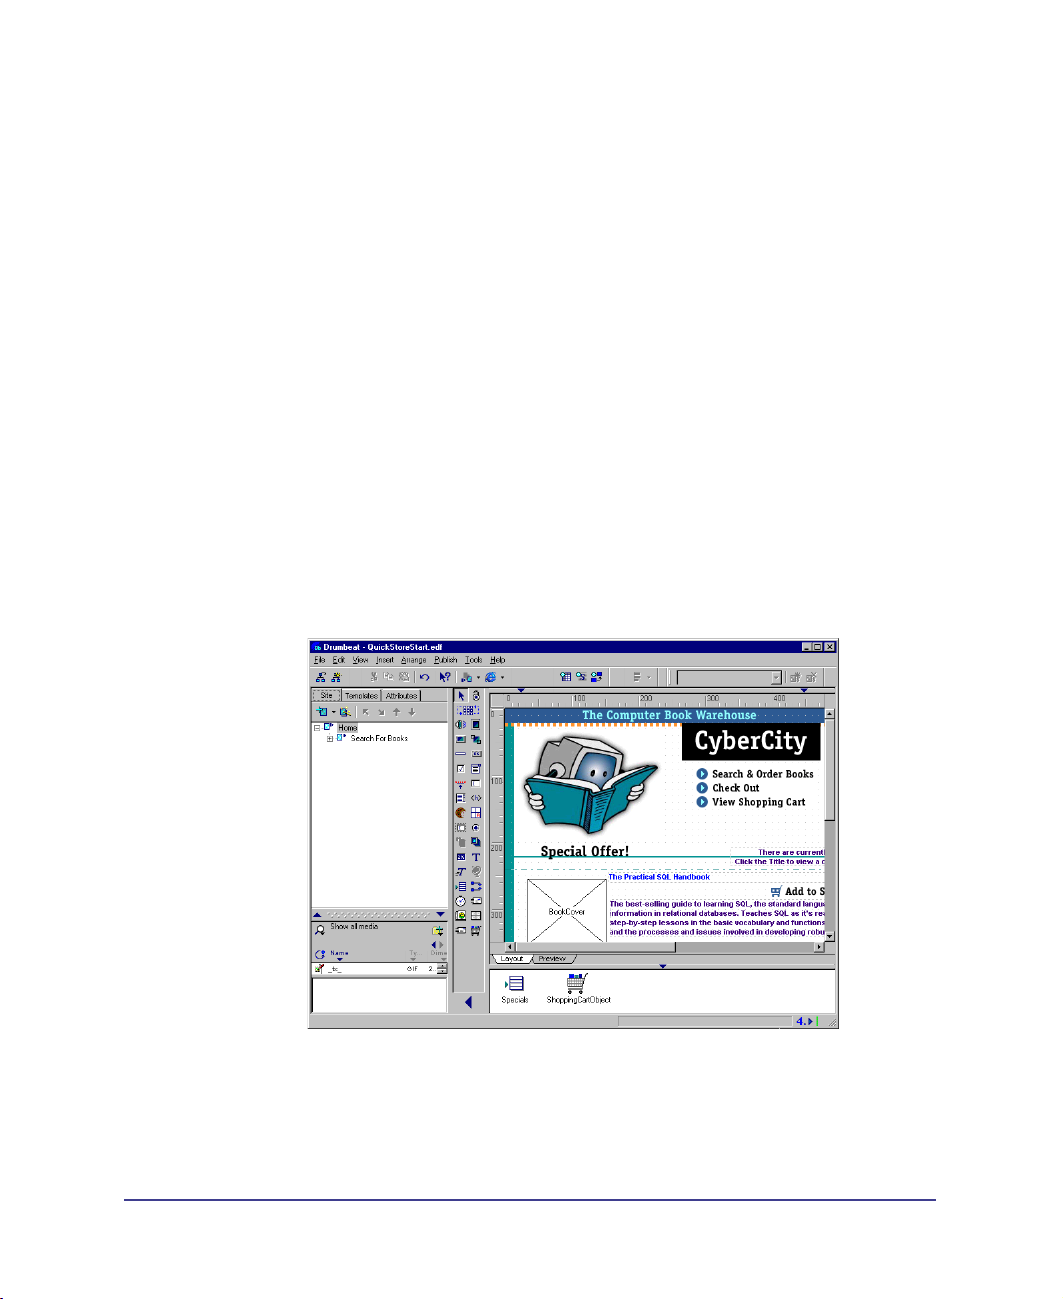
The Home page is designed to present visitors with rotating book specials. If
a special catches their eye, they can order it immediately by clicking an order
button. Otherwise, visitors can choose to go to one of the three main areas of
the site.
The three links at the top of the page correspond to the three areas of the site as
shown by the main pages in the site tree:
Search and Browse Books: Initiate a search by various criteria, including
keyword, title, author and category. The Search For Books page in the site tree
is the main page in this section.
Checkout: Enter billing and shipping information and get an order summary.
The CheckoutArea page in the site tree is the main page in this section.
View Shopping Cart: Check the current contents of their shopping cart, to see
the books they have ordered already and the total. The Shopping Cart page in
the site tree is the main page in this section.
For information about the Site tab in Site Management Center, check the index of
the Drumbeat User’s Guide or Help for the words in bold.
Quick Store Tutorial
15
Page 16
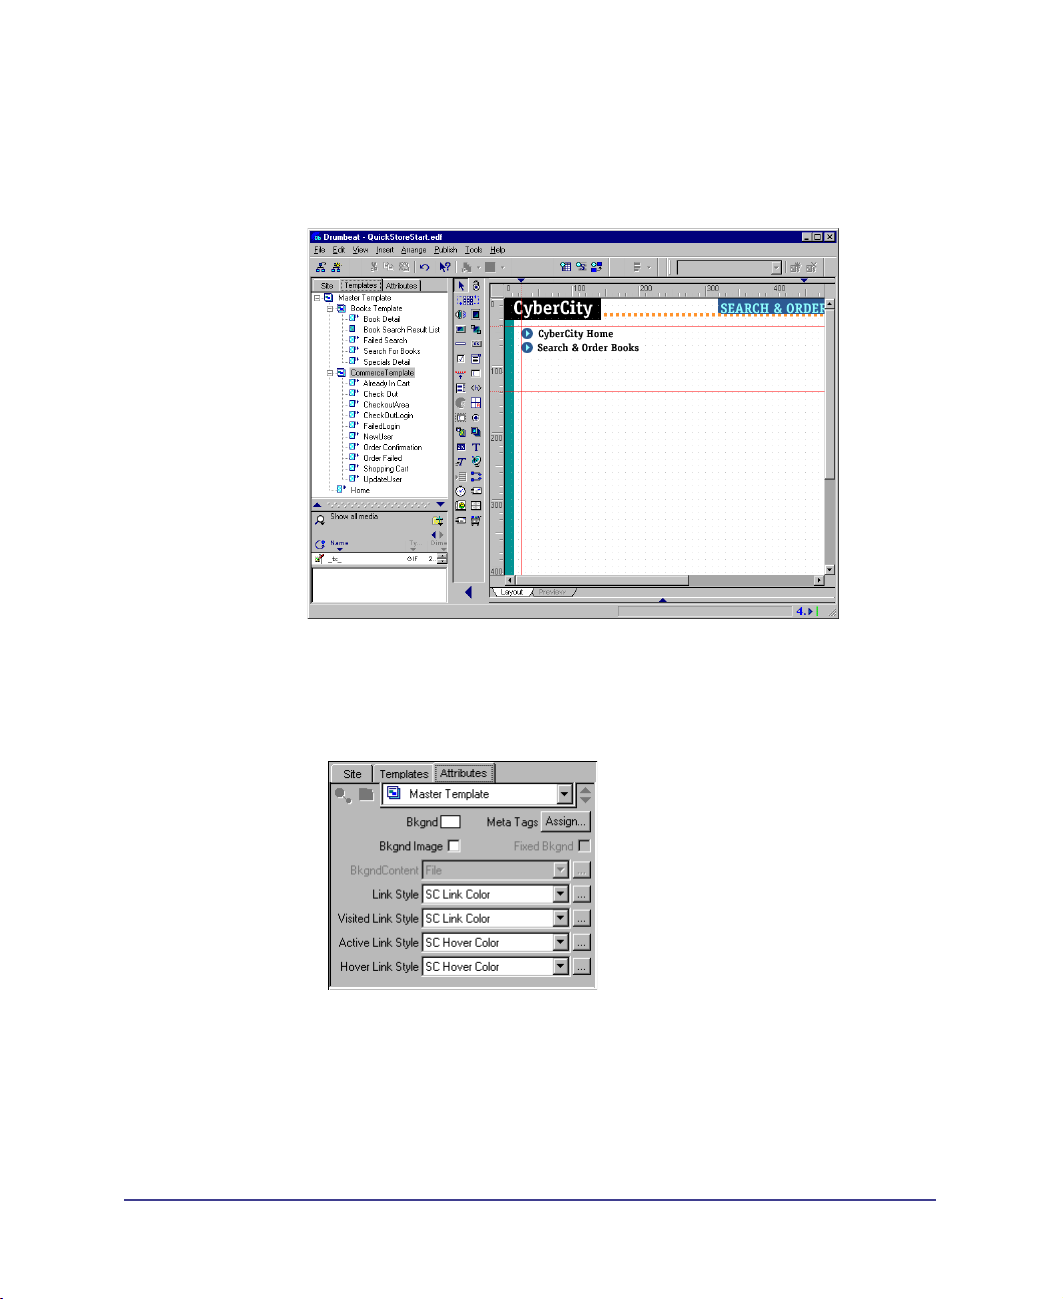
Templates
Templates speed up the development time by reducing repetitive design tasks.
Click the Templates tab and you’ll see that the site has three templates: a Master
Template and two section templates:
Master Template: This template contains only the link style information for the
site. (Select the Master Template in the site tree and then click the Attributes
tab to see the names of the assigned link styles.) All pages in the site inherit
these styles.
16
Chapter 1
Books Template: This template is used for the pages that display book search
and detail information. The template contains a background, a logo, and four
linked images for navigation. All of the pages shown under this template in the
Templates tab site tree inherit these elements.
Page 17
Commerce Template: This template is used for the shopping cart and checkout
pages. It contains a background, logo and two linked images for navigation. All
of the pages shown under this template in the Templates tab site tree inherit
these elements.
For more information about templates check the index of the Drumbeat User’s
Guide or Help for the words in bold.
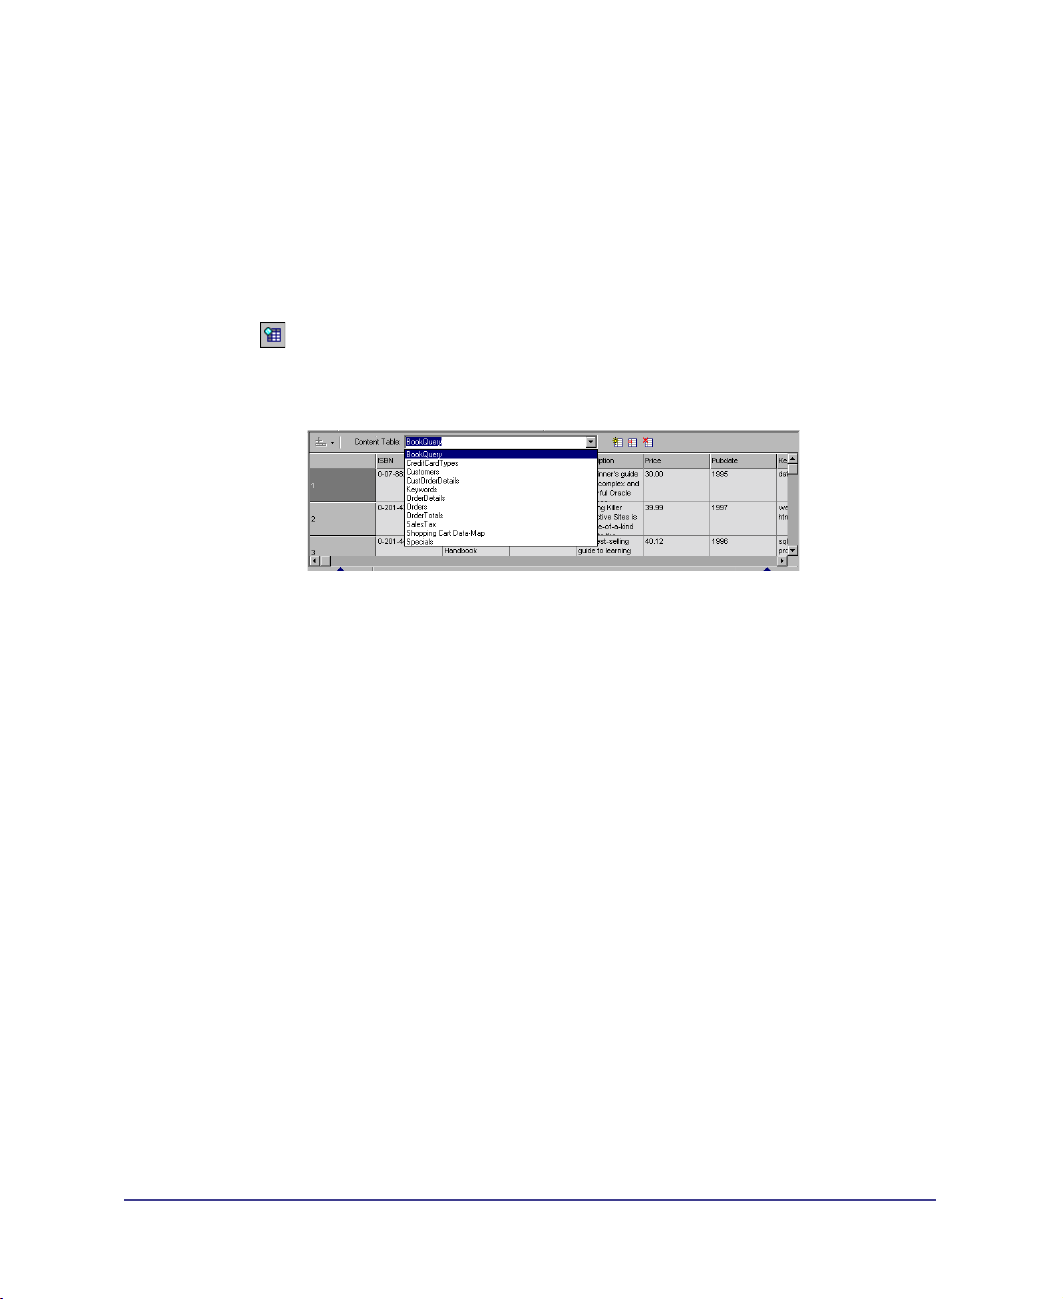
Content Tables
Content Tables organize media as well as give you a visual representation of
databases. Expose the Content Center (click the Content Center button). Click
the dropdown arrow and you’ll see that a number of Content Tables have already
been set up in the site.
All of these Content Tables, with one exception, are ODBC-driven, with the
content coming from queries to the database that drives the site. The exception is
the Shopping Cart Data-Map. This table, whose initial content comes from a
CSV file, provides a bridge to the database so that user selections can be retrieved
from and passed to the server-side shopping cart.
When using database content in Drumbeat, you must first create a query to the
database (using the Query Manager). Then you create an ODBC Content Table
based on that query. The ODBC Content Table provides a visual representation of
the database content so it can be used in design. To use the data on a page, a
Recordset is added to the page, which is then bound to the appropriate Content
Table. If you are new to Drumbeat, you can find an explanation of the process of
creating queries and ODBC Content Tables and using recordsets in Chapter 15 of
the Drumbeat User’s Guide.
Note:
Not all of the databases have content, such as the Customers and Orders databases.
They are used to provide field references that are used when adding customer information
and placing orders when the site is deployed.
Quick Store Tutorial
17
Page 18
The Recordsets used in the Quick Store tutorial have also been created for you.
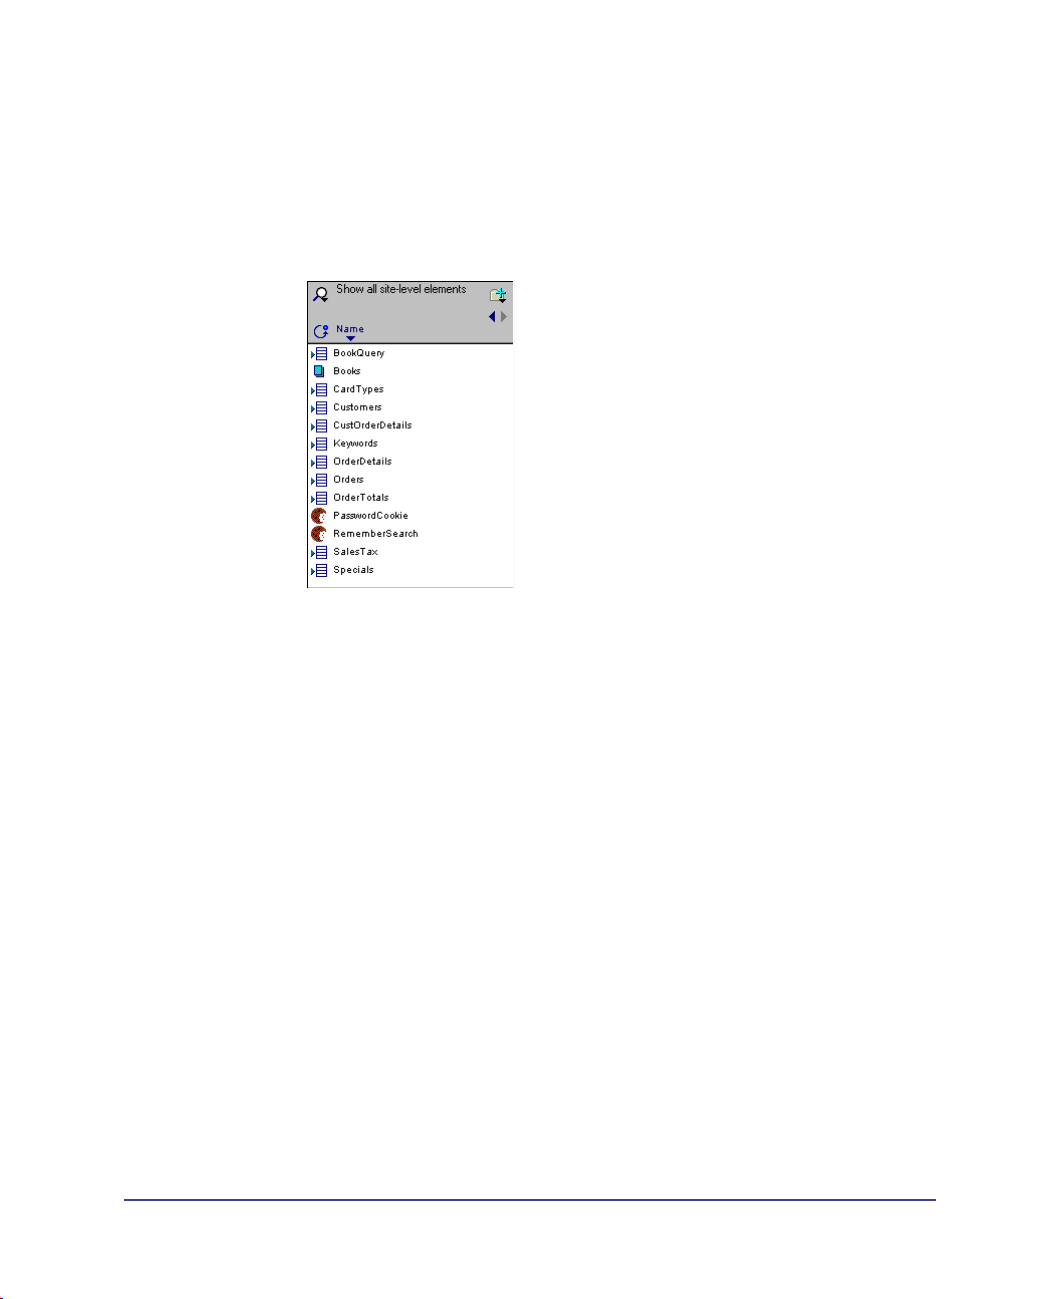
You can view them by querying the Asset Center for site-level elements. Click the
Locate Assets button and choose Site Elements > Show all site-level elements.
The site-level elements on this site also include the DataForm and Cookies that
are used. Notice that each Recordset matches a Content Table in the Content
Center (although the names of the Recordsets may differ slightly from the
Content Table names).
You will see the recordsets used in the basement of the data-driven pages in the
Quick Store Starting Point.
18
Chapter 1
Page 19

The description and purpose of each recordset is explained in the following table.
Recordset Name Content Table Description
BookQuery BookQuery Used in the search, results, and details
CardTypes CreditCardTypes Used on the NewUser and Update User pages
Customers Customers Used to capture customer details.
CustOrderDetails CustOrderDetails Used to capture the order details and
Keywords Keywords Used for keyword search functionality.
OrderDetails OrderDetails Used for capturing shipping and freight
Orders Orders Used for capturing customer-ordering
OrderTotals OrderTotals Use for displaying order totals on the
SalesTax SalesTax Used for adding the different sales tax
Specials Specials Used for searching on books by publisher.
product pages. From the detail page, the
product items are inserted into the Orders
table and then carried by the Orders detail
and Orders recordsets to the CheckOut pages.
to populate the Credit Cards supported.
customer ID. The customer ID links the
CustOrderDetails table to the Customer details
table.
details.
information.
Checkout page.
percentages to total cost.
For answers about database-related questions, check the index of the Drumbeat
User’s Guide or Help for the words in bold.
eStore Builder SmartElements
In Drumbeat, a SmartElement is any type of element you put on a page, such as
text, images, video, etc. They include Applets, ActiveX objects, COM objects,
Scriptlets and a variety of custom elements. You drag and drop SmartElements
from the toolbar and/or Asset Center.
The eStore Builder package includes three custom eStore SmartElements, two
of which you will be using in this tutorial. The eStore SmartElements were
added to your Element Library collection when you installed eStore. They should
also appear on your SmartElements Toolbar. The CyberCash SmartElement,
which is not used in this tutorial, is discussed in the User’s Guide and Reference
Guide following.
Quick Store Tutorial
19
Page 20
The custom eStore SmartElements are:
Shopping Cart: This component is a server-side object which holds user
selections as they shop the store. It manages the data in an online shopping
session until they are ready for checkout.
Shopping Cart Display: This component is used to display the data contained
in the shopping cart, so that users can check the contents of their cart.
If the Shopping Cart and Shopping Cart Display elements are not on your
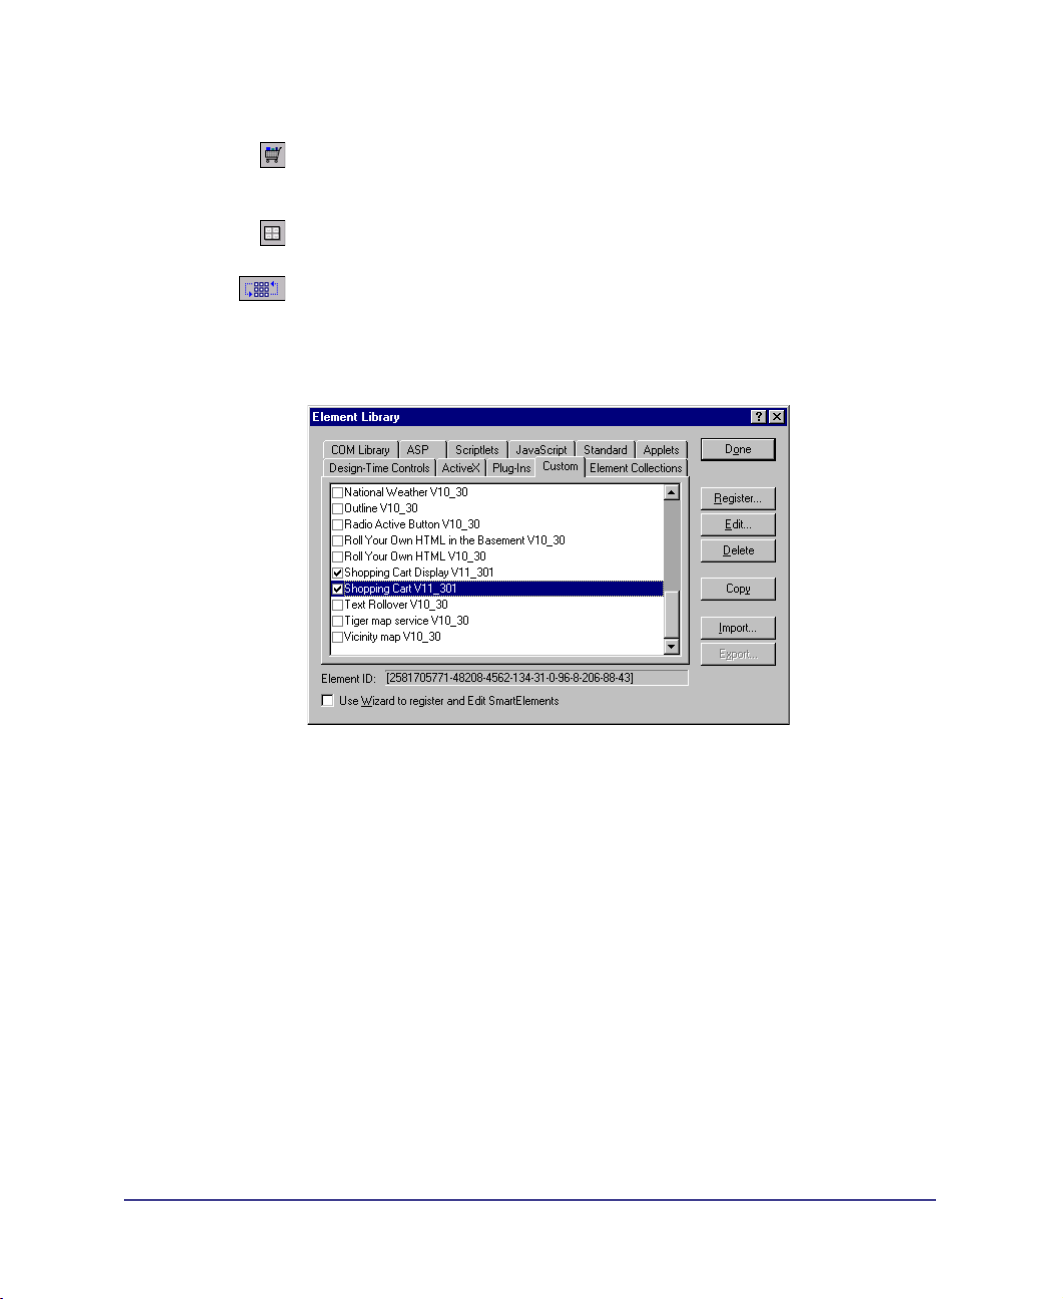
SmartElements toolbar, you should add them for this exercise. Click the Element
Library icon on the SmartElements toolbar and select the Custom tab. Place a
check next to each element, then close the Element Library and they will appear
on the toolbar.
20
Technical documentation on these Custom SmartElements can be found in the
Shopping Cart section of the Reference guide in this book, or see the following
documents in the Drumbeat 2000/eStore Builder directory:
ShoppingCartV2.doc
ShoppingCartAPIV2.doc
ShoppingCartDisplayV2.doc
For information about SmartElements, check the index of the Drumbeat User’s
Guide or Help for the words in bold.
Chapter 1
Page 21
eStore Interactions
An Interaction is a pre-written JavaScript or VBScript function that can be
applied to SmartElements. By selecting SmartElements, you create a contextsensitive list of interactions, from which you can choose the one(s) you want
to use.
A number of eStore-specific interactions are included in the eStore package. These
are added to the Interactions available to you in the Interactions Center and will
appear when the appropriate participants are selected.
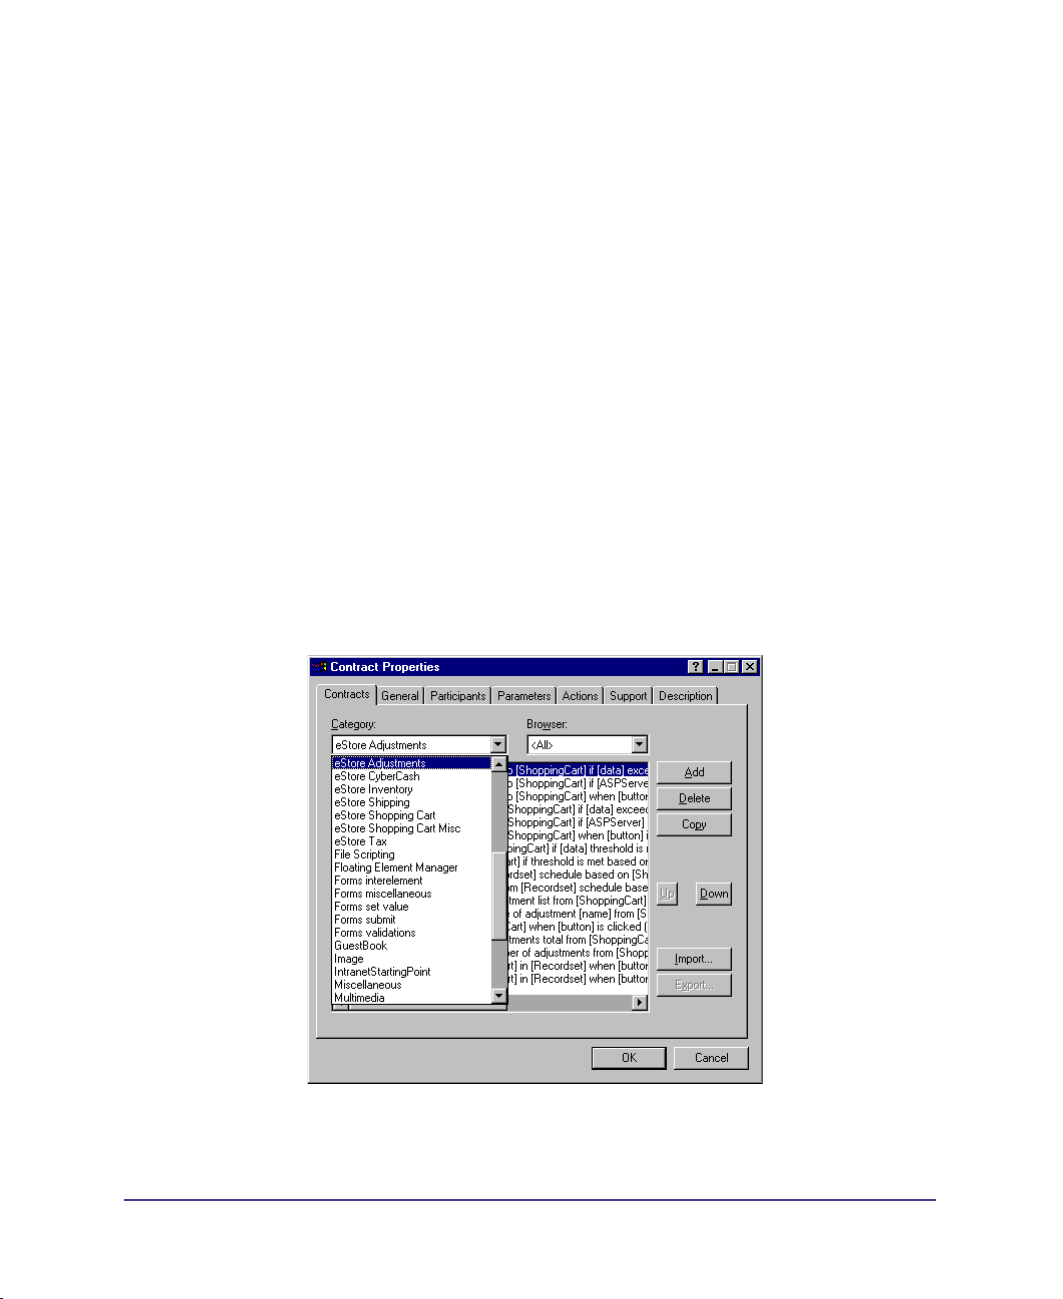
eStore Interactions are available in the following categories:
eStore Adjustments
eStore CyberCash
eStore Inventory
eStore Shipping
eStore Shopping Cart
eStore Shopping Cart Misc.
eStore Tax
You can view these suites of interactions in the Contract Manager (Tools >
Contracts). You can sort the interactions by category to see what’s available.
Quick Store Tutorial 21
Page 22

Not all of the eStore interactions are used in this tutorial, so be sure to check for
what’s available when you develop your own online store and want to customize it
with advanced features. Also, check the DrumNotes for examples of how to use
many of these interactions.
If you are new to Drumbeat, you can quickly familiarize yourself with the way
interactions are used in the Quick Start Tutorial. For more detailed information,
see Chapter 17 in the Drumbeat User’s Guide.
Note: The eStore Builder contracts are not exportable like other contracts in Drumbeat.
For information about Interactions, check the index of the Drumbeat User’s
Guide or Help for the words in bold.
Moving Forward
The typical flow of an e-commerce site consists of searching, browsing, adding
items to a shopping cart and checking out. Typically a search page leads to a
results page with links to product details. From the detail page shoppers can add
items to the Shopping Cart. They can then choose to continue shopping (return
to searching or browsing) or check out.
Shoppers also need the flexibility to add items to the cart, remove items, or change
the order (such as change the quantity). In the final phase of checkout, the items
are inserted into an orders database.
The processes you will go through in building the Quick Store are:
Add the Shopping Cart to the product pages
Configure the Shopping Cart management (add to, update and clear cart
functions)
Calculate the order totals and insert order into the database
Create secure login and checkout pages
Set up the order confirmation page
Chapter 122
Page 23
Step 1: Adding A Shopping Cart
You will add the heart of the shopping experience by adding and setting up these
components:
The Shopping Cart server element (referred to as ‘basement element’ in
Drumbeat)
The Shopping Cart Display element (can also be referred to as ‘page element’
in Drumbeat)
The Data-Map which binds the Shopping Cart server and display elements to
product, customer, and billing information.
Configure the Shopping Cart
The Shopping is configured using the Shopping Cart Data-Map, which is a static
Content Table in Drumbeat generated from a CSV file. For this tutorial, the CSV
file has been imported for you.
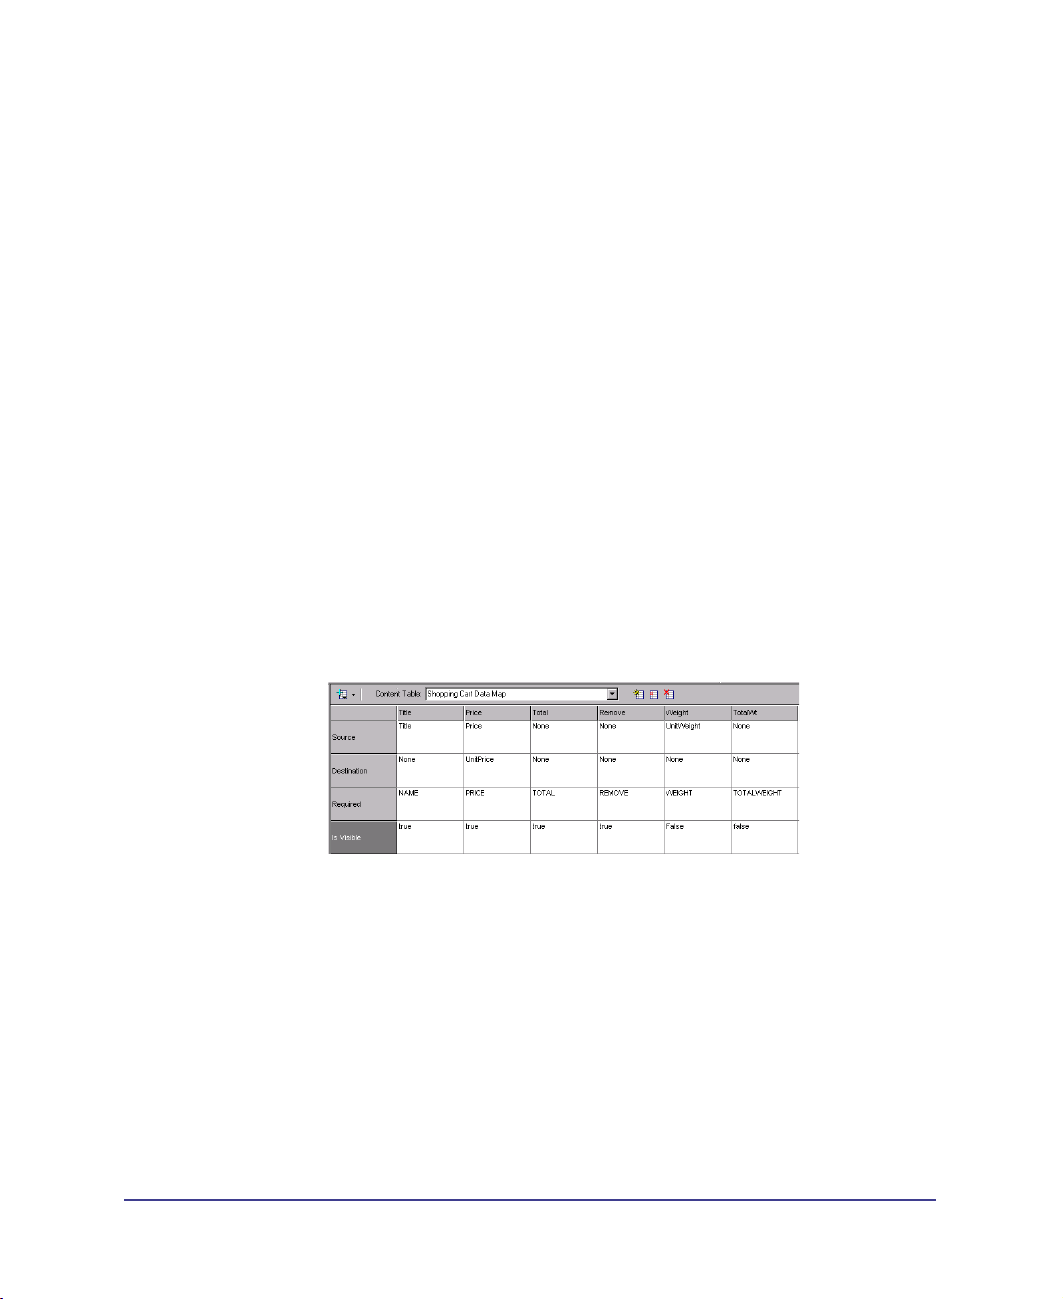
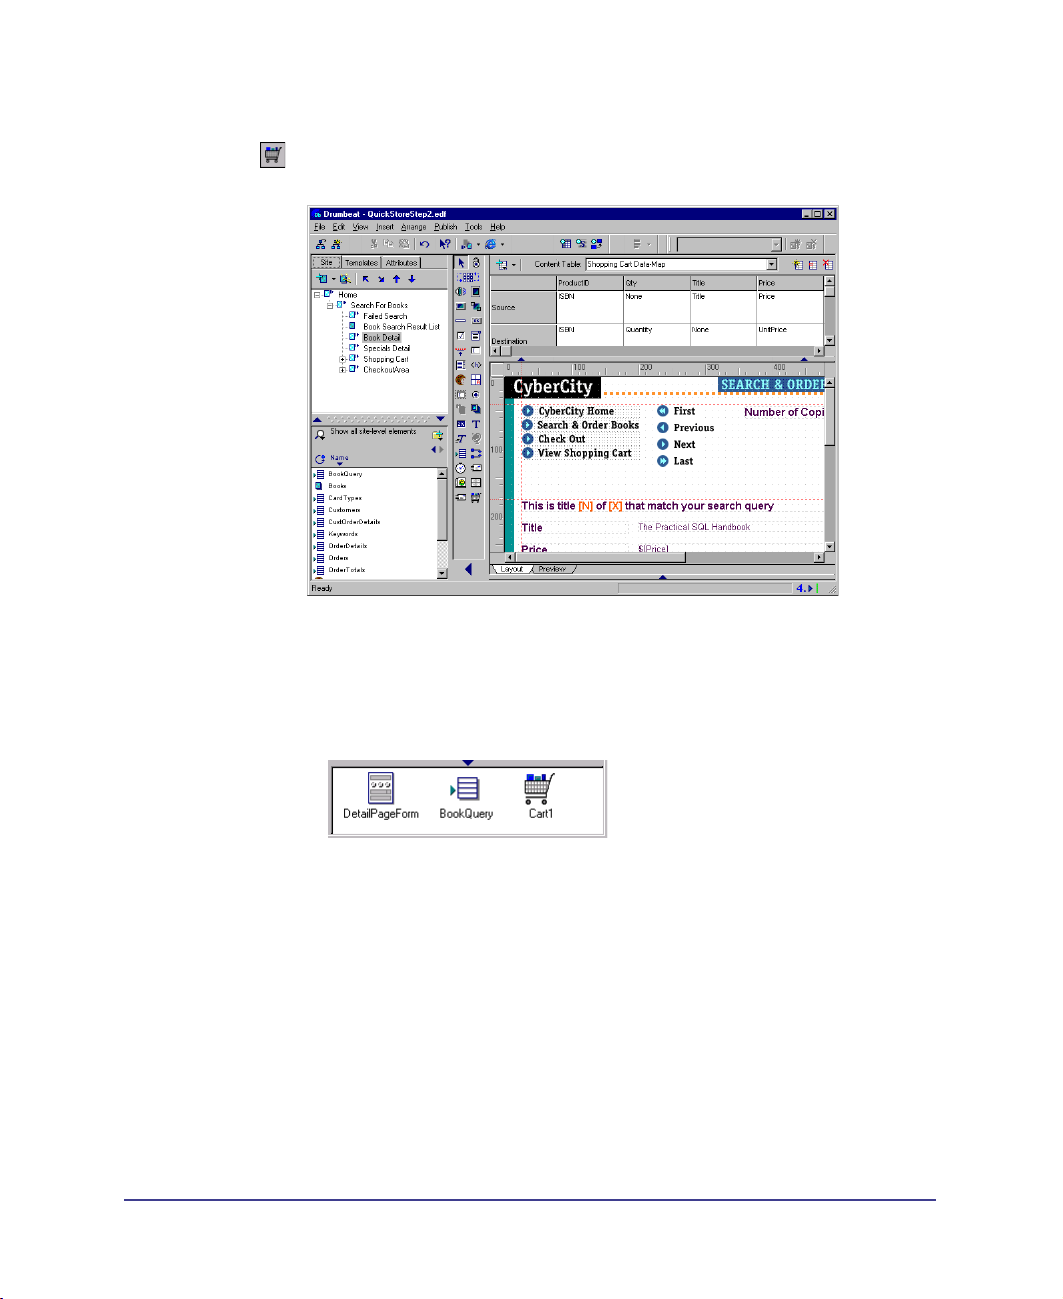
Take a look at the Data-Map in Drumbeat:
1
In the Content Center, select Shopping Cart Data-Map from the
dropdown list.
2 Drag the splitter bar down to expand the Content Center so you can view the
rows in the table, as shown in the following figure.
The Data-Map provides information needed by the shopping cart for:
Obtaining information from the Product database when product items are
added to the shopping cart.
Storing information in the OrderDetails database when a site shopper decides
to check out and order products.
Calculating totals for price, weight, and/or discounts.
Determining which information in the shopping cart is displayed on the page.
The Data-Map can be customized to integrate any existing database schema with
the Shopping Cart elements. The User’s Guide section after this tutorial explains
how to customize the Data-Map to meet your requirements.
Quick Store Tutorial 23
Page 24
Add the Shopping Cart SmartElement
In Site Manager, expand the Search For Books node, and click the Book Detail
icon to make its layout active.
1 From the SmartElements Toolbar, select the Shopping Cart SmartElement and
drop it on the page. The Basement opens (if not already) and the element
appears in the Basement. This element represents the Shopping Cart on the
server. Ensure that the element is on the far right side. If it was added to the left
of the Form element, drag and drop it to the right side.
Chapter 124
Page 25
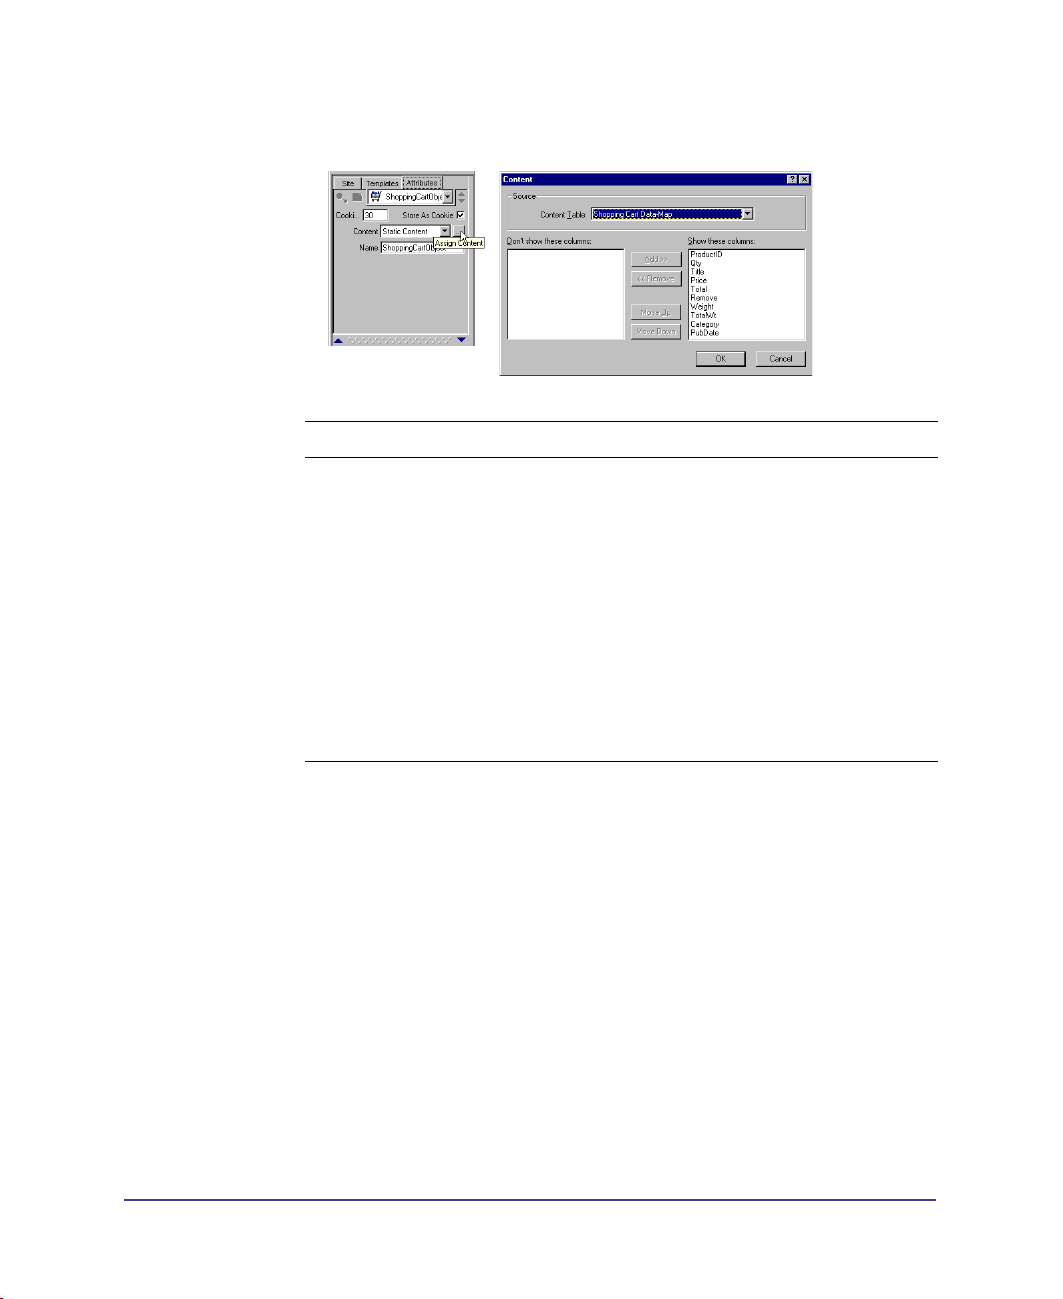
2
Right click the Cart1 SmartElement in the basement and select Attributes. In
the Attributes Sheet, set the attributes as shown in the table.
Attribute Description Set to:
Content Sets the content of the element to
Cookie Expiration
(days)
Name Names the ASP object for scripting
Store As Cookie Stores the shopping cart data in a
the Shopping Cart Data-Map
Content Table.
Stores the shopping cart data in
a cookie file on the client for the
designated amount of time
in days.
and Point-and-Click Interactions.
cookie file on the client so that the
site shopper can continue from
session to session.
Select Static Content.
Click the ellipsis button, and
choose Shopping Cart
Data-Map
30
ShoppingCartObject
Checked
. Show all columns.
Each time you use the Shopping Cart SmartElement on a page, the content must
be set to the Shopping Cart Data-Map Content Table. Since you will use the same
Shopping Cart element on several pages, you can speed up this process by creating
a reusable Element Collection. Element Collections retain all element attributes,
interactions, and links.
Once you have set all the attributes correctly, create an Element Collection so that
you can reuse the component on another page easily.
Quick Store Tutorial 25
Page 26
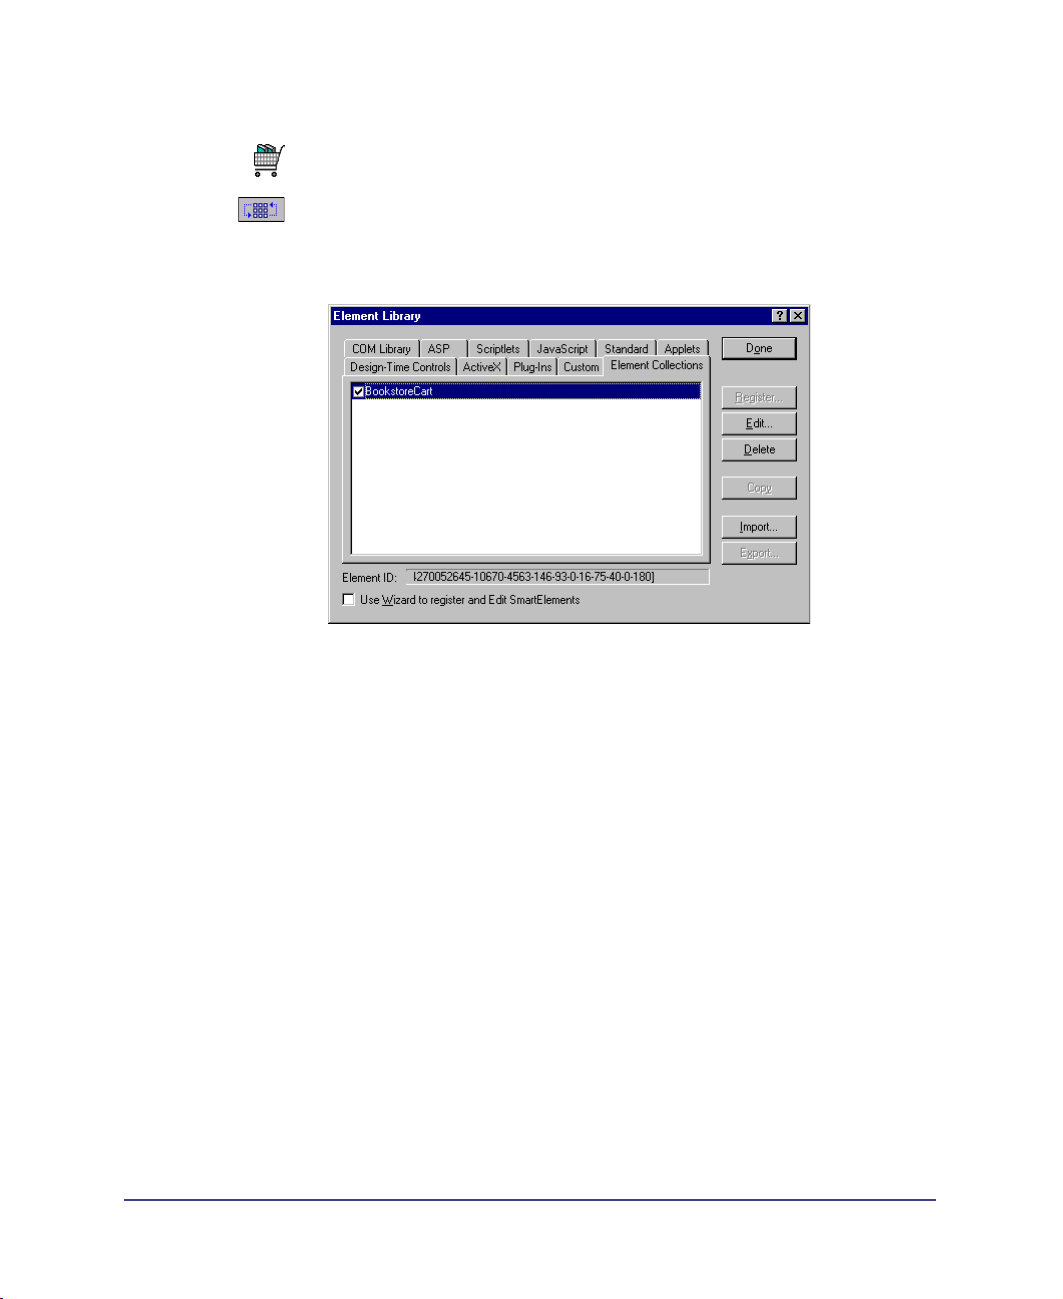
To create an Element Collection for the ShoppingCart Object:
1
Right click the ShoppingCartObject element in the basement and choose Add
to SmartElement Library. Name the element BookstoreCart and click OK.
2 From the Element Toolbar open the Element Library by clicking the
Element Library button. Click the Element Collections tab and check the
box next to the BookstoreCart name. Doing this will add the element to the
Element Toolbar.
Chapter 126
Page 27
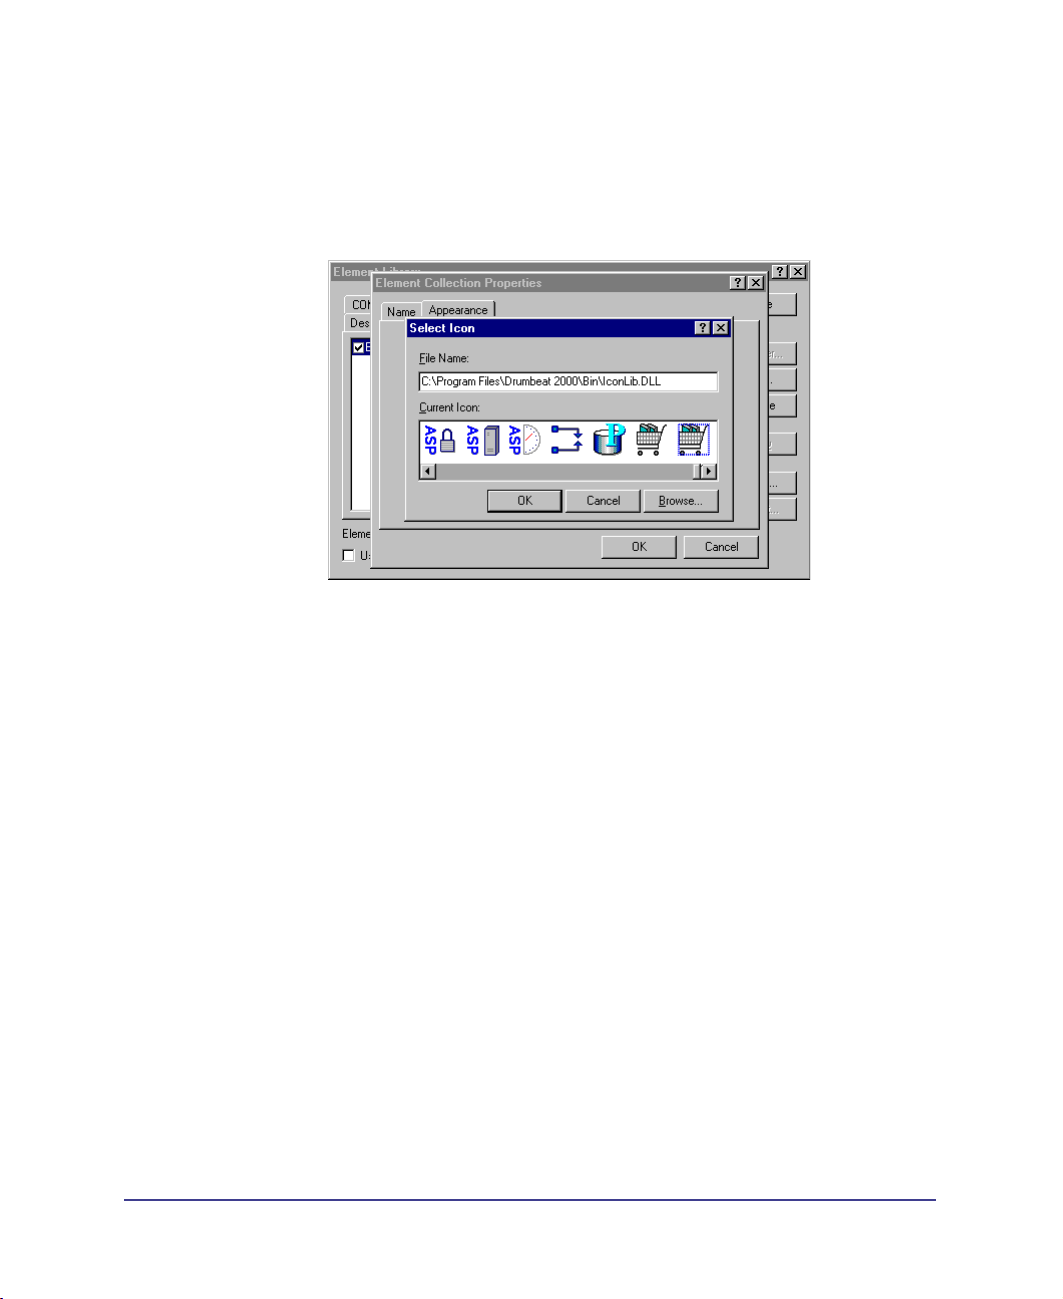
3
Choose an icon to use to represent the collection on the SmartElements
toolbar. Uncheck the Use Wizard checkbox, if it is not already unchecked.
Click the Edit button and then click the Appearance tab. Click Change Icon.
Scroll to the far right for the next to last icon and you’ll find the icon created
especially for this element, as shown in the margin. Click OK, OK again, and
then Done.
Setting up an Element Collection is a time-saving technique that ensures that the
content attribute for the server element is bound to the Shopping Cart Data-Map
on every page. Next time you add the server-side Shopping Cart SmartElement to
a page, drag the Element Collection, named BookStoreCart, from the Element
Toolbar and the settings in the Attributes Sheet will already be made for you.
Insert Product Items Into the Shopping Cart
Continuing on the Book Detail page, we will now use an Image Button on the
Book Detail page that submits the product information to the Shopping Cart.
When you use an Image Button as a submit button (rather than a standard
form button), you must apply the Activation to submit the form when the
button is clicked.
Quick Store Tutorial 27
Page 28

To add a Shopping Cart button:
1
Drag an Image Button from the SmartElements Toolbar to the upper right side
of the layout (under the ‘Number of Copies’ text).
2 In the Attributes tab, name the button ShoppingCartButton.
3 From Asset Center query for images. Locate and drag the btn-AddToCart2 and
btn-AddToCart1 images to the Image Button element.
4 Right click the Image Button element and choose Possible Activations. From
the list of Activations, scroll down to the Forms Submit category and double
click the interaction that says: ShoppingCartButton: Submit the Form when
[ShoppingCartButton] is clicked.
5 In the Parameters dialog, uncheck Validate Form and leave the edit box blank,
as shown in the accompanying figure and table, and then click OK.
Parameter Description Set to:
Validate Form Validates that every form field has data. Unchecked
Replace Action With Overrides the action of the form. Leave blank
See DrumNote 28 for an explanation of using images as submit actions.
Chapter 128
Page 29
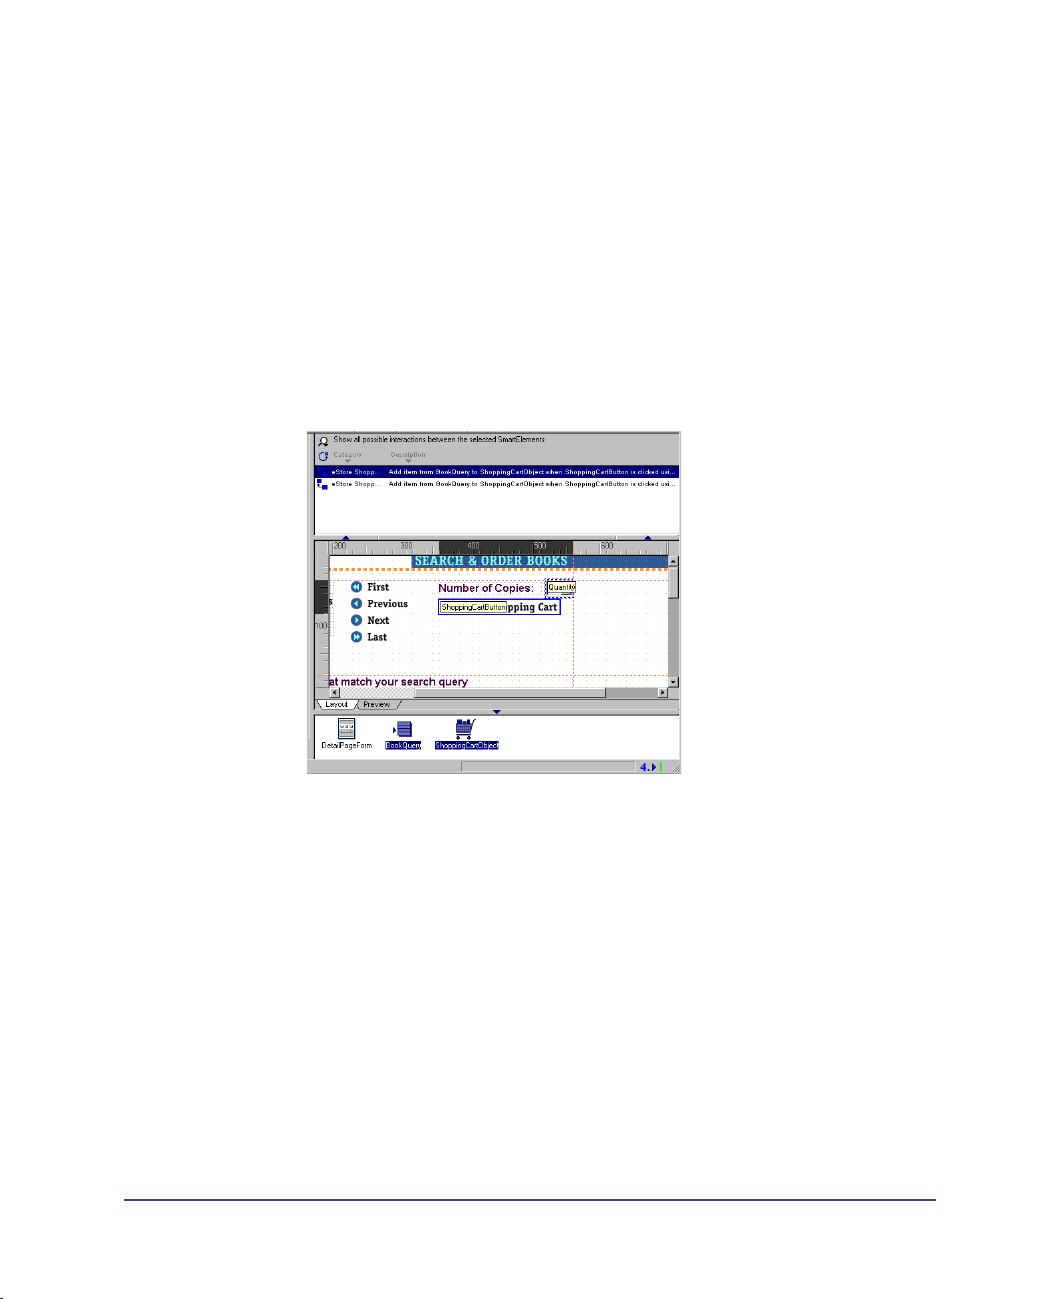
6
Shift select the following elements:
Add to Shopping Cart button (on page)
Dropdown list for number of copies (on page)
ShoppingCartObject (in Basement)
BookQuery Recordset (in Basement)
Right click and choose Possible Interactions.
In Interactions Center, double click the interaction in the eStore Shopping Cart
category that says:
Add item from [BookQuery] to [ShoppingCartObject] when
[ShoppingCartButton] is clicked using quantity from [Quantity]
Quick Store Tutorial 29
Page 30
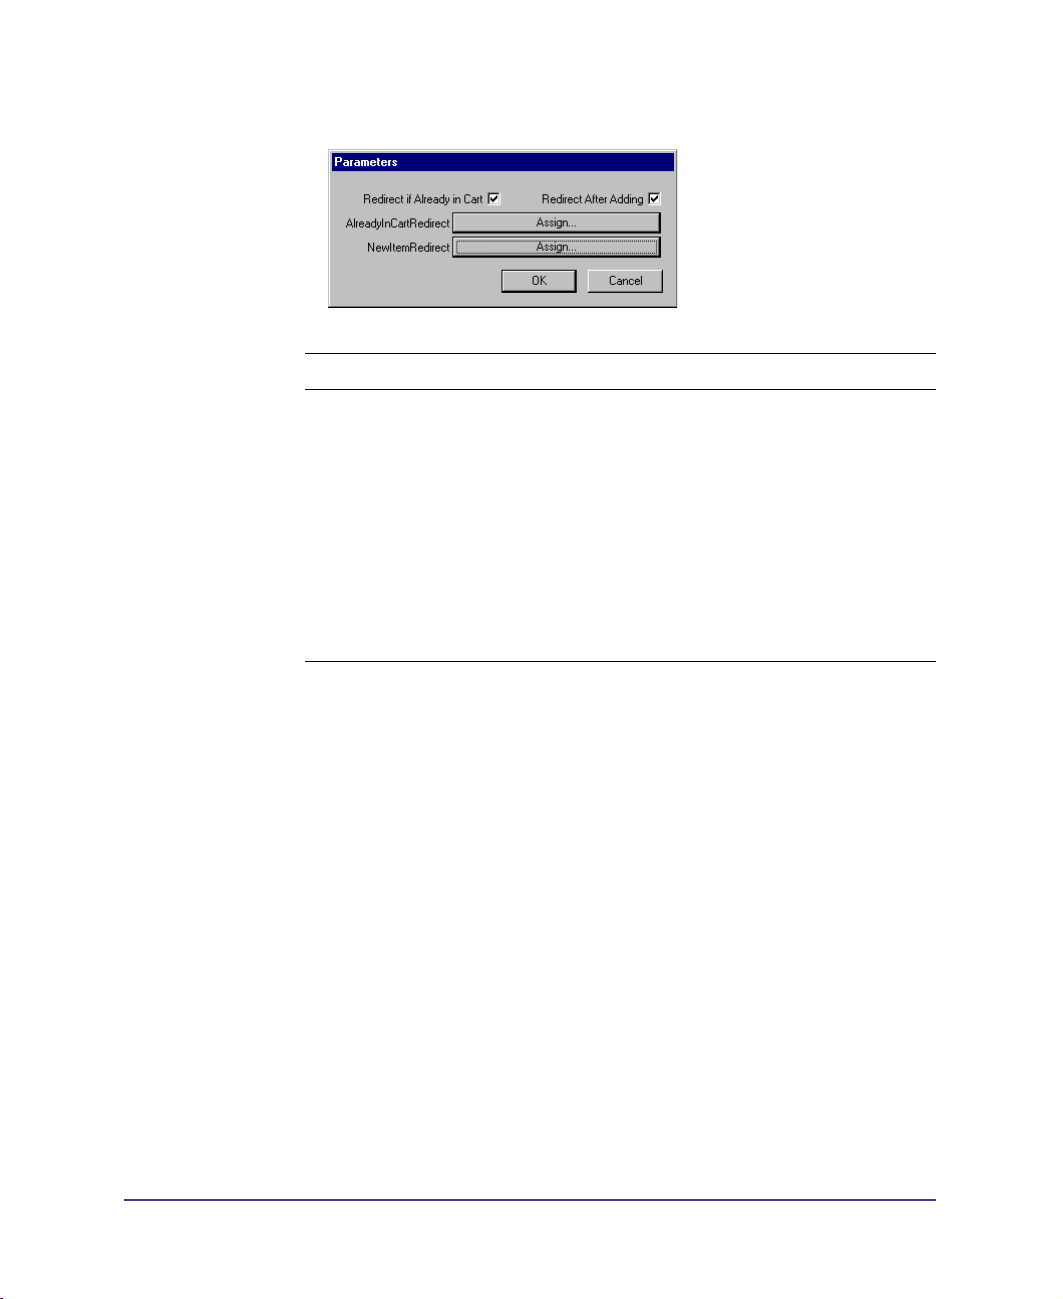
7
Set the parameters according to the following table, then click OK.
Parameter Description Set to:
Redirect after adding Redirect the shopper to
Redirect if already in
Cart:
AlreadyInCartRedirect Specifies the target page for
NewItemRedirect: Specifies the target page for
8 Click OK and OK again. Then, close Interactions Center.
confirmation page.
Redirect the shopper to a message
page if the selected item is already
in the cart.
redirecting if an item is already in
the cart
redirecting after an item is
successfully added to the cart
Checked
Checked
Expand the tree node
and select the Already In
Cart page (under the
Shopping Cart page)
Expand the tree node
and select the Shopping
Cart page.
Chapter 130
Page 31

Build the Shopping Cart Page
The Shopping Cart page displays the items in the Shopping Cart and allows the
shopper to manage his or her cart. From this page the shopper can check out or
continue shopping.
To develop the Shopping Cart page:
1
In Site Manager, click the Shopping Cart page to make its layout active.
2 From the SmartElements Toolbar, add the ShoppingCartObject Element
Collection named BookstoreCart to the Basement of the page. This is the
Element Collection created previously.
3 From the SmartElements Toolbar, add the ShoppingCartDisplay
SmartElement to the page layout. This element displays the content of the
shopping cart server object.
4 Click OK to dismiss the warning message. Because the browser preference for
the site is set to Any Version 4.0 Browser, a reminder message comes up stating
that certain dynamic HTML features will be unavailable as you enhance this
page layout. This is due to limitations in Navigator 4.0 which limit element
movements on HTML pages with form elements.
5 Right click the Shopping Cart display on the layout and select Attributes. In
the Attributes Sheet, set the attributes as shown in the following table. Most
importantly, make sure the Source Cart attribute is set to ShoppingCartObject.
Quick Store Tutorial 31
Page 32

Note: The Attributes Sheet for this element is very long. In order to see and set all the
attributes, use the attribute scroll buttons (the blue arrows) in the top right corner of the
Attributes Sheet.
Attribute: Set to:
Left 24
Top 234
Width 555
Height 135
Border 0
Padding 2
Spacing 0
Anchor Unchecked
Visible Checked
EditableQuantities Checked
MinusSign Checked
ShowShipping/Tax in Summary Unchecked
ShowEmptyMsg Checked
ShowHeaders Checked
Chapter 132
Page 33

Attribute: Set to:
ShowSummary Checked
UseCurrencySymbol Checked
EmptyMsgStyle SC Display Header
EvenRowStyle SC Text
HeaderStyle SC Display Header
OddRowStyle SC Odd Row
SummaryStyle SC Totals
Name ShoppingCartDisplay
Adjusted Total Label Adjusted Subtotal
ColumnWidths 10%,45%,15%,15%,5%
CurrencySymbol $
EmptyMsg Shopping Cart is Currently Empty
GrandTotal Label Grand Total
SourceCart ShoppingCartObject
Subtotal Label Subtotal
Align left
HeaderAlign left
HeaderVAlign top
SummaryTotalsAlign right
VAlign top
For more information about the attributes of the Shopping Cart Display
SmartElement, see the Shopping Cart Display SmartElement section of the
Reference Guide section in this book.
Create an Element Collection with the Shopping Cart page and basement
elements so you don't have to set their attributes again.
Quick Store Tutorial 33
Page 34

To create an Element Collection for the ShoppingCartDisplay Object:
1
In the Layout, shift-select the ShoppingCartDisplay and ShoppingCartObject
elements. Right click and choose Add to SmartElement Library. Name the
element BookstoreCartandDisplay. Click OK.
2 In Element Library, click the Element Collections tab and check the box next
to the BookstoreCartandDisplay name. You can change the icon from Edit >
Appearance as you did with the ShoppingCart object. We’ve added an icon
especially for this Element Collection as shown in the sidebar (scroll to the very
end for icon).
3 Click OK, OK again, and then Done to close Element Library.
Chapter 134
Page 35

Managing the Cart
Additional functions required by shoppers are the ability to modify quantities,
remove individual items, or clear the cart completely and continue shopping.
Continuing on the same Shopping Cart page, you will add update, checkout,
clear cart, and continue shopping buttons to the Shopping Cart page.
Add an Update Button
To add an update button:
1
Drag a Form Button from the SmartElements Toolbar to the layout above the
ShoppingCartDisplay element.
2 Right click the button and choose Attributes. In the Attributes Sheet, set
the attributes according to the following table, and as shown in the
accompanying figure.
Attribute Description Set to:
Left Positions button 24
Top Positions button 202
Anchor Sets element as page anchor when enabled. Unchecked
Visible Sets button as visible or non-visible. Checked
Style Sets the button style. You can create your
own style in Asset Center.
Name Names the button for scripting and Point-
and-Click Interactions.
Label Sets the button label on the layout. Update Order
Type Sets button type Submit
SC Button Style
Update
Quick Store Tutorial 35
Page 36

3
Shift select the following elements:
Update Button (on page)
ShoppingCartObject (in Basement)
4 Right click and choose Possible Interactions. Scroll to the eStore Shopping Cart
category and double click the interaction:
Do not display Update if ShoppingCartObject is empty
There are no parameters for this Interaction.
5 Shift select the following elements:
Update Button (on page)
ShoppingCartDisplay (on page)
ShoppingCartObject (in Basement)
6 Right click and choose Possible Interactions. In the eStore Shopping Cart
category, double click the interaction:
Update ShoppingCartObject with data from ShoppingCartDisplay when
Update is clicked
There are no parameters for this Interaction.
Chapter 136
Page 37

Add a Checkout Button
To add a checkout button:
1
From the SmartElements Toolbar, add another Form Button to the layout, next
to the Update Order button.
2 Right click the button and choose Attributes. In the Attributes Sheet, set
the attributes according to the following table and as shown in the
accompanying figure.
Attribute Description Set to:
Left Positions button 165
Top Positions button 202
Anchor Sets element as page anchor when enabled. Unchecked
Visible Sets button as visible or non-visible. Checked
Style Sets the button style. You can create your own
style in Asset Center.
Name Names the button for scripting and Point-and-
Click Interactions.
Label Sets the button label on the layout. Check Out
Type Sets button type Submit
3 Shift select the following elements:
SC Button Style
Checkout
Checkout Button (on page)
ShoppingCartObject (in Basement)
Quick Store Tutorial 37
Page 38

4
Right click and choose Possible Interactions. Scroll to the eStore Shopping Cart
category and double click the interaction:
Do not display Checkout if ShoppingCartObject is empty
There are no parameters for this Interaction.
This next Interaction ensures that edits are made to this page and saved in the
Shopping Cart array and carried over to checkout.
5 With the CheckOut button and the ShoppingCartObject still selected, shift
select the ShoppingCartDisplay element in the layout.
Chapter 138
Page 39

6
Right click and choose Possible Interactions. In the eStore Shopping Cart
category, double click the interaction:
Update ShoppingCartObject with data from ShoppingCartDisplay when
Checkout is clicked and redirect to pagename.
7 In the Parameters dialog, click Assign. Then, expand the Search For Books
node and select the CheckArea page. This is the page to which the visitor is
redirected after updating.
Quick Store Tutorial 39
Page 40

Clear Items from the Cart
To clear all items from cart:
1
From the SmartElements Toolbar, add another Form Button to the layout next
to the Checkout button.
2 Right click the button and choose Attributes. In the Attributes Sheet, set
the attributes according to the following table and as shown in the
accompanying figure.
Attribute Description Set to:
Left Positions button 275
Top Positions button 202
Anchor Sets element as page anchor when enabled. Unchecked
Visible Sets button as visible or non-visible. Checked
Style Sets the button style. You can create your own style
in Asset Center.
Name Names the button for scripting and Point-and-Click
Interactions.
Label Sets the button label on the layout. Clear Cart
Type Sets button type Submit
3 Shift select the following elements:
SC Button Style
Clearcart
ClearCart Button (on page)
ShoppingCartObject (in Basement)
Chapter 140
Page 41

4
Right click and choose Possible Interactions. Scroll to the eStore Shopping Cart
category double click the interaction:
Do not display ClearCart if ShoppingCartObject is empty
There are no parameters for this Interaction.
5 With the ClearCart button and ShoppingCartObject elements still selected
scroll to the eStore Shopping Cart category and double the interaction:
Remove all ShoppingCart items when ClearCart is clicked and redirect to page
6 In the Parameters dialog, click Assign. Then, expand the Search For Books
node and select the Book Search Results List page. This is the page to
which the visitor is redirected when deleting items from the cart and
continuing shopping.
7 Click OK, and OK again.
This interaction will remove the session variables that are associated with the
shopping cart. But it will preserve other session information that you may not
want to lose when the shopper removes all the items from the cart.
Quick Store Tutorial 41
Page 42

Add a Continue Shopping Button
To add a Continue Shopping button:
1
From SmartElements Toolbar, add another Form Button to the layout next to
the Clear Cart button.
2 Right click the button and choose Attributes. In the Attributes Sheet, set
the attributes according to the following table and as shown in the
accompanying figure.
Attribute Description Set to:
Left Positions button 390
Top Positions button 202
Anchor Sets element as page anchor when
enabled.
Visible Sets button as visible or non-visible. Checked
Style Sets the button style. You can create your
own style in Asset Center.
Name Names the button for scripting and Point-
and-Click Interactions.
Label Sets the button label on the layout. Continue Shopping
Type Sets button type Submit
3 Shift select the following elements:
Unchecked
SC Button Style
Continue
Continue Button (on page)
ShoppingCartDisplay (on page)
ShoppingCartObject (in Basement)
Chapter 142
Page 43

4
Right click and choose Possible Interactions. In the eStore Shopping Cart
category and double click the interaction::
Update ShoppingCartObject with data from ShoppingCartDisplay when
Continue is clicked and redirect to pagename
5 In the Parameters dialog, click Assign. Then, expand the Search For Books
node and select the Book Search Result List page. This is the page to which the
visitor is redirected when clicking the continue shopping button.
6 Click OK and OK again, and close Interactions Center.
Quick Store Tutorial 43
Page 44
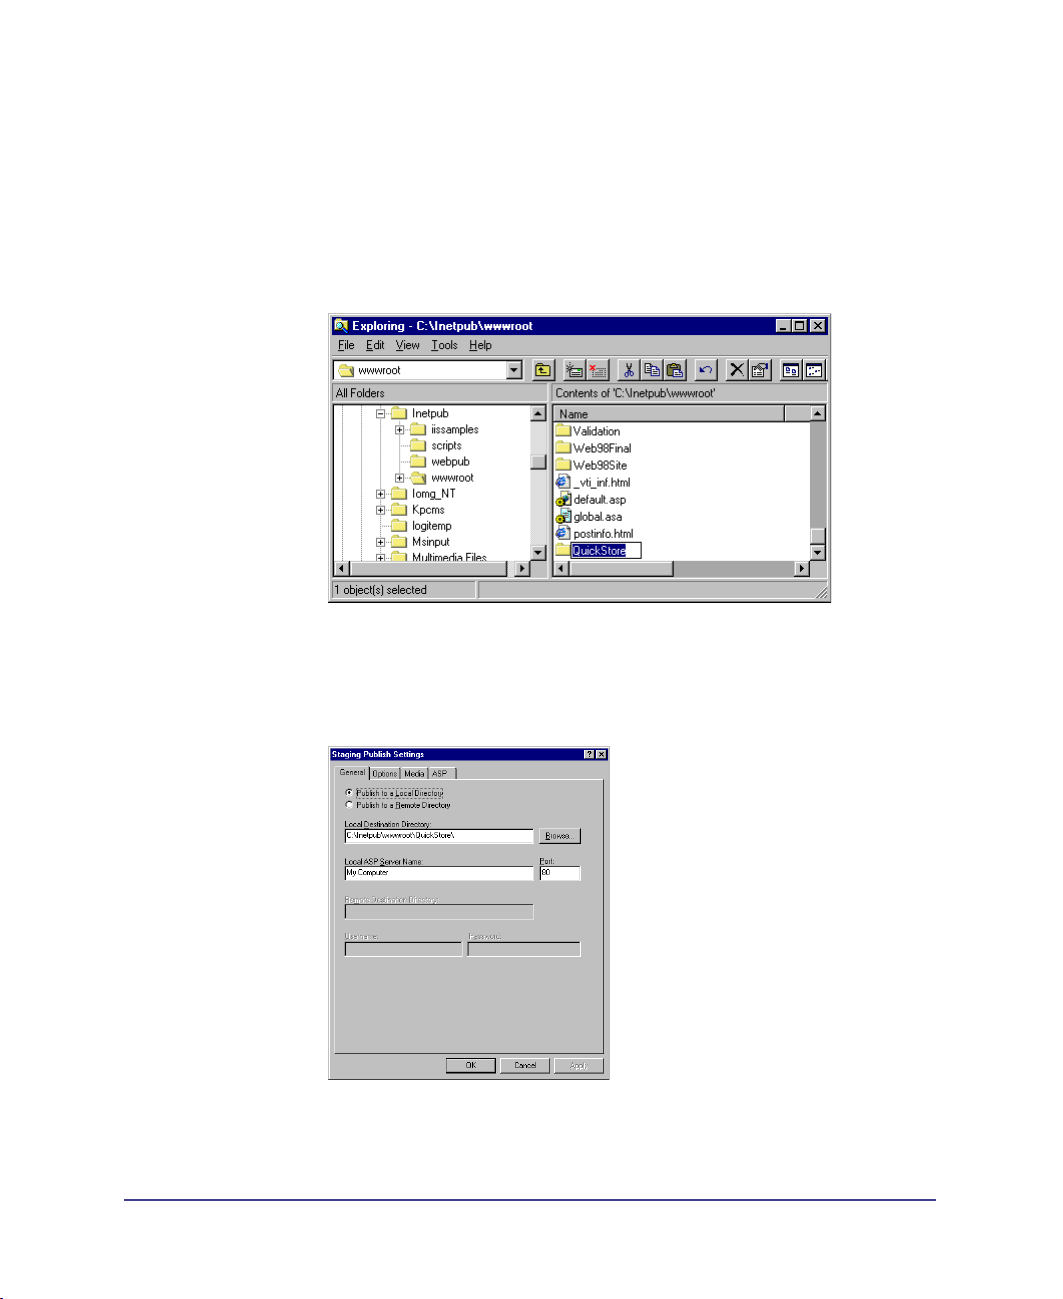
Publish and Browse
You can now publish the site and search for books and click through to the
products detail page. You can add and view books in the Shopping Cart.
To publish the site:
1
In Windows Explorer, create a new folder under the inetpub\wwwroot\
directory. Name the new folder QuickStore.
2 The Staging Publishing settings have already been set up in Drumbeat to point
to the QuickStore folder. To view the settings go to the main menu and choose
Publish > Staging. Then again from the main menu, choose
Publish > Publish Settings. Click OK when finished viewing.
Chapter 144
Page 45

3
Click the Publish button on the main toolbar and choose All Pages. Publishing
takes several moments.
Once the publishing has been completed, you need to copy the book cover images
into the images folder under the publish folder. (The images folder was created
during the publishing process). The book cover images are referenced in the Books
table as a relative path to \images\filename.jpg
To copy the book covers:
Go to Windows Explorer and navigate to the following folder in the Drumbeat
1
program files:
Drumbeat 2000\QuickStore\SiteAssets\Media\covers.
(If you don’t see the QuickStore folder, press F5 to refresh your directories.)
2 Select all (Ctrl+A) of the images in the covers folder. Then, copy (Ctrl+C) all
of the files.
3 Now you will copy them into the images folder under the publishing directory.
Navigate to your web publishing directory at
inetpub\wwwroot\QuickStore\Images.
4 With the Images folder selected, copy (Ctrl+V) all of the book cover images
into the folder.
Browse
Click the Browse button to browse the published site.
Notice you can search, browse and add books to the Shopping Cart.
On the Shopping Cart page, you can add, insert, and remove items, or
continue shopping.
On the Home page you can click a book title and browse the books offered on
special. You can add these books to the shopping cart. In the Starting Point, the
shopping functionality (shopping cart and add-to-cart button) was included on
the Specials Detail page.
Quick Store Tutorial 45
Page 46

Take a Snapshot
Site Snapshot enables you to save a copy of the project file in its current state
under a different name. Drumbeat saves every change you make to the application
to the project file as you work, so taking a Snapshot becomes important when you
want to save milestones as backups. Once you have taken a Snapshot you can
continue to work on the site or switch back to the Snapshot.
To take a Snapshot:
1
From the main menu, choose File > Snapshot.
2 Save the snapshot to the default location in \...\Drumbeat\MySites.
Moving Forward
You’ve built the Shopping Cart functionality using the eStore Shopping Cart
SmartElements and Interactions. In the next step, you will hook up the checkout
page where an electronic form collects customer and payment information and
submits it to a database. You will learn how to set up the Ordering functionality
using the eStore Shipping SmartElements and Interactions.
From this point on, at the beginning of each major instruction, you will be
presented with the SmartElements and Interactions that are used on each page.
Doing this will give you a bird's eye view of the elements and Interactions and
help clarify the e-commerce functionality.
Chapter 146
Page 47

Step 2: Setting Up Login and Checkout
The basic checkout area includes pages where the site shopper can change the
contents in the shopping cart, and decide to check out. The first stage of checking
out is the login page. Returning shoppers are sent to the checkout page. The
checkout page displays the shopping cart’s contents and their personal account
information. The returning shopper can decide to change the personal
information from this page. New shoppers are sent to a page where they enter
their personal account information. After providing their account information
they may proceed to the checkout page.
This tutorial does not use a secure server. We recommend that you use a secure
server and appropriate protocols to process confidential customer information.
See the chapter on security in the User’s Guide for further details.
Here are the main activities on this page:
Applying validation to edit boxes.
Setting up session-based security and capturing the CustomerID in a
session object.
Using CustomerID from session to filter recordsets
Using various recordsets to display order information on page by
replacing tokens.
Logging In
The shopper will either login as a returning customer or create a new user profile.
In Site Manager, click the CheckOutLogin (under the CheckOutArea node) page
to make its layout active.
The SmartElements:
Username and password edit boxes (on page)
LogIn and NewUser image buttons (on page)
SavePassword Checkbox (on page)
Customers Recordset (in Basement)
Password Cookie (in Basement)
The Interactions (to be applied):
Form Validations
Security
Form Submit
Quick Store Tutorial 47
Page 48

Validate the username and password boxes
You will apply a validation that ensures that shoppers enter text into the edit
boxes. The Non-blank validation can be applied at any time before the form is
submitted. You will add it first since it deals with only one element and is the
simplest procedure on this page.
To validate the edit boxes:
1
On the CheckOutLogIn page, select the UserName edit box. Right click and
choose Possible Activations.
2 Scroll to the Forms Validations category and double click the activation
that says:
UserName: Non Blank Validation on UserName
3 In the Parameters dialog enter the error message:
Please enter your email address in the User Name box
Then click OK.
4 Select the Password edit box. Right click and choose Possible Activations.
5 Scroll to the Forms Validation category and double click the activation:
Password: Non Blank Validation on Password
6 In the Parameters dialog enter the error message:
Please enter your password
7 Click OK.
Chapter 148
Page 49

8
Select the Form element in the Basement. Right click and choose Possible
Activations.
9 Scroll to the Forms Validation category and double click the activation
that says:
Login Form: Validate when LoginForm is submitted.
There are no parameters. This ensures that all validation activations have been
applied prior to submission. If any fail, an error report is generated, displayed to
the user, and the form is not submitted.
Welcome Returning Shoppers
The next Interactions will welcome returning shoppers and automatically enter
their usernames and, if they choose, their passwords as well. You will do this by
inserting the user name and password values into a cookie and then replace a
token and insert the value into the edit boxes using the value-name pairs carried
by the cookie.
First welcome returning shoppers by capturing their user names in a cookie and
replacing the token in the header text element.
To save the User Names in a cookie:
1
Shift-select the following elements:
UserName edit box (on page)
LogIn button (on page)
Password Cookie (in Basement)
2 Right click and choose Possible Interactions.
3 View the Cookie category and double click this Interaction:
Insert UserName into PasswordCookie when LogIn is Clicked
4 Set the Name parameter to eStoreUserName, then click OK.
Parameter Description Set to:
Name Defines the Name in the Name-
Value pair which is stored in the
cookie.
5 To insert the value into the UserName edit box the next time the shopper visits,
Enter eStoreUserName. Select and
copy(Ctrl+C) this name so you
don’t have to retype it when you
apply the Set Content
Interactions.
shift de-select the LogIn button, so only the User Name and Password Cookies
are selected.
Quick Store Tutorial 49
Page 50

6
The Interaction Center now shows the Possible Interactions between the edit
box and cookie elements currently selected. Double click this interaction:
Set Content of UserName to the value in Password Cookie
7 Set the Name parameter to eStoreUserName, then click OK.
Parameter Description Set to:
Name Defines the Name in the Name-
Value pair which is stored in the
cookie.
8 To insert the UserName into the Header text element the next time the
Paste (Ctrl+V) eStoreUserName
shopper visits, shift de-select the User Name edit box and Shift select the
Welcome text element, so only the text element and cookie are selected.
9 The Interaction Center now shows the Possible Interactions between the text
element and cookie element currently selected. Double click this interaction:
Replace [Token] in Welcome with value from PasswordCookie
10 Set the parameters according to the following table, then click OK.
Parameter Description Set to:
CookieName Defines the Name in the Name-
Value pair which is stored in the
cookie.
token Defines the token in the text
element. Tokens are casesensitive.
11 The shopper can choose to save the password in a cookie by checking the Save
Paste (Ctrl+V)
eStoreUserName
[UserName]
My Password checkbox. The password is passed to the editbox when the box is
checked as well as when the page is submitted.
Chapter 150
Page 51

To save the passwords in a cookie:
1
To ensure the necessary elements are selected, first select the Password edit box.
Then, shift-select the PasswordCookie element in the basement.
2 Right click and choose Possible Interactions.
3 View the Cookie category and double click this Interaction:
Set content of Password to the value in PasswordCookie
4 Set the Name parameter to eStorePassword, then click OK.
Parameter Description Set to:
Name Defines the Name in the Name-
Value pair which is stored in the
cookie.
5 To insert the value into the Password edit box when the shopper checks the
Enter eStorePassword.
Select and copy(Ctrl+C) this name
so you don’t have to retype it
when you apply the Set Content
Interactions.
Save My Password checkbox, shift select the SavePassword checkbox, so the
Password edit box and cookie are still selected.
6 The Interaction Center now shows the Possible Interactions for the edit box,
check box and cookie elements currently selected. Double click this interaction
in the Cookie category:
If SavePassword is selected, insert Password into Password Cookie when
SavePassword is clicked
7 Set the Name parameter to eStorePassword, then click OK.
Parameter Description Set to:
Name Defines the Name in the Name-
Value pair which is stored in the
cookie.
8 To capture the password when the LogIn button is clicked, shift select the
Paste (Ctrl+V) eStorePassword
LogIn image button, so the edit box, check box and cookie are still selected.
9 Interaction Center now shows the Possible Interactions for the edit box, check
box, image button and cookie elements currently selected. Double click this
interaction in the Cookie category::
If SavePassword is selected, insert Password in Password Cookie when LogIn
is clicked
Quick Store Tutorial 51
Page 52

10
Set the Name parameter to eStore Password, then click OK.
Parameter Description Set to:
Name Defines the Name in the Name-
Value pair which is stored in the
cookie.
11 Select the SavePassword checkbox. Then shift select the PasswordCookie.
12 Interaction Center now shows the Possible Interactions for the check box and
Paste (Ctrl+V) eStorePassword
cookie elements currently selected. Double click this interaction::
Set State of SavePassword if PasswordCookie value exists
13 Set the parameters according to the following table, then click OK.
Parameter Description Set to:
State Sets the State of the check box 1
Cookie Name Defines the name of the cookie PasswordCookie
See DrumNote 42 for a further discussion on using Cookies.
Use User Names and Passwords
These next Interactions allow session-based security. A shopper inputs a username
and password, which are compared against the Customer’s recordset. If the user is
registered in the Customer’s recordset, a session variable is created to define the
customerID. This session variable will be used to filter the Customer recordset on
the CheckOut page.
The Access Group parameter can be used to restrict access to pages or elements.
For information about setting up access groups, see the LogIn and Registration
Starting Points from the StartingPoints folder under your Drumbeat directory.
To look up the Customer using the username and password:
1
Shift-select the following elements:
UserName edit box (on page)
Password edit box (on page)
LogInButton (on page)
Customers recordset (in Basement)
LogInForm (in Basement)
2 Right click and choose Possible Interactions.
Chapter 152
Page 53

3
Scroll to the bottom of the Security category and double click this Interaction:
Verify username from Username and password from Password and redirect
(store additional request in Session)
4 Set the parameters according to the following table, then click OK.
Parameter Description Set to:
SuccessRedirect Defines the page to redirect to
FailedRedirect Defines the page to redirect to
AccessGroup Defines the acces group. Learn
AdditionVariableT
oForward
PasswordColumn Defines the password column in
UsernameColumn Defines the username column in
when the username and
password matches a record in the
recordset
when the username and
password does not match a
record in the recordset
about access groups in the eStore
User Guide.
Stores the CustomerID in the
Session object and passes it to
the page when submitting
the page.
the recordset.
the recordset.
Click the Assign button. Click
the tree node. Select the Check
Out page (under the
CheckoutArea).
Click the Assign button. Click
the tree node and select the
FailedLogIn page (under the
Checkout Area >
CheckoutLogin)
Customer
CustomerID
Password
CustomerEmail
See DrumNote 3 for more information on password protecting pages with this
interaction.
Next, you will apply the submit action to the Login button. Select only the LogIn
button. Then, right click and choose Possible Activations.
5 Scroll to the Forms Submit category and double click this Activation:
6 Submit the form when LogInButton is clicked
7 Set the parameters according to the following table, then click OK.
Parameter Set to:
Validate Form Leave checked.
Replace Action With Leave blank since the form action is set by the Security
8 Right click the NewUser button and select Assign Link. In the Link dialog,
Interaction
select the NewUser page (in the CheckoutArea, CheckOutLogin section).
Quick Store Tutorial 53
Page 54

Create and Update User Profiles
The NewUser and UpdateUser pages insert user data into the Customers
Recordset. The functionality has already been added to the Quick Store Starting
Point so you can focus on setting up the main e-commerce functionality. After
completing this tutorial, refer to Chapter 3 Creating Checkout Pages in the
Building Your eStore section of this book for page descriptions.
Checking Out
From the CheckOut page, the shopper can update customer details, update
shopping cart content, and submit the order. Once the shopper submits the order,
a new order is inserted in the Orders recordset and the Shopping Cart data is
entered in the Orders details recordset.
In Site Manager, click the CheckOut page to activate its layout.
The Page-Level SmartElements:
Customer Information elements including name, shipping and billing
addresses, email and credit card text fields
Customer Update button
Shopping Cart Display and object for viewing and updating cart contents (you
will add this in the next section)
Shopping Cart Update button (you will add this in the next section)
Order Summary elements including order date, subtotal, shipping, tax, and
grandtotal text value fields
Submit Order button
The Site-Level SmartElements displayed in the Basement:
CheckOut Form
ASP Session
Customers recordset
Orders recordset
OrderDetails recordset
SalesTax recordset
ShoppingCart (you will add this element)
SalesTaxHidden (hidden form element)
CustomerIDHidden (hidden form element)
OrderDateHidden (hidden form element)
Chapter 154
Page 55

ShippingHidden (hidden form element)
The Interactions you will add on the page:
You will apply Point-and-Click Interactions for ordering and payment
functionalities including shipping, and tax calculation on-the-fly.
eStore shipping
eStore tax
eStore Shopping Cart
Database Edit
Forms Set Value
Form Submit
Check the Customer Database
We have added a filter on the Customers recordset to this page in the Starting
Point. A shopper logs in as an existing customer on the CheckOutLogIn page, or
registers as a new one on the New User page. These pages either retrieve an
existing customer record or create a new one, and in each case store the
CustomerID as a session variable. Then, on this page (CheckOut), the Customers
recordset is filtered on the CustomerID in the session variable.
To view the Filter Customers on Session Variable Interactions:
1
Open the basement (if not already), right click the Customers recordset and
choose Assigned Interactions (ordered).
2 In the attic, select the Interaction in the Database Miscellaneous category:
Filter Customers with Session variable before page loads
3 Double click the interaction to view its parameters.
In the parameters dialog you can see that the name of the session variable is
CustomerID and the column on which to filter the Customers recordset is
CustomerID. This Interaction ensures the correct record is displayed.
4 Click OK or Cancel to close the Parameters dialog. Then, close the
Interactions Center.
Quick Store Tutorial 55
Page 56

View Shopping Cart Contents
The Shopping Cart Display element is used to display the contents of the
shopping cart.
1 From the Element Toolbar, use the Shopping Cart and Display Element
Collection, named BookStoreCartandDisplay, you previously created, and drop
it on the layout.
2 Select the Shopping Cart Display element, right click and choose Attributes.
Position the display at Left 24 and Top 438.
Next, add an update cart button:
1
From Element Toolbar, add a Form Button.
2 Right click the button and choose Attributes. In the Attributes Sheet, set the
attributes following the table below:
Attribute Description Set to:
Left Positions button 271
Top Positions button 399
Anchor Sets element as page anchor when
enabled.
Visible Sets button as visible or non-visible. Checked
Style Sets the button style. You can create your
own style in Asset Center.
Name Names the button for scripting and Point-
and-Click Interactions.
Label Sets the button label on the layout. Update Cart
Type Sets button type Submit
3 Scroll the basement to reveal the ShopplingCartObject. Then shift select the
Unchecked
SC Button Style
UpdateCart
following elements:
Update Button (on page)
ShoppingCartDisplay (on page)
ShoppingCartObject (in Basement)
4 Right click and choose Possible Interactions. Scroll to the eStore Shopping Cart
category and double click the interaction:
Update ShoppingCartObject with data from ShoppingCartDisplay when
UpdateCart is clicked
Chapter 156
Page 57

Displaying the OrderDate
The order date is set to the current date of the server following these steps.
Set tokens in the Order Date text box:
1
Right-click the OrderDateText text box element and select Attributes.
2 From the drop down list for Content, select Text.
3 Click on the ellipses button to open the text editor.
4 Enter [monthnumber]/[daynumber]/[year] for the tokens. Then, click OK.
5 Right click the OrderDateText text box and choose Possible Activations.
Double click the interaction in the Date category:
OrderDateText: Replace tokens in OrderDateText with static date/time
from server
6 Set the parameter according to the following table, then click OK.
Parameter Set to:
Use Leading Zeroes Checked
Quick Store Tutorial 57
Page 58

Inserting OrderDate into the Orders Recordset
Set the token in the hidden form element:
1
Right-click the OrderDateHidden element, in the Basement, and select
Attributes.
2 From the drop down list for Content, select Text.
3 Click on the ellipses button to open the text editor.
4 Enter [monthnumber]/[daynumber]/[year] for the tokens. Click OK.
5 Right click and choose Possible Activations. Double click the activation in the
Date category:
OrderDateHidden: Replace tokens in OrderDateHidden with static date/time
from server
6 Now, apply the interaction to insert the order date into the recordset when the
SubmitOrder button is clicked.
7 Shift-select the following elements:
SubmitOrder button (on page)
OrderDateHidden (in Basement)
Orders recordset (in Basement)
8 Right click and choose Possible Interactions. Double click the interaction in
the Database Edit category:
Use OrderDateHidden data to update/insert in Orders when SubmitOrder
is clicked
9 Set the Recordset Column parameter according to the following table, then
click OK.
Parameter Set to:
Recordset Column OrderDate
Calculate Sales Tax, Shipping, and Grand Total
The sales tax, shipping charges, and grand total of the order are calculated at
browse time. The sales tax is determined by the customer’s billing state and the
store state of origin. These variables come from the Customer recordset and the
parameters set in the eStore Tax Interactions. The shipping options are
determined by the item quantity. The shipping cost of the total quantity is set by
the flat rate. The grand total is calculated by adding the subtotal, shipping cost,
and tax (if any).
Chapter 158
Page 59

Calculating the Subtotal
These values are calculated using interactions between text boxes and the
ShoppingCartObject. The steps for each one are the same, only the participants
are different.
To calculate the Subtotal:
1
Select the SubtotalText text box. Type $[SUBTOTAL] in it
2 Shift select the following elements:
SubtotalText text box (on page)
ShoppingCartObject (in Basement)
3 Right click and choose Possible Interactions. Scroll to the eStore Shopping Cart
category and double click the interaction::
Replace [token] in SubtotalText with [Total] from ShoppingCartObject
4 Set the parameters according to the following table, then click OK.
Parameter Description Set to:
DoNotShowIfEmpty Allows you to hide the subtotal if
there are no items in the cart.
token The exact case-sensitive text in
the text element that will be
replaced with the subtotal
Total Allows you to select from three
types of totals.
checked
[SUBTOTAL]
Sub total
Quick Store Tutorial 59
Page 60

Calculating and Displaying Shipping Cost
There are numerous methods for calculating shipping costs in eStore Builder. For
this tutorial, we will use the simplest method and calculate shipping cost based on
a flat rate of $5 per item. Other options include shipping costs based on weight
and on total purchase. There is also a UPS server-side interaction with eStore that
provides shipping options and corresponding costs.
Please refer to the DrumNotes for more details on these alternative
shipping methods.
To set up shipping functionality:
1
Select the ShippingText text box. Type $[Shipping] in it
2 Shift-select the following elements as referenced by name given in
Attributes Sheet:
ShippingText (on page)
ShoppingCartObject (in Basement)
3 Right click and choose Possible Interactions. In the eStore Shipping category,
double click the interaction::
Replace [token] in ShippingText with [flat-rate] shipping based on total
quantity from ShoppingCartObject
4 Set the parameters according to the following table, then click OK.
Parameter Description Set to:
Ship Rate Per Item The numeric value of the shipping
charge for each item.
Token Exact case-sensitive text that will
be replaced by the shipping value
Chapter 160
5
[Shipping]
Page 61

Inserting Shipping Cost into the Orders Recordset
Now we set up the Shipping Cost to be inserted into the Orders recordset when
the Submit Order button is clicked. Since this is not possible using a text element,
we need to insert it from the ShippingHidden hidden form SmartElement.
Set the token in the hidden form element:
1
Right-click the ShippingHidden element, in the basement, and select
Attributes.
2 From the drop down list for Content, select Text.
3 Click on the ellipses button to open the text editor, and enter [Shipping]. Then
click OK.
4 Shift-select the following elements:
ShippingHidden (in Basement)
ShoppingCartObject (in Basement)
5 Right click and choose Possible Interactions. In the eStore Shipping category,
double click the interaction::
Replace [token] in ShippingHidden with [flat-rate] shipping based on total
quantity from ShoppingCartObject
6 Set the parameters according to the following table, then click OK.
Parameter Description Set to:
Ship Rate Per Item The numeric value of the shipping
charge for each item.
Token Exact case-sensitive text that will
be replaced by the shipping value
5
[Shipping]
Now, apply the interaction to insert the Shipping into the recordset when the
SubmitOrder button is clicked.
7 Shift-select the following elements:
SubmitOrder Button
ShippingHidden (in Basement)
Orders recordset (in Basement)
Quick Store Tutorial 61
Page 62

8
Right click and choose Possible Interactions. In the Database Edit category,
double click the interaction:
Use ShippingHidden data to update/insert in Orders when SubmitOrder
is clicked
9 Set the Recordset parameter according to the following table, then click OK.
Parameter Set to:
Recordset Column Freight
Calculating and Displaying Sales Tax
To calculate Sales Tax:
1
Select the SalesTaxText element and enter $[SalesTax].
2 Shift select the following elements:
SalesTaxText text box (on page)
ShoppingCartObject (in Basement)
SalesTax recordset (in Basement)
Customers recordset (in Basement)
3 Right click and choose Possible Interactions. Scroll to the eStore Tax category
and double click the interaction::
Replace [token] in SalesTaxText with sales tax from SalesTax using
ShoppingCartObject total and state from Customers
4 Set the parameters according to the following table, then click OK.
Parameter Set to:
MyStates CA
token [SalesTax]
TaxStateCol State
TaxCol SalesTax
BillingStateCol BillingRegion
Note: In order to display sales tax when testing your site, make sure your customer billing
region is a state that is listed in the MyStates parameter for the “Set sales tax in
ShoppingCartObject to tax value from SalesTax using state from Customers” interaction.
Chapter 162
Page 63

Inserting Sales Tax into the Orders recordset
Now we need to set up the sales tax to be inserted into the Orders recordset when
the Submit Order button is clicked.
Set the token in the hidden form element:
1
Right-click the SalesTaxHidden element, in the basement, and select
Attributes.
2 From the drop down list for Content, select Text.
3 Click on the ellipses button to open the text editor, and enter [SalesTax].
To calculate Sales Tax:
1
Shift select the following elements:
SalesTaxHidden (in Basement)
ShoppingCartObject (in Basement)
SalesTax recordset (in Basement)
Customers recordset (in Basement)
2 Right click and choose Possible Interactions. Scroll to the eStore Tax category
and double click the interaction::
Replace [token] in SalesTaxHidden with sales tax from SalesTax using
ShoppingCartObject total and state from Customers
3 Set the parameters according to the following table, then click OK.
Parameter Set to:
MyStates CA
token [SalesTax]
TaxStateCol State
TaxCol SalesTax
BillingStateCol BillingRegion
Now, apply the interaction to insert the sales tax into the recordset when the
SubmitOrder button is clicked.
4 Shift-select the following elements:
SubmitOrder button (on page)
SalesTaxHidden (in Basement)
Orders recordset (in Basement)
Quick Store Tutorial 63
Page 64

5
Right click and choose Possible Interactions. In the Database Edit category,
double click the interaction::
Use SalesTaxHidden data to update/insert in Orders when SubmitOrder
is clicked
6 Set the Recordset Column parameter according to the following table, then
click OK.
Parameter Set to:
Recordset Column SalesTax
Calculating the Grand Total
This value is calculated the same way as the Subtotal, only the participants and the
token are different.
To calculate the Grand Total:
1
Select the GrandTotalText text box. Type $[GRANDTOTAL] in it
2 Shift select the following elements:
GrandTotalText text box (on page)
ShoppingCartObject (in Basement)
3 Right click and choose Possible Interactions. Scroll to the eStore Shopping Cart
category and double click the interaction::
Replace [token] in GrandTotalText with [Total] from ShoppingCartObject
4 Set the parameters according to the following table, then click OK.
Parameter Description Set to:
DoNotShowIfEmpty Allows you to hide the Grand
Total if there are no items in
the cart.
token The exact case-sensitive text in
the text element that will be
replaced with the subtotal
Total Allows you to select from three
types of totals.
Chapter 164
Checked
[GRANDTOTAL]
Grand total
Page 65

Inserting CustomerID into the Orders Recordset
The CustomerID is derived from the Customers recordset, and inserted into the
Orders recordset.
Bind the CustomerIDHidden element to the Customers recordset:
1
Right-click the CustomerIDHidden element, in the Basement, and select
Attributes.
2 From the drop down list for Content, select Recordset.
3 Select the Customers recordset, and the CustomerID column.
4 Leave the check boxes unchecked.
Now, apply the interaction to insert the customer ID into the recordset when the
SubmitOrder button is clicked.
5 Shift-select the following elements:
SubmitOrder button (on page)
CustomerIDHidden (in Basement)
Orders recordset (in Basement)
6 Right click and choose Possible Interactions. In the Database edit category,
double click the interaction::
Use CustomerIDHidden data to update/insert in Orders when SubmitOrder
is clicked
7 Set the Recordset Column parameter according to the following table, then
click OK.
Parameter Set to:
Recordset Column CustomerID
This next Interaction inserts a new order record and allows you to obtain an
Autonumber OrderID from the Orders recordset when the new order is
generated. The Autonumber OrderID is placed in a session element, which will be
used extensively as you will see later.
Quick Store Tutorial 65
Page 66

To insert the new order and save the OrderID in the Session element:
1
Shift select the following elements:
Session (in Basement)
Orders recordset (in Basement)
Submit Order button (on page)
2 Right click and choose Possible Interactions. Scroll to the eStore Shopping Cart
category and double click the interaction:
Insert order in Orders and store OrderID in Session when SubmitOrder
is clicked
3 Set the parameters according to the following table, then click OK.
Parameter Description Set to:
TimeStamp Col The name of the column in the
recordset that stores the
Timestamp
OrderID Col The name of the column in the
recordset that stores the OrderID
TimeStamp
OrderID
Chapter 166
Page 67

Insert the Shopping Cart as Order Details
After you insert the order, and OrderID in the session object, you use the
OrderID, along with the Shopping Cart contents to insert into the
OrdersDetail recordset.
1 Shift select the following elements:
ShoppingCartObject (in Basement)
Session (in Basement)
OrderDetails recordset (in Basement)
Submit Order button (on page)
2 Right click and choose Possible Interactions. Scroll to the eStore Shopping Cart
category and double click the interaction::
Insert ShoppingCartObject in OrderDetails when SubmitOrder is clicked
using OrderID from Session
3 Set the parameters according to the following table, then click OK.
Parameter Set to:
Redirect After Insert Checked
Failed Redirect Order Failed (under Search For Books >
Success Redirect Order Confirmation (under Search For Books >
VariableName OrderID
OrderIDCol OrderID
4 Click OK and Close Interactions Center.
Checkout Area)
Checkout Area)
Quick Store Tutorial 67
Page 68

Submit the Form
Next, you will apply the Activation that submits the form when the shopper clicks
the Submit Order button.
1 Right click the Submit Order element and choose Possible Activations.
2 Scroll to the Forms Submit category and double click this activation:
SubmitOrder: Submit the form when SubmitOrder is click
3 Set the parameters according to the following table, then click OK.
Parameter Set to:
ValidateForm Uncheck
ReplaceAction With Leave Blank
Adding Another Level of Security
Now we will add one more level of security to mask the credit card number.
Notice the Credit Card text box is set to the token CreditCard. We use this token
when applying the interaction that masks the card number.
1 Shift-select the following elements:
CreditCardTypes (on page)
Customers recordset (in Basement)
2 Right click and select Possible Interactions. In the eStore Shopping Cart Misc.
category, double click the interaction:
Replace [token] in CreditCardText with last [N] characters in credit card
number from Customers
3 Set the parameters according to the following table, then click OK.
Parameter Set to:
N4
Mask xxxx-xxxx-xxxx-
token [CreditCard]
CreditCardCol CreditCard
Chapter 168
Page 69

Publish and Browse
Click the Publish button on the main toolbar and choose All Pages.
Publishing takes a few moments. When Publishing has been completed, click
Browse on the main toolbar.
Take a Snapshot
Site Snapshot enables you to save a copy of the project file in its current state
under a different name. Drumbeat saves every change you make to the application
to the project file as you work, so taking a Snapshot becomes important when you
want to save milestones as backups. Once you have taken a Snapshot you can
continue to work on the site or switch back to the Snapshot.
To take a Snapshot:
From the main menu, choose File > Snapshot. Save the snapshot to the default
location in \...\Drumbeat\MySites.
Moving Forward
So far, you’ve built a store front to the search, results, and detail DataForms. You
added to the store front functionality by inserting customer and payment details
to the orders database. You learned how to filter recordsets, set up session-based
security, and combine static and dynamic content using tokens. For more
information about these techniques, you can read Chapter 3 Creating Checkout
Pages in this book.
In the next step, you will set up the order confirmation page and practice filtering
recordsets and displaying order information by replacing tokens.
Quick Store Tutorial 69
Page 70

Step 3: Confirming the Order
When the shopper clicks the Submit Order button on the Checkout page, two
actions can take place depending on the outcome of the payment and order insert
mechanisms. If the order is submitted properly, the shopper is taken to a
confirmation page, which assures the shopper that he or she will soon receive the
order. If the order is not submitted properly, the shopper is taken to the Order
Failed page, which provides a phone number for phone orders.
Here are the main activities on this page:
Using OrderID from session to filter recordsets
Using various recordsets to display order information on page by
replacing tokens.
To activate the Order Confirmation page:
In Site Manager, click the Order Confirmation page to make its layout active.
The Page-Level SmartElements:
Customer Information text elements that contain Tokens.
Data Loop element to display shopping cart items from the orders
detail recordset.
The Site-Level SmartElements displayed in the Basement:
ASP Session (you will add this)
Customers recordset
CustOrderDetails recordset
OrderTotals recordset
The Interactions on the page:
Database Miscellaneous category for replacing tokens with values
Database Filter for Data-Loop element
Chapter 170
Page 71

Use OrderID in Session to Filter Recordsets
You will reference the recordset with the session variable before the Order
Confirmation page loads ensuring that the current order is displayed.
To do this:
1
Click the Order Confirmation page to activate its layout.
2 From Asset Center, click the Locate Assets button. Select SmartElements >
Show all SmartElements using custom technology.
3 Click the word custom (underlined in blue) and select asp from the list. Drag
the ASP Session object to the page. The object appears in the Basement.
4 Shift select the following elements:
ASPSession (in Basement)
CustOrderDetails recordset (in Basement)
5 Right click and choose Possible Interactions. Scroll to the Database
Miscellaneous category and double click the interaction:
Filter CustOrderDetails with Session variable before page loads
6 Set the parameters according to the following table, then click OK.
Parameter Description Set to:
Variable Name Defines the session variable from
previous page.
OrderIDCol Defines the unique order
identification column in
recordsets
OrderID
OrderID
Now that the correct record is filtered, you need to get the Customer details from
the Customers recordset. Doing this will facilitate replacing the token values,
which you will do next.
Quick Store Tutorial 71
Page 72

To filter the customers recordset with the customerID:
1
Shift select the following elements:
Customers recordset (in Basement)
CustOrderDetails recordset (in Basement)
2 Right click and choose Possible Interactions. Scroll to the Database Filter
category and double-click the interaction:
Filter Customers with related field from CustOrderDetails
3 Set the parameters according to the following table, then click OK.
Parameter Description Set to:
Filter column Defines the columns with which
to filter a recordset.
Filter By Defines the columns with which
to filter a recordset
CustomerID
CustomerID
Now, you need to repeat the same process with the OrderTotals recordset so that is
likewise filtered to the appropriate data for a captured order. In this case, the
captured order is filtered on the orderID.
To filter the customers recordset with the orderID:
1
Shift select the following elements:
OrdersTotals recordset (in Basement)
CustOrderDetails recordset (in Basement)
2 Right click and choose Possible Interactions. Scroll to the Database Filter
category and double-click the interaction:
Filter OrdersTables with related field from CustOrderDetails
3 Set the parameters according to the following table, then click OK.
Parameter Description Set to:
Filter column Defines the columns with which
to filter a recordset.
OrderID
Filter By Defines the columns with which
to filter a recordset
Chapter 172
OrderID
Page 73

Display Order Data on Order Confirmation Page
This is done by replacing tokens. Tokens for billing and order information are
used on the Confirmation Page.
To replace tokens for First and Last Name in Order Summary area:
1
Shift select the following elements:
Ordering text element (on page)
Customers recordset (in Basement)
2 Right click and choose Possible Interactions. Scroll to the Database
Miscellaneous category and double click the interaction:
Replace multiple [tokens] in Ordering with values from Customers
3 Set the parameters according to the following table, then click OK.
Parameter Description Set to:
Token List Defines tokens in comma-
Column List Defines columns in recordset to
To replace tokens for OrderNumber:
1
Shift select the following elements:
delimited string. Case-sensitive
comma-delimited string.
use as token values. Use commadelimited string. Token values can
have brackets around column
name: SQL Syntax.
[Freestone], [LastName]
FirstName, LastName
OrderNumber text element (on page)
CustOrderDetails recordset (in Basement)
2 Right click and choose Possible Interactions. Scroll to the Database
Miscellaneous category and double click the interaction:
Replace [token] in OrderNumber with value of [Field] from CustOrderDetails
3 Set the parameters according to the following table, then click OK.
Parameter Description Set to:
token Defines tokens in comma-
delimited string.
Field Defines columns in recordset to
use as token values.
[OrderNumber]
OrderID
Quick Store Tutorial 73
Page 74

To replace tokens for Total Price:
1
Shift-select the following elements:
TotalPrice text element (on page)
OrderTotals recordset (in Basement)
2 Right click and choose Possible Interactions. Scroll to the Database
Miscellaneous category and double click the interaction:
Replace [token] in TotalPrice with value of [Field] from OrderTotals
Set the parameters according to the following table, then click OK.
Parameter Description Set to:
Token Defines tokens in comma-
Field Defines columns in recordset to
To replace tokens for Shipping Address data:
1
Shift select the following elements:
delimited string.
use as token values.
[Price]
GrandTotal
ReceiverName text element (on page)
Customers recordset (in Basement)
2 Right click and choose Possible Interactions. Scroll to the Database
Miscellaneous category and double click the interaction:
Replace multiple [tokens] in ReceiverName with values from Customers
3 Set the parameters according to the following table, then click OK.
Parameter Description Set to:
Token List Defines tokens in comma-
delimited string.
Column List Defines columns in recordset to
use as token values. Use commadelimited string.
[FirstName], [LastName]
FirstName, LastName
Chapter 174
Page 75

To replace tokens for Shipping Address data:
1
Shift-select the following elements:
City text element (on page)
Customers recordset (in Basement)
2 Right click and choose Possible Interactions. Scroll to the Database
Miscellaneous category and double click the interaction:
Replace multiple [tokens] in City with values from Customers
3 Set the parameters according to the following table, then click OK.
Parameter Description Set to:
Token List Defines tokens in comma-
delimited string.
Column List Defines columns in recordset to
use as token values. Use commadelimited string.
[City], [State], [Zip]
ShipCity,
ShipRegion,ShipPostalCode
Note that the street address text element is bound to the ShipAddress column in
the Customers recordset.
Note: You can apply text styles to tokens. Styles applied to text within a text element
override the style applied at the element level. You can present token values in different
styles from styles applied on the text elements themselves.
Publish and Browse
Click the Publish button on the main toolbar and choose All Pages.
Publishing takes a few moments. When Publishing has been completed, click
Browse on the main toolbar.
Take a Snapshot
Site Snapshot enables you to save a copy of the project file in its current state
under a different name. Drumbeat saves every change you make to the application
to the project file as you work, so taking a Snapshot becomes important when you
want to save milestones as backups. Once you have taken a Snapshot you can
continue to work on the site or switch back to the Snapshot.
To take a Snapshot:
From the main menu, choose File > Snapshot. Save the snapshot to the default
location in \...\Drumbeat\MySites.
Quick Store Tutorial 75
Page 76

Moving Forward
Quick Store is a fast-track approach to understanding e-commerce application
development. Hopefully, by going through Quick Store, you have acquired an
awareness of which SmartElements and Interactions can be used when developing
an e-commerce application in Drumbeat.
As well as getting acquainted with eStore, you have built a fully functioning store
front. You can customize this project file (or you can use the QuickStoreComplete
Starting Point) by adding your own graphics and adding product data in the
databases. For step-by-step instructions on how to customize the
QuickStoreComplete Starting Point, go to chapter 8 Customizing Quick Store in
the User’s Guide section of this book.
Your feedback will help us to develop new DrumNotes. The eStore DrumNotes
will further demonstrate the eStore components and how they can be used to
build advanced e-commerce applications. Send your comments and suggestions to
documentation@drumbeat.com.
Overview of eStore Components
The main purpose of the Building Your eStore section is to help you jump right in
and start using the eStore components. These components are only available in
the eStore package. For technical details about each component, you can go to the
Reference section of this book.
Shopping Cart Server-side SmartElement
This is a SmartElement that holds product information. Adding to or removing
items from the cart updates the Shopping Cart SmartElement. This is the server
element that interacts with the products and orders database tables.
Chapter 176
Page 77

Shopping Cart Data-Map
The Data-Map is a static Content Table in Drumbeat. You can change and
customize it as you would any other static Content Table (see index of the
Drumbeat User’s Guide or HTML Help for information about Content Tables).
Depending on your specific storefront requirements, your Data Map will look
different from project to project.
The Data-Map provides information needed by the shopping cart for:
Obtaining information from the Product database when product items are
added to the shopping cart.
Storing information in the OrderDetails database when a site shopper decides
to check out and order products.
Calculating totals for price, weight, and/or discounts.
Determining which information in the shopping cart is displayed on the page.
The Data-Map links the dynamic content using a server-side element (Shopping
Cart site-level SmartElement), static content using a page-level element (Shopping
Cart Display SmartElement), and the data generated by parameters on-the-fly.
eStore ships with a five possible Data Map starter files that display the main
requirements of a storefront. You can choose the one you want to use based on
your requirements.
DataMap: Basic shopping cart used in the Quick Store tutorial
BasicShoppingCart: Includes only required fields. Does not include weight
tracking or line-item discount handling.
ShoppingCart_WeightTracking: Includes the weight-related columns so you
can do weight-based shipping.
ShoppingCart_Discounts_NoWeight: Includes the columns needed to handle
line-item discounts without the weight-related columns.
ShoppingCart_Discounts_WithWeight: Includes columns for discounts and
weight to enable both line-item discounts and weight-based shipping.
Chapter 2: Adding and Updating the Shopping Cart contains instructions
about how to customize the Data-Map.
Quick Store Tutorial 77
Page 78

Shopping Cart Display (Page-level) SmartElement
This is a place-holder display image that represents the look and content of the
server-side element. Since the actual content of the server-side Shopping Cart
cannot be displayed at design-time, use the Shopping Cart Display page-level
element while developing the storefront in Drumbeat.
eStore Suite of Point-and-Click Interactions:
There are currently seven eStore Contract categories that include many eStore
point-and-click Interactions for activating the Shopping Cart, as well as adding
merchandising, tax, and shipping functions.
These are the components that you will be working with when building an ecommerce site in Drumbeat. Technical information for each of them can be found
in the Reference section of this book.
Chapter 178
Page 79

CHAPTER 2
Setting Up Product Pages
.............................................................................................................
The content on the product pages comes from the products database. To display
product information you first need to query the products database and display the
query results in an ODBC Content Table in Drumbeat. Then, you can use the
DataForm Wizard to create the product pages. If you do not have a products
database, we have included an empty Access database that you can use as a starting
point. Find the starter database file, storefront.mdb, in the Drumbeat program
files directory: <installation directory>\QuickStore\SiteAssets\Database\.
Populate the empty database with your own product information.
Below is an overview of the steps that you can follow to set up the product pages.
Understand that there are many ways that you can create the products pages. The
products pages are set up using basic Drumbeat techniques and are not unique to
building an e-commerce site with eStore. You can find instructions and examples
of different techniques by checking the index of the Drumbeat User’s Guide and
Help for the words in bold.
Before working in Drumbeat, make sure you have a products database. eStore
offers an empty database for you to use as a starter if you do not have one (see the
location noted above). You can fill in the database with your own content items.
2
To create the products pages in this section, you will:
Set the Site Preferences to ASP.
Set up the Publishing Settings.
Set up a Data Source Name (DSN) to the products database.
Query the products database table.
Generate DataForms using DataForm Wizard.
79
Page 80
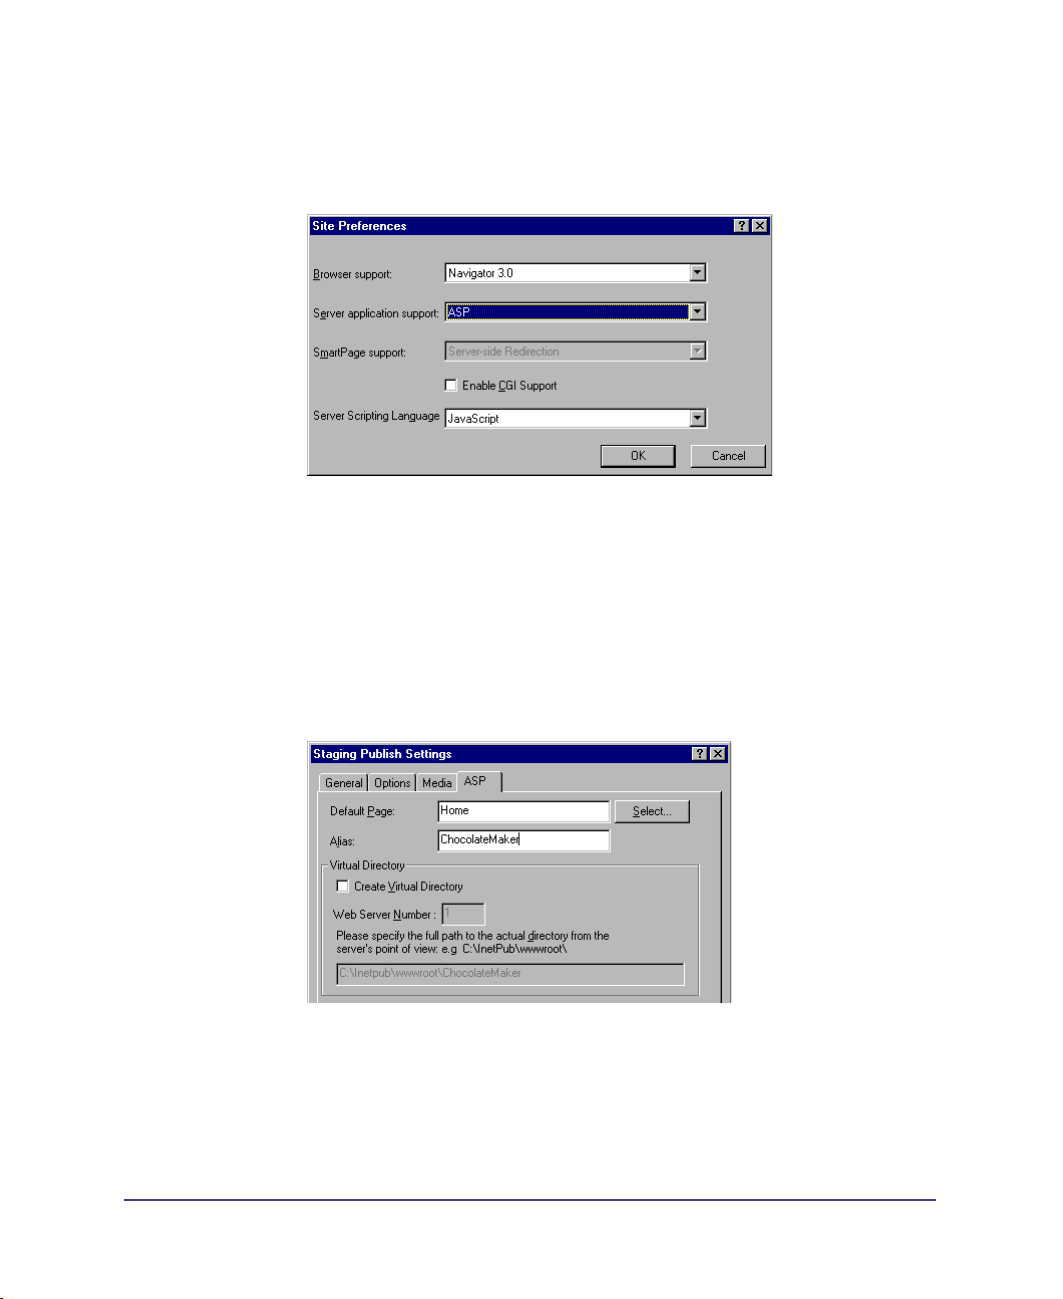
Setting Site Preferences
Set the Drumbeat Site Preferences to ASP. From the main menu, choose File >
Preferences > Site. Select ASP for the Server application support.
Setting Publishing Settings
Enter your publish settings. From the main menu, choose Publish > Publish
Settings. In the General tab, enter the publishing path and the local ASP server
name (if you are publishing to other than your local machine). Then, in the ASP
tab, enter the Alias. The Alias field takes the name of the folder you created under
the wwwroot folder for the project. Note that the ASP tab is only displayed when
server support is set to ASP.
If you need step-by-step instruction on how to set the publish settings, check the
index of the Drumbeat User’s Guide or Help for the words in bold.
After you have set the site application support and publish settings, you are ready
to query the products database and access the product information that will be
displayed on the shopping pages.
Chapter 280
Page 81

Setting up a Data Source Name to the
Products Database
Set up a System Data Source Name (DSN) to the products database. The DSN is
set up in the Windows ODBC Administrator that can be accessed from Query
Manager in Drumbeat or from the Windows Control Panel.
If you need step-by-step instruction on how to set up a DSN, check the index of
the Drumbeat User’s Guide or Help for the words in bold.
Setting Up Product Pages 81
Page 82

Creating a Query
Create a query. From Asset Center, click Add Assets and choose Queries. Then
click New. The SQL Query dialog opens where you can use SQL Wizard to create
the query. The query results are used to generate the product pages.
Click Save Query. The Query Manager opens, click Create Table. Doing this
creates an ODBC Content Table. You can view the content table in Content
Center. Choose the query name from the Content Table list. The Content Table is
a visual representation of the products query. The figure shows the sample
database populated with sample product information.
If you need step-by-step instruction on how to create a query and an ODBC
Content Table, check the index of the Drumbeat User’s Guide or Help for the
words in bold.
Now you are ready to run DataForm Wizard. The following example, creates two
products pages, one of which lists the product items with links to the product
detail pages for each item.
Chapter 282
Page 83

Creating Product Pages with DataForm Wizard
This is a simple example in which two product pages are generated using
DataForm Wizard. The first product page lists the product items in a table. The
product name is linked to a product details page. After creating product pages,
you can add the shopping components. Chapter 3: Adding Products to the
Shopping Cart contains an example of adding the shopping components.
Two product pages are generated using DataForm Wizard:
Products Results Page: Lists product items and links to the products
detail page.
Products Detail Page: Displays product details. This page will contain the
shopping cart. (See Chapter 3: Adding Products to the Shopping Cart.)
To use DataForm Wizard to create the product pages for your site:
1
From Site Manager, click New DataForm.
Setting Up Product Pages 83
Page 84

2
In the first screen, select the ODBC Content Table that represents the product
information.
3 DataForm Wizard asks you to enter a name for your DataForm and choose the
pages you want to create. A Detail page will always be created, so this option is
checked by default and grayed out. For this example, only the Results List and
default Detail page will be created.
Chapter 284
Page 85

4
In the Message option dialog, you can choose the message you want to display
when users reach the end of record navigation while browsing Detail pages, or
accept the defaults (No more records).
5 In the next screen, you choose the columns in the Content Table that you want
to display in the Detail page by checking those fields you want to include.
6 Navigation buttons can be used to browse through detail pages. Since in this
example the product result page links to its corresponding detail page, the
navigation button option is unchecked.
Setting Up Product Pages 85
Page 86

7
In this example the Result List page is used to provide an abbreviated list of
all product items by default (when the page is accessed directly, instead of via
a search).
8 In the next screen, you can choose to have sort features on the Results List
page. You can also choose how many records you want to show on the page.
Chapter 286
Page 87

9
The page that lists all the product items has a link to a page where the product
item is described. Choose which column you want to link to the details page.
If the unique key has not been set in the Query, you will have to indicate the
unique keys in the database in one more dialog. To generate the pages,
click Finish.
Setting Up Product Pages 87
Page 88

After clicking Finish, DataForm Wizard generates the products results and details
pages. Each DataForm page contains the Recordset SmartElement in the
Basement that represents the data source for that page (as shown in the Results
List page in the screenshot below). A Recordset element is created for each
database query that is used on a page. You can see another element displayed in
the Basement that represents the Form on the page. In the next few chapters, you
will be imposing activations and interactions on these Basement elements, as well
on page elements, to set up the shopping experience.
If you need step-by-step instruction on how to use DataForm Wizard and create
product pages, check the index of the Drumbeat User’s Guide or Help for the
words in bold.
Publish and browse your pages.
From the main toolbar, choose Publish > All Pages. Publishing takes a few
moments depending the number of pages and the elements on those pages. After
the pages have published successfully, from the main menu choose Publish >
Browse with. Choose the browser you want to use to view the product pages.
Start browsing and click the links on the product-list page to view the details
about each product item. You may want to place some links on the pages in order
to facilitate browsing the site.
Chapter 288
Page 89

The shopping cart will be added to the product detail page in Chapter 3: Adding
Products to the Shopping Cart.
If you need step-by-step instruction on how to publish and browse product pages,
check the index of the Drumbeat User’s Guide or Help for the words in bold.
Setting Up Product Pages 89
Page 90

Chapter 290
Page 91

CHAPTER 3
Adding and Updating the
Shopping Cart
.............................................................................................................
Before adding the shopping cart to the page, you need to import the Data-Map
Content Table into Drumbeat that works with the Shopping Cart elements. The
Data-Map tells the shopping cart which database columns (fields) to get data from
and which to update. It also tells the Shopping Cart display SmartElement what
to display on the page. Once you have imported the Data-Map you can set up the
shopping pages.
Here are the major steps for adding products to a Shopping Cart:
Import and customize the Data-Map. There are actually several different
Data-Maps to choose from depending on the features you want in your
shopping cart. The Data-Map CSV files can be found in the Drumbeat
program files directory. If you installed Drumbeat in the default location the
directory path will be:
C:\Program Files\Drumbeat 2000\estoreBuilder
BasicShoppingCart.csv: Includes only required fields. Does not include weight
tracking or line-item discount handling.
ShoppingCart_WeightTracking.csv: Includes the weight-related columns so
you can do weight-based shipping.
ShoppingCart_Discounts_NoWeight.csv: Includes the columns needed to
handle line-item discounts without the weight-related columns.
ShoppingCart_Discounts_WithWeight.csv: Includes columns for discounts
and weight to enable both line-item discounts and weight-based shipping.
Add the Shopping Cart SmartElement to a page.
Add the Shopping Cart Display SmartElement to a page.
3
91
Page 92

Updating the shopping cart can take place on the page where the shopper adds
items to the shopping cart, or a redirection page. On either page, the shopper can
manage the shopping cart by increasing the quantity of an item or removing it
from the shopping cart altogether.
To allow users to update the shopping cart you need the following SmartElements
on the page:
Shopping Cart SmartElement (server-side element)
Shopping Cart Display SmartElement
Form button(s)
In this chapter, these major steps are broken down into detailed instructions.
These steps are specific to setting up a storefront using the eStore package. Once
you understand the basic principles, you can customize the Data-Map and
storefront setup to suit your own requirements. You can exchange ideas with other
eStore developers and get specific assistance at community.drumbeat.com.
Configuring the Shopping Cart’s Content
The first step is to import the CSV file for your Data-Map. Then you can
customize the Data-Map table to suit your particular database.
To import the Data-Map CSV File:
1
In Content Center, click New Content Table.
2 Select Populate From External File and click Use First Line for Column Names.
3 Enter Data-Map as the name of the Content Table.
4 Browse to the eStore Builder folder in the Drumbeat program files folder. If
installed Drumbeat to the default location, this will be:
C:\Program Files\Drumbeat 2000\Estore Builder\
5 Select the CSV file you want to use and click Open.
6 Expand the Content Center so you can view all the rows in the table.
Chapter 392
Page 93

Customizing the Data-Map
Each project is unique. Therefore, you will probably want to customize the DataMap at some point to suit your own requirements. Customizing the Data-Map
gives you a lot of flexibility regarding the database tables you need to reference and
the type of functionality you want to set up.
Hooking up the Data-Map to the Source Database
The source database when developing an e-commerce solution is usually a
products table with product information columns (fields) including name,
description, price, etc. The source database table is represented in the first row of
the Data-Map table.
To hook up the data-map to the source database:
1
In the Content Center, choose the Data-Map table from the list.
2 Double click the header on the first row. Rename the row to Source Database
Table. You can rename it anything you want to represent the database table you
used to create the product pages.
3 Now you want to enter the appropriate database column (field) names in the
cells of the first row. Open your source database so you can look at the field
names. An example of a database table in Microsoft Access is shown below.
Adding and Updating the Shopping Cart 93
Page 94

4
In the Data-Map table in Drumbeat, double click the first cell under the
column header titled ProductID. The text editor appears. Look at your
products (source) database table in your database program to find the Unique
Key field-name. Then, enter the field name of the Unique Key in the cell.
5 The second column titled Qty, which stands for Quantity, has None entered by
default and should not be changed. The content of this column does not come
from the source database but from the shopping activity. This content comes
from the site shopper entering a number. Go to the Product column (third
column) and double click the cell where Product Name is currently entered.
Enter the name of the column in your database that contains product names.
Chapter 394
Page 95

6
Double click the Price cell and enter the field name for the product-item
price field.
7 The next two cells in the basic Data-Map table: Total and Remove should not
be changed. The word None is entered indicating that the content does not
come from the source database. Instead this content comes from the site
shopper’s activity.
The first row should reflect the field names of your source database. Double
check to make sure that you haven’t made any typos and that you entered the
correct field names.
Note: A typical cause of the ADODB.Fields error 800aocc1 is misspelled columns in the
Data-Map or non-existing columns in the database.
Hooking up the Data-Map to the Destination Database Table
The destination database when developing an e-commerce solution is usually an
orders-detail table with order information columns (fields) including a foreign key
to the products table, unit price, quantity, etc. The destination database table is
represented in the second row of the Data-Map table.
To hook up the data-map to the source database:
1
In the Content Center, choose the Data-Map table from the list.
2 Double click the header on the second row that says Item#. Rename the row to
Destination Database. You can rename it anything you want to represent your
orders-detail database.
3 Now you want to enter the appropriate database column (field) names in the
cells of the second row. Open your destination database table so you can look
at the field names. An example of a database table in Microsoft Access is
shown below.
Adding and Updating the Shopping Cart 95
Page 96

4
In the Data-Map table in Drumbeat, double click the second cell under the
column header titled ProductID. The text editor appears. Look at your
orders-details (destination) database table in your database program to find
the Unique Key field-name. Then, enter the field name of the Unique Key in
the cell.
5 Double click the second cell under the column header titled Qty (stands for
Quantity). The text editor appears. Look at your orders-details (destination)
database table in your database program to find the Quantity field-name. Then,
enter the field name of the Quantity field in the cell.
6 Skip the Name and Price cells. This content comes from the products table.
7 Double click the Total cell under and enter the database field name for the total
cost of the orders.
8 Skip the Remove cell. This content comes from the shopping activity.
Chapter 396
Page 97

The second row should reflect the field names of your destination database.
Double check to make sure that you haven’t made any typos and that you entered
the correct field names.
Note: Data-Map Third Row: Do not change this row. Provides keys for required columns of
the shopping cart. This allows the shopping cart code to track required columns without
having to know the column title or the relative column position. As a result, you can name
the cart columns anything you like and order them however you want. The CSV file contains
entries for this row. Do not change them. All columns beyond the required column should be
left blank. The following columns are required. You change the column names, as long as
you do not change the entries in the columns in the third row.
Column Name Column Key
Quantity QUANTITY
Product PRODUCT
Price PRICE
Total TOTAL
Product ID ID
Weight* WEIGHT
TotalWt* TOTALWEIGHT
Remove REMOVE
Note: Weight and TotalWeight columns are provided in the
ShoppingCart_WeightTracking.csv file. These are useful for determining shipping costs, and
are required if you choose to use the UPS shipping capabilities available.
Adding and Updating the Shopping Cart 97
Page 98

Adding Columns to the Data-Map
By adding columns to the Data-Map you can:
Add additional columns in the Shopping Cart Display
Capture additional columns into the Orders (destination database) tables.
To add a column to the Data-Map content table:
1
In Content Center, open the Data-Map.
2 Click the Add Row/Column and choose Add Row from the list.
3 In the Column dialog, enter a name. The name you enter will appear in the
Shopping Cart Display element on the page. Then, from the Type list, choose
Text. In the Text Type list, choose Formatted.
4 Now, you must enter the correct cell values for each row depending on your
source and destination database tables. See steps under Customizing the
Data-Map.
5 When you add a column to the Data-Map and the Data-Map is bound to
the Shopping Cart SmartElement, the column is defaulted as ‘not shown’.
You must add the column to the ‘Show’ side of the Shopping Cart
Content attribute.
6 In the Basement, right click the Shopping Cart SmartElement and choose
Attributes.
7 In the Attributes tab, click the ellipsis button next to Static Content.
Chapter 398
Page 99

8
In the Content dialog, make sure all the columns are under ‘Show
these columns’.
Note: A typical cause of the ‘SourceCol is undefined’ run-time error is caused by Data-Map
columns configured as ‘not shown’ for the content attribute of the Shopping Cart.
Displaying the Shopping Cart Data-Map Columns
Data-Map Fourth Row (Is Visible): Determines the visibility of a column in the
Shopping Cart Display element. Columns that you want to be visible should be
set to 'true' and columns that you want to be hidden should be set to 'false.' For
instance, the Product ID is a required column in the cart, but you may not want
to clutter the cart display with a cryptic ID. By setting the ID column's visibility
to false, you won't see the ID, but it will be there when you submit the cart to
your orders database.
Adding and Updating the Shopping Cart 99
Page 100

Adding the Shopping Cart SmartElement
To insert product items into a shopping cart, you need the Shopping Cart server,
Recordset, and Form button SmartElements on the same page. In the example
below, the Shopping Cart element is added to the Product Detail page generated
by DataForm Wizard (see Chapter 2 Creating Products Pages). An Interaction is
added to three elements so that the current product item in the recordset is added
to the shopping cart when the button is clicked.
To insert product items into a shopping cart, you need these SmartElements:
Recordset SmartElement
Shopping Cart server SmartElement
Submit button SmartElement
The Shopping Cart SmartElement lives in the Basement in Drumbeat during
design-time and on the server at run-time. You don't have to configure anything
on the server. The server only needs to support JavaScript. This server-side
JavaScript object captures information as the site shopper browses through
the site.
To add the Shopping Cart Basement SmartElement from Asset Center:
1
From Asset Center, click Locate Assets and choose SmartElements > Show all
Custom SmartElements, mouse down to the Shopping Cart SmartElement.
2 Drag and drop the element on the page. The element shows up in the
Basement. Make sure this element is on the right side of the recordset. This
element represents the Shopping Cart on the server.
3 With the element selected, activate the Attributes Sheet. Then, in the Content
attribute drop-down, choose Static Content and click the ellipsis button and
select the Data-Map Content Table. The element must be bound to the
Data-Map Content Table. This table maps the element to the source and
destination databases.
4 Setting up an Element Collection is a time-saving technique that ensures that
the content attribute for the server element is bound to the Data-Map on every
page. Next time you add the server-side Shopping Cart SmartElement to a
page, drag the Element Collection from the Element Toolbar.
Chapter 3100
 Loading...