

Page 1

ADOBE DRIVE CC
ADMINISTRATOR’S GUIDE
Page 2

© 2013 Adobe Systems Incorporated. All rights reserved.
Adobe Drive CC Administrator’s Guide
Adobe, the Adobe logo, Creative Cloud, and Creative Suite are either registered trademarks or trademarks of Adobe
Systems Inc. in the United States and/or other countries. Microsoft and Windows are registered trademarks or
trademarks of Microsoft Corporation in the United States and/or other countries. Apple, Mac OS, and Macintosh are
trademarks of Apple Computer, Inc., registered in the United States and other countries. Java and Sun are trademarks or
registered trademarks of Oracle Corporation, in the United States and other countries. All other trademarks are the
property of their respective owners.
The information in this document is furnished for informational use only, is subject to change without notice, and should
not be construed as a commitment by Adobe Systems Inc. Adobe Systems Inc. assumes no responsibility or liability for
any errors or inaccuracies that may appear in this document. The software described in this document is furnished under
license and may only be used or copied in accordance with the terms of such license.
Adobe Systems Inc., 345 Park Avenue, San Jose, California 95110, USA.
Page 3

Adobe Drive CC Administrator’s Guide
Overview
This document is intended for server administrators. For information about how to use Adobe® Drive CC to
connect to a DAM server, see the Adobe Drive 5 User Guide and other documentation at
helpx.adobe.com/drive.html.
Adobe Drive CC is the name of the version 5 release; the product is referred to in the documentation and in
the user interface as Adobe Drive 5.
As server administrator, you are responsible for configuring Adobe Drive 5 in order to simplify the
user’s experience when connecting to your server through the Adobe Drive 5 Connect UI. You do this
using a server presets configuration file; see “
In order to connect to a DAM server through Adobe Drive 5, each client must make sure that all
certificates in the server’s certificate chain are trusted. If a certificate is not trusted, the user’s first
attempt to connect fails with an error telling them to inform their administrator. If any of your clients
encounter this problem, see “
Adobe Drive 5 is extensible. If you are a third-party asset-management vendor, the Adobe Drive 5 SDK
allows you to provide integrated access to your DAM system from selected Adobe Creative Suite® 6
and Creative Cloud™ desktop applications. You can use the SDK to customize Adobe Drive 5 so that it
can seamlessly represent the contents of your remote DAM system as a network drive on the end
user’s file system.
Configuring server presets for Adobe Drive 5” on page 4.
Adding a non-trusted certificate to a client” on page 5 for instructions.
Adobe Drive 5 provides access to “hidden” user functions within integrated applications, such as
viewing version history or adding a check-in comment when saving a file. These features are
automatically activated in the integrated desktop application when the user installs Adobe Drive 5
along with your custom connector.
You can use the Adobe Application Manager Enterprise Edition (AAMEE) to package Adobe Drive 5 in a
platform-specific format suitable for enterprise deployment. See “
environment” on page 6.
Deploying in an enterprise
3
Page 4
Adobe Drive CC Administrator’s Guide Configuring server presets for Adobe Drive 5 4
Configuring server presets for Adobe Drive 5
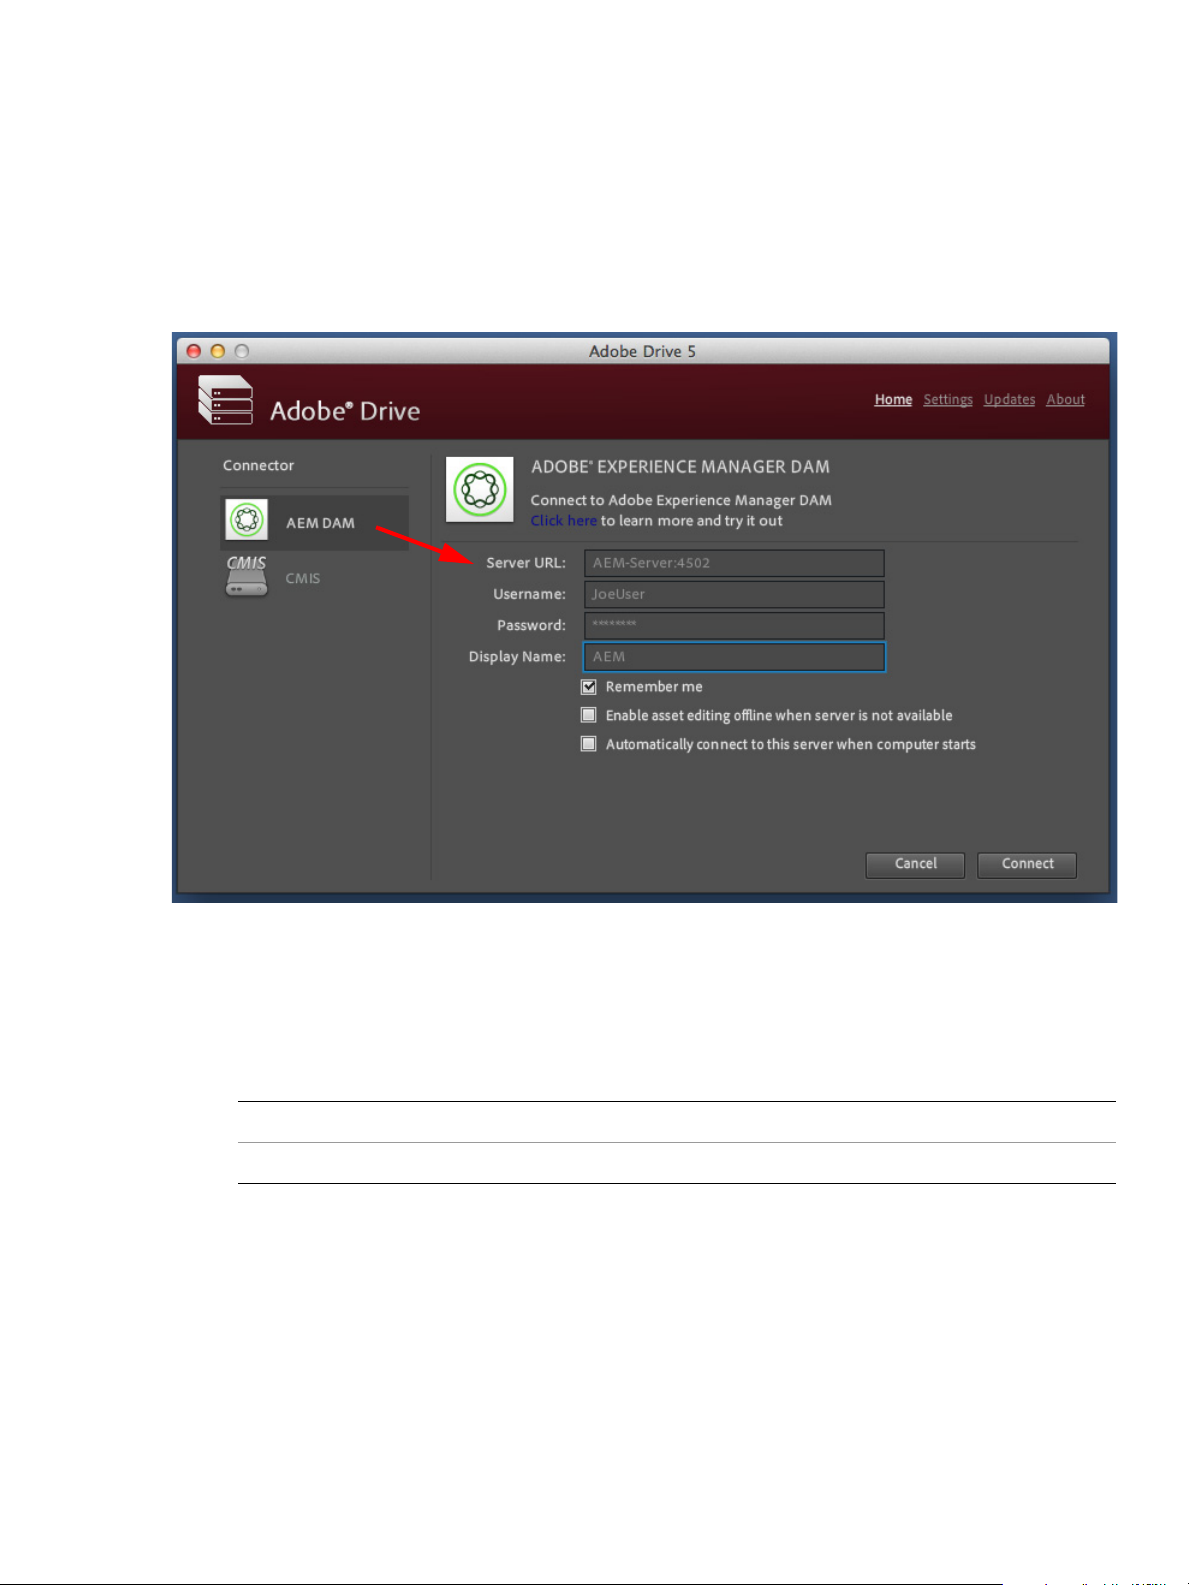
The Adobe Drive 5 Connect UI can be customized to offer easy access to your servers. When you bring up
the Adobe Drive 5 Connect UI on a client system, it offers a list of Preset Servers for each connector in the
left panel; when you select one, the URL for that server is automatically filled in as the Server URL.
The Preset Servers shown in this list are taken from a configuration file named
an editable text file. As administrator, you can configure this file and deploy it along with Adobe Drive 5 on
each client system.
Adobe Drive 5 looks for the configuration file on the client system at this location:
In Windows
In Mac OS
C:\Program Files (x86)\Common Files\Adobe\Adobe Drive 4
/Library/Application Support/Adobe/Adobe Drive 4
Configuring the presets file
The ServerPresets.xml file is a UTF8-encoded XML file that associates a list of server names with their
URLs. It contains a single
with this syntax:
<server name="display name" url="server URL">
Each element corresponds to one list item in the Preset Servers panel of the Adobe Drive 5 Connect UI.
<serverpresets> element, which in turn contains a set of <server> elements
ServerPresets.xml. This
Page 5

Adobe Drive CC Administrator’s Guide Adding a non-trusted certificate to a client 5
The ServerPresets.xml file that is installed as part of the default configuration contains no <server>
elements, but has comments describing how to configure the file. Here is an example of the configured
file, edited to configure for two CMIS servers and two CQ DAM servers:
<?xml version="1.0" encoding="UTF-8"?>
<serverpresets version="1.0" defaultScheme="cmis">
<server name="My CMIS Server A"
url="cmis://myservera.mycompany.com:8080/alfresco/service/cmis"/>
<server name="My CMIS Server B"
url="cmis://myserverb.mycompany.com:8080/alfresco/service/cmis"/>
<server name="My DAM Server A"
url="cq://myservera.mycompany.com:4502"/>
<server name="My DAM Server B"
url="cq://myserverb.mycompany.com:4502"/>
</serverpresets>
Deploying your configuration
There are three paths to deploying your configuration file with Adobe Drive 5:
As an Adobe partner, you can customize the Adobe Drive 5 installer to install your configured
ServerPresets.xml file along with Adobe Drive 5. For information about how to do this, see the
Adobe Drive 5 SDK Programmer’s Guide.
As an IT administrator, you can update the servers available to Adobe Drive 5 users by pushing your
configured
ServerPresets.xml file to user systems on which Adobe Drive 5 has already been
installed.
As a local system administrator, you can edit the default ServerPresets.xml file in a text editor on
the local system. You may need to copy the file to edit it.
Adding a non-trusted certificate to a client
In any deployment environment, each client must make sure that all certificates in the certificate chain for
a DAM server are trusted; that is, included in the Java
not trusted, the user’s first attempt to connect to the DAM server through Adobe Drive 5 fails with this
error:
Unable to connect because the server certificate is not trusted. To connect to this server, check with your
system administrator or refer to the Adobe Drive support documentation.
If your users encounter this problem, you must add the non-trusted certificate to the client’s trusted store,
according to platform. For both platforms:
The cacerts file is part of the Java installation. You must have write access to this file in order to add a
certificate.
The default password for the cacerts keystore is 'changeit'. Use this password when prompted while
adding the certificate.
cacerts keystore. If any certificate in the chain is
Page 6

Adobe Drive CC Administrator’s Guide Deploying in an enterprise environment 6
In Mac OS In Mac OS, the cacerts file is part of the standard Java installation. If you upgrade Java, you might lose the
entry for a certificate that you previously added to the
keystore. If this happens, you must add it again.
Add a non-trusted certificate to the Java
cacerts keystore using the following commands in a command
shell:
1. Change the permission of
permission for the file should be:
cacerts in the installed Java location using the chmod command. The
lrwxr-xr-x
2. Add the non-trusted certificate to the cacerts keystore with commands like this:
/Library/Java/Home/bin/keytool -keystore
/Library/Java/Home/lib/security/cacerts -import -alias cqse
-file cqnewpubliccert.cert
In Windows In Windows, The cacerts file is part of Java in the Adobe Drive 5 installation. If you uninstall Adobe Drive 5
and reinstall it, you must add the certificate back to the trusted store after reinstalling.
In order to add a certificate, you must open a command shell as Administrator with full privileges:
1. From the Start menu, right-click Command Shell and choose Run as > Administrator, or use Run to
enter the command:
runas /user:<admin> "cmd.exe"
2. Change the permission of cacerts to allow "Read and Write". The file that Adobe Drive uses is here:
C:\ProgramData\Adobe\CS5\jre\lib\security\cacerts
3. Add the non-trusted certificate to the cacerts keystore with commands like this:
> cd C:\Source\adobe-drive\main\resources\third_party\jre\1.6.0_29\bin
> keytool -import -keystore
> cd C:\Source\adobe-drive\main\resources\third_party\jre\1.6.0_29\lib\security
> cacerts -file cqnewpubliccert.cert -alias cqse
Deploying in an enterprise environment
In order to deploy Adobe Drive 5 in an enterprise environment you need the Adobe Application Manager
Enterprise Edition (AAMEE). This is a free tool Adobe provides for IT administrators. AAMEE allows the IT
admin to package up Adobe's applications in a deployment-friendly format.
Download AAMEE from here:
http://www.adobe.com/devnet/creativesuite/enterprisedeployment.html
Download Adobe Drive 5 from here:
http://www.adobe.com/products/adobedrive.html
Creating a deployment package
Follow these steps to create a deployment package:
1. Install AAMEE on your Mac OS or Windows computer.
Page 7

Adobe Drive CC Administrator’s Guide Deploying in an enterprise environment 7
2. Launch AAMEE. This brings up the Welcome screen, which allows you to create various kinds of
deployment packages. The format of the package it creates is appropriate to the platform on which
you are running the tool.
3. On the Welcome screen, click Trial Package.
You can create a Trial Package or Installation Package for Adobe Drive 5. It is not licensed, so both
options do the same thing; the Serialization option does not apply.
Page 8
Adobe Drive CC Administrator’s Guide Deploying in an enterprise environment 8
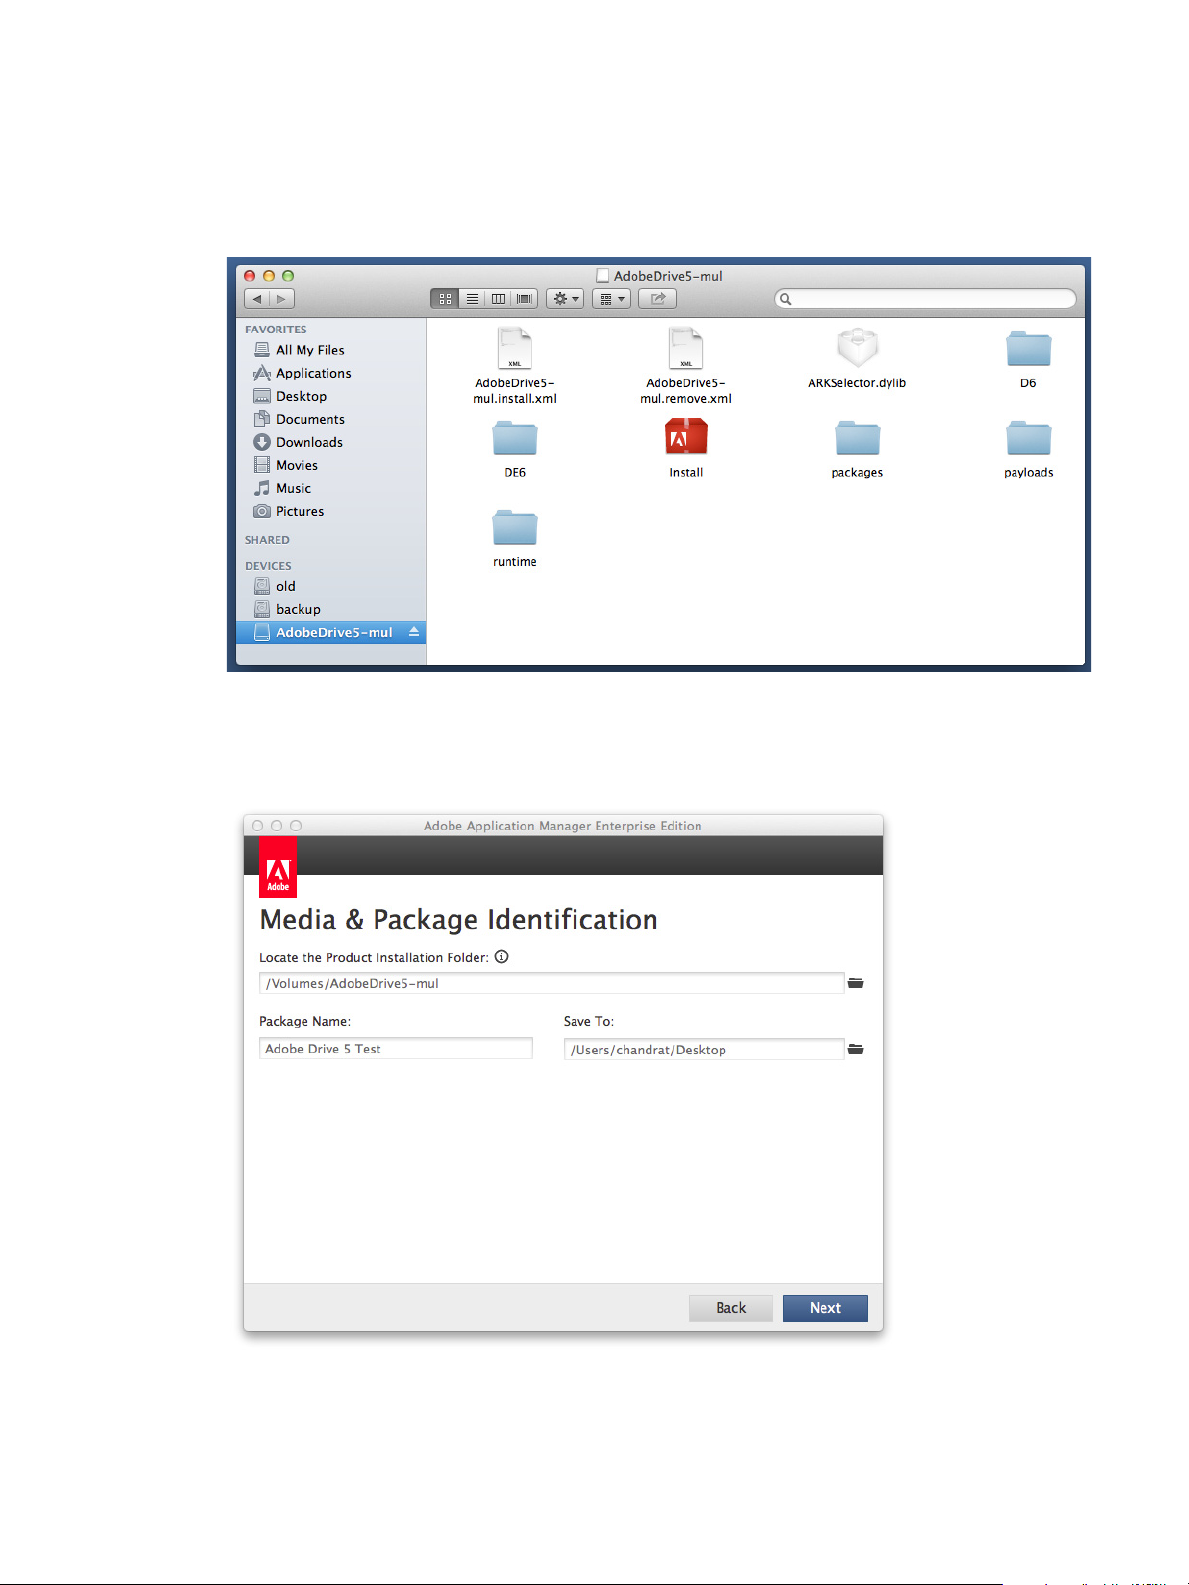
4. Navigate to where you have downloaded Adobe Drive 5.
— In Mac OS, mount the DMG that you downloaded.
— In Windows, go to the location where you extracted the installer.
5. Enter a Package Name and Save To location for your deployment package, then click Next.
Page 9

Adobe Drive CC Administrator’s Guide Deploying in an enterprise environment 9
6. Click Next on the Options screen.
7. Click Next in the Configuration screen, accepting all of the default configuration choices.
Page 10

Adobe Drive CC Administrator’s Guide Deploying in an enterprise environment 10
8. After the installer has finished checking for updates, click Build.
9. Your build should only take a few minutes. When it is completed, click Close to exit.
Page 11

Adobe Drive CC Administrator’s Guide Deploying in an enterprise environment 11
You now have a native installer, PKG for Mac OS or MSI for Windows. You can deploy these files using a
3rd-party deployment tool such as Microsoft SCCM, Alteris, or JAMF Casper.
Troubleshooting deployment
PROBLEM: Installation of Adobe Drive 5 fails if Adobe Drive 4 is still installed.
ORKAROUND: You must deploy the Adobe Drive 4 uninstaller and uninstall Adobe Drive 4 from target
W
systems before attempting to deploy Adobe Drive 5.
 Loading...