

Page 1

ADOBE DRIVE 2.0
USER GUIDE
Page 2

2
© 2010 Adobe Systems Incorporated. All rights reserved.
Adobe Drive 2.0 User Guide
Adobe, the Adobe logo, Creative Suite, Illustrator, InDesign, Photoshop, and Version Cue are either
registered trademarks or trademarks of Adobe Systems Inc. in the United States and/or other countries.
Microsoft and Windows are registered trademarks or trademarks of Microsoft Corporation in the United
States and/or other countries. Apple, Mac OS, and Macintosh are trademarks of Apple Computer, Inc.,
registered in the United States and other countries. Java and Sun are trademarks or registered trademarks
of Sun Microsystems, Inc. in the United States and other countries. All other trademarks are the property of
their respective owners.
The information in this document is furnished for informational use only, is subject to change without
notice, and should not be construed as a commitment by Adobe Systems Inc. Adobe Systems Inc. assumes
no responsibility or liability for any errors or inaccuracies that may appear in this document. The software
described in this document is furnished under license and may only be used or copied in accordance with
the terms of such license.
Adobe Systems Inc., 345 Park Avenue, San Jose, California 95110, USA.
Page 3

Contents
Overview . . . . . . . . . . . . . . . . . . . . . . . . . . . . . . . . . . . . . . . . . . . . . . . . . . . . . . . . . . . . . . . . . . . . . . . 4
Connecting to servers using Adobe Drive 2.0 . . . . . . . . . . . . . . . . . . . . . . . . . . . . . . . . . . . . . . 6
Working with remote files . . . . . . . . . . . . . . . . . . . . . . . . . . . . . . . . . . . . . . . . . . . . . . . . . . . . . . . . 9
Compatibility . . . . . . . . . . . . . . . . . . . . . . . . . . . . . . . . . . . . . . . . . . . . . . . . . . . . . . . . . . . . . . . . . . . . . . . . . . . . . . . . 4
Installing Adobe Drive 2.0 . . . . . . . . . . . . . . . . . . . . . . . . . . . . . . . . . . . . . . . . . . . . . . . . . . . . . . . . . . . . . . . . . . . . 4
Uninstalling . . . . . . . . . . . . . . . . . . . . . . . . . . . . . . . . . . . . . . . . . . . . . . . . . . . . . . . . . . . . . . . . . . . . . . . . . . 5
Terminology . . . . . . . . . . . . . . . . . . . . . . . . . . . . . . . . . . . . . . . . . . . . . . . . . . . . . . . . . . . . . . . . . . . . . . . . . . . . . . . . . 5
Edit connections . . . . . . . . . . . . . . . . . . . . . . . . . . . . . . . . . . . . . . . . . . . . . . . . . . . . . . . . . . . . . . . . . . . . . . . . . . . . . 8
Set system preferences . . . . . . . . . . . . . . . . . . . . . . . . . . . . . . . . . . . . . . . . . . . . . . . . . . . . . . . . . . . . . . . . . . . . . . . 8
Inspecting a connected server in Adobe Bridge . . . . . . . . . . . . . . . . . . . . . . . . . . . . . . . . . . . . . . . . . . . . . . 10
Adding files or folders to the DAM server . . . . . . . . . . . . . . . . . . . . . . . . . . . . . . . . . . . . . . . . . . . . . . . . . . . . 11
Opening a remote file . . . . . . . . . . . . . . . . . . . . . . . . . . . . . . . . . . . . . . . . . . . . . . . . . . . . . . . . . . . . . . . . . . . . . . . 12
Changing remote file names and locations . . . . . . . . . . . . . . . . . . . . . . . . . . . . . . . . . . . . . . . . . . . . . . . . . . . 13
Placing remote files in documents . . . . . . . . . . . . . . . . . . . . . . . . . . . . . . . . . . . . . . . . . . . . . . . . . . . . . . . . . . . 14
View file status and versions in the Links panel . . . . . . . . . . . . . . . . . . . . . . . . . . . . . . . . . . . . . . . 14
Replace a placed file with a previous version . . . . . . . . . . . . . . . . . . . . . . . . . . . . . . . . . . . . . . . . . 16
Deleting remote files or folders . . . . . . . . . . . . . . . . . . . . . . . . . . . . . . . . . . . . . . . . . . . . . . . . . . . . . . . . . . . . . . 16
Working with versions . . . . . . . . . . . . . . . . . . . . . . . . . . . . . . . . . . . . . . . . . . . . . . . . . . . . . . . . . . 17
File status in integrated applications . . . . . . . . . . . . . . . . . . . . . . . . . . . . . . . . . . . . . . . . . . . . . . . . . . . . . . . . . 17
Checking out files . . . . . . . . . . . . . . . . . . . . . . . . . . . . . . . . . . . . . . . . . . . . . . . . . . . . . . . . . . . . . . . . . . . . . . . . . . . 18
Checking in versions . . . . . . . . . . . . . . . . . . . . . . . . . . . . . . . . . . . . . . . . . . . . . . . . . . . . . . . . . . . . . . . . . . . . . . . . 18
Editing files checked out by another user . . . . . . . . . . . . . . . . . . . . . . . . . . . . . . . . . . . . . . . . . . . . . . . . . . . . 19
Updating a file to the most recent version . . . . . . . . . . . . . . . . . . . . . . . . . . . . . . . . . . . . . . . . . . . . . . . . . . . . 20
Viewing, promoting, and deleting versions . . . . . . . . . . . . . . . . . . . . . . . . . . . . . . . . . . . . . . . . . . . . . . . . . . . 20
Viewing a previous version in its native application . . . . . . . . . . . . . . . . . . . . . . . . . . . . . . . . . . 21
Promoting a version . . . . . . . . . . . . . . . . . . . . . . . . . . . . . . . . . . . . . . . . . . . . . . . . . . . . . . . . . . . . . . . . 22
Deleting a version . . . . . . . . . . . . . . . . . . . . . . . . . . . . . . . . . . . . . . . . . . . . . . . . . . . . . . . . . . . . . . . . . . . 22
Reverting to the last version . . . . . . . . . . . . . . . . . . . . . . . . . . . . . . . . . . . . . . . . . . . . . . . . . . . . . . . . . 22
Searching for managed files in Adobe Bridge . . . . . . . . . . . . . . . . . . . . . . . . . . . . . . . . . . . . . . . . . . . . . . . . 23
Troubleshooting . . . . . . . . . . . . . . . . . . . . . . . . . . . . . . . . . . . . . . . . . . . . . . . . . . . . . . . . . . . . . . . 24
Adobe Bridge does not show Adobe Drive features . . . . . . . . . . . . . . . . . . . . . . . . . . . . . . . . . . . . . . . . . . 24
Adobe Bridge does not update its view of remote assets . . . . . . . . . . . . . . . . . . . . . . . . . . . . . . . . . . . . . 24
Cannot connect to the Version Cue CS4 Server . . . . . . . . . . . . . . . . . . . . . . . . . . . . . . . . . . . . . . . . . . . . . . . 24
3
Page 4

Adobe® Drive 2.0 User Guide
Overview
Adobe Drive 2.0 enables you to connect Creative Suite® 4 and Creative Suite 5 applications to Digital Asset
Management (DAM) servers. A connected server appears in your computer as a mounted hard drive or
mapped network drive. Once connected, you can access the server through the platform file browser
(Windows Explorer or Mac OS Finder), where you can work with remote managed files as if they were local.
Some applications in the Adobe Creative Suite (Photoshop®, InDesign®, Illustrator®) and Adobe Bridge are
fully integrated with Adobe Drive 2.0. For example, when you use Photoshop CS5 to open and edit a file
stored on a DAM server, the file is checked out automatically when you modify it; when you close the file,
you can choose to check it in or simply save it. You can use Adobe Bridge to access DAM servers and files,
and to view, search for, and compare information about DAM-managed assets.
Compatibility
Adobe Drive 2.0 comes with connectors for particular asset management systems. For example, the Version
Cue® CS4 Connector enables Creative Suite 5 client applications to access to files on a Version Cue CS4
server.
Adobe Drive 2.0 can be used with both Creative Suite 5 and Creative Suite 4; the installation includes a
compatibility library for Creative Suite 4. If you have been using a Creative Suite 4/Version Cue server CS4
workflow, the compatibility library allows you to use Adobe Drive 2.0 features in your existing workflow,
and to migrate from your Version Cue server to other supported DAM servers.
Adobe Drive 2.0 includes a Migration Tool that a server administrator can use to migrate data from a
Version Cue server to another server (including another Version Cue server) or to the local file system. For
information about how to use this tool, see the Adobe Drive 2.0 Administrator’s Guide.
Installing Adobe Drive 2.0
Adobe Drive 2.0 is used together with Creative Suite products. See the Adobe Creative Suite 5 system
requirements at:
http://www.adobe.com/products/creativesuite/design/systemreqs/
Installing Adobe Drive 2.0 automatically uninstalls Adobe Drive CS4. You can use Adobe Drive 2.0 with
both Creative Suite 4 and Creative Suite 5; see “
Download the free, standalone installer for Adobe Drive 2.0 from:
http://www.adobe.com/downloads/adobedrive
Adobe Drive 2.0 installation requires 500MB of available hard-disk space. You must have Administrator
privilege to install on either platform.
Compatibility” on page 4.
X To install in Windows, unzip the installation package to the defined folder, then double click
set-up.exe to launch the install process.
4
Page 5

Adobe® Drive 2.0 User Guide Overview 5
To install in Mac OS, double-click the downloaded DMG file; this mounts the AdobeDrive2-mul
X
volume in Mac OS Finder. Go to this volume and double-click
Install.app to launch the install
process.
Restart the computer after the installation is completed.
Uninstalling
X In Windows XP, go to Control Panels > Add Remove Programs, select Adobe Drive 2.0, and click
Uninstall/Change.
X In Windows Vista, go to Control Panels > Programs and Features and select Adobe Drive 2.0, and
click Uninstall/Change.
X In Windows 7, go to Control Panels > Programs > Uninstall a Program and select Adobe Drive 2.0,
and click Uninstall/Change.
X In Mac OS, go to Applications > Utilities > Adobe Installers, and double-click Uninstall Adobe Drive.
Terminology
DAM SERVER: Digital Asset Management server, such as a Version Cue server.
ANAGED ASSETS: The files and folders managed by a DAM server.
M
NTEGRATED APPLICATIONS: Adobe Creative Suite applications (Illustrator, InDesign, Photoshop, and Adobe
I
Bridge) that are fully integrated with Adobe Drive 2.0 and offer operations on managed assets through the
application UI.
V
ERSION CUE SERVER: A DAM server from Adobe.
Page 6
Adobe® Drive 2.0 User Guide Connecting to servers using Adobe Drive 2.0 6
Connecting to servers using Adobe Drive 2.0
When you connect to a DAM server using Adobe Drive 2.0, you can view the remote files on that server
through your platform file browser (Windows Explorer or Mac OS Finder), and through Adobe Creative
Suite applications and Adobe Bridge. You also have access to the remote files in Open, Save As, and other
file management dialogs.
To establish a connection:
1. Make sure that the DAM server has been started.
2. Take one of these actions to invoke the Adobe Drive 2.0 interface:
Z Launch Adobe Drive 2.0 directly.
Z In Windows Explorer, right-click a folder, a file, or the desktop and choose Adobe Drive 2.0 >
Connect To from the context menu.
Z In Mac OS Finder, CTRL-click a folder or a file and choose Adobe Drive 2.0 > Connect To from the
context menu. (In Mac OS X Leopard, choose More > Adobe Drive 2.0 > Connect To.)
Z In Adobe Bridge, choose Tools > Adobe Drive > Connect To, or click the Connect To icon.
This brings up the Adobe Drive 2.0 Connect UI.
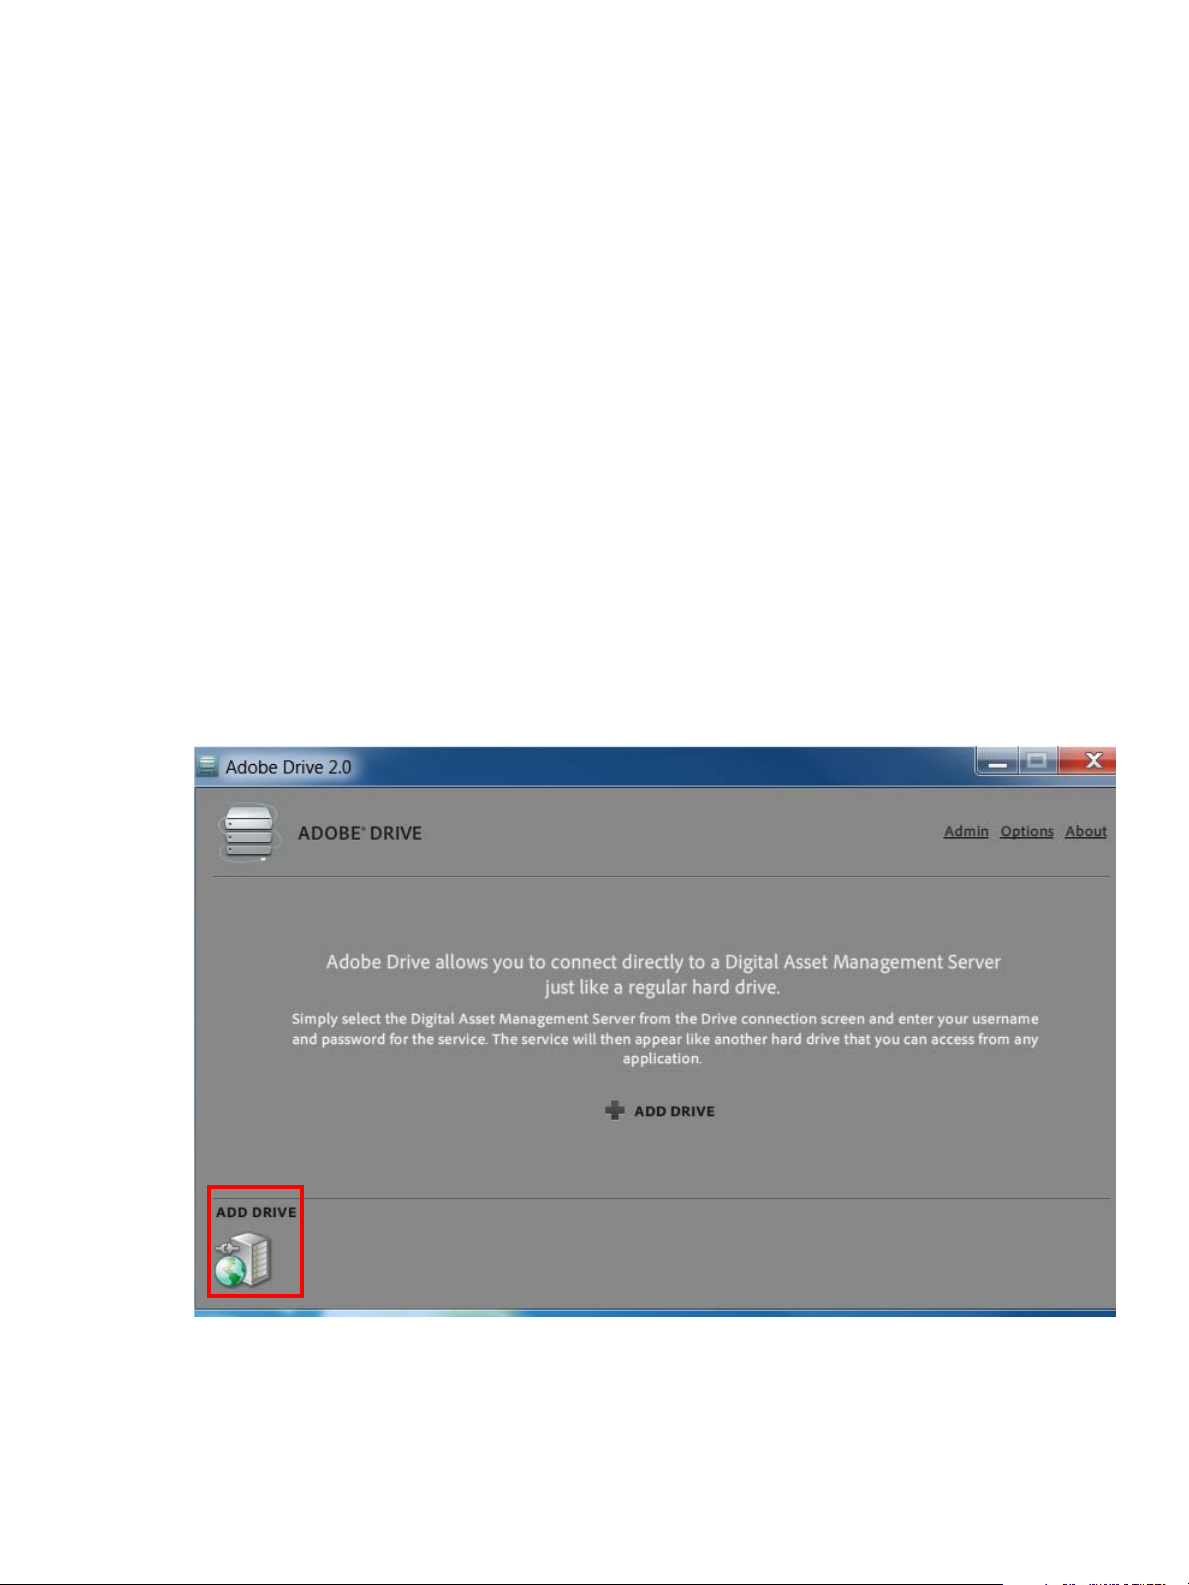
3. To connect to a server, click the Add Drive icon at the lower left.
Page 7
Adobe® Drive 2.0 User Guide Connecting to servers using Adobe Drive 2.0 7
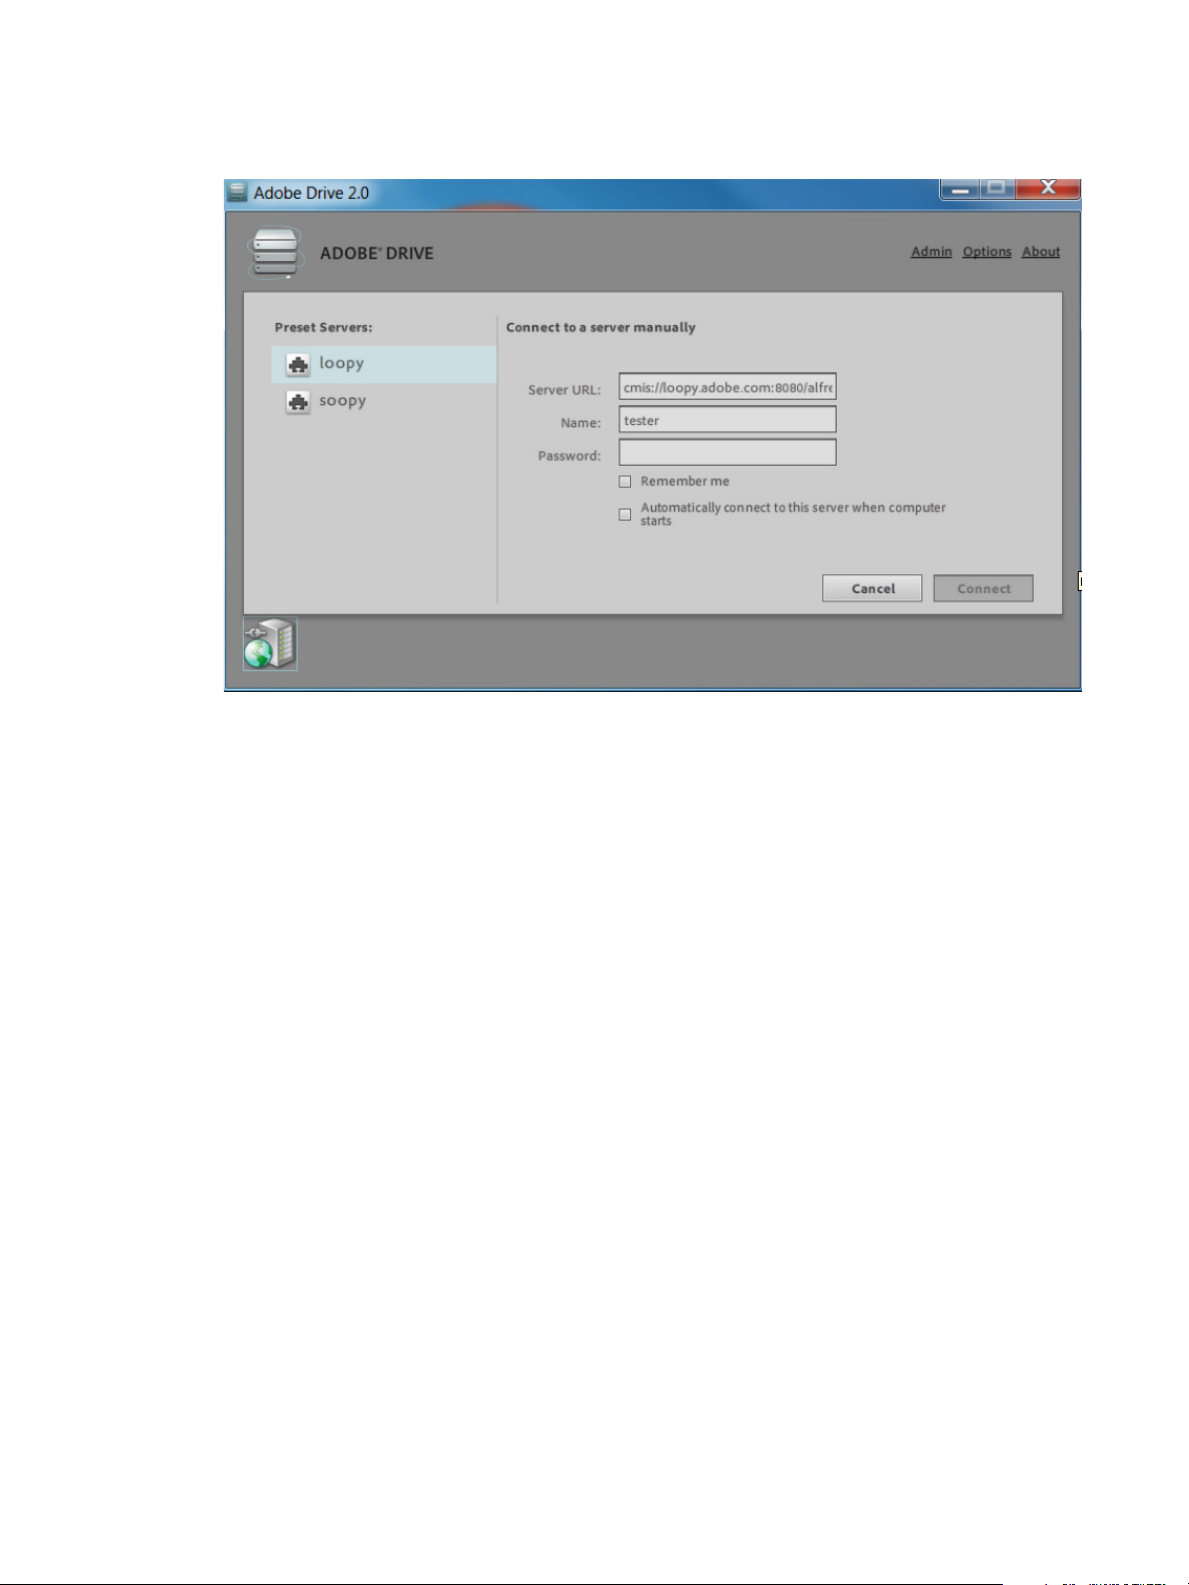
4. Choose one of the preset servers on the left, or enter the server URL on the right. When you select one
of the preset servers, the URL is for that server is filled in for you.
OTE: The list of preset servers is configurable by the server administrator. For details, see the Adobe
N
Drive 2.0 Administrator’s Guide.
5. Enter your login information, and choose configuration options:
Z Remember me: When selected, Adobe Drive 2.0 keeps your login information and automatically
fills in the password for you on future connections to this server.
Z Automatically connect to this server when computer starts: When selected, Adobe Drive 2.0
keeps your login information and server preference, and connects to the server on startup, so you
do not have to bring up the Adobe Drive 2.0 Connect UI unless you want to edit the connection or
connect to a different server.
6. Click Connect.
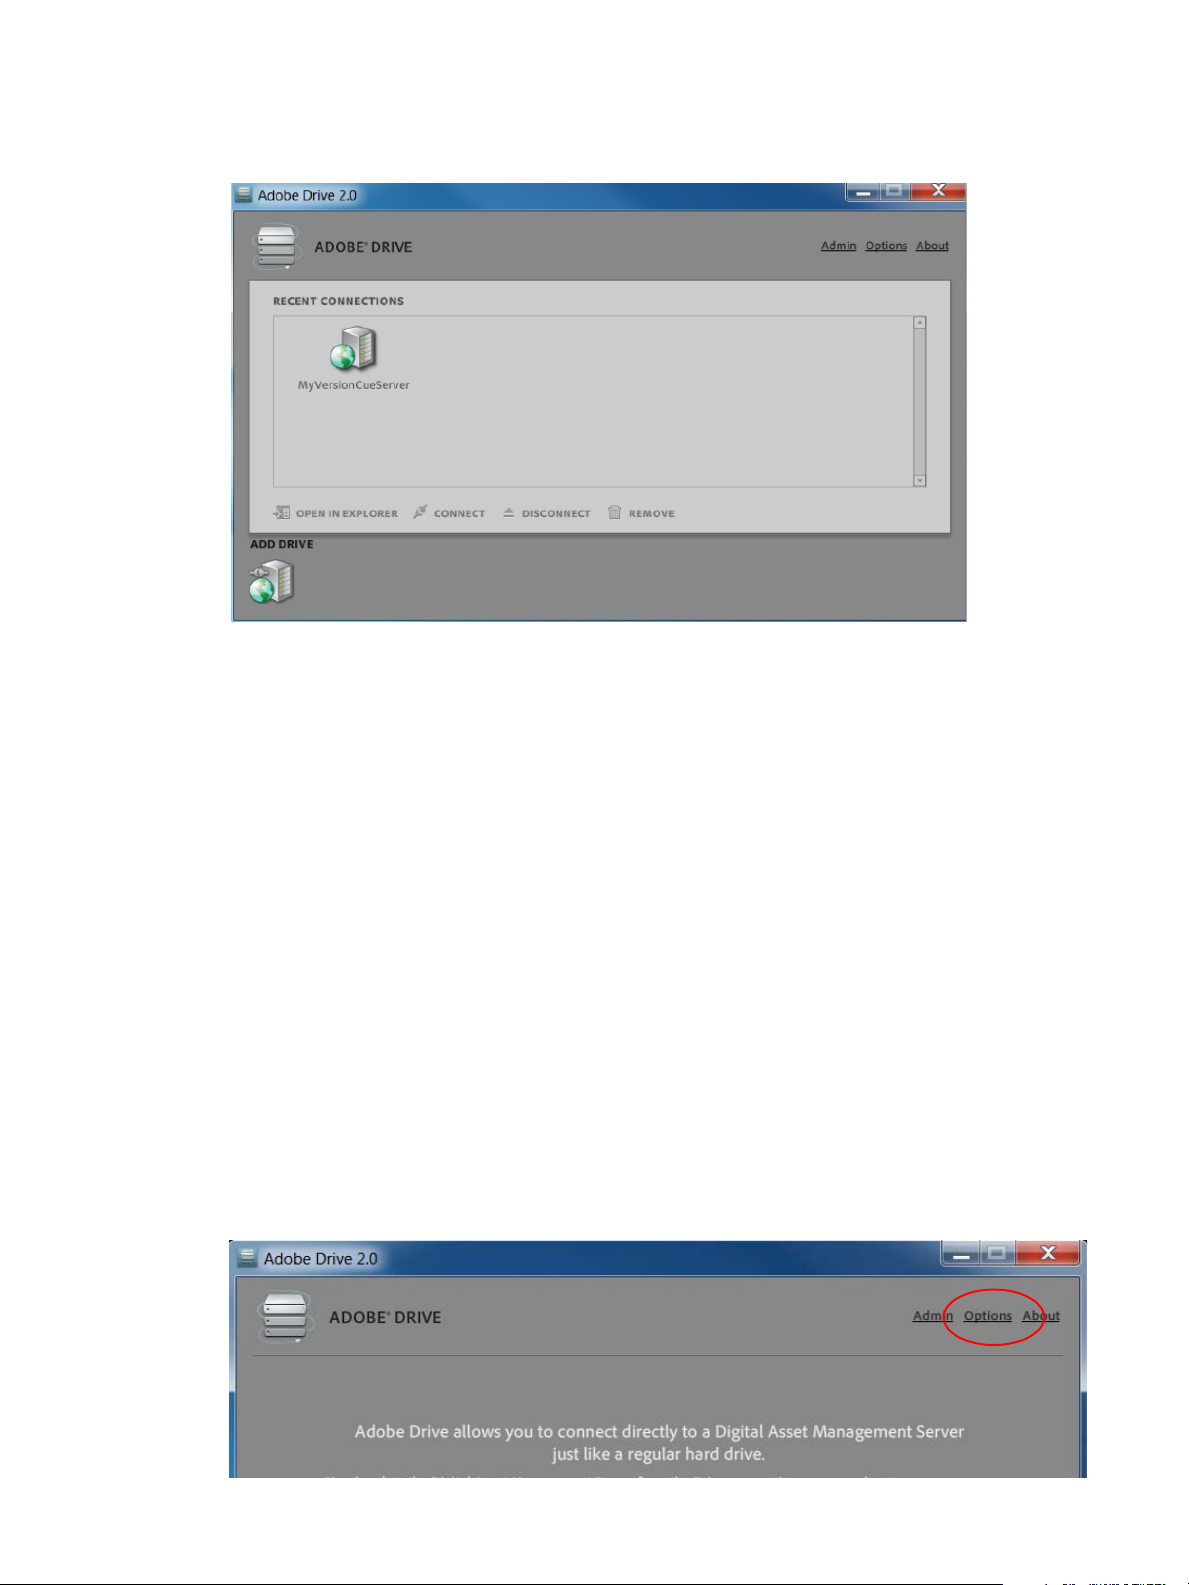
Once a connection has been established, the window shows the Recent Connections.
Page 8
Adobe® Drive 2.0 User Guide Connecting to servers using Adobe Drive 2.0 8
Edit connections
After you have successfully established the connection, you can close the Adobe Drive 2.0 Connect UI. You
remain connected until you explicitly disconnect. If you want to change the configuration setting, or
connect to a different server or service, open the Adobe Drive 2.0 Connect UI again.
For a selected server, you can:
O
PEN IN [PLATFORM FILE BROWSER]: Open the root folder of the mounted volume in Windows Explorer or
Mac OS Finder.
ONNECT: Establish a new connection to the selected DAM server, if it is currently disconnected.
C
ISCONNECT SERVER : Disconnect Adobe Drive 2.0 from the DAM server, if it is currently connected.
D
EMOVE: First disconnects the DAM server if it is currently connected, removes all cache data from the
R
local cache of Adobe Drive 2.0, and removes DAM server from the Recent Connections panel.
Set system preferences
To set system preferences for Adobe Drive 2.0:
1. Open the Adobe Drive 2.0 window and click Options.
Page 9

Adobe® Drive 2.0 User Guide Working with remote files 9
2. Specify any of these options:
ACHING: The cache stores information to improve performance when you’re connected to a DAM
C
server. The cache takes up disk space; you can modify the configuration to optimize it for your system.
Z After you have disconnected from all servers, you can click Move Cache to control where your
cached files are stored.
Z Specify a Cache Size to set the maximum total size of the cache. When the cache reaches this
limit, the oldest cached files are automatically deleted.
Z Click Empty Cache to delete all currently cached files.
OGGING : The log records information about the status of connections, and shows installation
L
locations and configurations of connected servers. In case of warnings or errors, it contains a Java
stack trace that you can send to your server administrator.
Z Specify the logging level as info (log informational, warning, and error messages), warning (log
warning and error messages), or error (log only error messages).
Z Click Open Log File to open the log file in the default text editor.
3. If you have changed the configuration, click Save.
Working with remote files
When Adobe Drive 2.0 successfully connects to a DAM server, a mounted hard drive or mapped network
drive appears in the file browsers. You can use the contents of this drive the same way you use the local file
system. However, when you work with files from a DAM server, you edit the files in their remote server
location (as opposed to editing a local copy of the file and then synchronizing the local and server
versions). There is no need to perform any synchronization; the files you see in your browser actually reside
on the server.
When you save a file, Adobe Drive 2.0 stores a temporary file locally. It creates a new version of the file on
the server only when you check a file in, or save it as a specific version.
This is what a remote file system might look like, for example, in Windows Explorer.
Page 10

Adobe® Drive 2.0 User Guide Working with remote files 10
Inspecting a connected server in Adobe Bridge
This is what a mounted drive might look like in the Content panel in Adobe Bridge.
Page 11

Adobe® Drive 2.0 User Guide Working with remote files 11
The Inspector panel in Adobe Bridge displays context-sensitive information about DAM servers and
managed assets. For example, if you select a DAM server in the Content panel, the Inspector shows
information about the server and asset properties in the top portion, and active links in the bottom
portion that allow you to perform Adobe Drive 2.0 tasks, such as disconnecting from the server.
You can set preferences to customize the information that appears in the Inspector panel:
1. Choose Edit > Preferences (in Windows) or Bridge CS5 > Preferences (in Mac OS).
2. In the Preferences dialog, select the Inspector tab.
3. Select items to be displayed in the Inspector panel, and click OK. For example, select Adobe Drive
Server Panel to display information and tasks related to a selected DAM server.
You can copy information from the Inspector panel; for example, the text of a lengthy version comment. To
do this, right-click (in Windows) or C
TRL-click (in Mac OS) the information (such as a version comment) that
you want to copy, and choose “Copy [item name]” from the context menu.
Adding files or folders to the DAM server
To save a version of a file, add the file to your DAM server. You can add both Adobe and non-Adobe files.
The procedure depends on whether you are using Adobe Bridge, a platform file browser, or an integrated
Adobe application. In all cases, assume that you have already connected to the server using Adobe Drive
2.0.
Using Adobe Bridge
1. Click Adobe Drive in the Favorites panel, open the DAM server in the Content panel, then double-click
the folder to which you want to add files.
2. Do one of the following:
Z Drag files or folders from Windows Explorer or Mac OS Finder to the folder in Adobe Bridge.
Z You cannot drag an empty folder into Adobe Bridge, but you can create a new subfolder in Adobe
Bridge, which is automatically checked in to the DAM server.
Z Choose Tools > Adobe Drive > Add Files. In the Open dialog box, select one or more files and click
Open.
3. Enter a version comment in the Check In dialog box and click OK.
Using the platform file browser
1. Open the DAM Server in Windows Explorer or Mac OS Finder.
The DAM Server appears in the same place as your mapped network drives and hard drives.
2. Open a folder, then do one of the following:
Z Drag the files you want to add into the folder.
Z Create a new subfolder in the platform browser; the created folder is automatically checked in to
the DAM server.
Page 12

Adobe® Drive 2.0 User Guide Working with remote files 12
3. To check in a file so that it is available to others, invoke the context menu for the file with right-click (in
Windows) or C
TRL-click (in Mac OS) and choose Adobe Drive 2.0 > Check In. (In Mac OS X Leopard,
choose More > Adobe Drive 2.0 > Check In.) Type a version comment and click OK.
4. If you check out a file, then drag a new version of the file into a folder that already contains an older
version, you can check in the file to create another version.
If you replace a file that is not checked out, Adobe Drive 2.0 checks it out automatically when you
choose Replace in the conflict-resolution dialog. You must then check the file in to commit a new
version.
Using an integrated Adobe application
If you save a file to a folder using one of the integrated Adobe applications—Photoshop, Illustrator, or
InDesign—you can check in a file to a connected DAM server during the save process.
1. In the application, choose File > Save, File > Save As, or File > Check In.
2. Save the file to the remote folder.
3. Type a version comment and click OK. The file is saved and checked in.
4. If you edit the file, it is automatically checked out to you again. You can then check in another version
by choosing File > Check In. You can also check in the edited file when you close it.
Opening a remote file
You can open a remote file directly in any application using File > Open, the same way you would open any
other file.
X If you open a checked-in file and edit it in an integrated Adobe application, the file is checked out
automatically and you can save versions of the file directly from the application UI.
X If you open a checked-in file in any other application, an error indicates that you are attempting to
open a file for which you do not have write permission. You must check the file out in a platform file
browser in order to open it, and explicitly check it in to commit any changes that you make.
To open a remote file from Adobe Bridge:
1. Select Adobe Drive in the Favorites panel.
2. Double-click the DAM server in the Content panel.
3. Double-click the folder that contains the file you want to open.
4. Select the file, invoke the context menu, and choose Checkout.
5. Double-click the file to open it.
Adobe Bridge relies on the operating system to know which application to use when opening the file. If
the file opens in the wrong application, open the file directly from within the desired application, or
change the system settings to specify a different default application for the file type.
Page 13

Adobe® Drive 2.0 User Guide Working with remote files 13
Changing remote file names and locations
You can use the move and copy commands of Adobe Bridge and the platform file browsers to move and
copy remote files on a connected DAM server. When you copy or move a file, the DAM server copies or
move only the most current version.
Similarly, you can rename remote files and folders in the same way you rename local files. In Adobe Bridge,
you can rename multiple files as a batch.
X To copy remo te f i les:
Z In Adobe Bridge, invoke the context menu for the file with right-click in Windows, choose Copy To,
and choose or browse to the target folder. In Mac OS, C
target folder, and choose Paste.
Z Select the file in a platform file browser, invoke the context menu and choose Copy, then go to the
target folder and choose Paste.
Z In a platform file browser, CTRL-drag (in Windows) or OPTION-drag (in Mac OS) the file to the target
location.
X To move remote files:
TRL-click and choose Copy, navigate to the
Z In Adobe Bridge, invoke the context menu for the file with right-click in Windows, choose Move
To, and choose or browse to the target folder. In Mac OS, there is no Move command; you can
copy/paste, then delete the file from the original location.
Z In a platform file browser, drag the file to the target location.
X You can only rename remote files if they are up-to-date. To rename remote files:
Z In a platform file browser, select the remote file, invoke the context menu and choose Rename.
Z In Adobe Bridge, invoke the context menu for the file with right-click (in Windows) or CTRL-click (in
Mac OS), choose Rename, and enter the new name.
Z To perform a batch rename in Adobe Bridge, select the files, invoke the context menu and choose
Tools > Batch Rename, set the desired options and click Rename.
Page 14

Adobe® Drive 2.0 User Guide Working with remote files 14
Placing remote files in documents
While working with a document in an integrated Adobe application, you can use the Place command to
place a remote file into the document, just as you would with a local file. You can also drag a remote file
from Adobe Bridge to an open document.
Always add assets to the DAM server before placing them in a managed document. When you place a file
that is not managed by the DAM server into a file that is managed, you cannot keep track of the placed
asset's versions or status.
View file status and versions in the Links panel
The Links panel in Illustrator or InDesign displays additional information about placed files from the DAM
server, identifying whether a linked file is being edited and which user is doing the editing. You can also
use the Links panel to determine whether the linked file needs to be updated to a newer version from the
DAM server.
Page 15

Adobe® Drive 2.0 User Guide Working with remote files 15
The Links panel works the same way for remote files as it does for local files. For example, if a newer version
of a linked file is on the DAM server, the Modified Artwork icon appears; if a file is missing, the Missing
Artwork icon appears. Update the linked file as you would for a local file.
In Illustrator, the Links panel identifies who is editing a linked file from a DAM server, as well as a status icon
that describes the current state of the file (see “
File status in integrated applications” on page 17). In
Illustrator and InDesign, the status bar displays the file status icons.
To view versions of a placed file, choose Versions (Illustrator) or Utilities > Versions (InDesign) from the
Links panel menu. In Illustrator, a tool tip displays the version of a placed file when the pointer hovers over
the name of the file in the Links panel.
See application Help for more information about working with the Links panel and placed files.
Page 16

Adobe® Drive 2.0 User Guide Working with remote files 16
Replace a placed file with a previous version
You may find yourself working with multiple versions of a document that includes a link to a file with
multiple versions. If you decide to promote an earlier version of the document that includes a link to an
earlier version of the file, Adobe Drive 2.0 automatically links to the current version of the file in the
promoted document.
For example, suppose you create an InDesign document, place a Photoshop file in the document, and
create multiple versions of each file. If you then decide to promote an earlier version of the InDesign
document, the link to the placed Photoshop file points to the current version of the file—not the version
of the file to which you originally linked in the promoted InDesign document.
Illustrator or InDesign may display a thumbnail of the version of the file to which you originally linked in
the promoted document, but the link actually points to the most current version of the file. For example,
when you package an InDesign document that displays a thumbnail of the correct version, InDesign
replaces the thumbnail of the file with the most current (but incorrect) version.
To resolve these version issues, replace the linked file with a previous version:
1. In Illustrator or InDesign, select the file in the Links panel.
2. Choose Versions (Illustrator) or Utilities > Versions (InDesign) from the Links panel menu.
3. Select a version and click Promote To Current Version.
4. Enter a version comment if desired, and click Save.
Deleting remote files or folders
You can delete remote files or folders from the DAM server using Adobe Bridge or the platform file
browsers. Any user with appropriate privileges can delete files and folders, unless they are marked as
Checked Out by Others. Delete remote assets the same way as local assets, by dragging them to Trash or
Recycle Bin, or choosing Delete from a menu or toolbar.
Deleting a file or folder from a Version Cue server is a two-step process that safeguards against accidental
deletions. The first step changes the status to Deleted, which hides the file or folder from normal view but
does not remove it from the server. The second step permanently removes the file or folder and its
previous versions from the server.
X To view and restore Version Cue files with the Deleted status in Adobe Bridge:
Z Open the project that contains the files you want to view or restore.
Z Choose Tools > Adobe Drive > View Project Trash, or click View Project Trash.
Z Select the file or files you want to restore, and choose Tools > Adobe Drive> Restore or click
Restore.
The file or folder selection is restored to its original location. Click the Go Back icon in the application
bar to return to the original folder.
X To permanently delete Version Cue files with the Deleted status in Adobe Bridge:
Z Open the project that contains the files you want to delete.
Z Choose Tools > Adobe Drive > View Project Trash, or click View Project Trash.
Page 17

Adobe® Drive 2.0 User Guide Working with versions 17
Select the file or files.
Z
Z Invoke the context menu for the files with right-click (in Windows) or CTRL-click (in Mac OS), and
choose Delete Permanently;
—or—
Click Delete in the navigation bar.
If you can still see files you’ve deleted, choose View > Refresh or press F5.
Working with versions
Versions track changes to a file. Each version is a snapshot of the file at a particular point in time. When you
edit a file from the DAM server, you are editing the last version saved to the DAM Server. When you are
ready to save changes to the DAM server, you check in a version. You do not have to check in a version
every time you save your changes, just when you want to create a snapshot of the file.
X You can save comments with versions to help you track changes.
X You can promote a previous version to be the current version, letting you recover from unwanted
changes.
X You can compare multiple versions of the same file, and delete versions as they become obsolete or to
save disk space.
File status in integrated applications
Files that are managed by Adobe Drive 2.0 are marked with a status icon that describes the state of the file
on the DAM server. When browsing managed files in Drive-integrated applications such as InDesign,
Illustrator or Photoshop, you can see a file’s status in the status bar.
A file can have more than one status at once. Possible status value are as follows:
Status Icon Description
Open The file is open on your computer.
Checked Out By Me You are editing the file. Adobe Drive 2.0 assigns this status
when you make an edit that changes the file’s content. You
can mark a file as checked out before you edit it to alert other
users that you intend to change the content.
(This is the Photoshop icon; different icons are used in
InDesign and Illustrator.)
Checked Out By [user name] Another user is editing the file and has not yet saved a new
version.
Up-to-date The latest known version of the file is checked in and
available for editing.
Conflicting There is a version conflict, or both you and another user are
editing the file.
Page 18

Adobe® Drive 2.0 User Guide Working with versions 18
Status Icon Description
New File The file appears in the mounted volume folder but has not
been checked in to the DAM server. This status can be
applied, for example, if a file is saved in an existing folder for
the first time while the DAM server is offline. You can edit the
file, but it is important to check in the file after you save your
changes.
Newer Version On Server A newer version of the file appears on the DAM server. This
icon appears if someone else checks in a version while you
have the file open and up to date.
Server Not Accessible The DAM server is offline, or you are offline and not able to
access the server.
Deleted The file or folder has been deleted from the server.
X For a Version Cue server, the file or folder is not yet
permanently erased, you can restore a deleted file or
folder in Bridge.
Checking out files
IN AN INTEGRATED ADOBE APPLICATION: Open a managed file as you would any other file. The file is checked
out automatically when you make your first edit.
N A PLATFORM FILE BROWSER: Invoke the context menu for the file with right-click (in Windows) or CTRL-click
I
(in Mac OS) and choose Adobe Drive 2.0 > Check Out. (In Mac OS X Leopard, choose More > Adobe Drive
2.0 > Check Out.)
N ADOBE BRIDGE: Select the file in the DAM server, then choose Tools > Adobe Drive > Check Out, or click
I
Check Out.
Checking in versions
To check in a new version of a file, use the Check In command, which saves your changes to the DAM
Server and removes the Checked Out status from the file. When you check in a version, Adobe Drive 2.0
transfers and saves only the changes you have made to the file.
X In an integrated Adobe application, you can check in files directly from the application UI, by choosing
File > Check In. (In Adobe Bridge, select the file in the DAM server, then choose Tools > Adobe Drive >
Check In, or click Check In.) Enter comments for the version in the Check In dialog, then click OK.
X For an Alfresco server, the file or folder is permanently
erased.
In InDesign or Illustrator, you can save versions of non-embedded graphics, images, and text files
using the Edit Original command in the Links panel. After editing the file, save it in its native
application. Then, in the Links panel, select the file and use the Check In Link command to check in a
version in the DAM server. For more information, see the application Help.
Page 19

Adobe® Drive 2.0 User Guide Working with versions 19
After you check in a file, editing the file checks it out again, allowing you to save another version. If you
close an edited file without saving, you are prompted with these choices:
S
AVE: Saves the file but doesn’t check it in.
HECK IN: Saves and checks in the file.
C
ON’T SAVE: Closes the file without saving the changes.
D
ANCEL: Doesn’t save or close the file.
C
X For all other applications, use the context menu in the platform file browser to check in versions
manually.
Invoke the context menu for the file with right-click (in Windows) or C
Adobe Drive 2.0 > Check In. (In Mac OS X Leopard, choose More > Adobe Drive 2.0 > Check In.) Enter
comments for the version in the Check In dialog, then click OK.
This method is especially useful when using non-Adobe files, such as Microsoft Word files.
X You can use Adobe Bridge to check in a file from an application that is not integrated with Adobe Drive
2.0 (assuming you have the file checked out):
Z Start Adobe Bridge.
Z Go to Bridge Preference -> Startup Scripts and make sure that “Adobe Drive” is selected.
Z Open the file in its native application, make your changes, and save and close the file.
Z In Adobe Bridge, select the file and click Check In.
Z Enter comments for the version in the Check In dialog, then click OK.
Editing files checked out by another user
If someone is editing a managed file, Adobe Drive 2.0 changes the file’s status to Checked Out. When you
attempt to edit the file in an integrated application, Adobe Drive 2.0 informs you that the file is already
checked out and gives you the option to continue working with a copy of the file.
TRL-click (in Mac OS) and choose
You can save your copy as a new version. Version Cue alerts all current users of the file about the presence
of a new version in the DAM Server and gives you the option of downloading the latest version or
continuing to edit your own copy.
To edit a file checked out by another user:
1. Open the file.
2. In the Checked Out By alert box, choose one of:
LOSE: Closes the file without any alterations.
C
ONTINUE: Keeps the file open so that you can work on a new copy).
C
Page 20

Adobe® Drive 2.0 User Guide Working with versions 20
3. If you continue working with the document and change the content, Adobe Drive 2.0 alerts you to the
possibility of conflicts. In this alert box, choose one of:
D
ISCARD CHANGESDisplays the most recent version of the file from the DAM Server
ONTINUE EDITING: Allows you to edit your copy of the file, which may result in conflicts.
C
4. For a Version Cue server, if the project does not have lock protection applied to it, you can save a new
version of your edits. Adobe Drive 2.0 displays an alert, warning you that conflicting edits will occur if
you continue. Choose one of:
ANCEL: Returns to the open document without checking in a new version.
C
HECK IN : Updates the master file in the Version Cue server with the new version.
C
5. If you choose to check in the new version, Adobe Drive 2.0 displays an alert to the other user to note
that a newer version of the file has been created.
6. At any point, you can choose to close the document and discard any changes you made.
Updating a file to the most recent version
If another user creates a version of a file that you have open or that is still marked as Checked Out, Adobe
Drive 2.0 reminds you to update your document with the latest version. This prompt appears when you
open the file, attempt to edit it, or when you bring the document window to the front.
When the prompt appears, choose one of:
ISCARD CHANGES: Updates the document with the most recent version from the DAM server. You can
D
continue editing the file after it is updated. You lose any changes you made even if you have already used
the Save command to save those changes to the local file.
C
ONTINUE EDITING: Leaves the document as is. You can continue editing the file without overwriting the
changes in the more recent version. Instead, you are prompted either to save a new version of the file
when you close it or to discard your changes.
Viewing, promoting, and deleting versions
Versions are treated as separate files, which you can access through the Content panel in Adobe Bridge.
The Versions dialog box and Adobe Bridge display thumbnails of all file versions (numbered sequentially)
with comments, dates, and the login name of the user who created the version.
To view versions in Adobe Bridge:
1. Click Adobe Drive in the Favorites panel, and open the DAM server in the Content panel.
2. Open the folder containing the file for which you want to view versions, and select the file.
3. Choose Tools > Adobe Drive > View Versions, or click View Versions in the Content panel.
Versions appear in the Content panel.
Page 21

Adobe® Drive 2.0 User Guide Working with versions 21
To invoke the Versions dialog:
X In the platform file browser, invoke the context menu for the file with right-click (in Windows) or
TRL-click (in Mac OS), and choose Adobe Drive 2.0 > View Versions (In Mac OS X Leopard, choose More
C
> Adobe Drive 2.0 > View Versions.)
X In an integrated Adobe application, choose Show Versions from the fly out menu in the status bar.
Viewing a previous version in its native application
If you want to compare versions in detail, you can choose to view each version in its native application.
If you view a previous version in its native application, changes you make are not reflected in the current
version, unless you promote the previous version to be the current version (see “
page 22). You can, however, save edits to a previous version as a new asset. Do this if you want both a
previous version and the current version to be available for simultaneous use in the DAM server.
To do this, open the Versions dialog, select the version that you want to open, and click Open Version. The
selected version opens in its own document window. The version number appears in the file’s title bar to
remind you that it is not the current version. The file status is Never Saved, because the previous version is
only a snapshot of a previous stage of the file.
Promoting a version” on
Page 22

Adobe® Drive 2.0 User Guide Working with versions 22
Promoting a version
Promoting a previous version saves a copy of the previous version as the current version. This process
keeps the previous version intact if you decide to return to it again in the future. Any changes made
between its creation and promotion do not appear in the new current version.
To do this:
1. View the version you want to promote in Adobe Bridge or the Versions dialog.
2. To promote the version:
Z In the Versions dialog, select the version you want to promote, and click Promote To Current
Version.
Z In Adobe Bridge, select the version you want to promote, and click the Promote icon.
3. Type a version comment in the Check In dialog and click OK.
Deleting a version
When you delete a version, the remaining versions are not renumbered. You cannot restore deleted
versions. You cannot delete the head version.
X In the Versions dialog, select the version you want to delete and click Delete.
X In Adobe Bridge, select the version you want to delete, and click Delete in the Content panel.
Reverting to the last version
When you revert to the last version, you cancel any changes you’ve made since you last checked the file
out.
X In the platform file browser, invoke the context menu for the file with right-click (in Windows) or
C
TRL-click (in Mac OS), and choose Adobe Drive 2.0 > Cancel Check Out (In Mac OS X Leopard, choose
More > Adobe Drive 2.0 > Cancel Check Out.) When prompted, click Revert To Last Version.
X In Adobe Bridge, select the project file and choose Tools > Version Cue > Revert To Last Version, or
click Revert.
Page 23

Adobe® Drive 2.0 User Guide Working with versions 23
Searching for managed files in Adobe Bridge
You can search for versions of managed files, as well as deleted files, using the Find dialog in Adobe Bridge.
To do this:
1. Launch Adobe Bridge and choose Edit > Find.
2. Choose the folder in which to search.
3. Choose search criteria by selecting options from the Criteria and Match menus. You can specify
multiple criteria. Use the + and - buttons to add and remove criteria. See Adobe Bridge documentation
for details of the search options.
4. When you are connected to a DAM server, you can choose one or both of the managed-file options:
Z Search includes all versions of a file: When selected, expands the search to include all versions
of a versioned file.
Z Search includes deleted files: When selected, expands the search to include Version Cue files
that have been marked as deleted (see “
5. Click Find to execute the search.
Deleting a version” on page 22).
Page 24

Adobe® Drive 2.0 User Guide Troubleshooting 24
Troubleshooting
This section describes how to work around common problems that might occur when attempting to
connect to a server through the Adobe Drive 2.0 Connect UI.
Adobe Bridge does not show Adobe Drive features
Adobe Drive 2.0 and Adobe Drive 2.0 SDK include startup scripts that configure the Adobe Bridge UI. If you
start Adobe Bridge and do not see the Adobe Drive 2.0 commands in the Tools menu or Inspector panel, it
likely that the startup scripts have not run. You can use the Preferences dialog to select them:
1. Connect to a DAM server using the Adobe Drive 2.0 Connect UI.
2. In Adobe Bridge, choose Edit > Preferences (in Windows) or Adobe Bridge CS5 > Preferences (in Mac
OS), and select Startup Scripts.
3. Select both Adobe Drive 2.0 and Adobe Drive 2.0 SDK, then click OK.
4. Restart Adobe Bridge.
Adobe Bridge does not update its view of remote assets
Occasionally, infrequently-used commands do not automatically update the Adobe Drive 2.0 information
displayed in Adobe Bridge (particularly if the Adobe Bridge window is in the background). If you do not
see the results of an action you have completed, refresh the view by doing one of the following in Adobe
Bridge:
X Choose View > Refresh or press “F5”.
X Change the focus by selecting another item.
X Change to a different folder and back.
X Resize the Adobe Bridge window, or bring it to the foreground.
Cannot connect to the Version Cue CS4 Server
Try any of the following:
X Make sure that your network connection is functioning properly.
X Temporarily disable firewalls or proxies.
X Restart the Version Cue CS4 Server.
X Consult the server log file for details that may indicate the cause of the problem. You can access the
log file from the Advanced tab of Version Cue Server Administration.
X In the Advanced tab of the Server Administration page, choose Preferences, and enter the IP of your
server hosting computer in the External URL field. For port, choose 3703 if it’s not already in use. Then
reconnect to the server.
X In Adobe Drive 2.0, empty the cache (see “Set system preferences” on page 8), then try to connect
again.
Page 25

Adobe® Drive 2.0 User Guide Troubleshooting 25
Delete the database log files (VersionCue.log) located here:
X
N WINDOWS: Program Files\Common Files\Adobe\Adobe Version Cue CS4\Server\Logs
I
IN MAC OS: Library/Application Support/Adobe/Adobe Version Cue CS4/Server/Logs
X If none of these solutions work, delete the CS5ServiceManager folder. However, note that files that
are not checked in may be deleted, and you will need to re-enter your login credentials when you start
Adobe Drive 2.0.
The
CS5ServiceManager folder is located here:
N WINDOWS XP: Documents and Settings\[username]\AppData\Adobe\CS5ServiceManager
I
IN WINDOWS VISTA/7: \Users\[username]\AppData\Roaming\Adobe\CS5ServiceManager
IN MAC OS: users/[username]/Library/Application Support/Adobe/CS5ServiceManager
If the folder cannot be deleted, exit the CS5ServiceManager in Windows Task Manager or Mac OS
Activity Monitor. Alternatively, wait a few minutes. The CS5ServiceManager closes itself after five idle
minutes.
 Loading...