

Page 1

Using Dreamweaver
Page 2

Trademarks
Add Life to the Web, Afterburner, Aftershock, Andromedia, Allaire, Animation PowerPack, Aria, Attain, Authorware,
Authorware Star, Backstage, Bright Tiger, Clustercats, Cold Fusion, Contribute, Design in Motion, Director, Dream Templates,
Dreamweaver, Drumbeat 2000, EDJE, EJIPT, Extreme 3D, Fireworks, Flash, Fontographer, FreeHand, Generator, HomeSite,
JFusion, JRun, Kawa, Know Your Site, Knowledge Objects, Knowledge Stream, Knowledge Track, LikeMinds, Lingo, Live
Effects, MacRecorder Logo and Design, Macromedia, Macromedia Action!, Macromedia Flash, Macromedia M Logo & Design,
Macromedia Spectra, Macromedia xRes Logo and Design, MacroModel, Made with Macromedia, Made with Macromedia Logo
and Design, MAGIC Logo and Design, Mediamaker, Movie Critic, Open Sesame!, Roundtrip HTML, Shockwave, Sitespring,
SoundEdit, Titlemaker, UltraDev, Web Design 101, what the web can be, and Xtra are either registered or trademarks of
Macromedia, Inc. and may be registered in the United States or in other jurisdictions including internationally. Other product
names, logos, designs, titles, words or phrases mentioned within this publication may be trademarks, servicemarks, or tradenames
of Macromedia, Inc. or other entities and may be registered in certain jurisdictions including internationally.
Third-Party Information
This guide contains links to third-party websites that are not under the control of Macromedia, and Macromedia is not
responsible for the content on any linked site. If you access a third-party website mentioned in this guide, then you do so at your
own risk. Macromedia provides these links only as a convenience, and the inclusion of the link does not imply that Macromedia
endorses or accepts any responsibility for the content on those third-party sites.
Third Party Software Notices and/or Additional Terms and Conditions can be found at www.macromedia.com/go/thirdparty/.
Opera ® browser Copyright © 1995-2002 Opera Software ASA and its suppliers. All rights reserved.
Apple Disclaimer
APPLE COMPUTER, INC. MAKES NO WARRANTIES, EITHER EXPRESS OR IMPLIED, REGARDING THE
ENCLOSED COMPUTER SOFTWARE PACKAGE, ITS MERCHANTABILITY OR ITS FITNESS FOR ANY
PARTICULAR PURPOSE. THE EXCLUSION OF IMPLIED WARRANTIES IS NOT PERMITTED BY SOME
STATES. THE ABOVE EXCLUSION MAY NOT APPLY TO YOU. THIS WARRANTY PROVIDES YOU WITH
SPECIFIC LEGAL RIGHTS. THERE MAY BE OTHER RIGHTS THAT YOU MAY HAVE WHICH VARY FROM
STATE TO STATE.
Copyright © 2003 Macromedia, Inc. All rights reserved. This manual may not be copied, photocopied, reproduced,
translated, or converted to any electronic or machine-readable form in whole or in part without prior written approval of
Macromedia, Inc. Part Number ZDW70M200
Acknowledgments
Senior Management: Sheila McGinn
Project Management: Charles Nadeau
Writing: Jed Hartman, Jennifer Rowe, Chris Bedford, Charles Nadeau
Editing: Lisa Stanziano, Mary Ferguson, Noreen Maher
Production Management: Patrice O’Neill
Media Design and Production: Adam Barnett, Aaron Begley, Chris Basmajian, John Francis, Jeff Harmon
Special thanks to Jay London, Alain Dumesny, Lori Hylan-Cho, Jack Herrington, Vic Mitnick, Rebecca Hyatt, Russ Helfand,
Erik Bergman, Luciano Arruda, Sho Kuwamoto, Ken Karleskint, Scott Richards, Bonnie Loo, David Deming, Jennifer Taylor,
Rosana Francescato, Randy Nielsen, the beta testers, and the entire Dreamweaver engineering and QA teams.
First Edition: September 2003
Macromedia, Inc.
600 Townsend St.
San Francisco, CA 94103
Page 3

CONTENTS
PART I: Dreamweaver Basics
INTRODUCTION: Welcome to Dreamweaver . . . . . . . . . . . . . . . . . . . . . . . . . . . 17
What’s new in Dreamweaver MX 2004. . . . . . . . . . . . . . . . . . . . . . . . . . . . . . . . . 18
Where to start . . . . . . . . . . . . . . . . . . . . . . . . . . . . . . . . . . . . . . . . . . . . . . . . . . . . 20
Dreamweaver workflow for creating websites. . . . . . . . . . . . . . . . . . . . . . . . . . . . . 22
Using Dreamweaver with other applications . . . . . . . . . . . . . . . . . . . . . . . . . . . . . 25
Dreamweaver and accessibility. . . . . . . . . . . . . . . . . . . . . . . . . . . . . . . . . . . . . . . . 26
Guide to Dreamweaver instructional media. . . . . . . . . . . . . . . . . . . . . . . . . . . . . . 27
Typographical conventions . . . . . . . . . . . . . . . . . . . . . . . . . . . . . . . . . . . . . . . . . . 29
HTML and web technologies resources . . . . . . . . . . . . . . . . . . . . . . . . . . . . . . . . . 29
CHAPTER 1: Exploring the Workspace . . . . . . . . . . . . . . . . . . . . . . . . . . . . . . . . . 31
About the Dreamweaver workspace. . . . . . . . . . . . . . . . . . . . . . . . . . . . . . . . . . . . 32
Working in the Document window . . . . . . . . . . . . . . . . . . . . . . . . . . . . . . . . . . . . 39
Using toolbars, inspectors, and context menus . . . . . . . . . . . . . . . . . . . . . . . . . . . 41
Using panels and panel groups . . . . . . . . . . . . . . . . . . . . . . . . . . . . . . . . . . . . . . . 46
Using Dreamweaver accessibility features. . . . . . . . . . . . . . . . . . . . . . . . . . . . . . . . 49
Optimizing the workspace for accessible page design. . . . . . . . . . . . . . . . . . . . . . . 53
Using visual guides in Dreamweaver . . . . . . . . . . . . . . . . . . . . . . . . . . . . . . . . . . . 54
Dreamweaver customizing basics. . . . . . . . . . . . . . . . . . . . . . . . . . . . . . . . . . . . . . 54
CHAPTER 2: Setting Up a Dreamweaver Site . . . . . . . . . . . . . . . . . . . . . . . . . . . 59
About Dreamweaver sites . . . . . . . . . . . . . . . . . . . . . . . . . . . . . . . . . . . . . . . . . . . 59
Setting up a new Dreamweaver site . . . . . . . . . . . . . . . . . . . . . . . . . . . . . . . . . . . . 62
Using the Advanced settings to set up a Dreamweaver site. . . . . . . . . . . . . . . . . . . 63
Editing settings for a Dreamweaver site . . . . . . . . . . . . . . . . . . . . . . . . . . . . . . . . . 67
Editing existing websites in Dreamweaver . . . . . . . . . . . . . . . . . . . . . . . . . . . . . . . 67
3
Page 4

CHAPTER 3: Creating and Opening Documents . . . . . . . . . . . . . . . . . . . . . . . . . 69
Creating new documents . . . . . . . . . . . . . . . . . . . . . . . . . . . . . . . . . . . . . . . . . . . . 70
Saving a new document. . . . . . . . . . . . . . . . . . . . . . . . . . . . . . . . . . . . . . . . . . . . . 72
Setting a default new document type. . . . . . . . . . . . . . . . . . . . . . . . . . . . . . . . . . . 72
Opening existing documents . . . . . . . . . . . . . . . . . . . . . . . . . . . . . . . . . . . . . . . . 73
Importing a Microsoft Word HTML file. . . . . . . . . . . . . . . . . . . . . . . . . . . . . . . . 74
PART II: Working with Dreamweaver Sites
CHAPTER 4: Managing Your Files . . . . . . . . . . . . . . . . . . . . . . . . . . . . . . . . . . . . 77
About site management. . . . . . . . . . . . . . . . . . . . . . . . . . . . . . . . . . . . . . . . . . . . . 78
Accessing sites, a server, and local drives . . . . . . . . . . . . . . . . . . . . . . . . . . . . . . . . 80
Viewing files and folders . . . . . . . . . . . . . . . . . . . . . . . . . . . . . . . . . . . . . . . . . . . . 83
Managing files and folders in the Files panel . . . . . . . . . . . . . . . . . . . . . . . . . . . . . 86
Working with a visual map of your site . . . . . . . . . . . . . . . . . . . . . . . . . . . . . . . . . 89
Importing and exporting sites . . . . . . . . . . . . . . . . . . . . . . . . . . . . . . . . . . . . . . . . 96
Removing a Dreamweaver site from your list of sites . . . . . . . . . . . . . . . . . . . . . . . 97
Checking in and checking out files . . . . . . . . . . . . . . . . . . . . . . . . . . . . . . . . . . . . 97
Getting and putting files to and from your server . . . . . . . . . . . . . . . . . . . . . . . . 101
Synchronizing the files on your local and remote sites . . . . . . . . . . . . . . . . . . . . . 103
Cloaking folders and files in your site . . . . . . . . . . . . . . . . . . . . . . . . . . . . . . . . . 104
Storing file information in Design Notes. . . . . . . . . . . . . . . . . . . . . . . . . . . . . . . 108
Testing your site . . . . . . . . . . . . . . . . . . . . . . . . . . . . . . . . . . . . . . . . . . . . . . . . . 111
CHAPTER 5: Managing Site Assets and Libraries . . . . . . . . . . . . . . . . . . . . . . . 115
About library items . . . . . . . . . . . . . . . . . . . . . . . . . . . . . . . . . . . . . . . . . . . . . . . 115
Working with assets. . . . . . . . . . . . . . . . . . . . . . . . . . . . . . . . . . . . . . . . . . . . . . . 116
Creating and managing a list of favorite assets . . . . . . . . . . . . . . . . . . . . . . . . . . . 123
Working with library items . . . . . . . . . . . . . . . . . . . . . . . . . . . . . . . . . . . . . . . . . 125
CHAPTER 6: Managing Contribute Sites with Dreamweaver . . . . . . . . . . . . . . . 133
About managing Contribute sites . . . . . . . . . . . . . . . . . . . . . . . . . . . . . . . . . . . . 134
Preparing a site for use with Contribute . . . . . . . . . . . . . . . . . . . . . . . . . . . . . . . 138
Administering a Contribute site using Dreamweaver . . . . . . . . . . . . . . . . . . . . . . 138
Troubleshooting a Contribute site . . . . . . . . . . . . . . . . . . . . . . . . . . . . . . . . . . . . 140
Managing Contribute files using Dreamweaver . . . . . . . . . . . . . . . . . . . . . . . . . . 141
4 Contents
Page 5

PART III: Laying Out Pages
CHAPTER 7: Laying Out Pages with CSS . . . . . . . . . . . . . . . . . . . . . . . . . . . . . 145
About layers in Dreamweaver . . . . . . . . . . . . . . . . . . . . . . . . . . . . . . . . . . . . . . . 146
Inserting content blocks for layout . . . . . . . . . . . . . . . . . . . . . . . . . . . . . . . . . . . 147
Changing highlight color for content blocks . . . . . . . . . . . . . . . . . . . . . . . . . . . . 148
Working with content blocks for layout. . . . . . . . . . . . . . . . . . . . . . . . . . . . . . . . 149
Inserting a layer . . . . . . . . . . . . . . . . . . . . . . . . . . . . . . . . . . . . . . . . . . . . . . . . . 150
Setting layer preferences and properties . . . . . . . . . . . . . . . . . . . . . . . . . . . . . . . . 152
Managing layers . . . . . . . . . . . . . . . . . . . . . . . . . . . . . . . . . . . . . . . . . . . . . . . . . 153
Manipulating layers. . . . . . . . . . . . . . . . . . . . . . . . . . . . . . . . . . . . . . . . . . . . . . . 157
Converting layers to tables. . . . . . . . . . . . . . . . . . . . . . . . . . . . . . . . . . . . . . . . . . 159
Using rulers and grids to lay out pages. . . . . . . . . . . . . . . . . . . . . . . . . . . . . . . . . 160
Using a tracing image . . . . . . . . . . . . . . . . . . . . . . . . . . . . . . . . . . . . . . . . . . . . . 161
CHAPTER 8: Presenting Content with Tables . . . . . . . . . . . . . . . . . . . . . . . . . . 163
About tables . . . . . . . . . . . . . . . . . . . . . . . . . . . . . . . . . . . . . . . . . . . . . . . . . . . . 164
Inserting a table and adding content . . . . . . . . . . . . . . . . . . . . . . . . . . . . . . . . . . 165
Importing and exporting tabular data . . . . . . . . . . . . . . . . . . . . . . . . . . . . . . . . . 166
Selecting table elements . . . . . . . . . . . . . . . . . . . . . . . . . . . . . . . . . . . . . . . . . . . 167
Using Expanded Tables mode for easier table editing. . . . . . . . . . . . . . . . . . . . . . 170
Formatting tables and cells . . . . . . . . . . . . . . . . . . . . . . . . . . . . . . . . . . . . . . . . . 170
Resizing tables, columns, and rows . . . . . . . . . . . . . . . . . . . . . . . . . . . . . . . . . . . 173
Adding and removing rows and columns. . . . . . . . . . . . . . . . . . . . . . . . . . . . . . . 176
Splitting and merging cells . . . . . . . . . . . . . . . . . . . . . . . . . . . . . . . . . . . . . . . . . 178
Copying, pasting, and deleting cells. . . . . . . . . . . . . . . . . . . . . . . . . . . . . . . . . . . 179
Nesting tables . . . . . . . . . . . . . . . . . . . . . . . . . . . . . . . . . . . . . . . . . . . . . . . . . . . 181
Sorting tables. . . . . . . . . . . . . . . . . . . . . . . . . . . . . . . . . . . . . . . . . . . . . . . . . . . . 181
CHAPTER 9: Laying Out Pages in Layout Mode . . . . . . . . . . . . . . . . . . . . . . . . 183
About Layout mode . . . . . . . . . . . . . . . . . . . . . . . . . . . . . . . . . . . . . . . . . . . . . . 184
Switching from Standard to Layout mode . . . . . . . . . . . . . . . . . . . . . . . . . . . . . . 187
Drawing in Layout mode . . . . . . . . . . . . . . . . . . . . . . . . . . . . . . . . . . . . . . . . . . 187
Adding content to a layout cell . . . . . . . . . . . . . . . . . . . . . . . . . . . . . . . . . . . . . . 190
Clearing automatically set cell heights . . . . . . . . . . . . . . . . . . . . . . . . . . . . . . . . . 192
Resizing and moving layout cells and tables. . . . . . . . . . . . . . . . . . . . . . . . . . . . . 192
Formatting layout cells and tables . . . . . . . . . . . . . . . . . . . . . . . . . . . . . . . . . . . . 194
Setting column width . . . . . . . . . . . . . . . . . . . . . . . . . . . . . . . . . . . . . . . . . . . . . 195
Setting preferences for Layout mode . . . . . . . . . . . . . . . . . . . . . . . . . . . . . . . . . . 197
CHAPTER 10: Using Frames . . . . . . . . . . . . . . . . . . . . . . . . . . . . . . . . . . . . . . . . 199
About frames and framesets . . . . . . . . . . . . . . . . . . . . . . . . . . . . . . . . . . . . . . . . 200
Working with framesets in the Document window . . . . . . . . . . . . . . . . . . . . . . . 203
Creating frames and framesets . . . . . . . . . . . . . . . . . . . . . . . . . . . . . . . . . . . . . . . 204
Selecting frames and framesets. . . . . . . . . . . . . . . . . . . . . . . . . . . . . . . . . . . . . . . 207
Opening a document in a frame . . . . . . . . . . . . . . . . . . . . . . . . . . . . . . . . . . . . . 209
Saving frame and frameset files . . . . . . . . . . . . . . . . . . . . . . . . . . . . . . . . . . . . . . 209
Contents 5
Page 6

Viewing and setting frame properties and attributes . . . . . . . . . . . . . . . . . . . . . . 210
Viewing and setting frameset properties . . . . . . . . . . . . . . . . . . . . . . . . . . . . . . . 212
Controlling frame content with links. . . . . . . . . . . . . . . . . . . . . . . . . . . . . . . . . . 213
Handling browsers that can’t display frames. . . . . . . . . . . . . . . . . . . . . . . . . . . . . 214
Using JavaScript behaviors with frames . . . . . . . . . . . . . . . . . . . . . . . . . . . . . . . . 214
CHAPTER 11: Managing Templates . . . . . . . . . . . . . . . . . . . . . . . . . . . . . . . . . . 215
About Dreamweaver templates . . . . . . . . . . . . . . . . . . . . . . . . . . . . . . . . . . . . . . 216
Creating a Dreamweaver template. . . . . . . . . . . . . . . . . . . . . . . . . . . . . . . . . . . . 226
Creating templates for a Contribute site . . . . . . . . . . . . . . . . . . . . . . . . . . . . . . . 229
Creating editable regions . . . . . . . . . . . . . . . . . . . . . . . . . . . . . . . . . . . . . . . . . . . 232
Creating repeating regions. . . . . . . . . . . . . . . . . . . . . . . . . . . . . . . . . . . . . . . . . . 234
Using optional regions. . . . . . . . . . . . . . . . . . . . . . . . . . . . . . . . . . . . . . . . . . . . . 237
Defining editable tag attributes . . . . . . . . . . . . . . . . . . . . . . . . . . . . . . . . . . . . . . 239
Creating a nested template . . . . . . . . . . . . . . . . . . . . . . . . . . . . . . . . . . . . . . . . . 241
Editing and updating templates. . . . . . . . . . . . . . . . . . . . . . . . . . . . . . . . . . . . . . 242
Managing templates . . . . . . . . . . . . . . . . . . . . . . . . . . . . . . . . . . . . . . . . . . . . . . 245
Exporting and importing template XML content . . . . . . . . . . . . . . . . . . . . . . . . 246
Exporting a site without template markup. . . . . . . . . . . . . . . . . . . . . . . . . . . . . . 247
Applying or removing a template from an existing document . . . . . . . . . . . . . . . 247
Editing content in a template-based document . . . . . . . . . . . . . . . . . . . . . . . . . . 248
PART IV: Adding Content to Pages
CHAPTER 12: Working with Pages. . . . . . . . . . . . . . . . . . . . . . . . . . . . . . . . . . . 253
About working with pages . . . . . . . . . . . . . . . . . . . . . . . . . . . . . . . . . . . . . . . . . . 253
Saving web pages . . . . . . . . . . . . . . . . . . . . . . . . . . . . . . . . . . . . . . . . . . . . . . . . . 257
Specifying HTML instead of CSS . . . . . . . . . . . . . . . . . . . . . . . . . . . . . . . . . . . . 258
Setting page properties . . . . . . . . . . . . . . . . . . . . . . . . . . . . . . . . . . . . . . . . . . . . 258
Working with colors . . . . . . . . . . . . . . . . . . . . . . . . . . . . . . . . . . . . . . . . . . . . . . 260
Selecting elements in the Document window . . . . . . . . . . . . . . . . . . . . . . . . . . . 262
Using the History panel. . . . . . . . . . . . . . . . . . . . . . . . . . . . . . . . . . . . . . . . . . . . 263
Automating tasks. . . . . . . . . . . . . . . . . . . . . . . . . . . . . . . . . . . . . . . . . . . . . . . . . 265
Using JavaScript behaviors to detect browsers and plug-ins . . . . . . . . . . . . . . . . . 270
Previewing and testing pages in browsers . . . . . . . . . . . . . . . . . . . . . . . . . . . . . . . 270
Setting download time and size preferences . . . . . . . . . . . . . . . . . . . . . . . . . . . . . 272
CHAPTER 13: Inserting and Formatting Text . . . . . . . . . . . . . . . . . . . . . . . . . . . 273
About text formatting in Dreamweaver . . . . . . . . . . . . . . . . . . . . . . . . . . . . . . . . 273
Inserting text . . . . . . . . . . . . . . . . . . . . . . . . . . . . . . . . . . . . . . . . . . . . . . . . . . . 280
Formatting paragraphs and document structure . . . . . . . . . . . . . . . . . . . . . . . . . 282
Formatting text . . . . . . . . . . . . . . . . . . . . . . . . . . . . . . . . . . . . . . . . . . . . . . . . . 285
Using Cascading Style Sheets styles . . . . . . . . . . . . . . . . . . . . . . . . . . . . . . . . . . . 290
Updating CSS style sheets in a Contribute site . . . . . . . . . . . . . . . . . . . . . . . . . . 300
Checking spelling . . . . . . . . . . . . . . . . . . . . . . . . . . . . . . . . . . . . . . . . . . . . . . . . 301
Searching for and replacing text. . . . . . . . . . . . . . . . . . . . . . . . . . . . . . . . . . . . . . 301
6 Contents
Page 7

CHAPTER 14: Inserting Images. . . . . . . . . . . . . . . . . . . . . . . . . . . . . . . . . . . . . . 303
About images . . . . . . . . . . . . . . . . . . . . . . . . . . . . . . . . . . . . . . . . . . . . . . . . . . . 303
Inserting an image . . . . . . . . . . . . . . . . . . . . . . . . . . . . . . . . . . . . . . . . . . . . . . . . 305
Resizing an image . . . . . . . . . . . . . . . . . . . . . . . . . . . . . . . . . . . . . . . . . . . . . . . . 309
Cropping an image . . . . . . . . . . . . . . . . . . . . . . . . . . . . . . . . . . . . . . . . . . . . . . . 310
Optimizing an image using Fireworks . . . . . . . . . . . . . . . . . . . . . . . . . . . . . . . . . 310
Adjusting the brightness and contrast of an image . . . . . . . . . . . . . . . . . . . . . . . . 311
Sharpening an image . . . . . . . . . . . . . . . . . . . . . . . . . . . . . . . . . . . . . . . . . . . . . . 311
Creating a rollover image. . . . . . . . . . . . . . . . . . . . . . . . . . . . . . . . . . . . . . . . . . . 312
Using an external image editor . . . . . . . . . . . . . . . . . . . . . . . . . . . . . . . . . . . . . . 313
Applying behaviors to images . . . . . . . . . . . . . . . . . . . . . . . . . . . . . . . . . . . . . . . 313
CHAPTER 15: Linking and Navigation . . . . . . . . . . . . . . . . . . . . . . . . . . . . . . . . 315
Understanding document locations and paths . . . . . . . . . . . . . . . . . . . . . . . . . . . 316
Jump menus . . . . . . . . . . . . . . . . . . . . . . . . . . . . . . . . . . . . . . . . . . . . . . . . . . . . 318
Navigation bars . . . . . . . . . . . . . . . . . . . . . . . . . . . . . . . . . . . . . . . . . . . . . . . . . . 319
About image maps. . . . . . . . . . . . . . . . . . . . . . . . . . . . . . . . . . . . . . . . . . . . . . . . 320
Creating links . . . . . . . . . . . . . . . . . . . . . . . . . . . . . . . . . . . . . . . . . . . . . . . . . . . 320
Managing links . . . . . . . . . . . . . . . . . . . . . . . . . . . . . . . . . . . . . . . . . . . . . . . . . . 327
Inserting jump menus . . . . . . . . . . . . . . . . . . . . . . . . . . . . . . . . . . . . . . . . . . . . . 331
Using navigation bars . . . . . . . . . . . . . . . . . . . . . . . . . . . . . . . . . . . . . . . . . . . . . 333
Using image maps . . . . . . . . . . . . . . . . . . . . . . . . . . . . . . . . . . . . . . . . . . . . . . . . 335
Attaching JavaScript behaviors to links . . . . . . . . . . . . . . . . . . . . . . . . . . . . . . . . 336
Checking for broken, external, and orphaned links . . . . . . . . . . . . . . . . . . . . . . . 336
Fixing broken links . . . . . . . . . . . . . . . . . . . . . . . . . . . . . . . . . . . . . . . . . . . . . . . 338
Opening linked documents in Dreamweaver. . . . . . . . . . . . . . . . . . . . . . . . . . . . 339
CHAPTER 16: Working with Other Applications . . . . . . . . . . . . . . . . . . . . . . . . . 341
About Fireworks and Flash integration . . . . . . . . . . . . . . . . . . . . . . . . . . . . . . . . 341
Optimizing your work environment for Fireworks and Flash. . . . . . . . . . . . . . . . 342
Working with Fireworks . . . . . . . . . . . . . . . . . . . . . . . . . . . . . . . . . . . . . . . . . . . 342
Working with Flash . . . . . . . . . . . . . . . . . . . . . . . . . . . . . . . . . . . . . . . . . . . . . . . 351
CHAPTER 17: Adding Audio, Video, and Interactive Elements. . . . . . . . . . . . . . 355
About media files . . . . . . . . . . . . . . . . . . . . . . . . . . . . . . . . . . . . . . . . . . . . . . . . 356
Inserting and editing media objects . . . . . . . . . . . . . . . . . . . . . . . . . . . . . . . . . . . 358
Starting an external editor for media files . . . . . . . . . . . . . . . . . . . . . . . . . . . . . . 359
Using Design Notes with media objects. . . . . . . . . . . . . . . . . . . . . . . . . . . . . . . . 360
Inserting and modifying a Flash button object. . . . . . . . . . . . . . . . . . . . . . . . . . . 361
Inserting a Flash text object . . . . . . . . . . . . . . . . . . . . . . . . . . . . . . . . . . . . . . . . . 363
Inserting Flash content . . . . . . . . . . . . . . . . . . . . . . . . . . . . . . . . . . . . . . . . . . . . 363
Downloading and installing Flash elements . . . . . . . . . . . . . . . . . . . . . . . . . . . . . 364
Inserting Flash elements . . . . . . . . . . . . . . . . . . . . . . . . . . . . . . . . . . . . . . . . . . . 364
Editing Flash element attributes . . . . . . . . . . . . . . . . . . . . . . . . . . . . . . . . . . . . . 365
Inserting Shockwave movies . . . . . . . . . . . . . . . . . . . . . . . . . . . . . . . . . . . . . . . . 365
Adding video. . . . . . . . . . . . . . . . . . . . . . . . . . . . . . . . . . . . . . . . . . . . . . . . . . . . 365
Adding sound to a page. . . . . . . . . . . . . . . . . . . . . . . . . . . . . . . . . . . . . . . . . . . . 366
Contents 7
Page 8

Inserting Netscape Navigator plug-in content . . . . . . . . . . . . . . . . . . . . . . . . . . . 367
Inserting an ActiveX control . . . . . . . . . . . . . . . . . . . . . . . . . . . . . . . . . . . . . . . . 368
Inserting a Java applet . . . . . . . . . . . . . . . . . . . . . . . . . . . . . . . . . . . . . . . . . . . . . 368
Using behaviors to control media . . . . . . . . . . . . . . . . . . . . . . . . . . . . . . . . . . . . 369
CHAPTER 18: Using JavaScript Behaviors. . . . . . . . . . . . . . . . . . . . . . . . . . . . . 371
Using the Behaviors panel . . . . . . . . . . . . . . . . . . . . . . . . . . . . . . . . . . . . . . . . . . 372
About events . . . . . . . . . . . . . . . . . . . . . . . . . . . . . . . . . . . . . . . . . . . . . . . . . . . . 372
Applying a behavior. . . . . . . . . . . . . . . . . . . . . . . . . . . . . . . . . . . . . . . . . . . . . . . 373
Attaching a behavior to text. . . . . . . . . . . . . . . . . . . . . . . . . . . . . . . . . . . . . . . . . 374
Changing a behavior . . . . . . . . . . . . . . . . . . . . . . . . . . . . . . . . . . . . . . . . . . . . . . 375
Updating a behavior . . . . . . . . . . . . . . . . . . . . . . . . . . . . . . . . . . . . . . . . . . . . . . 375
Creating new actions. . . . . . . . . . . . . . . . . . . . . . . . . . . . . . . . . . . . . . . . . . . . . . 375
Downloading and installing third-party behaviors . . . . . . . . . . . . . . . . . . . . . . . . 376
Using the behavior actions that come with Dreamweaver . . . . . . . . . . . . . . . . . . 376
PART V: Working with Page Code
CHAPTER 19: Setting Up Your Coding Environment . . . . . . . . . . . . . . . . . . . . . 401
Viewing your code. . . . . . . . . . . . . . . . . . . . . . . . . . . . . . . . . . . . . . . . . . . . . . . . 401
Using the coder-oriented workspace (Windows only) . . . . . . . . . . . . . . . . . . . . . 402
Setting viewing preferences . . . . . . . . . . . . . . . . . . . . . . . . . . . . . . . . . . . . . . . . . 403
Setting coding preferences . . . . . . . . . . . . . . . . . . . . . . . . . . . . . . . . . . . . . . . . . . 403
Customizing keyboard shortcuts . . . . . . . . . . . . . . . . . . . . . . . . . . . . . . . . . . . . . 405
Opening files in Code view by default . . . . . . . . . . . . . . . . . . . . . . . . . . . . . . . . . 405
Setting Validator preferences . . . . . . . . . . . . . . . . . . . . . . . . . . . . . . . . . . . . . . . . 405
Managing tag libraries . . . . . . . . . . . . . . . . . . . . . . . . . . . . . . . . . . . . . . . . . . . . . 406
Importing custom tags into Dreamweaver . . . . . . . . . . . . . . . . . . . . . . . . . . . . . . 410
Using an external HTML editor with Dreamweaver . . . . . . . . . . . . . . . . . . . . . . 412
CHAPTER 20: Coding in Dreamweaver . . . . . . . . . . . . . . . . . . . . . . . . . . . . . . . 415
About coding in Dreamweaver . . . . . . . . . . . . . . . . . . . . . . . . . . . . . . . . . . . . . . 416
Writing and editing code . . . . . . . . . . . . . . . . . . . . . . . . . . . . . . . . . . . . . . . . . . . 423
Searching and replacing tags and attributes . . . . . . . . . . . . . . . . . . . . . . . . . . . . . 428
Making quick changes to a code selection . . . . . . . . . . . . . . . . . . . . . . . . . . . . . . 430
Using language-reference material . . . . . . . . . . . . . . . . . . . . . . . . . . . . . . . . . . . . 431
Printing your code. . . . . . . . . . . . . . . . . . . . . . . . . . . . . . . . . . . . . . . . . . . . . . . . 432
CHAPTER 21: Optimizing and Debugging Your Code . . . . . . . . . . . . . . . . . . . . 433
Cleaning up your code . . . . . . . . . . . . . . . . . . . . . . . . . . . . . . . . . . . . . . . . . . . . 433
Verifying that tags and braces are balanced . . . . . . . . . . . . . . . . . . . . . . . . . . . . . 434
Checking for browser compatibility. . . . . . . . . . . . . . . . . . . . . . . . . . . . . . . . . . . 434
Validating your tags . . . . . . . . . . . . . . . . . . . . . . . . . . . . . . . . . . . . . . . . . . . . . . . 437
Making pages XHTML-compliant . . . . . . . . . . . . . . . . . . . . . . . . . . . . . . . . . . . 438
Using the ColdFusion debugger (Windows only) . . . . . . . . . . . . . . . . . . . . . . . . 439
8 Contents
Page 9

CHAPTER 22: Editing Code in Design View . . . . . . . . . . . . . . . . . . . . . . . . . . . 441
Editing code with the Property inspector. . . . . . . . . . . . . . . . . . . . . . . . . . . . . . . 441
Changing attributes with the Tag inspector . . . . . . . . . . . . . . . . . . . . . . . . . . . . . 442
Editing code with the Quick Tag Editor . . . . . . . . . . . . . . . . . . . . . . . . . . . . . . . 443
Editing code with the tag selector . . . . . . . . . . . . . . . . . . . . . . . . . . . . . . . . . . . . 446
Editing scripts . . . . . . . . . . . . . . . . . . . . . . . . . . . . . . . . . . . . . . . . . . . . . . . . . . . 446
Working with server-side includes . . . . . . . . . . . . . . . . . . . . . . . . . . . . . . . . . . . . 448
Using JavaScript behaviors. . . . . . . . . . . . . . . . . . . . . . . . . . . . . . . . . . . . . . . . . . 449
Viewing and editing head content . . . . . . . . . . . . . . . . . . . . . . . . . . . . . . . . . . . . 449
PART VI: Preparing to Build Dynamic Sites
CHAPTER 23: Setting Up a Web Application . . . . . . . . . . . . . . . . . . . . . . . . . . 453
What you need to build web applications . . . . . . . . . . . . . . . . . . . . . . . . . . . . . . 453
Setting up a web server . . . . . . . . . . . . . . . . . . . . . . . . . . . . . . . . . . . . . . . . . . . . 454
Setting up an application server. . . . . . . . . . . . . . . . . . . . . . . . . . . . . . . . . . . . . . 454
Creating a root folder for the application. . . . . . . . . . . . . . . . . . . . . . . . . . . . . . . 458
Defining a Dreamweaver site. . . . . . . . . . . . . . . . . . . . . . . . . . . . . . . . . . . . . . . . 459
Connecting to a database. . . . . . . . . . . . . . . . . . . . . . . . . . . . . . . . . . . . . . . . . . . 461
CHAPTER 24: Database Connections for ColdFusion Developers . . . . . . . . . . 463
Connecting to a database. . . . . . . . . . . . . . . . . . . . . . . . . . . . . . . . . . . . . . . . . . . 463
Editing or deleting a database connection . . . . . . . . . . . . . . . . . . . . . . . . . . . . . . 464
CHAPTER 25: Database Connections for ASP.NET Developers . . . . . . . . . . . 465
Connecting to a database. . . . . . . . . . . . . . . . . . . . . . . . . . . . . . . . . . . . . . . . . . . 465
Editing or deleting a database connection . . . . . . . . . . . . . . . . . . . . . . . . . . . . . . 468
CHAPTER 26: Database Connections for ASP Developers . . . . . . . . . . . . . . . 469
About database connections in ASP. . . . . . . . . . . . . . . . . . . . . . . . . . . . . . . . . . . 469
Creating a DSN connection . . . . . . . . . . . . . . . . . . . . . . . . . . . . . . . . . . . . . . . . 471
Creating a DSN-less connection . . . . . . . . . . . . . . . . . . . . . . . . . . . . . . . . . . . . . 474
Connecting to a database on an ISP . . . . . . . . . . . . . . . . . . . . . . . . . . . . . . . . . . 475
Editing or deleting a database connection . . . . . . . . . . . . . . . . . . . . . . . . . . . . . . 478
CHAPTER 27: Database Connections for JSP Developers . . . . . . . . . . . . . . . . 479
About database connections in JSP . . . . . . . . . . . . . . . . . . . . . . . . . . . . . . . . . . . 479
Connecting to a database. . . . . . . . . . . . . . . . . . . . . . . . . . . . . . . . . . . . . . . . . . . 481
Connecting through an ODBC driver. . . . . . . . . . . . . . . . . . . . . . . . . . . . . . . . . 482
Editing or deleting a database connection . . . . . . . . . . . . . . . . . . . . . . . . . . . . . . 485
Contents 9
Page 10

CHAPTER 28: Database Connections for PHP Developers . . . . . . . . . . . . . . . 487
Connecting to a database. . . . . . . . . . . . . . . . . . . . . . . . . . . . . . . . . . . . . . . . . . . 487
Editing or deleting a database connection . . . . . . . . . . . . . . . . . . . . . . . . . . . . . . 488
CHAPTER 29: Troubleshooting Database Connections . . . . . . . . . . . . . . . . . . 489
Troubleshooting permissions problems . . . . . . . . . . . . . . . . . . . . . . . . . . . . . . . . 489
Troubleshooting Microsoft error messages . . . . . . . . . . . . . . . . . . . . . . . . . . . . . . 491
PART VII: Making Pages Dynamic
CHAPTER 30: Optimizing the Workspace for Visual Development . . . . . . . . . . 497
Displaying web-application development panels . . . . . . . . . . . . . . . . . . . . . . . . . 497
Viewing your database within Dreamweaver . . . . . . . . . . . . . . . . . . . . . . . . . . . . 499
Viewing live data in Design view . . . . . . . . . . . . . . . . . . . . . . . . . . . . . . . . . . . . 500
Working in Design view without live data . . . . . . . . . . . . . . . . . . . . . . . . . . . . . . 505
Previewing dynamic pages in a browser . . . . . . . . . . . . . . . . . . . . . . . . . . . . . . . . 505
Restricting database information displayed in Dreamweaver . . . . . . . . . . . . . . . . 506
CHAPTER 31: The Workflow for Dynamic Page Design . . . . . . . . . . . . . . . . . . 507
Designing the page . . . . . . . . . . . . . . . . . . . . . . . . . . . . . . . . . . . . . . . . . . . . . . . 508
Creating a source of dynamic content . . . . . . . . . . . . . . . . . . . . . . . . . . . . . . . . . 508
Adding dynamic content to a web page . . . . . . . . . . . . . . . . . . . . . . . . . . . . . . . . 510
Enhancing the functionality of a dynamic page . . . . . . . . . . . . . . . . . . . . . . . . . . 510
Testing and debugging the page. . . . . . . . . . . . . . . . . . . . . . . . . . . . . . . . . . . . . . 511
CHAPTER 32: Obtaining Data for Your Page. . . . . . . . . . . . . . . . . . . . . . . . . . . 515
Using a database to store content. . . . . . . . . . . . . . . . . . . . . . . . . . . . . . . . . . . . . 515
Collecting data submitted by users . . . . . . . . . . . . . . . . . . . . . . . . . . . . . . . . . . . 516
Accessing data stored in session variables . . . . . . . . . . . . . . . . . . . . . . . . . . . . . . . 520
CHAPTER 33: Defining Sources of Dynamic Content . . . . . . . . . . . . . . . . . . . . 525
About dynamic content sources. . . . . . . . . . . . . . . . . . . . . . . . . . . . . . . . . . . . . . 526
Defining a recordset . . . . . . . . . . . . . . . . . . . . . . . . . . . . . . . . . . . . . . . . . . . . . . 530
Defining URL parameters . . . . . . . . . . . . . . . . . . . . . . . . . . . . . . . . . . . . . . . . . . 534
Defining form parameters . . . . . . . . . . . . . . . . . . . . . . . . . . . . . . . . . . . . . . . . . . 535
Defining session variables . . . . . . . . . . . . . . . . . . . . . . . . . . . . . . . . . . . . . . . . . . 536
Defining application variables for ASP and ColdFusion . . . . . . . . . . . . . . . . . . . 537
Using a variable as a data source for a ColdFusion recordset . . . . . . . . . . . . . . . . 538
Defining server variables . . . . . . . . . . . . . . . . . . . . . . . . . . . . . . . . . . . . . . . . . . . 538
Caching content sources . . . . . . . . . . . . . . . . . . . . . . . . . . . . . . . . . . . . . . . . . . . 542
Changing or deleting content sources . . . . . . . . . . . . . . . . . . . . . . . . . . . . . . . . . 543
Copying a recordset from one page to another page. . . . . . . . . . . . . . . . . . . . . . . 543
10 Contents
Page 11

CHAPTER 34: Adding Dynamic Content to Web Pages . . . . . . . . . . . . . . . . . . 545
About adding dynamic content . . . . . . . . . . . . . . . . . . . . . . . . . . . . . . . . . . . . . . 546
Making text dynamic . . . . . . . . . . . . . . . . . . . . . . . . . . . . . . . . . . . . . . . . . . . . . 547
Making images dynamic . . . . . . . . . . . . . . . . . . . . . . . . . . . . . . . . . . . . . . . . . . . 548
Making HTML attributes dynamic . . . . . . . . . . . . . . . . . . . . . . . . . . . . . . . . . . 549
Making ActiveX, Flash, and other object parameters dynamic. . . . . . . . . . . . . . . 551
Editing dynamic content . . . . . . . . . . . . . . . . . . . . . . . . . . . . . . . . . . . . . . . . . . . 552
Deleting dynamic content . . . . . . . . . . . . . . . . . . . . . . . . . . . . . . . . . . . . . . . . . 552
Creating dynamic pages in a Contribute site . . . . . . . . . . . . . . . . . . . . . . . . . . . . 553
CHAPTER 35: Displaying Database Records . . . . . . . . . . . . . . . . . . . . . . . . . . 555
About displaying database records . . . . . . . . . . . . . . . . . . . . . . . . . . . . . . . . . . . . 555
Using predefined data formats. . . . . . . . . . . . . . . . . . . . . . . . . . . . . . . . . . . . . . . 562
Creating recordset navigation links . . . . . . . . . . . . . . . . . . . . . . . . . . . . . . . . . . . 563
Showing and hiding regions based on recordset results . . . . . . . . . . . . . . . . . . . . 566
Displaying multiple recordset results . . . . . . . . . . . . . . . . . . . . . . . . . . . . . . . . . 566
Creating a table with a Repeat Region server behavior. . . . . . . . . . . . . . . . . . . . . 567
Creating a record counter . . . . . . . . . . . . . . . . . . . . . . . . . . . . . . . . . . . . . . . . . . 569
Creating ASP.NET DataGrid and DataList web controls . . . . . . . . . . . . . . . . . . 570
CHAPTER 36: Using ColdFusion Components . . . . . . . . . . . . . . . . . . . . . . . . . 573
About ColdFusion components. . . . . . . . . . . . . . . . . . . . . . . . . . . . . . . . . . . . . . 573
Visually creating a component in Dreamweaver . . . . . . . . . . . . . . . . . . . . . . . . . 574
Viewing ColdFusion components in Dreamweaver . . . . . . . . . . . . . . . . . . . . . . . 575
Editing ColdFusion components in Dreamweaver. . . . . . . . . . . . . . . . . . . . . . . . 576
Building web pages that use ColdFusion components . . . . . . . . . . . . . . . . . . . . . 577
CHAPTER 37: Using Web Services . . . . . . . . . . . . . . . . . . . . . . . . . . . . . . . . . . 579
About web services . . . . . . . . . . . . . . . . . . . . . . . . . . . . . . . . . . . . . . . . . . . . . . . 580
Configuring proxy generators for use with Dreamweaver. . . . . . . . . . . . . . . . . . . 583
Adding a web service proxy using the WSDL description . . . . . . . . . . . . . . . . . . 585
Adding a web service to a page . . . . . . . . . . . . . . . . . . . . . . . . . . . . . . . . . . . . . . 586
Editing the UDDI web service site list. . . . . . . . . . . . . . . . . . . . . . . . . . . . . . . . . 588
CHAPTER 38: Adding Custom Server Behaviors . . . . . . . . . . . . . . . . . . . . . . . 589
About custom server behaviors . . . . . . . . . . . . . . . . . . . . . . . . . . . . . . . . . . . . . . 589
Installing third-party server behaviors . . . . . . . . . . . . . . . . . . . . . . . . . . . . . . . . . 598
Using the Server Behavior Builder . . . . . . . . . . . . . . . . . . . . . . . . . . . . . . . . . . . . 598
Using parameters in server behaviors . . . . . . . . . . . . . . . . . . . . . . . . . . . . . . . . . . 601
Positioning code blocks . . . . . . . . . . . . . . . . . . . . . . . . . . . . . . . . . . . . . . . . . . . 602
Creating a dialog box for a custom server behavior . . . . . . . . . . . . . . . . . . . . . . . 603
Editing and modifying server behaviors . . . . . . . . . . . . . . . . . . . . . . . . . . . . . . . . 605
Contents 11
Page 12

CHAPTER 39: Creating Forms . . . . . . . . . . . . . . . . . . . . . . . . . . . . . . . . . . . . . . 607
About forms . . . . . . . . . . . . . . . . . . . . . . . . . . . . . . . . . . . . . . . . . . . . . . . . . . . . 607
Creating HTML forms . . . . . . . . . . . . . . . . . . . . . . . . . . . . . . . . . . . . . . . . . . . . 611
Inserting HTML form objects. . . . . . . . . . . . . . . . . . . . . . . . . . . . . . . . . . . . . . . 613
Inserting dynamic HTML form objects. . . . . . . . . . . . . . . . . . . . . . . . . . . . . . . . 617
Validating HTML form data . . . . . . . . . . . . . . . . . . . . . . . . . . . . . . . . . . . . . . . . 620
Attaching JavaScript behaviors to HTML form objects . . . . . . . . . . . . . . . . . . . . 620
Attaching custom scripts to HTML form buttons. . . . . . . . . . . . . . . . . . . . . . . . 621
Creating accessible HTML forms . . . . . . . . . . . . . . . . . . . . . . . . . . . . . . . . . . . . 622
Creating ASP.NET forms . . . . . . . . . . . . . . . . . . . . . . . . . . . . . . . . . . . . . . . . . . 623
PART VIII: Developing Applications Rapidly
CHAPTER 40: Building ColdFusion Applications Rapidly . . . . . . . . . . . . . . . . . 629
About rapid application development (all servers) . . . . . . . . . . . . . . . . . . . . . . . . 629
Building master/detail pages (ColdFusion) . . . . . . . . . . . . . . . . . . . . . . . . . . . . . 634
Building search/results pages (ColdFusion, ASP, JSP, PHP) . . . . . . . . . . . . . . . . . 641
Building a record insert page (all servers) . . . . . . . . . . . . . . . . . . . . . . . . . . . . . . . 646
Building pages to update a record (ColdFusion) . . . . . . . . . . . . . . . . . . . . . . . . . 649
Building pages to delete a record (ColdFusion) . . . . . . . . . . . . . . . . . . . . . . . . . . 655
Using stored procedures to modify databases (ColdFusion) . . . . . . . . . . . . . . . . . 665
Building pages that restrict access to your site (ColdFusion, ASP, JSP, PHP) . . . . 666
CHAPTER 41: Building ASP.NET Applications Rapidly . . . . . . . . . . . . . . . . . . . 675
Building master/detail pages (ASP.NET) . . . . . . . . . . . . . . . . . . . . . . . . . . . . . . . 675
Building a database search page (ASP.NET). . . . . . . . . . . . . . . . . . . . . . . . . . . . . 681
Building a record insert page (ASP.NET). . . . . . . . . . . . . . . . . . . . . . . . . . . . . . . 685
Building pages to update a record (ASP.NET) . . . . . . . . . . . . . . . . . . . . . . . . . . . 686
Building pages to delete a record (ASP.NET). . . . . . . . . . . . . . . . . . . . . . . . . . . . 692
Using stored procedures to modify databases (ASP.NET) . . . . . . . . . . . . . . . . . . 700
Building pages that restrict access to your site (ASP.NET) . . . . . . . . . . . . . . . . . . 701
CHAPTER 42: Building ASP and JSP Applications Rapidly . . . . . . . . . . . . . . . 703
Building master/detail pages (ASP and JSP) . . . . . . . . . . . . . . . . . . . . . . . . . . . . 703
Building search/results pages (ASP and JSP) . . . . . . . . . . . . . . . . . . . . . . . . . . . . 706
Building a record insert page (ASP and JSP) . . . . . . . . . . . . . . . . . . . . . . . . . . . . 706
Building pages to update a record (ASP and JSP) . . . . . . . . . . . . . . . . . . . . . . . . 707
Building pages to delete a record (ASP and JSP) . . . . . . . . . . . . . . . . . . . . . . . . . 711
Building pages with advanced data manipulation objects (ASP and JSP) . . . . . . . 714
Building pages that restrict access to your site (ASP and JSP) . . . . . . . . . . . . . . . 718
12 Contents
Page 13

CHAPTER 43: Building PHP Applications Rapidly . . . . . . . . . . . . . . . . . . . . . . 719
Building master/detail pages (PHP). . . . . . . . . . . . . . . . . . . . . . . . . . . . . . . . . . . 719
Building search/results pages (PHP) . . . . . . . . . . . . . . . . . . . . . . . . . . . . . . . . . . 725
Building a record insert page (PHP) . . . . . . . . . . . . . . . . . . . . . . . . . . . . . . . . . . 725
Building pages to update a record (PHP). . . . . . . . . . . . . . . . . . . . . . . . . . . . . . . 726
Building pages to delete a record (PHP) . . . . . . . . . . . . . . . . . . . . . . . . . . . . . . . 732
Building pages that restrict access to your site (PHP). . . . . . . . . . . . . . . . . . . . . . 738
PART IX: Appendixes
APPENDIX A: Beginner’s Guide to Databases . . . . . . . . . . . . . . . . . . . . . . . . . . 741
About databases. . . . . . . . . . . . . . . . . . . . . . . . . . . . . . . . . . . . . . . . . . . . . . . . . . 741
Database design basics . . . . . . . . . . . . . . . . . . . . . . . . . . . . . . . . . . . . . . . . . . . . . 742
Understanding database connections . . . . . . . . . . . . . . . . . . . . . . . . . . . . . . . . . 747
APPENDIX B: SQL Primer . . . . . . . . . . . . . . . . . . . . . . . . . . . . . . . . . . . . . . . . . 753
Syntax basics . . . . . . . . . . . . . . . . . . . . . . . . . . . . . . . . . . . . . . . . . . . . . . . . . . . . 753
Defining the columns of a recordset . . . . . . . . . . . . . . . . . . . . . . . . . . . . . . . . . . 755
Limiting the records in a recordset. . . . . . . . . . . . . . . . . . . . . . . . . . . . . . . . . . . . 755
Sorting the records in a recordset. . . . . . . . . . . . . . . . . . . . . . . . . . . . . . . . . . . . . 758
Joining tables. . . . . . . . . . . . . . . . . . . . . . . . . . . . . . . . . . . . . . . . . . . . . . . . . . . . 759
INDEX . . . . . . . . . . . . . . . . . . . . . . . . . . . . . . . . . . . . . . . . . . . . . . . . . . . . . . . . . . 761
Contents 13
Page 14

14 Contents
Page 15

PART I
Dreamweaver Basics
Learn how to use Macromedia Dreamweaver MX 2004 documentation and other resources, and
set up the Dreamweaver workspace to fit your preferred working style. Then plan and set up a
site, and begin to create pages.
This part contains the following chapters:
Introduction, “Welcome to Dreamweaver,” on page 17
Chapter 1, “Exploring the Workspace,” on page 31
Chapter 2, “Setting Up a Dreamweaver Site,” on page 59
Chapter 3, “Creating and Opening Documents,” on page 69
PART I
Page 16

Page 17

INTRODUCTION
Welcome to Dreamweaver
Macromedia Dreamweaver MX 2004 is a professional HTML editor for designing, coding, and
developing websites, web pages, and web applications. Whether you enjoy the control of
hand-coding HTML or prefer to work in a visual editing environment, Dreamweaver provides
you with helpful tools to enhance your web creation experience.
The visual editing features in Dreamweaver let you quickly create pages without writing a line of
code. You can view all your site elements or assets and drag them from an easy-to-use panel
directly into a document. You can streamline your development workflow by creating and editing
images in Macromedia Fireworks or another graphics application, then importing them directly
into Dreamweaver, or by adding Macromedia Flash objects.
Dreamweaver also provides a full-featured coding environment that includes code-editing tools
(such as code coloring and tag completion) and reference material on HTML, Cascading Style
Sheets (CSS), JavaScript, ColdFusion Markup Language (CFML), Microsoft Active Server Pages
(ASP), and JavaServer Pages (JSP). Macromedia Roundtrip HTML technology imports your
hand-coded HTML documents without reformatting the code; you can then reformat code with
your preferred formatting style.
Dreamweaver also enables you to build dynamic database-backed web applications using server
technologies such as CFML,ASP.NET, ASP, JSP, and PHP.
Dreamweaver is fully customizable. You can create your own objects and commands, modify
keyboard shortcuts, and even write JavaScript code to extend Dreamweaver capabilities with new
behaviors, Property inspectors, and site reports.
This chapter contains the following sections:
• “What’s new in Dreamweaver MX 2004” on page 18
• “Where to start” on page 20
• “Dreamweaver workflow for creating websites” on page 22
• “Using Dreamweaver with other applications” on page 25
• “Dreamweaver and accessibility” on page 26
• “Guide to Dreamweaver instructional media” on page 27
• “Typographical conventions” on page 29
• “HTML and web technologies resources” on page 29
17
Page 18

What’s new in Dreamweaver MX 2004
Dreamweaver MX 2004 contains a new, streamlined interface, along with improved product
performance. There’s also a wide variety of new features that improve usability and help you build
pages whether you are working in the design environment or the coding environment.
Streamlined design and development interface
The Dreamweaver interface is more approachable to help you improve your productivity and
quality of work.
Insert bar improvements give the Insert bar a new streamlined look, which takes up less space in
the workspace. There’s also a new Favorites category, which you can use to customize an Insert bar
with the objects you use most often. For more information, see “The Insert bar” on page 37.
Microsoft Word and Microsoft Excel copy and paste commands enable you to copy and paste
a Microsoft Word or Excel document directly into Dreamweaver. When you paste a Word or
Excel document, Dreamweaver preserves formatting and generates quality HTML. For more
information, see “Copying and pasting text from MS Office documents” on page 281.
Table editing visual feedback enables you to see the effects column resize operations will have
on your tables. Visual feedback also makes it easier for you to select table elements. For more
information about resizing, see “Resizing tables, columns, and rows” on page 173. For more
information about using Expanded Tables mode for selecting elements, see “Using Expanded
Tables mode for easier table editing” on page 170.
User interface overhaul maximizes the usable workspace, showing context and focus more
clearly, and makes the interface more approachable and logical. For more information about the
Dreamweaver workspace, see “About the Dreamweaver workspace” on page 32.
The Start page enables you to access recently used files, create new files, and access Dreamweaver
resources. The Start page appears when you start Dreamweaver or when you don’t have any
documents open. For information hiding or showing the Start page, see “Hiding and displaying
the Start page” on page 55.
Saved desktop option gives you the choice to have Dreamweaver reopen documents you were
last working on when you restart Dreamweaver. For information about setting this option, see
“Setting General preferences for Dreamweaver” on page 56.
Full Unicode support means that Dreamweaver in Windows supports all text encodings
supported by Internet Explorer. You can use almost any language font installed on your system in
Dreamweaver, and Dreamweaver will render and save it properly. For information about setting
font encodings, see “Setting Fonts preferences for Dreamweaver display” on page 56.
Secure FTP enables you to fully encrypt all file transfers and prevent unauthorized access to your
data, files, user names, and passwords. For information about setting up a remote connection
using FTP, see “Setting up a remote folder” on page 65.
Modernized page layout and design environment
Dreamweaver includes the following enhanced CSS features that provide a more sophisticated
way to style and add interactivity to designs, and also includes feedback to improve visual editing.
18 Introduction: Welcome to Dreamweaver
Page 19

Dynamic cross-browser validation automatically checks the current document for cross-
browser compatibility issues when you save the document. You specify which browsers to target,
and Dreamweaver checks to make sure pages are not using tags or CSS constructs that those
browsers do not support. For more information, see “Checking for browser compatibility”
on page 434.
Relevant CSS tab displays the CSS rules applied to the current Code view or Design view
selection. Click any rule to see which attributes it specifies (border style, margin, padding, text
size, and so on). Special markings let you know when a specific attribute has been overridden, and
in-place editing allows for quick edits that are instantly reflected in Design view. For more
information, see “The CSS Properties tab” on page 279.
CSS layout visualization makes laying out pages in CSS much easier. You can easily select div
and other content blocks in Design view, then modify properties with the CSS Properties tab. For
more information, see Chapter 7, “Laying Out Pages with CSS,” on page 145.
Improved CSS rendering means Dreamweaver can render more complicated CSS-based layouts
and designs more accurately. Improved CSS rendering enables you to design more sophisticated
layouts and use Dreamweaver design tools for robust visual manipulations.
Improved CSS Styles panel provides more options for editing styles in the current document.
You can also now directly apply styles from the text Property inspector. For more information, see
“Using Cascading Style Sheets styles” on page 290.
CSS-based text Property inspector lists all of the styles available for use in text, and includes a
preview that shows what text will look like after the style is applied. For more information, see
“The Property inspector and text formatting” on page 277.
CSS-based page properties give you more control of page properties, such as the appearance of
headings and links, using modern CSS coding constructs. For more information, see “About
setting page properties” on page 254.
Integrated image-editing toolbar enables you to do basic image manipulation and editing from
Dreamweaver using Macromedia Fireworks technology. You can crop, resize, resample, and so on,
without leaving Dreamweaver. For more information, see “Editing images in Dreamweaver”
on page 304.
Powerful and open coding environment
Dreamweaver offers the following new features for coders, including improvements to the Code
view and the ability to edit files without creating a Dreamweaver site. Dreamweaver also includes
current support for server technologies.
Improved Tag inspector displays a list of properties available for the current selection and
enables you to make quick, comprehensive edits. For more information, see “Changing attributes
with the Tag inspector” on page 442.
Siteless file editing enables you to work directly on an FTP or RDS server without creating a
Dreamweaver site. For more information about setting up Dreamweaver to work on a server, see
“Setting up Dreamweaver to work without defining a site” on page 82. For more information
about setting up a Dreamweaver site, see “Setting up a new Dreamweaver site” on page 62.
PHP server behaviors enable you to create a master/detail page set and user authentication
pages. For more information, see “Building master/detail pages (PHP)” on page 719 and
“Building pages that restrict access to your site (PHP)” on page 738.
What’s new in Dreamweaver MX 2004 19
Page 20

Improved support for ASP.NET form controls provides new and improved ways, including new
Property inspectors, to build and manipulate ASP.NET web forms in Design view. For more
information, see Chapter 42, “Building ASP and JSP Applications Rapidly,” on page 703.
Code view context menu enables you to make quick formatting changes to selected code. For
more information, see “Making quick changes to a code selection” on page 430.
Where to start
Dreamweaver documentation includes information for readers from a variety of backgrounds.
To get the most out of the documentation, start by reading the parts that are most appropriate
for you.
For information about Dreamweaver resources, see “Guide to Dreamweaver instructional media”
on page 27.
Web-design novices
If you are relatively new to web design, this section will point you to sections of the Dreamweaver
documentation that are most appropriate for your background.
For web-design novices:
1 Begin by reading the tutorials for creating a static site in Getting Started Help.
2 In Using Dreamweaver Help (Help > Using Dreamweaver), read Chapter 1, “Exploring the
Workspace,” on page 31, Chapter 2, “Setting Up a Dreamweaver Site,” on page 59, Chapter 4,
“Managing Your Files,” on page 77, and Chapter 3, “Creating and Opening Documents,”
on page 69.
3 Learn about page layout by reading Chapter 9, “Laying Out Pages in Layout Mode,”
on page 183.
4 To learn about formatting text and including images in your pages, read Chapter 13, “Inserting
and Formatting Text,” on page 273 and Chapter 14, “Inserting Images,” on page 303.
5 That’s all you really need to begin producing high-quality websites, but when you’re ready to
learn how to use more advanced tools, you can proceed through the rest of the static-page
chapters in Using Dreamweaver Help. You might want to wait to read the dynamic-page
chapters until you’re more familiar with creating web pages.
Experienced web designers
If you are an experienced web designer, this section will point you to sections of the Dreamweaver
documentation that are most appropriate for your background. There are two different
approaches: one for designers who are new to Dreamweaver and one for designers who are
familiar with Dreamweaver but would like to learn more about creating dynamic pages.
For experienced web designers who are new to Dreamweaver:
1 Begin by reading the tutorials for creating a static site in Getting Started Help.
2 In Using Dreamweaver Help, read Chapter 1, “Exploring the Workspace,” on page 31 to learn
more about the Dreamweaver user interface.
3 Although much of the material in Chapter 2, “Setting Up a Dreamweaver Site,” on page 59 and
Chapter 4, “Managing Your Files,” on page 77 is probably familiar to you, skim those chapters
to see how these familiar concepts are implemented in Dreamweaver. Pay particular attention
to the sections about setting up a Dreamweaver site.
20 Introduction: Welcome to Dreamweaver
Page 21

4 For useful information on the details of using Dreamweaver to create basic HTML pages, read
Chapter 13, “Inserting and Formatting Text,” on page 273 and Chapter 14, “Inserting Images,”
on page 303.
5 For information about coding in Dreamweaver, see “Setting Up Your Coding Environment”
on page 401, “Coding in Dreamweaver” on page 415, “Optimizing and Debugging Your
Code” on page 433, and “Editing Code in Design View” on page 441.
6 Read the overview at the beginning of each of the other chapters in Using Dreamweaver Help
to determine whether its topics are of interest to you.
For experienced web designers, familiar with Dreamweaver, who want to learn about
creating dynamic pages:
1 Begin by reading “Understanding Web Applications” and “Tutorial: Developing a Web
Application” in Getting Started Help.
2 In Using Dreamweaver Help, skim Chapter 1, “Exploring the Workspace,” on page 31 to learn
about new aspects of the Dreamweaver user interface, then read “Optimizing the Workspace for
Visual Development” on page 497.
3 Become familiar with the Dreamweaver workflow for dynamic pages by reading “The Workflow
for Dynamic Page Design” on page 507.
4 Set up a web server and application server. (See Chapter 23, “Setting Up a Web Application,”
on page 453.)
5 Connect to a database. (See “Connecting to a database” on page 461.)
6 Read the overview at the beginning of each chapter in Using Dreamweaver Help to determine
whether its topics are of interest to you.
7 If you’re interested in customizing Dreamweaver by hand, read Customizing Dreamweaver on
the Macromedia Support Center at www.macromedia.com/go/customizing_dreamweaver. If
you want to write extensions for Dreamweaver, read Extending Dreamweaver Help.
Experienced hand-coders
If you are an experienced hand-coder, this section will point you to sections of the Dreamweaver
documentation that are most appropriate for your background.
For experienced hand-coders:
1 Begin by reading “Tutorial: Editing Code” in Getting Started Help.
2 In Using Dreamweaver Help, read Chapter 1, “Exploring the Workspace,” on page 31 to learn
more about the Dreamweaver user interface.
3 Although much of the material in Chapter 2, “Setting Up a Dreamweaver Site,” on page 59 and
Chapter 4, “Managing Your Files,” on page 77 is probably familiar to you, skim those chapters
to see how these familiar concepts are implemented in Dreamweaver. Pay particular attention
to the sections on setting up a Dreamweaver site.
4 Read more about coding with Dreamweaver in Chapter 19, “Setting Up Your Coding
Environment,” on page 401, Chapter 20, “Coding in Dreamweaver,” on page 415, Chapter 21,
“Optimizing and Debugging Your Code,” on page 433, and Chapter 22, “Editing Code in
Design View,” on page 441.
5 Read the overview at the beginning of each chapter in Using Dreamweaver Help to determine
whether its topics are of interest to you.
Where to start 21
Page 22

Web application developers
If you are a web application developer, this section will point you to sections of the Dreamweaver
documentation that are most appropriate for your background. There are two different
approaches, depending on whether you’ve used Dreamweaver before.
For web application developers who have not used Dreamweaver:
1 Begin by quickly reading Getting Started Help to familiarize yourself with the basics of using
Dreamweaver.
2 In Using Dreamweaver Help, read Chapter 1, “Exploring the Workspace,” on page 31 to learn
more about the Dreamweaver user interface.
3 Although much of the material in Chapter 2, “Setting Up a Dreamweaver Site,” on page 59 and
Chapter 4, “Managing Your Files,” on page 77 is probably familiar to you, skim those chapters
to see how these familiar concepts are implemented in Dreamweaver. Pay particular attention
to the sections on setting up a Dreamweaver site.
4 Set up a web server and application server using Dreamweaver. (See Chapter 23, “Setting Up a
Web Application,” on page 453.)
5 Connect to a database. (See “Connecting to a database” on page 461.)
6 Read the overview at the beginning of each of the chapter in Using Dreamweaver Help to
determine whether its topics are of interest to you.
For experienced web application developers who have used Dreamweaver:
1 Begin by reading “What’s new in Dreamweaver MX 2004” on page 18.
2 In Using Dreamweaver Help, skim Chapter 1, “Exploring the Workspace,” on page 31 to learn
about new aspects of the Dreamweaver user interface.
3 If you’re interested in customizing Dreamweaver by hand, read “Customizing Dreamweaver”
on the Macromedia Support Center at www.macromedia.com/go/customizing_dreamweaver.
If you want to write extensions for Dreamweaver, read Extending Dreamweaver Help.
Dreamweaver workflow for creating websites
There are many possible approaches to creating a website. The workflow presented in this
documentation starts by defining a site’s strategy or goals. If you’re developing web applications,
you have to set up servers and databases as needed. Then you design the look and feel of the site.
When the design is complete, you build the site and code the pages, adding content and
interactivity; then you link pages together, and test the site for functionality and to see if it meets
its defined objectives. You can include dynamic pages in your site as well. At the end of the cycle,
you publish the site on a server. Many developers also schedule periodic maintenance to ensure
that the site remains current and functional.
Planning your site
Planning and organizing your site carefully from the start can save you time later on. Organizing
your site includes not only determining where the files will go, but also examining site
requirements, audience profiles, and site goals. Additionally, you should consider technical
requirements such as user access, as well as browser, plug-in, and download restrictions.
22 Introduction: Welcome to Dreamweaver
Page 23

Once you’ve organized your information and determined a structure, you can begin creating
your site.
• Use the Dreamweaver Files panel to set up your site’s organizational structure. In the Files
panel, you can easily add, delete, and rename files and folders to change the organization as
needed. (See Chapter 2, “Setting Up a Dreamweaver Site,” on page 59 and Chapter 4,
“Managing Your Files,” on page 77.)
• You can begin to create simple pages which you’ll later turn into more complex designs. Create
new blank pages or pages based on predesigned page designs. (See Chapter 3, “Creating and
Opening Documents,” on page 69.)
If you work on a web-development team, you may also be interested in these topics:
• Set up a system to prevent team members from overwriting files. (See “Checking in and
checking out files” on page 97.)
• Use Design Notes to communicate with web team members. (See “Storing file information in
Design Notes” on page 108.)
Managing your site files
The Dreamweaver Files and Assets panels make it easy for you to manage your site files.
• In the Dreamweaver Files panel you’ll find many tools to help you manage your site, transfer
files to and from a remote server, set up a Check In/Check Out process to prevent files from
being overwritten, and synchronize the files on your local and remote sites. (See “Managing
Your Files” on page 77.)
• Use the Assets panel to easily organize the assets in a site; you can then drag most assets directly
from the Assets panel into a Dreamweaver document. (See Chapter 5, “Managing Site Assets
and Libraries,” on page 115.)
• You can use Dreamweaver to manage aspects of your Contribute sites. (See Chapter 6,
“Managing Contribute Sites with Dreamweaver,” on page 133.)
Laying out web pages
Dreamweaver provides you flexibility as you mock-up and work toward a final layout for your
pages. Choose the layout technique that works for you, or use the Dreamweaver layout options in
conjunction with one another to create your site’s look.
• You can use Dreamweaver layers or CSS positioning styles to create your layout. (See
Chapter 7, “Laying Out Pages with CSS,” on page 145.)
• The table tools and Layout mode in Dreamweaver let you quickly design web pages by
drawing and then rearranging the page structure. (See Chapter 8, “Presenting Content with
Tables,” on page 163 and Chapter 9, “Laying Out Pages in Layout Mode,” on page 183.)
• If you want to display multiple documents at once in a web browser, you can lay out
documents using frames. (See Chapter 10, “Using Frames,” on page 199.)
• Dreamweaver templates enable you to easily apply reusable content and page designs to your
site. You can create new pages based on a Dreamweaver template, then update the layout of
those pages automatically when the template changes. (See Chapter 11, “Managing
Templates,” on page 215.)
Dreamweaver workflow for creating websites 23
Page 24

Adding content to pages
Using Dreamweaver, you can easily add a variety of content to web pages. Add assets and design
elements, such as text, images, colors, movies, sound, and other forms of media.
• Dreamweaver page creation features enable you to specify web page properties such, as page
titles, background images and colors. In addition, Dreamweaver provides tools to help you
maximize website performance, and to test pages to ensure compatibility with different web
browsers. (See Chapter 12, “Working with Pages,” on page 253.)
• Type directly in a Dreamweaver document, or import text from other documents, then format
the text using the Dreamweaver Property inspector. You can also easily create your own
Cascading Style Sheets. (See Chapter 13, “Inserting and Formatting Text,” on page 273.)
• Insert images, including rollover images, image maps, and Fireworks sliced images, and use
alignment tools to position images in a page. You can also resize images directly in
Dreamweaver. (See Chapter 14, “Inserting Images,” on page 303 and Chapter 16, “Working
with Other Applications,” on page 341.)
• With Dreamweaver you can create standard HTML links, including anchor links and e-mail
links, or easily set up graphical navigation systems, such as jump menus and navigation bars.
(See Chapter 15, “Linking and Navigation,” on page 315.)
• Insert other types of media in a web page, such as Flash, Shockwave, and QuickTime movies,
sound, and applets. (See Chapter 17, “Adding Audio, Video, and Interactive Elements,”
on page 355.)
• Use behaviors to perform tasks in response to specific events, such as highlighting a button
when the visitor passes the pointer over it, validating a form when the visitor clicks the Submit
button, or opening a second browser window when the main page is finished loading. (See
Chapter 18, “Using JavaScript Behaviors,” on page 371.)
Hand-coding
Coding web pages by hand is another approach to creating pages. Dreamweaver provides easy-touse visual editing tools, but it also provides a sophisticated coding environment; you can use
either approach, or both, to create and edit your pages.
• You can work in a coding environment without visual tools; coding tools help you create and
edit code, format code, and make sure that your code adheres to standards. (See Chapter 19,
“Setting Up Your Coding Environment,” on page 401 and Chapter 20, “Coding in
Dreamweaver,” on page 415, and Chapter 21, “Optimizing and Debugging Your Code,”
on page 433.)
• You can also use some Dreamweaver coding tools in Design view, the visual design
environment. (See Chapter 22, “Editing Code in Design View,” on page 441.)
Setting up a web application
Many websites contain dynamic pages that allow visitors to view information stored in databases,
and usually allow some visitors to add new information and edit information in the databases. To
create such pages, you must first complete several preparatory steps.
• Set up a web server and application server, then create or modify a Dreamweaver site. (See
Chapter 23, “Setting Up a Web Application,” on page 453.)
• Connect to a database. (See “Connecting to a database” on page 461).
24 Introduction: Welcome to Dreamweaver
Page 25

Creating dynamic pages
In Dreamweaver, you can define a variety of sources of dynamic content, including recordsets
extracted from databases, form parameters, and JavaBeans components. To add the dynamic
content to a page, simply drag it onto the page.
You can set your page to display one record or many records at a time, display more than one page
of records, add special links to move from one page of records to the next (and back), and create
record counters to help users keep track of the records.
• If you’re unfamiliar with creating web applications in Dreamweaver, learn how to use
Dreamweaver to build dynamic pages. (See Chapter 30, “Optimizing the Workspace for Visual
Development,” on page 497 and Chapter 31, “The Workflow for Dynamic Page Design,”
on page 507.)
• Define and display dynamic content on your pages. (See Chapter 32, “Obtaining Data for
Your Page,” on page 515, Chapter 33, “Defining Sources of Dynamic Content,” on page 525,
Chapter 34, “Adding Dynamic Content to Web Pages,” on page 545, and Chapter 35,
“Displaying Database Records,” on page 555.)
• Encapsulate application or business logic using leading-edge technologies such as Macromedia
ColdFusion components and web services. (See Chapter 36, “Using ColdFusion
Components,” on page 573 and Chapter 37, “Using Web Services,” on page 579.)
• If you need more flexibility, you can create your own server behaviors and interactive forms.
(See Chapter 38, “Adding Custom Server Behaviors,” on page 589 and Chapter 39, “Creating
Forms,” on page 607.)
Rapid application development
Dreamweaver offers a number of rapid application development (RAD) tools, including server
behaviors and application objects, that help you build sophisticated web applications without
having to write any server-side code.
• Quickly create pages that search and modify databases and display the results. Provide security
by restricting access to your pages. (See “Building ColdFusion Applications Rapidly”
on page 629, “Building ASP.NET Applications Rapidly” on page 675, “Building ASP and JSP
Applications Rapidly” on page 703, and “Building PHP Applications Rapidly” on page 719.)
Using Dreamweaver with other applications
Dreamweaver accommodates your web design and development process by making it easy for you
to work with other applications. For information about working with other applications such as
browsers, HTML editors, image editors, and animation tools, see the following topics:
• For information about using Dreamweaver with other HTML editors, such as HomeSite or
BBEdit, see “Using an external HTML editor with Dreamweaver” on page 412.
• You can specify preferred browsers for previewing your site. (See “Previewing and testing pages
in browsers” on page 270.)
• You can start an external image editor, such as Macromedia Fireworks or Adobe Photoshop,
from within Dreamweaver. (See “Using an external image editor” on page 313.)
• You can configure Dreamweaver to start a different editor for each file type. (See “Starting an
external editor for media files” on page 359.)
Using Dreamweaver with other applications 25
Page 26

• For information about adding interactivity to your site using Macromedia Flash, see “Inserting
and modifying a Flash button object” on page 361, “Inserting a Flash text object” on page 363,
or “Downloading and installing Flash elements” on page 364.
• To learn how to add animation to your site using Macromedia Shockwave movies, see
“Inserting Shockwave movies” on page 365.
• For information about using ColdFusion, see ColdFusion help in Dreamweaver (Help > Using
ColdFusion).
Dreamweaver and accessibility
Accessibility refers to making websites and web products usable for people with visual, auditory,
motor, and other disabilities. Examples of accessibility features for software products and websites
include screen reader support, text equivalents for graphics, keyboard shortcuts, change of display
colors to high contrast, and so on.
Note: For more information about two significant accessibility initiatives, see the World Wide Web
Consortium Web Accessibility Initiative (www.w3.org/wai) and Section 508 of the Federal
Rehabilitation Act (www.section508.gov).
Dreamweaver provides tools that make the product accessible and tools that help you author
accessible content:
Using Dreamweaver accessibility features For Dreamweaver web designers who need to use
accessibility features, Dreamweaver offers screen reader support, keyboard navigation, and
operating system accessibility support.
For more information, see “Using Dreamweaver accessibility features” on page 49.
Authoring for accessibility For Dreamweaver web designers who need to create accessible
content, Dreamweaver assists you in creating accessible pages that contain useful content for
screen readers and comply with government guidelines.
Dreamweaver provides dialog boxes that prompt you to enter accessibility attributes when you
insert page elements (see “Optimizing the workspace for accessible page design” on page 53). For
example, the accessibility dialog box for images reminds you to add text equivalents for graphics.
Then, when the image appears on a page for a user with visual disabilities, the screen reader reads
the description.
Dreamweaver also provides sample web pages that were designed for accessibility (see “Creating a
document based on a Dreamweaver design file” on page 70) and an accessibility report that you
can run to test your page or site against the Section 508 accessibility guidelines (see “Testing your
site” on page 111).
Note: Remember that no authoring tool can automate the development process. Designing
accessible websites requires you to understand accessibility requirements and make many ongoing
subjective decisions about how users with disabilities interact with web pages. The best way to
ensure that a website is accessible is through deliberate planning, development, testing,
and evaluation.
26 Introduction: Welcome to Dreamweaver
Page 27

The Dreamweaver accessibility validation feature
The accessibility validation feature in Dreamweaver MX uses technology from UsableNet.
UsableNet is an industry leader in developing easy-to-use software to automate usability and
accessibility testing and repair. For additional assistance with accessibility testing, try the
UsableNet LIFT for Macromedia Dreamweaver, a complete solution for developing usable and
accessible websites. UsableNet Lift for Macromedia Dreamweaver includes fix wizards for
complex tables, forms, and images; a global ALT editor; customizable reporting; and a new active
monitoring mode that ensures content is accessible as pages are being built. Request a demo of
Lift for Macromedia Dreamweaver at www.usablenet.com.
Guide to Dreamweaver instructional media
Dreamweaver has a variety of resources to help you learn the program quickly and become
proficient in creating your own websites and pages:
• “Dreamweaver Help systems” on page 27
• “Macromedia website resources” on page 28
• “Additional books and training” on page 28
To get the most out of the Dreamweaver resources, see “Where to start” on page 20.
Note: For a list of HTML and web resources, see “HTML and web technologies resources”
on page 29.
Dreamweaver Help systems
The Dreamweaver Help systems are accessible through the Help menu. All Dreamweaver Help
appears in the Help viewer provided by your operating system: Microsoft HTML Help
(Windows) or Apple Help (Macintosh).
Dreamweaver help includes the following help systems:
Getting Started Help is designed to guide you through the process of creating a simple but
functional website using Dreamweaver. It’s aimed at users who have created web pages but are
unfamiliar with particular aspects of Dreamweaver. It contains tutorials on creating and editing
simple static pages, editing the code by hand, and creating dynamic web applications. The guide
is provided as a printed manual, as part of the help system, and as a PDF file.
Using Dreamweaver Help provides comprehensive information about all Dreamweaver features,
optimized for online reading.
Extending Dreamweaver Help provides information on the Dreamweaver Document
Object Model.
Dreamweaver API Reference Help provides information on the APIs (application
programming interfaces) that enable JavaScript and C developers to create extensions
for Dreamweaver.
Related topics
• “Additional books and training” on page 28
Guide to Dreamweaver instructional media 27
Page 28

Macromedia website resources
The Macromedia website contains the following resources to support Dreamweaver users:
The Dreamweaver Support Center website helps you get the most out of Dreamweaver. The
Dreamweaver Support Center website at www.macromedia.com/go/dreamweaver_support/ is
updated regularly with the latest information on Dreamweaver, plus advice from expert users,
examples, tips, updates, and information on advanced topics. Check the website often for the
latest news on Dreamweaver and how to get the most out of the program.
Macromedia Developer Center at www.macromedia.com/go/devnet/ provides tools, tutorials,
and more for all Macromedia products.
The Dreamweaver online forums give you an opportunity to discuss technical issues and share
helpful hints with other Dreamweaver users. You’ll find information on accessing the forums on
the Macromedia website at www.macromedia.com/go/dreamweaver_newsgroup.
Keyboard shortcut charts show all the keyboard shortcuts in the default Dreamweaver
configuration are available on the Macromedia website at www.macromedia.com/go/
dreamweaver_mx_shortcuts.
Related topics
• “Dreamweaver Help systems” on page 27
Additional books and training
You can use additional books and training to become more proficient with Dreamweaver; you can
also find Dreamweaver documentation in PDF and printed formats available online:
Macromedia Press books enable you to improve your Dreamweaver skills. Check out the latest
books written by the experts on the Macromedia website at www.macromedia.com/go/
dw2004_help_mmp.
Macromedia Dreamweaver Training and Certification provides hands-on tasks and real-world
scenarios. Choose between instructor-led and online training, or combine them to create a
learning path that is most effective for you. Learn more on the Macromedia website at
www.macromedia.com/go/dreamweaver_training.
Dreamweaver PDFs are available on your product CD for the complete set of Dreamweaver
documentation. Certain reference topics are not included in the PDF version of Using
Dreamweaver; for more information on those topics, see Using Dreamweaver Help.
Dreamweaver manuals, not provided with the product, are available for purchase online.
To purchase printed copies of Dreamweaver documentation, see the Macromedia website at
www.macromedia.com/go/books_and_training/.
Related topics
• “Dreamweaver Help systems” on page 27
• “Macromedia website resources” on page 28
28 Introduction: Welcome to Dreamweaver
Page 29

Typographical conventions
The following typographical conventions are used in this guide:
• Menu items are shown in this format: menu name > menu item name. Items in submenus are
shown in this format: menu name > submenu name > menu item name.
• Code font indicates HTML tag and attribute names as well as literal text used in examples.
• Italic code font indicates replaceable items (sometimes called metasymbols) in code.
• Bold roman text indicates text for you to enter verbatim.
For a complete list of Dreamweaver resources, see “Guide to Dreamweaver instructional media”
on page 27.
HTML and web technologies resources
The following are some useful resources available on the web:
Note: For a list of Dreamweaver resources, see “Guide to Dreamweaver instructional media”
on page 27.
The Cascading Style Sheets, level 1 specification (CSS1)
level 2 specification (CSS2) (www.w3.org/TR/REC-CSS2/) are the official specifications for
(www.w3.org/TR/REC-CSS1) and
style sheets from the World Wide Web Consortium.
The HTML 4.01 specification (www.w3.org/TR/REC-html40/) is the official specification for
HTML from the World Wide Web Consortium.
Index DOT HTML (www.blooberry.com/indexdot/html/) is a comprehensive listing of HTML
tags, attributes, and values, as well as their compatibility with the various browsers.
The XHTML 1.0 specification (www.w3.org/TR/xhtml1/) is the official specification for
Extensible HyperText Markup Language.
The O’Reilly XML.com site (www.xml.com/) provides information, tutorials, and tips about
Extensible Markup Language (XML), as well as other web technologies.
Microsoft ASP Overview pages (http://msdn.microsoft.com/workshop/server/asp/ASPover.asp)
provide information about Active Server Pages (ASP).
Microsoft ASP.NET page (www.asp.net/) provides information about ASP.NET.
Sun JSP page (http://java.sun.com/products/jsp/) provides information about JavaServer
Pages (JSP).
The PHP website (www.php.net/) provide information about PHP.
The MySQL site (www.mysql.com/) provides information about MySQL.
Entities Table (www.bbsinc.com/iso8859.html) lists the entity names used in ISO 8859-1
(Latin-1).
Macromedia ColdFusion product page (www.macromedia.com/go/coldfusion/) provides
information about ColdFusion.
Macromedia JRun Server product page (www.macromedia.com/go/jrun/) provides
information about the JRun Java application server.
IBM WebSphere page (www.ibm.com/software/webservers/appserv/) provides information
about the WebSphere application server.
HTML and web technologies resources 29
Page 30

Sun ONE product page (www.Chilisoft.com/products/) provides information about the Sun
ONE ASP application server.
Web Services Demystified (www.sitepoint.com/article/692) explains what web services are and
how they work.
JavaScript Bible, by Danny Goodman (IDG Books), comprehensively covers the
JavaScript 1.2 language.
JavaScript: The Definitive Guide, by David Flanagan (O’Reilly & Associates), provides
reference information for every JavaScript function, object, method, property, and event handler.
The CGI Resource Index (www.cgi-resources.com/) is a repository of all things related to CGI,
including ready-made scripts, documentation, books, and even programmers for hire.
The Common Gateway Interface site (http://hoohoo.ncsa.uiuc.edu/cgi/) includes an
introduction to CGI.
30 Introduction: Welcome to Dreamweaver
Page 31

CHAPTER 1
Exploring the Workspace
To get the most out of your Macromedia Dreamweaver MX 2004 experience, you should
understand the basic concepts behind the Dreamweaver workspace and how to select options, use
inspectors and panels, and set preferences that fit your work style best.
This chapter contains the following topics:
• “About the Dreamweaver workspace” on page 32
• “Working in the Document window” on page 39
• “Using toolbars, inspectors, and context menus” on page 41
• “Using panels and panel groups” on page 46
• “Using Dreamweaver accessibility features” on page 49
• “Optimizing the workspace for accessible page design” on page 53
• “Using visual guides in Dreamweaver” on page 54
• “Dreamweaver customizing basics” on page 54
Related topics
• “Optimizing the Workspace for Visual Development” on page 497
31
Page 32
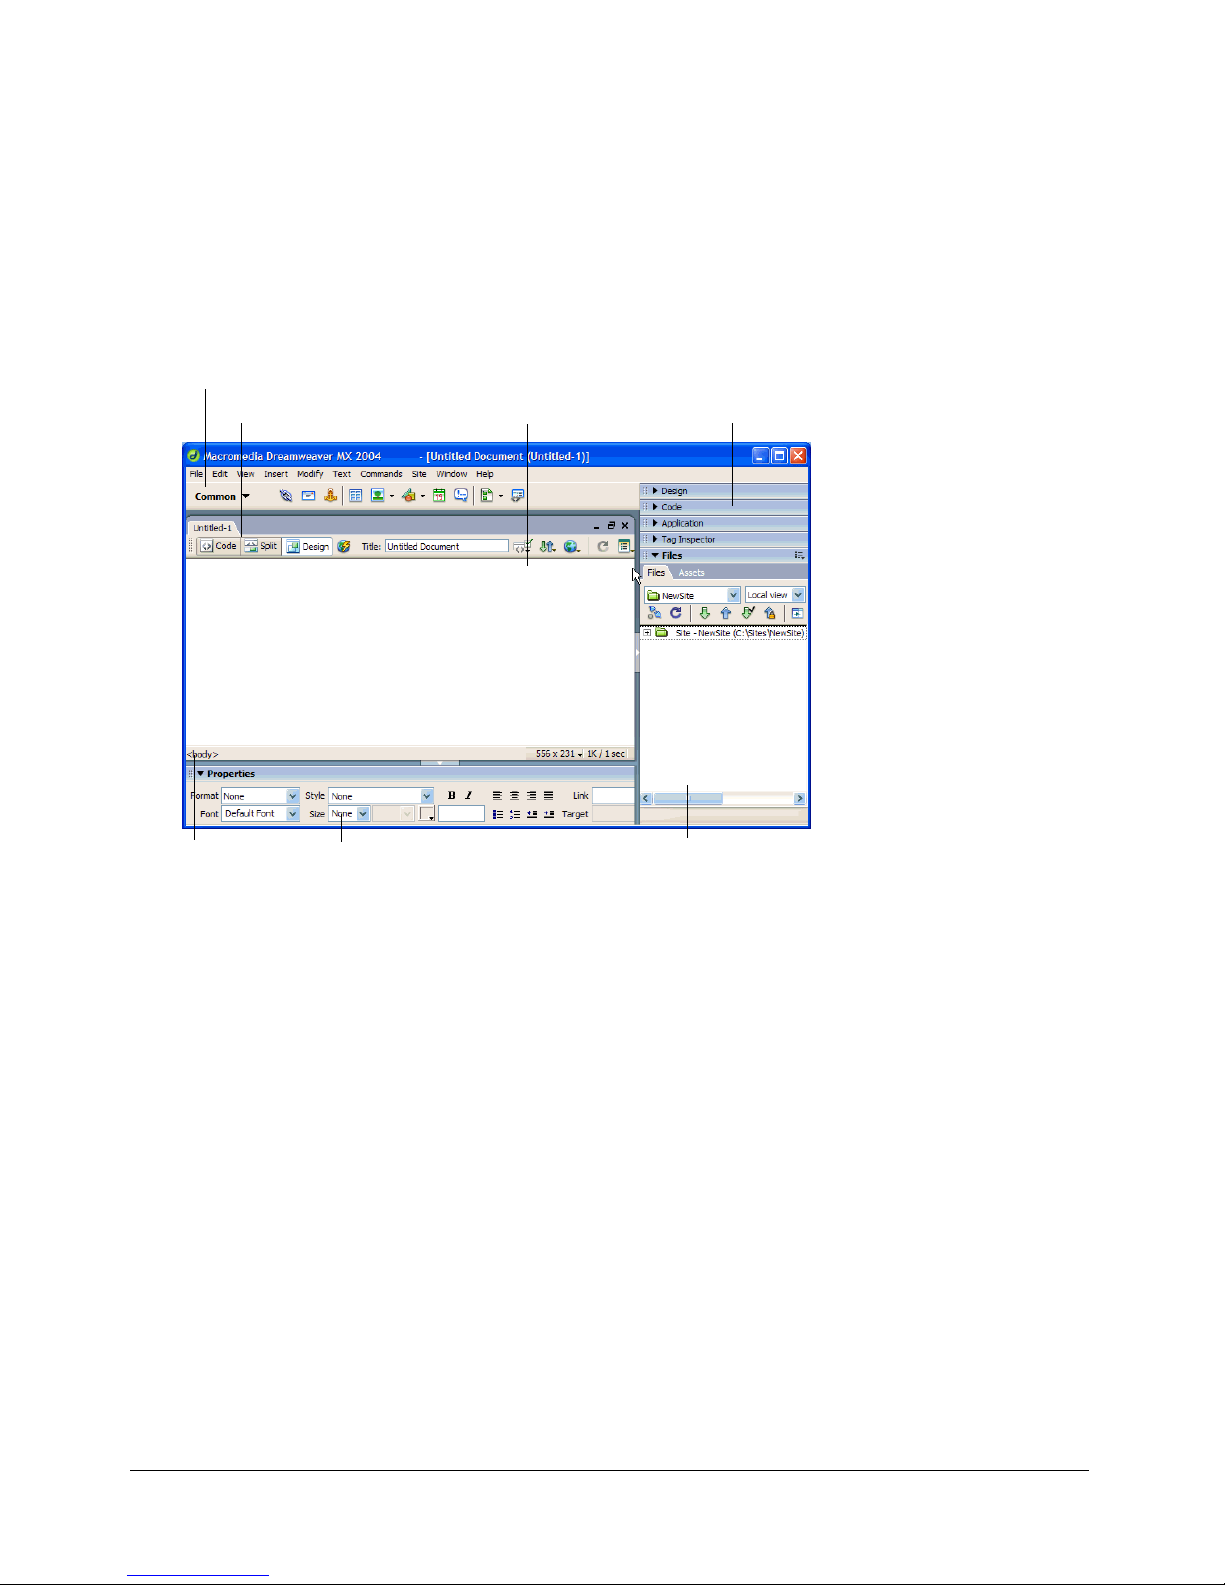
About the Dreamweaver workspace
The Dreamweaver workspace enables you to view documents and object properties. The
workspace also places many of the most common operations in toolbars so that you can quickly
make changes to your documents.
The workspace layout
In Windows, Dreamweaver provides an all-in-one-window integrated layout. In the integrated
workspace, all windows and panels are integrated into a single larger application window.
Insert bar
Document toolbar
Document window Panel groups
Files panelProperty inspectorTag selection
Note: The Windows workspace also has a Coder option, which docks the panel groups on the left
side and displays the Document window in Code view by default. For more information, see “Using
the coder-oriented workspace (Windows only)” on page 402. To use this option, see “Choosing the
workspace layout (Windows only)” on page 55.
32 Chapter 1: Exploring the Workspace
Page 33

On the Macintosh, Dreamweaver provides a floating workspace layout, in which each document
is in its own individual window. Panel groups are initially docked together, but can be undocked
into their own windows. Windows “snap” automatically to each other, to the sides of the screen,
and to the Document window as you drag or resize them.
Document toolbar
Insert bar
Document window
Panel groups
Tag selector
Property inspector
Files panel
Related topics
• “Dreamweaver workspace elements” on page 33
• “Using toolbars, inspectors, and context menus” on page 41
• “Using panels and panel groups” on page 46.
Dreamweaver workspace elements
This section briefly describes some elements of the Dreamweaver workspace.
Note: Dreamweaver provides many other panels, inspectors, and windows. To open Dreamweaver
panels, inspectors, and windows, use the Window menu. If you can’t find a panel, inspector, or
window that’s marked as open, select Window > Arrange Panels to neatly lay out all open panels.
The Start page
page you can also learn more about Dreamweaver by taking a product tour or a tutorial.
enables you to open a recent document or create a new document. From the Start
About the Dreamweaver workspace 33
Page 34

The Insert bar contains buttons for inserting various types of “objects,” such as images, tables,
and layers, into a document. Each object is a piece of HTML code that enables you to set various
attributes as you insert it. For example, you can insert a table by clicking the Table button in the
Insert bar. If you prefer, you can insert objects using the Insert menu instead of the Insert bar.
The Document toolbar contains buttons that provide options for different views of the
Document window (such as Design view and Code view), various viewing options, and some
common operations such as previewing in a browser.
The Standard toolbar (not displayed in the default workspace layout) contains buttons for
common operations from the File and Edit menus: New, Open, Save, Save All, Cut, Copy, Paste,
Undo, and Redo. To display the Standard toolbar, select View > Toolbars > Standard.
The Document window displays the current document as you create and edit it.
The Property inspector lets you view and change a variety of properties for the selected object or
text. Each kind of object has different properties. The Property inspector is not expanded by
default in the Coder workspace layout.
The tag selector in the status bar at the bottom of the Document window shows the hierarchy of
tags surrounding the current selection. Click any tag in the hierarchy to select that tag and all
its contents.
Panel groups are sets of related panels grouped together under one heading. To expand a panel
group, click the expander arrow at the left of the group’s name; to undock a panel group, drag the
gripper at the left edge of the group’s title bar.
The Files panel enables you to manage your files and folders, whether they are part of a
Dreamweaver site or on a remote server. The Files panel also enables you to access all the files on
your local disk, much like Windows Explorer (Windows) or the Finder (Macintosh).
Related topics
• “Working in the Document window” on page 39
• “Using toolbars, inspectors, and context menus” on page 41
• “Using panels and panel groups” on page 46
• “Managing files and folders in the Files panel” on page 86
The Document window
The Document window shows the current document. You can select any of the following views:
Design view is a design environment for visual page layout, visual editing, and rapid application
development. In this view, Dreamweaver displays a fully editable, visual representation of the
document, similar to what you would see viewing the page in a browser. You can configure the
Design view to display dynamic content while you’re working on the document (see “Viewing live
data in Design view” on page 500).
Code view is a hand-coding environment for writing and editing HTML, JavaScript,
server-language code—such PHP or ColdFusion Markup Language (CFML)—and any other
kind of code. For more information, see Chapter 20, “Coding in Dreamweaver,” on page 415.
Code and Design view enables you to see both Code view and Design view for the same
document in a single window.
34 Chapter 1: Exploring the Workspace
Page 35

When the Document window has a title bar, the title bar displays the page title and, in
parentheses, the file’s path and filename. After the filename, Dreamweaver displays an asterisk if
you’ve made changes that you haven’t saved yet.
When the Document window is maximized in the integrated workspace layout (Windows only),
it has no title bar; in that case the page title and the file’s path and filename appear in the title bar
of the main workspace window.
When a Document window is maximized, tabs appear at the top of the Document window area
showing the filenames of all open documents. To switch to a document, click its tab.
Related topics
• “Working in the Document window” on page 39
The Document toolbar
The Document toolbar contains buttons that let you toggle between different views of your
document quickly: Code, Design, and a split view that shows both Code and Design view.
The toolbar also contains some common commands and options related to viewing the document
and transferring it between the local and remote sites.
Show Code View
Show Code and Design Views
Show Design View
Server Debug
Document Title
No Browser/Check Errors
File Management
Preview/Debug in Browser
View Options
Refresh Design View
The following options appear in the Document toolbar:
Show Code View displays only the Code view in the Document window.
Show Code and Design Views displays Code view in part of the Document window and Design
view in another part. When you select this combined view, the option Design View on Top
becomes available in the View Options menu. Use this option to specify which view appears at
the top of your Document window.
Show Design View displays only the Design view in the Document window.
Server Debug displays a report to help you debug the current ColdFusion page. The report
includes errors, if any, in your page.
Title allows you to enter a title for your document, to be displayed in the browser’s title bar. If
your document already has a title, it appears in this field.
No Browser/Check Errors enables you to check cross-browser compatibility.
File Management displays the File Management pop-up menu.
Preview/Debug in Browser allows you to preview or debug your document in a browser. Select a
browser from the pop-up menu.
About the Dreamweaver workspace 35
Page 36
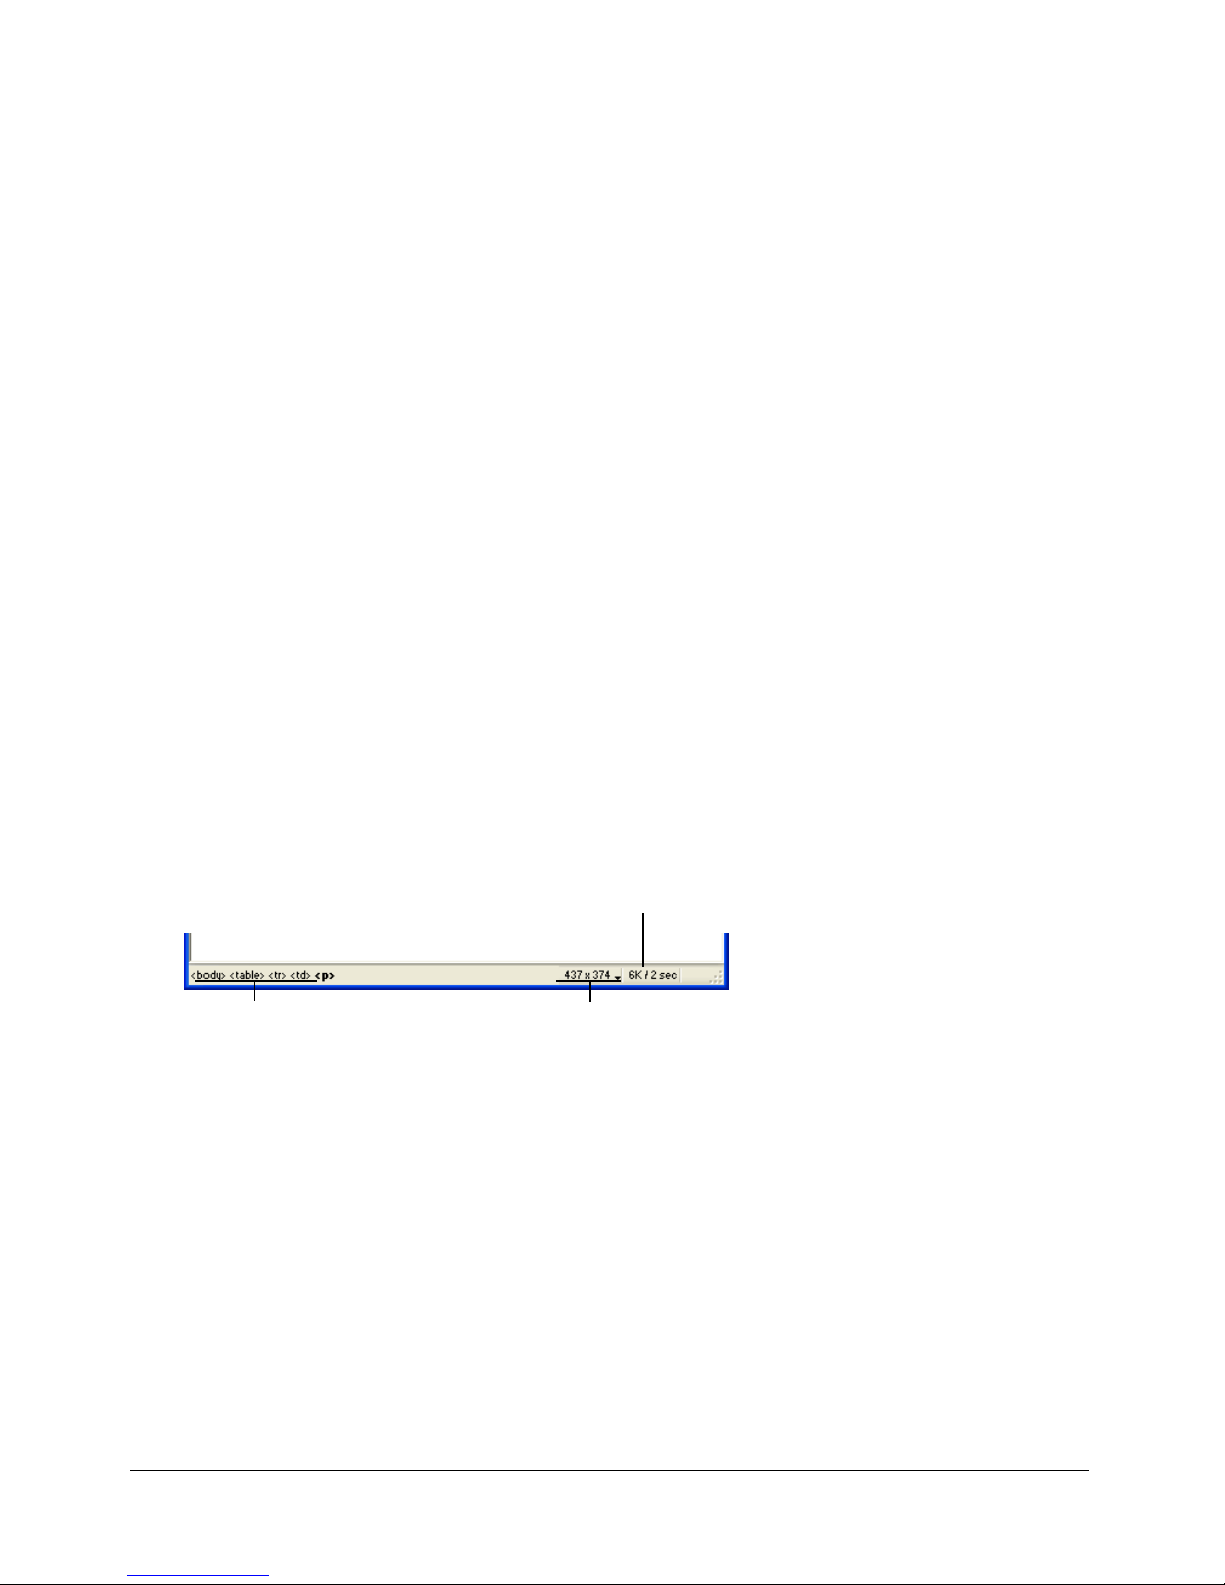
Refresh Design View refreshes the document’s Design view after you make changes in Code
view. Changes you make in Code view don’t automatically appear in Design view until you
perform certain actions, such as saving the file or clicking this button.
View Options allows you to set options for Code view and Design view, including which view
should appear above the other. Options in the menu are for the current view: Design view, Code
view, or both. For information about Code view options, see “Setting viewing preferences”
on page 403. For information about Design view options, see “Selecting elements in the
Document window” on page 262, “Viewing and editing head content” on page 449, and “Using
visual guides in Dreamweaver” on page 54.
Related topics
• “Displaying toolbars” on page 41
The Standard toolbar
The Standard toolbar contains buttons for common operations from the File and Edit menus:
New, Open, Save, Save All, Cut, Copy, Paste, Undo, and Redo. Use these buttons just as you
would use the equivalent menu commands.
For more information about operations such as Open and Save, see Chapter 3, “Creating and
Opening Documents,” on page 69.
Related topics
• “Displaying toolbars” on page 41
The status bar
The status bar at the bottom of the Document window provides additional information about the
document you are creating.
Document size and
estimated download time
Tag selector
Window Size pop-up menu
The tag selector shows the hierarchy of tags surrounding the current selection. Click any tag in the
hierarchy to select that tag and all its contents. Click
document. To set the
class or id attributes for a tag in the tag selector, right-click (Windows) or
<body> to select the entire body of the
Control-click (Macintosh) the tag and select a class or ID from the context menu.
The Window Size pop-up menu (visible in Design view only) lets you resize the Document
window to predetermined or custom dimensions. For more information, see “Resizing the
Document window” on page 40.
To the right of the Window Size pop-up menu are the estimated document size and estimated
download time for the page, including all dependent files such as images and other media files.
For more information, see “Setting download time and size preferences” on page 272.
Related topics
• “Setting Status Bar preferences” on page 41
36 Chapter 1: Exploring the Workspace
Page 37
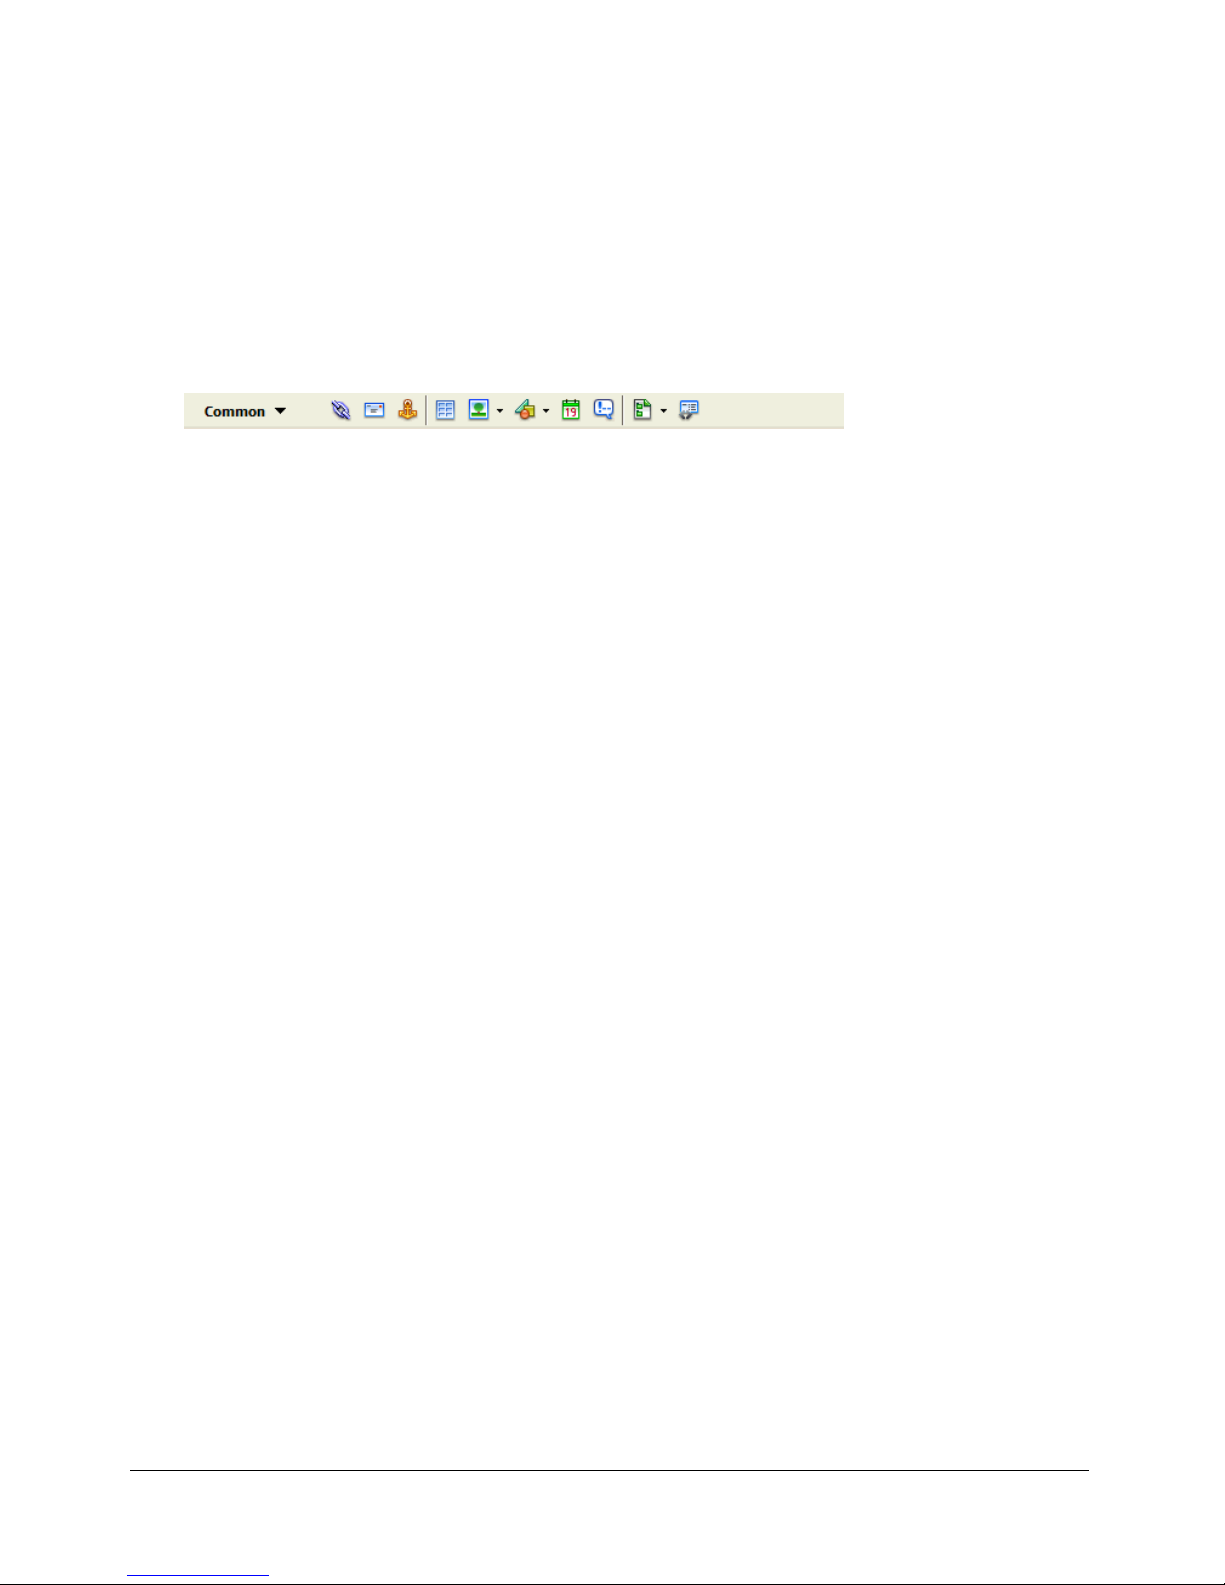
The Insert bar
The Insert bar contains buttons for creating and inserting objects such as tables, layers, and
images. When you roll the pointer over a button, a tooltip appears with the name of the button.
The buttons are organized into several categories, which you can switch on the left side of the
Insert bar. Additional categories appear when the current document contains server code, such as
ASP or CFML documents. When you start Dreamweaver, the category you were last working
in opens.
Note: If you prefer to view the categories as tabs across the top of the Insert bar, you can change the
layout of the Insert bar (see “Setting Fonts preferences for Dreamweaver display” on page 56).
Some categories have buttons with pop-up menus. When you select an option from a pop-up
menu, it becomes the default action for the button. For example, if you select Image Placeholder
from the Image button’s pop-up menu, the next time you click the Image button, Dreamweaver
inserts an image placeholder. Anytime you select a new option from the pop-up menu, the default
action for the button changes.
The Insert bar is organized in the following categories:
The Common category enables you to create and insert the most commonly used objects, such
as images and tables.
The Layout category enables you to insert tables, div tags, layers, and frames. You can also you
choose among three views of tables: Standard (default), Expanded Tables, and Layout. When
Layout mode is selected, you can use the Dreamweaver layout tools: Draw Layout Cell and Draw
Layout Table.
The Forms category contains buttons for creating forms and inserting form elements.
The Text category enables you to insert a variety of text- and list-formatting tags, such as b, em,
p, h1, and ul.
The HTML category enables you to insert HTML tags for horizontal rules, head content, tables,
frames, and scripts.
Server-code categories are available only for pages that use a particular server language,
including ASP, ASP.NET, CFML Basic, CFML Flow, CFML Advanced, JSP, and PHP. Each of
these categories provides server-code objects that you can insert in Code view.
The Application category enables you to insert dynamic elements such as recordsets, repeated
regions, and record insertion and update forms.
The Flash elements category enables you to insert Flash elements.
The Favorites category enables you to group and organize the Insert bar buttons you use the
most in one common place.
You can modify any object in the Insert bar or create your own objects (see “Customizing
Dreamweaver” on the Macromedia Support Center at www.macromedia.com/go/
customizing_dreamweaver).
Related topics
• “Using the Insert bar” on page 42
About the Dreamweaver workspace 37
Page 38

Reports in Dreamweaver
You can run reports in Dreamweaver to find content, troubleshoot, or test content. You can
generate the following types of reports:
Search enables you to search for tags, attributes, and specific text within tags. To search your
code, see “Searching and replacing tags and attributes” on page 428.
Validation enables you to check for code or syntax errors. To validate your code, see “Validating
your tags” on page 437.
Target Browser Check enables you to test the HTML in your documents to see if any tags or
attributes are unsupported by your target browsers. To run a target browser check, see “Checking
for browser compatibility” on page 434.
Link Checker enables you to find and fix broken, external, and orphaned links. To run the link
checker, see “Checking for broken, external, and orphaned links” on page 336.
Site Reports enable you to improve workflow and test HTML attributes in your site. Workflow
reports include checked out by, recently modified, and design notes; HTML reports include
combinable nested font tags, accessibility, missing Alt text, redundant nested tags, removable
empty tags, and untitled documents. To run site reports, see “Testing your site” on page 111.
FTP Log enables you view all FTP file transfer activity. To view the FTP log, see “Getting files
from a remote server” on page 101 or “Putting files on a remote server” on page 102.
Server Debug enables you to view information to debug a ColdFusion application. To view
debugging information, see “Using the ColdFusion debugger (Windows only)” on page 439.
About customizing Dreamweaver in multiuser systems
You can customize Dreamweaver to suit your needs even in a multiuser operating system such as
Windows XP or Mac OS X.
Dreamweaver prevents any user’s customized configuration from affecting any other user’s
customized configuration. To accomplish this goal, the first time you run Dreamweaver in one of
the multiuser operating systems that it recognizes, the application creates copies of a variety of
configuration files for you. These user configuration files are stored in a folder belonging to you.
For example, in Windows XP they’re stored in C:\Documents and Settings\username\Application
Data\Macromedia\Dreamweaver MX\Configuration (which may be inside a hidden folder).
In Mac OS X they’re stored inside your home folder; specifically, in Users/username/Library/
Application Support/Macromedia/Dreamweaver MX/Configuration.
Note: In older operating systems (Windows 98, Windows ME, and Mac OS 9.x), a single set of
Dreamweaver configuration files is shared by all users, even if the operating system is configured to
support multiple users.
If you reinstall or upgrade Dreamweaver, Dreamweaver automatically makes backup copies of
existing user configuration files, so that if you’ve customized those files by hand, you still have
access to the changes you made.
Related topics
• “Dreamweaver customizing basics”
38 Chapter 1: Exploring the Workspace
Page 39
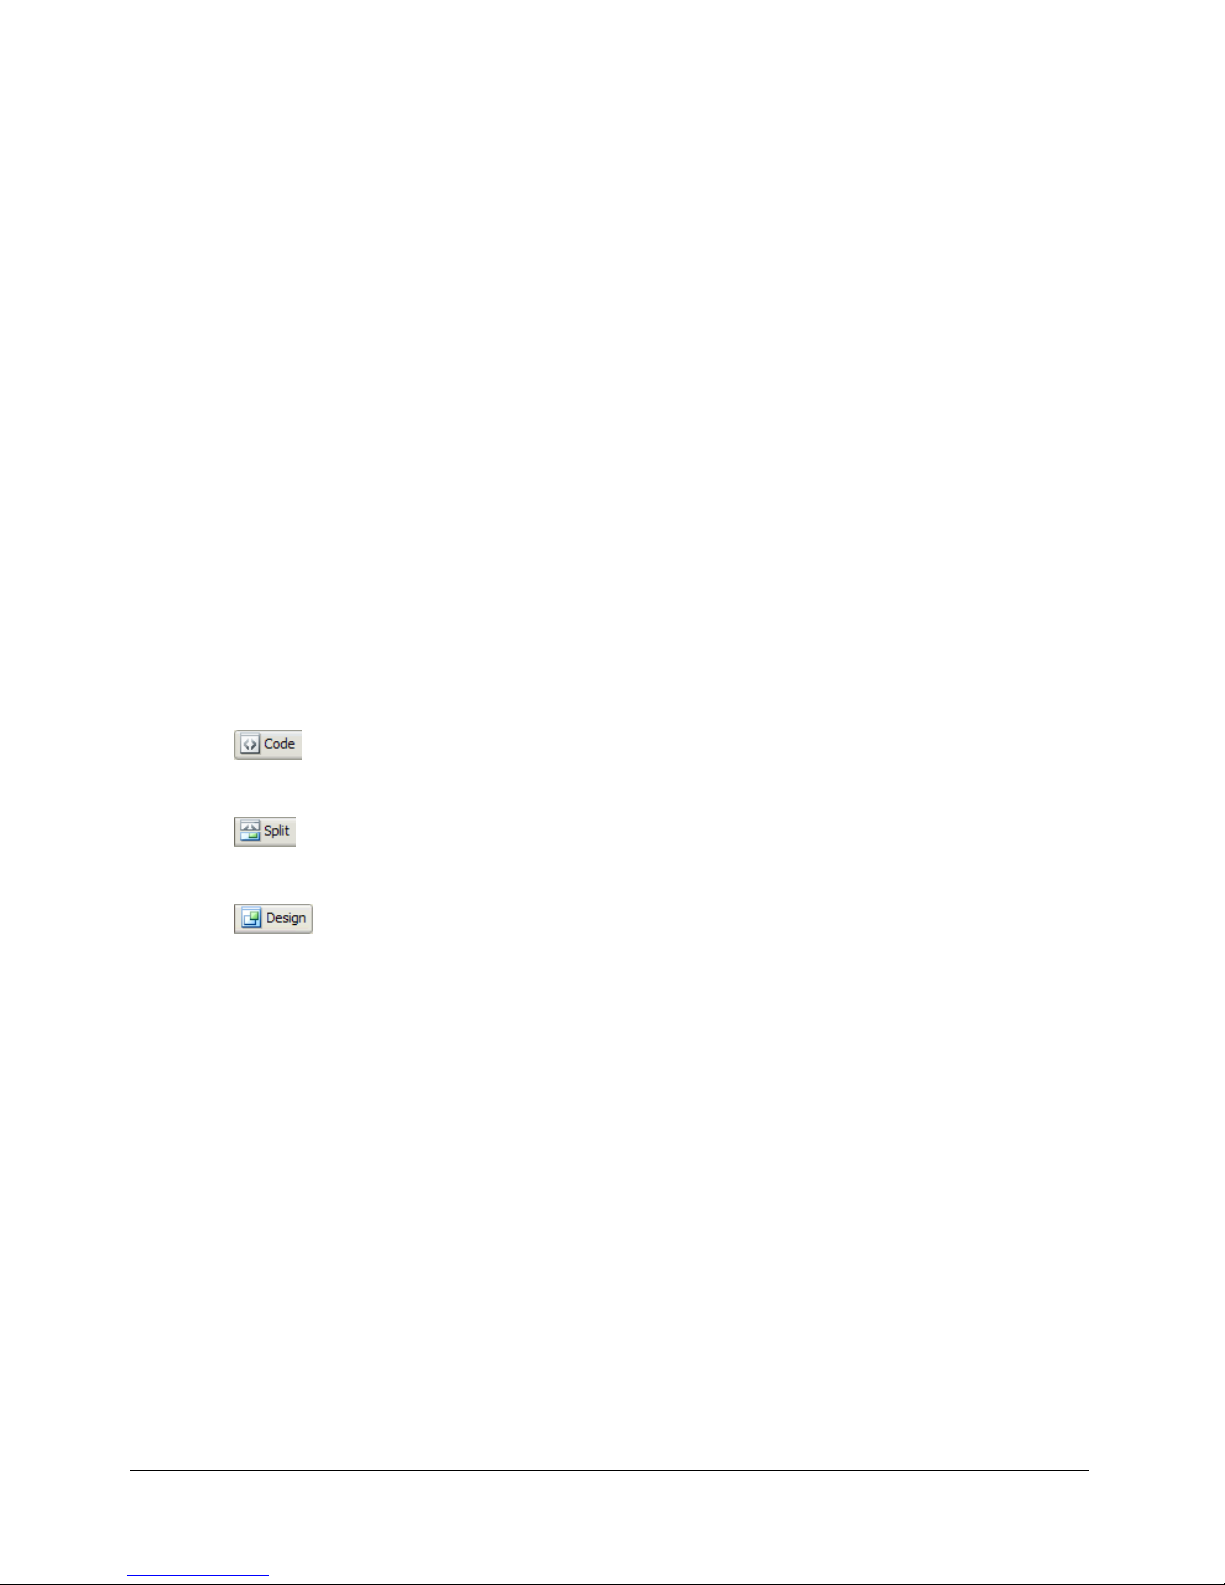
Working in the Document window
The Document window shows the current document. You can view a document in Design view,
Code view, or Code and Design views. The Document window’s status bar provides information
about the current document.
Related topics
• “The Document window” on page 34
• “The status bar” on page 36
Switching between views in the Document window
You can view a document in the Document window in Code view, Design view, or Code and
Design views.
To switch views in the Document window, do one of the following:
• Use the View menu:
■ Select View > Code.
■ Select View > Design.
■ Select View > Code and Design.
• Use the Document toolbar:
■ Click the Show Code View button.
■ Click the Show Code and Design Views button.
■ Click the Show Design View button.
To toggle between Code view and Design view:
• Press Control+tilde (~) (Windows) or Command+backquote (‘) (Macintosh).
Note: If both views are showing in the Document window, this keyboard shortcut changes
keyboard focus from one view to the other.
Related topics
• “The Document window” on page 34
Working in the Document window 39
Page 40
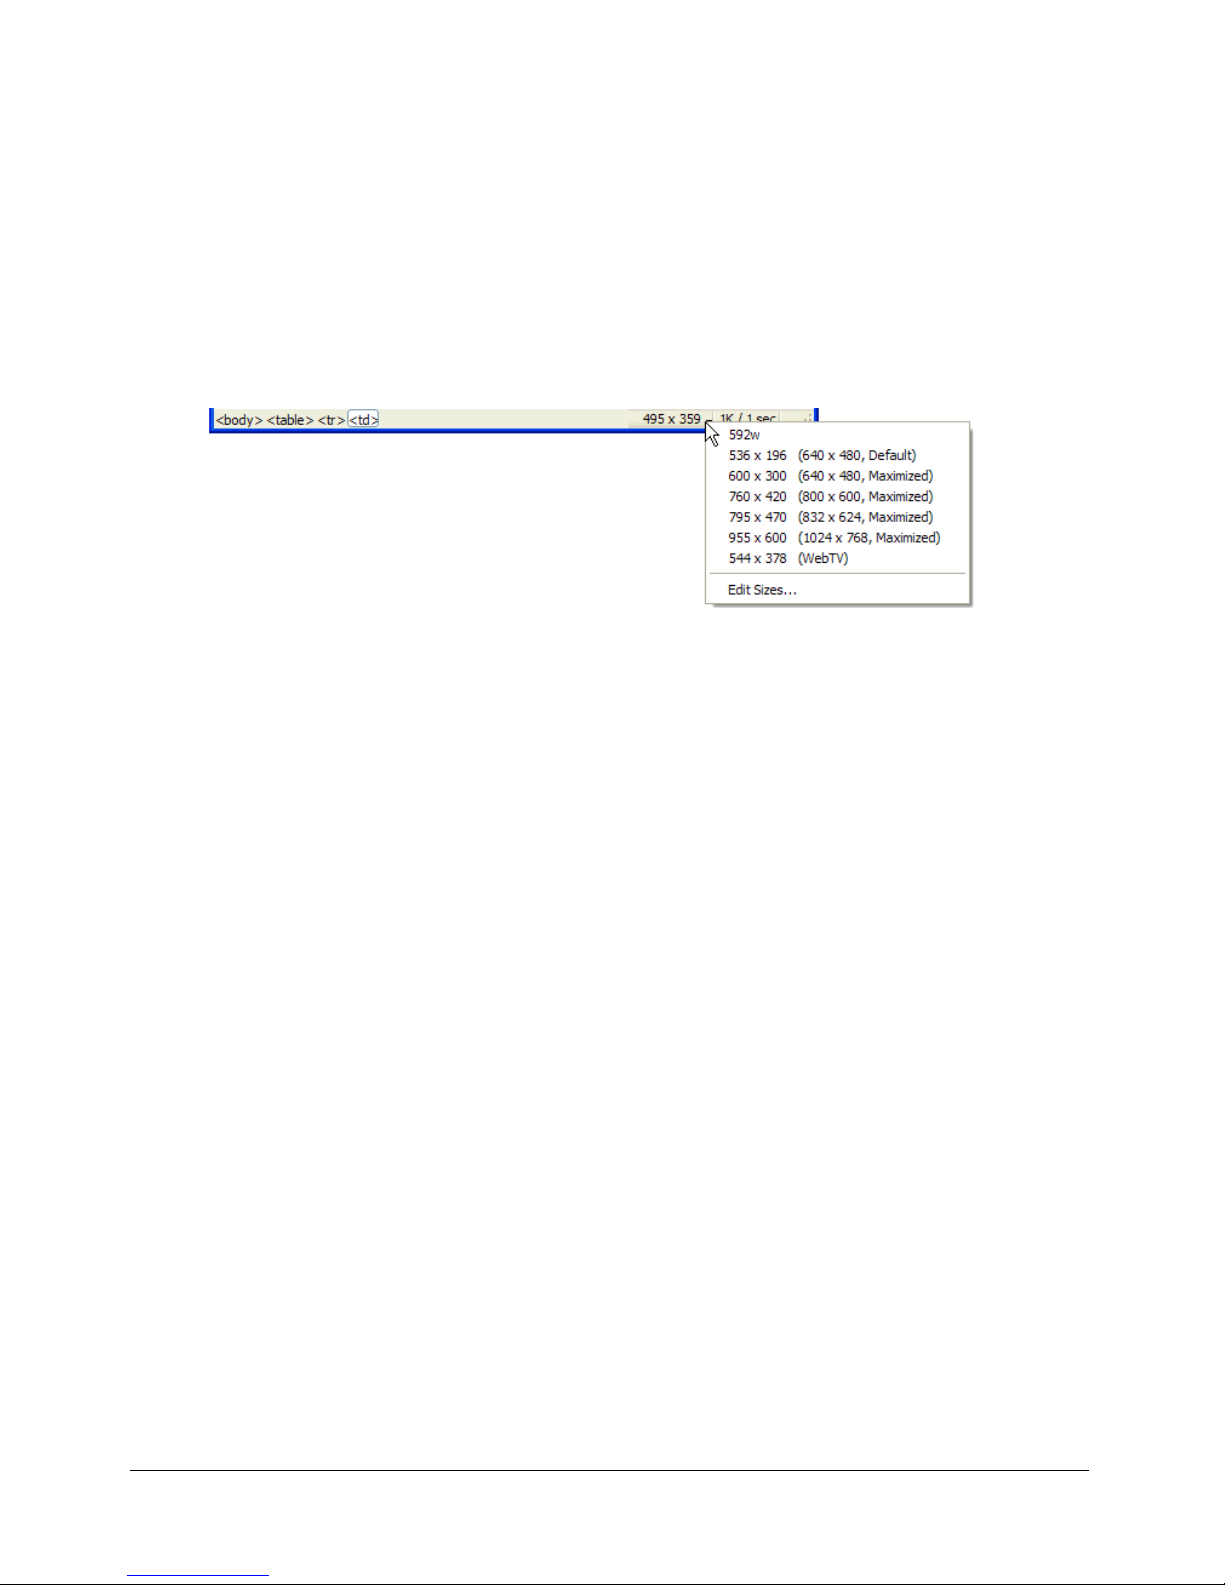
Resizing the Document window
The status bar displays the Document window’s current dimensions (in pixels). To design a
page that looks its best at a specific size, you can adjust the Document window to any of the
predetermined sizes, edit those predetermined sizes, or create new sizes.
To resize the Document window to a predetermined size:
• Select one of the sizes from the Window Size pop-up menu at the bottom of the Document
window.
Note: In Windows, you can maximize a Document window so that it fills the entire document area
of the integrated window. You can’t resize a Document window when it is maximized.
The window size shown reflects the inside dimensions of the browser window, without borders;
the monitor size is listed in parentheses. For example, you would use the size “536 x 196 (640 x
480, Default)” if your visitors are likely to be using Microsoft Internet Explorer or Netscape
Navigator in their default configurations on a 640 x 480 monitor.
Tip: For less precise resizing, use your operating system’s standard methods of resizing windows,
such as dragging the lower right corner of a window.
To change the values listed in the Window Size pop-up menu:
1 Select Edit Sizes from the Window Size pop-up menu.
2 Click any of the width or height values in the Window Sizes list, then type a new value.
To make the Document window adjust only to a specific width (leaving the height
unchanged), select a height value and delete it.
3 Click the Description text box to enter descriptive text about a specific size.
4 Click OK to save the change and return to the Document window.
To add a new size to the Window Size pop-up menu:
1 Select Edit Sizes from the Window Size pop-up menu.
2 Click the blank space below the last value in the Width column.
3 Enter values for Width and Height.
To set the Width or Height only, simply leave one field empty.
4 Click the Description field to enter descriptive text about the size you added.
5 Click OK to save the change and return to the Document window.
For example, you might type SVGA or average PC next to the entry for an 800 x 600 pixel
monitor, and 17-in. Mac next to the entry for an 832 x 624 pixel monitor. Most monitors can
be adjusted to a variety of pixel dimensions.
40 Chapter 1: Exploring the Workspace
Page 41

Setting Status Bar preferences
Set preferences for the status bar using the Preferences dialog box.
To set preferences for the status bar:
1 Select Edit > Preferences (Windows) or Dreamweaver > Preferences (Macintosh).
The Preferences dialog box appears.
2 Select Status Bar from the Category list on the left.
3 Set preference options.
For more information, click the Help button in the dialog box.
4 Click OK.
Related topics
• “The status bar” on page 36
Using toolbars, inspectors, and context menus
Dreamweaver contains several tools that enable you to quickly make changes as you create or edit
a document.
The Document and Standard toolbar are for editing and working with the current document.
The Insert bar contains buttons for creating and inserting objects such as tables, layers, and
images, while the Property inspector enables you to edit properties for those objects.
Note: You can also use the Tag inspector to view and edit properties (see “Changing attributes with
the Tag inspector” on page 442). The Tag inspector enables you to view and edit every attribute
associated with a given tag, while the Property inspector shows only the most common attributes.
Context menus give you an alternative to the Insert bar and Property inspector for creating and
editing objects.
Displaying toolbars
Use the Document and Standard toolbars to perform document-related and standard editing
operations. You can choose to display the toolbars as necessary. The setting for displaying or
hiding toolbars is document specific; the setting applies to the current document only.
To display or hide the Document toolbar, do either of the following:
• Select Window > Toolbars > Document.
• Right-click (Windows) or Control-click (Macintosh) in the Insert bar or the Document or
Standard toolbar, then select Document Toolbar.
To display or hide the Standard toolbar, do either of the following:
• Select Window > Toolbars > Standard.
• Right-click (Windows) or Control-click (Macintosh) in the Insert bar or the Document or
Standard toolbar, then select Standard Toolbar.
Related topics
• “The Document toolbar” on page 35
• “The Standard toolbar” on page 36
Using toolbars, inspectors, and context menus 41
Page 42

Using the Insert bar
The Insert bar contains buttons for creating and inserting objects such as tables and images. The
buttons are organized into categories. When you roll the pointer over a button, a tooltip appears
with the name of the button.
Related topics
• “The Insert bar” on page 37
Displaying the Insert bar and its categories and menus
You can hide or show, and collapse or expand the Insert bar as necessary. You can also display the
different categories of the Insert bar. Some categories of the Insert bar have buttons that contain
menus with common commands.
If you prefer to view the categories as tabs across the top of the Insert bar, you can change the
layout of the Insert bar.
To hide or show the Insert bar, do either of the following:
• Select Window > Insert.
• Right-click (Windows) or Control-click (Macintosh) in the Insert bar or the Document or
Standard toolbar, then select Insert Bar.
To show the buttons in a particular category:
• Click the arrow beside the category name on the left end of the Insert bar, then select another
category from the pop-up menu.
To display the pop-up menu for a button:
• Click the down arrow beside the button’s icon.
42 Chapter 1: Exploring the Workspace
Page 43

To show Insert bar categories as tabs:
• Click the arrow beside the category name on the left end of the Insert bar, then select Show
as Tabs.
The Insert bar displays the categories as tabs across the top of the Insert bar.
Note: You might need to click the Insert bar title bar to reopen the Insert bar.
To show Insert bar categories as a menu:
• Right-click (Windows) or Control-click (Macintosh) in the Insert bar, then select Show
as Menus.
The Insert bar displays the categories in a menu instead of tabs.
Related topics
• “Customizing and using the Favorites category in the Insert bar” on page 44
Using the Insert bar to insert objects
The Insert bar is a convenient method for creating and inserting objects.
To insert an object:
1 Select the appropriate category from the left side of the Insert bar.
2 Do one of the following:
■ Click an object button or drag the button’s icon into the Document window.
■ Click the arrow on a button, then select an option from the menu.
Depending on the object, a corresponding object-insertion dialog box may appear, prompting
you to browse to a file or specify parameters for an object. Or, Dreamweaver may insert code into
the document, or open a tag editor (see “Editing tags with Tag editors” on page 426) or panel for
you to specify information before the code is inserted.
For some objects, no dialog box appears if you insert the object in Design view, but a tag editor
appears if you insert the object in Code view. For a few objects, inserting the object in Design
view causes Dreamweaver to switch to Code view before inserting the object.
Note: Some objects, such as named anchors, are not visible when the page is viewed in a browser
window. To display icons in Design view that mark the locations of such invisible objects, see
“Showing and hiding invisible elements” on page 263.
To bypass the object-insertion dialog box and insert an empty placeholder object:
• Control-click (Windows) or Option-click (Macintosh) the button for the object.
For example, to insert a placeholder for an image without specifying an image file,
Control-click or Option-click the Image button.
Note: This procedure does not bypass all object-insertion dialog boxes. Many objects,
including navigation bars, layers, Flash buttons, and framesets, do not insert placeholders or
default-valued objects.
Using toolbars, inspectors, and context menus 43
Page 44

To modify preferences for the Insert bar:
1 Select Edit > Preferences (Windows) or Dreamweaver > Preferences (Macintosh).
The Preferences dialog box displays the General preferences category.
2 Deselect Show Dialog When Inserting Objects to suppress dialog boxes when you insert objects
such as images, tables, scripts, and head elements or by holding down the Control key
(Windows) or the Option key (Macintosh) while creating the object.
Tip: When you insert an object with this option off, the object is given default attribute values. Use
the Property inspector to change object properties after inserting the object.
3 Click OK.
Related topics
• “Displaying the Insert bar and its categories and menus” on page 42
Customizing and using the Favorites category in the Insert bar
The Favorites category of the Insert bar enables you to group and organize commonly used Insert
bar buttons. You can add, manage, and delete buttons from the Favorites category.
To add, delete, or manage items in the Favorites category:
1 Select any category in the Insert bar.
2 Right-click (Windows) or Control-click (Macintosh) in the area where the buttons appear
(do not right-click in the category name), then select Customize Objects.
The Customize Favorite Objects dialog box appears.
3 Make changes as necessary.
For more information, click the Help button in the dialog box.
4 Click OK.
The Favorites category reflects the changes you made.
Tip: If you’re not in the Favorites category, select that category to see your changes.
To insert objects using buttons in the Favorites category:
• Select the Favorites category from the left side of the Insert bar, then click the button for any
Favorites object you’ve added.
Note: The Favorites category does not contain any buttons until you customize Favorites to
add objects.
Related topics
• “Displaying the Insert bar and its categories and menus” on page 42
• “Using the Insert bar to insert objects” on page 43
44 Chapter 1: Exploring the Workspace
Page 45

Using the Property inspector
The Property inspector lets you examine and edit the most common properties for the currently
selected page element, such as text or an inserted object. The contents of the Property inspector
vary depending on the element selected.
Note: Use the Tag inspector to view and edit every attribute associated with a given tag properties
(see “Changing attributes with the Tag inspector” on page 442).
Tip: The Property inspector is at the bottom of the workspace by default, but you can dock it at the
top of the workspace if you want. Or, you can make it a floating panel in the workspace. For more
information about moving the Property inspector, see “Docking and undocking panels and panel
groups” on page 47.
To show or hide the Property inspector:
• Select Window > Properties.
To expand or collapse the Property inspector:
• Click the expander arrow in the lower right corner of the Property inspector.
To view properties for a page element:
• Select the page element in the Document window.
Note: You might need to expand the Property inspector to view all the properties for the
selected element.
To change properties for a page element:
1 Select the page element in the Document window.
2 Change any of the properties in the Property inspector.
Note: For information on specific properties, select an element in the Document window and then
click the Help icon in the upper right corner of the Property inspector.
Most changes you make to properties are immediately applied in the Document window.
3 If your changes are not applied immediately, do one of the following:
■ Click outside the property-editing text fields.
■ Press Enter (Windows) or Return (Macintosh).
■ Press Tab to switch to another property.
Using toolbars, inspectors, and context menus 45
Page 46

Using context menus
Dreamweaver makes extensive use of context menus, which provide convenient access to the most
useful commands and properties related to the object or window you’re working with. Context
menus list only those commands that pertain to the current selection.
To use a context menu:
1 Right-click (Windows) or Control-click (Macintosh) the object or window.
The context menu for the selected object or window appears.
2 Select a command from the context menu.
Using panels and panel groups
Panels in Dreamweaver are grouped together into panel groups. The selected panel within a panel
group appears as a tab. Each panel group can be expanded or collapsed, and can be docked or
undocked with other panel groups.
Panel groups can also be docked to the integrated application window (Windows only). This
makes it easy to access the panels you need without cluttering your workspace.
Note: When a panel group is floating (undocked), a narrow blank bar appears at the top of the panel
group. In this documentation, the term “panel group’s title bar” refers to the area where the panel
group’s name appears, rather than to this narrow blank bar.
Viewing panels and panel groups
You can display or hide panel groups and panels in the workspace as necessary.
To expand or collapse a panel group, do one of the following:
• Click the expander arrow on the left side of the panel group’s title bar.
• Click the panel group’s title.
To close a panel group so that it isn’t visible on your screen:
• Select Close Panel Group from the Options menu in the panel group’s title bar.
The panel group disappears from your screen.
46 Chapter 1: Exploring the Workspace
Page 47

To open a panel group or panel that isn’t visible on your screen:
• Select the Window menu, then select a panel name from the menu.
A check mark next to an item in the Window menu indicates that the named item is currently
open (though it may be hidden behind other windows).
Tip: If you can’t find a panel, inspector, or window that’s marked as open, select Window >
Arrange Panels to neatly lay out all open panels.
To select a panel within an expanded panel group:
• Click the panel’s name.
To see a panel group’s Options menu if it isn’t showing:
• Expand the panel group by clicking its name or its expander arrow.
The Options menu is visible only when the panel group is expanded.
Tip: Some options are available in the panel group’s context menu even when the group is
collapsed; right-click (Windows) or Control-click (Macintosh) the panel group’s title bar to view the
context menu.
Docking and undocking panels and panel groups
You can move panels and panel groups as necessary, and arrange them so that they are floating or
docked in the workspace.
Most panels can be docked only to either the left or the right of the Document window area in
the integrated workspace, while others (such as the Property inspector and the Insert bar) can be
docked only to the top or bottom of the integrated window.
To undock a panel group:
• Drag the panel group by its gripper (on the left side of the panel group’s title bar) until its
outline indicates that it’s no longer docked.
To dock a panel group to other panel groups (floating workspace) or to the integrated
window (Windows only):
• Drag the panel group by its gripper until its outline indicates that it’s docked.
To undock a panel from a panel group:
• Select Group With > New Panel Group from the Options menu in the panel group’s title bar.
(The Group With command’s name changes depending on the name of the active panel.)
The panel appears in a new panel group of its own.
To dock a panel in a panel group:
• Select the name of a panel group from the Group With submenu of the panel group’s
Options menu. (The Group With command’s name changes depending on the name of the
active panel.)
Using panels and panel groups 47
Page 48

To drag a floating (undocked) panel group without docking it:
• Drag the panel group by the bar above its title bar. The panel group doesn’t dock as long as you
don’t drag it by its gripper.
Resizing and renaming panel groups
You can change the size and name of panel groups depending on your needs.
To change the size of the panel groups:
• For floating panels, drag to resize the set of panel groups just as you would drag to resize any
window in your operating system.
For example, you can drag the resize area at the lower right corner of the set of panel groups.
• For docked panels, drag the splitter bar between the panels and the Document window.
To maximize a panel group, do one of the following:
• Select Maximize Panel Group from the Options menu in the panel group’s title bar.
• Double-click anywhere in the panel group’s title bar.
The panel group grows vertically to fill all of the available vertical space.
To rename a panel group:
1 Select Rename Panel Group from the Options menu in the panel group’s title bar.
2 Enter a new name, then click OK.
Setting Panels preferences
You can set preferences to specify which panels and inspectors always appear in front of the
Document window, and which ones may be obscured by the Document window.
To set preferences for panels:
1 Select Edit > Preferences (Windows) or Dreamweaver > Preferences (Macintosh).
The Preferences dialog box appears.
2 Select Panels from the Category list on the left.
3 Select options.
For more information, click the Help button in the dialog box.
4 Click OK.
48 Chapter 1: Exploring the Workspace
Page 49

Using Dreamweaver accessibility features
Dreamweaver provides features that make it accessible to users with disabilities.
Specifically, Dreamweaver supports screen readers, operating system accessibility features,
and keyboard navigation.
Related topics
• “Dreamweaver and accessibility” on page 26
Using screen readers with Dreamweaver
A screen reader recites text that appears on the computer screen. It also reads non-textual
information, such as button labels or image descriptions in the application, provided in
accessibility tags or attributes during authoring.
As a Dreamweaver user, you can use a screen reader to assist you in creating your web pages. The
screen reader starts reading in the top left corner of the Document window.
Dreamweaver supports JAWS for Windows, from Freedom Scientific
(www.freedomscientific.com), and Window Eyes screen readers, from GW Micro
(www.gwmicro.com).
Related topics
• “Using the keyboard to navigate Dreamweaver” on page 50
Support for operating system accessibility features (Windows only)
Dreamweaver supports the Windows operating system high contrast setting. You activate this
option through the Windows control panel. When high contrast is on, it affects Dreamweaver
as follows:
• Dialog boxes and panels use system color settings.
For example, if you set the color to White on Black, then all Dreamweaver dialog boxes and
panels appear with a white foreground color and black background.
• Code view syntax coloring is off.
Code view uses the system window and window text color, and ignores color settings in
Preferences. For example, if you set the system color to White on Black, and then change text
colors in Preferences > Code Coloring, Dreamweaver ignores the colors set in Preferences and
displays the code text with a white foreground color and black background.
• Design view uses the background and text colors you set in Modify > Page Properties so that
pages you design render colors as a browser will.
Related topics
• “Using screen readers with Dreamweaver” on page 49
Using Dreamweaver accessibility features 49
Page 50

Using the keyboard to navigate Dreamweaver
You can use the keyboard to navigate Dreamweaver panels, inspectors, dialog boxes, frames, and
tables without a mouse.
Related topics
• “Using screen readers with Dreamweaver” on page 49
• “Support for operating system accessibility features (Windows only)” on page 49
Navigating panels
You can use the keyboard to navigate the panels.
Note: Tabbing and the use of arrow keys are supported for Windows only.
To navigate panels:
1 In the Document window, press Control+Alt+Tab to shift focus to a panel.
A white outline around the panel title bar indicates that focus is on that panel. The screen
reader reads the panel title bar that has focus.
2 Press Control+Alt+Tab again to shift focus to the next panel.
Continue until you have focus on the panel you want to work in.
3 Press Control+Alt+Shift+Tab to shift focus to the previous panel, if necessary.
4 If the panel you want to work in is not open, use the keyboard shortcuts listed in the Windows
menu to display the appropriate panel; then press Control+Alt+Tab to shift focus to that panel.
If the panel you want to work in is open, but not expanded, place focus on the panel title bar,
and then press the Spacebar. Press the Spacebar again to collapse the panel.
5 Press the Tab key to move through the options in the panel.
A dotted outline around the option indicates that focus is on that option.
6 Use the arrow keys as appropriate:
■ If an option has choices, use the arrow keys to scroll through the choices, and then press the
Spacebar to make a selection.
■ If there are tabs in the panel group to open other panels, place focus on the open tab, and
then use the left or right arrow key to open another tabs. Once you open a new tab, press
the Tab key to move through the options in that panel.
Related topics
• “Navigating dialog boxes” on page 51
• “Navigating frames” on page 52
• “Navigating tables” on page 52
50 Chapter 1: Exploring the Workspace
Page 51

Navigating the Property inspector
You can use the keyboard to navigate the Property inspector and make changes to your document.
Note: Tabbing and the use of arrow keys are supported for Windows only.
To navigate the Property inspector:
1 Press Control+F3 to display the Property inspector, if it is not visible.
2 Press Control+Alt+Tab until you shift focus to the Property inspector.
3 Press the Tab key to move through the Property inspector options.
4 Use the arrow keys as appropriate to move through option choices, and press Enter (Windows)
or Return (Macintosh) to make a selection.
5 Press Control+Tab (Windows) or Option+Tab (Macintosh) to open and close the expanded
section of the Property inspector, as necessary, or, with focus on the expander arrow at the
bottom right, press the Spacebar.
Related topics
• “Navigating panels” on page 50
• “Navigating frames” on page 52
• “Navigating tables” on page 52
Navigating dialog boxes
You can use the keyboard to navigate dialog boxes.
Note: Tabbing and the use of arrow keys are supported for Windows only.
To navigate a dialog box:
1 Press the Tab key to move through the options in a dialog box.
2 Use the arrow keys to move through choices for an option.
For example, if an option has a pop-up menu, move focus to that option, and then use the
down arrow to move through the choices.
3 If the dialog box has a Category list, press Control+Tab (Windows) or Option+Tab
(Macintosh) to shift focus to the category list, and then use the arrow keys to move up or down
the list.
4 Press Control+Tab (Windows) or Option+Tab (Macintosh) again to shift to the options for
a category.
5 Press Enter (Windows) or Return (Macintosh) to exit the dialog box.
Related topics
• “Navigating panels” on page 50
• “Navigating the Property inspector” on page 51
• “Navigating tables” on page 52
Using Dreamweaver accessibility features 51
Page 52

Navigating frames
If your document contains frames, you can use the arrow keys to shift focus to a frame.
Note: Tabbing and the use of arrow keys are supported for Windows only.
To select a frame:
1 Place the insertion point in the Document window.
2 Press Alt+Up Arrow to select the frame that currently has focus.
A dotted line indicates the frame that has focus.
3 Continue pressing Alt+Up Arrow to shift focus to the frameset, and then parent framesets, if
there are nested framesets.
4 Press Alt+Down Arrow to shift focus to a child frameset or a single frame within the frameset.
5 With focus on a single frame, press Alt+Left or Right Arrow to move between frames.
6 Press Alt+Down Arrow to place the insertion point in the Document window.
Related topics
• “Navigating panels” on page 50
• “Navigating the Property inspector” on page 51
• “Navigating dialog boxes” on page 51
Navigating tables
After you select a table, you can use the keyboard to navigate through it.
Note: Tabbing and the use of arrow keys are supported for Windows only.
To navigate a table:
1 In the Document window, do one of the following to select the table:
■ If the insertion point is to the left of the cell, press Shift+Right Arrow.
■ If the insertion point is to the right of the cell, press Shift+Left Arrow.
2 Press the down arrow to position the insertion point in the first cell.
3 Use the arrow keys or press Tab to move to other cells as necessary.
Tip: Pressing Tab in a right-most cell adds another row to the table.
4 To select a cell, press Control+A while the insertion point is in the cell.
5 To exit the table, use the Select All command (Control+A in Windows or Option+A in
Macintosh) twice, and then press the up, left, or right arrow key.
Related topics
• “Navigating panels” on page 50
• “Navigating the Property inspector” on page 51
• “Navigating dialog boxes” on page 51
• “Navigating frames” on page 52
52 Chapter 1: Exploring the Workspace
Page 53

Optimizing the workspace for accessible page design
When you create accessible pages, you need to associate information, such as labels and
descriptions, with your page objects to make your content accessible to all users.
To do this, activate the Accessibility dialog box for each object, so that Dreamweaver prompts you
for accessibility information when you insert objects. You can activate a dialog box for any of the
objects in the Accessibility category in Preferences.
To activate the Accessibility dialog boxes:
1 Select Edit > Preferences (Windows) or Dreamweaver > Preferences (Macintosh).
The Preferences dialog box appears.
2 Select Accessibility from the Category list on the left.
The Preferences dialog box displays accessibility options.
3 Select the objects you want to activate Accessibility dialog boxes for.
For more information, click the Help button in the dialog box.
Note: Accessibility attributes automatically appear in the Insert Table dialog box when you insert a
new table.
4 Click OK.
For each object you select, an Accessibility dialog box prompts you to enter accessibility tags and
attributes when you insert that object in a document.
Related topics
• “Dreamweaver and accessibility” on page 26
• “Inserting an image” on page 305
• “Validating HTML form data” on page 620
• “Creating frames and framesets” on page 204
• “Inserting and editing media objects” on page 358
• “Inserting a table and adding content” on page 165
Optimizing the workspace for accessible page design 53
Page 54

Using visual guides in Dreamweaver
Dreamweaver provides several kinds of visual guides to help you design documents and predict
(approximately) how they will appear in browsers. You can do any of the following:
• Instantly snap the Document window to a desired window size to see how the elements fit on
the page. (See “Resizing the Document window” on page 40.)
• Use rulers to provide a visual cue for positioning and resizing layers or tables. (See “Using rulers
and grids to lay out pages” on page 160.)
• Use a tracing image as the page background to help you duplicate a design created in an
illustration or image-editing application such as Macromedia Fireworks. (See “Using a tracing
image” on page 161.)
• Use the grid for precise positioning and resizing of layers. (See “Using rulers and grids to lay
out pages” on page 160.)
Grid marks on the page help you align layers, and when snapping is enabled, layers
automatically snap to the closest grid point when moved or resized. (Other objects, such as
images and paragraphs, do not snap to the grid.) Snapping works regardless of whether the grid
is visible.
Dreamweaver customizing basics
There are some basic techniques you can use to customize Dreamweaver to suit your needs
without knowing complex code or editing text files. For example, you can change the workspace
layout, hide or display the Start page, set preferences, create your own keyboard shortcuts, and
add extensions to Dreamweaver.
For information about customizing panel layout in the workspace, see “Using panels and panel
groups” on page 46.
Note: For information about customizing configuration files by hand, see “Customizing
Dreamweaver” on the Macromedia Support Center at www.macromedia.com/go/
customizing_dreamweaver.
This section describes only the most common of the preference options. For information on a
specific preference option not covered here, search for the corresponding topic in Using
Dreamweaver Help.
Related topics
• “About customizing Dreamweaver in multiuser systems”
• Extending Dreamweaver Help
54 Chapter 1: Exploring the Workspace
Page 55

Choosing the workspace layout (Windows only)
In Windows, you can choose between the Designer and Coder workspace layouts. The first time
you start Dreamweaver, a dialog box appears that enables you to choose a workspace layout. You
can switch to a different workspace at anytime.
To choose a workspace layout the first time you start Dreamweaver:
1 Select one of the following layouts:
Designer is an integrated workspace using MDI (Multiple Document Interface), in which all
Document windows and panels are integrated into one larger application window, with the
panel groups docked on the right.
Coder is the same integrated workspace, but with the panel groups docked on the left, in a
layout similar to that used by Macromedia HomeSite and Macromedia ColdFusion Studio,
and with the Document window showing Code view by default.
Note: You can dock panel groups on either side of the workspace in either layout.
2 Click OK.
To switch to a different workspace after you’ve chosen one:
1 Select Edit > Preferences (Windows) or Dreamweaver > Preferences (Macintosh).
The Preferences dialog box appears.
2 Select the General category in the Category list on the left, if it isn’t already selected.
3 Click the Change Workspace button.
4 Select a workspace layout, then click OK.
An alert message appears to tell you that the new layout will appear after you
restart Dreamweaver.
5 Click OK to dismiss the alert message.
6 Click OK again to dismiss the Preferences dialog box.
7 Exit Dreamweaver and restart it.
Related topics
• “The workspace layout” on page 32
Hiding and displaying the Start page
The Dreamweaver Start page appears when you start Dreamweaver and anytime that you do not
have any documents open. You can choose to hide the Start page, then later display it again.
When the Start page is hidden and there are no documents open, the Document window
is blank.
Note: You can choose to have Dreamweaver open the last document you were working each time
you start. For more information, see “Setting General preferences for Dreamweaver” on page 56.
To hide the Start page:
• Select the Don’t Show Again checkbox on the Start page.
The Start page will not appear when you start Dreamweaver, or after you open and close
a document.
Dreamweaver customizing basics 55
Page 56

To display the Start page:
1 Select Edit > Preferences (Windows) or Dreamweaver > Preferences (Macintosh).
The Preferences dialog box appears displaying the General preferences category.
2 Select the Show Start Page checkbox.
The Start page appears when you start Dreamweaver, or after you open and close a document.
Setting General preferences for Dreamweaver
The General preferences control the general appearance of Dreamweaver.
To change the General preferences:
1 Select Edit > Preferences (Windows) or Dreamweaver > Preferences (Macintosh).
The Preferences dialog box appears displaying the General preferences category.
2 Set preference options.
For more information, click Help.
3 Click OK.
Setting Fonts preferences for Dreamweaver display
A document’s encoding determines how the document appears in a browser. Dreamweaver font
preferences let you view a given encoding in the font and size you prefer without affecting how
the document appears when viewed by others in a browser.
To set the fonts to use in Dreamweaver for each type of encoding:
1 Select Edit > Preferences (Windows) or Dreamweaver > Preferences (Macintosh).
The Preferences dialog box appears.
2 Select Fonts from the Category list on the left.
3 Select an encoding type (such as Western (Latin1) or Japanese) from the Font Settings list, then
select fonts to use within Dreamweaver for that encoding, using the font pop-up menus below
the Font Settings list.
For more information, click Help.
Note: The fonts you select do not affect how the document appears in a visitor’s browser.
4 Click OK.
Related topics
• “Understanding document encoding” on page 256
56 Chapter 1: Exploring the Workspace
Page 57
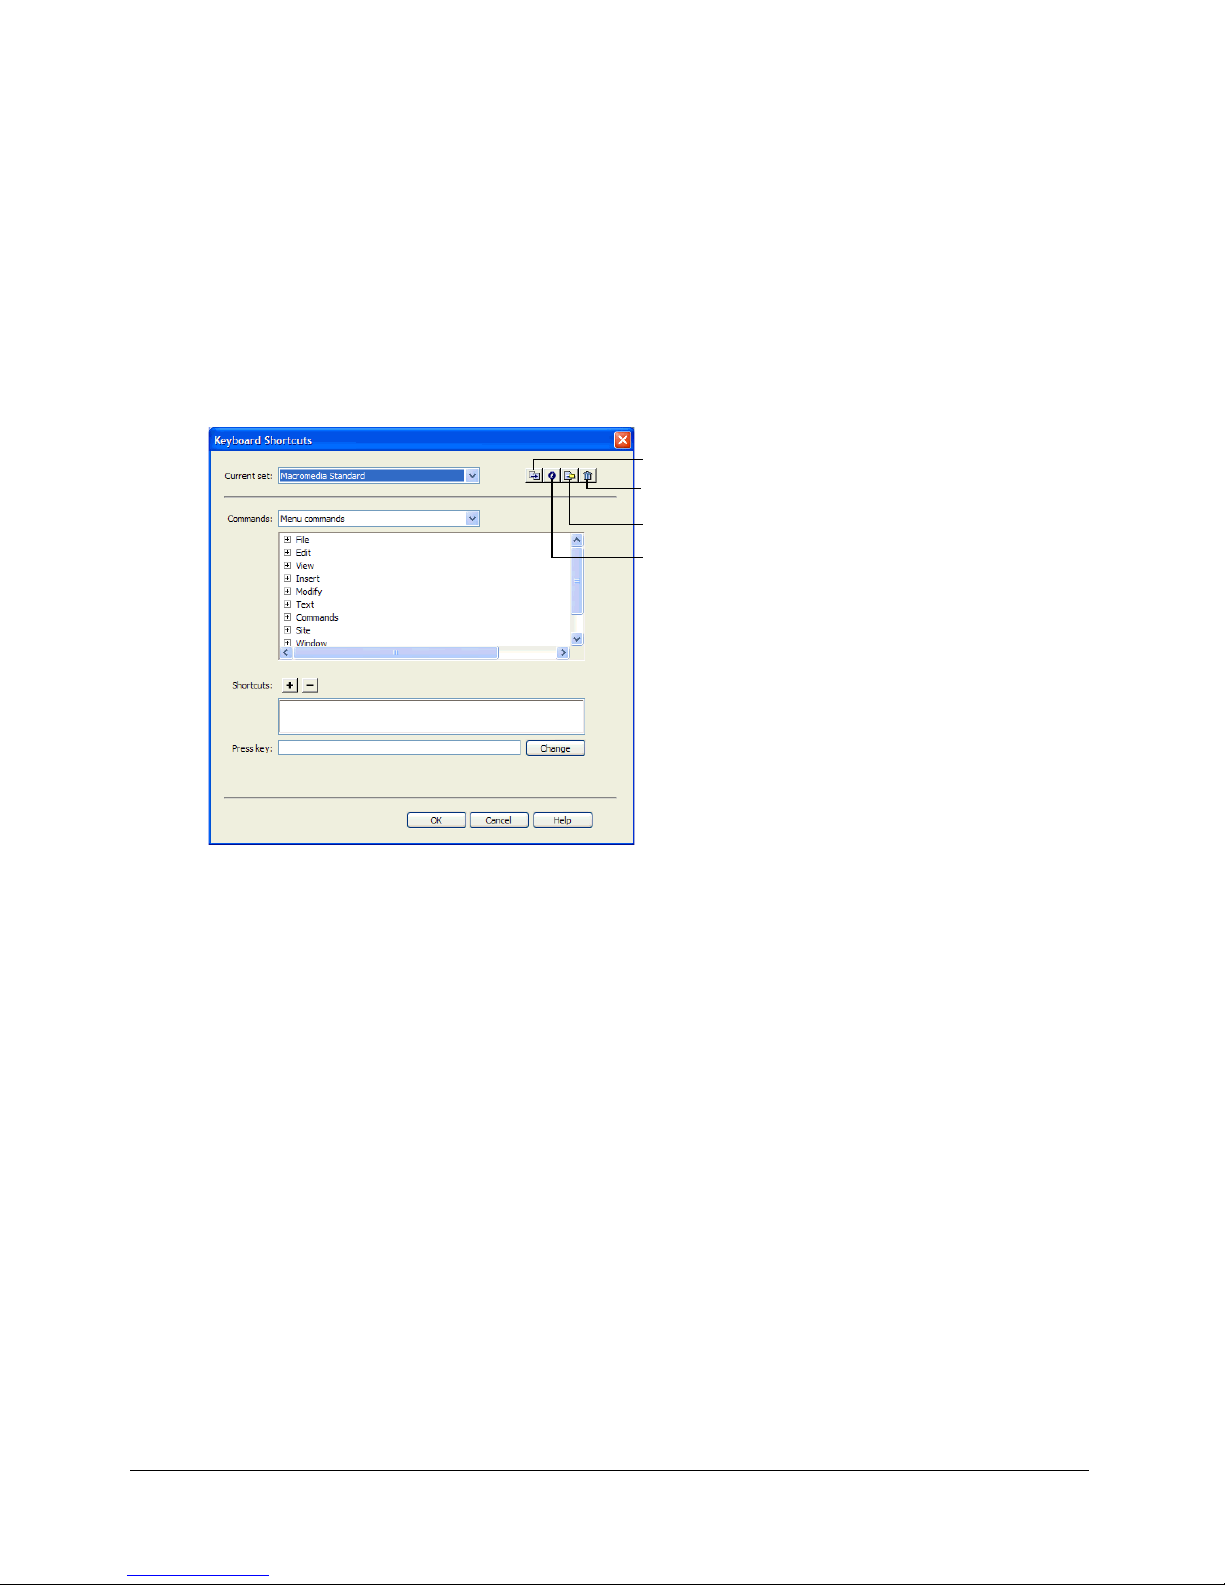
Customizing keyboard shortcuts
Use the Keyboard Shortcut Editor to create your own shortcut keys, including keyboard shortcuts
for code snippets. You can also remove shortcuts, edit existing shortcuts, and select a
predetermined set of shortcuts in the Keyboard Shortcut Editor.
Note: Charts showing all the keyboard shortcuts in the default Dreamweaver configuration are
available on the Macromedia website at www.macromedia.com/go/dreamweaver_mx_shortcuts.
To customize keyboard shortcuts:
1 Select Edit > Keyboard Shortcuts (Windows) or Dreamweaver > Keyboard Shortcuts
(Macintosh).
The Keyboard Shortcuts dialog box appears.
Duplicate Set button
Delete Set button
Export set as HTML button
Rename Set button
2 Add, delete, or edit keyboard shortcuts.
For more information, click Help.
3 Click OK.
Adding extensions to Dreamweaver
Extensions are new features that you can add easily to Dreamweaver. You can use many types of
extensions; for example, there are extensions that let you reformat tables, connect to back-end
databases, or help you write scripts for browsers.
Note: To install extensions that all users have access to in a multiuser operating system, you must be
logged in as Administrator (Windows) or root (Mac OS X). For more information about multiuser
systems, see “About customizing Dreamweaver in multiuser systems” on page 38.
To find the latest extensions for Dreamweaver, use the Macromedia Exchange website at
www.macromedia.com/go/dreamweaver_exchange/. Once there, you can log in and download
extensions (many of which are free), join discussion groups, view user ratings and reviews, and
install and use the Extension Manager. You must install the Extension Manager before you can
install extensions.
The Extension Manager is a separate application that lets you install and manage extensions in
Macromedia applications. Start the Extension Manager from Dreamweaver by choosing
Commands > Manage Extensions.
Dreamweaver customizing basics 57
Page 58

To install and manage extensions:
1 On the Macromedia Exchange website, click the download link for an extension.
Your browser may let you choose to open and install it directly from the site or save it to disk.
■ If you are opening the extension directly from the site, the Extension Manager handles the
installation automatically.
■ If you are saving the extension to disk, a good place to save the extension package file (.mxp)
is the Downloaded Extensions folder within the Dreamweaver application folder on
your computer.
2 Double-click the extension package file or open the Extension Manager and select File >
Install Extension.
The extension is installed in Dreamweaver. Some extensions aren’t accessible until
Dreamweaver has restarted; you may be prompted to quit and restart the application.
Note: Use the Extension Manager to remove extensions or to see more information about an
extension.
58 Chapter 1: Exploring the Workspace
Page 59

CHAPTER 2
Setting Up a Dreamweaver Site
A website is a set of linked documents and assets with shared attributes, such as related topics,
a similar design, or a shared purpose. Macromedia Dreamweaver MX 2004 is a site creation
and management tool, so you can use it to create complete websites, in addition to
individual documents.
The first step in creating a website is planning. For best results, design and plan the structure of
your website before you create any of the pages that the site will contain.
The next step is to set up Dreamweaver so that you can work on the basic structure of the site. If
you already have a site on a web server, you can use Dreamweaver to edit that site.
Tip: As you develop site content, consider basing your pages on Dreamweaver templates. See
“About Dreamweaver templates” on page 216 and “Creating a Dreamweaver template”
on page 226.
This chapter includes the following sections:
• “About Dreamweaver sites” on page 59
• “Setting up a new Dreamweaver site” on page 62
• “Using the Advanced settings to set up a Dreamweaver site” on page 63
• “Editing settings for a Dreamweaver site” on page 67
• “Editing existing websites in Dreamweaver” on page 67
About Dreamweaver sites
A Dreamweaver site provides a way to organize all of the documents associated with a website.
Organizing your files in a site enables you to use Dreamweaver to upload your site to the web
server, automatically track and maintain your links, manage files, and share files. To take full
advantage of Dreamweaver features, you should define a site.
A Dreamweaver site consists of as many as three parts, or folders, depending on your development
environment and the type of website you are developing:
The local folder is your working directory. Dreamweaver refers to this folder as your “local site.”
This folder can be on your local machine or it can be on a network server. It is where you store the
files you are working on for a Dreamweaver site.
59
Page 60

All you need to do to define a Dreamweaver site is set up a local folder. To transfer files to a web
server or to develop web applications, you need to also add information for a remote site and
testing server.
The remote folder is where you store your files, depending on your development environment,
for testing, production, collaboration, and so on. Dreamweaver refers to this folder as your
“remote site” in the Files panel. Typically, your remote folder is on the machine where your web
server is running.
Together, the local and remote folders enable you to transfer files between your local disk and web
server; this makes it easy for you to manage files in your Dreamweaver sites.
The testing server folder is the folder where Dreamweaver processes dynamic pages. For more
information, see “Specifying where dynamic pages can be processed” on page 461.
Related topics
• “Setting up a new Dreamweaver site” on page 62
Understanding local and remote folder structure
When you set up access to the remote folder for your Dreamweaver site (see “Setting up a remote
folder” on page 65), you must determine the remote folder’s host directory. The host directory
you specify should correspond to the root folder of the local folder. The following diagram shows
a sample local folder on the left and a sample remote folder on the right.
login directory
(Shouldn't be Host
Directory in this case)
public_html
(Should be
Host Directory)
Assets
(Shouldn't be
Host Directory)
HTML
local site
(root folder)
Assets
HTML
no
yes
no
If the structure of your remote folder doesn’t match the structure of your local folder,
Dreamweaver uploads your files to the wrong place and the files might not be visible to site
visitors. Also, your image and link paths might be broken.
The remote root directory must exist before Dreamweaver can connect to it. If you don’t have a
root directory for your remote folder, create one or ask the server’s administrator to create one
for you.
Even if you intend to edit only part of the remote site, you must locally duplicate the entire
structure of the relevant branch of the remote site, from the remote site’s root folder down to the
files you want to edit.
60 Chapter 2: Setting Up a Dreamweaver Site
Page 61

For example, if your remote site’s root folder, named public_html, contains two folders, Project1
and Project2, and you want to work only on the HTML files in Project1, you don’t need to
download the files in Project2, but you must map your local root folder to public_html, not
to Project1.
REMOTE SITE
public_html
Project 1
Project 2
Assets
HTML
Assets
HTML
LOCAL SITE
local root folder
(map this to public_html, not to
Project1 or Project1/HTML)
Project 1
(must be present on local site;
corresponds to Project1 on remote site)
HTML
(must be present on local site;
corresponds to Project1/HTML
on remote site)
Related topics
• “About Dreamweaver sites” on page 59
• “Setting up a remote folder” on page 65
About Dreamweaver sites 61
Page 62

Setting up a new Dreamweaver site
After you plan your site structure, or if you already have an existing site, you should define a site
in Dreamweaver before you start developing. Setting up a Dreamweaver site is a way to organize
all of the documents associated with a website. For more information, see “About Dreamweaver
sites” on page 59.
Note: You can also edit files without setting up a Dreamweaver site. For more information, see
“Accessing sites, a server, and local drives” on page 80.
After you set up a Dreamweaver site, it’s a good idea to export the site so that you have a local
backup copy. For more information, see “Importing and exporting sites” on page 96.
To set up a Dreamweaver site:
1 Select Site > Manage Sites.
The Manage Sites dialog box appears.
Note: If you don’t have any Dreamweaver sites defined, then the Site Definition dialog box
appears and you can skip the next step.
2 Click the New button.
The Site Definition dialog box appears.
3 Do one of the following:
■ Click the Basic tab to use the Site Definition Wizard, which steps you through the
setup process.
Note: Users who are new to Dreamweaver are encouraged to use the Site Definition Wizard;
experienced Dreamweaver users might prefer to use the Advanced settings.
■ Click the Advanced tab to use the Advanced settings, which enable you to set up local,
remote, and testing folders individually, as necessary.
Note: To get started, you can set up a Dreamweaver site completely or you can just start with
the first step, setting up your local folder.
4 Complete the Dreamweaver site setup process:
■ For the Site Definition Wizard, answer the questions on each screen, then click Next to
advance through the setup process or click Back to return to a previous screen.
■ For Advanced settings, complete the Local Info category, the RemoteInfo category, and the
Testing Server category, as necessary (see “Using the Advanced settings to set up a
Dreamweaver site” on page 63).
Tip: After you set up a Dreamweaver site, it’s a good idea to export the site so that you have a local
backup copy. For more information, see “Importing and exporting sites” on page 96.
If you are setting up a Dreamweaver site for a web application, see Chapter 23, “Setting Up a Web
Application,” on page 453.
62 Chapter 2: Setting Up a Dreamweaver Site
Page 63

Using the Advanced settings to set up a Dreamweaver site
You can use the Advanced settings of the Site Definition dialog box to set up a Dreamweaver site.
The Advanced settings enable you to set up local, remote, and testing (for processing dynamic
pages) folders individually, as necessary. This method is recommended for users who have
experience with using Dreamweaver.
Note: To get started quickly, you can just start with the first step of setting up a Dreamweaver site,
setting up your local folder. Then, you can add remote and testing information later. You should at
least set up a local folder before you start using Dreamweaver.
If you are new to Dreamweaver, you can use the Site Definition Wizard, instead of the Advanced
settings, to guide you through the setup process. (See “Setting up a new Dreamweaver site”
on page 62.)
If you are setting up a Dreamweaver site for a web application, skip this section and see
Chapter 23, “Setting Up a Web Application,” on page 453.
Tip: After you set up a Dreamweaver site, it’s a good idea to export the site so that you have a local
backup copy. For more information, see “Importing and exporting sites” on page 96.
Related topics
• “About Dreamweaver sites” on page 59
• “Specifying where dynamic pages can be processed” on page 461
Setting up a local folder
The local folder is your working directory for your Dreamweaver site. This folder can be on your
local machine or it can be on a network server.
To set up a local folder:
1 Select Site > Manage Sites.
The Manage Sites dialog box appears.
Note: If you don’t have any Dreamweaver sites defined, then the Site Definition dialog box
appears and you can skip the next step.
2 Click New.
The Site Definition dialog box appears.
Using the Advanced settings to set up a Dreamweaver site 63
Page 64
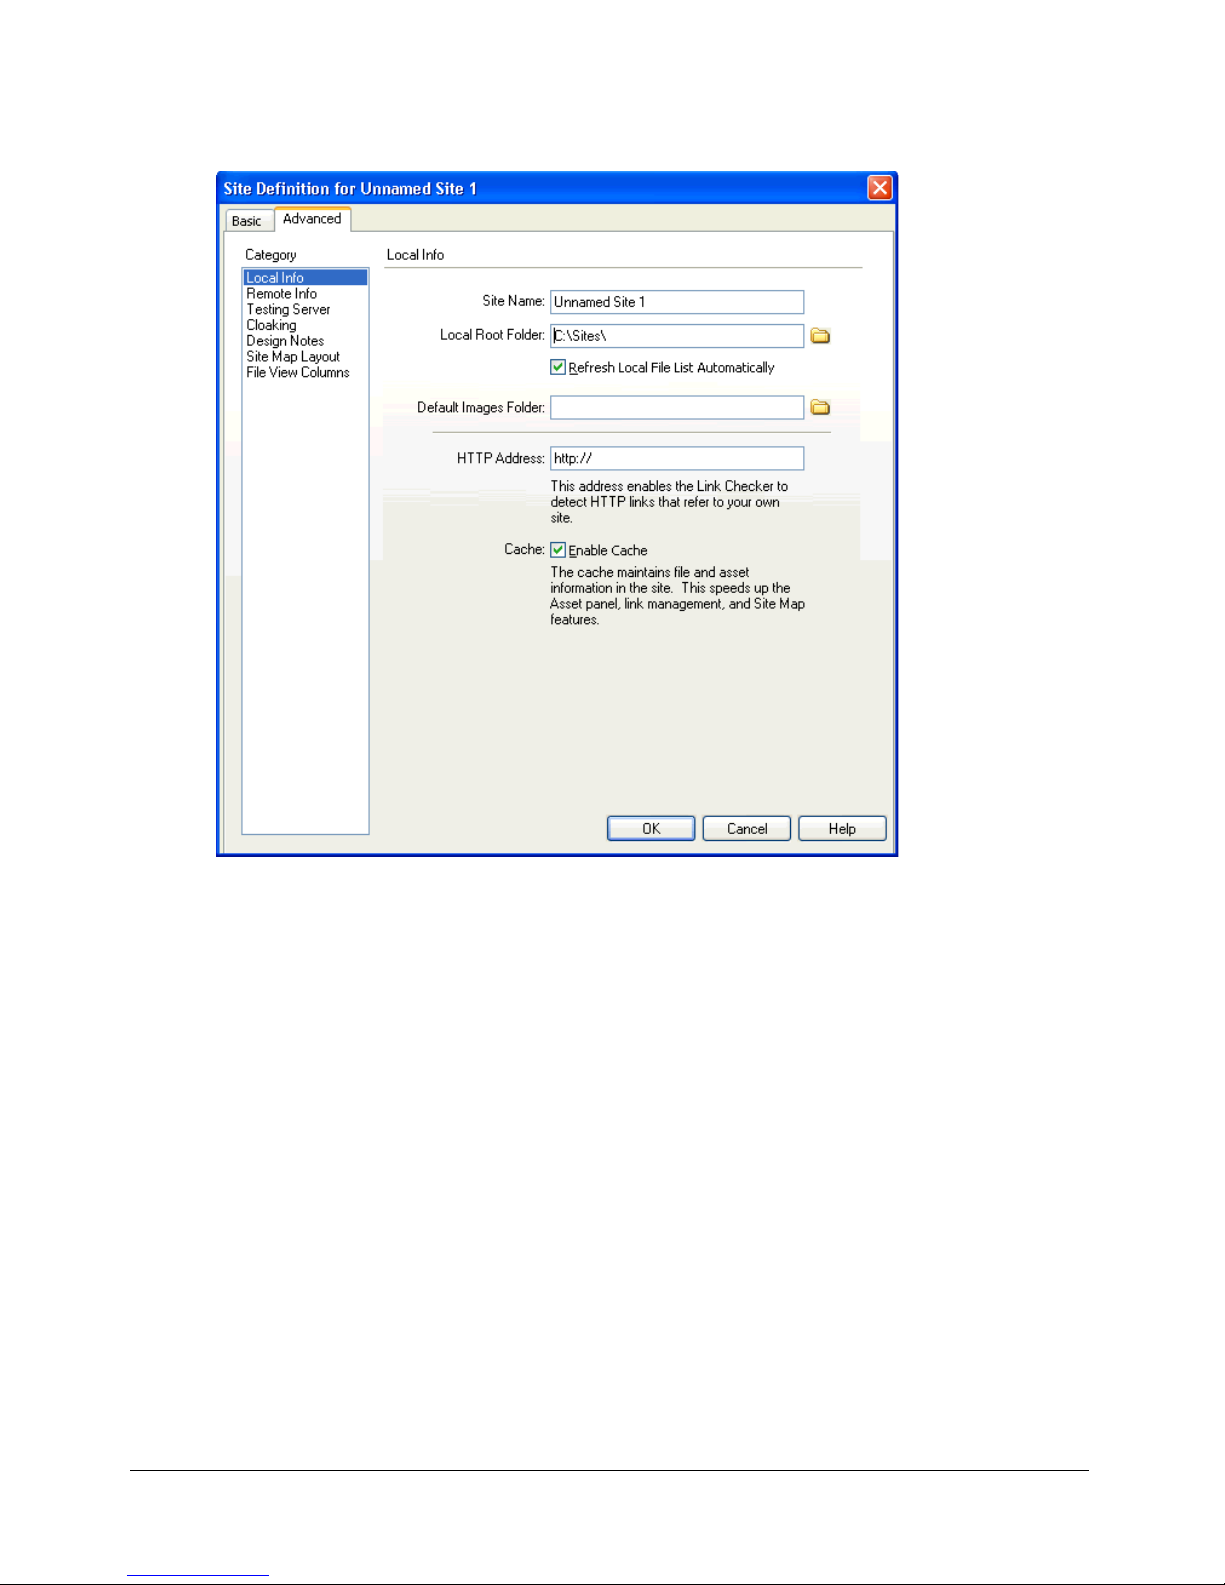
3 Click the Advanced button, if the Advanced settings aren’t showing.
The Advanced tab of the Site Definition dialog box displays the Local Info category options.
4 Enter the Local Info options.
For more information, click the Help button in the dialog box.
5 (Optional) If you are ready to set up your remote server now, skip the remaining step; select the
Remote Info category on the left, then complete the dialog box.
For more information, click the Help button in the dialog box.
6 Click OK.
Dreamweaver creates the initial site cache, and the new Dreamweaver site appears in the
Files panel.
After you set up a local folder, you might also add remote and testing folders (see “Setting up a
remote folder” on page 65 and “Specifying where dynamic pages can be processed” on page 461).
Related topics
• “About Dreamweaver sites” on page 59
• “Managing Your Files” on page 77
64 Chapter 2: Setting Up a Dreamweaver Site
Page 65

Setting up a remote folder
After you set up a local folder for a Dreamweaver site (see “Setting up a local folder” on page 63),
you can set up a remote folder. Depending on your development environment, the remote folder
is where you store files for testing, collaboration, production, deployment, or so on.
Note: You don’t need to specify a remote folder if the folder you specified as your local folder is the
same folder you created for your site files on the system running your web server. This implies the web
server is running on your local computer.
Determine how you will access the remote folder and note the connection information. This
section describes how to set up a remote folder and connect to it.
To set up a remote folder:
1 Select Site > Manage Sites.
The Manage Sites dialog box appears.
2 Select an existing Dreamweaver site.
If you have not defined any Dreamweaver sites, create a local folder before proceeding
(see “Setting up a local folder” on page 63).
3 Click Edit.
The Site Definition dialog box appears.
4 Click the Advanced button, if the Advanced settings aren’t showing.
5 Select Remote Info from the Category list on the left.
6 Select an Access option.
For more information, click the Help button in the dialog box.
7 Click OK.
Dreamweaver creates a connection to the remote folder. If you are developing a dynamic site,
you can add a Testing Server folder for processing dynamic pages (see “Specifying where
dynamic pages can be processed” on page 461).
To connect to a remote folder with FTP access:
• In the Files panel, click the Connects to Remote Host button in the toolbar.
If your site uses FTP with SSH to access your remote folder, when you try to connect to your
remote server, a command prompt starts for you to log in to the SSH server. Click OK in the
Dreamweaver dialog box after you log in.
Note: If you’re using network access for your remote folder, you do not need to connect to the
remote folder; you are always connected. Click the Refresh button to see your remote files.
To disconnect from a remote folder:
• In the Files panel, click the Disconnect button in the toolbar.
Related topics
• “About Dreamweaver sites” on page 59
• “Understanding local and remote folder structure” on page 60
• “Troubleshooting the remote folder setup” on page 66
Using the Advanced settings to set up a Dreamweaver site 65
Page 66

Troubleshooting the remote folder setup
A web server can be configured in a wide variety of ways. The following list provides information
on some common issues you may encounter in setting up a remote folder (see “Setting up a
remote folder” on page 65), and how to resolve them:
• The Dreamweaver FTP implementation may not work properly with certain proxy servers,
multilevel firewalls, and other forms of indirect server access.
If you encounter problems with FTP access, ask your local system administrator for help.
• For the Dreamweaver FTP implementation, you must connect to the remote system’s root
folder. (In many applications, you can connect to any remote directory, then navigate through
the remote file system to find the directory you want.)
Be sure that you indicate the remote system’s root folder as the host directory.
If you have problems connecting, and you’ve specified the host directory using a single slash
(/), you might need to specify a relative path from the directory you are connecting to and the
remote root folder.
For example, if the remote root folder is a higher level directory, you may need to specify a ../../
for the host directory.
• File and folder names that contain spaces and special characters often cause problems when
transferred to a remote site.
Use underscores in place of spaces, and avoid special characters in file and folder names
wherever possible. In particular, colons, slashes, periods, and apostrophes in file or folder
names can cause problems. Special characters in file or folder names may also sometimes
prevent Dreamweaver from creating a site map.
• If you encounter problems with long filenames, rename them with shorter names. On
Macintosh, filenames cannot be more than 31 characters long.
• Note that many servers use symbolic links (UNIX), shortcuts (Windows), or aliases
(Macintosh) to connect a folder on one part of the server’s disk with another folder elsewhere.
For example, the public_html subdirectory of your home directory on the server may really be
a link to another part of the server entirely. In most cases, such aliases have no effect on your
ability to connect to the appropriate folder or directory; however, if you can connect to one
part of the server but not another, there may be an alias discrepancy.
• If you encounter an error message such as “cannot put file,” your remote folder may be out of
space. For more detailed information, look at the FTP log.
Note: In general, when you encounter a problem with an FTP transfer, examine the FTP log by
selecting Window > Results (Windows) or Site > FTP Log (Macintosh), then clicking the FTP
Log tag.
66 Chapter 2: Setting Up a Dreamweaver Site
Page 67

Editing settings for a Dreamweaver site
Use the Site Definition Advanced settings to edit your Dreamweaver sites.
To edit settings for a Dreamweaver site, do one of the following:
• Select Site > Manage Sites, select a site in the Manage Sites dialog box, then click Edit.
• In the Files panel, select Manage Sites from the pop-up menu where the current site, server, or
drive appears; select a site in the Manage Sites dialog box, then click Edit.
Related topics
• “Setting up a new Dreamweaver site” on page 62
Editing existing websites in Dreamweaver
You can use Dreamweaver to edit existing sites, even if you didn’t use Dreamweaver to create
the original site. You can edit existing sites that are on your local system or sites that are on a
remote system.
Editing an existing local website in Dreamweaver
You can use Dreamweaver to edit an existing website on your local disk, even if you didn’t use
Dreamweaver to create the original site.
Note: This section sets up a Dreamweaver site to edit an existing local website. You can also edit the
existing site without creating a Dreamweaver site. For more information, see “Accessing sites, a
server, and local drives” on page 80.
To edit an existing local website:
1 Select Site > Manage Sites.
The Manage Sites dialog box appears.
2 Click New.
The Site Definition dialog box appears.
3 Click the Advanced button, if the Advanced settings aren’t showing.
The Advanced tab of the Site Definition dialog box displays the Local Info category options.
4 Complete the dialog box.
For more information, click the Help button in the dialog box.
5 Click OK.
Editing existing websites in Dreamweaver 67
Page 68

Editing an existing remote website in Dreamweaver
You can use Dreamweaver to copy an existing remote site (or any branch of a remote site) to your
local disk and edit it there, even if you didn’t use Dreamweaver to create the original site.
Note: This section sets up a Dreamweaver site to edit an existing remote website. You can also edit
the existing site without creating a Dreamweaver site. For more information, see “Accessing sites, a
server, and local drives” on page 80.
To edit an existing remote site:
1 Create a local folder to contain the existing site, then set it up as the local folder for the site (see
“Setting up a local folder” on page 63).
Note: You must locally duplicate the entire structure of the relevant branch of the existing remote
site. For more information, see “Understanding local and remote folder structure” on page 60.
2 Set up a remote folder (see “Setting up a remote folder” on page 65), using information about
your existing site.
Make sure to choose the correct root folder for the remote site.
3 In the Files panel (Window > Files), click the Connects to Remote Host button (for FTP access)
or the Refresh button (for network access) in the toolbar to view the remote site.
4 Depending on how much of the remote site you want to edit, do one of the following:
■ If you want to work with the entire site, select the root folder of the remote site in the Files
panel, then click Get in the toolbar to download the entire site to your local disk.
■ If you want to work with just one of the files or folders of the site, locate the file or folder in
the Remote view of the Files panel, then click Get in the toolbar to download that file to
your local disk.
Dreamweaver automatically duplicates as much of the remote site’s structure as is necessary to
place the downloaded file in the correct part of the site hierarchy. When editing only one part
of a site, you should generally choose to include dependent files.
5 Use Dreamweaver to work on your site.
Related topics
• “Editing an existing local website in Dreamweaver” on page 67
68 Chapter 2: Setting Up a Dreamweaver Site
Page 69

CHAPTER 3
Creating and Opening Documents
Macromedia Dreamweaver MX 2004 offers a flexible environment for working with a variety of
web design and development documents. In addition to HTML documents, you can create and
open a variety of text-based documents, including CFML, ASP, JavaScript, and CSS.
Dreamweaver also supports source code files, such as Visual Basic, .NET, C#, and Java.
Dreamweaver provides several options for creating a new document. You can create any of
the following:
• A new blank document or template
• A document based on one of the predesigned page layouts included with Dreamweaver
• A document based on one of your existing templates
Other document options are also available. For example, if you typically work with one type of
document, you can set it as the default document type for new pages you create.
In Dreamweaver, you can easily define document properties, such as meta tags, document title,
and background colors, and several other page properties in either the Design view or Code view.
This chapter contains the following sections:
• “Creating new documents” on page 70
• “Saving a new document” on page 72
• “Setting a default new document type” on page 72
• “Opening existing documents” on page 73
• “Importing a Microsoft Word HTML file” on page 74
69
Page 70

Creating new documents
Dreamweaver provides you with several choices for selecting a new document to work in. You can
create a new document in the following ways:
• Start with a blank document (see “Creating a new blank document” on page 70).
• Create a blank document or template based on a Dreamweaver design file (see “Creating a
document based on a Dreamweaver design file” on page 70).
• Use a template that defines how a document looks, and sets which parts of a document can be
edited (see “Creating a document based on an existing template” on page 71).
Tip: If you typically work with a specific document type, you can set a default document and
automatically open a new document based on the default document you’ve defined. For information,
see “Setting a default new document type” on page 72.
Creating a new blank document
You can select the type of blank document you want to create.
To create a new blank document:
1 Select File > New.
The New Document dialog box appears. The General tab is already selected.
2 From the Category list, select Basic Page, Dynamic Page, Template Page, Other, or Framesets;
then, from the list on the right, select the type of document you want to create.
For example, select Basic Page to create an HTML document, or select Dynamic page to create
a ColdFusion or ASP document, and so on.
For more information about options in this dialog box, click the Help button in the
dialog box.
3 Click the Create button.
The new document opens in the Document window.
4 Save the document (see “Saving a new document” on page 72).
Related topics
• “Creating a document based on an existing template” on page 71
Creating a document based on a Dreamweaver design file
Dreamweaver comes with several professionally developed page layout and design element files.
You can use these design files as starting points for designing pages in your sites. When you create
a document based on a design file, Dreamweaver creates a copy of the file.
Note: If you create a document based on a predefined frameset only the frameset structure is copied,
not the frame contents; additionally, you will have to save each frame file separately. For information
about saving frames, see “Saving frame and frameset files” on page 209.
70 Chapter 3: Creating and Opening Documents
Page 71

To create a new document from a Dreamweaver design file:
1 Select File > New.
The New Document dialog box appears. The General tab is already selected.
2 In the Category list, select CSS Style Sheets, Table Based Layouts, Page Designs (CSS), Page
Designs, or Page Designs (Accessible); then select a design file from the list on the right.
You can preview a design file and read a brief description of a document’s design elements.
For more information about options in this dialog box, click the Help button in the
dialog box.
3 Click the Create button.
The new document opens in the Document window. If you selected a CSS style sheet, the CSS
document appears in the Document window and the CSS Style Sheet opens in Code view.
4 Save the document (see “Saving a new document” on page 72).
If the file contains links to asset files, the Copy Dependent Files dialog box appears for you to
save a copy of the dependent files.
5 If the Copy Dependent Files dialog box appears, set options, then click Copy to copy the assets
to the selected folder.
You can choose your own location for the dependent files or use the default folder location
Dreamweaver generates (based on the design file’s source name).
Related topics
• “Creating a new blank document” on page 70
Creating a document based on an existing template
You can select, preview, and create a new document from an existing template. You can use the
New Document dialog box to select a template from any of your Dreamweaver-defined sites or
you can use the Assets panel to create a new document from an existing template.
For information about creating templates, see “Creating a Dreamweaver template” on page 226.
Tip: If you don’t have any templates in your site, you can save a document in one of the design file
categories of the New Document dialog box as a template, then create pages based on that
template. For information about saving a design file as a template, see “Creating a document based
on a Dreamweaver design file” on page 70.
To create a new document based on a template:
1 Select File > New.
The New Document dialog box opens.
2 Click the Templates tab.
3 In the Templates For list, select the Dreamweaver site that contains the template you want use,
then select a template from the list on the right.
For more information about options in this dialog box, click the Help button in the
dialog box.
4 Click Create.
The new document opens in the Document window.
5 Save the document (see “Saving a new document” on page 72).
Creating new documents 71
Page 72

To create a new document from a template in the Assets panel:
1 Open the Assets panel (Window > Assets), if it is not already open.
2 In the Assets panel, click the Templates icon on the left to view the list of templates in your
current site.
Tip: If you just created the template you want to apply, you might need to click the Refresh button
to see it.
3 Right-click (Windows) or Control-click (Macintosh) the template you want to apply, then
select New From Template.
The document opens in the Document window.
Related topics
• “Creating a new blank document” on page 70
• “Creating a document based on a Dreamweaver design file” on page 70
Saving a new document
When you create a new document, you need to save it.
To save a new document:
1 Select File > Save.
2 In the dialog box that appears, navigate to the folder where you want to save the file.
Tip: It’s a good idea to save your file in a Dreamweaver site. For more information, see “Setting up
a new Dreamweaver site” on page 62.
3 In the File Name text box, type a name for the file.
Avoid using spaces and special characters in file and folder names and do not begin a filename
with a numeral. In particular, do not use special characters (such as é, ç, or ¥) or punctuation
(such as colons, slashes, or periods) in the names of files you intend to put on a remote server;
many servers change these characters during upload, which will cause any links to the files
to break.
4 Click Save.
Setting a default new document type
You can define which document type Dreamweaver uses as a default document for a site.
For example, if most pages in your site will be a specific file type (such as Cold Fusion, HTML, or
ASP documents), you can set document preferences that automatically create new documents of
the specified file type.
To set a default new document type and preferences:
1 Select Edit > Preferences (Windows) or Dreamweaver > Preferences (Macintosh).
The Preferences dialog box appears.
Tip: You can also click the Preferences button in the New Document dialog box to set new
document preferences when you create a new document (see “Creating a new blank document”
on page 70).
2 Click New Document from the category list on the left.
72 Chapter 3: Creating and Opening Documents
Page 73

3 Set or change preferences as necessary.
For more information on options in the dialog box, click the Help button.
4 Click OK.
Dreamweaver saves your preferences.
Opening existing documents
In Dreamweaver, you can open an existing web page or text-based document, even if it wasn’t
created in Dreamweaver. You can open the document and use Dreamweaver to edit it in either
Design view or Code view.
If the document you open is a Microsoft Word file that was saved as HTML, you should use the
Cleanup Word HTML command to remove the extraneous markup tags Word inserts into
HTML files.
Tip: Instead of using the procedure described in this section to open a Microsoft Word files which
was saved as HTML, you may want to import the document into Dreamweaver (see “Importing a
Microsoft Word HTML file” on page 74) so that Dreamweaver automatically prompts you to clean up
the file.
You can also open non-HTML text files, such as JavaScript files, XML files, CSS Style Sheets, or
text files saved by word processors or text editors.
To open an existing file:
1 Select File > Open.
The Open dialog box appears.
Tip: You can also use the Files panel to open files. For more information, see “Working with files in
the Files panel” on page 87.
2 Navigate to and select the file you want to open.
Note: If you haven’t already done so, it’s a good idea to organize files you plan to open and edit in a
Dreamweaver site, instead of opening them from another location. For information about setting
up a Dreamweaver site, see “Setting up a new Dreamweaver site” on page 62.
3 Click Open.
The document opens in the Document window.
JavaScript, text, and CSS Style Sheets open in Code view by default. You can update the
document while working in Dreamweaver, then save the changes in the file. For information
about setting an external text editor for viewing these types of files, see “Starting an external
editor for media files” on page 359.
4 If you opened a Microsoft Word document, select Commands > Clean Up Word HTML,
deselect options in the dialog box if you want, and then click OK.
There might be a slight delay while Dreamweaver attempts to determine which version of
Word was used to save the file. If Dreamweaver is unable to determine this, select the correct
version using the pop-up menu.
For more information about options in the Clean Up Word HTML dialog box, click the
Help button.
Dreamweaver applies the cleanup settings to the new document and a log of the changes
appears (unless you deselected that option in the dialog box).
Opening existing documents 73
Page 74

Importing a Microsoft Word HTML file
In Dreamweaver, you can import documents saved by Microsoft Word as HTML files, then use
the Clean Up Word HTML command to remove the extraneous HTML code generated by
Word. The Clean Up Word HTML command is available for documents saved as HTML files by
Word 97 or later.
The code that Dreamweaver removes is primarily used by Word to format and display documents
in Word and is not needed to display the HTML file. Retain a copy of your original Word (.doc)
file as a backup, because you may not be able to reopen the HTML document in Word once
you’ve applied the Clean Up Word HTML feature.
To clean up HTML or XHTML that was not generated by Microsoft Word, see “Cleaning up
your code” on page 433.
To import and clean up a Microsoft Word HTML file:
1 If you haven’t already, in Microsoft Word, save your document as an HTML file.
2 In Dreamweaver, select File > Import > Word Document.
The Open dialog box opens.
3 Navigate to and select the Word HTML file you want to open.
The document opens and the Clean Up Word HTML dialog box appears.
There may be a slight delay while Dreamweaver attempts to determine which version of Word
was used to save the file. If Dreamweaver is unable to determine this, select the correct version
using the pop-up menu.
4 Deselect options in the dialog box if you want.
For more information about options in the dialog box, click the Help button.
5 Click OK.
Dreamweaver applies the clean up settings to the new document and a log of the changes
appears (unless you deselected that option in the dialog box).
Related topics
• “Copying and pasting text from MS Office documents” on page 281
74 Chapter 3: Creating and Opening Documents
Page 75

PART II
Working with Dreamweaver Sites
Learn how to manage Macromedia Dreamweaver MX 2004 sites and site-specific assets.
This part contains the following chapters:
Chapter 4, “Managing Your Files,” on page 77
Chapter 5, “Managing Site Assets and Libraries,” on page 115
Chapter 6, “Managing Contribute Sites with Dreamweaver,” on page 133
PART II
Page 76

Page 77

CHAPTER 4
Managing Your Files
Macromedia Dreamweaver MX 2004 helps you organize and manage your files.
Dreamweaver includes a number of features for managing files and transferring files to and from a
remote server. When you transfer files between local and remote sites, Dreamweaver maintains
parallel file and folder structures between the sites. When transferring files between sites,
Dreamweaver automatically creates necessary folders when they do not yet exist in a site. You can
also synchronize the files between your local and remote sites; Dreamweaver copies files in both
directions as necessary and removes unwanted files when appropriate.
Dreamweaver contains features to make collaborative work on a website easier. You can check files
in and out of a remote server so that other members of a web team can see who is working on a
file. You can add Design Notes to your files to share information with team members about a file’s
status, priority, and so on. You can also use the Workflow Reports feature to run reports on your
site to display information on the check-in/check-out status, and to search for Design Notes
attached to files.
This chapter contains the following sections:
• “About site management” on page 78
• “Accessing sites, a server, and local drives” on page 80
• “Viewing files and folders” on page 83
• “Managing files and folders in the Files panel” on page 86
• “Working with a visual map of your site” on page 89
• “Importing and exporting sites” on page 96
• “Removing a Dreamweaver site from your list of sites” on page 97
• “Checking in and checking out files” on page 97
• “Getting and putting files to and from your server” on page 101
• “Synchronizing the files on your local and remote sites” on page 103
• “Cloaking folders and files in your site” on page 104
• “Storing file information in Design Notes” on page 108
• “Testing your site” on page 111
77
Page 78

About site management
Dreamweaver includes a number of features for managing a site and transferring files to and from
a remote server. Dreamweaver also contains features to make collaborative work on a website
easier, such as Check In/Check Out and Design Notes.
The Check In/Check Out system
If you’re working in a collaborative environment, you can check files in and out from local and
remote servers.
Note: You can use Get and Put functionality with a testing server, but you cannot use the Check In/
Check Out system with a testing server. For more information about using Get and Put, see “Getting
and putting files to and from your server” on page 101.
Checking out a file is the equivalent of declaring “I’m working on this file now—don’t touch it!”
When a file is checked out, Dreamweaver displays the name of the person who checked out the
file in the Files panel, along with a red check mark (if a team member checked out the file) or
green check mark (if you checked out the file) next to the file’s icon.
Checking in a file makes the file available for other team members to check out and edit. When
you check in a file after editing it, your local version becomes read-only and a lock symbol appears
beside the file in the Files panel to prevent you from making changes to the file.
Dreamweaver does not make checked-out files read-only on the remote server. If you transfer files
with an application other than Dreamweaver, you can overwrite checked-out files. However, in
applications other than Dreamweaver, the .lck file is visible next to the checked-out file in the file
hierarchy to help prevent such accidents.
Related topics
• “Setting up the Check In/Check Out system” on page 98
• “Checking files into and out of a remote folder” on page 99
Site cloaking
Site cloaking enables you to exclude folders and file types from operations such as Get or Put. You
can cloak individual folders, but not individual files. To cloak files, you must select a file type and
Dreamweaver cloaks all files of that type. Dreamweaver remembers your settings for each site, so
you don’t have to make selections each time you work on that site.
For example, if you’re working on a large site and don’t want to upload your multimedia files each
day, you can use site cloaking to cloak your multimedia folder, and the system excludes files in
that folder from site operations you perform.
You can cloak folders and file types on the remote or local site. Cloaking excludes cloaked folders
and files from the following operations:
• Performing Put, Get, Check In, and Check Out operations
• Generating reports
• Finding newer local and newer remote files
• Performing sitewide operations, such as checking and changing links
• Synchronizing
78 Chapter 4: Managing Your Files
Page 79

• Working with Asset panel contents
• Updating templates and libraries
Note: Dreamweaver excludes cloaked templates and library items from Get and Put operations only.
Dreamweaver does not exclude these items from batch operations, because it might cause them to
become out of sync with their instances.
Related topics
• “Cloaking folders and files in your site” on page 104
Design Notes
Design Notes are notes that you create for a file. The Design Notes are associated with the file
they describe, but stored in a separate file. You can see which files have Design Notes attached in
the expanded Files panel: a Design Notes icon appears in the Notes column.
You can use Design Notes to keep track of extra file information associated with your documents,
such as image source-filenames and comments on file status. For example, if you copy a
document from one site to another, you can add Design Notes for that document, with the
comment that the original document is in the other site folder.
You can also use Design Notes to keep track of sensitive information that you can’t put inside a
document for security reasons, such as notes on how a particular price or configuration was
chosen, or what marketing factors influenced a design decision.
If you open a file in Macromedia Fireworks or Flash and export it to another format, Fireworks
and Flash automatically save the name of the original source file in a Design Notes file. For
example, if you open myhouse.png in Fireworks and export it to myhouse.gif, Fireworks creates a
Design Notes file called myhouse.gif.mno. This Design Notes file contains the name of the
original file, as an absolute
file: URL. So, the Design Notes for myhouse.gif might contain the
following line:
fw_source="file:///Mydisk/sites/assets/orig/myhouse.png"
A similar Flash Design Note might contain the following line:
fl_source="file:///Mydisk/sites/assets/orig/myhouse.fla"
Note: To share Design Notes, users should define the same site-root path (for example,
sites/assets/orig).
When you import the graphic into Dreamweaver, the Design Notes file is automatically copied
into your site along with the graphic. When you select the image in Dreamweaver and choose to
edit it using Fireworks (see “Starting an external editor for media files” on page 359), Fireworks
opens the original file for editing.
Related topics
• “Enabling and disabling Design Notes for a site” on page 108
• “Associating Design Notes with files” on page 109
About site management 79
Page 80
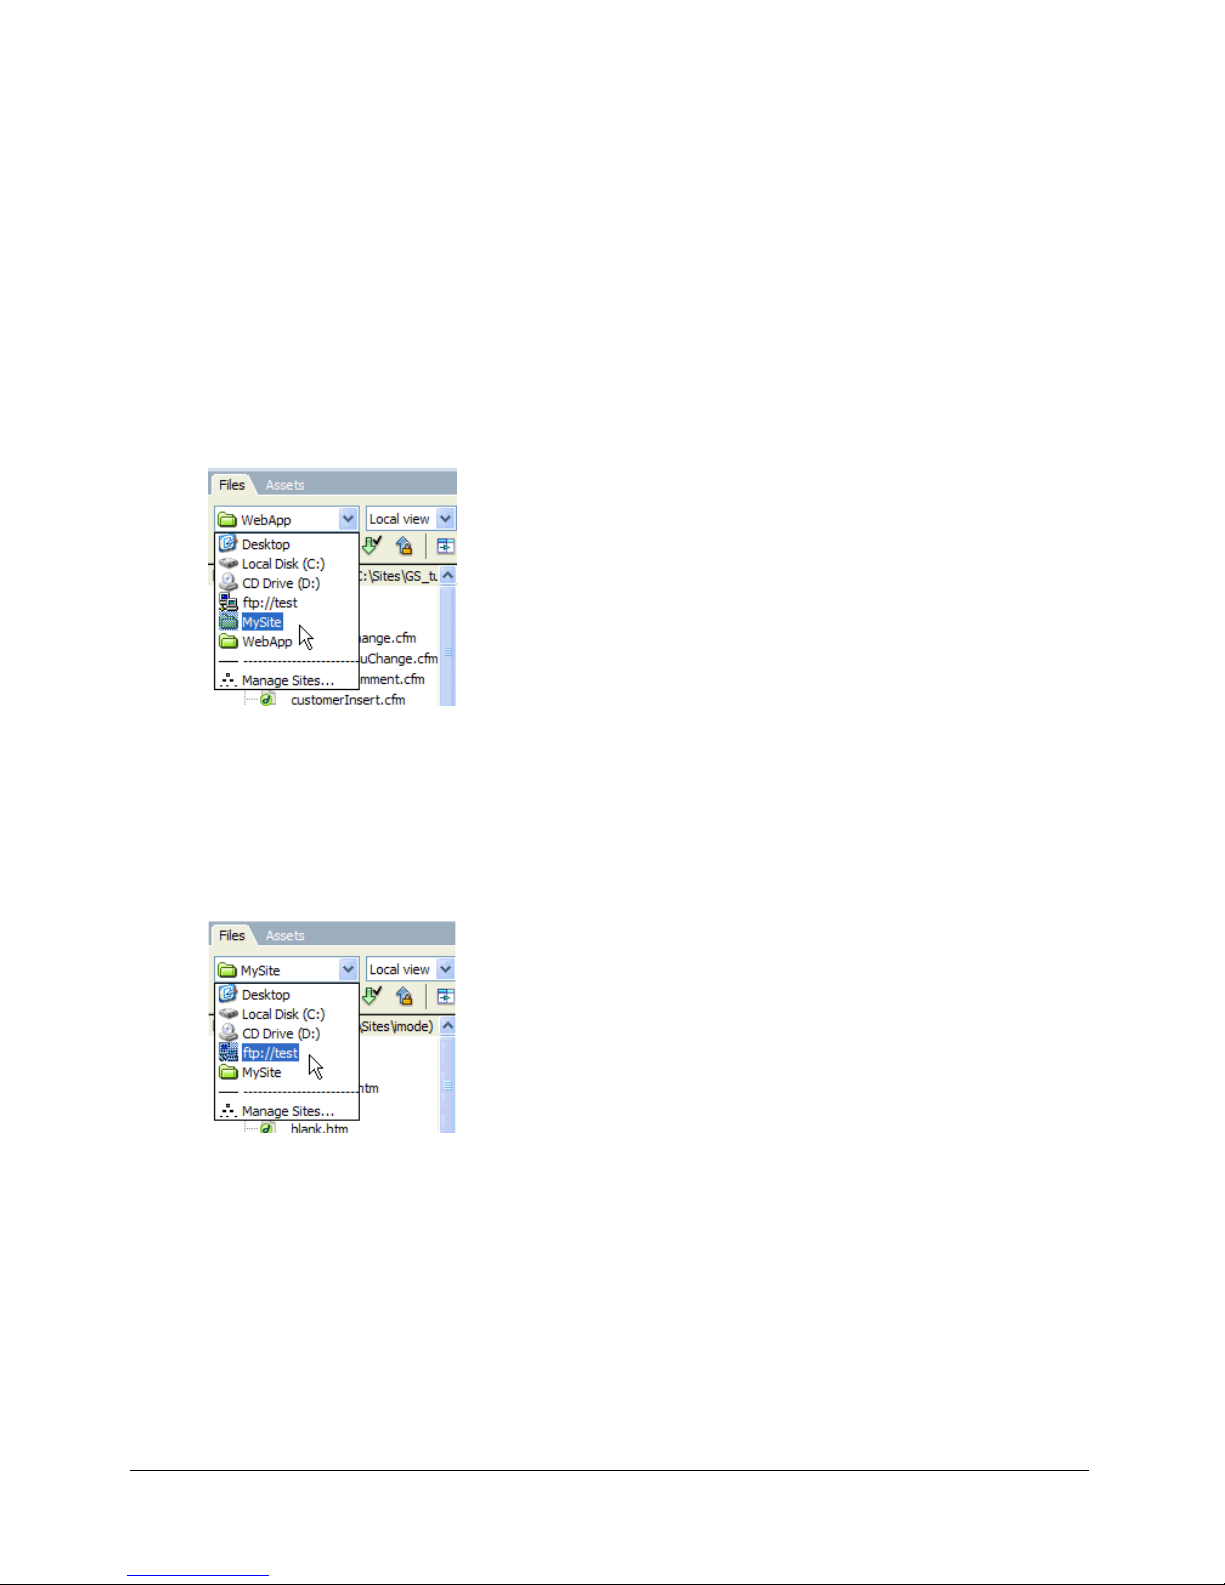
Accessing sites, a server, and local drives
You can access, modify, and save files and folders in your Dreamweaver sites, as well as files and
folders that are not part of a Dreamweaver site. In addition to Dreamweaver sites, you can access
a server, a local drive, or your desktop.
Before you can access a remote server, you must set up Dreamweaver to work with that server
(see “Setting up Dreamweaver to work without defining a site” on page 82).
Note: The best way to manage your files is to create a Dreamweaver site (see “Setting up a new
Dreamweaver site” on page 62).
To open an existing Dreamweaver site:
• In the Files panel (Window > Files), select a site from the pop-up menu (where the current site,
server, or drive appears).
For information about changing your site view (for example, to view the remote folder), see
“Viewing files and folders” on page 83. For information about opening files in your site, see
“Working with files in the Files panel” on page 87.
To open a folder on a remote FTP or RDS server:
1 In the Files panel (Window > Files), select a server name from the pop-up menu (where the
current site, server, or drive appears).
Note: Server names appear for servers you’ve configured Dreamweaver to work with. If you have
not configured a server yet, see “Setting up Dreamweaver to work without defining a site”
on page 82.
2 Navigate to and edit files as you normally do.
For more information, see “Working with files in the Files panel” on page 87.
80 Chapter 4: Managing Your Files
Page 81
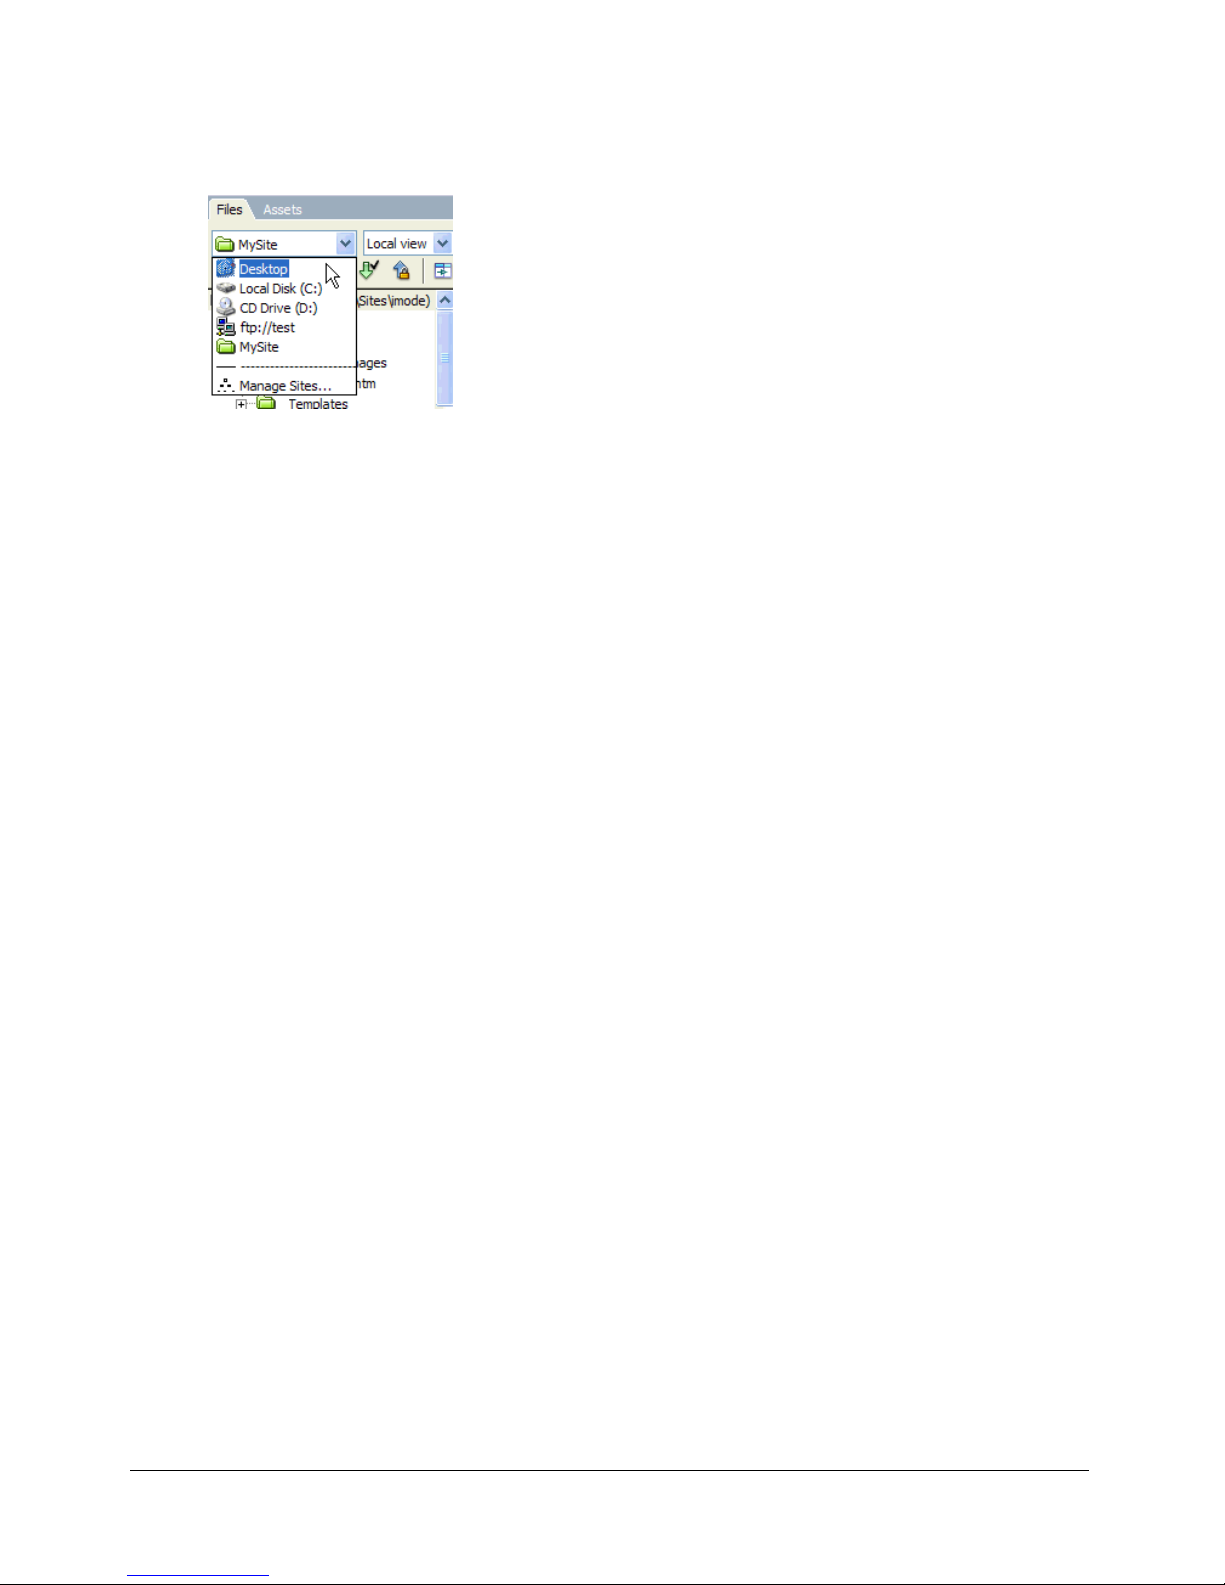
To access a local drive or your desktop:
1 In the Files panel (Window > Files), select Desktop, Local Disk, or CD Drive from the pop-up
menu (where the current site, server, or drive appears).
2 Navigate to a file, then do any of the following:
■ Open files in Dreamweaver or another application
■ Rename files
■ Copy files
■ Delete files
■ Drag files
When you drag a file from one Dreamweaver site to another or to a folder that is not part of
a Dreamweaver site, Dreamweaver copies the file to the location where you drop it. If you
drag a file within the same Dreamweaver site, Dreamweaver moves the file to the location
where you drop it. If you drag a file that is not part of a Dreamweaver site to a folder that is
not part of a Dreamweaver site, Dreamweaver moves the file to the location where you
drop it.
Note: To move a file that Dreamweaver copies by default, hold down the Shift key (Windows)
or the Command key (Macintosh) while you drag. To copy a file that Dreamweaver moves by
default, hold the Control key (Windows) or the Option key (Macintosh) while you drag.
Related topics
• “Managing files and folders in the Files panel” on page 86
Accessing sites, a server, and local drives 81
Page 82

Setting up Dreamweaver to work without defining a site
Dreamweaver enables you to connect to an FTP or RDS server to work on your documents
without creating a Dreamweaver site.
Note: If you work on files without creating a Dreamweaver site, you will not be able to perform
sitewide operations, such as link checking. To set up a Dreamweaver site, see “Setting up a new
Dreamweaver site” on page 62.
To set up Dreamweaver to work with a server from the Document window:
1 Select Site > Manage Sites.
The Manage Sites dialog box appears.
2 Click New, then select FTP & RDS Servers.
The Configure Server dialog box appears.
3 Complete the dialog box.
For more information, click the Help button in the dialog box.
Note: You only need to complete this dialog box once for each server you want to connect to.
4 Click OK.
The Files panel displays the contents of the remote server folder you connected to, and the
server name appears in the pop-up menu at the top of the panel.
To set up Dreamweaver to work with a server using the Files panel:
1 In the Files panel (Window > Files), select Desktop from the pop-up menu (where the current
site, server, or drive appears).
2 Right-click (Windows) or Control-click (Macintosh) the FTP and RDS Servers node in the
Files panel, then select Add FTP Server or Add RDS Server.
The Configure Server dialog box appears.
82 Chapter 4: Managing Your Files
Page 83

3 Complete the dialog box.
For more information, click the Help button in the dialog box.
Note: You only need to complete this dialog box once for each server you want to connect to.
4 Click OK.
The Files panel displays the contents of the remote server folder you connected to, and the
server name appears in the pop-up menu at the top of the panel.
Note: For large folders, it might take a few moments for the Files panel to display the folder.
Related topics
• “Accessing sites, a server, and local drives” on page 80
Viewing files and folders
You can view files and folders in the Files panel, whether they are associated with a Dreamweaver
site or not. When you view sites, files, or folders in the Files panel, you can change the size of the
viewing area, and, for Dreamweaver sites, you can expand or collapse the Files panel.
For Dreamweaver sites, you can also customize the Files panel by changing the view—either your
local or remote site—that appears by default in the collapsed panel. Or, you can switch the
content views in the expanded Files panel using the Always Show option (see “Setting preferences
for the Files panel” on page 86).
To open or close the Files panel:
• Select Window > Files.
To change the size of the view area in the expanded Files panel:
• In the Files panel (Window > Files), with the panel expanded, do one of the following:
■ Drag the bar that separates the two views to increase or decrease the view area of the right
or left pane.
■ Use the scroll bars at the bottom of the Files panel to scroll through the views’ contents.
■ In the site map, drag the arrow above a file to change the space between files.
To expand or collapse the Files panel (Dreamweaver sites only):
• In the Files panel (Window > Files), click the Expand/Collapse button in the toolbar.
Note: If you click the Expand/Collapse button to expand the panel while it is docked, the panel
maximizes so that you cannot work in the Document window. To return to the Document window,
click the Expand/Collapse button again to collapse the panel. If you click the Expand/Collapse
button to expand the panel while it is not docked, you can still work in the Document window.
Before you can dock the panel again, you must first collapse it.
When the Files panel is collapsed it displays the contents of the local site, the remote site, or the
testing server as a list of files. When expanded, it displays the local site and either the remote site
or testing server. The Files panel can also display a visual site map of the local site.
Viewing files and folders 83
Page 84
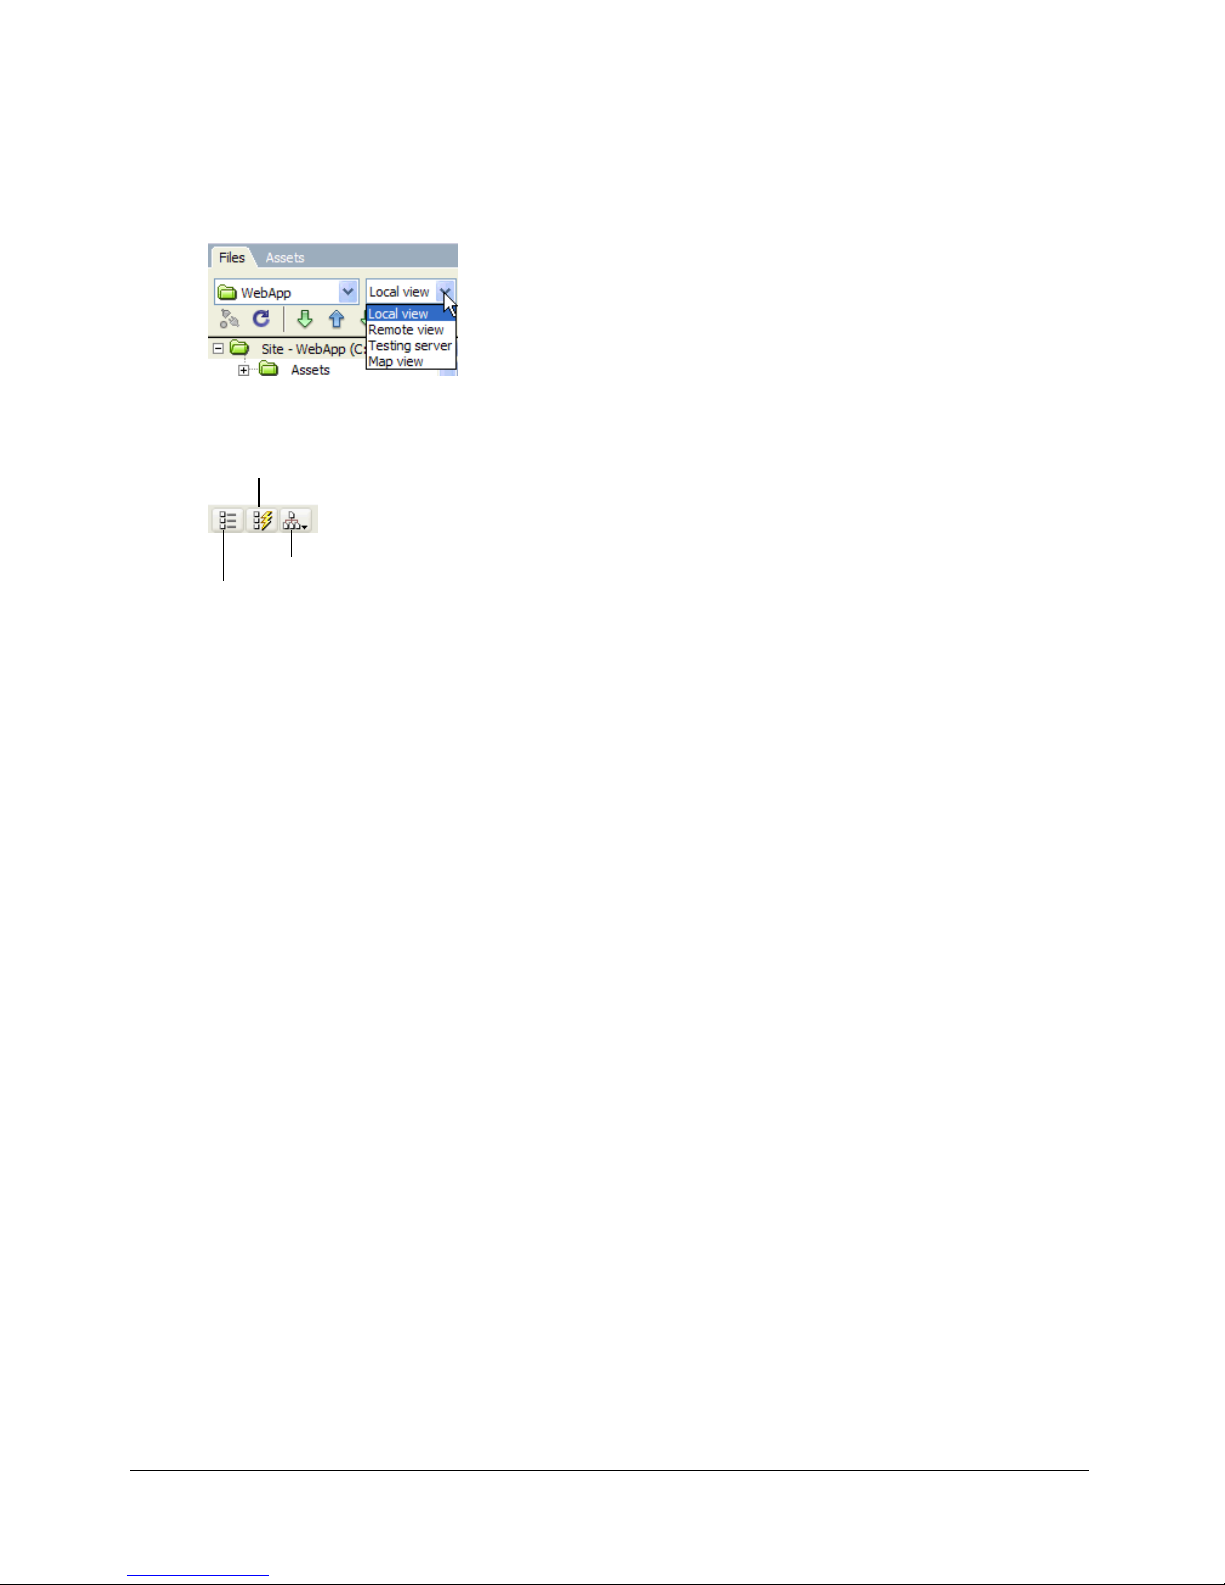
To change the site view in Files panel, do one of the following (Dreamweaver sites only):
• In the collapsed Files panel (Window > Files), select Local View, Remote View, Testing Server,
or Map View from the Site View pop-up menu.
Note: Local View appears in the pop-up menu by default.
• In the expanded Files panel (Window > Files), click the Site Files button (for the remote site),
Testing Server button, or Site Map button in the toolbar.
Testing Server
Site Map
Site Files
If you click the Site Map button, you can choose to view the site map with site files or to view
the site map only. For more information, see “Viewing a site map” on page 90.
Note: Before you can view a remote site or a testing server, you must set up a remote site or testing
server (see “Setting up a remote folder” on page 65 or “Specifying where dynamic pages can be
processed” on page 461). Before you can view a site map, you must set up a home page (see
“Viewing a site map” on page 90).
Related topics
• “Accessing sites, a server, and local drives” on page 80
• “Managing files and folders in the Files panel” on page 86
Customizing the file and folder details displayed in the expanded Files panel
When you view a Dreamweaver site in the expanded Files panel (see “Viewing files and folders”
on page 83), Dreamweaver displays information about the files and folders in columns. For
example, you can see the file type or the date a file was modified.
You can customize the columns by doing any of the following (some operations are only available
for columns you add, not default columns):
• Reorder or realign columns
• Add new columns (for a maximum of 10 columns)
• Hide columns (except the filename column)
• Designate columns to be shared with all users connected to a site
• Delete columns (custom columns only)
• Rename columns (custom columns only)
• Associate with a Design Note (custom columns only)
84 Chapter 4: Managing Your Files
Page 85

To sort by any detail column in the Files panel:
• Click the heading for the column you want to sort.
Tip: Click the heading again to reverse the order (ascending or descending) by which
Dreamweaver sorts the column.
To add, delete, or change detail columns:
1 Select Site > Manage Sites.
The Manage Sites dialog box appears.
2 Select a site, then click Edit.
The Site Definition dialog box appears.
3 Select File View Columns from the category list on the left.
The Site Definition dialog box displays the File View Columns options.
4 Complete the dialog box.
For more information, click the Help button in the dialog box.
5 Click OK.
Viewing files and folders 85
Page 86
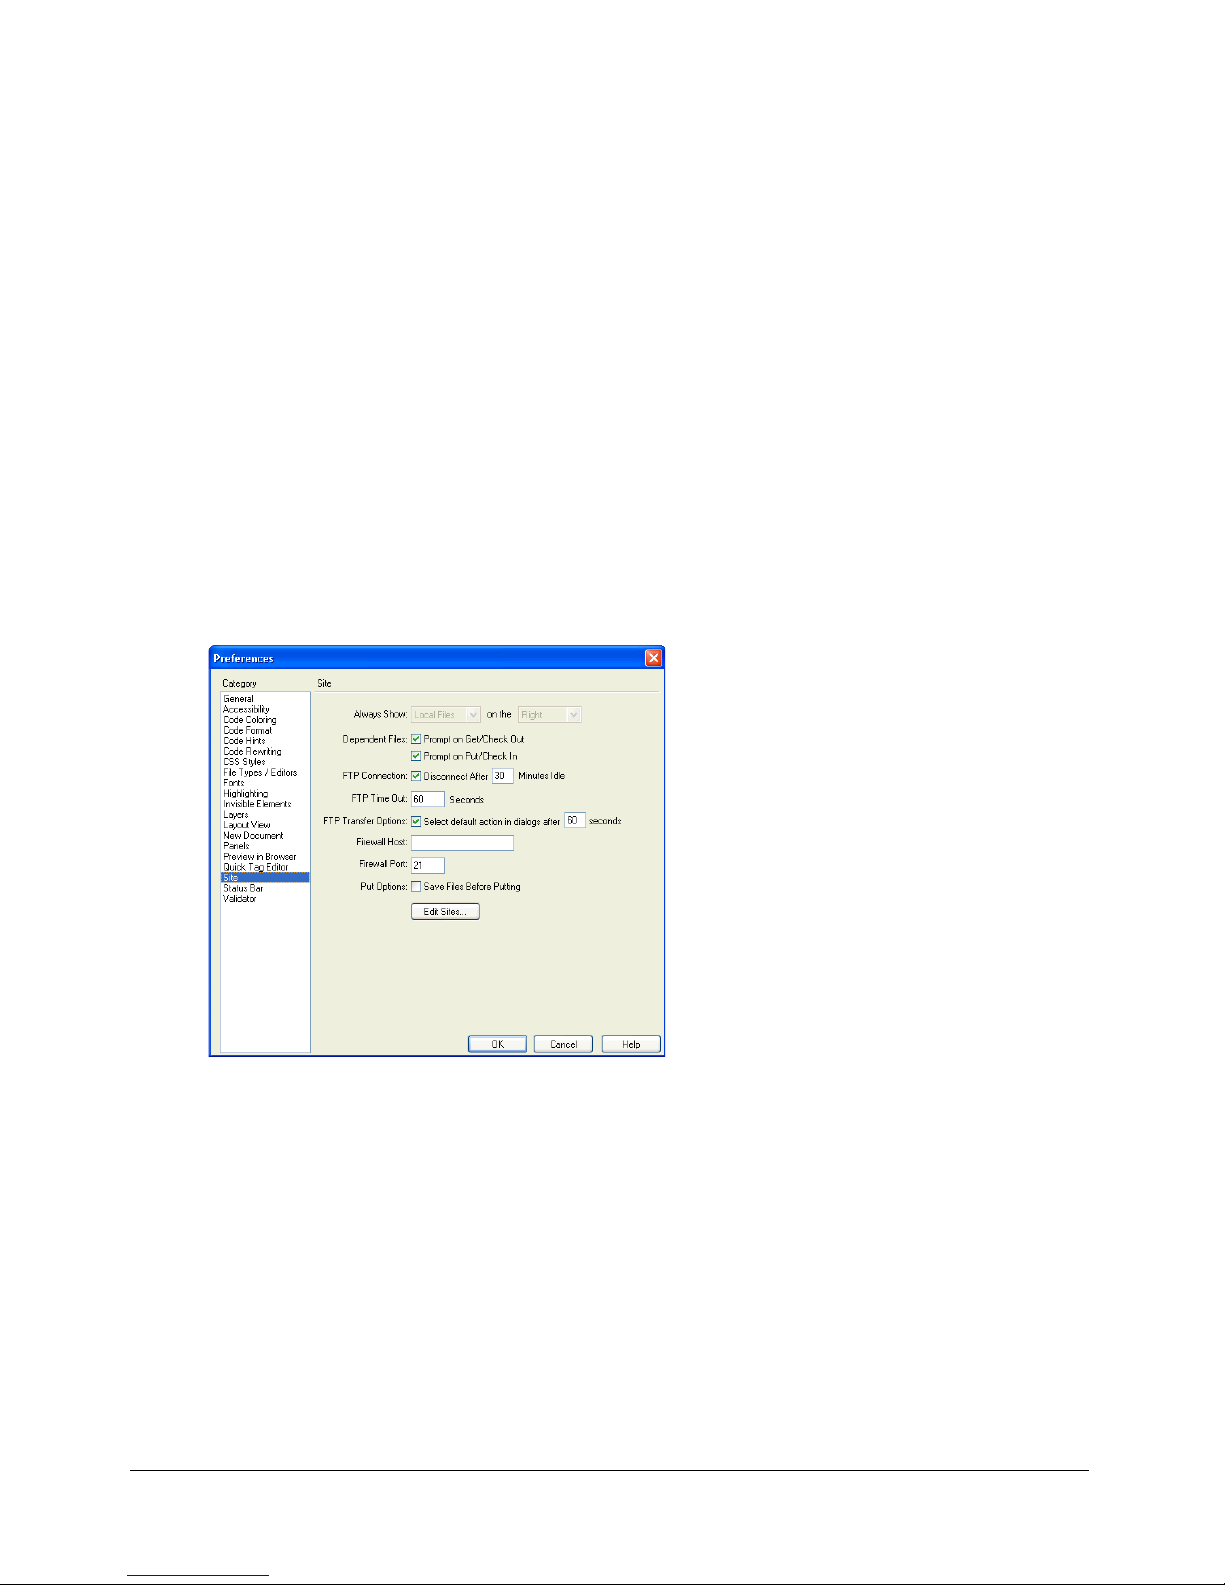
Managing files and folders in the Files panel
You can organize and manage your site files and folders whether they are part of a Dreamweaver
site, on a server you’ve connected to, or on your local drive or desktop.
Note: In previous versions of Dreamweaver, the Files panel was called the Site panel.
Related topics
• “Accessing sites, a server, and local drives” on page 80
• “Viewing files and folders” on page 83
Setting preferences for the Files panel
You select preferences to control file-transfer features in the Files panel.
To edit Files panel preferences:
1 Select Edit > Preferences (Windows) or Dreamweaver > Preferences (Macintosh).
The Preferences dialog box appears.
2 Select Site from the category list on the left.
The Site preference options appear.
3 Change options as necessary.
For more information, click the Help button in the dialog box.
4 Click OK.
Tip: You can define whether the types of files that you transfer are transferred as ASCII (text) or
binary, by customizing the FTPExtensionMap.txt file in the Dreamweaver/Configuration folder
(on the Macintosh, FTPExtensionMapMac.txt). For more information see, Extending
Dreamweaver Help.
86 Chapter 4: Managing Your Files
Page 87

Working with files in the Files panel
You can open or rename files; add, move, or delete files; or refresh the Files panel after you
make changes.
For Dreamweaver sites, you can also determine which files (on either the local or remote site) have
been updated since the last time they were transferred. For information on synchronizing the local
site with the remote site, see “Synchronizing the files on your local and remote sites” on page 103.
To open a file:
1 In the Files panel (Window > Files), select a site, server, or drive from the pop-up menu (where
the current site, server, or drive appears).
2 Navigate to the file you want to open.
3 Do one of the following:
■ Double-click the file’s icon.
■ Right-click (Windows) or Control-click (Macintosh) the file’s icon, then select Open.
Dreamweaver opens the file in the Document window.
To create a new file or folder:
1 In the Files panel (Window > Files), select a file or folder.
Dreamweaver will create the new file or folder inside the currently selected folder, or in the
same folder as the currently selected file.
2 Right-click (Windows) or Control-click (Macintosh), then select New File or New Folder.
3 Enter a name for the new file or folder.
4 Press Enter (Windows) or Return (Macintosh).
To delete a file or folder:
1 In the Files panel (Window > Files), select the file or folder you want to delete.
2 Right-click (Windows) or Control-click (Macintosh), then select Delete.
To rename a file or folder:
1 In the Files panel (Window > Files), select the file or folder you want to rename.
2 Do one of the following to activate the name of the file or folder:
■ Click in the filename, pause, then click again.
■ Right-click (Windows) or Control-click (Macintosh) the file’s icon, then select Rename.
3 Type the new name over the existing name.
4 Press Enter (Windows) or Return (Macintosh).
To move a file or folder:
1 In the Files panel (Window > Files), select the file or folder you want to move.
2 Do one of the following:
■ Copy the file or folder, then paste it in a new location.
■ Drag the file or folder to a new location.
3 Refresh the Files panel to see the file or folder in its new location.
Managing files and folders in the Files panel 87
Page 88
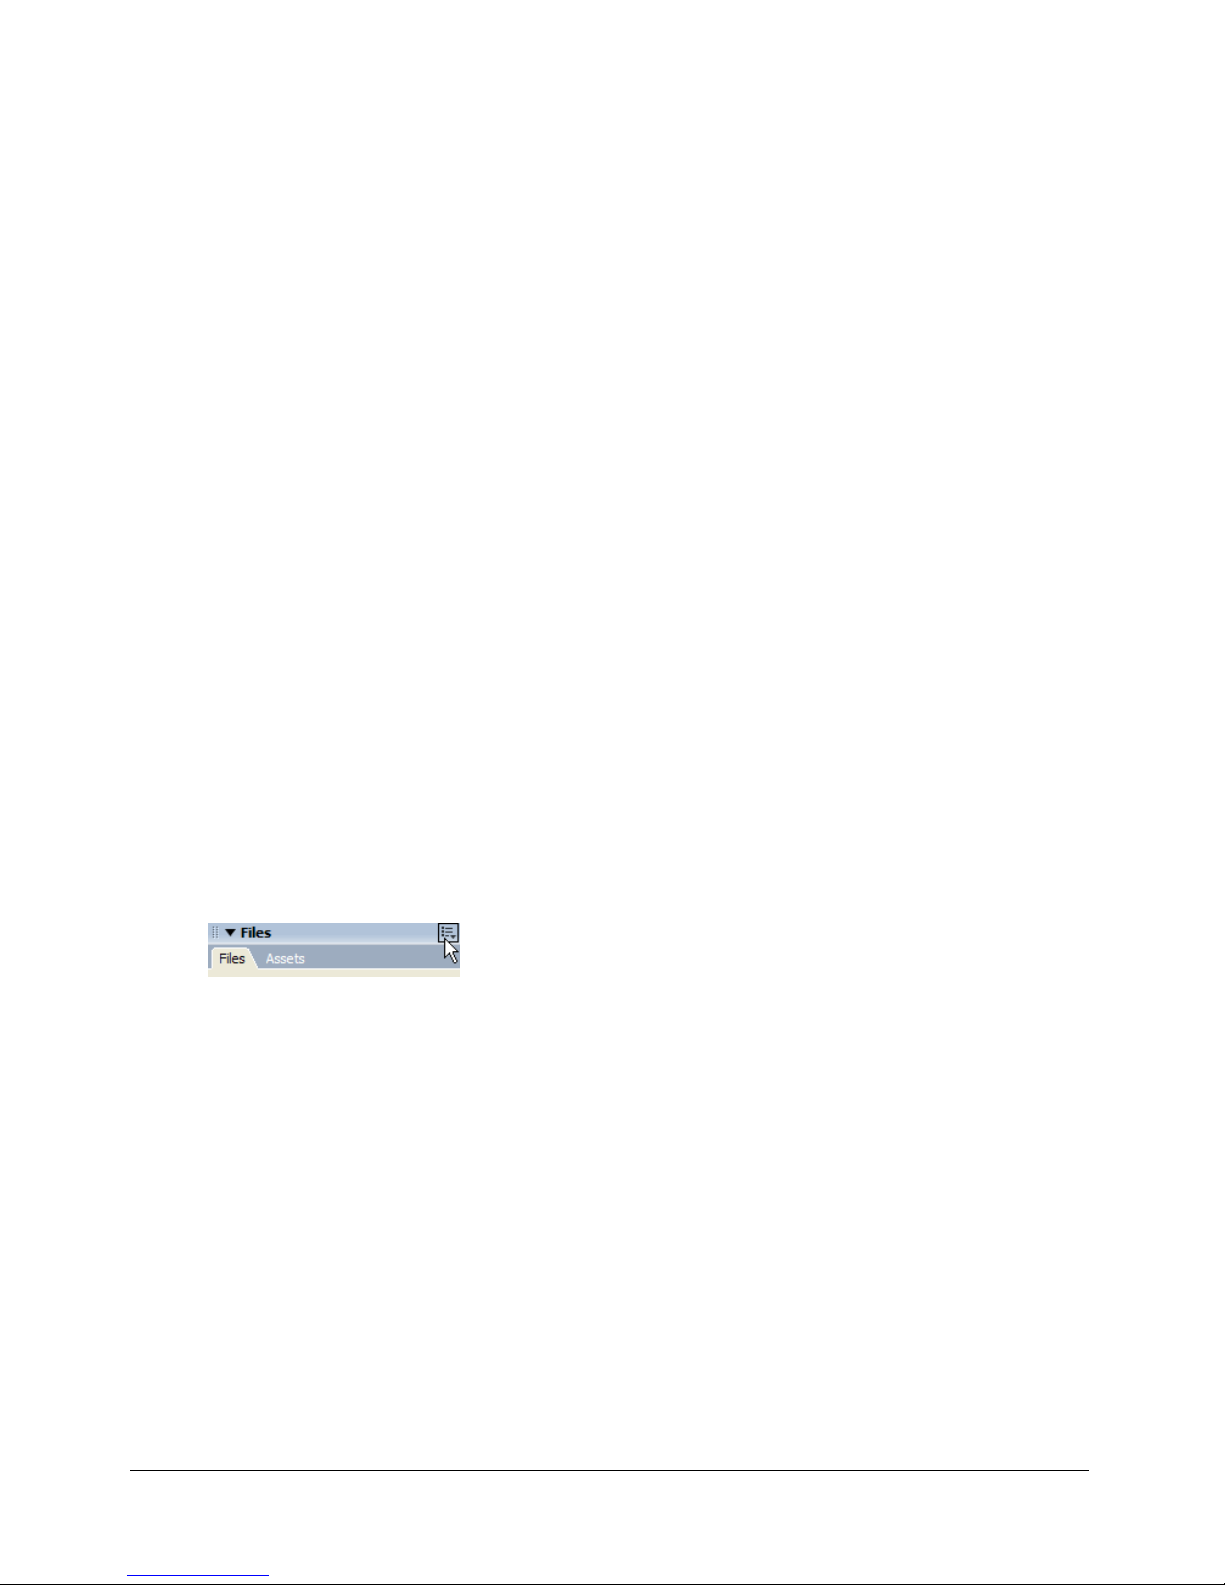
To refresh the Files panel, do one of the following:
• Right-click (Windows) or Control-click (Macintosh) any file or folder, then select Refresh.
• (Dreamweaver sites only) Click the Refresh button in the Files panel toolbar (this option
refreshes both panes).
Note: Dreamweaver automatically refreshes the Files panel when you make changes in another
application, then return to Dreamweaver.
Related topics
• “Viewing files and folders” on page 83
• “Accessing sites, a server, and local drives” on page 80
• “Setting preferences for the Files panel” on page 86
Finding files in your Dreamweaver site
Dreamweaver makes it easy to find selected, open, checked out, or recently modified files in your
site. You can also find files that are newer in your local or remote site.
To find an open file in your site:
1 Open the file in the Document window.
2 Select Site > Locate in Site.
Dreamweaver selects the file in the Files panel.
Note: If the open file in the Document window is not part of the current site in the Files panel,
Dreamweaver attempts to determine which of your Dreamweaver sites the file belongs to; if the
current file belongs to only one local site, Dreamweaver opens that site in the Files panel, then
highlights the file.
To locate and select checked out files in a Dreamweaver site:
• In the collapsed Files panel (Window > Files), click the Options menu in the upper right corner
of the Files panel, then select Edit > Select Checked Out Files.
Dreamweaver selects the files in the Files panel.
To find a selected file in your local or remote site:
1 Select the file in the Local or Remote view of the Files panel (Window > Files).
2 Right-click (Windows) or Control-click (Macintosh), then select Locate in Local Site or Locate
in Local Site (depending on where you selected the file).
Dreamweaver selects the file in the Files panel.
To locate and select files that are newer in the local site than in the remote site:
• In the collapsed Files panel (Window > Files), click the Options menu in the upper right corner
of the Files panel, then select Edit > Select Newer Local.
Dreamweaver selects the files in the Files panel.
88 Chapter 4: Managing Your Files
Page 89

To locate and select files that are newer in the remote site than in the local site:
• In the collapsed Files panel (Window > Files), click the Options menu in the upper right corner
of the Files panel, then select Edit > Select Newer Remote.
Dreamweaver selects the files in the Files panel.
To find recently modified files in your site:
1 In the collapsed Files panel (Window > Files), click the Options menu in the upper right corner
of the Files panel, then select Edit > Select Recently Modified.
The Select Recently Modified dialog box appears.
2 Complete the dialog box.
For more information, click the Help button in the dialog box.
3 Click OK to save your settings.
Dreamweaver highlights the files that were modified within the selected time frame in the
Files panel.
Related topics
• “Accessing sites, a server, and local drives” on page 80
• “Viewing files and folders” on page 83
• “Working with files in the Files panel” on page 87
Working with a visual map of your site
You can view a local folder for a Dreamweaver site as a visual map of linked icons, called a site
map. Use the site map to add new files to a Dreamweaver site, or to add, modify, or remove links.
The site map shows the site structure two levels deep, starting from the home page. It shows pages
as icons and displays links in the order in which they are encountered in the source code.
The site map is ideal for laying out a site structure. You can quickly set up the entire structure of
the site, then create a graphic image of the site map.
Note: The site map applies to local sites only.To create a map of a remote site, copy the contents of
the remote site into a folder on your local disk, then use the Manage Sites command to define the site
as a local site (see “Setting up a local folder” on page 63).
Related topics
• “Linking documents using the site map” on page 322
Working with a visual map of your site 89
Page 90
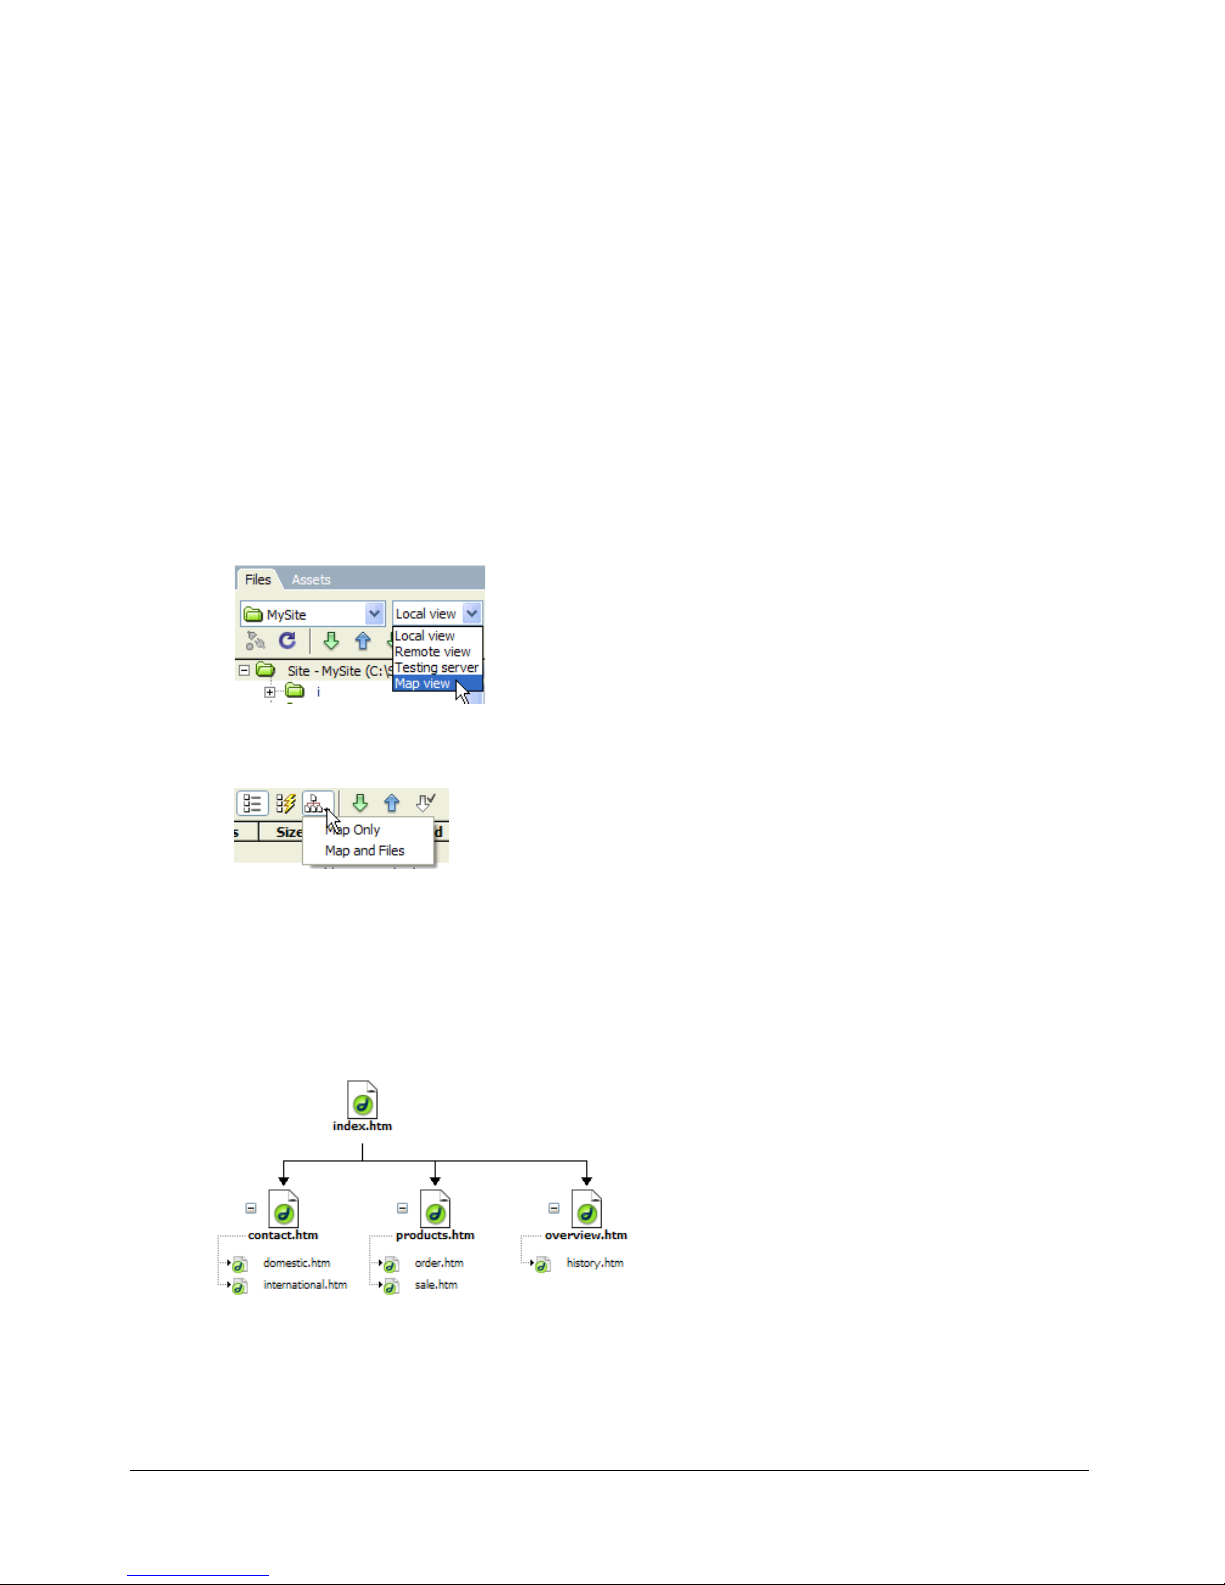
Viewing a site map
You must d ef in e a home page for your site before you can display the site map. The site’s home
page can be any page in your site; it does not have to be the main page for your site. In this case,
the home page is simply the starting point of the map.
To define a home page for a site:
1 In the Files panel (Window > Files), select a site from the pop-up menu where the current site,
server, or drive appears.
2 Right-click (Windows) or Control-click (Macintosh) the file you want to be the home page,
then select Set as Home Page.
Note: You can also set the home page in the Site Map Layout options in the Site Definition dialog
box (see “Modifying the site map layout” on page 91).
To view a site map:
1 To display the site map, in the Files panel (Window > Files), do one of the following:
■ In the collapsed Files panel, select Map View from the Site View pop-up.
■ In the expanded Files panel, click the Site Map button in the toolbar, then select Map Only
or Map and Files.
Select Map Only to view the site map without the local file structure, or Site and Map to
view the site map with the local file structure.
Note: If you have not defined a home page, or if Dreamweaver can’t find an index.html or
index.htm page in the current site to use as the home page, Dreamweaver prompts you to select a
home page.
The Files panel displays a site map showing the site structure two levels deep.
Note: By default, the site map does not display hidden files and dependent files. For more
information, see “Showing and hiding site map files” on page 94.
2 Click the Plus (+) and Minus (–) next to a filename to show or hide pages linked below the
second level.
90 Chapter 4: Managing Your Files
Page 91

3 Notice the colors in the site map:
■ Text displayed in red indicates a broken link.
■ Text displayed in blue and marked with a globe icon indicates a file on another site or a
special link (such as an e-mail or script link).
■ A green check mark indicates a file checked out by you.
■ A red check mark indicates a file checked out by someone else.
■ A lock icon indicates a file that is read-only (Windows) or locked (Macintosh).
Related topics
• “Working with pages in the site map” on page 92
• “Showing and hiding site map files” on page 94
• “Viewing the site from a branch” on page 95
Modifying the site map layout
Use the Site Map Layout options to customize the appearance of your site map. You can change
the home page, the number of columns displayed, whether the icon labels display the filename or
the page title, and whether to show hidden and dependent files.
To modify the site map layout:
1 Do one of the following to open the Site Definition dialog box:
■ Select Site > Manage Sites.
■ In the Files panel, select Manage Sites from the pop-up menu where the current site, server,
or drive appears.
The Manage Sites dialog box appears.
2 Click Edit.
The Site Definition dialog box appears.
Working with a visual map of your site 91
Page 92

3 Select Site Map Layout from the Category list on the left.
The Site Definition dialog box displays Site Map Layout options.
4 Make changes as necessary.
For more information, click the Help button in the dialog box.
5 Click OK to close the Site Definition dialog box.
6 Click Done to close the Manage Sites dialog box, if it is open.
Related topics
• “Viewing a site map” on page 90
• “Showing and hiding site map files” on page 94
• “Saving the site map” on page 96
Working with pages in the site map
When working in the site map, you can select pages, open a page for editing, add new pages to the
site, create links between files, and change page titles.
To select multiple pages in the site map, do one of the following:
• Shift-click to select a range of adjacent pages.
• Starting from a blank part of the view, drag around a group of files to select them.
• Control-click (Windows) or Command-click (Macintosh) to select nonadjacent pages.
To open a page in the site map for editing, do one of the following:
• Double-click the file.
• Right-click (Windows) or Control-click (Macintosh) the file, then select Open.
92 Chapter 4: Managing Your Files
Page 93

To add an existing file to the site, do one of the following:
• Drag the file from the Windows Explorer or the Macintosh Finder to a file in the site map. The
page is added to the site, and a link is created between it and the file you dragged it to.
• Right-click (Windows) or Control-click (Macintosh) the file in the site map, select Link to
Existing File, then browse to the file.
To create a new file and add a link in the site map:
1 Select a file in the site map.
2 Right-click (Windows) or Control-click (Macintosh), then select Link to New File.
The Link to New File dialog box appears.
3 Enter a name, title, and text for the link.
4 Click OK.
Dreamweaver saves the file in the same folder as the selected file. If you add a new file to a
hidden branch, the new file is also hidden (see “Showing and hiding site map files”
on page 94).
To modify the title of a page in the site map:
1 Make sure page titles are showing by clicking the Options menu in the upper right corner of the
collapsed Files panel, then selecting File > Rename View > Show Page Titles.
2 Select a file in the site map, then do one of the following:
■ Click the title. When the title becomes editable, enter a new title.
■ Click the Options menu in the upper right corner, then select File > Rename.
3 Press Enter (Windows) or Return (Macintosh) after you type the new name.
Note: When you work in the Files panel, Dreamweaver automatically updates all links to files whose
names have changed.
To change the home page in the site map, do one of the following:
• In the Local view of the Files panel, select a file; right-click (Windows) or Control-click
(Macintosh), then select Set as Home Page.
• In the Files panel, select Manage Sites from the pop-up menu where the current site, server, or
drive appears, then click Edit. Select Site Map Layout in the Site Definition dialog box
category list. Browse to a new home page, then click OK.
Working with a visual map of your site 93
Page 94
To update the site map display after making changes:
1 Click anywhere in the site map to deselect any files.
2 Click the Refresh button in the Files panel toolbar.
Related topics
• “Viewing a site map” on page 90
• “Modifying the site map layout” on page 91
• “Saving the site map” on page 96
Showing and hiding site map files
You can modify the layout of the site map to show or hide hidden and dependent files.
This is useful when you want to emphasize key topics or content, and de-emphasize less
important material.
To hide a file using the site map, you must mark the file as hidden. When you hide a file, its links
are also hidden. When you display a file marked as hidden, the icon and its links are visible in the
site map, but the names appear in italics.
Note: By default, dependent files are already hidden.
To mark files as hidden in the site map:
1 In the site map, select one or more files.
2 Right-click (Windows) or Control-click (Macintosh), then select Show/Hide Link.
To unmark files marked as hidden in the site map:
1 In the site map, select one or more files.
2 Do one of the following:
■ Right-click (Windows) or Control-click (Macintosh) in the site map, then select
Show/Hide Link.
■ In the collapsed Files panel (Window > Files), click the Options menu in the upper right
corner, then select View > Show Files Marked as Hidden.
■ In the collapsed Files panel (Window > Files), click the Options menu in the upper right
corner, then select View > Show/Hide Link.
To show or hide files marked as hidden in the site map:
1 In the collapsed Files panel (Window > Files), click the Options menu in the upper right corner.
2 Do one of the following:
■ Select View > Show Files Marked as Hidden.
■ Select View > Layout to open the Site Definition dialog box, then select the Display Files
Marked as Hidden option.
94 Chapter 4: Managing Your Files
Page 95
To show dependent files in the site map:
1 In the collapsed Files panel (Window > Files), click the Options menu in the upper right corner.
2 Do one of the following:
■ Select View > Show Dependent Files.
■ Select View > Layout to open the Site Definition dialog box, then select the Display
Dependent Files option.
Related topics
• “Viewing a site map” on page 90
• “Modifying the site map layout” on page 91
• “Working with pages in the site map” on page 92
• “Saving the site map” on page 96
Viewing the site from a branch
You can view the details of a specific section of a site by making a branch the focus of the site
map.
To view a different branch in the site map:
1 Select the page you want to view.
2 Do one of the following:
■ Right-click (Windows) or Control-click (Macintosh) in the site map, then select View
as Root.
■ In the collapsed Files panel (Window > Files), click the Options menu in the upper right
corner, then select View > View as Root.
The site map is redrawn in the window as if the specified page were at the root of the site. The
Site Navigation text box above the site map displays the path from the home page to the specified
page. Select any item in the path to view the site map from that level by clicking once.
To expand and contract branches in the site map:
• Click a branch’s Plus (+) or Minus (–) button.
Related topics
• “Viewing a site map” on page 90
• “Modifying the site map layout” on page 91
• “Working with pages in the site map” on page 92
Working with a visual map of your site 95
Page 96

Saving the site map
You can save the site map as an image, then view the image in (or print it from) an image editor.
To create an image file of the current site map:
1 In the collapsed Files panel (Window > Files), click the Options menu in the upper right corner,
then select File > Save Site Map.
The Save Site Map dialog box appears.
2 Enter a name in the File Name text box.
3 In the File Type pop-up menu, select .bmp or .png.
4 Select a location to save the file, then enter a name for the image.
5 Click Save.
Related topics
• “Viewing a site map” on page 90
• “Modifying the site map layout” on page 91
• “Working with pages in the site map” on page 92
Importing and exporting sites
With Dreamweaver you can export a site as an XML file and import it back into Dreamweaver.
This enables you to move sites between machines and product versions or to share with
other users.
Tip: It’s a good idea to export your sites regularly so that you have a backup copy if anything happens
to the site.
To export a site:
1 Select Site > Manage sites.
The Manage Sites dialog box appears.
2 Click the Export button.
The Export Site dialog box appears.
3 Browse to and select a location to save the site.
4 Click Save.
Dreamweaver saves the site as an XML file, with an STE file extension, in the
specified location.
5 Click Done to close the Manage Sites dialog box.
96 Chapter 4: Managing Your Files
Page 97

To import a site:
1 Select Site > Manage sites.
The Manage Sites dialog box appears.
2 Click the Import button.
The Import Site dialog box appears.
3 Browse to and select a site (saved as an XML file) to import.
Note: You must export the site from Dreamweaver, which saves the site as an XML file, before you
can import the file.
4 Click open.
Dreamweaver imports the site, then the site name appears in the Manage Sites dialog box.
5 Click Done to close the Manage Sites dialog box.
Removing a Dreamweaver site from your list of sites
If you no longer want to work with a site in Dreamweaver, you can remove the site from your list
of sites. The files in the site are not removed.
Note: When you remove a site from the list, all setup information about the site is permanently lost.
To remove a site from your site list:
1 Select Site > Manage Sites.
The Manage Sites dialog box appears.
2 Select a site name.
3 Click Remove.
A dialog box appears asking you to confirm the removal.
4 Click Yes to remove the site from your list, or click No to leave the site name.
If you click Yes, the site name disappears from the list.
5 Click Done to close the Manage Sites dialog box.
Checking in and checking out files
If you’re working in a collaborative environment, you can use the Check In/Check Out system to
check files in and out from local and remote servers.
If you’re the only person working on the remote server, you can use the Put and Get commands
without checking files in or out (see “Getting and putting files to and from your server”
on page 101).
Related topics
• “The Check In/Check Out system” on page 78
Checking in and checking out files 97
Page 98
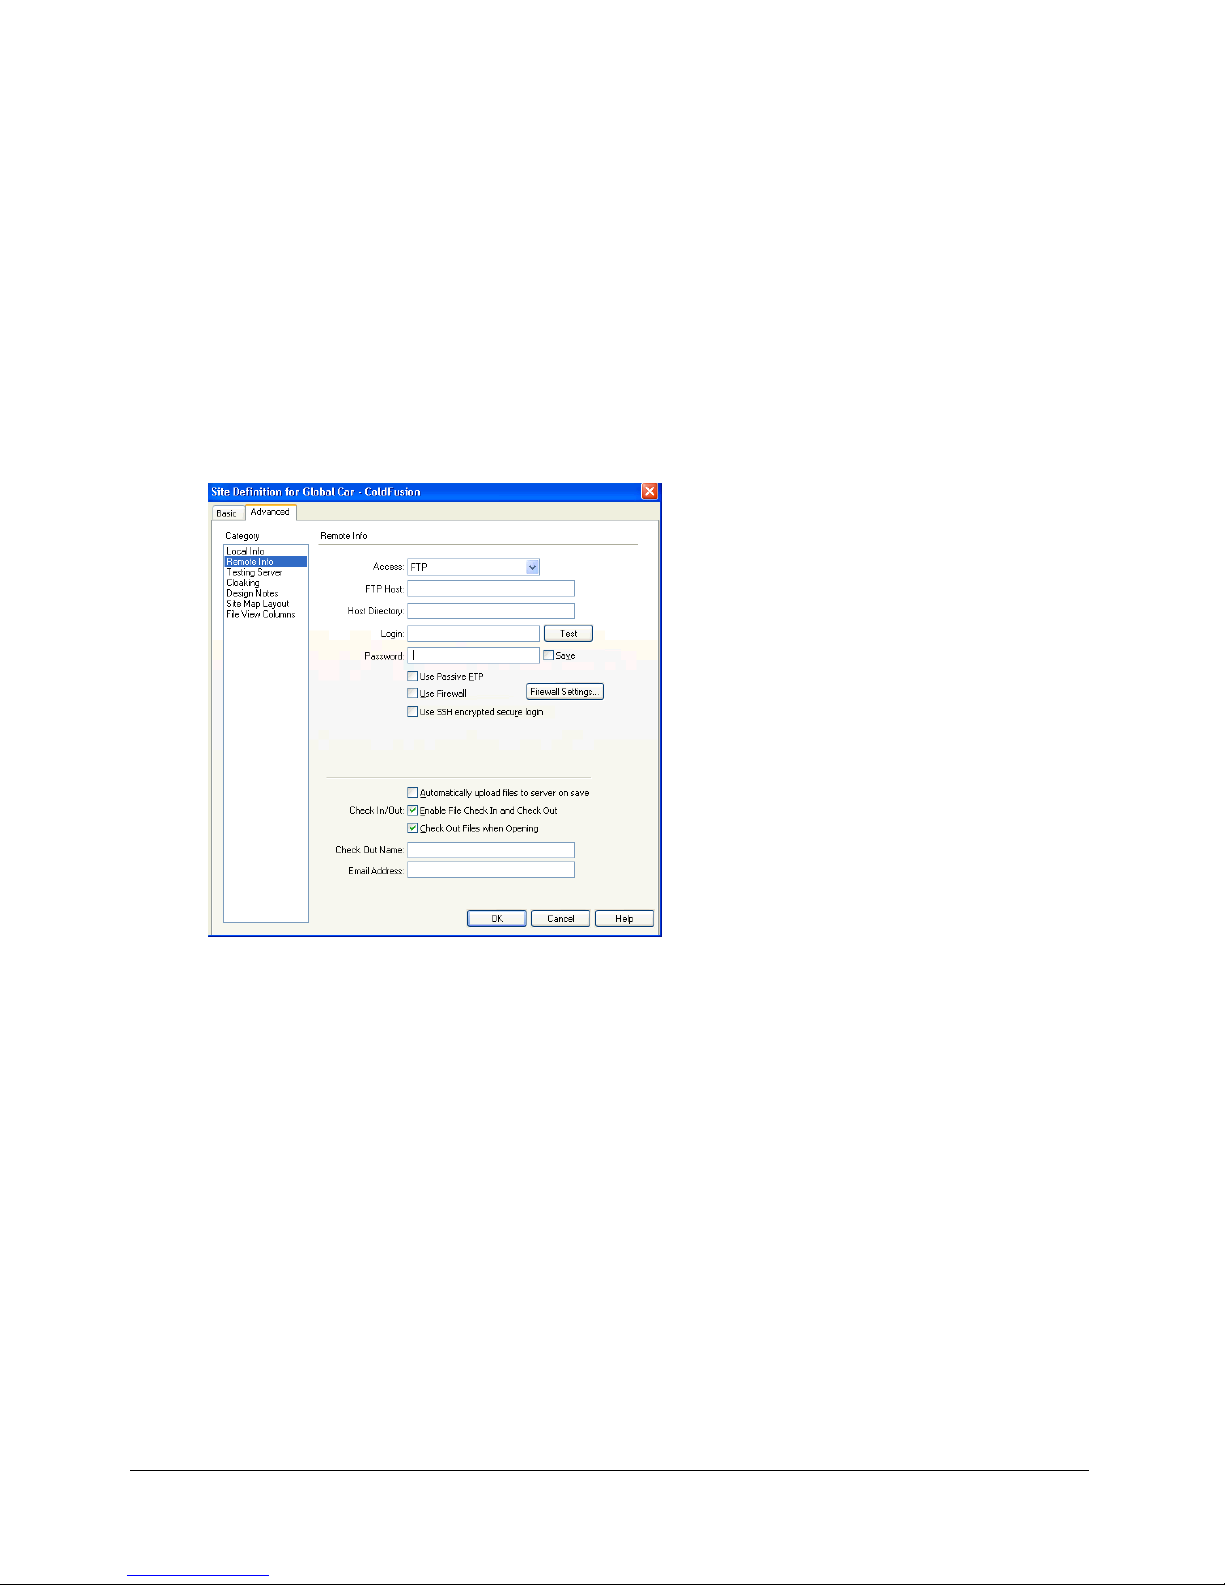
Setting up the Check In/Check Out system
Before you can use the Check In/Check Out system, you must associate your local site with a
remote server (see “Setting up a remote folder” on page 65).
To set up the Check In/Check Out system:
1 Select Site > Manage Sites.
The Manage Sites dialog box appears.
2 Select a site, then click Edit.
The Site Definition dialog box appears.
3 Select Remote Info from the category list on the left.
The Site Definition dialog box displays Remote Info options. The Check In/Out section
appears at the bottom of the dialog box.
Note: If you do not see Check In/Out options, you have not set up your remote server (see “Setting
up a remote folder” on page 65).
4 Complete the Check In/Out section.
For more information, click the Help button in the dialog box.
5 Click OK.
Related topics
• “The Check In/Check Out system” on page 78
• “Undoing a file check-out” on page 100
98 Chapter 4: Managing Your Files
Page 99

Checking files into and out of a remote folder
After you set up the Check In/Check Out system (see “Setting up the Check In/Check Out
system” on page 98), you can check in and check out files on a remote server using the Files panel
or from the Document window.
To check out files using the Files panel:
1 In the Files panel (Window > Files), select files to check out from the remote server.
Note: You can select files in the Local or Remote view, not the Testing Server view.
A red check mark indicates that another team member has the file checked out and a lock
symbol indicates that the file is read-only (Windows) or locked (Macintosh).
2 Do one of the following to check out the file(s):
■ Click the Check Out button in the Files panel toolbar.
■ Right-click (Windows) or Control-click (Macintosh), then select Check Out from the
context menu.
The Dependent Files dialog box appears.
3 Click Yes to download dependent files along with the selected files, or click No to refrain from
downloading dependent files.
Note: It’s usually a good idea to download dependent files when checking out a new file, but if the
latest versions of the dependent files are already on the local disk, there’s no need to download
them again.
A green check mark appears beside the local file’s icon indicating that you have checked it out.
To check in files using the Files panel:
1 In the Files panel (Window > Files), select checked-out or new file(s).
Note: You can select files in the Local or Remote view, but not the Testing Server view.
2 Do one of the following to check in the file(s):
■ Click the Check In button in the Files panel toolbar.
■ Right-click (Windows) or Control-click (Macintosh), then select Check In from the context
menu.
The Dependent Files dialog box appears.
3 Click Yes to download dependent files along with the selected files, or click No to refrain from
downloading dependent files.
Note: It’s usually a good idea to upload dependent files when checking in a new file, but if the latest
versions of the dependent files are already on the remote server, there’s no need to upload
them again.
A lock symbol appears beside the local file’s icon indicating that the file is now read-only.
Checking in and checking out files 99
Page 100

To check in or check out an open file from the Document window:
1 Make sure the file you want to check in or out is active in the Document window.
Note: You can check in only one open file at a time.
2 Do one of the following:
■ Select Site > Check In or Site > Check Out.
■ Click the File Management icon in the Document window toolbar, then select Check In or
Check Out from the pop-up menu.
Note: If the current file is not part of the current site in the Files panel, Dreamweaver attempts to
determine which locally defined site the current file belongs to. If the current file belongs to only
one local site, Dreamweaver opens that site, then performs the check in or check out operation.
If you check out the currently active file, the currently open version of the file is overwritten by
the new checked-out version. If you check in the currently active file, the file may be
automatically saved before it’s checked in, depending on the preference options you’ve set (see
“Setting preferences for the Files panel” on page 86).
Related topics
• “The Check In/Check Out system” on page 78
• “Setting up the Check In/Check Out system” on page 98
Undoing a file check-out
If you check out a file, then decide not to edit it (or decide to discard the changes you made), you
can undo the check-out operation and the file returns to its original state.
To undo a file check-out, do one of the following:
• Open the file in the Document window, then select Site > Undo Check Out.
• In the Files panel (Window > Files), right-click (Windows) or Control-click (Macintosh), then
select Undo Check Out.
The local copy of the file becomes read-only, and any changes you’ve made to it are lost.
Related topics
• “The Check In/Check Out system” on page 78
• “Setting up the Check In/Check Out system” on page 98
• “Checking files into and out of a remote folder” on page 99
100 Chapter 4: Managing Your Files
 Loading...