

Page 1

USER MANUAL
M-DL7000
Page 2

Page 3

- 3 -
Contents
Safety Precautions ....................................1-2
Warning ......................................................... 2
Product overview .......................................... 3
Front Panel ............................................... 3
Basic Opertion .............................................. 4
Power On/Off ............................................ 4
Volume Adjusting ..................................... 4
Mute .......................................................... 4
Playing sources selection ........................ 4
Setting Date/Time......................................... 4
Date .......................................................... 4
Clock mode ............................................... 4
Time .......................................................... 4
Audio control ................................................ 5
Equalizer preset ....................................... 5
Equalizer parameters .............................. 5
Adjst Fad/Bal ............................................ 5
FM/AM Radio mode ...................................... 6
Radio overview .......................................... 6
Selection .................................................. 6
Band selection .......................................... 6
Tune ......................................................... 6
Preset station ........................................... 7
Tuning sensitivity ...................................... 7
RDS ........................................................... 7
RDS setting ............................................... 7
Radio Data System ................................... 8
AF function ................................................ 8
EON ........................................................... 8
TA function ................................................ 8
CT (clock Time) ......................................... 8
PTY function .............................................. 8
CarPlay ......................................................... 9
Play with CarPlay ..................................... 9
Call out/ receive Call ................................ 9
Map ........................................................... 9
Message .................................................... 9
Siri ............................................................. 9
iPod ............................................................. 10
Play with iPod ......................................... 10
Android Auto ............................................... 10
Installation procedure ................. 10-11-12
Play with Android .................................... 13
Map ......................................................... 13
Call out/ receive Call .............................. 13
BAck to Android Auto ............................ 13
Play music .............................................. 13
Talk with Google ..................................... 13
Back to unit menu .................................. 13
Playback mode ........................................... 14
Touch screen controls ........................... 14
Controlling playback .............................. 14
Connect USB .......................................... 14
Remove USB ........................................... 14
Play/Pause .............................................. 15
Search content ....................................... 15
Repeat ..................................................... 15
Bluetooth mode .......................................... 16
Device ...................................................... 16
Connecting device .................................. 16
Function .................................................. 17
Make a Call ............................................. 17
Alphabetic search ................................... 17
Streaming Audio ..................................... 17
Setting ..................................................... 17
Settings ....................................................... 18
General ................................................... 18
Video ........................................................ 18
Volume .................................................... 18
Time ........................................................ 18
System .................................................... 19
Various ........................................................ 19
Additional devices ................................... 19
Reset ....................................................... 19
Steering Whell Control ........................... 19
Specifications ............................................. 20
Troubleshooting ......................................... 21
Wire Connetions ......................................... 22
Declaration of Conformity .......................... 24
Page 4
- 1 -
Safety Precautions
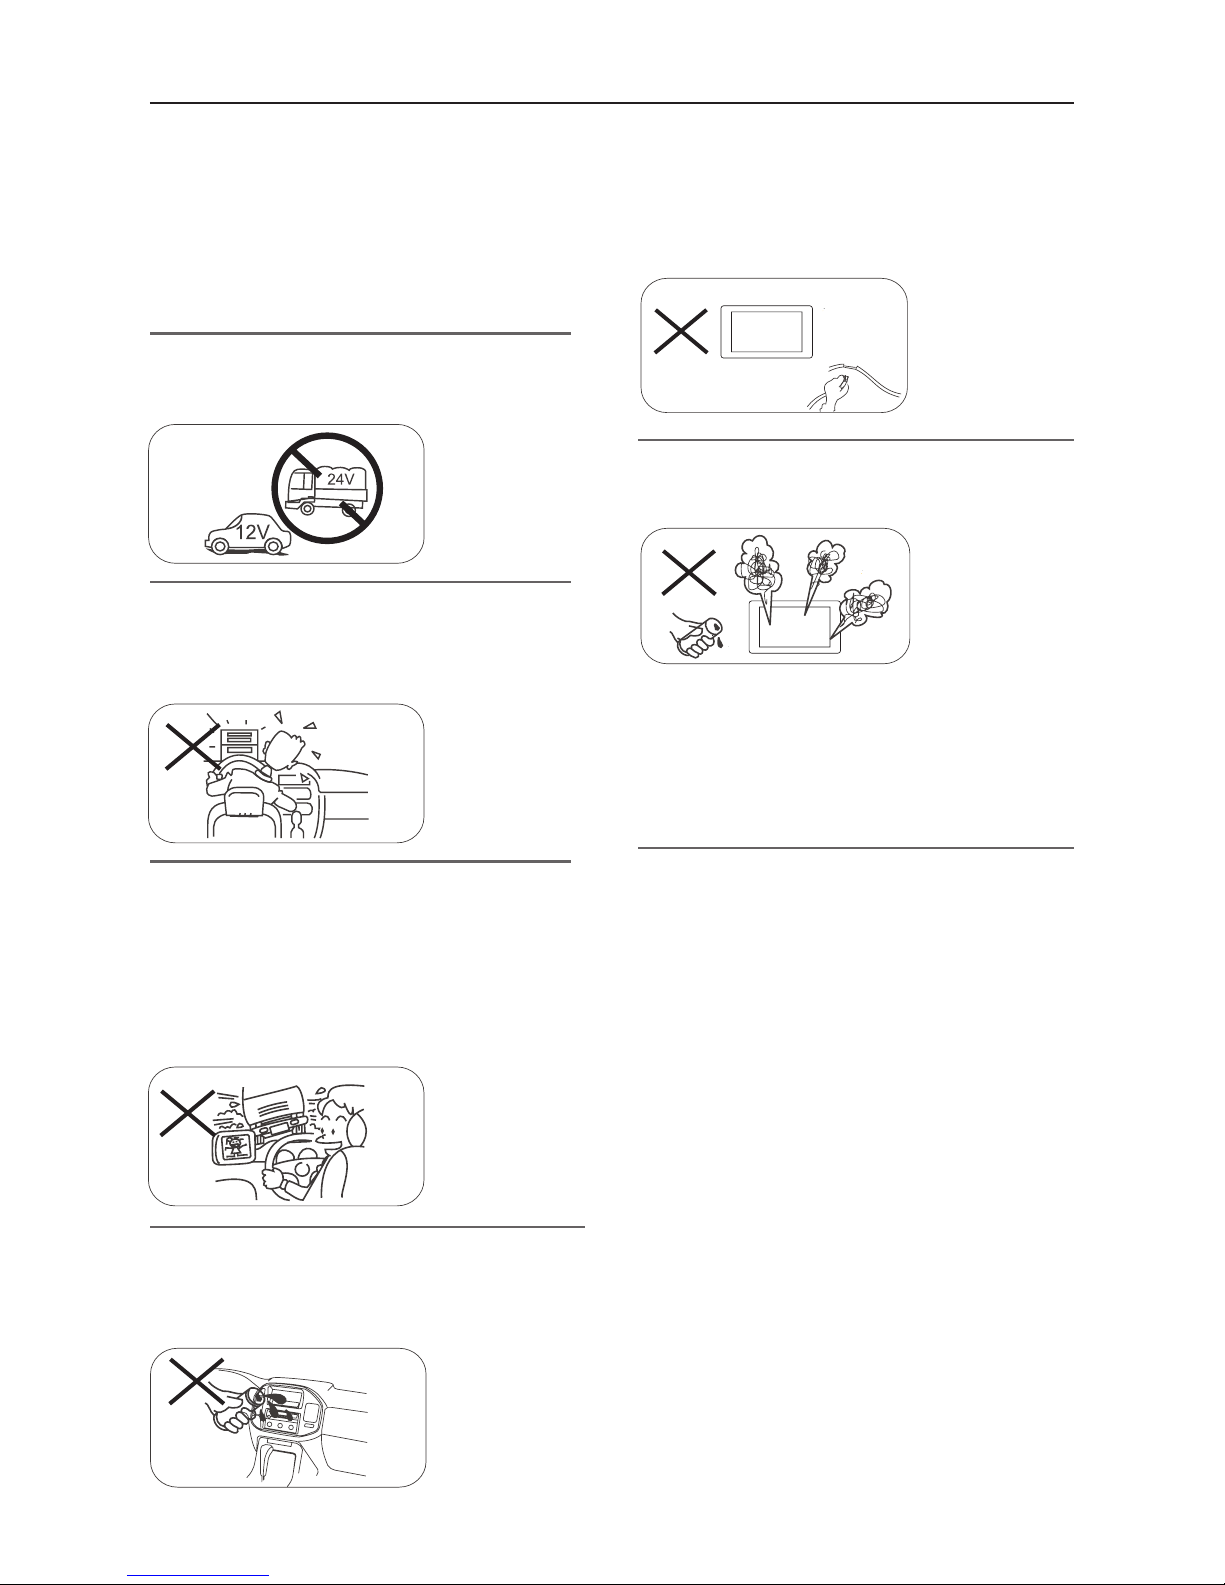
Never expose this unit, amplifier, and
speakers to moisture or water to prevent
electric sparks or fire.
Please don't change the fuse on the power
cord without professional guidance, using
improper fuse may cause damage to this unit
or even cause fire.
Please contact your nearest dealer if one of
the following symptoms is experienced:
(a). Water or other objects enters the unit.
(b). There is smoke.
(c). Peculiar smell.
Only connect the unit to a 12-volt power
supply with negative grounding.
Never install this unit where the operation &
condition for safe driving is impaired.
Never use the video display function in the
front when driving to prevent the violation of
laws & regulations and also to reduce the
risk of traffic accident except for using rear
view video camera.
MUTE
OK
Thank you for purchasing this product. Please
read through these operating instructions
so you will know how to operate your model
properly. After you’ve finished reading the
instructions, keep this manual in a safe place
for future reference.
To ensure safe driving, please adjust the
volume to a safe and comfortable level in
case of emergency situations.
Page 5
- 2 -
1. Never disassemble or adjust the unit without any professional guidance.
For details, please consult any professional car shop / dealer for inquiry.
2. If the front panel or TFT monitor is dirty, please use a clean silicone cloth and neutral detergent
to wipe off the spot. Using a rough cloth and non-neutral detergent such as alcohol for cleaning
may result in scratching or decoloration to the monitor.
3. If any abnormal behavior of the unit is found, please refer to trouble shooting guide of this
manual. If no relevant information is found, please press the [RESET] key on the front panel to
resume factory default.
4. If you have parked the car in hot or cold weather for a long time, please wait until the
temperature in the car becomes normal before operating the unit.
5. Using the car heater in low temperature environment may result in moisture inside the unit, DO
NOT use the unit in this situation. Eject the disc and wipe off the moisture on the disc. If the unit
still doesn't work after a few hours, please contact the service center.
6. Do not impact the LCD monitor which could cause damage.
7. To prevent damage to the screen, avoid touching it with sharp objects.
8. To provide a clear demonstration and an alternative for easy understanding to the operation of
this unit, graphic illustrations are used.
However, some illustrations are different from the actual images displayed on the screen.
9. Operate the unit correctly according to this manual to prevent unnecessary problem. The
guarantee won't be valid if the problem is caused by inappropriate operation.
Safety Precautions
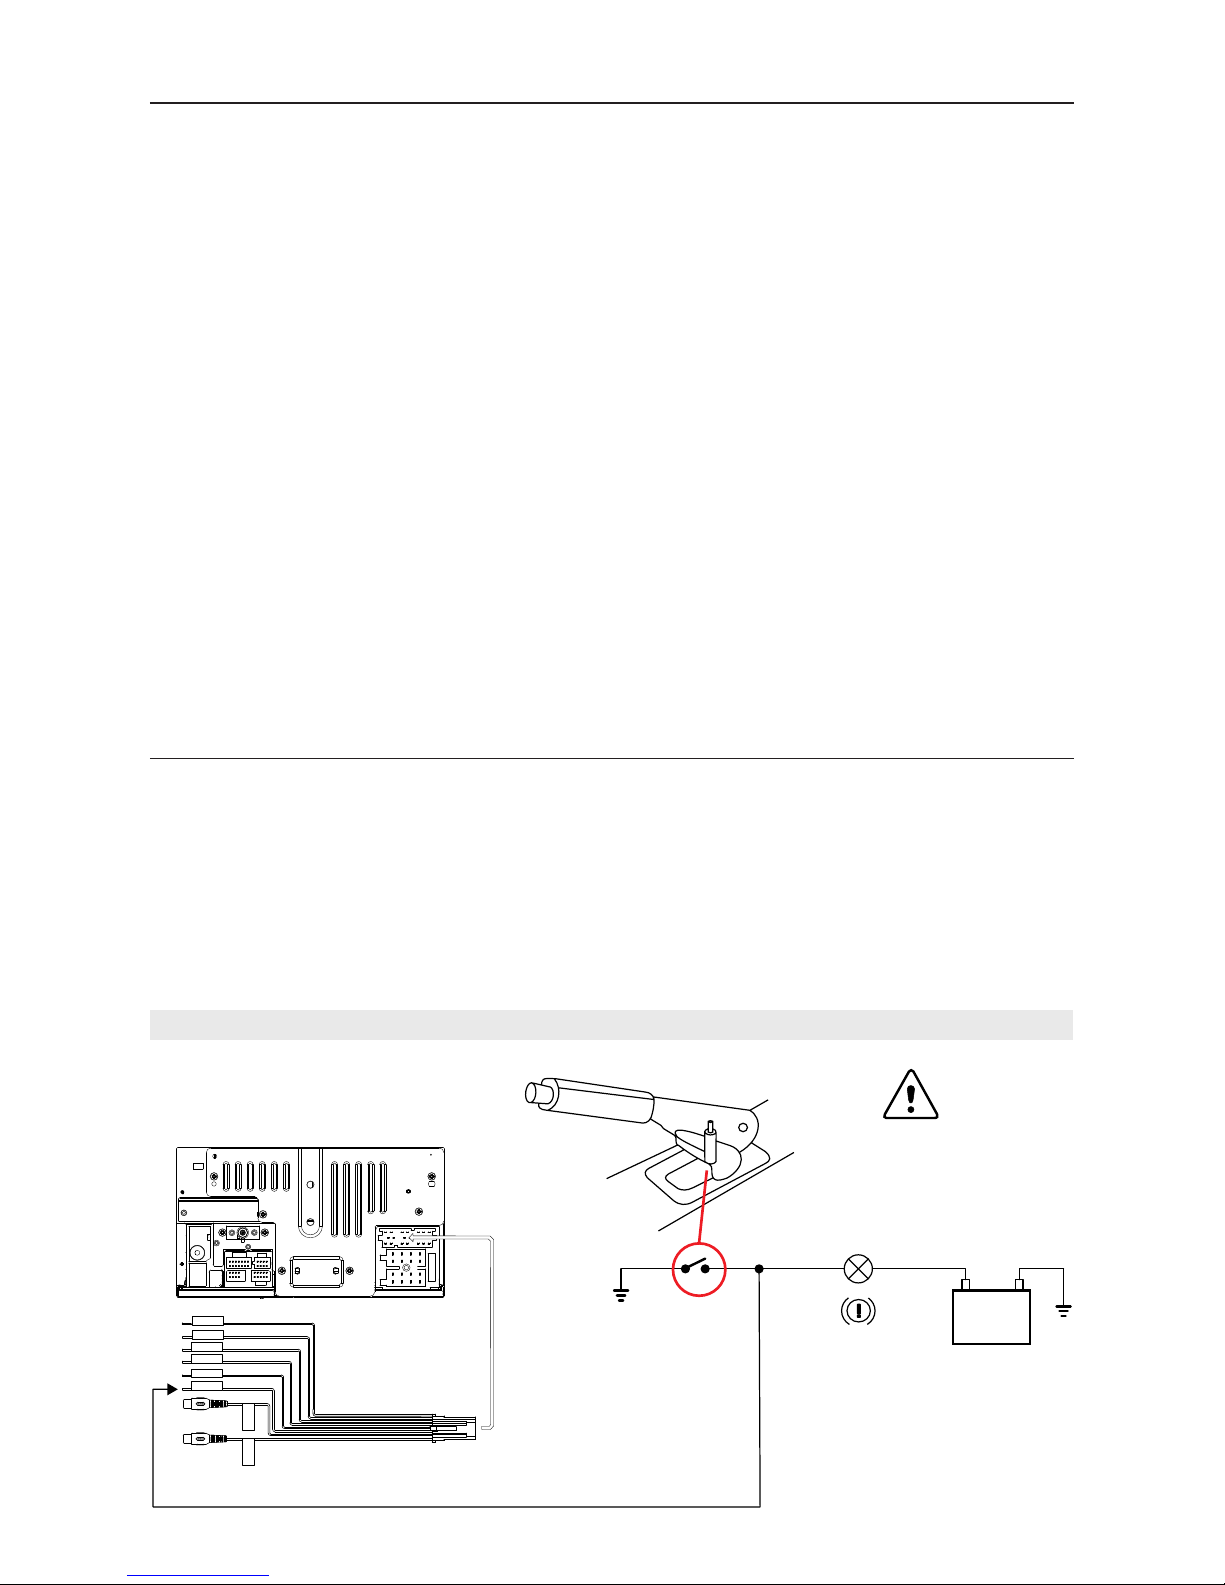
Detect parking brake
• In order to be able to install the android application, the handbrake connection must be
connected. Engage the parking brake for APP installation.
• Connect the cable "BRAKE" to the parking brake switch to view video files on the TFT monitor.
Engage the parking brake for viewing videos.
• When the parking brake is not engaged, the monitor displays "Warning!!!, Video playback is
disabled for your safety. Engage parking brake to watch video.", preventing the driver to watch
content while driving. The rear screens are not interested in this inhibition.
Importante note:
This connection is indispensable for the proper operation.
Warning
Brake light
Battery
Pink
Green with White
Black
Orange with white
Brown with white
Blue
SWC &
CAMERA IN
Camera IN
Video Out
PARKING
REVERSE
SWC GND
SWC2
SWC1
P.CONT
Video Out
Yellow
Yellow
To connect to
the Parking cable
Page 6
- 3 -
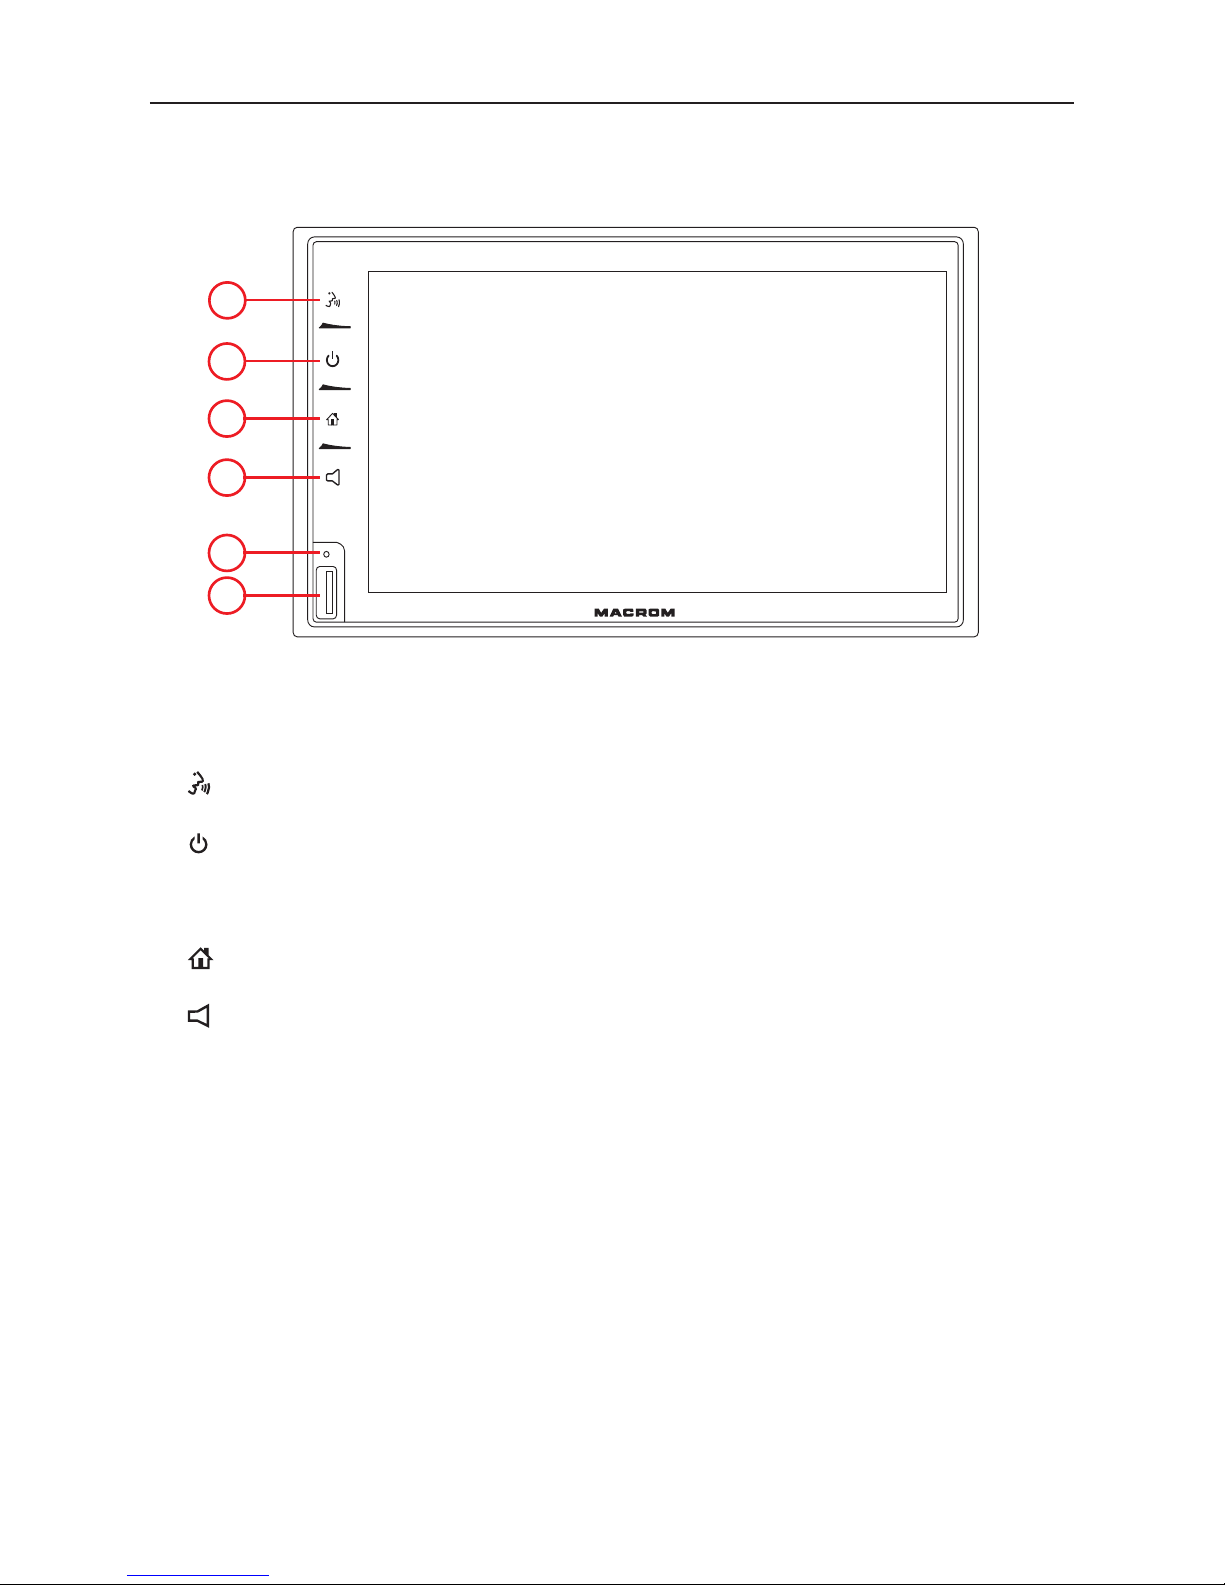
Front Panel
1. [ ] button
Activate Siri/Google voice control
2. [ ] button
Short press: Switch on device
In operation: Mute audio source
Long press: Switch off device
3. [ ] button
Call up main menu
4. [ ] button
Show the volume bar
5. Reset Button:
Press to reset system settings to factory default (except password and parental lock
settings).
6. USB Connector
Connect a USB device for playback of music/video/picture files.
Product overview
Notice:
The graphic in this manual is for reference only, and may be different from the actual unit.
M-DL7000
3
2
4
5
6
1
Page 7
- 4 -
Power On / Off
Press the [ ] button on the unit to turn the unit on. The buttons on the front of the unit light up
and the current mode status appears in the LCD.
Press and hold the [ ] knob to power off the unit.
Volume Adjustment
You can adjust the volume in steps from 0 (off) to 39 (maximum).
Press the [ ] button and drag left/right on the volume bar to change the volume.
Mute
Briefly press the [ ] button to mute the device or to reactivate the previous volume.
Playing Source Selection
Press the [ ] button on the front panel to display the playing source menu.
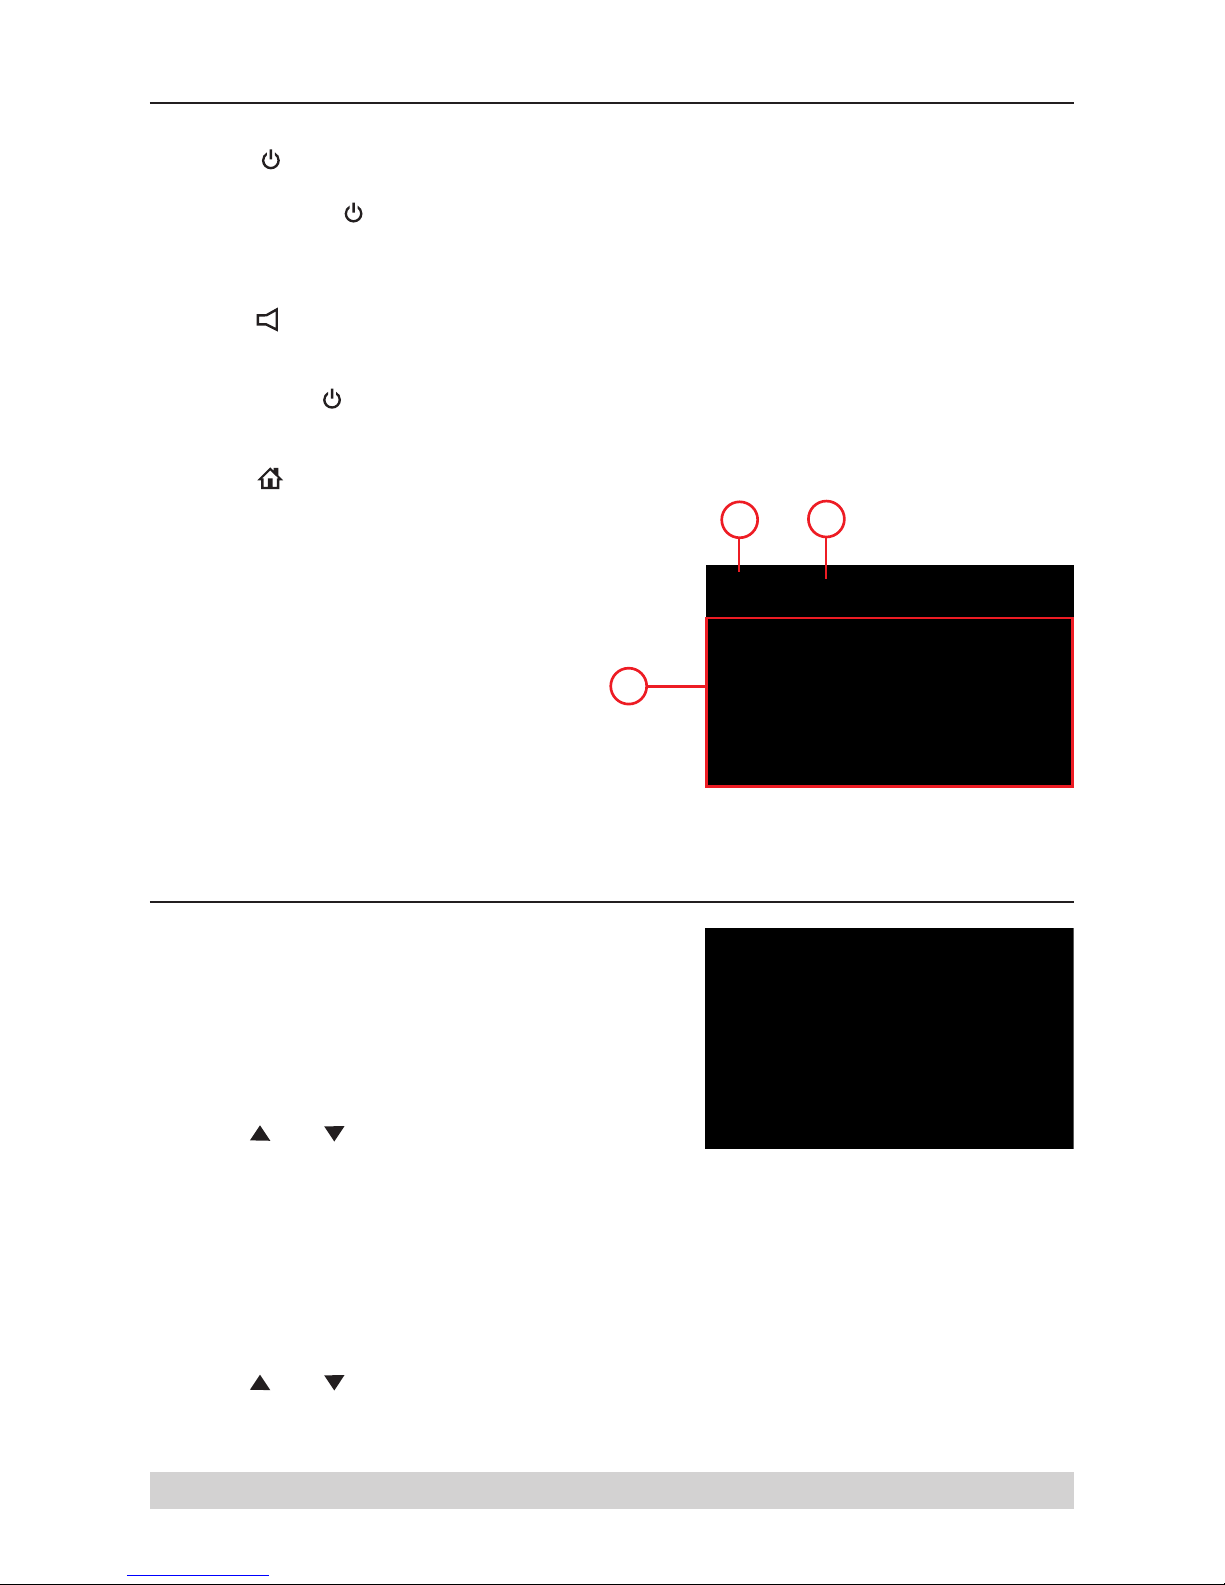
The playing mode is displayed on the screen.
1. Date display
2. Time display.
3. Function icons.
Basic Operations
1
2
3
Setting Date /Time
1. Touch [ Settings].
2. Touch [ Time ].
The date/time setup menu is displayed.
Set Date
1. Touch [ Date ].
2. Touch the date information on the screen .
A submenu is displayed.
3. Touch [ ] or [ ] to set year, month and day.
Set Clock Mode
1. Touch [Clock mode].
2. Touch [12Hr] or [24Hr] to switch clock mode.
Set Time
1. Touch [ Time ].
2. Touch the time on the screen, a submenu is displayed.
3. Touch [ ] or [ ] to set hour and minute.
4. When date/time is set, touch [ Save ] to confirm or [ Cancel ] to exit.
Note:
When date/time is set, touch [ OK ] to confirm or [ Cancel ] to exit.
Page 8

- 5 -
Select Preset Equalizer
1. Enter the EQ setup mode
Touch the [ ] icon in the user interface and the
EQ setup interface will display on the screen.
2. Select EQ mode
Touch the desired EQ selection: [ Comfort ] /
[Classic ] / [ Rock ] / [ Jazz ] / [ Relax ] / [ Pop ],
and the EQ mode will change.
Adjust Equalizer Parameters
To adjust EQ parameters, touch and drag the parameters adjustment bar.
[ Customize ]: Set the desired audio effect.
[ Original ]: Select the original audio effect.
[ LoudNess: On/Off ]: When listening to music at low volumes, this feature will selectively boost
certain bass and treble frequencies.
Adjust FAD BAL
You can adjust front/back/left/right balance of the speaker and the subwoofer volume to get
balanced listening effect according to the surroundings and your interest.
1. Enter the EQ setup mode
Touch the [ ] icon in the user interface and the EQ
setup interface will display on the screen.
2. Adjust subwoofer volume
Touch [ ] / [ ] or drag [ ] to adjust subwoofer
volume from -12 to +12.
3. Adjust fader / balance value
Touch [ ] / [ ] / [ ] / [ ] to adjust fader /
balance value from -7 to +7.
[ ]: Front speaker
[ ]: Rear speaker
[ ]: Left speaker
[ ]: Right speaker
Audio control
Equalizer Menu
The Audio Control feature allows you to easily adjust your audio system to meet the acoustical
characteristics of your vehicle, which vary depending on the type of vehicle and its measurements.
Proper setting of the Fader and Balance boosts the effects of the cabin equalizer.
Notes:
1. The parameters of the EQ modes has been preset and you can not change them besides ‘User’.
2. The EQ mode will change to ‘User’ automatically when you adjust the frequency value under the
modes besides ‘User’.
3. The value of Sub is independent of EQ mode and can be adjusted separately.
Page 9
- 6 -
Select Radio as Playing Source
Open the Source Menu and then touch [Radio].
Select One Radio Band
Touch the [ ] icon on the user interface repeatedly to cycle through the radio bands between
FM1, FM2, FM3, AM1 and AM2.
Tune the radio
Auto Tunig
During auto tuning, the frequency will be changed in seek mode.
Touch the [ ] / [ ] icon on the user interface to tune in a higher / lower station.
Note: When a station is received, searching stops and the station is played.
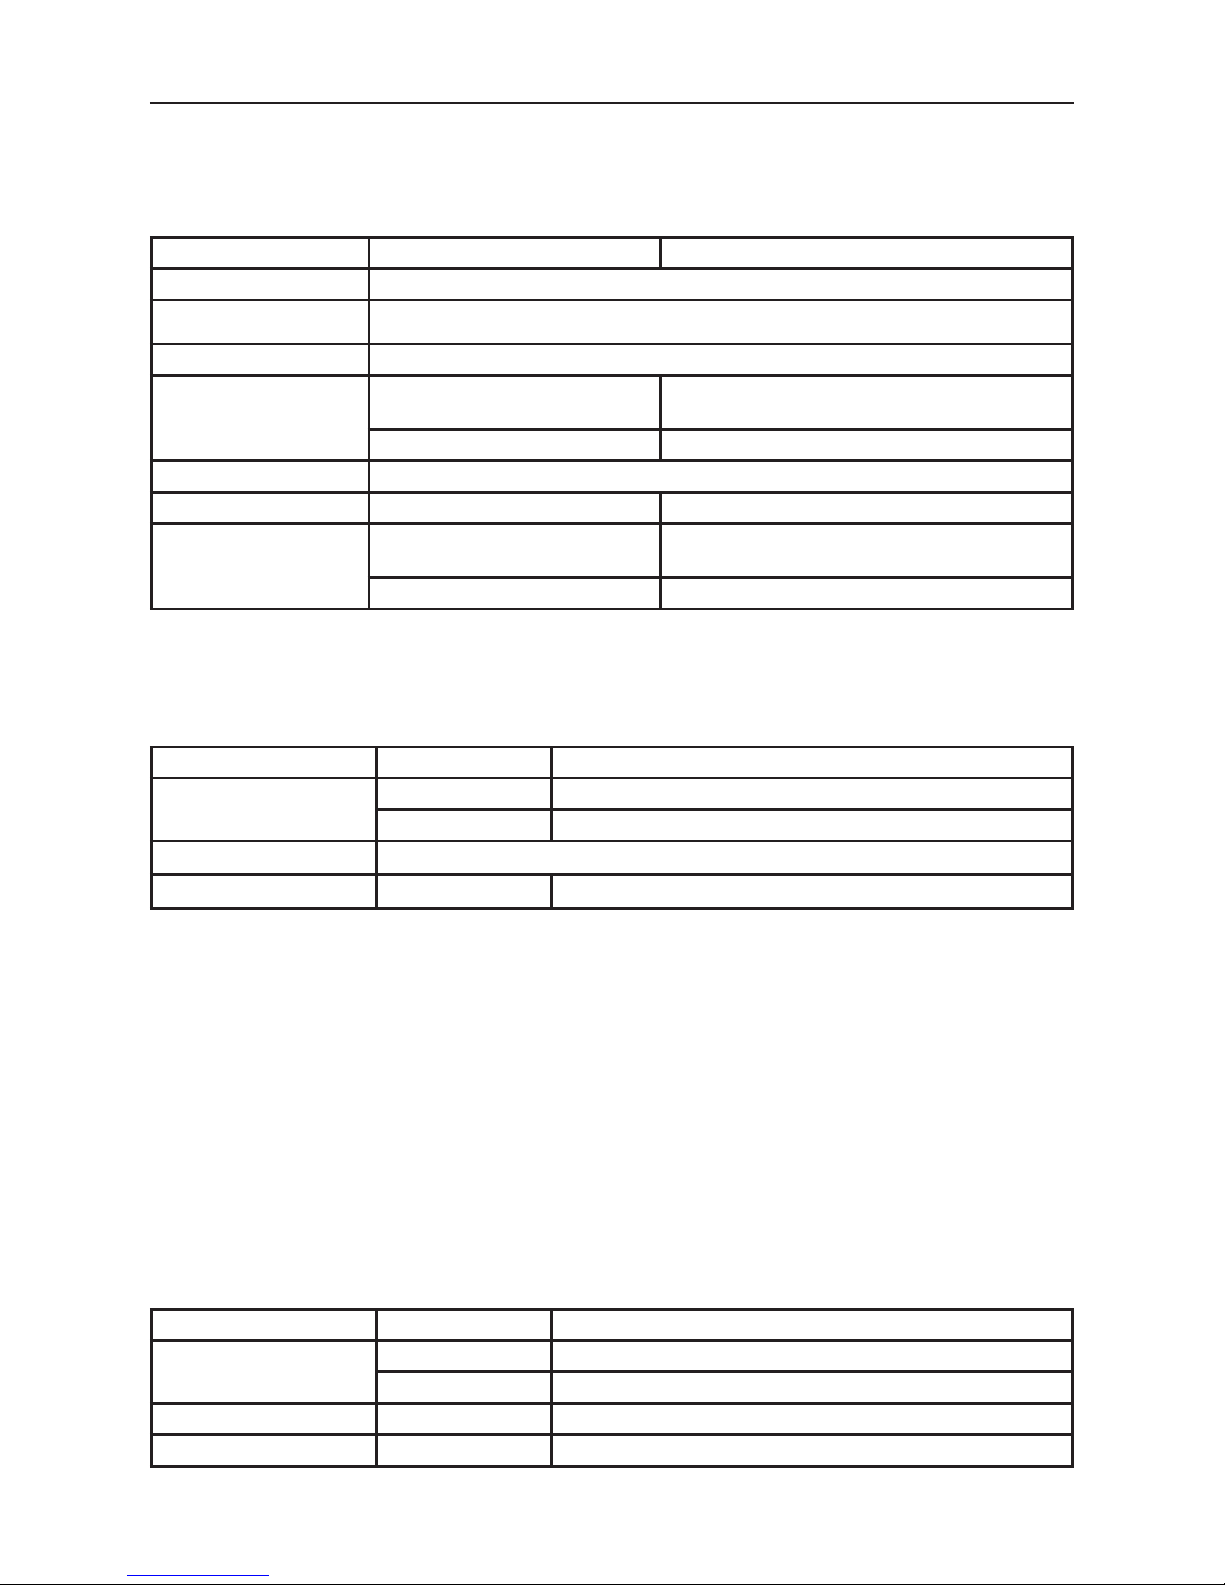
Manual Tuning
Method 1:
Touch and hold [ ] / [ ] icon on the user interface more than 1 second to changed in steps
higher / lower station. Repeat the operation to change step by step.
Method 2:
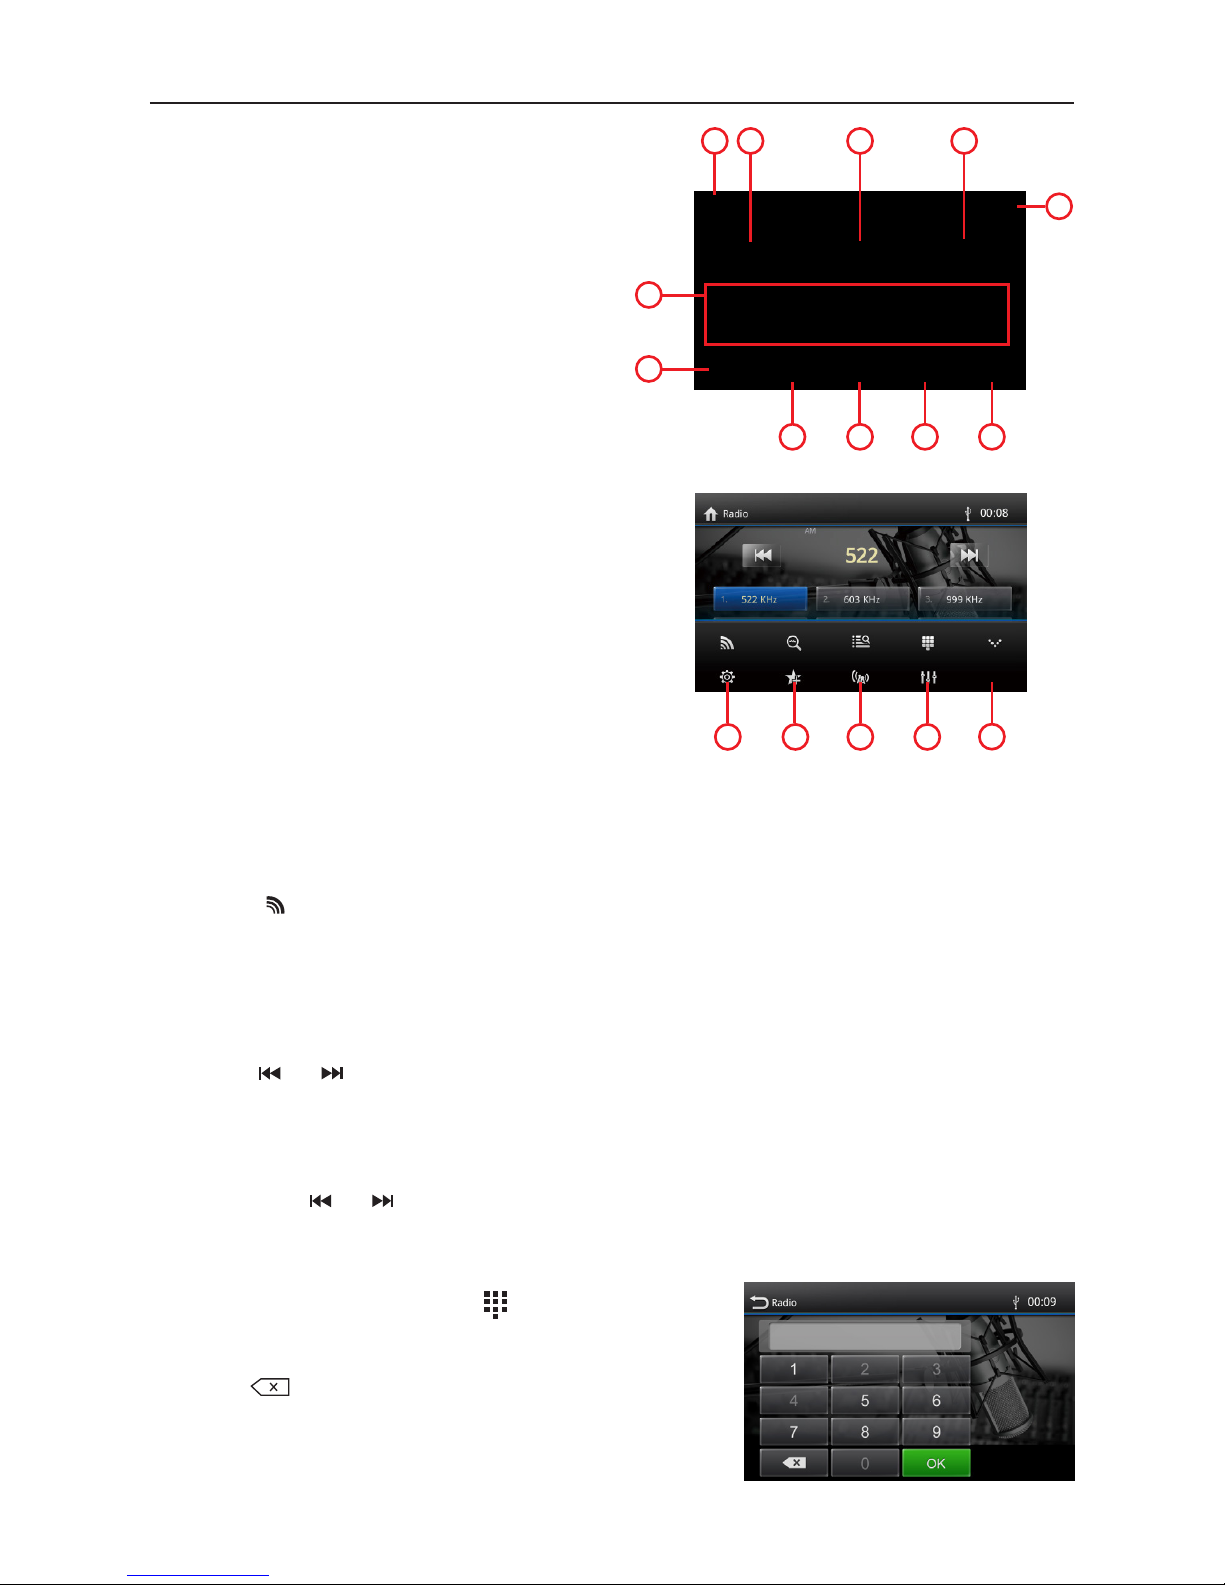
1. Touch the numeric keypad icon [ ].
Numeric keyboard is displayed, touch number to
input frequency.
2. Touch [ ] to delete the input number step by step.
3. Touch [ OK ] to enter.
FM/AM Radio mode
1. Touch to view the MENU and select a new
playback source
2. Tune backward (short press)
Seek backward (long press)
3. Current radio frequency
4. Tune forward (short press)
Seek forward (long press)
5. Broadcaster information stored at the preset
6. Touch to change between AM/FM bands
7. Search stations automatically
8. To view all the stored stations
9. Enter frequency directly
10. Touch to view more on-screen buttons
11. Clock
12. RDS setting options
13. Save the desired radio station
14. Touch to change between Local and Distance
15. Touch for quick access to EQ level settings
Radio overview
1 2 3 4
5
6
7 8 9 10
12 13 14 15
16
11
Page 10

- 7 -
Adjusting the seek tuning sensitivity
The seek tuning sensitivity decides whether the automatic station
seek tuning finds only strong stations or also weaker stations that
may be noisy.
1. Press the [ ] button in main menu.
2. Press the button right to [ LOC ] to adjust the sensitivity of station seek tuning.
If LOC is on, only stations with a strong signal are found during seek tuning.
If LOC is off, stations with a strong and weak signal are found during seek tuning.
EQ Selection
Press the [ ] icon and enter the EQ setup.
RDS Basics
RDS transmits data to the radio which displays information such as name station, song artist, and
song title. RDS service availability varies with areas.
Adjust RDS Settings
1. In Radio menu, touch [ ].
The option menu is displayed.
2. Touch on the selected option to change the setting.
[RDS]: To turn on or off “RDS” function.
[CT]: To turn on or off “Clock Time” synchronization function.
[TA]: To turn on or off “TA” function.
[PTY]: To show PTY list.
[EON]: To turn on or off “EON” function.
FM/AM Radio mode
Preset Station
The unit has 5 bands, such as FM1, FM2, FM3, AM1, AM2, and each band can store 6 stations; the
unit can store 30 stations in total.
Search Stations Automatically
Touch [ ] to search station and store 6 strongest
stations in current band automatically.
Manual Store
1. Tune to a station manually.
2. Touch [ ].
3. Touch one of the channels P1 to P6 to save th selected
station.
Tune to a Preset Station
1. Touch [ ].
2. Touch one of the preset channels on the screen.
Page 11

- 8 -
RDS ( Radio Data System )
The unit provides basic functions of RDS.
RDS service availability varies with areas. Please verify if RDS service is available in your area.
AF Function
Alternative Frequencies Lists are used in conjunction with the PI code (Program Identification
code)to assist automatic tuning.
Using this information, the radio can automatically search out another frequency of the same
station.
Note:
• During auto switching radio frequency, some interference may be heard..
• Turning off AF function can settle this problem.
EON ( Enhanced Other Networks )
When EON data is received, the EON indicator lights and the TA and AF functions are enhanced.
TA: Traffic information can be received from the current station or stations in other network.
AF: The frequency list of preset RDS stations is updated by EON data. EON enables the radio to
make fuller use of RDS information. It constantly updates the AF list of preset stations, including
the one that currently tuned into.
TA Function
The TA (Traffic Announcement) function lets the unit receive traffic announcements automatically.
The TA function can be activated by a TP (Traffic Program) station broadcasting traffic information.
When TA is activated and a traffic announcement is received, the current playing source will be
overridden by the traffic announcement The unit returns to the original source after the traffic
announcement has been received.
CT (Clock Time)
Some stations broadcast the time and date within the encoded RDS signal. The clock time is
automatically adjusted when ‘CT’ is set to ‘ON’.
PTY Function
PTY is an abbreviation for the type of program defined by a code to define the program being
broadcast (eg news or Rock).
The Options of PTY is displayed on the screen. To see the options PTY, tap the scroll bar and arrows
on the screen.
When an option is selected PTY (eg News), the radio unit, the PTY search available. If the PTY
requested was not found, the unit returns to the original radio frequency.
FM/AM Radio mode
Page 12

- 9 -
Car Play
Using Apple lightning cable to connect iPhone with the product, and it will automatically show the
CarPlay interface. User could directly operate the common functions of iPhone on the product.
iPhone support: minimum iPhone6; Required iOS: minimum iOS 7.1.
1
Play with CarPlay
1. Select the CarPlay source to play music.
Play Music
Touch the main interface of CarPlay mode to access
all of your content from iTunes.
Call Out / Receive Call
Touch the Phone of CarPlay mode for Calling.
Map
Touch the Map of CarPlay mode to let the iPhone
show you the way.
Message
Touch the Messages of CarPlay mode for sending
message or check unread message.
Siri
1. Touch and hold Apple Home key on product or
iPhone for using Siri voice assistant, such as
issuing a call, playing music, opening the map
and other voice commands.
2. Touch the Siri key on the front panel.
3. When iPhone is connected, enable Siri by steering
wheel control
This function is only available on cars equipped
with the equivalent key
4. Control with “Hey, Siri”.
Play music
Call Out/Receive Call
CarPlay
Use map
Page 13

- 10 -
Android Auto
Connect Android phone by standard micro USB cable, drivers can enjoy the music from their phone,
show the way with Google map or other map App and make or receive a call.
User need to enable Bluetooth on phones and the product at the same time.
Required Android OS: 5.0. (Android Auto App must be installed on the phone before connecting).
Installation procedur
The following procedure illustrated for the installation of Android Auto APP.
Note: The sequence shown may vary depending on the device connected.
IMPORTANT NOTE:
In order to continue with the APP installation, the vehicle must be parked with the handbrake
inserted.
1
Page 14

- 11 -
Android Auto
Installation procedure
To continue with the installation, you must agree to the terms provided by Google.
Next step, are to allow Android Auto to easily work with navigation, music, calls messages and other
voice commands. If you want these functions to Allow or Deny the functions.
Page 15

- 12 -
Android Auto
Next step, are to allow Android Auto to show your notifications on top of your other apps.
Next step, Get started to Android Auto.
Page 16

- 13 -
Android Auto
Connect Android phone by standard micro USB cable, drivers can enjoy the music from their phone,
show the way with Google map or other map App and make or receive a call.
User need to enable Bluetooth on phones and the product at the same time.
Required Android OS: 5.0. (Android Auto App must be installed on the phone before connecting).
1
Play with Android Auto
1. Select the Andorid Auto source to play music.
Map
Touch the ( ) icon of Android Auto to let the phone
show you the way.
Call Out / Receive Call
Touch the ( ) icon on Android Auto for Calling.
Back to Android Auto
Touch the ( ) icon of Android Auto to back on main
menu.
Play Music
Touch the ( ) icon of Android Auto to play music.
Talk with Google
1. Touch the ( ) on product for using Google voice
assistant, such as issuing a call, playing music,
opening the map and other voice commands.
2. Touch the ( ) on the top right of LCD .
3. When Phone is connected, enable Google voice by
steering wheel control
This function is only available on cars equipped
with the equivalent key
4. Control with “Ok, Google”.
Back to unit menu
Touch the ( ) icon of Android Auto to back on unit
main menu.
Andorid Auto
Page 17

- 14 -
Touch Screen Controls
The touch key areas for playback are outlined below:
A: Return to the main menu
B: Display onscreen control menu
C: Time display
Controlling Playback
To access the on-screen controls, touch the screen except upper left corner, and touch again to
cancel display. Touch [ ] to view all function icons.
Connect a USB Device
1. Open the USB door.
2. Insert the USB socket, then connect the other end of the cable to your USB device.
Remove a USB Device
1. Select other source on the main menu.
2. Remove the USB device.
Play/Pause
1. Once USB or SD/MMC card is inserted, play starts automatically.
For movie, if a menu appears, press [ ] to start play.
2. To pause, touch [ ].
To resume play, touch [ ].
3. Skip to previous / next track / chapter, press [ ] / [ ] key.
Previous/Next
Touch [ ] / [ ] key on the screen to skip to previous / next track / chapter.
Playback Mode
B
C
A
A
B
C
Page 18
- 15 -
Playback Mode
Search for a content
For Folder Control
1. Touch [ ] to display all available folders
2. Touch a folder, then touch the desired file.
3. Touch the file again to start play
For Audio Files
1. Touch [ ] to display all available audio folders.
2. Touch a folder,then touch the desired file.
3. Touch the file again to start play.
For Video Files
1. Touch [ ] to display all available ideo folders.
2. Touch a folder,then touch the desired file.
3. Touch the file again to start play.
For Picture Files
1. Touch [ ] to display all available picture folders
2. Touch a folder,then touch the desired file.
3. Touch the file again to start play.
Repeat
1. Touch anywhere except the upper left corner to display menu on the screen.
2. Touch [ ] repeatedly:
[ ] Repeat off: Cancel repeat play.
[ ] Repeat folder: Play all in the current folder.
[ 1 ] Repeat single: Play the current single repeatedly.
Shuffle (Random) Play
You can play audio tracks/files in random order.
1. Touch [ ] to display the 2nd menu.
2. Touch [ ] on the screen repeatedly to turn random play on or off.
Rotate Pictures
1. When you view pictures, touch the screen to display menu on the screen, if necessary.
2. Touch [ ] to display the 2nd menu.
3. Touch [ ] or [ ] repeatedly to rotate the picture.
Zoom in or out
1. When you view pictures, touch the screen to display menu on the screen, if necessary.
2. Touch [ ] to display the 2nd menu.
3. Touch [ ] or [ ] repeatedly to zoom in or out the picture.
Page 19

- 16 -
You can make or receive phone calls with Bluetooth-enabled phones through the unit. You can also
listen to music from a Bluetooth-enabled device.
Bluetooth device
• In the main menu, press [Phone] the Bluetooth menu will be displayed.
The list shows known Bluetooth devices.
[ ] Add a new Bluetooth device.
[ ] Displays the settings menu.
Bluetooth mode
• Press the [ ] key of the Bluetooth device with which
you want to establish a connection.
When the device is within range and the connection is
established, the device is displayed in the menu.
• Press the [ ] button if you want to delete the
Bluetooth device from the list.
Connecting Bluetooth devices
If you want to connect a device to the audio system fothe first time, do the following:
1. Activate the Bluetooth function on the device.
2. Touch [ ] to search for the Bluetooth device with the unit.
3. Start scanning on the Bluetooth device and select the unit “M-DL7000”
4. If required, enter the default password “0000”.
The connection is established and the menu for the registered device is displayed.
Note:
If a telephone is connected with the car sound system, the Bluetooth icon is displayed at the to
right edge of the display in all audio/video sources.
Page 20
- 17 -
Bluetooth function
[ ] Call up the phone book.
[ ] Call up records lists.
[ ] Display the dial keypad menu.
[ ] Disconnect connection with current device.
[ ] Display options menu.
Make a Call
• Enter a phone number with the dial keypad and press
the [ ] button.
- Or -
• Select a contact/number via the records lists or phone
book.
The connection is being established.
If a call is coming in, the call menu is displayed.
[ ](Hang up): Reject a call.
[ ](Answer): Answer a call.
Alphabetic search
Press [ ] on the left bottom of the screen to access Phonebook. If you want to search a contact,
press [ ] and enter the characters via the keypad.
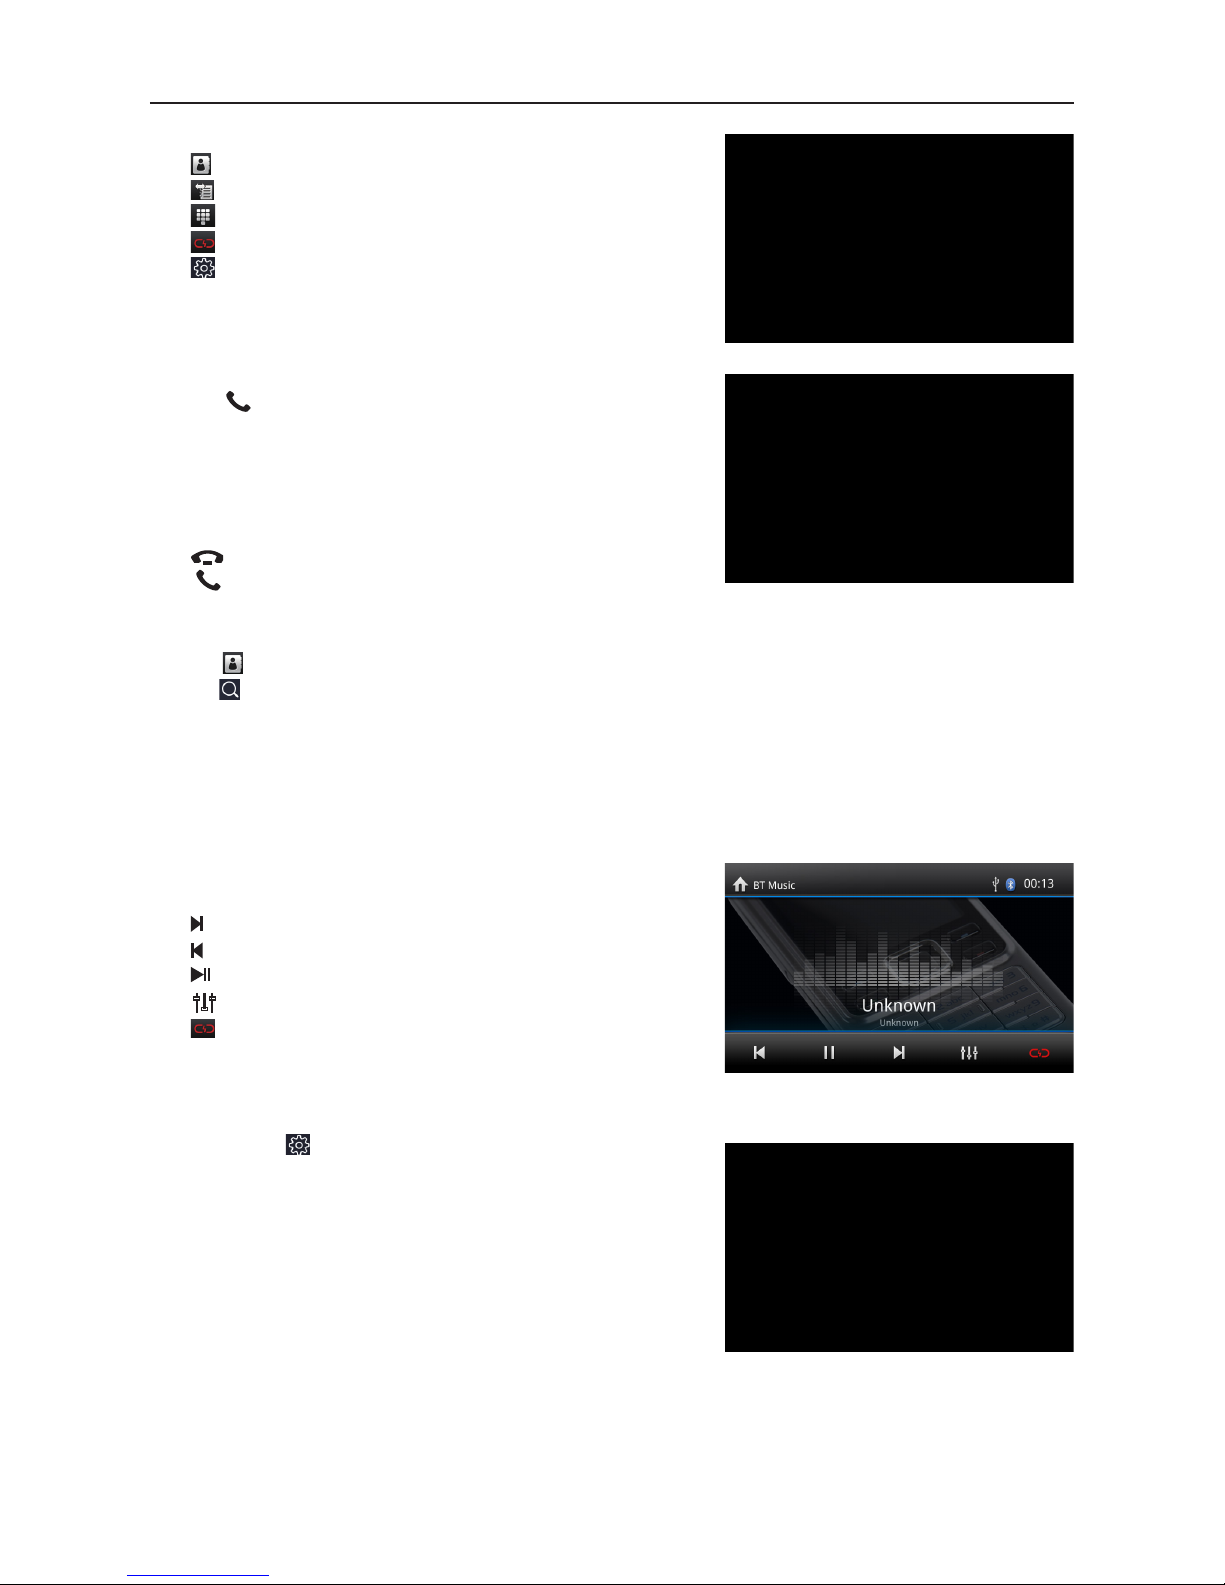
Audio playback via Bluetooth streaming
A2DP is short for Advanced Audio Distribution Profile. The mobile phones supporting this function
can transmit stereo audio, whereas the ones not supporting this function can transmit mono audio
only.
• Press the [ BT Music ] button on main menu to change
to the audio playback.
[ ] Title selection.
[ ] Interrupt playback and continue playback.
[ ] Title selection.
[ ] Enter the EQ setup menu.
[ ] Disconnect connection with current device.
Bluetooth settings
• Press the [ ] button.
The options menu is displayed.
[ Auto Connect ]: If “Auto Connect” the unit
automatically connects to the Bluetooth devices listed.
[ Auto Answer ]: If “Auto Answer” is activated,
incoming phone calls are automatically answered.
[ Phone book sync ]: To be able to access the
phonebook of the connected phone, synchronization is
required.
Bluetooth mode
Page 21
- 18 -
General
1. Touch [ General ] in the settings page.
2. Touch to highlight a setting.
3. Touch to display/select an option.
General settings Options Description
System Language Select on-screen display language.
Lighting You can select the key color.
Radio Area Select your region of origin.
Beep
On
Turn on the beep sound. Each time you press a
button, the unit beeps.
Off Turn off the beep sound.
SWC Steering wheeel control
Screen Saver On/Off Turn on/off Screen Saver.
LOC
On
If LOC is on, only stations with a strong signal
are found during seek tuning.
Off f LOC is off, all stations are tuned during search.
Video
1. Touch [Video].
2. Touch an option repeatedly to select:
Video settings Options Description
Parking
On Disable video
Off Enable video
Day/Night Mode
Day/Night/Auto
Brightness
0~10 Adjust the display Brightness.
Volume
You can set different volumes for different modes.
1. Touch [Volume].
The volume setting sub-menu is displayed.
2. Touch to select a source.
3. The volume range is from: -12 to 12.
When switching to the source, the volume increases automatically.
4. Touch the upper left corner of the screen to exit.
Time
1. Touch [ Time ].
2. Touch an option repeatedly to select:
3. Touch the upper left corner of the screen to exit.
Time settings Options Description
Set Time
Hour To set hour and minute.
Minute To set AM/PM (only for 12Hr).
Set data Y/M/D To set year, month and day.
12H Format On/Off Touch On/Off to switch to time mode.
Settings
Page 22
- 19 -
System
1. Touch [ System ].
2. Touch an option repeatedly to select:
System settings Description
MCU Update Update MCU
MPEG Update Update MPEG
MCU Version Display the current MCU version information.
MPEG Version Display the current MPEG version information.
Load factory Restore to default settings.
Settings
Various
Additional devices
You can connect an external audio/video device to the unit.
1. Connect the external device with the supplied AV cable.
2. Touch the upper left corner to display the main menu.
3. Touch [AV-IN] to access external device.
Reset
When the unit hangs up, you can reset it.
1. Press [ RESET ] with a ball-point pen or similar tool.
Replace a Fuse
If there is no power, the fuse may be damaged and need to be replaced.
1. Remove the unit from the dashboard.
2. Check all electrical connections.
3. Buy a fuse that matches the amperage of the damaged fuse.
4. Replace the fuse while the unit is powered off.
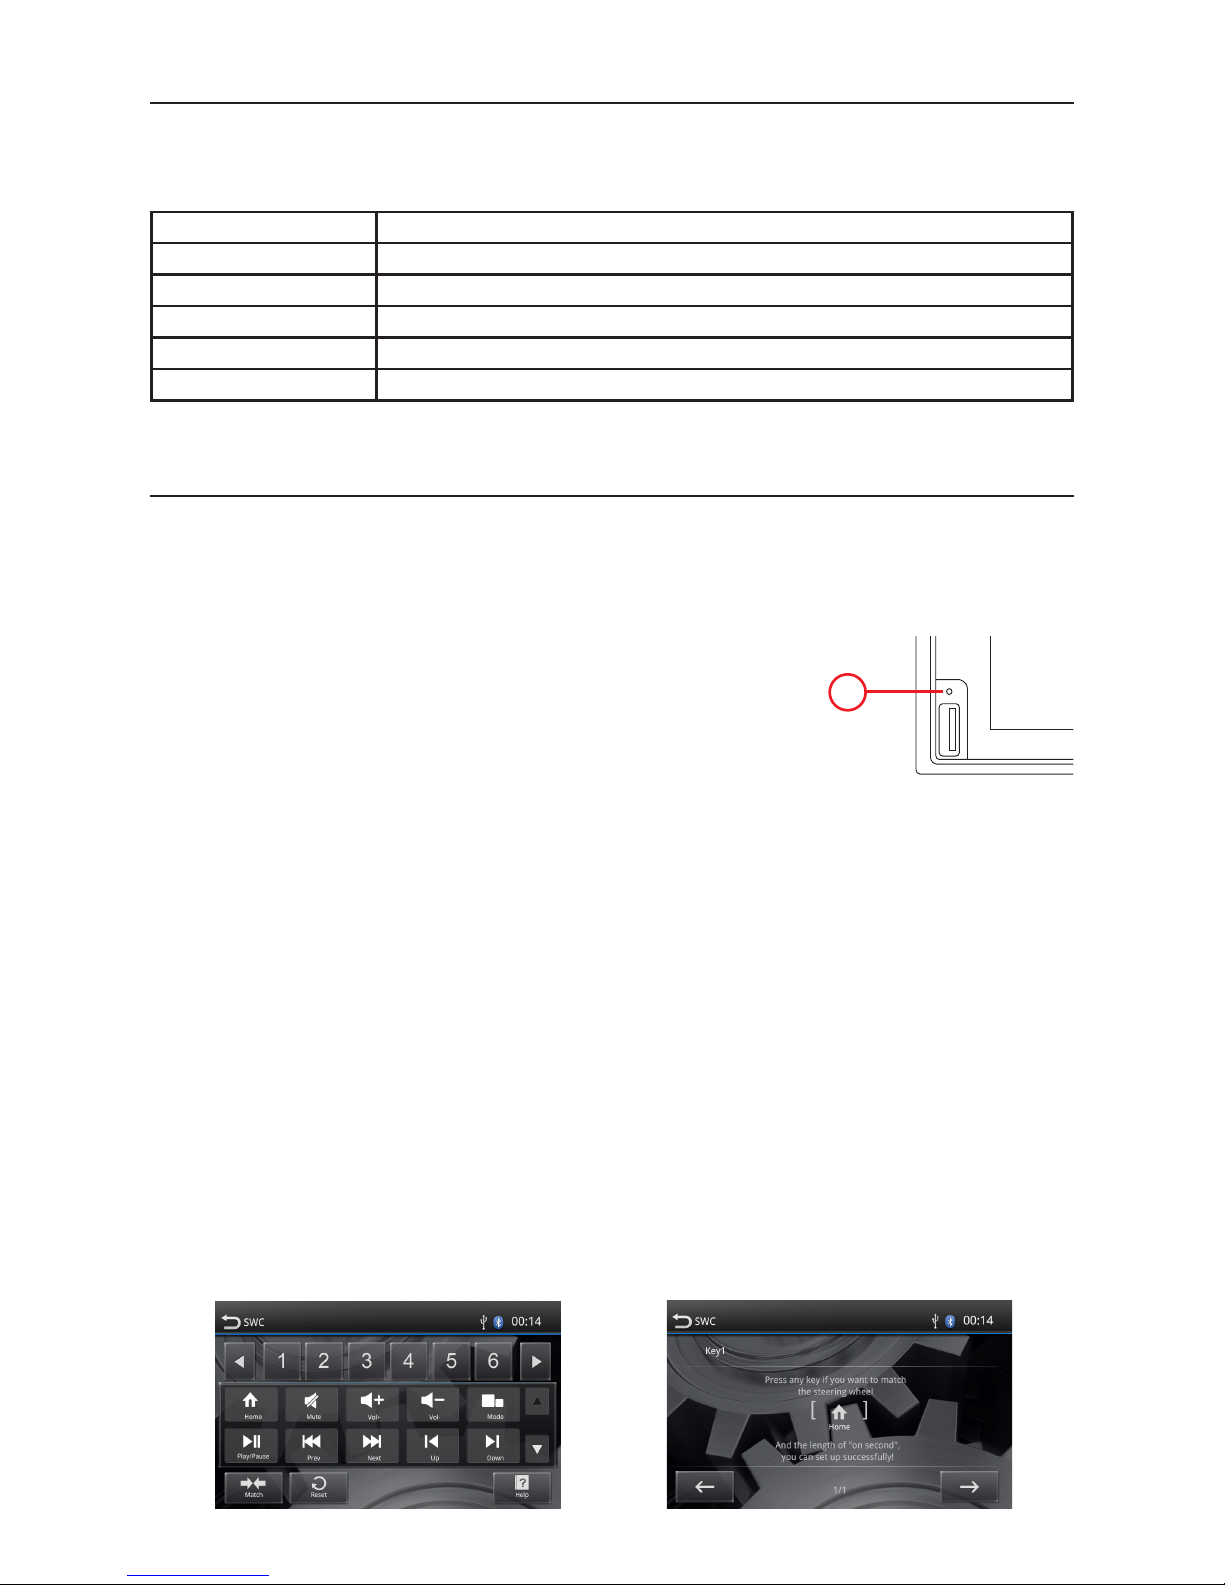
Steering Wheel Control Programming
1. Touch the [ ] button in main menu, the settings menu is displayed.
2. Touch [ General setting ] in the settings page.
3. Touch [ SWC ], the SWC menu will display.
4. Select the keys corresponding to the functions of steering wheel controls by tapping the KEY
and define the desired function.
5. Touch [ Match ] to program.
6. Press each individual steering wheel control button for each corresponding function.
7. Once the final steering wheel control button is programmed, the functions are saved and the
programming.
8. Touch [Reset] to reset the programming.
M-DL7000D
1
Page 23

- 20 -
Specifications
General
Reference Supply Voltage ...........................................................................................................12V
Operating Voltage Range ...................................................................................................... 9 - 16V
Max Operating Current ....................................................................................................................15A
Grounding System ...................................................................................... Car Battery Negative Pole
Dimensions(WXHXD)................................................... .......................................... 178X100X166.5mm
Weight(main unit) .........................................................................................................................1.9kg
FM
Signal Noise Ratio ....................................................................................................................≥55dB
Residual Noise Sensitivity (S/N=30dB) ............................................................................... ≤10dBµV
Frequency Response (±3dB) ......................................................................................... 40Hz~12KHz
Station Seeking Level ........................................................................................................ 23±3dBµV
Distortion ................................................................................................................................. ≤1.0%
Stereo Separation (1KHz ......................................................................................................... ≥25dB
Antenna Impedance ..................................................................................................................... 75
Ω
Frequency range .........................................................................................................87,5 /108,0MHz
AM
Residual Noise Sensitivity (S/N=20dB) ................................................................................ ≤28dBµV
Selectivity (±9KHz ..................................................................................................................... ≥50dB
Frequency range ............................................................................................................522/1620KHz
BT
Frequency ............................................................................................................... 2,402 - 2,480GHz
EIRP power ............................................................................................................................5.44dbm
LCD
Screen size .............................................................................................................. 6.75 inches(16:9)
Display resolution .......................................................................................................... 800X480dots
Contrast ratio ................................................................................................................................. 400
Brightness ...........................................................................................................................280cd/m2
Power output
Frequency Response (±3dB .......................................................................................... 50Hz~16KHz
Maximum Output Power ......................................................................................................... 4×45W
Load Impedance ............................................................................................................................ 4
Ω
AUX IN
Distortion .................................................................................................................................. ≤0.5%
Frequency Response (±3dB .......................................................................................... 50Hz~20KHz
Audio Input Level .................................................................................................................. 0.5Vrms
Audio
Audio Output Impedance ........................................................................................................... 100
Ω
Audio Output Level ......................................................................................................... 2Vrms(Max)
Video
Normal Video Input Level (CVBS ......................................................................................... 1.0±0.2V
Video Input Impedance ................................................................................................................ 75
Ω
Video Output Impedance ............................................................................................................. N/A
Video Output Level ........................................................................................................................ N/A
Environment
Operating Temperature .............................................................................................. -20°C ~ +70°C
Storing Temperature .................................................................................................. -30°C ~ +80°C
Operating Humidity ........................................................................................................ 45%~80%RH
Storing Humidity ............................................................................................................ 30%~90%RH
Versione Software
MCU ........................................................................................................................................ Ver 1.03
Page 24

- 21 -
Troubleshooting
If the unit is faulty, please consult the following points before calling the service center.
Problem Phenomena Solutions
Unit
Cannot power on/off
Check the connection, if it is broken, try to reconnect it;
Check the main fuse, if it is damaged, replace it; Press reset
key.
No sound
Adjust the volume.
Confirm whether the music and video is supported or not.
Reversing Abnormal picture
Exit reversing mode and enter again.
Check whether the camera is covered by foreign matters.
Check whether the type of reverse camera is matched or not.
Check the reversing signal cable.
Radio
Noisy; Cannot search
the station
Ensure there is no metal products around the machine.
Driving the vehicle to the place where the radio signal is good
and search the station.
If the solutions above are invalid, please check whether
the antenna is disconnected, damaged, etc.
Navigation
Satellite positioning
failure
Please make sure that the SD card has been inserted into
the machine, which has navigation map software inside.
Driving the vehicle to the open place and search the satellite,
the result will be different due to weather conditions.
Bluetooth Connecting fail
Please make sure that the Bluetooth of mobile device is
turned on.
USB playing Playing fail
Ensure the U disk is not damaged.
Please make sure that the format of content is supported.
Page 25
- 22 -
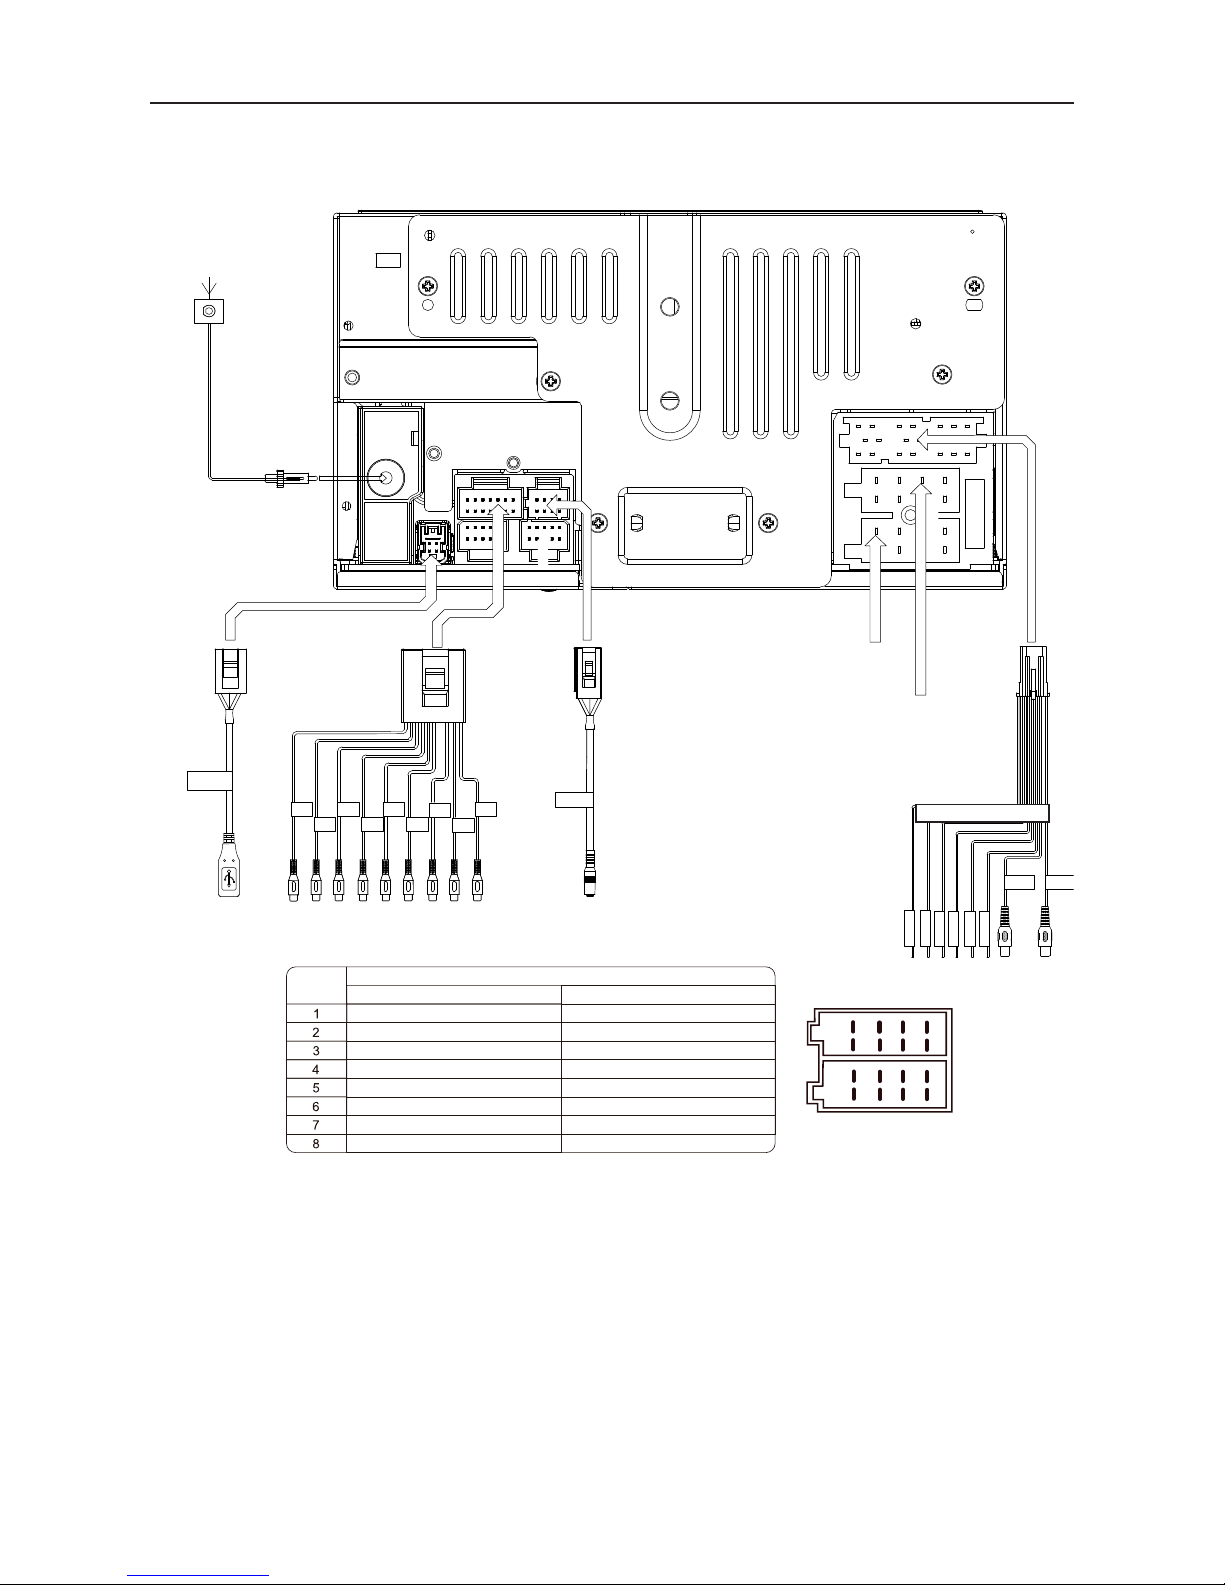
Wire Connections
Red
White
Yellow
Red
White
Red
White
Brown
Brown
USB-0.5A
Pink
Green with White
Black
Orange with white
Brown with white
Blue
MIC
LINE OUTPUT
& AV IN
USB
MICROPHONE
SWC &
CAMERA IN
RADIO FM/AM Antenna
SUB 1
SUB 2
Front L
Front R
Rear L
Rear R
Video
Aux L
Aux R
Rear right (+) / Purple
Rear right (-) / Purple with black stripe
Front right / Gray
Front right (-) / Gray with black stripe
Front left (+) / White
Front left (-) / White with black stripe
ACC+ / Red
Rear left (+) / Green
Ground / Black
Battery 12V(+) / Yellow
Rear left (-) / Green with black stripe
Function
Connector A Connector B
PIN NO.
Illumination / Orange
Antenna-Power Control/ Blue
1
2
3
4
5
6
7
8
1
2
3
4
5
6
7
8
Camera IN
Video Out
PARKING
REVERSE
SWC GND
SWC2
SWC1
P.CONT
Video Out
Yellow
CONNECTOR A
CONNECTOR B
CONNECTOR A
CONNECTOR B
Yellow
Not available
Page 26

-
23
-
Page 27

There are no restrictions of use.
The manufacturer Aldinet S.p.A declares that the type of radio equipment - Multimedia Navigation
Receiver, model M-DL7000, brand Macrom - complies with the 2014/53 / EU Directive.
The full text of the EU Declaration of conformity is available at the following internet address:
www.macrom.it, or at
Aldinet S.p.A. Viale Colombo, 8 - 20090 Trezzano S/N (MI) Italy
Made in China by
Aldinet S.p.A.
Viale Colombo, 8 - 20090 Trezzano S/N (MI) Italy
Declaration of Conformity
Information on disposal of unit
This product bears the selective sorting symbol for waste electrical and electronic
equipment (WEEE).
This means that this product must be handled to the local collecting points or given back to
retailer when you buy a new product, in a ratio of one to one (or one to zero if the external
dimension is less than 25 cm) pursuant to European Directive 2012/19/EC in order to be
recycled or dismantled to minimize its impact on the environment.
For further information, please contact your local or regional authorities.
Electronic products not included in the selective sorting process are potentially dangerous for the
environment and human health due to the presence of hazardous substances.
The unlawful disposal of the product carries a fine according to the legislation currently in force.
-
24
-
Page 28

www.macrom.it
The MACROM brand is a registered trade mark of ALDINET S.p.A.
 Loading...