

Page 1
RADIO
RECEIVER
USER MANUAL
M-DL3200
M-DL3200 User manual_ENG.indd 1 23/07/2018 15:29:17
Page 2
Safety Precautions
MUTE
OK
Thank you for purchasing this product. Please
read through these operating instructions
so you will know how to operate your model
properly. After you’ve finished reading the
instructions, keep this manual in a safe place
for future reference.
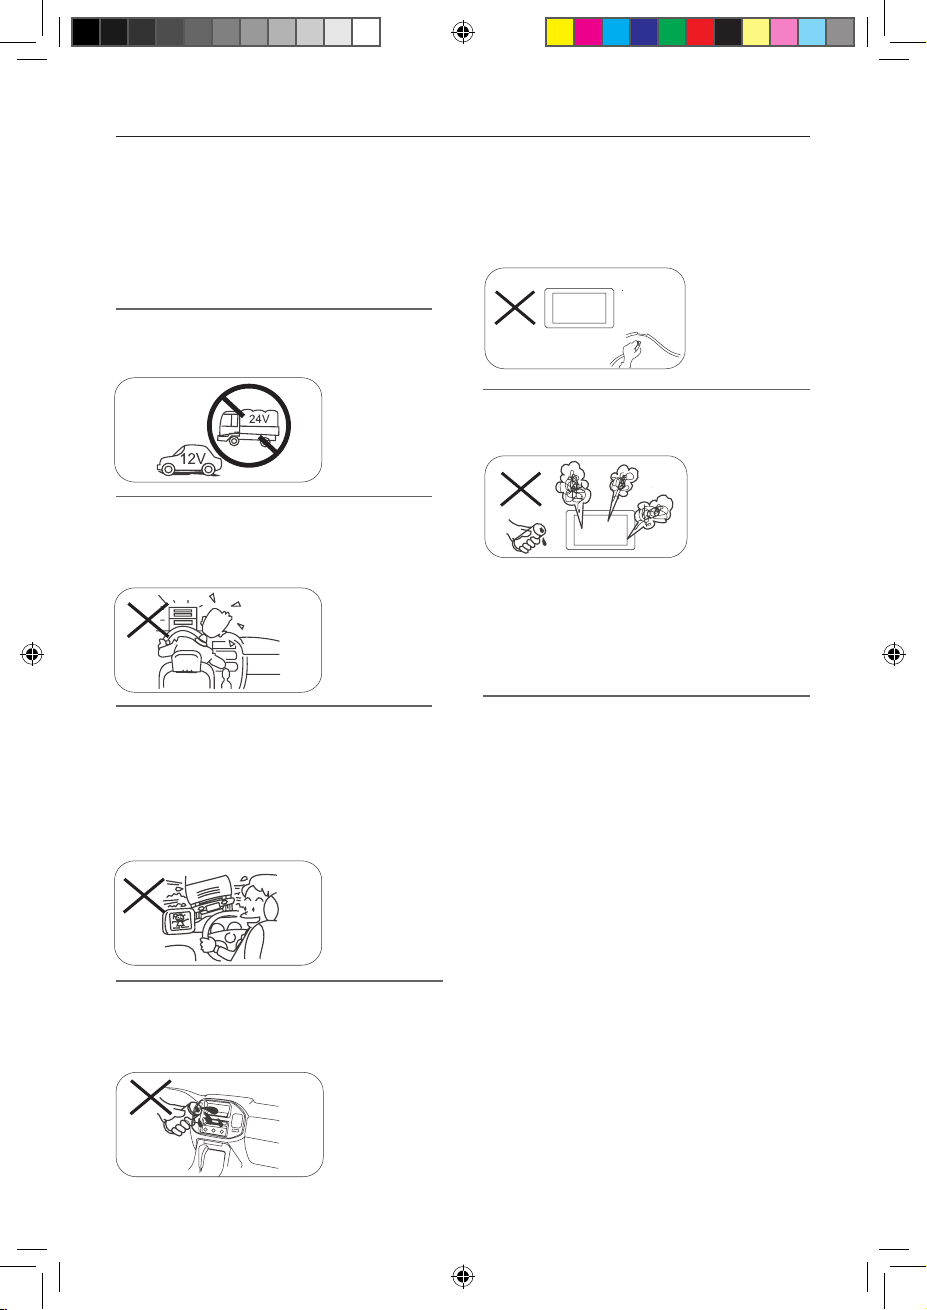
Only connect the unit to a 12-volt power
supply with negative grounding.
Never install this unit where the operation &
condition for safe driving is impaired.
Never use the video display function in the
front when driving to prevent the violation of
laws & regulations and also to reduce the
risk of traffic accident except for using rear
view video camera.
Please don't change the fuse on the power
cord without professional guidance, using
improper fuse may cause damage to this unit
or even cause fire.
Please contact your nearest dealer if one of
the following symptoms is experienced:
(a). Water or other objects enters the unit.
(b). There is smoke.
(c). Peculiar smell.
To ensure safe driving, please adjust the
volume to a safe and comfortable level in
case of emergency situations.
Never expose this unit, amplifier, and
speakers to moisture or water to prevent
electric sparks or fire.
- 1 -
M-DL3200 User manual_ENG.indd 1 23/07/2018 15:29:18
Page 3
Installation
• Before final installation, connect the wiring temporalty and make sure it is all working properly.
• Use only the parts included with the unit to ensure proper installation. The use of unauthorized
parts can cause malfunctions.
• This item must be installed by an authorized dealer in order to keep the warranty vaild.
• Install the unit where it does not get in the driver’s way and cannot injure the passenger if there
is a sudden stop, like an emergency stop.
• Avoid installing the unit where it would be subject to high temperature, such as direct sunlight,
or hot air, heater or where it would be subject to dust dirt or excessive vibration.
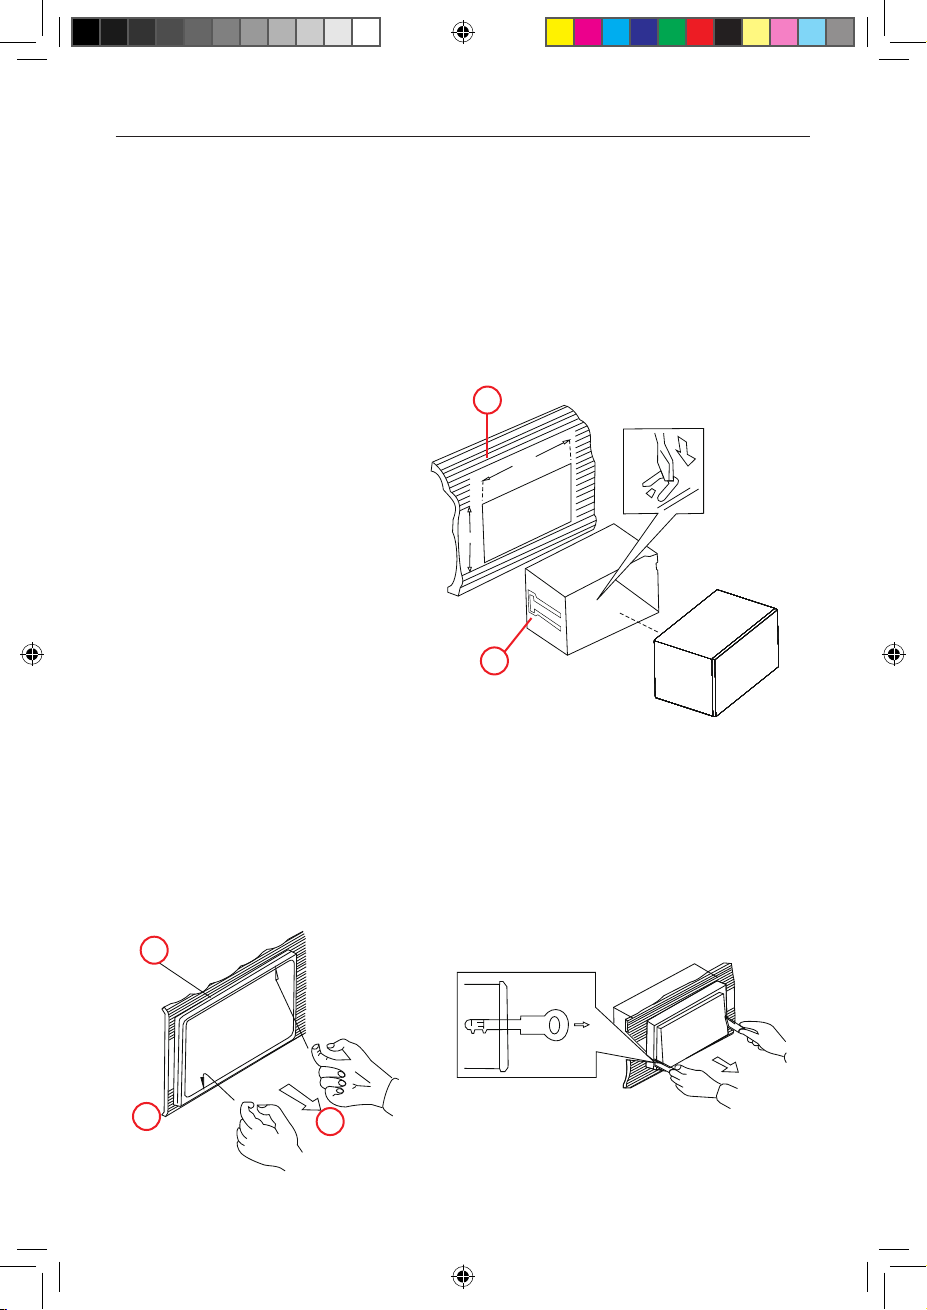
• Be sure to remove the front panel before installing the unit.
Double DIN Mount
Installation the unit
After inserting the half sleeve into
the dashboard, select theappropriate
tab according to the thickness of the
dashboard material and bend them
inwards to secure the holder in place.
1
182
1. Dashboard
2. Holder
108
2
Removing the unit
a. Front panel
b. Insert fingers into the groove in the front of frame and pull out toremove the frame.
(When re-attaching the frame, point the side with a groove down wards and attach it.)
c. Insert the levers supplied with the unit into the grooves at both sides of the unit as shown
in figure until they click. Pulling the levers makes it possible to remove the unit from the
dashboard.
a
c
b
- 2 -
M-DL3200 User manual_ENG.indd 2 23/07/2018 15:29:18
Page 4
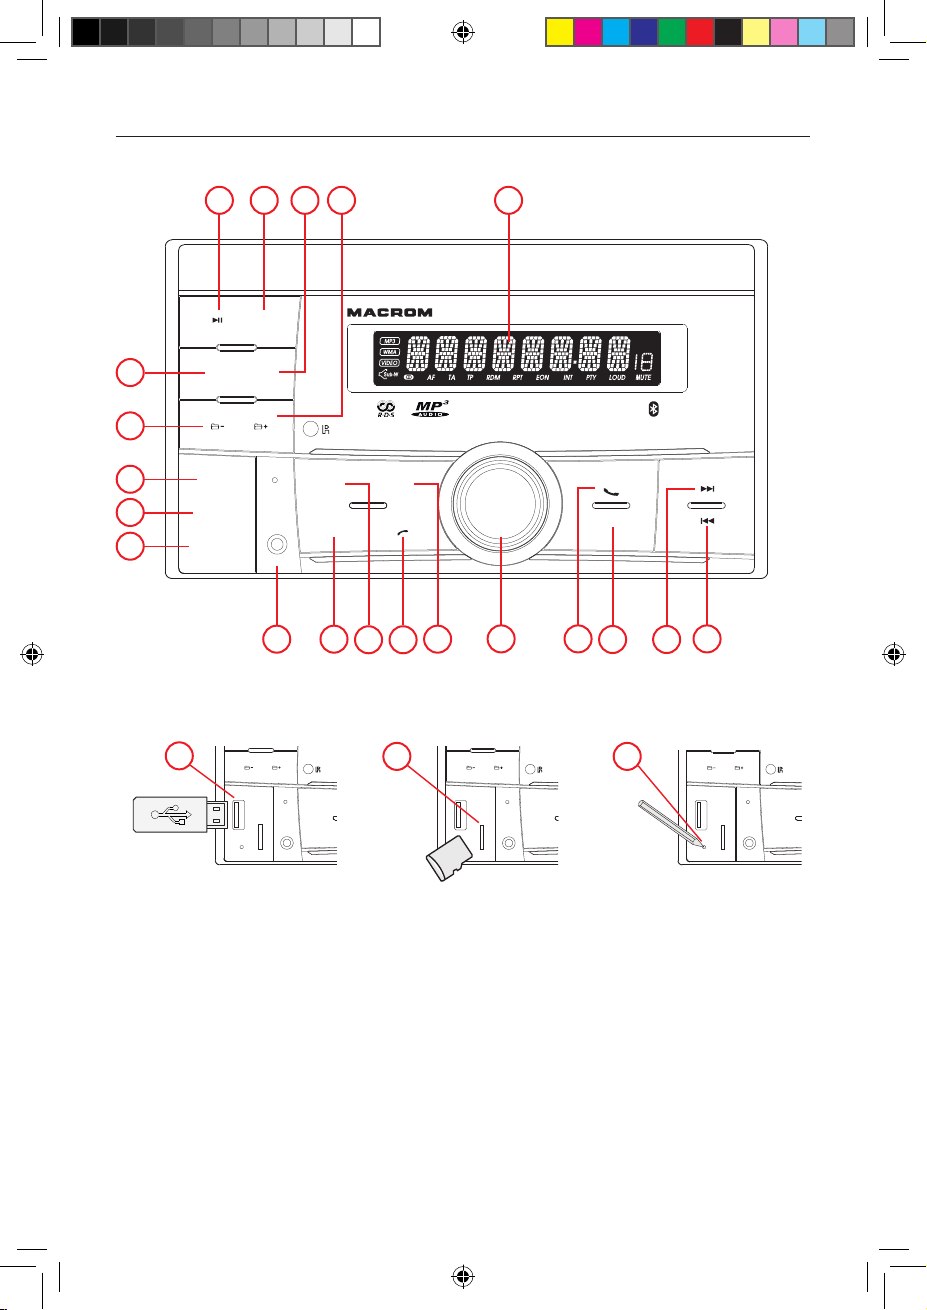
Product overview
BND
MODE
TA
F/PS
PWR/S EL
TA
F/PS
TA
F/PS
Front Panel
10
1
263 4
2 INT
1
RPT
4 RDM
5
USB
SD
RESET
6
AUX
11 12
5
6
AF
PTY
Notice:
The graphic in this manual is for reference only, and may be different from the actual unit.
F/PS
13 14
TA
15
9 10
7
8
9
8
5
5
PWR/SEL
6
17
M-DL3200
MODE
BND
18 19
2016
5
6
AF
PTY
AUX
1. Play-Pause / Perset 1
2. Introduction / Preset 2
3. Random / Preset 4
4. Folder next / Preset 6
5. Display
6. Repeat / Preset 3
7. Folder previous / Preset 5
8. USB slot
9. SD slot
10. Reset button
M-DL3200 User manual_ENG.indd 3 23/07/2018 15:29:18
11. Auxiliary Input
12. PTY selector
13. AF selector
14. Preset scan / Phone call close
15. TA selector
16. Power button / Volume control
17. Mode selector / Phone call reception
18. Band selector
19. Next selector
20. Previous selector
Micro
SD
- 3 -
AF
PTY
AUX
AF
PTY
AUX
Page 5

Remote overview
MUTE
BAND
LOUD
TA
VOL
MOD
CLK
APS
VOL
MONO
AF
LO/DX
PTY
142 3
5
6
SEL
Front Panel
162
3
4
1. Power Button
2. Volume Up
3. Volume down
4. Mode selector
5. Mute
5
6. Sound selector
7. Station tune / Seek down / Track down
8. Band selector
9. Loud / TA selector
10. Time clock display
7
8
11. Station tune / Seek up / Track up
12. Auto preset scan
9
13. Local / Distant / PTY selector
14. Mono / AF selector
15. Preset station
(CR2025)
Uninstall Battery
Slide out the battery compartment tray at the
bottom on the back of the remote control.
1 2
Install Battery
Use button-shaped lithium battery CR2025 (3V)
only. Insert the battery to the battery tray with
proper direction according to the (+) and (-) poles.
Warning
WARNING: The batteries (battery pack or batteries installed) shall not be exposed to excessive
heat such as sunshine, fire or the like.
CAUTION: Danger of explosion if battery is incorrectly replaced. Replace only with the same or
equivalent type.
Correct Disposal of this product. This marking indicates that this product should not be
disposed with other household wastes throughout the EU.
10
11
12
13
14
15
To prevent possible harm to the environment or human health from uncontrolled waste disposal,
recycle it responsibly to promote the sustainable reuse of material resources. To return your used
device, please use the return and collection systems or contact the retailer where the product was
purchased.
They can take this product for environmental safe recycling.
WARNING
Do not ingest the battery, Chemical Hazard
This product contains a coin/button cell battery. If the coin/button cell battery is swallowed, it can
cause severe internal burns in just 2 hours and can lead to death.
Keep new and used batteries away from children.
If the battery compartment does not close securely, stop using the product and keep it away from
children.
If you think batteries might have been swallowed or placed inside any part of the body, seek
immediate medical attention.
Disposal notes
Do not dispose of your old unit in the household trash!
Use the return and collection systems available to dispose of the old device, the remote control
and exhausted batteries.
- 4 -
M-DL3200 User manual_ENG.indd 4 23/07/2018 15:29:18
Page 6

General operations
Power On/Off button
Press POWER button to turn the unit on. Press and hold again to turn the unit off.
Mode Selection
Press the MODE button to cycle through different play modes.
Loudness control
Press the SEL Button repeatly until the display shows “LOUD ON” or “LOUD OFF”. Rotate the VOL
button to adjust. When “LOUD ON” shown on the display indicates
Mute control
Press and hold the MODE Button for 2s to activate the Mute function. Pressthe button again to
cancel mute function.
Volume
Rotate the VOL Button to adjust the volume level. Turn the button clockwiseto increase the volume,
and viceversa. The larger the number of volume, the higher the volume level.
Bass control
Press the SEL Button repeatly until the display shows “BAS 00”. Rotate the VOL button to adjust.
When DSP is ON, bass control is not available.
Treble control
Press SEL Button repeatly until the display shows “TRE 00”. Rotate the VOL Button to adjust. When
DSP is ON, treble control is not available.
Balance control
Press SEL Button repeatly until the display shows “BAL 00”, then Rotate VOL Button to adjust the
balance between the left & right speakers. When “BAL 00” is shown on the screen, itindicates that
the balance is 0.
Fader control
Press SEL Button repeatly until the display shows “FAD 00”, Rotate the VOL Button to adjust the
balance between the front & rear speakers. When “FAD 00” is shown on the screen, it indicates
that the fader is 0.
Equalizer function
Press SEL Button until the display shows “EQ OFF” ,then use button to choose the EQ sound
effects. The Sequence of equalizer setting will beas follows: CLASS-POP-ROCK-FLAT
Beep function
Press SEL button until the “BEEP” shown on the screen. Rotate the VOL Button to choose “BEEP
OFF” or “BEEP ON”. “BEEP OFF” means Beep function is inactive. “BEEP ON” means beep sound
will be heard when any button pressed.
Clock
1.Press and hold the PTY/CLK button, the clock will show on the display.
2.Press and hold the SEL button until the hours blinks on the display, thenshort press VOL+/
VOL- button to set hours.After adjusting the “hour”, press the SEL button again to confirm. and
then the minutes blinks on the display, and short press VOL+/VOL- button to set minutes. After
setting, wait for 4 seconds to confirm clock automatically.
3. Press and hold the PTY/CLK button once to view the time. If you need to update the time, repeat
steps 1-2.
Reset
The unit is equipped with memory for settings even when the battery power is disconnected. To
reset the unit for default settings, press and hold the MOD + BND buttons when the unit is off.
- 5 -
M-DL3200 User manual_ENG.indd 5 23/07/2018 15:29:18
Page 7

RDS operation
RDS function
RDS ( Radio Data System) service availability varies with areas. Please understand if RDS service is
not available in you area, the following service is not available, either.
AF- Alternative Frequency
In RDS mode, press the AF button on the panel to turn the AF function on or off. When the
Radio signal strength is poor, enabling the AF function will allow the unit to same PI (Program
Identification) as the current station but with stronger signal strength, so that you do not have to
retune the stations when driving between different transmitter coverage areas.
When AF symbol is on, it means RDS information is received; when AF symbol is flashing, it means
RDS information is not yet received.
PS (Program Service name): the name of statin will be display instead of frequency.
If RDS service is not available in your area, turn off the AF
TA Traffic anouncement
Press and hold the TA button so that the unit will be activated for reception of traffic announcement
from local radio stations. To choose the TA mode, press the sound select button for 2 seconds,
the display will show TA SEEK. Rotate the encoder volume to choose between the TA SEEK and TA
ALARM, after chooisng, please leave the unit idle for the mode to activate. In TA SEEK mode, the
unit will seek for traffic announcement programme when TA is pressed; in TA ALARM mode, no
TA/TP is displayed and the alarm is set off.
PTY- Programme type
This radio will allow you to select the type of programme required, and will search for a station
broadcasting that type of programme. Press and hold the PTY button once to show the music type.
Then press 1-6 button to choose the different music types available.
Press the PTY button twice to show the speech type programme. Then press 1-6 button to choose
the different speech type programme. Each number keye will show 3 different speech programme
for you to choose.
Mask DPI - Mask ALL
Press the sound select button for 2 seconds, the display will show TA SEEK. Press the sound select
button again so that the unit will show MASK DPI. Rotate the encoder volume to toggle between
MASK DPI and MASK ALL mode. Then leave the unit idle for the mode to take effect. During MASK
DPI mode, the unit will mask only the AF which has different PI, this is the default mode; during
MASK ALL mode, the unit will mask the AF which has different PI and no RDS signal with high field
strength.
Return S/L - Return/Long
This function is to set the initial duration of automatic TA Search -- Press and hold the sound
select button until “TA SEEK” is shown on the LCD, then press the SEL button to cycle through the
menu selections until “RETUNE_S” is shown, use the VOL +/- button to choose “RETUNE_S” or
“RETUNE_L”. The default is “RETUNE_ S”.
PI sound
Press and hold the volume button until “PI SOUND” is shown on the LCD. Rotate the volume button
to choose between PI sound and PI mute.
AF Sound / AF Mute
In FM mode, press the volume knob repeatedly until the display shows AF SOUND/AF MUTE.
Rotate the volume knob to select AF SOUND.
In AF SOUND, the user can hear the other stations during AF SEEK.
In AF MUTE, the user will not hear the other stations during AF SEEK. He will hear the same
station only after AF finds the same station.
AF setting
This function allows you to set the level of automatic AF search.
In FM mode, press the volume knob repeatedly until AF SETTING appears on the display.
Turn the volume knob to select AF LOW, AF MID, AF HIGH.
According to the FM radio signal in your area you can customize the search for alternative
frequencies.
- 6 -
M-DL3200 User manual_ENG.indd 6 23/07/2018 15:29:18
Page 8

Aux In
BND
MODE
TA
F/PS
PWR/SEL
Auxiliary Input
The Auxiliary Input Jack is on the front panel. Insert the AUX IN cable's stereo plug into the AUX
IN jack on the panel of the unit. Route the other end of the stereo plug to the headphone jack of
any external audio device such as walkman and discman. Press the Mode button to choose AUX.
Connect, any portable audio device such as a DVD player or VCD player to the AUX IN cable.
Use the volume control to adjust volume.
5
6
USB
SD
RESET
AF
PTY
AUX
- 7 -
M-DL3200 User manual_ENG.indd 7 23/07/2018 15:29:18
Page 9

USB/ SD Operation
1
2 INT
RPT
4 RDM
6
5
M-DL3200
2 INT
4 RDM
6
M-DL3200
Caution
Carefully unplug the USB socket from the unit, excessive force may cause permanent and severe
damage to the drive and USB device.
Compatibility
If there is any compatibility problems, we recommend you to format your flashdisk/storage card in
FAT32 mode before using it. If the problem persisits, kindly consult your dealer for assistance.
This unit may not be compatible with all USB devices.
In particular, USB devices requiring a driver or a power supply of more than 500mA.
USB specification
* Support MAX 32G USB flash memory
* Support MAX 9999 Songs
* USB 1.1 device support
* USB 2.0 device support (Transfer speed same as ver 1.1)
* File manager: FAT32
Note:
This unit is not compatible with portable Hard-Disc.
Play MP3 /WMA from USB/SD
Plug the USB or SD card into the USB/SD port. The MP3 and WMA files in the USB or SD card will
be played automatically. If there is no MP3 or WMA files in the USB or SD card, “USB” or “CARD”
will be shown on the screen.
Playback mode
The USB or SD/MMC mode can be chosen by pressing the MODE button. The “USB” means it is in
USB play mode, while “CARD” means it is in SD play mode.
Track / Folder search
a. Press
b. Press F/PS button once, the track number will be blink on the screen. Rotate the VOL button to
select the track number in this fold. Press SEL button to confirm the selection.
button once to advance one track, Press
>>|
button once to go back one track.
|<<
ID3
The name of the song will be displayed automatically on the screen.
Play / Pause
When the card/ USB device has been already loaded the playback of the first track starts
automatically. Press the “PLAY” button and the “PAUSE” will be twinkled on the screen.
Introduction
Press the “INT” button to select the previous part of each song in the card / USB to play. The “INT
+ Track no.” will be shown on the screen, indicating each song will be played for 10 seconds. After
the ending of one song, the consequent song will be played for 10 seconds and so on. Press the
“INT” button to cancel.
Repeat
Press the “RPT” button to repeat the same song continuously. The “RPT+ Track no.” will be shown
on the screen, indicating the repeatprocess is operating. Press “3 RPT” button to cancel.
Random
Press the “RDM” button to play all the files in card/ USB in random order. The “RDM + Track no.”
will be shown on the screen, indicating the songs are arranged in random order. Press “4 RDM”
button to cancel.
Folder Down
Press the “
Folder Up
Press the “
M-DL3200 User manual_ENG.indd 8 23/07/2018 15:29:19
” button once to go back one folder.
” button once to advance
- 8 -
Page 10

Bluetooth mode
Pairing
The bluetooth of this radio is always in standby mode for pairing and connection, signalled by a
blinking bluetooth icon on the LCD Display. At this blinking time, please run the bluetooth search
and connect function in your cellphone. The car radio model no “M-DL3000” will be shown on the
cellphone. Select this car radio and connect to finish the pairing. The bluetooth icon on the display
will be on indicating that the connection is established. Bluetooth function is ready to use. *Pairing
password is required in some phones. Insert “0000” in such case.
Calling
In any play mode, dial the desired number on your cellphone. The unit will switch to bluetooth
handsfree mode automatically. “CALL OUT” will be shown on the display indicating the dialling is
in progress.
Answer calls
When there is an incoming call, the LCD will display the CALL IN prompt followed by the caller
number display. At this time, after pressing the “answer button”, the current talk time status
will be displayed. Rotate the volume knob during ringing or conversation to adjust the respective
volume level.
Rejecting calls
During ringing or conversation, press the “EJECT” button to end the call or reject the call. “CALL
END” will be shown on the display and the unit will resume to the original play mode.
BT Audio streaming (A2DP)
Press MOD/(with green phone logo) button until the unit entered BT AUDIO.
BT audio will play automatically when you play the song in the cellphone.
You could pause by “
” button, to choose previous or next song by pressing
> / II
|<<
and
>>|
button.
Disconnecting
Disconnect the paired phone by operating on the cellphone. You cannot process disconnection on
the car radio headunit.
Setting
Illuminations
The RGB menu has the following illuminations LED modes:
(AUTO) > (WHITE) > (PURP)
(Factory default is LED AUTO). Press VOL knob repeatedly to enter the menu LED AUTO.
Rotate VOL to choose the color of your favorite light.
Steering Wheel Control
Press the volume knob repeatedly until the display shows SWRC. Rotate the volume knob to see
>
(MODE)
which represents different functions of the radio. In each function, press the volume knob to enter
SWC learning, for example, press the volume knob when the display shows MODE.
When PAIR is shown, press and hold the desired button in the steering wheel until display shows
PAIR OK. Proceed to the next function until all desired functions are set.
Note:
During the SWC setup, if the unit is idle for 5 seconds, the unit will return to the main GUI and user
has to repeat the above actions again.
M-DL3200 User manual_ENG.indd 9 23/07/2018 15:29:19
(VOL+)
>
(VOL-)
>
(CYAN) > (YELL) > (RED) > (BLUE)
>
(MUTE)
>
(SEEK UP)
>
(SEEK D)
- 9 -
>
>
(EJECT)
(GREE).
>
(ACCEPT),
Page 11

Wire Connections
10A
Left
Right
Back view
1
2
3
4
5
3
7
5
1
4
8
2
6
3
1
4
2
10A
7
5
8
Left
6
Right
1. Jack BT MIC
2. Fuse (10A)
3. Speaker connector
4. Power connector
5. AM/FM antenna
6. Rear line output
(Output speaker)
1. Rear Right (+)
2. Rear Right (-)
3. Front Right (+)
4. Front Right (-)
5. Front Left (+)
6. Front Left (-)
7. Rear Left (+)
8. Rear Left (-)
3
7
5
1
4
2
1
2
8
6
3
7
5
4
8
Power/service)
1. SWC (GND)
2. SWC (KEY1)
3. SWC (KEY2)
4. Battery +12V
5. Antenna (+12V output)
6. nc
7. ACC (+12V ignition)
8. GND (ground)
Specifications
General
Reference Supply Voltage ........................................................................................................ 12V
Operating Voltage Range ...................................................................................................11 - 14V
Max Operating Current ................................................................................................................. 10A
Grounding System ................................................................................... Car Battery Negative Pole
Power output
Frequency Response (±3dB) ......................................................................................... 20Hz~20KHz
Maximum Output Power .......................................................................................................... 4×40W
Load Impedance .........................................................................................................................4-8
Line output
Audio Output Impedance.............................................................................................................100
Audio Output Level........................................................................................................0.5Vrms(Max)
Distortion ..................................................................................................................................≤0.2%
FM Radio
Frequency range (EUR) ............................................................................................87.5- 108.0 MHz
Sensitivity ......................................................................................... Better than 10 dB at S/N 30 dB
Stereo separation ........................................................................................................ 35 dB at 1KHz
S/N ratio ..................................................................................................................................... 50 dB
AM Radio
Frequency range (EUR) ............................................................................................. 522 - 1620 KHz
Sensitivity ............................................................................................................... Better than 45 dB
S/N ratio ..................................................................................................................................... 40 dB
BT
Frequency .............................................................................................................. 2,402 - 2,480 GHz
EIRP power ...........................................................................................................................3.0 dBm
Software Version
MCU ........................................................................................................................................Ver V5A
Ω
Ω
- 10 -
M-DL3200 User manual_ENG.indd 10 23/07/2018 15:29:19
Page 12

Declaration of Conformity
There are no restrictions of use.
The manufacturer Aldinet S.p.A declares that the type of radio equipment- AM/FM/radio
receiver and USB/SD card reader, model M-DL3200, brand Macrom - complies with the
2014/53 / EU Directive.
The full text of the EU Declaration of conformity is available at the following internet address:
www.macrom.it, or at
Aldinet S.p.A. Viale Colombo, 8 - 20090 Trezzano S/N (MI) Italy
Made in China by
Aldinet S.p.A.
Viale Colombo, 8 - 20090 Trezzano S/N (MI) Italy
Information on disposal of unit
This product bears the selective sorting symbol for waste electrical and electronic
equipment (WEEE).
This means that this product must be handled to the local collecting points or given back to
retailer when you buy a new product, in a ratio of one to one (or one to zero if the external
dimension is less than 25 cm) pursuant to European Directive 2012/19/EC in order to be
For further information, please contact your local or regional authorities.
Electronic products not included in the selective sorting process are potentially dangerous for the
environment and human health due to the presence of hazardous substances.
The unlawful disposal of the product carries a fine according to the legislation currently in force.
recycled or dismantled to minimize its impact on the environment.
The MACROM brand is a registered trade mark of ALDINET S.p.A.
www.macrom.it
M-DL3200 User manual_ENG.indd 11 23/07/2018 15:29:19
 Loading...