

Page 1

GAIN
CHROMIUM
Premium USB Condenser Mic
w/built-in 2-channel Mixer
OWNER’S MANUAL
PATTERN
PHONES
BLEND
USB MIC
L R
INST
AUX
OL
6
12
18
INST
24
AUX
Page 2

www.mackie.com
Page 3

IMPORTANT SAFETY INSTRUCTIONS
. Read, follow, and keep these instructions. Heed all warnings.
2. Do not expose the microphone to extreme cold or heat.
3. Do not expose the microphone to rain, use it in water, or in damp or wet conditions.
4. Do not expose the microphone to any excessive dust and other foreign particles.
5. Keep the microphone clean by washing outside with a dry cloth.
6. Keep the microphone in the case when not in use.
7. Never attempt to disassemble the microphone.
8. Mackie cannot be held responsible for any damage caused
by improper use or modifications of the microphone.
9. Exposure to extremely high noise levels may cause permanent
hearing loss. Individuals vary considerably in susceptibility
to noise-induced hearing loss, but nearly everyone will lose
some hearing if exposed to sufficiently intense noise for a period
of time. The U.S. Government’s Occupational Safety and Health
Administration (OSHA) has specified the permissible noise level
exposures shown in the chart. According to OSHA, any exposure in
excess of these permissible limits could result in some hearing loss:
0. This device complies with part 5 of the FCC rules for the U.S.
and the ICES-003 for Canada.
Operation is subject to the following two conditions:
() this device may not cause harmful interference, and
(2) this device must accept any interference received, including
interference that may cause undesired operation.
Correct disposal of this product: This symbol indicates that this product should
not be disposed of with your household waste, according to the WEEE directive
(202/9/EU) and your national law. This product should be handed over to an
authorized collection site for recycling waste electrical and electronic equipment
(EEE). Improper handling of this type of waste could have a possible negative
impact on the environment and human health due to potentially hazardous substances that
are generally associated with EEE. At the same time, your cooperation in the correct disposal
of this product will contribute to the effective usage of natural resources. For more information
about where you can drop off your waste equipment for recycling, please contact your local
city office, waste authority, or your household waste disposal service.
Duration,
per day in
hours
8 90 dB
6 92 dB
4 95 dB
3 97 dB
2 00 dB
.5 02 dB
05 dB
0.5 0 dB
0.25 or less 5 dB
Sound
Level
LIMITED WARRANTY
Please keep your sales receipt in a safe place.
This Limited Product Warranty (“Product Warranty”) is provided by LOUD Audio, LLC.
(“LOUD”) and is applicable to products purchased in the United States or Canada
through a LOUD-authorized reseller or dealer. The Product Warranty will not extend
to anyone other than the original purchaser of the product (hereinafer, “Customer,”
“you” or “your”).
For products purchased outside the U.S. or Canada, please visit www.mackie.com
to find contact information for your local distributor, and information on any warranty
coverage provided by the distributor in your local market.
LOUD warrants to Customer that the product will be free from defects in materials
and workmanship under normal use during the Warranty Period. If the product fails
to conform to the warranty then LOUD or its authorized service representative will
at its option, either repair or replace any such nonconforming product, provided
that Customer gives notice of the noncompliance within the Warranty Period
to the Company at: www.mackie.com or by calling LOUD technical support
at .800.898.32 (toll-free in the U.S. and Canada) during normal business
hours Pacific Time, excluding weekends or LOUD holidays. Please retain the original
dated sales receipt as evidence of the date of purchase. You will need it to obtain
any warranty service.
For full terms and conditions, as well as the specific duration of the Warranty
for this product, please visit www.mackie.com.
The Product Warranty, together with your invoice or receipt, and the terms
and conditions located at www.mackie.com constitutes the entire agreement,
and supersedes any and all prior agreements between LOUD and Customer
related to the subject matter hereof. No amendment, modification or waiver
of any of the provisions of this Product Warranty will be valid unless set forth
in a written instrument signed by the party to be bound thereby.
3
Page 4

FEATURES
PROFESSIONAL QUALITY
• Engineered for recording music, podcasts,
live streams, and online content creation
• Legendary Onyx mic preamp circuitry provides
crystal clear sound and ultra-low noise
• Professional metering shows your levels
at a glance
4 SELECTABLE POLAR PATTERNS
• Stereo
• Cardioid
• Bi-directional (Figure 8)
• Omni
USB-C CONNECTIVITY
• Onboard USB interface plugs directly
into your computer for fast, easy recording
• Class compliant, no driver required
INSTRUMENT INPUT
• Connect a guitar directly and record along
with your vocals
• Mix with your mic and Aux In signal
STEREO 1/8" INPUT
• Connect your phone directly with a stereo
/8" cable
• Perfect for singing along with or auditioning
backing tracks
4
ONBOARD HEADPHONE MONITORING
• Headphone output with independent volume
control offers a convenient monitoring solution
• Blend between the direct signal and USB
ONBOARD GAIN CONTROL AND MUTE
• Optimize the microphone’s output
for your computer and/or DAW
• Mute button allows you to switch off the mic
while still hearing your computer’s output
RUGGED CONSTRUCTION
• Built-like-a-tank™ reliability ensures
consistent performance for years to come
INCLUDED SOFTWARE
• Pro Tools® | First and Waveform™ OEM
professional sofware and plugin packages
included
• The Musician Collection for ProTools | First
includes 23 plugins like BBD Delay, Eleven Lite,
304E EQ, and 304C Compressor
• The DAW Essentials™ Bundle for Waveform
OEM includes 6 powerful plugins like Equaliser,
Compressor, Reverber8, and Limiter
BIT DEPTH / SAMPLE RATE: 16-BIT / 48 KHZ
INCLUDED ACCESSORIES
• Mixer stand (Built-in)
• USB-C cable
INTRODUCTION
The EleMent Series Chromium Premium USB
Condenser Microphone delivers professional
quality and incredible versatility in an all-in-one
design for modern musicians, content creators,
singer-songwriters, and beyond.
Built right into the stand, the 2-channel mixer
includes Instrument and stereo /8" inputs
and has controls for gain, mute, and headphone
monitoring plus professional metering and Blend
control.
Featuring 4 selectable polar patterns,
Chromium can be optimized for vocals,
rooms, stereo, two person interviews, and more.
Legendary Onyx mic preamp circuitry provides
crystal clear sound and ultra-low noise.
Get recording fast with included Pro Tools® | First
and Waveform™ professional sofware.
Get out there and be heard with the Chromium
Premium USB Condenser Microphone.
SYSTEM REQUIREMENTS
PC
WINDOWS XP PRO, XP HOME, VISTA, 7, 8, 10
USB 1.1 / 2.0 (64 MB RAM MINIMUM)
MAC
MAC OSX (10.1.11 OR HIGHER)
USB 1.1 / 2.0 (64 MB RAM MINIMUM)
Page 5

12
GAIN
11
10
PATTERN
1
INST
46
AUX
9
L R
OL
6
BLEND
USB MIC
12
18
INST
24
AUX
7 3
PHONES
8 5
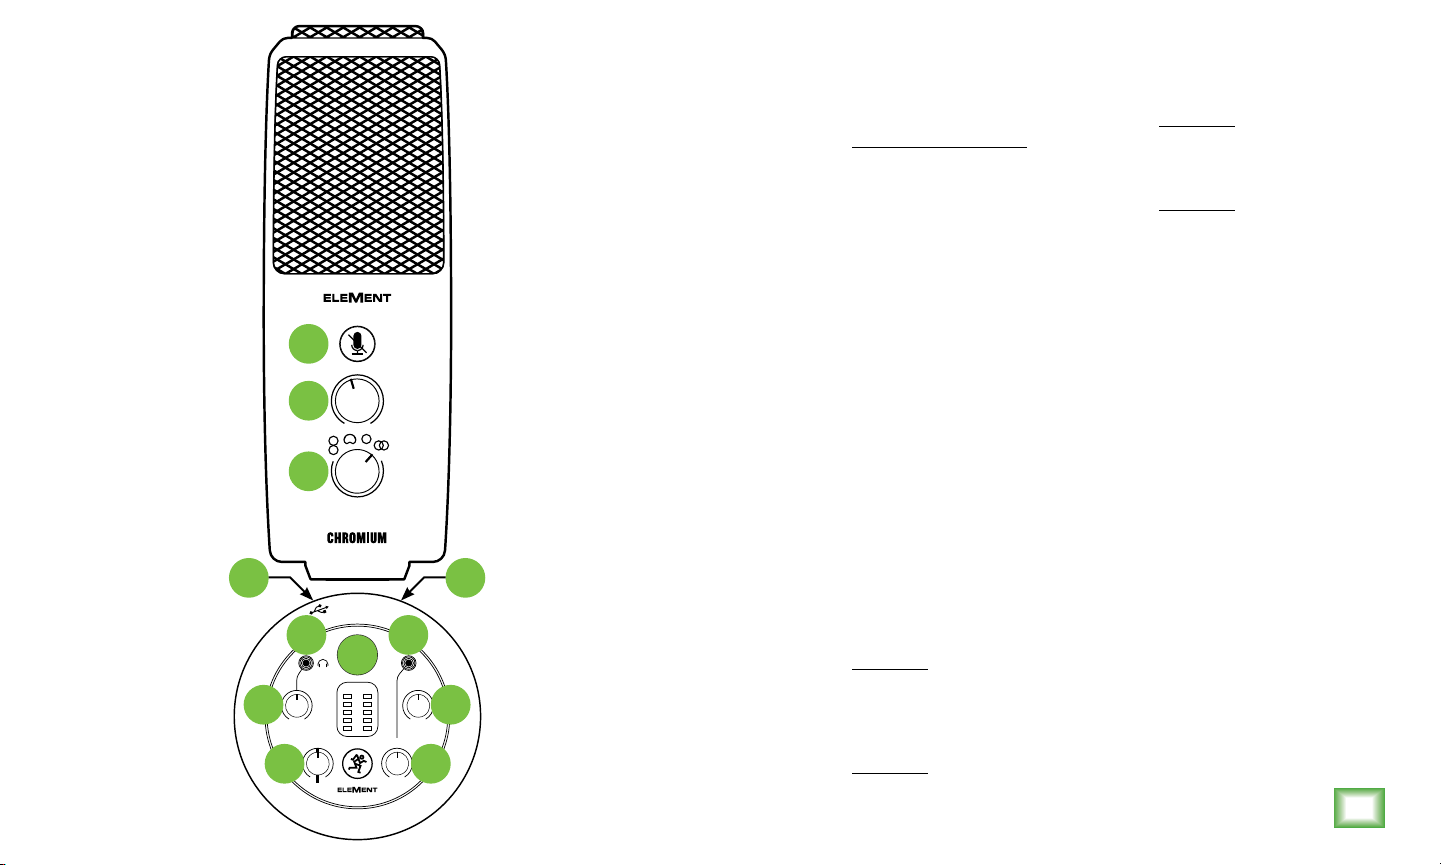
1. USB-C Port Connect the USB-C
side of the included USB cable
to the microphone and the USB-A
side to the computer’s USB port.
8. Blend Knob This knob adjusts the mix
of the incoming computer (USB)
level (lef) and the mic level (right)
to the headphones at zero-latency!
Knob position (L, C, R):
2. Instrument / Line Input Connect a
balanced or unbalanced instrument or
line-level signal using a /4" connector.
• Full Lef
USB Input = Full Volume
Mic = No Volume
• Center
3. Instrument Knob This knob adjusts
the input sensitivity of the instrument
input, allowing the signal to be adjusted
at an optimal level before it’s delivered
USB In and Mic = Equal Volume
• Full Right
USB Input = No Volume
Mic = Full Volume
to the headphones.
9. Main Meters Used to gauge the input
4. Aux Input Connect an /8" line-level
signal from a smartphone, MP3 player,
(lef) and output (right) levels to ensure
that the signals are not clipping.
or other signal source.
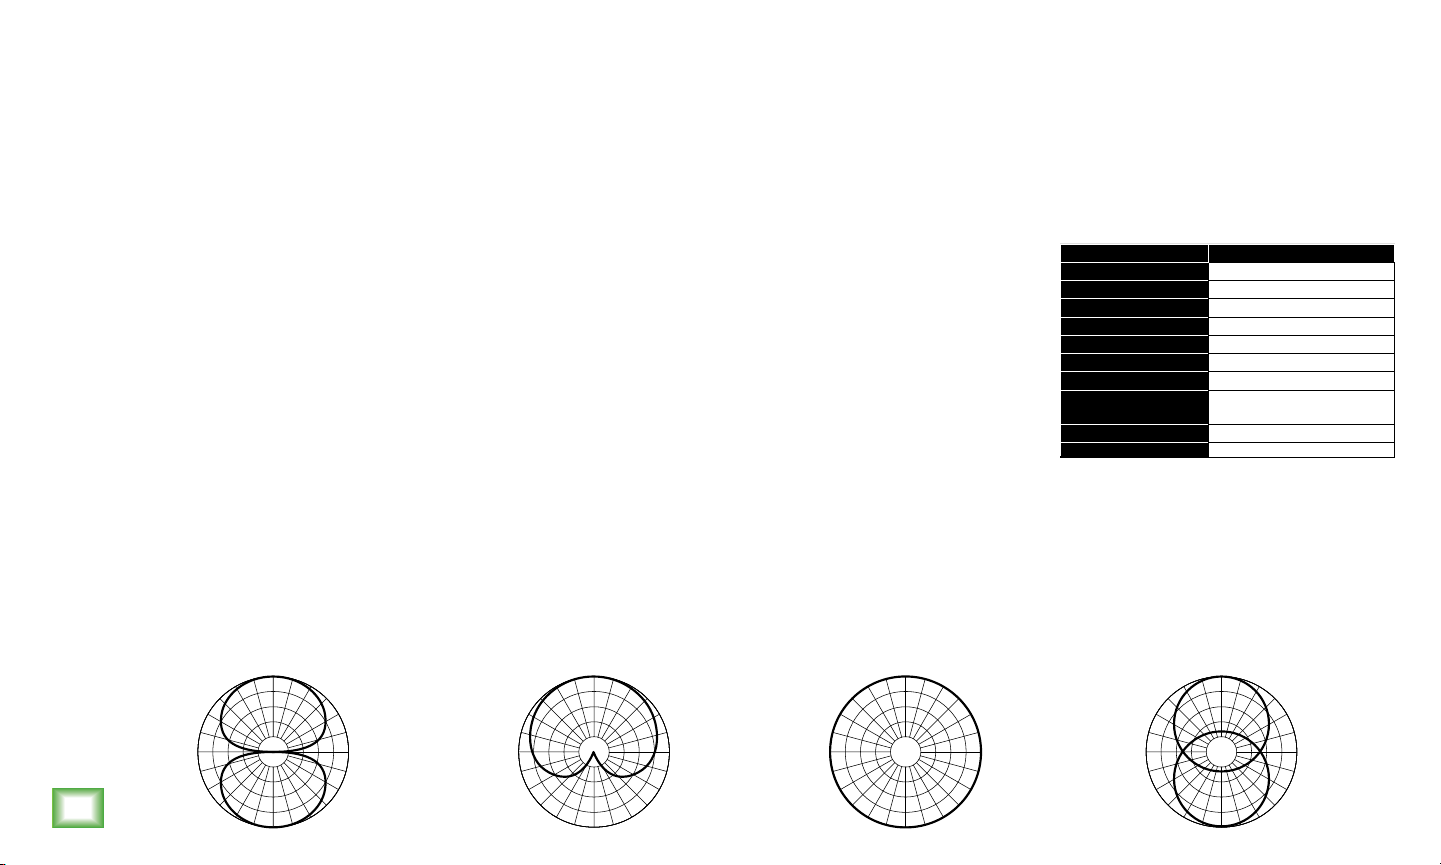
10. Pattern Knob
5. Aux Knob This knob adjusts the input
sensitivity of the aux input, allowing the
signal to be adjusted at an optimal level
before it’s delivered to the headphones.
Polar patterns illustrate how sensitive
a microphone is to sound received via
different angles from the central axis.
Rotate the knob to the desired polar
pattern.
2
6. Phones Jack
This /8" connector supplies the output
to stereo headphones.
Bi-directional (figure 8): Sound
is picked up from the front and rear
of the microphone, but not the sides.
Omni-directional: Sound is picked up
equally from every direction, not needing
to be aimed directly at the sound source.
Applications – Conference calls /
meetings, field recordings, symphonies.
Stereo: Sound is picked up from the lef
and right sides of the microphone.
Applications – Field recordings, filming,
instruments.
11. Gain Knob
The gain knob adjusts the input
sensitivity of the microphone,
allowing signals from the outside
world to be adjusted at optimal levels.
12. Mute Switch
The mute switch does just what
it sounds like it might do. It mutes
the mic signal! The button illuminates
if the mute switch is engaged.
NOTE: The mute switch mutes only
the mic input. Any signal coming IN
from the computer will still be heard
through the headphones regardless
of the state of the mute switch.
Applications – Interviews, vocal duets,
7. Phones Knob
This knob is used to adjust the volume
at the phones output from off to max.
Make sure that this knob is fully off
[counter-clockwise] before beginning.
instruments.
Cardioid: The front of the microphone
is the most sensitive, while sound from
the surrounding area remains isolated.
Applications – Podcasts, voiceovers,
vocals, instruments.
5
Page 6

0
˚
1
8
0
˚
0
˚
1
8
0
˚
0
˚
1
8
0
˚
0
˚
9
0
1
8
0
˚
GETTING STARTED
. Read and understand the Important Safety
Instructions on page 3.
2. Turn down all knobs. Leave the Blend
knob at center (2:00).
3. Disengage all switches.
4. Connect the USB-C side of the included USB
cable to the microphone and the USB-A side
to the computer’s USB port.
NOTE: Do not use a USB hub, keyboard’s
USB port, etc. Plug directly into an open
USB port on the computer.
5. Connect headphones to the headphone jack.
6. Computer setup instructions
[plug-and-play, no drivers required!]:
Mac: System Preferences > Sound > Input
(and Output) > USB Microphone
PC: Control Panel > Hardware and Sound >
Sound > Playback (and Recording) > USB
Microphone (make default).
Make sure the input and output levels
of the computer are un-muted and up.
7. While playing music from your computer,
slowly rotate the phones knob clockwise.
This will confirm that playback goes
through the microphone’s headphone jack.
NOTE: Your ears are important to us!
Be careful of permanent hearing damage.
Lower the volume on your device. Even
intermediate levels may be painfully loud.
Always turn the volume all the way down
before connecting the headphones or doing
anything new that may affect the headphone
volume. Then turn it up slowly as you listen
carefully.
8. Plug signal sources into the microphone,
such as:
• Instrument-level sources, such
as an acoustic guitar w/active
pickups into the instrument input.
• A line-level signal from an MP3 player,
smartphone or other signal source
into the aux input.
9. Be sure that the volume of the input
is the same as it would be during normal
use. Slowly rotate the instrument
and aux knobs clockwise until you
hear the signal(s) in the headphones.
NOTE: There may have to be some
experimentation until the perfect
blend of sounds is established.
0. Open up your favorite DAW and start
a new session.
. While speaking into the mic, disengage
the mute switch and slowly rotate the gain
knob clockwise until the input level meters
on the DAW bounce between green and
yellow.
NOTE: A safety knob is located on the right
side of the mic base. Loosen it to angle
the mic into an ideal pickup position,
then tighten to lock.
NOTE: The mute switch mutes only
the mic input. Any signal coming IN
from the computer will still be heard
through the headphones regardless
of the state of the mute switch.
NOTE: This is a side address mic and works
best when speaking into the side of the mic,
not the top.
2. While most DAWs work (relatively)
the same, the path to recording may be
different. As such, refer to your DAW’s
manual on how to open new sessions,
create tracks, select the Chromium mic,
arm tracks and the best part... recording!
Have fun!
Technical Specifications CHROMIUM
Element 3*16 mm electrets capsule
Polar Pattern Figure-8, Cardioid, Omni, Stereo
Frequency Response 20 Hz – 20 kHz
Sensitivity –38 dB ±3 dB (0 dB = 1 V/Pa @ 1 kHz)
Dynamic Range 96 dB
Max Input SPL 110 dB (@ 1 kHz 1% THD)
Bit Depth / Sample Rate 24-bit / 96 kHz
Size (H × W )
Weight 3.6 lb • 1.6 kg
9.8" × 4.7"
249 × 120 mm
All specifications subject to change
NEED HELP WITH THE MICROPHONE?
• Visit www.mackie.com and click Support to find:
FAQs, manuals, and addendums.
• Telephone -800-898-32 to speak with one
of our splendid technical support chaps (Monday
through Friday, normal business hours, Pacific Time).
STEREOCARDIOIDBI-DIRECTIONAL (FIGURE 8) OMNI-DIRECTIONAL
˚
5
1
3
6
˚
0
7
2
˚
5
2
2
4
5
˚
9
0
˚
1
3
5
˚
˚
5
1
3
˚
0
7
2
˚
5
2
2
4
5
˚
9
0
˚
1
3
5
˚
˚
5
1
3
˚
0
7
2
˚
5
2
2
4
5
˚
˚
1
3
5
˚
˚
5
1
3
˚
0
7
2
˚
5
2
2
4
5
˚
9
0
˚
1
3
5
˚
Page 7

INSTRUCCIONES IMPORTANTES DE SEGURIDAD
. Lea, cumpla y conser ve estas instrucciones. Preste atención a todas las advertencias.
2. No permita que el micrófono quede expuesto a temperaturas extremas
(tanto si es frío como calor excesivo).
3. No permita que el micrófono quede expuesto a la lluvia, ni lo use dentro del agua
o en entornos muy húmedos.
4. No permita que el micrófono quede expuesto a niveles elevados de polvo o suciedad,
ni partículas externas.
5. Mantenga el micrófono limpio frotando la superficie exterior con un trapo suave y seco.
6. Recoja el micrófono en su funda cuando no lo esté usando.
7. No intente nunca desmontar el micrófono.
8. Mackie no se hace responsable de posible daños provocados por un uso inadecuado
o modificaciones no autorizadas del micrófono.
9. La exposición a niveles de ruido extremadamente altos puede
causar problemas de sordera crónica. La susceptibilidad a esta
pérdida de audición inducida por el ruido varía considerablemente
de una persona a otra, pero casi cualquier persona tendrá una
cierta pérdida de audición al quedar expuestos a un ruido intenso
durante un determinado periodo de tiempo. El Departamento de
Salud y Seguridad en el Trabajo de Estados Unidos (OSHA, por sus
siglas en inglés) ha establecido unos niveles de ruido permisibles
que aparecen en la siguiente tabla. De acuerdo a la OSHA,
cualquier exposición que sobrepase estos límites permisibles
puede dar lugar a un problema de sordera.
0. Este dispositivo cumple con la sección 5 de las normas FCC
de EE.UU. y el ICES-003 de Canadá. Su funcionamiento está
sujeto a las dos condiciones siguientes:
() este dispositivo no debe producir interferencias molestas, y
(2) este dispositivo debe aceptar cualquier interferencia recibida,
incluyendo aquellas que puedan producir un funcionamiento no deseado.
Forma correcta de eliminar este aparato: Este símbolo indica que este producto no puede
ser eliminado junto con la basura orgánica, de acuerdo a lo indicado en la Directiva
de Residuos de Aparatos Eléctricos y Electrónicos (202/9/EU) y a la legislación vigente
de su país. Este producto debe ser entregado en uno de los “puntos limpios” autorizados
para su reciclaje. La eliminación inadecuada de este tipo de residuos puede tener
un impacto negativo en el medio ambiente y la salud humana debido a las sustancias potencialmente
peligrosas asociadas generalmente con este tipo de aparatos. Al mismo tiempo, su cooperación
a la hora de eliminar adecuadamente este producto contribuirá a un uso más eficaz de los recursos
naturales. Para más información acerca la correcta eliminación de este tipo de aparatos, póngase
en contacto con el Ayuntamiento de su ciudad, empresa local de recogida de basuras o con uno
de los “puntos limpios” autorizados.
0.25 or less 5 dB
Duración,
diaria en
horas
8 90 dB
6 92 dB
4 95 dB
3 97 dB
2 00 dB
.5 02 dB
05 dB
0.5 0 dB
Nivel
sonoro
GARANTÍA LIMITADA
Esta garantía limitada de producto (“Garantía de producto”) es ofrecida
por LOUD Audio, LLC. (“LOUD”) y es aplicable a los productos adquiridos
en los Estados Unidos o Canadá a través de un distribuidor oficial LOUD.
Esta Garantía de producto no cubrirá a ninguna otra persona distinta
al comprador original del producto (al que haremos referencia como
“Comprador”, “usted” o “tú”).
Para aquellos productos adquiridos fuera de los Estados Unidos o Canadá, visite
la web www.mackie.com para ver la información de su distribuidor local y sobre
la cobertura en garantía ofrecida por dicho distribuidor en ese país.
LOUD garantiza al comprador que el producto está libre de defectos en materiales
y mano de obra bajo condiciones de uso normales durante el Periodo de Garantía.
Si el producto no cumple con lo establecido en esta garantía, LOUD o su servicio
técnico autorizado, a nuestra elección, reparará o sustituirá ese aparato, siempre
y cuando el comprador notifique a fábrica esa situación dentro del Periodo
de Garantía a través de la web: www.mackie.com o llamando al servicio técnico
de LOUD en el .800.898.32 (llamada gratuita en los Estados Unidos y Canadá)
en horario comercial de la Costa del Pacífico, excluyendo fines de semana
o vacaciones de LOUD. Conserve la factura original sellada como prueba de la fecha
de compra. Es necesaria para cualquier reclamación en periodo de garantía.
Para consultar todos los términos y condiciones, así como la duración concreta
de la garantía de este producto, visite la www.mackie.com.
La Garantía de Producto, junto con su factura o recibo y los términos y condiciones
que encontrará en www.mackie.com constituyen el contrato completo y sustituyen
a cualquier otro contrato anterior entre LOUD y el comprador relativo al producto
en cuestión. No será válida ninguna enmienda, modificación o cambio de cualquiera
de las condiciones de esta Garantía de Producto salvo que aparezca previamente
en un documento oficial sellado por el fabricante y/o responsable.
Conserve su factura en un lugar seguro.
7
Page 8

CARACTERÍSTICAS
CALIDAD PROFESIONAL
• Diseñado para la grabación de música, podcasts,
streams en directo y creación de contenidos online
• Legendaria circuitería de previo de micro Onyx que
ofrece sonidos prístinos y mínimo nivel de ruidos
• Medidores profesionales que le indican sus niveles
de un simple vistazo
4 PATRONES POLARES SELECCIONABLES
• Stereo
• Cardioide
• Bidireccional (forma de 8)
• Omni
CONECTIVIDAD USB C
• Interface USB interno permite la conexión
directa con su ordenador para unas
grabaciones fáciles y rápidas
• Conexión de tipo Class compliant,
no es necesario ningún driver
ENTRADA INSTRUMENT
• Conecte directamente una guitarra
y grábela junto con su interpretación vocal
• Mezcle la señal de su micro y la entrada auxiliar
ENTRADA STEREO DE 3,5 MM
• Conecte directamente su giradiscos
con un cable stereo con clavija de 3,5 mm
• Perfecto para cantar con pistas de fondo
o para escucharlas simplemente
8
MONITORIZACIÓN POR AURICULARES INTERNA
• Salida de auriculares con control de volumen
independiente que le permite una solución
de monitorización de gran utilidad
• Mezcla entre la señal directa y la USB
CONTROL DE GANANCIA Y MUTE INTERNOS
• Optimice la salida del micrófono
para su ordenador y/o DAW
• Un botón Mute le permite desactivar el micro
y seguir escuchando la salida de su ordenador
CONSTRUCCIÓN ROBUSTA
• La fiabilidad que supone su diseño Built-likea-tank™ le asegura un rendimiento constante
durante muchos años
SOFTWARE INCLUIDO
• Incluye paquetes de plugin y sofware
profesional Pro Tools® | First y Waveform™ OEM
• La Musician Collection para ProTools | First
incluye 23 plugins como el retardo BBD,
Eleven Lite, EQ 304E y el compresor 304C
• El paquete DAW Essentials™ para Waveform
OEM incluye 16 potentes plugins como
el de Ecualizador, Compresor, Reverber8
y Limitador
FRECUENCIA DE MUESTREO: 16 BITS / 48 KHZ
ACCESORIOS INCLUIDOS
• Soporte de mezclador (interno)
• Cable USB-C
INTRODUCCIÓN
El micrófono de condensados USB de gama
alta EleMent Series Chromium le ofrece
una calidad profesional y una versatilidad
increíble en un diseño todo-en-uno creado para
los músicos de hoy en día, creadores de contenidos,
compositores y muchos otros profesionales.
Montado directamente sobre el soporte, el mezclador
de 2 canales incluye entradas Instrument y stereo
de 3,5 mm y tiene controles de ganancia, anulación
(mute) y monitorización de auriculares además
de medición profesional y control de mezcla (Blend).
Con 4 patrones polares seleccionables,
el Chromium puede ser optimizado para distintas
voces, salas, stereo, entrevistas a dos personas y más.
La legendaria circuitería de previo de micro
Onyx le ofrece un sonido cristalino y un mínimo
nivel de ruidos.
Empiece a grabar rápidamente con el sofware
profesional Pro Tools® | First y Waveform™ incluido.
Salga fuera y haga que le escuchen con el micrófono
de condensador USB de gama alta Chromium.
REQUISITOS DEL SISTEMA
PC
WINDOWS XP PRO, XP HOME, VISTA, 7, 8, 10
USB 1.1 / 2.0 (64 MB MÍNIMO DE RAM)
MAC
MAC OSX (10.1.11 OR HIGHER)
USB 1.1 / 2.0 (64 MB MÍNIMO DE RAM)
Page 9
12
GAIN
11
10
PATTERN
1
INST
46
AUX
9
L R
OL
6
BLEND
USB MIC
12
18
INST
24
AUX
7 3
PHONES
8 5
1. Puerto USB-C Conecte el extremo
USB-C del cable USB incluido
a este micrófono y el extremo
USB-A al puerto USB del ordenador.
2. Instrumento / Entrada Line Conecte
a esta toma combinada, instrumento
o señal de nivel de línea balanceada
o no balanceada usando una clavija
de 6,3 mm.
8. Mando Blend Este mando ajusta
la mezcla emitida a los auriculares
entre el nivel de la señal entrante
del ordenador (USB) (izquierda)
y el del micro (derecha) ¡sin latencia!
Posición del mando (L, C, R):
• Tope izquierdo
Entrada USB = Máximo
Mic = Sin volumen
• Centro
Omnidireccional: El sonido es captado
por igual desde cualquier dirección,
no hace falta que apunte el micro
directamente hacia la fuente sonora.
Aplicaciones – Mítines / conferencias,
grabaciones en exteriores, sinfonías.
Stereo: El sonido es captado desde los
lados izquierdo y derecho del micrófono.
Aplicaciones – Grabaciones en
exteriores, películas, instrumentos.
Entrada USB y Mic = Igual
3. Mando INST Este mando le permite
ajustar la sensibilidad de la entrada
de instrumento, lo que le permite
ajustar la señal a un nivel óptimo
antes de ser emitida por los auriculares.
• Tope derecho
Entrada USB = Sin volumen
Mic = Volumen máximo
9. Medidores principales Se usan
11. Mando Gain
Este mando ajusta la sensibilidad
de entrada del micro, lo que permite
ajustar las señales del exterior a niveles
óptimos.
para calibrar los niveles de entrada
4. Entrada Aux Conecte una señal de nivel
de línea con una clavija de 3,5 mm desde
un smartphone, reproductor MP3 u otra
(izquierda) y salidas (derecha)
para asegurarse de que las señales
no saturen.
fuente de señal.
10. Mando Pattern
5. Mando Aux Este mando le permite
ajustar la sensibilidad de la entrada
auxiliar, lo que le permite ajustar
la señal a un nivel óptimo antes
2
de ser emitida por los auriculares.
Estos patrones ilustran cómo de sensible
es un micrófono al sonido recibido desde
distintos ángulos con respecto al eje
central. Gire este mando para elegir
el patrón polar que quiera.
Bidireccional (forma de 8): El sonido
6. Toma de auriculares Conecte
unos auriculares estéreo usando
una toma de 3,5 mm.
es captado desde delante y detrás
del micro, pero no por los lados.
Aplicaciones – Entrevistas, duetos,
12. Interruptor Mute
Este interruptor hace justo lo que
se supone que debe hacer. ¡Anula
(mute) la señal del micro! Además,
este piloto se ilumina también cuando
haya activado el interruptor Mute.
NOTA: El interruptor Mute anula
solo la entrada de micros. Cualquier
señal recibida desde el ordenador
seguirá siendo escuchada a través
de los auriculares independientemente
del estado del interruptor Mute.
instrumentos.
7. Mando de auriculares
Este mando se usa para ajustar
el volumen de la salida de auriculares
de desactivado a máximo. Asegúrese
de que este control esté al mínimo
[tope izquierdo] antes de empezar.
Cardioide: El frontal del micro es el más
sensible y la zona circundante queda
más aislada.
Aplicaciones – Podcasts, anuncios,
voces, instrumentos.
9
Page 10

PUESTA EN MARCHA
0
˚
1
8
0
˚
0
˚
1
8
0
˚
0
˚
1
8
0
˚
0
˚
9
0
1
8
0
˚
. Lea y tenga en cuenta las Instrucciones
importantes de seguridad de la página 7.
2. Coloque al mínimo todos los mandos.
Deje el mando Blend en el centro (2:00).
3. Coloque todos los interruptores
en la posición de “apagado”.
4. Conecte en este micrófono el extremo
USB-C del cable USB incluido y el extremo
USB-A en el puerto USB del ordenador.
NOTA: No use un hub USB, puerto USB
de un teclado, etc. Conecte el micro
directamente a un puerto USB libre
del ordenador.
5. Conecte unos auriculares a la toma
de auriculares.
6. Instrucciones de configuración
en ordenador [Plug-and-play,
¡no es necesario ningún drivers!]:
Mac: Preferencias del sistema > Sonido >
Entrada (y Salida) > USB Microphone
PC: Panel de control > Hardware & Sonido
> Administración de dispositivos audio
> Reproducción (y Grabación) > USB
Microphone (elegir como dispositivo
predeterminado).
˚
5
1
3
Asegúrese de que los niveles de entrada
y salida del ordenador no estén anulados
ni al mínimo.
7. Mientras reproduce música desde
el ordenador, gire lentamente a la derecha
el mando de auriculares. Esto confirmará
que la reproducción pasa por la toma
de auriculares del el micro.
NOTA: ¡Sus oídos nos importan mucho!
Evite una posible sordera crónica.
Incluso niveles medios pueden llegar
a ser dolorosos. Reduzca siempre
el volumen al mínimo antes de conectar
los auriculares o hacer cualquier cosa
que pueda afectar al volumen y después
súbalo lentamente mientras escucha
hasta llegar al nivel que quiera.
8. Conecte fuentes de señal al micrófono,
tal como:
• Fuentes con nivel de instrumento,
como pueden ser guitarra acústica
con pastillas activaen las entradas
de instrumento.
• Conecte una señal de nivel de línea
de un reproductor MP3, smartphone
u otra fuente en la entrada de aux.
9. Asegúrese de que el volumen de la entrada
sea el mismo que tendrá durante el uso
normal. Gire lentamente los mandos de
instrumento y auxiliar a la derecha hasta
que escuche la señal(es) en los auriculares.
NOTA: Puede que necesite un poco
de práctica hasta que consiga
la mezcla perfecta de ambas señales.
0. Abra su DAW preferido e inicie una nueva
sesión.
. Mientras habla o canta en el micro,
desactive el interruptor Mute y gire
lentamente a la derecha el mando
de ganancia hasta que los medidores
de nivel de entrada del DAW se muevan
entre los colores verde y amarillo.
NOTA: Hay una tuerca de seguridad situada
en el lado derecho de la base del micro.
Afloje esta tuerca para cambiar el ángulo
del micro y ajustarlo a la posición de captura
idea y después vuelva a apretarla.
NOTA: El interruptor Mute anula
solo la entrada de micros. Cualquier
señal recibida desde el ordenador
seguirá siendo escuchada a través
de los auriculares independientemente
del estado del interruptor Mute.
NOTA: Este es un micro de colocación lateral
y funciona mejor cuando cante o hable
en él en sus lados, no desde arriba.
2. Aunque la mayoría de DAW funcionan
(relativamente) igual, la ruta para
la grabación puede ser diferente.
Por ello, consulte en el manual de su DAW
cómo abrir nuevas sesiones, crear pistas,
elegir el Chromium, armar las pistas
y la mejor parte... ¡grabar! ¡Que se divierta!
Especificaciones técnicas CHROMIUM
Elemento Cápsula de electreto de 3*16 mm
Patrón polar Forma de 8, Cardioide, Omni, Stereo
Respuesta de frecuencia 20 Hz – 20 kHz
Sensibilidad –38 dB ±3 dB (0 dB = 1 V/Pa @ 1 kHz)
Rango dinámico 96 dB
SPL máximo 110 dB (@ 1 kHz 1% THD)
Frecuencia de muestreo 24-bit / 96 kHz
Tamaño (A × L )
Peso 3.6 lb • 1.6 kg
9.8" × 4.7"
249 × 120 mm
Todas estas especificaciones están
sujetas a cambios sin previo aviso
¿NECESITA AYUDA CON EL MICRÓFONO?
• Visite la web www.mackie.com y haga clic en Support
para encontrar: Preguntas frecuentes (FAQ), manuales
y otros documentos anexos.
• Teléfono -800-898-32 si quiere hablar con uno
de nuestros estupendos técnicos (lunes a viernes,
horario laboral clásico, hora de la Costa del Pacífico).
STEREOCARDIOIDEBIDIRECCIONAL (FORMA DE 8) OMNIDIRECCIONAL
˚
5
1
4
5
˚
3
4
5
˚
˚
5
1
3
4
5
˚
˚
5
1
3
4
5
˚
10
˚
0
7
2
˚
5
2
2
9
0
˚
1
3
5
˚
˚
0
7
2
˚
5
2
2
9
0
˚
1
3
5
˚
˚
0
7
2
˚
5
2
2
˚
1
3
5
˚
˚
0
7
2
˚
5
2
2
9
0
˚
1
3
5
˚
Page 11

CONSIGNES DE SÉCURITÉ IMPORTANTES
. Lisez, appliquez et conser vez ces instructions. Tenez compte de tous les avertissements.
2. N’exposez pas le micro à une chaleur ou un froid extrême.
3. N’exposez pas le micro à la pluie, ne l’utilisez pas dans l’eau ou dans un environnement
très humide.
4. N’exposez pas le micro à de la poussière excessive ou autres particules étrangères.
5. Nettoyez régulièrement l’extérieur du micro avec un chiffon sec.
6. Conservez le micro dans sa boite lorsque vous ne l’utilisez pas.
7. Ne tentez jamais de démonter le micro.
8. Mackie ne peut pas être tenu responsable des dommages causés par une mauvaise
utilisation ou par une modification du micro.
9. L’exposition à des niveaux de bruit très élevés
peut entraîner une perte permanente de l’ouïe.
La sensibilité à ces dommages varie d’un
individu à l’autre, mais tout le monde est appelé
à des dommages auditifs extrêmes en présence
de niveaux sonores élevés. L’Administration
de la Sécurité et de la Santé (OSHA)
du Gouvernement des États-Unis a publié
les niveaux de bruit indiqués dans le tableau
ci-dessous. Selon l’OSHA, toute exposition
au-delà de ces limites entraîne des dommages
auditifs.
0. Cet appareil est conforme à la section 5
de la règlementation FCC aux États-Unis et à l’ICES-003 au Canada. Son fonctionnement
est soumis aux deux conditions suivantes : () cet appareil ne peut pas causer
d’interférences nuisibles et (2) il doit accepter toute interférence reçue, y compris
celles pouvant entraîner un dysfonctionnement.
Mise au rebut appropriée de ce produit: Ce symbole indique qu’en accord avec
la directive WEEE (202/9/EU) et les lois en vigueur dans votre pays, ce produit
ne doit pas être jeté avec les déchets ménagers. Ce produit doit être déposé dans
un point de collecte agréé pour le recyclage des déchets d’équipements électriques
et électroniques (EEE). Une mauvaise manipulation de ce type de déchets pourrait
avoir un impact négatif sur l’environnement et la santé à cause des substances potentiellement
dangereuses généralement associées à ces équipements. En même temps, votre coopération
dans la mise au rebut de ce produit contribuera à l’utilisation efficace des ressources naturelles.
Pour plus d’informations sur l’endroit où vous pouvez déposer vos déchets d’équipements
pour le recyclage, veuillez contacter votre mairie ou votre centre local de collecte des déchets.
Heures
par jour
8 90 dB
6 92 dB
4 95 dB
3 97 dB
2 00 dB
.5 02 dB
05 dB
0.5 0 dB
0.25 or less 5 dB
Niveau
sonore
GARANTIE LIMITÉE
Cette garantie limitée du produit (“Garantie du Produit”) est fournie par LOUD Audio,
LLC. (“LOUD”) et est applicable aux produits achetés aux états-Unis ou au Canada
chez un revendeur ou fournisseur agréé par LOUD. La Garantie du Produit n’est valable
que pour l’acheteur original du produit (ci-après appelé “l’Acheteur,” “vous”
ou “votre”).
Pour les produits achetés en dehors des USA ou du Canada, consultez
www.mackie.com pour trouver les informations de contact de votre distributeur
local ainsi que des informations sur la couverture de la garantie fournie par
le distributeur de votre marché local.
LOUD garantit à l’Acheteur que le Produit est exempt de tout défaut de matériaux
et de fabrication pour une utilisation normale pendant la période de garantie.
Si le Produit ne se conforme pas à la garantie mentionnée ici pendant la période
de la garantie, LOUD ou son représentant agréé s’engage, à son choix, à réparer
ou à remplacer le Produit défectueux, à considérer que l’Acheteur signale le défaut
durant la Période de Garantie à la Société sur : www.mackie.com ou en appelant
le support technique de LOUD au .800.898.32 (appel gratuit aux états-Unis
et au Canada) aux heures ouvrables normales, heure du Pacifique, à l’exception
des week ends et pendant les vacances de LOUD. Merci de conserver le ticket
de caisse original daté comme preuve de la date d’achat. Il vous sera demandé
pour tout service de garantie.
Pour les termes et conditions complets, ainsi que pour la durée spécifique
de la garantie pour ce Produit, consultez www.mackie.com.
La Garantie du Produit, conjointement à votre facture ou reçu, ainsi que les termes
et conditions mentionnés sur www.mackie.com constituent le contrat intégral, et
supplantent tout accord préalable entre LOUD et l’Acheteur sur l’objet de cet accord.
Aucun avenant, modification ou désistement des dispositions de cette Garantie du
Produit ne sera valide sauf mention écrite par la partie responsable par la présente.
Conservez vos tickets de caisse dans un endroit sûr.
11
Page 12

12
CARACTÉRISTIQUES
QUALITÉ PROFESSIONNELLE
• Conçu spécialement pour l’enregistrement
de musique, de podcasts, pour le streaming
et la création de contenu en ligne
• Le légendaire circuit de préampli Onyx permet
une qualité sonore incroyable et un niveau
de bruit extrêmement bas
• Les indicateurs de qualité professionnelle
permettent de connaitre les niveaux en un clin d’oeil
4 DIRECTIVITÉS SÉLECTIONNABLES
• Stéréo
• Cardioïde
• Bidirectionnelle (en forme de 8)
• Omnidirectionnelle
CONNEXION USB-C
• L’interface USB intégrée permet une connexion
directe à votre ordinateur pour enregistrer
rapidement et simplement
• Reconnu nativement, aucun pilote nécessaire
ENTRÉE POUR INSTRUMENT
• Connectez directement votre guitare
pour enregistrer un accompagnement
• Mélangez le signal du micro avec l’entrée Aux In
ENTRÉE MINIJACK STÉRÉO
• Connectez directement votre casque
doté d’une fiche minijack stéréo
• Idéal pour enregistrer votre voix tout
en écoutant une piste d’accompagnement
INTERFACE POUR CASQUE INTÉGRÉE
• La sortie casque avec réglage de volume dédié
permet de surveiller facilement les niveaux
• Mélangez le signal direct avec le signal USB
RÉGLAGE DE GAIN ET FONCTION MUTE
• Optimisez le niveau de sortie du micro
pour votre ordinateur et/ou votre STAN
• La commande Mute permet de désactiver
le micro en conservant le signal de sortie
de votre ordinateur
CONSTRUCTION ULTRA ROBUSTE
• Le micro est construit pour durer, vous pourrez
compter sur lui pendant des années
LOGICIELS FOURNIS
• Les logiciels professionnels et plugins Pro Tools® |
First et Waveform™ OEM sont fournis
• L’ensemble Musician Collection pour ProTools
| First comprend 23 plugins comme BBD Delay,
Eleven Lite, 304E EQ et 304C Compressor
• L’ensemble DAW Essentials™ pour Waveform OEM
comprends 6 plugins puissants comme Equaliser,
Compressor, Reverber8 et Limiter
FRÉQUENCE D’ÉCHANTILLONNAGE : 16 BITS / 48 KHZ
ACCESSOIRES FOURNIS
• Console de mixage (intégré)
• Câble USB-C
INTRODUCTION
Le micro USB à électret Chromium de la série EleMent
est un appareil tout-en-un ultra polyvalent de qualité
profesionnelle
créateurs de contenus ou compositeurs-interprètes.
Intégrée au corps du micro, l’interface de mixage
à 2 voies comprend une entrée pour instrument
et une entrée minijack stéréo et dispose d’un réglage
de gain, d’une fonction mute, d’un réglage de volume
pour casque ainsi que d’indicateurs de qualité
professionnelle et d’une fonction Blend.
Doté de 4 directivités sélectionnables, le Chromium
peut être optimisé pour l’enregistrement vocal,
en stéréo, les interviews à 2 personnes, capter
l’ambiance d’une pièce, et plus encore.
Le légendaire circuit de préampli Onyx permet
une qualité sonore incroyable et un niveau
de bruit extrêmement bas.
Commencez à enregistrer rapidement avec les logiciels
professionnels Pro Tools® | First and Waveform™ inclus.
Faites-vous entendre avec le micro USB à électret
Chromium.
conçu entres autres pour les musiciens,
CONFIGURATION NÉCESSAIRE
PC
WINDOWS XP PRO, XP HOME, VISTA, 7, 8, 10
USB 1.1 / 2.0 (64 MB DE RAM MINIMUM)
MAC
MAC OSX (10.1.11 OR HIGHER)
USB 1.1 / 2.0 (64 MB DE RAM MINIMUM)
Page 13

12
GAIN
11
10
PATTERN
1
INST
46
AUX
9
L R
OL
6
BLEND
USB MIC
12
18
INST
24
AUX
7 3
PHONES
8 5
1. Port USB-C Reliez le connecteur
USB-C du câble fourni au micro
et le connecteur USB-A à un port
USB de votre ordinateur.
8. Potentiomètre Blend Permet de régler
l’équilibre entre le signal transmis
par USB (vers la gauche) et celui
du micro (vers la droite) au casque
sans aucune latence !
2. Instrument / Entrée Line Connectez
une source symétrique ou asymétrique
(instrument ou source niveau ligne)
à ce entrée avec un câble Jack 6,35 mm.
Position du sélecteur (G, C, D) :
• Gauche
Entrée USB = Volume max
Micro = Pas de son
• Centre
3. Potentiomètre Inst Permet de régler
la sensibilité de l’entrée Inst ce qui
permet d’adapter le niveau du signal
de manière optimale avant qu’il ne soit
Entrée USB et Mic = Volume égal
• Droite
Entrée USB = Pas de son
Micro = Volume max
transmis au casque.
9. Main Meters Indiquent le niveau
4. Entrée Aux Permet de connecter
un signal niveau ligne porté
par un câble MiniJack
de sortie (droite) ou des entrées
(gauche) et permettent de s’assurer
que le signal n’est pas écrêté.
en provenance d’un smartphone,
d’un lecteur MP3 ou autre source.
10. Sélecteur Pattern
La directivité indique la manière dont
5. Potentiomètre Aux Permet de régler
la sensibilité de l’entrée Aux ce qui
permet d’adapter le niveau du signal
de manière optimale avant qu’il ne soit
2
transmis au casque.
un micro capte le son reçu depuis
différents angles par rapport
à l’axe central. Placez le sélecteur
sur la directivité de votre choix.
Bi-directionnel (en forme de 8) :
Omni-directionelle : Le son est capté de
manière égale dans toutes les directions,
il n’est pas nécessaire d’orienter le micro
dans la direction de la source sonore.
Applications : Conférence / réunions,
enregistrement d’ambiance, orchestres
classiques.
Stéréo : Le son est capté par
les côtés gauche et droit du micro.
Applications – Enregistrement
d’ambiance, tournage, instruments.
11. Potentiomètre Gain
Il permet de régler la sensibilité
du micro afin de capter les signaux
de manière optimale.
12. Bouton Mute
Ce bouton permet de couper le signal
du micro. Elle s’allume également
lorsque le bouton Mute est enfoncé.
REMARQUE : Le bouton mute coupe
uniquement le signal du micro.
Tout signal transmis au micro
par l’ordinateur est envoyé à la sortie
casque même si la fonction mute
est activée.
Le son est capté à l’avant et à l’arrière
6. Sortie casque Connectez votre
casque à cette embase Jack 3,5 mm.
du micro, mais pas sur les côtés.
Applications : Interviews, voix, duos,
instruments.
7. Potentiomètre Phones
Il permet de régler le volume de la sortie
casque. Assurez-vous qu’il soit réglé
au minimum avant de commencer
à utiliser le micro.
Cardioïde : La face avant du micro
est plus sensible et les sons
périphériques ne sont pas captés.
Applications : Podcasts, doublages,
voix, instruments.
13
Page 14
0
˚
1
8
0
˚
0
˚
1
8
0
˚
0
˚
1
8
0
˚
0
˚
9
0
1
8
0
˚
MISE EN ŒUVRE
. Lisez les instructions importantes
sur la sécurité page et assurez-vous
de les avoir bien comprises.
2. Mettez tous les potentiomètres au minimum.
Laissez le potentiomètre Blend au centre.
3. Relâchez tous les boutons.
4. Reliez le connecteur USB-C du câble
fourni au micro et le connecteur
USB-A à un port USB de votre ordinateur.
REMARQUE : N’utilisez pas de hub USB,
le port USB d’un clavier, etc. Connectez
le micro directement à un port USB
de l’ordinateur.
5. Connectez votre casque à la sortie casque.
6. Configuration de l’ordinateur
[plug-and-play, aucun pilote nécessaire !]:
Mac : Préférences système > Son > Entrées
(et Sorties) > micro USB
PC : Panneau de configuration > Matériel
et audio > Gérer les périphériques audio
> Lecture (et enregistrement) > Micro USB
(périphérique par défaut).
Assurez-vous que les niveaux d’entrée
et de sortie sont à un niveau audible.
7. Lisez un fichier audio sur votre ordinateur
puis tournez doucement le potentiomètre
de niveau du casque vers la droite. Cela
permet de vérifier que le signal audio est
bien transmis à la sortie casque de la micro.
REMARQUE : Vos oreilles sont précieuses !
Faites attention aux dommages permanents
de l’audition. Même un niveau intermédiaire
peut être dangereux. Mettez toujours
le volume au minimum avant de connecter
vos écouteurs ou d’agir d’une manière
pouvant affecter le volume. Montez
ensuite le volume progressivement.
8. Connectez vos sources à la micro,
par exemple:
• Des sources niveau instrument,
comme une guitare acoustique
avec micro actif, connectée
à l’une des entrée pour instrument.
• Permet de connecter un signal niveau
ligne en provenance d’un lecteur de MP3,
un Smart Phone ou autre source
connectée à l’une entrée pour aux.
9. Assurez-vous que le volume de l’entrée
est le volume de fonctionnement normal.
Tournez lentement les potentiomètres
Inst et Aux vers la droite jusqu’à entendre
les signaux dans le casque.
REMARQUE : Vous devrez faire des essais
avant d’obtenir un mélange parfait des sons.
0. Ouvrez votre STAN préférée puis lancez
une nouvelle session.
. Tout en parlant dans la micro,
désactivez la fonction mute puis tournez
le potentiomètre de gain vers la droite
jusqu’à ce que les voyants de niveau
d’entrée de la STAN oscillent entre
vert et jaune.
REMARQUE : Une molette de sécuritése
trouve sur la droite de la base du micro.
Desserrez-la afin d’orienter le micro puis
resserez-la pour maintenir le micro en place.
REMARQUE : Le bouton mute coupe
uniquement le signal du micro.
Tout signal transmis au micro
par l’ordinateur est envoyé
à la sortie casque même
si la fonction mute est activée.
REMARQUE : Le micro a été conçu
pour capter le son par le côté,
et non par le dessus.
2. Si la plupart des STAN fonctionne
(à peu près) de la même manière,
le processus d’enregistrement peut
différer. Référez-vous au mode d’emploi
de votre STAN pour savoir comment ouvrir
une nouvelle sessions, créer des pistes,
sélectionner l’Chromium, armer une piste
et enfin enregistrer. Amusez-vous bien !
Caractéristiques techniques CHROMIUM
Élément Capsule de électret de 3*16 mm
Courbe de directivité En forme de 8, Cardioïd, Omni, Stéréo
Réponse en fréquence 20 Hz – 20 kHz
Sensibilité –38 dB ±3 dB (0 dB = 1 V/Pa @ 1 kHz)
Plage Dynamique 96 dB
NPA maximum 110 dB (@ 1 kHz 1% THD)
Fréquence d’échantillonnage 24-bit / 96 kHz
Dimensions (H × L )
Poids 3.6 lb • 1.6 kg
9.8" × 4.7"
249 × 120 mm
Les caractéristiques peuvent être modifiées
BESOIN D’AIDE AVEC VOTRE MICRO ?
• Consultez www.mackie.com et cliquez sur Support
pour trouver : des FAQs, les modes d’emploi et des
informations supplémentaires.
• Appelez le -800-898-32 pour contacter le support
technique (du lundi au vendredi, aux heures ouvrables
normales, heure du Pacifique).
14
STÉRÉOCARDIOïDEBIDIRECTIONNELLE (EN 8) OMNIDIRECTIONNELLE
˚
5
1
3
˚
0
7
2
˚
5
2
2
4
5
˚
9
0
˚
1
3
5
˚
˚
5
1
3
˚
0
7
2
˚
5
2
2
4
5
˚
9
0
˚
1
3
5
˚
˚
5
1
3
˚
0
7
2
˚
5
2
2
4
5
˚
˚
1
3
5
˚
˚
5
1
3
˚
0
7
2
˚
5
2
2
4
5
˚
9
0
˚
1
3
5
˚
Page 15

WICHTIGE SICHERHEITSHINWEISE
. Anleitungen lesen, befolgen und aufbewahren. Warnhinweise beachten.
2. Setzen Sie das Mikrofon nicht extremer Kälte oder Hitze aus.
3. Setzen Sie das Mikrofon nicht dem Regen aus und verwenden
Sie es nicht im Wasser oder feuchten oder nassen Umgebungen.
4. Setzen Sie das Mikrofon nicht extremem Staub oder anderen Fremdpartikeln aus.
5. Halten Sie das Mikrofon sauber, indem Sie es außen mit einem trockenen Tuch reinigen.
6. Bewahren Sie das Mikrofon in seinem Koffer auf, wenn es nicht benutzt wird.
7. Versuchen Sie nicht, das Mikrofon in seine Bauteile zu zerlegen.
8. Mackie ist nicht verantwortlich für Schäden, die durch unsachgemäße
Verwendung oder Modifikationen des Mikrofons verursacht werden.
9. Extrem hohe Geräuschpegel können zu dauerhafem
Gehörverlust führen. Lärmbedingter Gehörverlust tritt von
Person zu Person unterschiedlich schnell ein, aber fast jeder
wird einen Teil seines Gehörs verlieren, wenn er über einen
Zeitraum ausreichend hohen Lärmpegeln ausgesetzt ist.
Die Occupational Safety and Health Administration (OSHA)
der US-Regierung hat den zulässigen Geräuschpegel in der
folgenden Tabelle festgelegt. Nach Meinung der OSHA können
alle Lärmpegel, die diese zulässigen Grenzen über schreiten,
zu Gehörverlust führen.
0. Dieses Gerät entspricht Part 5 der FCC Vorschrifen für die
USA und des ICES-003 für Kanada. Der Betrieb unterliegt
folgenden zwei Bedingungen: () Dieses Gerät darf keine
schädlichen Interferenzen erzeugen und (2) dieses Gerät muss
empfangene Interferenzen verkrafen können, einschließlich Störungen,
die möglicherweise den Betrieb auf unerwünschte Weise beeinflussen.
Korrekte Entsorgung dieses Produkts: Diese Symbol weist darauf hin, dass das
Produkt entsprechend den WEEE Richtlinien (202/9/EU) und den Landesgesetzen
nicht im Hausmüll entsorgt werden darf. Dieses Produkt sollte einer autorisierten
Sammelstelle zum Recyceln von unbrauchbaren elektrischen und elektronischen
Geräten (EEE) übergeben werden. Unsachgemäßer Umgang mit dieser Abfallart
könnte aufgrund der in EEE enthaltenen gefährlichen Substanzen negative Auswirkungen
auf die Umwelt und menschliche Gesundheit haben. Gleichzeitig tragen Sie durch Ihre Teilnahme
an der korrekten Entsorgung dieses Produkts zu einer effektiven Nutzung natürlicher Ressourcen
bei. Weitere Informationen zu Annahmestellen, die unbrauchbare Geräte recyceln, erhalten
Sie bei der örtlichen Stadtverwaltung, dem Entsorgungsträger oder der Müllabfuhr.
in Stunden
0.25 or less 5 dB
Dauer
pro Tag
0.5 0 dB
schallpegel
8 90 dB
6 92 dB
4 95 dB
3 97 dB
2 00 dB
.5 02 dB
05 dB
BESCHRÄNKTE GARANTIE
Diese beschränkte Produktgarantie („Produktgarantie“) wird von LOUD Audio, LLC.
(„LOUD“) gewährt und gilt für Produkte, die in den USA oder Kanada bei einem
von LOUD autorisierten Wiederverkäufer oder Einzelhändler gekauf wurden.
Die Produktgarantie gilt nur für Erstkäufer des Produkts (im Folgenden „Kunde“,
„Sie“ oder „Ihren“).
Bei außerhalb der USA oder Kanada gekaufen Produkten informieren Sie sich bitte
unter www.mackie.com über die Kontaktdaten unseres örtlichen Vertriebspartners
und die Details der Garantieleistungen, die vom Vertriebshändler für Ihren lokalen
Markt gewährt werden.
LOUD garantiert dem Kunden, dass das Produkt während der Garantiezeit
bei normalem Gebrauch frei von Material- und Verarbeitungsfehlern ist.
Wenn das Produkt dieser Garantie nicht entspricht, kann LOUD oder ihre
autorisierte Service-Vertretung das fehlerhafe Produkt nach ihrer Einschätzung
entweder reparieren oder ersetzen, vorausgesetzt dass der Kunde den Defekt
innerhalb der Garantiezeit unter www.mackie.com bei der Firma meldet oder
indem er den technischen Support von LOUD unter .800.898.32 (gebührenfrei
innerhalb der USA und Kanada) während der normalen Geschäfszeiten (SPT),
mit Ausnahme von Wochen enden oder LOUD-Betriebsferien, anruf.
Bitte bewahren Sie den originalen datierten Kaufbeleg als Nachweis
des Kaufdatums auf. Er ist die Voraussetzung für alle Garantieleistungen.
Die kompletten Garantiebedingungen sowie die spezielle Garantiedauer
für dieses Produkt können Sie unter www.mackie.com nachlesen.
Die Produktgarantie zusammen mit Ihrer Rechnung bzw. Ihrem Kaufbeleg
sowie die unter www.mackie.com aufgeführten Bedingungen stellen die gesamte
Vereinbarung dar, die alle bisherigen Vereinbarungen zwischen LOUD und
dem Kunden bezüglich des hier behandelten Gegenstands außer Kraf setzt.
Alle Nachträge, Modifikationen oder Verzichtserklärungen bezüglich der
Bestimmungen dieser Produktgarantie treten erst in Kraf, wenn sie schriflich
niedergelegt und von der sich verpflichtenden Partei unterschrieben wurden.
Kaufbeleg bitte sicher aufbewahren.
15
Page 16

16
FEATURES
PROFI-QUALITÄT
• Entwickelt für Musikaufnahmen, Podcasts,
Live-Streams und die Erstellung von Inhalten
• Legendäre Onyx Mikrofon-Vorverstärker liefern
kristallklaren Klang bei extrem geringem Rauschen
• Professionelle Pegelanzeigen für den schnellen
Überblick
4 WÄHLBARE RICHTCHARAKTERISTIKEN
• Stereo
• Niere
• Bi-direktional (Achtercharakteristik)
• Kugel
USB-C KONNEKTIVITÄT
• Das integrierte USB Interface ist direkt
an den Computer anschließbar und ermöglicht
schnelle, unkomplizierte Aufnahmen
• Standardkonformer Anschluss
ohne zusätzliche Treiberinstallation
INSTRUMENTENEINGANG
• Direktanschluss zum gleichzeitigen
Aufnehmen von Gitarre und Gesang
• Mischung von Mikrofon- und Aux In-Signal
STEREO 3,5 MM EINGANG
• Direktanschluss für Smartphones
via 3,5 mm Stereokabel
• Perfekt zum Singen zu Begleitmusik
oder Vorhören von Musikmaterial
INTEGRIERTES KOPFHÖRER-MONITORING
• Ein Kopfhörerausgang mit separater
Lautstärkeregelung bietet eine praktische
Abhörmöglichkeit
• Mischung von Direktsignal und USB
REGLER FÜR VERSTÄRKUNG UND
STUMMSCHALTUNG
• Regler zur Optimierung des Mikrofon ausgangs
für Computer und/oder DAW
• Mute-Taste zum Ausschalten des Mikrofons bei
gleichzeitigem Abhören des Computerausgangs
ROBUSTE KONSTRUKTION
• Ultrastabile Bauweise garantiert
langjährige, gleichbleibende Performance
INKLUSIVE SOFTWARE
• Pro Tools® | First und Waveform™ OEM
Profi-Sofware und Plugin-Pakete
im Lieferumfang enthalten
• Musician Collection für ProTools | First
enthält 23 Plugins wie BBD Delay,
Eleven Lite, 304E EQ und 304C Compressor
• DAW Essentials™ Bundle für Waveform OEM
enthält 6 leistungsstarke Plugins wie Equaliser,
Compressor, Reverber8 und Limiter
SAMPLE-RATE: 16-BIT / 48 KHZ
ZUBEHÖR
• Mixerstativ (integriert)
• USB-C Kabel
EINLEITUNG
Das Chromium Premium USB Kondensatormikrofon
der EleMent-Serie bietet modernen Musikern,
Content-Erstellern, Singer-Songwritern und anderen
Kreativen professionelle Qualität und hohe Flexibilität
in einem eigenständigen Komplettpaket.
Der direkt ins Stativ integrierte 2-Kanal-Mixer verfügt
über 3,5 mm Instrument- und Stereoeingänge sowie
über Regler für Gain, Mute und Kopfhörermonitoring
plus professionelle Pegelanzeigen und BlendRegelung.
Mit seinen 4 wählbaren Richtcharakteristiken
ist das Chromium mühelos für Stimmen, Räume,
Stereo, 2-Personen-Interviews und mehr optimierbar.
Die legendäre Onyx Mikrofonvorverstärkerschaltung
liefert kristallklaren Sound bei extrem geringem
Rauschen.
Mit den im Lieferumfang enthaltenen
Pro Tools® | First und Waveform™ Sofwares
gelingen sofort professionelle Aufnahmen.
Mit dem Chromium Premium USB Kondensatormikrofon sind Sie für alle Aufgaben gerüstet.
SYSTEMANFORDERUNGEN
PC
WINDOWS XP PRO, XP HOME, VISTA, 7, 8, 10
USB 1.1 / 2.0 (MINDESTENS 64 MB RAM)
MAC
MAC OSX (10.1.11 OR HIGHER)
USB 1.1 / 2.0 (MINDESTENS 64 MB RAM)
Page 17

12
GAIN
11
10
PATTERN
1
INST
46
AUX
9
L R
OL
6
BLEND
USB MIC
12
18
INST
24
AUX
7 3
PHONES
8 5
1. USB-C Port Verbinden Sie die USB-C
Seite des mitgelieferten USB-Kabels
mit dem Mikrofon und die USB-A Seite
mit dem USB-Port des Computers.
2. Instrumenten / Line-Eingänge Hier kann
man symmetrische oder unsymmetrische
Instrumenten- oder Line-Pegel-Signal
über 6,3 mm-Stecker anschließen.
3. Instrument-Drehregler Steuert
die Eingangsempfindlichkeit
des Instrumenteneingangs. Damit kann
man das Signal vor der Weiterleitung
zu den Kopfhörern auf einen optimalen
Pegel einstellen.
8. Blend-Drehregler Steuert die latenzfreie
Pegelmischung des eingehenden
Computersignals (USB/links)
und des Mikrofonsignals (rechts)
zu den Kopfhörern!
Reglerposition (L, M, R):
• Ganz links
USB-Eingang = voller Pegel
Mic = kein Pegel
• Mitte
USB In & Mic = gleicher Pegel
• Ganz rechts
USB-Eingang = kein Pegel
Mic = voller Pegel
9. Main Meters Hier können Sie die
Kugel: Schall wird aus allen Richtungen
gleich stark aufge nommen, ohne dass
man das Mikrofon direkt auf eine
Schallquelle richten muss.
Anwendung – Konferenzen / Meetings /
Aufnahmen im Freien / Sinfonien.
Stereo: Der Schall wird über die
linke und rechte Seite des Mikrofons
aufgenommen.
Anwendung – Aufnahmen im Freien,
Filmproduktion, Instrumente.
11. Gain-Regler
Passt die Eingangsempfindlichkeit
des Mikrofons optimal auf den Pegel
der eingehenden Signale an.
auf Ein- (links) und Ausgangs (rechte)
4. Aux-Eingänge Hier kann man
die Line-Pegel-Signale von Smartphones,
MP3-Playern oder anderen Quellen
via 3,5 mm-Stecker anschließen.
5. Aux-Drehregler Steuert die Eingangs-
empfindlichkeit des Aux-Eingangs.
Damit kann man das Signal vor
der Weiterleitung zu den Kopfhörern
2
auf einen optimalen Pegel einstellen.
signale prüfen, um Übersteuerungen
zu verhindern.
10. Pattern-Regler
Die Richtcharakteristiken zeigen, wie
empfindlich das Mikrofon auf Klänge
reagiert, die aus unterschiedlichen
Winkeln zur Zentralachse eingehen.
Mit dem Drehregler stellen Sie die
gewünschte Richtcharakteristik ein.
12. Mute-Taste
Schaltet das Mikrofonsignal stumm!
Leuchtet die auch, wenn die Mute-Taste
aktiviert ist.
HINWEIS: Der Mute-Schalter schaltet
nur den Mikrofoneingang stumm. Vom
Computer EINgehende Signale werden
weiterhin über Kopfhörer ausgegeben.
Bi-direktional (Acht): Schall wird
6. Phones-Buchse Zum Anschließen
von Stereokopfhörern über
einen 3,5 mm-Stecker.
von der Vorder- und Rückseite, aber
nicht von den Seiten, aufgenommen.
Anwendung – Interviews,
Gesangs duette, Instrumente.
7. Phones-Regler
Stellt die Lautstärke
am Kopfhörer ausgang im Bereich
Aus bis Maximal ein. Drehen
Sie diesen Regler anfänglich
unbedingt auf Aus [ganz nach links].
Niere: Die Vorderseite des Mikrofons ist
am empfindlichsten, während Schall aus
den Randbereichen unterdrückt wird.
Anwendung – Podcasts, Voiceovers,
Stimmen, Instrumente.
17
Page 18

0
˚
1
8
0
˚
0
˚
1
8
0
˚
0
˚
1
8
0
˚
0
˚
9
0
1
8
0
˚
ERSTE SCHRITTE
. Lesen und beachten Sie die „Wichtigen
Sicherheitshinweise“ auf Seite 5.
2. Drehen Sie alle Regler ganz nach unten.
Lassen Sie den Blend-Regler in der Mitte
(2:00).
3. Deaktivieren Sie alle Schalter.
4. Verbinden Sie die USB-C Seite des
mitgelieferten USB-Kabels mit dem
Mikrofon und die USB-A Seite mit
dem USB-Port des Computers.
HINWEIS: Verwenden Sie keinen USB
Hub oder den USB-Port der Tastatur etc.
Schließen Sie das Kabel direkt an einen
offenen USB-Port des Computers an.
5. Schließen Sie Ihre Kopfhörer
an die Kopfhörerbuchse.
6. Computer-Einrichtungsanleitung
[Plug&Play, keine Treiber erforderlich!]:
Mac: Systemeinstellung > Sound >
Ein gabe (und Ausgabe) > USB Mikrofon
PC: Systemsteuerung > Hardware & Sound
> Audiogeräte verwalten > Wiedergabe
(und Aufnahme) > USB Mikrofon (zum
Standardgerät machen).
Die Eingangs- und Ausgangspegel
des Computers müssen aufgedreht
und dürfen nicht stummgeschaltet sein.
˚
5
1
3
7. Spielen Sie Musik über den Computer
ab und drehen Sie den Phones-Regler
langsam nach rechts. Dadurch wird
die Wiedergabe über die Kopfhörerbuchse
des Mikrofons aktiviert.
HINWEIS: Ihre Ohren sind uns wichtig!
Verringern Sie die Lautstärke am Gerät,
um dauerhafe Hör schäden zu vermeiden.
Drehen Sie die Lautstärke immer ganz
zurück, bevor Sie die Ohrhörer anschließen
oder etwas Neues ausprobieren, das die
Lautstärke beeinflussen könnte. Erhöhen
Sie den Pegel dann langsam und vorsichtig.
8. Schließen Sie Signalquellen
an den Mikrofon an, zum Beispiel:
• Signale mit Instrumentenpegel, wie z.B.
Akustikgitarren mit aktiven Pickup,
an die Instrumenteneingänge.
• Hier schließen Sie das Line-Pegel-Signal
eines MP3 Players, Smartphones oder
einer anderen Signalquelle an.
9. Achten Sie darauf, dass die Lautstärke
der Eingangssignale genau so hoch wie im
Normalfall ist. Drehen Sie die Instrumentund Aux-Regler langsam nach rechts, bis
Sie die Signale in den Kopfhörern hören.
HINWEIS: Vielleicht müssen Sie etwas
experimentieren, bis Sie den perfekten
Soundmix gefunden haben.
0. Öffnen Sie Ihre bevorzugte DAW
und starten Sie eine neue Session.
. Sprechen Sie ins Mikrofon, deaktivieren
Sie den Mute-Schalter und drehen Sie
den Gain-Regler langsam nach rechts,
bis sich die Eingangspegelanzeige
im grünen bis gelben Bereich bewegt.
HINWEIS: Der Mute-Schalter schaltet
nur den Mikrofoneingang stumm.
Vom Computer EINgehende Signale werden
weiterhin über Kopfhörer ausgegeben.
HINWEIS: Dieses Mikrofon ist für die
Schallaufnahme von der Seite - nicht
von oben - optimiert.
2. Obwohl die meisten DAWs (relativ)
ähnlich funktionieren, können sich
die Aufnahmewege unterscheiden.
Wie man eine neue Session anlegt,
Spuren erstellt, das Chromium wählt,
Spuren aufnahmebereit schaltet
und aufnimmt, wird im DAW-Handbuch
beschrieben. Viel Spaß!
HINWEIS: Auf der rechten Seite
des Mikrofon sockels befindet sich
ein Sicherungs drehknopf. Lösen Sie
ihn, um das Mikrofon optimal auszurichten.
Drehen Sie ihn dann wieder fest.
Technische Daten CHROMIUM
Element 3*16 mm Elektretkapsel
Richtcharakteristik Kugel, Niere, Acht, Stereo
Frequenzgang 20 Hz – 20 kHz
Empfindlichkeit –38 dB ±3 dB (0 dB = 1 V/Pa @ 1 kHz)
Dynamikbereich 96 dB
Max. Schaldruck 110 dB (@ 1 kHz 1% THD)
Samplerate 24-bit / 96 kHz
Abmessungen (H × B )
Gewicht 3.6 lb • 1.6 kg
Technische Änderungen und Ergänzungen vorbehalten
9.8" × 4.7"
249 × 120 mm
SIE BRAUCHEN HILFE MIT DEM MIKROFON?
• Besuchen Sie auf www.mackie.com die Rubrik Support:
Hier finden Sie FAQs, Handbücher und Ergänzungen.
• Unter der Telefonnummer -800-898-32 erreichen
Sie unseren technischen Support (Montag bis Freitag
zu den üblichen Geschäfszeiten, Pacific Standard Time).
STEREONIEREBI-DIREKTIONAL (ACHT) KUGEL
˚
5
1
4
5
˚
3
4
5
˚
˚
5
1
3
4
5
˚
˚
5
1
3
4
5
˚
18
˚
0
7
2
˚
5
2
2
9
0
˚
1
3
5
˚
˚
0
7
2
˚
5
2
2
9
0
˚
1
3
5
˚
˚
0
7
2
˚
5
2
2
˚
1
3
5
˚
˚
0
7
2
˚
5
2
2
9
0
˚
1
3
5
˚
Page 19

www.mackie.com
Page 20

9820 North Creek Parkway #20 • Bothell, WA 980 • USA
Phone: 425.487.4333 • Toll-free: 800.898.32
Fax: 425.487.4337 • www.mackie.com
Part No. 205338 Rev. B 09/20 ©2020 LOUD Audio, LLC. All Rights Reserved.
 Loading...