


xPONENT 4.2
Table of contents
 Loading...
xPONENT
®
for
FLEXMAP 3D
®
Software Version 4.2 User Guide

©
Luminex Corporation, 2012. All rights reserved. No part of this publication may be
reproduced, transmitted, transcribed, or translated into any language or computer language,
in any form or by any means without prior express, written consent of Luminex Corporation.
LUMINEX CORPORATION
12212 Technology Boulevard
Austin, Texas 78727-6115
U.S.A.
Voice: (512) 219-8020
Fax: (512) 219-5195
xPONENT
®
for FLEXMAP 3D
®
Software Verison 4.2 User Manual
89-00002-00-399 Rev. A
July 2012
Luminex Corporation (Luminex) reserves the right to modify its products and services at any
time. This guide is subject to change without notice. Although prepared to ensure accuracy,
Luminex assumes no liability for errors or omissions, or for any damages resulting from the
application or use of this information.
The following are trademarks of Luminex Corporation: Luminex
®
, xMAP
®
, xTAG
®
,
xPONENT
®
, Luminex
®
SD
™
, Luminex
®
XYP
™
, MAGPIX
®
, MagPlex
®
Microspheres,
MicroPlex
®
.
All other trademarks, including ProClin
®
, Cheminert
®
, Windows
®
Pentium
®
and Dell
®
are
trademarks of their respective companies.
xPONENT
®
for FLEXMAP 3D
®
ii

Standard Terms and Conditions for Use of Instrument
Product
By opening the packaging containing this instrument product ("Product") or by using
such Product in any manner, you are consenting and agreeing to be bound by the
following terms and conditions. You are also agreeing that the following terms and
conditions constitute a legally valid and binding contract that is enforceable against
you. If you do not agree to all of the terms and conditions set forth below, you must
promptly return the Product for a full refund prior to using them in any manner.
1. Acceptance
ALL SALES ARE SUBJECT TO AND EXPRESSLY CONDITIONED UPON THE TERMS
AND CONDITIONS CONTAINED HEREIN, AND UPON BUYER'S ASSENT THERETO. NO
VARIATION OF THESE TERMS AND CONDITIONS SHALL BE BINDING UPON LUMINEX
CORPORATION ("LUMINEX") UNLESS AGREED TO IN WRITING AND SIGNED BY AN
AUTHORIZED REPRESENTATIVE OF LUMINEX.
For purposes of this agreement, "Seller" shall mean either Luminex, if the Product is
purchased directly from Luminex, or a Luminex authorized reseller. Buyer, by accepting the
Product, shall be deemed to have assented to the terms and conditions set forth herein,
notwithstanding any terms contained in any prior or later communications from Buyer and
whether or not Seller shall specifically or expressly object to any such terms.
2. Warranties
THIS WARRANTY IS APPLICABLE FOR PARTS AND SERVICE FOR LUMINEX
INSTRUMENTS PURCHASED DIRECTLY FROM LUMINEX TO BUYER AND ONLY TO
THE EXTENT SUCH INSTRUMENTS ARE LOCATED IN NORTH AMERICA AND THE
COUNTRIES THAT COMPRISE THE EUROPEAN UNION. LUMINEX MAKES NO
WARRANTY, EITHER EXPRESS OR IMPLIED, WITH RESPECT TO PRODUCTS SOLD,
DISTRIBUTED, LOCATED OR USED OUTSIDE OF NORTH AMERICA OR THE
COUNTRIES COMPRISING THE EUROPEAN UNION. PRODUCTS SOLD OUTSIDE OF
NORTH AMERICA OR THE COUNTRIES COMPRISING THE EUROPEAN UNION ARE
SOLD ONLY ON AN "AS IS, WHERE IS" BASIS. NOTWITHSTANDING THE FOREGOING,
LUMINEX SHALL PROVIDE BUYER A WARRANTY ON FIELD SERVICE PARTS
PROCURED FROM LUMINEX FOR MAINTENANCE OF LUMINEX INSTRUMENTS IN ALL
COUNTRIES IN THE WORLD AND PER THE TERMS AND CONDITIONS HEREIN. TO
THE EXTENT THAT THE FOREGOING DISCLAIMERS ARE INVALID OR
UNENFORCEABLE UNDER THE LAWS OF ANY JURISDICTION, THE WARRANTY,
DISCLAIMER, LIMITATION OF LIABILITY AND OTHER PROVISIONS SET FORTH BELOW
SHALL THEREUPON BE EFFECTIVE TO THE FULLEST EXTENT PERMITTED BY
APPLICABLE LAW.
Notwithstanding Buyer's acceptance thereof, if Product is purchased directly from Luminex,
Luminex warrants that for a period of twelve (12) months from date of delivery that the
Product shall conform in all material respects with the Product Specifications provided by
Luminex with the Product. The warranty provided herein specifically excludes any software or
iii

hardware not provided by Luminex. If Product is purchased from a Luminex authorized
reseller, any warranty obligations shall be provided in writing directly by such Luminex
authorized reseller to Buyer. THIS WARRANTY IS EXCLUSIVE AND LUMINEX MAKES NO
OTHER WARRANTY, EXPRESS OR IMPLIED, INCLUDING, WITHOUT LIMITATION, ANY
IMPLIED WARRANTY OF MERCHANTABILITY, FITNESS FOR A PARTICULAR
PURPOSE, OR NON-INFRINGEMENT. Seller's warranties made in connection with this sale
shall not be effective if Seller has determined, in its sole discretion, that Buyer has misused
the Product in any manner, has failed to use the Product in accordance with industry
standards or practices, or has failed to use the Product in accordance with instructions, if any,
furnished by Seller.
BUYER'S EXCLUSIVE REMEDY WITH RESPECT TO PRODUCT PROVED TO SELLER'S
SATISFACTION TO BE DEFECTIVE OR NONCONFORMING, SHALL BE, REPAIR OR
REPLACEMENT OF SUCH PRODUCTS WITHOUT CHARGE OR REFUND OF THE
PURCHASE PRICE, IN SELLER'S SOLE DISCRETION, UPON THE RETURN OF SUCH
PRODUCTS IN ACCORDANCE WITH SELLER'S INSTRUCTIONS BELOW. NEITHER
SELLER NOR LUMINEX NOR ANY OF ITS AFFILIATES SHALL IN ANY EVENT BE LIABLE
FOR INCIDENTAL, CONSEQUENTIAL OR SPECIAL DAMAGES OF ANY KIND
RESULTING FROM ANY USE OR FAILURE OF THE PRODUCT, EVEN IF SELLER OR
LUMINEX OR ITS AFFILIATE HAS BEEN ADVISED OF THE POSSIBILITY OF SUCH
DAMAGES, INCLUDING, WITHOUT LIMITATION, LIABILITY FOR LOSS OF WORK IN
PROGRESS, DOWN TIME, LOSS OF REVENUE OR PROFITS, FAILURE TO REALIZE
SAVINGS, LOSS OF PRODUCTS OF BUYER OR OTHER USE OR ANY LIABILITY OF
BUYER TO A THIRD PARTY ON ACCOUNT OF SUCH LOSS, OR FOR ANY LABOR OR
ANY OTHER EXPENSE, DAMAGE OR LOSS OCCASIONED BY SUCH PRODUCT,
INCLUDING PERSONAL INJURY OR PROPERTY DAMAGE UNLESS SUCH PERSONAL
INJURY OR PROPERTY DAMAGE IS CAUSED BY SELLER'S GROSS NEGLIGENCE.
In the event that Product is located outside of North America or the European Union and fails
to conform to the warranty set forth herein, during the warranty period: (i) Buyer shall notify
Luminex in a timely manner in writing that such Product failed to conform and shall furnish a
detailed explanation of any alleged nonconformity; (ii) Buyer, at its expense, will contact
either Luminex or a Luminex trained service engineer to assess the issue and identify the
defective FS-PART; and (iii) at Luminex's option and election, Buyer shall either return such
nonconforming Product to Luminex's manufacturing facility or destroy such Product and
provide Luminex with written certification of destruction. In the event that an FS-PART is
returned to Luminex's manufacturing facility, Luminex may analyze such FS-PART for
defects. In the event that Luminex determines that such FS-PART is not defective, the FS-
PART shall be shipped to Buyer and Buyer shall be responsible for the payment for such FS-
PART and related shipping charges. In the event that Luminex determines that such FS-
PART is defective, Luminex shall be responsible for the payment for such FS-PART and
related shipping charges. Except as expressly provided herein, Buyer shall not have the right
to return a Product to Luminex without Luminex's prior written consent.
3. Buyer's Use of Product
Buyer shall not use this Product for any commercial purpose, including without
limitation, performance of testing services, unless expressly agreed to in writing by
Luminex or as specifically authorized by Luminex through a Luminex distributor.
Buyer agrees that no rights or licenses under Luminex's patents shall be implied from the
sale of the Product, except as expressly provided herein or as specifically agreed to in writing
by Luminex, and Buyer does not receive any right under Luminex's patent rights hereunder.
Buyer acknowledges and agrees that the Product is sold and licensed only for use with
xPONENT
®
for FLEXMAP 3D
®
iv

Luminex's laser based fluorescent analytical test instrumentation. Buyer further
acknowledges that the Product has not received approval from the United States Food and
Drug Administration or other federal, state or local regulatory agencies and has not been
tested by Seller or Luminex for safety or efficacy in food, drug, medical device, cosmetic,
commercial or any other use, unless otherwise stated on the Product label or in Seller's
technical specifications or material data sheets furnished to Buyer. Buyer expressly
represents and warrants to Seller that Buyer will use the Product in accordance with the
Product label, if applicable, and will properly test and use any Product in accordance with the
practices of a reasonable person who is an expert in the field and in strict compliance with the
United States Food and Drug Administration and all applicable domestic and international
laws and regulations, now and hereinafter enacted.
BUYER HEREBY GRANTS TO LUMINEX A NONEXCLUSIVE, WORLDWIDE,
UNRESTRICTED, ROYALTY-FREE, FULLY PAID-UP LICENSE, WITH THE RIGHT TO
GRANT AND AUTHORIZE SUBLICENSES, UNDER ANY AND ALL PATENT RIGHTS IN
INVENTIONS COMPRISING MODIFICATIONS, EXTENSIONS, OR ENHANCEMENTS
MADE BY BUYER TO THE PRODUCT OR TO THE MANUFACTURE OR USE OF THE
PRODUCT ("IMPROVEMENT PATENTS"), TO MAKE, HAVE MADE, USE, IMPORT,
OFFER FOR SALE OR SELL ANY AND ALL OF THE PRODUCT; EXPLOIT ANY AND ALL
METHODS OR PROCESSES; AND OTHERWISE EXPLOIT IMPROVEMENT PATENTS
FOR ALL PURPOSES. NOTWITHSTANDING THE FOREGOING, "IMPROVEMENT
PATENTS" SPECIFICALLY EXCLUDES PATENT CLAIMS CONCEIVED AND REDUCED
TO PRACTICE BY BUYER CONSISTING OF METHODS OF SAMPLE PREPARATION,
METHODS OF CONJUGATING PRODUCT TO ANALYTES, THE COMPOSITION OF
MATTER OF THE SPECIFIC CHEMISTRIES OF THE ASSAYS DEVELOPED BY BUYER
AND METHODS OF PERFORMING THE ASSAYS (I.E., THE PROTOCOL FOR THE
ASSAY).
Buyer has the responsibility and hereby expressly assumes the risk to verify the hazards and
to conduct any further research necessary to learn the hazards involved in using the Product.
Buyer also has the duty to warn Buyer's customers, employees, agents, assigns, officers,
successors and any auxiliary or third party personnel (such as freight handlers, etc.) of any
and all risks involved in using or handling the Product. Buyer agrees to comply with
instructions, if any, furnished by Seller or Luminex relating to the use of the Product and to
not misuse the Product in any manner. Buyer shall not reverse engineer, decompile,
disassemble or modify the Product. Buyer acknowledges that Luminex retains ownership of
all patents, trademarks, trade secrets and other proprietary rights relating to or residing in the
Product and Buyer receives no rights to such intellectual property rights by virtue of its
purchase of Product other than as expressly set forth herein. Buyer shall have no right to use
any trademarks owned or licensed to Luminex without the express written permission of
Luminex.
4. Buyer's Representations, Release and Indemnity
Buyer represents and warrants that it shall use the Product in accordance with Paragraph 3,
"Buyer's Use of Product," and that any such use of the Product will not violate any law,
regulation, judicial order or injunction. Buyer agrees to release, discharge, disclaim and
renounce any and all claims, demands, actions, causes of action and/or suits in law or equity,
now existing or hereafter arising, whether known or unknown, against Seller and Luminex,
and their respective officers, directors, employees, agents, successors and assigns
(collectively the "Released Parties"), with respect to the use of the Product. Buyer agrees to
indemnify and hold harmless the Released Parties from and against any suits, losses, claims,
demands, liabilities, costs and expenses (including attorney, accounting, expert witness, and
v

consulting fees) that any of the Released Parties may sustain or incur as a result of any claim
against such Released Party based upon negligence, breach of warranty, strict liability in tort,
contract or any other theory of law or equity arising out of, directly or indirectly, the use of the
Product or by reason of Buyer's failure to perform its obligations contained herein. Buyer shall
fully cooperate with the Released Parties in the investigation and determination of the cause
of any accident involving the Product which results in personal injury or property damage and
shall make available to the Released Parties all statements, reports, recordings, and tests
made by Buyer or made available to Buyer by others.
5. Patent Disclaimer
Neither Seller nor Luminex warrants that the use or sale of the Product will not infringe the
claims of any United States or other patents covering the Product itself or the use thereof in
combination with other products or in the operation of any process.
89-30000-00-186 (Rev C.)
xPONENT
®
for FLEXMAP 3D
®
vi

End-User License Agreement (EULA) for Luminex
®
xPONENT
®
Software
This Luminex End-User License Agreement (“EULA”) is a legal agreement between you
(either an individual or a single entity, also referred herein as “you”) the end-user and
Luminex Corporation (“Luminex”) regarding the use of the xPONENT software product
provided to you above, which includes computer SOFTWARE and online or electronic
documentation and may include associated media and printed materials (if any)
(“SOFTWARE”). The terms also apply to any updates, supplements, web content or internet-
based services, such as remote access.
BY USING THE SOFTWARE, YOU ACCEPT THESE TERMS. IF YOU DO NOT ACCEPT
THESE TERMS, DO NOT USE THE SOFTWARE. INSTEAD, RETURN IT TO LUMINEX OR
THE LUMINEX AUTHORIZED DISTRIBUTOR FROM WHICH YOU PURCHASED THE
SOFTWARE FOR A REFUND OR CREDIT. IF YOU COMPLY WITH THESE LICENSE
TERMS, YOU HAVE THE RIGHTS TO USE THE SOFTWARE AS SPECIFICALLY SET
FORTH BELOW.
1. OVERVIEW. The SOFTWARE is protected by copyright laws and international copyright
treaties, as well as other intellectual property laws and treaties. The SOFTWARE is
licensed, not sold.
2. ADDITIONAL LICENSING REQUIREMENTS AND/OR USE RIGHTS.
a. Trial and Conversion. Some or all of the SOFTWARE may be licensed on a trial basis.
Your rights to use trial SOFTWARE are limited to the trial period. The trial SOFTWARE
and length of the trial period are set forth during the activation process. The
SOFTWARE may be used for evaluation purposes only during the trial period and not
for any commercial use, including without limitation to any diagnostic use. You may
have the option to convert your trial rights to perpetual rights. Conversion options will
be presented to you at the expiration of your trial period.
b. Activation. For certain SOFTWARE, you can activate the SOFTWARE by obtaining a
license key provided by Luminex Technical Support at support@luminexcorp.com or
1-877-785-2323 or 1-512-381-4397.
c. Branding. You may only add additional branding or other graphics to SOFTWARE with
Luminex's express written consent.
d. Upgrades. You may only obtain updates or upgrades for the SOFTWARE from
Luminex Technical Support at orders@luminexcorp.com or authorized resellers. For
more information on obtaining updates from authorized resellers, see http://
www.luminexcorp.com.
3. GRANT OF LICENSE. Subject to the terms and conditions of this EULA, Luminex hereby
grants to you a non-exclusive, non-transferable, non-assignable license (without right to
sublicense) under Luminex's copyrights and trade secrets to use the SOFTWARE on a
single computer running with a single unit of a specific model of Luminex instrument, as
such model is identified on the packaging included with the SOFTWARE. You may make
one (1) copy of the SOFTWARE for backup or archival purposes only. You may also
install the SOFTWARE on up to two (2) additional computers for purposes of performing
ancillary tasks (i.e. preparing templates/protocols, performing further analysis or re-
running previous data), provided such computers are at a single location and are NOT
connected with a Luminex instrument. In addition, you may purchase the right to use the
vii

SOFTWARE on additional computers, as agreed to in writing with Luminex or its
authorized reseller, for purposes of performing ancillary tasks (i.e. preparing templates/
protocols, performing further analysis or re-running previous data), provided such
computers are at a single location and are NOT connected with a Luminex instrument.
Although no rights or licenses under any of Luminex's patents are granted by or shall be
implied from the license of the SOFTWARE or the sale of Luminex instrumentation to
you, the purchaser, you may obtain a license under Luminex's patents, if any, to use this
unit of Luminex instrumentation with fluorescently labeled microsphere beads authorized
by Luminex by purchasing such beads from Luminex or an authorized Luminex reseller.
4. RESTRICTIONS
• SOFTWARE must only be installed and operated on a single computer running with a
Luminex instrument, as set forth above.
• You may not use this SOFTWARE for any commercial purpose, including in the
performance of testing services, unless expressly agreed to in writing by Luminex or
as authorized in writing by Luminex through an authorized reseller of the SOFTWARE.
• You may only use the SOFTWARE with microspheres manufactured by Luminex or
with kits developed, manufactured and distributed by licensees authorized in writing by
Luminex.
• You must maintain all proprietary notices on all copies of the SOFTWARE.
• You may not distribute copies of the SOFTWARE to third parties.
• You may not reverse-engineer, decompile, disassemble, or otherwise attempt to derive
source code from the SOFTWARE.
• You may not copy (other than one backup or archival copy), distribute, sublicense,
rent, lease, transfer or grant any rights in or to all or any portion of the SOFTWARE.
• You must comply with all applicable laws regarding the use of the SOFTWARE.
• You may not modify or prepare derivative works of the SOFTWARE, including
modifying any branding or graphics.
• You may not use the SOFTWARE in a computer-based service business or publicly
display visual output of the SOFTWARE.
• You may not transmit the SOFTWARE over a network, by telephone, or electronically
by any means.
5. TERM AND TERMINATION. Your rights under this EULA are effective until termination.
You may terminate this EULA at any time by destroying the SOFTWARE, including all
computer programs and documentation, and erasing any copies residing on your
computer equipment. Luminex may terminate this EULA upon thirty (30) days written
notice to you. Your rights under this EULA automatically terminate without further action
on the part of Luminex if you do not comply with any of the terms or conditions of this
EULA. Upon any termination of this EULA, you agree to destroy the SOFTWARE and
erase any copies residing on your computer equipment.
6. RIGHTS IN SOFTWARE. All rights and title in and to the SOFTWARE and any copies
thereof are owned by Luminex or its suppliers. This EULA is not a sale and does not
transfer to you any title or ownership interest in or to the SOFTWARE or any patent,
copyright, trade secret, trade name, trademark or other intellectual property right therein.
You shall not remove, alter, or obscure any proprietary notices contained on or within the
SOFTWARE and shall reproduce such notices on any back-up copy of the SOFTWARE.
All title and intellectual property rights in and to the content which may be accessed
through use of the SOFTWARE is the property of the respective content owner and may
xPONENT
®
for FLEXMAP 3D
®
viii

be protected by applicable copyright or other intellectual property laws and treaties. This
EULA grants you no rights to use such content.
7. EXPORT RESTRICTIONS. You agree that you will not export or re-export the
SOFTWARE to any country, person, entity, or end-user subject to U.S.A. export
restrictions. You hereby warrant no state or federal agency has suspended, revoked, or
denied your export privileges.
8. NO WARRANTY. THE SOFTWARE IS LICENSED "AS IS." ANY USE OF THE
SOFTWARE IS AT YOUR OWN RISK. THE SOFTWARE IS PROVIDED FOR USE
ONLY WITH LUMINEX PRODUCTS. TO THE MAXIMUM EXTENT PERMITTED BY
APPLICABLE LAW, LUMINEX AND ITS SUPPLIERS DISCLAIM ALL WARRANTIES,
EITHER EXPRESS OR IMPLIED, INCLUDING, BUT NOT LIMITED TO, IMPLIED
WARRANTIES OF MERCHANTABILITY, FITNESS FOR A PARTICULAR PURPOSE,
AND NONINFRINGEMENT.
9. LIMITATION OF LIABILITY. IN NO EVENT SHALL LUMINEX OR ITS AFFILIATES OR
SUPPLIERS BE LIABLE FOR ANY SPECIAL, INCIDENTAL, INDIRECT, OR
CONSEQUENTIAL DAMAGES WHATSOEVER (INCLUDING, WITHOUT LIMITATION,
DAMAGES FOR LOSS OF BUSINESS PROFITS, BUSINESS INTERRUPTION, LOSS
OF BUSINESS INFORMATION, OR ANY OTHER PECUNIARY LOSS) ARISING OUT
OF THE USE OF OR INABILITY TO USE THE SOFTWARE, EVEN IF LUMINEX OR ITS
AFFILIATES OR SUPPLIERS HAVE BEEN ADVISED OF THE POSSIBILITY OF SUCH
DAMAGES.
10. MISCELLANEOUS. This EULA is governed by the laws of the State of Texas, U.S.A.,
without reference to conflicts of laws principles. You shall not assign or sublicense or
otherwise transfer the rights or license granted hereunder, by agreement or by operation
of law, without the prior written consent of Luminex, and all assignments in violation of
this prohibition shall be null and void. This EULA is the complete and exclusive
agreement of Luminex and you and supersedes all other communications, oral or written,
relating to the subject matter hereof. No change to this EULA shall be valid unless in
writing and signed by the party against whom enforcement is sought. The waiver or
failure of Luminex or you to exercise in any respect any right or rights provided for herein
shall not be deemed a waiver of any further right hereunder. If any provision of this EULA
is held unenforceable, the remainder of this EULA will continue in full force and effect.
89-30000-00-403 Rev. A
ix

xPONENT
®
for FLEXMAP 3D
®
x

Table of Contents
Chapter 1 Introduction .......................................................................................................1
Safety Precautions .......................................................................................................................................1
Elements of the Software .............................................................................................................................1
Home Page ...........................................................................................................................................1
Screen Elements ...................................................................................................................................3
System Monitor .....................................................................................................................................4
Help .......................................................................................................................................................5
Quick Start .............................................................................................................................................5
System Info Tab ....................................................................................................................................6
Basic Procedures .........................................................................................................................................8
StartingxPONENT
®
...............................................................................................................................8
Adding a New License Key ...................................................................................................................8
Logging On to xPONENT
®
....................................................................................................................8
Initial Startup .......................................................................................................................................10
Shutting Down the Analyzer ................................................................................................................13
Logging Off and Exiting .......................................................................................................................13
Using Online Help ...............................................................................................................................14
Luminex
®
Support .....................................................................................................................................15
Viewing the Luminex
®
Website ...........................................................................................................15
Contacting Technical Support .............................................................................................................15
Software Packages ....................................................................................................................................15
Chapter 2 Running Assays with FLEXMAP 3D
®
............................................................17
General Guidelines ....................................................................................................................................17
Biological Samples ....................................................................................................................................18
Bead (Microsphere) Handling ....................................................................................................................18
Sample Volume .........................................................................................................................................18
Plates .........................................................................................................................................................19
Chapter 3 Samples Page ..................................................................................................21
Samples Page Overview ...........................................................................................................................21
Creating New Samples ........................................................................................................................22
Editing a Sample List ...........................................................................................................................24
Chapter 4 Batches Page ...................................................................................................27
Batches Page Functionality .......................................................................................................................27
Setting Up Batches ....................................................................................................................................28
Using the Batches Page ............................................................................................................................29
Create a New Batch from an Existing Protocol ...................................................................................29
Create a New Batch from a New Protocol ...........................................................................................35
Create a New Multi-Batch ...................................................................................................................46
Batch Procedures ......................................................................................................................................49
Running a Pending Batch ....................................................................................................................49
xi

Importing a Batch ................................................................................................................................49
Exporting a Batch ................................................................................................................................49
Editing a Batch ....................................................................................................................................50
Deleting a Batch ..................................................................................................................................50
Chapter 5 Results Page ....................................................................................................51
Results Page .............................................................................................................................................51
Performing Analysis ...................................................................................................................................52
Current Batch Tab .....................................................................................................................................53
Saved Batches Tab ...................................................................................................................................59
Replaying a Batch ...............................................................................................................................63
Results Subtab ....................................................................................................................................63
Settings Subtab ..................................................................................................................................66
Log Subtab ..........................................................................................................................................67
Sample Details Subtab ........................................................................................................................68
LIS Results Tab .........................................................................................................................................69
Reports Tab ...............................................................................................................................................70
Generating a Report ............................................................................................................................72
Chapter 6 Protocols Page .................................................................................................73
Protocols Page Functionality .....................................................................................................................73
Protocol Procedures ..................................................................................................................................74
Creating an Allele Call Protocol ...........................................................................................................74
Creating a Quantitative Assay Protocol ...............................................................................................75
Creating a Qualitative Assay Protocol .................................................................................................77
Deleting a Protocol ..............................................................................................................................78
Editing a Protocol ................................................................................................................................78
Exporting a Protocol ............................................................................................................................79
Importing a Protocol ............................................................................................................................79
Adding a New Lot for Protocol .............................................................................................................79
Lots and Kits Procedures ...........................................................................................................................79
Creating a Lot ......................................................................................................................................79
Editing a Lot ........................................................................................................................................80
Deleting a Lot ......................................................................................................................................80
Exporting a Lot ....................................................................................................................................80
Importing a Lot ....................................................................................................................................80
Creating a Kit .......................................................................................................................................80
Protocols Tab .............................................................................................................................................81
Settings Subtab ...................................................................................................................................82
Plate Layout Subtab ............................................................................................................................86
Analytes Subtab ..................................................................................................................................88
Standards and Controls (Stds & Ctrls) Tab ...............................................................................................91
Chapter 7 Maintenance Page ...........................................................................................93
Auto Maintenance (Auto Maint) Tab ..........................................................................................................93
Running Calibration and Verification ...................................................................................................95
Running the Performance Verification Routine ...................................................................................95
Lot Management Tab .................................................................................................................................95
Importing CAL or VER Kits ..................................................................................................................97
Deleting CAL and VER Kit Information ................................................................................................97
xPONENT
®
for FLEXMAP 3D
®
xii

Commands and Routines ..........................................................................................................................97
Creating a New Routine ......................................................................................................................99
Editing a Routine ...............................................................................................................................100
Deleting a Routine .............................................................................................................................100
Running a Routine .............................................................................................................................100
Importing a Routine ...........................................................................................................................100
Exporting a Routine ...........................................................................................................................101
Probe and Heater Tab .............................................................................................................................101
Adjusting the Sample Probe Height ..................................................................................................102
System Info Tab .......................................................................................................................................103
System Status Tab ..................................................................................................................................105
Schedule Tab ...........................................................................................................................................106
Support Utility Tab ...................................................................................................................................107
Sending a Support.zip File ................................................................................................................108
Chapter 8 Admin Page ....................................................................................................109
System Setup Tab ...................................................................................................................................109
Adding an External Analysis Program ...............................................................................................112
Editing an Analysis Program .............................................................................................................112
Removing an Analysis Program ........................................................................................................112
Arranging Main Navigation Buttons ...................................................................................................112
Maintenance Options ........................................................................................................................113
Group Setup Tab .....................................................................................................................................114
User Setup Tab ........................................................................................................................................116
Create User Account Window ...........................................................................................................118
Edit User Account Window ................................................................................................................119
Batch Options Tab ...................................................................................................................................120
Alert Options Tab .....................................................................................................................................122
Alert Options Tasks .................................................................................................................................123
CSV Options Tab .....................................................................................................................................124
Archive Options Tab ................................................................................................................................126
Archive Utility .....................................................................................................................................126
Licensing Tab ..........................................................................................................................................130
Adding a New License Key ...............................................................................................................131
Schedule Tab ...........................................................................................................................................131
Editing Maintenance Schedule Settings ............................................................................................132
Report Options Tab .................................................................................................................................133
Table of Contents
xiii

xPONENT
®
for FLEXMAP 3D
®
xiv
Safety Precautions
DANGER: Samples and waste fluid can contain biohazardous infectious
agents. Handle them at Biosafety level 2, as recommended for
any potentially infectious human serum or blood specimen in the
DCE/NIH manual, Biosafety in Microbiological and Biomedical
Laboratories, 1984.
CAUTION: Although beads do not contain hazardous or carcinogenic
components at toxic levels, they can be toxic if swallowed. In
addition, contact with acids liberates toxic gases. If beads come
into contact with skin, wash immediately with copious amounts of
water. In case of an accident, seek medical advice immediately
and show the product label or container to your medical provider.
A material safety data sheet (MSDS) is available upon request.
CAUTION: Luminex
®
reagents can contain ProClin
®
as a preservative. This
can cause an allergic reaction in some people. Use personal
protective equipment (PPE), including gloves and safety glasses.
Check the assay package insert for assay component
information.
NOTE: Do not use strong organic solvents with this instrument. Contact
Luminex
®
Technical Support when in doubt about compatibility of
cleaning and decontamination agents or materials.
Elements of the Software
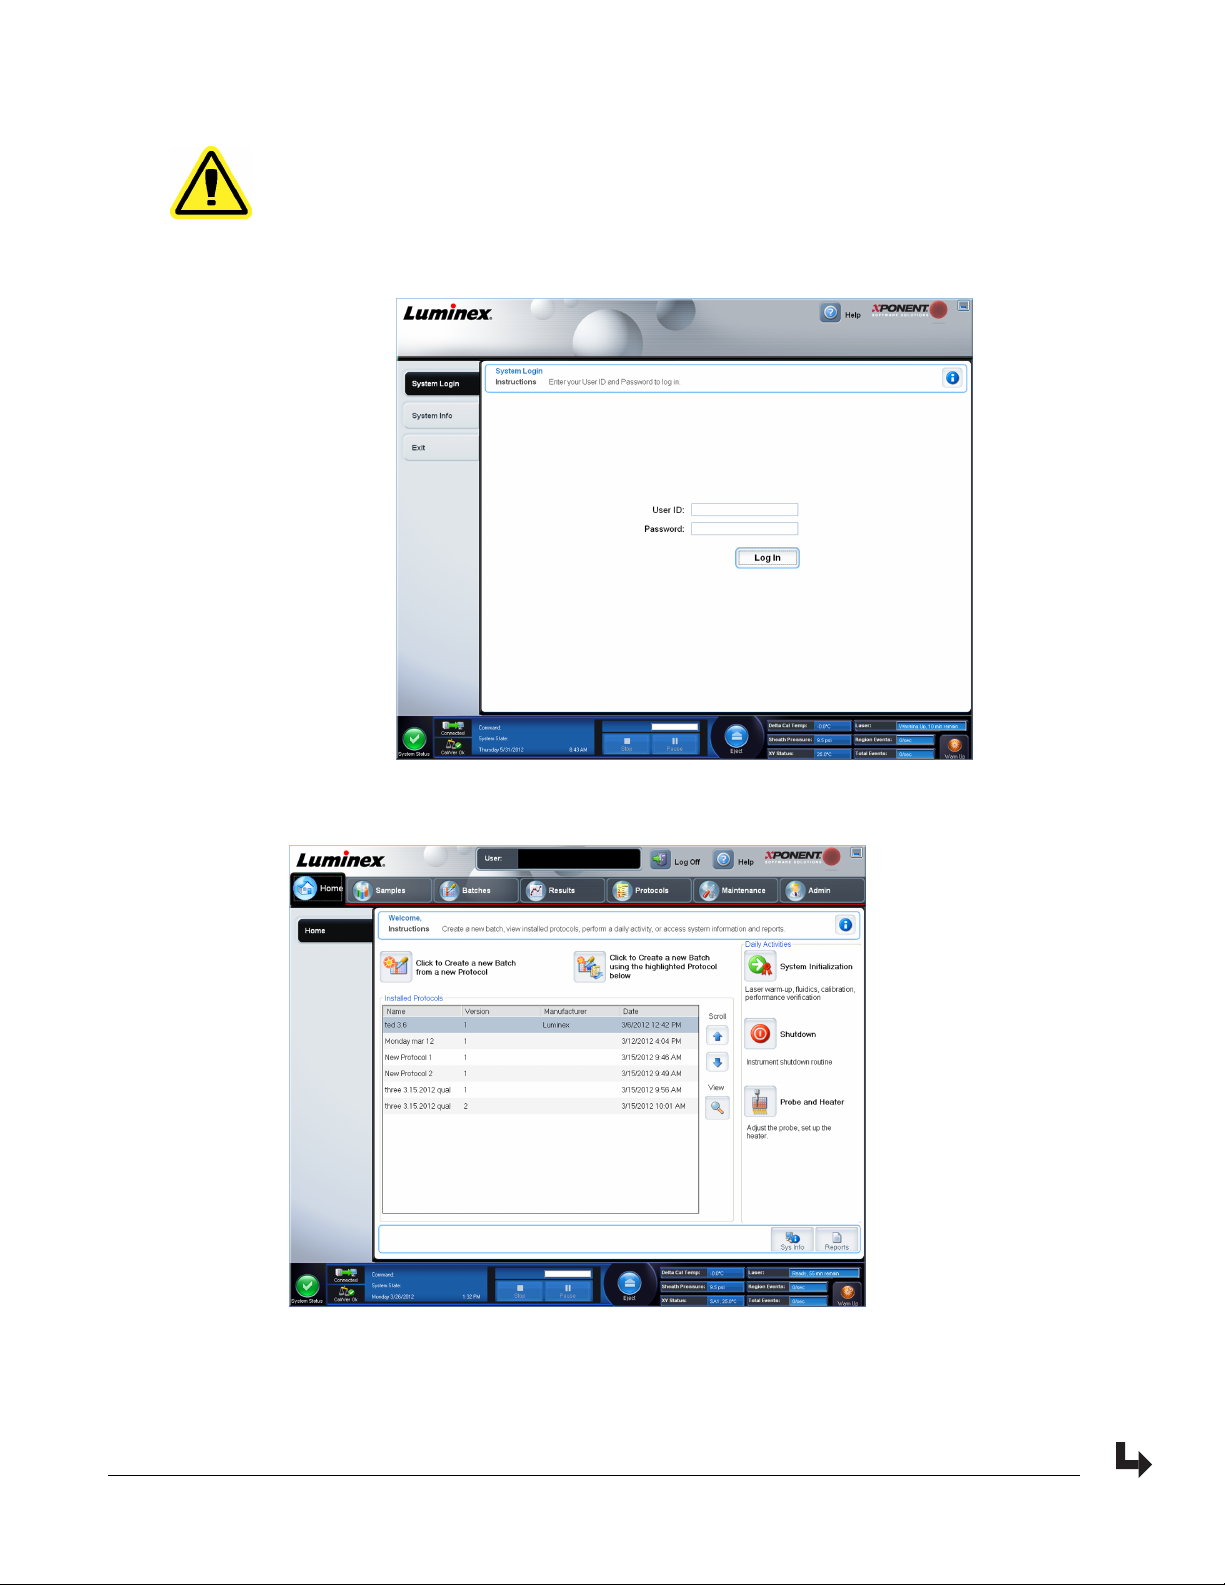
Home Page
Home > Home
Chapter 1: Introduction
1
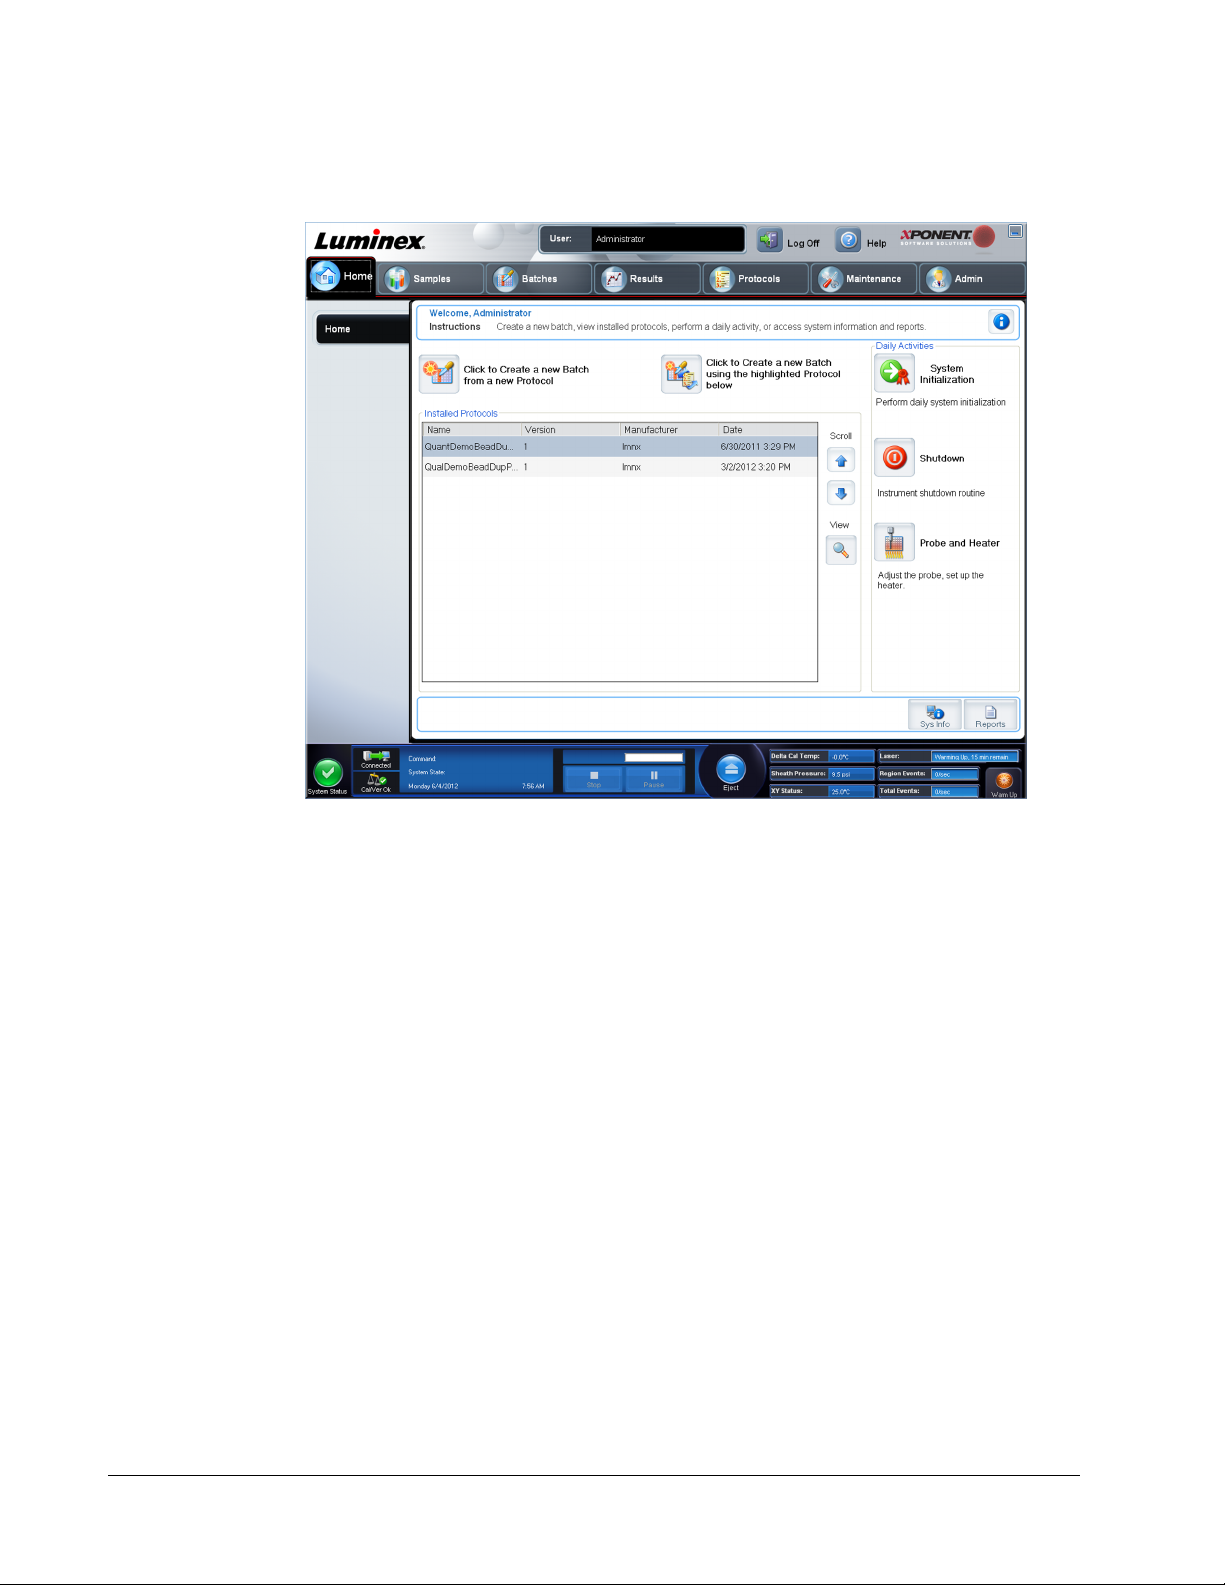
The Home page displays a Welcome message, batch creation buttons, Daily Activities
shortcuts, and the Installed Protocols list.
Return to the Home page at any time by clicking Home in the Navigation toolbar. This page
contains the following:
Click to Create a new Batch using the highlighted Protocol below - Creates a new batch
from a new protocol. This allows you to create a new protocol while you are creating the
batch. Choose this function if you want to quickly create a batch and run it and you do not
already have a protocol that is appropriate for use. This is useful for one time batches you do
not expect to rerun frequently. However, you always have the option of saving a protocol
once a batch is created.
Click to Create a new Batch using the highlighted Protocol below - Creates a new batch
using a selected protocol from the Installed Protocols list.
Installed Protocols - Displays a list of protocols. The list contains the following information
about each protocol:
• Name
• Version
• Manufacturer
• Date
Scroll - Use the arrows on the right to move through the list of protocols.
View - Opens the Settings tab of the Protocols page to view the selected protocol. This tab
enables viewing the settings, analytes, and plate layout for the selected protocol.
Daily Activities - Contains shortcut buttons to common commands in the Luminex
®
xPONENT
®
software:
xPONENT
®
for FLEXMAP 3D
®
2
• System Initialization - Opens the routine specified in the Maintenance Options on the
Admin page.
• Shutdown - Opens the System Shutdown command in the Auto Maint tab on the
Maintenance page.
• Probe and Heater - Opens the Probe and Heater tab on the Maintenance page.
Sys Info - Opens the System Info tab of the Maintenance page.
Reports - Opens the Reports tab of the Results page.
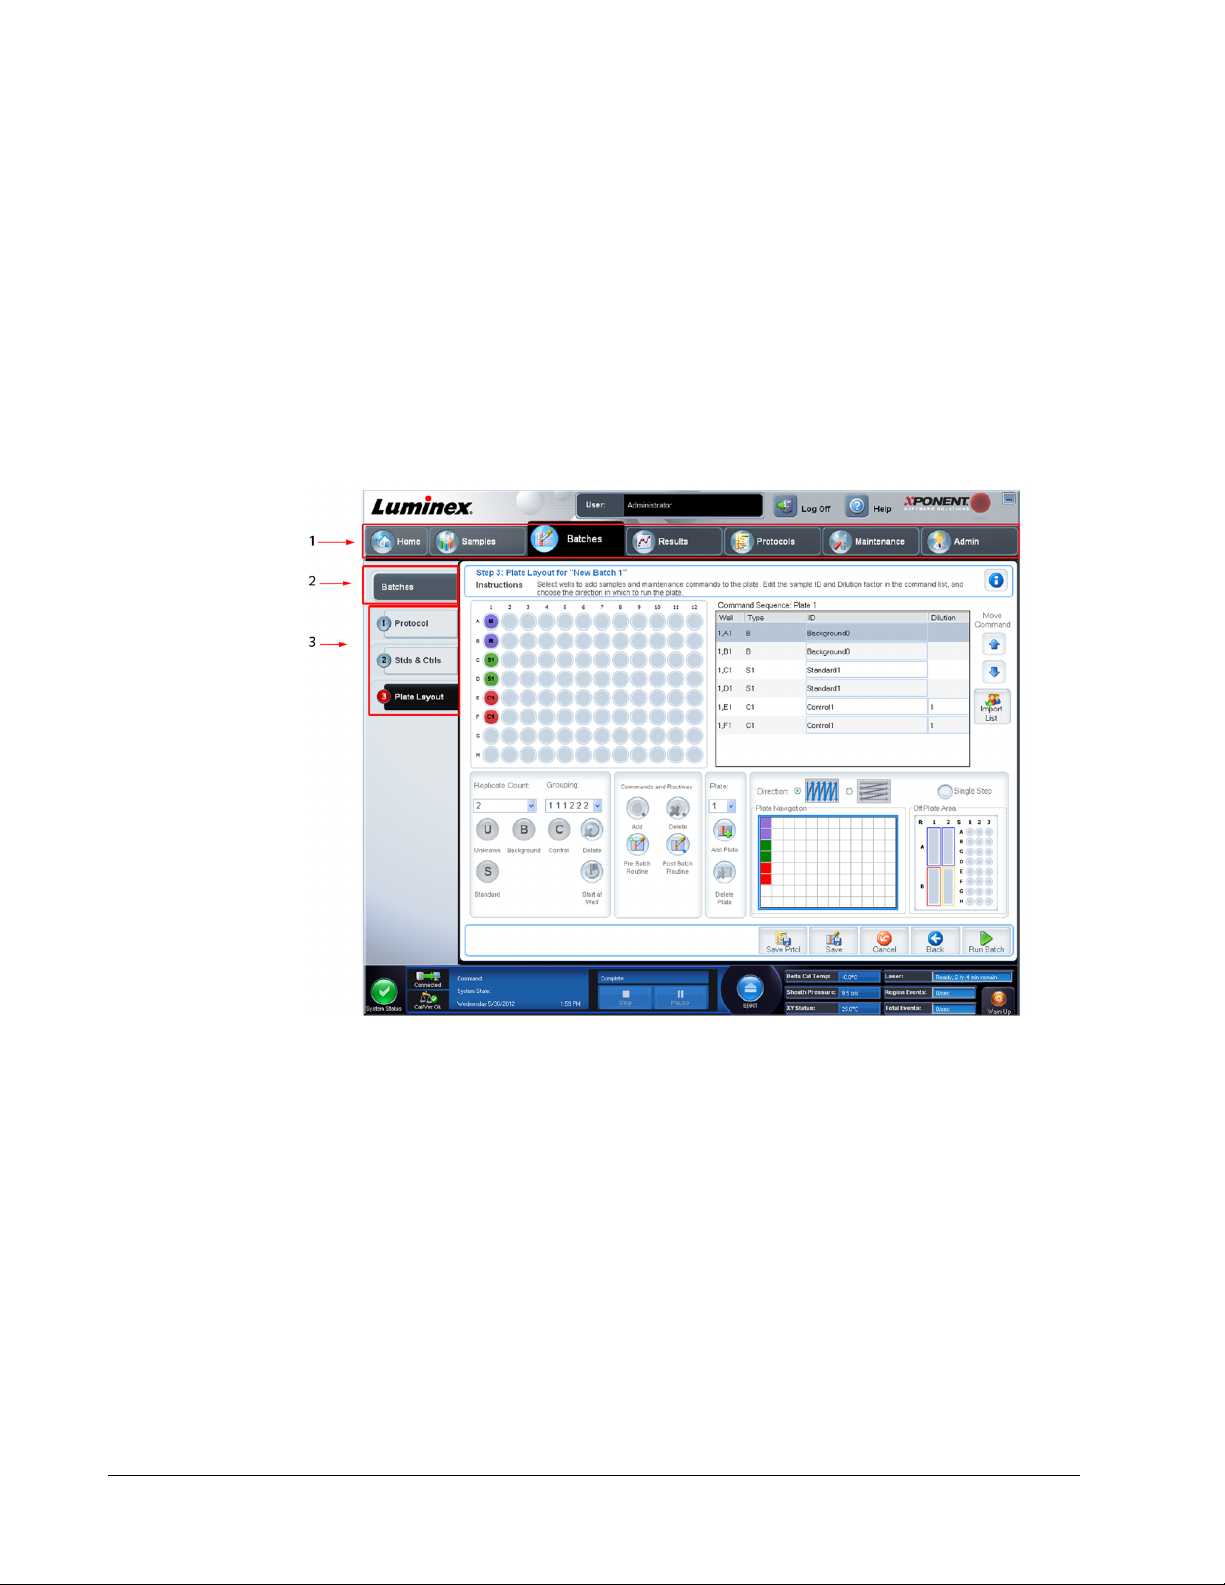
Screen Elements
This section shows screen elements and the terms used in this book to describe them.
1 Page 2 Tab 3 Subtab
Navigation Elements
Page - Across the top of the window, there is a content pane with page tabs. Click a page to
go to that part of xPONENT
®
.
Tab - On the left side of the window, along the left side of the content pane, are tabs. Click a
tab to go to that subsection of the software.
Subtab -
A tab can have one or more subtabs. These are located below the tab, are smaller, and are
identified by the circle on the left end of the subtab. The circle is red when the subtab is open.
For some workflows, you must move through the subtabs of a tab sequentially, completing
the work on one subtab and clicking Next to move to the next subtab.
Introduction
3
Right-Click Menu
Certain sections of the software such as tables, lists, and text boxes have right-click option
menus. Menus are different depending upon the item you right-clicked.
• Apply Dilution Down - sets the dilution levels for the sample.
• Print All - Prints all sections or cells of the item.
• Print Selection - Prints only the selected section or cell.
• Import - Imports a file.
• Export Grid Contents - Opens a File Dialog dialog box. Use the Browse button to select
a location, file name, and file type (either a text or CSV file) for the export. This exports all
data from the right-clicked item.
• Cut - Cuts the selected data.
• Copy All - Copies all data.
• Copy - Copies only the selected data.
• Paste - Pastes previously copied text or data into the box.
• Delete - Erases text or data from the selection.
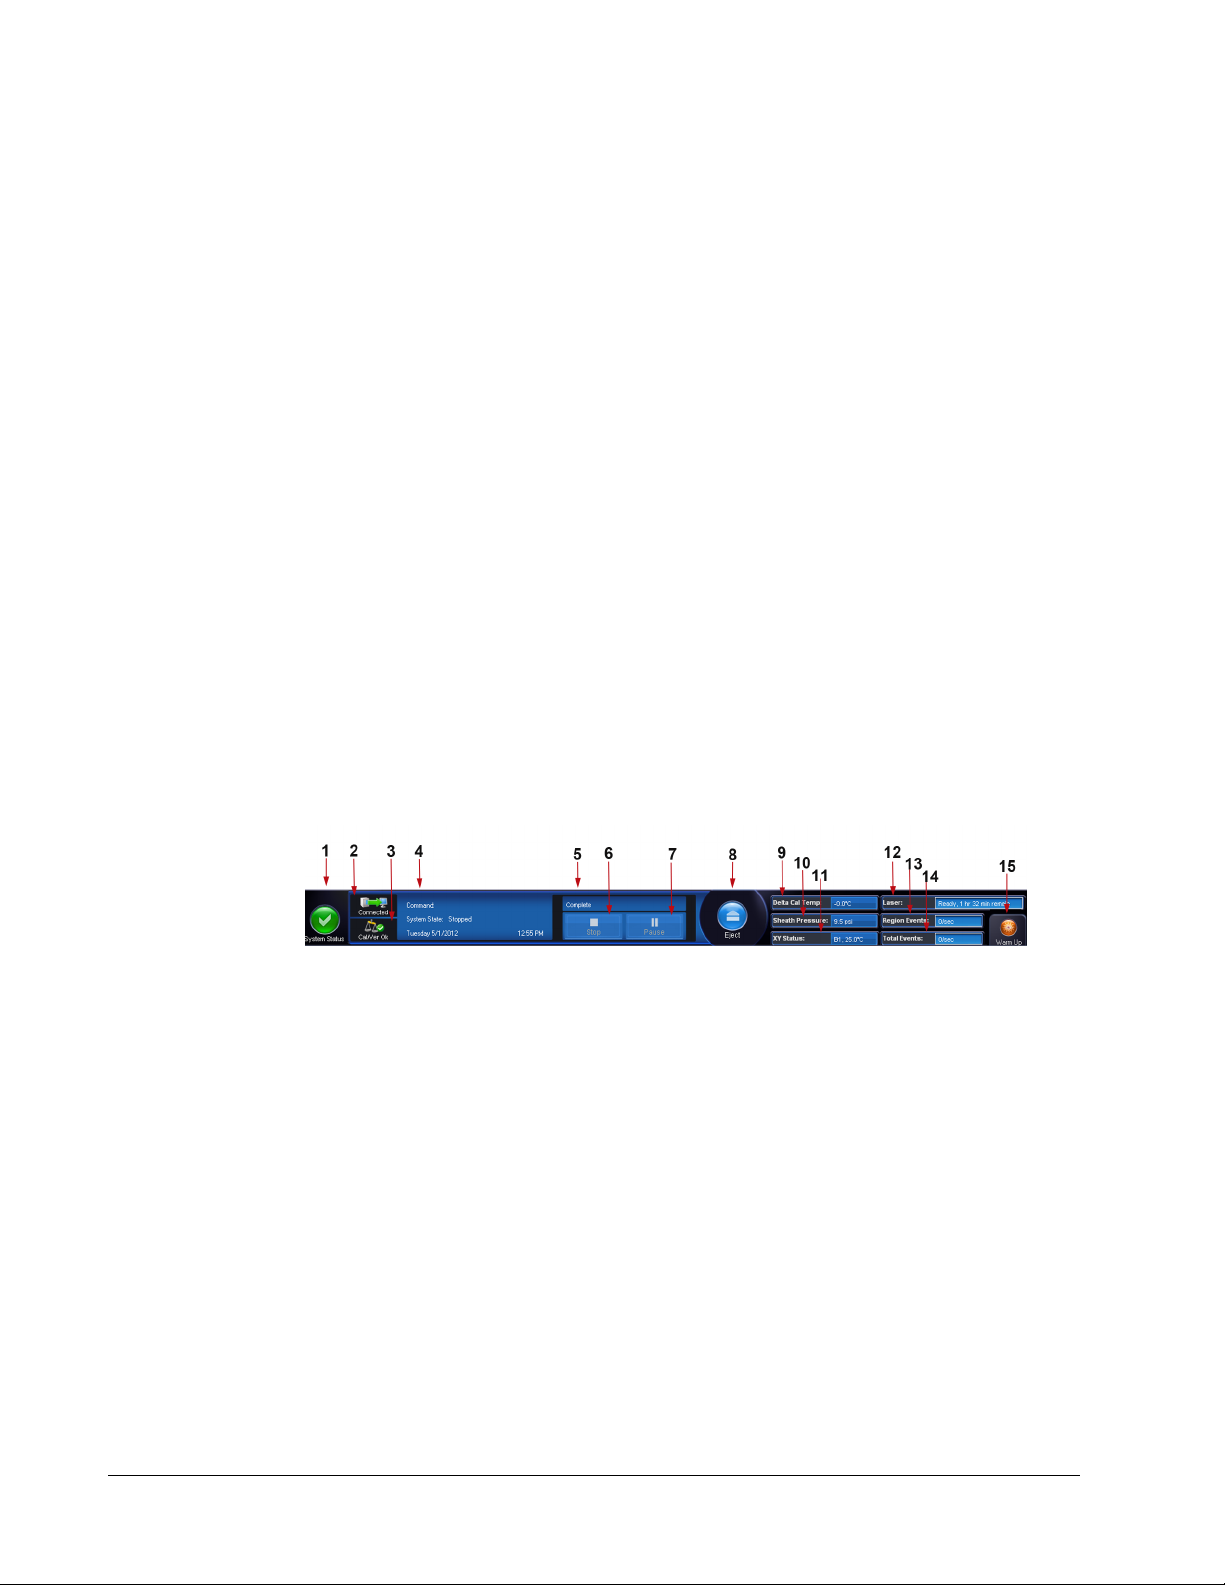
System Monitor
The System Monitor is displayed at the bottom of all xPONENT
®
windows. It displays the
physical state of the Luminex
®
system. Values are reported directly from the Luminex
®
system.
1 System Status button 2 Connection Status 3 Check Cal/Ver Ok
4 Command Display 5 Progress Bar and buttons 6 Stop button
7 Pause button 8 Eject button 9 Delta Cal Temp Status
10 Sheath Pressure 11 XY Status 12 Laser Status
13 Region Event Status 14 Total Events Status 15 Warm Up button
System Status Button - This button has two functions: When clicked, it opens the system
log. It also displays the current status of the system. If there are no warnings or errors, the
System Status button is green with a check mark. If there is a warning, out of calibration
condition, or other important user notification, the button is yellow with an exclamation point.
Connection Display - Displays the connection status.
Cal/Ver Ok - This will be lit up if the calibrations and verifications are connected. When you
click the Cal/Ver button, it takes you to Maintenance > System Setup.
xPONENT
®
for FLEXMAP 3D
®
4

Command Display - Displays the following:
• The command currently running.
• The system state (i.e. running, idle, etc.).
• Date and time.
Progress - Displays a bar graph showing the progress of the current command or routine; if
the command or routine is finished, it displays a full progress bar and the command status as
Complete.
Pause - Pauses the system after the current command completes. Pause does not stop the
system in the middle of running a command. You cannot run another command while the
system is paused. Pause the system before stopping it so that it will finish the current
command, store the pending batch and then resume exactly where it left off.
Stop - Stops the system, regardless of command status. Use this only if it does not matter
whether the data from the current well is lost.
Eject - Ejects the plate. Once the plate is ejected, the Eject button changes to Retract.
Retract retracts the plate, and the Retract button changes back to Eject.
Delta Cal Temp - Displays the difference in temperature in degrees Celsius between the
current reading and the reading when the system was calibrated. If the temperature is out of
tolerance, this shows a high or low arrow. When clicked, it opens the Auto Maint tab.
Sheath Pressure - Displays the sheath pressure in psi. A high or low arrow is displayed if the
pressure is trending up or down versus the calibration pressure it turns yellow. When clicked,
it opens the System Info tab.
XY Status - Displays the current location of the command and the temperature of the plate
heating block in degrees Celsius. When clicked, it opens the Probe & Heater tab.
Laser Status - Displays the laser status, including the time remaining until you must warm
up the laser again. The Laser status box is blue. The button turns yellow when the lasers are
turned off and about ten minutes before they turn off. Clicking the Warm Up button restarts
the active clock for the laser.
Region Events Status - Displays the number of bead events detected per second that are
classified in a region.
Total Events Status - Displays the number of total events detected per second.
Warm Up Button - Starts or schedules a warmup.
Help
To display online help for the tab in which you are currently working, click the blue “i” icon at
the upper right of the xPONENT
®
window. This opens a help window with information specific
to that tab.
To display system-level help, click the blue question mark at the top of the xPONENT
®
window, then click Contents and Index. The online help opens and you can navigate to any
available topic.
To display quick start information, click the blue question mark at the top of the xPONENT
®
window, then click Quick Start.This displays information about the seven basic steps to start
the system.
Quick Start
The five steps to starting and using xPONENT
®
are the following:
Introduction
5
To Go to Expanded Help
Adjust the sample probe height Home > Probe and Heater Adjusting the Sample Probe
Initialize the system Home > System Initialization Running the System Initialization
Routine
Run an assay Home > Create a new Batch
from a new protocol, or Home
> Create a new Batch using
the highlighted protocol below
Create a New Batch from a New
Protocol
Create a New Batch from an
Existing Protocol
Analyze Results > Saved Batches Performing Analysis
Print reports Results > Reports Reports Tab
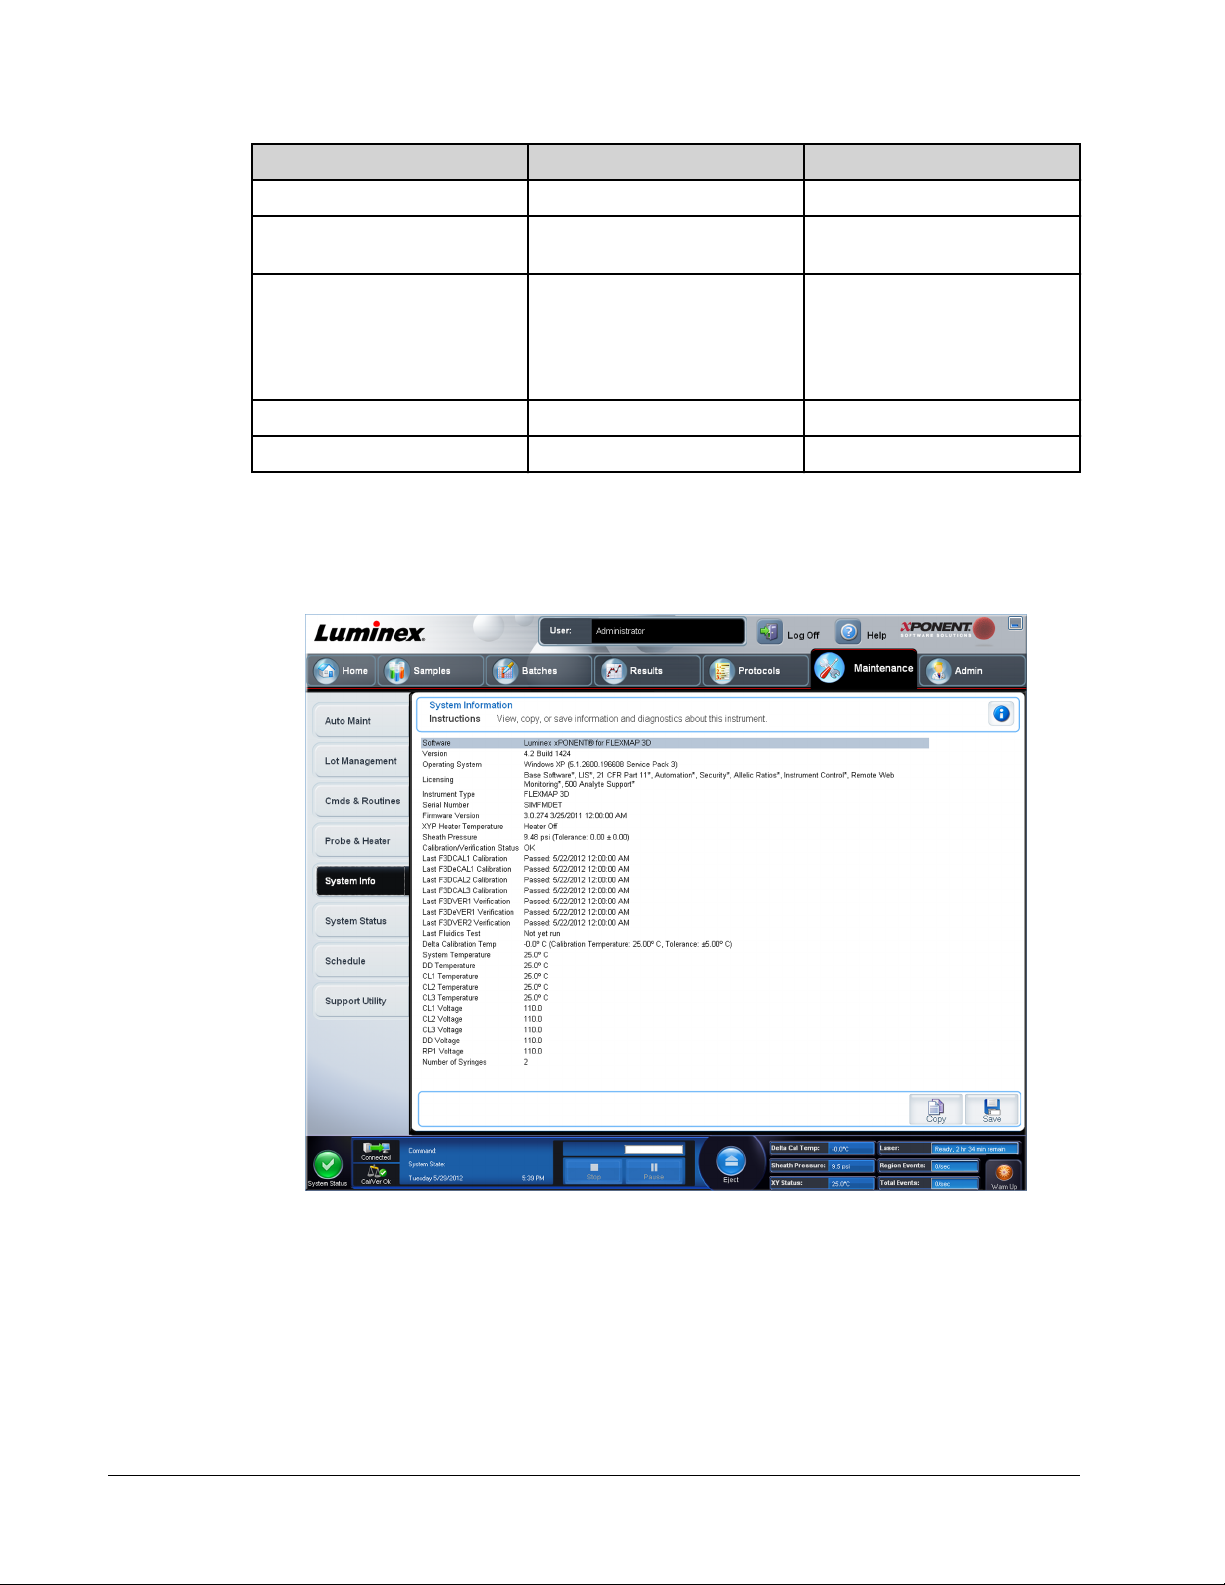
System Info Tab
Maintenance > System Info
Use this tab to view information and diagnostics about the Luminex instrument.
This tab contains the following information:
• Software
• Version
• Operating System
• Licensing
• Instrument Type
xPONENT
®
for FLEXMAP 3D
®
6

• Serial Number
• Firmware Version
• XYP Heater Temperature
• Sheath Pressure
• Calibration/Verification Status
• Last F3DCAL1 Calibration
• Last F3DeCAL1 Calibration
• Last F3DCAL2 Calibration
• Last F3DCAL3 Calibration
• Last F3DVER1 Verification
• Last F3DeVER1 Verification
• Last F3DVER2 Verification
• Last Fluidics Test
• Delta Calibration Temp
• System Temperature
• DD Temperature
• CL1 Temperature
• CL2 Temperature
• CL3 Temperature
• CL1 Voltage
• CL2 Voltage
• CL3 Voltage
• DD Voltage
• RP1 Voltage
• Number of Syringes
Items in this list relating to calibration and verification (CAL/VER) have one of the following
states:
• Passed - Indicates that the process completed successfully.
• Failed - Indicates that the process was not completed successfully. Failed items appear in
red.
• Not Current - Indicates that verifiers are not current. Verifiers are not current if you have
not calibrated the system since the last time you ran the verifiers.
• Not Yet Run - Indicates that this process has not yet been run on the machine.
Copy - Copies the system information to the Windows clipboard. You can then paste it into a
text editor such as Notepad.
Save - Opens the Save As dialog box to specify a file name and location to save the system
information file.
Introduction
7

Basic Procedures
StartingxPONENT
®
• On the PC desktop, click the Luminex
®
xPONENT
®
icon, or click Start > All Programs >
Luminex > xPONENT > Luminex xPONENT.
• If you have a trial license, contact Luminex
®
Technical Support to obtain a full license, or
click OK in the dialog box to continue.
• If this is the first time you have started the software, the User License Agreement may
display. Read the license agreement. Select I accept the terms of this license
agreement, then click OK.
NOTE: For safety and legal information, refer to the xPONENT
®
for
FLEXMAP 3D
®
Hardware Version 4.2 User Manual that you
received with your instrument.
Adding a New License Key
1. Access the Admin page, then the Licensing tab.
2. Click License (bottom right corner of window).
3. Copy and paste the new key into the License Code field. The License File field remains
blank.
4. Click OK. This closes xPONENT
®
, applies the license, and restarts xPONENT
®
.
Contact Luminex
®
Technical Support if you have any difficulty saving or adding a new
license key.
Logging On to xPONENT
®
If your version of xPONENT
®
is licensed for 21 CFR Part 11 or Security, an application
administrator must set up user IDs (and passwords, if required).
NOTE: Contact Luminex
®
Technical Support if you have problems logging
in. If you want to purchase a license for 21 CFR Part 11 or the
security module, contact Luminex
®
to place an order.
xPONENT
®
for FLEXMAP 3D
®
8
CAUTION: Use of this software by untrained personnel can result in
inaccurate data and test results. Users of xPONENT
®
must read
the documentation thoroughly before operating the software.
1. On the System Login tab, type your user ID.
2. If you are using a secure version of the software, type your password. The Home page
opens.
3. From the Home page, open the Admin page. Open System Setup tab.
NOTE: This allows you to define the System Initialization routine.
Introduction
9
4. From the Maintenance options drop-down menu you can define the daily startup routine.
Select the check box if you want to Allow running the calibration or verification if the
instrument is not warmed up.
5. You can set how often the system will run the calibration routine.
Initial Startup
When you turn on the system for the first time, perform the following procedures:
1. Adjusting the Sample Probe Height
2. System Initialization
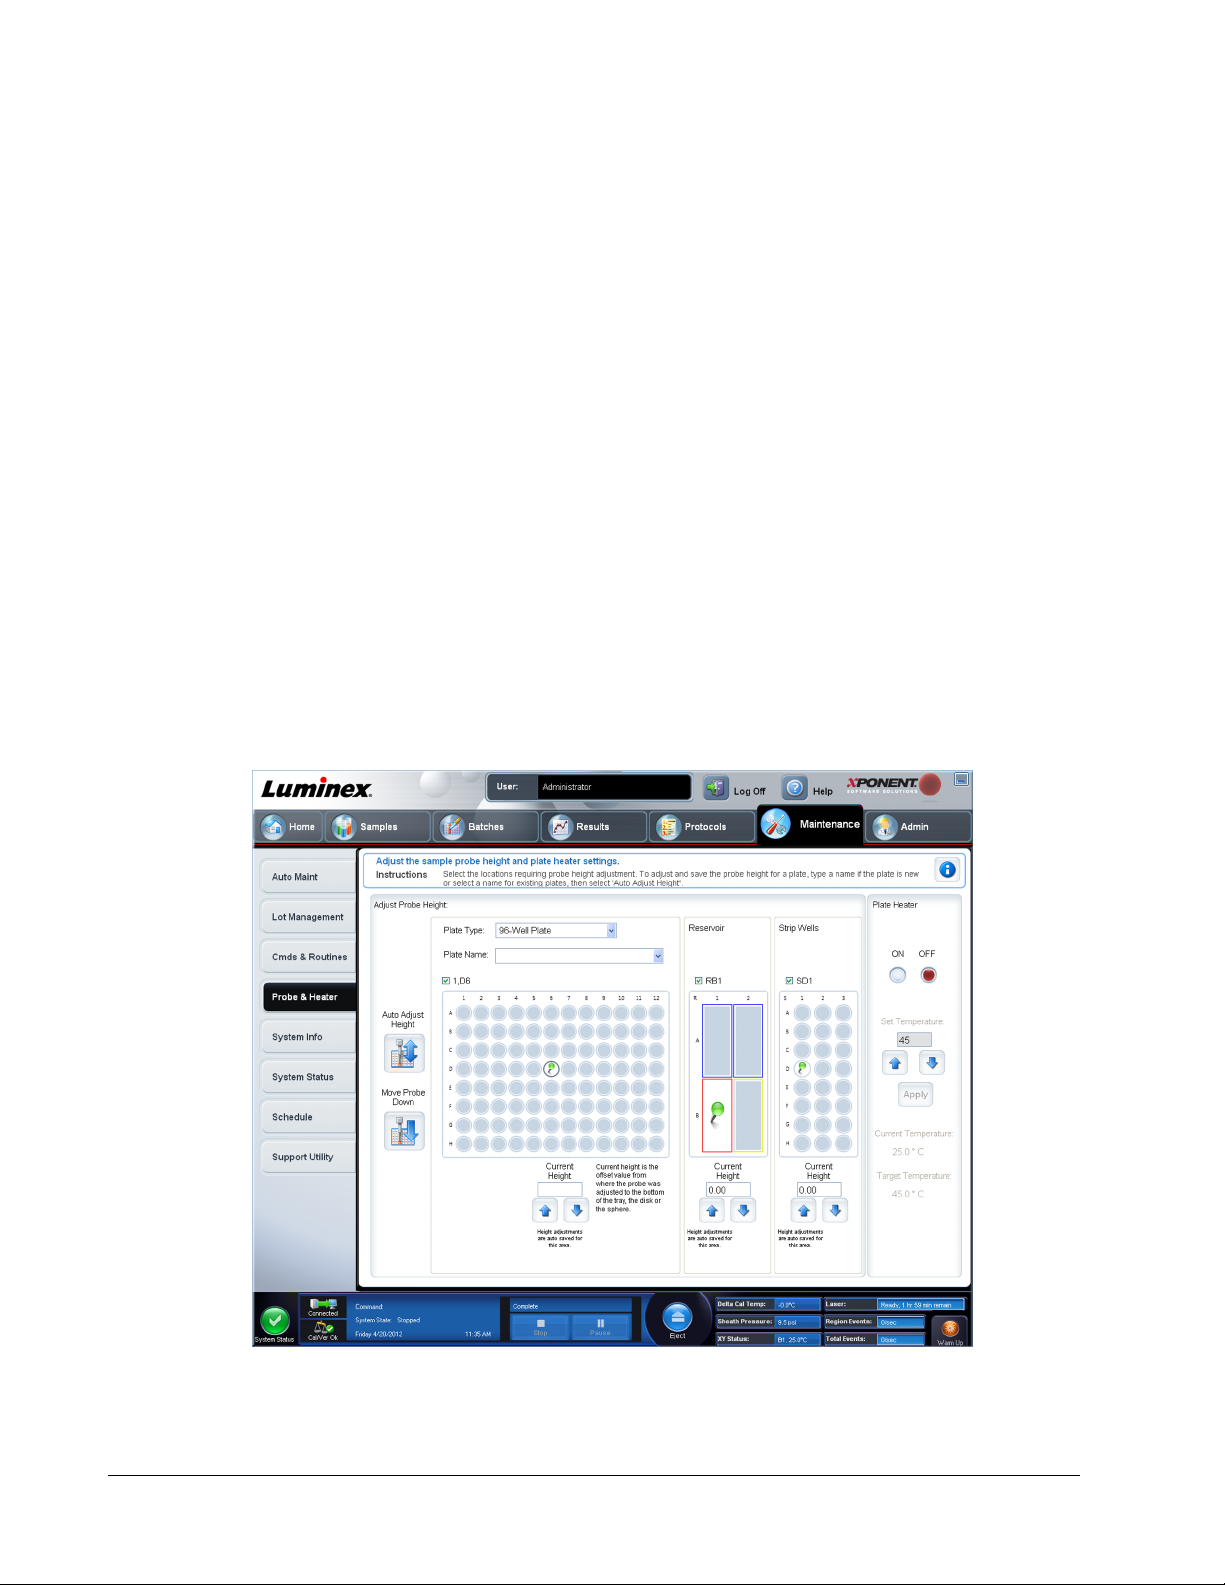
Adjusting the Sample Probe Height
Adjust the sample probe height to ensure that the probe drops far enough into the well to
acquire sample.
NOTE: Ensure that there is no liquid in the wells or reservoirs before
adjusting the sample probe height.
NOTE: When you adjust and save the probe height settings for all three
areas under a plate name, all areas retain the adjustment.
WARNING: Correct sample probe height is critical to successful sample
acquisition and calibration. Problems with the sample probe
height can lead to fluid leaks and inhibit sample acquisition.
1. On the Home page, click Probe and Heater under Daily Activities. The Probe &
Heater tab opens.
2. Select a plate in the Plate Type list.
• 96-well and 384-well Hard Bottom Plates - No disk is required. Ensure that the well
location is selected on the plate image. Use well D6 for the 96-well plate and well H12
for the 384-well plate (a green pin marks the location). To change the well location,
click on the desired well in the plate image.
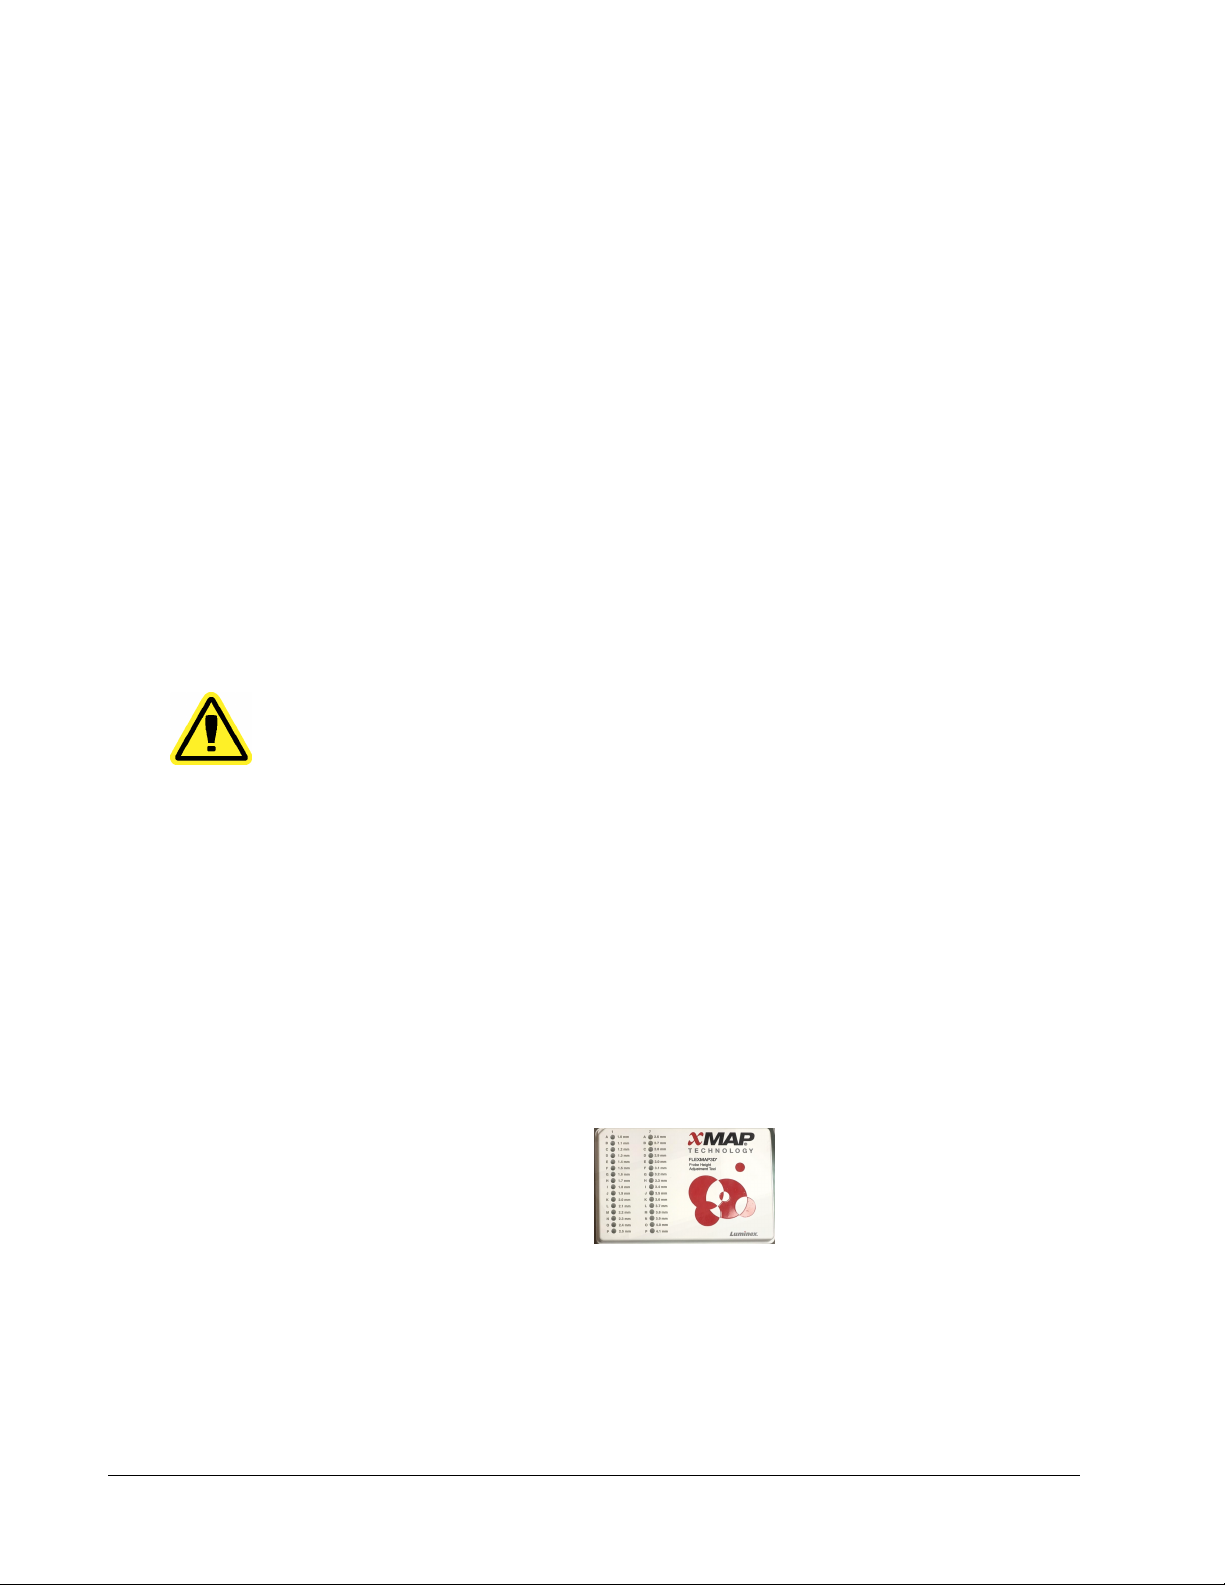
• 96-well Filter or Mylar Bottom Plate - Place one (5.08) alignment disk into a well.
Ensure that the well location is selected on the plate image. Luminex
®
recommends
using well D6 for 96-well plates.
• 384-well Filter or Mylar Plate - Use the Probe Height Adjustment Tool (not supplied).
NOTE: You can order the Probe Height Adjustment Tool (P/N CN-0298-01)
at http://www.luminexcorp.com/Products/ORDERING-
INFORMATION
3. Verify that the microtiter is not warped. Warped plates can lead to incorrect probe height
adjustment.
4. Click Eject to eject the plate carrier.
xPONENT
®
for FLEXMAP 3D
®
10
NOTE: If using a strip-well plate, ensure that a strip is present in the
selected well location, prior to calibration.
5. Place the plate on the plate holder with A1 in the top left corner. Place the off-plate
reagent block on the plate carrier. Place a well-strip (provided with the Calibration and
the Performance Verification kits) in column S1 of the block.
NOTE: Make sure there is no liquid in the plate or the off plate reagent
block.
6. Click Retract to retract the plate carrier.
7. Type a name for the plate in the Plate Name box, or select a saved plate from the Plate
Name list.
NOTE: If a saved plate is selected the results of the new calibration will
override the previous calibration.
8. In the Plate section, click D6 for the 96-well plate. Click H12 for the 384-well plate.
9. In the Reservoir section, click RB1.
10. In the Strip-Wells section, click SD1.
11. Click Auto Adjust Height. The probe automatically adjusts itself and saves it to the plate
you selected.
NOTE: The probe height is automatically set to 0.49 mm. The probe
automatically adjusts this distance from the bottom of the plate or
calibration disks.
NOTE: When you adjust and save the probe height settings for all three
under a plate name, all areas retain the adjustment.
Introduction
11

WARNING: Correct sample probe height is critical to successful sample
acquisition and calibration. Problems with the sample probe can
lead to fluid leaks and inhibit sample acquisition.
CAUTION: Ensure that the probe height is set correctly before calibrating
the system.
Revive After Storage Routine
NOTE: The Revive After Storage routine is necessary when the system
has been idle for more than a week.
After you have adjusted the sample probe height, run the Revive After Storage (Luminex)
routine.
1. Open the Maintenance page, then the Cmds & Routines tab.
2. Select Revive After Storage (Luminex) from the Routine Name drop-down list. The
Revive After Storage routine performs the following commands:
• Warmup
• Backflush (x2)
• Drain RA2 (x3)
• Alcohol Flush RB1 (x2)
• Backflush
• Wash RA1 (x3)
3. Add 70% isopropanol or 70% ethanol to reservoir RB1 on the off-plate reagent block as
indicated on the Cmds & Routines tab. Add DI Water to reservoir RA1.
NOTE: The drain reservoir (RA2) should be empty.
4. Click Run.
After the Revive After Storage routine is complete, run the System Initialization routine.
System Initialization
Warm up the lasers to prepare the optics prior to sample acquisition. The system
automatically begins warming up when you turn power on; however, you will need to use the
Warmup command if the system is idle for four hours or longer. Failure to properly warm up
the lasers will affect assay results and system performance.
• On the System Status bar, click the Warm Up button.
OR
• Open the Maintenance page, and then the Cmds & Routines tab. Click Warmup in the
Commands section at the left of the screen, and then click the Run button at the bottom
right to begin the procedure. The warmup process takes 30 minutes to complete.
Calibrate the system before use. Open the Maintenance page and then the Auto Maint tab
and select the Calibration Verification button and follow the instructions provided on the
screen.
xPONENT
®
for FLEXMAP 3D
®
12
NOTE: See the Defining the System Initialization section for more
information.
Calibrator xMAP beads are used to normalize the settings for the reporter channel, all
classification channels, and the doublet discriminator channel. Verification xMAP beads are
used to verify calibration and optical integrity of the system.
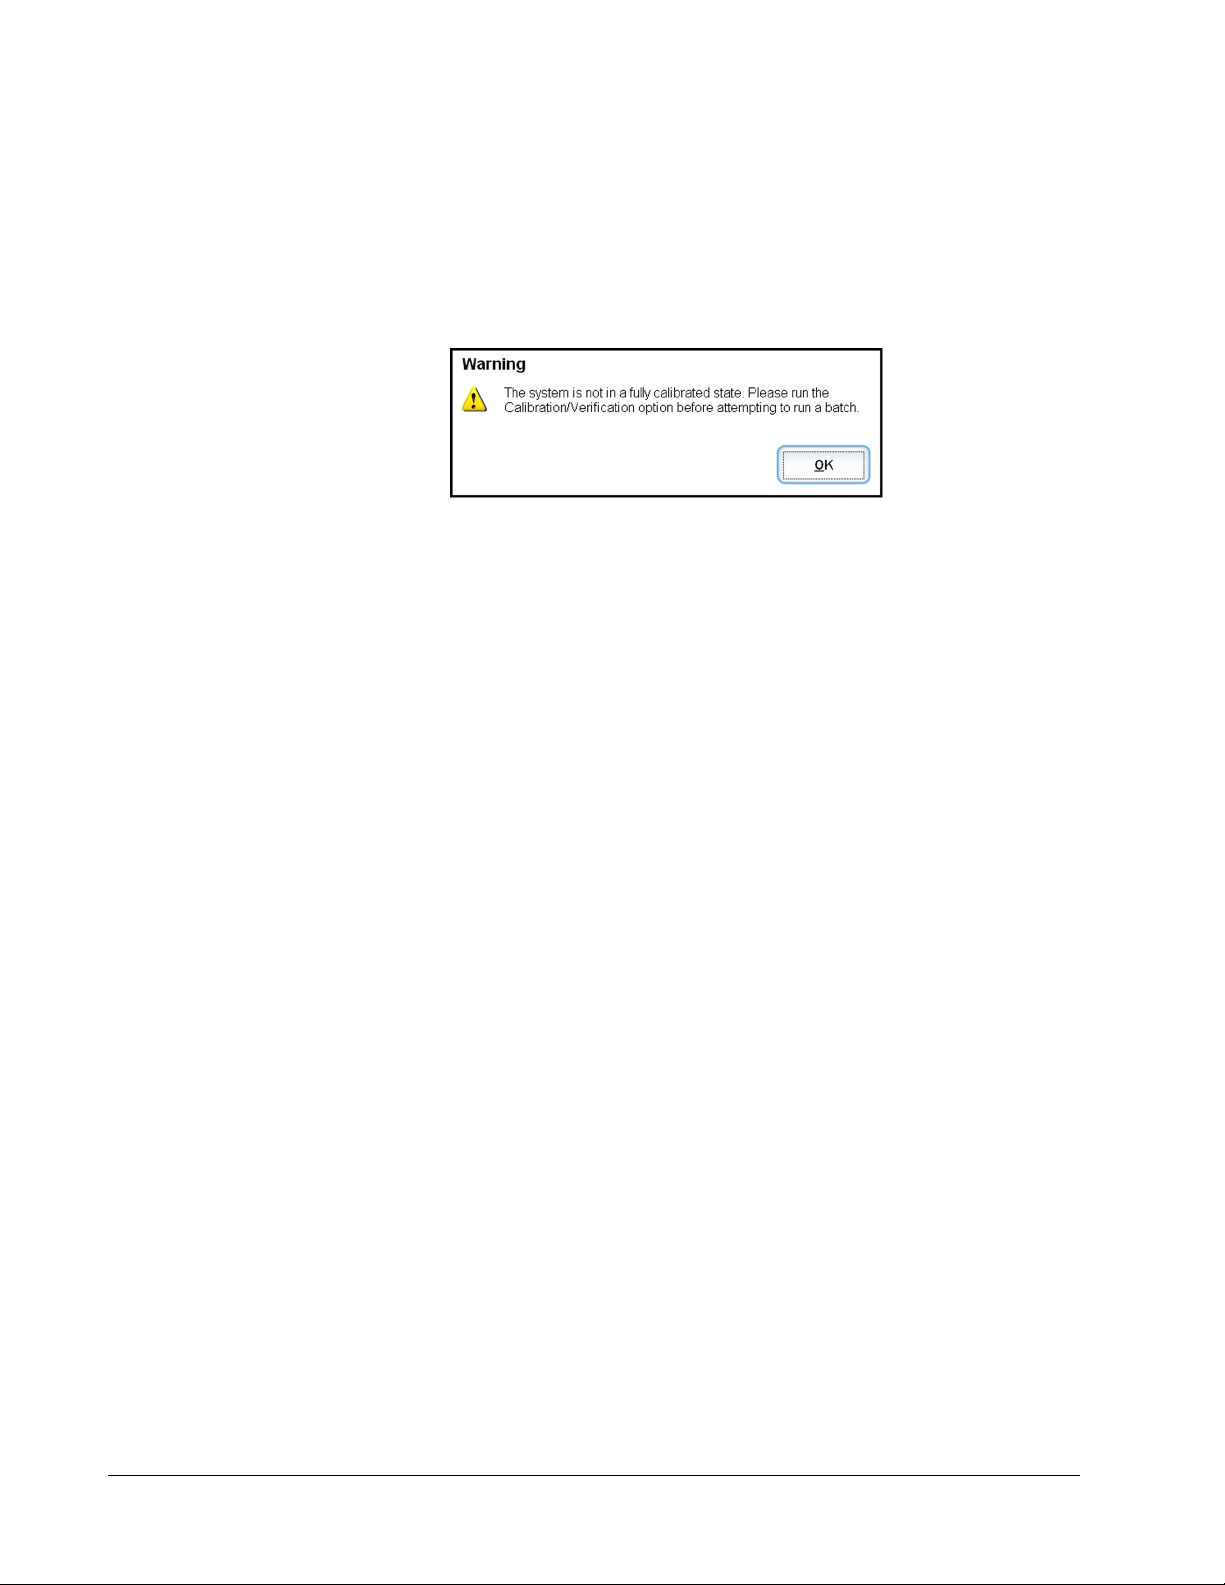
If the system is not fully calibrated, a warning message opens.
Once calibrated, the values remain until you recalibrate. You can track system calibration and
verification results through the Calibration and Verification report.
Luminex
®
recommends that you calibrate your system once a week. In addition, recalibrate
the system if any of the following things occur:
• The delta calibration temperature exceeds ± 5°C.
• You move the instrument.
• You experience sample acquisition problems.
• The instrument undergoes hardware maintenance, such as replacement of a part.
Luminex
®
recommends that you verify system performance on a daily basis.
The daily system initialization routine can be set to include calibration and or verification
under the Admin page, System Setup tab, Maintenance Options section.
Before you can calibrate or verify the system, you must import FLEXMAP 3D
®
calibrator and
verification bead lot information. Do this using the Lot Management tab of the Maintenance
page. This information is available on the CD that accompanies the Performance Verification
Kit and the Calibration Kit, and also available on the Luminex website at http://
www.luminexcorp.com/Support/index.htm.
NOTE: Ensure that the Luminex analyzer lasers are warmed up and the
probe height is set correctly before calibrating the system. Do not
move the system waste line while calibrating.
Shutting Down the Analyzer
Run the daily shutdown routine to prevent clogs and crystallization of salt in the sample
probe. Clogs and crystallization of salt in the sample probe can cause problems with
calibration, verification, and data acquisition; they can also cause sample splashing. Shut
down the system properly to ensure system integrity.
Logging Off and Exiting
To log off and exit xPONENT
®
:
1. Click Logoff at the top of the page.
2. When the Confirm dialog box opens, click OK. This opens the Log In page, with Exit on
the left tab.
Introduction
13

3. Click Exit to exit the application.
Using Online Help
English-language help is available at all times while you are using xPONENT
®
. To display
online help for the page or tab in which you are currently working, click the blue “i” icon at the
upper-right of the xPONENT
®
window. This opens a help window with information specific to
that page or tab.
To display system-level help, click the blue question mark at the top of the xPONENT
®
window, then click Contents and Index. The online help opens, where you can navigate to
any available topic.
To display quick start information, click the blue question mark at the top of the xPONENT
®
window, then click Quick Start. This displays information about the basic steps to start the
system.
To display software information, click the blue question mark at the top of the xPONENT
®
window, then click About Luminex xPONENT. The xPONENT information dialog box opens,
displaying the software version information.
xPONENT
®
for FLEXMAP 3D
®
14

Luminex
®
Support
Viewing the Luminex
®
Website
Additional information is available on the Luminex
®
website. FAQs are available at http://
www.luminexcorp.com/Support/index.htm.
You can access the Technical Support Website using a user name and password at https://
esupport.luminexcorp.com/OA_HTML/jtflogin.jsp.
Contacting Technical Support
Luminex
®
Technical Support representatives are ready to help you. If the question or problem
relates to materials from the assay kit, contact the kit provider directly.
Luminex
®
Technical Support is available to users in the U.S. and Canada by calling
1-877-785-BEAD (2323). Users outside of the U.S. and Canada can contact us at +1
512-381-4397. Inquiries may also be sent by email to support@luminexcorp.com.
Software Packages
Multiple levels of user access can be licensed for xPONENT
®
.
Basic - Allows instrument control.
Additional features for which you can obtain a license:
• Secure - Includes all of the Basic functions as well as administrator-controlled user
permission levels.
• 21 CFR Part 11 - Includes all of the Secure package features as well as the option to
require electronic signatures to perform certain tasks. (Electronic signatures are listed in
the system log.)
• Automation - Includes the ability to communicate with external hardware.
• Remote Web Monitoring - Enables you to view alerts and system status using a
webpage.
• LIS - Enables the system to communicate with an external Laboratory Information System
(LIS) database. The LIS package enables you to export and import patient result data in
ASTM file format.
You must have an instrument control license to operate the instrument.
For more information about purchasing upgraded packages, or to obtain specific package
documentation, contact your vendor.
Introduction
15

xPONENT
®
for FLEXMAP 3D
®
16
Loading...