

Page 1

PC CardPC Card
Introduction
Installing your PC Card
Working with ORiNOCO
Getting Started Guide
TM
Your Mobile Broadband Connection
Page 2

Table of Contents
Table of Contents
1 About ORiNOCO
Kit Contents 1-1
ORiNOCO Network Scenarios 1-3
■
■
■
■
ORiNOCO PC Card Features 1-9
■
Peer-to-Peer Workgroup 1-3
Home Networking 1-5
Enterprise Networking 1-6
It’s Easy 1-8
ORiNOCO PC Card Types 1-10
About the Software CD-ROM 1-12
■
Finding Information 1-16
ORiNOCO Adapter Cards 1-15
2 Installation for Windows
Introduction 2-1
Insert your ORiNOCO PC Card 2-5
ORINOCO PC Card - Getting Started
i
i
Page 3

Table of Contents
Install Drivers 2-6
■
■
■
■
Before You Start the Installation 2-6
What You Need to Know 2-6
Driver Installation for Windows 95/98 2-7
Windows Network Properties 2-9
Set Basic Parameters 2-11
■
■
■
Basic Settings for Enterprise Networks 2-13
Basic Settings for Residential Gateways 2-15
Basic Settings for Peer-to-Peer Workgr oups 2-17
Finish the Installation 2-19
■
After Restarting Your Computer 2-20
3 Using ORiNOCO and Windows
Introduction 3-1
Using your PC Card 3-2
■
■
■
Radio Antennas 3-2
Removing the PC Card 3-2
Maintenance of your PC Card 3-4
View Other Computers 3-5
Using the Client Manager 3-7
■
■
View Wireless Link Quality 3-7
View/Modify PC Card Settings 3-9
Finding More Information 3-11
ii
ORINOCO PC Card - Getting Started
Page 4

A Card Specifications
Table of Cont ents
■
■
■
■
■
■
Physical Specifications A-1
Power Characteristics A-1
Networking Characteristics A-2
Radio Characteristics A-3
ORiNOCO Fixed Wireless PC Card A-9
Supported Frequency Sub-bands A-9
B Troubleshooting
Common Troubleshooting Tips B -1
■
■
LED Activity B-1
Can Not Connect To The Network B-5
Warranty Repair Card
■
■
About Warranty and Repair W-1
Limited Warranty W-2
Technical Support
ORINO C O PC Ca rd - Ge tt ing Sta r ted
iiiiii
iii
Page 5

Page 6
About ORiNOCO
1
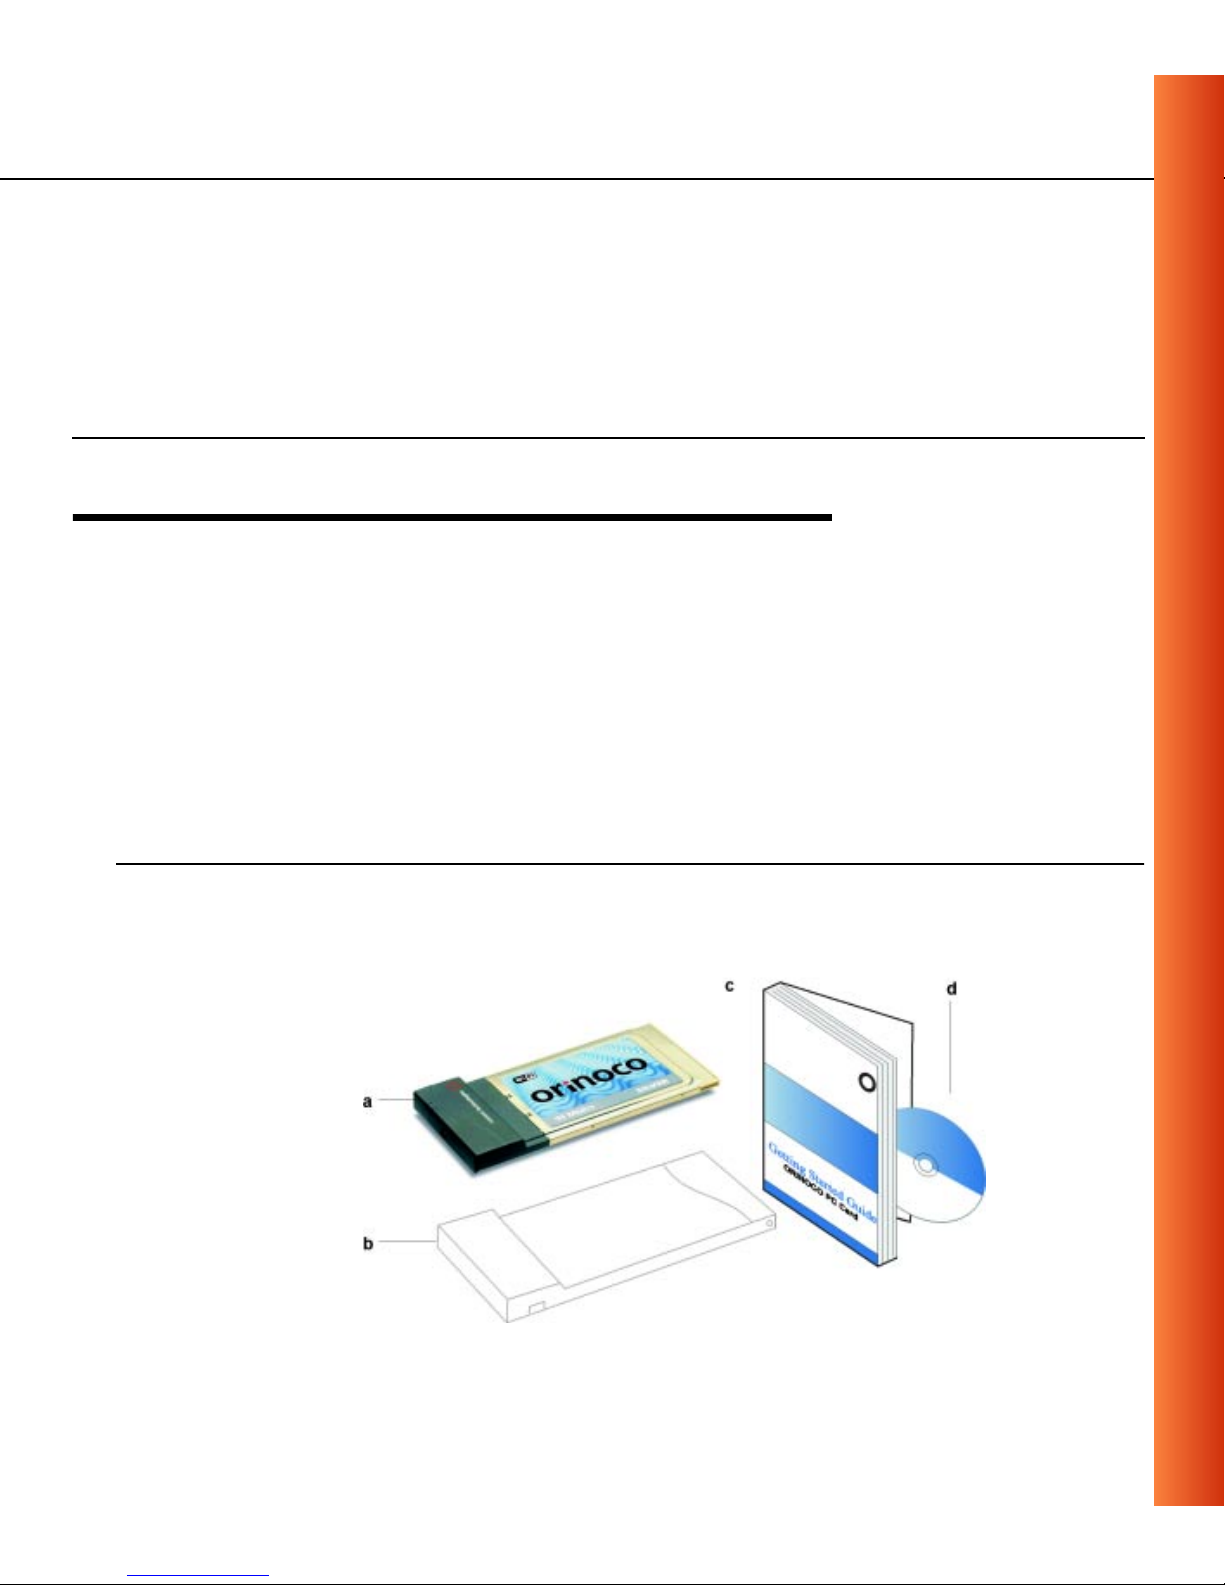
Kit Contents 1
The ORiNOCO PC Card kit includes the items as pictured in Figure 1-1:
a. One ORiNOCO PC Card.
b. Transparent pr ot ect i ve casin g
(for storing your PC Card while not in use).
c. The “ORINOCO PC Card - G ett in g Start ed” gui de.
d. The ORiNOCO Software CD-ROM.
Figure 1-1 ORiNOCO Kit Contents
ORINOCO PC Card - Getting Started
1-1
Page 7

About ORiNOCO - Kit Contents
The pri nted document “ORI N O CO PC Card - Get tin g Sta rte d” is an abs tract
of the “ORINOCO PC Card - User’s Guide” that is available in Adobe’s
Acrobat Portable Document File (*.pdf) format on the ORiNOCO Software
CD-ROM. This printed copy will help you installing your ORiNOCO PC Card
using the minimum set of parameters. For detailed information you may wish
to consult the “ORINOCO PC Card - User’s Guide”.
NOTE:
In order to extend the life of the PC Card hardware it is advised to
store the card in the protective casing whenever carrying the
compute r on travel without operating the device.
1-2
ORINOCO PC Card - Getting Started
Page 8

About ORiNOCO - ORiNOCO Net work Scenarios
ORiNOCO Network Scenarios 1
The ORiNOCO PC Card Kit enables you to:
Connect your comp u te r t o a Peer-to-Peer workgroup of wireless
■
computing d evices (see Fi gu re 1-2 on page 1-4).
Connect your computer to a Small Office/Home Office (SOHO) network
■
that includes a Lucent Technol ogies Residenti al Ga teway (RG) access
point (see Figur e 1- 3 on page 1-5).
Connect your compu te r to a Local Area Network (LAN) Infrastr ucture
■
that includes Lu cent Technologies O R iN O C O AP- 1000s
P oints), or other IEEE 802.11 compliant LAN systems (see Figure 1-4 on
page 1-6 and Figure 1-5 on page 1- 7) .
1
(Access
Expand the ca pabilities of your AP-1000s, to support wireles s devices
■
that have been equipped with ORiNOCO PC Cards.
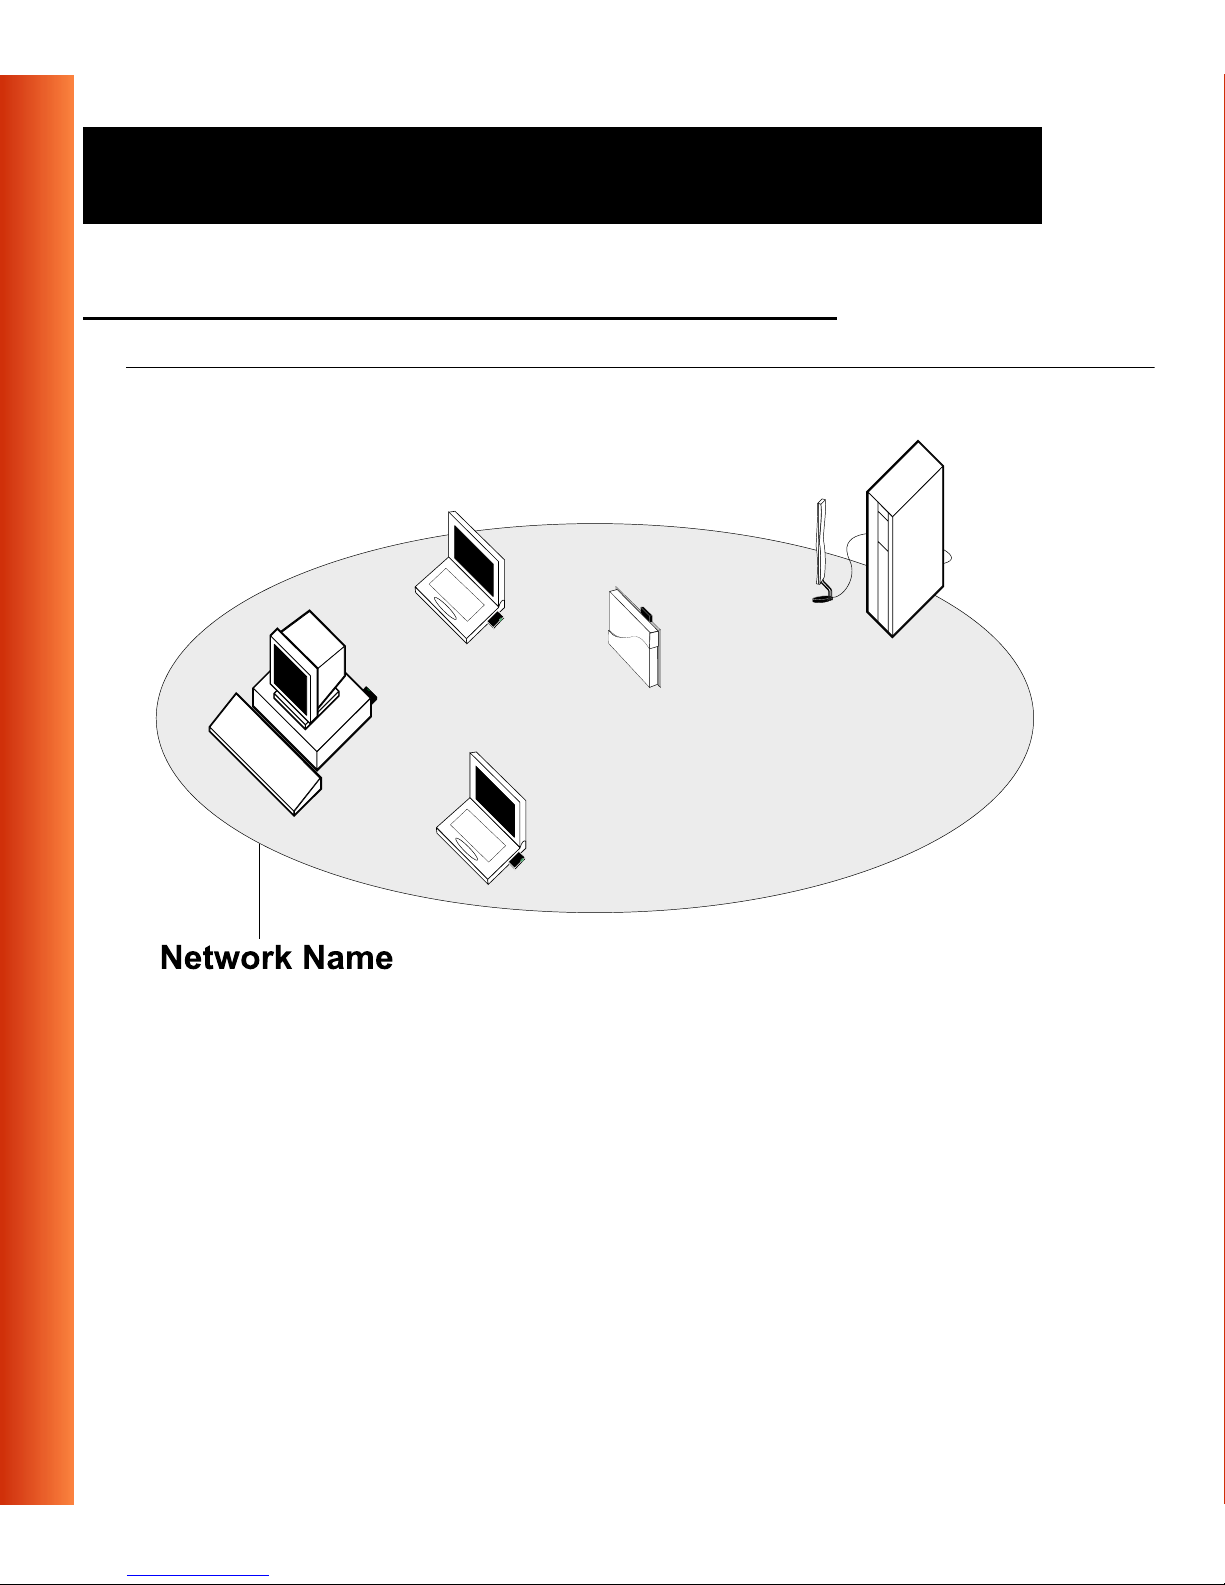
Peer-to-Peer Workgroup 1
The Peer-to-Peer workgroup configuration enables you to quickly set up a
small wireless workgroup, where the workgroup participants can exchange
files using features like “Files and Printer Sharing” as supported by Microsoft
Networking.
1 The AP-1000 is formerly identified as WavePOINT-II AP.
ORINOCO PC Card - Getting Started
1-3
Page 9

About ORiNOCO - ORiNOCO Network Scenarios
Figure 1-2 Peer-to-Peer Wireless Workgroup
You can use thi s option to setup a temporary or ad-hoc net work in
1-4
environments w her e no access points are available (for example in Sma l l
Office/Home Office (SOHO) environments).
As long as the st ati ons are within range of on e another, this is the e asiest
and least e xpensive w ay to set up a wirel ess network.
ORINOCO PC Card - Getting Started
Page 10

About ORiNOCO - ORiNOCO Net work Scenarios
Home Networking 1
With the Luce nt Technologies ORiNOCO Resid ent i al G at eway (RG),
wireless access to the Internet or ot her computers is at your fing ertips.
Figure 1-3 Connect to a Residential Gateway (RG)
All you need to do is connect the wireless computers to the ORiNOCO
Resi dential Ga tewa y ( R G ) , and yo u are ready t o:
Share files and printers, and
■
Access the Int ernet via the built-i n m odem of the RG.
■
Optionally the RG allows you to connect your wireless stations to previously
installed wired computers and/or an external cable, an xDSL or a ISDN
modem.
ORINOCO PC Card - Getting Started
1-5
Page 11
About ORiNOCO - ORiNOCO Network Scenarios
Enterprise N et working 1
Figure 1-4 Stand Alone Wireless LAN
With the ORiNOCO AP-1000 you can connect to a corporate Local Area
Network (LAN) infrastructure to have wireless access to all network facilities.
LAN Inf rastruc t ures may eit her be:
Stand-alone wireless LAN s as pictured in Fig ur e 1- 4.
■
Wireless net wor k infrastruct ur es connected to an existing Eth ernet
■
network as pi ct ur ed in Figure 1-5 on p age 1-7.
1-6
ORINOCO PC Card - Getting Started
Page 12
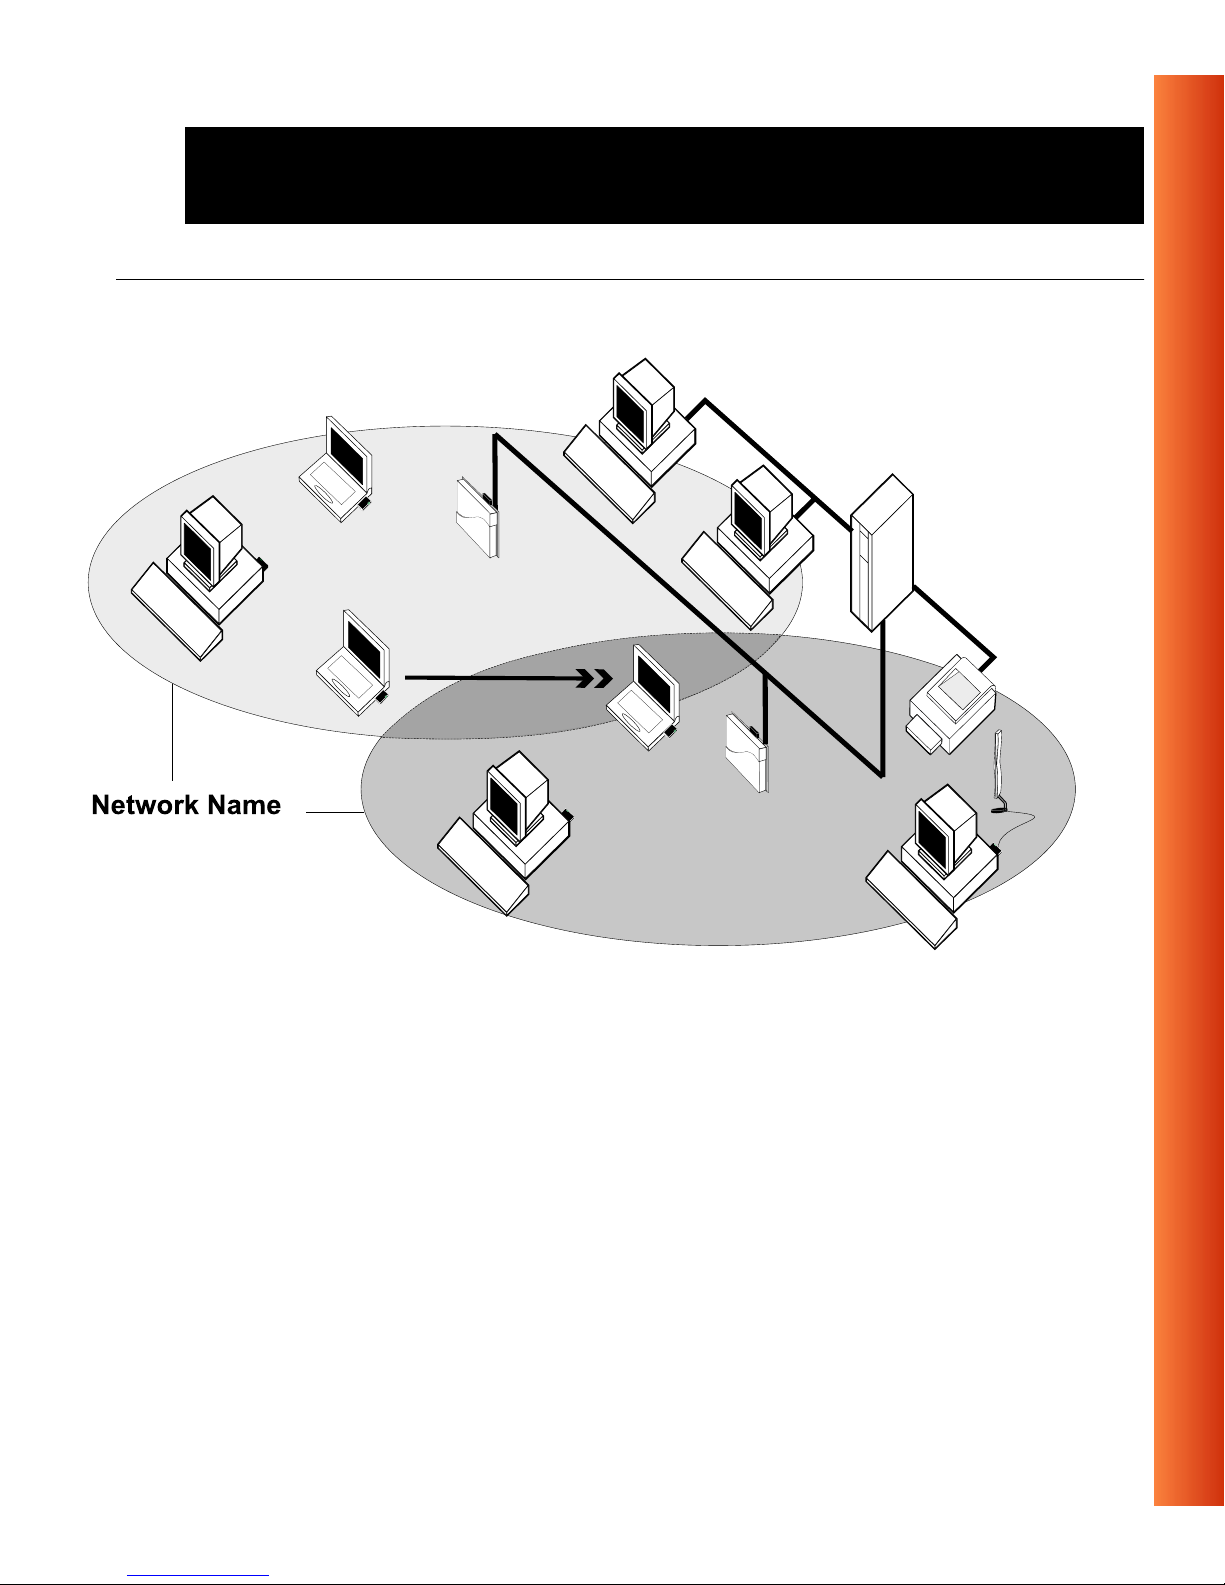
About ORiNOCO - ORiNOCO Net work Scenarios
Figure 1-5 LAN Infrastru ctur e
ORINOCO PC Card - Getting Started
1-7
Page 13

About ORiNOCO - ORiNOCO Network Scenarios
It’s Easy 1
The ORiNOCO PC Card functions like any standard wired Ethernet card, but
ORiNOCO does not need any wires!
Where an Ethernet car d re quires a cable connecti on t o a hub and/or patch
panel, the ca ble physically ties you down to the loc at i on of t he wi re d
connection.
ORiNOCO allows you to connect your computer to a Local Area Network
(LAN) system f ro m anywh er e w i th in th e w ireless coverage area. Expanding
or re-designi ng your network is easy : Ad d or reloc at e AP- 1000s, power-up
your (new) ORiNOCO computers, and you’re done!
1-8
Unlike Ethernet, ORiNOCO will enable you to roam throughout the netw ork
while remaining connected to the LAN.
NOTE:
The ORiNOCO PC Card is a radio product. Refer to the flyer
“Information to the User” for regulatory information that may apply in
your country.
ORINOCO PC Card - Getting Started
Page 14
About ORiNOCO - ORiNOCO PC Card Features
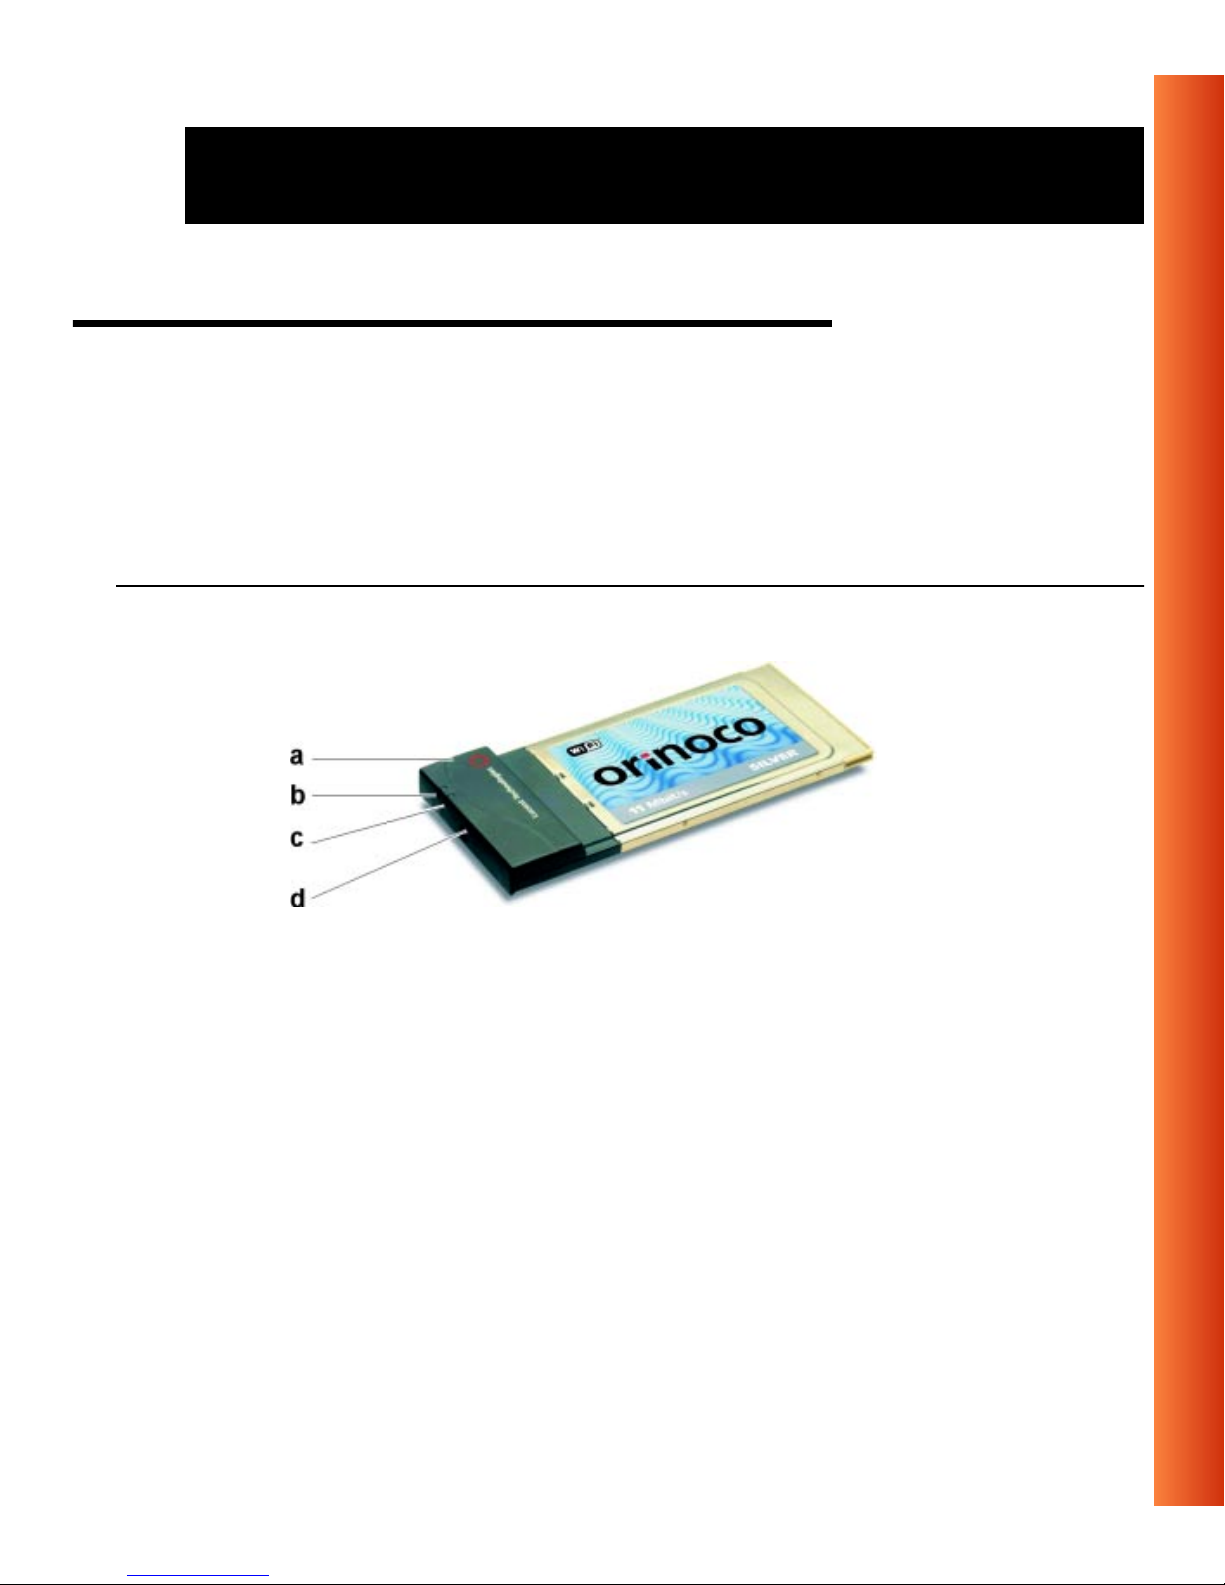
ORiNOCO PC Card Features 1
The ORiNOCO PC Card is a wireless network PC Card that fits into any
standard PC Card Type II slot.
The ORiNOC O PC Card has two LED ind ic ator s and two integrated
antennas. Optionally you can use the ORiNOCO PC Card in combination
with an external an te nna.
Figure 1-6 The ORiNOCO PC Card
a. Integrated Antennas
b. Transmit/ Receive LED
■
■
Off - No wireless activity
Blinking - Sensing/transmitting wireless data
c. Power ON/OFF LED
■
■
Solid Green - standard ope ratio na l mode
Blinking Gr een - Power Managemen t mo de
d. Connec tor for optional Ext ernal A ntenna (see the ORINOCO PC Card -
User’s Guide provided on the CD-ROM for more informat ion).
ORINOCO PC Card - Getting Started
1-9
Page 15

About ORiNOCO - ORiNOCO PC Card Features
ORiNOCO PC Card Types 1
The ORiNOCO PC Card is a wireless network PC Card that complies with
the IEEE 802.11 standard on wireless LANs (Revision B). The ORiNOCO
PC Ca rd sup ports data rates up to 11 M bit/s and is available in two variants:
ORiNOCO Silver Label, and
■
ORiNOCO Gold Label.
■
Both types of ORiNOCO PC Cards are:
Wi-Fi (Wireless Fidelity) certified by the Wireless Ethernet
■
Compatibility Alliance (WECA). This means that your
ORiNOCO hardware will communicate with other vendors’
1-10
IEEE 802.11 compliant wireless LAN products.
Fully compatible with any other wireless LAN system based
■
on Direct Sequ ence Spread Spectrum (DSSS) radio technology that
complies with the “IEEE 802.11 standard on wireless LANs (Revision
B)”.
Backwards compatible with any other previously released model of the
■
WaveLAN/IEEE product family.
ORINOCO PC Card - Getting Started
Page 16

About ORiNOCO - ORiNOCO PC Card Features
Silver Label Cards 1
The ORiNOC O Silver PC C ards supports the following wireless LAN
features:
Automatic Transmit Rate Select mechanism in the transmit range of 11,
■
5.5, 2 and 1 Mbit/s.
Frequency Ch annel Selectio n (2 .4 G Hz) .
■
Roaming over multiple chann el s.
■
Card Power Managem ent.
■
Wired Equivalent Privacy (WEP) data encryption, based on the 64 bit
■
RC4 encryption al gorithm as def ined in the IEEE 802.11 standa rd on
wireless LANs.
These features are described in more detail in the ORINOCO PC Ca rd -
User’s Guide provided on the CD-ROM.
Gold Label Cards 1
The ORiNOC O G old PC Cards support th e same functional ity as th e
ORiNOCO Silver cards. The Gold card however provides an enhanced type
of WEP data en crypt io n, based on the 128 bi t RC4 algorith m .
NOTE:
The ORiNOCO Gold PC Card may not be marketed in all par ts of
the world, subject to nationa l legislation or local re gulations. For
availability in your countr y, please consult your auth orized
ORiNOCO Reseller.
ORINOCO PC Card - Getting Started
1-11
Page 17

About ORiNOCO - About the Softw are CD-ROM
About the Software CD-ROM 1
The ORiNOCO software CD-ROM contains both software and
documentation for all ORiNOCO products in indoor environments.
If you wish t o install ORiNOCO driv er softw are, tu rn to Chapter 2 ”Installati on
for Windows” and follow the instructions as desc r ibed for installing your
ORiNOCO PC Card.
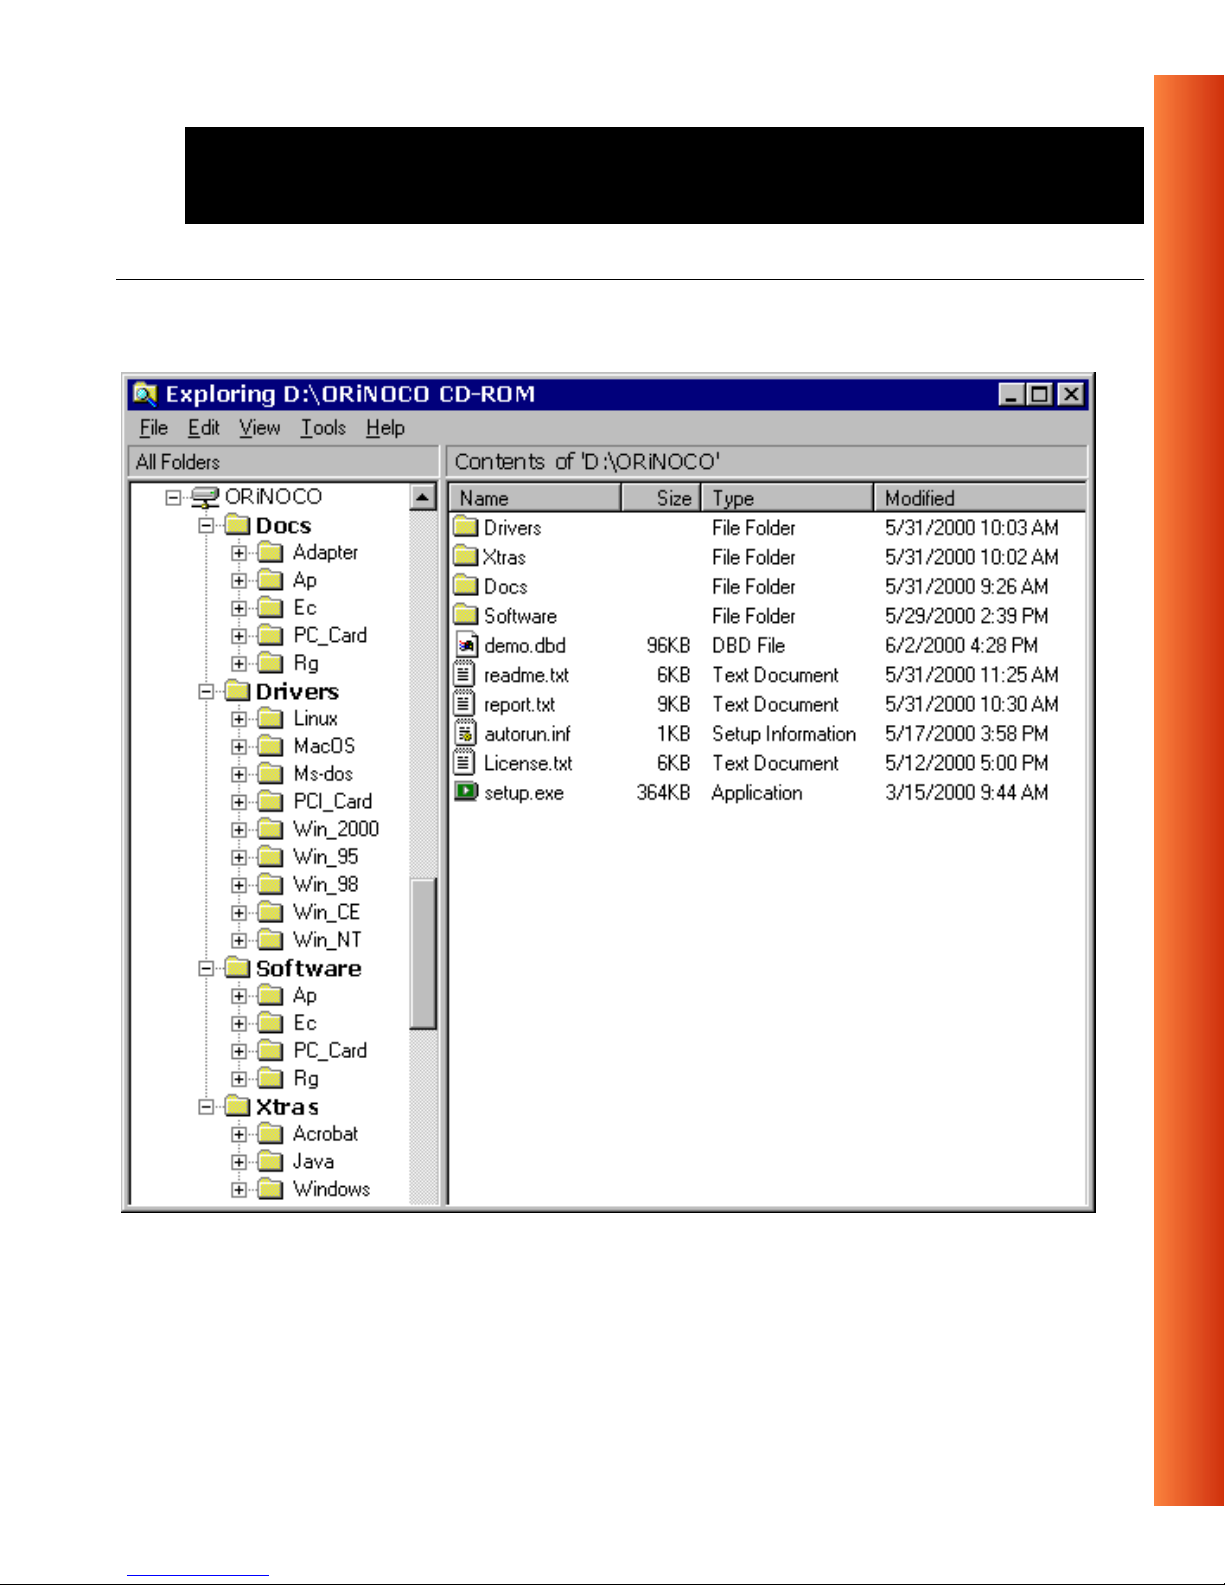
If y ou would like to e xplore the conte nts of the CD-ROM, the contents map
as pictured in Fig ure 1-7 on page 1-1 3, may help you find the item s you are
looking for:
ORiNO CO U ser G ui de s and other reference docu m ent s are located in
■
“D:\Docs\”
1
.
1-12
Software for ORiNOCO client stations and/or infrastructure products,
■
such as the AP-1000s, are located in “D:\Software\”
NOTE:
Prior to co pying or inst al ling the softw are, you are advise d t o read
the Software Licens e Agre em ent “License.txt”, locat ed i n t he r oot
f ol de r of th e CD -ROM. B y in st al li ng, co pyi ng or us in g th e ORi NOCO
software, you are consenting to be bound by this agreement. If you
do not agree to all of th e t erms of the Sof t ware License Agreement ,
do not download , co py or install the ORiNOCO soft ware.
1 The drive letter of your CD-ROM drive may differ from this example.
ORINOCO PC Card - Getting Started
1
.
Page 18
About ORiNOCO - About the Software CD-ROM
Figure 1-7 Contents of the Software CD-ROM
ORINOCO PC Card - Getting Started
1-13
Page 19

About ORiNOCO - About the Softw are CD-ROM
NOTE:
It is the policy of Lucent Technolog ies t o improve products as new
technolog y, components, software and firmware become availabl e.
Before you proceed with the installation of this product, we
recommend you to consult the ORiNOCO website to:
■
Verify if newer versions of the software th at was sh i pped with
your product are available.
■
Download and install the latest software with your purchased
product.
You can download the la test sof t ware and document at io n f ro m
the ORiNOCO website at:
http://www.lucent.com/orinoco
.
Looking again at Figure 1 -7 on page 1-1 3 y ou will see that t he CD-R OM a lso
includes a folder named “Xtras”. This folder contain s add i tional tools, that
may help you install and manage your ORiNOCO Network.
The folder “Acrobat” inclu des a copy of the
Adobe Acrobat Reader ®,
required to view and/or print the ORiNOCO user documentation inclu ded on
this CD-ROM.
NOTE:
The Adobe A cr oba t Reader is owned by and licensed f ro m A dobe
Systems Inc orporated. This software is provided “a s is.”
1-14
ORINOCO PC Card - Getting Started
Page 20

About ORiNOCO - About the Software CD-ROM
Lucent m akes no warranty or re pr esentation, express or implied,
relating to the completeness, re lia bi lity, effectiveness, accuracy,
performance, or operation of the Adobe software, or as to its
suitability, merchantability or fitness for a particular purpose or
against infringement of intellectual property rights of any party.
For more information about Adobe Acrobat sof t ware, pl ease consult
the Adobe Website at:
http:\\www.adobe.com\acrobat
ORiNOCO Adapter Cards 1
The Lucent Technologies ORiNOCO solution has been based upon a single
wireless PC Card that can be used in a variety of com put ing systems.
Optionally available are the following adapters for computer systems tha t do
not have a PC Card Type II slot:
ISA and PCI adapter cards, that enable you to use the ORiNOCO
■
PC Card i nside desktop com puters
W aveLAN/EC and WaveLAN/EC-S1 devices, that allow you to connect
■
computer with a standard 10Base-T interface to your ORiNOCO
network.
1 The WaveLAN/EC-S features an additional Serial Port.
ORINOCO PC Card - Getting Started
1-15
Page 21

About ORiNOCO - Finding Information
Finding Information 1
This pr int ed document was desi gned to give you a brief introd uc tion about
the ORINOCO PC Card and the ORiNOCO wireless network system.
In this printed document you will find the most important information to get
your ORiNOCO network up and running, with a minimum set of parameters
for the MS-Windows 95/9 8 operating systems.
NOTE:
For installing procedu res using other operating systems than
Windows 95/98 pl ease refer to the ORINOCO PC Card - U ser ’s
Guide on the ORiNOCO Software CD-ROM.
1-16
The ORINOCO PC Card - User’s Guide on the ORiNOCO Software CDROM, also describes:
Advanced ORiNOCO parameters (required for special situations only).
■
Extensive Troubleshooting infor m ation, beyond the basic hints pr ovided
■
in Appendix B ” Troubleshoo t ing” of this m anual.
Alter natively you can consult the on-li ne help docume nt at ion for the
ORiNOCO drivers and/or tools by:
Clicking the button on your screen, or
■
Pressing th e function key on your keyboard.
■
F1
ORINOCO PC Card - Getting Started
Page 22

About ORiNOCO - Finding Information
To view or print the “ORINOCO PC Card - User’s Guide” you will need the
Adobe Acrobat Reader. A copy of this soft w are is inclu ded on the ORiNOCO
Software CD-ROM.
ORINOCO PC Card - Getting Started
1-17
Page 23

Page 24

Installation for Windows
2
Introduction 2
The com plete in st allation of your PC Card and the ne cessary driv ers (for
Windows 95/98) consist of the following steps :
1. Insert the ORiNOCO Software CD-ROM and install the Client Manager
software by clicking the
the CD-ROM. (see p age 2-3).
2. Insert your ORiNOCO PC Card (see page 2-5).
3. Install drivers (see page 2-6).
4. Set basic para m et er s (s ee page 2-11).
5. Finish inst al la tio n (s ee page 2-19).
This chapter de scribes the i ns ta llation of the ORiNOCO PC Card for
Microsoft Windows 95 and 98 op erati ng systems only.
Install So ft wa re
button on the start-up screen of
ORINOCO PC Card - Getting Started
2-1
Page 25

Installation for Windows - Introduction
For other operating system s please consult the following appendices of the
ORINOCO PC Card - User’s Guide provided on the CD-ROM:
Document Operating System
Appendix C Windows CE
Appendix D DOS
Appendix E Apple/MAC OS
Appendix F Windows NT
Readme.txt Linux
Installation procedures for other operating systems are described in the
online ORINOCO PC Card - User’s Guide provided on the ORiNOCO
CD-ROM.
2-2
To view and/or print this document in Adobe’s Acrobat Portable Document
File format (*.pd f) you will ne ed to i nst al l th e Adobe Acrobat Rea der
software. You can find a copy of this software in the CD-ROM folder:
“D:\Xtras\Acrobat”
1
NOTE:
If you intend to use the ORiNOCO PC Card in a ORiNOCO
AP-1000
that was shipped wi t h the device. Alternatively you can download
1 Where “D:\” represents the drive letter of your CD-ROM drive.
2 The AP-1000 is formerly identified as the WavePOINT-II AP
2
(Access Point), please refer to the User Documentati on
ORINOCO PC Card - Getting Started
Page 26

Installation for Windows - Introduction
these documents from the ORiNOCO website at:
www.lucent.com/orinoco
.
http://
Installing the Client Manager Software 2
The ORiNO CO C lien t Manager pro gram is a so ftware t ool that you can use
to check the quality of your networ k connectio n.
NOTE:
It is not mandatory to install the Client Manager program in order to
establish a networ k connection , but it provides you with m or e
options to:
■
■
View/change the se tti ngs of your network conn ec tion.
Monitor your network connect i on.
To install the Client Manager software, proceed as follows:
1. Insert the ORiNOCO software CD-ROM that came with your PC Card kit
in your CD-ROM drive.
Your operating system wi ll aut om atically start the C D and display the
menu pictured in Figure 2-1 on page 2-4 .
ORINOCO PC Card - Getting Started
2-3
Page 27

Installation for Windows - Introduction
Figure 2-1 Start-Up Screen ORiNOCO Software CD-ROM
2-4
2. Select button
3. Select
Instal l Client Manage r
Install Software
.
.
4. Follow the instructions on your screen.
NOTE:
If the CD-ROM doe s not st art aut om atically:
1. Click the Windows
2. Select
Run
Start
3. Browse to the CD-ROM
4. Select the file “setup.exe”.
ORINOCO PC Card - Getting Started
button
Page 28

Installation for Windows - Insert your ORiNOCO PC Card
Insert your ORiNOCO PC Card 2
1. Unpack y our ORiNOCO PC Card kit and verify that all i tems are present,
as descr ib ed i n “Kit Contents” on page 1-1.
If any of the items described appear to be damaged or missing, please
contact your suppli er.
2. Insert the ORiNOCO PC Card into the PC Card slot of y our computer as
pictured in Fig ure 2- 2.
Figure 2-2 Inserting the PC Card into Your Computer
If you want to install the PC C ar d i nt o a desktop comp ut er, use an
ISA Adapter or PCI Adapter.
ORINOCO PC Card - Getting Started
2-5
Page 29

Installation for Windows - Install Drivers
Install Drivers 2
Before You Start the Installation 2
Before you start the installation, you are advised to keep the Windows
CD-ROM or software diskettes close at hand. If your computer came with a
factory -installed Windows operating system, these files will be stored on
your computer’s hard disk, in the form of cabinet (*.cab) files.
NOTE:
If you are upgrading from an earlier version of the ORiNOCO
Miniport driver, please read Appendix B of the ORINOCO PC Card -
2-6
User’s Guide provided on the ORiNOCO Software CD-ROM.
What You Need to Know 2
Installing a ORiNOCO PC Card requires the same l e v e l of expertise that you
would need to ins ta ll a standard Ethernet network adapter car d. It is
assumed that you have a worki ng knowledge of stan dar d Windows 95 /9 8
operations an d of ins t alling network adapter cards. Refer to the Windows
Help when necessary (on the Windows task bar, press the
select
Help
).
ORINOCO PC Card - Getting Started
Start
button and
Page 30

Installation for Windows - Install Drivers
Driver Installation for Windows 95/98 2
Windows 95/98 operating systems support “Plug & Play” for PC Cards. Once
you insert the ORiNOCO PC Card into your computer, these operating
systems will automatically:
Detect the card, and enable the ORiNOCO Driver, or
■
Start the
■
Add Ne w Hardware
wizard and prom pt you to inst al l the driver,
when the operati ng system cann ot find t he required dr i ver.
This would typically occur when inserting the ORiNOCO PC Card into
your computer for the very first time.
To install the driver proceed as follows:
1. If Windows starts the
the
New Hardware Found
■
When you are pro m pt ed to locate the dr i ver install at ion f iles:
Add New Hardware
wizard to instal l th e drivers.
wizard fo llow t he instructions of
— Select the ORiNOCO CD-ROM that was included with your
PC Card kit and.
— If you downloaded the drivers from the ORiNOCO website
navigate to the folder that matc hes your Operating system.
Windows 95:D:\Drivers\Win_95
Windows 98:D:\Drivers\Win_98
Windows 2000: D: \ D rivers\Win_2000
When fini she d inst alling the dri vers, Windows au to m at ical l y opens
the
Add/Edit Configuration Profile
window.
ORINOCO PC Card - Getting Started
2-7
Page 31

Installation for Windows - Install Drivers
2. Continue wi th setting the basic pa ramet er s as describ ed on page 2-11.
NOTE:
If your computer does not detect the new hardware consult
Appendix B.
2-8
ORINOCO PC Card - Getting Started
Page 32

Installation for Windows - Install Drivers
Windows Networ k Propert ies 2
If this is the very first time that Networking support is installed onto your
computer, the Windows operating system will prompt you to enter a
computer and workgroup name. These names will be used to identify your
computer on t he M i cr osoft Network N ei ghborhood.
Figure 2-3 Windows Ne tw ork Identification Properties
ORINOCO PC Card - Getting Started
2-9
Page 33

Installation for Windows - Install Drivers
NOTE:
The screen displayed in Figure 2- 3 on page 2-9 will no t ap pea r if
network s upport had not been in st al led. If so, move to page 2-11
and proceed w ith s et ting the basic param et er s.
1. The window will pop-up automatically.
2. In the
3. In the
Computer Name
Workgroup
field, enter the na m e of your wor kgro up.
4. (Optional ) Provide a des cription of th e computer in the
Description
field.
field, enter a uniq ue name for your computer.
Computer
For more information about setting your Windows Ne twork Propertie s,
consult your Windows documentati on or the Windows on-li ne help
information.
2-10
ORINOCO PC Card - Getting Started
Page 34

Installation for Windows - Set Basic Parameters
Set Basic Parameters 2
After installing the drivers, Windows will open the Ad d/ Ed it C on figuration
Profile window for your ORiNOCO PC Card as pictured in Figur e 2- 4.
Figure 2-4 Add/Edit Configuratio n Profile windo w
The Add/Edit Configuration Profile wind ow enables you to spec ify one or
more network connection profiles.
For example you can setup pr of i le s for:
■
Office
■
W orkgroup Computing
, to connect to an Enterprise Network via an Access Point.
Peer-to-Peer workgroups with out access poi nt .
■
Home
, to connect to a Residential Gatew a y (RG) that pro vides access to
the Internet or your home pr i nt er s.
, to share files with colleagues or friends in small
ORINOCO PC Card - Getting Started
2-11
Page 35

Installation for Windows - Set Basic Parameters
For more information about t he differ ent types of networks, re fer to
“ORiNOCO Network Scenarios” on page 1-3.
To connect your computer to a wireless net wo r k you will need to:
1. As sign a name t o t he netw or k connect ion profile
2. Use the pull-down menu on the right to select how you wish to connect to
the wireless network.
3. Click the
Edit Profile
button to view/modify the parameter s for the
selected profile.
For first-time installat ions, you are advised to setup the si ngle profile usi ng
only the Basic Set t i ngs.
NOTE:
The number an d type of parameters you need to s pec ify may differ
according t o th e selected conn ection type. See page 2-1 3 for
Access Point connection set tings and page 2-15 for the Residential
Gateway connection settings.
For infor m at i on a bou t var ious option press th e key or click the
button.
F1
Help
2-12
ORINOCO PC Card - Getting Started
Page 36

Installation for Windows - Set Basic Parameters
Basic Settings for Enterprise Networks 2
If you wish to connect to an Enter prise Network, use the Add /E di t
Configuration Profile window to:
Select to connect to an
■
Set the correct
■
Network Name
Access Point
.
Figure 2-5 Edit Configuration window
.
ORINOCO PC Card - Getting Started
2-13
Page 37

Installation for Windows - Set Basic Parameters
1. In the field
Network Name
define the name of th e w ire le ss network to
which you want to connect. Yo u can either use:
■
The value “ANY”
To connect to any ORiNOCO network in the vicinity of your
computer.
■
An “exact” value to connect to
Consult your LAN Administrator for the value that applies to your
network.
The Network Name can be any alp hanum eric str i ng in the range of
“a” to “z”, “A” to “Z” and “0” to “9” with a maximum of 32 characters
(case-sensitive).
2. Click
to confirm and return to the Add/Edit Configuration Profile
OK
window.
2-14
3. Click
again to finish wit h th e i nst allation as described on pa ge 2-19.
OK
The ORiNOCO Edit Configuration window, also provides you the possibility
to change other parameters (Encryption, Advanced and Admin parameters).
These parameters are described in the on-line help file of the drivers, and in
Chapter 4 of the on-line “ORiNOCO PC Card User’s Guide” on the
ORiNOCO Software CD-ROM.
You are advised to leav e these paramet ers to the i r def ault settings, unle ss
there are special situations , for ex a mple, upon advice of an ORiNOCO
expert.
ORINOCO PC Card - Getting Started
Page 38

Installation for Windows - Set Basic Parameters
Basic Settings for Residential Gateways2
If y ou w ish to conn ect to a Ho me Net work vi a a Re side nti al Gat e way, use the
Add/Edit Config uration Pr of i le w indow to:
Select to connect to a
■
Set the correct
■
Reside ntial Ga teway
Network Name and Encrypti on Key
.
.
Figure 2-6 Edit Configuration window: Residential Gateway
ORINOCO PC Card - Getting Started
2-15
Page 39

Installation for Windows - Set Basic Parameters
1. In the field
Network Name
enter the 6-character RG ID to define the
name of the wi r el ess network to wh i ch you want to connect.
The
Network Name
has to match the unique RG ID (which can be found
on the device).
2. In the
Encryption Key
fie l d enter th e last 5 digi ts of the R G ID (default).
NOTE:
If you changed the de fault Encryption Key on the Residential
Gateway (RG) you will need to enter the new value here as well.
3. Click
window.
4. Click
to confirm and return to the Add/Edit Configuration Profile
OK
again to finish the installation as describ ed on page 2-19.
OK
2-16
ORINOCO PC Card - Getting Started
Page 40

Installation for Windows - Set Basic Parameters
Basic Settings for Peer-to-Peer
Workgroups 2
If you wish to connect to a Peer-to-Peer workgroup, use the Add/Edit
Configuration Profile window to:
Select to connect to a
■
Set the correct
■
Peer-to-Peer Workgroup
Network Name and Encrypti on Key
.
Figure 2-7 Edit Configuration window: Peer-to-Peer
.
ORINOCO PC Card - Getting Started
2-17
Page 41

Installation for Windows - Set Basic Parameters
1. In the field
Network Name
define the name of th e w ire le ss network to
which you want to connect.
The Network Name can be any alphanumeric string in the range of “a” to
“z”, “A” to “Z” and “0” to “9” with a maximum of 32 characters
(case-sensitive).
■
If th ere is al re ady a Peer-to- Peer grou p wi th th is name available y our
computer will automatically connect to this workgroup.
■
If there is not yet such a group available, your computer will
automatically star t one with this name.
2. Click
to confirm and return to the Add/Edit Configuration Profile
OK
window.
3. Click
again t o proceed wi th the installation.
OK
Continue with “Finish the Installation” on page 2-19 to complete the
2-18
installatio n procedure.
ORINOCO PC Card - Getting Started
Page 42

Installation for Windows - Finish the Installation
Finish the Installation 2
When you have finished “Set Basic Parameters”, click the
butto n to cl ose
OK
the Add/Edit Co nf ig uration window and to proceed with the instal lat i on
process. Windows will finish building the dri ver config urati on da t abase and
copy some files to your computer’s hard disk.
If the Windows operat ing system prompts you to identify the locat i on of
■
the Windows files, sp ecif y t he drive and directory of th e W in dows
Installation C D-ROM or diskettes.
When you had a PC Card installed on your comp ut er before, most of
these files are already available on your hard disk drive. If you do not
have the Windows CD-ROM available, you may try replac ing t he
proposed path in the Copy Files From dialo g box with:
“C:\Windows\System” or “C:\Windows\”
If the Windows operat ing system prompts you to identify the locat i on of
■
the ORiNOCO driver files (typically file names starting with the
characters wv*.v) specify the drive and director y of the ORiNOCO
Software:
— if installing from the ORiNOCO CD-ROM specify the drive in one of
the following directories on the ORiNOCO Software CD-ROM.
Windows 95:D:\Drivers\Win_95
Windows 98:D:\Drivers\Win_98
Windows 2000:D:\Drivers\Win_2000
— if installing files that you downloaded from the Internet, point to the
disk dri ve or direc to ry whe re you saved the download ed f i les.
ORINOCO PC Card - Getting Started
2-19
Page 43

Installation for Windows - Finish the Installation
When Wi ndows has finished the copying of files, it will pr om pt you to rest art
your computer (see Figur e 2-8). Clic k the
button to restart your computer .
OK
Figure 2-8 Finished Setting up the Hardware
After Restarting Your Computer 2
After you have restarted your computer, the Windows operating system will
2-20
detect the ORiNOCO PC Card (you can hear the two-tone sound of the
PC Card Socket Controller ).
Load the ORiNOCO driver, in a dialog box enter a Windows user name and
password.
The password you enter here will be the one used to login to the Windows
Network N eighborhood .
ORINOCO PC Card - Getting Started
Page 44

Installation for Windows - Finish the Installation
Verifying installatio n 2
To verify if the installat io n of th e drivers was completed successfully:
Check if the PC Card icon on the Windows task bar is visible as pictured
■
in Figure 2-9.
Check the LEDs on your PC Card. The following should be visible:
■
— A steady green Power LED to indicate the PC Card is active.
— A flickering green Transmit/Receive LED to indicate wireless activity
while transmitting data.
For other LED behavior see Appendix B.
(Optional) To check the quality of the network connection, install the
■
ORiNOCO Client Manager program as described in “Installing the
Client Ma nager Software”.
Figure 2-9 PC Card icon on the Windows task bar
ORINOCO PC Card - Getting Started
2-21
Page 45

Page 46

Using ORiNOCO and Windows
3
Introduction 3
This chapter provid es g eneral information ab out :
Using your PC Card
■
View Other Computers
■
View Wireless Link Quality
■
View/Modify PC Card Settings
■
Finding More Inform at i on
■
ORINOCO PC Card - Getting Started
3-1
Page 47

Using ORiNOCO and Windows - Using your PC Card
Using your PC Card 3
Radio Antennas 3
The built-in radio and antennas of your ORiNO C O PC Card perform best in
an open environ m ent w ith as few obstacles as po ssible.
To achieve the maximum range for wireless communicat i ons do not
■
cover the card with objects such as book s or thick sta cks of pap er.
If you are using the ca rd inside a deskto p computer you may consider
■
the purchase of the opti onal Ran ge Extender Antenna.
3-2
Removing the PC Card 3
If you do not need the wireless connectivity of your ORiNOCO PC Card, you
can remove the PC Card f ro m its sl ot as pic t ure d in Fi gure 3-1.
!
CAUTION:
When removing the ORiNOCO PC Card you will lose your
connection to the network. Prior to removing the PC Card, make
sure you have closed all files and network applicat ions (such as
e-mail).
ORINOCO PC Card - Getting Started
Page 48

Using ORiNOCO and Windows - Using your PC Card
You ar e advised to always disable the PC Card
prior to removing th e card
from the PC Card slot. This will allow the Windows operating system to:
Log off from the network server
■
Disable the ORiNOCO PC Card dr iver
■
Disconnect power to the PC Card slot (which will extend battery life for
■
mobile computers).
Figure 3-1 Removing the PC Card
To stop using the ORiNOCO PC Card:
1. Click once on the PC Card icon on the right side of the Windows task
bar.
2. Select the option
1 Alternatively, disable the PC Card via the PC Card icon on the Control Panel menu.
Stop ORiNOCO PC Card
1
.
ORINOCO PC Card - Getting Started
3-3
Page 49

Using ORiNOCO and Windows - Using your PC Card
3. Wait a few seconds until the operating system s displays a pop-up
message to indicate you can safely remove the PC Card.
Maintenance of your PC Card 3
If you are not using the ORiNOCO PC Card for wireless communications,
extend its life by storing it inside the transparent plastic casing that was
shipped wi th th e pr oduct.
To clean the PC Card, gently wipe it w ith a sof t (da m p) clot h.
!
CAUTION:
To avoid damage to the PC C a r d do not use abrasive mater ial s, or
rinse th e card with liquids.
3-4
ORINOCO PC Card - Getting Started
Page 50

Using ORiNOCO and Windows - View Other Computers
View Other Computers 3
When multiple ORiNOCO stations are up-and-running in your wireless
network, you can use the procedur e de scribed be low to d isp lay the other
computers:
1. Start Windows Explorer.
2. Scroll down the list of files and folders to look for the item
Neighborhood
3. Double-click the
.
Network Neighborho od
item to display all stations in
Network
your Microsoft Networking Group.
4. To display other workgroups in the network environment, double-click the
Entire Network
icon.
If you cannot find other (ORiNOCO) networked computers, verify whether
the other ORiNOCO computers are:
Powered up and logged on to th e net work.
■
Configured to operate with identical Microsoft Network settings
■
concerning:
— Networkin g Pr ot oco l .
— Wireless N et work Name
— Workgroup Name
ORINOCO PC Card - Getting Started
3-5
Page 51

Using ORiNOCO and Windows - View Other Computers
To v ie w or modi fy the
Station N ame
or
Workgroup
of your computer, proceed
as follows:
1. Click the button from the Windows task bar.
2. Click on
Settings
, and then on
Control Panel
3. In the Control Panel window, double-click the
4. In the Network Settings window, select the
You can ve rify and change the
Station Name
.
Network
Identification
or
Workgroup
icon.
tab.
parameters.
NOTE:
You have to restart your computer before changes to the Network
Settings will be effected.
To verify the radio connection with other stations refer to “View Wireless Link
Quality” on page 3-7.
3-6
ORINOCO PC Card - Getting Started
Page 52

Using ORiNOCO and Windows - Using the Client Manager
Using the Client Manager 3
If you installed the ORiNOCO Client Manager as described in “Installing the
Client Manager Software” on page 2-3, you can use the Client M anager to:
Verify the quali t y of your wirel ess connectio n t o th e network.
■
View/Modify the config urati on se t tings of your wireless PC C ar d.
■
The Client Manager will start automatically every time you power up y our
computer.
The Client Manager icon is displayed in the “System Tray” of your
Windows task ba r at th e right-side on the bottom of your screen,
indicating that the Client Manager program is running.
Click the icon once with your
■
mouse button to retr i eve a more
left
detailed status overview.
Click the icon once with your
■
right
mouse button to display a menu with
more options.
View Wireless Link Quality 3
You can use the Clie nt Manager icon on the Windows ta sk b ar to verify the
link quality of your networ k connectio n.
An overview of all possible icons is given in Table 3-1. When t he
Client Manager icon is no t indicating excellent or good radio connection, act
as described below.
ORINOCO PC Card - Getting Started
3-7
Page 53

Using ORiNOCO and Windows - Using the Client Manager
Table 3-1 Client Manager Icon
Icon Description Color
Excellent radio connection Green
Good radio connection Green
Marginal radio connection:
Yellow
The radio signal is weak. Move closer to the:
ORiNOCO AP-1000, or
■
ORiNOCO Base Station
■
Poor radio connection:
Red
The radio signal is very weak. Save your files and move
closer to the:
ORiNOCO AP-1000, or
■
ORiNOCO Base Station
■
No radio connection because:
Looking for initial connection, or
■
You have moved out of range of the network.
■
Red
Peer-to-Peer network connection Blank
3-8
ORINOCO PC Card - Getting Started
Page 54

Using ORiNOCO and Windows - Using the Client Manager
View/Modify PC Card Settings 3
If you would like to view or modify ORiNOC O para m et er s, for example
because you would like to connec t to another network or type of networ k,
proc eed as follows:
1. Right-cl ick on the Cl ient Manage r icon on the Windows task bar.
2. From the menu, select
■
■
Add/Ed it Pr o fi le
One of the existing profiles
to add a new profile or to m odi f y an existing prof ile.
Configuration Profile
(if present) to sel ect a pr of i le w ithout
(see Figure 3- 2) a nd select:
viewing or modify ing t he settings.
After selecting and another profile, the PC Card will use the selected profile
to connect to the w ireless network.
Figure 3-2 Edit Wir e les s Configuration Settings
ORINOCO PC Card - Getting Started
3-9
Page 55

Using ORiNOCO and Windows - Using the Client Manager
If your Client M anager icon is not vi sible, you have to start the
Client Manager program again:
1. Click the button from the Windows task bar.
2. Select
Programs
3. Next select
, and then selec t the
Client Manager
ORiNOCO
to start the Clie nt Manager program .
workgroup.
Alter natively you can to change the PC Card configuration via the Control
Panel:
1. Click the button from the Windows task bar.
2. Click on
Settings
, and then on
Control Panel
3. In the Control Panel window, double-click the
.
Wireless Network
icon.
4. (Optional ) Change the param eters you would like to modify, and click
■
■
the
the
button to confirm your changes, or
OK
Cancel
button to ignore your modifications.
3-10
ORINOCO PC Card - Getting Started
Page 56

Using ORiNOCO and Windows - Finding More Information
Finding More Information 3
If you are looking for more information than contained in this manual, please
consult one of the following options:
■
The on l ine “
ORINOCO PC Card - User’s Guide” - for more information
about the Clie nt Manager program and for informa tio n about installing
the ORiNOCO PC Card in other operating systems, such as:
—MS Windows NT
—MS Windows CE
—MS DOS
— Apple Macintosh
The onl ine “ORINOCO PC Card - User’s Guide” can be found on the
ORiNOCO Software CD-ROM that came with your PC Card kit.
■
The on-line help system
of your ORiNOCO wireless system - for
informati on about so f tware and driver fu nctionality.
To view the on-line help sy st em cl i ck the
Help
button or press the
function key on your keyboard in any ORiNOCO window, or
F1
■
The “ORiNOCO Manager Suite User’s Guide ”
LAN Administ rator s that need to setup, monitor and manage corporate
LANs.
- a reference guide for
ORINOCO PC Card - Getting Started
3-11
Page 57

Page 58

Card Spec ifications
Physical Specifications A
A
Form Factor
Color
Dimensions
Weight
Temperature & Humidity
Operation
Transit
Storage
1 Color of the Range Extender Antenna is related to the Radio Characteristics
2 Although the PC Card may still operate in the range of -20° to 70°C, operat ion
1
described on page A-3
outside the range of 0° to 55° C may no longer be according to specifications.
PC Card Type-II Extended
■ Black for ORiNOCO PC Card (both Gold and Silver Label)
■ Red for IEEE Fixed Wireless PC Cards
(LxWxH) 117.8 x 53.95 x 8.7 mm
45 gram (PC Card)
0° to 55° C
-20° to 70° C 15 to 95% (no condensation allowed)
-10° to 60° C 10 to 90% (no condensation allowed)
2
maximu m humidi ty 95%
Power Characteristics A
Doze Mode
Receive Mode
Transmit Mode
Power Supply
10 mA
180 mA
280 mA
5 V
ORINOCO PC Card - Getting Started
A-1
Page 59

Card Specifications
Networking Characteristics A
Compatibility ■ IEEE 802.11 Standard for Wireless LANS (DSSS)
■ Wi-Fi (Wireless Fidelity) certified by the Wireless Ethernet
Compatibility Alliance (WECA).
Network Operating
System
Host Operating System
Media Access Protocol
Data Rate ■ High 11 Mb/s
■ Novell® Client 3.x & 4.x
■ Microsoft Windows® Networking
Microsoft Windows® 95:
■ NDIS3 Miniport Driver
Microsoft Windows® NT v4.0:
■ NDIS4 Miniport Driver
Microsoft Windows® 98 and 2000:
■ NDIS5 Miniport Driver
MS-DOS & Microsoft Windows 3.x:
■ DOS ODI Driver
■ Packet Driver
Windows CE
■ Windows CE v.2.0 & 2.11
Apple Macintosh Operating Systems:
■ Apple PowerBook G3
CSMA/CA (Collision Avoidance) with Acknowledgment (ACK)
A-2
■ Medium 5.5 Mb/s
■ Standard 2 Mb/s
■ Low 1 Mb/s
The cards use an automatic Transmit Rate Select mechanism.
ORINOCO PC Card - Getting Started
Page 60

Card Specificat ions
Radio Characteristics A
Radio Characteristics of ORiNOCO PC Cards may vary:
According to the country where the product was purchased.
■
According to the type of product that was purchased.
■
Wireless co m munication is often su bj ect to local radio regul at ions. Alt hough
ORiNOCO wireless networking products have been designed for operation
in the license-free 2.4 GHz band, local radio regulations may impose a
number of limitations to the use of wirel ess communicat io n equipment.
NOTE:
Refer to the flyer “Information to the User” for regulatory information
that may apply in your country.
To comply with such regulations, ORiNOCO PC Cards are marketed with
dedicated channel-sets with a number of factory-programmed channels
identified by the following acronyms:
ETS for countries that adhere to the regulatio ns as defined by the
■
European Telecommu ni ca tions Standards In st itute (ETSI).
FCC for countries that adhere to the regulations as def ined by the US
■
Federal Communications Commission (F C C ).
FR for France, and
■
JP for Japan.
■
ORINOCO PC Card - Getting Started
A-3
Page 61

Card Specifications
The acronym of the channel-set supported by your card is printed on a label
on the back-side of your ORiNOCO PC Card (see Table “ORiNOCO IEEE
802.11 Channels Sets” on page A-10 for a detailed list of channels).
If you plan to install and u se ORiNOCO PC Cards to connect your AP-1000
or other com puting device to an outdoor ant enna installation, additional
regulations m ay apply.
To comply with such regulation s Lu cent Technologies offers two types of
ORiNOCO PC Cards:
In countries that adhere to the FCC regulations, you can use the
■
standard bla ck-colored ORiNOCO PC Card.
In countries that adhere to the ETSI regulations, including France and
■
A-4
Japan, you must select the car d- ty pe based upon the antenna that w i ll
be used:
■
You can use the blac k-colored ORiNOCO PC Card when connecting
the device to standard Lucent Technologi es omni-dire cti onal
antennas.
■
You must use the red-col ored IEEE Fixed Wireless PC Card when
connecting the de vice to th e standard Lucent Technologi es 14 dBi
directional antenna for outdoor use.
ORINOCO PC Card - Getting Started
Page 62

Card Specificat ions
When you ordered the ORiNOCO Outdoor Router kit1 fo r outdoor antenna
installations, your kit includes the correct card type that complies with the
regulations th at app ly in your coun try.
!
WARNING:
At all times, it will be the responsibility of the end-user to ensure that
an outdoor antenna installation complies with local radio regulations.
The end-user must verify that:
■
■
The antenn a in st all er is aware of these re gul at ions.
The correc t type of PC Card is used to con nect the host device
to the outdoo r an te nna installation.
Lucent Technologies and its resellers or distributors are not liable f or
any damage or vi olat io n of gover nm ent regulations that may arise
from failing to comply with these guidelines.
1 Formerly identified as the WaveLAN Office Router, WaveACCESS LINK WP-II, or
WaveL AN IEEE PTP Kit
ORINOCO PC Card - Getting Started
A-5
Page 63

Card Specifications
Radio Characteristics ORi N OCO PC Card A
R-F Frequency Band 2.4 GHz (2400-2500 MHz)
Number of selectable
sub-channels
Modulation Technique Direct Sequence Spread Spectrum
Spreading 11-chip Barker Sequence
Bit Error Rate (BER) Better than 10
Nominal Output Power 15 dBm
Range (100 bytes User
Data) / Transmit Rate
Open Office Environment
North America (FCC) 11
Europe (ETS) 13
France (FR) 4
Japan (JP) 1
Other Countries: FCC 11, ETS 13
■ CCK for High & Medium Transmit Rate
■ DQPSK for Standard Transmit Rate
■ DBPSK for Low Transmit Rate
-5
High Speed
11 Mb/s
160 m
(525 ft.)
Medium Speed
5.5 Mb/s
270 m
(885 ft.)
Standard Speed
2 Mb/s
400 m
(1300 ft.)
Low Speed
1 Mb/s
550 m
(1750 ft.)
Semi-Open Office
Environment
Closed Office
Receiver Sensitivity
Delay Spread
(at FER of <1%)
A-6
50 m
(165 ft.)
25 m
(80 ft.)
70 m
(230 ft.)
35 m
(115 ft.)
90 m
(300 ft.)
40 m
(130 ft.)
115 m
(375 ft.)
50 m
(165 ft.)
-83 dBm -87 dBm -91 dBm -94 dBm
65 ns 225 ns 400 ns 500 ns
ORINOCO PC Card - Getting Started
Page 64

Card Specificat ions
The range of the wireless signal is related to the Transmit Rate of the
wireless communication. Communicatio ns at l ower Transmit range m ay
travel larger distances.
NOTE:
The range values listed in Table “Radio C haracteristi cs” are t ypi c a l
distances as measured at the Lucent Technologies ORiNOCO
laborator ies. Th ese values may provide a rule of thumb and may
vary acc or di ng t o t he ac tu al radio conditions at the lo cat i on wh er e
the ORiNOCO product will be installed.
■
The range of your wireles s devices can be af fected when th e
antennas are placed near metal surfaces and solid high-density
materials.
■
Range is als o im pacted due to “o bstacles” in the signal path of
the radio that may either abso rb or reflect the radio s ignal .
Table “Radio Characteristics” on page A-3 lists the typical ranges when used
indoors in “off ice envir on ments” that can be describe d as follows:
■
In
Open Office environments
, antennas can “see” each other, i.e. there
are no physical obstr uctions between them.
■
In
Semi-open Office envir onments
, work spa ce is divided b y shoulder-
height, hollow wall elements; antennas are at desktop level.
ORINOCO PC Card - Getting Started
A-7
Page 65

Card Specifications
In
Closed Office environme nts
, work space is separated by floor-to-ceiling
brick walls. If you intend using the ORiNOCO PC Card as part of an outdoor
antenna installation, the range of the outdoor antenna installations will be
related to:
Type of outdoor antennas connected to the ORiNOCO PC Card.
■
Length of ant enna cables.
■
Clearance of th e radio s ig nal path.
■
For more information please consult the “ORiNOCO Outdoor Antenna
Installation Guide”
A-8
ORINOCO PC Card - Getting Started
Page 66

ORiNOCO Fixed Wireless PC Card A
Card Specificat ions
R-F Frequency Band 2.4 GHz
Number of selectable
sub-channels:
Modulation Technique: Direct Sequence Spread Spectrum
Spreading 11-chip Barker Sequence
Bit Error Rate (BER) Better than 10
Nominal Output Power: 8 dBm
Range Consult the “ORiNOCO Outdoor Antenna Installation
1 The Fixed Wireless PC Card is not available in FCC regulated countries.
2 This card is designed for o utdoor anten na instal lation s in co untries that ad here t o radi o
regulations as defined by the ETSI.
Europe (ETS) 13
France (FR) 4
Japan (JP) 14
Other Countries (ETS)
■ CCK for High & Medium Transmit Rate
■ DQPSK for Standard Transmit Rate
■ DBPSK for Low Transmit Rate
Guide”
(2400-2500 MHz)
-5
2
1
13
Supported Frequency Sub-bands A
Subject to the radio regulations that apply in your countr y, your ORiNOCO
PC Card m ay support a dif ferent set of 2 .4 GHz channels (s ee table below).
Consult your Authorized ORiNOCO Reseller or Lucent Technologies Sales
office for information abou t the rad io reg ul at ions that apply in your count ry.
ORINOCO PC Card - Getting Started
A-9
Page 67

Card Specifications
ORiNOCO IEEE 802.11 Channels Sets A
Frequency Range 2400-2500 MHz
1
Channel ID FCC ETSI France Japan
1
2
3
4
5
6
7
8
9
10
11
12
2412 2412 - 2412
2417 2417 - 2417
2422 2422
2427 2427 - 2427
2432 2432 - 2432
2437 2437 - 2437
2442 2442 - 2442
2447 2447 - 2447
2452 2452 - 2452
2457 2457 2457 2457
2462 2462
- 2467 2467 2467
- 2422
2462
2462
A-10
13
14
1 printed in bold are the factory-set default channels
- 2472 2472 2472
---
2484
When installing ORiNOCO PC Ca rds the channel configuration is managed
as follows:
For wireless clients that operate in an ORiNOCO Infrastructure, the
■
ORiNOCO PC Card will automatically start operation at the channel
identified by the AP-1000s. When roaming between different access
ORINOCO PC Card - Getting Started
Page 68

Card Specificat ions
points the stat io n can dynamical ly switch to another channel if required.
For ORiNOCO PC Cards installed into wireless cl ients that oper ate in an
■
“Peer-to-Peer” mode, the PC Card will default use channel 10.
When inserted into a AP-1000, the ORiNOCO PC Card will use the factoryset default channel (printed in bold), unless the LAN Administrator selected a
different channel when configurin g the AP-1000 device.
ORINOCO PC Card - Getting Started
A-11
Page 69

Page 70

Troubleshooting
B
Common Troubleshooting Tips B
LED Activity B
If you encounter diffi culty using and/or installi ng your ORiNOCO product, the
error may be related to various causes:
Out-of range situation, which prevents the ORiNOCO PC Card from
■
establishing a wirele ss connection with the network.
Configuration mismatch, which prevents the ORiNOCO PC Card from
■
establishing a wirele ss connection with the (correct) networ k.
Absence of, or conflict of the ORiNOCO Driver.
■
A problem or conflict with the PC Card slot which pr events the PC Card
■
from powering on.
A conflict of the ORiNOCO hardware with another device.
■
The starting point to troubleshoot problems with your ORiNOCO PC Card is
looking at the LED activity of the ORiNOCO PC Ca rd.
ORINOCO PC Card - Getting Started
B-1
Page 71

Troubleshooting
Table B-1 on page B-2 provides an over vi ew of the various modes of
operation and the associated LED activity. Table B-1 also includes a number
of troubleshooting hints, if required, that may help you solve the problem.
Table B- 1 LED A ct ivity Table
P ower LED Tran smit
Description/Action
Receive LED
Continuous
Green
Flicker Flicker Power Management mode:
Blinking Standard operational mode.
■ Card is powered on.
■ Sensing/transmitting wireless data.
Off ■ Card is powered on.
■ No wireless activity.
No action is required.
■ Card is powered on, but set to power saving mode, to conserve
battery life.
■ Flashes indicates that the card wakes up at regular intervals to
verify if there is wireless data addressed to your computer.
B-2
ORINOCO PC Card - Getting Started
Page 72

Table B-1 LED Activity Table—Continued
Troubleshooting
Po wer LED Transmit
Receive LED
Both LEDs blink once every
10 seconds
Description/Action
The PC Card works fine, but di d not yet succeed esta bli shin g a
wireless connection with the wireless Infrastructure.
Actions:
■ Contact the LAN Administrator to verify the ORiNOCO Network
Name assigned to the wireless infrastructure.
■ Contact the LAN Administrator to verify the correct value(s) of
the encryption keys.
■ Contact the LAN Administrator to verify whether the network
infrastructure has been closed
■ Change the configuration of your ORiNOCO PC Card to enter
the correct Network Name
■ If there are no AP-1000 devices available, change the
configuration of your ORiNOCO PC Card to run in “Peer-toPeer” mode.
1
.
ORINOCO PC Card - Getting Started
B-3
Page 73

Troubleshooting
Table B-1 LED Activity Table—Continued
P ower LED Tran smit
Description/Action
Receive LED
Off Off Card is not powered on, so it can not transmit/receive data.
The cause may either be:
■ No Driver loaded/installed
■ Card - Driver mismatch which prevented the driver from loading
■ Device conflict which prevented the driver from loading
Actions:
■ Verify if a driver has been installed, if not install the driver.
■ Verify the device settings of the PC Card to determine the
occurrence of a conflict with another device. If so, change the
settings of either your PC Card or the conflicting device to
resolve the problem.
■ Verify the versions of the driver, and the embedded software in
the PC C ar d (also referred to as Station fi rm ware ).
■ Consult the ORiNOCO website at:
orinoco
upgrade both the embedded software and driver to the latest
available version.
to see if newer versions are av ailable and if so,
http://www.lucent.com/
B-4
1 Only for networks that include ORiNOCO AP-1000s.
ORINOCO PC Card - Getting Started
Page 74

Troubleshooting
Can Not Connect To The Network B
If your PC Card seems to be working fine, but you are not able to connect to
the network, th is error might be due to a configuration mism at c h.
For e xample if both LEDs of your PC Card blink once every ten seconds, the
problem is likely to be caused by a conf i gurati on mismatych of:
Network Name
■
Encryption Key
■
The ORiNOCO Network Name is case-sensitive.
On MS-DOS sy st em s the Network N ame should be ent er ed between
quotation marks. If you omit the quotation marks, the driver will interpret the
value as all upper-case e.g. 12C AFE instead of "12C afe".
If your AP-1000s have been configured with both lower- and up per -c ase
characters, the dr i ver will not be able to esta blish a radio co nnection.
LEDs Work But Can’t Connect to Network B
If you can not connect to the net wo r k while the LED s indi cate that the
network is working properly (Po w er LED is on, Transmit Receive LED blinks)
probably the TCP/IP sett in gs of your network are no t properly set.
NOTE:
Some old er versions of the Wi ndows 95 op eratin g system will not
automatically install the necessa ry TCP/IP network prot ocol.
ORINOCO PC Card - Getting Started
B-5
Page 75

Troubleshooting
Changi ng TCP/IP Setting s
Consult your LAN A dm ini st rator for your the values of your TCP/IP settings.
To change the TCP/IP Settings:
1. On the Win dows ta sk bar click the
2. Select
Settings
and then select
Control Panel
Start
button
.
3. On the Con trol Panel window, double click on the
the
Network Properties
.
4. From the list of installed components, check if the
PC Card
■
protocol is inst al le d.
If this protocol is not yet installed, click the
TCP/IP
protocol from the list. Refer to the Windows Help for more
Add
informa tion.
■
If this protocol is inst al l ed, select this protocol and click the
Properties
button. Check if the parameters resemble the settings
provided by your LAN Administrat or. Make Changes if necess ary,
and click
when you’re done.
OK
Network
TCP/IP -> ORiNOCO
icon to view
button and select the
5. When prompted, restart your computer.
For more detailed Troubleshooting hints, and/or information about upgrading
the ORiNOCO drivers, please consult the “ORINOCO PC Card - User’s
Guide” provide d on t he C D - ROM .
B-6
ORINOCO PC Card - Getting Started
Page 76

Warranty Repair Card
W
About Warranty and Repair W
In case your ORiNO CO pr oduct is not worki ng properly, you are advised to
consult Appendix B ”Troubleshooting” prior to contacting ORiNOCO
Technical Support.
In case this does not help you solving the problem, contact ORiNOCO
Technical Support as describe d on the last pages of thi s document.
If it appears that your unit needs a r pair or r epl a cem ent retrun to your
Dealer/Distributor in its original packaging
Warranty Repairs: W
When returning a defective product for Warranty, always include the following
documents:
Problem Report Form (an elect r oni c copy is available on the CD-ROM
■
(
report.txt
The Warranty Repair card, and
■
A copy of the inv oice/proof of purchase
■
).
ORINOCO PC Card - Getting Started
W-1
Page 77

Warranty Repair Card
All other Repairs: W
When retu rning a defective product for Repair, always include the the
Warranty Repair card.
You are advised to read the Information about “Limited Warranty” as
descr ib ed on the following page.
Limited Warranty W
Lucent Techn ol ogi es extends a limited warranty from date of purchase of :
Thir ty-six (36) months for ORiNOCO hardware products
■
Twelve (12) months for AP-1000
■
W-2
Twelve (12) months for the media on which the software is furnished and
■
the reproduction of the software on the media.
ORINOCO PC Card - Getting Started
Page 78

Warranty Repair Card
Upon proof-of-purchase Lucent Technologies shall at its option, repair or
replace the defective item at no cost to the buyer.
Defective items shall be returned to the de al er / di st ributor :
Freight prepai d.
■
Accompanied by a copy of proof-of-purchase.
■
Accompanied by a filled out Warranty/Repair card.
■
This warranty is continge nt upon proper use in t he ap pl i cati on for which t he
products are i nt en ded and does not cover produc ts whi ch have been
modified without the seller’s approval or which have been subject ed t o
unusual physical or electrical dema nds or d amaged in any way.
This Warranty constitutes the sole and exclusive remedy of any buyer or
seller’s equipment and the sole and exclusive liability of Lucent
Technologies in connecti on with the products and is in lieu of all other
warranties, express, implied or statutory, including, but not limited to, any
implied warranty of merchantability of fitness for a particular use and all
other obligations or liabilities of Lucent Technologies.
In no event will Lucent Technologies Inc. or any other party or person be
liable to you or anyone else for any damages, including lost profits, lost
savings or other incidental or consequential damages, or inability to use
the software provided on the software media even if Lucent Technologies
or the other party person has been advised of the possibility of such
damages.
ORINOCO PC Card - Getting Started
W-3
Page 79

Warranty Repair Card
To be filled out by the User: 0
Produc t Description:
COMCODE (Product ID):
Serial Number:
In voice Date:
Name:
Title:
Company:
Address:
City/State/Zipcode:
Country:
Telephone:
Fax:
Email:
(dd/mm/yyyy)
To be filled o ut by the Dealer/Distributor:0
0
Dealer Name:
Address:
City/State/Zipcode:
Countr y:
Telephone:
Fax:
Warranty Comment
Yes
❑
No
❑
Return Approval Reference
:
0
Reported Problem: Problem Description:
❑
❑
Out-of-Box Failure
Other
ORINOCO PC Card - Getting Started
-4
Page 80

Technical Support
If you encounter problems w he n i nst al l ing or using this produ ct , ple ase
consult the ORiNOCO website at:
the latest software, use r do cum entation and pr oduct update s
■
the Frequently Asked Questions (FAQ)
■
http://www.lucent.com/orinoco
for:
Alternatively please contact your local authorized ORiNOCO reseller for
Technical Support.
Help us helping you by completing the ORiNOCO problem report form and
include it with your e-mail or fax when contacting Technical Support.
You can find the problem report form (
the ORiNOCO CD-ROM, and
■
the support pages of the ORiNOCO website.
■
report.txt
) on:
Addresses of authorized ORiNOCO resellers are listed in the “Contact &
Ordering” section of the ORiNOCO website.
ORINOCO PC Card - Getting Started
Page 81

 Loading...