

Page 1

MERLIN
®
PIus
COMMUNICATIONS SYSTEM
Release 2
User’s Guide
Lucent Technologies
Bell Labs Innovations
999-500-148
Issue 1
August 1988
Page 2

© 1988 AT&T
999-500-148
All Rights Reserved
Issue 1
Printed in U.S.A.
August 1988
NOTICE
The information in this document is subject to change without notice. Lucent Technologies assumes no
responsibility for any errors that may appear in this document.
MERLIN is a registered trademark of Lucent Technologies.
To order copies of this document, call the Lucent Technologies Customer Information Center, 1-888-582-3688
and include the document number 999-500-148 with your order.
Intellectual property related to this product (including trademarks) and registered to AT&T Corporation has
been transferred to Lucent Technologies Incorporated,
Any references within this text to American Telephone and Telegraph Corporation or AT&T should be
interpreted as references to Lucent Technologies Incorporated. The exception is cross references to books
published prior to December 31, 1996, which retain their original AT&T titles.
Lucent Technologies
– formed as a result of AT&T’s planned restructuring
– designs, builds, and delivers a
wide range of public and private networks, communication systems and software, consumer and business
telephone systems, and microelectronic components. The world-renowned Bell Laboratories is the research
and development arm for the company.
Page 3

Introduction 2
Programming Ringing Options 3
Features on a BIS-34D Voice Terminal
with Display 4
Placing Outside Calls 6
Answering Your Calls 10
Handling Calls with the Hold and
Transfer Features
Placing
Setting
Intercom Calls
Up a Conference Call
Using the Speakerphone and
Using Privacy Features
14
16
17
Speaker 18
19
Paging
Using a
20
Template 21
1
Page 4
About This Guide
This guide shows how to use various features of your
MERLIN Plus system voice terminal, The
MERLIN Plus
System Manual
provides complete
system features and equipment.
Programming
The procedures in this
program features onto
symbols:
T • P
→→
Button
■ ■ ■
■ ■ ■
■ ■ ■
■ ■ ■
Code
T • P
guide that
information about
show you how to
buttons use the following
Slide the T/P switch to
P
to put your
voice terminal in programming mode,
(It rings while you’re programming.)
Touch the button to which you’re
assigning the feature.
Dial a number, such as a feature code or
an outside telephone number.
Slide the T/P switch to the center
position to return to regular call-handling
mode.
What the Lights Indicate
Lights next to the buttons on your voice terminal show
the status of lines, features, and other people’s voice
terminals.
●
●
●
●
●
Next to a Line Button:
you lift your handset,
or on Exclusive Hold.
Red
= you get this line when
Steady green =this line is in use
Flashing green
= a call is coming
in on this line.
Faster flashing green
= someone else’s
call on hold. Fastest flashing green = a call you’ve put
on hold.
Next to a Feature Button:
Steady green
= the feature is
activated. Light off =
the feature is deactivated.
Next to a Direct Extension Dialing (DXD)/Call
Forwarding (CF) Button:
Green and red lights off
=
normal mode. Green light on = DXD mode. Red light
on = CF mode. Flashing red light = CF problem, call
administrator.
Flashing green light
= DXD problem, call
administrator.
Next to a Remote Line Access (RLA) or System Answer
(SA) Button:
Steady green on
= the feature is activated.
Flashing green
= problem with feature, call
administrator.
Next to an Auto Intercom Button: Steady green = the
voice terminal is busy or the person is using Do Not
Disturb. Flashing green =
an intercom call is coming in
to you from this voice terminal.
←←
2
Page 5

Decide if incoming calls should ring at your voice
terminal, how the ring should sound, and how loud it
should be.
Ringing Options
You can set your voice terminal so that incoming calls
ring right away, after a delay of two rings, or not at all.
Use the delayed ring option if you answer calls for
someone else when they’re not available. Use the no
ring option if someone else normally answers your
incoming calls.
To program:
Touch each line button, then dial the code for the
ringing option you prefer: The codes are *35 (no
ring), *36 (delayed ring), and *37 (immediate ring).
Volume Control
To make the sound of the ringer louder, slide the volume
control lever on the bottom left side of the voice terminal
up (HI). To make it softer, slide the lever down (LO).
Personalized Ringing
You can choose from among eight ringing patterns. To
select one, enter programming mode and touch
Speakerphone
(or
Speaker)
repeatedly until you hear the
ringing pattern you prefer.
3
Page 6
6
7
8
5
4
3 9
2
1
10
11
12
14
13
Page 7

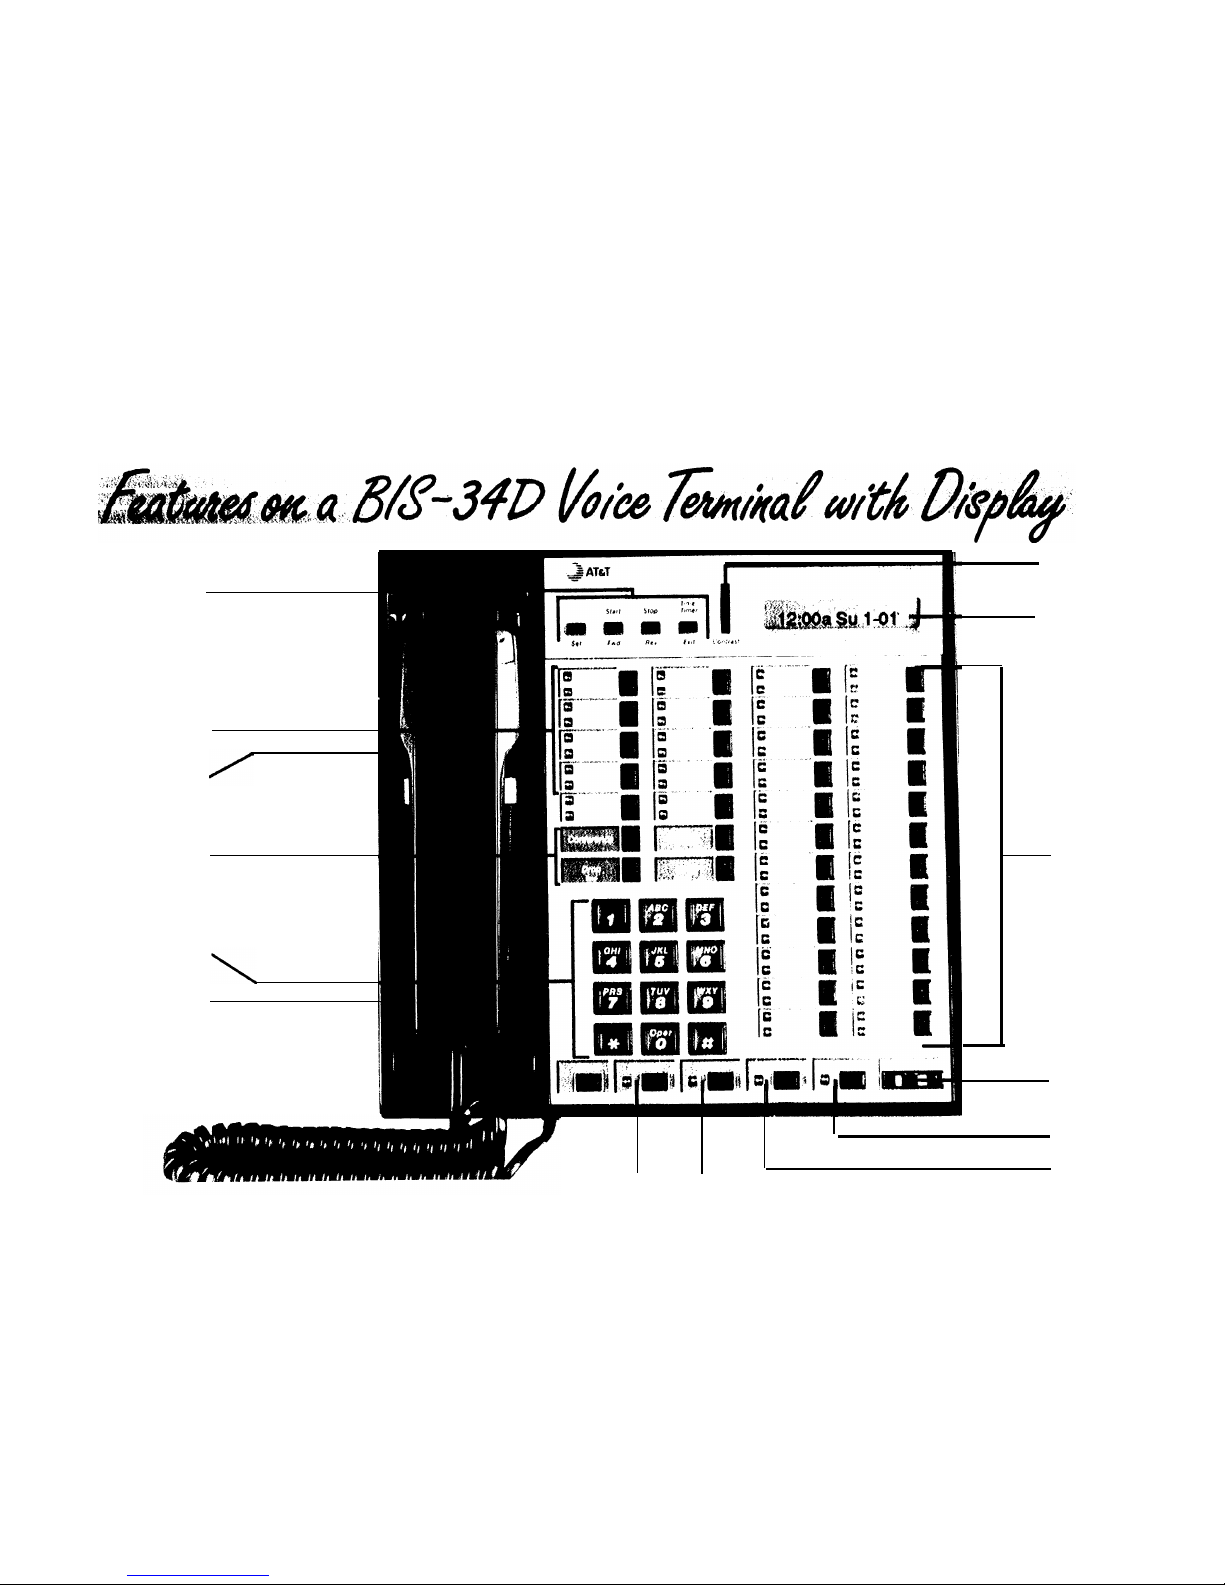
1
2
3
4
5
6
7
8
Adjust the ringer volume of your voice terminal’s
speaker with the volume control.
Use the dial pad to place calls. In programming
mode, use it to enter codes and data.
Use
Conference, Drop, Transfer,
and
Hold
for
efficient call handling.
Test your voice terminal and program its features by
sliding the
T/P
switch to T (Test) or P (Program),
Use line buttons to call people who aren’t connected
to your system.
Use the display buttons to operate clock, calendar,
timer, and alarm functions.
Adjust the contrast on the display.
Use the information on the display as you handle calls
and messages and program your voice terminal.
* The BIS-34D is the largest of the MERLIN Plus system voice terminals. Other models have buttons, but the features they have are located
in the same positions as on the BIS-34D shown above.
9
Tailor your voice terminal to meet your individual
needs by programming available buttons with custom
features.
10
Adjust the volume of the speakerphone.
11
The Speakerphone feature allows you to have a phone
conversation without using the handset. The
Speakerphone light indicates when the feature is
activated.
12
Touching the Microphone button while you’re on a call
enables you to have a private side conversation with
someone in your office without the caller overhearing
it. The Microphone light indicates when the feature is
activated.
13
HFAI enables you to answer intercom calls hands free.
The HFAI light indicates when the feature is activated.
14
If the Message light is on, call the attendant for your
messages.
5
Page 8

You can assign telephone numbers
to buttons or codes
for quick dialing of outside calls. Using a special
password, you can also use company lines to make
outside calls from a remote location.
Outside Auto Dial
You can program telephone numbers onto buttons for
one-touch dialing.
To place a call:
1
Touch the Outside Auto Dial button.
2
If someone answers, begin speaking or lift your
handset. If no answer, touch
Speakerphone
(or
Speaker)
to disconnect the call.
To program:
Label a button and follow the steps below.
T • P
T
• P
Main
■ ■ ■
■ ■ ■
■ ■ ■
■ ■ ■
■ ■ ■
■ ■ ■
■ ■ ■
■ ■ ■
Office
→→ ✱ 90
tel. no.
←←
Personal Speed Dial
You can assign codes #01 through #24 to telephone
To use Personal Speed Dial:
numbers or account numbers you dial often.
1
Dial the pound sign and code for your model voice
terminal:
To program Personal Speed Dial codes:
T • P
■ ■ ■
■ ■ ■
■ ■ ■
■ ■ ■
■ ■ ■
■ ■ ■
■ ■ ■
■ ■ ■
■ ■ ■
■ ■ ■
■ ■ ■
■ ■ ■
T
• P
– 22-Button Voice Terminal:
Dial the pound sign
and code (#01 through #12).
– 5- and 10-Button Voice Terminals:
Dial the pound
sign and code (#01 through #24).
→→
#01-#24
✱ 90
tel. no.
←←
6
Page 9

System Speed Dial
Your administrator may assign System Speed Dial codes
To place a call:
#60 through #89 and #900 through #999 to telephone
1
If you have a button programmed with this code,
numbers that people in your system call often, such as
touch the button. If not, dial the pound sign and
vendors or clients. You can program any of these codes
code (#60 through #89 and #900 through #999).
on buttons for one-touch dialing. Ask your
administrator for a list of System Speed Dial codes.
To program a System Sped Dial button:
Label a button and follow these steps:
T • P
■ ■ ■
■ ■ ■
■ ■ ■
■ ■ ■
■ ■ ■
■ ■ ■
■ ■ ■
■ ■ ■
T
• P
Main
Office
→→
60-89
✱
95
←←
900-999
Last Number Dial
You can program a button for one-touch redialing of the
To use Last Number Dial:
last number you called.
1
Touch Last Number.
To program:
Label a button
2
If someone answers, begin to speak or lift your
handset. If no answer, touch
Speakerphone
(or
and follow these steps:
Speaker)
to disconnect.
T • P
■ ■ ■
■ ■ ■
■ ■ ■
■ ■ ■
T
• P
Last No.
→→
✱ 72
←←
7
Page 10

Saved Number Dial
You can program a button to redial a telephone number
that you've saved.
To Program:
Label a button and follow these steps:
To use Saved Number Dial:
1
Before disconnecting, touch
Saved Number.
2
To redial the call, touch
Saved Number.
3
If someone answers, begin to speak or lift your
handset. If not, touch
Speakerphone
(or
Speaker)
to
disconnect.
T • P
■ ■ ■
■ ■ ■
■ ■ ■
■ ■ ■
T
• P
Saved
Number
→→
✱ 74
←←
Busy Buster
You can program a button to have the system redial a
To use Busy Buster:
busy telephone number automatically and signal you if
1
Before you disconnect, touch
Busy Buster.
the call goes through, if this feature has been
2
When you hear ringing, the signal that the call has
administered on your system.
gone through, touch
Speakerphone
(or
Speaker)
or
When activated, Busy Buster will redial the busy number
lift your handset.
up to 15 times at 30 second intervals.
To program
Label a button
and follow these steps:
IMPORTANT:
Answer returning Busy Buster calls
promptly when your voice terminal alerts you.
Otherwise, the called party may become confused by
the silence caused by the delay and hang up.
T • P
■ ■ ■
■ ■ ■
■ ■ ■
■ ■ ■
T
• P
Busy
To turn off Busy Buster:
1
Touch
Busy Buster.
Buster
→→
✱ 31
←←
8
Page 11

Remote Line Access (RLA)
When the system is in the RLA mode you can call in
To use RLA:
from a remote location and enter a password to gain
1
access to one of
To program:
Label a button
steps:
the system’s outside lines.
2
with a green light and follow these
T • P
■ ■ ■
■ ■ ■
■ ■ ■
■ ■ ■
T
• P
PLA
→→
✱
84
3
4
5
6
If the system is in RLA mode, go to the next step. If
the system is in either CF or DXD mode, after the
introductory message, dial *#*.
From a remote location, dial the telephone number of
a line in the RLA incoming line group.
When requested, enter the 5-digit password.
When requested, enter a line number between 1 and
8 of the outside line you want to make your call on.
Dial the telephone number you are calling plus a
pound sign.
Complete your call as usual.
←←
9
Page 12

You can answer your calls at your voice terminal or at
another voice terminal.
Answering Calls at Your Voice Terminal
You can answer outside calls by activating the
speakerphone or picking up the handset.
To answer a call:
1
Touch
Speakerphone
or lift your handset.
Answering Intercom Calls Automatically
If your voice terminal has the Hands-Free-Answer-onIntercom (HFAI) feature or is connected to a Hands-Free
To activate the automatic answer feature:
1
Touch
HFAI
or
Auto Answer-Intercom.
Unit (HFU), you can have your speakerphone go on
automatically whenever you receive an intercom call. T
O
The light next to the button goes on.
do this with an HFU, you must program an Auto
Answer-Intercom button.
To deactivate the automatic answer feature:
1 Touch HFAI or Auto Answer-Intercom.
To program:
Label a button with lights and follow these steps:
The light next to the button goes off.
T • P
■ ■ ■
■ ■ ■
■ ■ ■
■ ■ ■
T
• P
Auto Ans.-
Intercom
→→
✱ 70
←←
10
Page 13

Forwarding Calls
You can use the Call Forwarding (CF) feature to have all
To activate Call Forwarding:
calls that come into designated lines forwarded to
1
Touch
CF/DXD
until only
another number. Call Forwarding can be activated from
any voice terminal with a CF/DXD button.
To cancel Call Forwarding:
1
Touch
CF/DXD
until both
To program:
are off.
Label a button with lights and follow these steps:
T • P
T
• P
CF/DXD
the red light is on.
the red and green lights
■ ■ ■
■ ■ ■
■ ■ ■
■ ■ ■
→→
✱
83
←←
Directing Calls to Extensions
Direct Extension Dialing (DXD) directs incoming calls to
To activate Direct Extension Dialing
requested extensions.
Callers hear a voice message that
1
Touch
CF/DXD
until only the green light is on.
requests the desired extension number. The
transferred to the requested extension. This
be activated from any voice terminal with a
button.
call is then
feature can
To deactivate Direct Extension Dialing
CF/DXD
1
Touch
CF/DXD
until both the green light and the red
light are off.
To program
Label a button with lights (if you already have a CF
button, you use the same one for DXD) and follow
these steps:
T • P
■ ■ ■
■ ■ ■
■ ■ ■
■ ■ ■
T
• P
CF/DXD
→→
✱ 83
←←
11
Page 14

Automatic Answering of Calls
You can use System Answer to answer calls
automatically and place them on hold until someone is
available to handle them.
System Answer can only be
activated from either the attendant console or the alternate
attendant console.
To program:
Label a button with a green light and follow these
To activate System
1
Touch
System Answer.
The green light comes on.
To deactivate System Answer.
Answer:
1
Touch
System Answer.
The green light goes off.
steps:
T • P
T
• P
System
Answer
■ ■ ■
■ ■ ■
■ ■ ■
■ ■ ■
→→
✱ 58
←←
12
Page 15

Using Call Pickup
You can use Call Pickup to answer a call coming into
To use a general Call Pickup Button:
someone else’s voice terminal. There are two ways to
1
Touch
Speakerphone
or lift your handset.
pick up calls ringing on another voice terminal: You can
2
Touch
Call Pickup.
touch a Call Pickup button then dial the intercom
number of the ringing voice terminal or, if you regularly
3
Dial the intercom number.
handle calls for someone else, you can program an
individual Call Pickup button, so that you can pick up
calls on that voice terminal with one touch.
To program a general Call Pickup button:
Label a button and follow these steps:
T • P
■ ■ ■
■ ■ ■
■ ■ ■
■ ■ ■
→→
✱
85
Call
Pickup
T
• P
←←
To program an individual Call Pickup button:
T • P
Call
Pickup 18
■ ■ ■
■ ■ ■
■ ■ ■
■ ■ ■
■ ■ ■
■ ■ ■
■ ■ ■
■ ■ ■
T
• P
To use an indvidual Call Pickup Button:
1
Touch
Speakerphone
or lift your handset.
2
Touch
Call Pickup.
→→
✱
85
Icom No.
←←
13
Page 16

You use fixed buttons on your voice terminal to put calls
on hold and transfer them to other people.
Putting Calls on HoId
After you put a call on hold, you can hang up your
To put a call on hold, then retrieve it:
handset or touch a line button to take another call.
1
To put a call on hold, touch
Hold.
When you put a call on hold, a green light flashes next
to the line button. Your voice terminal beeps every 60
seconds to remind you of the held call.
2
To take a call off hold, touch the line button of the
held call.
You can also put a call on Exclusive Hold so no one
at another voice terminal can pick up the call.
To put a call on Exclusive Hold, then retrieve it:
1
To put a call on Exclusive Hold, touch
Exclusive
Hold.
To program an Exclusive Hold button:
Label the button
Exclusive Hold
and follow these
Speakerphone
(or
Speaker)
or by touching the line
steps:
button of the held call. This can only be done from
the voice terminal that put the call on Exclusive
■ ■ ■
■ ■ ■
Hold.
■ ■ ■
■ ■ ■
→→
✱ 7 ←←
T • P
Exclusive
Hold
2
Take the call off Exclusive Hold by touching
T • P
14
Page 17

Transferring Calls
You use a fixed button on your voice terminal to transfer
To transfer a call:
outside calls to other voice terminals.
If the person to
1
Touch
Transfer.
whom you transfer the call doesn’t answer within a
2
Touch the Auto Intercom button or dial the intercom
preset number of rings, the call rings at your voice
terminal again.
number for the person.
To place one-touch transfer:
1
With the call in progress, touch the Auto Intercom
button of the person to whom you want to transfer
the call.
2 When you hear a beep, announce the call, if
appropriate, and advise the person which line the
call is on.
3 Hang up.
15
Page 18

To place an intercom call:
dialing his or her intercom number
or
by touching a
button you’ve programmed with that number.
You can call anyone in the MERLIN Plus system by
1
Touch
Intercom.
2
Touch
Speakerphone
or lift your handset.
You can also enable your voice terminal so that you can
hear voice announcements through your voice terminal
3
Dial the 2-digit intercom number of the voice
terminal you want to call.
speaker.
To program an Auto Intercom button:
Label a button and follow these steps:
4
When you hear a beep, begin speaking. If you hear a
series of beeps, wait for the person to answer.
To place an intercom call with one touch:
■ ■ ■
■ ■ ■
■ ■ ■
■ ■ ■
■ ■ ■
■ ■ ■
■ ■ ■
■ ■ ■
1
Touch the Auto Intercom button for the voice
terminal you want to call.
T • P
John 12
←
2
Begin speaking or lift your handset and begin
speaking.
→
✱
91
Icom No.
To enable/disable voice announcements:
T • P
T
• P
■ ■ ■
■ ■ ■
■ ■ ■
■ ■ ■
T
• P
Intercom
→
✱
38 or ✱ 39
←
16
Page 19

You can set up a conference call that includes up to two
To
set up a conference call:
people in the MERLIN Plus system, two people-from
1
To set up a call when one of the people is already on
outside the system, and yourself. People connected to
the line, touch
Conference.
the MERLIN Plus system can bridge onto an outside line
2
Touch an outside line button.
that is active on a conference call.
3
Dial the outside telephone number of the person.
you’re adding to the call.
4 Take the appropriate action:
– If the person answers, begin the conversation.
–
If the person doesn’t answer, touch Drop, and
repeat steps 1 through 3 to add another person.
To leave and reenter a conference call:
1
Touch
Hold
to remove yourself from the call.
2
To rejoin the call, touch
Speakerphone
or lift the
handset and touch one of the line buttons associated
with the call.
17
Page 20

Using the Speakerphone
If you have a speakerphone, you can dial and conduct a
To turn the speakerphone on or off:
call without lifting your handset. You can activate the
1
Touch
Speakerphone.
speakerphone before you place the call or at any time
during the call. The lights next to Speakerphone and
Green light on =
Speakerphone on
Microphone go on whenever the speakerphone is on.
Green light off =
Speakerphone off
Using the Speaker
If you don’t have a speakerphone, you can use your
To listen while you place a call:
voice terminal speaker to monitor calls as you place them
1
Touch
Speaker,
then dial the call.
or while you’re on hold. You don’t need to lift your
handset until you’re ready to speak.
2
If someone answers, lift your handset. If not, touch
Speaker
to disconnect the call.
To monitor while you’re waiting on hold:
1
When you’re put on hold, touch
Speaker
and
hang up.
2
When you’re taken off hold, lift your handset.
To let others hear an in-progress call:
1
Touch
Speaker
without hanging up.
18
Page 21

features on buttons with lights.
Program privacy
Privacy
The Privacy feature
lines from bridging
To program:
prevents people who share your
To turn Privacy on:
onto your conversation.
1
Touch
Privacy.
The green light comes on.
follow these steps:
Label a button with lights and
To turn Privacy off:
T • P
■ ■ ■
■ ■ ■
■ ■ ■
■ ■ ■
T
• P
1
Touch
Privacy.
The green light goes off.
Privacy
→→
✱ 72 ←←
Do
The
Not Disturb
Do Not Disturb feature prevents calls from ringing at
your voice terminal, although you can still place and
To turn Do Not Disturb on:
Not Disturb.
comes on.
1
Touch
Do
receive calls.
To program:
Label a button with
The green
To turn
light
lights and
Do Not Disturb off:
follow these steps:
1
Touch
Do Not Disturb.
The green light goes off.
T • P
T
• P
Do Not
Disturb
■ ■ ■
■ ■ ■
■ ■ ■
■ ■ ■
19
→→
✱ 71
←←
Page 22

With the Page features, you can make announcements to
people through your voice terminal.
Group Page
If your administrator has set up paging groups, you can
make announcements to members of a particular group,
Ask your administrator for the group codes.
To make an announcement to a paging group:
1
Touch
Intercom.
2
Touch
Speakerphone
(or
Speaker)
or lift your
handset and dial the code for the group.
3
At the beep, make your announcement through your
handset.
Loudspeaker Page
Connect a loudspeaker paging system to your control
To make an announcement with a page jack
unit in either of two ways. Connect it to a line jack,
connection:
.
touch the line button
with the unit to page
jack and follow these
announcements.
then follow the directions provided
1
Touch
Loudspeaker Page.
someone, Connect it to the page
2
When you hear a beep, touch
Speakerphone
or lift
instructions to make
your handset and make your announcement.
To program a Loudspeaker Page button (page jack
or
connection):
1
Touch
Intercom.
Label the button and follow these steps:
2
Touch
Speakerphone
or lift your handset.
■ ■ ■
■ ■ ■
■ ■ ■
■ ■ ■
■ ■ ■
■ ■ ■
■ ■ ■
■ ■ ■
T
• P
3
Dial 6.
4
When you hear a beep, make your announcement.
T • P
Ldsp.
Page
20
→→
✱ 91
6
←←
Page 23

If the system administrator has assigned one of three
voice terminal templates to your voice terminal, you
already have special features programmed onto buttons,
The special features for each template are shown on the
following pages.
Refer to the
Merlin Plus System Manual
for information on how to use these features.
KEY
AI
=
BB
=
DND
=
DXD/CF
=
LND
=
CP10
=
PAGE 1 =
PAGE ALL =
ROVRD =
SND 1
=
SND 2
=
Auto Intercom
Busy Buster
Do Not Disturb
Direct Extension Dialing/Call Forwarding
Last Number Dial
Call Pickup 10
Page Group 1
Page All
Ring Override
Save Number Dial 1
Save Number Dial 2
21
Page 24

Dialer Template
34-Button
22-Button
10-Button
❑
❑
Line D
❑
❑
Line H
❑
❑
❑
❑
❑
❑
❑
❑
❑
❑
Line C
❑
❑
Line G
❑
❑
❑
❑
Line F
❑
❑
❑
❑
Line B
Line A
Intercom
❑
❑
Line E
❑
❑
❑
❑
❑
❑
❑
❑
BB
❑
❑
❑
❑
❑
❑
Conference
❑
Transfer
❑
Drop
❑ ❑
❑
❑
❑
❑
❑
❑
❑
❑
Al10
❑
❑
❑
❑
LND
❑
❑
(See Note)
Hold
❑
❑
❑
❑
❑
❑
Assign to Intercom Number(s):
❑
❑
❑
❑
❑ ❑
❑
SND
❑
NOTE: If there are fewer than eight outside lines on a voice terminal, then those buttons wiII be blank
on the template and on the target voice terminal. For example, if your system has four outside lines
(Lines A through D), then the template will have four blank buttons and Busy Buster in the second column
above the dial pad.
22
Page 25

Feature Template
34-Button
22-Button
10-Button
Assign to Intercom
Number(s):
❑
❑
Line D
❑
❑
Line H
❑
❑
DND
❑
❑
ROVRD
❑
❑
Line C
❑
❑
Line G
❑
❑
Privacy
❑
❑
❑
❑
Line B
❑
❑
Line F
❑
❑
❑
❑
❑
❑
Line A
❑
❑
Line E
❑
❑
❑
❑
❑
❑
Intercom
❑
❑
BB
❑
❑
❑
❑
Conference
❑
Transfer
❑
❑
❑
❑
❑
❑
❑
❑
❑
Drop
(See Note)
❑
Hold
❑
❑
❑
Page 1
❑
❑
❑
❑
Page All
❑
❑
❑
❑
Al10
❑
❑
❑
❑
SND1
❑
❑
SND2
❑
❑
LND
❑
❑
DXD/CF
NOTE: If there are fewer than eight outside Iines on a voice terminal, then those buttons wiII be blank
on the target voice terminal. For example, if your system has four outside Iines
then the template wiII have four blank buttons and Busy Buster In the second column
on the template and
(Lines A through D),
above the dial pad.
23
Page 26

Receptionist/Secretary Template
34-Button
22-Button
10-Button
Assign to Intercom Number(s):
❑
❑
Line D
❑
❑
Line H
❑
❑
Al19
❑
❑
Al29
❑
❑
Line C
❑
❑
Line G
❑
❑
Al18
❑
❑
Al28
❑
❑
Line B
❑
❑
Line F
❑
❑
Al17
❑
❑
Al27
❑
❑
Line A
❑
❑
Line E
❑
❑
Al16
❑
❑
Al26
❑
❑
Intercom
❑
❑
BB
❑
❑
Al15
❑
❑
Al25
❑
❑
Al14
❑
❑
Al24
Conference
❑
Transfer
❑
❑
❑
Al13
❑
❑
Al23
Drop
❑
Hold
❑
❑
❑
Al12
❑
❑
Al22
❑
❑
Al11
❑
❑
Al21
❑
❑
Al10
❑
❑
Al20
❑
❑
SND
❑
❑
CP10
❑
❑
LND
❑
❑
Page All
NOTE: If there are fewer than eight outside lines on a voice terminal, then those buttons will be blank
on the template and on the target voice terminal. For example, If your system has four outside Iines
(Lines A through D), then the template wiII have four blank buttons and Busy Buster In the second column
above the dial pad.
24
 Loading...