

Page 1

Contents
Chapter One Introduction..............................................................................................................2
1.1 Operating environment ...................................................................................................2
1.2 About the system .............................................................................................................2
1.3 Installation on the desk ...................................................................................................2
1.4 Connection on the wall....................................................................................................3
1.5 Startup screen ..................................................................................................................3
1.6 Tips for fingerprint enrollment ........................................................................................4
Chapter Two Main Menu ...............................................................................................................5
2.1 Keypad ..............................................................................................................................5
2.2 Menu..................................................................................................................................5
1. User Mgmt..................................................................................................................5
2. Setting.........................................................................................................................5
3. U-disk storage (optional) .......................................................................................6
4. Sys Info.......................................................................................................................6
Chapter Three Operation Instruction...........................................................................................7
3.1 User Mgmt ........................................................................................................................7
3.1.1 Enroll N.User .......................................................................................................7
3.1.2 Enroll MGR...........................................................................................................7
3.1.3 Delete Info ............................................................................................................7
3.2 Setting ...............................................................................................................................8
3.2.1 System Set...........................................................................................................8
3.2.2 Power Mgmt.........................................................................................................8
3.2.3 Communication...................................................................................................8
3.2.4 Log Set..................................................................................................................9
3.3 U-disk storage (optional).................................................................................................9
3.3.1 Download Logs...................................................................................................9
3.3.2 Download User Info ...........................................................................................9
3.3.3 Upload User Info.................................................................................................9
3.4 Sys Info .............................................................................................................................9
3.4.1 Enrolled User.......................................................................................................9
3.4.2 Enrolled MGR ......................................................................................................9
3.4.3 Enrolled FP ..........................................................................................................9
3.4.4 Enrolled Card (custom-made).........................................................................9
3.4.5 AT Logs .................................................................................................................9
3.4.6 Mgmt Logs ...........................................................................................................9
3.4.7 Device Info ...........................................................................................................9
Chapter Four F.A.Q......................................................................................................................11
Note: This user manual is written according to V1.3-110224 version, any modification
subject to version update without prior notice.
1
Page 2
Chapter One Introduction
Please read this user manual carefully which will be helpful for your operation.
1.1 Operating environment
¾ Please do not place the device under bright and direct light as it will obviously influence fingerprint
information acquisition and may cause failed verification.
¾ The operating temperature of the device is -10℃–50℃. If possible, please operate the device
indoor since long-term operation outdoor is bad for the performance of the device. If it is a must to
operate it outdoor, it is suggested to work with support of sunshades or cooling equipments in
summer, and thermal facilities in winter.
1.2 About the system
¾ Fingerprint AT management system can be divided into two parts: fingerprint time attendance
(hereafter called device) and time attendance management software (hereafter called software).
¾ The device is mainly for fingerprint enrollment and attendance logs, while the software for managing
logs and generating statistics report according to the attendance settings.
¾ The communication ways between the device and PC where software is installed are USB.
Note: The device in this manual is LTAL130PM while softeware is time atendance management
software.
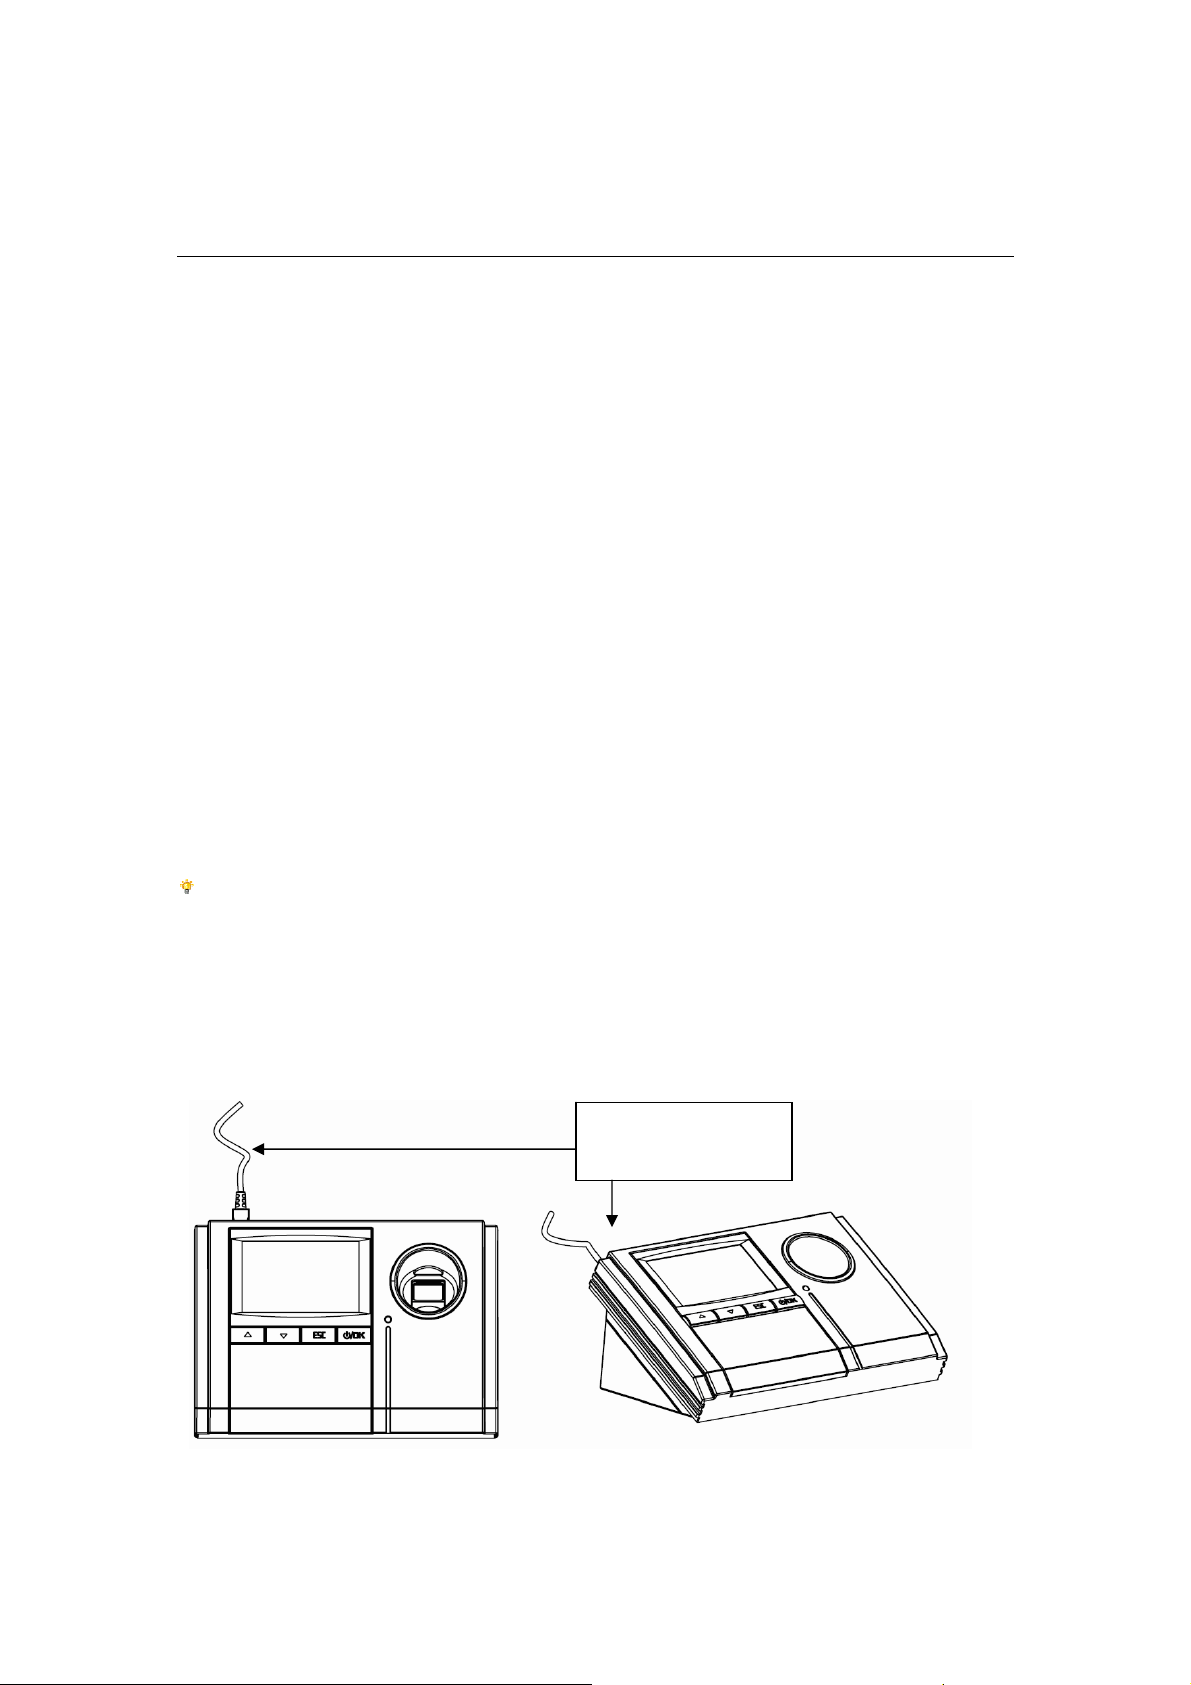
1.3 Installation on the desk
USB communication
and power cord
Installation on the desk
2
Page 3
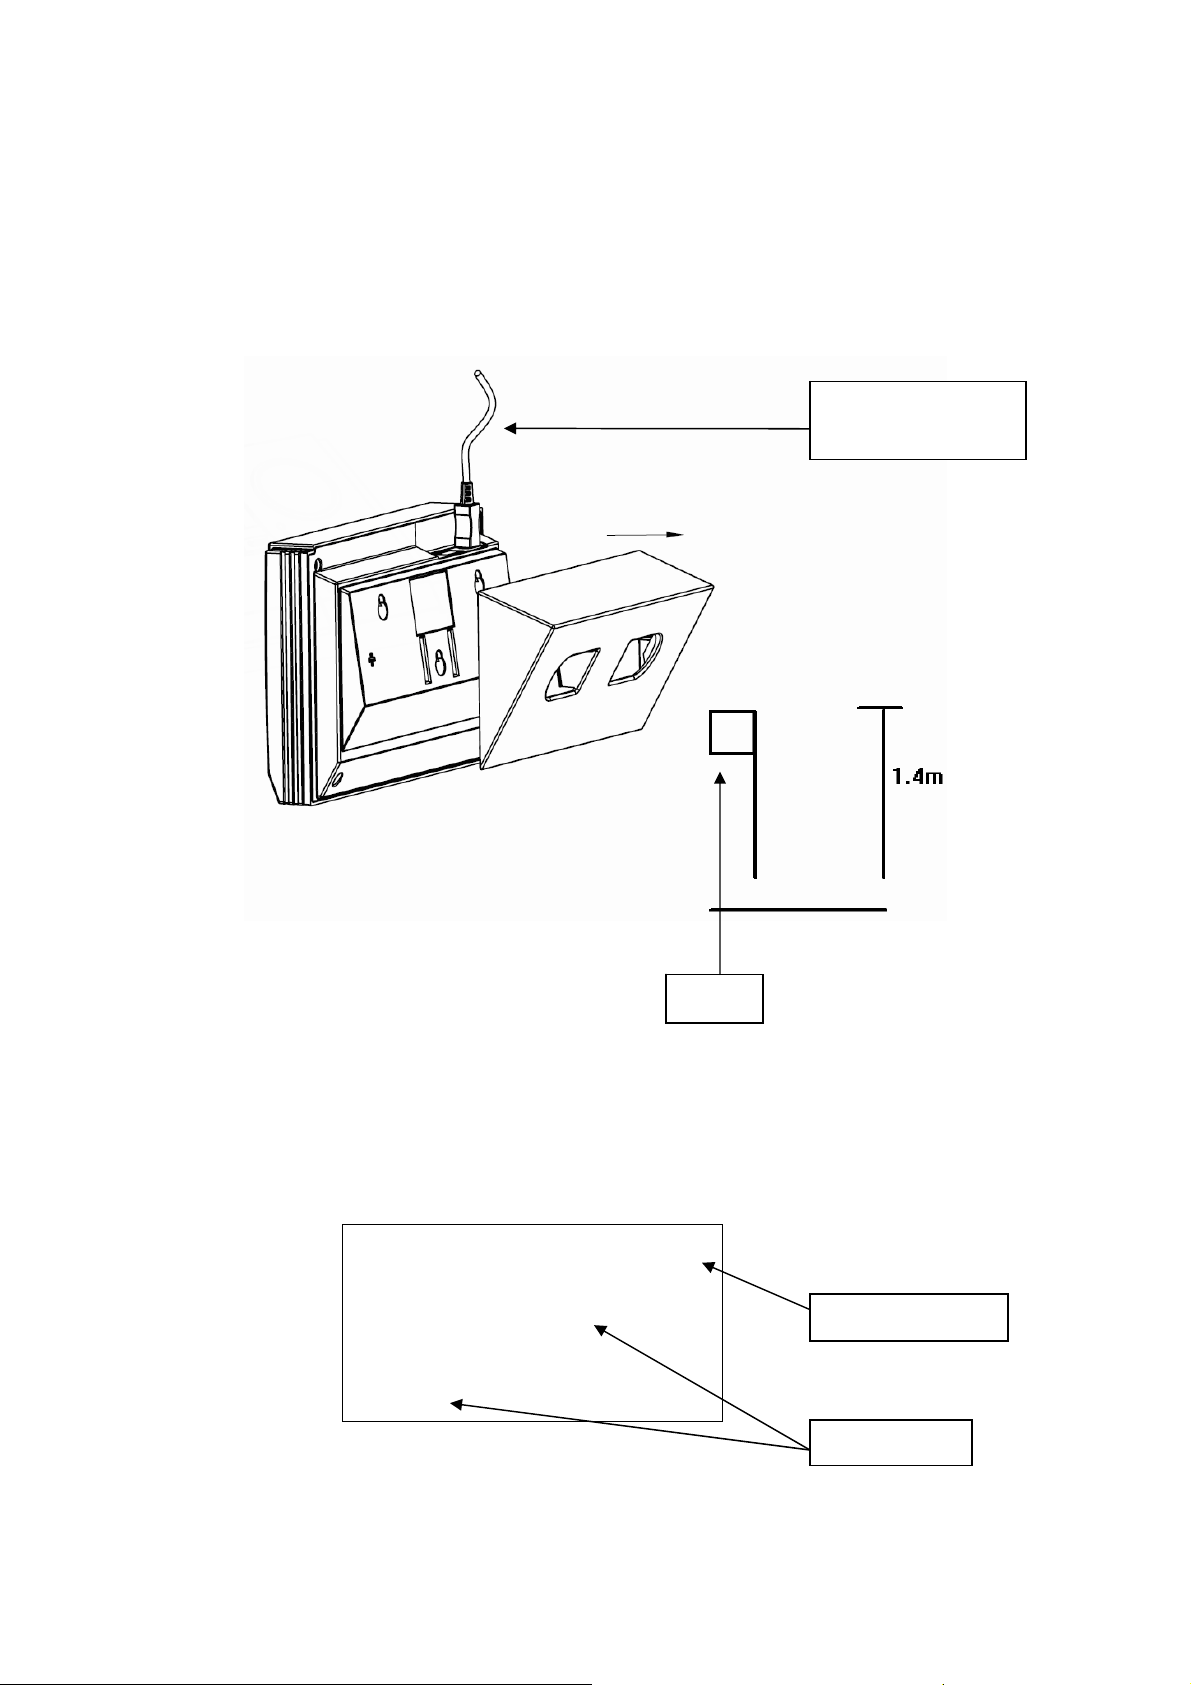
1.4 Connection on the wall
Mount the device on the wall, about 1.4 meters above the floor, to avoid bright and direct light.
USB communication
and power cord
Device
Installation on the wall
The metal rack on the back of the device is helpful for mounting the device on the wall.
1.5 Startup screen
W elcome Duty on
08: 28
Attendance status
10-10-27 WED
Date and time
3
Page 4
w
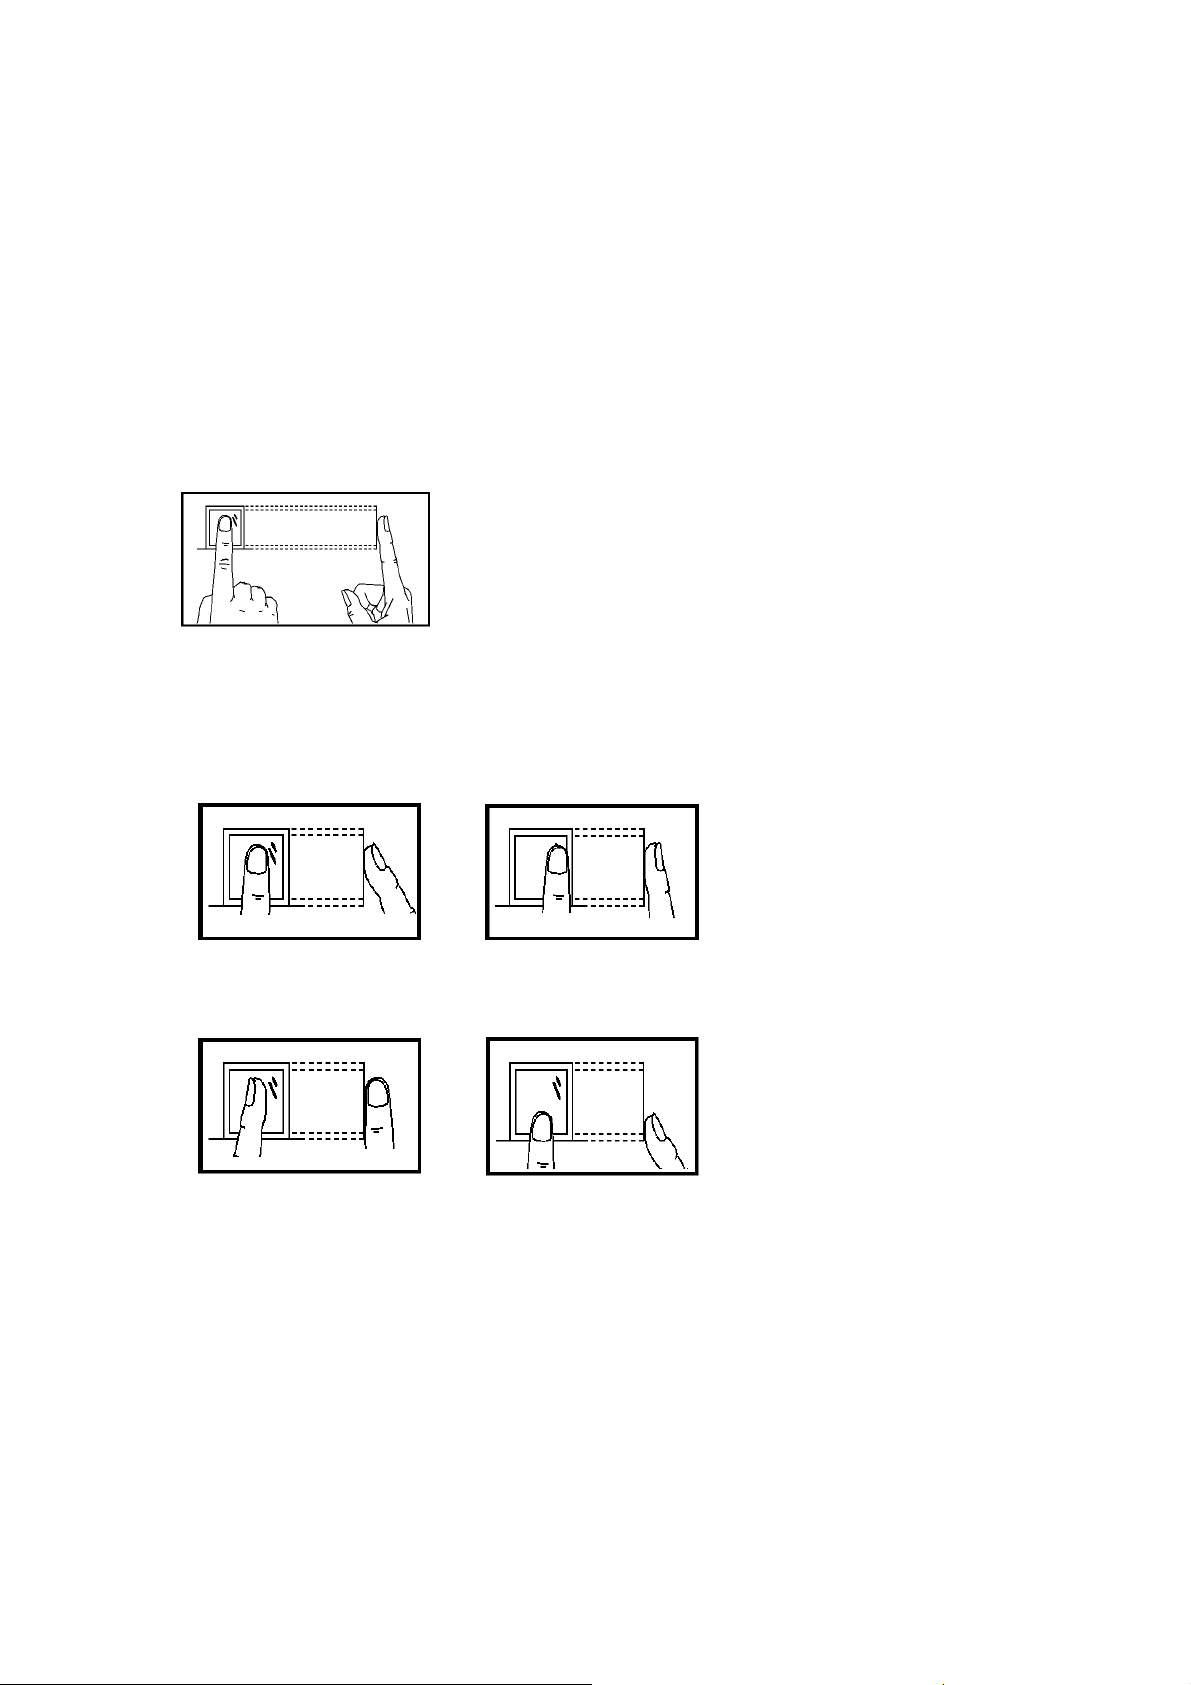
1.6 Tips for fingerprint enrollment
After installation, you can begin fingerprint enrollment (index and middle fingers are recommended) and
fingerprint verification.
What you should do?
The correct enrollment: place your finger on the reader. Make sure the finger’s midpoint is placed at the
center of the reader as shown in the figure below.
Correct
What you should not do?
Too Upright
Too Aske
Off Center
Part
4
Page 5

Chapter Two Main Menu
2.1 Keypad
Keypad is shown as the figure 2-1:
Function of keys as shown in figure 2-2:
▲ Scroll up
▼ Scroll down
ESC Exit/Cancel
⊙/OK Power on or off / Confirm
Figure 2-1
Note: you can change the attendance modes by ▲ and ▼.
2.2 Menu
You can operate the device, such as selecting menu items with function keys.
The main menu of the device is as follows:
1. User Mgmt
1.1 Enroll N.User
1.1.1 Enroll FP
1.2 Enroll MGR
1.2.1 Enroll FP
1.3 Delete Info
2. Setting
2.1 System Set
2.1.1 Time Set
2.1.2 Format
2.1.3 Advanced Set
2.1.4.1 Factory Default
2.1.4.2 Delete All Log
2.1.4.3 Delete All Info
2.1.4.4
2.1.4.5 Adjust Sensor
5
Cancel Priv.
Page 6

2.1.4 Language
2.1.5 Time Zone
2.2 Power Mgmt
2.2.1 Auto Off
2.2.2 Free Time (Min)
2.3 Communication
2.3.1 Device ID
2.3.2 COMM. PWD
2.4 Log Set
2.4.1 Mgmt Log Warn
2.4.2 AT Log Warn
2.4.3 Re-verify (Min.)
3. U-disk storage (optional)
3.1 Download Logs
3.2 Download User Info
3.3 Upload User Info
4. Sys Info
4.1 Enrolled User
4.2 Enrolled MGR
4.3 Enrolled FP
4.4 Enrolled Card (custom-made)
4.5 AT Logs
4.6
Mgmt Logs
4.7 Device Info
4.7.1 FP Capacity
4.7.2 Card Capacity
4.7.3
4.7.4 Serial No.
4.7.5
4.7.6 Device Name
Production Date
Manufacturer
4.7.7 Algo Version
4.7.8 F/W Version
6
Page 7

Chapter Three Operation Instruction
3.1 User Mgmt
Users include normal users and managers. The privilege can be given to different people who can
operate the device according to their requirements.
Normal user: The person who need to be enrolled and verified.
Manager: The person who can view all the information, modify all the settings and enroll or delete
normal user information (including the manager)
User management includes normal user enrollment, manager enrollment and deletion of enrolled
info.
Verification ways are fingerprint, password and proximity card (custom-made). All devices are with
one kind of verification way that is fingerprint. Card is available for some kinds of devices.
Everyone can only get one ID No. in an enrollment. The ID No. shall be the same with that in the
software. Everyone can enroll 3 fingerprints
3.1.1 Enroll N.User
It is to enroll a normal user’s fingerprint to the device. Its information, including ID No.,
fingerprint, can be set or enrolled in the matching menu item.
3.1.2 Enroll MGR
Manager set in the device can manage the system. Manager’s privilege is beyond that of a
user. Its information, including ID No., fingerprint, can be set or enrolled in the matching menu
item.
Only the manager can enter the management menu item, download attendance logs, user
information to U-disk root directory.
3.1.3 Delete Info
This item is for deleting user information. You should select ID NO. to be deleted at first as
follows:
Delete Info
Enroll ID No. 00003
ESC
OK
After selecting ID No. and pressing OK, the screen will read Confirm deletion as shown in the
following figure:
7
Page 8

Delete Info
Delete?
Enroll ID No. 00003
ESC
Press OK to delete fingerprint and password information of this user.
OK
3.2 Setting
The items are system set, power mgmt, communication setting and log set.
3.2.1
System Set
3.2.1.1 Time set: It is to set time. If the time is slower or faster than the normal time, you can
enter this menu item to modify the time, or set the time by software when it is communicating
with the device.
3.2.1.2 Format: It is to set time format to be displayed on the screen.
3.2.1.3 Advanced Set
3.2.1.3.1 Factory Default: All the information can be initialized to be the factory default.
3.2.1.3.2 Delete All Log: Attendance logs and management logs will be cleared.
3.2.1.3.3 Delete All Info: Attendance logs, management logs and user information (ID No.,
and fingerprints) can be cleared.
3.2.1.3.4 Cancel Priv.: Management privilege can be canceled and the manager turns to be a
user.
3.2.1.3.5 Adjust Sensor: The device can adjust the sensor automatically if you choose sensor
adjustment. Information will be read for successful adjustment.
3.2.1.4 Language: It is to select language of the device.
3.2.1.5 Time Zone: Choose the item Attendance Time Zone to set time zones for your different
requirements. The system will switch attendance status automatically according to your
setting.
3.2.2 Power Mgmt
3.2.2.1 Auto Off: The device can be off automatically at the time you have set in this item. If you set
auto off 18:00, the device will be off at 18:00:00.
3.2.2.2 Free Time: To set the time (minute) between operation and system hibernation.
3.2.3 Communication
3.2.3.1 Device ID: This is the device ID No. from 1-255. Every device ID No. shall be the same with
that in the software.
3.2.3.2 COMM. PWD: It is to set the access password in communication. The setting shall be
000000~999999, which will be the same as that in the software.
8
Page 9

3.2.4 Log Set
3.2.4.1 Mgmt Log Warn: If the free space of management log is within the setting range, warning
signals will be heard at every enrollment or verification and warning information will be noticed.
The setting range can be No or 1-99.
3.2.4.2
3.2.4.3 Re-verify (Min.): This menu item is to set time limits to prevent duplicate verification of the
AT Log Warn: If the free space of attendance log is within the setting range,
warning information will be noticed. The setting range can be No or 1-99.
same user. If a person’s attendance log has existed in the system, his second verification will
not be saved in the system within the setting range, which can be No or 1-99 (minute).
3.3 U-disk storage (optional)
Download or upload enrolled user’s fingerprint and related user information for storage
management.
3.3.1 Download Logs
Download management and attendance logs to U-disk root directory.
3.3.2 Download User Info
Download the enrolled user’s fingerprint and related user information to U-disk root directory.
3.3.3 Upload User Info
Upload the user info in root directory of U-disk, including enrolled user’s fingerprint and related user
information to the device.
3.4 Sys Info
View system information and device information in this item.
3.4.1 Enrolled User
3.4.2 Enrolled MGR
3.4.3 Enrolled FP
3.4.4
Enrolled Card (custom-made)
3.4.5 AT Logs
3.4.6
Mgmt Logs
View user, manager, fingerprint and card enrollment, attendance and management logs.
3.4.7 Device Info
3.4.7.1
3.4.7.2
3.4.7.3 Production Date: View production date
3.4.7.4
3.4.7.5
FP Capacity: View fingerprint template capacity: 100
Card Capacity: View card capacity: 100
Serial No.: View serial No.
Manufacturer: View manufacturer’s name
3.4.7.6 Device Name: View device name: LTAL130PM
9
Page 10

3.4.7.7
3.4.7.8 F/W Version: View firmware version
Algo Version: View algorithm version
10
Page 11

Chapter Four F.A.Q
1. When it is in USB communication, why the device can not be searched?
1)Enter the software: 【Device ManagementÆAdd】, and confirm whether the device type been
selected is correct.
2)The communication way must be USB. The search range is within the device ID No.. For port No.,
please refer to related information on the device.
3)The default device communication【Password】 is 0. If you have to change it, please record it
correspondingly.
4)The device works normally and there is no problem of connection.
2. How to cancel the management privilege in the device?
If
administrator is not available, you can cancel management privilege by software as the
following steps.
1)Communicate PC with the device;
2)Enter the 【User Mgmt】 pageÆ【Cancel Management Privilege】 in the software. Save and
upload the setting. Click OK after successful uploading;
3)Enter OK again on the device, you can operate on the device.
3. After a period of time, why the time on the device is faster or slower than the normal time? And how
to adjust it?
The clock chip is the same as that in other electronic equipments. It is common if the time inaccuracy
is ±3 minutes within one month. You can adjust the time in the menu of the device or by software or
adopt synchronous time on the PC.
4. When there is no response or it is insensitive during verification, how to deal with the problem?
1)It is may caused by the finger which is too dry or too wet, as optics is applied to the operation of
fingerprint sensor. The finger which is too dry or too wet may not be verified or the verification is
insensitive. You can slightly wet your finger, which will improve the successful verification rate.
2)If user’s fingerprint is poor, it is suggested to enroll a new and clear finger for successful
verification.
3)The verification way is incorrect. User’s fingerprint to be verified shall be parallel with reader
surface so as to improve the search time.
4)Enter the menu of the device and set the menu item【Adjust Sensor】.
11
Page 12

5. When no one operates the device, why auto-verification will be done and voice indication will be
heard?
1)Move the device to shade as direct sunlight or bright light can influence the device to a large
extent.
2)Some dust may be on the reader. Please clean the reader with soft and wet cloth.
3)Enter the menu of the device and set the menu item【Adjust Sensor】.
6. How to shift the attendance model automatically?
The users could set the time zone by their needs and the attendance model will be kept within the
time zone. E.g. time zone 1: working time is “07:00 – 10:00 “, then the attendance model is within
this scope.
7. How to shift the attendance model manually?
You can shift the model by ▲ and ▼. If the time shifted manually is not accordance with the time
zone, it will return to the time zone after several minutes of manual settings.
12
 Loading...