

Page 1
Pub. 988-0148-532
Turn-by-Turn Mapping GPS and MP3 Player
Quick Start Guide
Page 2

Copyright © 2005 Lowrance Electronics, Inc.
All rights reserved.
No part of this manual may be copied, reproduced, republished, transmitted or distributed for any purpose, without prior written consent of
Lowrance. Any unauthorized commercial distribution of this
manual is strictly prohibited.
Lowrance Electronics may find it necessary to change or end our policies, regulations and special offers at any time. We reserve the right to
do so without notice. All features and specifications subject to change
without notice. All screens in this manual are simulated.
A CAREFUL NAVIGATOR NEVER RELIES ON ONLY ONE METHOD
TO OBTAIN POSITION INFORMATION.
When showing turn-by-turn navigation data, a GPS unit will show the shortest,
most direct route to the destination. There are times when it may give directions,
such as a U-turn, that may be prohibited in some locations. While navigating, a
driver is responsible for noting all traffic signs and obeying all local traffic
laws. When following turn-by-turn directions, a driver must take advantage of
all available navigation tools, and must visually check to make sure a clear, safe
path to the next destination is available.
When a GPS unit is used in a vehicle, the vehicle operator is solely responsible for operating the vehicle in a safe manner. Vehicle operators
must maintain full surveillance of all pertinent driving conditions at
all times. An accident or collision resulting in damage to property,
personal injury or death could occur if the operator of a GPS-equipped
vehicle fails to pay full attention to travel conditions and vehicle operation while the vehicle is in motion.
Do not attempt to configure, adjust or enter information into your GPS
unit while driving.
WARNING!
CAUTION
WARNING!
For free owner's manuals and the most current information on
this product, its operation and accessories,
visit our web site:
www.lowrance.com
Lowrance Electronics Inc.
12000 E. Skelly Dr.
Tulsa, OK USA 74128-2486
Printed in USA.
Page 3
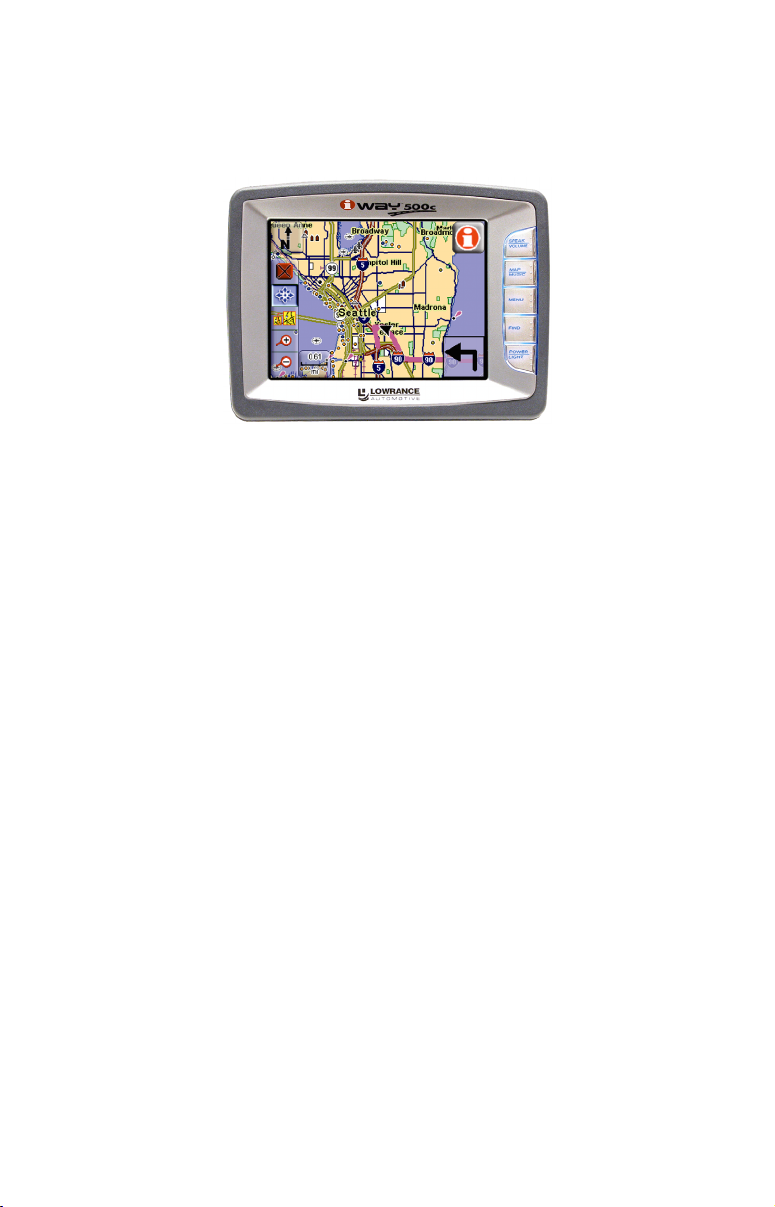
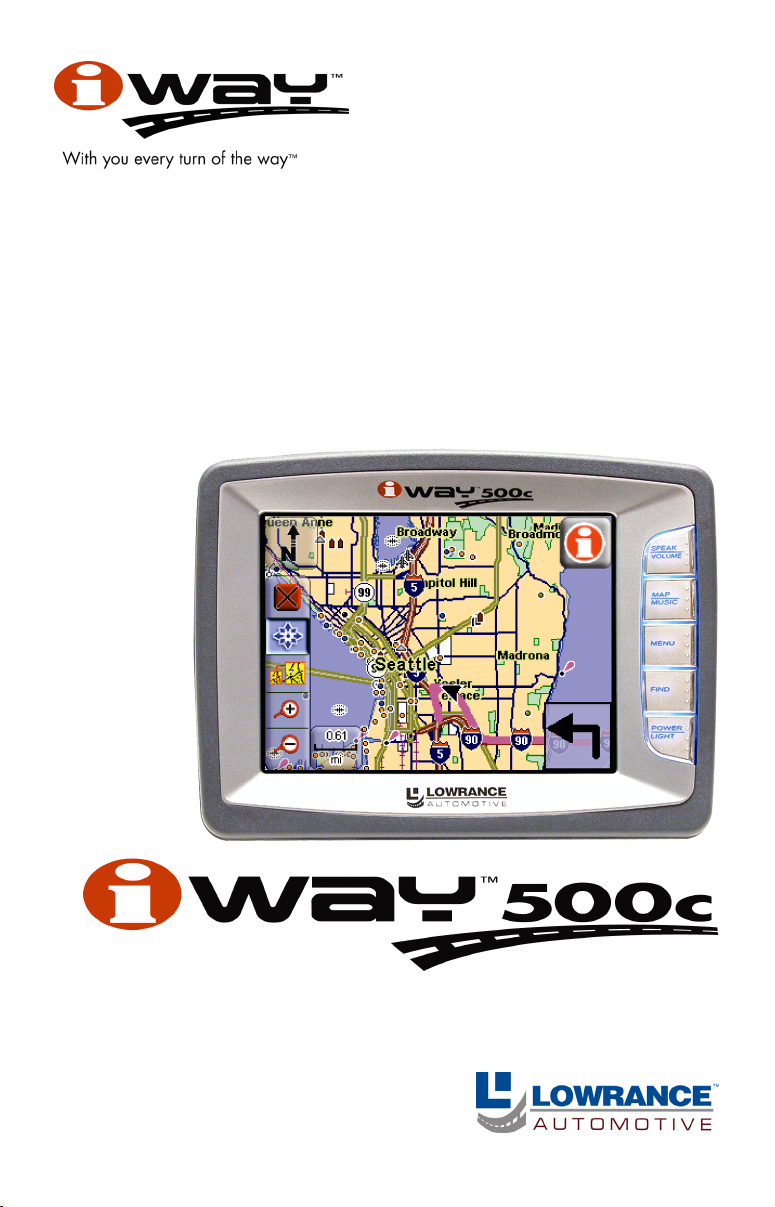
iWAY 500C Quick Start Guide
We've tried to make iWAY operation as simple as possible. Five buttons
along the side of the screen launch various menus and turn the unit on
and off, but the main way you control the iWAY is with its touch screen.
The iWAY 500C navigating a route.
When you turn the unit on, whether it's in Map Mode or Music Mode,
you can control most of its operation using the touch screen. In Music
Mode, touch the play control buttons to start and stop music, or skip
among songs. In Map Mode, you can drag the map across the screen to
focus on an area you'd like to see better, or point to a nearby restaurant
to get detailed information and begin navigating to it.
The touch screen responds to pressure, so you'll have to actually push
against the screen to scroll the map or drag the borders of a zoom box.
With practice, you'll learn the amount of pressure necessary to operate
the unit effectively.
NOTE:
Use the provided suede microfiber cloth to clean the iWAY's touch
screen. Other cleaning materials could damage the screen – damage
that's not covered by this product's warranty. See Section 1 of the
manual under the heading "Screen Care Instructions" for details.
To use your iWAY's Music Mode, you'll need to copy some of your favorite songs onto the unit. The iWAY comes with a USB cable that you
can use to connect it to your PC. (Instructions for connecting the iWAY
to your computer and copying music onto it can be found in the owner's
manual.) The iWAY can play both MP3 and Ogg Vorbis music files.
Caution:
Use care when connecting or disconnecting the USB transfer cable
from your computer. Detailed instructions can be found on a onepage insert included in this package, or in Section 1 of the owner's
manual, under the heading "USB-to-PC Cable Connection".
1
Page 4

Music Mode Operation
The iWAY has two main Modes of operation: Map Mode and Music
Mode. To switch between these modes, press the
The Music Mode display contains a large area for visualization effects,
with a set of play control buttons along the bottom of the screen. When a
song or play list is playing, the name of the current song will appear at
the top of the screen, as well as the song's length and quality (in kbps).
Music Mode display.
The play control buttons are, from left to right:
Previous Song begins playing the previous song in the current play list.
Play will play the currently selected song or play list, starting at the
beginning. If no play list or song has been chosen, it will automatically
generate a play list from all the songs on your music drive.
Next Song begins playing the next song in the current play list.
Stop cancels the current song playing.
Volume Slider adjusts the playback volume. Press the blue button
and drag it left or right to get the desired volume.
There are two ways to choose the song or play list you want to play next.
You can press the
screen in the song information area at the top to open the file selector.
The file selector will open a screen showing the file structure of your music
drive, including all of the songs and play lists available as well as any subfolders. If you've sorted your music by album or artist, you can select the
folder you wish and play only the songs in that folder, or you can choose a
particular song to play right away.
For superior audio playback, you can connect your iWAY directly to your
car's stereo. The iWAY comes with a direct cable connection to hook it to
an auxiliary line input. If you use the direct connection, you should get
excellent audio quality. (Cassette adapters and FM modulator connections
are also available for vehicles that don't have auxiliary inputs, but you
will notice significantly lower audio quality.) See the manual for details.
FIND button to search for a song by name, or touch the
2
MAP/MUSIC button.
Page 5

Map Mode Operation
To switch to Map Mode from Music Mode, press the MAP/MUSIC button.
The Map Mode display shows your current position on a moving map.
It's the main display mode you'll be using while driving around town.
You can do a lot with the Map Mode display. Its basic purpose is to
show where you are, and what's around you. That's what we mean
when we say "current position on a moving map." The iWAY uses a
black arrowhead icon to indicate where you are, and the arrow is
pointing the direction you're moving.
When you have the Map Mode centered on your current position, the
iWAY will keep this icon in the center of the screen, scrolling the map
as you travel so that you can see your surroundings change. If you pass
under a highway, you'll see the highway on the map approach your current position icon, then scroll away behind it even as the highway overpass dwindles in your rear-view mirror.
Map Mode display, with toolbar buttons showing.
There are three different ways to view the map. The Map Orientation
button can be found in the top left corner of the screen. Touch this button to toggle between North Up, Track Up and 3D Mode. Practice some
with each of the modes, and find out which one is right for you.
The iWAY is useful for more than just showing you your current surroundings, though. Overlay Data boxes – like those in the bottom right
corner of the image above – provide textual information about your location and the route that you're following. You also need to be able to
look around and find destinations for the iWAY to get you to, whether
they're across town or across the country.
At any time you can change what's visible on the map display by touching
the screen, which will bring up a toolbar with several map display buttons.
The map display toolbar buttons are, from top to bottom:
Clear Cursor clears the toolbar from the screen and centers the map
on your current position.
3
Page 6

Move Map lets you drag the map with a touch, focusing on areas other
than your current location. When the Move Map button is selected,
press anywhere on the map display and a cursor will appear. Drag your
finger across the screen (still pressing down) and the map and cursor
will move with it.
Zoom Box lets you draw a box on the screen and zoom in on the map
area within the box. When the Zoom Box button is selected, press the
screen at the corner of the area you want to select and drag your finger
across the area (still pressing down). You'll see a box appear on the
screen. When the box contains all the area you want to see, lift you finger and the map display will zoom in.
Zoom In and Zoom Out will change the current zoom level, moving in
or out from the cursor's location. Control the zoom to get the most detail possible while still showing all of the necessary area. Use these
buttons in combination with the Move Map function to focus on an area
other than your current location.
There's one more button that appears whenever the cursor is up, but it's
not part of the toolbar. The Information button appears in the top right
corner of the screen. Push this button to bring up a screen showing
details on the selected location. From the information screen, you
can choose to
generate a route. See the "Go To" description on page 5 for details. When
you clear the cursor, the Information button is replaced by one with a flag
symbol, allowing you to create a new address book entry at your current
position. See the manual for details on address creation.
Pressing the
for complete details on map menu settings. Some of the most important
commands in the map menu are:
MENU button will bring up a map menu. See the manual
GO TO the selected location, which makes the iWAY
– Main Menu
This button – also available on the audio menu – opens up the unit's Main
Menu so you can change various display settings like Units of Measure
and Screen options such as Contrast and Brightness. See the manual for
detailed description of the options available in the main menu.
– Directions List
This button shows all the textual instructions for the route you're currently following. See page 6 for details on following a generated route.
Press on an entry in the list to get a close-up preview of the turn.
OVERLAY DATA SETUP is another important option on the map menu, but it
is described later in this quick start guide.
4
Page 7

Using the Find Menu
The most important use of the iWAY is generating routes to help you
get from where you are, to where you want to be. We provide you several ways to do this. The simplest is the
mation screen, combined with the Move Map function described earlier.
Point the map cursor at any location on the map and use the Information
button on the map display. On the Information page, choose the
command. The iWAY examines the roads between your current position
and the position of the cursor on the map, and it tries to find you the
fastest, shortest route to your destination. It will generate a list of instructions detailing the turns you need to make and the roads you need
to follow along the way. It also draws a magenta line on the map display,
showing the route you're supposed to take.
GO TO is the simplest way to generate a route, but we provide several
other options which can be found by pressing the
The iWAY Find Menu.
The options on the left side of the list all point to a database of POIs
(Points of Interest) stored on your unit. We've divided Gas and ATMs,
Lodging, and Restaurants into their own categories to save you time on
the most common searches. No matter which of these you choose, you'll
be able to either search for places nearest your current position (or cursor, if the cursor is active), or to search for specific places by name.
RECENT DESTINATIONS is a helpful function that keeps track of the most
recent places you've searched for, so you can go right back.
ADDRESS lets you enter a street address and navigate directly to it.
ADDRESS BOOK lets you search through a list of Address Book entries that
you have saved on the iWAY, such as the rental location you saved when
you first started.
Any location you find to navigate to can be added to this Address Book
and stored in the iWay's memory. When you find a location, simply choose
"Add to Address Book" if you might want to navigate back to that location
later.
MORE shows you another screen of POI categories, such as Emergency
and Government, Cities, and Attractions.
5
GO TO command on the Infor-
GO TO
FIND key.
Page 8

Following Navigation Instructions
Once you've chosen to navigate to a particular location – whether it's a
POI in our database, an address you've searched for, or just a cursor position on the map – the iWAY will try to generate a route from your current
location to the destination. If you're moving, the iWAY will take your current direction into account, too, and if you miss a turn, the iWAY will
automatically begin generating a new route based on your new position.
We've done everything we can to help you follow the routes the iWAY
makes for you. On the map display, you can see a magenta line showing
the path the route takes, with colored dots at each turn. You can zoom in
to see greater detail, or let iWAY try to show you the optimum level of
detail throughout your trip with the powerful Auto Zoom feature.
The iWAY also provides you with textual instruction for every turn of the
way. You can view the whole list of instructions from the map menu by
selecting the
the list and another screen will pop up, showing a close-up of the map
area around the turn.
You can also display these instructions on the map display, using Overlay
Data. Use the
which information you wish to display. Overlay Data appears in semitransparent boxes over the map display, and can show information such as
the distance to your next turn, and the direction and angle of the turn.
Overlay Data can be minimized using the button with the minus symbol in
the bottom right corner of the screen. The data boxes disappear, replaced by
a button with a plus symbol that allows you to show the data boxes again.
Finally, every turn in the route can be played through your speakers as
spoken instructions. You'll hear "Take next left," or "Exit right in fourpoint-one miles." The spoken instructions are set up to repeat occasionally, and you can customize how often using the
on the map menu. You can also press the
to hear the current instruction. Press and hold the
up the audio menu, which will let you adjust sound options and volume,
or even turn off spoken instructions entirely.
DIRECTIONS LIST command. There you can select any step from
OVERLAY DATA SETUP command on the map menu to choose
ROUTE OPTIONS command
SPEAK key while navigating
SPEAK key to bring
Lowrance Pub. 988-0148-532 © Copyright 2005
All Rights Reserved
Printed in USA 080305 Lowrance Electronics, Inc.
6
 Loading...