

Lowrance iFINDER User Manual

www.lowrance.com
Pub. 988-0148-641
iFINDER PhD
Mapping GPS & MP3 Player
Operation Instructions

Copyright © 2005 Lowrance Electronics, Inc.
All rights reserved.
No part of this manual may be copied, reproduced, republished,
transmitted or distributed for any purpose, without prior written
consent of Lowrance. Any unauthorized commercial distribution
of this manual is strictly prohibited.
iFINDER
Electronics, Inc. MapCreate, FreedomMaps and IMS are
trademarks of LEI. Fishing Hot Spots
Fishing Hot Spots Inc. Navionics
Navionics, Inc. DURACELL
RAYOVAC
Energizer
PhD and Lowrance® are registered trademarks of Lowrance
is a registered trademark of
is a registered trademark of
is a registered trademark of Rayovac Corporation.
and e
2
are registered trademarks of Energizer Holdings, Inc.
is a registered trademark of Duracell, Inc.
Points of Interest Data in this unit are by infoUSA,
copyright 2001-2004, All Rights Reserved. infoUSA is a
trademark of infoUSA, Inc.
eXitSource Database, copyright 2001-2003 Zenrin Co.
Ltd. Exit Authority and eXitSource are trademarks of
Zenrin Co. Ltd.
Lowrance Electronics may find it necessary to change or end our
policies, regulations and special offers at any time. We reserve the right
to do so without notice. All features and specifications subject to change
without notice. All screens in this manual are simulated.
For free owner's manuals and the most current information on
this product, its operation and accessories,
visit our web site:
www.lowrance.com
Lowrance Electronics Inc.
12000 E. Skelly Dr.
Tulsa, OK USA 74128-2486
Printed in USA.

Table of Contents
Section 1: Read Me First!......................................................... 1
How iFINDER Works ................................................................... 2
Introduction to GPS and WAAS................................................... 4
How to Use this Manual: Typographical Conventions................ 4
Section 2: Installation & Accessories.................................... 7
Power............................................................................................. 7
Batteries .................................................................................... 7
Cigarette Lighter Power Adapter............................................. 8
Headphone Adapter ...................................................................... 9
NMEA Cable Connections .......................................................... 10
MMC or SD Memory Card Installation ..................................... 10
FreedomMaps .......................................................................... 12
External Antenna ....................................................................... 13
R-A-M
Other Accessories........................................................................ 14
Section 3: Music Mode Operation ........................................ 15
Keypad......................................................................................... 15
Power/Lights On and Off............................................................ 16
Main Menu .................................................................................. 16
The Music Mode Display and Keyboard Commands ................ 18
Music Mode Practice Run .....................................................21
Play Lists..................................................................................... 22
The Music Menu ......................................................................... 22
Power Saving .............................................................................. 23
Use Indoors ................................................................................. 23
Sounds Menu............................................................................... 24
Section 4: Map Mode Operation ........................................... 25
Keypad......................................................................................... 25
Power/Lights On and Off............................................................ 26
Main Menu .................................................................................. 26
The Map Mode Display............................................................... 28
Map Mode Practice Run ........................................................32
Digital Data Display ................................................................... 33
Compass Display......................................................................... 34
Bracket Mounting Systems .......................................... 14
Using the Play Control Buttons ............................................. 19
Using the SONGS key to Launch Music Browser................. 19
Getting the Music onto Your iFINDER ................................. 22
Shuffle (On/Off)....................................................................... 24
Repeat (On/Off) ....................................................................... 24
Sleep Mode .............................................................................. 34
Instant-On Compass ............................................................... 34
Calibrate Compass.................................................................. 36
i

Find Your Current Position........................................................ 37
Find Distance From Current Position To Another Location .... 38
Find Distance From Point to Point ............................................ 38
Moving Around the Map: Zoom & Cursor Arrow Keys ............. 39
Selecting Any Map Item with the Cursor.................................. 40
Icons............................................................................................. 40
Create Icon on Map................................................................. 40
Create Icon at Current Position ............................................. 41
Delete an Icon ......................................................................... 41
Load GPS Data Files from an MMC .......................................... 41
Navigate ...................................................................................... 42
Navigation Display ................................................................. 42
Navigation Menu................................................................. 43
Set Man Overboard (MOB) Waypoint.................................... 43
Navigate Back to MOB Waypoint .......................................... 43
Cancel Navigation................................................................... 44
Navigate a Route..................................................................... 44
Navigate to Cursor Position on Map...................................... 44
Navigate to an Icon................................................................. 45
Navigate to Point of Interest (POI) ........................................ 45
Navigate to a Waypoint .......................................................... 46
Navigate a Trail ...................................................................... 46
Backtrack a Trail .................................................................... 47
Routes.......................................................................................... 47
Create and Save a Route ........................................................47
Delete a Route ......................................................................... 49
Save GPS Data Files to an MMC............................................... 49
Searching..................................................................................... 50
Trails ........................................................................................... 52
Create and Save a Trail.......................................................... 52
Delete a Trail .......................................................................... 52
Edit a Trail Name ................................................................... 52
Transfer Custom Maps and GPS Data Files ............................. 53
Utilities........................................................................................ 54
Alarm Clock............................................................................. 54
Sun/Moon Rise & Set Calculator............................................ 54
Trip Calculator........................................................................ 54
Trip Down Timer..................................................................... 54
Trip Up Timer ......................................................................... 54
Waypoints.................................................................................... 54
Create a Waypoint .................................................................. 54
Create Waypoint on Map .................................................... 54
Create Waypoint at Current Position ................................ 55
ii

Create a Man Overboard Waypoint ...................................55
Create a Waypoint by Average Position ............................ 55
Create a Waypoint by Projecting a Position ...................... 55
Select a Waypoint ................................................................... 56
Delete a Waypoint................................................................... 56
Edit a Waypoint (Name, Symbol, Position or Altitude) ........ 56
Section 5: System & GPS Setup Options ............................ 59
Alarms ......................................................................................... 59
Auto Satellite Search.................................................................. 60
Check MMC Files and Storage Space........................................ 60
Com Port Configuration ............................................................. 61
Configure NMEA ........................................................................ 61
Coordinate System Selection...................................................... 62
Map Fix.................................................................................... 64
Customize Page Displays ........................................................... 65
Enable Sleep Mode...................................................................... 65
GPS Simulator ............................................................................ 66
Simulating Trail or Route Navigation ................................... 67
Instant-On Compass................................................................... 67
Map Auto Zoom........................................................................... 67
Map Data..................................................................................... 68
Show Map Data....................................................................... 68
Popup Map Information.......................................................... 68
Draw Boundaries ....................................................................69
Fill Land With Gray ............................................................... 69
Map Overlays (Range Rings; Lat/Long Grid) ........................ 69
Map Datum Selection ................................................................. 69
Map Detail Category Selection................................................... 70
Map Orientation ......................................................................... 71
Navionics
Charts....................................................................... 72
Port Information .....................................................................73
Tidal Current Information ..................................................... 74
Tide Information ..................................................................... 76
Pop-up Help................................................................................. 77
Power Saving .............................................................................. 78
Reset Options .............................................................................. 79
Screen Contrast and Brightness ................................................ 79
Satellite Status Screen ............................................................... 81
Set Language .............................................................................. 82
Set Local Time ............................................................................ 82
Software Version Information.................................................... 83
Sounds and Alarm Sound Styles................................................ 84
Track Smoothing......................................................................... 85
iii

Trail Options ............................................................................... 85
General Trail Options............................................................. 85
Delete All Trails .................................................................. 85
Flash Trails on Screen Option............................................ 85
Update Trail Option............................................................ 85
Update Trail Criteria (Auto, Time, Distance).................... 86
Trail Update Rate (Time, Distance)................................... 86
Specific Trail Options ............................................................. 87
Delete Trail.......................................................................... 87
New Trail............................................................................. 87
Trail Visible/Invisible and Other Trail Options ................87
Units of Measure......................................................................... 88
Use Indoors ................................................................................. 88
Section 6: Searching ...............................................................89
Find Addresses............................................................................ 89
Find Any Item Selected by Map Cursor .................................... 92
Find Interstate Highway Exits .................................................. 92
Find Map Places or Points of Interest (POI) .............................93
Find Streets or Intersections...................................................... 95
Find Waypoints........................................................................... 98
Section 7: Supplemental Material .....................................101
Index......................................................................................... 107
A CAREFUL NAVIGATOR NEVER RELIES ON ONLY ONE METHOD
TO OBTAIN POSITION INFORMATION.
When showing navigation data to a position (waypoint), a GPS unit will show
the shortest, most direct path to the waypoint. It provides navigation data to the
waypoint regardless of obstructions. Therefore, the prudent navigator will not
only take advantage of all available navigation tools when traveling to a waypoint, but will also visually check to make sure a clear, safe path to the waypoint
is always available.
When a GPS unit is used in a vehicle, the vehicle operator is solely responsible for operating the vehicle in a safe manner. Vehicle operators
must maintain full surveillance of all pertinent driving, boating or flying conditions at all times. An accident or collision resulting in damage
to property, personal injury or death could occur if the operator of a
GPS-equipped vehicle fails to pay full attention to travel conditions and
vehicle operation while the vehicle is in motion.
WARNING!
CAUTION
WARNING!
iv

Section 1: Read Me First!
How this manual can get you out on the road, fast!
Welcome to the exciting world of GPS satellite navigation! We know
you're anxious to begin finding your way with this hand-held technology, but we have a favor to ask. Before you grab the batteries and head
outside, please give us a moment or two to explain how our manual can
help you get the best performance from this remarkable little GPS unit.
First, we want to thank you for buying an iFINDER
you're a first-time user or a professional navigator, you'll discover that
the iFINDER is a true pocket-sized, full-featured mapping GPS receiver. When you team an iFINDER with one of our specialized maps or
our custom mapping software MapCreate 6, you have an incredible
combination. No other consumer GPS mapping system on the market
offers so much information and so many features in one package. Not
only that, the iFINDER PhD also makes it easy to take your favorite
music along wherever you go.
Our goal for this book is to get you on the road fast, with a minimum of
fuss. Like you, we'd rather spend more time actually getting somewhere
and less time reading about it in the manual!
So, we designed our book so that you don't have to read the whole thing
from front to back for the information you want. At the start (or end) of
each segment, we'll tell you what content is coming up next. If it's a
concept you're already familiar with, we'll show you how and where to
skip ahead for the next important topic. We've also made it easy to look
up any tips you may need from time to time. Here's how:
PhD. Whether
The manual is organized into seven sections. This first section is an
introduction to Lowrance GPS. It tells you the basics you need to know
before you can make the unit look around and tell you where you are.
Section 2 will help you get the batteries and MultiMedia Card (MMC)
correctly installed in your iFINDER. We'll also tell you about some of
the accessories available for your unit.
In Section 3, we leave mechanics behind and introduce you to Music
Mode Operation. We'll tell you everything you need to know about
copying music to your MMC, and creating and using play lists. We'll
also explain how you can easily browse music on your iFINDER and
listen to your favorite tunes while navigating! If you're in a hurry to
get some music playing, skip to the Music Mode Practice Run
on Page 21 and start copying music to your MMC card!
1

Section 4 covers Mapping Mode Operation. It will show you how easy it
is to run the iFINDER, right out of the box. This section features a onepage Map Mode Practice Run. (If you've already jumped ahead and
figured out how to set up the unit yourself, and you just can't
wait any longer, turn to the Practice Run on page 32 and head
for the road with your GPS unit!)
When you come to a GPS menu command on the iFINDER screen, you can
look it up in the manual by skimming over the table of contents or index, or
by scanning through the commands in Section 4.
The iFINDER is ready to use right out of the box, but you can fine tune
and customize its operation with dozens of options. We describe how to
use general system options along with GPS options in Section 5, System
Setup and GPS Setup Options. This section covers both Music Mode
and Map Mode options.
In Section 6, we’ll go into detail on how to search for and navigate to
points of interest, addresses and waypoints you’ve created. Finally, in Section 7, we offer Supplemental Material, including a list of the GPS datums used, warranties, and customer service information.
How iFINDER Works
You'll navigate faster and easier if you understand how iFINDER scans
the sky to tell you where you are on the earth — and, where you're going. (But if you already have a working understanding of GPS receivers
and the GPS navigation system, skip on ahead to Section 2, Installation
& Accessories on page 7. If you're new to GPS, read on, and you can
later impress your friends with your new-found knowledge.)
First, think of your iFINDER as a small but powerful computer. (But
don't worry — we made iFINDER easy to use, so you don't need to be a
computer expert to find your way!) The iFINDER includes a keypad
and a screen with menus so you can tell it what to do. The screen also
lets iFINDER show your location on a moving map, as well as point the
way to your destination.
This pocket-sized computer also contains an antenna and specialized
scanning receiver, something like your car radio. But instead of your
favorite dance tunes, this receiver tunes in to a couple of dozen GPS
satellites circling the earth. (It will also listen in to the WAAS satellites
in orbit, but more about that in the upcoming segment introducing you
to GPS and WAAS.)
iFINDER listens to signals from as many satellites as it can "see" above
the horizon, eliminates the weakest signals, then computes its location in
relation to those satellites. Once iFINDER figures its latitude and longi-
2

tude, it plots that position on the moving map shown on the screen. While
the screen is updated once a second, your iFINDER is making these internal calculations and determining its position several times a second!
The performance doesn't stop there. Stored in the permanent memory of
each iFINDER is a basic background map of the entire world. We lock it in
here at the factory — you can't change or erase this map.
Another portion of iFINDER's onboard memory is devoted to recording
GPS navigation information, which includes waypoints, event marker
icons, trails and routes. This lets you look back the way you came.
Think of this data storage like the hard drive memory in a computer or
a tape in a cassette tape recorder. You can save several different GPS
data files, erase 'em and record new ones, over and over and over again.
Like any computer file, these GPS Data Files (file format *.usr) can be
shared between iFINDERs, other Lowrance GPS or sonar/GPS units,
even personal computers.
iFINDER has one more thing in common with a personal computer.
Just as computers have a floppy disk drive for storing and exchanging
files, iFINDER has a slot for an MMC (MultiMedia Card) or SD (Secure
Digital) Card flash memory card. These solid-state memory devices are
about the size of a postage stamp, but can hold data ranging from 8 MB
to 512 MB in size. (Compare that to a floppy disk's 1.44 MB capacity!)
iFINDER uses all that MMC space for two key purposes.
First, you can backup your onboard GPS Data Files by copying them to
the MMC. Since the MMC is removable (like a floppy disk or a cassette
tape), you can store these GPS Data Files on a personal computer
equipped with an MMC card reader. (Or store them on a pocketful of
MMCs, if you don't have a computer.) Our MapCreate mapping software
can save, edit or create its own GPS Data Files, which can be copied to
the MMC and then loaded from the MMC into iFINDER's memory.
(NOTE: No matter where they come from, GPS Data Files must be
loaded from the MMC into memory before iFINDER can use them.)
The other key GPS use for MMCs is storage of special high-detail, custom maps, which you can produce on your computer with our MapCreate software. These MapCreate custom maps contain much greater detail than the basic background map. These Custom Map Files (file
format *.lcm) can also be shared between iFINDERs, other Lowrance
GPS or sonar/GPS units and personal computers.
You make your own Custom Map Files with our MapCreate software,
but you don't have to. We also sell ready-to-use FreedomMaps. These
custom maps are pre-loaded on MMCs. (No computer work required!).
3

iFINDER automatically reads Custom Map Files directly from the MMC
or SD Card. To use a custom map, all you need to do is slide an MMC
containing a map into the unit.
Introduction to GPS and WAAS
GPS stands for Global Positioning System, a navigational system that
can accurately locate your position anywhere on the Earth. This technology is available to everyone, everywhere, 24 hours a day, in all
weather conditions. GPS uses 24 satellites orbiting 10,900 miles above
the Earth to transmit position data back to Earth. A GPS receiver processes that data to tell you where you are.
For the system to work, the unit must have a clear view of the satellites
in order to receive their signals. Unlike radio or television signals, GPS
works at very high frequencies. These signals can be easily blocked by
trees, buildings, an automobile roof, even your body.
If you would like to know more about GPS and its companion system
WAAS, visit our web site and check out the GPS Product Guide section
(www.lowrance.com/Support/gps.asp). It includes a GPS tutorial, frequently asked questions and a glossary.
How to Use this Manual: Typographical Conventions
Many instructions are listed as numbered steps. The keypad and arrow
"keystrokes" appear as boldface type. So, if you're in a real hurry (or
just need a reminder), you can skim the instructions and pick out what
menu command to use by finding the boldface command text. The following paragraphs explain how to interpret the text formatting for
those commands and other instructions:
Arrow Keys
The arrow keys control the movement of dotted cross-hair lines on your
mapping screen called the cursor. The arrow keys also help you move
around the iFINDER menus so you can execute different commands.
They are represented by symbols like these, which denote the down ar-
row key, the up arrow, the left arrow and the right arrow: ↓ ↑ ← →.
Keyboard
The other keys perform a variety of functions. When the text refers to a
key to press, the key is shown in bold, sans serif type. For example, the
"Enter/Save" key is shown as
Menu Commands
A menu command or a menu option will appear in small capital letters,
in a bold sans serif type like this:
are to select this command or option from a menu or take an action of
ENT and the "Menu" key is shown as MENU.
GO TO CURSOR. These indicate that you
4

some kind with the menu item. Text that you may need to enter or file
names you need to select are shown in italic type, such as trail name.
Instructions = Menu Sequences
Most functions you perform with iFINDER are described as a sequence
of key strokes and selecting menu commands. We've written them in a
condensed manner for quick and easy reading.
For example, the instructions for deleting a route in Map Mode start
like this:
1. Press
2. Press ↓ to the route list|↓ or ↑ to select route name|
MENU|MENU|↓ to ROUTE PLANNING|ENT.
ENT.
Translated into complete English, step 1 means: "Press the Menu key
twice. Next, press the down arrow key to scroll down the menu and select
(highlight) the Route Planning menu command. Finally, press the Enter
key." Step 2 means, "Press the down arrow key until you enter the route
list, then press the up or down arrow keys to select the name of the route
you want to delete. Finally, press the Enter key."
Also note that throughout this text, we will refer to the iFINDER PhD
as iFINDER, or simply as the unit.
5

Notes
6

Section 2:
Installation & Accessories
Power
The iFINDER operates from AA batteries or on 3 volts DC using an
optional external power cable with a cigarette lighter adapter. When
the power cable is used, the iFINDER automatically switches to it if the
external power is greater than the battery voltage. If the external
power fails, the unit automatically switches to the batteries.
Flash memory will keep your stored data safe and accessible for the life
of the product — after the unit is turned off, no battery or external
power is needed to store your data.
Batteries
The unit requires two, 1.5 volt AA batteries. We recommend that you
use alkaline batteries for the best trade-off between battery life and
cost. We recommend DURACELL
If you're looking for an extended-life battery, the Duracell
tery has performed well in our tests.
brand, but other brands will work.
ULTRA bat-
You can also use rechargeable AA alkaline batteries, such as those
made by RAYOVAC
batteries. We do not recommend nickel cadmium (NiCd) rechargeable
batteries because we tend to get poor battery life from them.
Rechargeable alkaline batteries will not last as long as standard alkaline batteries. However, rechargeable NiMH batteries should give you
suitable battery life.
NOTE:
The battery gauge on the Satellite Status Page may not read accurately with some battery brands because discharge rates can vary
significantly. This is especially true for rechargeables. This battery
gauge was calibrated for alkaline batteries.
Do not mix different battery types. Mixing battery types may cause leakage. (For example, don’t use both alkaline and NiMH batteries at the
same time, and don't use standard alkalines with rechargeable alkalines.)
Battery Installation
Turn the unit over so that the back is facing you. With your thumb or
nail, pull back on the small clip to release the battery cover latch as
, or rechargeable AA nickel metal hydride (NiMH)
7
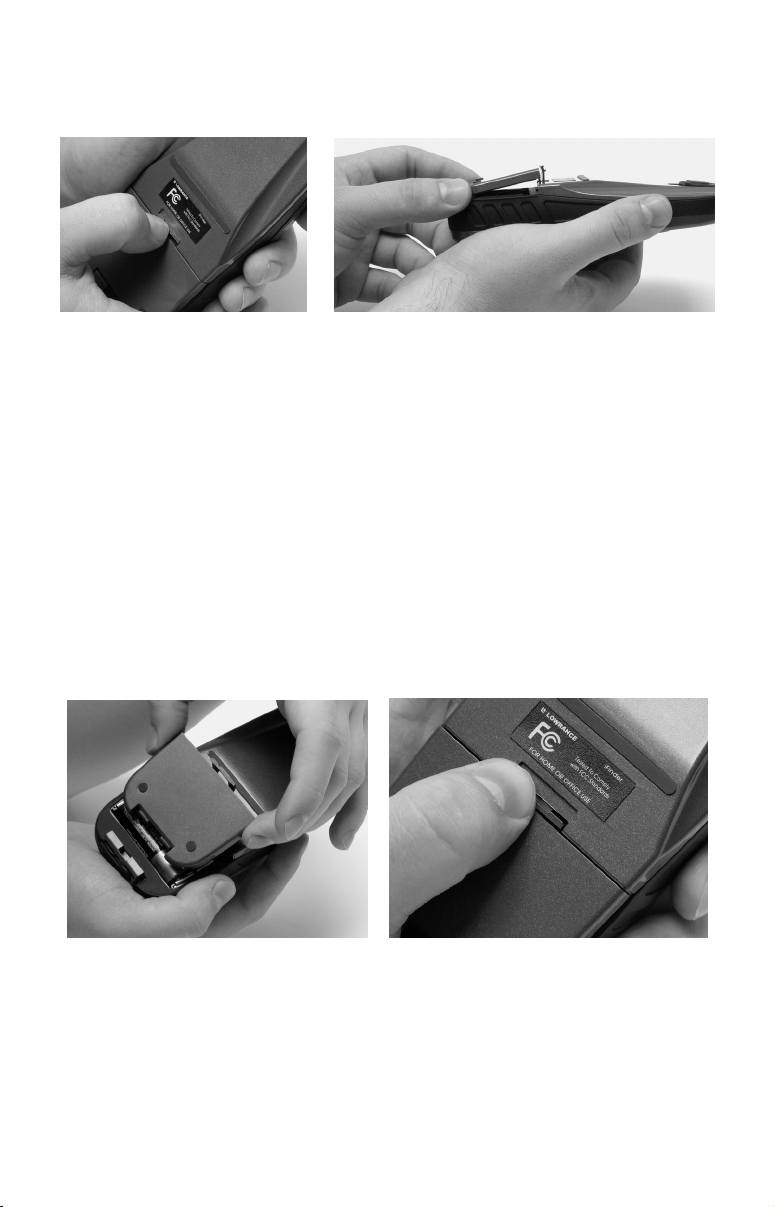
shown in the following images. Once the latch is released, pull the battery cover up out of the grooves in the bottom of the case.
Remove iFINDER battery cover.
Install the batteries according to the embossed signs in the battery compartment, which shows the correct polarity. Point the positive pole of the
upper battery to the left; point the positive pole of the bottom battery to
the right.
NOTE:
Inside the battery compartment is a rotating MMC card lock. The
grip on this lock must be turned parallel with the direction of the
batteries for them to fit properly.
Replace the battery compartment cover. First align the latch tabs at the
bottom of the cover with the slots at the case's base. Press the cover into
place, and then firmly push up on the clip at the top of the cover until it
latches in place. There is usually an audible click when the latch engages.
Replace battery compartment cover. Align tabs with slots
in the base, left. Press latch firmly until it clicks, as shown right
Cigarette Lighter Power Adapter with Headphone Adapter
To use external DC power: Plug the power cable's cigarette lighter
adapter into a cigarette lighter receptacle. Next, pull aside the rubber
cover on the bottom of the unit and insert the other connector as shown
8

in the following image. A small clip on the connector should hold the
connector in place.
Attach external power cable to iFINDER.
WARNING:
Do not remove the cigarette lighter adapter and splice
the exposed wires directly to a 12-volt power system. The
cigarette lighter adapter contains in the plug a protective fuse and a voltage regulator to convert 12 volts
down to about 3 volts. Without this regulator, connecting
your unit to a 12-volt power source will destroy the unit.
This damage will not be covered by your warranty.
The iFINDER can use two other optional external cables to supply a
NMEA/serial data connection or a combination of power and data. These
cables are discussed in the following segment on NMEA connections.
Headphone Adapter
The iFINDER PhD comes with a cable adapter that allows you to plug
in your headphones. To use this adapter: Plug your headphones into
the standard audio socket on the adapter. Next, pull aside the rubber
cover on the bottom of the unit and insert the other connector as shown
in the following image. A small clip on the connector should hold the
connector in place.
9

Attach headphone adapter to iFINDER.
NMEA Cable Connections
NMEA is a standard communications format for marine electronic
equipment. For example, an autopilot can connect to the NMEA interface
on this unit and receive positioning information. The unit can exchange
information with any device that transmits or receives NMEA 0183 data.
To exchange NMEA data, Lowrance offers an optional data only cable
and a power/data combo cable:
The PC-DI7 is a NMEA/serial communications cable. It has a standard
female DB-9 connector on one end to attach your unit to a computer's
serial communications port.
The PC-DI8 combines a cigarette lighter power adapter with a DB-9
plug for a NMEA/serial com port connection to a laptop computer or
other device. This is our favorite cable for connecting the iFINDER PhD
to a laptop computer in an RV or other vehicle. By transmitting NMEA
data to the computer, you can get live position data for GPS-compatible
mapping software.
You can also run one of our free Lowrance GPS emulators on your laptop, and operate it with real-time position information.
To use it, plug the power adapter into a cigarette lighter socket, plug
the DB-9 connector into a serial port on the computer and attach the
cable to the iFINDER. Then see "Com Port Configuration" in Sec. 5.
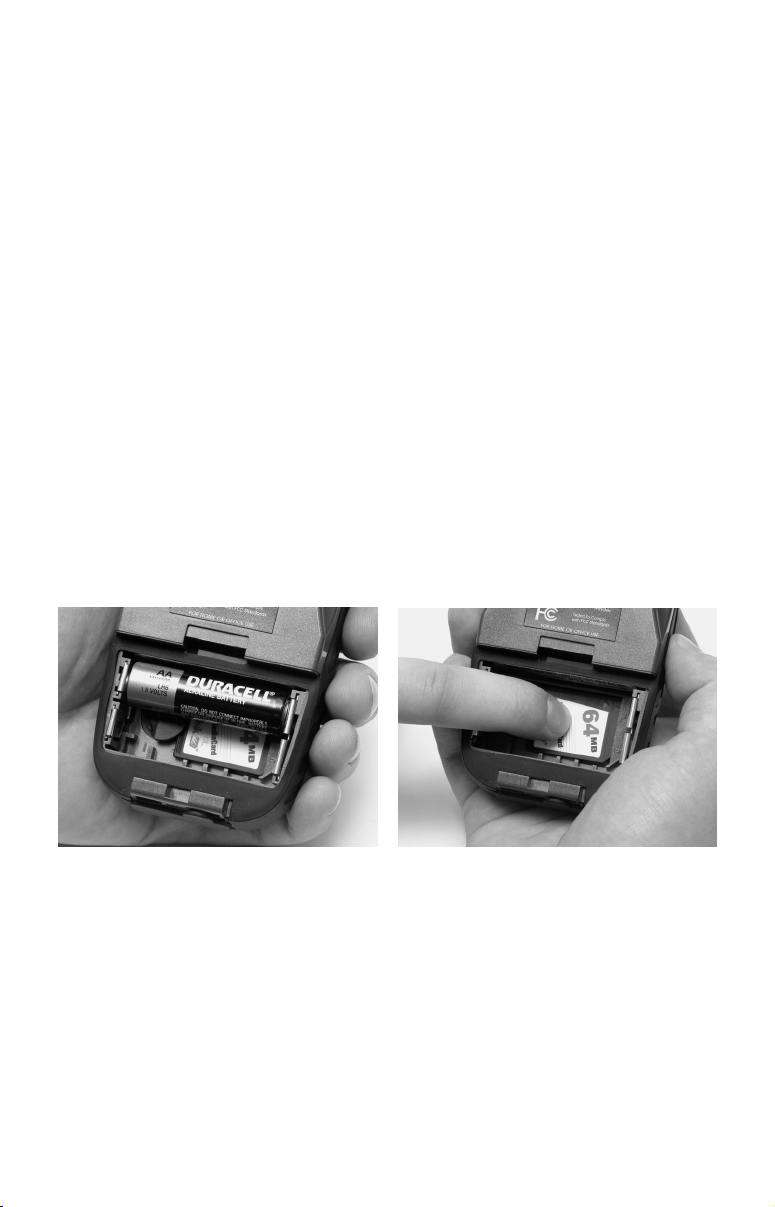
MMC or SD Memory Card Installation
Your iFINDER uses a MultiMedia Card to store information, such as
custom maps, waypoints and other GPS data. The unit can also use Secure Digital Cards (SD cards) to store information.
10
NOTE:
Throughout this manual, we will use the term MMC, but just remember that your unit can use an MMC or SD card to store data.
Both of these solid-state flash memory devices are about the size of a
postage stamp. An SD card is slightly thicker than an MMC. As this
manual went to press, MMCs were available in storage capacities of 8
MB, 16 MB, 32 MB, 64 MB and 128 MB. SD cards were available in
capacities of 8 MB, 16 MB, 32 MB, 64 MB, 128 MB, 256 MB and up. We
have successfully tested SD cards up to 1 GB.
Additional MMC cards are available from LEI Extras; see ordering information inside the back cover of this manual. MMCs and SD cards
are also available at many consumer electronics stores.
The MMC slot is located in the battery compartment, beneath the batteries on the right side of the unit. The contact pins are springy, to
make it easier to insert and remove the MMC card.
To remove an MMC
1. Remove battery compartment cover.
2. Remove batteries, if present.
3. Hold unit facedown in right hand. Use your thumb or index finger
and press down on the center of the MMC label.
Remove an MMC Card.
4. Drag the MMC from the slot into the battery compartment.
5. Turn the iFINDER face up and give it a shake to dump the MMC
into your hand or onto a work surface.
To add an MMC or SDC
1. Remove battery compartment cover.
2. Remove batteries, if present.
3. Hold unit facedown in right hand. Drop the MMC card into the slot,
label-up, with the notched edge toward the right.
11

4. Press down on the center of the label and slide the card to the right.
Add an MMC Card.
5. Turn the plastic rotating card lock until it holds the card firmly in
place, with the grip parallel to the direction of the batteries.
6. Replace the batteries and battery cover.
FreedomMaps
FreedomMaps are pre-made custom maps that cover multiple states,
provinces, countries or other geographic regions on a single memory
card. They give you all the features found in our MapCreate™ mapping
software, but without the necessity of using a computer. FreedomMaps
are available for the United States, Canada and Europe. In 2004, FreedomMaps with topographic contours will become available for the United
States and Canada.
Like custom maps built in MapCreate, the custom map on a FreedomMap
card contains all of these features: rivers/lakes/tributaries; more than
60,000 critical navigation aids; more than 10,000 wrecks/obstructions in
coastal and Great Lakes waters; interstate/federal/state highways; interstate exit services; searchable Points-of-Interest (POI) database including:
airports, hotels, restaurants, entertainment, emergency services; rural
roads and city streets; cities and towns; railways; key landmarks; searchable street intersections and street addresses; national parks and forests
with boundaries; wildlife preserves; and more!
FreedomMaps come to you preloaded on a single 128 or 256 MB memory card. Simply insert the memory card into your Lowrance GPS unit,
and you're ready to go.
FreedomMaps are available through LEI-Extras. To order a card (or for
a list of the areas available) see the ordering information in the back of
this manual.
12

External Antenna
A GPS antenna requires a clear view of the sky for optimum operation.
Inside a vehicle, your iFINDER can sometimes maintain satellite lock
while sitting on the seat beside you, but we don't recommend this for
optimum performance.
Since the "view" is restricted to what can be seen through the windows,
this operating mode will reduce position accuracy and will increase the
chance of losing satellite lock. Inside a vehicle, the unit operates best
with an optional external antenna mounted on the windshield, on the
dash or on the top of the vehicle.
The optional external antenna can use a magnetic base that allows
temporary mounting on any flat ferrous metal surface. A suction-cup
mount allows you to attach the antenna to a windshield.
The iFINDER PhD can use the passive FA-8 antenna or the active
RAA-3 antenna. The active antenna offers a further performance boost
by amplifying the satellite signals it receives. This is especially helpful
when operating in areas such as dense forests, which can obstruct GPS
signals. Your unit will automatically switch between the active RAA-3
and its internal antenna (located in the top of the case). If you purchase
the passive FA-8, you must use a menu check box to manually switch
between it and the internal antenna. See the topic "External Passive
Antenna" in Sec. 5.
Attach iFINDER antenna to windshield bracket with two screws.
You may achieve good results by simply placing the external antenna
on the top of the dash, at the base of the windshield. A piece of the rubber non-skid shelf liner material available in recreational vehicle supply stores will also help hold the antenna in place.
To use the antenna: Mount it in a location with an unobstructed view of
the sky. Plug the connector into the unit's antenna socket, located on
the back, in the upper left corner of the case.
13
R-A-M Bracket Mounting Systems
Several R-A-M mounting brackets are available for your iFINDER.
There are permanent mounts and temporary mounts suitable for virtually any boat, aircraft or other vehicle, even motorcycle handlebars.
One of the R-A-M mounting systems for your unit.
One model has a mounting arm and cradle attached to a swivel ball
plate that can be screwed or bolted to a supporting surface. Another has
a strong suction-cup mount for attachment to windscreens or fiberglass
surfaces. See your Lowrance dealer or visit the LEI web site for the latest options; accessory ordering information is on the inside back cover
of this manual. For a complete look at the many mounting options, visit
the R-A-M web site at www.ram-mount.com.
Other Accessories
Other iFINDER accessories include MMC cards, MMC card readers and
MapCreate™ 6 custom mapping software for your computer. (The
iFINDER PhD Plus model ships with the GPS Accessory Pack, which is
composed of the MapCreate CDs, the card reader, and one memory card.)
If these accessories are not available from your dealer, see the accessory ordering information on the inside back cover of this manual.
MapCreate™ 6 CD-ROM and MMC card reader for USB ports.
14
Section 3:
3
1
5
6
829
Music Mode Operation
This section addresses the unit's Music Mode operation. Music Mode is
designed as a powerful but simple interface for playing back your music
collection while navigating. If you'd rather skip ahead, you can look at
Sec. 5, which starts on page 59 and is full of details on setting up and
customizing the iFINDER's various options. Or you could turn to Sec. 6
starting on page 89, where you'll learn about Searching.
Before you start playing your music, it's a good idea to learn about the
different keys, the two Page screens and how they work together. BUT,
if you just can't wait to get going, you can skip ahead to the one-page
Music Mode Practice Run on page 21.
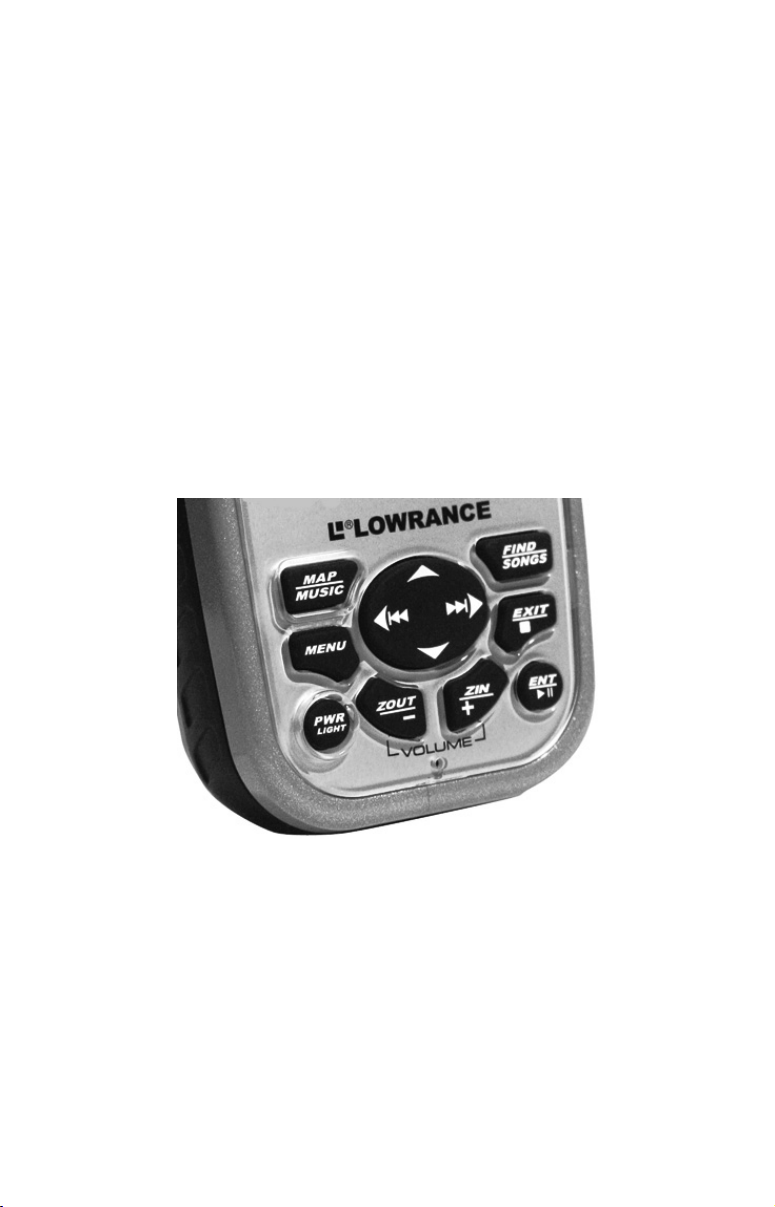
Keypad
4
iFINDER PhD keypad.
Many of the keys have two functions: one for Music Mode, one for Map
Mode. The Music Mode names always come second. Throughout this
section, we'll refer to the keys by their Music Mode names, but in the
following list you can see the full name for each of the keys.
1. MAP/MUSIC – Press this key to toggle between the two page
screens. Each page represents one of the unit's major operation modes.
See Sec. 4 for full details on the Map Mode.
15

2. MENU – Press this key to show the menus, which allow you to select
or adjust a feature from a list.
3. PWR (Power)/LIGHT – The PWR key turns the unit on and off and
activates the backlight.
4. ARROW KEYS/Previous Song & Next Song – These keys are
used to navigate through the menus, make menu selections, move the
map cursor and enter data. When no menus are open, the left and right
arrows act as the Skip Previous and Skip Next buttons, to let you move
to the beginning of the song before or after the one currently playing.
5. ZOUT (Zoom Out)/Decrease Volume – This key lets you turn down
the volume of the music playback.
6. ZIN (Zoom In)/Increase Volume – This key lets you zoom the
screen in to see greater detail in a smaller geographic area on the map.
7. FIND/SONGS – The Find key launches the iFINDER search menus
and some navigation functions.
8. EXIT/Stop Music – The Exit key lets you return to the previous
screen, clear data or erase a menu.
9. ENT (Enter)/Play & Pause Music – This key allows you to save
data, accept values or execute menu commands.
Power/Lights On and Off
To turn on the unit, press PWR. To turn on the backlight, press PWR
again. Pressing PWR once again will turn off the backlight. (Press EXIT
to clear any message or alarm displays.)
Turn off the unit by pressing and holding the
PWR key for 3 seconds.
Main Menu
The iFINDER has a single Main Menu accessible from either operation
mode. The Main Menu contains some function commands and some
setup option commands. Access it by pressing
also has its own page menu, which is accessed by pressing
time. (All of these options come with default values so that you can use
the iFINDER right out of the box, but if you want to learn about the
various options, see Sec. 5, System Setup and GPS Setup Options.)
To clear the menu screen and return to the page display, press
16
MENU|MENU. Each page
MENU one
EXIT.
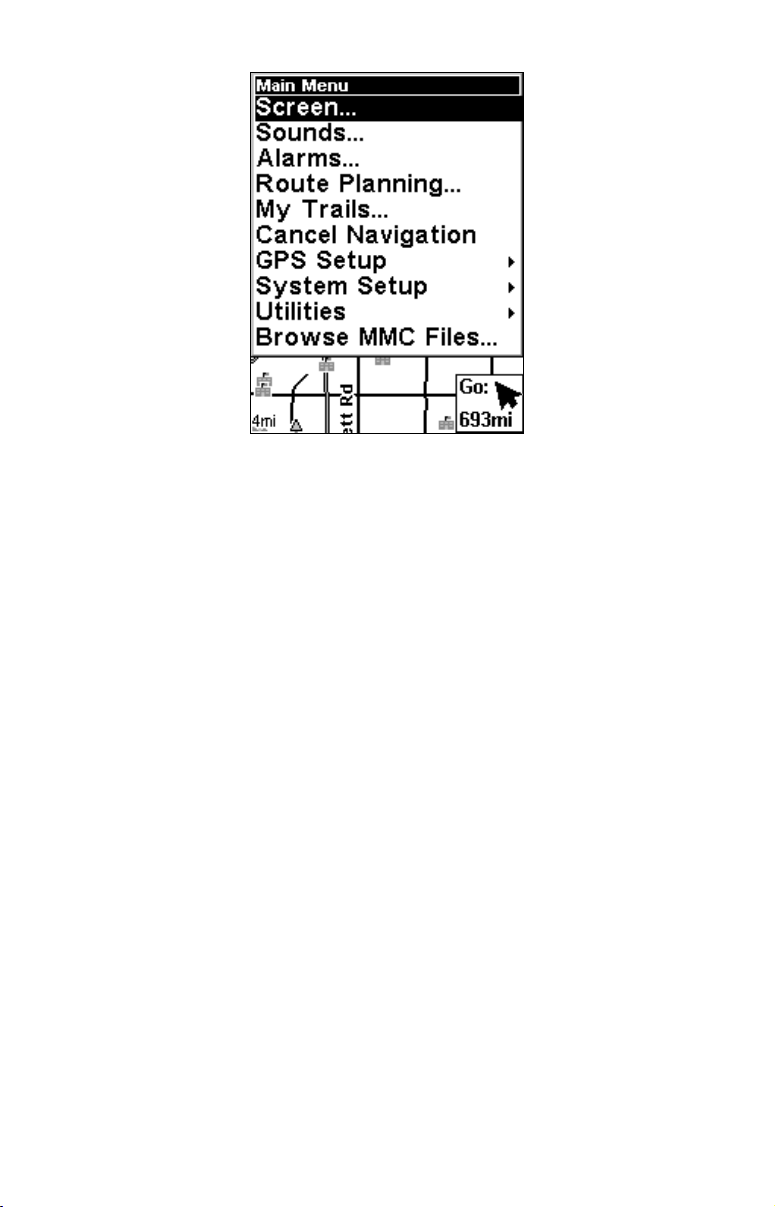
The Main Menu.
The Main Menu commands and their functions are:
Screen command: changes the contrast or brightness of the display
screen as well as the backlight delay.
Sounds command: enables or disables the sounds for key strokes and
alarms, sets the alarm style and controls speaker volume.
Alarms command turns GPS alarms on or off and changes alarm
thresholds.
Route Planning command lets you plan, view or navigate a route.
My Trails command: shows, creates and deletes trails. You can control
how trails are recorded and you can navigate trails forward and backward with this command.
Cancel Navigation command: turns off the navigation command after
you have reached the end of a back trail or your destination waypoint,
Point of Interest or map cursor location.
GPS Setup command sets the GPS receiver options.
System Setup command sets general configuration options.
Utilities command lets you access a Sun/Moon rise and set calculator,
a trip calculator, an alarm clock and other timers.
Browse MMC Files command gives you information about the installed MMC card and the files it contains.
17
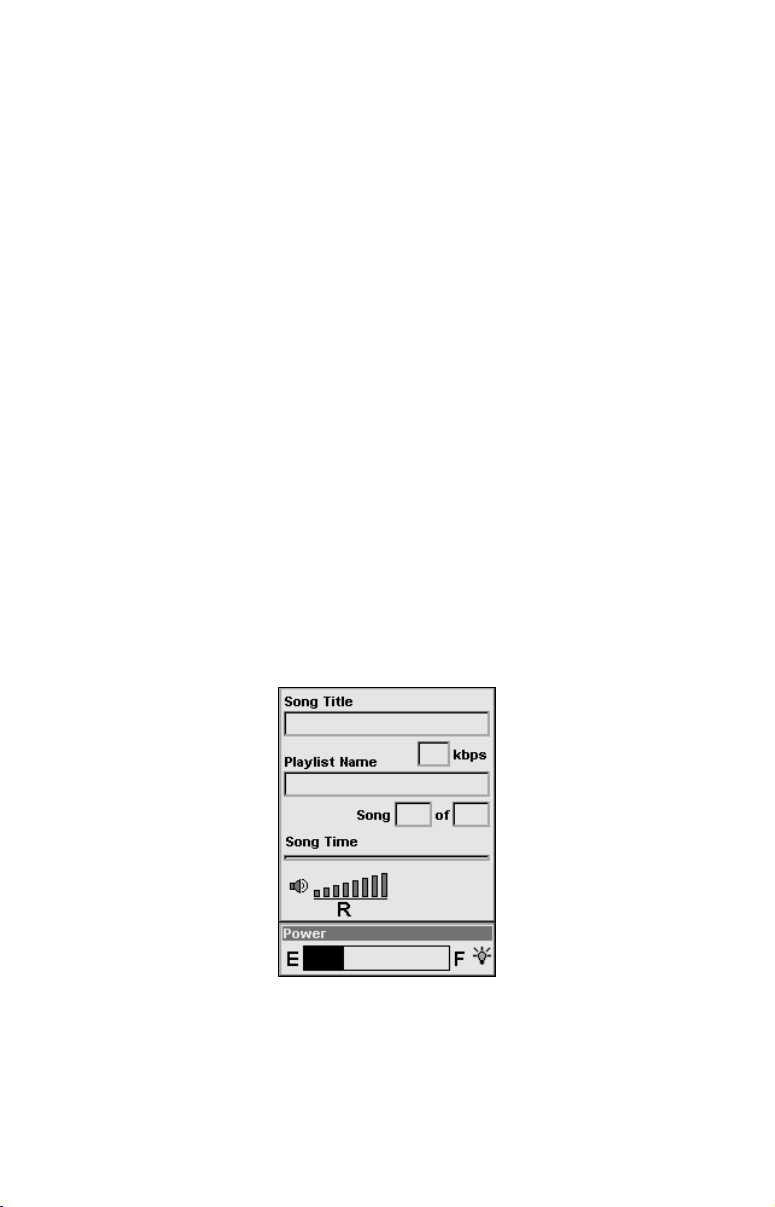
The Music Mode Display and Keyboard Commands
The Music Mode screen contains a battery power indicator and a volume
display for quick reference. When a song or play list is playing, the name
of the current song will appear at the top of the screen, as well as the
song's quality (in kbps).
NOTE:
We’ve found that songs using a bitrate of 128 kbps work well in the
unit. Playing a song with a higher bitrate may slow down the unit's
overall functionality. To ensure consistent performance in map redraw and menu response, 56 kbps is preferred. Try the unit with
various settings to find what works best for you.
Other options for improving the iFINDER's performance (without
sacrificing audio quality) include activating the unit's Power Save
mode. Changing the Update Rate will free-up some processor power
to allow simultaneous map re-draws, searches and music playback.
If you're playing a list, then the play list's name and the song's position
in the list are both displayed as well.
To switch to Music Mode from Map Mode, press the
MAP/MUSIC button.
The Music Mode display is designed to be simple. The following image
shows the Music Mode in action, with a song playing. Using only these
buttons and the simple Music Menu, you can listen to what you want,
when you want.
Music Mode display, with all the on-screen command buttons shown.
Most of the music player's commands are available at the touch of a single button. The most important tools are the play control buttons:
PAUSE
SONGS key to open the file browser and choose a new song or play list.
, STOP, PREVIOUS SONG and NEXT SONG. You can also press the
PLAY &
18

Music Mode always runs using a "play list," even if this consists of a
single song. You can copy pre-made play list files from your PC to your
MMC card and play the songs in these play lists by selecting them from
the song browser. It's just as easy to organize your music when you
copy it to the MMC, by arranging it into folders from your computer.
That way you can simply play a folder at a time. When you select a
folder to play, the iFINDER automatically creates a play list out of all
of the songs contained in that folder.
Later in this section we'll explain how to play folders, how to copy music
and play lists from your PC, and how to manage them all on the iFINDER.
Using the Play Control Buttons
All of the play control buttons are represented by symbols on the keyboard, not names. These symbols are fairly standard, and are probably
already familiar to you.
PREVIOUS SONG is shown as a double arrow pointing to the left. NEXT
SONG
is a double arrow pointing to the right. These correspond to the
left and right arrow, respectively.
PLAY & PAUSE are both on the same button – when the music is play-
ing, this button pauses it. When music is paused, this button resumes
play. The Play symbol is a single arrow pointing to the right. The Pause
symbol is a pair of vertical bars.
STOP is shown as a solid square.
NOTE:
Some advanced Map Mode operations, such as achieving a satellite
lock or searching for POIs, require intense processing power. If
you're having trouble performing advanced GPS operations while
listening to music, use the
PAUSE key to pause your music, switch
over to the Map Mode until your unit achieves a lock (for instance),
then switch back to Music Mode and resume playing music. Normal
Map Mode operation will work fine with music playing.
INCREASE VOLUME is shown as a plus sign (+) and DECREASE VOLUME as
a minus sign (–). As you push these buttons, you can see the current volume display shift on-screen. Move the level to the left or right to get the
desired volume. The far left is mute, the far right is maximum volume.
Using the SONGS key to Launch Music Browser
You can push the
SONGS key at any time to open the music browser,
which lets you choose the song or play list to play next. The music
browser is a screen showing the file structure of your MMC card, includ-
19

ing all of the songs and play lists available as well as any subfolders. If
you've sorted your music on the MMC by album or artist, you can select
the folder you wish and play only the songs in that folder, or you can
choose a particular song to play right away.
We'll describe the Music Browser under the heading "Play Lists" later in
this section.
In addition to all these keyboard commands, the Music Mode has its
own menu, which is used to access several commands and to set various
options. To access the Music Menu, in Music Mode press the
MENU key.
Later in this section we'll describe the various options in the Music
Menu in detail.
The following page contains an 11-step "Practice Run" that will walk you
through the most basic Music Mode operations. Following just the steps
outlined here, you can start using the iFINDER to listen to your favorite songs in no time.
20

Music Mode Practice Run
Start at your computer. You should already have some MP3 or Ogg Vorbis music files available. If you need help ripping your CDs to these formats, consult the documentation for the CD ripper software.
1. Insert an MMC card with free space into your MMC card reader.
2. Select a few of your favorite songs and copy them onto the MMC
card. For now, copy only a few songs and place them directly in MMC
card's main folder. (Later, you might prefer to set up subfolders on the
card and organize your music by artist, album or genre.)
3. Wait until the songs are finished copying, then transfer the MMC
card to your iFINDER. (You can find instructions for this in Sec. 2,
starting on page 7.)
4. To turn on the unit, press and release the
PWR/LIGHT key.
5. The opening screen displays either a map of North America or the
music player. If the Map Mode opens up, press the
MAP/MUSIC key to
switch to Music Mode.
6. Open the file browser by pressing the
SONGS key, which will display
a list of the songs available on your iFINDER. These should match the
songs you just copied there. Using the arrow keys, choose one from the
list and press
your music playing:
PLAY. This is a quick and convenient combination to start
SONGS|PLAY.
7. The song will begin playing. Make sure you've attached your headphones (or other external speakers) as described in Sec. 2. You can use
the Browse Music Files screen (activated by pressing the
SONGS key) to
choose another song, if you want. If you'd prefer to play several songs,
move on to step 8.
8. Cancel the song currently playing by pressing
STOP. To have the
iFINDER create a play list of all of the songs on the MMC, press
SONGS|PLAY with the PLAY ALL option selected. The iFINDER will be-
gin playing the first song on the MMC.
9. Press
to
til you get back to the Music Mode display. Press
MENU|↓ to SOUNDS|ENT to open up the Sounds Menu. Press ↓
SHUFFLE and press ENT to toggle it on. Now press EXIT repeatedly un-
SONGS|PLAY again
and the iFINDER will begin playing a randomly sorted play list.
10. Listen to your favorite music. Now you can return to your computer
and add more songs or play lists to your MMC.
11. To turn off the unit, press and hold
POWER key for three seconds.
21
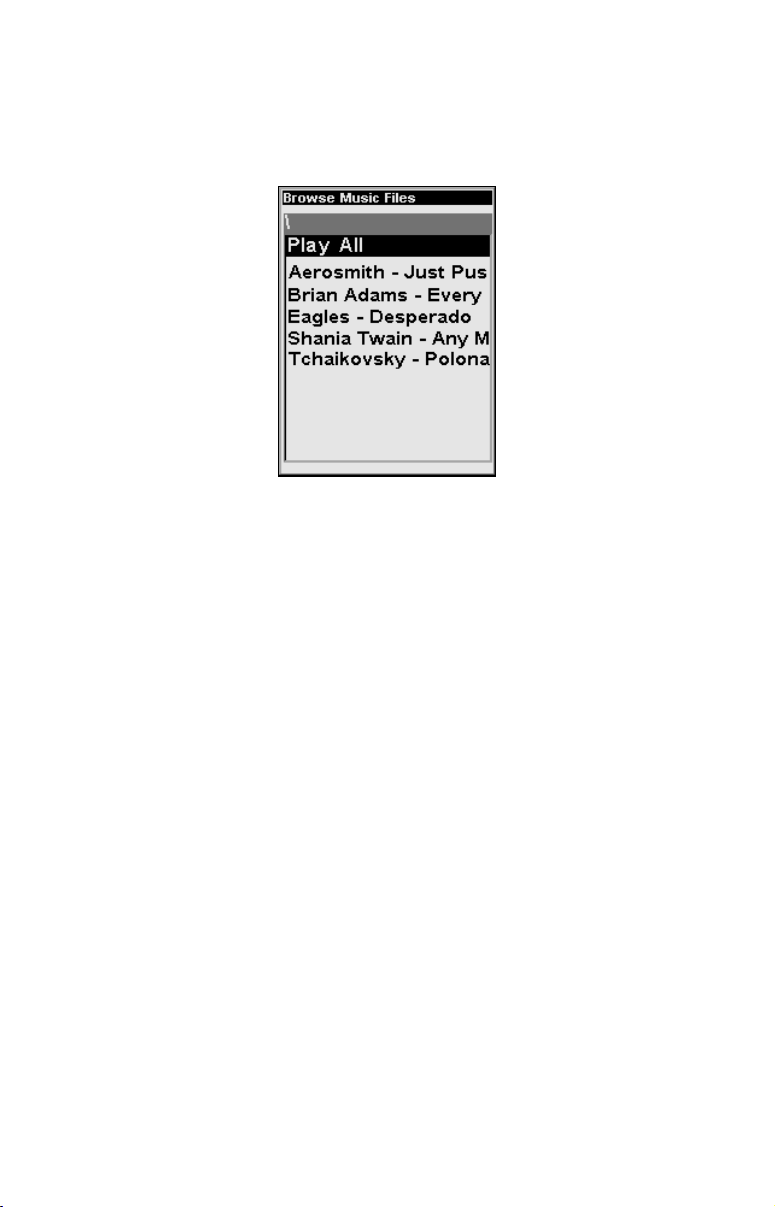
Play Lists
The iFINDER can play both MP3 and Ogg Vorbis music files. It can
also recognize m3u-style play list files. Use the
the Browse Music Files screen.
Use the Browse Music Files screen to choose which songs to play next.
From the music browser you can choose individual songs, play list files,
or subfolders to play. Choose
selected folder and its subfolders.
Getting the Music onto Your iFINDER
Of course, to use your iFINDER's Music Mode, you'll need to get some
music onto the unit. To do this, simply use an MMC card reader to copy
the MP3 or OGG Vorbis files from your PC onto an MMC card. Insert
the MMC card in the iFINDER as described in Sec. 2, and the music
will immediately be available in the file browser. It's that simple.
PLAY ALL to play all of the music files in the
SONGS key to launch
Before you copy your music onto the MMC card, consider setting up
some subfolders to sort your music by artist, album or genre – however
you prefer to arrange your music. The iFINDER makes it easy to play a
whole folder at a time, so if you arrange your music well when you're
installing it, playing the right songs when you want to hear them will
be a breeze.
The Music Menu
Any time you're using the iFINDER in Music Mode you can press MENU
to open a special Music Menu containing several settings and commands relating to Music Mode operation. You can use these settings to
change the way the iFINDER plays back music. The iFINDER works
great right out of the box, but as you become more familiar with the
unit and what it can do, you'll eventually want to begin tweaking some
of these settings.
22
We'll spend the rest of this section introducing you to the options and
settings available from the Music Menu.
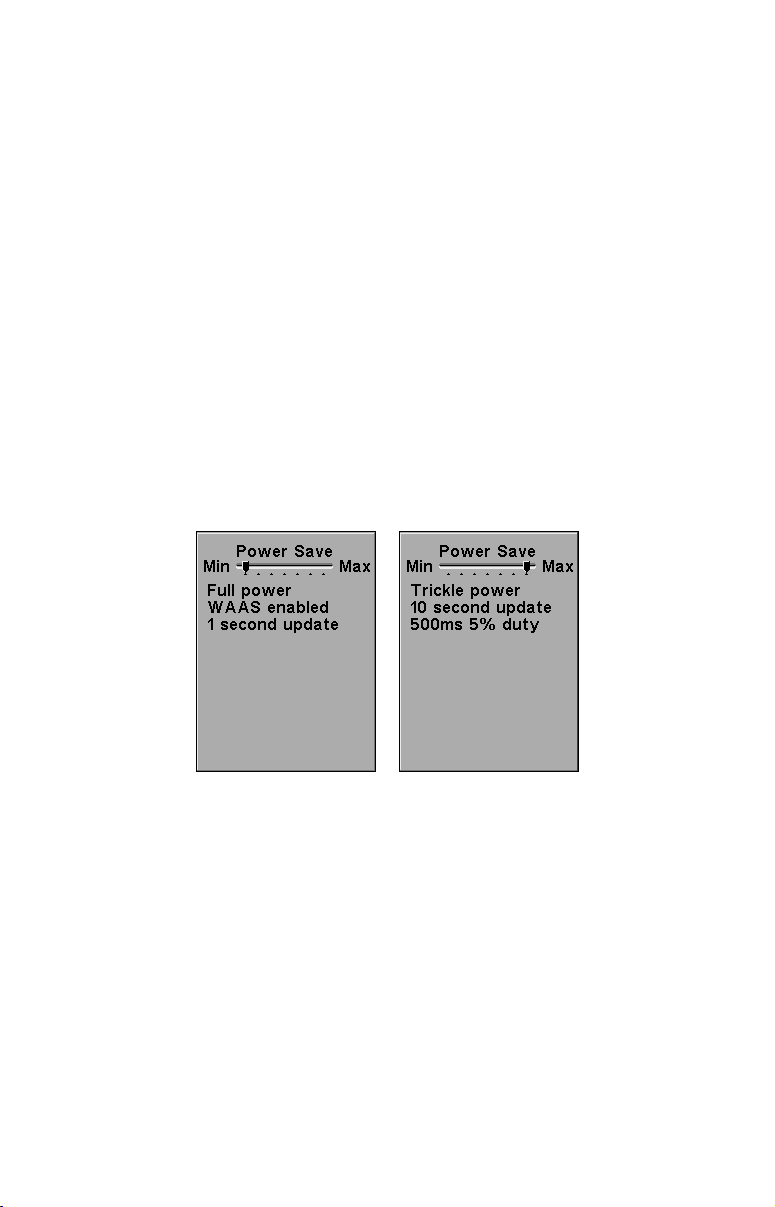
Power Saving
If you're using your iFINDER for both mapping and music, you can control how much of each get out of it. One of the biggest drains on the
iFINDER's battery is the position update rate – that is, how often the
iFINDER checks its location from the GPS signal.
You can tell the iFINDER to check less often, giving you inferior position accuracy but longer battery life. To do this, use the Power Saving
command. Just remember that the higher your Power Saving setting,
the less reliable your position information on the map display.
To access the Power saving feature from Music Mode, press
POWER SAVING|ENT. Press → or ← to move the slider bar. The left end of
MENU|↓ to
the scale is minimum power saving (full battery power); the right end of
the scale is maximum power saving (minimum battery power.)
To return to the last page displayed, press
EXIT|EXIT.
The Power Save menu at Min Power save (shown left center)
and Max Power Save (shown right).
For a more detailed description of Power Saving, look for the same topic
in Sec. 5.
Use Indoors
When you're only using your iFINDER to listen to music, you can preserve battery life by turning off the GPS satellite search. To do this,
turn on the Use Indoors option.
To toggle this feature on or off from the Music Mode, press
USE INDOORS|ENT. The box is checked when the feature is turned on, and
MENU|↓ to
unchecked when the feature is off. The iFINDER will automatically
resume searching for satellites the next time you turn it on.
23
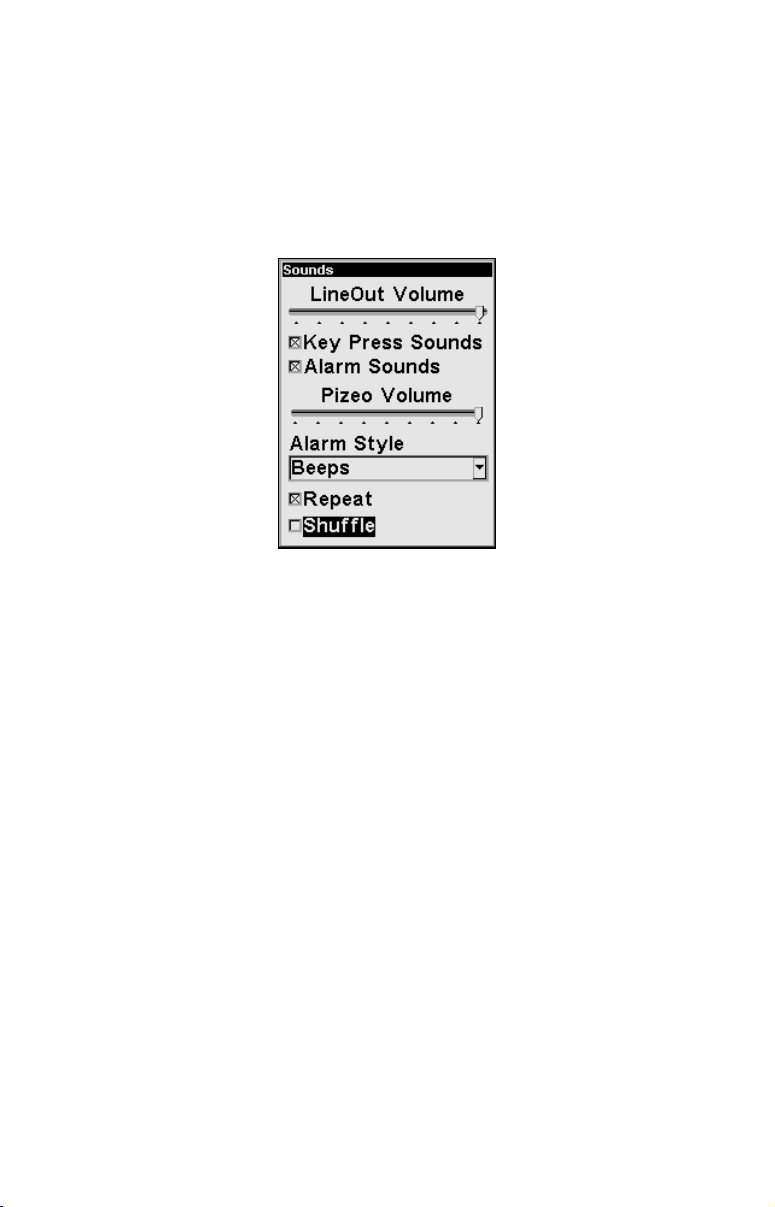
Sounds Menu
The Sounds command on the Music Menu opens the same Sounds
Menu accessible from the Main Menu. We've added this option to the
Music Menu for your convenience. From the Sounds Menu you can adjust the volume of both the unit's internal speaker, and the Line Out
volume to your headphones. The most important options on this menu
for Music Mode, though, are at the very bottom.
Sounds Menu, with the Repeat command activated and
the Shuffle command selected.
To access the Sounds Menu, from Music Mode press MENU|↓ to
SOUNDS|ENT.
Shuffle (On/Off)
When Shuffle is turned on, every time the iFINDER generates a play
list, it will randomly sort the order of the songs. When Shuffle is turned
off, play lists will be built generated alphabetically by filename.
From the Sounds Menu, press ↓ to
SHUFFLE|ENT to toggle whether the
option is on or off. The box is checked when the feature is turned on,
and unchecked when the feature is off.
Repeat (On/Off)
When Repeat is turned on, at the end of a play list (or song, if you're only
playing one song) the iFINDER will immediately start playing the play
list again, from the beginning. When Repeat is turned off, it will simply
stop playing music and wait for you to select a new song or play list.
From the Sounds Menu, press ↓ to
REPEAT|ENT to toggle whether the
option is on or off. The box is checked when the feature is turned on,
and unchecked when the feature is off.
24
 Loading...