

Page 1
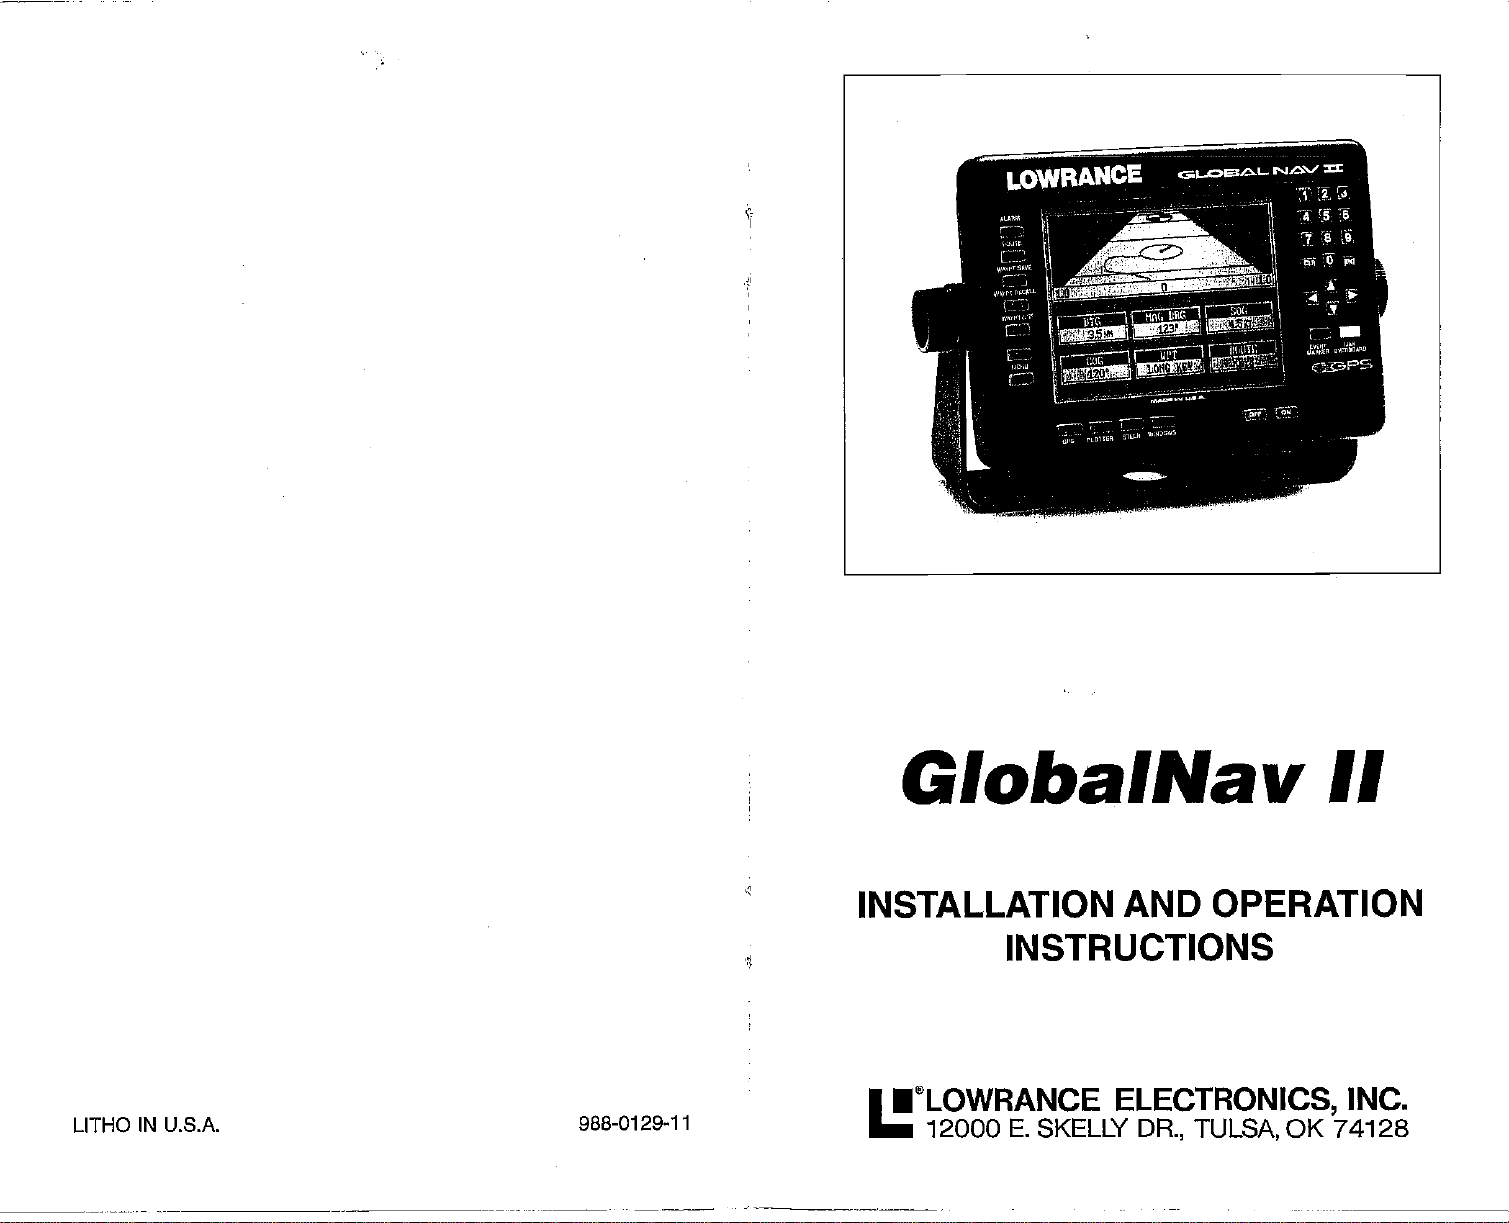
GlobalNav
II
AND OPERATION
ELECTRONICS,
DR., TULSA,
OK 74128
INC.
LITHO
IN U.S.A. 988-0129-11
INSTALLATION
INSTRUCTIONS
•®LOWRANCE
12000 E. SKELLY
PDF compression, OCR, web-optimization with CVISION's PdfCompressor
Page 2
WARNING!
USE THIS GPS RECEIVER ONLY AS
CAREFUL NAVIGATOR NEVER
OBTAIN POSITION INFORMATION.
RELIES ON ONLY ONE METHOD TO
CAUTION
This GPS
shortest,
receiver,
most direct
waypoint regardless
not
a
the
As of this
GPS
Satellites can be turned off
system operators.
is
take
only
waypoint,
waypoint
navigation system operational.
advantage
but will also
is
always
writing,
the
Rememberthat the GlobalNav
as accurate as the
only
all OPS
(like
to a
path
waypoint.
of obstructions.
of all available
visually
available.
checkto make certain a
NOTICE!
or
accuracy
of Defense
it's
Department
system
navigation
Therefore,
navigation
The
using.
AN AID TO NAVIGATION. A
equipment)
It
provides navigation
the
prudent navigator
tools when
(DOD)
system
can be
is still in a
degraded
II,
will show the
data to the
travelling
safe
clear,
path
has not declared the
testing phase.
at will
by
or
GPS receiver
any
NOTES:
will
to
to
the
1993 Lowrance Electronics
All
rights
reserved.
to
change
simulated.
without notice.
All features and
All screens in this manual are
Copyright
specifications subject
PDF compression, OCR, web-optimization with CVISION's PdfCompressor
Page 3
NOTE&
TABLE OF CONTENTS
INTRODUCTION
MOUNTING
BRACKErMOUNT
IN-DASH MOUNT
CONNECTIONS
POWER
GPS MODULE INSTALLATION
KEYBOARD
GPS-HOWITWORKS
ACCURACY
THE LOWRANCE
GETTING STARTED - INITIALIZATION
CHANGE POSITION
CHANGE ALTITUDE
CHANGETIME
CHANGE DATE
COLD
POSITION/NAVIGATION DISPLAYS
SATELLITE INFORMATION
POSITION SCREEN
STEERING SCREEN
CUSTOMIZE SCREENS
PLOTTER
PLOTTERCURSOR
PLOTTING WITH A WAYPOINT
PLOTTER MENUS
PLOTTER MENU-PAGE 1
CLEAR PLOT
ICON ON/OFF
CHANGE
PLOTTER MENU
GO TO CURSOR
PLOTTER UPDATE
GRID LINES
SELECTUNITSOFMEASURE
BACK LIGHT
EVENTMARKER
USING THE EVENT MARKER WITH THE
ERASING ICONS
WINDOWS
VIEWING WINDOWS
MODIFYING GROUPS
RESETTING
WAYPOINT NAVIGATION
HOW
QUICK SAVE METHOD
VIEW
ENTER NEWWAYPOINT
NAMEAWAYPOINT
ERASEAWAYPOINT
RECALL AWAYPOINT
ROUTES
CREATING A ROUTE
NAMEAROUTE
WAYPOINT SELECTION
FOLLOWING A ROUTE
CANCEL NAVIGATION
MODIFYING
ERASINGAROUTE
GPS MODULE
START
SCREEN
DISPLAY
-
PAGE 2
ON/OFF
OPTIONS
ALL GROUPS
TO SAVE A WAYPOINT
AND SAVE METHOD
A ROUTE
1
2
3
4
7
9
ID
10
II
12
12
IS
13
IS
14
14
15
16
17
18
19
20
20
2D
21
21
21
22
22
23
23
24
24
25
CURSOR 25
26
27
29
29
30
30
3D
31
31
32
32
33
33
34
34
35
35
36
37
37
37
PDF compression, OCR, web-optimization with CVISION's PdfCompressor
Page 4
GPS ALARMS
TABLE OF
ARRI VAL ALARM
XTE
ANCHORALARM
CHANGING GPS SE1TINGS
SELECINMEA
TRUEANIJ MAGNETIC POSITION
PRESET
MAN OVERBOARD
GPS MODULE SELF-TEST
GPS SIMULATOR
DISPLAY CONTRAST
ADJUST BACK LIGHT LEVEL
BACK LIGHT ON/OFF
SPEAKER VOLUME
PCF OFFSET
SYSTEM INFORMATION
WINDOWS SUMMARY
SPECIFICATIONS
(CROSS
TRACK
ERROR)
ALARM
CONTENTS
(cant.)
38
38
39
39
40
. Mi
41
41
43
43
45
45
45
47
48
49
fl'Nhusw,,
IPBRG
NFCOG
U0G 22.0 FM
TTC oQ:az:
0.16
MI!
272' e
197' IG
Anival 0.10 MI
XTE 050 MI
AiicI,or 0.10 Mi
r
/rr\
r—
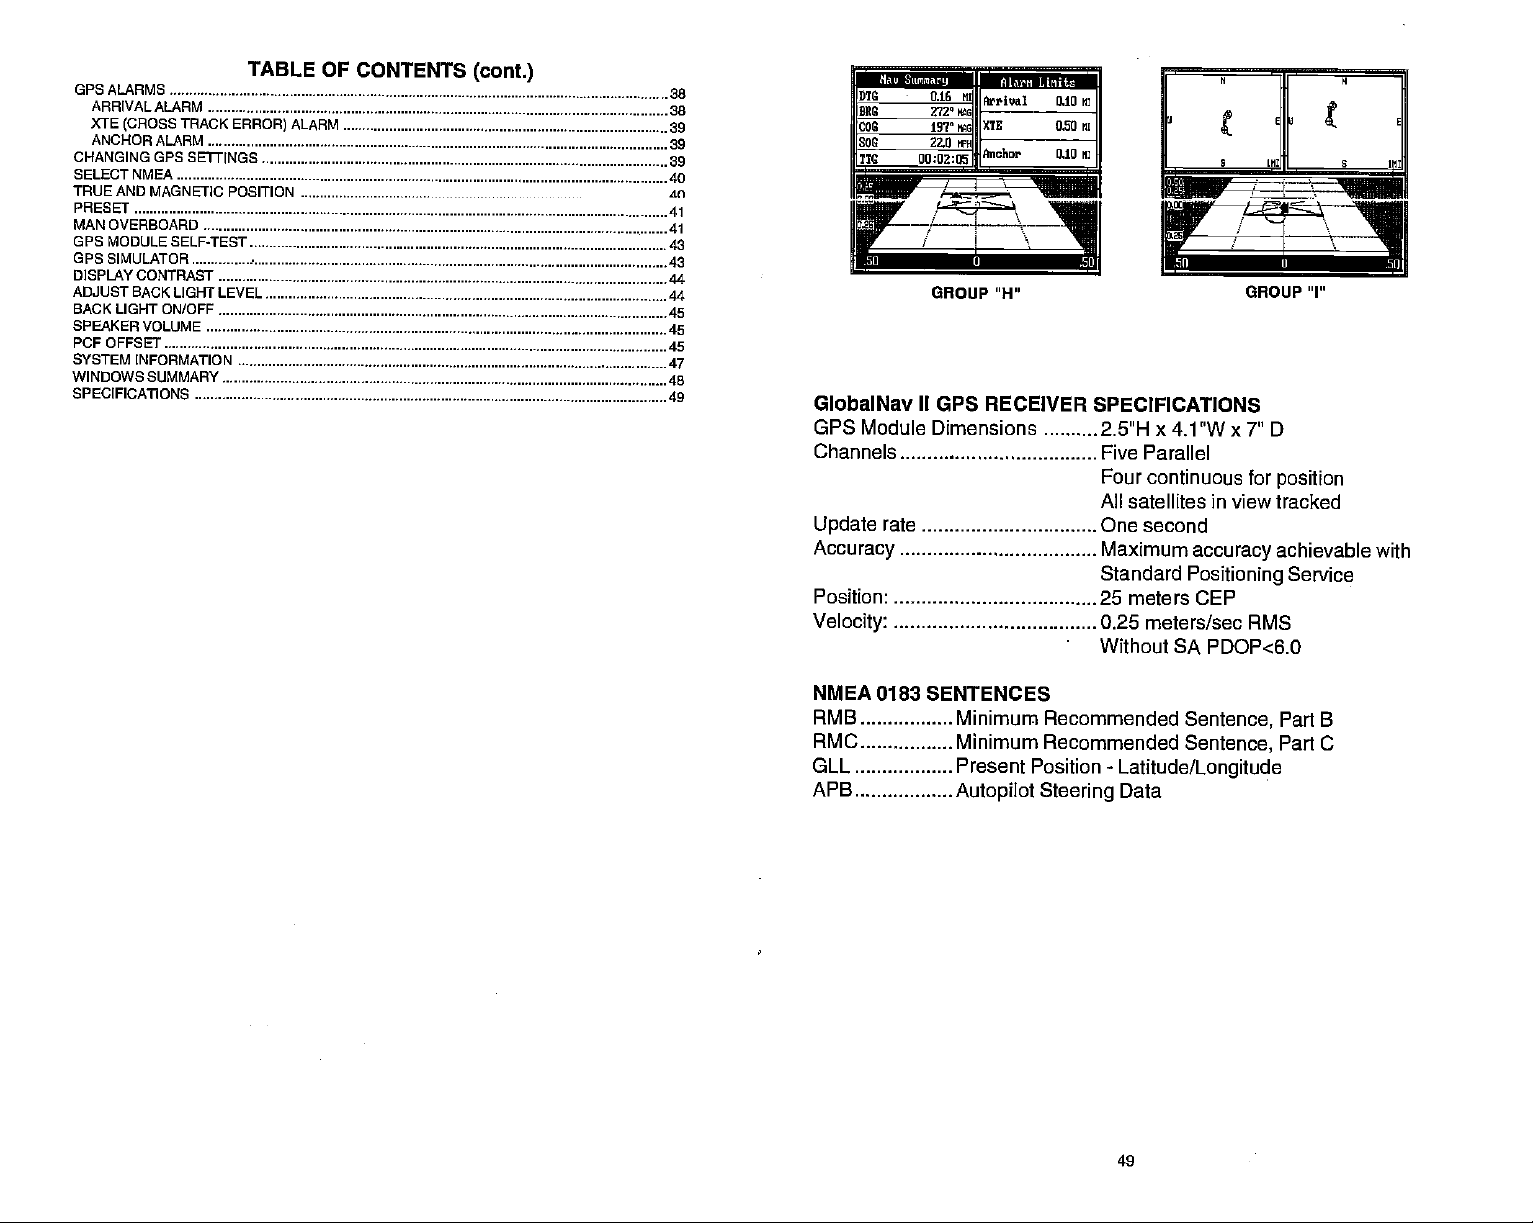
GlobalNav II GPS RECEIVER
OPS Module Dimensions
Channels
Update
Accuracy
Position 25 meters CEP
Velocity
rate One second
-i
GROUP H"
SPECIFICATIONS
2.5"H x 4.1 "W x 7" 0
Five Parallel
Four continuous for
All satellites in view tracked
Maximum
Standard
0.25
accuracy
Positioning
meters/sec RMS
Without SA PDOP<6.O
GROUP "I"
position
achievable
Service
with
NMEA 0183 SENTENCES
RMB Minimum
RMC Minimum
GLL Present Position
APB
Autopilot
Recommended
Recommended
Steering
-
Latitude/Longitude
Data
Sentence,
Sentence,
Part B
Part C
PDF compression, OCR, web-optimization with CVISION's PdfCompressor
Page 5
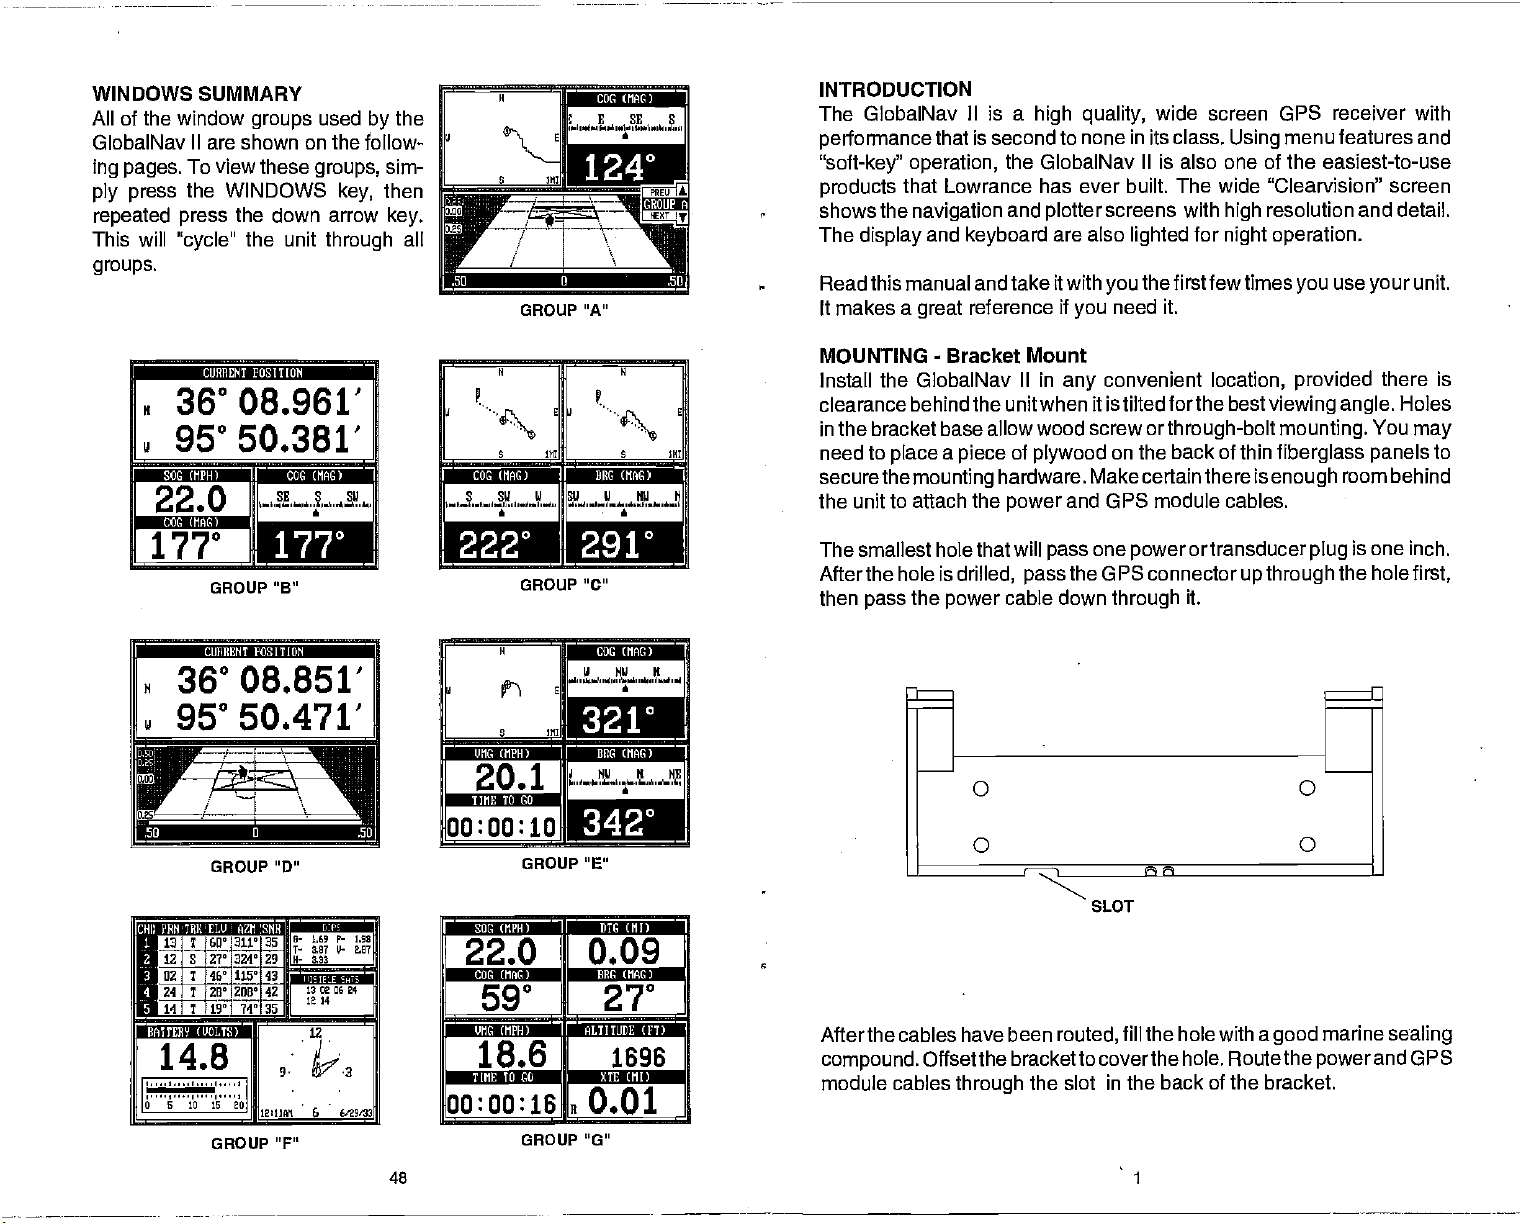
WINDOWS SUMMARY
All of the window
GlobalNav II are shown on the follow-
ing pages.
ply press
repeated press
This will
groups.
To view these
the WINDOWS
"cycle"
F CUXIIENT POSITION
groups
the down arrow
the unit
used
by
groups,
key,
through
the
sim-
then
key.
all
4sjL
GROUP "A"
N N
: u:
rnitniin
S SW U SW U NW
a a
INTRODUCTION
The GlobalNav
performance
"soft-ke?' operation,
products
shows the
The
Read this manual and take itwith
makes a
It
MOUNTING
Install the GlobalNav
clearance
in the bracket base allow
need to
securethe
the unit to attach the
that Lowrance has ever built. The wide "Clearvision" screen
display
place
II is a
that is second to none in its class.
high quality,
the GlobalNav Ills also one of the easiest-to-use
navigation
and
great
-
behindthe unitwhen it istilted forthe
a
mounting
and
plotter
keyboard
reference if
Bracket Mount
piece
are also
you
II in
any
wood screw
of
plywood
hardware.
and GPS module cables.
power
Make certain there is
wide screen GPS receiver with
menu features and
Using
screens with
lighted
you
need it.
convenient
on the back of thin
for
thefirstfewtimes
orthrough-bolt
resolution and detail.
high
night operation.
use
you
location, provided
bestviewing angle.
mounting.
fiberglass panels
enough
unit.
your
there is
Holes
You
may
to
room behind
4*'
GROUP "B"
CUIIECNT OITibN
N 36°08.851'
—i
95°50.471'
U-
I'—..'-
II
IIuiI•M
ho:oo:io
GROUP "0"
rt,ip
IKiii I22I
12 S
27'I324'JH
02 7
46'Fliz'
ZFiü'4Z
1T
14]!
:ra*d$:at'l.ffiKII
19']
74'
14.8
GROUP "F"
PDF compression, OCR, web-optimization with CVISION's PdfCompressor
43
13020624
1fl4
.
I2UlA 6
all
12
I
'jgpi,i:i •,iiuiiitiaiS
00:00:16
46 1
GROUP "C"
N
W NW N
a
S liii
}c
B•"
2O
00k,i.l:1 — INetIiII
22.0 0.09
rn1,tl.111S Hetir,1,t
590 27
18.6 1696
ui1,1,1gs
J NW H NE
P'
,,
GROUP "E"
B 0.01
GROUP 'G"
tlpliI
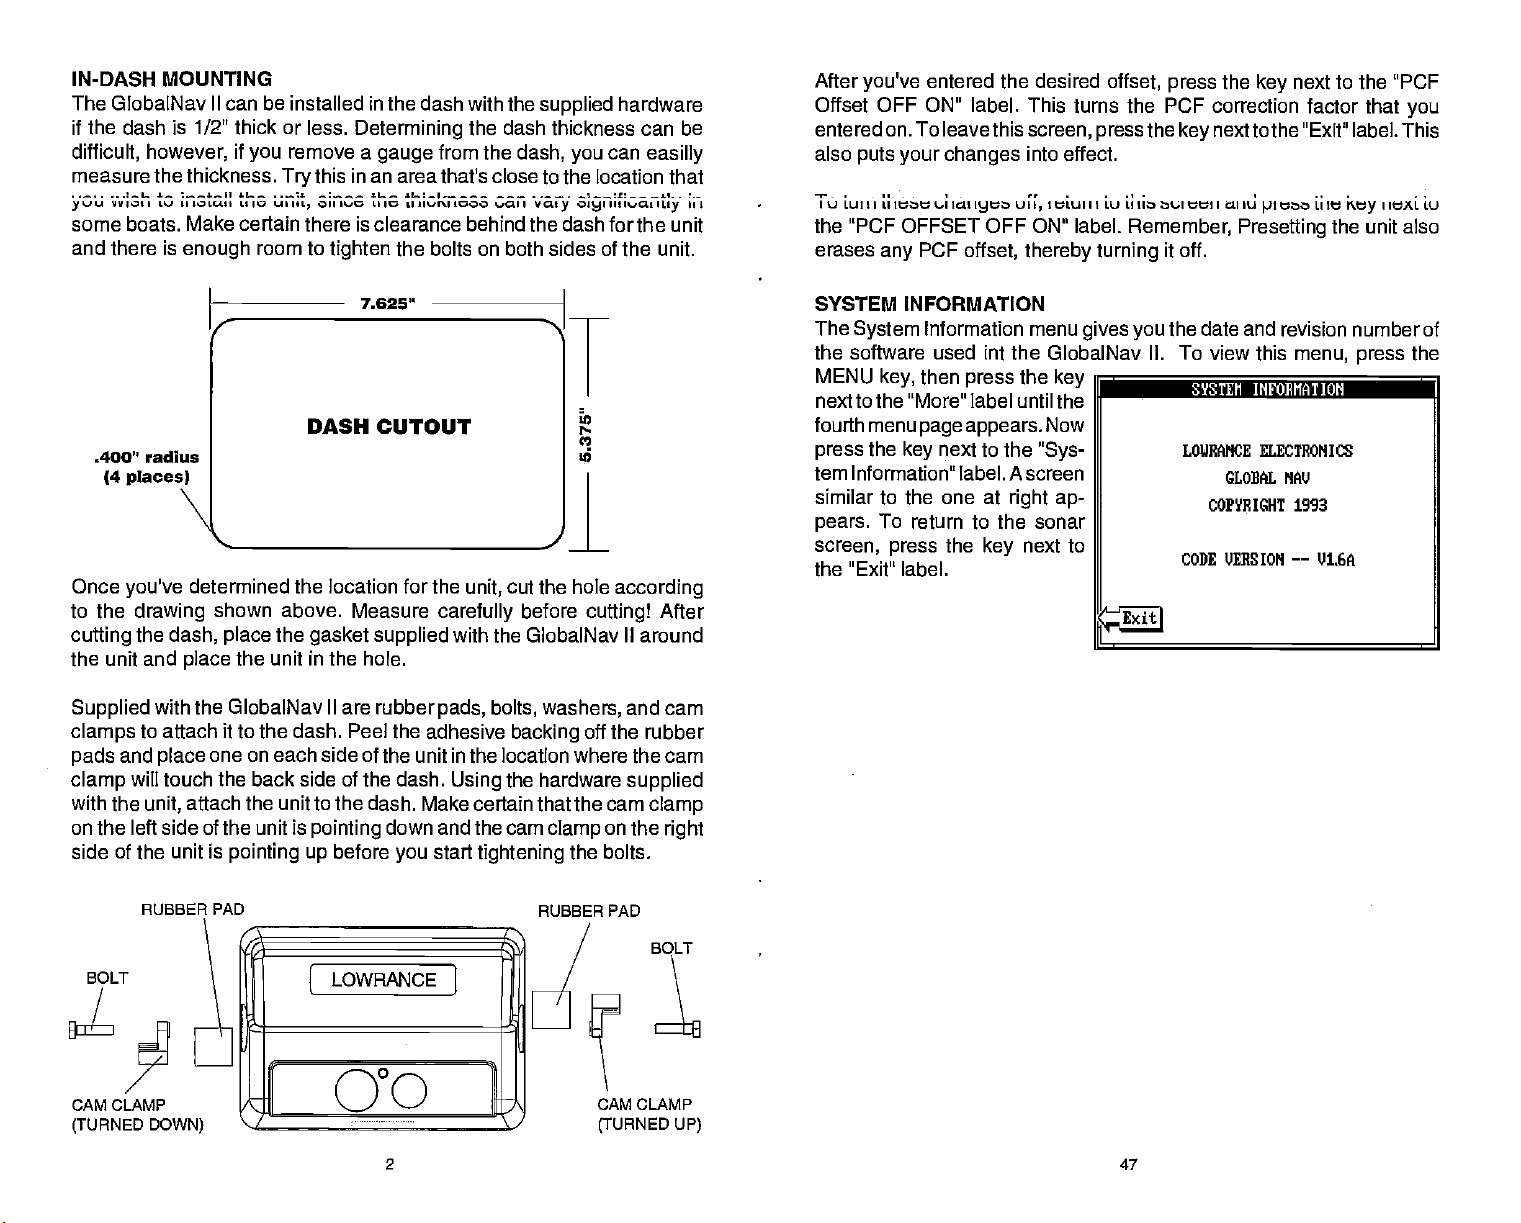
The smallest hole that will
Afterthe hole is
then
pass
Afterthe cables have been
compound.
module cables
drilled,
the
power
Offsetthe
through
passthe
cable down
bracketto coverthe hole. Routethe
the slot in the
one
pass
OPS connector
through
routed,
or transducer
power
up through
it.
fill the hole with a
back of the bracket.
plug
good
powerand
is one inch.
the
holefirst,
marine
sealing
OPS
Page 6
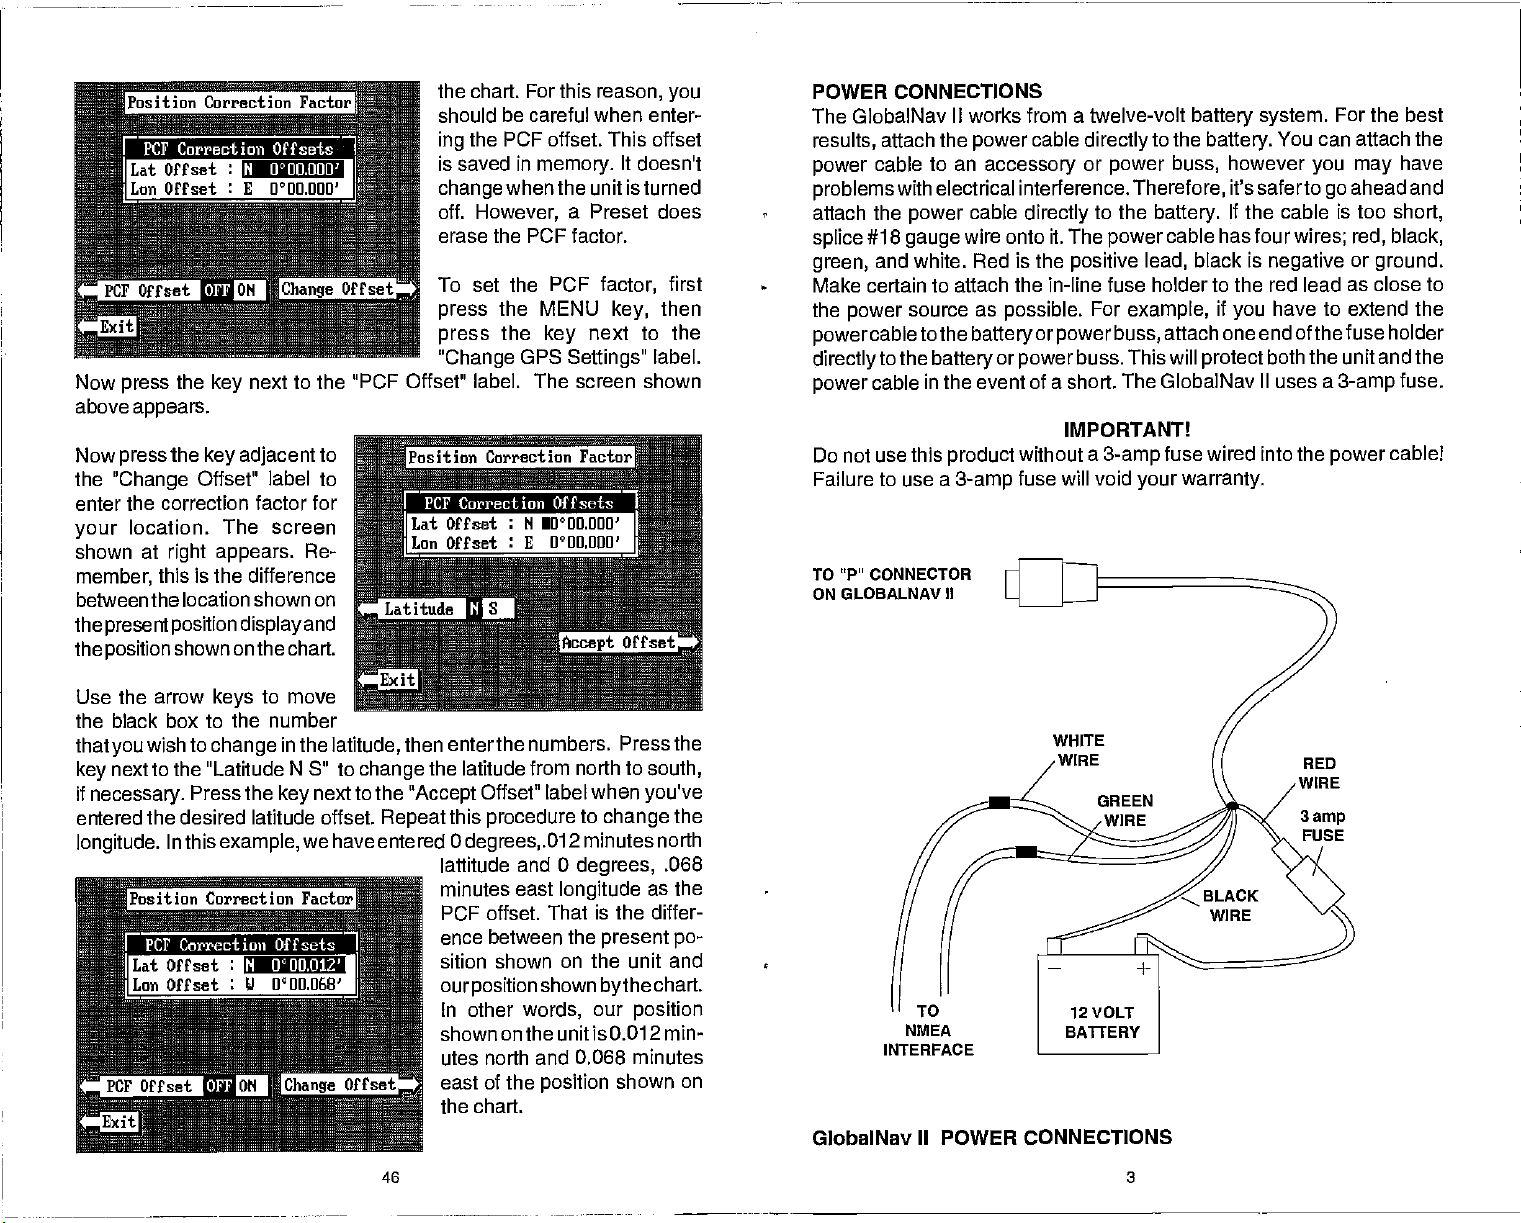
IN-DASH MOUNTING
The GlobalNav II can be installed in
if the dash is 1/2" thick or less.
if
difficult, however,
measure the thkness.
yJIIvVIotIttJIItoLAtILlIai
you
LII
IY
remove a
Oil lO LI 10
IlL,
the dash with the
Determining
from the
gauge
an area
thaVs dtohi
II 11¼#l'I 1000 ¼.I I Vat
you
) 0191
hardware
can
IItIaI
the
supplied
dash thickness can be
dash,
easilly
III
1L131
some boats. Make certain there is clearance behind the dash for the unit
and
there
is
enough
room to
tighten
the bolts on both sides of the unit.
After
you've
entered the desired
offset,
press
Offset OFF ON" label. This turns the PCF
entered on. To leavethis
also
puts your changes
T Luit, L;iee Iat
the "PCF OFFSET OFF ON" label.
erases
any
PCF
offset,
screen, pressthe key
into effect.
Iyt u,
tetuiji Lu Lt
thereby turning
auieeii allu LuI
Remember,
it off.
the
correction factor that
nexttothe
next to the "PCF
key
"Exit" label. This
Presetting
heAL Lu
key
the unit a!so
you
.400" radius
(4
places)
N
Once
you've
to the
culling
the unit and
Supplied
clamps
and
pads
clamp
with the
on the left side of the unit is
side of the unit is
determined the
drawing
the
dash, place
place
shown
above. Measure
the
the
unit
with the GlobalNav II are rubber
to attach it to the dash. Peel the adhesive
one on each side of the unit in the location where the cam
place
will touch the back side of the dash.
attach the unit to the dash. Make certain that the cam
unit,
pointing up
7.625"
DASH CUTOUT
location
gasket supplied
in
the hole.
pointing
before
for
the
carefully
with the GlobalNav II around
pads,
Using
down and the cam
start
you
cut the hole
unit,
before
bolts,
backing
the hardware
tightening
I
cutting!
washers,
off the rubber
on the
clamp
the bolts.
according
After
and cam
supplied
clamp
right
SYSTEM INFORMATION
The
System
Information menu
gives you
the software used mt the GlobalNav
MENU
next to the "More" label until the
fourth menu
press
tem Information" label. A screen
similar to the one at
pears.
screen,
then
key,
page appears.
the
key
next to the
press
the
Now
"Sys-
right ap-
To return to the sonar
press
the
key
next to
key
P SYSTEM INFOFIIATION
the "Exit" label.
the date and revision number of
II. To view this
LUUEANCE ELECTRONICS
GLOEAL MV
COPYRIGHT 1993
CODE UERS
ION
menu,
——
V1.GA
press
the
1
RUBBER PAD
BOLT
CAM CLAMP
(TURNED
DOWN)
!
/I
LOWRANCi]
000
2
RUBBER PAD
—'
BOLT
CAM CLAMP
(TURNED UP)
47
PDF compression, OCR, web-optimization with CVISION's PdfCompressor
Page 7
N o°uaoou'
Now
press
above
appears.
Now
pressthe key
the
"Change
the
next to the
key
adjacent
to
Offset' label to
enter the correction factor for
location. The screen
your
shown at
member,
between the location shown on
the
presentposition
the
position
right appears.
this is the difference
display
shown on the chart.
Re-
and
the chart. For this
reason,
you
should be careful when enter-
the PCF offset. This offset
ing
is saved in
change
off.
However,
erase the PCF factor.
memory.
when the unit is turned
To set the PCF
the MENU
press
press
"Change
"PCF Offset" label. The screen shown
the
GPS
key
It doesn't
a Preset does
key,
first
then
factor,
next to the
Settings"
label.
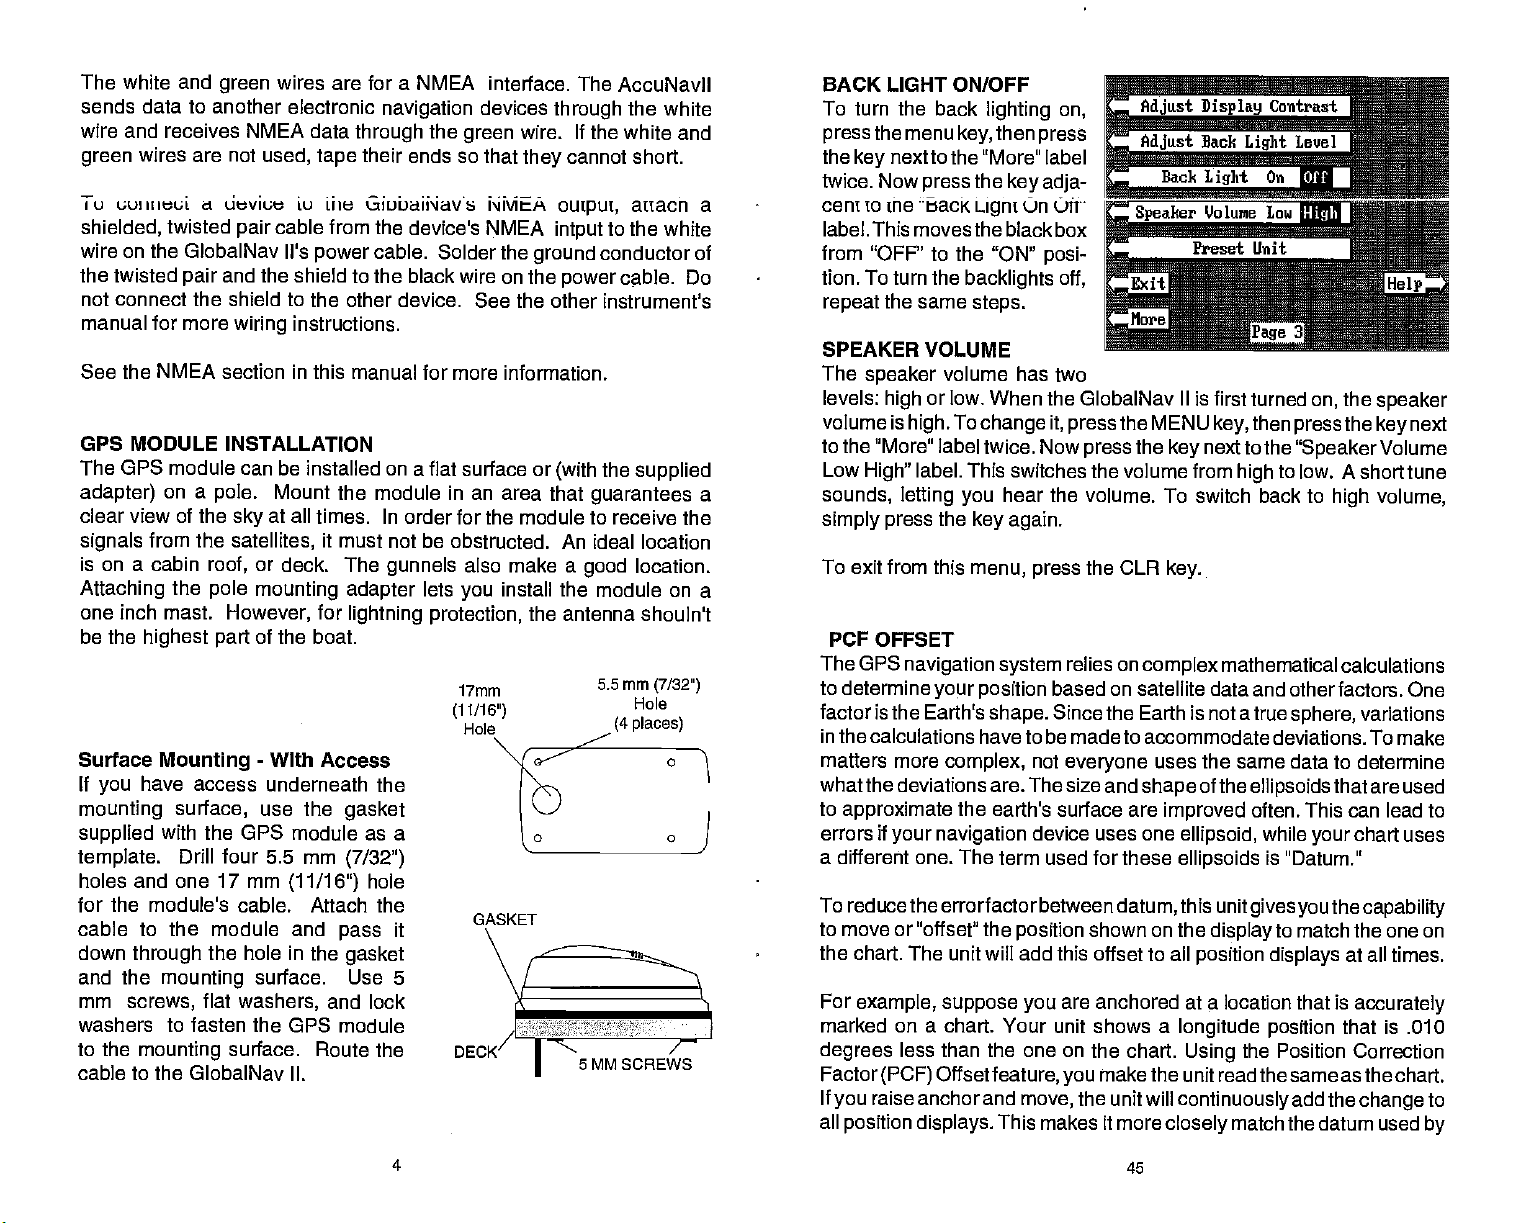
POWER
The GlobalNav
results,
power
problems
attach the
splice
green,
Make certain to attach the in-line fuse holder to the red lead
the
powercabletothe
directly
power
Do not use this
Failure to use a
TO "P
ON GLOBALNAV
CONNECTIONS
II works from a twelve-volt
attach the
cable to
power
an
accessory
with electrical interference.
cable
power
#18
wire onto it. The
gauge
and white. Red is the
power
source as
to the
cable in
"
CONNECTOR
battery
possible.
battery orpowerbuss,
or
power
the event of a short. The GlobalNav II uses a
product
3-amp
II
without a
fuse will void
cable
directly
or
directly
to the
positive
For
buss. This will
IMPORTANTl
to the
power
power
3-amp
buss,
Therefore,
battery.
cable has four
lead,
example,
attach one end of thefuse holder
fuse wired into the
your warranty.
battery system.
battery.
You can attach the
however
you may
it's saferto
If the cable is too
wires; red, black,
black is
protect
negative
if
have to extend the
you
both the unit and the
go
power
For the best
have
ahead and
short,
or
ground.
as close to
3-amp
fuse.
cablel
Use the
arrow
keys
to move
the black box to the number
that
key
if
entered the desired latitude offset.
longitude.
you
wish to
change
in the
next to the "Latitude N 3" to
necessary.
Press the
Inthis
key
example,
N 0000.012
we haveentered
latitude,
change
next to the
then enterthe
numbers. Press the
the latitude from north to
"Accept
Repeat
Offset" label when
this
procedure
Odegrees,.012
lattitude and 0
minutes east
PCF offset. That
ence between the
sition shown
ourposition
In other
shown on the unit is 0.012 min-
words,
utes north and 0.068 minutes
east of the
south,
you've
to
change
minutes north
degrees,
longitude
as the
is the differ-
present
on the unit and
shown
our
position
bythe
position
shown on
the
.068
po-
chart.
NMEA
INTERFACE
WHITE
WIRE
GREEN
RED
WIRE
3
amp
FUSE
the chart.
GlobalNav II POWER CONNECTIONS
PDF compression, OCR, web-optimization with CVISION's PdfCompressor
46
3
Page 8
The white and
sends data to another electronic
wire and receives NMEA data
wires are not
green
Tu uuIIlIeei d deviuw u ilie
shielded,
wire on the GlobalNav Ii's
the twisted
not connect the shield to the other
manual for more
See the NMEA section in this
GPS MODULE
The OPS module can be installed on
adapter)
clear view of the
signals
on a cabin
is
Attaching
one inch mast.
be the
Surface
If
you
mounting surface,
supplied
template.
holes and one 17 mm
for the
cable to the module and
down
and the
mm
washers
to the
cable to the GlobalNav II.
twisted
pair
on a
pole.
from the
roof,
the
pole
highest part
Mounting
have access
with the
Drill four
module's
through
screws,
the hole in the
mounting
flat
to fasten
mounting
wires are for a NMEA interface.
green
navigation
through
used,
cable from the device's
pair
and the shield to the black
instructions.
wiring
INSTALLATION
Mount the module in an area that
at all
sky
satellites,
or
deck. The
mounting adapter
However,
their ends so
tape
GiobuiNavs NMEA
cable. Solder the
power
manual for more information.
times. In order for the module to receive the
it
must not be obstructed. An ideal
gunnels
for
lightning protection,
of the boat.
-
With Access
underneath the
use the
GPS module as a
5.5 mm
cable. Attach the
surface. Use 5
washers,
the OF'S module
surface. Route the
gasket
(7/32")
(11/16")
pass
gasket
and lock
hole
it
The AccuNavil
devices
the
green
that
NMEA
wire on the
device. See the other instrument's
a flat surface or
also make a
lets
you
17mm
(11/16')
through
wire. If the white and
they
output,
intput
ground
power
(with
install the module
the antenna shouln't
the white
cannot short.
auacn a
to the white
conductor of
cable.
the
supplied
guarantees
location
location.
good
on a
5.5mm
(7/32")
Hole
(4 places)
Do
a
\[
,
DECK7
5MM SCREWS
BACK LIGHT ON/OFF
To turn the back
pressthe
the
twice. Now
cent to the back
label. This moves the black box
from "OFF" to the "ON"
tion. To turn the
repeat
SPEAKER
The
levels:
volume is
menu
nexttothe "More" label
key
press
the same
speaker
high
high.
to the "More"
Low
sounds,
simply press
To exit from this
PCF OFFSET
The GPS
label. This switches the volume from
High"
letting you
navigation system
to determine
factor is the Earth's
in the
calculations have to be made to accommodate deviations. To make
matters more
what the deviations are. The size and
to
approximate
errors if
your navigation
lighting
then
key,
the
igni
backlights off,
steps.
VOLUME
volume
or low.
When the GlobalNav II is first turned
To
change
label twice. Now
the
key again.
menu, press
your position
shape.
complex,
the earth's surface are
a different one. The term used for these
To reducethe errorfactorbetween
to move or "offset" the
the chart. The unit will add this offset to all
For
example, suppose you
:
marked on a chart. Your unit shows a
degrees
Factor
If
you
all
less than the one on the chart.
(PCF) Offsetfeature, you
raise anchor and
position displays.
This makes it more
on,
press
key adja-
On Oft
posi-
has two
on,
it,
pressthe
press
hear the volume. To switch back to
the CUR
relies on
based on satellite data and other factors. One
Since the Earth is not a true
not
everyone
device uses one
position
move,
shown on the
are anchored at a location
the unit will
MENU
the
key
key.
complex
uses the same data to
shape
improved
ellipsoid,
ellipsoids
datum,
makethe unit read the same asthe chart.
this unit
longitude position
Using
continuously
closely
then
key,
next to the
mathematical calculations
of the
display
position displays
match the datum used
pressthe key
"Speaker
to low. A
high
high volume,
sphere,
ellipsoids
often. This can
while
is "Datum."
gives you
the
that are used
your
the
to match the one
is
that
Position Correction
add the
the
speaker
next
Volume
short tune
variations
determine
lead to
chart uses
capability
on
at all times.
accurately
that is .010
change
to
by
PDF compression, OCR, web-optimization with CVISION's PdfCompressor
4
45
Page 9
DISPLAY CONTRAST
The unit's
adjustableto
conditions. To
ing
press
the
key
display
the menu
next to the "More" label
two times. Now
nextto the
"Adjust Display
contrast is
suitdifferent
it,
adjust
then
key,
press
press
the
light-
first
key
Con-
trast" label. A screen similar to
the one at
the
press
right appears.
key adjacent
Now
to the
r
H 36° 08.993'
______________________________
2 2
__________ ___________ ___________
0.15 MI 77°M
CURRENT POSITION
950 50.552'
MPH MAG
left arrow to decrease the con-
trast. Press the
the
arrow to increase it. The
right
as the arrow
indication of the contrast level. You can see the
you press
the
adjacent
key
are
keys
keys. Afteryou've
to
pressed.
percentage
of contrast in use
The bar chart also
made the
adjustment, press
to erase the menu.
ADJUST BACK LIGHT
LEVEL
The GlobalNav II has internal
lights
board. To
of the
key,
the "More" labeltwotimes. Now
press
just
Thescmenshownbelowappears.
0
gives a graphical
change
for the
on the screen as
display
adjust
lighting, press
then
the
Back
the
press
next to the "Ad-
key
Light
12:iu;ji ill
2/19/1993
oo:oo:55
changes
the CLR
the
key
Level" label.
key
and
key-
intensity
the MENU
next to
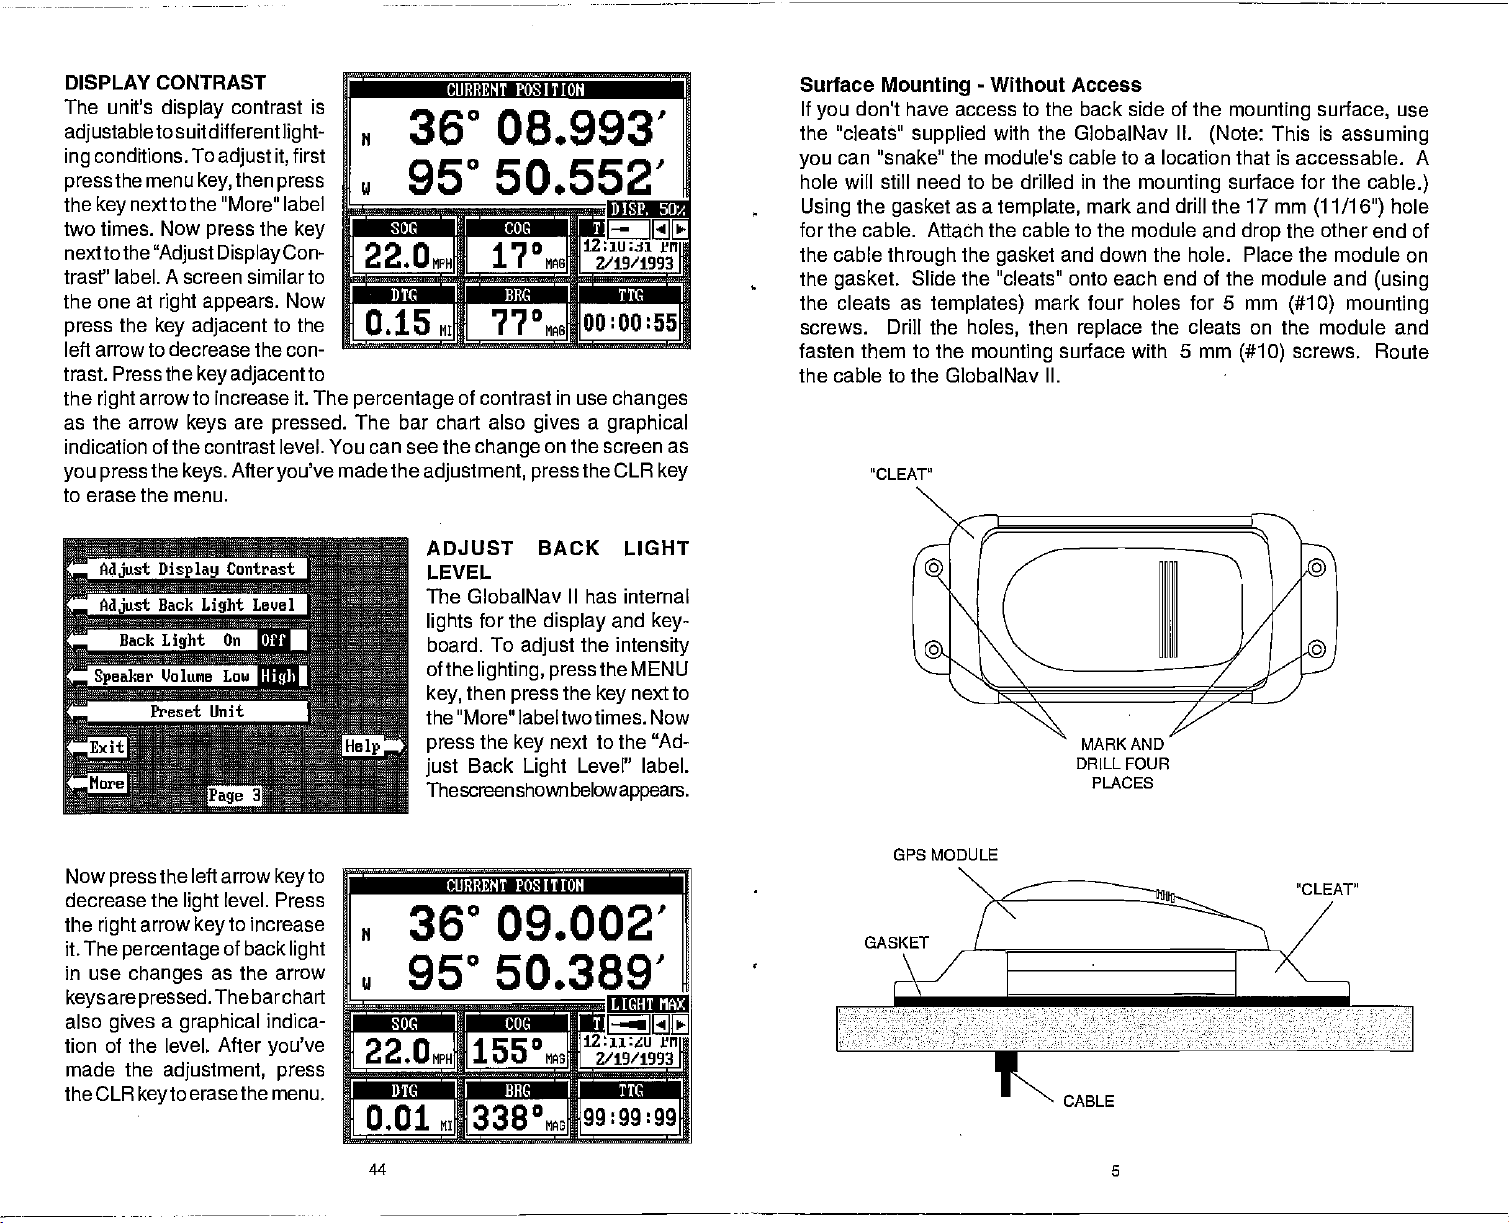
Surface
If
you
the "cleats"
you
hole will still need to be drilled in the
Using
for the
the cable
the
Mounting
don't have access to the back side of the
supplied
can "snake" the module's cable to a location that is accessable. A
the
gasket
cable. Attach the cable to the
through
gasket.
Slide the "cleats" onto each end of the module and
the cleats as
screws. Drill the
fasten them to the
-
Without Access
with the GlobalNav II.
as a
template,
the
gasket
templates)
holes,
mounting
mounting
(Note:
mounting
mark and drill the 17 mm
module and
and down the hole. Place the module on
mark four holes for 5 mm
then
replace
surface with 5 mm
the cleats on the module and
surface for the
drop
(#10)
surface,
This is
assuming
(11/16")
the other end of
(#10) mounting
screws. Route
the cable to the GlobalNav II.
"cLEAT"
MARK AND
DRILL FOUR
PLAcEs
use
cable.)
hole
(using
GPS MODULE
Now
decrease
the
it. The
in use
keys
also
tion of the level. After
made the
the CLR
PDF compression, OCR, web-optimization with CVISION's PdfCompressor
the left arrow
press
the
arrow
right
percentage
changes
are
pressed.
gives a graphical
adjustment, press
keyto
level. Press
light
to increase
key
of back
as the arrow
The barchart
erase the menu.
to
key
light
indica-
you've
ffTii?&iiTiN
36° 09.002'
950 50.389'
____________ _____________
2 2
. MPH MAG 2/19/1993
I I
o
IRE
0.01 M 338°MAG
44
IU(mIlirY
1z:n:tu ii,
99:99:99
1
GASKET
CABLE
5
Page 10

Pole Mount
thread the
First,
ratchet base.
pole mounting adapter
the
Align
pole mounting adapter
the bow of the boat. Install and
mounting adapter
I I •.•
mounting adapter.
the cable
through
GPS module on
and
tighten
IIIII
Now attach the cable to the GPS module and
the
gasket, pole mounting adapter,
of the
top
it
securely.
JilItIfl.
pole mounting adapter
tighten
1J.Jfl..
onto the
mounting pole
so the module will face
the set screw into the
This should
I It4L LI i.#
._LoI".,I.'J.jL'.J
and
and
threaded holes in the module with the holes in the
or mast
with
your
the four stainless steel 5 mm screws and lock washers
attach the
II,
completes
MODULE
SET
scREw
you're using
unit. Thread the cable
the
assembly.
POLE
MOUNTING
ADAPTER
isn't hollow or if the hole in the middle of
connectors,
Then thread the
Route the cable down the outside of the
MODULE
pole mounting adapter
POLE
use the cable
mounting adapter
mounting adapter
pole
adapter. Using
supplied
GPS
If the
the
supplied
GPS
mounting adapter.
with the GlobalNav
module. This
pole
is too small forthe
pole
pole mounting adapter.
pole
pole.
align
the OPS
LI fl.
JLJI
pass
Set the
the four
prevent
pole mounting
to the
into the
into the cable
pole.
or
GPS MODULE SELF-TEST
This feature tests the GPS module and returns a
is of interest
interpretsthis
"MODULE HAS PASSED" or "MODULE HAS FAILED" and shows at the
k,nltnrn n4 Ika onroon 'rho n, ,rran+ onflwn ',nrer%n n, ,n,hr,r ,, I
to the service
only
code and
displays
department.
astatus
message.
special
However,
code. This code
the GlobalNav II
This
message
is either
';Ih; tom;:Ctacttorrervi
department
product
To use the self test
press
pressthe key
label.
if the module fails the self test. Do not
if it fails the self test.
feature,
MENU
the
nextto the "More"
Finally, press
key,
the
then
key
next to the "OPS Module Self
Tesf' label. The screen shown
at
right appears.
To exit from this
the
next to the "Exit" label.
key
screen,
press
GPS SIMULATOR
This feature
the
plotter.
distance to
message appears, alerting you
navigate
places position
The unit
go,
"navigates"
course over
when the simulator is on!
To turn the simulator
the "More" label.
ON" label.
either
off,
press
Finally, press
The
simulator
and hold the OFF
and
ground,
on, press
mode
attempt
C Mo&tle Self Test
Bit
Summary
Low Order Rami
Order Rami
High
Pre Process Test
Pre Process Rae
Multi Interface
'JCO Test
Signal
Software Version
navigation
INJ.
Modale Has PASSEO
data on all
screens,
a closed course. It shows
and other information. A
that the simulator mode is enabled. Don't
the MENU
the
key
starts
immediately.
or
key
then
key,
press
next to the "GPS Simulator OFF
To turn the simulator
the above
repeat
to use this
including
bearing
recurring
the
key
steps.
11
and
next to
CABLE
MOUNTING
ADAPTER
POLE
6 43
CABLE
MOUNTING
ADAPTER
POLE
PDF compression, OCR, web-optimization with CVISION's PdfCompressor
Page 11

display. Usingthesedisplaysalongwith
of the
display gives you
overboard
The
Overboard mode. Your
pressed
"0." Steer to the
Man Overboard
The GlobalNav II doesn't savethe Man Overboard
table.
The GlobalNav II
the Man Overboard screen wheneverthe Man Overboard
To
stop
key
navigtion. Forexample, suppose you
you press
GlobalNav
Overboard
the Man Overboard
position you
your present position. Repeated pressing
not
repeatedly
the first time the Man Overboard
Overboard
adiacent
You can
howeverwhen
stops navigating
Man
Remember,
the
person immediately
tion are also
excellentsafety
safety procedures
what to do before
position.
plotter display automatically
is shown
waypoint flag
However,
the unit from
next to the "DISABLE MOB" label. This resets the Man Overboard
Man
the
II first
screen,
were in when
save
oostion.you
to the "DISABLE MOB" label.
navigate
you go
Overboard location.
saving
good
courses. Instruct all members on board
the information
position
the'S" with a circle and
by
to
was
key
pressed.
IMPORTANT!
it does save the
always
displays
to the recalled
shows
navigation
navigating
Overboard
then switches backto the Position screen. If
key again,
your present position!
mustfirstcleartheold
to a
backto the Man Overboard
the victim is the
afterthe accident
accident
before
any emergency
to the Man Overboard
then stores
first
you
waypoint using
waypoint
preventatives.
leavingthe
the
plotterin
need to steer back to the man
you
shows a .1 mile
when the Man
back to the
get
position
key,
it
on the Man Overboard screen.
data to the
are
viewing
then
your present position
will still show
pressed
key
primary goal. Try
dock. Make certain all on board know
occurs.
the Man Overboard
of the Man Overboard
The unit
is
pressed.
the
and show
happens. Training
the lower
display
Overboard
the
by
waypoint
position
position
position, press
the Position
the GPS
press
navigation
only
To save a new Man
position
Waypoint
bypressincithe
screen,
navigation
all
The Coast Guard has
right
in the Man
icon with a
saved
in
thewaypoint
position
is
key
screen,
on the Man
you press
data
savesthe
Recall
the GlobalNavl I
data
options
and educa-
your
corner
was
key
when the
shown on
pressed.
the
and
The
key.
to
the
-
not
key
does
key
position
key
feature,
to the
to rescue
boat on
KEYBOARD
The
keyboard
row at the bottom. The
numbers,
in the bottom
key
The
page.
event markers or man overboard
the arrow
has
keys arranged
in the left and
keys
activate the windows feature and menu selections.. The menu
corner of the
right
keys along
keys.
the bottom of the screen are used to activate the
I
LOWRANCE GLOBALNAV fl
ALARM
L19
WAVPT SAVE
LI]
WAYPT RECALL
WAYPT
N 36° 08.855'
2 2 0
El
MSN1
El
0.19 MI 329°M
El El El El
OPS PLOTTER STEER WINDOWS
K
GPS - Press this
PLOTTER
STEER
WINDOWS - This
MENU
ALARM - Use this
ROUTE
-
This
-
Press this
you
-
Press this
functions
-
Save and recall routes
key
key gives
key gives you
customize
CUBBENT POSJTLOM 1
950 50.445'
MPH MAO 2/19/1993
to show the Position Screen.
access to the Plotter.
to show the
key
displays.
to show the menus and
key
to set the GPS alarms.
key
in two vertical columns
columns are used to enter
right
keyboard
feature,
IRE ste
access
using
and make menu selections
0 112:35:55
00:02:12
Steering
to
this
activates the first menu
PM
Screen.
the windows
gain
key.
a horizontal
plus
J1
EtJ1
EVFNT MAN
MARKER OVIRODARD
2
which lets
mode,
access to most
with
WAYPT SAVE
PDF compression, OCR, web-optimization with CVISION's PdfCompressor
42 7
-
Pressing
this
key
lets
you
save a
waypoint.
Page 12

LOWRANCE GLOBALNAV II
AlARM
El
ROUTE
WAYPT SAVE
El
WAYPT RE
El
WAYPT
El
El
MENU
El
WAYPT RECALL
WAYPOINT QUICK SAVE
EVENT MARKER - To mark a location on the
MAN OVERBOARD
ARROW KEYS
CLR - This
ENT - This
ON - The ON
OFF - Press and
M 2A° 0RS855'
CALL
2
_,M
0.19 MI 329°M
ElElElEl
OPS PLOTTER STflS WINDOWS
-
position.
feature.
postion
navigation
-
These
move
clears menus and erases entries from the screen.
key
is used to enter numbers and
key
turns
key
HOLD
CIJ]IDENT POSITION 1
950 50.445'
o 1112:35:55
2/19/1993
GJ
2.i53
Press this
-
and switches the unit into a mode that shows
key
-
Press this
Pressing
data to the last
are used to make menu selections and to
keys
objects
the GlobalNav II on
Off
the
jOO:02:12
to recall a
this
key instantly
on the screen.
to turn the GlobalNav II off..
key
key
saved
waypoint.
to
instantly
make selections.
L!J !J''
cj
PM
cJL!j
ElEl
fliRT MAR
MflXER OVEAEOARO
save
plotter
saves
position.
I]
your present
screen,
use this
your present
)
either have to convert
you'll
readings.
The GlobalNav
When it's turned on for the first time
nress the MFNIJ
next to the
"Select Units of Measure" label. Now
"Bearing"
next to the "Exit" label when
key
PRESET
The Presetfeature returns all sonarand GPS unitsto
settings.
contrast,
To
preset
appears.
and the GlobalNav
returned to
MAN OVERBOARD
One of
fall overboard. This situation can be
salt. It's
course,
can use the GlobalNav II to
boating's
particularly dangerous
the first
measures to
Once
you're
II
can
display navigation
while a GPS screen is
key
"Change
label. This moves the black boxfrom "MAG" to "TRU." Press the
This resets the units of
and more. This doesn't erase
the
Press the
their
try
backatthe helm after initial rescue efforts have
GPS
unit, press
key
II
returns
factory settings.
most
terrifying
to do is remain calm and
thing
and rescue the
the GlobalNav Ii's MAN OVERBOARD
Your
appears.
is shown in the
the
display.
tion
isthetimethatyou pressed
position
top
Beneath the
the Man Overboard
bottom
navigation
ing
ing (BRG),
Speed
and Time To Go
the
of
the Distance
Over Ground
postion
screen are the
the
data
displays
Course
at the
at the time
left cornerof
key.
(DTG),
(COG),
(SOG),
back to
(TTG)
top
magnetic readings
information in
magnetic
Settings"
the MENU
next to that label. The menu screen
label. Now
simply press
you're
measure,
anywaypoints
to the GPS
events
person.
help
posi-
is
deadly
at
night
If
start a search
you pressed
is used. To switch to
displayed.
press
finished.
speaker
until the "Preset Unit?' label
key
position
having
or if
you
key.
screen. All units will be
afriend
on
any body
out of
you're
try
lose
sight
pattern.
The screen shown below
the Man Overboard
At the
show-
Bear-
of the
to true or use true
magnetic
Next
the
key
the
key
theiroriginalfactory
volume,
or
routes,
orfamily
of
sight
all standard
of the
or true.
the
press
next to the
next to the
display
however.
disappears
member
fresh or
water,
of land. Of
safety
person, you
failed,
true,
key
press
key
8 41
PDF compression, OCR, web-optimization with CVISION's PdfCompressor
Page 13

SELECT NMEA
The GlobalNav II sends data out the white wire on the
according
Association).
navigation
autopilots,
following
sends
0183 sends
feature,thewhitewire
data
of this manual for
to standards set
This allows the GlobalNav II to send
information to 'listener"
and other marine instruments. The GlobalNav II uses the
NMEA data
steering
on the other
input
information
position, steering, speed,
protocols:
onthe
instrument.
wiring
Onceyou connectthewiring properly,
dataformatto use. Consuitthe owner's manual of the
the NMEA
by
units,
(National
such as
NMEA 0180 and 0183. NMEA 0180
It's useful
only.
mainly
and more. In order to use this
powercable
must beconnectedtothe NMEA
See the installation section in the front
connection information.
the GlobalNav II must betoldwhich
position, depth,
charting instruments,
for
'istener"equipment
power
Marine Electronics
autopilots.
NMEA
to see which format it needs. Then set the GlobalNav II as follows:
cable
and
GPS - HOW IT WORKS
The Global
haseverbeen devised. Conceived
United States
global positioning,
Basically, thesystemworks by usingaconstellation
11
,000miles
operational.
satellitesareinplace,
twenty-fourhoursa day.
give
latitude/longitude plus altitude.)
displays
Positioning System (GPS)
the GPS
365
days ayear.
Therewill be2l satellites in orbitwhenthe
atleastfourofthemwill
in
Three more satelliteswill actas
a"2D"fix.
military,
space.
(A2Dfix isyourposition
a3D fix.
The GPS
isthe
bestapproach
bythe Departmentof
system
is an answertotheirneedsof 24 hour
spares,
beinviewnearlyanywhereon
receiverrequiresat
in
latitude/longitude.
When it locks on to at
to
navigation
Defense
of
satellitesorbiting
(DOD)
system isfully
that
andthe
Earth
foratotal of 24. When all
Earth
leastthree satellitesto
A3Dfix
isyour
leastfoursatellites,
it
First, press
Settings"
screen shown below
The data format
next to the desired data
key
used GPS screen and send
NMEA data out the white wire
on the
the MENU
label. Now
cable.
power
key. Next, press
press
appears.
currently
the
key
in use shows
output.
TRUE and MAGNETIC POSITION
True and
magnetic
north are not
of the world. It's where all lines of
the location
of true
Charts
true north. If
ourcompasses point.
at a location in Canada.
north,
are
usually
you
laid out
a course on a chart
plot
according
PDF compression, OCR, web-optimization with CVISION's PdfCompressor
the
next to the
key
"Change
GPS
next to the "Select NMEA" label. The
at the
The GlobalNav II will return to
always
the same. True north is the
longitude
Itliesseveral hundred milestothe
to a Mercator
40 9
of the screen. Press the
top
converge. Magnetic
projection
the Mercator
using
the
last
top
north is
south
that uses
projection,
It takes three satellites to determine
Asthe receiver locks on to each
satellite
satellite has an
transmission started. The
thus it knows how
to reach it. If
you
bymeasuringthe length
extremely
ittookthe radio
long
knowtimeand
havethisfromthree
you
accurateclockthattellsthe receiverwhen the radio
receivercomparesthattimeagainst
speed,
satellites,
satellite,
of time ittakesthe
position.
it calculates the distance
radiosignalto
signal (travelling
then
then the receivercan determine
can calculate distance. Once
you
atthe
reach it. Each
its own
speed
from the
clock,
of
light!)
position.
Page 14

ACCURACY
You
mayhave
DOD
requires accuracyof
onlythe military getsthis precision.
unauthorized
words,thedatacomingfromthesateiiitesisencrypted.
use"C/ACode."
Inthis
manner,
Meanwhile,
enemies.
meters. This is more than
However
accuracy
Availabili
so
youraccuracywill
depends
numberofsatellitestrackedatonetime
The smallest
present
Don't let this
updates
to use.
systems.
the market
heardtalesof
peoplefrom usingthe
It'saccuracyisintentionallyworsethanthemilitary's"P
civilian usersworldwidecan
the
militarykeepsthe
Theoretically,
of this
(as
writing),
extraordinaryaccuracyfrom
1 Oto 15
C/A code can
adequate
inthe hands of theworid.
orSA. This is
t'
on the
angle
ranges
position symbol
discourage you,
than other
Accuracy,
You've
today.
small,
typicallybe
of the satellite abovethe
on
the
can move off thescreen even
systems (such
even with SA on is still betterthan most other
purchased
We
hope you'll enjoy
metersfromthesatellitesystem. However,
The
waythe military keeps
more
precise system
benefitfromexcellentpositionfixes.
most accurate
give
for most
the
military
Ws
So,
random errors
within 100 meters. Of
(the
plotter may
however. GPS
one of the finest
not be usable if the SA is
as
Loran),
system awayfrom potential
accurate
people.
isn't satisfied with C/A's
degrading
intentionallyaddedto
horizon, signal-to-noise ratio,
morethe
it for
better),
nature has much faster
by
and
typically
navigation
many years
The Lowrance LGC-1 GPS Module
This GPS receiver is
small,
rugged,
in view and
information to the GlobalNav II once
Rockwell's GPS receiver
design
acquire up
and
manufacturing capabilities,
currently
and fast. The five channel
the most advanced line of GPS marine
world.
used in all Lowrance GPS receivers. It's
design
lets it track all satellites
to five satellites at one time. It sends
second.
every
technology
with Lowrance's state-of-the-art
Lowrance
navigation systems
brings
GPS receivers. The
us and other
is
coding.
Civilian aPS receivers
position
fixes
In other
Code."
to 15
up
potential
itfurtherwith "Selective
the
system
high.
also
the
The
still.
course,
whileyou're sitting
accuracy
andotherfactors.
is much easier
navigation
instruments on
to come.
position
By incorporating
to the consumer
available in the
within .1 mile ala recalled
The alarm is
adjustable
from .01 to 9.9 miles.
waypoint
if the arrival alarm's
XTE ALARM
The XTE
error is
greater
changes
the XTE
track
(cross
man the alarms
range
alarm sounds a tone when
error)
setting. unanging
on the
steering
screen. The alarm is
from 0.0 to 9.9 miles.
ANCHOR ALARM
The anchoralarm sounds atone when the
a
(600 feet),
the location where
CHANGING GPS SE11'INGS
Forthefastestacquisition
when it's turned on for the
the GPS section in this manual.
of the
SETUP" menu. To do
to the
Lat, Lon, Alt, Time,
Using
Time, Date,
of these menus work
section atthe
unit returns to the OPS or
You
the unit if
distance
the unit off. In
radius.
preset
Forexample,
then the alarm will sound if
you
parameters (such
"Change
GPS
the menus on this menu
or Altitude without
beginning
need to re-initialize
may
move a
you
100
(over
miles)
this
example you
if
setthe
you
you
setthe alarm.
of
satellites,
It's
adjustable
the GlobalNav
first time. This is described at the
However,
as
this, press
Settings"
use the menu features in the "CHANGE
time),
the MENU
label.
Finally, press
Date" label. The screen shown below
pages, you
affecting any
identically
to the ones described in the initialization
of the GPS section.
screen.
plotter
long
with
would need to enter a new ini-
tial
position
GlobalNav II find the correct
satellites
to
quicker.
help
the
your
is .1 mile.
cross track
setting
tne XI h alarm also
adjustable
present position
anchoralarmto
move more than 600 feet from
from
if
need to
you
then
key,
the
can
changethe
moves
.1
0.01 to 9.9 miles.
II
mustbe initialized
change only
press
next to the "Set
key
Initial
other initialization
Afteryou
make
__________
N 36'O1.042'
outside
nautical mile
beginning
one
the
appears.
next
key
Position,
setting.
achange,
the
of
All
WRANE
it
PDF compression, OCR, web-optimization with CVISION's PdfCompressor
10
39
Page 15

After
you've
RTE"label.This erases the route from
to the 'EXIT" abel. This returns
selected the desired
press
the
key
display.
route,
memory. Finally, press
to the GPS
you
next to the "ERASE GETTING STARTED
the
key
next
GPS ALARMS
The GlobalNav II has three GPS alarms. One is an arrival alarm that
sounds
when
come within
you
is a cross track error alarm that sounds when
than the alarm's
sounds when
identically.
To
adjust
press
screen
Now
desired alarm's label. In this
example,
set.
the ALARM
shown
press
the Arrival
Pressing
you
a GPS
below
the
key
the
setting.
move outside a
alarm,
key.
appears.
next to the
alarm
moves
key
a
preset
distance
to a
waypoint.
move off course more
you
Another
The last GPS alarm is an anchor alarm that
radius. All of these alarms are set
preset
first
The
is
the black box from "OFF" to
"Adjust'.
A new box
appears
at
the bottom of the screen as
shown at the bottom of this
page. Using
enterthe desired alarm
keys,
the
arrival alarm to sound an alert if we come within
awaypoint. Onceyou'veenteredthe
to the
"Accept"
position
alarm's label. You can set
navigation orplotterscreen by pressing
turn an alarm
the numbered
label. The black box
and the number
off,
simply press
distance. Inthis
"trip"
desired
entered
you
other alarm on this
any
the ALARM
example,
numbers,
automatically
appears
the
at the far
next to the "Exit" label. To
key
then
key,
we're
0.20
nautical
pressthe key
moves to the
side of the
right
or return
page,
the
press
setting
miles of
next
"ON"
to a
next
key
to the alarm label until the
black box moves over "OFF".
The
following
scribes each GPS alarm and
its limits.
ARRIVAL ALARM
The arrival
tone when
within the
waypoint.
alarm
sounds if
section de-
alarm sounds a
position
your
alarm's radius of a
For
example,
you
the
come
is
Initialization - Power On
In
them. If
by
the
showing
navigation displays, including
set the time to
process, you
time it'sturned on. This initialization
requires
1. Present
2. Elevation above sea level
3.
The unit
it's been initialized
After the
ON
"CHANGE GPS SETTINGS" label.
LAT, LON, ALT, TIME,
next.
This is the GPS
The
shown at the
for the
order
you simplyturn
GlobalNav Ito lock onto the
the unit on and
the unit will find the satellites
wait,
satellites,
itself in 15 minutes or less. This is called "Cold Start." If
satellites,
the time
UTC time orthetime at
your
display
local
will
probably
Greenwich,
the
position displaywill
To
time.)
speed up
be
wrong,
England.
the satellite
can initialize the GlobalNav II or "tell it where it is" the first
Now
is
usually
press
the
the
the
Today's
usually only
power
then
key,
process
following
position
date and time
data:
in
latitude/longitude
(altitude)
takes afew minutes or less to find the
the user.
by
cable and GPS antenna module are
the MENU
press
key.
Finally, press
DATE' label. The screen shown below
screen.
setup
settings
now in use are
of the
top
display.
A black box surrounds the lati-
tude box. If
unit for the first
settings
your position
change
this
display, simply
you're using
time,
are
probablywrong
and time. To
of the numbers on
any
black box to the desired num-
ber
you
example,
on the time. The label at the bottom of the
Time". Pressthe
the number
the arrow
using
move the box
to
change
keys
,the
key
at the
the different items on this screen.
the
these
for
move the
As
keys.
label at the bottom of the screen
the
time,
nexttothis label. This
of the unit. See the
top
the down arrow until the
press
screen now shows
letsyou
following pages
changethetime, using
it must
you
since it will be
However,
be correct.
acquisition
done
installed,
key
H O°OD.OdIIJ'
also
once and
only
satellites
press
next to the
key
nexttothe "SET
changes.
black box is
on
first find
let it find
all other
can
(You
once
the
appears
For
"Change
selling
PDF compression, OCR, web-optimization with CVISION's PdfCompressor
38 11
Page 16

Note: If
all of the
can't
values
don't use the "cold
you
settings
by
enter
itself.
simply
start"
feature,
on this
to their correct values. In
page
your present position
cnArlut I'USIIIUN
Use a chart to determine
longitudethatyou
haveto be
extremely
Typically,
tion within one
present position,
II should
tual
quickly
latitude/longitude.
enterdoesn't
if
enter a
you
degree
the GlobalNav
find
change your present position,
first move the black box to the
LATITUDE box
ready there).
next to the "CHANGE LAT"
key
(if
Next,
label. The screen shownat
appears.
your present
entered is in
seconds!)
Next,
latitude
If
you
simply
degrees,
make a
to the number in the latitude that needs
the "Latitude N 5"
necessary.
"Accept
The black box
the
latitude.
After the latitude has been
La? label.
automatically
Now
enterthe
to enter a zero "0" as
degrees!
"Longitude
everything
"Accept
After
you've
W E" label to
in
the
Lon" label.
your position
accurate.
posi-
of
your
ac-
your
To
it isn't al-
the
press
right
enter
the numbered
using
minutes,
mistake, press
label to
longitude using
the first number in the
entered the last
change
longitude
and hundredths of a minute.
change
moves to the
the latitude from north to
it from west to
field is
correct,
then
will have to
you
other
and
have the unit find the correct
if
don't know it. The latitude!
you
Notice that the
keys.
the left or
changing.
entered,
longitude
the numbered
longitude
number,
press
arrow
right
Press
the
the
press
key
field after
keys.
if it's less than 100
the
press
east,
key
if
necessary.
the
key
keys
change
words,
you
position
(Not
to move
next to
key
south,
next to the
enter
you
Be certain
next to the
When
next to the
IMPORTANT!
Turning
the arrival alarm off
to the next
However,
the unit will still show
waypoint
prevents
in the route.
the GlobalNav II from
in
This,
navigation
effect,
data to the current
turns the
sequencing
waypoint
route off.
in
the route at the time the arrival alarm was turned off.
CANCEL NAVIGATION
To
waypoint
to the
Canceling navigation
memory.
MObIFYING A ROUTE
Any partof
have a route
change waypoint
"ROUTE"
Using
the route number that
the GlobalNav II from
stop
in a
route,
"CANCEL
It
NAVIGATION" label. This
merely stops
a route can be
consisting
number 3 to
then
key,
the
next to the "Increase" or "Decrease RTE#"
keys
to
waypoint
twice. Now
key
stops
press
navigating
the MENU
NOTE:
does not erase the route or
the GlobalNav II from
changed
of
press
you
waypoints
the
wish to
at
anytime. Forexample, supposeyou
number
waypoint
next to the "Save/Edit Route" label.
key
change.
1,2,
number 5.
The list of
or
navigating
press
all
navigation.
any waypoints
navigating.
and 3 and
Simply press
waypoints
the
key
you
labels,
to a
next
from
wish to
the
select
used in
the route are shown beneath the route number and name.
down arrow
if
Using
movethe blackboxto
number3.
bered
waypoint
press
cept'
waypointfrom3toS.
the
label.
to the "Exit' label and
finished.
the
Simply
keys
from 3 to 5.
the
key
label. You've
next to the "Save RTE"
key
Finally, pressthekeynext
usethe
to
change
next to the "Ac-
changed
key,
waypoint
num-
Next,
Now
press
you're
the
the
itoH 1
IC :REEF 1
PTII 3
PTII 6
PTII 5
PT
ItS!I
flU 0
flU 0
TII 0
unit o
tJPTII 0
k'PTU 0
nit a
110CR PT
PALM COUE
BUOY 4
CHANGE ALTITUDE
To enter
the arrow
using
your present
keys.
altitude,
Now
The GlobalNav II needs to know
above the
height
Use the numbered
the "Altitude +
ground.) Again,
to enter
keys
-"
label if
PDF compression, OCR, web-optimization with CVISION's PdfCompressor
move the black box to the Altitude field
the
press
your
an
your
altitude is below sea level. For
your
next to the
key
elevation above sea level.
approximation
"Change
is
usually
altitude data. Press the
12
Alt" label.
(Not your
sufficient.
next to
key
example,
Remember, any part
ERASING A ROUTE
To erase a
the
"Save/Edit
Now
to
cycle through
route,
pressthe key
of the route can be
first
Route" label. The route menu
press
the ROUTE
changed
key.
nexttothe "Increase RTE#"
the available routes.
37
at
time.
any
Next, press
appears
as shown above.
the
key
next to
or"Decrease RTE#" labels
Page 17

ingthewaypoints
Then
in
memory.
press
the
key
You must select
In other
numbers
finally
when
words,
1, 3,
5. In this
making
and 5.
case,
the route.
until all of
thewaypoints
havebeen enteredforthe route.
next to the 'Save RTE" label. This saves
IMPORTANT!
waypoints
suppose you
in the order
However,
must select
you
they
a route that consists of
want
wish to travel
you
waypoint
to be used in the route.
are
to 3
3, 1,
route
your
waypoint
first,
then
1,
and
and 5 in that order
suppose you're
and the
is
would need to
bers
spot you're standing
35 feet below sea level. You
"35",
in Death
enter the num-
then
press
nextto the "Altitude +
change
key
label when
it to -35 feet. Press the
next to the
you're
Valley
the
-"label to
"Accept
done.
in
key
Alt"
FOLLOWING
follow a
To
"Recall Route" label.The
one
appears
A ROUTE
route,
on the
the ROUTE
press
screen shown below
side of the screen. The list of
right
key,
the route are shown beneath the route
recall a different
"Decrease RTE#" label to
After
you've
sired
route, you'll
box
surrounding
waypoint
the
you
ing
route,
in the route. This is
starting waypoint
wish to start the route
the first
simply pressthe key
route,
selected the de-
notice a black
the first
box. If
waypoint
the
press
cycle through
us-
in the
next
key
to the "Start Route" label. How-
if
ever,
route
using
simply
to move the black boxto the desired
wish to start the
you
a
differentwaypoint,
use the down arrow
key
waypoint
next to the "Start Route" label.
To follow a route
example, suppose you
numbered
show
navigation
travel backward
you
number 2
backwards, press
and 2.
3,6,
data to
then
first,
If
you
waypoint
through
and end with
6,
travel forward or reverse
waypoint
in the
the arrival alarm
route,
have three
through
the
waypoints
travel forward
number 3
the
route,
waypoint
the
then
the
press
appears.
key
Route number
waypoints
number and name. If
next to the
"Increase RTE#" or
the available routes.
number. Then
nextto the "Reverse" label.
key
in a route and
first,
the
then
through
press
route,
and
6,
the unit will start with
number 3. No matter if
when
route,
sounds until
reach the last
you
turn it off.
you
next to the
used in
wish to
you
the
key
For
they're
the unit will
2. If
finally
waypoint
you
CHANGE TIME
To
change
the local time
to move the black box
to the
"Change
Use the number
Time" label. The screen
keys
(the
to the "Local Time" field. Now
to enter
time
at
the time. Remember to enter a
zero first if the
10.
Forexample,
for 7:30.
"Time AM PM" label to
the
change
PMPress the
"Accept
finished.
you're
CHANGE DATE
To enter
"Local Date"
number
the
label when
The numbers
the
press
correct,
position
should find the satellites and show a
COLD START
the GlobalNav II is turned on for the first time
When
automatically
can send a cold start
time is less than
enterO73000
Press the
the time
key
next to
key
from AM to
next to the
Time" label
today's
press
date,
press
field. Now
keys
you're
at the
next to
key
the
press
to enterthe date. Press the
finished.
top
the label that
next to the
key
screen and start
sends a "cold start"
message
when
the arrow
the
key
of the screen should be correct. If
"Exit" label. The unit will switch to the
searching
message
to the receiver.
your position), press
press
shown below
to move the
keys
nextto the
you
"Change
key
need to
next to
for the satellites
position
in
appears.
the
change.
currently
a few minutes.
"out of the
GPS receiver. You also
to the
the arrow
the
key
keys
next
black box to the
Date" label.
"Accept
they
If
everything
Use
Date"
aren't,
is
in view. It
box",
it
PDF compression, OCR, web-optimization with CVISION's PdfCompressor
36
13
Page 18

If the unit can't lock on to
if
it has trouble
This can
example, given
finding
happen
it east
the
if
you've
longitude
the satellites
satellites,
using
perhaps
entered the
instead of west. Orif
the data
it is
wrong
data
distance with the unit turned off.
To
send a cold start
the
press
key
technique
key
next to the "OPS "COLD" Start" label. The unit will
to find the available satellites. It should lock on to them in 15
minutes or less.
date
display
will
message
next to the
Remember,
probably
set the time and date to their
internal clock will
The GPS
satellites.
POSITION/NAVIGATION DISPLAYS
system updates
keep
The GlobalNav II has a
satellite information screen. These
most
important
extent
screen.
through
(There
data.
However,
the
"Change Display"
are other screens that can be customized
to the
receiver,
"ChangeGPS Settings"
when it
be
wrong.
proper
the correct
does, your
Use the method shown
local
time,
press
label.
local time
settings.
even when
this clock when the unit is locked on
position screen, plotter,
displays
can customize all of them to some
you
steering
were
feature on the first GPS menu
Windows feature. See the Windows section for more
these
screens,
see the "Customize" section.
you've given it,
the
using
accident. For
by
moved a
you've
the MENU
Finally, press
begin
and
previously
Once this is
data.
wrong
long
Now
key.
a cold start
possibly
done,
the unit is turned off.
to the
indicator,
designed
detail.)
To customize
and a
to show the
by using
or
the
to
an
the
Name a Route
To
assign
or "Decrease RTE#" label to move
desired route
the down arrow
nrnc'o tine, Lien, nr,..,+ I.—, +1.,,., "rk—,.,.-,," Ie,ke.l tin
appears
Use the
example,
"REEF
QUICK SAVE
until the letter "14"
the window.
right
black box to the next letter
sition. Now
key.
the screen. Use the number
keysto
this
name has been written on the
screen. Now
to the
You can now enter the
a name to a
numberappears
key
"-"'''"''-' —. .'—,
'-'S
next.
on both sides
keys
to name a route
1", press
key repeatedly
Next,
arrow
The
process
key
press
"E"
letter
enter numbers.
until the entire _______________
press
"Accept
Name" label. The GlobalNav II returns to the
route, press
the
through
next to the
key
the list of routes. When the
inthewindowatthetopof
until the black box moves to the
''—'—''-'' ' ' ''—
'a—'
of the screen to enter the
the
WAYPT
_____________________________
SAD09
appears
press
in
the
F C H
_____________________________
to move the _______________________________
po-
the ROUTE
appears
the
on
Repeat
next
key
waypoints
II II 0 P KEYS TO MAKE YOUR CHANGES. PUSH
'
_______________________________
(IOU X
used in
USE THE ALPHA KEYS OR
the route.
"Name"
waypoint
Routett
Kane :EEEJ1
IIJPTIt
UPT U
lip, H n
EUENI MARKER
CHANGE
OR PUSH CLR TO "ABORT"
YOUR CHANGES.
It LI
1UPT
It LI
jUPT
"Increase RTE#"
the
screen,
position.
TO "ACCEPT" THE
Accept
press
Now
name. For
1
THE NUMERIC
Kane
,
route menu.
IMPORTANTl
If the data shown in
then it means that data is invalid. Do not
For
example,
if the
satellites and hasn't
last known
unit until
Each of the
of the
position,
have found the reason the unit has
you
following
unit, except
for the
numbers on
digital
position display
re-aquired
not
your present position!
them. The
is
screen on
any
on that data if it is
rely
flashing,
position
then the
that is
Do not
lost the satellites!
screens is
available
satellite information screen A detailed
by pressing
this unit
isflashing,
flashing.
unit has lost the
flashing
navigate
a
key
with this
at the bottom
descrip-
is
tion of each screen follows.
SATELLITE INFORMATION SCREEN
The
satellite
in view. To see this
information screen
display, press
showstechnical data about each satellite
the MENU
key,
then
press
the
key
to the "Satellite Information" label. A screen similar to the one at the
of
the next
page appears.
14
your
next
top
Waypoint
If
you've
the screen. If
keys.
in the route. For
the 8
right
Next, press
"Accept"
II reverts to the menu shown
above.
The cursor should now be on
the second
enter the
the second
route. Press the
"Accept"
Selection
named a
Now
press
If
key.
you've
of the
label. The GlobalNav
waypoint
waypoint
route,
movethe blackboxto the"O"
not,
the numbered
example,
named the
waypoint
the
next to the
key
line. Now
number for
waypoint
nextto the
key
label. Continue enter-
the black box should be on the "0" at the
ordown arrow
wish to
blankspaceto
PT
1t!1
PT It U
PTII 0
PT It 0
PT It 0
PT It 0
if
you
number.
of the
key
want
waypoint
waypoint,
usingthe up
waypoint you
number 8 to be
it shows in the
loLite It 1
lane REEF 1
:1 * 0
in the
35
PT It 0
UPT It 0
UPT It 0
UPT It 0
top
to first
go
first,
press
the
——
________
_________
of
PDF compression, OCR, web-optimization with CVISION's PdfCompressor
Page 19

Now
untilthe
ber
When it
nexttothe "Goto
key
label. The GlobalNav
to the last used
ing navigation
waypoint you
ROUTES
A route
navigate
without
the unit after
waypoints.
navigation
the first
automatically sequences
shown to this
waypoint
There are four
create and name the route.
Then
Finally,
backward. After these
showing navigation
CREATING A ROUTE
To create a
the
press
desiredwaypoint
appears
does, simply press
next to the "Increase WPT" or "Decrease
key
on the screen.
Waypoint"
II returns
screen,
data to the
recalled.
you
to
arriving
When
the
ability
waypoints
re-program
at
travell on a
you
gives
to several
having
information to the
waypoint, (signalled by
waypoint
in a
route,
and the
the arrival alarm sounds until
steps required
determinethe
startingwaypoint.
the unit will ask
steps
data to the first
first
route,
press
num-
the
IILAT
show-
LOM
to
each one. A route consists of two or more
the GlobalNav II first shows
route,
first
waypoint
the Arrival
to the next
process repeats.
in the route. When
Alarm),
the GlobalNav II
waypoint. Navigation
When
you
turn it off.
you
to create and follow a route.
select the
Next,
if
you
you
are
the ROUTE
waypoints
Next,tellthe
wish to run the route forward or
completed,
waypoint
the GlobalNav II will start
on the route.
key. Next, press
used in the route.
unittofollowthe route.
to the "Save/Edit Route" label. The screen shown below
This menu lets
route
number,
and
choosethewaypoints
in the route. Select the route
you
name the
thatyouwishtocreate by press-
the
ing
crease"
labels. When the desired num-
ber
appears, you
modify
next to the "In-
key
or "Decrease'
can create or
it.
select
route,
used
RTE#
the
PT
PT
I
iT
PT
PT
PT
PT
lIFT
It
It
It
It
It
It
It
It
It
It
It
WPT" label
_______
:
H 36°08.915'
:
U
reach
you
information is
reach the last
you
key
must
next
First,
the
appears.
a
a
0
0
0
U
U
0
0
0
0
The GlobalNav II has a five
channel GPS receiver. Data on
each channel is shown at the
of the
top
nels are numbered
five
onthe
Every
display.
Ieftside
satellite in the constella-
tion has a number
called the PRN. The PRN is
it,
The chan-
onethrough
ofthescreen.
assigned
thefirstnumberinthechannel's
row. TRK stands for "track." If
the GlobalNavil is
satellite,
then a'l"' is
tracking
placed
this column. If the GlobalNav II
appears.
from
yourposition.
it is due south. SNR is the
the satellite's
ELV is the elevation
your position.
AZM is the azimuth or
Forexample,
signal
signal-to-noise
is. The
Thesatellitesthat are visible in the
side of the screen under the "VISIBLE SATS"
right
In the
upperrightcornerof
the "Dilution Of Precision"
you
ric
(GDOP), position (PDOP),
GDOP isthe combination value of
the GDOP's number
based
on
GDOP,
DOP values. These
and
any ground
Remember,
therefore
based obstructions.
the smaller the number
the screen arethe DOPS
the better. The GPS receiver selects satellites
is,
depend
fl13T
12 S 21° 324° 29 H- 2:33
02 T 46° 115° 43
T 28° 208° 42
..?i
1.4 T 19° '14° 35
I
'a}1wO1: '('I
36°09.044'
N
to
the
in
if the azimuth ofasatellite is
higher
it
on the azimuth and elevation of the
95°5I].415'
IU
li
II 1,1 flA"JO
U..L2 MI Ca•T I MPG
r
is
searching
(height)
(DOP)
time
always
of the satellite above the horizon
direction
ratio. This
the SNR
skyfrom yourposition
forthe horizontal
(TDOP),
HDOP, VDOP,
tries to use satellites that have
-
number,
the better on all of the DOPs.
for the
and vertical
and TDOP. Thesmaller
At the bottom of the screen are the Present Position
Over Ground
waypoint) (DTG), Bearing (to
displays.
POSITION SCREEN
The
position
initialized
The
position display
of the screen and
top
(SOG),
These
screen
oryou
Course Over Ground
waypoint)
displays
are customizable.
automatically appears
can viewthisscreen
shows
your present position
Speed
Over Ground
(COG),
(BRG),
and
after the
atanytime by pressingthe
in
(SOG),
—r
13020624
1 t4
.
soI
• MPH
satellite,
of
the satellite from
1
Sodegrees,
tells
you
the better.
are shown in the
heading.
displays.
(POSITION), Speed
Distance To Go
local time and date
large
Course Over Ground
These show
(HDOP), geomet-
(VDOP).
GlobalNav
numbers at the
0
MPG
•IiI,AJTh1
12:35:55PM
2/19/1993
a "5"
then
then
how
strong
The
good
satellite,
II
POS
key.
(to
is
PDF compression, OCR, web-optimization with CVISION's PdfCompressor
34
15
Page 20

(COG),
to
waypoint,
waypoint,
date
thA snrAn ________________________________
Your
the
longitude
shown in
thousandths
example,
latitude and
Please note that
To
STEERING SCREEN
The
travelled. This iscalled a Course Deviation lndicatororCDl. It also shows
Distance To Go
Name),
Waypoint
Your
direction the boat is
the boatwith the arrow
arrive at the
or
on the center line.
display.
closer
past
waypoint's
bottom of the
The numbers on the
Distance To Go
waypoint, Bearing
Time To Go
and local time and
displays
present position
top
Go,
steering
present position
path you've
at the bottom of
shows
of the screen in latitude!
coordinates. This is
degrees,
on this
and Time To Go
Cross Track Error
Name
As
together.
the
minutes,
of a minute. For
page,
82
degrees,
must recall
you
screen shows a
(DTG), Bearing
(WFT Name).
heading
waypoint.
taken. To travel
The
you approach
If
you
waypoint,
box will move to the
display.
(DTG)
CURRENT POSITION
to
to
(TTG)
at
and
the
present position
50.853
!k
minutes
36° 08.855'
95° 50.445'
22.0
0.19
________________________________
MPH1
J329M41uh30212
is
31
longitude.
awaypointto
displays.
pictorial
to
(XTE),
Press the STEER
is shown
relative to the
view of
Waypoint (BRG),
Time To Go to
the arrow. The arrow shows the
by
waypoint.
always pointingtowards
The solid line
waypoint
the
travel
extendingfrom
direetlyto
is
depicted by
waypoint,
a
waypoint, try
the arrow and the box will move
the
left
top
o
253
degrees,
use the
the
MA4
8.642 minutes
Bearing,
boat and course
your
Route Name
Waypoint (TTG),
to view this screen.
key
In
theory,
waypoint,
arrow
the
to
keep
a box at the
1112:35:55 PN
2/19/1993
Distance
(RTE
and
if
steer
you
then
you
will
isyourtrack
the arrow
of the CDI
top
I
the
Name" label. The screen shown
at
Use the
the screen to enterthe wavooint
name. For
waypoint
ALARM
letter "C"
dow.
row
to the next letter
press
screen.
screen.
GlobalNav II
the
label. Now
Erase a
The
lets
the list. To erase a
first
key.
the "Increase WPT" or "De-
crease WPT" label until the
desired
pears
press
"ERASE WPT" label. The
screen shown above
A
ARE YOU SURE?." If
erase, press
the
information from the
next to the
key
"Change
right appears.
on both sides of
keys
example,
"COVE
key repeatedly
appears
Next, press
to move the black box
key
to name a
1",
press
until the
in the win-
the
right
position.
the WAYPT RECALL
Now
this
press
process
the
Repeat
returnstothewaypointsave
waypoint
with this
press
the
name,
key
Waypoint
Waypoint
erase
you
press
Now
waypoint
Erase feature
waypoints
waypoint,
the WAYPT SAVE
the
press
key
number
on the screen.
the
message
next to the
key
appears
appears.
on the screen that
you
the
next to the "YES" arrow. If
key
"NO" arrow. Press the
displayed waypoint
_____________________________
the
ar-
Now
key repeatedly
until the entire name has been written on the
next to the
key
first
press
until the "0"
"Accept
menu as shown above. To save
the
next to the
key
- -
ETII:
1
ThE cove ii
LAT : N —'——.——'
LON 4——'
appears
NAME"
"Save WPT"
next to the "Exit' label to exit this menu.
from
next to
ap-
Simply
"WAIT!! DELETE WAYPOINT
says
are certain this is the
next to the "YES" arrow to erase all
key
number.
waypoint
not, press
that
the
you
on the
label. The
wish to
next to
key
side of the screen are distance
markers, showing
distance to the recalled
ing
waypoint.
If the numbers have
a black box
the remain-
surrounding
them,
To exit from the
Recall a
waypoint
Waypoint
You must recall a
GlobalNav II. To recall
The screen shown at the
16 33
save
waypoint
a
waypoint,
top
menu, press
in order to
first
of the next
the
navigate
press
page appears.
next to the
key
to that
the WAYPT RECALL
position
"Exit"
with the
label.
key.
PDF compression, OCR, web-optimization with CVISION's PdfCompressor
Page 21

Enter New
To save a location
SAVE
to the
latitude
screen shown below
Nowenterthe location
to save
keys.
a
backspace
mistake. In
the left arrow
ing
Waypoint
otherthan
the
Using
key.
latitude/longitude position.
position.
using
up
Press the
appears.
the numbered
Use the left arrow
if
you
otherwords,
key
yourpresent
and down arrow
key
wish
you
as
key
make a
press-
moves
position,
keys,
Now
press
next to the
first
move the black box down
the down arrow
Change
Latitude" label. The
AT
LON
the WAYPT
press
Pm:
:
i;— ._...j
key
to the
the black box overthe last num-
ber entered. Notice that the
position
minutes,
minute.
the
8" label to
entered the
waypoint
black box to the
Lon" label. Now enter the
longitude
degrees,
to
'Accept
appears
top
entered is in
degrees,
and thousandths of a
(Not seconds!)
next to the "Latitude N
key
change
save menu
the "N" to a
latitude,
press
reappears.
longitude position
if it's less than 100
then enter"085". Press the
change
of the screen. If this
it from west to
Lon" label when
with the
position you
Press
the
longitude.
degrees.
east,
you've
entered in the
position
if
"5",
key
Next,
and
if
necessary.
finished. The save
is
correct,
latitude is south. After
your
next to the
using
press
Make certain to add a zero to the
For
next to the
key
"Accept
the arrow
the
key
example,
Press the
Lat" label. The
keys,
next to the
if the
longitude
"Longitude
key
waypoint
waypoint position
press
the
next to the "Save
key
you've
move the
"Change
is
85
WE" label
next to the
menu
box at the
wpr' label.
Name a
To
press
The
pears.
the "Increase WPT" or "De-
crease WPT" label to move
through
When the desired
appears
the down arrow
black box moves to the
'NAME:"
PDF compression, OCR, web-optimization with CVISION's PdfCompressor
Waypoint
assign anametoawaypoint,
the WAYPT SAVE
waypoint
Press the
save menu
the
list
the
in
position.
key
of
window, press
key
Now
key.
ap-
next to
waypoints.
waypoint
until the
press
WPTII:
NAME: I
tAT : N ————.———'
:
LON
KE'S TO MAKE YOUR CHANGES. PUSH
EVENT MARKER TO 'ACCEPT" THE
CHANGE OR PUSH CLR TO 'ABORT"
YOUR CHA) B.
32 17
_____
THE HU._.5
then the distance markers is
other
words,
passed
The numbers
gives you
is
halfway
range
CDI
range
alarms to
Using
display
CUSTOMIZE SCREENS
The
digital displays
Satellite
if the numbers are surrounded
the
waypoint
immediately
an idea of how far off course
between the
is 0.5
miles,
is the same as the CDI alarm
change
the
digital displays
at the
top
screens, plus
and need to turn around.
then
the CDI
let
you accurately
on the bottom half of
showing
below the CDI
course line and the outside left line and the CDI
cross
your
range.
at the bottom of the screen with the
the
displays
as desired. To show how this is
example.
To customize the Position
pressing
screen
DISPLAY" label. The unit re-
the GPS
appears.
key.
Press the
Screen,
Next,
turns to the Position Screen
with a black box around the
Speed
Over Ground
(SOG)
label . The letters "SOG"also
flash. The black box and
letters identifies the Bear-
ing
box as
ing
To
change
press
keys
"ready
the
Bearing display,
the
or down arrow
up
to select the data that
for
change."
flash-
you
want to show inside the box.
NORMAL
DISPLAY
the distance PASTthe
a black
by
are the
you
CDI
are. For
range
example,
waypoint.
then
box,
in miles. This
if the arrow
track error is to the left 0.25 miles. The
setting.
steer the boat to a
on the Plotter screen can be
we'll use the
done,
first make certain it is
the MENU
press
next to the "CHANGE POSITION
key
See the section on OPS
waypoint.
the
Position, Steering,
Position
The first GPS menu
key.
screen as an
showing by
P CURRENT POSITION
36°08.851'
950 50.467'
€I4
22.OM
PH 26?°
0.1
I I
I
22.01
DISPLAY READY
'
S(II
suiIIr2adi
II
112:35:55 PSI
}
Iii
FOR CHANGE
2/19/1993
00:01:29
In
have
you
graphical
and
changed
'I
Page 22

In this
the
display
example,
Speed
to XTE
Over Ground
Error) by pressing
key eight
To
play, press
row
digital display
you
pressthe up
to
change
The
BRG
SOG
DTG
times.
change
another
the left
The label in the
key.
box
the arrow
press
ordown arrow
the
display.
digital displays
DEST WPT
POSITION
ALTITUDE
RTE NAME
WPT NAME
1TG
XTE
TIME/DATE
COG
VMG
When
"locks" the
you
PLOTTER
The
If
you've
present position,
waypoint
display.
you
To use the
one at the
have
you
designed it,
plotter
the.display arranged
display. Every
lets
you
recalled a
to use the
These
visulize
grid
your position
plotter, simply press
of the next
top
we
changed (Quick
IF
CURIIENT POSITION
1
(500)
the
up
Track
arrow
36°08.851'
(Cross
950 50.649'
dis-
digital
or
changes
key. Again,
available for
unless
see
ar-
right
next
as
key
time
you preset
course and direction of travel on the screen.
your
waypoint,
you
and destination.
plotter.
The
lines show latitude and
or the location of other
page appears.
i ,Ie
fl flfl a flCD 112:35:55
LU.UMI U
IO.19H1
use are:
Bearing
Speed
Distance To Go
Destination
Present Position
Present Altitude
Route Name
Waypoint
Time To Go
Cross Track
Local Time and Date
Course
Velocity
the
plotter
the PLOTTER
Over Ground
Waypoint
Name
Error
Over Ground
Made Good
as
desired, press
switch to this
the unit.
plotter
However,
shows
you
also can show
longitude
key.
display,
MAB 2/19/1993
PA
3O°M
the CLR
it will
your starting
do not have to recall a
grid
lines that can
objects.
A screen similarto the
•lIiIw2Ira*
PM
0001.27
This
key.
appear
location,
lines on the
help
as
Save
Feature)
The GlobalNav II lets
one
only
position
I
U bVe
QUICKSAVE
assigns
Saving
press.
key
of a wreck or
yUui piebellt
key.
the first available
Present Position - View and Save Method
The "Quick Save"feature doesn't let
have to use the next available numberwhen
and Save method lets
position
number that
save
to the one below
The first
the
page.
is stored in.
already
your present position, press
appears.
waypoint
listappears atthetop
This is the number that
your present position
stored under. Your
the time
WAYPT SAVE
you
pressed
key
save
you
This
your present position
"Quick
Save" feature lets
other locations.
JUb1LIUI I db
The GlobalNav
waypoint
you pick
(Note:
has a
the
You can store a
position assigned
the WAYPT SAVE
number in
of the
will be
position
is shown in
at
the
vvaypti
number to it.
you
It,
II
takes
selectthe
waypoint
the "Current Position" box in
the middle of the screen. If
wish to save the location
Current Position box underthis
waypoint
the
number,
next to the "Use Cur-
key
simply press
rent Position" label. The
will show in the
waypoint
To savethe location under a
wfthout
waypoint
naming it, simply press
you
in
the
position
shown in the Current Position box also
location at the
the
differentwaypoint
top
key
to the "Increase WPT #" label to increase the
waypoint
to decrease the
number ito
waypoint
numberto save the location
Position"
store the location under the
the last used
label. Then
position,
Pressthe
2).
number. Once
under,
the
press
waypoint
plotter,
nextto the "Decrease WPT#" label
key
you've
the
press
next to the "Save WPT" label. This will
key
number
or
steering
screen.
as a
waypoint
you
easily
bill
piy
JlCbb
tile flfl I r I
your present position
waypoint
that method. The View
using
number that
position
to it
using
key.
number. You
your present
under a
this
method.)
A screen similar
with
save the
and
waypoint
of the screen. To save the
next to the "Save WPT' label.
number,
waypoint
decided the
next to the "Use Current
key
selected and return to
you
the
press
number
next
key
from
(i.e.
waypoint
To
PDF compression, OCR, web-optimization with CVISION's PdfCompressor
lB 31
Page 23

The
plotter
the
upper right
screen. Press the
to the "Next Window" label to
move
through
reach the last
you
wish to
you
through
key
label. When the desired win-
dowisonthescreen,
key
label. The screen
the new window in the
ing
windowtakes
half the screen
up
left corner of the screen. If the new
upper
vertically,
then the
left side of the screen. If the new window takes
horizontally,
then the unit will
place
it on the
the
next to the "Prey Window"
next to the 'Use Window"
half
top
window
corner of the
keyadjacent
the
window,
go
windows,
clears,
unit will
place
half the screen
up
of
the screen.
appears
in
windows, if
or if
backwards
the
press
pressthe
plac-
it on
the
The
flashing
present position.
is
your track,
traveled. The
just
is a
compass
North, South, East,
The
square's height
cross is
your
The solid line
or
path you
large square
rose marked with
have
and West,
and width
shows at the bottom of the
screen. This is the distance
from one side to the other and
from the
Your
present position
at the
top
lfyourpresent position
clears the
screen.Your
of the
to the bottom,
top
is shown
of the screen
display,
then re-draws
present position
startsto move outsidethe
•a)IIlr,JI
N 36°OB.9fl'
U 95'StJ.bSS'
—'p
2 2.OMPH
IW
NI
i:P
— — —
MAI
•
square,
your present position
will
always
be
displayedonthe plotter.
N
S
5
0.5111
the GlobalNavil
closerto the center
Continue with the window selections until the screen is filled. The unit will
in the windows mode
stay
want to fill a screen and
using your
use
only
simplypressthe key adjacenttothe"Stop"label.
exits the
Remember,
modify
pressing
customized screen from the full screen
RESETTING ALL
To return all of the
off and on
then
press
adjacent
next to the "RESET ALL GROUPS" label.
WAYPOINT NAVIGATION
to the "RE-PROGRAM A GROUP" label.
windows mode.
can
you
the
GPS, PLOTTER,
always
GROUPS
groups
again,
the
press
key adjacent
to
theirfactory settings withoutturning
the WINDOWS
to the 'MAIN MENU" label. Now
new customized screen. If
one, two,
or three windows in a
This
savesthegroup
you
group,
don't
return to the full screen GPS mode
or STEER
OPS,
simply
key,
To switch back to
key
the WINDOWS
press
then
press
Finally, press
the
press
your
the unit
MENU
the
the
and
by
key.
key,
key
key
To clear the
plotter screen,
On the leftside of the screen belowthe Present Position box
Over Ground
displays.
except
(SOG),
All of these
COG and Positioin which are
can be customized. See the Plotter Menus section for more detail.
PLOTTER CURSOR
The
plotter
waypoint
the
plotter
new lines
latitude/longitude position
shows at the
along
bearing
cursor
can
or event marker. To use
is
displayed.
appear
on the screen. These are the
of the screen
top
with the distance and
from
your present po-
sition to the intersection of the
cursor lines. Usethe arrow
HOW TO SAVE A WAYPOINT
Waypoints
to.
Waypoints
otherfishing
il's
memory
pressing
You can store
positions
PDF compression, OCR, web-optimization with CVISION's PdfCompressor
are locations on
are useful for
or
navigation
makes it
a few
easy
buttons.
your present position
as
waypoints.
theearth'ssurfacethatyouwish
marking shipwrecks,
locations.
Storing waypoint's
to return to
The
GlobalNav II can
as a
30 19
any point
waypoint
hot
in the world
store
up
or enter
to
or return
go
fishing spots,
in the GlobalNav
by simply
to 200
waypoints.
latitudeAongitude
and
to move the cursor lines to the
desired location. To erase the
cursorlines, pressthe
This also will erase the cursor
position, distance,
displaysatthetop
and
ofthescreen.
see the Plotter Menus section.
Distance To Go
displays
are used
help you
determine the
it, press
(DTG),
only
always
and
when a
active. These
latitude/longitude
the
or down arrow
up
A screen similar to the one below
plotter
of
keys
CLR
key.
bearing
the
plotter
cursor - not
are the
Speed
Bearing (BRG) digital
is
waypoint
recalled,
displays
also
of a
keywhile
appears.
cursor lines. The
present position
your
Two
Page 24

PLO111NG WITH A
WAYPOINT
the
Using
waypoint
way
and
also
use
first recall a
route.
plotterwith
or
route is an
Lu ee [he eeuw u wind
current
on
simplifies navigation.
the
plotter
waypoint
the
(See
call section for more
Then
tion.)
appears.
The'S" is
the
waypoint.
"flag"
press
your starting
The
with a number inside is the destination
number inside the
waypoint
number 10 is the destination. The dotted line is the
most direct course from the
line to
get
to the
The arrival alarm is
within a
preset
the section on alarms for more
a recalled
easy
boat. It
your
To
in
this
manner,
or start a
Waypoint
the PLOTTER
flashing
flag
waypoint.
distancetothe
Re-
informa-
location. This was
circle with a cross is
is the recalled
automatically
starting point
destination when
information about the arrival alarm.
PLOTTER MENUS
Pressing
menus that relate
the MENU
onlyto
while the
key
the
plotter.
PLOTtER MENU - PAGE 1
A screen similar to the one above
key.
your position
when
you
your present position.
(recalled waypoint).
waypoint
number. In this
to the destination. Follow this
set to sound a tone when
recall a
you
plotter displays gives you
There are two
pages
waypoint.
a new set of
of
plotter
recalled
The
The
example,
shortest,
come
you
See
menus.
VIEWING WINDOWS
OPTIONS
To see all
dow
DOWS
IVItINU
adjacent
label.
the "VIEW ALL WINDOWS"
to
label. The screen at
pears.
The first window
upper right
of
the available
options, press
key,
INUW
Key.
to the
Finally,
pressthe
the WIN-
then
press
press
"MAIN MENU"
appears
corner of the screen. A
me
key
right ap-
in the
box at the bottom of the screen. Now
label. This
When
MODIFYING GROUPS
To
group,
DOWS
MENU
adjacent
you've
modify
first
key,
key.
to the
changes
or "customize" a
Now
the
displayed
finished
press
then
viewing
the WIN-
press
press
the
"MAIN MENU"
win-
the
Key
next
the
key
"eu
S
description
press
window and
the
windows, press
label at the bottom of the
screen. The screen shown at
right appears.
Now
press
the
key adjacent
to
the "RE-PROGRAM A
GROUP" label. The screen shown below
U
PLOTTER
You
Parameters
zet
ma
from the
Plotter
any
indepeHdent 19
Menu.
of the screen shows in the
the
key adjacent
description.
appears.
the CLR
to the "Next"
key.
N
(—'e
S 0.511
E
CLEAR PLOT
To clear or erase the solid track
line
from the
screen,
use the
"Clear Plot "menu selection.
The
plotterwill
track after this
your
pressed, starting
continueto draw
is
key
from
your
present position.
PDF compression, OCR, web-optimization with CVISION's PdfCompressor
20
29
Select the letter of the
wish to customize
you
pressing
the
isn'tshownonthis
the
"MORE" label.
the
A" label was
screen shown atthe
next
the
key adjacent
group's
label. If the label
page, press
key adjacent
Inthisexample,
next to the "GROUP
key
pressed.
page appears.
top
group
by
to
to the
The
of the
Page 25

H
w
nsa
SE
E
I
Press the
move backward. For
pressing
shows the
once
screen . To exit the windows
mode, press
or STEER
TER,
one of the
Every
example, press
labels
appear
window menus.
labels
givesyou
example,
arrow
up
key
example,
the down arrow
group
the
GPS,
keys.
group
PLOT-
the MENU
on the
display
Pressing
a menu with functions that relate
if
you press
the
to
key
"B"
screens
the
key adjacent
To use the windows
S
a
first
A screen similar to the one
shown at left
menu
screen lets
the
are lettered
Group
the down arrow
forward
the WINDOWS
press
appears.
on the
you
"pages"
of
"A" shows first. Press
through
side of the
right
switch between
displays.
"A"
through
key
the screens.
can be modified to some extent. For
while
key
shown above. Two of these labels are
as
key adjacent
"A" is
group
to one
to the
plotter
plotter
clear and
menu with
"Clear Plot" and
This isthe
screen.
displayed.
of the "window menu"
window. For
to that
only
menu label on the
window,
the screen will
will have
you
selections such as
"Set
normal
plotter
To exit from a window
the CLR
press
key.
feature,
key.
The
These
"I".
to move
Four new
a new
Range".
menu
menu,
SET RANGE
Use the "Set
change
Range"
the
plotter's range
distance across the
display.
mile when the GlobalNav II is
turned
available
The
on for the first time. The
plotter ranges
range
is 1
.2, .5, 1, 2, 5, 10, 20,
100 miles. This lets
in" to see small
course or "zoom
your
see
yourstarting position, present
ICON ON/OFF
Pressing
this
you
variations in
turns on the icons that
key
the EVENT MARKER
menu
or
plotter's
statute
are
.1,
and
50,
"zoom
out" to
For
key.
to
position,
more information on this
Event Marker section. This also turns on
ALARMS
Press this
see the ALARMS
forthe alarms menu. For more information
key
section.
CHANGE PLOTTER DISPLAY
When the GlobalNav II is first turned
screen has a column of
displays
screen
To
displayed.
The menu
display, press
the "Full
plotter
at the
appears.
To
press
"Change
similar
page
can be
plotter.
change
the
plotter display, press
Now
shown below
the
Screen Plotter"
similiartothe
of the next
top
change digital display
the
key
Info Boxes".Ascreen
to the one on the
appears.
digital displays
changed
the
press
key
one shown
next to
or erased
key
appears.
next to
A
key.
page
boxes,
the
next
next to the
on, (or
on the left side of the screen.
completely.
the
To
track, course,
you placed
all of the
waypoint
after a
This
MENU
"Change
change
key
Plotter
to a full-screen
,CHANCE
BLOT DISPLAV
and destination.
on the screen
icons,
on the
the
see the
alarms,
feature,
preset),
gives you
while the
plotter
Display"
using
also.
plotter
These
a full-
is
label.
plotter
PDF compression, OCR, web-optimization with CVISION's PdfCompressor
28
21
Page 26

The unit returns
screen with a black
the
position
to the
box around
display
plotter N WINDOWS
at the
top
of the screen as shown below.
The word
flashes, identifying
for
change.
right
data
example,
tion
display
(DTG), press
two times. To
key
other
box's label is
display.
•LI}IbIOE•
N 36°08915'
U 95°50.563'
"POSITION" also
Press the left or
arrow
keys
displayed
in that box. For
to
change
to Distance Go Go
the
box,
digital
flashing.
it as
ready
to
change
the
the Posi-
arrow
right
change
simply press
an-
Then
N
a
22.0MPH
m
ia
— — —
•
:l:{
— — —
PLOTTER MENU -PAGE 2
GOTO CURSOR
As mentioned
or
highlight
you
position
the
display
of the screen.
next to the "GOTO CURSOR"
label on the
the GlobalNav II to
gation
position
hairs. This
the arrival alarm
MI
MA
previously,
a
position.
use the cursor
of the cross hairs on
are shown
Pressing
menu causes
plotter
and
steering
shown
by
automatically
on,
I
8 0.5 MI
t he cursor lines can be used to
When
the
lines,
atthetop
the
key
show navi-
data to the
the cross
turns
also.
the
up
use the
or down arrow
or left arrow
right
E
When
the CLR
keys
keys
you're
key
until the desired
to select the
finished,
press
to exit.
an icon
place
You can
feature. This lets
situations. This feature also
screens,
change
each
The screens
windows
mode are divided into
two or more
screen.
dows is called
"A" as
plotter,
and
in
group
many
Each screen of win-
shown at
Course Over
steering displays showing
three
separate
of windows can be as
as
four,
window can
GPS
data,
navigation displays,
more.
N
t
N
I
____________
s
the
displays
customize
you
customizable.
available in the
windows
a"group". Group
has the
right
Ground,
windows. A
or
display digital
GPS
one: A
only
steering
and
many
_________________________
IF!tL_
EIIIS
*-
I9°
o.SMIITTG
per
or
L:szii.
You can
change
customized
windows,
mode,
WINDOWS
simply press
simply press
thatwas in usewhen
if
were
you
WINDOWS
the look of
by following
the
the
key again,
using group
key, group
the
you
a few
WINDOWS
GPS, PLOTTER,
GlobalNav II will
switchedoutof thewindows mode.
"C" and
"C" will
on
the GlobalNav
displays
gives you
333'
NAG
273' NAG
OU:Ot:2
I
any group
simple steps.
pressed
show on the
the
fishing
to
Ilby using
your
own
10 different window
Forexample, you
"A" as shown
group
changing
upper right
gation Summary
shown at left. Once
the
saves the
so that
when
at
any
the
change,
change
is
it
choose
you
time.
Each
can
window in the
cornerto
display
the GlobalNav II
in
always displayed
group
group
To view the
To switch out of the windows
key.
or
STEER
always
the GPS
display.
If
key.
you press
return to the last
Forexample,
then
key,
pressed
windows
or
boating
display
change
above
the Navi-
make
you
memory
"A".
can be
groups
group
the
by
as
of
the
22
27
PDF compression, OCR, web-optimization with CVISION's PdfCompressor
Page 27

the arrow
ing
MARKER
intersection
To erase the
Erasing
Although you
on the
key,
of the
the Icons
plotter
can't erase them
When it's at the desired
keys.
then select an icon. The GlobalNav II
cursor lines.
plotter
cursor
can
lines, press
icons
place
individually, you
one at a time.
You have to erase the whole
of icons. For
group
20 fish
you've
icons, erasing
erases all 20.
To erase an
the
Next,
shown above
Now select the
place
one of them
icon,
EVENT MARKER
the
press
key
appears.
group
next to the desired
example,
first
next to the "DELETE ICON BANK" label. The
of icons
icon. After
if
symbol
press
key.
that
pressing
all of the selected icons from the
the CLEAR
YOU ABE EEA8JN
wish to erase
you
the
plotter.
location,
press
the EVENT
placesthe
key.
ALL ICONS IN
TI-tAT GEOUPt
by pressing
the GlobalNav II erases
key,
icon atthe
screen
the
key
To use this
the
plotterscreen.
feature,
to the "More" label.
The unit returns to the
label.
the screen
when
digital displays
location. This includes the
member,
off or if it's
(numbered "0")
you pressed
this is a
preset.
first move the cursor
Next,
pressthe
Finally, press
that was the location
the
next to the "Go To User Cursor label. The
key
on all screens will show
position, steering,
temporary waypoint.
PLOTTER UPDATE
The
plotter
position.
on for the first time.
line
may
shows
your
The track is
However,
end
prematurely
track
updated
due
by
to the limited number of dots
a
longer
the
plotter
next to the
key
press
that
update
key
mode,
Update
available
Using
change
the MENU
in the
the
bel. Now
the "Plot
The screen shown at
pears.
date times
and2O seconds.
GlobalNav
The available
are
II
immediately
the track.
plot
update
time To
rate, press
while the unit is
then
press
'More" la-
the
key
next to
Rate" label.
right ap-
plot up-
Instant, 2,5,10,
Simplypressthe key
returnsto the
lines to the desired location on
MENU
the
plotter
key.
nextto
key
screen. A
navigation
It's erased when the unit is turned
drawing
once
if
you're
—
a solid line behind
instantlywhen
every
travelling
Instant
2 Seconds
_______________
onds
10 Seconds
nexttothe
plotterscreen
Now
pressthe key adjacent
the "Go To User Cursor
waypoint
flag appears
of the cursor cross hairs
information to this new
and
plotter displays.
your present
the unit isturned
a
long
desired
distance,
updatetime.
using
the track
¶'
the newtime.
on
Re-
U.S NI
The
GRID LINES
The
plotter
longitude grid
the
key
can show
lines
next to the "Set
On" label on the second
menu
off,
repeat
PDF compression, OCR, web-optimization with CVISION's PdfCompressor
26
page.
the
Toturnthe
previous
Iatitude/
by pressing
Grid Off
plotter
lines
grid
step.
23
Page 28

SELECT UNITS OF
MEASURE
The
GiobalNav II can
distance in
or
nautical
miles cer hour. kilometers
hour,
miles, kilometers,
miles,
or
knots,
bearing
grees magnetic ortrue,
in
feetormeters,
display
velocity
in de-
altitude
and time in 12
per
C
r0t
in
Coto User
Update
Cursor
Bate]
hour or 24 hour format.
To
change
press
press
"More label. Now
next to the "SELECT
key
UNITS OF
The screen
pears.
line shows
sure
currently
screen shown
of
measure are in statute miles
fordistance,
velocity, degrees magnetic
hour format
Pressthe
nextto the Distance
black box two times from the "Ml" to the "KM".
When
"EXIT' label.
(a.m./p.m.)
keynexttothe
label twiceto swftch from milesto kilometers. This movesthe
have the units of measure set as
you
forbearing,
unitthatyou wishtochange. Forexample, pressthe key
altitude in
desired,
feet,
BACK LIGHT ON/OFF
To turn the back
lighting
to the "More" label. Now
on,
pressthe
press
the
MENU
nextto the
key
key,
"BacklightOn
This moves the black box from "OFF" to the "ON"
on.
lights
To turn the
backlights
off,
repeat
these
N
key,
to
press
first
then
the
the
ap-
these,
any
the
MENU
the
key adjacent
MEASURE" label.
shown at left
The black box on each
the unit of mea-
in use. In the
the units
below,
miles
and time is in the 12
the
press
then
press
position
steps.
hourfor
per
next to
key
the
key
Off" label.
and turns
the
next
the
EVENT MARKER
The GlobalNav II can
event markers
plotter
to mark
shallow
or"icons" on the
or other
water,
fishing spots,
Inratinno Thrc aro fh,a rliffnr_
ent icons to choose from
there are lOOof
each iconfora
total of 500. You can
each icon
you
once
an
To
above
Now
pressing
the GlobalNav II
stays
display,
Note: When
individually,
can't erase a
you've placed
icon,
place
have to erase alt of the icons in that
you
an
icon,
appears.
select one of the five icons shown on the left side of
the
in this location. It's saved in
next to the desired icon. As soon as
key
places
even if the unit is turned off and on
you place
the GlobalNavll is first turned
automatically
Icons feature on the first
when
you place
until
you
Using
the Event Marker with the Cursor
Normally,
its
icon,
yourpresent position.
can
you
where on the
cursor. To do
one of the arrow
makes the
appear
move the lines to the desired
position
turned on.
an icon.
turn the icons on.
when
you
place
on the
an icon
placed
plotter using
this,
plotter
on the
on the
display.
display by press-
place
special
and
place
however,
icon
single
it. To erase
the EVENT MARKER
press
the icon at
an
icon,
your present position.
memory
first make
certain the icons are on. When
on or after a
if
However,
menu
plotter
unitwill
The
select an
plotterat
However,
any
first
press
This
keys.
the
•i)iIl(si•
________
N 36°08 860'
________
________
_________
cursor lines _________
Now
________
turn the icons off
you
screen),
placethe icon,
1 95°50.608'
22.OM
:l:a
so it will
again.
group.
The screen shown
key.
the screen
you press
This icon
always
preset,
then the icons won't show
show on the
the icons are
(using
the
key,
always
the Set
by
howeveritwon'tshow
H
7Th
/
W
\\p
S O.SMI
E
24
25
PDF compression, OCR, web-optimization with CVISION's PdfCompressor
 Loading...