

Page 1
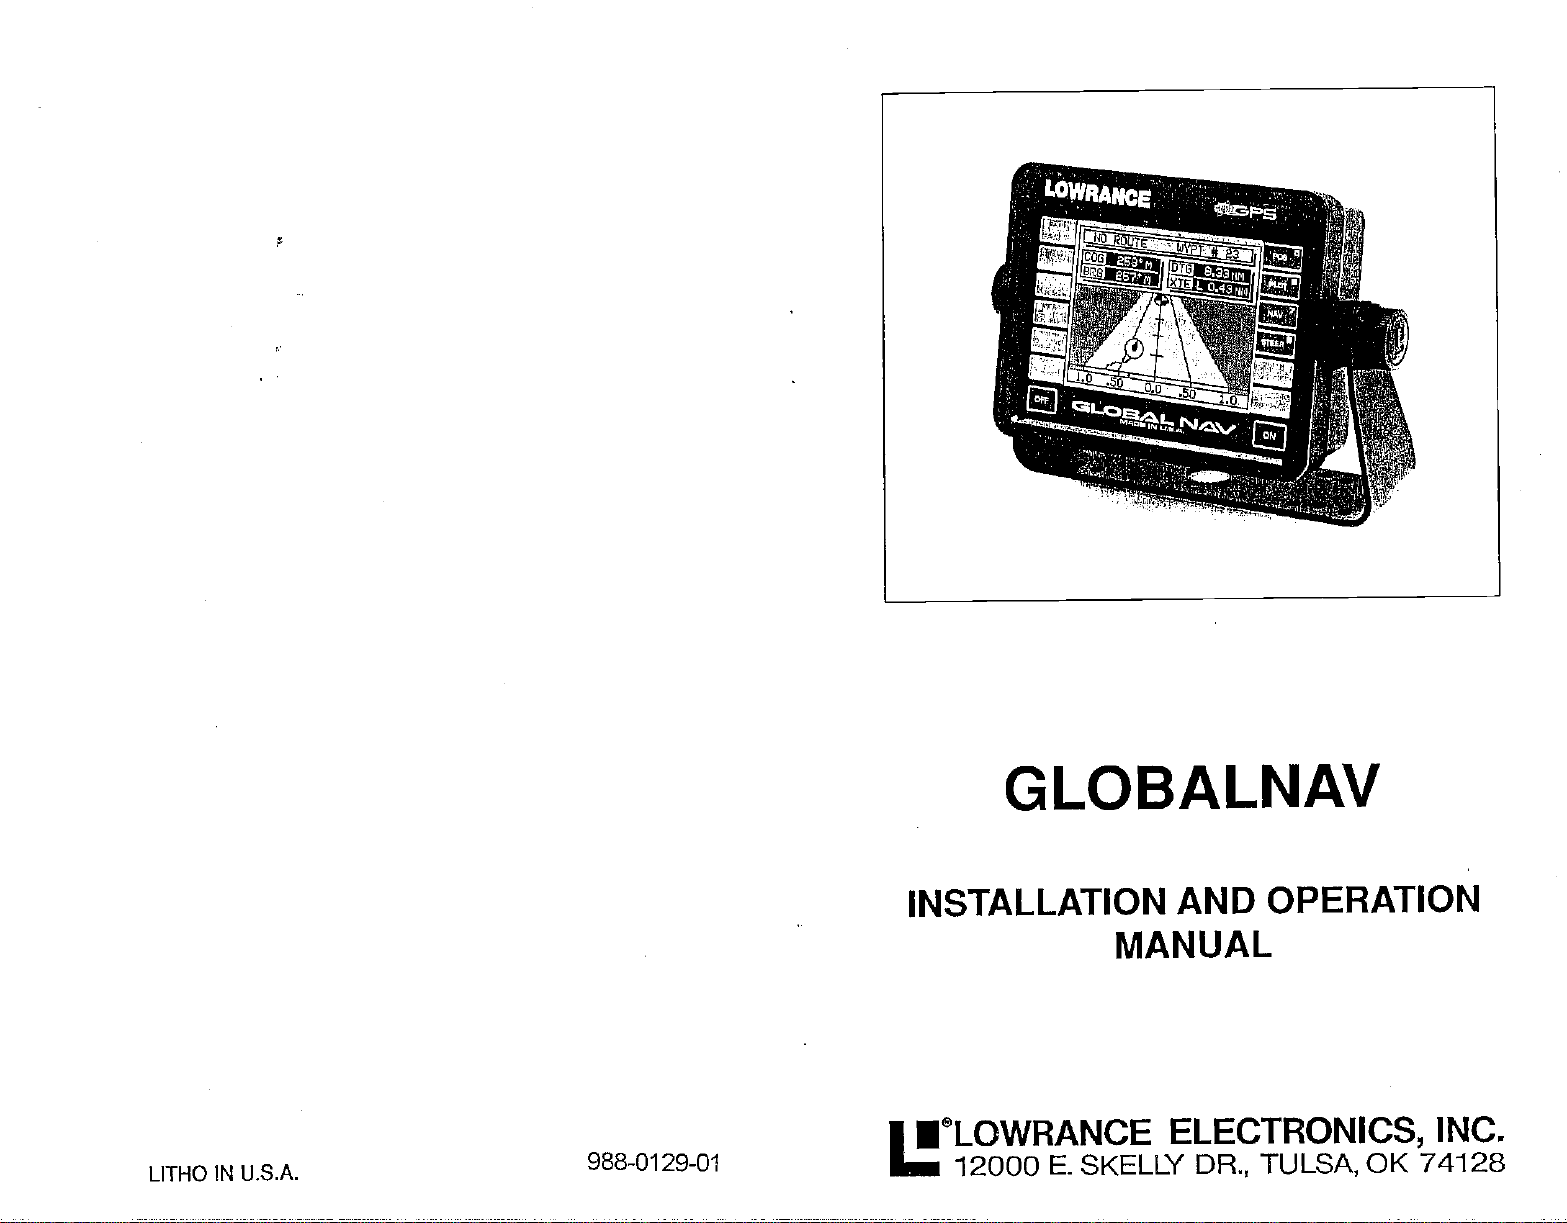
G LOBALNAV
INSTALLATION
AND OPERATION
MANUAL
I®LOWRANCE ELECTRONICS,
PDF compression, OCR, web-optimization with CVISION's PdfCompressor
LITHO IN U.S.A.
988-0129-01
12000
F. SKELLY
DR, TULSA,
OK 74128
INC.
Page 2
NOTES:
Copyright
USE
THIS GPS
TION. A
CAREFUL
ONE METHOD
This GPS
the
tion
the
navigation
ally
always
As of this
receiver,
shortest, most direct
data to the
pnident
waypoint regardless
navigator
tools when
check to
make
available.
writing,
declared the GPS
is still
in a
testing
can be
that the
the
degraded
GlobalNav,
system
it's
using.
©
1991, Lowrance
All
rights
WARNING!
RECEIVER
NAVIGATOR NEVER
TO OBTAIN
(like
will
travelling
certain a
the
Department
navigation system
phase.
at will
or
any
ONLY AS AN AID
POSITION
CAUTION
all
GE'S
to
path
not
only
to a
clear, sate
NOTICE!
Satellites can be
the
by
GPS receiver
Electronics,
reserved.
INFORMATION.
navigation
a
waypoint.
of
obstructions.
take
advantage
waypoint,
path
of
Defense
as
operational.
system
operators.
is
Inc.
TO NAVIGA-
RELYS ON ONLY
equipment)
It
provides naviga-
will show
Therefore,
of all
available
but will also visu-
to the
waypoint
(DOD)
has not
The
turned off or
only
accuracy
Remember
as
accurate as
is
system
Features and
All
display
specifications
screens in this
subject
to
change
without notice.
manual are simulated.
PDF compression, OCR, web-optimization with CVISION's PdfCompressor
Page 3
MOTES.
TABLE
INTRODUCTION
MOUNTING
POWER
GPS MODULE INSTALLATION
SURFACE
POLE MOUNT
NOISE
KEYDOARD
GE'S -HOW IT WORKS
ACCURACY
THE LOWRANCE GPS MODULE
GETTING
INITIALIZATION
POSITION/NAVIGATION DISPLAYS
POSITION DISPLAY
NAVIGATION
STEERING SCREEN
STATUS DISPLAY
PLOTTER
HOW TO SAVE A
SAVING
ENTER
VIEW AND SAVE WAYPOINT
NEW
ERASE A WAYPOINT
GOTOWAYPOINT
WAYPOINT RECALL
VIEW/GO
DESTINATION
ROUTES
CREATING A ROUTE
FOLLOWING A
CANCELLING A ROUTE
ERASING A
GPSALARMS
ARRIVAL
CDI. ALARM
ALARM MUTE
UNITS OF MEASURE
NMEA
COMMUNICATION
SPEAKERVOLIJME
DISPLAY
LIGHT
MEMORY-PRESET
SYSTEM
PCF OFFSET
SoI as
Set as Onset
MAN
OVERBOARD
SPECIFICATIONS
. 1
CONNECTIONS
MOUNTING
STARTED
INITIAL SETTINGS
TIME OF DAY
DATE
TIMEZONE
ALTITUDE
INITIAL POSITION
DISPLAY
STEERING
USING THE PLOTTER
PLOTTER
....CLEARPLOTTRAIL
WAYPOINT QUICKSAVE
SAVEAS#
WAYPOINT NUMBER
CONTRAST
INFORMATION
SETUP
MENUS
PLOTtER RADIUS
UPDATE INTERVAL
WAYPOINT
CURRENT POSITION
NEW AYPOINT
TO WAYPOINT
WAYPOINT NUMBER
ROUTE
ROUTE
ALARM
(PosItIon CorrectIon
PosItIon
OF CONTENTS
WITH A WAYPOINT
Factor) 44
3
3
5
s
6
7
8
9
9
9
Ic
ii
11
12
13
Is
16
16
17
Is
19
21
22
23
23
24
24
25
25
25
25
26
27
26
29
ao
31
32
32
33
35
37
37
38
38
39
40
41
42
42
44
45
46
47
48
PDF compression, OCR, web-optimization with CVISION's PdfCompressor
Page 4

NOTES:
NOTES:
PDF compression, OCR, web-optimization with CVISION's PdfCompressor
Page 5
NOTES:
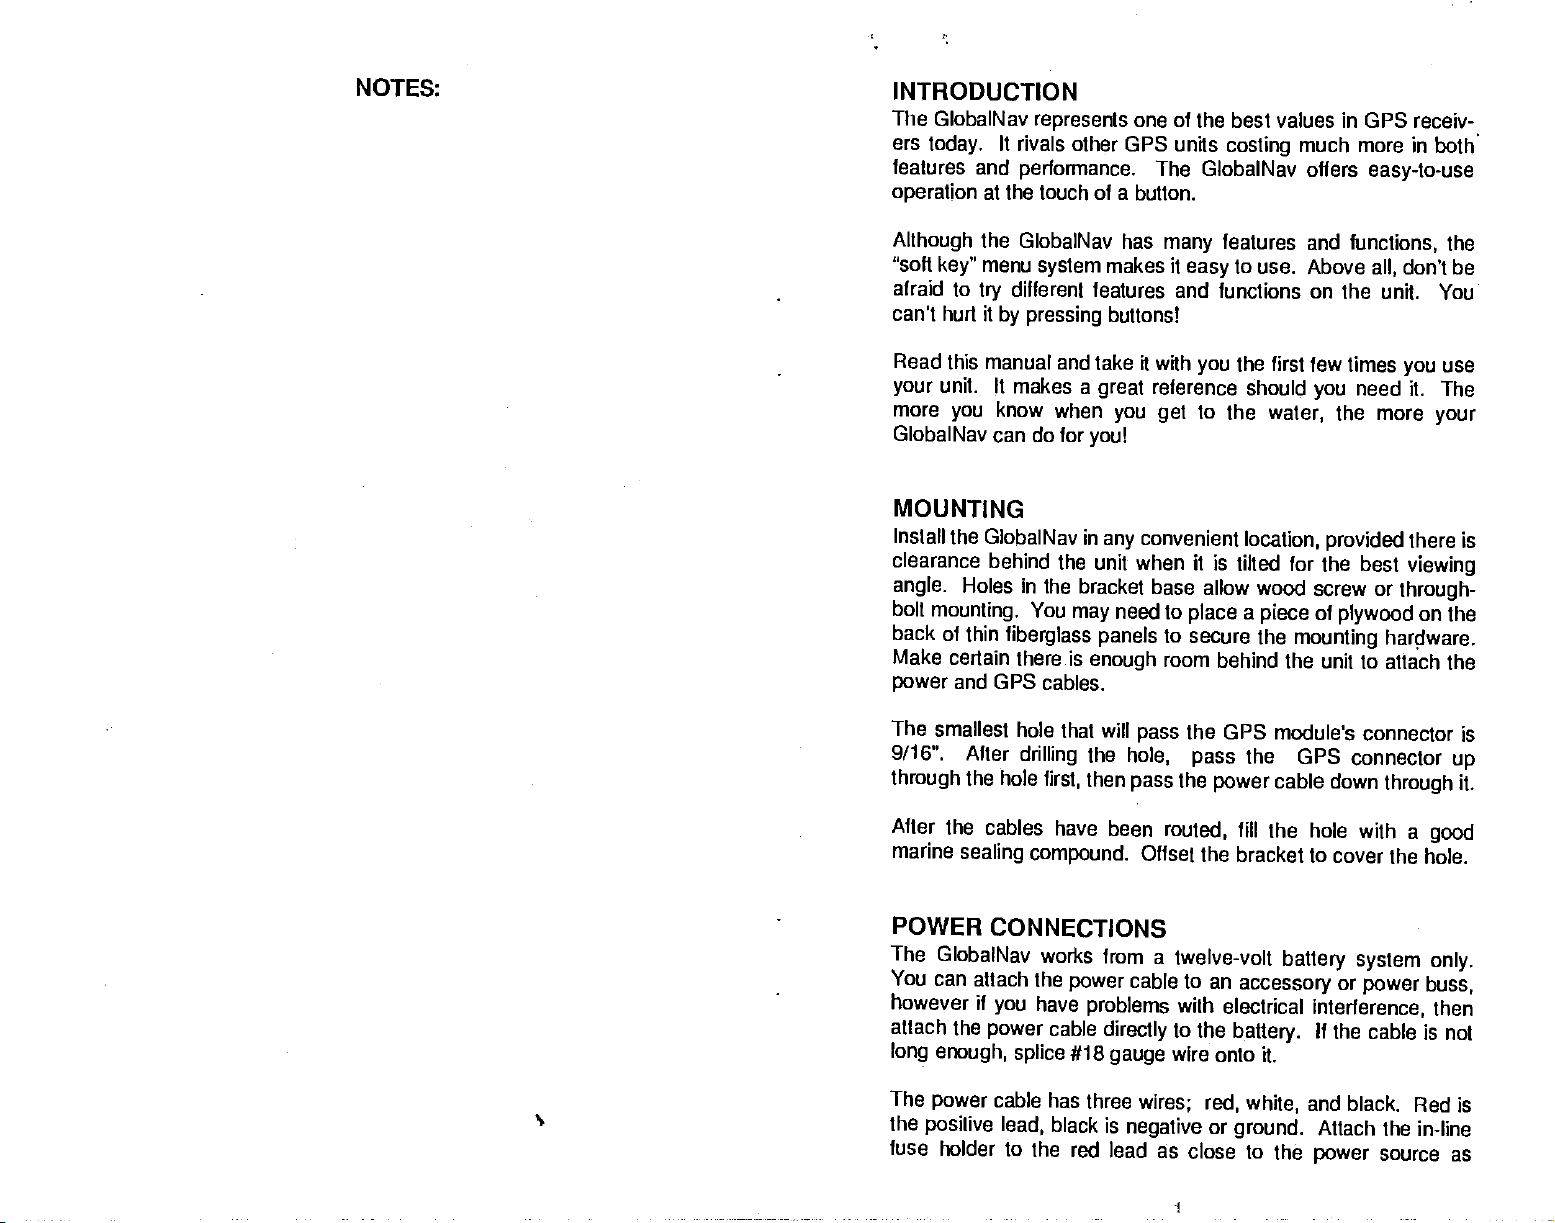
INTRODUCTION
The GlobalNav
ers
today.
features and
operation
represents
It
rivals other GPS units
performance.
at the touch of a button.
one of the best values in GPS receiv-
costing
The GlobalNav
much more in both
offers
easy-to-use
Although
"soft
afraid to
can't hurt it
Read
your
more
GlobalNav can do for
the GlobalNav has
menu
key"
system
different features and functions on the
try
by pressing
this manual and take ft with
unit. It
you
makes a
know when
MOUNTING
Install the GlobalNav in
clearance behind
angle.
bolt
Holes in the
mounting.
back of thin
Make certain
and
power
GPS cables.
The smallest hole
91 16". After
through
the hole
the unit when it is tilted for
bracket base allow
You
may
fiberglass panels
there is
that will
drilling
first,
makes it
buttons!
great
you get
you!
any
need to
enough
pass
the
hole,
then
pass
features and
many
to use. Above
easy
the first few times
you
reference should
to
the
water,
convenient
location, provided
functions,
all,
unit. You
need it. The
you
the more
the best
wood screw or
place a piece
to
secure the
room behind the unit to attach
the GPS
the GPS connector
pass
the
power
of
plywood
mounting
module's
connector is
cable down
the
don't be
use
you
your
there is
viewing
through-
on the
hardware.
the
up
through
it.
After the cables
marine
POWER
The
You can
however if
attach the
sealing
CONNECTIONS
GlobalNav works
attach the
you
power
long enough, splice
The
power
the
posilive lead,
fuse
cable has three
holder to the red lead
have been
compound.
from a twelve-volt
power
have
problems
cable
directly
#18
gauge
black is
routed,
fill
the hole with a
Offset the bracket to cover
battery system
cable to an
with
electrical
to the
accessory
battery.
or
interference,
If the cable
wire onto it.
wires; red, white,
negative
or
ground.
as close to the
and black.
Attach
power
good
the hole.
only.
power buss,
then
is not
Red is
the in-line
source as
PDF compression, OCR, web-optimization with CVISION's PdfCompressor
I
Page 6
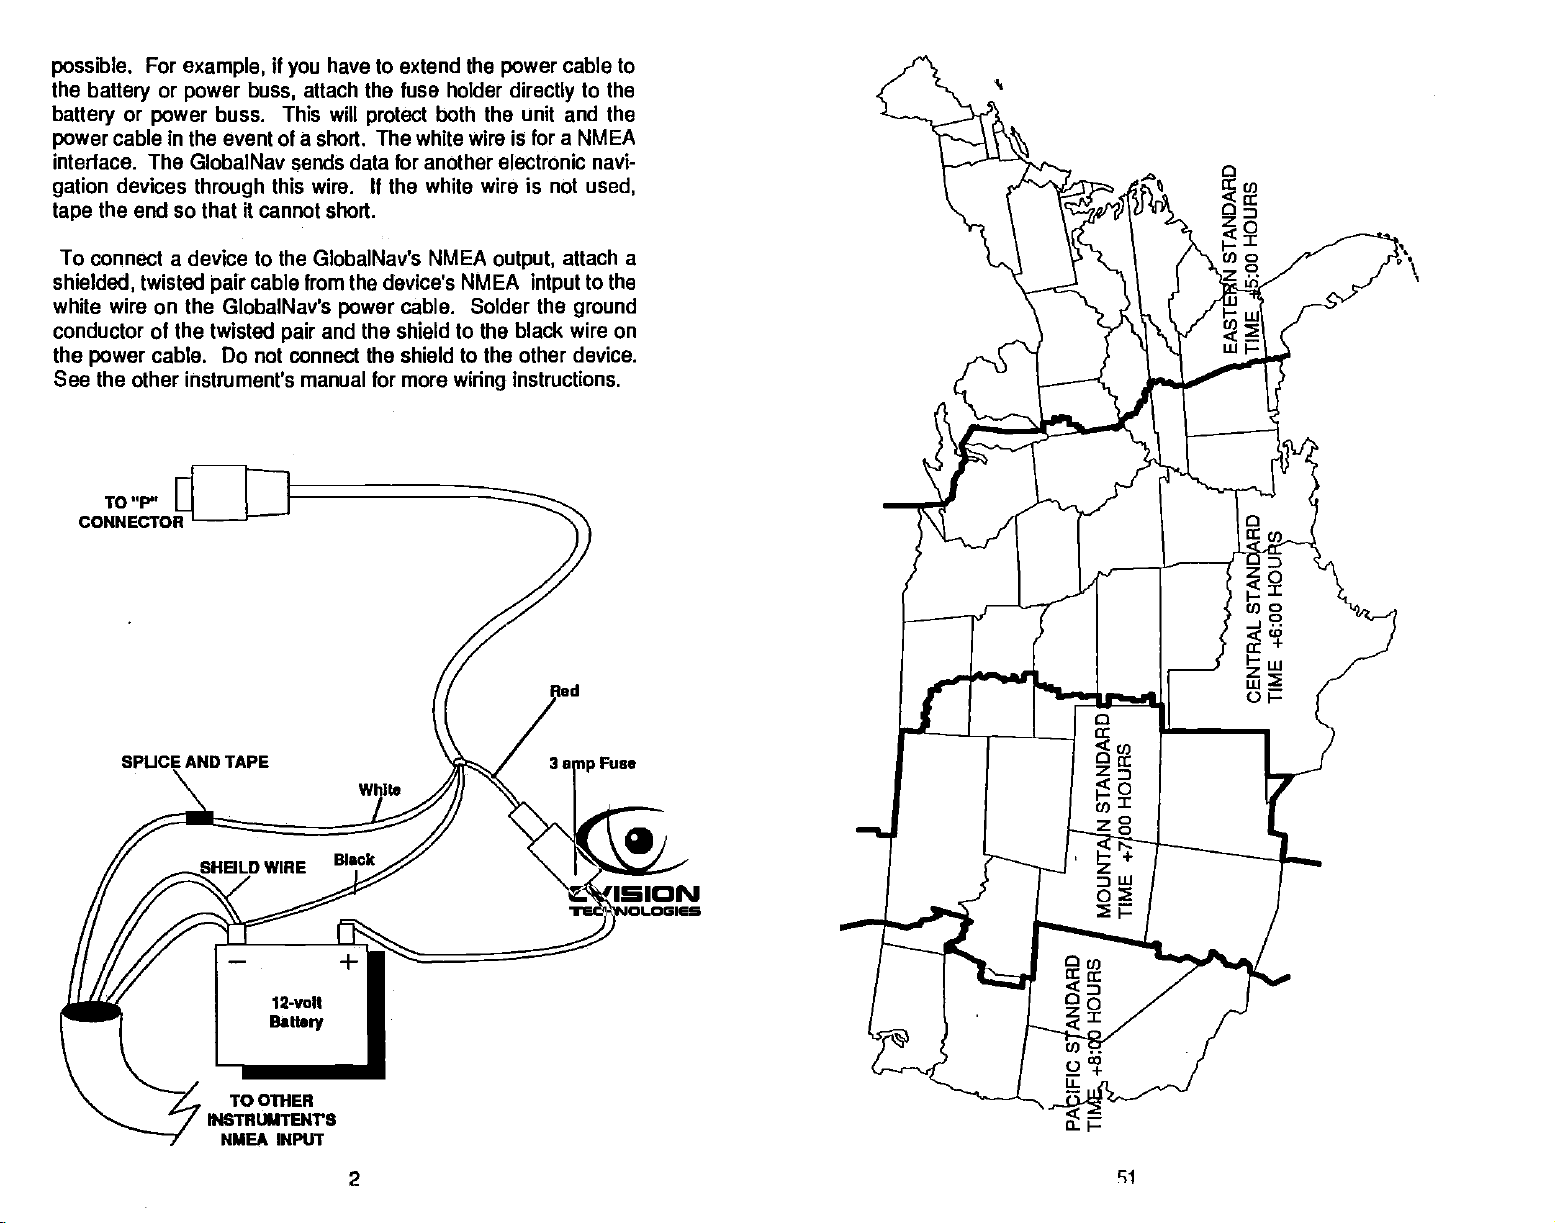
possible.
the
battery
power
interface. The GlobalNav
gation
tape
For
example,
battery
or
power
or
power
cable in the event of a short. The white wire is for a
devices
the end so that it cannot short.
through
if
buss,
buss. This will
this wire. If the white wire is not
have to extend the
you
attach the fuse holder
protect
data for another electronic navi-
sends
both the unit and the
power
directly
cable
to the
NMEA
used,
to
To connect a device to the GlobalNav's NMEA
power
TO 'P'
twisted
cable. Do not connect the shield to the other device.
AND TAPE
shielded,
white wire on the GlobalNav's
conductor of the
the
See the other instrument's manual for more
CONNECTOR
cable from the device's NMEA
pair
cable. Solder the
the shield to the black wire on
twisted
pair
power
and
wiring
output,
attach a
intput
instructions.
rd
to the
ground
Fuse
To OThER
IPISTHUMTENVS
NMEA INPUT
PDF compression, OCR, web-optimization with CVISION's PdfCompressor
2
ci
Page 7
See the NMEA
GlobalNav
once it
GPS
The GPS module can be
supplied
guarantees
module
obstructed. An ideal location
gunnels
adapter
location is
tenna
acquires
MODULE
to receive the
also make a
lets
shouln'l be the
section in this manual for more information.
automatically
and 'locks on" to the
sends NMEA
INSTALLATION
installed on a flat surface or
adapter)
on a
pole.
a clear view of the
signals
location.
good
install the module on a
you
preferred. However,
highest part
data out the while wire
satellites.
Mount the
sky
from
on
is
for
of
module in an area that
at all times. In order for the
the
satellites,
a cabin
Attaching
one inch mast. A
lightning protection,
it must not be
or deck.
roof,
the
pole mounting
the boat.
The
(with
The
high
the an-
the
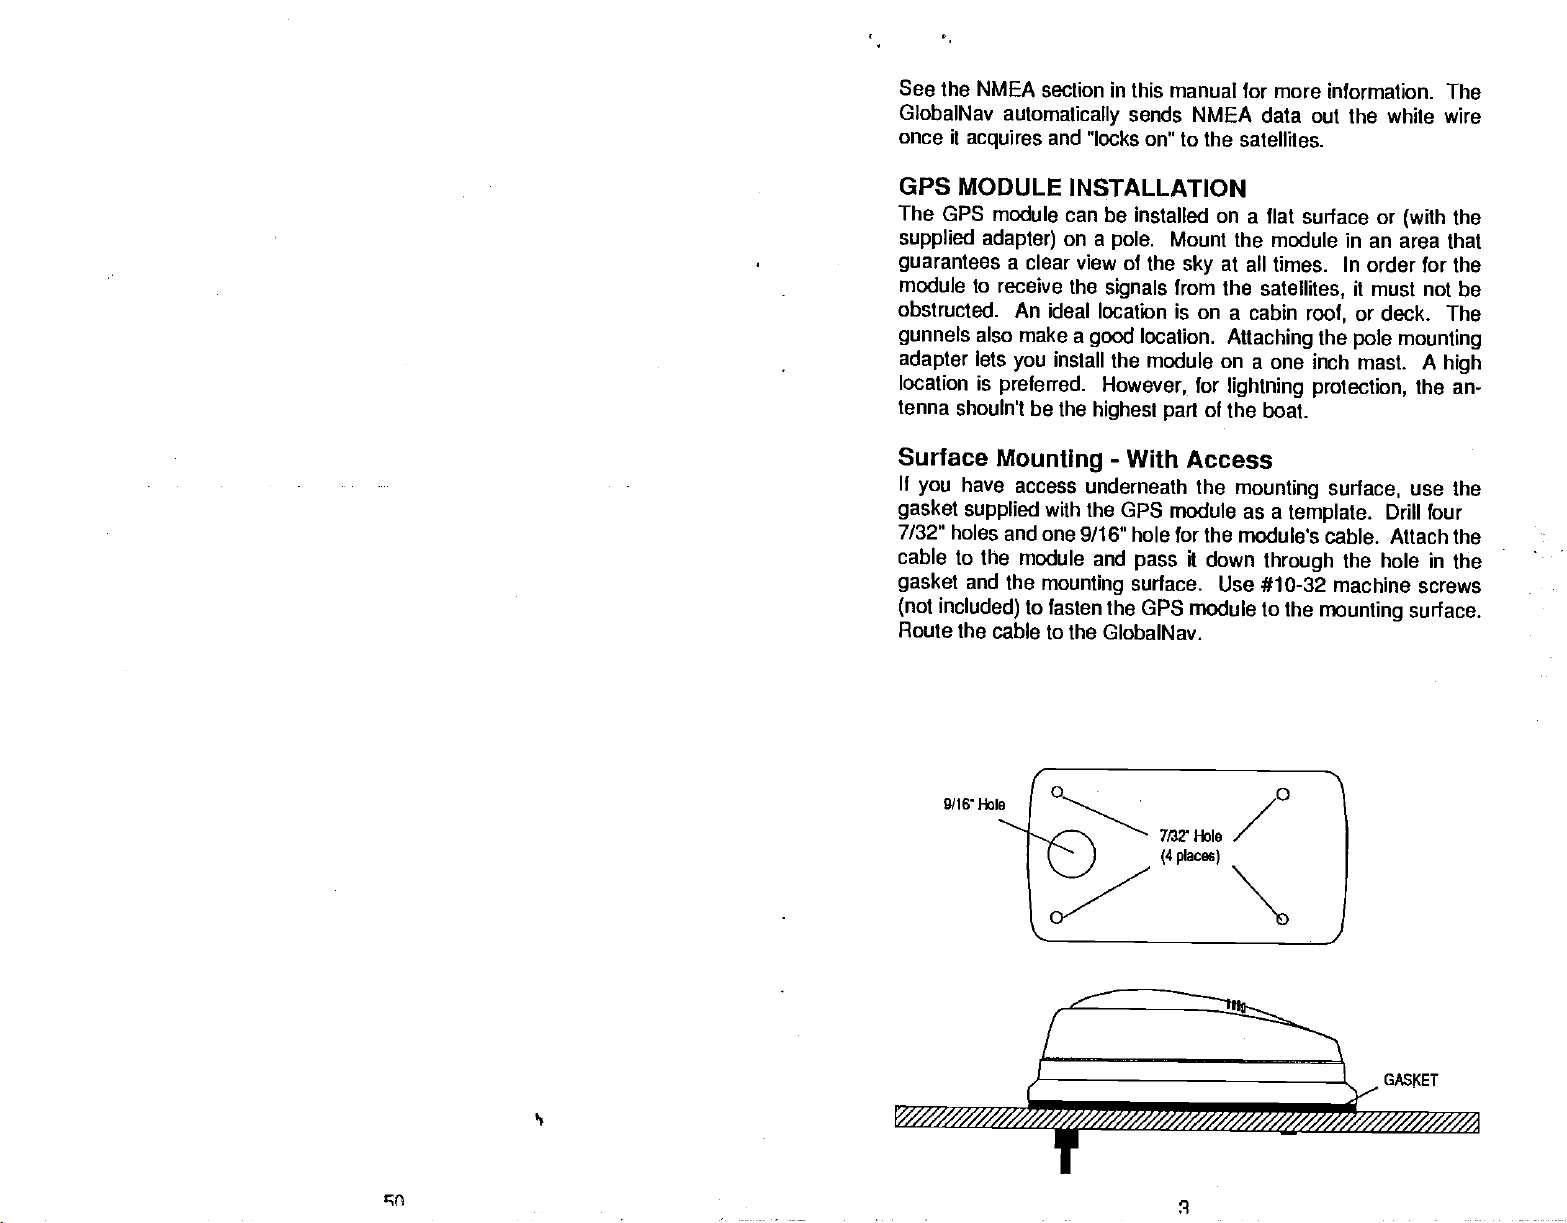
Surface
If
you
gasket
7/32"
cable to the
gasket
(not
Route the cable to the
Mounting
have access
supplied
holes and
module and
and
the
included)
9/16' 1-lob
underneath the
with
the GPS module as a
one 9/16" hole for the
mounting
to fasten
-
With Access
mounting surface,
template.
module's cable. Attach the
it
pass
surface.
the GPS module to the
GlobalNav.
down
through
Use #10-32 machine screws
use the
Drill
four
the hole in the
mounting
surface.
_______________________-
/////////a
////////////
JGA5KET
PDF compression, OCR, web-optimization with CVISION's PdfCompressor
çç
Page 8
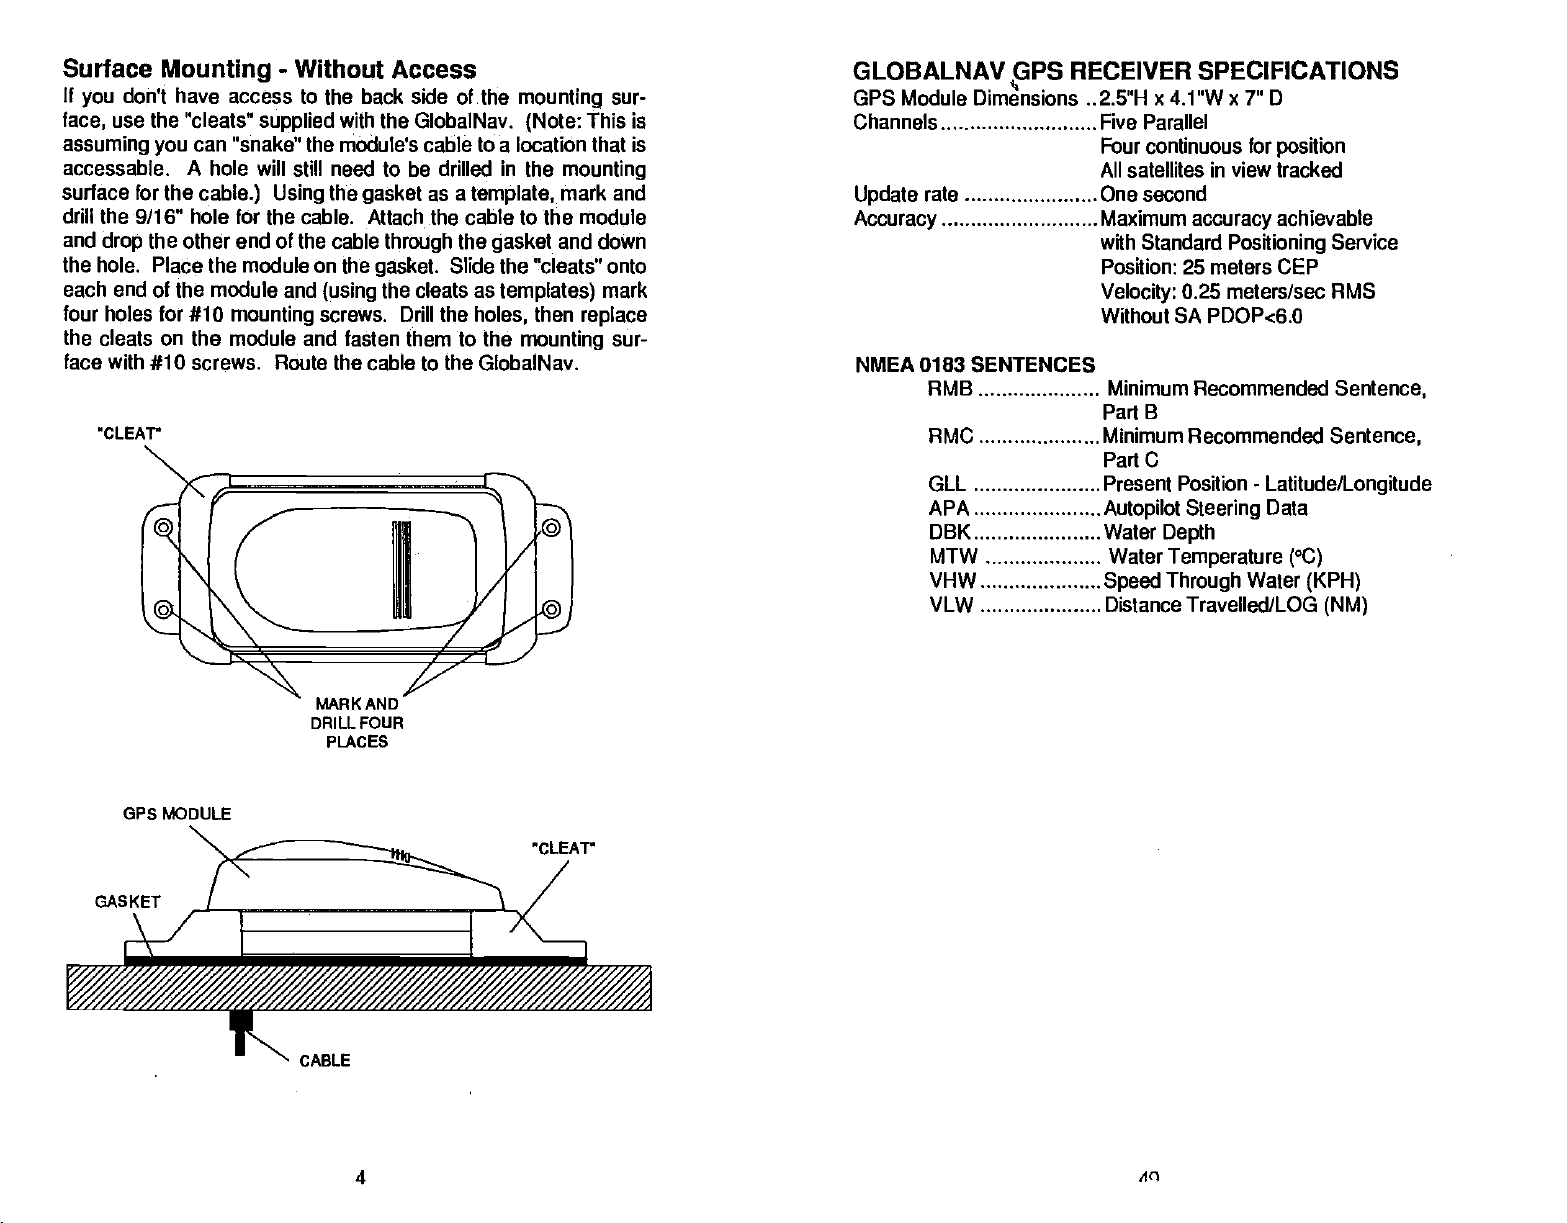
Surface
If
you
face1
assuming you
accessable. A hole will still need to be drilled in the
surface for the
Mounting
don't have access to the back side of the
use the "cleats"
can "snake" the module's cable to a location that is
cable.) Using
-
Without Access
supplied
with the GlobalNav.
the
gasket
as a
mounting
(Note:
template,
sur-
This
is
mounting
mark and
drill the 9/16" hole for the cable. Attach the cable to the module
and
the hole. Place the module on
each end
four holes for #10
the cleats on the module and fasten them to the
face with #10 screws. Route the cable to the GlobalNav.
the other end of the cable
drop
of the module and
mounting
tLEAV
through
the
gasket.
the cleats as
(using
screws. Drill the
the
Slide the "cleats" onto
gasket
templates)
then
holes,
mounting
and down
mark
replace
sur-
GLOBALNAV
PS
RECEIVER SPECIFICATIONS
GPS Module Dimensions ..2.5"H x 4.1"W x 7" D
Channels Five Parallel
Four continuous for
All satellites in view tracked
Update
Accuracy
rate One second
Maximum
accuracy
with Standard
Position:
Velocity:
Without SA PDOP.c6.0
25 meters CEP
0.25 meters/sec RMS
Positioning
NMEA 0183 SENTENCES
RMB Minimum Recommended
B
Part
RMC Minimum Recommended
Part C
GLL
APA
DBK
Present
Autopilot
Water
MTW Water
VHW
VLW Distance Travelled/LOG
Speed Through
Position
Steering
Depth
Temperature (°C)
-
Latitude/Longitude
Data
Water
position
achievable
Service
Sentence,
Sentence,
(KPH)
(NM)
MARK AND
DRILL FOUR
PLAcEs
OPS MODULE
CLEAV
GASKET
CABLE
PDF compression, OCR, web-optimization with CVISION's PdfCompressor
4
An
Page 9
GLOBALNAV
GPS
Module Dimensions .. 2.5"H x 4.VW x 7"
Channels
Update
Accuracy
rate One second
GPS RECEIVER
Five
Parallel
Four
continuous for
All
satellites in view tracked
Maximum
with Standard
Position: 25
Velocity:
Without SA PDOP.cG.O
SPECIFICATIONS
D
position
accuracy
meters CEP
0.25
achievable
Positioning
Service
meters/sec RMS
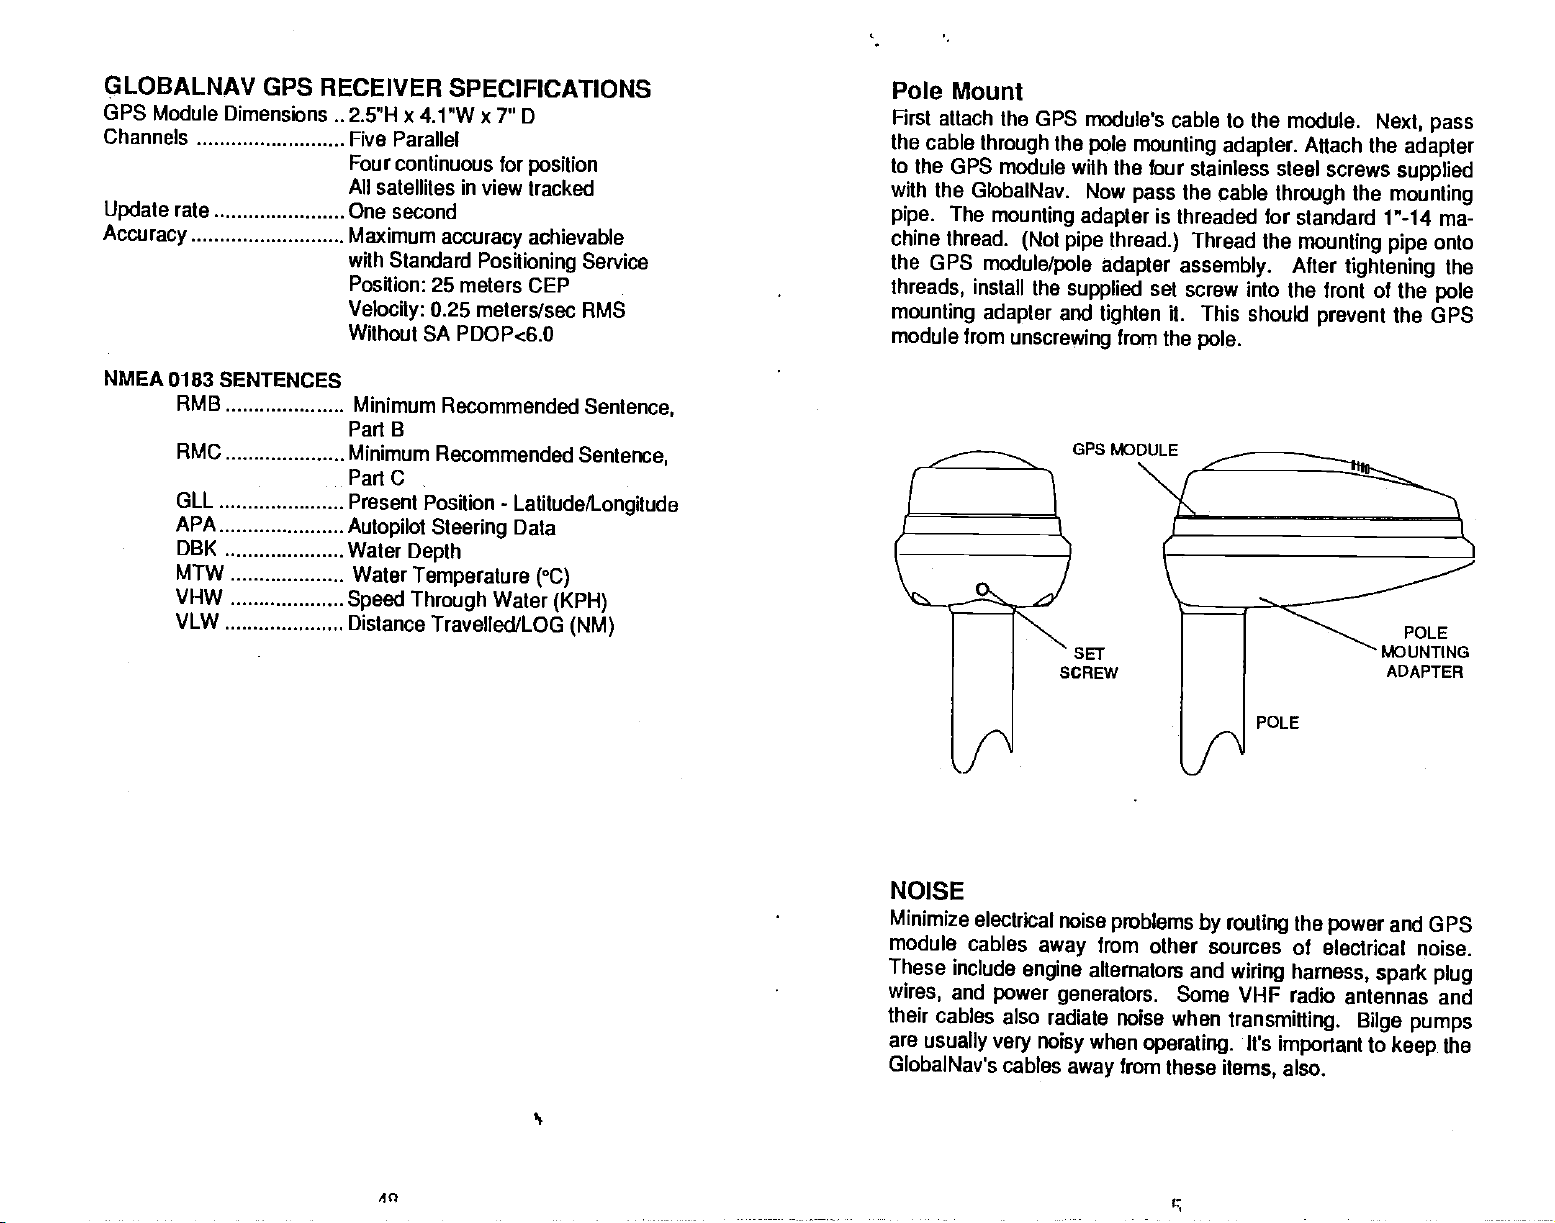
Pole Mount
First attach the GPS module's
the cable
to
the GPS module with
through
with the GlobalNav. Now
The
pipe.
mounting adapter
chine thread.
the GPS
threads,
module/pole adapter assembly.
install the
mounting adapter
module from
the
pole
(Not
pipe thread.)
supplied
and
tighten
unscrewing
mounting adapter.
the four stainless steel
pass
from the
cable to the module.
Attach the
the cable
is threaded for
Thread the
through
standard 1"-14 ma-
mounting pipe
After
set screw into
the front of the
it. This should
pole.
Next,
screws
the
tightening
prevent
pass
adapter
supplied
mounting
onto
the
pole
the GPS
NMEA 0183
RMB
RMC
GLL
APA
DBK
MTW
VHW
VLW
SENTENCES
Minimum
Part B
Minimum Recommended
Part C
Present Position
Autopilot Steering
Water
Water
Speed Through
Distance Travelled/LOG
Recommended
-
Latitude/Longitude
Data
Depth
Temperature
Water
(°C)
(KPH)
Sentence,
Sentence,
(NM)
NOISE
Minimize
module
These
wires,
their
are
GlobalNav's cables
electrical noise
cables
include
and
away
engine
power
generators.
cables also radiate noise
usually very noisy
OPS
MoDuLE
SET
SCREW
problems
from
other sources of
alternators and
when
operating.
from these
away
POLE
by routing
the
wiring harness,
Some VHF radio
when
transmitting. Bilge
It's
important
items,
also.
POLE
MOUNTING
ADAPTER
and
power
GPS
electrical noise.
spark plug
antennas and
pumps
to
keep
the
PDF compression, OCR, web-optimization with CVISION's PdfCompressor
40
Page 10

KEYBOARD
The
keyboard
in
keys
waypoint&
functions. The MENU
keyboard
-
POS
PLOT-
NAV
STEER
MENU - Press this
other functions.
ON - The ON
WAYPT
present
WAYPOINT SAVE - This feature
ing options.
Pressing
This switches the
-
Pressing
-
position.
has
keys arranged
the left
activates the
This
QUICKSAVE
The
keys
this
this
displays
key
column are used for
in the
key displays
key displays
key
turns the GlobalNav on.
column
right
in the bottom
key
first menu
GlobalNav into the
the
Steering
to
show the menus and
-
Pressing
in two vertical columns. The
to
right
plotter
screen.
gain
more
and
recalling
the
basic GPS
corner of
mode.
access to
saves
your
waypoint
Saving
pertain
page.
the Position screen.
the
Navigation
screen.
this
key instantly
gives you
the
sav-
MAN
One of
member fall
of
you're
remain calm and
rescue the
OVERBOARD
boating's'most
overboard. This situation can
water,
fresh or
out of
person.
sight
terrifying
salt. It's
01 land. Of
all standard
try
If
you
the GlobalNav to initiate
Once
you're
failed,
instantly
waypoint
the
press
Waypt
appears.
the
press
waypoint
information back to that
since
you're
to silence it.
key
the unit in this
Using
back at the helm after initial
the GlobalNav's
press
stores
Num." near
your present
number that
Waypoint
Enter the
key adjacent
stored,
you
within ft's
Recall
the bottom of the screen. A new
waypoint
causing
radius,
manner lets
the victim from a known
.05 mile
accident area.
makes it easier to see
range
events is
particularly dangerous
Oourse,
safety
lose
a search
position
appears
key.
to the
waypoint.
either
location.
of the
sight
pattern.
Waypoint
in
at the
number
"ENTER" label. This recalls the
the
top
Press the
that
GlobalNav to show
The Arrival alarm will sound
ignore
start a search
you
Switching
your position
having
memory.
a friend
be
deadly
the first
measures to
person, you
rescue efforts have
Quicksave
or
on
any body
at
night
to do is
thing
try
can use
key.
Memorize the
of the screen! Now
next to the 'Vest.
key
you just saved,
navigation
it or
to the
the
press
pattern
plotter
relative to the
CLEAR
family
or if
and
This
menu
then
for
on
the
ED
Remember,
to rescue the
Training
The Coast Guard has
bers on board
dock.
emergency
saving
and
Make certain all on board know
occurs.
the victim is the
person
education are also
your
immediately
excellent
boat on
safety
safety procedures
primary goal. Try
after the accident
accident
good
courses.
what to do before
preventatives.
Instruct all mem-
before
all
options
happens.
leaving
the
any
ED
IWAYr
For more information on
"How to Save a
Waypoint"
saving
section in
and
recalling waypoints,
this manual.
see
C
_
OFFj
PDF compression, OCR, web-optimization with CVISION's PdfCompressor
6 47
C
ON
Page 11

key
adjacent
to
the last used
offset information
switch to the
"PCF"
appear
Set as
To
enter the offset or
position
position
example,
chart's
offset is N
the
press
ment"
label
screen
Now
press
screen shown below
your
position
After
pressing
below
right appears.
to the
position, navigation,
you
position,
on these
Offset
and the one on
from the
if
position
00°05.384,
key
shown at the
location on the
location is N
your
is N
adjacent
appears.
the
key
and
the chart's location in
the
"Use Position" label. The
or
entered. To
navigation,
screens when POF is enabled.
difference in
the
chart,
32°10.220',
3215.604', W 08012.714,
W
0O°O0.608'.
to the
"More" label until the "POF
Press the
of
top
adjacent
left
appears.
key adjacent
key adjacent
the
previous page
to the
to
plotter
that PCF is
verify
or
plotter
position
first
subtract
chart
you
W
Ppress
"Set as Offset" label. The
Enter the difference
latitude and
that
label,
PCF Offset
S
00°05.384'
E000°
North/South
:
Globalwav returns
screen
screen. The
from
your present
your
wish to match. For
80012.1061 and
then the
the
MENU
to
that label. The
appears.
the
using
in
effect,
letters
current
the
position
then
key,
Adjust-
between
longitude.
the screen shown
00.608'
I
Lat.
WAYPOINT RECALL - This
memory.
CLEAR - Use
OFF - The
-
GPS
The Global
tech
approach
Department
GPS
system
tioning,
Basically,
orbiting
orbit when the
will act as
place,
least three satellites to
in
tude.)
displays
at least
Earth
twenty
latitude/longitude.
When the
this
key
Off
HOW IT
Positioning System
of
365
days
the
Earth
spares,
turns the GlobalNav
key
WORKS
to
navigation
Defence
is
an answer to their
a
year.
system
11,000
system
four hours
works
miles in
for a total of 24.
four of them
A 3D I ix is
GlobalNav locks on
a 3D
fix.
to exit from menus
(DOD)
is
fully operational.
a
give
is
used to recall
key
off.
(GPS)
yet
and the United
by using
space.
will be in view
day.
a "2D" fix.
is the
devised.
needs of 24 hour
a
constellation of satellites
There will be 21 satellites in
When all satetlites
The GPS
(A
your
latitude/longitude plus
to at least four
waypoints
newest,
Conceived
States
global
Three more
nearly
receiver
2D
anywhere
fix is
your position
from
most
high-
the
by
military,
requires
satellites,
the
posi-
satellites
are in
on
alti-
at
it
East/West
Use
Position
Clear
J
If
you
key adjacent
if
necessary
"East/West
screen is
label.
or
tion,
To
verify
or
plotter
when
PDF compression, OCR, web-optimization with CVISION's PdfCompressor
I
need to switch the
tot he
"North/South Lat."
in the same
Long."
correct,
The GlobalNav
plotter
that POF is in
screen. The
POE is enabled.
label. If
press
screen
returns to the last used
using
latitude from north to
manner
the offset shown
the
key adjacent
the offset
switch to the
effect,
letters "POP
'IA
Clear
label. Switch the
by pressing
appear
the
to
the "Use Position"
information
positjon,
at the
on these screens
Long.
L
south,
next to the
key
top
position, naviga-
you
navigation,
the
press
longitude
of the
entered.
It
takes three satellites to
determine
position
Page 12

As the receiver
tance
from the satellite
the radio
accurate clock and it
sion started. The
thus
clock,
the
speed
can
you
satellites,
calculate distance. Once
lacks on to each
signal
then the receiver can
to reach it. The satellites have an
receiver
knows
it
of
light!)
how
to reach
satellite,
by measuring
tells the receiver when the radio transmis-
compares
it look the radio
long
If
it.
you
determine
it calculates the dis-
the
length
that time
know time and
you
position.
of time it
against
signal (travelling
speed,
have this from three
takes
extremely
its own
at
then
The Globalwav
The first method
corrected
requires
GlobalNav.
Set as Position
To use the Set as Position
the chart that
Then move the
as
rately
adjacent
appears.
shown below
gives you
(Set
latitude/longitude.
a calculation be
you
boat to that
possible.
to the "More" label until the "PCF
Press the
appears.
ACCURACY
Most of us
receivers. The DOD
the satellite
sion.
people
words,
GPS receivers
worse than the
worldwide can benefit from
the
military keeps
enemies.
fixes
people.
However
potential accuracy
further with what's
small,
accuracy
also
signal-to-noise
(the
Don't let this
repeatably
GPS
(such
purchased
today.
PDF compression, OCR, web-optimization with CVISION's PdfCompressor
have heard tales of
system. However,
The
from
the data
the
way
the more
using
coming
use what's known as "CIA Code." It's
military's
requires accuracy
military keeps
extraordinary accuracy
only
precise system
from the
"P Code." In
satellites
excellent
the most accurate
Theoretically,
to 15 meters. This is more than
up
of this
(as
C/A code can
writing),
the
military
in the hands of the world.
called "Selective
random errors
will
typically
depends
more the
by
as
We
on the
better),
shown better than
nature has much faster
Loran),
one of the finest
hope you'll enjoy
intentionally
be within 100 meters. Of
of the satellite above the
angle
the number of satellites tracked at one time
ratio,
and other factors.
discourage you,
100 meter
and
typically
is much easier to use. You've
navigation
it
many years
fgr
from OPS
of 10 to 15 meters from
the
military gets
us and other unauthorized
is
coding.
is
encrypted.
this
manner,
position
system away
fixes.
accurate
give
adequate
isn't satisfied with CIA's
So,
Availablity"
added to the
course,
however. Our
accuracy. Furthermore,
updates
than other
instwments on the market
to come.
this
preci-
In
Civilian
intentionally
civilian users
Meanwhile,
from
potential
position
for
it's
degrading
or SA. This is
system
so
accuracy
horizon,
tests
systems
other
most
it
your
have
V
ItT
Set
Now
screen shown below left
I(,J
$IJ
the
press
key adjacent
PCF Position
N ——°——.
u—--°--.
4
I
t i,
Lcic1
Now enter the
pressed,
adjacent
north to south. Switch the
manner
If the
position
position
the screen shown above
tot he "North/Sooth
by pressing
shown at the
a choice of methods to enter the PCF.
as
Position)
The second method
performed,
method,
wish to match the
position
Now
press
key adjacent
PCF
N
LPOO.OOW
lets
you simply
then entered into the
first choose the location on
unit's
position
and hold it there as accu-
the MENU
key,
Adjustment"
to that label. The screen
Offset
E 0° 00.000'
Turn PCF On
'e*s tnt;
I
N 32° 10 220'
CLear
———'
as Offset
Li
to the "Set as Position" label.
appears.
PCF Position
---'
,
I19!'94 thaaI
shown on the chart. After the last
tat."
longitude
the
next to the
key
top
of the screen
45
North/South Lat.
East/West
Use
Position
right appears.
label to switch
in
necessary
"East/West
the latitude from
is
correct,
enter the
as
(Set
then the
Offset)
display
106'
Long.
Press the
in
the same
Long."
press
to.
key
label
The
key
key
label.
the
L
I
I
is
Page 13

SYSTEM
The code
lion can
adjacent
adjacent
below will
contained in the GlobalNav
be obtained
to the MORE label
to the
be
INFORMATION
by pressing
Info"
"System
displayed.
Lowrance Electronics
label. A
GlobalNav
Version:
Copyright
is numbered. This informa-
the
MENU
two times.
message
1.0
1991
lhen the
key,
Next,
press
similar to the one
the
key
key
The Lowrance GPS Module
This GPS receiver
in all Lowrance GPS
five channel
view at all times.
GlobalNav once
receiver
manufacturing capabilities,
vanced
technology
line of
GETTING
(manufactured
receivers. It's
design
lets it
acquire
It transmits
second.
every
with
GPSnavigation systems
By incorporating
Lowrance's state-of-the-art
Lowrance
STARTED
by Rockwell) currently
and track
small,
rugged,
position
brings you
available in
is
used
and fast. The
to all satellites in
up
information to the
Rockwell's GPS
design
and
the most ad-
the world.
Press the
and
key
adjacent
return to the sonar screen.
PCF OFFSET
The GPS
culations to
other
not a true
to
accommodate deviations. To
not
tions
approximate
lead
your
soids is "datum."
To reduce the error
gives you
the
this offset to all
For
accurately
tude
Using
make the
anchor
to all
used
entering
change
the PCF
navigation
determine
factors. One factor is the
sphere,
everyone
are. The size and
uses the same
the earth's
to errors if
chart uses a different
display
example, suppose you
position
the Position
and
positions.
the
by
the PCF
when the unit is turned off.
settings.
your navigation
the
capability
to match
position displays
marked on a chart. Your
that is .010
GlobalNav read the same as the
move,
chart. For this
to the CLEAR label to
(Position
system
your position
variations in the
factor between
Correction
relies on
based on
Earth's
calculations have to be made
make matters more
data to determine what the devia-
of
shape
surface are
the
device uses one
one. The term used for
to move or "offset" the
one shown on the
at all
are
anchored at a location that is
GlobalNav
degrees
Correction Factor
less than the one on the chart.
the GlobalNav will
This makes it more
reason,
Offset. This is
you
saved in
However,
erase this
message
Factor)
complex
shape.
ellipsoids
improved
datum,
times.
(PCF)
add the
closely
mathematical cal-
satellite data and
Since the Earth is
complex,
that are
often. This can
ellipsoid,
the
position
chart. The unit will add
displays
Offset
chart. If
change you
match the datum
should be careful when
memo'.
Preset does
used to
these
UltraNavGPS
shown on
a
feature,
you
It does not
while
ellip-
longi-
you
raise
made
erase
Initialization
The GlobalNav must be initialized or "told
time it's turned on. This
once and
1. Present
2. Elevation above sea
3.
Today's
4. Number of
time the GlobalNav is turned
Every
appears.
at
power
module which satellites
tion faster. Please
make certain
CLEAR
on. This is needed
key
-
Power On
initialization
requires
position
date
This shows the
the
following
in
latitude/longitude
level
and time
hours from
that it is correct. If it is
Greenwich,
data that the GPS module will start with
are visible so it can determine
check it
to erase the screen.
process
data:
(altitude)
England (UTC)
the screen shown below
on,
the GlobalNav to tell
by
time
every
you
correct,
Y ii ::3rIAr,1
DATE
I
TIME ZONE
I
ALTI
I
INITIAL
POSITION
Lanp
Clear
fIJi]
VERIFY SETUP:
CLEAR IF OK.
nIflI
+
N
ciijocio.oo':''
w Urj°Oo.000'
Change
where it is" the first
is
usually
done
only
the GPS
turn the
simply press
your posi-
unit on to
the
I
OrT
I
PDF compression, OCR, web-optimization with CVISION's PdfCompressor
114
9
Page 14

If
you
the
"Change"
you'll
below
need to
need to
appears.
4ITIME
change any
label. The
this
press
OF
of this
data, press
first time
very
key.
After
you
pressing
DAY Uuiiu
the
key adjacent
use the
it,
GlobalNav,
the screen shown
I
to
41
TIME 2 +01:1
41
ALTITUDE
41
4
POSITION
EX I
41
INITIAL
This screen
example,
time,
settings.
SETTINGS
lets
when the time
need to
you'll
A
description
you change
TIME OF DAY
The time of
time on the
"TIME OF
day
screen is
DAY" label. The screen shown below
DATE
—Ii I
INITIAL
u-Il
—.—————-,——————I
TI
some or all of
from
goes
change
of each
is
simply
the
wrong,
Enter
24hr format
standard to
the lime Of
section follows.
present
then
time at
press
Tine
I
:ijpj
I
I
the initial values. For
daylight savings
and Time Zone
Day
location. If the
your
the
key adjacent
appears.
to the
iuj
lean
bc
The
on.
seconds unless the
makes it easier to turn the
light
The
menu also
lights
appears
and the menu will turn
key adjacent
MEMORY - PRESET
The GlobalNav saves all
contrast
memory.
from
settings,
Preset returns all GPS
setting,
This
the unit. If
use the Preset function.
to be re-Initalized
To do
this,
the MORE label
Preset label. A
presetting
Now
press
screen will clear and the
Wait"
may appear
display
their
the intial
factory settings.
alarm
memory
you
after a Preset!
the MENU
press
three times. Now
warning
a
unit,
navigation
the
key adjacent
for a few seconds. Then
settings screen,
settings,
is retained even if
need to return the unit to the
IMPORTANT!
settings
message "System Powering
each time the GlobalNav is turned
off
after a few
is
key
pressed.
measure,
battery-backed-up
is disconnected
to the ON
on at
lights
settings
and more in
themselves
night.
such as units of
power
to zero. The GPS will have
then
key,
press
label
appears
to
waypoints
to the Preset label to continue. The
and all
the
press
the
as shown below. When
and routes
key adjacent
köy adjacent
is cancelled.
Up.
the GlobalNav will
features will return to
This
factory
to
to the
Please
WARNING Ut
I-IH:tlM
Clear
PDF compression, OCR, web-optimization with CVISION's PdfCompressor
-In 42
Enter
IFø
Preset will
Waypoint uauigat
and
Routes.
cancel
I Preset
Exit iJ
ion
Page 15

DISPLAY
The contrast of
different
To
change
key adjacent
adjacent
Press the
contrast. The
bar
graph changes
box
also
Press the CLEAR
CONTRAST
the
conditions.
light
the
contrast,
to
the MORE label three
to the
Display
key
adjacent
key adjacent
changes.
display
can be
the MENU
press
Contrast label. The
to the
up
to the down arrow
with
There
key
selection. The
your
are 31
to erase the menu.
changed
arrow to increase
steps
for easier
key. Next, press
times. Now
Disp.
press
menu
decreases it. The
number
of contrast available.
reading
the
appears.
the
display
in
the menu
in
the
key
Enter
sides of the
afternoon,
12:00,
press
The GlobalNav returns to the
local time in 24 hour
your
screen. For
then
you
next to the
key
is 24:00. After
midnight
the
example,
will enter 14:00.
'Enter' label.
DATE
The next
the "DATE"
shown below
setup
label to
appears.
item is
today's
change
Enter Date
format
it
your
you've
initial
setup
date. Press
the
displayed
the
using
watch reads 2:00 in the
Twelve o'clock noon is
entered
menu.
your
the
key adjacent
date. The screen
keys
local
on both
time,
to
Disp.
MM/DD/YYYY
05/05/0000
Clear
Now
Clear
DISPLAY
CONTRAST MENU
enter the
example,
After
entering
label. The
month,
if the date is
the
GlobalNav returns
TIME ZONE
LIGHT
The
keyboard
on
lights
To turn the
key adjacent
Press the
Press the
Press the CLEAR
PDF compression, OCR, web-optimization with CVISION's PdfCompressor
and
display
and off from the
on or
lights
to the
key adjacent
off,
"Lamp"
key adjacent
to erase the menu.
key
are
backlighted
menu.
Light
the MENU
press
label. This
to
the ON label to
for
night
key. Next,
displays
turrrthe
the
to the OFF label to turn
49
use. Turn
press
menus.
light
lights
the
lights
the
the
on.
off.
The time
hours
It
used to be called
what
GlobalNav needs to know
UTC
number. Use a
lime zone
this manual.
zone is the
and minutes. UTC
call
you
time,
not
map
it,
local. If
then
today's
October
date,
press
22, 1991,
the
to the initial
difference between
stands for Universal Coordinated
Greenwich Mean Time or GMT.
this is the
negative
for the
time at
this time since the
west of
you're
number if
continental Unhed States is in
11
Enter
and
date,
key adjacent
Greenwich,
you're
finally
then
setup
your
system
Greenwich,
east of
the
enter 10/2211991.
year.
For
to the "Enter"
menu.
time and UTC in
Time.
No matter
England.
works off of
use a
Greenwich. A
The
positive
the back of
Page 16

The
lime zones for the
Time Zone
Eastern Standard
Central Standard
Mountain Standard
Pacific Standard
NOTE: Don't
savings
Time becomes
Time Zone
time is in
TIME
BETWEEN
AND
Time
Time
forget
effect. For
+6:00. Remember 10
when
changing
DIFFERENCE
LOCAL
GREENWICH
lF:I1ll
Continental United States
Time
(EST)
(CST)
Time
(MST)
(PST)
to
change
IThi
the
example,
to or
from
time
change
Daylight
Enter
+5:00
+6:00
+7:00
+8:00
one hour if
by
Eastern
both local time
Savings
tJTC
fl6 :00
+/—
are:
Daylight
Time.
Offset
Toçjçjle
daylight
Savings
and
First,
"More" label un\il the
this label. The
pears.
screen.
GlobalNav
send NMEA
SPEAKER
The
speaker
can hear
you
noisy
surroundings.
the
press
MENU
screen shown at the
The data format
Press the
will return to the last
key adjacent
data out the
VOLUME
volume is
alarms or
Next,
key.
NMEA label
currently
to the desired
used GPS or
white wire on the
adjustable.
the
"beep"
Or
can turn it down in
you
the
press
appears.
top
key
Press the
of the next
in use shows at the
data
plotter screen,
cable.
power
You can make
each time
you press
quiet
next to the
next
key
page
ap-
of
the
top
output.
The
and
it louder so
the
key
situations.
to
in
C
To
enter the Time
ZONE
the
you're finished,
screen
If
adjacent
offset from
Toggle",
from this
adjacent
label. The screen shown
difference in time
shown above
the UTC offset shown
to the
positive
then
menu without
to the
_
press
"Use Time" label. If
press
"Clear' label.
Zone, press
between UTC and
the
right
appears
on this
to
negative,
the
key
changing
the
above left
next to the "Enter"
key
next.
page
press
next to the "Use Time" label.
the time
Use Tine
Clear I
key adjacent
appears.
local time.
your
is
correct,
you
the
offset,
press
need to
next to the
key
to the TIME
Now enter
When
label. The
the
key
change
"+1-
To exit
the
press
key
Spkr.
the
Clear
ALTITUDE
The next
parameter
the distance from
altitude doesn't have to
to
find
your position.
feet. If
elevation of Tulsa atthe
easiest
member,
the
top
you're
to find both
way
however to ask for
key adjacent
of the
next
PDF compression, OCR, web-optimization with CVISION's PdfCompressor
the GlobalNav needs is
the GPS module to
be
precise
For
example,
in
Tulsa, Oklahoma,
airport.
altitude and
elevation,
in order for
if
you're
(Calling your
your
sea level in feet. The
on the
enter 675 feet.
your present position.
not
altitude.)
to the Altitude label. The screen
page appears.
12
altitude. This is
the GPS receiver
ocean,
local
enter 0
That's the
Now
is the
Re-
press
airport
shown at the
To
the
label
Volume label. The
display.
volume or
The bar
change
change.
volume is set to 7.
the
adjust
key adjacent
appears.
speaker volume,
Use the
the
graph.
make. The
you
When the
to
the MORE label until the
Now
press
Speaker
key adjacent
key adjacent
will increase or
GlobalNav is first turned
The
press
the
key adjacent
menu
appears
to the
to the down arrow to
decrease
number in the menu's box
is 11010.
range
41
the
MENU
on the left
an-ow
up
corresponding
Next,
key.
Speaker
to the
press
Volume
Speaker
side of the
to increase the
decrease it.
to the
will also
the
on,
speaker
Page 17

The unit of
on this screen.
adjacent
change
to the
can
change
screen at
When
tings, press
used
measure for all of
to the label that
Distance from
'Distance" label until
the units of
the same
you've
the
navigation
To
time.
modified
CLEAR
screen
the items on this menu
change
miles to nautical
the units of
one or
wish to
you
the label reads
measure for all of
measure to the desired
The
key.
using
Globalwav reverts to
the
changes you
all,
simply press
change.
miles, press
For
"Distance
the items on this
made.
are shown
the
example,
the
key
=
NM." You
the last
key
to
next
set-
t.IEnter
in
Feet.
e
e
A1titude
It
FT
NMEA
The
according
tronics
depth,
charting instruments,
The GlobalNav uses
0180, 0182,
only.
information,
order to
be
See
connection information.
Once
told which
"listener"
the
COMMUNICATION
GlobalNav sends data
to
standards
Association).
and
navigation
and
It's useful
sending position,
use this
connected to the
the installation
the
wiring
data
equipment
GlobalNav as
CURRENT
This
the
0183. NMEA 0180
mainly
feature,
NMEA data
section at the front of
is
connected
format to use.
to
follows:
out the white wire on
set
the NMEA
by
allows the GlobalNav
information to "listener"
autopilots,
following
for
the white wire on
see the which
FORMAT: HMEA
and
NMEA
autopilots.
steering, speed,
input
properly,
Consult the owner's manual of
(National
other marine
data
sends
NMEA 0183
the
on the other
this manual for
the GlobalNav
format it
0180
the
power
Marine Elec-
to send
protocols:
steering
power
needs. Then set
position,
such as
units,
instruments.
information
has the most
and more. In
cable must
instrument.
must be
0180
1 NMEA
cable
NMEA
wiring
the
i1earj
Now enter
screen. After
as
pears
positive
you're
Once the numbers on
adjacent
to
the Initial
shown below. This
to
above sea
to the
Altitude
your
you've
negative.
level,
'Use Position" label.
Settings
screen.
the
using
entered the
In
other
use
negative
the
display
keys
numbers,
lets
words,
switch the
you
use
numbers if
are
The GlobalNav then
Altitude
+10 FT
Toggle
Posit
EnterI
on both sides
a new
positive
correct,
screen
numbers from
altitude when
you're
press
I
ion
I
of the
ap-
below it.
the
key
returns
PIMEA
NMEA
NMEA
0182
0100/0102
0103
Cl
PDF compression, OCR, web-optimization with CVISION's PdfCompressor
40
I
I
INITIAL
1
S
The
present
cent to
of
top
POSITION
last
piece
position
the "INITIAL
the next
of
information the GlobalNav
in
latitude/longitude. First,
POSITION" label.
page
appears.
1'i
needs to start is
press
The screen
the
shown at the
your
key adja-
Page 18

mit!.
II
——'°-—.
Pos
IJ___o__.
___I
.____J
To set the XTE
to
adjacent
Now
opposite page
in the XTE
the
key
range
the'More" label until the "Set Alarms" label
the
press
alarm's menu to increase the alarm's
next to the down
is from .01 to
alarm,
key adjacent
appears.
press
Press the
arrow to decrease it.
10 miles.
the MENU
to that label. The
key adjacent
key,
then
the
press
screen on the
to the
range.
The XTE alarm's
key
appears.
arrow
up
Press
Clear
Now
enter
sides of the screen.
ft's
less than 100
degrees,
then enter 081.
latitude and
your
degrees.
North/South Lat.
East/Wet
Ii:is
longitude using
Remember to add a zero to the
For
example,
Initi.
N 32°24.
Wue1°4a
Pos
126
232
the
if
your
Long.
keys
longitude
To turn
until
Press the CLEAR
ALARM
on both
longitude
1 ,_
if
is 81
When
appears
silences the
turn the alarm
UNITS OF MEASURE
The GlobalNav can
and time in different
can be
the XTE alarm
the word "OFF"
MUTE
alarm
any
at the
speaker
off,
displayed
I
I
off, press
appears.
to exit from the GPS alarm
key
sounds,
top
in
the "Press
of the screen.
until the alarm is
ft
merely
display
units of measure. For
statue
the
shuts the
distance,
nautical
miles,
key
Clear
Distance
Speed
=
npli
Altitude
next to the down arrow
menu.
to Mute"
key
off
example,
miles,
ni
ft
the CLEAR
or kilometers.
Pressing
tripped again.
speaker
speed, altitude, degrees,
=
=
message
This doesn't
temporarily.
distance
I
1
1
key
Clear
After
entering
Press the
latitude from north to
key adjacent
When the initial
"Use Position" label. The
screen.
PDF compression, OCR, web-optimization with CVISION's PdfCompressor
the
position,
key adjacent
to the East/West label
position
the screen shown above
to the
south,
if
is
correct,
GlobalNav returns to the Initial
North/South label to
tb
change
the
Likewise,
key adjacent
necessary.
press
14
appears.
change
press
the
longitude.
the
the
to the
Settings
To
change
the
press
label
appears.
label. The screen
Direction
L
the units of
key
me
next to the "More" label
Now
press
shown above
—
measure,
the
key
appears.
39
=
it'
first
press
until the
adjacent
nag
the MENU
"Change
to the
"Change
I
1
key
,then
Units"
Units"
Page 19

GPS
ALARMS
The
GlobalNav
alarm. The
indicator moves
adjusted
ARRIVAL
The
arrival alarm
alarm's
is .5
mile,
miles of
To
set the
next to
key
Now
press
appears.
alarm's
to the
from
down arrow
.01 to 10
CDI alarm
from
the same
ALARM
radius of a
then
a
waypoint.
arrival
the
the
Press the
menu to
miles.
has Iwo GPS
sounds an
a
past
sounds a
the alarm
alarm,
"More' label
key adjacent
increase
preset limit. Both
menu.
waypoint.
sounds a tone
first
key
adjacent
the
to
decrease it.
alarms;
tone when
For
press
until the
to
a CDI
audible
your
example,
when
the MENU
"Set Alarms"
that label. The
to the
alarm's radius.
The arrival
alarm arid an
tone when
alarms are set
position
if the
you
key,
arrow
up
Press the
is within the
alarm's
come within
then
label
screen below
in the
alarm's
Arrival
the CDI
and
setting
the
press
appears.
arrival
next
key
range
.5
is
The
initial
GPS
flashing.
lites.
displays.
the
GlobalNav has
the
satellite
Never
latitude/longitude!
tion.
If
you
GlobalNav,
the
GlobalNav,
The
page returns
wise,
setup
position
Once ft
navigate
Always
move a
'Initial
you shouldn't need to
screen
The
GlobalNav
The
latitude/longitude
data,
use more
you
Setup"
you
is now
locks onto at
see the
with
long
may
you
to
complete.
appears
begins
locked onto
Satellite Status
WARNING!
this unit
This
means the
than one
distance
need
to
will
definitely
menu
selection
the initial
repeat
Press the
with the
its search
least three of
position
the
when the
method to
from
re-initialize the
present
necessary
position
unit is not
the last
need to
on the
setup menu,
these
steps.
CLEAR
position
for the
them,
will
section in
navigate.
re-initialize the
GPS' second
when
correct satel-
your
stop flashing
satellites. To view
this manual.
screen
usable for
time
unit. If
flashes the
you
you preset
needed. Other-
key.
display
position
when
naviga-
used
unit.
menu
The
the
To turn
until the
XTE
The XTE
ceeds the
nautical
than .5
the arrival
worti °OFP'
ALARM
miles,
mile.
I
GPS
IRR I LJAL
Alarms
iLARM
$
0. 05111
I
ALARI'l
ft1
Clear
alarm
alarm's
the
alarm of
sounds a tone
setting.
alarm will
I,
appears.
press
when the
For
example,
sound if
the
next to the
key
cross
if
the alarm
you
go
down arrow
track error ex-
is set
off
Uourse
by
to .5
more
POSITION/NAVIGATION
The
GlobalNav has
Position,
To view
the
screen,
appears.
key adjacent
screen
Navigation,
any
respective
simply press
To
follows.
of
view the
to
five main
Steering,
the first four
label.. In
the
Status
rr—
other
the
NAV
Status
screen's label.
TE
DISPLAYS
display
Plotter,
displays,
screen,
words,
key.
-
I?JY21
simply
The
press
modes.
and Status
press
to
view the
screen
the
MENU
A
description
#21
These are the
displays.
the
Navigation
shown below
key
key,
with
then
of each
PDF compression, OCR, web-optimization with CVISION's PdfCompressor
38
ir
Page 20

Position
The Position
longitude
thousands of a minute.
position display
Error
(BRG).
used
waypoints
Display
display
coordinates. This is
is Course Over
(XTE),
only
Distance To Go
Gross Track
when a
for
waypoint
more information.
shows
Error,
your
present position
displayed
(Not seconds.)
Ground
(DTG),
Distance
is
and
To
recalled. See the section
in latitude/
in
degrees, minutes,
Beneath the
and
Gross
to
Bearing
(COG),
Bearing
Go,
and
present
Track
waypoint
are
on
Turning
quencing
the route off.
the arribal alarm off
to the next
CANCELING
To
press
the
GlobalNav from
waypoint.
to the current
though
the GlobalNav
stop
the
key adjacent
key adjacent
The unit will continue to show
the route was canceled.
IMPORTANT!
the GlobalNav from se-
This,
the MENU
Planning"
label. Now
waypoint
A
ROUTE
to the "Route
prevents
in the route.
in
a
route, press
tot he "Cancel Route" label. This
sequencing
waypoint
to
any waypoints
until the arrival alarm
after the current
navigation
Select Function
in
effect,
key,
stops
information
sounds,
turns
then
press
the
even
POSITION DISPLAY
Navigation Display
This screen shows all
are as follows:
1. Present Position.
2.
Distance To Go
3.
Time To Go
4. Time Of
5. Altitude
6.
Speed
7.
Velocity
8. Gourse Over Ground
9.
Bearing
10. Gross Track Error
Present
This is
minute. Gross Track Error
right
Day (TOD)
(ALT)
Over Ground
Made Good
to
position
expressed
of
course to
the
waypoint (BRG)
(DIG)
(TFG)
is
your
as
major navigation
(SOG)
(VMG)
(COG)
(XTE)
location in
degrees, minutes,
a
waypoint.
latitudb/longitude
is the distance to the left or
(XTE)
In
other
information. The
and thousandths of a
words,
displays
coordinates.
if
you
draw a
Create New Route
Erase Route I
Follow Route
Cance 1 Route
NOTE:
Canceling
merely
waypoints
a route
stops
in the route.
ERASING A ROUTE
To erase a route from
the
press
the "Route
"Erase Route" label. The screen shown below
keys adjacent
desired route name. Then
label. This
key
key
Planning"
erases
to exit this menu.
does
not erase the route from
the GlobalNav from
memory,
next to the "More" label. Now
label.
to the
up
the route from
Next,
or down labels to move the box
press
sequencing through
first
press
the
press
the
key adjacent
memory.
the MENU
press
J
U
I
memory.
then
key,
the
key adjacent
appears.
to the "Erase"
Press the CLEAR
key
next to
to the
Use the
to the
It
the
PDF compression, OCR, web-optimization with CVISION's PdfCompressor
16 37
Page 21

SEL. WAYPT.
FOR ROUTE:
WRECK
Enter
IJaypt
H 32°24. 142'
W
GO°18. 357'
OTG:
BRG: 239°M
1
32. 24MM
H 1
I—
" I
Clear I
the
Finally,
shown below. This
route
waypoint
6, 7, 8, 9,
waypoints
'Select Route Travel Direction" menu
is the last route menu. You can follow a
forward or backward. In our
number
4, 3, 2,
5,
travelling
and 10.
and 1. Press
the desired direction.
Select Route
Travel
Forward
rReverse
WAYPT 1* 2
WAYPT * 3
WAYPT #
WAYPT * 5
WAYPT # 6
WAYPT * 7
forward would take
Travelling
backward would take us to
the
key
Direction
I
I
4
example
next to the label
route,
us to
appears
starting
waypoints
showing
as
at
straight
deviation to the left or
Time To Go
destination,
is
your present position
height
speed you
speed
waypoint (BAG)
destination
the direction
Remember
Velocity
is
line from
(TTG)
travelling
the current time.
above
sea level.
are
are
you
measured in
travelling. Velocity
travelling
is
the boat is
,Cross
Made
Good,
recalled.
your starting
Distance To Go
the direction from
Track
NAVIGATION DISPLAY
position
of
right
is the
at
that line is
time it will take
your present
speed.
(DTG)
to the destination.
Speed
degrees.
travelling.
and
Over Ground
Made Good
towards the destination.
your present
Course
Distance To
Error,
Bearing
are used
to the
destination,
cross track error.
your
to reach
you
Time Of
is the distance from
Altitude
(SOG)
Over Ground
Go,
only
Day (TOD)
(ALT)
is the actual
(VMG)
Bearing
position
Time To
when
a
(COG)
waypoint
any
the
is
your
is the
to the
Go,
to
is
Steering
ear
The
GlobalNav now shows
route.
for
other
nautical mile of the
in the
The arrival alarm sounds when
about seven seconds. It's radius
words,
route,
the arrival alarm sounds
waypoint.
the arrival alarm sounds until
I
navigation
When
to the first
reach each
you
is
preset
when
youcome
reach the last
you
you
waypoirit
on the
waypoint
for 0.1 mile. In
within .1
it
off.
waypoint
turn
This screen
Cross Track
elled.)
waypoint
(COG),
Error
waypoint
The
the
screen. The
Bearing
PDF compression, OCR, web-optimization with CVISION's PdfCompressor
IC
Screen
shows a
Error,
At the
(XTE) display.
top
number are
Distance To Go
is not recalled.
CDI
(Course
straight
Line. This
graphical display
and Track.
of the
screen,
displayed.
(DTG), Bearing (BAG)
Only
Deviation
line down the middle of the
is the shortest distance to the
(Track
Course Over Ground is
Indicator) displays
of
your
is
your path you've
the route name
Course
Next,
present position,
trav-
in
(if
Over Ground
and Cross Track
in the
display
and
use)
used if a
middle of
is the
waypoint.
Page 22

then
and 5 in that order
1,
and
finally
5.
In this
when
case,
making
must select
you
the route.
waypoint 3, 1,
After
you've
"CLEAR"
use.
selected all of the
Your new route is stored in
key.
waypoints
for the
route,
memory, ready
press
the
for
FOLLOWING A ROUTE
To follow
adjacent
"Route
Route' label. The screen shown below
Route"
STEERING
Angled
cross track
bottom of the
angled
"+"
determine
track
slightly
scale is
Your
The
are left of
get
your
on the center
the
range.)
closer
small arrow will
bottom
at the
bottom
tines on
error. Thecross track error
lines.
moves with
the cross track error. In the
error is .43 miles to the
to the
adjustable
present
arrow shows the direction the
course,
back on
track. To
top
course. The solid line
of the CDI
As
you approach
together.
pointing
of
top
lets
you
STEERING
The
Steering
erase the track
MENU
label.
then
key,
The screen shown at the
left
the
screen. This scale has
This lets
your present position
right
position
trave!
line. The
the
the screen
accurately
and
you
of
the .50 scale mark on the XTE
(see below).
is shown
then
you
directly
waypoint
display (if
the
If the
waypoint
appear
at either the
to the
way
along
SETUP
Setup
menu lets
line on the
the
press
PDF compression, OCR, web-optimization with CVISION's PdfCompressor
DISPLAY
of the
right
know the cross track
left of course. The small "+" is
by
need to steer the boat to the
to a
Bearing
(XTE) range
above
example
the circle with an arrow inside.
boat is
extending
waypoint., try
is
depicted by
it's within the
waypoint,
is riot
the two
displayed
top
waypoint.Using
with the
steer the boat to a
you change
steering, display.
key adjacent
of the
top
18
Line measure the
shows at the
marks that match the
error. A small
the scale to
above,
range.
heading (COG).
from the
to
keep
another
steering
circles
on the
of the screen or the
the
digital
graphical display
waypoint.
the XTE
To do
this,
to
the
"Steering Setup"
next
page
appears.
help you
the cross
This
If
you
right
circle is
the circle
circle at
screen's
will
move
screen,
displays
at the
and
range
the
press
to
a
Press the
around
label. This tells
The
the
top
the route
route. For
waypoints
waypoint
tion data to
arid
waypoint
waypoint
a
route,
press
the MENU
to the "More" label.
Planning"
menu has the list of routes
the desired route. Then
label.
Finally, press
next to the
key
the GlobalNav which route to
up
Select
Enter
—
a
Clear
starting waypoint
of the next
to
to first. The route
go
example, suppose
one
through
number
waypoint
the arrival alarm
number 6. It will continue in
number 10.
menu
You
page.
ten in
if desired. The
5,
number 5
sounds,
key,
Next,
press
the
the
on the screen's
or down labels
the
press
then
key
adjacent
next to the "Follow
key
appears.
until the box is
next to the "Enter"
key
follow.
the
press
The "Select
right
key
to the
side.
Route
I
l.,JF.:ECK— 1
3K REEF
TOMS COLE
I Down
WRECK—2
automatically appears
must tell the unit which
can start at
have
you
consecutive order. You can start at
GlobalNav will
first. When
any waypoint
a route
you
the GlobalNav will
this
manner
qç
as shown at
waypoint
in
in the
consisting
give naviga-
reach number 5
sequence
until
you
of
to
reach
Page 23

To
labels to move the box to the
adjacent
top
the last
time
erased.
the route's
spell
to the
of the screen under
letter,
you press
name,
"Select" label. The selected letter
the
press
this
key,
use the
the "ENTER NAME:"
key
the letter at the end of the
I_Enter U
next to the left and
keys
desired letter. Now
message.
next to the
"Backsp."
ENTER NAME:
WRECK
the
press
appears
To erase
label.
line will be
right
key
at the
Each
XTE
4,'
—
4
,'
4
—
—
4
IA
flange
RAtIGE
1. OMI
ALA Rt1
________
and Alarn
a
Hight
Clear
For
example,
the
"W,"
"W"
appears
"A" and
until the word
the
press
and the
menu as shown below.
The Select
View and
waypoint
the route.
the
waypoint.
select it in the same manner.
waypoints
to
name a new route
then
press
key adjacent
GlobalNav
Waypoint
Save
number
Press the
in the route are
the
press
at
the
top
the
key
"WRECK" shows at
automatically displays
Waypoint
one
Move the box
next to the
key
of the screen.
next to the
to the
For Route menu
menu.
or down
up
next to
key
to the next
selected.
ABCDE
GH I Jl<
I
M
NtJP
STUUW
V 20
45678
U
•
I
p
Q
12
—
F
L
R
x
3
9
I
"WRECK,"
"Select" label. The letter
Now move the box to the
"Select" label
the
top
"Enter" label. This names the
works the same as
Move the box that surrounds
until ft's on the first
the "Enter" label. This selects
waypoint
Continue
move the box to
again. Repeat
of the screen. Now
the select
doing
waypoint
waypoint
in
the route and
this until all
route
the
in
CI
The XTE
Clear Trail menu is
the
it.
turned on for the
1.0 mile.
The
adjacent
See the
Status
This screen shows
To view this
next to 'Status
Range adjustment
key adjacent
The
range
"Clear Trail" label also
to this label
"Alarms" section for
to the
is
adjustable
first
Display
screen,
Display."
NO
GOOP
HOOPaALT
TWNTRKELVA1SNR
menu is at the
beneath ft. To
or down arrow to
up
from 0.1 to 10
or after it's
time,
appears
to erase the track line.
the state of each
the MENU
press
The
ROUTE
1J
change
on this
information on the CDI
screen shown below
WYPT
FIX
of the
top
the XTE
increase or decrease
miles. When the unit is
preset,
menu. Press the
satellite the unit is
then
key,
screen,
range, press
the XTE
alarm,
press
appears.
________
#ei'1
the
is
range
key
tracking.
the
key
_LSaaiiua t
IMPORTANT!
You must
route. In other
waypoint
PDF compression, OCR, web-optimization with CVISION's PdfCompressor
select
waypoints
words,
numbers
suppose
1, 3,
in the order
and
you
5. But
are
they
want a route (hat
wish to
you
be used in the
4
travel to 3
consists of
first,
in
Page 24

Your
present position
neath
this and to the left are the GOOP
GDOP stands for
crossing angle
zontal
the
then the satellites are
fore1
(HOOP),
GOOP number
GPS
receiver selects satellites
always
angles.
problems.
appear
see
tries
The best
In other
the
system may
shortly. By monitoring
system geometry problems
P10
Geometric Dilution Of
indicator. It shows the
vertical
is,
to use satellites that will
way
words,
ROUTE WYPT #21
to use
if
the
out of
near the
and Time
the
crossing angles
based on
GDOP is 10
crossing angles
your viewing range.
the
GDOP
before
appears
(VDOP),
the better
moving
become unusable if more
of the
top
and HDOP
Precision. This is a
combination value of hori-
(TDOP).
GDOP,
in
result
anticipate system
display, you
they happen.
screen. Be-
displays.
The
smaller
are. The
therefore it
good crossing
are
decreasing,
There-
satellites don't
can fore-
There are four
must
you
used in the route. Then determine the
tell
the unit to follow the route.
wish to wn
completed,
CREATING A
To
create a
adjacent
"Route
nally, press
The screen shown at
screen lets
have
Planning"
up
steps
required
creatèand name the route.
the route forward or backward. After these
the
GlobalNav will start on the route.
ROUTE
first
route,
to the "More" label. Now
the
you
to ten
characters.
press
label. The screen
key adjacent
enter the name of
Select
to create and follow a route.
Next,
Finally,
the MENU
to
the bottom of this
the unit will
press
shown below
the 'Create New Route" label.
the route. The route name can
Function
select the
starting waypoint.
key. Next,
the
key adjacent
page appears.
waypoints
ask
you
steps
press
appears.
First,
Now
if
the
to the
you
are
key
Fi-
This
ODOP
HOOP
SAT PRN
1
TRK ELIWJ AZM SNR
2
3
4
S
Beneath the GDOP
2D, horizontal
the
better the
Observe both
working
the
To
how well the unit is
one,
"jitter"
location.
ground
small
well and when it isn't. This will
numbers should be
the
the worst is 9.
of the GDOP
right
increases. Jitter is the small
In
and tum it
position changes
display
crossing angle. Again,
crossing angles
the GDOP and HDOP
during
tracking
As the fix number
other
words,
on,
you'll
will
PDF compression, OCR, web-optimization with CVISION's PdfCompressor
FIX
ALT
is the HOOP
are.
displays
those times.
is
display
satellites.
if
you place
see the
constantly
the
position changes
position "jump
20
____
____
____
display.
the smaller the number
give you
Fix
The best fix number is
increases,
This shows the
when the
an idea of what
display.
Fix shows
the
system
position's
around a
a GPS receiver on the
occur.
around."
This is called
Very
jitter;
is,
is
Create
New Route
Route
:
Canc
Enter
L
Backsp.
———I
a
Left
Clear I
Bout:
ENTER HAME:
ABCDE
GHIJK
M
NI1P
STUULJ
YZO
45678
a
•
Q
12
I
I
I
I
F
L
R
3
9
/
Page 25

Destination
The Destination
torecall
To
press
menu
a
waypoint.
use this
feature,
the
key adjacent
shown below
Waypoint
Waypoint
Number menu
first
press
to the test.
appears.
Number
the
Waypoint
gives you
Waypt
another
Recall
Num" label.
key.
way
Now
The
it's normal
the fix
longitude position
the effect of S/A.
ing
display,
position only.
data. "H"
and
happens
number and HDOP numbers are
shown in
3D"
stands for Altitude Hold.
in all electronic
shown on
parenthesis.
means it's
the
display
Also shown in the fix box is the mode
"2D"
showing
navigation
then the
good,
should be
means the unit is
both
good,
position
devices, If
latitude!
exclud-
showing
and altitude
Clear
For
the 1
key.
the
example,
and the 0
The
Simply press
waypoint.
10,
press
the Enter
information to the
Ja5jpt.
N
32°23.
U
B0°42.
Uayp-t.
key adjacent
if
you
keys. Finally,
GlobalNav will
recalled
waypoint
10
to the
want to
This:
184'
287'
II
IEnterFJ
number of the
recall
waypoint
the
press
immediately
on
the GPS screens.
show
destination
number
key adjacent
navigation
to
Beneath the
above sea level in
The box at the bottom of the
receiver
left side of the screen.
satellite
satellites in
position.
the channel is
ber)
the "Track"
searching
the box is
channel, ELV is the elevation of
degrees.
position
satellite. The
SNR we've seen so
is a
good
fix box is the Altitude
feet.
channel.
(if available),
The
column. An "S" in
for the satellite. "T"
AZM is the
in
Channels one
Four channels track each track one
The fifth channel switches
view to track ones not
satellite number
tracking
blank,
degrees.
no action is
the SNR
larger
satellite's
SNR is the
far is 52.
SNA.
screen shows the status of each
(sometimes
shows
this column means the receiver is
means it's
number,
Typically,
PLOTTER
The
plotter
position, course,
waypoint,
screen shows a
and
direction of travel. If
the
starting position
'birds-eye"
and destination
display.
through
being
in
being
This is
five are listed on the far
used to determine
called the PRN num-
the SAT column. TRK is
tracking
taken
your height
between all
the satellite. If
that receiver's
by
the satellite above the horizon in
azimuth,
signal
or direction
to noise ratio
the better.
number
any
view of
you've
also show.
from
your
for the
The
highest
in
the forties
your present
recalled
a
ROUTES
Routes
without
A
route,
waypoint
nalled
quences
to this
waypoint
turned off.
gives
having
route consists of two or
the GlobalNav
in the
the Arrival
by
to the next
waypoint
in a
the
you
to
re-program
route. When
waypoint.
and the
route is
to
ability
the unit after
more
gives
navigation
you
Alarm),
reached,
the
Navigation
process repeats.
the
to
navigate
waypoints.
reach the
GlobalNav
arrival alarm s'unds
several
arriving
When
information to the first
first
waypoint (sig-
automatically
information is shown
When the
waypoints
at each one.
run a
you
se-
last
until it's
To use the
ply press
A screen
oneat
the
similar to the
right
plotter,
appears.
sim-
PLOTkey.
fl
__________
(i,,Jpj NM
PDF compression, OCR, web-optimization with CVISION's PdfCompressor
21
Page 26

hid ELC1CI
The diamond is
or
track,
north,
The
This is the
plotter's
or when
tion
Beneath the
ing,
used
tude/longitude
path you've
south, east,
plotters
on
Distance To
only
radius shows at
distance from the center of
radius is .25 nautical mile when
it's
preset.
changing
radius
when a
displays
Dci
Fill
your
present position.
travelled. The circle
and west marked.
the
top
See the Plotter Radius
the
radius.
display
Go,
waypoint
are the
and Gross Track Error
is recalled.
at the bottom of this
The solid
is a
compass
left corner of the screen.
the circle to the
line is
rose with
edge.
the unit is first turned on
section for informa-
Course Over
Present
Ground,
displays.
position
screen.
These are
your
The
Bear-
in lati-
There are two
"View/Go To
the
Waypoint
Destination
waypoint
The
other two
recalled
the current
Waypoint" method,
Waypoint
number that is
waypoint (View
waypoint (Cancel
shoices
Save's "View/Save" menu. The
options
in
recalling
Number in which
desired destination.
your
on this screen lets
Current
Waypt. Nay.)
VIEW/GO TO WAYPOINT
To
select a destination
first
adjacent
below
press
to
appears.
the
the "View/Go To
Dest
WAYPOINT RECALL
waypoint
Upt
[Enter
a-
Erase
I'
a
waypoint.
which
is identical in
you
you
or
Wpt)
from the
Waypt"
cancel the
of
list
Now
key.
label.
Waypt
N
32°24. 142'
U 80018. 35?
I
OTS: 32. 24MM
BRO: 239°M
snaJt
liJAYPT * 2
WAYPT * 3
WAYPT *
.
WAYPT * 5
WAYPT * 6
WAYPT * 7
You can use the
operation
other
option
simply
view
stored
The screen shown
enter the
the
navigation
waypoints,
press
11 1
to
is the
currently
to
the
key
4
Using
You can see
tion when
manner,
tion),
at the
The
position
present position,
The
are
dotted
location. Follow this line
your
the Plotter
your present
you
simply
then
press
of the
top
square
destination is the
travelling
track,
box
when the
on
line is the shortest
or
path you've
PDF compression, OCR, web-optimization with CVISION's PdfCompressor
with a
recall a
recall a
the
PLOTTER
next
page appears.
with a S" is
waypoint
and the circle with the "D" is the destination.
position
a
route,
Waypoint
position, starting position,
To
waypoint.
waypoint (see
key.
your starting
is recalled. The diamond is
of the recalled
it's the first
to the destination from the
path
to
to the
get
travelled.
use the
the
Waypoint
A screen similar to the one
location. This is
waypoint.
waypoint
waypoint.
on the route. The
and
destina-
plotter
in this
Recall sec-
If
starting
The solid line is
your
your
you
At the screen's
rently displayed.
beneath the
bearing
the
bottom of
Waypoint
waypoint number,
labels. As
waypoint's location,
of
number,
the
information to the recalled
to the
position.
the screen. Move the black box to the desired
then
waypoint.
upper right
The
waypoint
waypoint
The first seven
the screen. This is the
number one is shown in reverse. To select a
press
the black box moves to each
distance to
the
press
The GlobalNav will
corner is the
position
number.
for
from
your present position
waypoint
the
key adjacent
go,
key adjacent
waypoint
••.4
waypoint
this
waypoint
Distance to the
numbers are listed at the
waypoint
to the
waypoint number,
and
bearing display
to the Enter label
immediately
on the GPS
number cur-
is shown
waypoint
show under
selection
up
at the
show
navigation
screens.
directly
and
box.
different
or dowi
the
top
waypoint
to recall
Page 27

GO TO
The
GlobalNav
it
without
WAYPOINT
gives
you
storing
it in the
the
und's
option
memory.
to
enter a
position and
go
to
r
r
To
to
a
go
the
"New
press
Waypoint"
this label.
to
this
WAYPolpj
You
tures of
WAYPOINT
waypoint without
Waypoint Position"
the
key
label
The
position.
must
recall
the
GlobalNav,
RECALL
Saue
N
32°09.
hi
8003?. 408'
Go
_________________
to
Plore
Clear
adjacent
appears.
Globaluav will
RECALL
a
waypoint
to
Now
To
key.
264'
Waypo
_______________________________
saving it,
method
the
"More" label
simply
immediately
in
order to
recalt
a
The
screen
jut
first
enter a
described
the
press
show
use
the
waypoint, first
shown
I
position
earlier.
until
the "Go
key
adjacent
navigation
navigation
below
using
Next,
data
fea-
press
appears.
To
to
the
PLOTrER
Pressing
Setup"
plotter.
the
gives
A
description
r
MENUS
MENU
you
a
key,
new
of the
PL IJ I
L RADIUS
______________________________________________
______
2
SECONDS
then the
set of
menus
plotter
TER
key
which
menus
I
I
I
adjacent
relate
follow.
to the
only
"Plotter
to the
Plot
View
fltFunctifl
Dest.
Cancel
La
PDF compression, OCR, web-optimization with CVISION's PdfCompressor
Current
Uaypt
ear
30
Upt
To
Wayp-tjj
Num.
Waypt Na.,.]
S
I
PLO'rrEn
Radius
radius is
or
arrow to
Press
menu
.25
preset. To
increase the
the
CLEAR
Clear
RADIUS
lets
you
nautical
change
mile
the
key
change
when the
radius,
radius
when
L
the
press
or the
finished.
TrailJ
circle's
Globalwav is
down
the
radius.
key
arrow
adjacent
I
The
first
turned on
to
to
decrease it.
circle's
the
up
Page 28

UPDATE
The
plotter
present
position
from
two seconds to ten
The
plotter
screen. As each
from the end
course to
especially
INTERVAL
shows
position.
is
updated
has 200
of the line. You can use
a destination
true if
—
S
A____
rLJ
L_Clear
track
your
When the
once
every
minutes.
dots available
is
dot
placed
that's a
use a short
you
PLOT T ER
F:A DI
.
25MM
liP 0 i:½ T E
I NTER)IIL
2
SECONDS
a
by drawing
unit is turned on for the
ten seconds. This
at
your
long
plotter update
solid line behind
to
plot
last
up
your
location,
all 200 dots if
distance
time.
time is variable
away.
lj S
Plot Trail
-
your
first
track on the
one is erased
the
time,
you plot
This
a
is
I
the
key adjacent
to the "New
Wa'pt.
C
C
Simply press
wish to
you
For
example,
ber
10,
press
adjacent
waypoint
to the Enter
number 10 and returns to
to the More label. Now
Nurm" label. The menu below
Save Pos:
H
32°23. 184'
U 8O042.287
Waypt.
Clear
the
key adjacent
assign
the
position
if
want to save the
you
the 1 and the 0
The GlobalNav stores
key.
the
press
appears.
It
Enter
to the
shown
waypoint
at the
position
keys. Finally, press
number(s)
of the screen.
top
as
waypoint
that
the last used screen.
key adjacent
that
num-
the
key
position
as
To
with the
gives you
To
up
decrease
CLEAR PLOT
To erase the track line from the
the "Clear Plot Trail'
erases the track
you travel,
PDF compression, OCR, web-optimization with CVISION's PdfCompressor
a continuous line
keep
update
interval.
a better chance
change
arrow to increase
the
plotter update time,
it. Press the CLEAR
TRAIL
line(s)
the
plotter
plotted, you may
Lengthening
to see more
press the.key adjacent
the lime between
when finished.
key
display, press
label. The GlobalNav returns to the
and centers
continues to draw
your present position.
94
want to
experiment
the interval between
history.
or the down arrow to
plots
the
key adjacent
new
your
track line.
plots
to the
to
plotter,
As
under a
you
then
key,
Use the
that
selected,
the New
are
using
WAYPOINT
position
press
up
you
position
Remember,
a
position
certain
this method!
ERASE A
To erase a
Save
label.
number
number is
This
deletes the
blank. Press the CLEAR
IMPORTANT!
Waypoint
waypoint
the correct
from
the
and down arrow
wish to erase.
press
Number method wilt let
number
waypoint
the
waypoint
key adjacent
the
key adjacent
from that
to
key
exit from this menu.
nfl
is
that
already
numbers before
list,
press
in use. Make
the
to the "View/Save
to
keys
When the desired
select the
to the Erase label.
waypoint
number,
save
you
using
Waypoint
Waypt."
waypoint
waypoint
leaving
it
Page 29

Save
'-'n s
Upt
r
Waypt
H
32°24, 142'
W 80018. 357'
OTG:
32.24HM
BRG: 239°M
____ WAYPT It 2
-—
____________
At the screens
rently displayed.
beneath the
bearing
the
bottom of the screen. This is the
Waypoint
waypoirit number,
labels. As the black box moves to each
waypoint's
of
number,
the
to the
position.
the screen. Move the black box to the
then
position.
L[ui1I
_________
Erase
—
Clear 1
upper right
The
waypoint
waypoint
The first seven
number
location,
one is shown in reverse. To select a different
press
distance to
the
press
The
position
WAYPT * 3
WAYPT * 4
WAYPT * 5
WAYPT It 6
WAYPT
corner is the
position
number. Distance to the
for this
from
your present
waypoint
the
key adjacent
and
go,
key adjacent
is now
saved.
waypoint
numbers are listed at the
waypoint
bearing
to
II 1
It
7
waypoint
position
to the
waypoini
the Enter label to save
number cur-
is shown
selection box.
display
desired
directly
waypoint
show under
or down
up
number,
at the
waypoint
and
the
top
HOW TO SAVE A WAYPOINT
Waypoints
memory.
Steering, Navigation,
for
marking
positions.
store
tude
positions
Saving
The
GlobalNav lets
waypoint.
wreck's
quickly
To save
QUICKSAVE
present position
(Waypoint
appears
know the
saved. To return to
section.
are locations that
You can then
or Plotter
shipwrecks, buoys,
The GlobalNav can store
your present
Current Position
This "Quick Save" feature
position
and
easily.
your present
position
as
waypoints.
you instantly
or other
key.
position, simply press
The GlobalNav
in the first available
locations are numbered 1
at the
waypoint
of the screen: "SAVED AS #1." This lets
top
number
that
you
navigate
as a
(Waypoint
fishing
waypoint,
to these locations
displays. Waypoints
and other
waypoint
save
assigned
store in the GlobalNav's
using
are useful
fishing
to 75
up
or enter
Quick Save
your present position
permits
and
navigational positions
immediately
empty waypoint
through 75.)
to the
see the
or
navigational
waypoints.
the
the WAYPOINT
position you just
Waypoint
You can
latitude/longi-
Method)
storage
stores
location.
A
message
as a
your
Recall
the
of a
you
NOTICE!
The GlobalNav won't let
tion that's
feature.
the View and
methods. Use caution when
waypoint
New
The New
a
waypoint.
waypoint
To use this
position by merely
already
However,
number is
Waypoint
Waypoint
that
in
use when
it will let
Save or the New
really
Number
Number menu
This
option
want the
you
feature,
first enter
pressing
save a
you
you
saving
the one
lets
you simply
position assigned
the
position
use the
you
overwrite a
Waypoint
a
position.
wish to use.
you
gives you
a
position,
Waypoint
in a
Waypoint
position
Number
Make certain the
another
enter the
to.
or ute
Save
key. Next, press
waypoint
when
(see below)
way
number of the
your present
loca-
QuickSave
using
to save
Saving
This method is similar to the
you
cally
the
next
of
the screen. This is
WAYPOINT SAVE
label that
available
10 this label to
waypoint
the
Current Position
to view the
saves it. To
WAYPOINT SAVE
page appears.
last used screen.
waypoint
save a
The
key.
"Save
says
empty
waypoint
save the
number listed on
number before the GlobalNav automati-
position using
key.
position
your
Immediately
as #." The number in this label is
number.
position
(Save
Quick Save
The screen
position
as #
method,
this
shown at the
to be saved
at the time
beneath this
Method)
except
method,
first
topof
appears
you pressed
at the
position
it allows
press
the
top
the
is
a
the first
Simply press
at the
top
the label. The GlobalNav returns to
the
key adjacent
of the screen under the
PDF compression, OCR, web-optimization with CVISION's PdfCompressor
28
Page 30

Enter
To save
WAYPOINT SAVE
More
New
Waypoint
a
position
label. The screen
other than
key. Next, press
shown below
your
present one,
the
key adjacent
appears.
first
press
to the
the
JJaypt
N
32°04.
UO$30°26.
Lat/Long:
242'
648'
Now
press
screen
Saue
N
hi 80°37.
New
New
Clear
the
key adjacent
shown below
appears.
¶Jwaypt
i
IJaypoint:
32°09. 264'
408'
Waypt.
Waypt.
LI
to the
"New
Pos.
Nun.
Waypt.
Lat/Loug1
d
1
Pos."
label. The
CI
Press the
longitude
position
label.
the
CLEAR
The
the
top
the "Use
of the
top
to
the "Save
adjacent
menu
You
you press
as #" or
key
from
is
shown,
To exit from
key.
GlobalNav
of the
Position" label. The
screen. To save
to
the "View/Save
selection
haven't saved the
the
"View and
North/South
Position
adjacent
west to
press
this screen
returns to the
previous
as #" label
follows.
key adjacent
page)
IMPORTANT!
waypoint yet!
Save
Waypoint"
to the
east,
"East/West
if
the
as described
necessary.
key
adjacent
without
Save
after
position you
this
position,
Waypt."
to the
"CLEAR" label.
Lati
to the
saving
Waypoint
you press
entered
press
above or
label.
You will
section to
1 Use
Long."
to switch the
When
"Use Position"
the
position,
screen
the
key adjacent
shows at the
the
key
press
Information
lose the
See the
save this
the correct
press
the
key
on this
"Save
at
to
if
(shown
adjacent
position
position.
jC1e
Now enter the
ber to
enter the
minute.
add a
zero to it. For
enter
080. After
the
top
of the
Also,
next
position you
position
if the
entering
page appears.
PDF compression, OCR, web-optimization with CVISION's PdfCompressor
wish to save
in
degrees, minutes,
the
is less
if
last
7R
position
example,
the
Il%
as a
waypoint.
and
than 100
longitude
number,
degrees
is 80
the screen
Remem-
thousands of a
longitude,
degrees,
then
shown at
View and
The View
saved
save the
To
save
first
press
to the
the
next
Save
and Save
waypoints.
position
your present
the
Waypoint
"View/Save
page
appears.
Waypoint
Waypoint
You
can then
or
erase a
position
Save
Waypt."
screen
choose the
position
as a
waypoint
Then
key.
label. The
07
lets,
you
waypoint
from the
screen shown
waypoint
using
press
the
see the list of
number
list.
this
key
at the
to
method,
adjacent
of
top
 Loading...