

Page 1

WIRELESS VIDEO MONITOR
USER’S GUIDE
ENGLISH VERSION 5.0
LW2401/LW2450/LW2451
www.lorextechnology.com
Page 2

Page 3

Welcome!
Thank you for purchasing the Lorex LIVE video monitor. This user’s
guide refers to the following models:
• LW2401
W241
• L
• LW2450
• LW2451
Contents
Before you start, make sure you have the contents listed below.
• 1x Video monitor
• 1x Camer
• 1x Video monitor charging cradle
• 1x Camera power adapter
• 1x Video monitor power adapter
• 1x microSD memory card*
• 1x microSD to SD adapter card*
• 1x mini-USB cable
• 1x User’s guide
• 1x Quick start guide
• 1x Driver CD
• 1x Mounting screw kit
• 3x Cable clips
a
*Optional. Check the contents on y
our product package.
i
Page 4

Safety Instructions
WARNING
This video monitor is compliant with all relevant standards regarding
ectromagnetic fields and is, when handled as described in the User’s
el
Guide, safe to use. Therefore, always read the instructions in this
User’s Guide carefully before using the device.
• Adult assembly is required. Keep small parts away from children when
assembling.
• This product is not a toy. Do not allow children to play with it.
• This video monitor is not a substitut
• Keep the cords out of reach from children.
• Do not cover the video monit
• Never use extension cords with power adapters.
• Only use the power adapters provided.
• Test the video monitor before use. Bec
• Do not use the video monitor near water.
• Do not install the video monitor near a heat source.
• Only insert batteries/battery pack of the same type.
• Do not touch the plug contacts with sharp or met
Only use the chargers and power adapters provided. Do not use other chargers
or power adapters as this may damage the device and battery pack.
• Keep this user’s guide for future reference.
or with a towel or blanket.
e for responsible adult supervision.
ome familiar with its functions.
al objects.
CAUTION
Risk of explosion if battery is replaced by an incorrect type.
• DISPOSE OF OR RECYCLE BATTERIES PROPERLY IN ACCORDANCE WITH
APPLICABLE LAWS, which may vary by location.
• Insert batteries with the correct polarity.
• Do not mix new and used batteries.
• Do not mix alkaline, standard, and rechargeable batteries.
• Remove exhausted batteries from the product.
• Keep all batteries away from children.
ii
Page 5
Using this product as a baby monitor
3 ft./1m
Option 1:
Thread the extra cable through
the cable clip notches.
Option 2:
Thread the extra cable through
the cable clip notches. Wrap the
excess cable around the clip.
Option 3:
Wrap the excess cable around the
clip.
If you intend to use this wireless video monitor as a baby monitor, we
advise you to take the following precautions to avoid possible injury to
infants:
• DO NO
T plac
e baby audio and video camera monitors too close to cribs,
bassinets, play yards, and other safe sleep environments for infants.
• MAKE SURE to run all power adapter cords where they are unlikely to
be tripped over and are out of arms reach of your infant. Keep them
at least 3 ft./1m away
• MAKE SURE baby audio and video camera monitors are on a stable
footing so they cannot be easily knocked over
• Use the included cable clips to keep the power cord out of reach from
infants and young children.
NOTE: These pr
ec
autions are important even if your infant is not yet
standing or mobile.
Using the Cable Clips
iii
Page 6

iv
Page 7

Table of Contents
Video Monitor Overview . . . . . . . . . . . . . . . . . . . . . . . . . . . . . . . . . . . . . . . . . . 1
Using the joystick to navigate menus . . . . . . . . . . . . . . . . . . . . . . . . . . . . . . . . . . . . . . . . 2
Monitor display icons . . . . . . . . . . . . . . . . . . . . . . . . . . . . . . . . . . . . . . . . . . . . . . . . . . . . . 3
Camera Overview . . . . . . . . . . . . . . . . . . . . . . . . . . . . . . . . . . . . . . . . . . . . . . . 4
Cameras and Accessories . . . . . . . . . . . . . . . . . . . . . . . . . . . . . . . . . . . . . . . . . . . . . . . . . 4
LW2401 Camera . . . . . . . . . . . . . . . . . . . . . . . . . . . . . . . . . . . . . . . . . . . . . . . . . . . . . . . . . 5
Pan-Tilt Camera . . . . . . . . . . . . . . . . . . . . . . . . . . . . . . . . . . . . . . . . . . . . . . . . . . . . . . . . .6
Pan/tilt control . . . . . . . . . . . . . . . . . . . . . . . . . . . . . . . . . . . . . . . . . . . . . . . . . . . . . . . . . . . . . . . . . . . . . . . 6
Basic Setup . . . . . . . . . . . . . . . . . . . . . . . . . . . . . . . . . . . . . . . . . . . . . . . . . . . . 7
Step 1 of 2: Powering on the camera . . . . . . . . . . . . . . . . . . . . . . . . . . . . . . . . . . . . . . . . . . . . . . . . . . . . . 7
Step 2 of 2: Powering on the video monitor . . . . . . . . . . . . . . . . . . . . . . . . . . . . . . . . . . . . . . . . . . . . . . . . 7
Testing your setup . . . . . . . . . . . . . . . . . . . . . . . . . . . . . . . . . . . . . . . . . . . . . . . . . . . . . . .8
Positioning / wall mounting your camera . . . . . . . . . . . . . . . . . . . . . . . . . . . . . . . . . . . . 9
Adjusting camera view . . . . . . . . . . . . . . . . . . . . . . . . . . . . . . . . . . . . . . . . . . . . . . . . . . . 10
Camera setup . . . . . . . . . . . . . . . . . . . . . . . . . . . . . . . . . . . . . . . . . . . . . . . . . . . . . . . . . .10
Adjusting the camera sensitivity . . . . . . . . . . . . . . . . . . . . . . . . . . . . . . . . . . . . . . . . . . . . . . . . . . . . . . . . 10
Adjusting the camera volume . . . . . . . . . . . . . . . . . . . . . . . . . . . . . . . . . . . . . . . . . . . . . . . . . . . . . . . . . . 11
Turning on the camera night light (LW2401 camera only) . . . . . . . . . . . . . . . . . . . . . . . . . . . . . . . . . . . 11
Video monitor setup . . . . . . . . . . . . . . . . . . . . . . . . . . . . . . . . . . . . . . . . . . . . . . . . . . . . .11
Unlocking the video monitor antenna . . . . . . . . . . . . . . . . . . . . . . . . . . . . . . . . . . . . . . . . . . . . . . . . . . . . 11
Reading the power indicator LED . . . . . . . . . . . . . . . . . . . . . . . . . . . . . . . . . . . . . . . . . . . . . . . . . . . . . . . 11
Pairing cameras . . . . . . . . . . . . . . . . . . . . . . . . . . . . . . . . . . . . . . . . . . . . . . . . . . . . . . . .12
Sequence view . . . . . . . . . . . . . . . . . . . . . . . . . . . . . . . . . . . . . . . . . . . . . . . . . . . . . . . . .13
Viewing multiple cameras (Quad view) . . . . . . . . . . . . . . . . . . . . . . . . . . . . . . . . . . . . . 13
Using the talk function . . . . . . . . . . . . . . . . . . . . . . . . . . . . . . . . . . . . . . . . . . . . . . . . . . . 14
Music . . . . . . . . . . . . . . . . . . . . . . . . . . . . . . . . . . . . . . . . . . . . . . . . . . . . . . . . . . . . . . . . . 14
Turning the video monitor screen on/off . . . . . . . . . . . . . . . . . . . . . . . . . . . . . . . . . . . . 15
Recording. . . . . . . . . . . . . . . . . . . . . . . . . . . . . . . . . . . . . . . . . . . . . . . . . . . . . 16
Manual recording & auto recording . . . . . . . . . . . . . . . . . . . . . . . . . . . . . . . . . . . . . . . .16
Manual recording . . . . . . . . . . . . . . . . . . . . . . . . . . . . . . . . . . . . . . . . . . . . . . . . . . . . . . . . . . . . . . . . . . . . 17
Auto recording . . . . . . . . . . . . . . . . . . . . . . . . . . . . . . . . . . . . . . . . . . . . . . . . . . . . . . . . . . . . . . . . . . . . . . . 17
Viewing recorded files on the video monitor . . . . . . . . . . . . . . . . . . . . . . . . . . . . . . . . . 18
Viewing video files on a PC . . . . . . . . . . . . . . . . . . . . . . . . . . . . . . . . . . . . . . . . . . . . . . . . . . . . . . . . . . . . . 19
Viewing video files on a Mac . . . . . . . . . . . . . . . . . . . . . . . . . . . . . . . . . . . . . . . . . . . . . . . . . . . . . . . . . . . . 19
Configuring your Video Monitor . . . . . . . . . . . . . . . . . . . . . . . . . . . . . . . . . . 20
Enabling the Auto-Mute feature . . . . . . . . . . . . . . . . . . . . . . . . . . . . . . . . . . . . . . . . . . . 20
Configuring the Overwrite feature . . . . . . . . . . . . . . . . . . . . . . . . . . . . . . . . . . . . . . . . . 20
Changing the date and time . . . . . . . . . . . . . . . . . . . . . . . . . . . . . . . . . . . . . . . . . . . . . . 21
Adjusting the alarm volume . . . . . . . . . . . . . . . . . . . . . . . . . . . . . . . . . . . . . . . . . . . . . .21
v
Page 8

Adjusting the screen brightness . . . . . . . . . . . . . . . . . . . . . . . . . . . . . . . . . . . . . . . . . . . 22
Adjusting the timer settings . . . . . . . . . . . . . . . . . . . . . . . . . . . . . . . . . . . . . . . . . . . . . . 22
Adjusting the temperature unit of measurement . . . . . . . . . . . . . . . . . . . . . . . . . . . . . 23
Configuring the temperature alert range . . . . . . . . . . . . . . . . . . . . . . . . . . . . . . . . . . . 23
Erasing the memory card . . . . . . . . . . . . . . . . . . . . . . . . . . . . . . . . . . . . . . . . . . . . . . . .24
Restoring default settings . . . . . . . . . . . . . . . . . . . . . . . . . . . . . . . . . . . . . . . . . . . . . . . . 24
Viewing your Camera Remotely Using Skype . . . . . . . . . . . . . . . . . . . . . . . 25
How it works . . . . . . . . . . . . . . . . . . . . . . . . . . . . . . . . . . . . . . . . . . . . . . . . . . . . . . . . . . .25
System requirements . . . . . . . . . . . . . . . . . . . . . . . . . . . . . . . . . . . . . . . . . . . . . . . . . . . . . . . . . . . . . . . . . . . . . 25
Connecting to Skype on a PC . . . . . . . . . . . . . . . . . . . . . . . . . . . . . . . . . . . . . . . . . . . . . . 26
Step 1 of 6: Installing the camera driver for PC . . . . . . . . . . . . . . . . . . . . . . . . . . . . . . . . . . . . . . . . . . . . 26
Step 2 of 6: Connecting the video monitor to the PC . . . . . . . . . . . . . . . . . . . . . . . . . . . . . . . . . . . . . . . . 27
Step 3 of 6: Creating a Skype account . . . . . . . . . . . . . . . . . . . . . . . . . . . . . . . . . . . . . . . . . . . . . . . . . . . . 27
Step 4 of 6: Configuring Skype . . . . . . . . . . . . . . . . . . . . . . . . . . . . . . . . . . . . . . . . . . . . . . . . . . . . . . . . . . 29
Step 5 of 6: Send a contact request . . . . . . . . . . . . . . . . . . . . . . . . . . . . . . . . . . . . . . . . . . . . . . . . . . . . . . 30
Step 6 of 6: Test the connection . . . . . . . . . . . . . . . . . . . . . . . . . . . . . . . . . . . . . . . . . . . . . . . . . . . . . . . . . 31
Connecting to Skype on a Mac . . . . . . . . . . . . . . . . . . . . . . . . . . . . . . . . . . . . . . . . . . . . 32
Step 1 of 6: Installing the camera driver for Mac OS . . . . . . . . . . . . . . . . . . . . . . . . . . . . . . . . . . . . . . . . 32
Step 2 of 6: Connecting the video monitor or receiver to your computer . . . . . . . . . . . . . . . . . . . . . . . 32
Step 3 of 6: Creating a Skype account . . . . . . . . . . . . . . . . . . . . . . . . . . . . . . . . . . . . . . . . . . . . . . . . . . . . 33
Step 4 of 6: Configuring Skype . . . . . . . . . . . . . . . . . . . . . . . . . . . . . . . . . . . . . . . . . . . . . . . . . . . . . . . . . . 34
Step 5 of 6: Send a contact request . . . . . . . . . . . . . . . . . . . . . . . . . . . . . . . . . . . . . . . . . . . . . . . . . . . . . . 35
Step 6 of 6: Test the connection . . . . . . . . . . . . . . . . . . . . . . . . . . . . . . . . . . . . . . . . . . . . . . . . . . . . . . . . . 36
If you do not have a Skype account... . . . . . . . . . . . . . . . . . . . . . . . . . . . . . . . . . . . . . . . 37
Changing the camera view on Skype . . . . . . . . . . . . . . . . . . . . . . . . . . . . . . . . . . . . . . . 38
Viewing a camera on your mobile device . . . . . . . . . . . . . . . . . . . . . . . . . . . . . . . . . . . . 39
Supported apps & devices . . . . . . . . . . . . . . . . . . . . . . . . . . . . . . . . . . . . . . . . . . . . . . . . . . . . . . . . . . . . . 39
Viewing your camera on iPhone . . . . . . . . . . . . . . . . . . . . . . . . . . . . . . . . . . . . . . . . . . . . . . . . . . . . . . . . 39
Installing Camera Batteries (LW2401 Camera Only). . . . . . . . . . . . . . . . . 41
Installing non-rechargeable AA batteries . . . . . . . . . . . . . . . . . . . . . . . . . . . . . . . . . . . . . . . . . . . . . . . . 41
Installing a rechargeable battery pack . . . . . . . . . . . . . . . . . . . . . . . . . . . . . . . . . . . . . . . . . . . . . . . . . . . 41
Technical Specifications . . . . . . . . . . . . . . . . . . . . . . . . . . . . . . . . . . . . . . . . 42
Cleaning and disposal . . . . . . . . . . . . . . . . . . . . . . . . . . . . . . . . . . . . . . . . . . 43
Cleaning . . . . . . . . . . . . . . . . . . . . . . . . . . . . . . . . . . . . . . . . . . . . . . . . . . . . . . . . . . . . . . . . . . . . . . . . . . . . 43
Disposal of the device . . . . . . . . . . . . . . . . . . . . . . . . . . . . . . . . . . . . . . . . . . . . . . . . . . . . . . . . . . . . . . . . . 43
Notices . . . . . . . . . . . . . . . . . . . . . . . . . . . . . . . . . . . . . . . . . . . . . . . . . . . . . . . 44
FCC notice . . . . . . . . . . . . . . . . . . . . . . . . . . . . . . . . . . . . . . . . . . . . . . . . . . . . . . . . . . . . . 44
IC notice . . . . . . . . . . . . . . . . . . . . . . . . . . . . . . . . . . . . . . . . . . . . . . . . . . . . . . . . . . . . . . . 44
Troubleshooting . . . . . . . . . . . . . . . . . . . . . . . . . . . . . . . . . . . . . . . . . . . . . . . 45
Troubleshooting (continued) . . . . . . . . . . . . . . . . . . . . . . . . . . . . . . . . . . . . . . . . . . . . . . . . . . . . . . . . . . . 46
Frequently Asked Questions . . . . . . . . . . . . . . . . . . . . . . . . . . . . . . . . . . . . . 47
Mounting Template (LW2401 Camera Only) . . . . . . . . . . . . . . . . . . . . . . . . 50
vi
Page 9

Video Monitor Overview
Video Button
Press the Video button to
turn off the screen. The
speaker will remain on.
Press to access the monitor menu
options. Press Menu again to exit.
Joystick
Use to navigate monitor
menus. Press down on the
joystick to confirm a
selection. Use to control the
pan/tilt camera.
Volume Control
Press + / - to control the
volume level.
Audio Level Indicator
Displays the level of sound
detected by the camera.
Menu Button
Talk Button
Hold the talk button to
enable two-way audio
between the video monitor
and camera.
AUTO LED
Glows blue when
auto-record is enabled.
Blinks when monitor is in
Scan mode.
ON/OFF Switch
Slide the power switch to the
ON position to turn the video
monitor on.
Music Buttons
Press the button once to
begin playing a tune. Press
the button again to stop
the tune.
Press the button to skip to
the next tune.
microSD Card Slot
Ins ert a micro SD card to reco rd vid eo.
NOTE: microSD card and adapter are
optional. Check the contents on your
product package.
Power LED
Glows green to indicate unit
is powered on. Blinks when
the battery is low.
Microphone
Allows you to speak to the
person on the camera side
when you press the Talk
button.
Charging Cradle
Charges the video monitor’s
battery.
Press to start manual
recording.
Manual Record Button
Press to enable auto recording.
Auto Record Button
Slide the switch to release the
receiver antenna.
Antenna Unlock Switch
Video Monitor
Overview
1
Page 10

Video Monitor Overview
OK Button
Step 1: Press the Menu button on the
video monitor.
Step 2: Move the joystick up, down, left,
or right to navigate through the menus.
Step 3: Press down on the OK button to
confirm a selection or press Menu to
exit menus without saving changes.
Menu Navigation
Sequence/Quad Button
Press the Sequence/Quad button
to view video in Quad view (4
screen split view), or in Sequence
view.
Scan Button
Turns off the video monitor,
and waits for a camera to
detect a sound. When sound
is detected, the video
monitor turns back on.
Charging LED Indicator
Glows red to indicate video
monitor is charging.
Glows green to indicate
video monitor is finished
charging.
Cam Button
Press the Cam button to
manually switch between
channels 1-4.
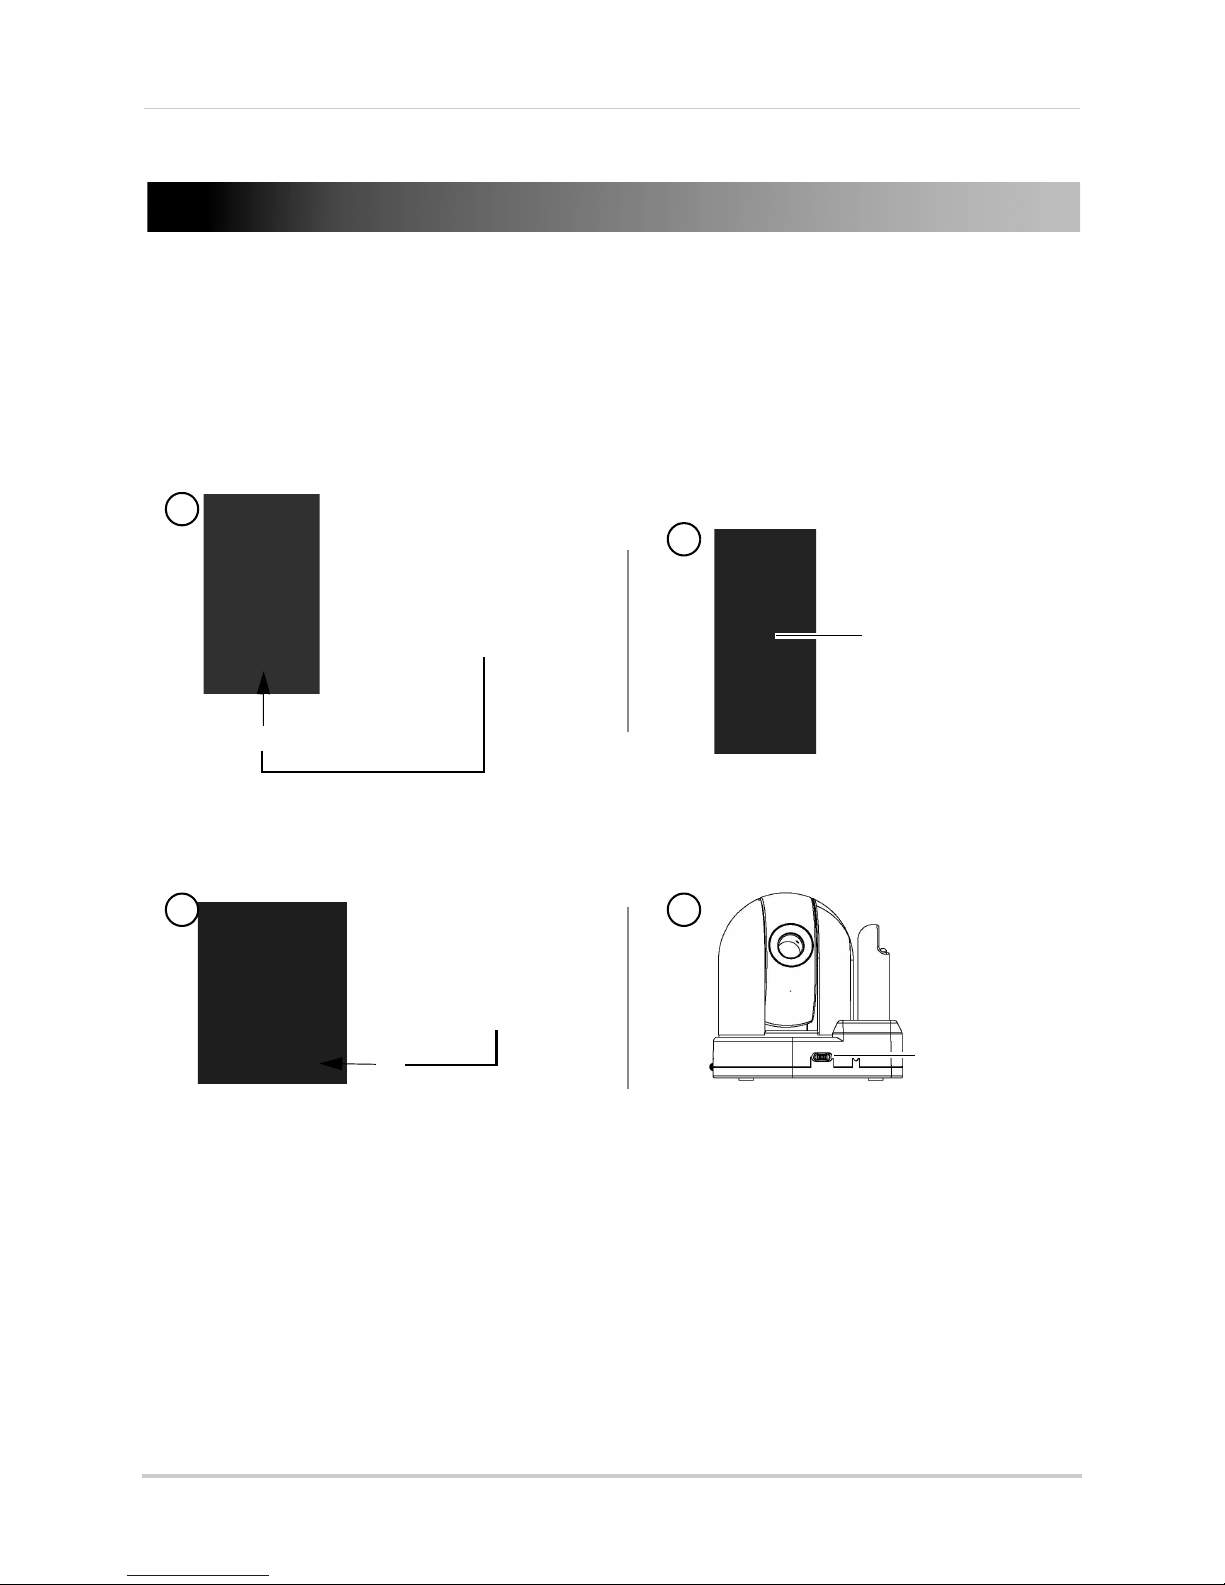
Power Port
Connect the power adapter
into the power port to charge
the video monitor without
the cradle.
Mini USB
Connect a mini USB cable
(included) between the video
monitor and a computer to
view video remotely using
Skype (setup required).
Speaker
Plays sound received from
the camera(s).
Power Port (DC5V)
Connect the power adapter
to the charging cradle.
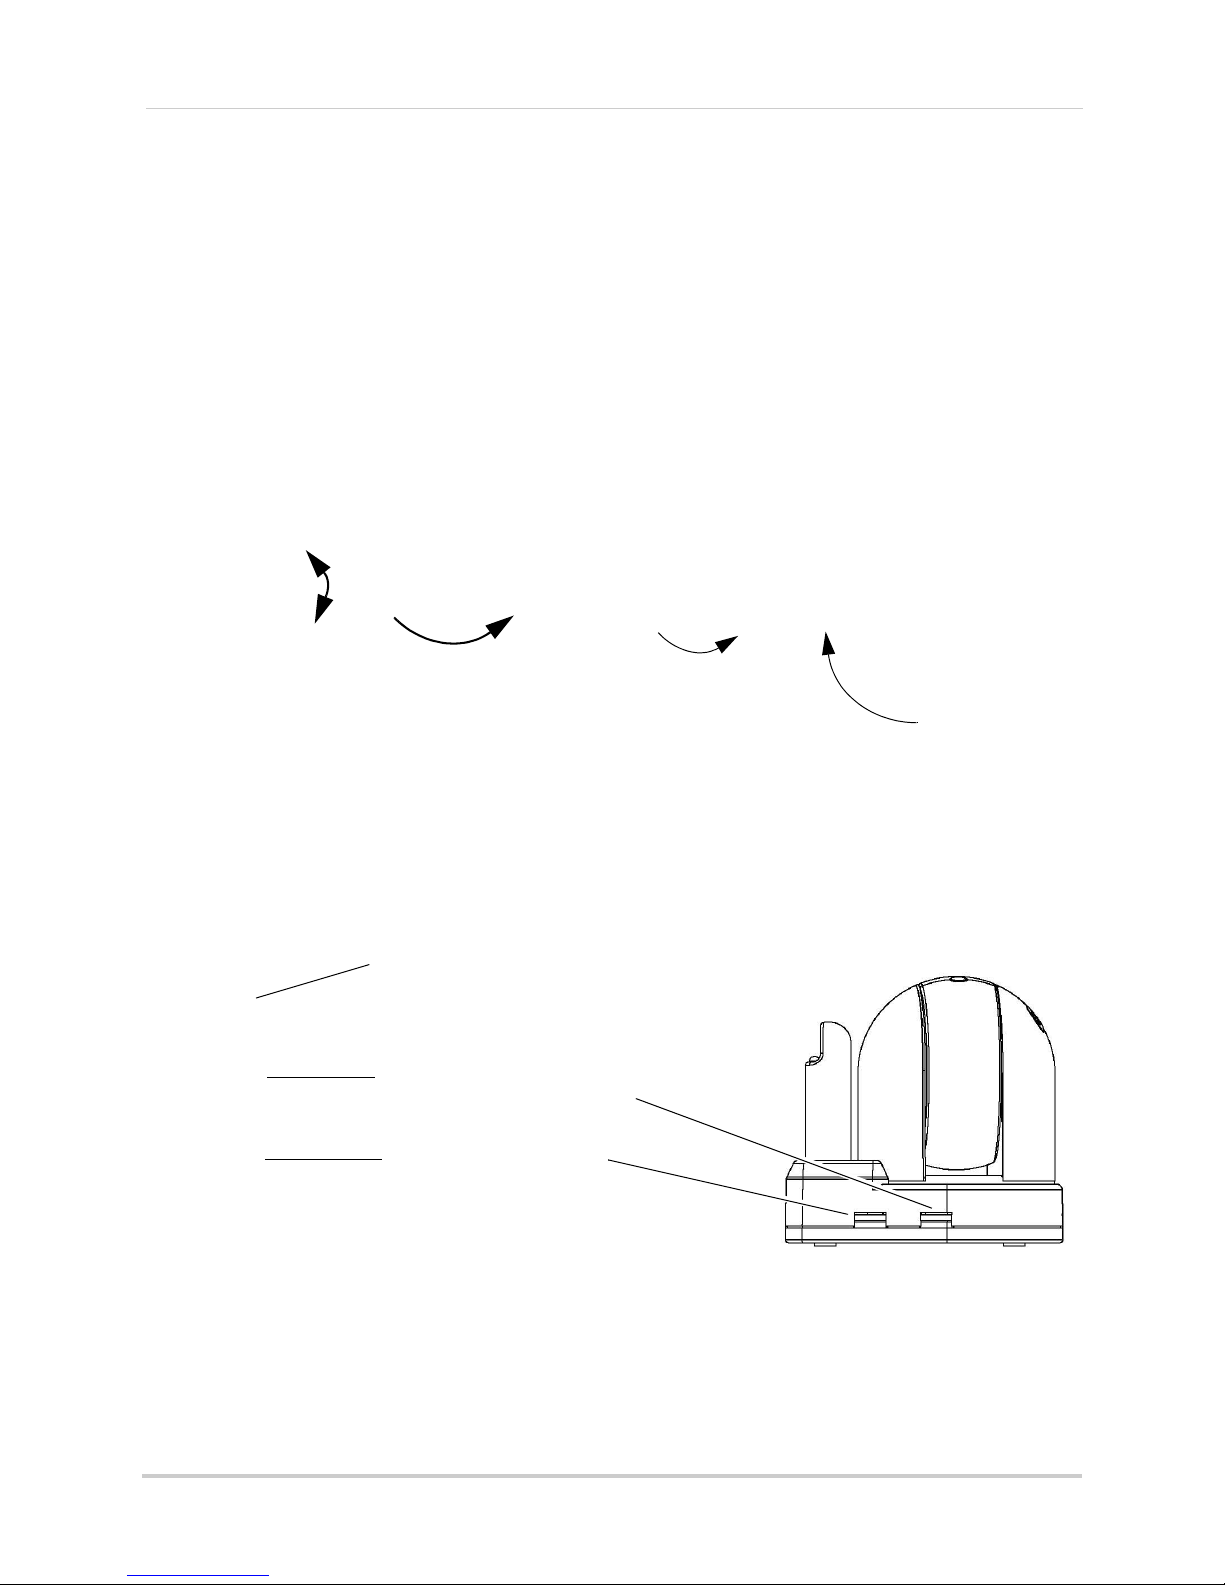
Charging Terminals
Metal contact points are located on the
cradle and underneath the video
monitor. These contact points must be
aligned to charge the monitor using
the cradle.
Using the joystick to navigate menus
The joystick allows you to navigate through the video monitor menus or control the camera
angle (pan/tilt camera only, see “Pan/tilt control” on page 6)
2
Page 11
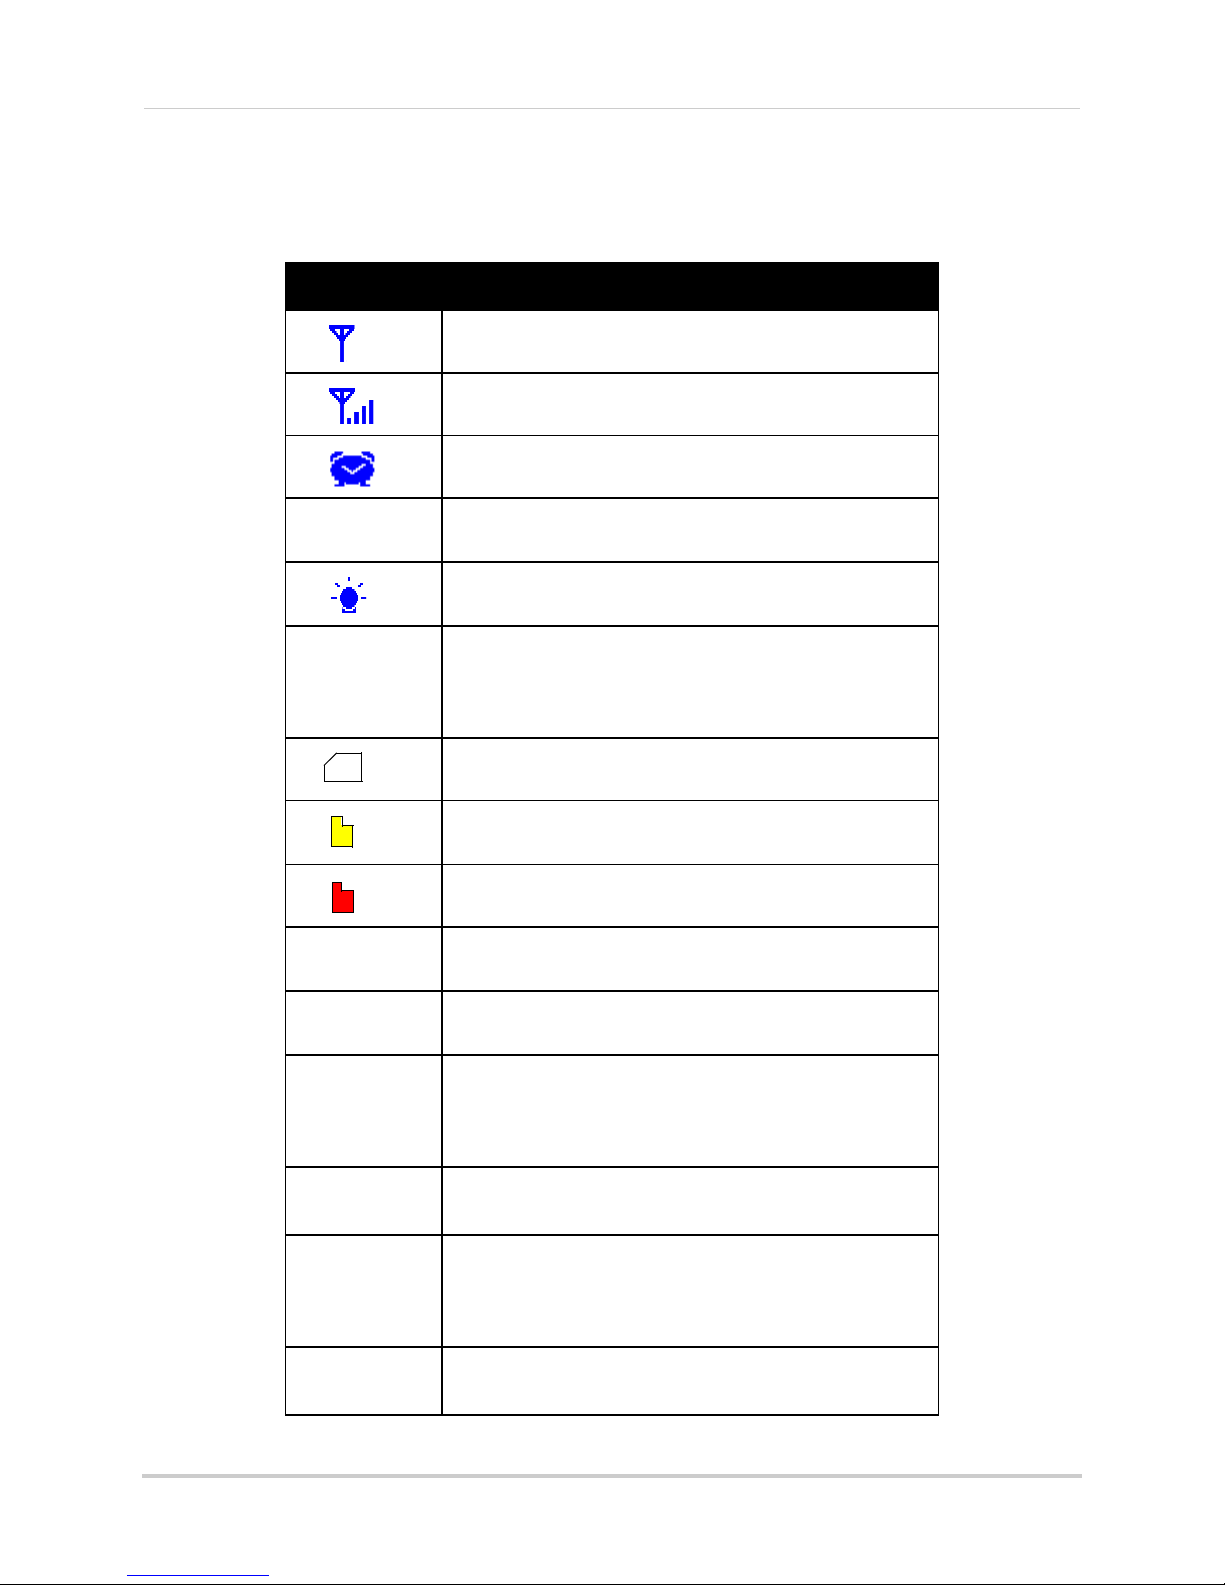
Monitor display icons
SD
CAM1
REC
OW
The video monitor displays the following icons during normal use.
Icon Meaning
No signal between the camera and video monitor.
Full signal between the camera and video monitor.
Timer is enabled.
The video monitor audio is muted.
The camera night light is on (LW2401 camera only).
Two-way talk is enabled. You can now speak into the
video monitor to talk to the camera. Release the Talk
button on the video monitor to listen to audio from the
camera.
Video Monitor Overview
Charge
Battery
Charge
Camera
An SD card is inserted in the video monitor.
A new file has been recorded onto the microSD card.
Note that this icon is yellow.
The microSD card is full. Note that this icon is red.
Indicates what channel the video monitor is on.
Indicates that the video monitor is recording video.
The file name appears beside the REC icon.
Overwrite is enabled. This means the video monitor
will overwrite old video files once the card is full. For
details, see “Configuring the Overwrite feature” on
page 20.
The video monitor battery is low.
The camera batteries are low (LW2401 camera only).
For details on installing batteries in the camera, see
“Installing Camera Batteries (LW2401 Camera Only)”
on page 41.
OUT OF
RANGE
The camera is out of range. Move the camera closer
to the video monitor.
3
Page 12
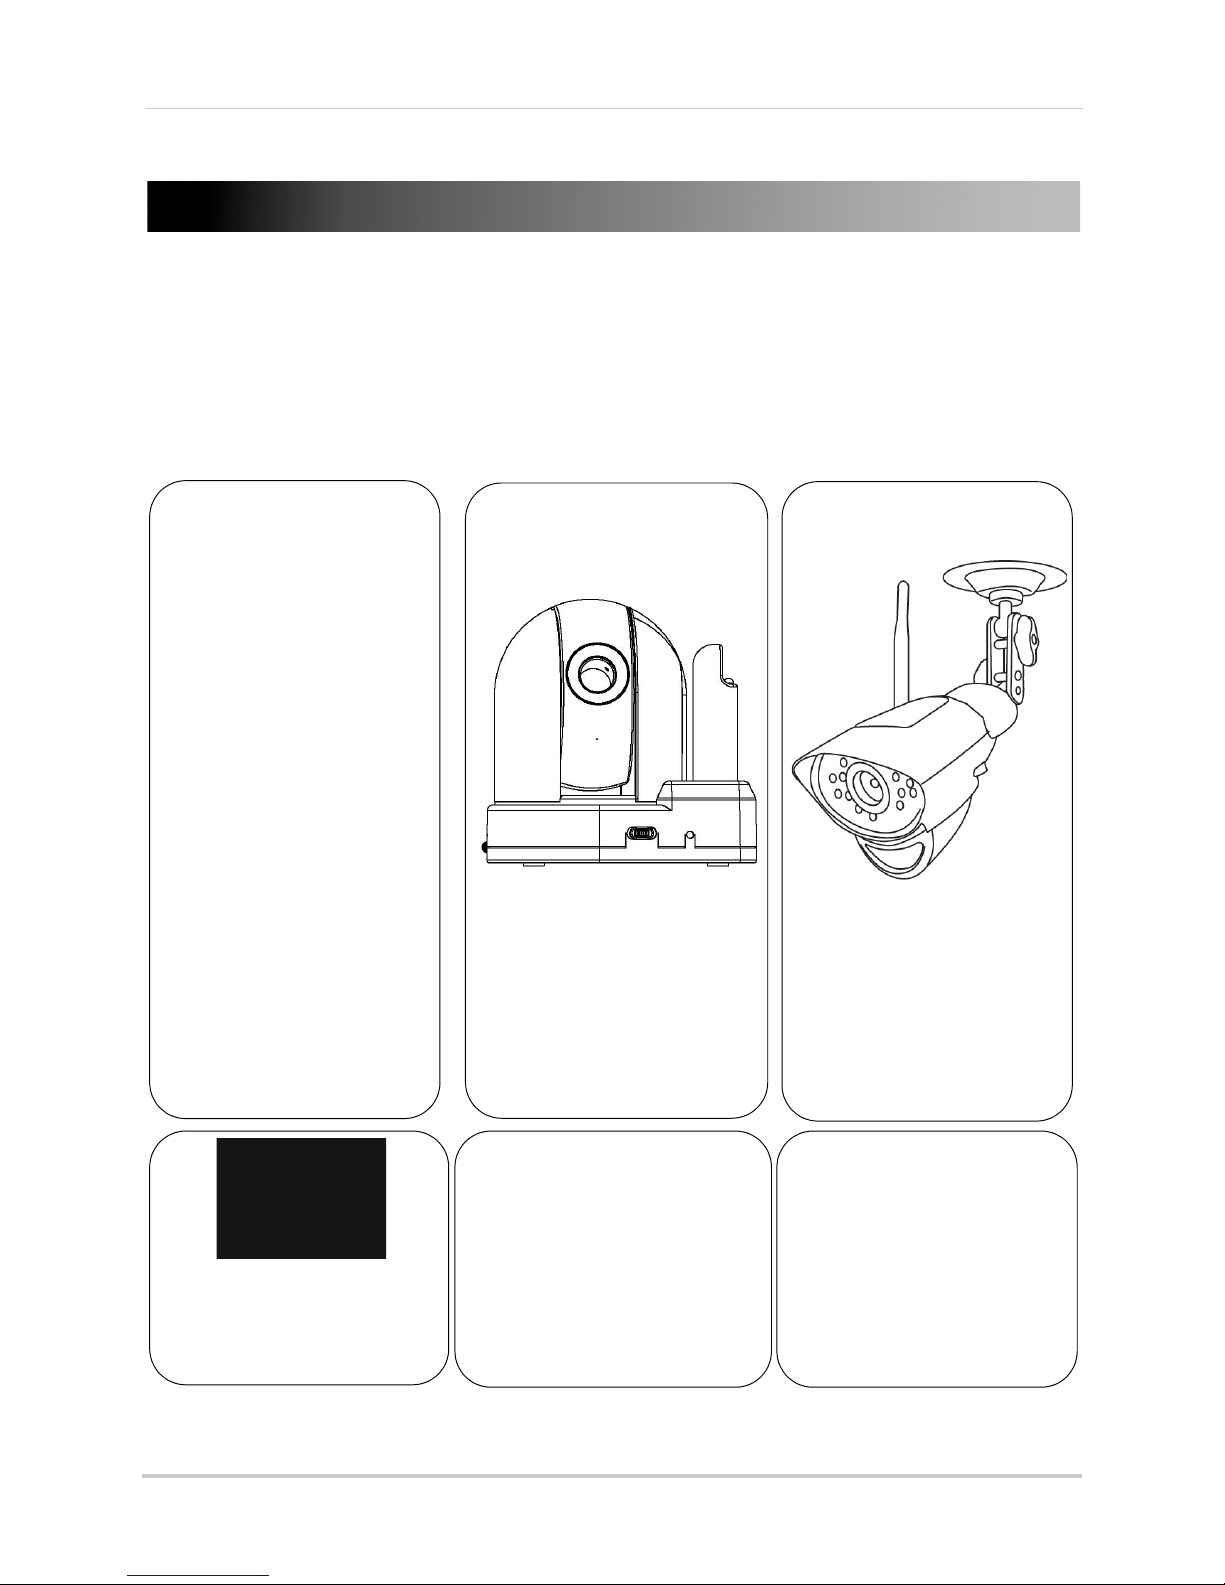
Camera Overview
LW2401AC1
Camera
Accessory #: LW2401AC1
• Wall mountable
• Includes night light
• Takes AA batteries (optional, not
included)* or rechargeable battery
pack (optional, not included)*
For instructions, see “LW2401 Camera”
on page 5.
LW2451AC1
Pan/Tilt Camera
Accessory #: LW2451AC1
• Adjustable pan/tilt using the video
monitor joystick
• Wall mount available
• AC power only
For instructions, see “Pan-Tilt Camera”
on page 6.
Rechargeable Battery for
LW2401AC1 Camera*
Accessory #: ACC2401BATT
Wall Mount for
LW2451AC1
Camera****
Accessory #: ACCMNT2451
Charging Cradle for
Video Monitor
Accessory #: ACC241CRDL
LW2401AC2 Indoor/
Outdoor Camera
Accessory #: LW2401AC2
• Wall/ceiling mountable
• Motion detector for motion recording/
alarms**
• No volume control, audio alarms, or
alarm sensitivity control
• No temperature sensor***
• AC power only
For installation instructions, see the
LW2401AC2 Quick Start Guide.
Camera Overview
Cameras and Accessories
The camera included with your system differs depending on the model number of your
device. The cameras and accessories shown below are all compatible with the video
monitor system and are available from www.lorextechnology.com. The video monitor
supports up to 4 cameras and can support a mix of pan/tilt, regular, and indoor/outdoor
cameras.
* For instructions on installing batteries, see “Installing Camera Batteries (LW2401 Camera Only)” on page 41.
** Motion detector uses Auto Record feature for motion recording. For details, see “Auto recording” on page 17.
*** When selected, temperature reading on monitor is permanently set to 68°F / 20°C.
**** Appearance may not be exactly as shown.
4
Page 13

LW2401 Camera
Infrared LEDS
Infrared (IR) LEDs that allow
you to see in the dark.
Sensitivity Dial
Adjust the audio level that
will trigger an alert on the
video monitor.
Volume Dial
Adjusts the speaker volume.
Battery Charging Indicator
Glows to indicate battery is charging.
This requires a rechargeable battery
pack. For details, see “Installing
Camera Batteries (LW2401 Camera
Only)” on page 41).
Power Switch
Turns the camera on and off.
Speaker
The speaker allows you to
hear the person speaking
into the video monitor.
Power Port (DC5V)
Connect the power
adapter to the Power Port.
Microphone
Pair Button
Press the Pair button
during the pairing
process with the video
monitor.
Temperature Sensor
Detects the room’s ambient
temperature*.
* Avoid placing the camera in direct sunlight, as this will cause
the temperature sensor to detect the wrong temperature.
IR Light Sensor
Night Light Button
Press to activate the
camera’s night light.
Power LED
Glows to indicate camera is
on. Blinks when battery is
low.
Detects the level of light in
the room to trigger night
vision.
Camera Overview
5
Page 14
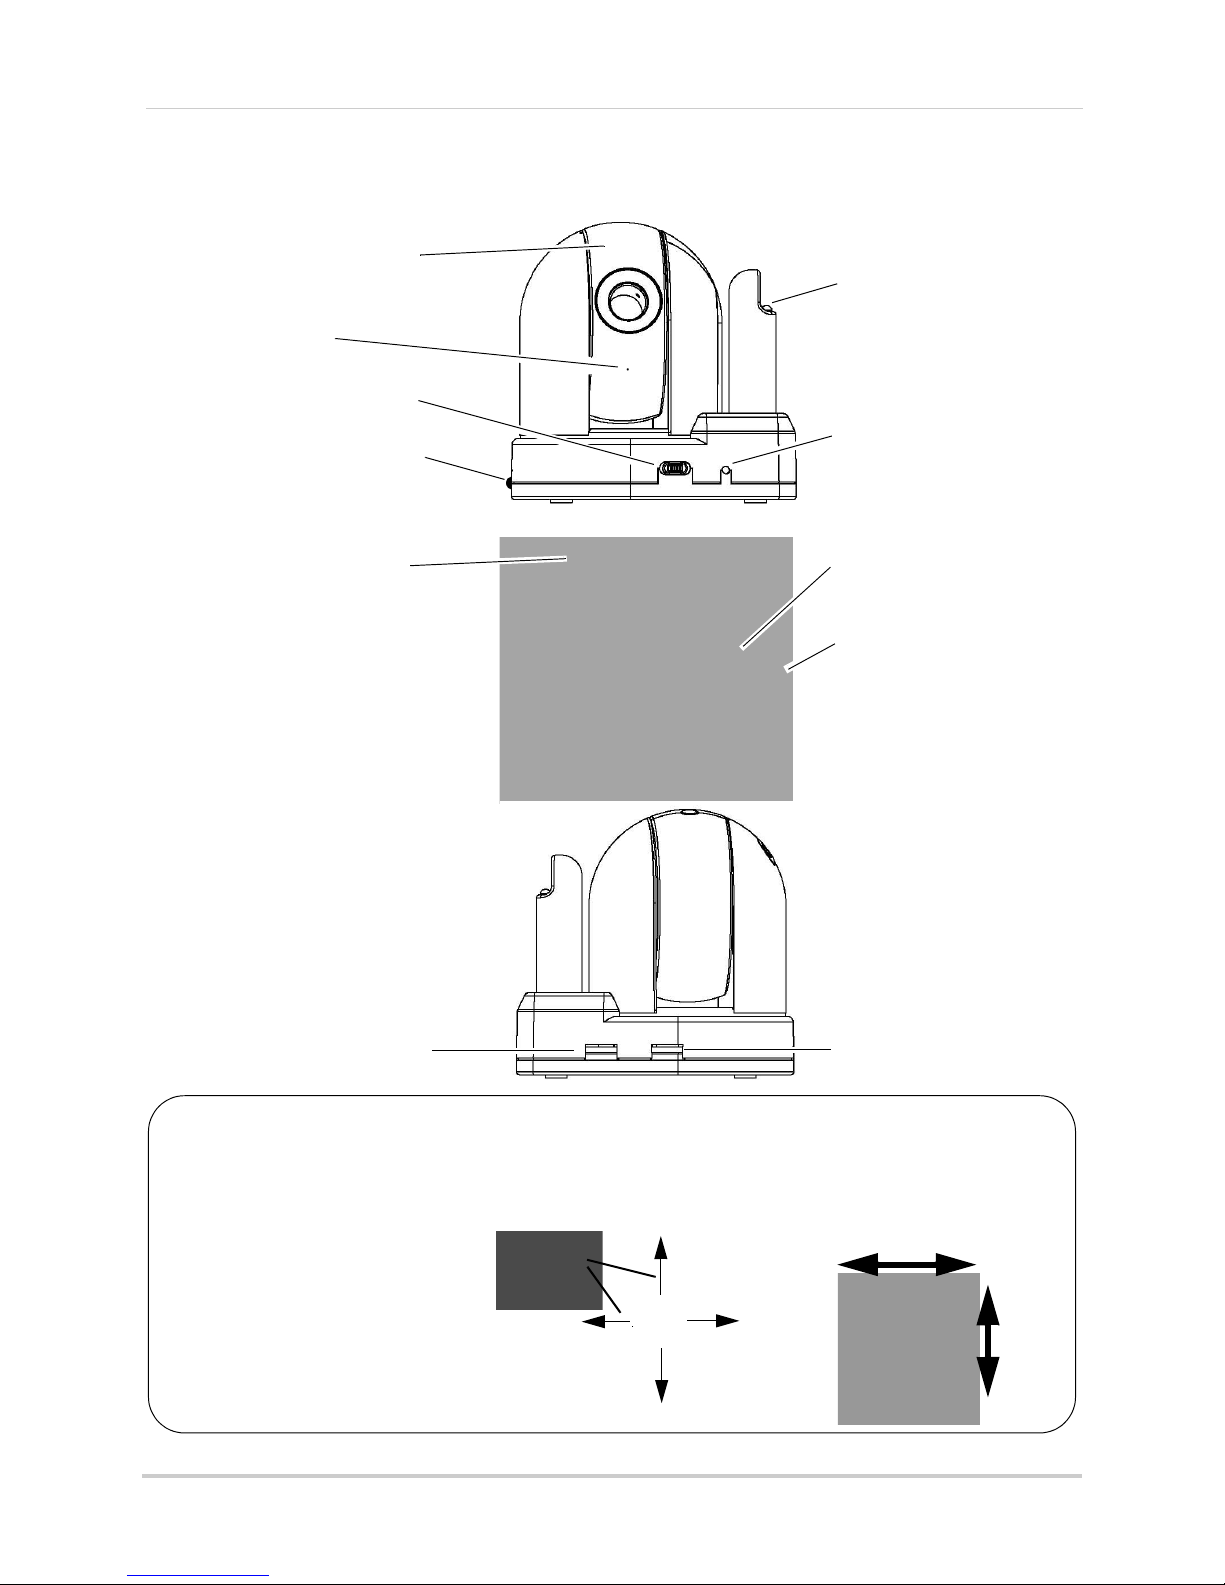
Camera Overview
Power Switch
Turns the camera on and off.
Speaker
The speaker allows you to
hear the person speaking
into the video monitor.
Power Port (DC5V)
Microphone
Light Sensor
Detects the level of light in
the room to trigger night
vision.
Sensitivity Dial
Adjust the audio level that will
trigger an alert on the video
monitor.
Volume Dial
Adjusts the speaker volume.
Pair Button
Use a pin or thin object to
press the Pair button
during the pairing
process with the video
monitor.
Temperature Sensor
Detects the room’s ambient
temperature*.
Pan/tilt control
Power LED
Glows when the camera is on.
NOTE: You must be in full-screen view to adjust the angle. If the monitor is in Quad view (i.e. showing
multiple cameras), press
SEQ and then CAM to return to full-screen view. If the monitor is in
Sequence view (i.e. switching between cameras), press
CAM to exit Sequence view.
Tilt UP
Tilt DOWN
Pan LEFT
Pan RIGHT
Pan Left/ Right
Tilt
Up/Down
Connect the power
adapter to the Power Port.
Infrared LEDS
Infrared (IR) LEDs that allow
you to see in the dark.
*Avoid placing the camera in
direct sunlight, as this will
cause the temperature
sensor to detect the wrong
temperature.
1 Select the channel the pan/
tilt camera is connected to.
Ensure you are in
full-screen view.
2 Use the joystick on the video
monitor to control the
camera.
Pan-Tilt Camera
6
Page 15
Basic Setup
Slide the power
switch to the ON
position
OPTIONAL (LW2401 camera only): To install batteries in the camera, see
“Installing Camera Batteries (LW2401 Camera Only)” on page 41.
1
2
LW2401 camera
Pan-tilt camera
1 2
Slide the power
switch to the ON
position
Basic Setup
Step 1 of 2: Powering on the camera
1 Connect the power adapter to the DC5V port on the camera. Connect the other end to a power
outlet.
2 Slide the power
switch to the ON position.
Step 2 of 2: Powering on the video monitor
1 Connect the power adapter to a power outlet and to the DC5V port on the video monitor or
charging cradle (ensure the video monitor firmly rests on the cradle). The video monitor’s
charging LED indicator glows red to indicate charging is in progress. The charging LED glows
green when the video monitor is fully charged.
NOTE: It requires 6 hours to fully charge the battery.
7
Page 16

Basic Setup
DC5V port
Slide the power
switch to the ON
position
Using the charging cradle
2 Slide the power switch to ON.
The video monitor will automatically scan for cameras in range.
Testing your setup
It is recommended that you test your camera setup before permanent installation so that
you get the best picture and sound quality from your video monitor.
Test the camera and video monitor reception:
1 Plac
e the camera and video monitor in two different rooms.
2 Have one person monitor the signal strength on the video monitor.
3 If the signal strength is low, have a second person move the camera to different locations in
the r
oom to find the best placement location.
Test the camera volume level:
1 Hav
e a person with the video monitor press and hold the TAL
volume level. Have the other person adjust the volume dial on the camera as required.
2 Have the person near the camera speak into it t
The person holding the video monitor can determine if the camera needs to move to a
different location in the room for better sound clarity.
K button to confirm the camera
o test the sound quality on the video monitor.
8
Page 17

Basic Setup
Use the cable clips to secure and manage the
cables. You can wrap the excess cable around the
security clip to reduce the cable length.
Positioning / wall mounting your camera
• Keep cables and wires at least 3 feet (1 meter) away from infants or young children.
• Use the cable clips to keep the power cords out of reach from young children and infants.
• Determine the camera position that will give you the best view before permanently mounting
the camera. Ensure the power cable is long enough to power the camera.
To wall mount your camera (LW2401 camera only)*:
1 Mark
2 Drill
3 Insert the scr
the screw holes using the template on page 50.
the holes in the wall.
ew anchors (included) into the hole. Lightly tap the anchor into the hole with the
hammer until the anchor is flush with the wall.
4 Tight
5 Rot
6 Slide the back of the c
7 Con
8 Use
en the screw into the anchor, leaving 1/4" of the screw exposed.
ate the base of the camera as shown in “Adjusting camera view” on page 10.
amera onto the screws and pull down to secure the camera in place.
nect the power adapter to the camera.
the cable clips to keep the cables out of reach from infants and young children.
* An optional wall-mount accessory is available for the pan/tilt camera from
www.lorextechnology.com (accessory # ACCMNT2451). For wall/ceiling mounting
instructions for LW2401AC2, see the LW2401AC2 Quick Start Guide.
9
Page 18
Basic Setup
Table top adjustment Wall mount Adjustment
St ep 1 : Ro tat e Ca mer a
Rotate the camera to the
right.
Step 2: Fold camera base
Fold the camera base towards
the back of the camera.
LW2401 Camera
Night Light Button
(LW2401 Camera Only)
Press the Night Light
button to turn the camera
night light on or off.
Adjust the camera volume
Adjust the speaker volume.
Adjust the audio sensitivity
Adjust the audio level that will
trigger an alert on the video monitor.
LW2401 Camera Pan/tilt Camera
Adjusting camera view
Adjust the camera to achieve the optimal viewing position.
Pan/tilt camera
Use the pan/tilt controls to adjust the camera view. For instructions, see “Pan/tilt control”
on page 6.
Camera setup
Adjusting the camera sensitivity
The camera’s Sensitivity dial allows you to adjust the microphone sensitivity level for
triggering an alert on the video monitor.
10
Page 19

Basic Setup
Power LED
Slide the Lock button to the
right to release the antenna
To adjust the camera’s sensitivity level:
• Scroll the Sensitivity dial to increase camera sensitivity (i.e. softer noises trigger the camera)
or re
duce sensitivity (i.e. louder noises trigger the camera).
Adjusting the camera volume
The camera’s speaker volume can be adjusted to the desired level. Scroll the Volume dial
to increase or decrease the camera volume.
Turning on the camera night light (LW2401 camera only)
• Press the night light button on the top of the camera to turn the night light on or off. The night
light button glows when the night light is on and the monitor displays the icon to indicate
the camera night light is on.
Video monitor setup
Unlocking the video monitor antenna
The video monitor has a built-in antenna that improves signal range. It is recommended
that you extend antenna for optimal performance.
To unlock the monitor antenna:
• Slide the lock button to the right.
Reading the power indicator LED
The power indicator LED glows green when
the monitor is powered on. When the
battery is low, the power LED blinks.
11
Page 20

Basic Setup
Pair Button
Press the Pair button
during the pairing
process with the
video monitor.
LW2401 Camera
Pair Button
Press the Pair button
with a pin or thin
object.
Pan/tilt Camera
Pairing cameras
The camera included with the video monitor has already been paired up with the video
monitor. If for any reason your monitor and camera are not paired up, or you wish to add
additional cameras, follow the directions below.
To pair a camera to the video monitor:
1 Place the camera and video monitor 12
inches apart. Turn on the camera first and
then the video monitor.
2 Press the Me
3 Select an available channel, and press the
4 Press the PAIR button
5 OPTIONAL: To
nu button on the monitor,
then select Pairing and press the OK
button.
OK butt
NOTE: By defa
on.
ult, the camera included with
the system is paired to channel 1.
on the camera
within 30 seconds. (Pan/tilt camera) Use a
pin, paper clip, or another thin object to
press the PAIR button.
• You should immediately see video from the
mera on the video monitor.
ca
pair multiple cameras,
repeat steps 2~4, selecting a different
channel in the pairing menu.
NOTE: You can add a maximum of four (4)
wir
eless cameras to the video
monitor. Add-on cameras are
available from
www.lorextechnology.com
(accessory # LW2401AC1,
2451AC1, LW2401AC2).
LW
12
Page 21

Basic Setup
SEQ/Quad button
Camera 1
Camera 4
Camera 3
Camera 2
How Sequence View works
SEQ/Quad button
Video monitor displays 4 video images in
Quad view
Sequence view
In Sequence view, the monitor switches between paired cameras every six seconds. For
example, the monitor displays channel 1 for six seconds, then channel 2 for six seconds
and so on. The monitor only switches to channels that are paired with a camera.
To enable Sequence view:
• Press the SEQ/
To exit Sequence view:
• Press the CAM butt
Quad button once to enter Sequence view.
on.
Viewing multiple cameras (Quad view)
You can view all of the paired cameras in Quad view. The video monitor supports a
maximum of four cameras.
NOTE: Audio monit
To view multiple cameras in Quad view:
• Press the SEQ/
To exit Quad view:
• Press the SEQ/Quad button, and then press CAM t o ex i t Q u a d v i e w an d re t u rn t o s i ng l e- c a m er a
view.
oring is not available in Quad view.
Quad button twice on the video monitor.
13
Page 22

Basic Setup
Hello
Hello
Talk and listen
(Two-way co mmunicat ion)
LW2401 camera shown
Using the talk function
The talk function allows you to speak into the video monitor and have the camera output
your voice. The camera also has a built-in microphone, which allows the person to speak
into the camera.
To use the talk function:
1 Adjust the volume on the camera and video monitor to the desired level.
2 Press and hold the Ta
lk button on the video monitor and begin speaking. Release the Talk
button when you are finished.
NOTE: You must release the Talk button on the video monitor in order to listen to the audio
fr
om the camera.
NOTE: The talk function does not work in Quad view.
Music
The music feature allows the camera to
play pre-loaded tunes.
To use the tune feature:
• Press the button to begin playing
a tune on the ca
monitor.
• Press the button again to stop the
tune.
• Press the button to skip to the next
tune. The song title appears on-screen.
NOTE: Music is not available in Quad
w.
vie
mera and video
14
Page 23

Basic Setup
Scan button
Video button
Using Scan mode
Scan mode temporarily turns off the video monitor, and waits for a camera to detect a
noise. Once one of the cameras detect sounds, the video monitor automatically turns on,
and beeps to notify you. This feature is especially useful if you have multiple cameras, and
only want to view the camera that detects a sound (e.g. infant crying).
To enable Scan mode:
• Press the Scan butt
To disable the Scan mode:
• Press the Scan
on.
button to turn off Scan mode.
NOTE: The
first camera to detect a sound will trigger the video monitor to turn on. After
several seconds, the monitor turns off and begins monitoring the cameras again.
Turning the video monitor screen on/off
Turning off the video monitor screen allows you to listen to audio from the camera, while
the video monitor screen is off. For example, if you want to monitor a baby’s room at night
while you sleep, you can turn off the video monitor screen to conserve power, and at the
same time listen to the camera audio.
To turn the video monitor screen on/off:
• Press the Video button to turn the screen off.
• Press the Video button again to turn the screen on.
15
Page 24

Recording
microSD Card
Capacity
With movement
(e.g. drive-by cars)
With limited movement
(e.g. empty room)
512 MB 55 minutes 1 hour and 50 minutes
1 GB 1 hour and 45 minutes 2 hours and 50 minutes
2GB 3 hours and 50 minutes 5 hours and 50 minutes
4GB 7 hours and 40 minutes 12 hours
8GB 15 hours and 30 minutes 23 hours and 40 minutes
16 GB 29 hours and 10 minutes 45 hours and 50 minutes
32 GB 57 hours and 40 minutes 89 hours and 25 minutes
NOTE: Estimated recording times based on tests using Kingston
TM
brand microSD cards.
There may be a slight variation when using different brands of memory. A scene
with more activity requires more storage space.
Orient the
microSD card as
shown and insert
it into the microSD
slot.
microSD icon
SD
Recording
NOTE: A microSD card is required to enable recording.
This system is capable of recording video on a microSD car
d. Use the table below to help
you estimate recording times on various sizes of microSD cards.
Manual recording & auto recording
Prerequisite:
• Insert a microSD card into the microSD slot in the video monitor.
NOTE: The video monit
16
or supports microSD cards up to 32 GB (gigabytes).
Page 25

Recording
Manual recording
Manual recording allows you to record video by pressing the record button on the video
monitor. Manual recording may be useful if you want to quickly record an event to your
video monitor while you are watching it.
NOTE: It is
To start manual recording:
ess the M button
1 Pr
113711-1.AVI) appears on the screen to indicate recording is in progress.
2 Press the M button again to stop recording. The yellow file icon ( ) appears to indicate a
new recording is ready for viewing.
recommended to set the date and time before using the recording function. For
det
ails on setting the date and time, see “Changing the date and time” on page 21.
on top of the video monitor. The REC icon, followed by the file name (e.g.
Auto recording
Auto Recording allows the video monitor to record only when the camera detects a sound
or motion (LW2401AC2 only). For example, if you are monitoring a sleeping baby, the video
monitor will not record until the baby cries (ensure you set the appropriate sensitivity
level).
W2401AC2 Only: Auto
• L
The camera does not support audio alarms or audio triggered recording.
Prerequisites:
• Adjust the sensitivity level on the camera to the desired level. Higher sensitivity means the
a
mera will be more sensitive to noise. This means that the slightest sound will cause the
c
video monitor to record. There is no sensitivity control on the LW2401AC2 camera.
To enable Auto Recording:
• Press the A button
detects a sound or motion (LW2401AC2 only), the video monitor begins to record. The REC
icon, followed by the file name (i.e. 113711-1.AVI) appears on screen to indicate a new
recording. The yellow file icon appears to indicate a new recording is ready for viewing.
Recording is triggered by the built in motion detector in the camera.
on top of the video monitor. The AUTO LED glows blue. When a camera
NOTE: The recording time after a camera triggers the video monitor, is between 5~30
sec
onds. The duration of the recording can be set in the Trigger menu
(Menu>Record>Audio Trigger). This also applies to motion recording using the
LW2401AC2 camera.
NOTE: Th
e maximum recording time during auto rec
example, if there is constant noise, the video monitor will record a maximum of 10
minutes.
ording is 10 consecutive minutes. For
17
Page 26

Recording
VIDEO
110204
• Press right on the joystick repeatedly to increase
playback speed (2x, 4x, 8x)
• Press left on the joystick to reduce playback speed
(-2x, -4x, -8x)
..
102904_1
1MB
Video Playback Controls
Fast forward
Rewind
Viewing recorded files on the video monitor
There are two ways that you can view the recorded video files on the microSD memory
card: through the video monitor or on your computer.
NOTE: Vid
To v
1 Press the OK butt
opens.
eo files are saved in .avi format.
iew video files through the video monitor:
on on the video monitor (press down on the joystick). The File List menu
2 Press OK to open the VIDEO folder.
3 Select the desired folder and press the OK butt
NOTE: The folder
s are named by the year, month, and date. For example, a folder named
on.
110204 means that the folder was created in 2011, February (02), on the 4th.
4 Select the video file you wish to view, and press the OK button to begin playback.
18
Page 27

Viewing video files on a PC
Push the microSD
card to eject
1 Remove the memory card.
2 Insert the microSD card into a memory card reader (not included).
NOTE: If required, use the included SD card adapter to convert the microSD card to
SD/HCSD
memory card format.
Recording
3 When the AutoPlay menu
4 Double-click the VIDEO folder, then select the sub-folder you want to open.
NOTE: The folder
110204 means that the folder was created in 2011, February (02), on the 4th.
5 Double-click the desired video file to begin playback.
s are named by the year, month, and date. For example, a folder named
appears, click on Open folder to view files.
Viewing video files on a Mac
1 Insert the microSD card into a memory card reader. If required, use the included SD card
adapter.
2 The memory card automatically appears on the desktop.
3 Double-click the USB icon (
4 Double-click the VIDEO
folder, then select the sub-folder you want to open.
) on your desktop to view the microSD contents.
19
Page 28

Configuring your Video Monitor
Configuring your Video Monitor
Enabling the Auto-Mute feature
The Auto-Mute feature eliminates white noise when monitoring a room. The Auto-Mute
feature works by muting the video monitor when the camera detects no audible noise. Once
the camera detects a sound, the video monitor plays sound again.
To enable Auto-Mute:
1 Press the Me
nu button on the video monitor.
2 Select A
and press OK.
3 Select ON
4 Press the OK but
joystick) to save your settings.
uto Mute ( ) using the joystick
to enable auto mute.
ton (press down on the
Configuring the Overwrite feature
The Overwrite feature allows the video monitor to continuously record on the microSD
card. When the microSD card is full, the video recordings overwrite the first recorded video
entry (first in first out).
To enable overwrite:
1 Press the Me
2 Select Re
3 Select File Overwrite and
nu button on the video monitor.
cord ( ) and press OK.
press OK.
4 Select Yes t
disable overwrite.
5 Press the OK
20
o enable overwrite or select No to
button to save your settings.
Page 29

Changing the date and time
2011-02-14
09:54:30
NOTE: To disable the alarm ’beep’ turn
the volume all the way down.
To adjust the video monitor’s date and time:
1 Press the Menu button on the video monitor.
Configuring your Video Monitor
2 Select Settings (
button.
3 Select Date
button.
4 Use the joystick to configure the Year, Month,
and D
• Press up/down on the joystick to adjust the
ues.
val
• Press left/right to move between the year,
month, and date.
5 Press the OK but
your changes.
& Time and then press the OK
ate.
ton to save your changes, or press Menu to exit the menu without saving
) and then press the OK
Adjusting the alarm volume
The video monitor ’beeps’ when the camera
detects audio triggers (e.g. a loud noise) or
motion triggers (LW2401AC2 only). You can adjust
how loud the video monitor beeps when the alarm
triggers.
This is useful if you want to monitor activity in an
area, but cannot
monitor.
To change the video alarm volume:
ess the Me
1 Pr
2 Select Settings (
button.
3 Select Alarm Vo
4 Press left and right on the joystick to adjust the alarm volume.
5 Press the OK b
keep your eyes on the video
nu button on the video monitor.
) and then press the OK
lume and then press the OK button.
utton to save your settings.
21
Page 30

Configuring your Video Monitor
04:30
Timer
indicator
00:00
Adjusting the screen brightness
To adjust screen brightness:
1 Press the Me
2 Select Settings ( ) and then press the OK
button.
nu button on the video monitor.
3 Se
lect Bri
ghtness and then press the OK button.
4 Press left and right on the joystick to adjust the
een brightness.
scr
5 Press the OK
button to save your settings.
Adjusting the timer settings
The timer allows the video monitor to beep after a set duration. If the monitor is used as a
baby monitor, the timer can help remind you when it is time to feed the baby.
To enable the Timer:
1 Press the Me
2 Select Settings ( ) and then press the OK
button.
3 Se
lect Tim
nu button on the video monitor.
er and then press the OK button.
4 Enter the timer duration using the joystick. Press
eft / right to navigate the values. Press up/down
l
to adjust the values.
a
NOTE: Timer dur
tion is represented as (Hours:
Minutes)
5 Se
lect ON
and then press the OK button to save
your settings. When the timer duration ends, an
alarm goes off and the timer resets until it is
manually disabled.
22
Page 31

Adjusting the temperature unit of measurement
The camera has a built-in temperature
sensor.You can change the video monitor to
display temperature in Fahrenheit (F) or
Celsius (C).
To change the unit of measurement:
1 Press the Me
nu button on the video monitor.
Configuring your Video Monitor
2 Select Settings (
button.
3 Select Tem
button.
4 Select either C fo
Fahrenheit.
5 Press the OK b
p. Display and press the OK
utton to save your settings.
) and press the OK
r Celsius or F for
Configuring the temperature alert range
You can configure the video monitor to alert you
through alarm beeps, when the temperature
goes above or below the
NOTE: T
NOTE: The L
emperature sensor is accurate within
3°F/1
°C.
W
2401AC2 accessory camera does
not have a temperature sensor. When this
camera is selected, the temperature
reading is permanently set to 68°F/20°C.
set temperature range.
To configure the tempe
1 Press the Me
2 Select Settings (
button.
3 Select Tem
4 Using the Jo
• Beside Low Temperature, enter the lowest room temperature threshold.
• Beside High T
5 Select the ON butt
nu button on the video monitor.
p. Alert and then press the OK button.
ystick, press up/down to change selection, left/right to adjust the values:
emperature, enter the highest room temperature threshold.
r
) and then press the OK
on and then press OK.
ature alert range:
23
Page 32

Configuring your Video Monitor
Erasing the memory card
Once you erase the memory card, the video
will be deleted permanently.
To erase the memory card:
1 Press the Me
monitor.
nu button on the video
2 Select Settings (
OK button.
3 Select Fo
OK button.
4 Se
lect Yes and then pr
erase the memory card.
• The message "Format OK" appears to
confirm
rmat memory and then press the
that the card has been erased.
) and then press the
ess the OK button to
Restoring default settings
Restoring your video monitor settings
returns any setting changes to factory
default settings
To restore the video monitor factory
defaults:
1 Press the Me
monitor.
nu button on the video
2 Select Settings (
OK button.
3 Select Fa
OK button.
4 Se
24
lect Ye
ctory Reset and then press the
s, and then press the OK button.
) and then press the
Page 33

Viewing your Camera Remotely Using Skype
Skype server
Home computer
Disclaimers
You must have a high-speed
internet connection to use the
video function on Skype. Traffic
congestion may result in
choppy video.
Mobile Data Charges
When using a mobile cellular
network, data charges may
apply. Check with your
provider for details.
*Computer to computer
For Skype related support, visit
https://support.skype.com/
Viewing your Camera Remotely Using Skype
Connecting to your video monitor through Skype is a convenient and free* method to view
your camera from anywhere with an internet connection.
NOTE: When r
monitoring, and pan/tilt controls are disabled.
How it works
Your computer connects to the Skype server. The Skype server is connected to your home
computer. Your home computer connects to the video monitor, which captures video from
the camera.
emotely connecting to your video monitor using Skype, recording, audio
System requirements
iPhone, iPad, iPod Touch Requirements
•
Skype
for iPhone v. 3.0 and above
•
Skype for iPad
• iPhone 4S/4/3GS, iPad (1st generation and above),
iPod touch (3rd generation and above)
• iOS 4.0 and above
For the latest device compatibility list, visit
www.lorextechnology.com
PC requirements
• Skype for Windows v. 4.2 and above
ndows XP SP2/Vista/Windows 7
• Wi
• 1 Ghz or greater processor
For instructions, see “Connecting to Skype on a PC”
on page 26.
Mac requirements
• Skype for Mac OS v. 5.3 and above
c OS
• Ma
• 1 GHz or higher Intel processor
• PowerPC™ not supported
For instructions, see “Connecting to Skype on a Mac” on page 32.
v. 3.5 and above
v. 10.5.8 and above
25
Page 34

Viewing your Camera Remotely Using Skype
Run
Lorex.exe
Click the USB Driver button
Then, click "USB Driver" to copy
the driver to your desktop.
Connecting to Skype on a PC
Step 1 of 6: Installing the camera driver for PC
You will need to install the camera drivers located on the software CD (included) or
available as a free download from www.lorextechnology.com.
To install the camera drivers:
1 Insert th
e softwar
e CD into your computer. An Autoplay window opens.
2 Click Run Lor
ex.exe.
3 Click the USB Driver button, and then click USB Driver. The driver appears on your desktop.
4 Click the button to close the window.
5 Double-click the Usbdr
iver-PC icon on your desktop.
6 Follow the on-screen instructions to complete the driver installation
26
Page 35

Viewing your Camera Remotely Using Skype
mini-USB cable
Click Create a new account
Step 2 of 6: Connecting the video monitor to the PC
1 Turn on the camera first, then the video monitor. Make sure you can see a video image on
channel 1.
NOTE: Pair the camera that is most important for you to view remotely to Channel 1. For
ins
tructions on how to pair cameras, see “Pairing cameras” on page 12.
2 Con
port.
nect the mini-USB cable (included) to your video
The video monitor displays the following: "USB PC CAMERA MODE"
monitor and into the computer’s USB
Step 3 of 6: Creating a Skype account
A Skype account allows you to connect to your camera through the Skype service. Skype is
a service that allows users to make voice calls and video calls to anywhere in the world.
In order to connect to your video monitor using Skype, you will need two accounts---one
for the
camera
NOTE: The Skype illustrations and instructions bel
change their website / product interface without prior notice.
If you do not have a Skype account
See “If you do not have a Skype account...” on page 37.
If you have an existing Skype account (PC)
You will have to create a separate account for your camera. Follow the in
(e.g Lorex Camera) and one for yourself (e.g. Tom Smith).
ow serve as a guideline only. Skype may
structions below.
1 Launch Skype. If y
ou are connected to Skype, click Skype>Sign Out.
2 From the Skype Login window, click
Create a new account.
27
Page 36

Viewing your Camera Remotely Using Skype
Live video
Continue
Select Wireless Monitoring
System if necessary
Live video
Save button
Video Settings
Select Wireless Monitoring
System if necessary
3 Follow the on-screen instructions to create a new account. Upon login, the Setting up Skype
wizard starts. Click Continue. Under Video, you will see an image from the camera. If no
image appears, make sure the monitor is connected to the computer via the USB cable.
NOTE: If you can see an image from a webcam that is already connected, select Wireless
Monitoring System from the drop-down menu.
NOTE: If the Setting up
Skype wizard does not run, click Tools>Options>Video Settings.
Make sure you can see video in the window. Click Save to exit. If the image is from
an already connected webcam, select Wireless Monitoring System under Select
Webcam.
4 Click Continue.
5 In the next page, click Add later t
o not include a profile picture for the camera’s Skype
account, or click Continue and follow the instructions to add a profile picture for the camera’s
Skype account.
ick Start using Skype.
6 Cl
28
Page 37

Step 4 of 6: Configuring Skype
Options
Show advanced options
7 Click on Tools>Options.
8 Click the Calls button ( ).
Viewing your Camera Remotely Using Skype
9 Click the Show advanced options but
ton.
10 Under Allow calls from..., select people in my Contact list only. This will prevent the device
from accepting Skype calls from anyone who is not in the contact list for its account.
NOTE: You may also select anyone, which will allow anyone with a Skype account to call
the device and access your camera. This setting is not recommended
29
Page 38

Viewing your Camera Remotely Using Skype
Save
Add a contact
Search for the name of your personal
Skype account
Click Add
11 Check Answer incoming calls automatically and Start my video automatically when I am in
Click Save.
a call.
Step 5 of 6: Send a contact request
Next, you have to send a friend request to your personal account (e.g. Tom Smith).
1 Click the A
dd a contact button ( ).
2 Search for the name of your personal account (e.g. Tom Smith), and then click the Add button.
30
Page 39

Viewing your Camera Remotely Using Skype
Send contact request
3 Click Send Request.
Step 6 of 6: Test the connection
NOTE: This step requires you to log in to Skype from a different computer or compatible
mobile device.
1 Log in t
o your personal account (e.g. Tom Smith).
2 A "new contact" pop-up appears. Click the new contact request icon that appears on the
bottom-right c
orner of the window.
3 Click the Add to Contacts button to add the camera to your contact list.
31
Page 40

Viewing your Camera Remotely Using Skype
Call
4 From the contact list, right-click on your camera’s account name (e.g. Lorex Camera), and
click Call. The video call begins automatically. Please allow around 15 to 25 seconds for the
video connection to be established.
NOTE: Video may appear pixelated immediately after connecting. It should improve within
a few seconds, depending on your Internet connection.
Connecting to Skype on a Mac
Step 1 of 6: Installing the camera driver for Mac OS
You will need to install the camera drivers included on the software CD (included).
1 Insert the software
2 Double-click the Lor
3 Double-click the Mac fo
4 Double-click the SD Series Mac Driv
your Downloads folder and your downloads folder opens automatically.
5 Double-click the SD S
WirelessCameraMacDriverSuiteInstaller (.pkg) file.
6 Follow the on-screen instructions to install.
CD into your computer. The Lorex CD icon ( ) appears on your desktop.
ex CD icon ( ) on your desktop.
lder.
er.zip file to extract the installer. The installer is saved to
eries Mac Driver folder and then double-click the
Step 2 of 6: Connecting the video monitor or receiver to your computer
1 Turn on your camera first, and then turn on your video monitor or receiver. Make sure you can
see a video image on Channel 1.
NOTE: Pair the camera that is most important for you to view remotely to Channel 1. For
ins
tructions on how to pair cameras, see “Pairing cameras” on page 12.
32
Page 41

Viewing your Camera Remotely Using Skype
mini-USB cable
Create New
Account
2 Connect the mini-USB cable (included) from the USB port on your video monitor or receiver
to an available USB port on your computer. "USB PC CAMERA MODE" appears on the screen.
Step 3 of 6: Creating a Skype account
A Skype account allows you to connect to your camera through the Skype service. Skype is
a service that allows users to make voice and video calls to anywhere in the world.
In order to connect to your video monitor using Skype, you will need two accounts—one fo
the camera (e.g. Lorex Camera) and one for yourself (e.g. Tom Smith).
NOTE: The Skype illustrations and instructions bel
ow serve as a guideline only. Skype may
change their website / product interface without prior notice.
r
If you do not have an existing Skype account:
See “If you do not have a Skype account...” on page 37.
a
If you have an existing Skype
ccount (Mac):
You have to create a separate account for your camera.
1 Launch Skype. If
you are already connected to Skype, click File>Sign Out.
2 Click Create New Account.
Follow the instructions below.
3 Follow the on-screen instructions to create a new account.
33
Page 42

Viewing your Camera Remotely Using Skype
Audio/Video tab
Calls tab
Answer
automatically
Click Configure
Step 4 of 6: Configuring Skype
1 Upon login, click Skype>Preferences. Select the Audio/Video tab.
2 Under Camera, select Wireless Monitoring System if it is not already selected. You will see
live video from your camera if your device is connected.
• If the video area is black, check to see if your ca
mera is on and is paired to Channel 1. Also
check to make sure your video monitor is connected to your computer.
c
NOTE: When
onnecting or reconnecting your video monitor, you must close the
Preferences window and re-open it to the Audio/Video tab to test the video
connection.
3 Se
lect the Calls ta
b.
4 Under Incoming Calls, select Answer Automatically.
5 Click Configur
34
e.
Page 43

6 Select Answer automatically with video. Click Done.
Select Answer automatically with video
Allow calls
from Contacts
Privacy tab
Add Contact
7 Select the Privacy tab.
Viewing your Camera Remotely Using Skype
8 Under Allow calls from, select Co
ntacts. This will prevent the device from accepting Skype
calls from anyone who is not in the contact list for its account.
NOTE: You may also select Anyone, which will allow anyone with a Skype account to call
the device and access your camera. This setting is not recommended.
9 Close the Preferences window to return to the main Skype window.
Step 5 of 6: Send a contact request
Next, you have to send a friend request to your personal Skype account (e.g. Tom Smith).
1 From the main Skype window, click Co
ntacts then click Add Contact.
35
Page 44

Viewing your Camera Remotely Using Skype
Enter the account name or
email address for your
personal Skype account
Click Find
Send contact request
Contact
Request
Accept
Call
2 Under Add Contact, enter the Skype account name (e.g. Tom Smith) or email address for your
personal Skype account. Click Find. Your personal Skype account should appear below the
search bar.
3 Next to your personal Skype account, click and then click Send to send the contact
request.
Step 6 of 6: Test the connection
NOTE: This step requires you to log in to Skype from a different computer or compatible
mobile device.
1 Log in t
o your personal account (e.g. Tom Smith).
2 The contact request from your device’s Skype account should appear in the left column under
Rec
ent. Click the Skype account name for your device.
3 Click Accept.
4 Click the
(Make a Voice Call) button to call your camera. The video call begins
automatically. Please allow around 15 to 25 seconds for the video connection to be
est
ablished.
• You can also call the camera from the contact list using the button. Do not use
the Video Call (
NOTE: Video may appear pix
) button.
elated immediately after connecting. It should improve within
a few seconds, depending on your Internet connection.
36
Page 45

Viewing your Camera Remotely Using Skype
Join Skype
Create Account
I Agree - Continue
If you do not have a Skype account...
Create your personal account first (e.g. Tom Smith), then create a second account for your
camera (e.g. Lorex Camera).
Create a personal account (i.e. Tom Smith):
in Sky
1 Go to www.skype.com, and click on Jo
pe.
2 Click Create an Account. Fill in the appropriate fields.
3 Click the I Agree - Continue button.
4 Follow the on-screen instructions to download and install Skype on your computer.
5 Once you are logged in to Skype, click on Skype>Sign out (PC) or File>Sign out (Mac), t
see “If you have an existing Skype acc
Skype account (Mac):” on page 33.
ount (PC)” on page 27 or see “If you have an existing
hen
37
Page 46

"Personal" Skype account
(e.g. Tom Smith)
"Camera" Skype account
(e.g. Lorex Camera)
Skype Name:
Password:
Email address used to register this
account (used for account retrieval):
Skype Name:
Password:
Email address used to register this
account (used for account retrieval):
Viewing your Camera Remotely Using Skype
Press CAM to change cameras
Cam 2
USB PC CAMERA MODE
Camera number
My Skype Account Information
Changing the camera view on Skype
NOTE: This section is applicable only if you have more than 1 camera.
You cannot change the camera or control the camera angle on the
remotely using Skype; however, you can change the channel manually using the video
monitor.
Pair the camera that is most important for you to view remotely to Channel 1. When you
connect the USB cable to the vide
if you have a different channel selected.
To change the camera view:
• From your video monitor, press CA
• The camera number changes to the next connected camera.
NOTE: You can only view one camera at a time
pan/tilt camera
o
monitor, the video monitor defaults to Camera 1, even
M t
o change cameras.
38
Page 47

Viewing your Camera Remotely Using Skype
Voice Call button
Viewing a camera on your mobile device
You can remotely monitor your camera using Skype on supported mobile devices.
Supported apps & devices
•
Skype
for iPhone v. 3.0 and above
Skype for iPad
•
• iPhone 4S/4/3GS, iPad (1st generation and above), iPod touch (3rd generation and above)
• iOS 4.0 and above
For the latest device compatibility list, visit www.lorextechnology.com
Prerequisites
• Install and configure the PC/Mac Skype software and USB driver
your Camera Remotely Using Skype” on page 25.
• Ensure you configure your camera’s Skype account to auto-accept incoming calls.
• Ensure your personal Skype account has been added to the contact list for the video monitor’s
Skype account.
• Ensure the video monitor is connected to your computer with the USB cable.
v. 3.5 and above
s. For details, see “Viewing
Viewing your camera on iPhone
1 Download and install the
NOTE: Skype is
2 Launch Skype
Contacts. If a different contact list is open, tap Contacts and then tap All Contacts.
3 Se
lect the video monitor’s account, and tap
ice Call to connect to the camera. The
Vo
video call connects automatically. Please
allow 15 to 25 seconds for the call to
connect.
NOTE: Video may appear pixelated
immediately after connecting. It
should improve within a few seconds,
depending on your Internet
connection.
a free application, but it requires a valid iTunes account to download.
and sign in using your personal account. Your contact list opens to All
Skype
application from the App Store.
39
Page 48

Viewing your Camera Remotely Using Skype
Voice Call button
Viewing your camera on iPad
1 Download and install the
NOTE: Skype fo
2 Launch Skype
r iPad is a free application, but it requires a valid iTunes account to download.
and sign in using your personal account. Your contact list opens to All
Skype for iPad
application from the App Store.
Contacts. If a different contact list is open, tap Lists (
3 Select the video monitor’s
count, and tap Voice Call to
ac
connect to the camera. The
video call connects
automatically. Please allow 15
to 25 seconds for the call to
connect.
NOTE: Video may appear
pixelated immediately
after connecting. It
should improve within a
few seconds, depending
on your Internet
connection.
) and then tap All Contacts.
40
Page 49

Installing Camera Batteries (LW2401 Camera Only)
Remove battery cover from camera base.
Align the metal contact
points to the connector
inside the camera base.
This side faces up.
Connect the
power adapter to
the DC5V port
Installing Camera Batteries (LW2401 Camera
Only)
The camera base has a built-in battery compartment where you can install rechargeable
and non-rechargeable batteries. This can be useful if you want to temporarily monitor an
area with no power outlets.
Installing non-rechargeable AA batteries
You can install regular AA Alkaline batteries
(non-rechargeable) into the camera’s battery
compartment.
To install regular AA batteries in the camera:
1 Unplug the po
wer cord from the base of the camera.
2 Remove the battery cover.
3 Insert four AA batteries into the battery compartment
1 Remove the battery cover and insert the
2 Plug the po
and r
eplace the battery cover.
Installing a rechargeable battery pack
Optional rechargeable battery packs are
available from www.lorextechnology.com
(part # ACC2401BATT). Regular rechargeable
batteries
base.
To install the rechargeable battery pack:
r
echargeable battery pack in the battery
compartment. Replace the battery cover.
the power adapter into the camera base. Allow the camera to
charge for 6 hours.
NOTE: The Charge LED indicator glows to indicate the battery is
cannot be charged in the camera
wer adapt
er into a power outlet. Connect the end of
charging.
41
Page 50

Technical Specifications
Technical Specifications
LW2401 Camera Specifications
Frequency 2400~2483.5Mhz
Maximum Range 450 ft. (138m) outdoor / 150 ft. (46m)
Image Sensor 1/5" CMOS sensor
IR LED 8 Pcs.
Power Adapter Voltage 5V 1A
Battery Voltage 4xAA alkaline battery (not included)
or 3.7V Li-Polymer battery (not included)
Battery Life Up to 4 hours. Up to 2.5 hours with night vision on. Requires
tional batteries.
p
o
Dimensions 3.3in x 2.6in x 6in / 84mm x 67mm x 158mm
indoor line of
sight
Weight 0.3 lbs / 0.14 kg
Pan/Tilt Camera Specifications
Frequency 2400~2483.5Mhz
Maximum Range 450 ft. (138m) outdoor / 150 ft. (46m)
Image Sensor 1/5" CMOS sensor
IR LED 8 Pcs.
Power Adapter Voltage 5V 1A
Dimensions 2.8in x 3.5in x 3.6in / 70mm x 90mm x 91mm
Weight 0.4lbs / 0.19 kg
Video Monitor Specifications
Frequency 2400~2483.5Mhz
Display size 3.5" TFT LCD
Power adapter voltage 5V 1A
Battery voltage 3.7V Li-Polymer battery (built-in)
Battery Life Up to 4.5 hours
Dimensions 5.0in x 0.7in x 3in / 126mm x 17mm x 76mm
Weight 0.35lbs / 0.16kg
indoor line of
sight
42
Page 51

Cleaning and disposal
Cleaning and disposal
Cleaning
Clean the monitor and camera with a slightly damp cloth or an anti-static cloth. Never use
cleaning agents or abrasive solvents.
• Do not clean any part of the product with cleaners with thinners or other solvents and
em
icals. This may cause permanent damage to the product which is not covered by the
ch
Warranty. When necessary, clean it with a damp cloth.
• Keep your camera and monitor away from hot, humid, pr wet areas or strong sunlight.
• Every effort has been made to ensure high standards of reliability for your video monitor.
However, if something does go wrong, please do not try to repair it yourself . Contact Customer
Service for assistance.
Disposal of the device
At the end of the product lifecycle, you should not dispose of this
product with normal household waste, but take the product to a
collection point for the recycling of electrical and electronic
equipment. The symbol on the product, user’s guide and/or box
indicates this.
Some of the product materials can be re-used if you take them to a
recycling point. By reusing some parts or raw materials from used
products you make an important contribution to the protection of the
environment.
Please contact your local authorities in case you need more information on the collection
points in your area. Dispose
according to your local regulations.
of the battery pack in an environmentally-friendly manner
43
Page 52

Notices
Notices
Warning: Any changes or modifications not expressly approved by the grantee of this
device could void the user's authority to operate the device.
FCC notice
This device complies with Part 15, subpart C, of the FCC Rules. Operation is subject to the
following two conditions: (1) this device may not cause harmful interference, and (2) this
device must accept any interference received, including interference that may cause
undesired operation. The manufacturer is not responsible for any radio or TV interference
caused by unauthorized modifications to this equipment. Such modifications could void the
user’s authority to operate the equipment.
However, it is imperative that the user follows the
improper usage which may result in damage to the unit, electrical shock and fire hazard
injury. In order to improve the feature functions and quality of this product, the
specifications are subject to change without notice from time to time.
Caution: To maintain compliance with
at least 20cm (7.87in) from nearby persons.
the FCC’s RF exposure guidelines, place the camera
guidelines in this man
ual to avoid
IC notice
This device complies with Industry Canada license-exempt RSS standard(s). Operation is
subject to the following two conditions: (1) this device may not cause interference, and (2)
this device must accept any interference, including interference that may cause undesired
operation of the device.
Le présent appareil est conforme aux CNR d'Industrie Canada applicables aux appareils
radio exempts de licence.
(1) l'appareil ne doit pas produire
accepter tout brouillage radioélectrique subi, même si le brouillage est susceptible d'en
compromettre le fonctionnement.
The Lorex Live Handheld Video Monitor models LW2401 and LW241 are
in compliance with the essential requirements and other relevant
provisions of Directive
L'exploitation est autorisée aux deux conditions suivantes:
de brouillage, et (2) l'utilisateur de l'appareil doit
1999/5/EC.
44
Page 53

Troubleshooting
Problem Possible Causes Solution
No picture or sound
on the Monitor
• The monitor may be off.
• The batteries on the camera
or video monitor may be low.
• The batteries may be
installed backwards.
• The monitor may be in Scan
mode.
• Ensure that both the camera and
monitor are turned on.
• Ensure that both the camera and
monitor are plugged in and fully
charged
• Double check that you have not
inserted the rechargeable battery
backwards.
• Press the scan button to turn off Scan
mode.
Monitor produces a
high-pitched noise
(squealing)
• The video monitor and
camera are too close
together.
• The video monitor volume
may be too loud.
• Move the camera and video monitor
further apart.
• Lower the video monitor volume.
Picture but no sound
on the monitor
• The volume on the video
monitor may be too low.
• The Auto-Mute feature may
be enabled.
• Turn up the volume on the video
monitor.
• In the Main Menu select Auto-Mute,
then turn the setting off.
Sound but no picture
on monitor
• The video monitor screen
may be off.
• Press the Video button on the video
monitor to turn the screen back on.
I get a "Out of Range"
message on the monitor
• The video monitor lost
connection with the camera.
• The camera may be off.
• (LW2401 only) The camera
may be out of batteries.
• Move the video monitor and camera
closer together.
• Ensure the cameras are turned on.
• (LW2401 only) Install fresh camera
batteries.
Picture is not clear • The video monitor and
camera may have a weak
signal.
• Interference from the
environment (from
microwaves, wireless
routers, etc.)
• Brightness on the video
monitor may be too low.
• Move monitor closer to the camera.
• Move the monitor away from other
wireless devices (e.g. wireless
routers, cordless phones,
walkie-talkies, etc).
• Adjust the brightness on the video
monitor.
The video monitor
does not turn on
• The video monitor may have
low batteries.
• Connect a power adapter to the video
monitor and a power outlet to charge
the monitor. Charge the monitor for
4.5 hours.
Troubleshooting
45
Page 54

Troubleshooting
Problem Possible Causes Solution
Incorrect temperature
reading
• The camera may be under
direct sunlight.
• Temperature sensor is
accurate within 3°F/1°C.
• Temperature setting on
LW2401AC2 accessory
camera is permanently set to
68°F/20°C.
• Move the camera to an area away from
direct sunlight.
Missing recorded
video files
• The Overwrite feature may
be turned on.
• Turn the Overwrite feature off. For
details, see “Configuring the Overwrite
feature” on page 20.
I’m connected to
Skype, but I don’t see
any video
• The video monitor may be on
the wrong channel.
• The camera(s) may be off.
• Handheld monitor may not
be connected to computer.
• USB drivers may not be
installed.
• USB port may be broken.
• Auto-answer may not be
enabled.
• Press right on the joystick to change to
the correct channel.
• Ensure the camera has power, and is
turned on.
• Launch Skype, then click
Tools>Options>Video Settings.
Ensure you can see the video on Skype
• Ensure the handheld monitor is
connected to the computer via the USB
cable.
• Insert the driver CD and install the USB
driver.
• Connect the video monitor to a different
USB port.
• For instructions on how to configure
Skype to Auto-answer incoming calls,
see page 29 for PC or page 34 for Mac.
I can’t see video on
my mobile device
• Outdated version of Skype.
• Camera drivers may not be
installed.
• Viewing on a non-supported
mobile device.
• Install the latest version of Skype on
your mobile device.
• Ensure the camera drivers are
installed from the CD.
• Ensure the device is compatible with
Skype. For a compatibility list, visit
www.lorextechnology.com
Troubleshooting (continued)
46
Page 55

Frequently Asked Questions
Frequently Asked Questions
Q: I have Skype. Why do I need to create a Skype account for the video
monitor?
A: The video monitor requires a Skype account so you can access the camera(s) from your
personal Skype account. Setup the video monitor for Skype viewing (for instructions, see
“Viewing your Camera Remotely Using Skype” in the user’s guide). Then create a Skype
account for the video monitor and add your personal Skype account to its Contacts. You
s the camera by calling it - just like calling any one of your Skype contacts.
acces
Q: Why can't I see an image from the camera(s) in Skype?
A: Is this the first time you are setting up the video monitor for remote viewing? If so, follow
the instructions in the “Viewing your Camera Remotely Using Skype” section of the user’s
guide.
If you have already performed the initial setup, and still cannot access your camera(s) (or
video monitor appears as 'Offline'), check the following:
the
• Is the camera you want to view paired to Channel 1 or the
monitor?
• Is the handheld monitor connected to the computer?
• Are the camera and handheld monitor powered on?
• Is the computer powered on?
• Is the computer in Sleep mode or Hibernate mode? The video monitor will not be able to
connect to Skype if the computer is in Sleep or Hibernate mode.
• Is Skype running on the computer and is the video monitor’s account signed in?
• Have you created a Skype account for the video monitor?
• Have you added your personal Skype account to the video monitor’s contact list?
• Do you have the latest version of Skype installed on your computer and/or mobile device?
channel selected on the video
Q: What Skype app do I use to connect to the video monitor on my iPhone
or iPad?
A: For the iPhone, use the Skype app. For the iPad, use the Skype for iPad app. Both apps
are available for free from the App Store.
Q: How do I pair cameras?
A: The camera included with your device has already been paired up with the handheld
monitor. If for any reason your monitor and camera are not paired up, or you wish to add
additional cameras, please perform the following:
1 Plac
2 Pr
e the camera and video monitor 12 inches apart. Turn on the camera first and then the
video monitor.
ess the Menu button on the monitor, then select Pairing and press the OK button.
47
Page 56

Frequently Asked Questions
Pop up mode
Default view
3 Select an available channel, and press the OK button.
NOTE: By default, the camera included with the system is paired to Channel 1.
4 Press the PA
camera within 30 seconds. You should immediately see video from the camera on the video
monitor.
NOTE: You can add a maximum of four (4) wireless cameras to the handheld monitor.
NOTE: On the pan/tilt
IR button behind the camera (LW2401 camera) or on the side of the pan/tilt
camera, you will need to use a pin or thin object to press the PAIR
button.
Q: How do I copy video to my computer?
A: Remove the microSD card by using your finger-nail or other thin object to release the
card. Insert the microSD card into the included SD card adapter and slide the notch to
LOCK. Insert the SD card into your computer's SD card reader. If your computer does not
have a built-in SD card slot, you will have to purchase a separate SD card reader. Your
computer (PC or Mac) should load the card like a standard drive. Copy or move the files
from the SD card to a location on your hard disk.
Q: Why is my picture at night time not as clear via Skype compared to my
handheld monitor?
A: Video is transmitted at a resolution
of QVGA (320x240). When viewing on
your computer,
screen is larger than the handheld
monitor, resulting in
to fit the screen-size. This is even more
evident in night vision mode. In Skype,
we recommended using "pop up mode"
(image 1) for better clarity compared to
default view (image 2).
typically the viewing
a stretched image
Q: Why is the temperature sensor giving me
an inaccurate reading?
A: Older versions of the LW2401 camera have a flexible
temperature sensor. If it is placed too close to the camera,
heat from the camera can be cause the temperature to
appear higher than the actual temperature. The solution is
to gently angle the sensor away from the body of the
camera.
Newer versions of the LW2401 camera have a non-flexible
temper
away from the camera to prevent inaccurate readings.
Make sure to keep the camera out of direct sunlight, as this
may affect temperature
NOTE: The L
48
ature sensor that keeps the temperature sensor
W
2401AC2 accessory camera does not have a temperature sensor. When this
camera is selected, the monitor will always show a temperature of 68°F/20°C.
readings.
Page 57

Frequently Asked Questions
49
Page 58

Mounting Template (LW2401 Camera Only)
Mounting Template (LW2401 Camera Only)
Use the mounting template to align mounting holes for your camera.
50
Page 59

Page 60

LW2401 / LW2450 / LW2451
Version 5.0
www.lorextechnology.com
Copyright © 2012 Lorex Technology Inc.
 Loading...