

Lorex LIVE View LW2004 series Instruction Manual

Welcome!
Thank you for purchasing the Lorex LIVE View video monitor.
Before you start...
Please make sure to charge the handheld monitor before use.
See the quick start guide or "Getting Started” on page 7 for
instructions.
Contents
Make sure you have the following:
• 1x Handheld monitor
• 1x Camer
• 1x Rechargeable Li-Ion battery for the handheld monitor
(pre-installed)
• 1x Camera power adapter
• 1x Handheld monitor power adapter
• 1x Camera stand*
• 1x Handheld monitor stand
• 1x Camera mounting screw kit
• 1x User’s guide
• 1x Quick start guide
a*
*
*
* Contents may vary by model.
i

Safety Instructions
WARNING
This baby monitor is compliant with all relevant standards
regarding electromagnetic fields and is, when handled as
described in the User’s Guide, safe to use. Therefore, always
read the instructions in this User’s Guide carefully before using
the device.
• Adult assembly is required. Keep small parts away from children
when assembling.
• This product is not a toy. Do not allow children to play with it.
• This video monitor is not a substitute for responsible adult
supervision.
• Do not place the camera or cords in the cot or within arm's reach
of the baby (the unit and cords should be at least 3 ft. / 1m away).
English
• Keep the cords out of reach of children.
• Do not cover the video monitor with a towel or blanket.
• Never use extension cords with power adapters.
• Test the video monitor before use. Become familiar with its
functions.
• Do not use the video monitor near water.
• Do not install the video monitor near a heat source.
• Only use the chargers and power adapters provided. Do not use
other chargers or power adapters as this may damage the device
and battery pack.
• Only insert battery pack of the same type.
• Do not touch the plug contacts with sharp or metal objects.
• Keep this User’s Guide for future reference.
CAUTION
Risk of explosion if battery is replaced by an incorrect type.
Dispose of used batteries according to the instructions.
ii
3 ft. / 1m
To Avoid Injury to Children/Infants:
We advise you to take the following precautions to avoid
possible injury to infants:
• DO NO
ose to cribs, bassinets, play yards, and other safe sleep
cl
T place baby audio and video camera monitors too
environments for infants.
• MAKE SURE to run all power adapter cords where they are
unlikely to be tripped over and are out of arms reach of your
infant. Keep them at least 3 ft. / 1m away.
• MAKE SURE baby audio and video camera monitors are on
a stable footing so they cannot be easily knocked over.
NOTE: These precautions are important even if your infant is
not yet standing or mobile
iii

TABLE OF CONTENTS
1. Handheld Monitor Overview . . . . . . . . . . . . . . . . . . . . . . 1
2. Camera Overview . . . . . . . . . . . . . . . . . . . . . . . . . . . . . . . 5
3. Getting Started . . . . . . . . . . . . . . . . . . . . . . . . . . . . . . . . . 7
3.1 Installing The Handheld Monitor Stand . . . . . . . . . . . . . . . . . . . .7
3.2 Connecting The Handheld Monitor . . . . . . . . . . . . . . . . . . . . . . . .8
3.3 Setting Up The Camera . . . . . . . . . . . . . . . . . . . . . . . . . . . . . . . . .9
4. Using The Handheld Monitor . . . . . . . . . . . . . . . . . . . . . 10
4.1 Selecting The Camera . . . . . . . . . . . . . . . . . . . . . . . . . . . . . . . . .10
4.2 Viewing Options . . . . . . . . . . . . . . . . . . . . . . . . . . . . . . . . . . . . . .10
4.3 Adjusting Volume . . . . . . . . . . . . . . . . . . . . . . . . . . . . . . . . . . . . .11
4.4 Talk Function . . . . . . . . . . . . . . . . . . . . . . . . . . . . . . . . . . . . . . . .12
4.5 Adjusting Screen Brightness . . . . . . . . . . . . . . . . . . . . . . . . . . . .12
4.6 Navigating The Menu . . . . . . . . . . . . . . . . . . . . . . . . . . . . . . . . . .13
4.7 Menu Options . . . . . . . . . . . . . . . . . . . . . . . . . . . . . . . . . . . . . . . .14
4.8 Voice Trigger (Audio Activated Alerts) . . . . . . . . . . . . . . . . . . . .15
4.9 Sleep Mode (Audio Only Mode) . . . . . . . . . . . . . . . . . . . . . . . . . .16
4.10 Adjusting Scan Duration . . . . . . . . . . . . . . . . . . . . . . . . . . . . . .16
4.11 Key Lock . . . . . . . . . . . . . . . . . . . . . . . . . . . . . . . . . . . . . . . . . . .17
4.12 Paging The Handheld Monitor . . . . . . . . . . . . . . . . . . . . . . . . . .17
5. Pairing Up Cameras . . . . . . . . . . . . . . . . . . . . . . . . . . . . 18
6. Help. . . . . . . . . . . . . . . . . . . . . . . . . . . . . . . . . . . . . . . . . . 20
English
7. Cleaning and Disposal . . . . . . . . . . . . . . . . . . . . . . . . . . 22
7.1 Cleaning . . . . . . . . . . . . . . . . . . . . . . . . . . . . . . . . . . . . . . . . . . . .22
7.2 Disposal Of The Device . . . . . . . . . . . . . . . . . . . . . . . . . . . . . . . .22
8. Notices . . . . . . . . . . . . . . . . . . . . . . . . . . . . . . . . . . . . . . . 23
9. Technical Specifications. . . . . . . . . . . . . . . . . . . . . . . . . 24
10. Mounting The Camera On A Wall / Ceiling. . . . . . . . . 25
11. Replacing The Monitor Battery . . . . . . . . . . . . . . . . . . 27
12. Battery Saving Tips. . . . . . . . . . . . . . . . . . . . . . . . . . . . 28
iv

v
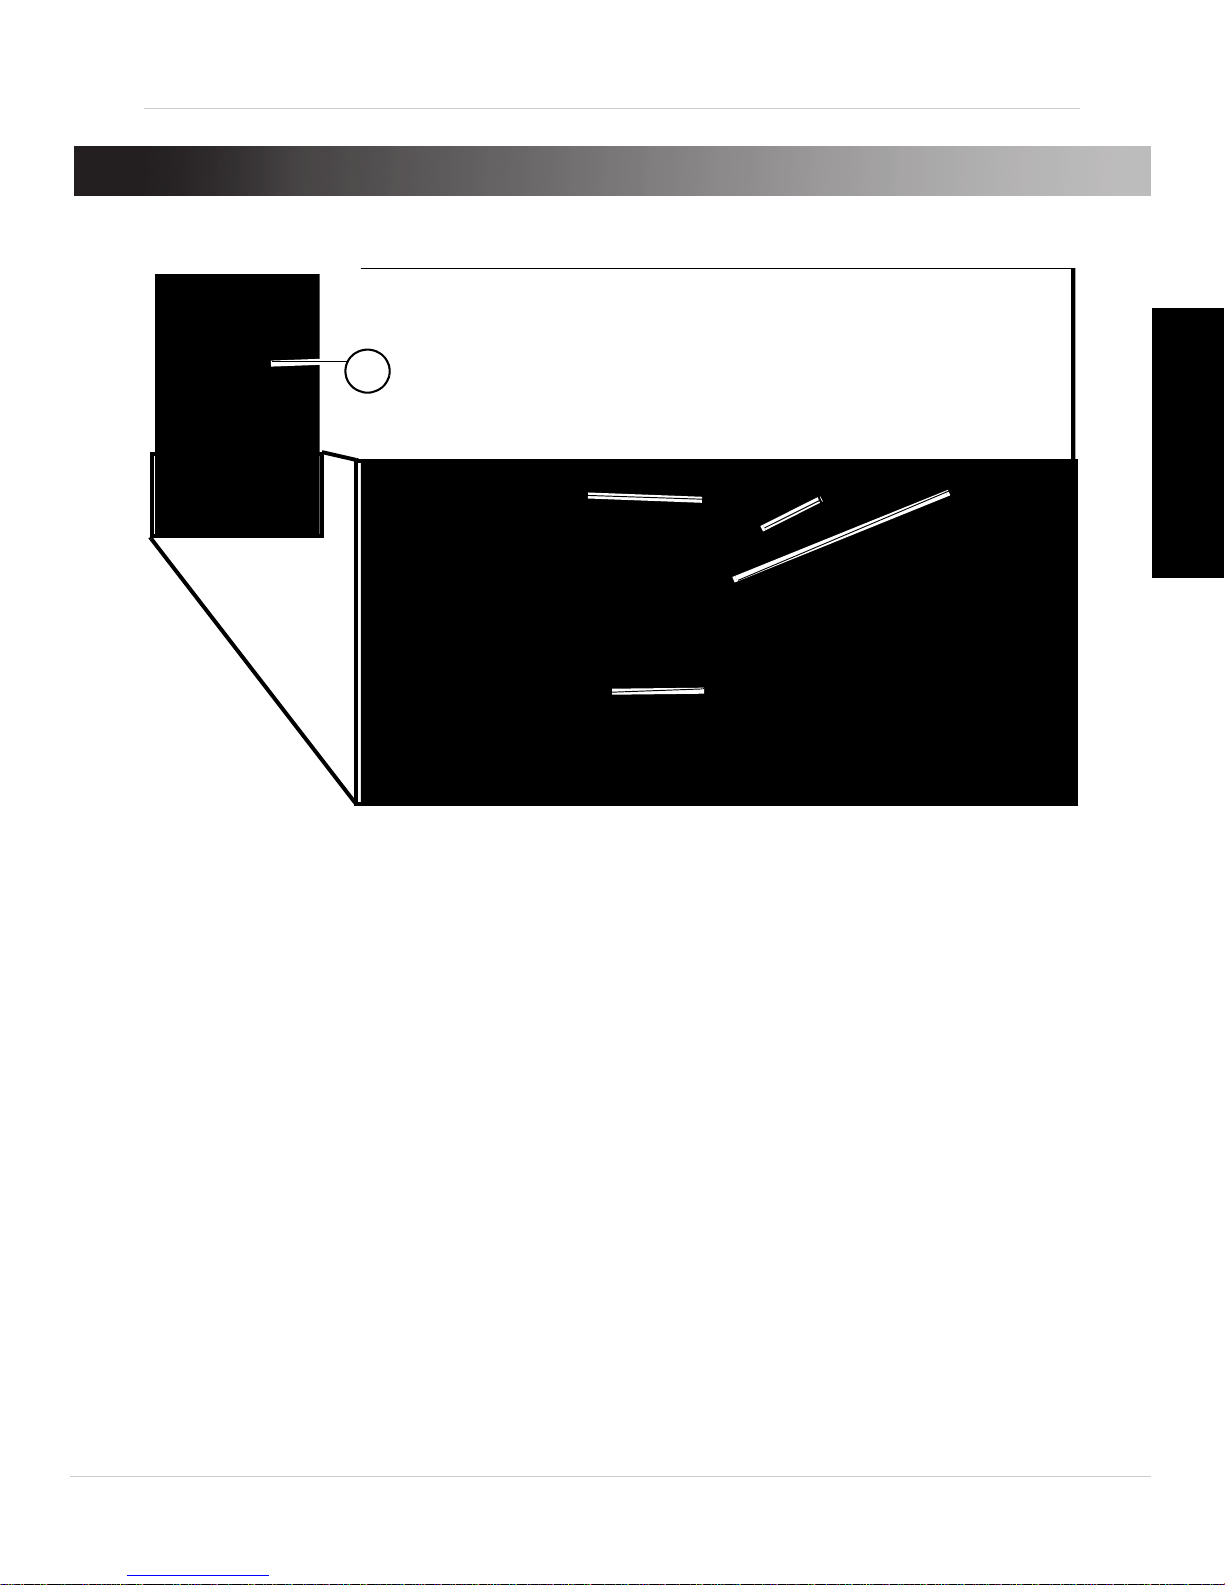
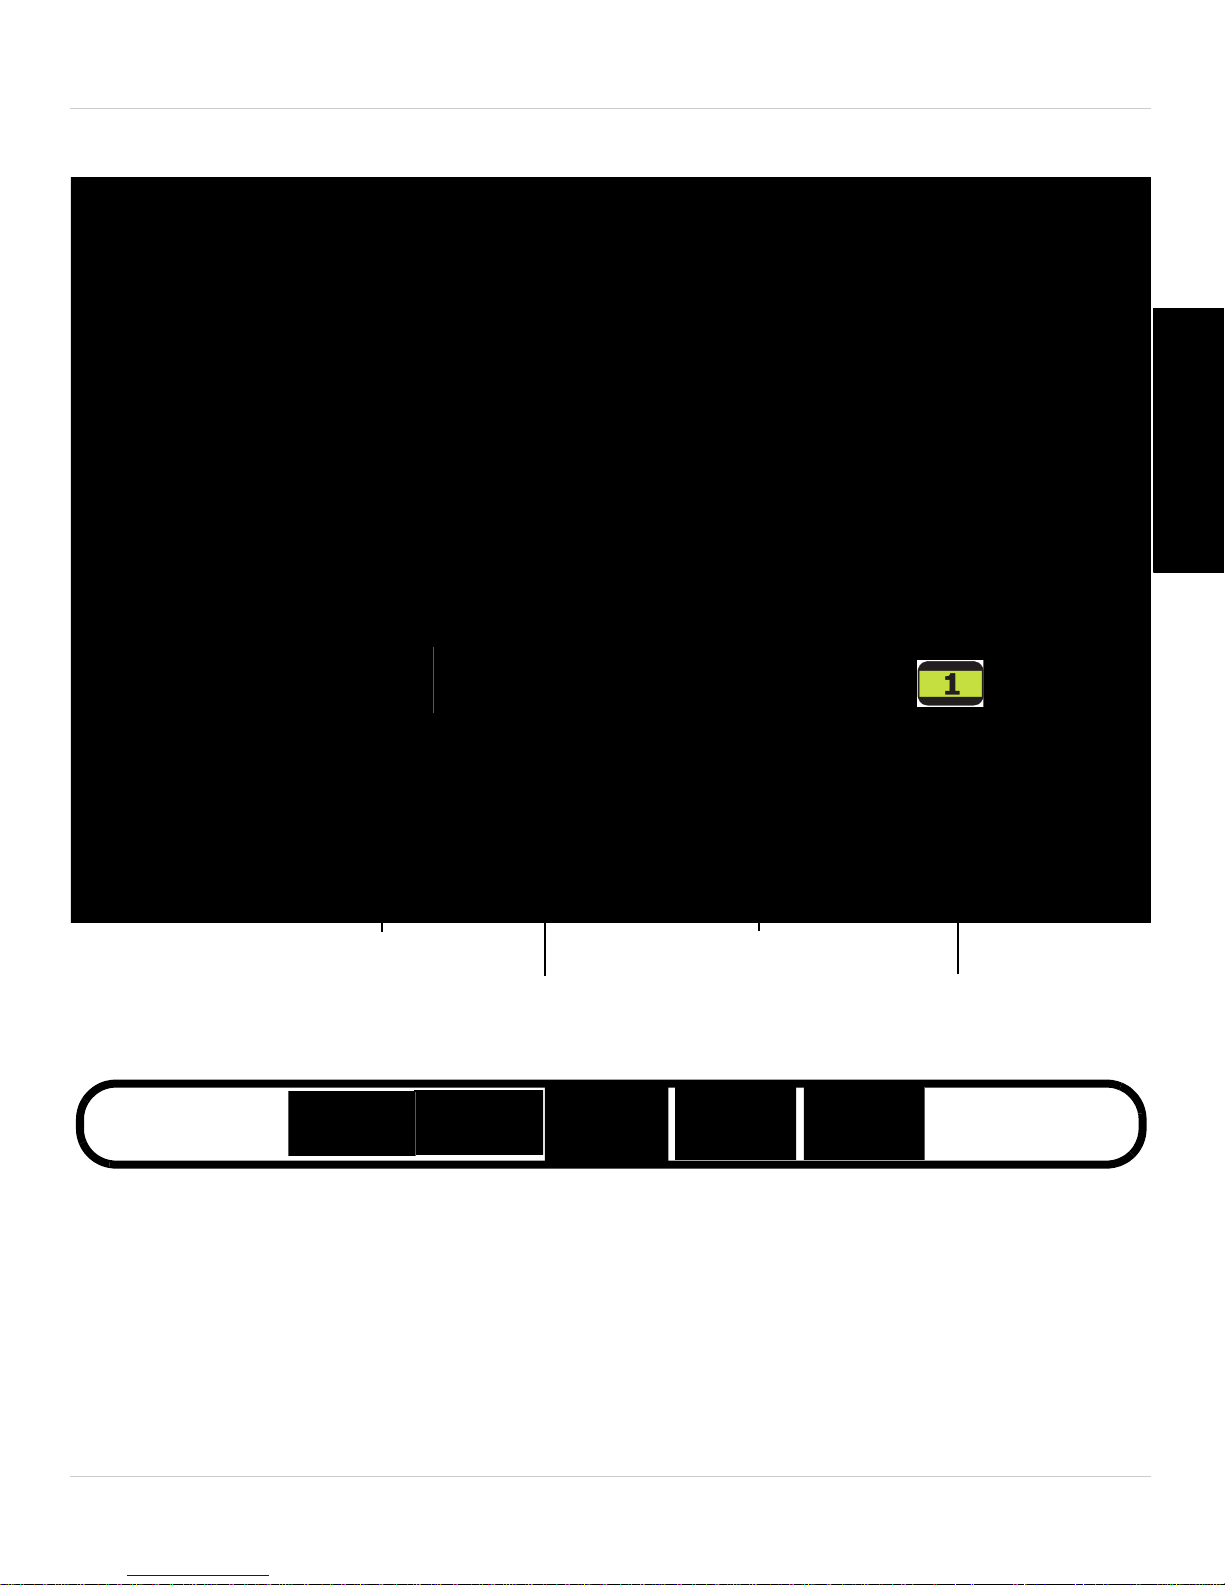
1. HANDHELD MONITOR OVERVIEW
1
2
3
4
5
6
8
9
10
11
12
Expanded View
7
English
1. Display: Displays video from the camera(s).
2. Up button / Increase volume: Pr
ess to increase volume. Press to
scroll up in menus.
3. Men
u button: Pr
4. Left button / Decrease brightnes
ess to open / close the menu.
s: Press to decrease the brightness
of the display. Press to scroll left in menus.
5. Sc
an button: Pr
ess to turn on Scan View. In Scan View, the monitor
automatically switches between all connected cameras*. See “Scan
View” on page 11 for details.
6. Down button / Decrease volume: Pr
ess to decrease volume. Press to
scroll down in the menu.
ower / Audio Level Indicator: T
7. P
on and flashes to indicate battery is low. Glow expands to indicate
sound level.
op glows green to indicate power is
1
Handheld Monitor Overview
13
15
16
14
17
8. Ok button: Press to select menu options. Press to save setting
changes and exit the current menu screen.
9. Ta
lk button: Pr
ess and hold to activate the intercom on the selected
camera.
10.Right button / Incr
ease brightnes
s: Press to increase the brightness
of the display. Press to scroll right in the menu.
11.Ca
m button: Pr
ess to switch between connected cameras*.
12.Microphone
13.AC adapter port: Plug in the power adapter to charge the monitor.
14.Power / Video button: Pr
monitor on / off. Press to enter / exit Sleep Mode (audio only
monitoring).
15.Speaker: Allo
ws you to listen to audio from the camera.
16.Stand mounting hole
17.Monitor Stand: St
* Scan and Cam buttons only work if more than one camera has been
and doubles as a belt clip.
paired with the handheld monitor.
2
ess and hold for 3 seconds to power the
: Install the monitor stand by screwing it in here.
Monitor icons overview
Key lock indicator
Battery life indicator
Channel scan
Talk function
Audio Activated Alerts
Volume
Camera signal strength
Channel number
Low battery
Full battery
The battery life indicator fills up when the monitor is charging and
flashes when the battery is low.
Handheld Monitor Overview
English
Reading the battery life indicator
NOTE: When the battery is fully charged, the handheld monitor can last
up to 4 hours, or up to 7 hours in Sleep Mode (see page 16 for details).
For overnight monitoring, use the included power adapter.
3

Handheld Monitor Overview
• Wheel glows to display the
sound level from selected
camera.
• Green indicates no / quiet
sound. Red expands as
volume increases.
No / quiet sound
Medium sound Loud sound
No signal
Full signal
Low signal
Medium signal
Signal strength icon flashes when signal is low.
Very low signal
Reading the audio level indicator
Reading the signal strength indicator
NOTE: If you hear a beeping sound from the monitor, and your monitor
displays "CAMERA NOT DETECTED":
• The camera may be out of range. Try placing the camera and monitor
closer t
ogether.
• Camera may be powered off. Press and hold the Power button on the
camera for 3 seconds to turn the camera on.
• You may have the wrong channel selected. Press the CAM button until
the correct channel is shown.
• For more details, See “Help” on page 20.
4

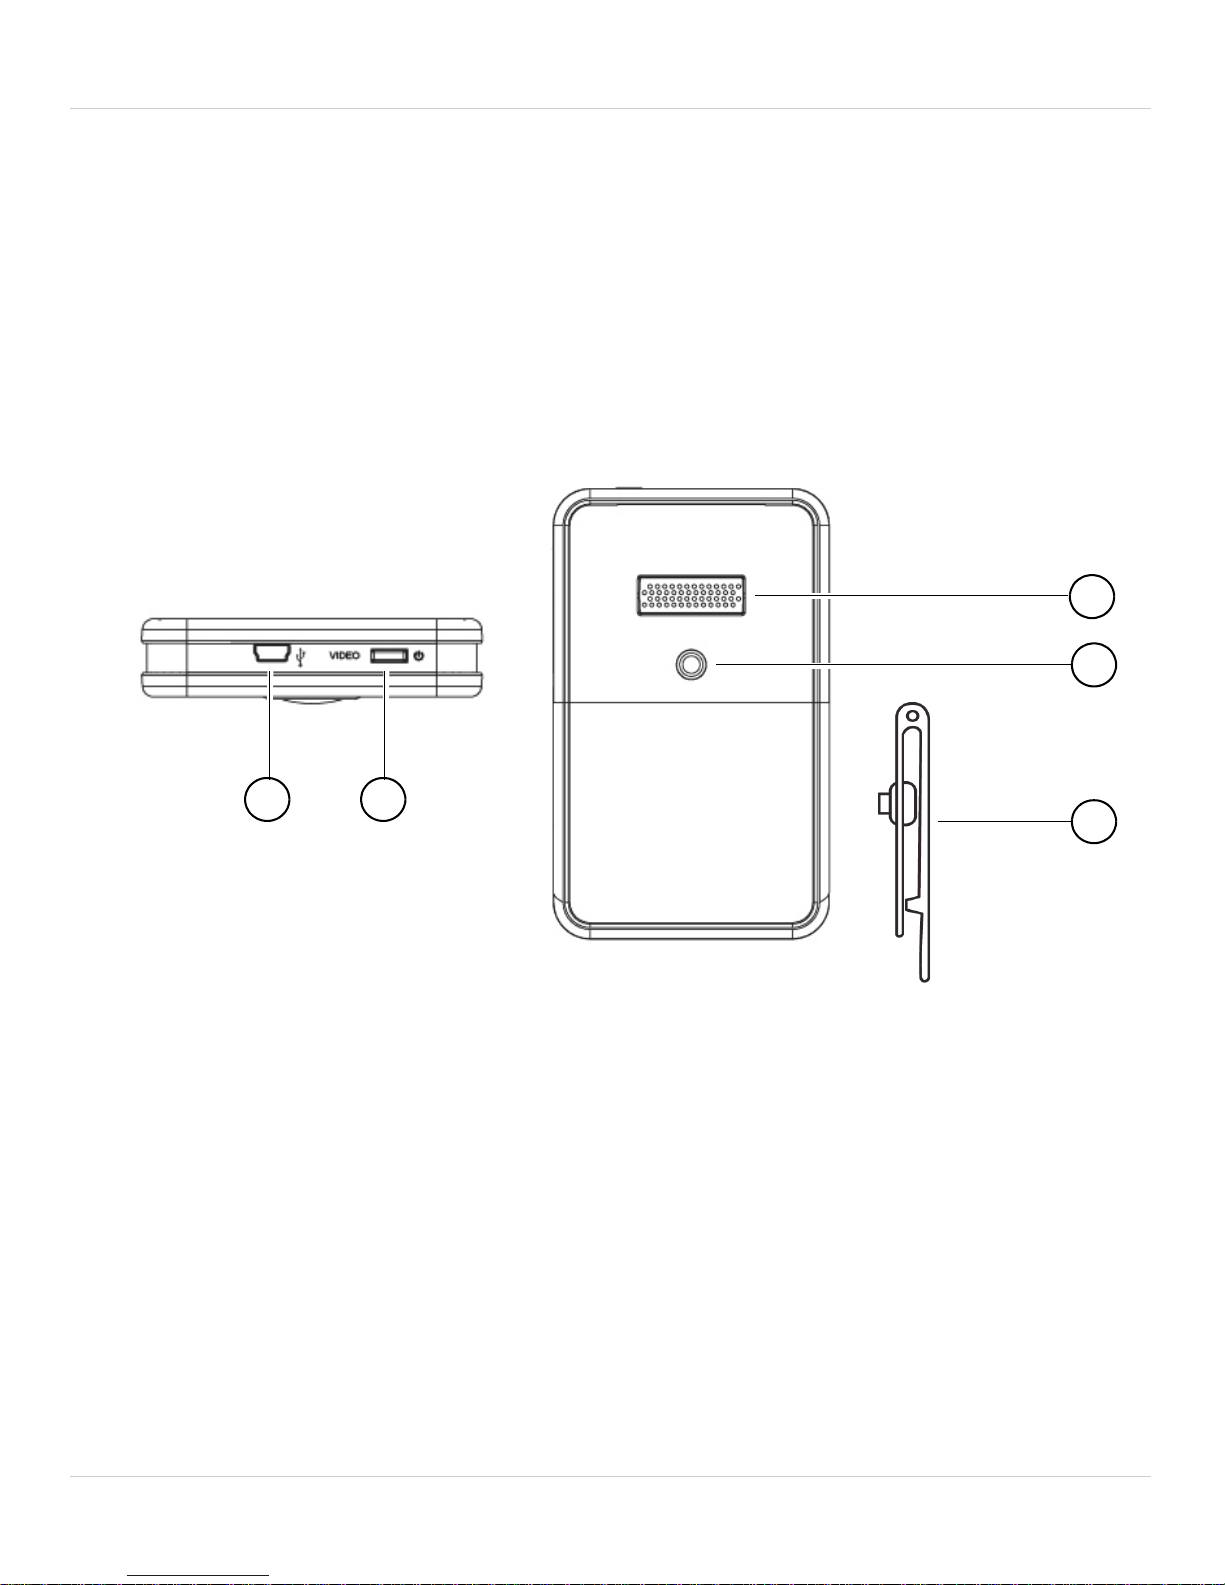
2. CAMERA OVERVIEW
4
1
3
5
2
Camera Overview
English
1. Power Indicator LED: Glows green to indicate camera power is on.
2. Infrared LEDs: All
ow the camera to view in the dark. LEDs glow red
when night vision is activated.
3. Camer
4. Microphone
5. Power button: Pr
a lens
ess and hold for 3 seconds to power camera on/off.
5
 Loading...