

Page 1

VIDEO BABY MONITOR
USER’S GUIDE
ENGLISH VERSION 1.0
LW200
www.lorextechnology.com
Page 2

Welcome!
Thank you for purchasing this Lorex LIVE video monitor. This
manual covers the following models:
• LW200
Before you start...
Please make sure to charge the handheld monitor and
camera(s) before use. See the Quick Start Guide or “Getting
Started” on page 5 for instructions.
Contents
Make sure you have the following:
• 1x Handheld monitor
• 1x Camera*
• 1x Rechargeable Li-Ion battery for the handheld monitor
• 1x Camera power adapter*
• 1x Handheld monitor power adapter
• 1x Camera mounting kit
• 1x User’s Guide
• 1x Quick Start Guide
*
* Contents may vary by model.
0
Page 3

Safety Instructions
WARNING
This baby monitor is compliant with all relevant standards
regarding electromagnetic fields and is, when handled as
described in the User’s Guide, safe to use. Therefore, always
read the instructions in this User’s Guide carefully before using
the device.
• Adult assembly is required. Keep small parts away from children
when assembling.
• This product is not a toy. Do not allow children to play with it.
• This video monitor is not a substitute for responsible adult
supervision.
• Do not place the camera or cords in the cot or within arm's reach
of the baby (the unit and cords should be at least 3ft / 1m away).
English
• Keep the cords out of reach of children.
• Do not cover the video monitor with a towel or blanket.
• Never use extension cords with power adapters.
• Test the video monitor before use. Become familiar with its
functions.
• Do not use the video monitor near water.
• Do not install the video monitor near a heat source.
• Only use the chargers and power adapters provided. Do not use
other chargers or power adapters as this may damage the device
and battery pack.
• Only insert battery pack of the same type.
• Do not touch the plug contacts with sharp or metal objects.
• Keep this User’s Guide for future reference.
CAUTION
Risk of explosion if battery is replaced by an incorrect type.
Dispose of used batteries according to the instructions.
i
Page 4
3ft / 1m
To Avoid Injury to Children/Infants:
We advise you to take the following precautions to avoid
possible injury to infants:
• DO NO
ose to cribs, bassinets, play yards, and other safe sleep
cl
T place baby audio and video camera monitors too
environments for infants.
• MAKE SURE to run all power adapter cords where they are
unlikely to be tripped over and are out of arms reach of your
infant. Keep them at least 3ft / 1m away.
• MAKE SURE baby audio and video camera monitors are on
a stable footing so they cannot be easily knocked over.
NOTE: These precautions are important even if your infant is
not yet standing or mobile
.
ii
Page 5

TABLE OF CONTENTS
1. Handheld Monitor Overview . . . . . . . . . . . . . . . . . . . . . . 1
2. Camera Overview . . . . . . . . . . . . . . . . . . . . . . . . . . . . . . . 4
3. Getting Started . . . . . . . . . . . . . . . . . . . . . . . . . . . . . . . . . 5
3.1 Charging the Camera . . . . . . . . . . . . . . . . . . . . . . . . . . . . . . . . . . .5
3.2 Installing the Handheld Monitor Battery . . . . . . . . . . . . . . . . . . .6
3.3 Charging the Handheld Monitor . . . . . . . . . . . . . . . . . . . . . . . . . .7
4. Positioning The Camera. . . . . . . . . . . . . . . . . . . . . . . . . . 8
5. Using the Handheld Monitor . . . . . . . . . . . . . . . . . . . . . . 9
5.1 Changing Camera Views . . . . . . . . . . . . . . . . . . . . . . . . . . . . . . . .9
5.2 Adjusting the Volume . . . . . . . . . . . . . . . . . . . . . . . . . . . . . . . . . . .9
5.3 Adjusting Screen Brightness . . . . . . . . . . . . . . . . . . . . . . . . . . . . .9
5.4 Configuring the Power Save Feature . . . . . . . . . . . . . . . . . . . . .10
6. Snapshot and Video Recording . . . . . . . . . . . . . . . . . . . 11
6.1 Inserting or Removing the microSD Card . . . . . . . . . . . . . . . . .11
6.2 Taking a Snapshot . . . . . . . . . . . . . . . . . . . . . . . . . . . . . . . . . . . .12
6.3 Recording Video . . . . . . . . . . . . . . . . . . . . . . . . . . . . . . . . . . . . . .13
6.4 Viewing Pictures and Videos on your Handheld Monitor . . . . .14
6.5 Opening Images and Videos on Mac or PC . . . . . . . . . . . . . . . . .15
7. Pairing Up Cameras . . . . . . . . . . . . . . . . . . . . . . . . . . . . 16
8. Help. . . . . . . . . . . . . . . . . . . . . . . . . . . . . . . . . . . . . . . . . . 17
English
9. Cleaning and Disposal . . . . . . . . . . . . . . . . . . . . . . . . . . 19
9.1 Cleaning . . . . . . . . . . . . . . . . . . . . . . . . . . . . . . . . . . . . . . . . . . . .19
9.2 Disposal of the Device . . . . . . . . . . . . . . . . . . . . . . . . . . . . . . . . .19
10. Notices . . . . . . . . . . . . . . . . . . . . . . . . . . . . . . . . . . . . . . 20
11. Wall Mounting the Camera . . . . . . . . . . . . . . . . . . . . . 21
iii
Page 6

iv
Page 7
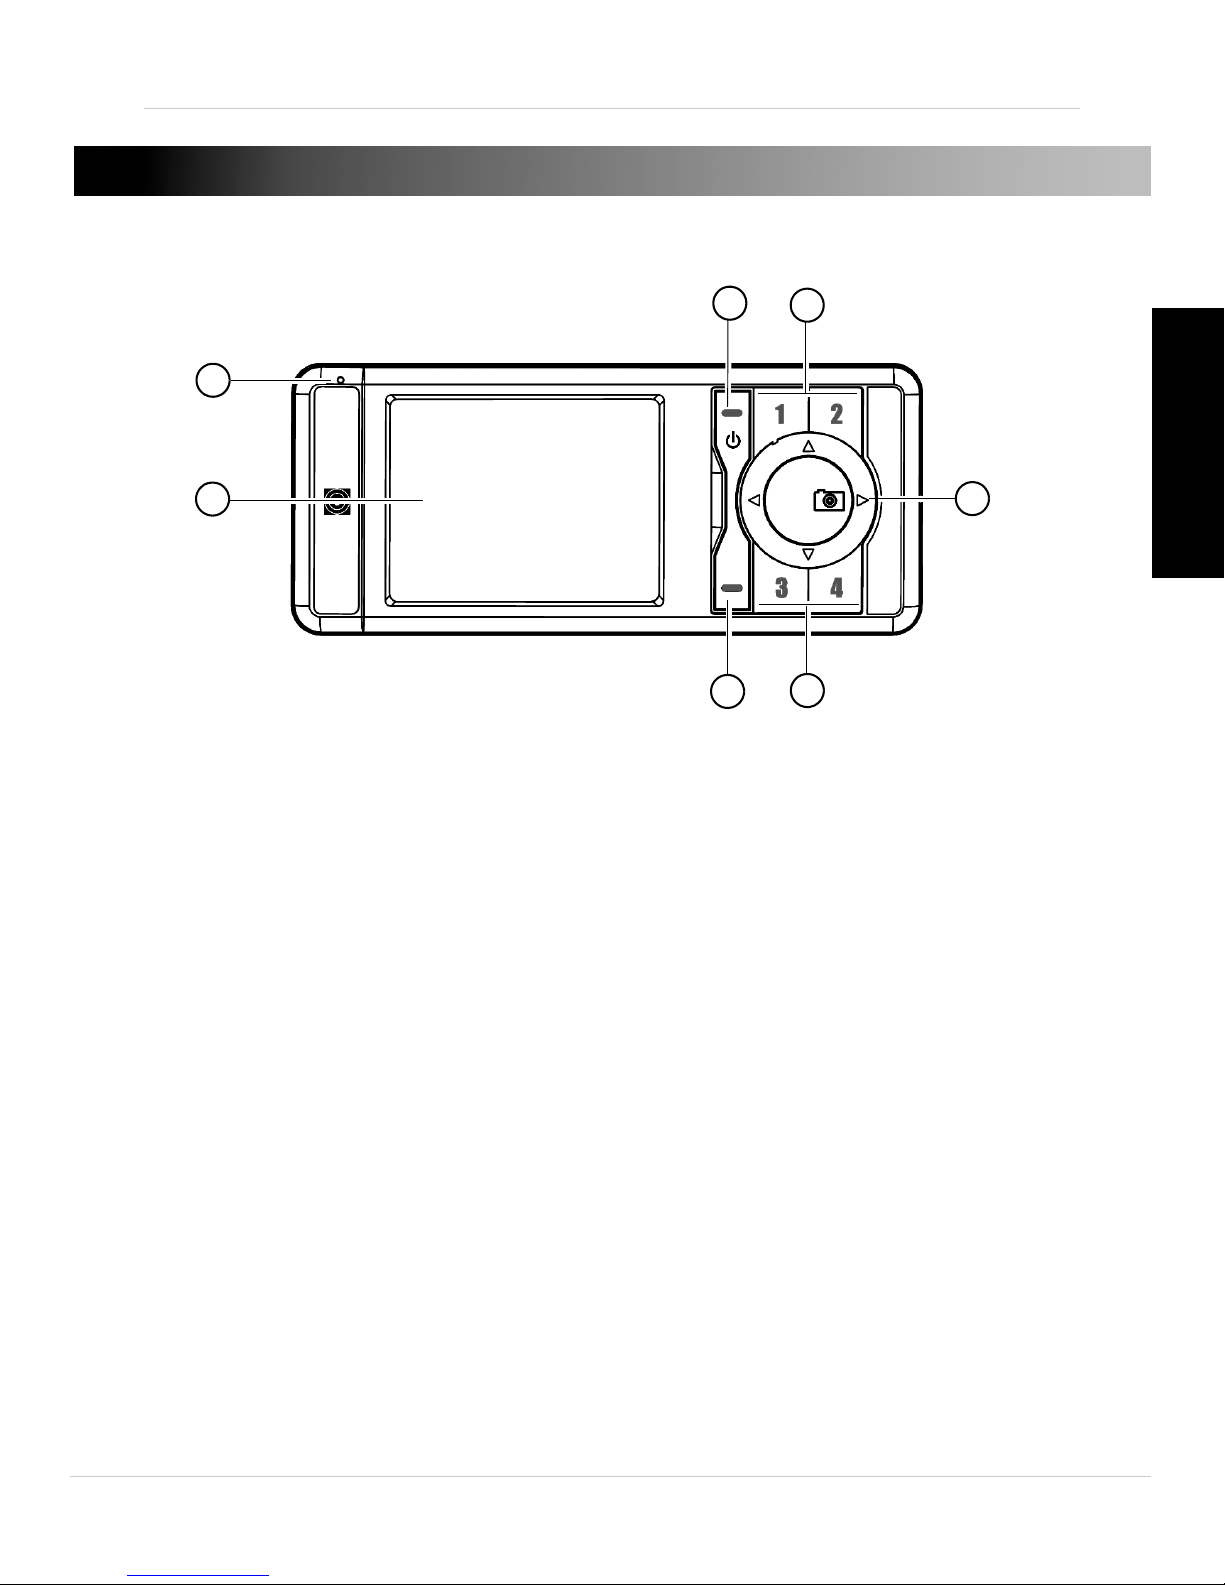
1. HANDHELD MONITOR OVERVIEW
1
2
3
5
4
5
6
1. Power LED: Glows green to indicate handheld monitor is powered on.
English
2. Display: Displays video from the c
3. Power / OK: Pr
ess and hold to turn handheld monitor ON/OFF. Press
amera(s).
to confirm certain menu options.
4. Men
u button: Pr
5. Camera buttons: Pr
ess to open/close the menu.
ess to select cameras 1~4.
6. Directional buttons:
• Right / Snapshot:
Pres
s to change settings in the menu. While viewing,
press to take a photo snapshot. Press and hold to record video; press
again to stop recording. A microSD card is required (not included) for
snapshot or video recording.
• Up / Increase volume: Press to scroll up in the menu. Press to increase
volume.
• Left: Press to change settings in the menu.
• Down / Decrease Volume: Press to scroll down in the menu. Press to
decrease volume.
1
Page 8

Handheld Monitor Overview
7
9
8
10
7.
microSD memory slot: Insert a microSD memory card (not included)
to enable snapshot and video recording. The handheld monitor
supports microSD c
o
8. Battery c
ver: Press firmly and slide to remove battery cover.
ards up to a maximum size of 16GB.
9. Speaker: Allows you to listen to audio from the camera.
10.Power adapter port: Connect the included power adapt
er to charge
the battery.
2
Page 9

Icons Overview
1
1
Battery life
indicator
Charging indicator
Audio indicator
Power Save mode
Camera signal strength
Camera number
Low battery
Full battery
Low signal
Full signal
Reading the battery indicator
Handheld Monitor Overview
English
Reading the signal indicator
NOTE:
If your handheld monitor displays "CAMERA NOT DETECTED":
• The camera may be out of range. Try placing the camera and handheld
monitor closer together.
• The camera may be out of batteries or off. Check the camera power
switch and connect the camera power adapter.
• For more details, see “Help” on page 17.
3
Page 10

Camera Overview
8
1
2
4
6
7
5
3
2. CAMERA OVERVIEW
1. Status LED: Glows green to indicate camera is active.
2. Charging LED:
3. Infrared LEDs: All
Glows red to indicate camera is charging.
ow the camera to view in the dark. Glow red during
night time viewing.
e
4. Light Sensor: Det
on/off the night time LEDs.
5. Camer
a lens
6. Microphone
7. Power adapter port: Connect the included power adapt
cts the light level in the room to automatically turn
the camera.
8. ON/OFF Switch: T
u
rns camera on/off.
er to charge
4
Page 11

Getting Started
Power adapter port
Power Outlet
Power adapter
3. GETTING STARTED
It is recommended to charge your handheld monitor and camera for 6
hours before initial use.
3.1 CHARGING THE CAMERA
English
To charge the camera:
1. Plug the power adapter into the pow
and connect the other end to a power outlet.
• The charging LED glows red to indicate the camera is charging.
• Char
2. Turn the power switch to ON t
NOTE: Only use the included power adapter to charge the camera(s).
ge the camera for 6 hours to fully charge.
er adapter port on the camera
o turn on the camera.
5
Page 12

Getting Started
-
+
-
+
Metallic
contact points
-
+
Low battery
Full battery
Battery icon flashes when battery is low.
3.2 INSTALLING THE HANDHELD MONITOR
BATTERY
To install the handheld monitor
battery:
1. Slide the cover off of the back of
the handheld monitor.
2. Align the metallic contact points
on the batt
contact points on the handheld
monitor by ensuring the
symbols are shown in the bottom
right corner
3. Press down on the battery so it is
held firml
compartment.
4. Replace the cover on the
handheld monit
The handheld monitor automatically turns on once the battery is
inserted. It is recommended to charge the handheld monitor for 6 hours
before use.
ery with the met
.
y
in place inside the
o
r.
allic
TE: Remove battery during long periods of non-use.
NO
Reading the battery life indicator
6
Page 13

Getting Started
Power Outlet
Power adapter
Charging symbol
3.3 CHARGING THE HANDHELD MONITOR
TIP: Charge the handheld monitor for 6 hours to fully charge. The
handheld monitor can remain on while charging.
English
1. Connect the power adapter to the handheld monitor. Connect the
other end of the power adapter to a power outlet.
• The battery life indicator will show a lightning bolt beside the battery
ic
on when the handheld monitor is charging.
7
Page 14

Positioning The Camera
Step 2 Step 3
For details on wall mounting, See “Wall
Mounting the Camera” on page 21.
Step 1
TIP
4. POSITIONING THE CAMERA
• Place the camera in a location where the baby cannot easily reach or
knock over the camera.
• Keep all power cables out of arms reach of your baby (at least 3ft /
1m away)
• Place the camera on a flat surface, such as a table.
• Adjust the camera as shown in step 3 to improve camera balance
when positioning on a flat surface.
• The camera head swivels 360 degrees.
8
Page 15

Using the Handheld Monitor
Camera buttons (1~4)
5. USING THE HANDHELD MONITOR
5.1 CHANGING CAMERA VIEWS
• Press 1, 2, 3, or 4 to view the desired camera.
English
5.2 ADJUSTING THE VOLUME
• Press or to increase or decrease the volume.
5.3 ADJUSTING SCREEN BRIGHTNESS
1. Press the Menu button
2. Press
or and select .
9
Page 16

Using the Handheld Monitor
3. Press or to select the desired brightness level. Press
Menu to exit.
NOTE: Decreasing brightness will help save battery power, so you can
use the handheld monitor longer without charging.
5.4 CONFIGURING THE POWER SAVE FEATURE
Power Save mode allows the handheld monitor display to be turned off
while continuing audio monitoring. This allows you to save battery power
and use the handheld monitor for longer without charging. You will still
be able to listen to your cameras during Power Save mode.
To enable Power Save mode:
1. Press the Menu button.
Press
2.
3. Press
monitor display remains on before turning off.
4. Press the Menu button t
After the selected duration (e.g. 15 seconds), the handheld monitor’s
or and select .
or to change the duration of how long the handheld
o exit and save your settings.
display turns off. The handheld monitor will continue to play sound.
Press any button on the handheld monitor to turn on the display. Note
that you may need to press the button a couple times to turn the display
back on.
10
Page 17

Snapshot and Video Recording
Orient the microSD card as
shown above, before inserting
it into the handheld monitor.
6. SNAPSHOT AND VIDEO RECORDING
You can take picture snapshots or videos on the handheld monitor. A
microSD card (not included) is required for snapshot or video recording.
NOTE: The handheld monitor supports micr
size of 16GB.
oSD cards up to a maximum
6.1 INSERTING OR REMOVING THE MICROSD CARD
A microSD card (not included) is required to save snapshots or videos.
To insert a microSD memory card:
• Orient the microSD card as shown below. Push the microSD card into
the slot until the c
NOTE: The microSD card goes in one way only. Do not force the microSD
card into the slot.
ard clicks into place.
English
11
Page 18

Snapshot and Video Recording
microSD card slot
To remove a microSD memory card:
• Press the microSD card with a small, rigid object (such as a paper
clip or finger nail). The microSD c
ard should eject from the slot.
6.2 TAKING A SNAPSHOT
The Snapshot function lets you take pictures of what you see on screen.
A microSD card (not included) is required to take snapshots.
NOTE: Snapshots are saved in JPEG (.jpg) format.
To take a picture:
1. Select the camera you want to take a Snapshot picture with by
pres
2. Press the
• A icon momentarily appears on the display when a picture is
sing 1, 2, 3, or 4 on the handheld monitor.
/ ( ) button to take a picture.
being taken.
12
Page 19

Snapshot and Video Recording
Press and hold for
approximately 5 seconds
00:18
Timer indicates recording is in progress
6.3 RECORDING VIDEO
You can record live video onto a microSD card (not included).
NOTE: Videos are saved in AVI (.avi) format.
To record live video:
1. Press and hold the
top-left corner of the screen.
/ ( ) button until a timer appears in the
English
2. Press the / ( ) button to stop recording.
13
Page 20

Snapshot and Video Recording
OK
00:18
23/23
Video Time stamp
Picture number
6.4 VIEWING PICTURES AND VIDEOS ON YOUR
HANDHELD MONITOR
You can view images and videos recorded on your handheld monitor.
To view pictures or video on your handheld monitor:
1. Press the Menu button.
2.
Press
to select Memory ( ), and press the OK button.
3. Press or to select a desired video or image to view.
• Videos will have a time stamp on the top left corner.
• Pictures will display the or
1 is 1/2, picture 2 is 2/2 etc.).
4. If viewing video, press the OK button t
der that the picture was taken (e.g. Picture
o begin playback.
14
Page 21

Snapshot and Video Recording
Use an SD card adapter (not included) if your memory
card reader does not support microSD memory cards.
6.5 OPENING IMAGES AND VIDEOS ON MAC OR PC
To retrieve images or videos from the microSD card:
1. Remove the microSD card from the handheld monitor by pr
essing on
the microSD card with a small, rigid object (such as a paper clip or
finger nail).
2. Insert the microSD card into a memory car
d reader (not included) that
is connected to your computer. An SD memory card adapter (not
included) may be required if microSD cards are not compatible with
your memory card reader.
English
3. On your computer, browse for the memory card directory and locate
the folder named LOREX.
R
4. Double-click the LO
EX folder to access your pictures or videos.
15
Page 22

Pairing Up Cameras
Camera buttons (1~4)
Place 1 ft apart
7. PAIRING UP CAMERAS
The camera(s) included with the handheld monitor have already been
paired up with the handheld monitor. If for any reason your handheld
monitor and camera are not paired up, OR you purchased additional
add-on cameras (model # LW2031AC1), follow the steps below.
To pair cameras:
1. Select the channel that you wish to pair the camer
a to by pressing 1,
2, 3 or 4 on the handheld monitor. Place the camera that you wish to
pair one foot apart from the handheld monitor.
2. Press the Menu button on the handheld monitor. Press or
and highlight
3. Turn off the camer
.
a that you wish to pair. Then, turn the camera back
on.
4. Press the OK butt
on on the handheld monit
been successfully paired with the handheld monitor, a "Device Found"
message appears.
NOTE: You must complete steps 3 & 4 in under 3 seconds to pair the
camera.
16
or. When the camera has
Page 23

8. HELP
• Press and hold the button for 5 seconds to power on
the handheld monitor.
• Recharge the battery in the handheld monitor.
• Reset the handheld monitor and camera by removing the
battery from the handheld monitor. Turn the camera power
off. Wait for 60 seconds and power the units back on.
• The handheld monitor is in Power Save mode. Press any
button to turn on the display. Note that you may have to press
the button a couple times to turn the display back on.
• The camera is not selected. Press 1, 2, 3, or 4 to select the
desired camera.
• The monitor is charging. Press and hold the
button to turn on the monitor.
Handheld monitor screen keeps turning off
• Power Save mode is on. To turn off Power Save mode, press Menu
Help
and select . Press
No video displayed on the handheld monitor
• Ensure the handheld monitor is powered on (check for green power
LED on handheld monitor).
1.If the power LED is off:
to select Off, and press Menu to exit.
English
2.If the power LED is on:
3.If the power LED is blinking:
17
Page 24

Help
The camera and handheld monitor are not detecting each other
• Ensure you have selected the correct camera.
• Mak
e sure the camera is turned on.
• Make sure the camera is charged.
• The camera and handheld monitor may be out of range. Move the
handheld monitor and camera closer together.
• Reset the handheld monitor and camera by removing the battery from
the handheld monitor. Next, turn the camera power off. Wait for 60
seconds and power the units back on.
• You may need to pair the camera and the handheld monitor again.
See “Pairing Up Cameras” on page 16.
Feedback/Squealing noise coming from the handheld monitor
• Your camera and handheld monitor may be too close. Move them
further apart.
• Mak
e sure the handheld monitor and camera are not near televisions,
computers, cordless/mobile phones or other electrical equipment.
18
Page 25

Cleaning and Disposal
9. CLEANING AND DISPOSAL
9.1 CLEANING
Clean the monitor and camera with a slightly damp cloth or an anti-static
cloth. Never use cleaning agents or abrasive solvents.
• Do not clean any part of the product with cleaner
other solvents and chemicals. This may cause permanent damage to
the product which is not covered by the Warranty. When necessary,
clean it with a damp cloth.
• Keep your camera and monitor away from hot, humid areas or strong
sunlight, and do not get it wet.
• Every effort has been made to ensure high standards of reliability for
your baby monitor. However, if something does go wrong, please do
not try to repair it yourself. Contact Customer Service for assistance.
s with thinners or
9.2 DISPOSAL OF THE DEVICE
At the end of the product lifecycle, you should not dispose of this product with
normal household waste, but take the product to a collection point for the
recycling of electrical and electronic equipment. The symbol on the product,
English
user’s guide and/or box indicates this.
Some of the product materials can be re-used if you take
them to a
materials from used products you make an important
contribution to the protection of the environment.
Please contact your local authorities in case you need more
information on the collection points in your area. Dispose of
the battery pack in an environmentally-friendly manner according to your
local regulations.
recycling point. By reusing some parts or raw
19
Page 26

Notices
10. NOTICES
Warning: Any changes or modifications not expressly approved by the
grantee of this device could void the user's authority to operate the
device.
FCC Notice
This device complies with Part 15, subpart C, of the FCC Rules. Operation is subject to the
following two conditions: (1) this device may not cause harmful interference, and (2) this device
must accept any interference received, including interference that may cause undesired
operation.
The manufacturer is not responsible for any radio or TV interference caused by unauthorized
modifications to this equipment. Such modifications could void the user’s authority to operate
the equipment.
However, it is imperative that the user follows the guidelines in this manual to avoid improper
usage which may result in damage to the unit, electrical shock and fire hazard injury.
In order to improve the features, functions, and quality of this product, the specifications are
subject to change without notice from time to time.
Caution: To maintain compliance with the FCC’s RF exposure guidelines, place the camera at
least 20cm (7.87in) from nearby persons.
Canada/IC Notice
This device complies with Industry Canada licence-exempt RSS standard(s). Operation is
subject to the following two conditions: (1) this device may not cause interference, and (2) this
device must accept any interference, including interference that may cause undesired
operation of the device.
Le présent appareil est conforme aux CNR d'Industrie Canada applicables aux appareils radio
exempts de licence. L'exploitation est autorisée aux deux conditions suivantes: (1) l'appareil ne
doit pas produire de brouillage, et (2) l'utilisateur de l'appareil doit accepter tout brouillage
radioélectrique subi, même si le brouillage est susceptible d'en compromettre le
fonctionnement.
20
Page 27

Wall Mounting the Camera
11. WALL MOUNTING THE CAMERA
1. Mark two holes for the mounting screws 60mm away from each other
in a vertical line. See below for reference. Drill holes for the mounting
screws.
English
2. Insert included screws into the holes and tighten the screws 3/4 of the
way. Then, align the camera with the screws and push it down.
3. Adjust the camera so that it provides a satisfactory view of your baby
on the handheld monitor.
21
Page 28

LW200
Version 1.0
www.lorextechnology.com
Copyright © 2012 Lorex Technology Inc.
 Loading...