

Page 1
WIRELESS NETWORK CAMERA
USER’S GUIDE
ENGLISH VERSION 1.0
LNC100 Series
www.lorextechnology.com
Page 2

Page 3

NEED HELP?
CONTACT US FIRST
DO NOT RETURN THIS PRODUCT TO THE STORE
Please make sure to register your product at www.lorextechnology.com
to receive product updates and technical support.
2 Easy Ways to Contact Us
Online:
Product Support is available 24/7 including product information, user
manuals, quick start up guides and FAQ’s at
www.lorextechnology.com/support
For all other matters, visit www.lorextechnology.com
By Phone:
North America:
C ustomer Service (for warranty matters): 1-888-425-6739 (1-888-42-L OREX)
Tech Support (for technical/installation issues): 1-877-755-6739 (1-877-75-LOREX)
Mexico: 001-800-681-9263, 001-800-514-6739
SEP 12 2012 - R14
International: +800-425-6739-0
(Example: From the UK, dial 00 instead of +)
Page 4
VIEW YOUR WORLD™
VOIR VOTRE MONDE
VEA SU MUNDO™
MD
¿NECESITA AYUDA?
COMUNÍQUESE PRIMERO
CON NOSOTROS
NO DEVUELVA ESTE PRODUCTO A LA TIENDA NE RETOURNEZ PAS CE PRODUIT AU MAGASIN
Por favor, registre su producto en www.lorextechnology.
com para recibir actualizaciones del producto y
asistencia técnica.
Hay 2 maneras fáciles de comunicarse
con nosotros:
En línea:
Apoyo al cliente está disponible 24/7, incluyendo
información del producto, manuales para el usuario, guías
de inicio rápido y preguntas más frecuentes en:
www.lorextechnology.com/support
BESOIN D’ASSISTANCE?
COMMUNIQUEZ D’ABORD
AVEC NOUS
Veuillez enregistrer votre produit sur le site
www.lorextechnology.com afin de recevoir des mises à jour
et le soutien technique pour votre produit.
2 façons simples de communiquer
avec nous :
En ligne :
À votre disposition 24/7, le soutien pour les produits comprend
les renseignements sur les produits, guides d’utilisation, guides
de départ rapide et FAQ :
www.lorextechnology.com/support
Para todo lo demás, visite
www.lorextechnology.com
Por teléfono:
Norte América:
Atención al cliente (para asuntos de la garantía):
1-888-425-6739 (1-888-42-LOREX)
Asistencia técnica (para asuntos técnicos o de instalación):
1-877-755-6739 (1-877-75-LOREX)
Mexico: 001-800-681-9263, 001-800-514-6739
Internacional: +800-425-6739-0
(Ejemplo: Desde el Reino Unido, marque el 00 en lugar del +)
Pour toutes les autres questions,
visitez
www.lorextechnology.com
Par téléphone :
En Amérique du Nord :
Service à la clientèle (pour tout ce qui concerne la garantie) :
1-888-425-6739 (1-888-42-LOREX)
Soutien technique (pour les questions d’ordre technique ou relatives à
l’installation) : 1-877-755-6739 (1-877-75-LOREX)
Mexique : 001-800-681-9263, 001-800-514-6739
International : +800-425-6739-0
(par exemple : à partir du Royaume-Uni, composez le 00 au lieu de +)
SEP 12 2012 - R14
Page 5
BEFORE YOU S TA R T
Please make sure to register your product at www.lorextechnology.com
to receive product updates and technical support
THIS PRODUCT MAY REQUIRE PROFESSIONAL INSTALLATION
LOREX IS COMMITTED TO FULFILLING YOUR SECURITY NEEDS
• We have developed user friendly products and documentation.
Please read the Quick Start Guide and User Manual before you
install this product.
• Consumer Guides and Video Tutorials are available on our web
site at www.lorextechnology.com/support
• If you require further installation assistance, please visit
www.lorextechnology.com/installation or contact a
professional installer.
• Please note that once the components of this product have been
unsealed, you cannot return this product directly to the store
SEP 6 2012 - R8
without the original packaging.
Page 6

AVANT DE
ANTES DE
COMMENCER
Veuillez enregistrer votre produit sur le site
www.lorextechnology.com afin de recevoir
des mises à jour et le soutien technique pour
votre produit.
CE PRODUIT PEUT NÉCESSITER UNE
INSTALLATION PROFESSIONNELLE
LOREX S’ENGAGE À RÉPONDRE À VOS
BESOINS EN MATIÈRE DE SÉCURITÉ
• Nous avons conçu et développé une documentation
et des produits extrêmement conviviaux. Veuillez
lire le Guide de départ rapide et le Guide
d’utilisation avant d’installer ce produit.
• Des guides pour consommateurs et des tutoriels
EMPEZAR
Cerciórese de por favor colocar su producto
en www.lorextechnology.com para recibir
actualizaciones y la información del producto
y soporte técnico.
ESTE PRODUCTO PUEDE EXIGIR UNA INSTALACIÓN PROFESIONAL
LOREX SE COMPROMETE A SATISFACER
SUS NECESIDADES EN SEGURIDAD
• Favor de leer la guía de instalación rápida y la
guía del usuario antes de instalar este product.
• Puede conseguir las guías del consumidor y los
cursos en enseñanza video sobre el Internet
visitando www.lorextechnology.com/support
vidéo vous sont offerts sur notre site Web :
www.lorextechnology.com/support
• Si vous avez besoin de plus d’assistance pour
l’installation de ce produit, veuillez visiter le site
www.lorextechnology/installation ou communiquez
avec un installateur professionnel.
• Veuillez prendre note que lorsque vous avez déballé
les pièces et composantes de ce produit, vous ne
pouvez pas retourner celui-ci dire
magasin sans son emballage original.
ctement au
www.lorextechnology.com
• Si necesita ayuda para la instalación, visite
www.lorextechnology.com/installation o contacte
un especialista en instalaciones.
• Favor de notar que una vez que los componentes
de este producto han sido removidos del
embalaje, no podrá devolver este producto
directamente a la tienda.
VIEW YOUR WORLD™
VOIR VOTRE MONDE
VEA SU MUNDO™
MD
SEP 6 2012 - R8
Page 7

Welcome!
Thank you for purchasing this Lorex wireless network camera. This
user’s guide refers to the following models:
• LNC101
• LNC104
Contents
Before you start, make sure you have the contents listed below.
• 1 x Camera
• 1 x Camer
• 1 x Ethernet cable
• 1 x Mounting kit
• 1 x Quick Start Guide
• 1 x Software/documentation CD
a power adapter and USB power cable
i
Page 8

Safety Instructions
• Read this guide carefully and keep it for future reference.
• Camera is rated for indoor use only.
• Do not use in wet or humid areas.
• Use the camera within given temperature, humidity, and voltage levels
noted in the Technical Specifications.
• Do not use the camera near a heat source, such as a radiator.
• Do not point the camera directly towards the sun or a source of intense
light.
• Do not disassemble the camera.
• Periodic cleaning may be required. Use a damp cloth only. Do not use
harsh cleaners or aerosol cleaners.
• Do not cover the camera with a towel or blanket.
• Keep all power and network cables out of reach of children.
• Use only the included power adapter or USB power adapters rated for
1A or higher.
ii
Page 9

If using this product as a baby monitor:
3ft / 1m
We advise you to take the following precautions to avoid possible injury
to infants:
NOT place the camera too close to cribs, bas
• DO
other safe sleep environments for infants.
• MAKE SURE to run all power adapter cords and network cables where
they are unlikely to be tripped over and are out of arms reach of your
infant. Keep them at least 3ft / 1m away.
• MAKE SURE the camera is on a stable footing so it cannot be easily
knocked over.
NOTE: These prec
standing or mobile
autions are important even if your infant is not yet
sinets, play yards, and
iii
Page 10

Features
• iOS, Android, PC and Mac compatible
• Wi-Fi & wired internet connectivity
• Easy connection to Wi-Fi networks with WPS
• Night vision up to 30ft with single high-power IR LED
• microSD recording & playback supported
1
2
3
4
5
• Dual motion detection: PIR & video
• Sound activated alerts
• Push notification of events & email alerts with snap shot attachment
• Bandwidth-efficient VGA (640x480) resolution
• H.264 video compression
• Supports up to 20 simultaneous users
• Two-way audio supported
6
• Flexible indoor mounting (counter, wall, ceiling)
As our product is subject to continuous improvement, Lorex Technology &
subsidiaries reserve the right to modify product design, specifications & prices
without notice and without incurring any obligation.
1. Up to 4 simultaneous camera views available on PC, Mac, and tablets. Selectable single camera
viewing on smartphones.
2. Connection speed may vary depending on internet bandwidth.
3. Compatible with WPS enabled routers (not included).
4. Infrared illumination range under ideal conditions. Actual range and clarity may vary depending
on scene/object reflection and camera application.
5. microSD Card not included (supports up to 32GB).
6. External speaker required, not included.
iv
Page 11

TABLE OF CONTENTS
1. Camera Overview . . . . . . . . . . . . . . . . . . . . . . . . . . . . . . . 1
2. Getting Started . . . . . . . . . . . . . . . . . . . . . . . . . . . . . . . . . 3
2.1 Basic Setup . . . . . . . . . . . . . . . . . . . . . . . . . . . . . . . . . . . . . . . . . . .3
2.2 Connecting to your Camera . . . . . . . . . . . . . . . . . . . . . . . . . . . . . .5
2.2.1 Connecting to your Camera on PC . . . . . . . . . . . . . . . . . . . . . . . . . . . . . .5
2.2.2 Connecting to your Camera on Mac . . . . . . . . . . . . . . . . . . . . . . . . . . . . .9
2.2.3 Connecting to your Camera on iPhone . . . . . . . . . . . . . . . . . . . . . . . . .12
2.2.4 Connecting to your Camera on iPad . . . . . . . . . . . . . . . . . . . . . . . . . . . .15
2.2.5 Connecting to your Camera on Android . . . . . . . . . . . . . . . . . . . . . . . . . 18
2.3 WiFi Setup . . . . . . . . . . . . . . . . . . . . . . . . . . . . . . . . . . . . . . . . . . .21
2.3.1 PC/Mac WiFi Setup . . . . . . . . . . . . . . . . . . . . . . . . . . . . . . . . . . . . . . . . .21
2.3.2 iPhone WiFi Setup . . . . . . . . . . . . . . . . . . . . . . . . . . . . . . . . . . . . . . . . . . 23
2.3.3 iPad WiFi Setup . . . . . . . . . . . . . . . . . . . . . . . . . . . . . . . . . . . . . . . . . . . . 25
English
2.3.4 Android WiFi Setup . . . . . . . . . . . . . . . . . . . . . . . . . . . . . . . . . . . . . . . . .26
3. L-View 104 for PC . . . . . . . . . . . . . . . . . . . . . . . . . . . . . . 28
3.1 System Requirements . . . . . . . . . . . . . . . . . . . . . . . . . . . . . . . . .28
3.2 L-View for PC Interface . . . . . . . . . . . . . . . . . . . . . . . . . . . . . . . .29
3.2.1 Display Sub-Menu . . . . . . . . . . . . . . . . . . . . . . . . . . . . . . . . . . . . . . . . . . 31
3.2.2 All Camera Action . . . . . . . . . . . . . . . . . . . . . . . . . . . . . . . . . . . . . . . . . .32
3.3 Camera List (Managing Cameras) . . . . . . . . . . . . . . . . . . . . . . .33
3.3.1 Adding Cameras to Camera List . . . . . . . . . . . . . . . . . . . . . . . . . . . . . . .33
3.3.2 Saving Camera Passwords . . . . . . . . . . . . . . . . . . . . . . . . . . . . . . . . . . .34
3.3.3 Deleting Cameras . . . . . . . . . . . . . . . . . . . . . . . . . . . . . . . . . . . . . . . . . .34
3.3.4 Configuring Mobile Streaming Settings . . . . . . . . . . . . . . . . . . . . . . . . .35
3.3.5 Configuring Night Mode Control . . . . . . . . . . . . . . . . . . . . . . . . . . . . . . .36
3.4 Recording to your PC’s Hard Drive . . . . . . . . . . . . . . . . . . . . . . .37
3.5 L-Play: Playing back Video from your PC’s Hard Drive . . . . . .38
3.5.1 Searching for Video Files in l-Play . . . . . . . . . . . . . . . . . . . . . . . . . . . . .40
3.6 Playing Back Recordings on the microSD card with L-View . .42
3.7 Configuring Camera Video Settings . . . . . . . . . . . . . . . . . . . . . .43
3.7.1 Quality Tab (Configuring Resolution, Frame Rate, and Bandwidth) . .44
3.7.2 Video Tab (Configure General Video Settings) . . . . . . . . . . . . . . . . . . . .45
v
Page 12

3.7.3 Control Tab (Configure Status LED’s and Motion Detection
Sensitivity) . . . . . . . . . . . . . . . . . . . . . . . . . . . . . . . . . . . . . . . . . . . . . . . . . . . . . 47
3.7.4 Camera Info Tab . . . . . . . . . . . . . . . . . . . . . . . . . . . . . . . . . . . . . . . . . . . 48
3.8 Configuring L-View . . . . . . . . . . . . . . . . . . . . . . . . . . . . . . . . . . . 49
3.8.1 Directories (Opening or Changing the Snapshot Folder) . . . . . . . . . . . 49
3.8.2 Startup Options . . . . . . . . . . . . . . . . . . . . . . . . . . . . . . . . . . . . . . . . . . . . 50
3.8.3 Fixed IP Access . . . . . . . . . . . . . . . . . . . . . . . . . . . . . . . . . . . . . . . . . . . . 51
3.8.4 Login (Enabling a Password to Access L-View) . . . . . . . . . . . . . . . . . . 52
3.8.5 Image Ratio . . . . . . . . . . . . . . . . . . . . . . . . . . . . . . . . . . . . . . . . . . . . . . . 52
3.8.6 Software Update . . . . . . . . . . . . . . . . . . . . . . . . . . . . . . . . . . . . . . . . . . . 53
4. L-View for Mac. . . . . . . . . . . . . . . . . . . . . . . . . . . . . . . . 54
4.1 System Requirements . . . . . . . . . . . . . . . . . . . . . . . . . . . . . . . . 54
4.2 L-View for Mac Interface . . . . . . . . . . . . . . . . . . . . . . . . . . . . . . 54
4.3 Camera List (Managing Cameras) . . . . . . . . . . . . . . . . . . . . . . . 56
4.3.1 Adding Cameras to Camera List . . . . . . . . . . . . . . . . . . . . . . . . . . . . . . 56
4.3.2 Deleting Cameras from Camera List . . . . . . . . . . . . . . . . . . . . . . . . . . 57
4.4 Recording Video to your Mac’s Hard Drive . . . . . . . . . . . . . . . . 57
4.4.1 Playing Back Video from your Mac’s Hard Drive . . . . . . . . . . . . . . . . . 58
4.5 Using Camera List to Modify Camera Settings . . . . . . . . . . . . 59
4.5.1 Quality Tab (Configure Bandwidth, Resolution, and Frame Rate) . . . 60
4.5.2 Video Tab (Configure General Video Settings) . . . . . . . . . . . . . . . . . . . 61
4.5.3 Control Tab (Configure Status LED’s and Motion Detection
Sensitivity) . . . . . . . . . . . . . . . . . . . . . . . . . . . . . . . . . . . . . . . . . . . . . . . . . . . . . 63
4.5.4 Camera Info Tab . . . . . . . . . . . . . . . . . . . . . . . . . . . . . . . . . . . . . . . . . . . 64
4.5.5 Configuring Night Mode Settings . . . . . . . . . . . . . . . . . . . . . . . . . . . . . . 65
5. iPhone App . . . . . . . . . . . . . . . . . . . . . . . . . . . . . . . . . . . 67
5.1 Live Viewing with Lorex Ping for iPhone . . . . . . . . . . . . . . . . . . 67
5.1.1 Using 2-Way-Audio (Intercom) . . . . . . . . . . . . . . . . . . . . . . . . . . . . . . . . 68
5.1.2 Taking Snapshots . . . . . . . . . . . . . . . . . . . . . . . . . . . . . . . . . . . . . . . . . . 68
5.1.3 Recording Video to iPhone . . . . . . . . . . . . . . . . . . . . . . . . . . . . . . . . . . . 68
5.2 Playing Back Video Recorded on iPhone . . . . . . . . . . . . . . . . . 69
5.2.1 Using Playback . . . . . . . . . . . . . . . . . . . . . . . . . . . . . . . . . . . . . . . . . . . . 69
5.3 Playing Back Video Recorded on microSD on iPhone . . . . . . . 69
5.4 Using Camera List to Edit Camera Settings . . . . . . . . . . . . . . . 70
5.4.1 Editing Camera Connection Settings . . . . . . . . . . . . . . . . . . . . . . . . . . . 71
5.4.2 Deleting Cameras from Camera List . . . . . . . . . . . . . . . . . . . . . . . . . . 71
5.4.3 Editing Alarm Notification Settings (Push Notifications) . . . . . . . . . . . 72
vi
Page 13

5.4.4 Editing Camera Mobile Streaming Settings . . . . . . . . . . . . . . . . . . . . . 73
5.4.5 Editing Camera Video Settings . . . . . . . . . . . . . . . . . . . . . . . . . . . . . . . . 74
5.4.6 Configuring LED Control and Motion Detection Sensitivity . . . . . . . . . 75
5.4.7 Configuring Night Mode Settings . . . . . . . . . . . . . . . . . . . . . . . . . . . . . . 76
5.4.8 Editing Camera Wired Network Settings . . . . . . . . . . . . . . . . . . . . . . . 78
5.4.9 Editing Camera WiFi Network Settings . . . . . . . . . . . . . . . . . . . . . . . . . 79
5.4.10 Enabling Email Notifications . . . . . . . . . . . . . . . . . . . . . . . . . . . . . . . . 80
5.4.11 Enabling Speaker Alarms . . . . . . . . . . . . . . . . . . . . . . . . . . . . . . . . . . . 81
5.4.12 Configuring microSD Recording . . . . . . . . . . . . . . . . . . . . . . . . . . . . . 83
5.4.13 Configuring the Camera Recording and Alarm Schedule . . . . . . . . . 84
5.4.14 Configuring the Camera Date and Time . . . . . . . . . . . . . . . . . . . . . . . 86
5.4.15 Rebooting the Camera . . . . . . . . . . . . . . . . . . . . . . . . . . . . . . . . . . . . . 87
5.5 Using Local Search to Add Cameras . . . . . . . . . . . . . . . . . . . . . 88
6. iPad App . . . . . . . . . . . . . . . . . . . . . . . . . . . . . . . . . . . . . 89
6.1 Live Viewing with Lorex Ping HD . . . . . . . . . . . . . . . . . . . . . . . . 89
6.1.1 Using 2-Way Audio (Intercom) . . . . . . . . . . . . . . . . . . . . . . . . . . . . . . . . 90
6.1.2 Taking Snapshots . . . . . . . . . . . . . . . . . . . . . . . . . . . . . . . . . . . . . . . . . . 90
6.1.3 Recording Video to iPad . . . . . . . . . . . . . . . . . . . . . . . . . . . . . . . . . . . . . 90
6.2 Playing Back Video Recorded to iPad . . . . . . . . . . . . . . . . . . . . 90
6.3 Playing Back Video Recorded to microSD on iPad . . . . . . . . . . 91
6.4 Using Camera List to Edit Camera Settings . . . . . . . . . . . . . . . 93
6.4.1 Editing Camera Connection Settings . . . . . . . . . . . . . . . . . . . . . . . . . . . 93
6.4.2 Deleting Cameras from Camera List . . . . . . . . . . . . . . . . . . . . . . . . . . 94
6.4.3 Editing Alarm Notifications Settings (Push Notifications) . . . . . . . . . . 95
6.4.4 Editing Camera Mobile Streaming Settings . . . . . . . . . . . . . . . . . . . . . 96
6.4.5 Editing Camera Video Settings . . . . . . . . . . . . . . . . . . . . . . . . . . . . . . . . 97
6.4.6 Configuring LED Control and Motion Detection Sensitivity . . . . . . . . . 98
6.4.7 Configuring Night Mode Settings . . . . . . . . . . . . . . . . . . . . . . . . . . . . . . 99
6.4.8 Editing Camera Wired Network Settings . . . . . . . . . . . . . . . . . . . . . . 100
6.4.9 Editing Camera WiFi Network Settings . . . . . . . . . . . . . . . . . . . . . . . . 101
6.4.10 Enabling Email Notifications . . . . . . . . . . . . . . . . . . . . . . . . . . . . . . . 102
6.4.11 Enabling Speaker Alarms . . . . . . . . . . . . . . . . . . . . . . . . . . . . . . . . . . 104
6.4.12 Configuring MicroSD Recording . . . . . . . . . . . . . . . . . . . . . . . . . . . . 105
6.4.13 Configuring the Camera Recording and Alarm Schedule . . . . . . . . 106
6.4.14 Configuring the Camera Date and Time . . . . . . . . . . . . . . . . . . . . . . 108
6.4.15 Rebooting the Camera . . . . . . . . . . . . . . . . . . . . . . . . . . . . . . . . . . . . 109
6.5 Using Local Search to Add Cameras . . . . . . . . . . . . . . . . . . . . 110
vii
Page 14

7. Android App . . . . . . . . . . . . . . . . . . . . . . . . . . . . . . . . . 111
7.1 Live Viewing with Lorex Ping for Android . . . . . . . . . . . . . . . . 111
7.1.1 Using 2-way Audio (Intercom) . . . . . . . . . . . . . . . . . . . . . . . . . . . . . . . 112
7.1.2 Saving Snapshots . . . . . . . . . . . . . . . . . . . . . . . . . . . . . . . . . . . . . . . . . 112
7.1.3 Recording Video to Android . . . . . . . . . . . . . . . . . . . . . . . . . . . . . . . . . 112
7.2 Playing Back Video Recorded to your Android Device . . . . . . 112
7.3 Playing Back Video Recorded on microSD on Android . . . . . 114
7.4 Using Camera List to Edit Camera Settings . . . . . . . . . . . . . . 115
7.4.1 Editing Camera Connection Settings . . . . . . . . . . . . . . . . . . . . . . . . . . 116
7.4.2 Deleting Cameras from Camera List . . . . . . . . . . . . . . . . . . . . . . . . . 116
7.4.3 Editing Camera Mobile Streaming Settings . . . . . . . . . . . . . . . . . . . . 117
7.4.4 Editing Camera Video Settings . . . . . . . . . . . . . . . . . . . . . . . . . . . . . . . 117
7.4.5 Configuring LED Control and Motion Detection Sensitivity . . . . . . . . 119
7.4.6 Configuring Night Mode Settings . . . . . . . . . . . . . . . . . . . . . . . . . . . . . 120
7.4.7 Enabling Push Alarm Notifications . . . . . . . . . . . . . . . . . . . . . . . . . . . 121
7.4.8 Editing Camera Wired Network Settings . . . . . . . . . . . . . . . . . . . . . . 122
7.4.9 Editing Camera WiFi Network Settings . . . . . . . . . . . . . . . . . . . . . . . . 123
7.4.10 Enabling Email Notifications . . . . . . . . . . . . . . . . . . . . . . . . . . . . . . . 124
7.4.11 Enabling Speaker Alarms . . . . . . . . . . . . . . . . . . . . . . . . . . . . . . . . . . 126
7.4.12 Enabling microSD Recording . . . . . . . . . . . . . . . . . . . . . . . . . . . . . . . 127
7.4.13 Configuring the Recording and Alarm Schedule . . . . . . . . . . . . . . . 128
7.4.14 Configuring the Camera Date and Time . . . . . . . . . . . . . . . . . . . . . . 130
7.4.15 Rebooting the Camera . . . . . . . . . . . . . . . . . . . . . . . . . . . . . . . . . . . . 131
7.5 Using Local Search to Add Cameras . . . . . . . . . . . . . . . . . . . . 132
8. Configuring Camera Settings using a Web Browser 133
8.1 Web Configure Overview . . . . . . . . . . . . . . . . . . . . . . . . . . . . . 134
8.2 Network . . . . . . . . . . . . . . . . . . . . . . . . . . . . . . . . . . . . . . . . . . . 135
8.2.1 Wired Network (DHCP or Fixed IP) . . . . . . . . . . . . . . . . . . . . . . . . . . . 135
8.2.2 WiFi Security (Configuring Wifi settings) . . . . . . . . . . . . . . . . . . . . . . 136
8.3 Video . . . . . . . . . . . . . . . . . . . . . . . . . . . . . . . . . . . . . . . . . . . . . . 137
8.3.1 Display . . . . . . . . . . . . . . . . . . . . . . . . . . . . . . . . . . . . . . . . . . . . . . . . . . 137
8.3.2 Video Settings . . . . . . . . . . . . . . . . . . . . . . . . . . . . . . . . . . . . . . . . . . . . 138
8.3.3 Mobile Video . . . . . . . . . . . . . . . . . . . . . . . . . . . . . . . . . . . . . . . . . . . . . 140
8.3.4 Night Mode . . . . . . . . . . . . . . . . . . . . . . . . . . . . . . . . . . . . . . . . . . . . . . . 141
8.4 Schedule . . . . . . . . . . . . . . . . . . . . . . . . . . . . . . . . . . . . . . . . . . 143
8.4.1 Email/FTP Alarm Settings (Configuring Email Alarms) . . . . . . . . . . 143
viii
8.4.2 Speaker Alarm (Configuring Audio Alarms) . . . . . . . . . . . . . . . . . . . . 145
Page 15

8.4.3 SD Card (Configuring microSD Recording) . . . . . . . . . . . . . . . . . . . . . 146
8.4.4 Scheduling (Configuring Recording and Alarm Schedules) . . . . . . . 147
8.5 Admin . . . . . . . . . . . . . . . . . . . . . . . . . . . . . . . . . . . . . . . . . . . . . 148
8.5.1 Admin Login . . . . . . . . . . . . . . . . . . . . . . . . . . . . . . . . . . . . . . . . . . . . . . 149
8.5.2 LED Control . . . . . . . . . . . . . . . . . . . . . . . . . . . . . . . . . . . . . . . . . . . . . . 150
8.5.3 Date/Time . . . . . . . . . . . . . . . . . . . . . . . . . . . . . . . . . . . . . . . . . . . . . . . 151
8.5.4 Upgrade . . . . . . . . . . . . . . . . . . . . . . . . . . . . . . . . . . . . . . . . . . . . . . . . . 151
8.5.5 Reboot . . . . . . . . . . . . . . . . . . . . . . . . . . . . . . . . . . . . . . . . . . . . . . . . . . 153
9. Technical Specifications. . . . . . . . . . . . . . . . . . . . . . . 154
10. Cleaning and Disposal . . . . . . . . . . . . . . . . . . . . . . . 155
11. Notices . . . . . . . . . . . . . . . . . . . . . . . . . . . . . . . . . . . . 156
12. Wall or Ceiling Mounting . . . . . . . . . . . . . . . . . . . . . 157
12.1 Installation Tips and Warnings . . . . . . . . . . . . . . . . . . . . . . . 157
12.2 Installation . . . . . . . . . . . . . . . . . . . . . . . . . . . . . . . . . . . . . . . . 157
13. Troubleshooting . . . . . . . . . . . . . . . . . . . . . . . . . . . . 159
ix
Page 16

x
Page 17
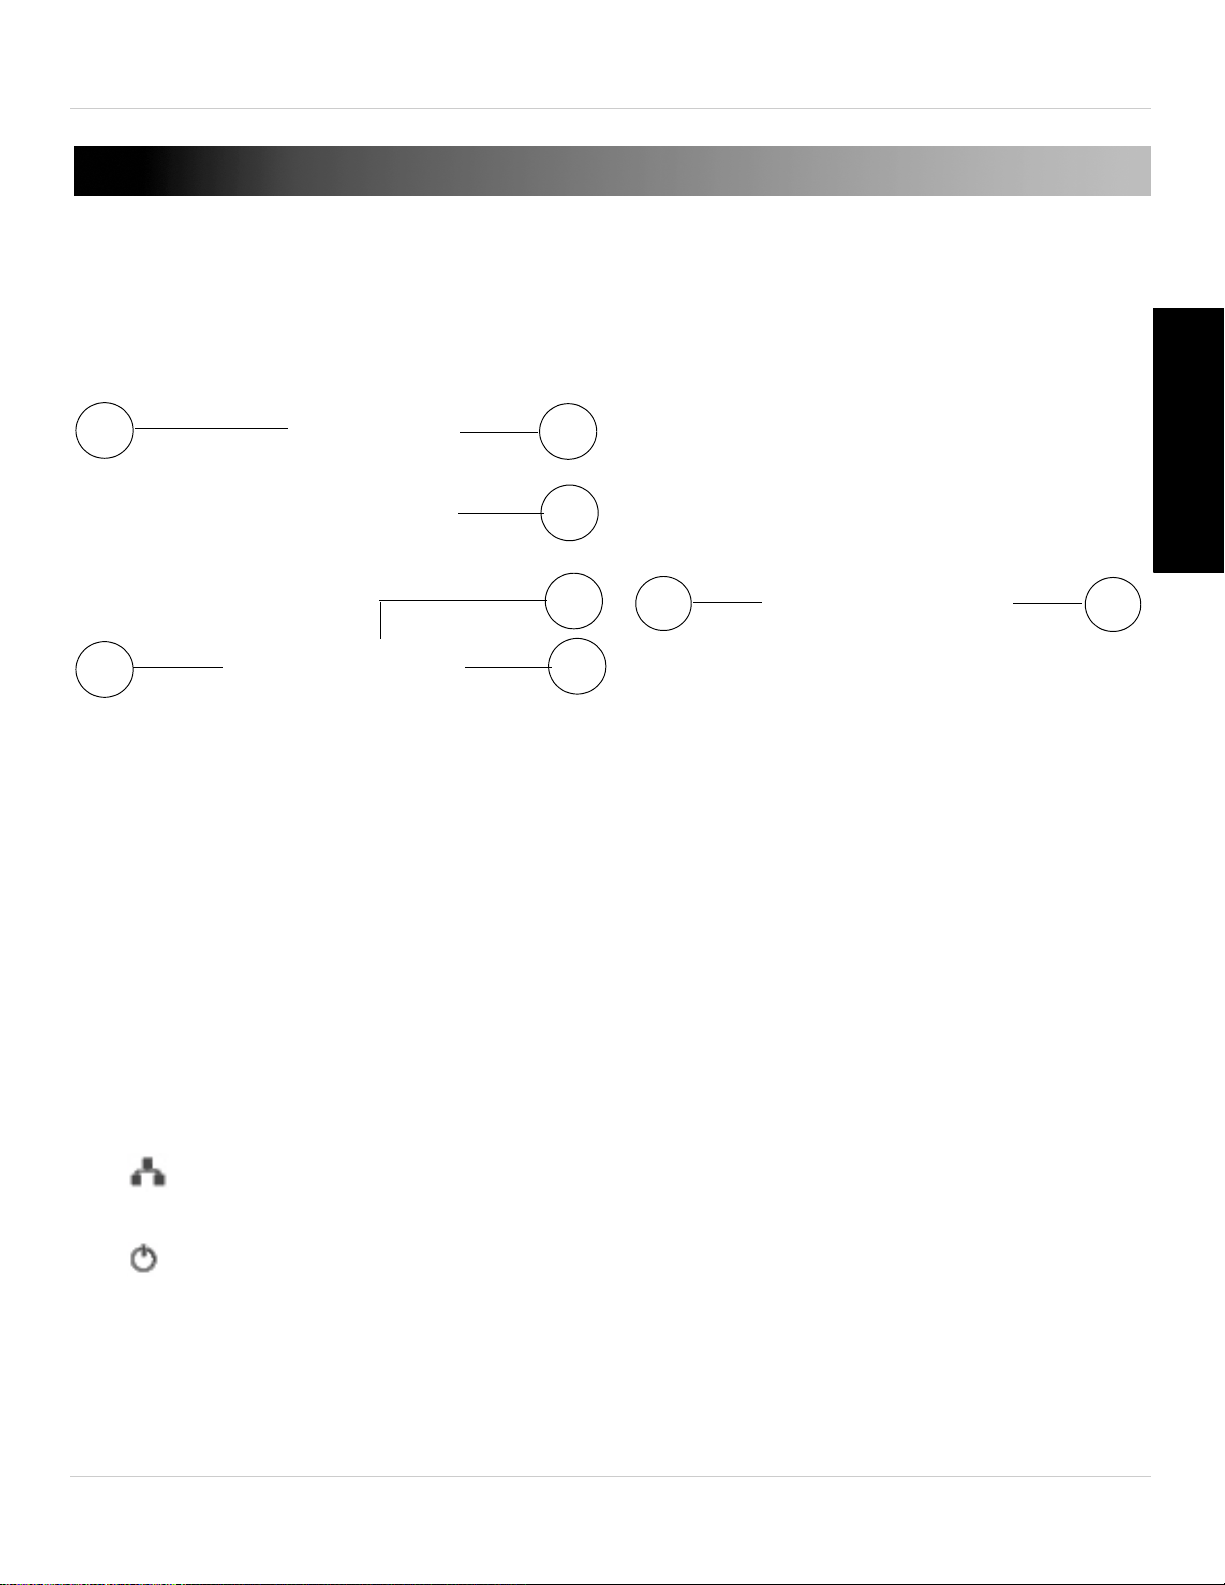
1. CAMERA OVERVIEW
1
2
3
4
6
5
7
8
Camera Overview
English
1. Camera Lens: The camera has separate lenses for day/night use.
2. Microphone
3. WPS Button: Used t
WPS button.
4. Indicator Lights:
• SD: Glows when a microSD card (not included) is inserted. Flashes during recording.
• / Network: Gl
sending or receiving data.
• / Status: Glows when camera is connected to the Internet. Flashes when there is
a connection problem.
IR Motion Sensor: All
5. P
6. Infrared LED: All
7. DC/IN: Connect the included powe
o connect the camera to a wireless router (not included) with a
ows when connected to an ethernet or WiFi network. Flashes when
ows the camera to detect motion by tracking body heat.
ows the camera to see in the dark.
r adapter.
1
Page 18

Camera Overview
9
10
12
11
Bottom of camera
8. NET: Connect an Ethernet cable and connect the other end to your router (not
included).
9. MicroSD Card Slot: Insert a microSD card (not included) to enable recording on the
camera. Camera supports microSD cards up to a maximum size of 32GB.
o
10.Audio Out: Connect t
jack to enable 2-way audio and alarms.
11.Mounting Stand: F
page 157.
t
12.Reset But
least 4 seconds to reset the camera to factory defaults. This is useful if you have
forgotten the password for the camera.
on: While the camera is powered on, press with a pin or small object for at
an external speaker (not included) using a 3.5mm headphone
o
r mounting instructions, see “Wall or Ceiling Mounting” on
2
Page 19

Getting Started
Power Adapter
Power Adapter Cable
1
2
2. GETTING STARTED
2.1 BASIC SETUP
1. Connect the power adapter cable to the power adapter using the USB connector.
English
2. Connect the power adapter to a surge protector or power outlet. Connect the power
adapter cable to the DC/IN port on the camera. The camera LED’s will begin flashing.
3
Page 20

Getting Started
3A
Router
Ethernet Cable
3B
Press and hold the WPS button
on the router
Then, press the WPS button
on the camera
3. A: Connect an Ethernet cable (included) to the NET port on the camera and connect
the other end to an available LAN port (usually numbered 1~4) on your router (not
included). The blue Network LED on the camera will glow blue when the camera is
connected to your network.
• For instructions on setting your camera up for WiFi, see “WiFi Setup” on page 21.
• OR:
B: OPTIONAL: If your router supports WPS, press and hold the WPS button
router until the WPS light turns on. Then, press the WPS button on the camera within 1
minute. The camera will automatically connect to your WiFi network and the blue
Network LED on the camera will turn on.
NOTE: Not all routers support WPS, and the location of the WPS button on your router
on your
depends on your router model. Check your router’s instruction manual for details.
4
Page 21

Getting Started
Run Lorex.exe
2.2 CONNECTING TO YOUR CAMERA
Once your camera is connected to your wired or wireless network, you can connect to
your camera using your PC, Mac, iPhone, iPad, or Android phone or tablet.
2.2.1 CONNECTING TO YOUR CAMERA ON PC
To connect to your cameras using a PC, you must install the L-View software provided
on the CD or as a free download at www.lorextechnology.com. The steps to connect to
cameras differ if you are connecting to a camera on a local network (i.e. your computer
is connected to the same router as the camera) or over the Internet.
st
NOTE: For PC sy
Installing L-View (PC)
1. Insert the CD into your computer. The Autorun screen will appear. Click Run
ex.exe
Lor
2. Click Software, then L-Vie
instructions to install the software.
.
em requirements, see “System Requirements” on page 28.
w for PC to begin the installation. Follow the on-screen
English
Connecting to your Camera on the Local Network (PC)
1. Double-click the L-View icon
network for connected cameras. Connected cameras are shown under Auto Search.
to run L-View. L-View opens and scans the local
5
Page 22

Getting Started
Or, double-click
camera under
Auto Search
Click and drag camera
to a display screen
Click OK
2. Double-click the camera under Auto Search or click and drag the camera to a
desired screen on the display grid to connect to the camera.
3. Enter the camera password. If this is the first time connecting to the camera, the
password is lorex. Click OK.
o
4. If you have connected to this camera before, L-View c
the first time connecting to the camera, L-View will prompt you to create your own
password for the camera. Click OK.
nnects to the camera. If this is
6
Page 23

Getting Started
Enter a new password
Confirm new password
Click OK
Click +
5. Under New Password, enter a password that will be used for the camera. Under
Confirm Password, enter the password again. Click OK.
6. Double-click the camera again under Auto Search to connect. Enter the new
password for the camera then click OK to connect. L-View connects to the camera. If
you would like to save the camera password in L-View, see “Saving Camera
Passwords” on page 34.
Connecting to a Camera Over the Internet (PC)
English
1. Double-click the L-View icon
2. Click + next t
o Camera List.
to run L-View.
3. Under Name, enter a camera name of your choice.
4. Under CamID, ente
r the Cam ID number printed on the camera.
7
Page 24

Getting Started
Enter a camera name
Enter the camera ID
Enter the camera Password
(default: lorex)
Click OK
Enter a new password
Confirm new password
Click OK
5. Under Password, enter the camera password. If this is the first time connecting to
the camera, the password is lorex. Click OK.
6. Double-click the camera or drag the camera to a display screen to connect to the
camera.
o
7. If you have connected to this camera before, L-View c
the first time connecting to the camera, L-View will prompt you to create your own
password for the camera. Click OK.
nnects to the camera. If this is
8. Under New Password, enter a password that will be used for the camera. Under
Confirm Password, enter the password again. Click OK.
9. Double-click the camera again under Camera List to connect. For detailed
instructions on using L-View, see “L-View 104 for PC” on page 28.
8
Page 25

Getting Started
Click and drag L-View and
L-Play to Applications
Double-click
the camera ID
2.2.2 CONNECTING TO YOUR CAMERA ON MAC
To connect to your cameras using a Mac, you must install L-View for Mac, which is
available as a free download from www.lorextechnology.com. The steps to connect to
cameras are different depending on if you are connecting to a camera on a local network
(i.e. your computer is connected to the same router as the camera) or over the Internet.
Installing L-View for Mac
1. Download L-View Client Softwar
2. Extract the installer file and double-click it to run.
3. Click and drag the L-View icon and the L-Play icon to Applications t
Connecting to your Camera on the Local Network (Mac)
1. Connect the camera to your router using an ethernet ca
adapter to power on the camera. Please note that your computer must be on the
same network as the camera.
e for Mac from www.lorextechnology.com.
o
install.
ble and connect the power
English
2. Open L-View (
local network.
3. Double-click the camera ID.
) from your Applications list. L-View scans for cameras on your
9
Page 26

Getting Started
Enter the password (default: lorex)
and then click OK
Click and drag camera ID
from Auto Search List to
Camera List
Right-click and select
ID/Password settings
Enter a name of
your choice
Enter the camera
password and click OK
4. Enter the password (default: lorex) and then click OK to connect. L-View connects to
your camera and streams live video.
5. If this is the first time connecting to the camera, you are prompted to change your
password. Click OK.
6. Enter a new password and click OK.
7. Double-click the camera ID under Auto Search again, enter the new password, and
click OK. L-View
connects to your camera and streams live video.
TIP: To save the camera password in L-View, click and drag the ID from the Auto Search
List to the Camera List. Then, right-click the ID and click ID/Password settings. Enter
the camera password. If you want, you can also enter a Camera Name of your choice for
your camera. Click OK.
10
Page 27

Connecting to your Camera over the Internet (Mac)
Right-click Camera List
and click New Camera
Enter a name of your choice
Enter the camID on the camera label
Enter the camera password
(default: lorex) and click OK.
Double-click the camera
Getting Started
1. Right-click Camera
2. Under Camera Name, enter a name for your camera of your choice.
3. Under ID, ente
4. Under Pas
5. Double-click the camera to open it in L-View.
r the CamID number printed on the label on the back of your camera.
sword, enter the camera password (default: lorex) and then click OK.
List and then click New camera.
English
6. If this is the first time connecting to the camera, you are prompted to change your
password. Click OK.
7. Enter a new password and click OK.
8. Double-click the camera again. L-View connects to your camera and streams live
video. Fo
r more details on using L-View for Mac, see “L-View for Mac” on page 54.
11
Page 28

Getting Started
Click to select a
display area
Then, double-click
a camera to open it
NOTE: To connect to multiple cameras, click to select a display area. The top of the area
turns orange. Then, double-click the camera to open it in the selected area.
2.2.3 CONNECTING TO YOUR CAMERA ON IPHONE
The app for iPhone is called Lorex Ping iPhone.
To connect to your camera using an iPhone:
1. Download Lor
NOTE: Lorex Ping is a free application, but it requires a valid iTunes account to download.
Lorex Ping requires iOS v4.0 and higher.
2. Tap the Lorex Ping icon (
opens to the Camera List.
x Ping iPhone from the App Store.
e
) from the home screen to open Lorex Ping. Lorex Ping
12
Page 29
Getting Started
Tap +
Enter a name for your
camera of your choice
Press to scan the QR code
printed on the back of the
camera, OR manually enter the
CamID printed on the camera
Line up the QR code to the
middle using the phone camera
3. Tap + to add a camera.
4. Under Name, enter a name for your camera. This can be anything of your choice.
English
5. Under ID, press the QR code button ( ) and line up the QR code printed on the back
of the camera using the camera on the phone. The CamID will automatically be
ente
red.
• OR: Manually enter the CamID printed on the camera.
13
Page 30

Getting Started
Enter the camera password. The
default password is lorex.
Tap the name of the
camera to connect
Tap OK
Enter a new password, confirm
your password, and then tap OK
6. Under Password, enter the camera password. If this is the first time connecting to
the camera, enter lorex. Press Done.
7. Tap the name of the camera in the Camera List to connect to the camera. Lorex Ping
connects to the camera.
8. If this is the first time connecting to the camera, you will be prompted to create your
own password. Tap OK.
9. Under New password, enter a new password for the camera and repeat the password
under Confirm password. Tap OK.
10.Tap the name of the camera in Camera List again to connect to the camera. For
details on using the iPhone app, see “iPhone App” on page 67.
14
Page 31

2.2.4 CONNECTING TO YOUR CAMERA ON IPAD
Tap +
The app for iPad is called Lorex Ping HD.
To connect to your camera using iPad:
Getting Started
1. Download the Lore
NOTE: Lorex Ping is a free application, but it requires a valid iTunes account to download.
Lorex Ping requires iOS v4.0 and higher.
2. Tap the Lorex Ping icon (
opens to the Camera List.
3. Tap + to add a camera.
x Ping HD app from the App Store.
) from the home screen to open Lorex Ping. Lorex Ping
English
15
Page 32

Getting Started
Enter a name for your
camera of your choice
Press to scan the QR
code printed on the back
of the camera, OR
manually enter the
CamID printed on the
camera
Line up the QR code to the
middle using the iPad camera
4. Under Name, enter a name for your camera. This can be anything of your choice.
5. Under ID, press the QR code button ( ) and line up the QR code printed on the
back of the camera using the camera on the iPad. The CamID will aut
entered.
omatically be
• OR: Manually enter the CamID printed on the camera.
NOTE: QR code setup is not compatible with 1st generation iPads. If you have a 1st
generation iPad, manually enter the CamID printed on the camera into ID.
16
Page 33

Getting Started
Enter the camera
password. The default
password is lorex.
Tap the name of the
camera to connect
Tap OK
6. Under Password, enter the camera password. If this is the first time connecting to
the camera, enter lorex. Press Done.
7. Tap the name of the camera in the Camera List to connect to the camera. Lorex Ping
connects to the camera.
English
8. If this is the first time connecting to the camera, you will be prompted to create your
own password. Tap OK.
17
Page 34

Getting Started
Enter a new password,
confirm your password,
and then tap Done
Tap +
9. Under New password, enter a new password for the camera and repeat the
password under Confirm password. Tap Done.
10.Tap the name of the camera in Camera List again to connect to the camera. For
details on using the iPad app, see “iPad App” on page 89.
2.2.5 CONNECTING TO YOUR CAMERA ON ANDROID
The app for Android is called Lorex Ping.
To connect to your camera using Android:
1. Download the Lore
NOTE: Lorex Ping requires Android v.2.3 or higher.
2. Tap the Lorex Ping icon (
Lorex Ping opens to the Camera List.
3. Tap + to add a camera.
x Ping app from the Google Play store.
) from the home screen or app list to open Lorex Ping.
18
Page 35

Getting Started
Enter a name for your
camera of your choice
Press to scan the QR code
printed on the back of the
camera, OR manually enter the
CamID printed on the camera
Line up the QR code to the
middle using the camera on the
phone or tablet
4. Under Camera Name, enter a name for your camera. This can be anything of your
choice.
5. Under ID, press the QR code button ( ) and line up the QR code printed on the back
of the camera using the camera on the Android phone or tablet. The CamID will
tomatically be entered.
au
English
• OR: Manually enter the CamID printed on the camera.
19
Page 36

Getting Started
Enter the camera password. The
default password is lorex.
Tap the name of the
camera to connect
Tap OK
Enter a new password, confirm
your password, and then tap OK
6. Under Password, enter the camera password. If this is the first time connecting to
the camera, enter lorex. Press OK.
7. Tap the name of the camera in the Camera List to connect to the camera. Lorex Ping
connects to the camera.
8. If this is the first time connecting to the camera, you will be prompted to create your
own password. Tap OK.
9. Under New password, enter a new password for the camera and repeat the
password under Confirm password. Tap OK.
10.Tap the name of the camera in Camera List again to connect to the camera. For
details on using the Android app, see “Android App” on page 111.
20
Page 37

Getting Started
Right-click the camera under Auto
Search and click Web Configure
2.3 WIFI SETUP
You can setup the camera to use WiFi using your PC, Mac, iPhone, iPad, or Android phone
or tablet. You can also quickly connect the camera to a WiFi network using WPS (WPS
compatible router required; see step 3B on page 4 for instructions).
2.3.1 PC/MAC WIFI SETUP
NOTE: The camera must be connected to your router using an Ethernet cable before you
can set it up to use WiFi.
1. Install L-View on a PC or Mac in your loca
router as the camera) and connect to the camera. For details, see “Connecting to
your Camera on PC” on page 5, or see “Connecting to your Camera on Mac” on
page 9.
2. Right-click on the camera ID in the Auto Search area and click W
3. Enter the camera admin user name and password. By default, the admin user name
is admin and the admin password field is left blank. Click Log in. The Web Configure
interface opens in your default web browser.
NOTE: Your camera admin user name and password differs from the password used to
connect to your camera to view video.
l network (must be connected to the same
b Configure.
e
English
4. Click on Netw
rk and then WiFi Security.
o
21
Page 38

Getting Started
WiFi Scan
Click your WiFi
network from the list
Save & Apply
Enter WiFi
Password
5. Click WiFi Scan and select your WiFi network from the list.
6. Under WPA-PSK Key or WEP Key, enter the WiFi password. Click Save and Apply
.
22
Page 39

Getting Started
WiFi test
7. Click WiFi Security again and click WiFi Test (this may take up to 60 seconds).
English
8. When successful, Status will say Test Success. If unsuccessful, double check your
wireless password and make sure your camera is close enough to the wireless router
to get a good signal.
9. Remove the Ethernet cable from the camera wait 60 seconds and then reconnect to
o
ur camera in L-View.
y
2.3.2 IPHONE WIFI SETUP
NOTE: The camera must be connected to your router using an Ethernet cable before you
can set it up to use WiFi.
1. Connect to your camera using Lorex Ping iPhone. For details, see “Connecting to
your Camera on iPad” on page 15. Y
y
our 3G/mobile network.
2. Tap
to open the edit camera screen.
our iPhone must be connected to your WiFi, not
23
Page 40

Getting Started
Network
WiFi Network
Slide Wi-Fi to ON
Tap your WiFi
network
3. Tap Camera Settings. Enter the camera’s admin username and password. By
default, the admin username is admin and the password is left blank. Tap OK.
4. Tap Network then WiFi Network.
5. Slide Wi-Fi to ON. The ca
6. Tap the name of your WiFi network, enter the password, and tap OK.
7. Wait for the update to complete.
mera scans for available networks in range.
8. Remove the Ethernet cable from the camera. It will co
When it is connected, the blue Network LED will be on or flashing.
a
9. Press Camer
24
Settings, ID/Password, and then Back to exit the edit camera screen.
nnect to the wireless network.
Page 41

Getting Started
Camera Settings
WiFi Network
Network
10.Tap the camera in the Camera List to connect. If you cannot connect, check to make
sure you have entered the correct wireless password and that the camera is in signal
range of your wireless router.
2.3.3 IPAD WIFI SETUP
NOTE: The camera must be connected to your router using an Ethernet cable before you
can set it up to use WiFi.
1. Connect to your camera using Lorex Ping HD. For details, see “Connecting to your
Camera on iPad” on page 15. Your iPad must be connected to your WiFi, not your
3G/mobil
e network.
English
2. Press
3. Tap Camera
default, the admin username is admin and the password is left blank. Tap OK.
4. Tap Netw
to open the edit camera screen.
Settings. Enter the camera’s admin username and password. By
o
rk then WiFi Network.
5. Slide Wi-Fi to ON. The camera will scan for available networks.
25
Page 42

Getting Started
Slide Wi-Fi to ON
Tap your WiFi
network
6. Tap the name of your WiFi network, enter the password, and tap OK. Wait for the
update to complete.
7. Remove the Ethernet cable from the camera. It will connect to the wireless network.
When it is connected, the blue Network LED will be on or flashing.
8. Press
9. Tap the camera in the Camera List to connect. If you cannot connect, check to make
you have entered the correct wireless password and that the camera is in signal
sure
range of your wireless router.
next to the camera name to exit the edit camera screen.
2.3.4 ANDROID WIFI SETUP
NOTE: The camera must be connected to your router using an Ethernet cable before you
can set it up to use WiFi.
1. Connect to your camera using Lorex Ping. For details, see “Connecting to your
Camera on Android” on page 18. Your phone or tablet must be c
WiFi, not your 3G/mobile network.
2. Tap
to open the edit camera screen.
onnected to your
26
Page 43

Getting Started
Tap Camera Settings
Check WiFi
Tap the name of your WiFi
network
3. Tap Camera Settings. Enter the admin username and password. By default, the
admin username is admin and the password is left blank. Tap OK.
English
4. Tap Network then WiFi Network.
5. Check the WiFi checkbox
6. Tap the name of your WiFi network, enter the password, then tap OK. Wait for the
update to complete.
7. Remove the Ethernet cable from the camera. It will connect to the WiFi network.
o
When it is c
8. Press Camer
nnected, the blue Network LED will be on or flashing.
a
Settings then Camera List to exit the edit camera screen.
. The camera will scan for available networks.
9. Tap the camera in the Camera List to connect. If you cannot connect, check to make
you have entered the correct wireless password and that the camera is in signal
sure
range of your wireless router.
27
Page 44

L-View 104 for PC
3. L-VIEW 104 FOR PC
L-View is a PC client software that supports up to 4 cameras. L-View is provided on the
CD or available as a free download from www.lorextechnology.com.
For instructions on installing and connecting to your camera using L-View, see
“Connecting to your Camera on PC” on page 5.
NOTE: For Mac software instructions, see “L-View for Mac” on page 54.
3.1 SYSTEM REQUIREMENTS
Description Minimum System Requirements
CPU 2.0 GHz (dual-core recommended)
Memory 2GB
Operating System Windows XP SP 2 and higher
Windows 7 Basic, Home Premium, Ultimate
Windows 8
Hard Drive Minimum 5~10 GB free for recordings and snapshots
28
Page 45

3.2 L-VIEW FOR PC INTERFACE
1
2
3
4 5 6
8
10
9
11
7
12
14
13
L-View 104 for PC
English
1. Display: Shows live or recorded video from your camera(s).
• Click to select a camera and scroll up/do
zoomed in, click and drag the camera image to pan the camera.
• Double-click to open the display area in full-screen. Double-click again to exit
full-screen.
• Right-click to open the display sub-menu. See “Display Sub-Menu” on page 31.
mage/Recording Controls:
2. I
• Video Settings: Click to edit the camera’s video settings. See “Configuring
wn to zoom in/out. When the camera is
Camera Video Settings” on page 43.
29
Page 46

L-View 104 for PC
• microSD: Click to open a list of recordings saved on the camera’s microSD card
(not included). See “Playing Back Recordings on the microSD card with L-View” on
page 42.
• Snapshot: Click to save a still image screenshot of the camera. To access
Snapshots, see “Directories (Opening or Changing the Snapshot Folder)” on page 49.
Snapshots are saved in .png format.
• Record: Click to start/stop manual recording. For details, see “Recording to your
PC’s Hard Drive” on page 37.
• Record Folder: Click to open the recording folder for this camera. For details,
see “L-Play: Playing back Video from your PC’s Hard Drive” on page 38.
3. Time and Date: Show the current time and date on the computer. Note that the
camera time and date may differ. For instructions on setting the time and date on the
camera, see “Date/Time” on page 151.
4. Min
5. Maximize/Re
6. Exit
7. Camer
NOTE: Cameras may appear in red before you have connected to them the first time.
8. Aut
9. Pan/Tilt/Zoom Contr
imize/Restore
vert to Window
a List: Shows list of saved cameras. Available cameras are in blue. Cameras
in red are not available. If a camera appears in red, check the network connection.
For more details, see “Camera List (Managing Cameras)” on page 33.
o Search: Auto Search shows cameras located on your local network (LAN).
• Double-click the camera name or click and dr
view the camera.
• Drag the camera to the Camera List to save the camera.
• Right-click the camera ID and select Web Configure to configure the camera settings
using a browser. See “Configuring Camera Settings using a Web Browser” on
page 133.
ols: Controls for compatible PTZ cameras (not included).
ag the camera to the display area to
10.Vo
30
lume Controls:
• Click to activate 2-way-audio (intercom) feature and click again to deactivate
2-way-audio. Camera speaker required (not included). Note that turning on
2-way-audio will mute audio from the camera.
Page 47

L-View 104 for PC
Right-click on a camera in the display area to
open the Display sub-menu
• Click to mute audio from the camera. Click again to unmute audio from the
camera.
• Use the top volume slider to control the volume for the camera speaker (not included)
when the 2-way-audio is activated.
• Use the bottom volume slider to control the volume of audio coming from the camera.
11.L-View Controls:
• L-View Settings: Click t
on page 49.
• Language Selector: Click to select the language for L-View.
12.
13.
to select 4-camera view.
14.
exit full-screen.
All Camera Action: Click to perform an action on all cameras.
Split-Screen Selectors: Click to select single camera view or
Full Screen: Click to open the camera display area in full-screen. Press ESC to
o open settings for L-View. See “Configuring L-View”
3.2.1 DISPLAY SUB-MENU
The Display sub-menu opens when you right-click on a camera’s display area. It contains
additional camera controls.
English
31
Page 48

L-View 104 for PC
Video Properties
The Display sub-menu contains the following controls:
• Full window: Open the c
• Auto reconnect: L-View will attempt to reconnect to the camera if it becomes
disconnected.
• Stop: Disconnect from the camera.
• Pause: Pause the video. Click again to un-pause the video.
• Properties: Click to view video properties.
amera in single camera view.
3.2.2 ALL CAMERA ACTION
Press to open the All Camera Action menu.
The All Camera Action Menu contains the following controls:
• Snapshot all: Take a snapshot from all connected cameras.
• Play all: Connect to all cameras selected in display grid.
• Pause all: Pause video for all connected cameras. Click Pause all again to resume
video.
• Disconnect all: Disconnect from all connected cameras.
• Clear all connection info: Remove all cameras from the display grid.
32
Page 49

L-View 104 for PC
Click and drag camera from
Auto Search to Camera List
3.3 CAMERA LIST (MANAGING CAMERAS)
The Camera List is used to save connection information for your cameras, so you don’t
have to re-enter the ID or password each time you connect. The Camera List also allows
you to configure certain camera settings.
Cameras connected to the Internet or local network are shown in blue in the camera list.
Cameras not connected are shown in red. If your camera is red, check the network
connection.
NOTE: Cameras may appear in red before you have connected to them the first time.
3.3.1 ADDING CAMERAS TO CAMERA LIST
• If the camera is on the local network, click and drag a camera from the Auto Search
list to Camera List to add it.
English
• If the camera is not on the local network (i.e. you are connecting to it over the Internet),
see “Connecting to a Camera Over the Internet (PC)” on page 7 to add the camera
to the Camera List.
33
Page 50

L-View 104 for PC
Enter a name
for your camera
Enter the password
to save it in L-View
Right-click on the camera
and click Delete Camera
Right-click to open the
Camera List sub-menu
• Right-click on your camera to open the Camera List sub-menu. See below for
instructions.
3.3.2 SAVING CAMERA PASSWORDS
You can use the Camera List sub-menu to save the camera’s password in L-View, so you
don’t have to enter the password to connect to the camera.
NOTE: To change the camera’s password, see “Video Settings” on page 138.
To save the camera password:
1. Right-click on the camera in Camera List and click ID/Passw
2. Under Name, ente
r a name for the camera that will appear in Camera List. This can
ord settings.
be anything of your choice.
s
3. Under Pa
sword, enter the camera password to save the password in L-View.
4. Click OK.
3.3.3 DELETING CAMERAS
1. Right-click on the camera in Camera List and click Delete Camera
.
2. Click Dele
34
te to confirm.
Page 51

L-View 104 for PC
Select Bandwidth
Select Resolution and Frame Rate
for mobile streaming
Enable or disable audio streaming
to mobile device
Check to automatically adjust
resolution and frame rate based on
bandwidth available
3.3.4 CONFIGURING MOBILE STREAMING SETTINGS
Configure streaming settings when connecting using a smartphone or tablet.
English
To configure mobile streaming settings:
1. Right-click on the camera you want to configure and click Mobile
2. Under Bandwidth, sele
ct your available mobile bandwidth. If you are primarily
settings.
connecting using WiFi, you may set this setting higher.
e
3. Check Sel
ct resolution and frame rate automatically to have the camera
automatically select the resolution and frame rate based on available bandwidth. If
you leave this unchecked, configure the following:
• Under Resolution, sele
ct the resolution that will be used when connecting to the
camera using a smart phone or tablet: 640x480 (VGA), 320x240 (QVGA), or 160x120
(QQVGA).
• Under Frame rate, select the frame rate that will be used when connecting to the
camera using a smart phone or tablet between 30fps (highest) and 1fps (lowest).
4. Under Micr
ophone, sel
ect Enable to enable audio streaming to smart phones and
tablets or Disable to disable audio streaming to smart phones and tablets.
o
5. Click Update t
apply changes to your camera. Enter the admin username (default:
admin) and password (default: left blank) for the camera and click OK.
6. The camera will disconnect when the setting is changed. Doubl
Camera List to reconnect.
e
-click the camera in
35
Page 52

L-View 104 for PC
Start of night mode
(8:00 PM)
Return to day mode
(6:00 AM)
EXAMPLE
3.3.5 CONFIGURING NIGHT MODE CONTROL
Configure when the camera uses day or night mode. When day mode is on, the camera
sees in color. When night mode is on, the camera sees in black and white, and the
Infrared LED turns on to enable night vision.
To configure night mode settings:
1. Right-click on the camera you want to configure and select Night mode co
2. Select one of the following:
• Automatic day and night mode switch: Camer
day mode or night mode, based on the amount of light in the room.
• Scheduled time of night mode: Camera will switch between day mode and night
mode at a scheduled times each day. If using this option, use the first set of drop-down
menus to select (in 24-hour time) the time the camera will switch to night mode and
the second set of drop-down menus to select when the camera will return to day
mode.
a will automatically switch between
ntrol.
36
Page 53

L-View 104 for PC
Select day or night mode
Start/stop recording
• Manual night mode control: Manually select day mode or night mode. If using this
option, under Mode, select Day for day mode or Night for night mode.
3. Click Update to apply changes to your camera. Enter the admin username (default:
admin) and password (default: left blank) for the camera and click OK.
English
4. The camera will disconnect when the setting is changed. Doubl
Camera List to reconnect.
e-click the camera in
3.4 RECORDING TO YOUR PC’S HARD DRIVE
You can manually record video to your computer hard drive.
To record to your computer’s hard drive:
• Click above the camera's video area to start recording. The recording icon will
turn red ( ).
• Click again to stop recording. To playback video, see “L-Play: Playing back Video
from your PC’s Hard Drive” on page 38.
37
Page 54

L-View 104 for PC
Open recording folder
3.5 L-PLAY: PLAYING BACK VIDEO FROM YOUR
PC’S HARD DRIVE
L-Play is used to playback video files saved to your computer’s hard drive. L-Play is
installed automatically when you install L-View.
To playback video saved to your computer’s hard drive:
1. Record some video using the steps above if you have not done so already.
2. Click the folder icon (
from that camera.
NOTE: Video files are named using
video files from other days, go to the folder one level above the one that opens. Day
folders use the format
yyyymmdd
) above the camera's video area to open today's recordings
hhmmss
(e.g.
20121016
format (e.g.
is
October 16, 2012
103045
is
10:30:45am
). To open video files
). To open
from other cameras, go two levels up (camera folders are named using the camera
name and ID).
38
Page 55

L-View 104 for PC
Double-click a video
file to open in L-Play
Minimize
Maximize
Exit
Search for video
Open in
full-screen
Time video
was recorded
Volume
Mute
Zoom in
Zoom out
NOTE: Once zoomed in,
click and drag the mouse
to pan the zoom area.
Slow down
playback
Speed up
playback
Change language
Stop
Pause
Play
Seek to different time
3. Double-click a video file (video files use the .crf extension) to open it. L-Play opens
and begins playing the video
.
4. Use the on-screen controls to control playback.
English
39
Page 56

L-View 104 for PC
Click Open Record
Click a day to
select it
3.5.1 SEARCHING FOR VIDEO FILES IN L-PLAY
You can use L-Play to search for video recorded at certain times.
To search for video using L-Play:
1. If L-Play is not open, double-
2. Click Open Reco
3. Use the Recorded Files area to find the day you would like to playback from.
• Click + next to a year to expand recordings for the year.
• Click + ne
rd.
xt to a month to expand recordings for that month.
click the L-Play icon ( ) on the Desktop.
• Click a day to select it.
40
Page 57

L-View 104 for PC
Click the camera ID
to select
Available Recordings
Click Play
Use the slider to adjust the
playback time
4. Click the ID of the camera you would like to playback video from and then click Play.
English
5. Playback begins from the earliest video recorded on that day. Use the slider to adjust
the playback time.
41
Page 58

L-View 104 for PC
Click + to view
recordings from a day
3.6 PLAYING BACK RECORDINGS ON THE
MICROSD CARD WITH L-VIEW
You can use L-View to playback recorded video on the camera’s microSD card (required;
not included). For instructions on setting up recording on the microSD card, see “SD
Card (Configuring microSD Recording)” on page 146.
To playback recorded video on the microSD card:
1. Connect to the camera you would like to playback recordings from.
oS
2. Click the micr
password if required.
D button ( ) on top of the camera display area. Enter the camera
3. A list is created of all days with recordings available in the format
example,
4. Click the + next to a day to view recordings from that day. Recordings from that day
are shown from earliest to latest. Recordings are named according to the time they
were recorded with the format
20120730
is
July 30, 2012
.
hhmmss
(for example,
115553
yyyymmdd
is
11:55:53 AM
(for
).
42
Page 59

5. Click a recording from the list and then click Playback to view it.
Click a recording
from the list
Click Playback to play
6. The recording plays back in the camera display area.
L-View 104 for PC
English
• To return to a live view of your camera, wait fo
and select Play.
• OR, while the recording is still playing, right-click in the display area and select Stop
then right-click again and select Play.
r the recording to finish, then right-click
3.7 CONFIGURING CAMERA VIDEO SETTINGS
The Video Settings menu allows you to adjust the quality of the camera video.
To open the Video Settings menu:
• Click on the top of the display area for the c
NOTE: The camera will disconnect aft
seconds after clicking Update and double-click the camera in Camera List or Auto
Search to reconnect to the camera.
er making changes to video settings. Wait about 15
mera you would like to configure.
a
TIP: Change only one camera image quality setting at a time before clicking Update so
you can judge the effects.
43
Page 60

L-View 104 for PC
Select Internet connection speed
Check to automatically adjust
resolution and frame rate
based on bandwidth
Select Resolution
Select Frame Rate
Select how image quality will be
affected when bandwidth is low
3.7.1 QUALITY TAB (CONFIGURING RESOLUTION, FRAME RATE,
AND BANDWIDTH)
The Quality tab allows you to configure image quality settings such as the camera
resolution, frame rate, and bandwidth settings.
To configure image quality settings:
1. Under Bandwidth, sele
connection is faster than 1.5Mbps, select 1.5Mbps.
e
2. Check Sel
automatically adjust the resolution and frame rate based on bandwidth. Or, un-check
it to manually configure the resolution and frame rate. If you are manually
configuring the resolution and frame rate, configure the following:
• Resolution: Manually sel
resolution will give you a better, more detailed picture, but requires more bandwidth.
QVGA allows the camera to maintain a higher frame rate when available bandwidth
is low.
• Frame rate: Manually select the frame rate between 30fps (highest) and 1fps (lowest).
30fps is real time video, meaning that movement in the image will appear smooth,
with no choppiness.
3. Under Pr
decreases:
ct the best resolution and frame rate automatically to have the camera
ef
erence, select your quality preference when bandwidth increases or
ct the speed of your Internet connection. If your Internet
ect either VGA (640x480) or QVGA (320x240) resolution. VGA
44
Page 61

L-View 104 for PC
Select Brightness
Select Low Light
Sensitivity
Enable/disable time
stamps
Enable/disable built-in
microphone
Select Color or
Black & White
Select Sharpness
Select Lighting
Select Indoor
Lighting Frequency
Flip camera
image
• Select Video Motion to have the camera maintain the frame rate and reduce image
quality when bandwidth is insufficient.
• Select Image Quality to have the camera maintain image quality and reduce frame
rate when bandwidth is insufficient.
• Select Better Quality to have the camera maintain frame rate and increase quality
when bandwidth is sufficient.
• Select Best Quality to have the camera maintain the frame rate and increase quality
to the maximum speed of the connection.
4. Click Update to save changes. Enter the camera admin username (default: admin)
and password (default: left blank) and click OK. The camera will disconnect. Wait
about 15 seconds and then double-click the camera in Camera List or Auto Search to
reconnect to the camera.
3.7.2 VIDEO TAB (CONFIGURE GENERAL VIDEO SETTINGS)
English
The Video tab allows you to configure general video settings, such as color and
brightness settings.
To configure general video settings:
1. Under Video Colo
2. Under Sharpness
(lowest).
r, select Color or Black & White.
, select the sharpness of the image between 10 (highest) and 1
45
Page 62

L-View 104 for PC
3. Under Place, select Outdoor video if the area with the camera is brightly lit. Select
Indoor Video if you notice strip lines in the image or if the picture is too dark on the
Outdoor video setting. Select Indoor video + Sunlight if the picture is too bright on
the Indoor Video setting.
• If you select Indoor Video or Indoor Video + Sunlight, sel
the camera for the frequency of your indoor lighting.
4. Under Video Flip, sel
horizontally or select Normal for normal orientation.
5. Under Brightness, sel
1 (lowest).
6. Under Lo
between Very High (highest), High, and Normal (lowest).
7. Check Enabl
disable video time stamps.
8. Under Micr
or select Disabled to disable the built-in microphone on the camera.
9. Click Update t
and password (default: left blank) and click OK. The camera will disconnect. Wait
about 15 seconds and then double-click the camera in Camera List or Auto Search to
reconnect to the camera.
w Light Sensitivity, set the camera’s sensitivity in low light environments
e time display on video to turn on video time stamps or un-check it to
ophone, select Enabled to enable the built-in microphone on the camera
o save changes. Enter the camera admin username (default: admin)
ect Video Flip to flip the camera image vertically and
ect the brightness of the image between 10 (highest) and
ect 60Hz or 50Hz to adjust
46
Page 63

L-View 104 for PC
Configure status LED’s
Configure motion detection
sensitivity from 1 (High) to 10 (Low)
3.7.3 CONTROL TAB (CONFIGURE STATUS LED’S AND MOTION
DETECTION SENSITIVITY)
English
The Control tab allows you to configure the camera status LED’s to make the camera
harder to spot at night. It also allows you to configure the motion detection sensitivity
when using video motion detection.
To configure the camera status LED’s:
1. Under Status LED Contro
• Normal: LED’s will function as normal. For det
Overview” on page 1.
• Always turn off: LED’s are turned off at all times.
• Turn off after connected: LED’s turn on when the camera is powered on and turn off
once a network connection is made.
o
2. Click Update t
and password (default: left blank) and click OK. The camera will disconnect. Wait
about 15 seconds and then double-click the camera in Camera List or Auto Search to
reconnect to the camera.
To configure motion detection sensitivity:
save changes. Enter the camera admin username (default: admin)
l, select one of the following:
ails on LED functions, see “Camera
NOTE: The following method works when using video motion detection. It does not work
when using PIR motion detection. For details on enabling motion detection and selecting
video motion detection or PIR, see “Sc
1. Under Motion Detection Sensitivity, sel
1 (High) and 10 (Low). If Motion Detection Sensitivity is set to 1, motion detection will
hedule” on page 143.
e
ct the motion detection sensitivity between
47
Page 64

L-View 104 for PC
be triggered if a moving object is larger than 1% of the video area. If it is set to 10, a
moving object must be larger than 10% of the video area to trigger motion detection.
o
2. Click Update t
and Password (default: left blank) and click OK. The camera will disconnect. Wait
about 15 seconds and then double-click the camera in Camera List or Auto Search to
reconnect to the camera.
save changes. Enter the camera admin User Name (default: admin)
3.7.4 CAMERA INFO TAB
The camera info tab shows system information about the camera.
48
Page 65

L-View 104 for PC
Change folder
Open folder
Snapshot folder
location
3.8 CONFIGURING L-VIEW
To configure settings for L-View, click the settings button ( ).
3.8.1 DIRECTORIES (OPENING OR CHANGING THE SNAPSHOT
FOLDER)
The Directories menu shows you the folder where Snapshots are saved. It allows you to
open or change the Snapshot folder.
English
To open the Snapshot folder:
• Click Open.
To change the Snapshot folder:
1. Click Change.
2. Select a new Snapshot folder and click OK to
save changes.
49
Page 66

L-View 104 for PC
Check for L-View to open automatically
when your computer turns on
Check to restore camera layout and
connect to previously open cameras when
L-View opens
3.8.2 STARTUP OPTIONS
The Startup options menu allows you to configure startup options for L-View.
To configure startup options:
1. Check Automatically s
tart L-View when Windows starts to have L-View open when
your computer is turned on.
t
2. Check Res
ore the last time playing/running state when L-View starts to set L-View
to restore the camera layout and connect to all the previously open cameras when
L-View opens.
o
3. Click OK t
save changes.
50
Page 67

L-View 104 for PC
Check to enable Fixed IP
addresses for cameras
Assign IP address
3.8.3 FIXED IP ACCESS
The Fixed IP Access menu is for advanced users only. It must be used if you have
assigned your camera a fixed IP address on your router.
English
To configure your camera to use a fixed IP address:
1. Check Connect to the camera
IP addresses.
o
2. Click OK t
3. In the camera list, right-click the camera yo
Assign IP Address.
4. Enter the camera’s internal IP address and click OK.
save changes.
with a fixed IP address to enable cameras to use fixed
u would like to configure and select
51
Page 68

L-View 104 for PC
Select Enable
Enter a User Name
Enter a Password
Check to prevent video
stretching or un-check to
enable image stretching
3.8.4 LOGIN (ENABLING A PASSWORD TO ACCESS L-VIEW)
The Login menu allows you to enable a password to open L-View.
To enable a password for L-View:
1. Select Enable.
2.
Under User Name and Pas
must be used when you open L-View.
o
3. Click OK t
for a password to log in.
save changes. The next time you exit L-View and re-open it, it will ask you
sword, enter the desired user name and password that
3.8.5 IMAGE RATIO
The Image Ratio menu allows you to configure L-View to preserve the original aspect
ratio of the video, or to allow the video to stretch to fill the display area.
52
Page 69

To configure Image Ratio:
Check to have L-View
look online for updates
when it opens
Click to manually check
for updates
L-View 104 for PC
1. Check Keep Image Ratio to
on the sides of the image). Un-check Keep Image Ratio to stretch the image to the
entire size of the display.
save changes.
2. Click OK t
o
not allow any stretching of the image (bars may appear
3.8.6 SOFTWARE UPDATE
The Software Update menu allows you to enable automatic updates of L-View or the
camera firmware. It also allows you to manually check for updates.
English
To enable automatic upgrades:
1. Check Automatically Check Softwar
2. Click OK. L-View will
update is available, follow the on-screen instructions to install the update.
• It will also check for camera updates when a new firmware
camera firmware is available, click OK and enter the admin user name (default:
admin) and password (default: left blank). Then, wait for the upgrade to complete.
Do not unplug the camera power cable or Ethernet cable during firmware updates.
The camera will reboot during the firmware upgrade process.
To manually check for an update:
• Click Check fo
instructions to install the update.
check online for an software updates when it opens. If an
r latest version now. If an update is available, follow the on-screen
e Update.
is available. If a new
53
Page 70

L-View for Mac
2
3
1
4
5
6
4. L-VIEW FOR MAC
L-View for Mac allows you to view your camera on a Mac computer. L-View for Mac is
available as a free download from www.lorextechnology.com.
For instructions on connecting to your camera using Mac, see “Connecting to your
Camera on Mac” on page 9.
4.1 SYSTEM REQUIREMENTS
Description Minimum System Requirements
CPU 2.0 GHz (dual-core recommended)
Memory 2GB
Operating System OS X 10.6.8 Snow Leopard (Intel Processors only)
Hard Drive Minimum 5~10 GB free for recordings
4.2 L-VIEW FOR MAC INTERFACE
1. Window Controls: Click to exit or minimize L-View.
54
Page 71

L-View for Mac
Click to select a
display area
Then, double-click
a camera to open it
Right-click the camera ID and select Web
configure to open the Web Configuration tool
2. Camera List: Shows cameras that have been saved in L-View. Double-click cameras
to connect to them.
NOTE: To con
selected area turns orange. Then, double-click the camera to open it in the selected
area.
3. Auto Search List: Auto Search shows cameras located on your local network (LAN).
• Double-click the camera ID to view the camera.
• Drag the c
• Right-click the camera ID and select Web configure to configure the camera settings
using a browser. See “Configuring Camera Settings using a Web Browser” on
page 133.
nect to multiple cameras, click to select a display area.
amera to the Camera List to save the camera.
The top of the
English
4. Recording Controls:
• Record: Click to start/stop manual recording. F
to your Mac’s Hard Drive” on page 57.
• Folder: Click to open the recording folder for this camera. For details, see
“Playing Back Video from your Mac’s Hard Drive” on page 58.
5. Display Ar
• Double-click to view the camera in full-screen; double
• Right-click and click Stop to close the selected camera.
• Click a display area to select it. The top of the area turns orange. L-View plays audio
from the camera in the currently selected area.
ea: S
or details, see “Recording Video
hows video from your camera.
-click again to exit full-screen.
55
Page 72

L-View for Mac
Click and drag camera ID
from Auto Search List to
Camera List
Right-click and select ID/
Password settings
Enter a name of
your choice
Enter the camera
password and click OK
6. Split-screen Controls:
• : Click t
o open single camera view.
• : Click to open 4-camera view.
• : Click to open 6-camera view.
• : Click to open the current display in full-screen. Press ESC to exit full-screen.
4.3 CAMERA LIST (MANAGING CAMERAS)
The Camera List is used to save connection information for your cameras, so you don’t
have to re-enter the ID or password each time you connect. It also allows you to
configure certain camera settings (see “Using Camera List to Mod
on page 59).
4.3.1 ADDING CAMERAS TO CAMERA LIST
• If the camera is on the same network as the computer, click and drag the ID from
the Auto Search List to the camera list. Then right-click the ID and click ID/Password
settings. Enter the camera password. If you want, you can also enter a Camera Name
ify Camera Settings”
of your choice for your camera. Click OK.
• If you are adding a camera over the Internet, see “Connecting to your Camera over
the Internet (Mac)” on page 11.
56
Page 73

L-View for Mac
Click to Start/Stop recording
Right-click the camera and
select Delete Camera
4.3.2 DELETING CAMERAS FROM CAMERA LIST
• Right-click the camera in Camera List and select Delete Camera. Click OK to confirm.
4.4 RECORDING VIDEO TO YOUR MAC’S HARD
DRIVE
You can manually record video to your computer’s hard drive.
English
To record video to your Mac’s hard drive:
1. Press the recording button (
during recording.
2. Press the recording button again (
) to start recording. The recording button will turn red
) to stop recording.
57
Page 74

L-View for Mac
Click to open the recording folder
Double-click video file
4.4.1 PLAYING BACK VIDEO FROM YOUR MAC’S HARD DRIVE
L-Play for Mac is included to playback video files you have saved to your Mac’s hard drive.
To play back video from your Mac’s hard drive:
1. Use the instructions above to record some video if y
2. Click the folder icon (
from that camera.
NOTE: Video files are named using
video files from other days, go to the folder one level above the one that opens. Day
folders use the format
from other cameras, go two levels up (camera folders are named using the camera
name and ID).
yyyymmdd
) above the camera's video area to open today's recordings
hhmmss
(e.g.
20121016
format (e.g.
is
October 16, 2012
u have not done so already.
o
103045
is
10:30:45am
). To open video files
). To open
3. Double-click a video file to open it. The file opens in L-Play.
58
Page 75

4. Use the on-screen playback controls in L-Play.
Play/pause
Stop
Select playback time
Open/close
full-screen
Right-click on the camera and select
Video settings or Night mode control
L-View for Mac
English
4.5 USING CAMERA LIST TO MODIFY CAMERA
SETTINGS
You can use L-View to configure certain settings for the camera.
TIP: Change only one camera setting at a time before clicking Update so you can judge
the effe
To configure camera settings using Camera List:
cts.
• Right-click on the camera in Camera List and select Video settings or Night mode
co
trol. See below for details.
n
59
Page 76

L-View for Mac
Select Internet connection speed
Check to automatically adjust resolution and
frame rate based on bandwidth available
Select Resolution
Select Frame Rate
Select how image quality will be affected
when bandwidth is low
4.5.1 QUALITY TAB (CONFIGURE BANDWIDTH, RESOLUTION, AND
FRAME RATE)
The Quality tab allows you to configure image quality settings such as the camera
resolution, frame rate, and bandwidth settings.
To configure image quality settings:
1. Right-click on the camera in Camera List and select Video settings. Sele
ct the
Quality tab.
e
2. Under Bandwidth, sel
ct the speed of your Internet connection. If your Internet
connection is faster than 1.5Mbps, select 1.5Mbps.
e
3. Check Sel
ct the best resolution and frame rate automatically to have the camera
automatically adjust the resolution and frame rate based on bandwidth. Or, un-check
it to manually configure the resolution and frame rate. If you are manually
configuring the resolution and frame rate, configure the following:
a
• Resolution: M
(160x120) Q2VGA resolution. VGA resolution will give you a better, more detailed
nually select either (640x480) VGA, (320x240) QVGA, or
picture, but requires more bandwidth. QVGA and Q2VGA allow the camera to maintain
a higher frame rate when available bandwidth is low.
• Frame rate: Manually select the frame rate between 30fps (highest) and 1fps (lowest).
30fps is real time video, meaning that movement in the image will appear smooth,
with no choppiness.
60
Page 77

L-View for Mac
Select Brightness
Select Low Light
Sensitivity
Enable/disable time
stamps
Enable/disable built-in
microphone
Select Colored or
Black & White
Select Sharpness
Select Lighting
Select Indoor
Lighting Frequency
Flip camera image
4. Under Preference, select your quality preference when bandwidth increases or
decreases:
• Select Video motion to
have the camera maintain the frame rate and reduce image
quality when bandwidth is insufficient.
• Select Image quality to have the camera maintain image quality and reduce frame
rate when bandwidth is insufficient.
• Select Better quality to have the camera maintain frame rate and increase quality
when bandwidth is sufficient.
• Select Best quality to have the camera maintain the frame rate and increase quality
to the maximum speed of the connection.
o
5. Click Update t
save changes. Enter the camera admin user name (default: admin)
and password (default: left blank) and click OK. Click OK to close the settings
window.
NOTE: The camera may reboot after settings are changed. Wait about 30 seconds and
h
en double-click the camera in Camera List or Auto Search to reconnect to the camera.
t
4.5.2 VIDEO TAB (CONFIGURE GENERAL VIDEO SETTINGS)
English
The Video tab allows you to configure general video settings, such as color and
brightness settings.
61
Page 78

L-View for Mac
To configure general video settings:
1. Right-click the camera in Camera List and click Video settings. Then
Video tab.
2. Under Video Col
3. Under Sharpnes
(lowest).
4. Under Plac
if you notice strip lines in the image or if the picture is too dark on the Outdoor video
setting. Select Indoor + Sunlight if the picture is too bright on the Indoor setting.
• If you select Indoor or Indoor + Sunlight, select 60Hz or 50Hz under Light F
to adjust the camera for the frequency of your indoor lighting.
5. Under Video Flip, sel
select Normal for normal orientation.
6. Under Brightness, sel
1 (lowest).
7. Under Lo
between Very High (highest), High, and Normal (lowest).
8. Check Enabl
disable video time stamps.
e, select Outdoor if the area with the camera is brightly lit. Select Indoor
w Light Sensitivity, set the camera’s sensitivity in low light environments
or, select Colored or Black & White.
s, select the sharpness of the image between 10 (highest) and 1
ect Flip to flip the camera image vertically and horizontally or
ect the brightness of the image between 10 (highest) and
e time display on video to turn on video time stamps or un-check it to
, select the
requency
9. Under Micr
or select Disabled to disable the built-in microphone on the camera.
10.Click Updat
and password (default: left blank) and click OK. Click OK to exit the settings window.
NOTE: The camera may reboot after settings are changed. Wait about 30 seconds and
hen double-click the camera in Camera List or Auto Search to reconnect to the camera.
t
ophone, select Enabled to enable the built-in microphone on the camera
e to save changes. Enter the camera admin user name (default: admin)
62
Page 79

L-View for Mac
Configure status LED’s
Configure motion detection
sensitivity from 1 (High) to 10 (Low)
4.5.3 CONTROL TAB (CONFIGURE STATUS LED’S AND MOTION
DETECTION SENSITIVITY)
The Control tab allows you to configure the camera status LED’s to make the camera
harder to spot at night. It also allows you to configure the motion detection sensitivity
when using video motion detection.
English
To configure the camera status LED’s:
, sel
1. Right-click the camera in Camera List and click Video settings. Then
Control tab.
o
2. Under Status LED Contr
• Normal: LED’s will function as normal. For det
Overview” on page 1.
• Always turn off: LED’s are turned off at all times.
• Turn off after connected: LED’s turn on when the camera is powered on and turn off
once a network connection is made.
3. Click Update to
and password (default: left blank) and click OK. Click OK to exit the settings window.
NOTE: The camera may reboot after settings are changed. Wait about 30 seconds and
h
en double-click the camera in Camera List or Auto Search to reconnect to the camera.
t
To configure motion detection sensitivity:
NOTE: T
when using PIR motion detection. For details on enabling motion detection and selecting
video motion detection or PIR, see “Sc
1. Right-click the camera in Camera List and click Video settings. Then, sel
Control tab.
he following method works when using video motion detection. It does not work
save changes. Enter the camera admin user name (default: admin)
l, select one of the following:
ails on LED functions, see “Camera
hedule” on page 143.
ect the
ect the
63
Page 80

L-View for Mac
2. Under Motion Detection Sensitivity, select the motion detection sensitivity between
1 (High) and 10 (Low). If Motion Detection Sensitivity is set to 1, motion detection will
be triggered if a moving object is larger than 1% of the video area. If it is set to 10, a
moving object must be larger than 10% of the video area to trigger motion detection.
save changes. Enter the camera admin User Name (default: admin)
3. Click Update t
and Password (default: left blank) and click OK. Click OK to exit the settings window.
NOTE: The camera may reboot after settings are changed. Wait about 30 seconds and
h
en double-click the camera in Camera List or Auto Search to reconnect to the camera.
t
o
4.5.4 CAMERA INFO TAB
The camera info tab shows system information about the camera.
To access the camera info tab:
• Right-click on the camera in Camera List and select Video Sett
Camera Info tab.
64
ings. Then select the
Page 81

L-View for Mac
Start of night mode
(8:00 PM)
Return to day mode
(8:00 AM)
EXAMPLE
4.5.5 CONFIGURING NIGHT MODE SETTINGS
Configure when the camera uses day or night mode. When day mode is on, the camera
sees in color. When night mode is on, the camera sees in black and white, and the
Infrared LED turns on to enable night vision.
English
To configure night mode settings:
1. Right-click on the camera you want to configure in Camera List and select Night
mode c
2. Select one of the following:
• Aut
the amount of light in the room.
• Scheduled time of night mode: Camera will switch between day mode and night
mode at a scheduled time each day. If using this option, use the first set of drop-down
menus to select (in 24-hour time) the time the camera will switch to night mode and
the second set of drop-down menus to select when the camera will return to day
mode.
ontrol.
o: Camer
a will automatically switch between day mode or night mode, based on
65
Page 82

L-View for Mac
Select day or night mode
• Manual night mode control: Manually select day mode or night mode. If using this
option, under Mode, select Day for day mode or Night for night mode.
3. Click Update to apply changes to your camera. Enter the admin username (default:
admin) and password (default: left blank) for the camera and click OK. Click OK to
exit the settings window.
NOTE: The camera may reboot after settings are changed. Wait about 30 seconds and
hen double-click the camera in Camera List or Auto Search to reconnect to the camera.
t
66
Page 83

iPhone App
Video
information
Disconnect button (only
shown in portrait mode)
Record video to phone
memory; press again to
stop recording
Save a snapshot of the
camera on your phone
Play an audio alarm on the
camera (speaker required;
not included)
Activate 2-way-audio
(intercom) using the phone
microphone (speaker
required; not included)
5. IPHONE APP
The app for iPhone is called Lorex Ping iPhone.
For instructions on connecting to your camera using an iPhone, see “Connecting to your
Camera on iPhone” on page 12.
5.1 LIVE VIEWING WITH LOREX PING FOR IPHONE
You can use Lorex Ping in portrait or landscape mode. Tilt the phone to switch between
portrait or landscape.
English
67
Page 84

iPhone App
Turn off 2-way-audio
Adjust speaker volume
5.1.1 USING 2-WAY-AUDIO (INTERCOM)
1. While viewing, touch to activate 2-way-audio (intercom) using the phone
microphone (speaker required; not included).
• A volume slider appears that allows yo
• Touch again to turn off 2-way audio.
5.1.2 TAKING SNAPSHOTS
u to adjust the speaker volume.
• While viewing, tap to take a snapshot from the camera. You can view snapshots
using the Camera app or save photos to your computer by connecting your iPhone
to your computer using a USB cable.
5.1.3 RECORDING VIDEO TO IPHONE
You can manually record video from your camera directly to your iPhone’s built in
memory.
To record video to your iPhone’s memory:
1. While viewing, tap
2. Tap
68
again to stop recording. To view the recorded video, see below.
to start recording.
Page 85

iPhone App
Tap the camera you would
like to playback video from
5.2 PLAYING BACK VIDEO RECORDED ON IPHONE
After using the record button to record video to your iPhone, you can playback video on
iPhone.
5.2.1 USING PLAYBACK
1. From the Camera List, tap Playback ( ).
NOTE: If you are still connected to the camera, tap Disconnect to return to the Cam
List. Disconnect only appears when holding the phone in portrait mode.
2. Tap the name of the camera you would like to select.
3. Tap the date of the video recording you would like to playback. Then tap the desired
video file to start playback.
4. Use the on-screen video controls to control playback. Tap St
list.
op to r
eturn to the file
era
5.3 PLAYING BACK VIDEO RECORDED ON
English
MICROSD ON IPHONE
You can playback video recorded on the camera microSD card (not included) on your
iPhone. For details on setting up microSD recording, see “Configuring microSD
Recording” on page 83.
To play back video recorded on the camera microSD card:
1. From the Camera List, tap
2. Scroll down and tap SD ca
rd playback.
to open the camera settings page.
69
Page 86

iPhone App
Select camera for microSD
playback
Tap a day to view recorded
videos from that day.
3. Select the camera you would like to playback from.
4. The camera scans for recorded video files and shows a list of days with recorded
video. Tap a day to view recordings created on that day.
5. Tap a recording to play it.
6. Tap Disconnect t
o return to the recordings list.
5.4 USING CAMERA LIST TO EDIT CAMERA
SETTINGS
You can use the Camera List to adjust the connections settings or other settings for your
camera.
To access Camera Settings:
1. Tap Camera List
2. For certain menus, you will need to ente
password before you may change settings. By default, the admin user name is admin
and the password is left blank.
70
. Then tap next to the camera you would like to edit.
r the camera admin user name and
Page 87

iPhone App
Edit Camera Name
Edit Password
Enable/disable automatic icon updates
Enable/disable saving admin user name and
password next time entered
Tap Move
5.4.1 EDITING CAMERA CONNECTION SETTINGS
You can edit your camera connection information. This is useful if you change the
password of the camera or if you want to save the admin user name and password, so
you don’t have to enter it to make settings changes.
To edit camera connection settings:
1. In Camera List, tap
2. Change the Name and Password as needed.
3. Under Dynamic icon update
every time you connect to the camera, or select OFF to keep the icon as is.
next to the camera you would like to edit.
, select ON to have the camera icon automatically update
English
e
4. Under Sav
name and password the next time you enter it, or OFF to require the admin user
name and password whenever settings changes are made.
5. Tap Back t
admin password, select ON to have Lorex Ping save the admin user
o
save changes and return to camera list.
5.4.2 DELETING CAMERAS FROM CAMERA LIST
1. In Camera List, tap Move.
71
Page 88

iPhone App
Then tap Delete
Tap here
Example of Push Notification
Enable/disable push notifications for
video motion detection
Enable/disable push notifications for sound
Select sensitivity for sound push notifications
Enable/disable push notifications for PIR motion detection
2. Tap next to the camera you would like to delete then tap Delete to confirm.
3. Tap Done.
5.4.3 EDITING ALARM NOTIFICATION SETTINGS (PUSH
NOTIFICATIONS)
Push Alarm Notifications can be set up to create a notification straight to your iPhone
when motion or sound is detected by the camera. Push Alarm Notifications go directly to
the notifications area on your device.
To enable Push Alarm Notifications:
1. In Camera List, tap
next to the camera.
2. Tap Alarm notification.
72
Page 89

iPhone App
Select Mobile Bandwidth
Enable/disable auto resolution and frame
rate adjustement
Select Resolution
Enable/disable audio streaming
Select Frame rate
3. Under Motion, select ON to enable Push Alarm Notifications when motion is detected
using video motion detection or OFF to disable.
e
4. Under PIR, sel
using the PIR motion sensor or OFF to disable.
5. Under Sound, sel
by the camera or OFF to disable. Under Sound Sensitivity, select a sensitivity for
Sound Push Alarm Notifications between 1 (lowest) and 10 (highest).
6. Tap Updat
e t
ct ON to enable Push Alarm Notifications when motion is detected
e
ct ON to enable Push Alarm Notifications when sound is detected
o save your settings
5.4.4 EDITING CAMERA MOBILE STREAMING SETTINGS
Configure the camera image quality settings for streaming to mobile devices (i.e. smart
phones and tablets). Please note that less bandwidth is generally available over mobile
networks than over WiFi or Ethernet.
English
To edit mobile streaming settings:
1. In Camera List, tap
2. Tap Stream Settings.
next to the camera.
3. Under Bandwidth, select the bandwidth for your mobile connection. If you are mainly
connecting using WiFi, you may set this setting higher.
73
Page 90

iPhone App
Select Color or Black & White
Select Brightness
Select Sharpness
Select environment settings
Select Low light sensitivity
Select quality preference
Enable/disable time stamps
Enable/disable video flip
4. Under Auto, select ON to have the camera automatically select the resolution and
frame rate based on available bandwidth. Or, select OFF to manually select the
resolution and frame rate. If you select OFF, configure the following:
• Under Resolution, sele
ct the resolution that will be used when connecting to the
camera using a smart phone or tablet: 320x240 (QVGA) or 640x480 (VGA).
• Under Frame rate, select the frame rate that will be used when connecting to the
camera using a smart phone or tablet between 30fps (highest) and 1fps (lowest).
5. Under Micr
ophone, sel
ect OFF to turn off audio streaming to your mobile device or
tap to select ON to turn on audio streaming to your mobile device.
e t
6. Tap Updat
o save your settings.
5.4.5 EDITING CAMERA VIDEO SETTINGS
1. In Camera List, tap next to the camera.
2. Tap Video Settings.
3. Tap Video.
74
Page 91

4. Configure the following:
iPhone App
• Video c
Video to return to Video settings.
• Brightness: Manually adjust the brightness of the image between 10 (highest) and
1 (lowest). Tap Video to return to Video settings.
• Sharpness: Manually adjust the sharpness of the image between 10 (highest) and 1
(lowest). Tap Video to return to Video settings.
• Low Light Sensitivity: Set the camera's sensitivity in low light environments between
Very High (highest), High , and Normal (lowest). Tap Video to return to Video settings.
• Place: Select Outdoor for well lit environments. Select Indoor if you notice strip lines
in the image or if the picture is too dark on the Outdoor video setting. Select Indoor
+ Sunlight if the picture is too bright on the Indoor Video setting. If you select an
indoor setting, select 60Hz or 50Hz to adjust the camera for the frequency of your
indoor lighting. Tap Video to return to Video settings.
• Preference: Select whether you would like the camera to reduce the image quality
or the frame rate when bandwidth increases or decreases. Select Video Motion to
have the camera maintain the frame rate and reduce image quality when bandwidth
is insufficient. Select Image Quality to have the camera maintain image quality and
reduce frame rate when bandwidth is insufficient. Select Better Quality to have the
camera maintain frame rate and increase quality when bandwidth is sufficient. Select
olor: Select Colored to view the camera in color or select Black & white. Tap
English
Best Quality to have the camera maintain the frame rate and increase quality to the
maximum speed of the connection. Tap Video to return to Video settings.
• Time Display on Video: Select ON to enable time stamps on video or OFF to disable
time stamps.
• Video flip: Select ON to flip the camera image vertically and horizontally or select
OFF for the normal orientation. This is useful if the camera has been mounted to a
wall or ceiling upside down.
5. Tap Video Settings when finished making changes, then t
settings.
ap Update to save your
5.4.6 CONFIGURING LED CONTROL AND MOTION DETECTION
SENSITIVITY
Configure the behavior of the camera status LED's. This is useful if you want the camera
to be harder to spot at night. You can also configure the sensitivity for video motion
detection.
75
Page 92

iPhone App
Select LED behavior
Select video motion detection sensitivity
To configure LED’s and motion detection sensitivity:
1. In Camera List, tap
2.Tap Video Settings. Then tap Contr
2. Under Status LED, select one of the following:
• Normal: LED's will function as normal. For details on LED functions, see "Camera
Ov
erview" on page 1.
• Always turn off: LED's are turned off at all times.
• Turn off after network connected: LED's turn on when the camera is powered on
and turn off once a network connection is made.
3. Tap Contro
l to return to the Control menu.
next to the camera.
ol.
4. Under Motion Sensiti
and 10 (Low). If Motion Detection Sensitivity is set to 1, motion detection will be
triggered if a moving object is larger than 1% of the video area. If it is set to 10, a
moving object must be larger than 10% of the video area to trigger motion detection.
Tap Control to return to the Control menu.
NOTE: This setting does not affect the PIR motion detector.
5. Tap Video Settings when finished making changes, then t
settings.
vity, select the motion detection sensitivity between 1 (High)
a
p Update to save your
5.4.7 CONFIGURING NIGHT MODE SETTINGS
Configure when the camera uses day or night mode. When day mode is on, the camera
sees in color. When night mode is on, the camera sees in black and white, and the
Infrared LED turns on to enable night vision.
To configure Day/Night mode:
1. In Camera List, tap
next to the camera you would like to edit.
76
Page 93

2. Tap Video Settings. Then tap Night Mode Control.
Select Night Mode
control type
Select Schedule to schedule
day/night mode switch
Tap to configure day/
night mode schedule
3. Select one of the following:
iPhone App
• Auto: Camer
a will automatically switch between day mode or night mode, based on
the amount of light in the room.
• Schedule: Camera will switch between day mode and night mode at a scheduled
times each day. If using this option, tap under Schedule time of night mode, use the
sliders to set the Start time (when night mode begins each day) and End time (when
night mode ends each day), then tap OK.
English
77
Page 94

iPhone App
Select DHCP or Static
If Static, configure IP
address information
Select Manual
Select Day or Night mode
• Manual: Manually select day mode or night mode. If using this option, select Day for
day mode or Night for night mode.
4. Tap Update to save your changes.
5.4.8 EDITING CAMERA WIRED NETWORK SETTINGS
Configure the camera IP address when connected using Ethernet. Select DHCP or Fixed
IP.
To edit camera wired network settings:
1. In Camera List, tap
2. Tap Camera
3. Tap Netwo
Settings.
rk then Wired Network.
next to the camera you would like to edit.
78
Page 95

iPhone App
Slide Wi-Fi to ON
Tap your WiFi network
Tap Other to add a hidden WiFi
network
4. Select DHCP (recommended) to allow the camera to automatically obtain an IP
address from the router or Static to use fixed IP address settings. If you select Static,
configure your IP Address, Subnet mask, Default gateway, DNS1, and DNS2.
e t
5. Tap Updat
o save your settings.
5.4.9 EDITING CAMERA WIFI NETWORK SETTINGS
Configure WiFi network settings for the camera. To setup the camera with a WiFi
network, see “iPhone WiFi Setup” on page 23.
To edit camera WiFi settings:
1. In Camera List, tap
2. Tap Camera
3. Tap Netwo
4. Slide WiFi to ON to
5. Tap a WiFi network and enter the password to connect.
• To connect to a hidden WiFi network, tap Other. Ente
type and tap Add. Tap the network name from the list and enter the password.
Settings.
rk then WiFi Network.
enable WiFi on the camera and scan for available networks.
next to the camera you would like to edit.
r the SSID and select the security
English
6. Wait for the update to complete.
7. Remove the Ethernet cable from the camera. It will connect to the WiFi network.
o
When it is c
8. Press Camer
nnected, the blue Network LED will be on or flashing.
a
Settings then Camera List to exit the edit camera screen.
79
Page 96

iPhone App
Enable/disable email notifications
Select email triggers
Select motion sensitivity for video motion
Enable/disable email notifications
9. Tap the camera in the Camera List to connect. If you cannot connect, check to make
sure you have entered the correct wireless password and that the camera is in signal
range of your wireless router.
5.4.10 ENABLING EMAIL NOTIFICATIONS
Configure email alarms. The camera can be set up to send email alerts when motion is
detected. Email alarms include a .jpg attachment.
To enable email notifications:
1. In Camera List, tap
2. Tap Camera
Settings.
3. Tap Schedule then
next to the camera.
Email Alarm.
4. Under Email trigger, select ON to enable email notifications or OFF to disable. Then
under Send Email, select ON to enable email notifications.
5. Under Mot
ion sensiti
vity, select the motion detection sensitivity between 1 (High)
and 10 (Low). If Motion Detection Sensitivity is set to 1, motion detection will be
triggered if a moving object is larger than 1% of the video area. If it is set to 10, a
moving object must be larger than 10% of the video area to trigger motion detection.
Tap Email alarm to return to the Email Alarm menu.
NOTE: This setting does not affect the PIR motion detector.
80
Page 97

6. Check the following trigger options for email alarms:
Enter recipient email addresses
iPhone App
• Motion: Use Video motion dete
looks for movement in the image to determine if there is motion. This means that
there may be false alarms caused by changes in lighting, trees moving in the wind,
etc.
• PIR: Use the PIR motion detector to trigger email alarms. The PIR motion detector
uses changes in temperatures (e.g. from a person moving around in front of the
camera) to determine if there is motion. PIR motion detection is less effective at
higher temperatures.
al
NOTE: You may
triggers.
• Schedule: Send email alarms based on the settings c
menu.
• Disable: Disable email alarms.
7. Enter up to 3 email addresses under Recipient1~3 that will re
so select both PIR and Motion to receive alarms from both motion
ction to trigger email alarms. Video motion detection
onfigured in the Scheduling
ceive email alarms.
English
8. Tap Update to save your changes.
NOTE: If you want to use a custom SMTP server to send Email messages, click SMTP
Settings, enter your SMTP server information, and tap OK.
5.4.11 ENABLING SPEAKER ALARMS
Configure audio alarms using a speaker (not included) connected to the camera. Audio
alarms can be set up to go off when the camera detects motion. This is helpful if you want
to scare off intruders.
To configure speaker alarms:
1. In Camera List, tap
2. Tap Camera
Settings.
next to the camera you would like to edit.
81
Page 98

iPhone App
Select speaker alarm triggers
Test speaker alarm
Select number of times speaker alarm will
repeat
3. Tap Schedule then Speaker Alarm.
4. Under Speaker Alarm Trigger, check the triggers that will cause speaker alarms:
• Motion: Use Video motion dete
ction to trigger audio alarms. Video motion detection
looks for movement in the image to determine if there is motion. This means that
there may be false alarms caused by changes in lighting, trees moving in the wind,
etc.
• PIR: Use the PIR motion detector to trigger audio alarms. The PIR motion detector
uses changes in temperatures (e.g. from a person moving around in front of the
camera) to determine if there is motion. PIR motion detection is less effective at
higher temperatures.
al
NOTE: You may
so select both PIR and Motion to receive alarms from both motion
triggers.
• Schedule: Create audio alarms based on the settings set in the Scheduling menu.
• Disabl
5. Under Alarm Loop Times, sele
e: Disable speaker alarms.
ct the number of times you would like the speaker
alarm to repeat when alarms occur.
e
6. Tap Alarm T
st to sound a test alarm.
7. Tap Update t
82
o save your settings.
Page 99

iPhone App
Enable microSD recording
Select Always recording or
Schedule recording
Select if you want the camera to
overwrite or stop recording when
the microSD card is full
5.4.12 CONFIGURING MICROSD RECORDING
Configure video recording to the microSD card (required; not included). To playback
recordings saved on the microSD card, use L-View or the iPhone, iPad, or Android apps.
To configure microSD card recording:
1. Make sure a microSD card (not included) is inserted into the camera. It is
commended to format the microSD card before using it with the camera.
re
2. In Camera List, tap
3. Tap Camera
4. Tap Schedule then
5. Under Recording, select ON to enable microSD recording or OFF to disable.
Settings.
SD-Card.
next to the camera you would like to edit.
English
6. Check one of the following recording options:
• Always Recording: Camera will record continuously at all times.
• Schedul
schedule.
NOTE: To enable Motion detection recording using iPhone, you must use Schedule
recording. Then, create a schedule in the Scheduling menu with Motion trigger, PIR
trigger, or both Motion trigger and PI
7. Under When disk space full, c
oldest recordings when the microSD card is full or select Stop recording to set the
camera to stop recording when the microSD card is full.
8. Tap Updat
e Recording: Camera will record according to settings set in the recording
e t
o save your settings.
R trigger selected.
heck Overwrite to set the camera to overwrite the
83
Page 100

iPhone App
Add Schedule
Configure triggers for email
alarms in this schedule
Configure triggers for
speaker alarms in this
schedule
5.4.13 CONFIGURING THE CAMERA RECORDING AND ALARM
SCHEDULE
Configure schedules for recording and alarms. Schedules can be configured separately
for alarms and recording. You can configure up to 12 schedules.
To create a schedule for alarms or recording:
1. First, you must enable alarms or recording to use the schedule.
2. In Camera List, tap
3. Tap Camera
4. Tap Schedule then
5. Tap Add Schedule.
6. Under Email Alarm, check Motion trigger to send an email alarm based on video
motion, select PIR trigger to use the PIR motion sensor, or select both Motion
Trigger and PIR trigger.
Settings.
Scheduling.
next to the camera you would like to edit.
7. Under Speaker Alarm, check Motion trigger to create an audio alarm based on video
motion, check PIR trigger to use the PIR motion sensor, or select both Motion
trigger and PIR trigger.
84
 Loading...