

Page 1
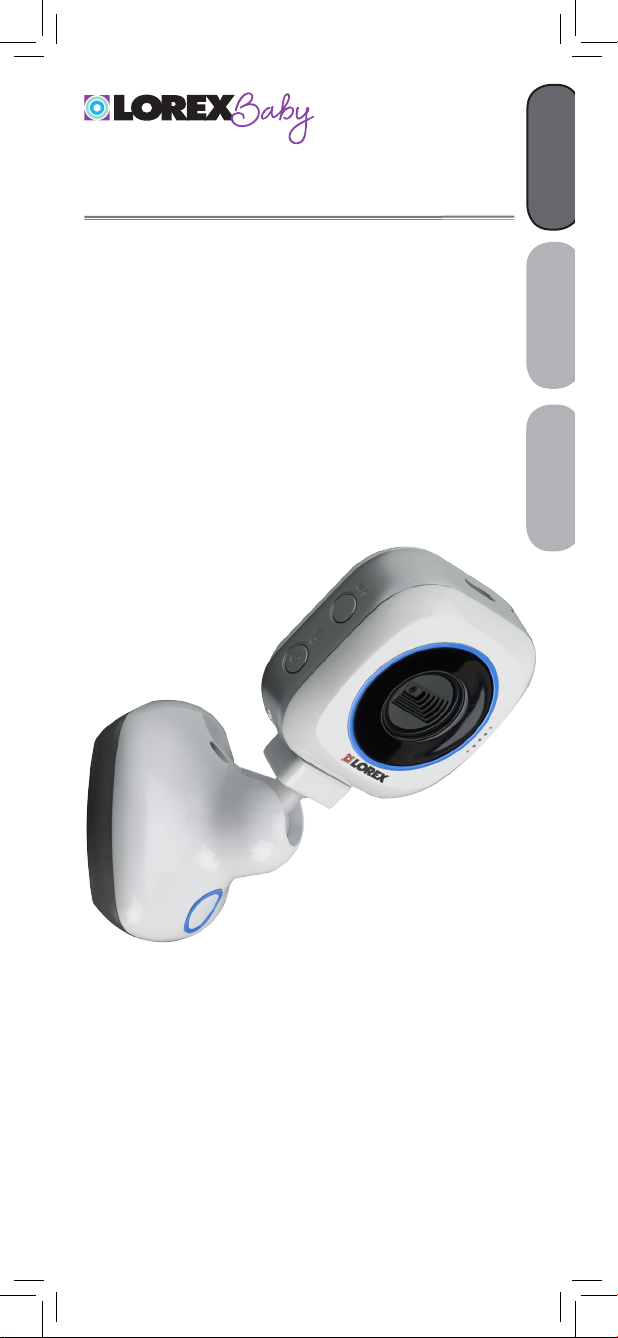
LITTLE LINK
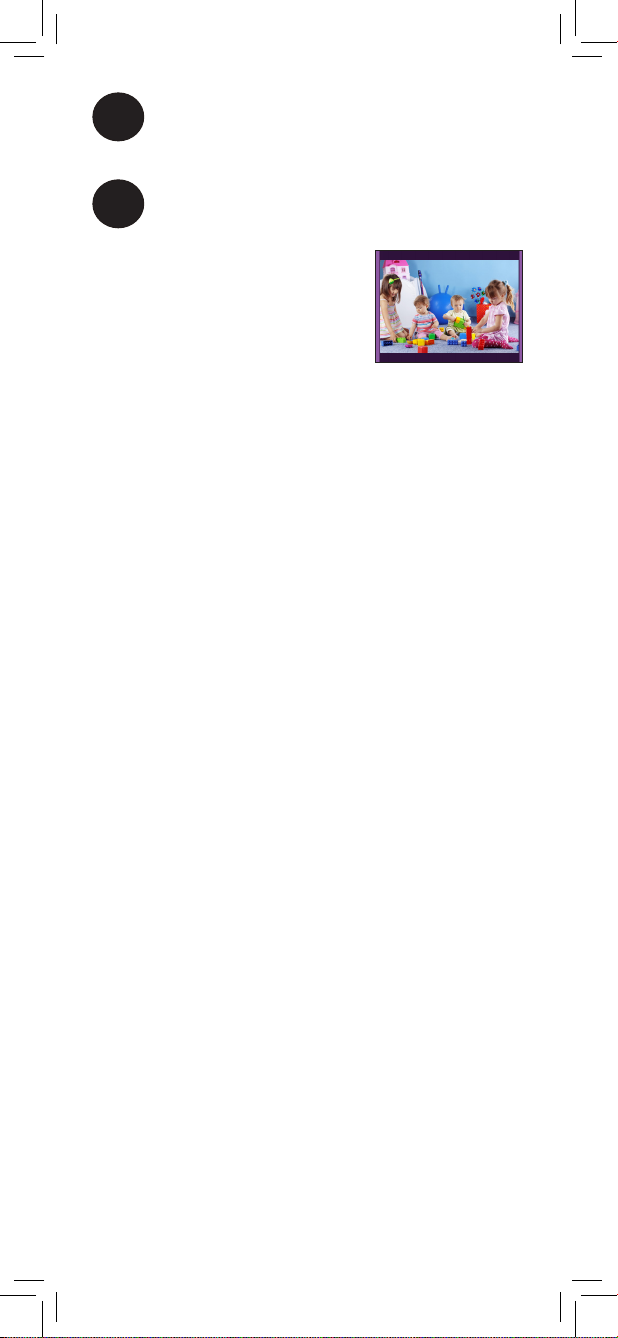
HD WIFI VIDEO BABY MONITOR
ENGLISH
USER’S GUIDE
Version 1.0
FRANÇAIS
ESPAÑOL
www.lorexbaby.com
Page 2
Safety Precautions
• Adult assembly is required. Keep small parts away
from children when assembling.
• This product is not a toy. Do not allow children or
infants to play with it.
• This video monitor is not a substitute for responsible
adult supervision.
• Do not use in wet or humid areas.
• Test the mobile app before extended use. Become
familiar with its functions.
• Do not use or install the camera near a heat source,
such as a radiator.
• Do not point the camera directly towards the sun or a
source of intense light.
• Keep the cords out of reach of children and infants.
• Never use extension cords with power adapters.
• Only use the chargers and power adapters provided.
Do not use other chargers or power adapters as this
may damage the camera.
• Do not cover the camera with a towel or blanket.
• Do not use the camera near water.
• Do not touch the plug contacts with sharp or metal
objects.
• Do not connect more than one USB cable to the
camera at once.
• Keep this user’s guide for future reference.
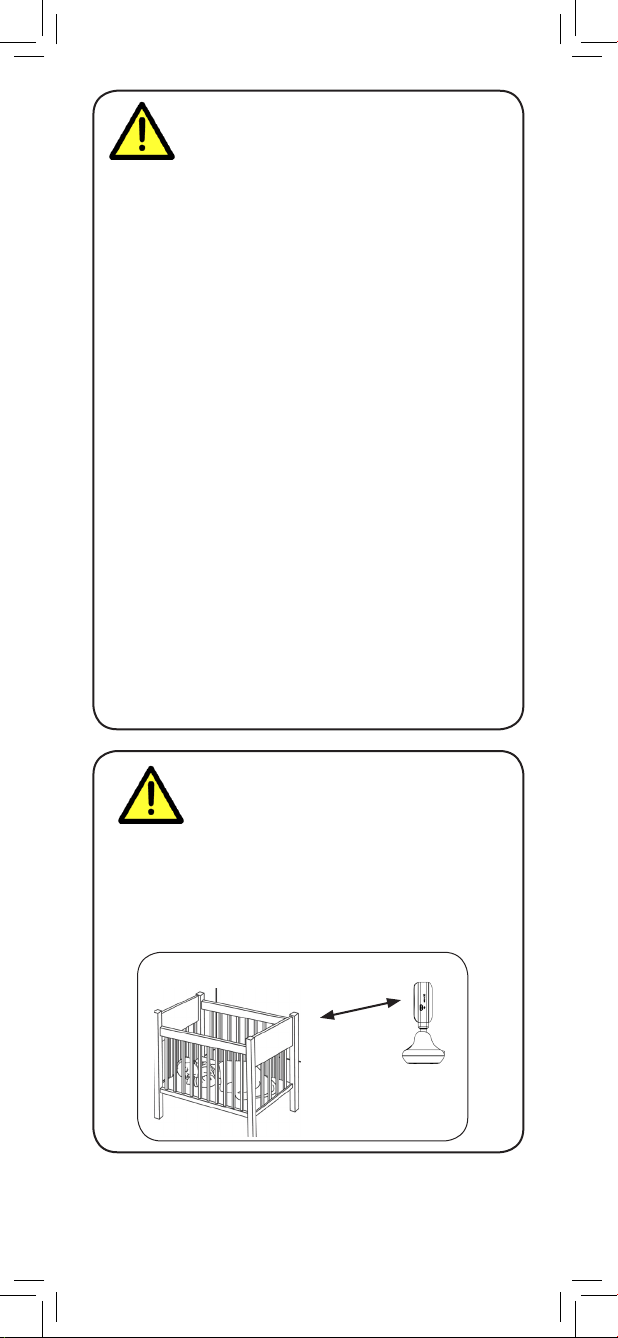
To Avoid Injury to
Children & Infants:
• MAKE SURE to keep the camera and all power
cords at least 3ft / 1m away from cribs and out of
reach of your child.
• Use the included cable clips to help keep power
cords away from your child.
3ft / 1m
Page 3

ENGLISH
Table of Contents:
Product Includes ..............................3
Camera Overview ...........................3
Getting Started ...............................5
Wall Mounting the Camera ...................... 7
Connecting to the Camera on a
Smartphone / Tablet .......................8
Hotspot Setup ......................................... 9
Cloud Setup .........................................10
Adding a Smartphone or Tablet .............. 11
Mobile App Interface .....................13
Camera List .......................................... 13
Dashboard ........................................... 13
Camera Settings Menu ..................14
Setting Date & Time ............................... 14
Video Quality .......................................15
Format SD Card (hotspot connection only) ......... 16
Alert Notification Menu .................17
Audio Detection .................................... 18
Motion Detection ...................................18
Temperature Alert .................................. 19
E-mail Alerts (cloud connection only) ................... 20
Audio and Video Settings ..............21
Taking a Snapshot ................................. 21
Recording a Video ................................21
Talking to Your Baby .............................. 21
Audio Only Mode ................................. 22
Mute Audio .......................................... 22
Night-Light and Sleep ‘n’ Soothe ...23
Night-Light ............................................23
Sleep ‘n’ Soothe ....................................24
1
Page 4

Album Mode .................................25
Viewing Video Recordings ......................25
Viewing Snapshots ................................ 26
Viewing Alert Recordings ....................... 26
View Alert Recordings on a PC ......28
Transferring Recordings and
Snapshots to a PC (Android users only) ..30
Restore to Default Settings ............31
Upgrading Camera Firmware ........32
Delete Camera (cloud connection only) ....33
Technical Specifications .................34
Troubleshooting ............................35
Need Help? ...................................35
2
Page 5
ENGLISH
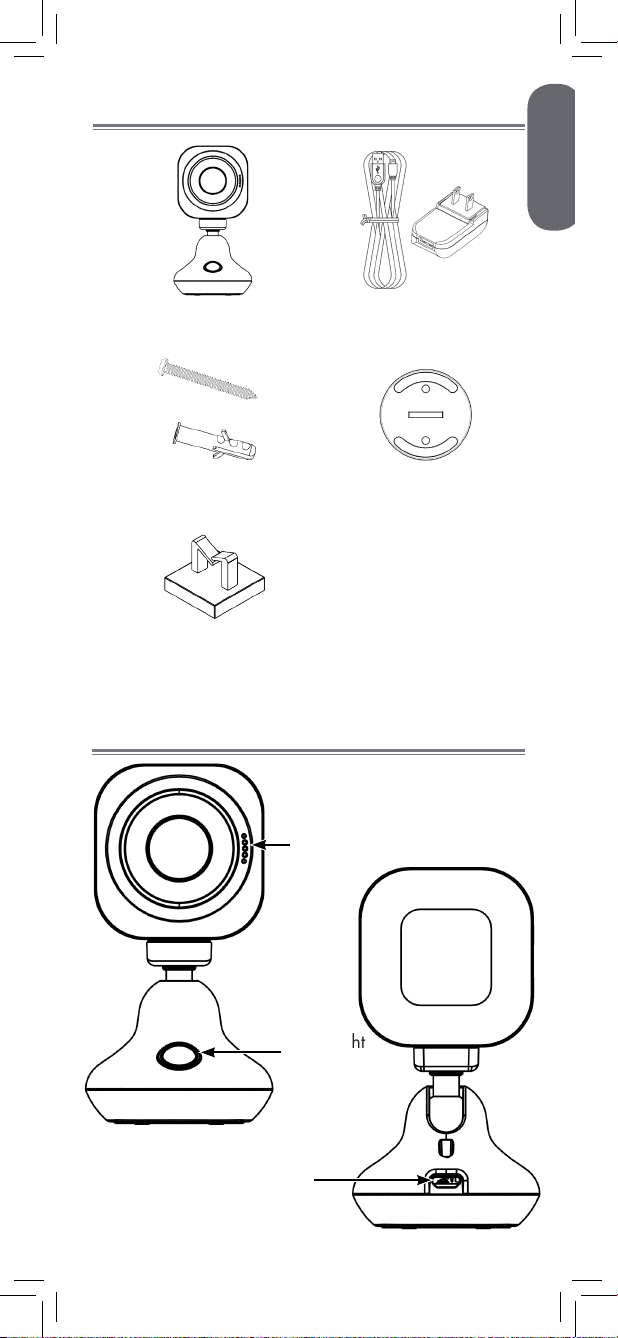
Product Includes
x1*
Camera USB cable &
power adapter
x1*
x2*
x2*
Screws & anchors
x3*
Cable clips
*Contents may vary by model
Camera Overview
Speaker
x1*
Mounting plate
Night-light
button
Micro-USB
3
Page 6
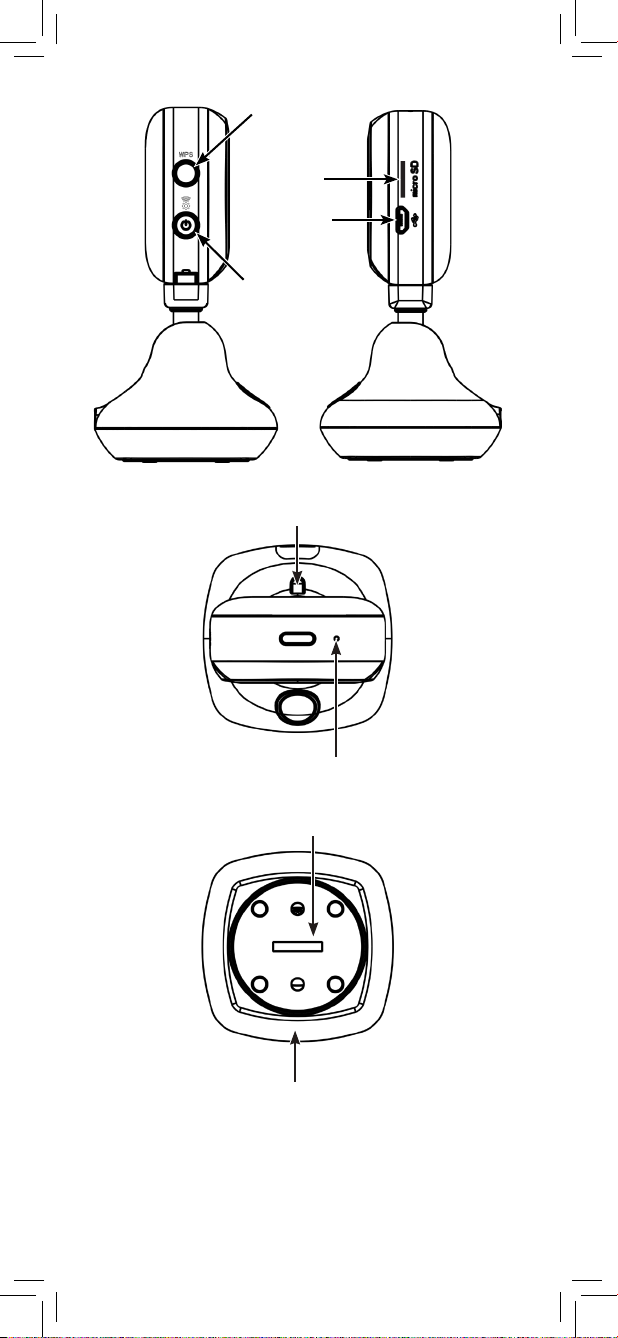
WPS*
MicroSD
slot
Micro-USB
Power / hotspot
Temperature sensor
Microphone
Mounting / base plate
Night-light
* If your wireless router has a WPS button, you can
connect your camera to the Internet by pressing the WPS
button on your router, then pressing the WPS button on the
camera.
4
Page 7
ENGLISH
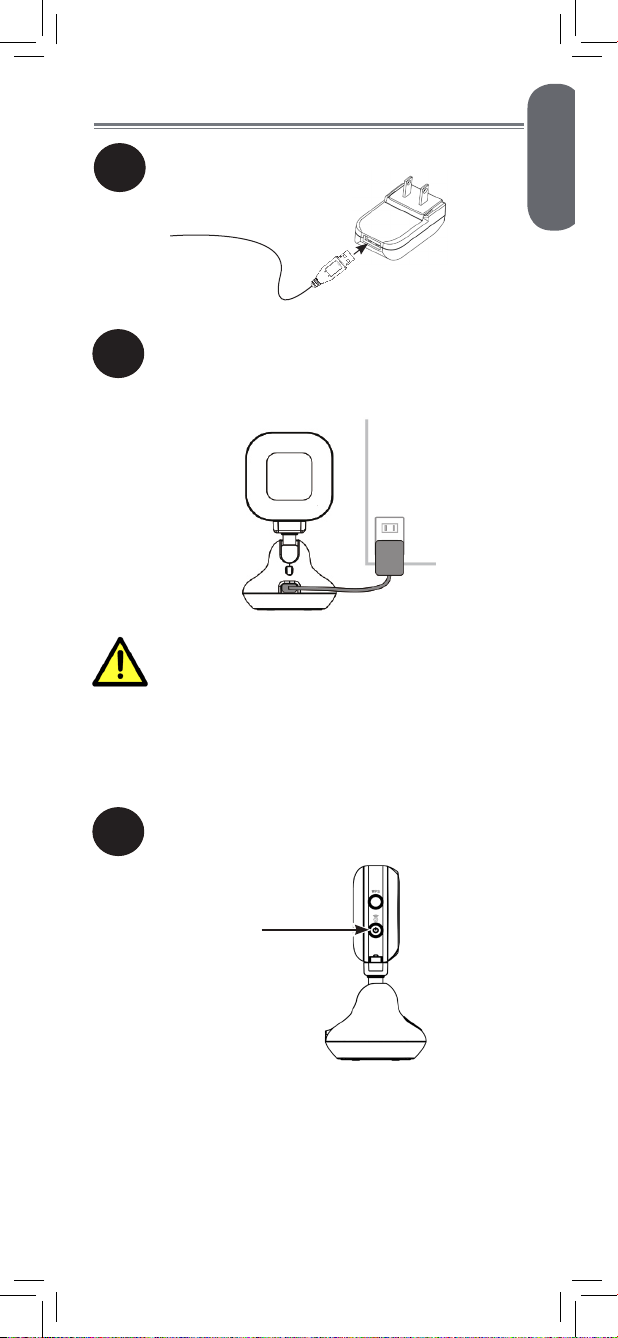
Getting Started
Connect the USB cable to the power
1
adapter.
Connect the other end of the USB cable
2
to the camera base. Connect the power
adapter to a power outlet.
Make sure all power cables are at least
3ft / 1m away from the crib and out of
reach of your child.
Use the included cable clips to help
keep power cords away from your
child.
Press and hold the power button on the
3
camera for one second.
Power button
The camera battery is charged out
of the package. For future use, plug
in the camera for at least 6 hours to
fully charge the battery.
5
Page 8
The indicator LED glows
red to show that the
camera is powered on.
After a few seconds,
the LED will glow
steadily orange.
To power off the camera:
Press and hold the power button on the
1
camera for 5 seconds.
Power button
The camera beeps once and the LED
indicator turns off. The camera starts
up in hotspot mode when it is powered
back on.
If the camera is unresponsive:
Press and hold the power button on the
1
camera for 10 seconds.
Power button
The LED indicator turns red.
6
Page 9

ENGLISH
Wall Mounting the Camera
Before permanently mounting the camera:
• Determine where you will get the best view of your
baby.
• Ensure the power cable is long enough to power the
camera.
Make sure all power cables are at
least 3ft / 1m away from the crib and
out of reach of your child.
Use the included cable clips to help
keep power cords away from your
child.
Cable clips
Using a coin, turn the mounting plate on the
1
camera base counter-clockwise to remove it
from the base.
Hold the mounting plate against the wall
2
where you would like to mount the camera.
Use a pencil to mark holes for the mounting
3
screws.
Drill holes where marked using a drill.
4
Tap the included anchors into the holes.
5
Attach the mounting plate to the wall using the
6
included mounting screws.
Attach the camera base to the mounting plate.
7
Make sure the locking mechanism on the plate
lines up with the indent in the camera base.
Twist the camera base clockwise to secure it to
8
the mounting plate.
The package includes an extra mounting
plate to be attached to the camera base
when the camera is used on a flat surface.
7
Page 10
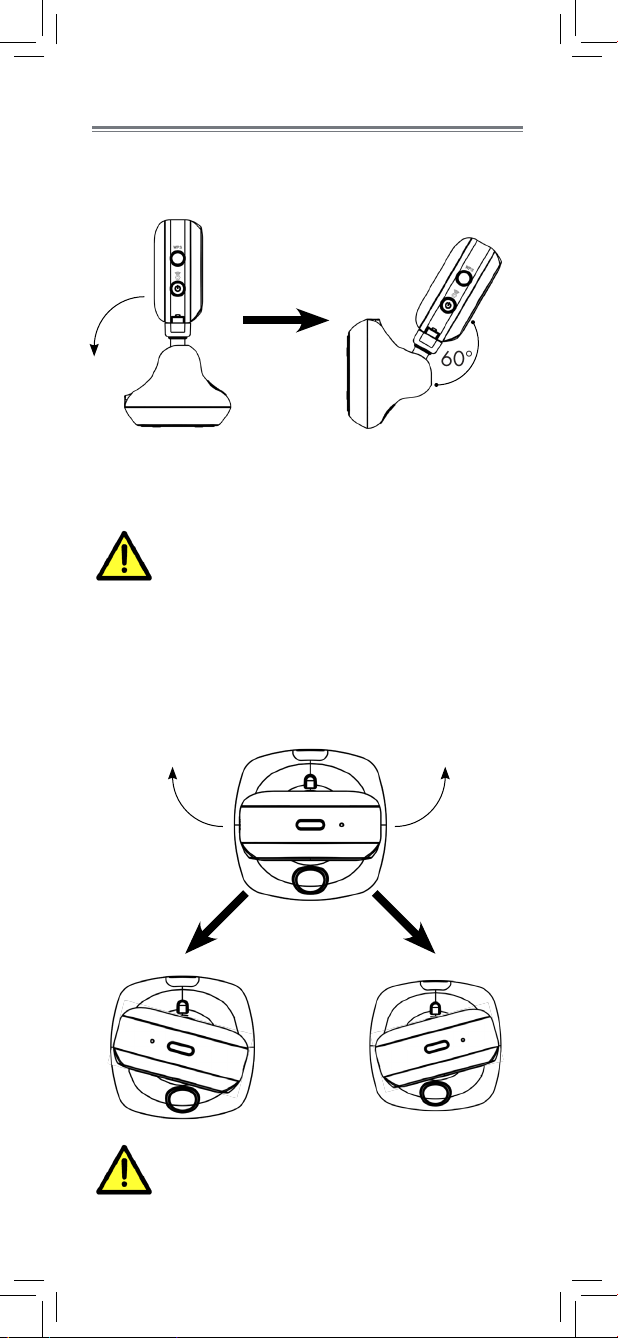
Positioning the Camera
You can tilt the camera up to 60° backward from
the upright position.
60°
This enables wall-mounted cameras to look down
at your baby’s crib from above.
Make sure all power cables are at
least 3ft / 1m away from the crib and
out of reach of your child.
Use the included cable clips to help
keep power cords away from your
child.
The camera also rotates from left and right.
Do not force the camera to tilt or
rotate further than allowed.
8
Page 11
ENGLISH
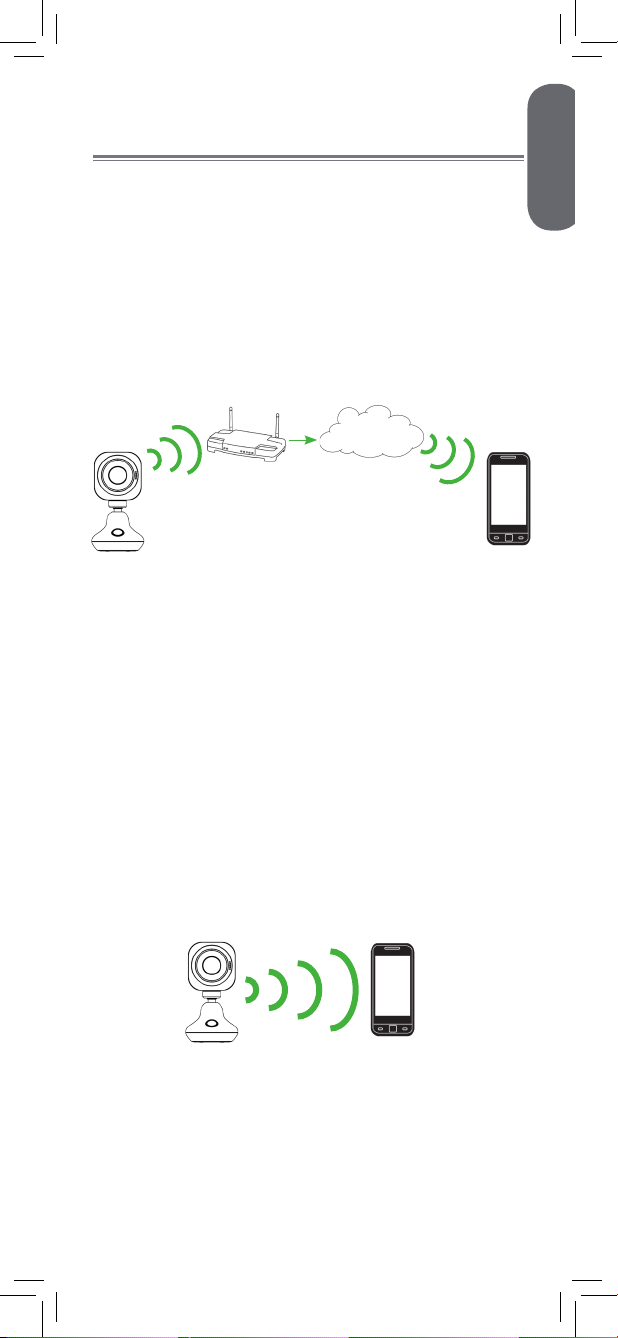
Connecting to the Camera on a
Smartphone / Tablet
There are two ways for you to connect to your
camera on a smartphone or tablet using the
Lorex Baby Link app: cloud connection and
hotspot connection.
Cloud Connection
You can also connect to the camera over the
Internet from anywhere in the world. The camera
connects to your wireless router to send data
securely over the Internet.
Internet
A cloud connection to the camera allows you to
view live video from the camera and configure
the camera’s settings online from anywhere in the
world. The camera must be within range
of your wireless router to create a cloud
connection.
To connect to the camera in cloud mode, see
“Cloud Setup” on page 10.
Hotspot Connection
You can connect to the camera on your smartphone
or tablet the same way you connect to a WiFi
network. Connecting to the hotspot creates a direct
link between the camera and your smartphone or
tablet that does not require an Internet connection.
While connected to the camera’s hotspot, you can
view live video from the camera and configure the
camera’s settings, all without an Internet connection!
Only devices within range of the hotspot
(up to 328ft / 100m) may connect to it.
To connect to the camera in hotspot mode, see
“Hotspot Setup” on page 12.
9
Page 12
System Requirements:
• iOS v6.0 or higher / Android v2.3 or higher
• Access to a WiFi internet connection
Cloud Setup
Download the free Lorex Baby Link
1
app from the App Store / Google Play
Store.
Ensure WiFi on your smartphone /
2
tablet is turned on. See the user guide
provided with your smartphone / tablet
for details.
Connect to the camera’s WiFi hotspot.
3
The hotspot appears in your available
WiFi networks as “Lorex“ followed by the
Device ID (Lorex-XXXXXXX).
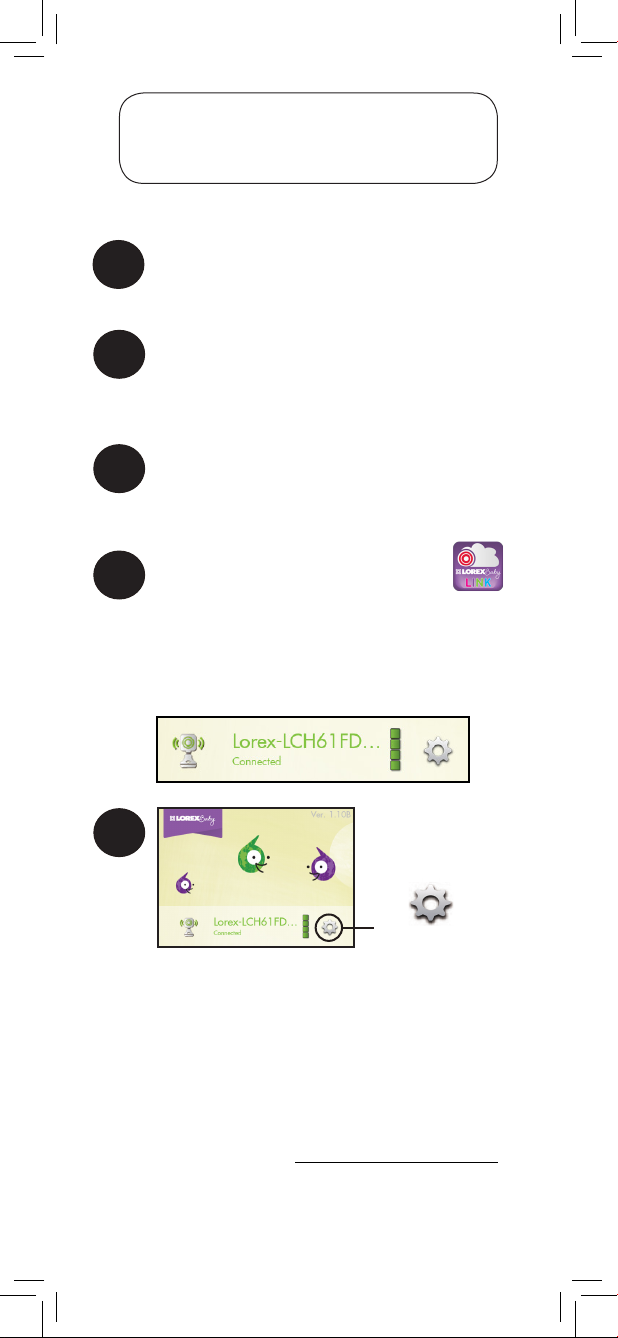
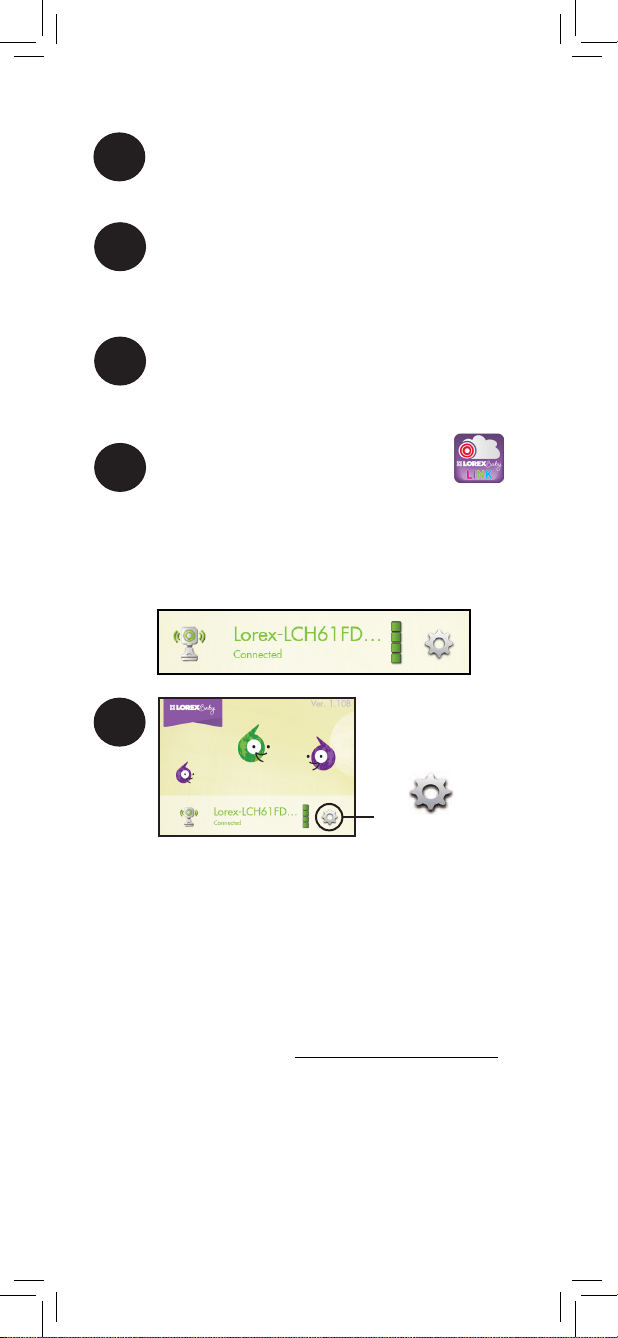
Tap the Lorex Baby Link icon ( ).
4
You are now connected to the camera’s
personal hotspot. Your camera will
appear on the main screen of the app
with a Connected status.
5
Tap beside
the camera name
You will be prompted to create a
personalized password for the camera.
Your password must be at least 6
characters in length. Write down your
password for future reference:
PASSWORD:
10
Page 13
ENGLISH
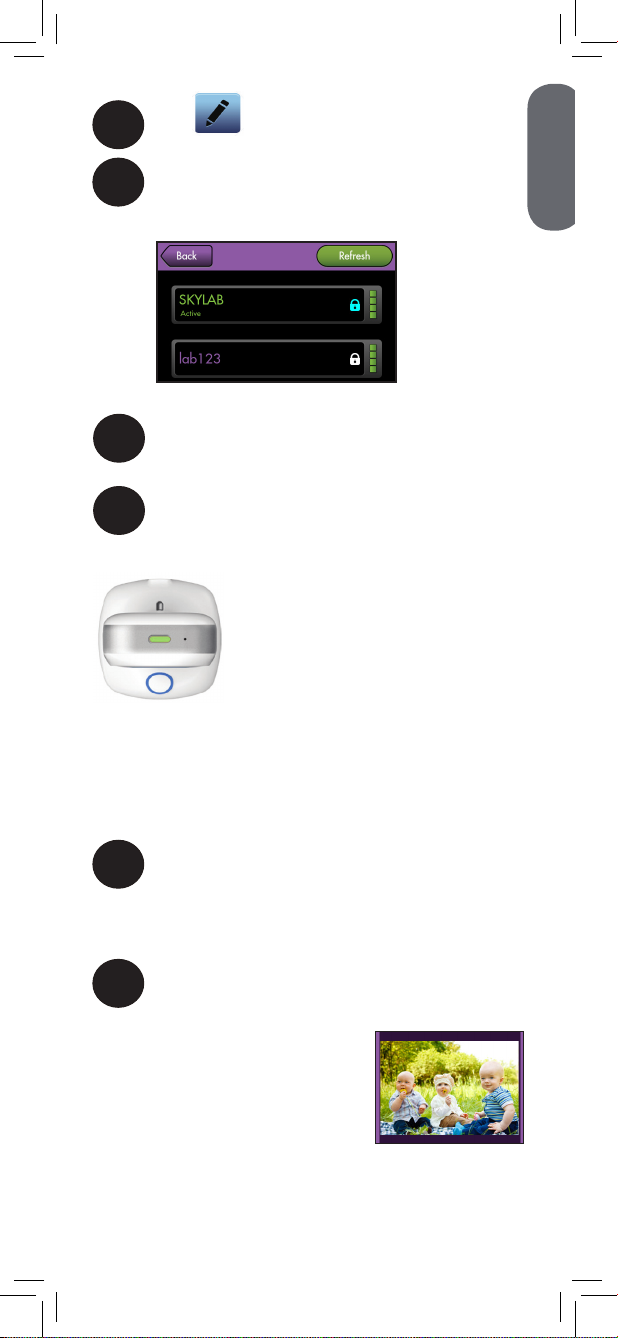
Tap under WiFi AP.
6
Select the WiFi network that will be used
7
to connect the camera to the Internet
(e.g., Home WiFi).
Enter the password for your WiFi network,
8
then tap Back.
Tap Save to save your settings to the
9
camera, then tap Back to return to the
main screen.
The indicator LED will glow
green and flash on and off.
Once the LED glows steadily
green, continue to Step 10.
NOTE: If the indicator LED continues to flash for
more than one minute, you may have entered your
WiFi password incorrectly. Press the power button
on the camera and return to Step 3.
Ensure your smartphone / tablet is
10
connected to your WiFi network.
OR
Use your mobile Internet connection.
Tap the camera name and enter the
11
password you created in Step 5.
Live video from your camera
appears on your smartphone
or tablet!
11
Page 14
Hotspot Setup
Download the free Lorex Baby Link
1
app from the App Store / Google Play
Store.
Ensure WiFi on your smartphone /
2
tablet is turned on. See the user guide
provided with your smartphone / tablet
for details.
Connect to the camera’s WiFi hotspot.
3
The hotspot appears in your available
WiFi networks as “Lorex“ followed by the
Device ID (Lorex-XXXXXXX).
Tap the Lorex Baby Link icon ( ).
4
You are now connected to the camera’s
personal hotspot. Your camera will
appear on the main screen of the app
with a Connected status.
5
Tap beside
the camera name
If this is your first time connecting to the
camera, you will be prompted to create a
personalized password for the camera.
Your password must be at least 6
characters in length. Write down your
password for future reference:
PASSWORD:
12
Page 15
ENGLISH
Adding a New Device
Once you have set up cloud connection on
one smartphone or tablet, you can allow other
devices to access the camera.
Download the free Lorex Baby Link app
1
from the App Store (iPhone® / iPad®) or
the Google Play Store (Android™).
Ensure your smartphone / tablet is
2
connected to the Internet.
Tap the Lorex Baby Link icon ( ).
3
4
Tap .
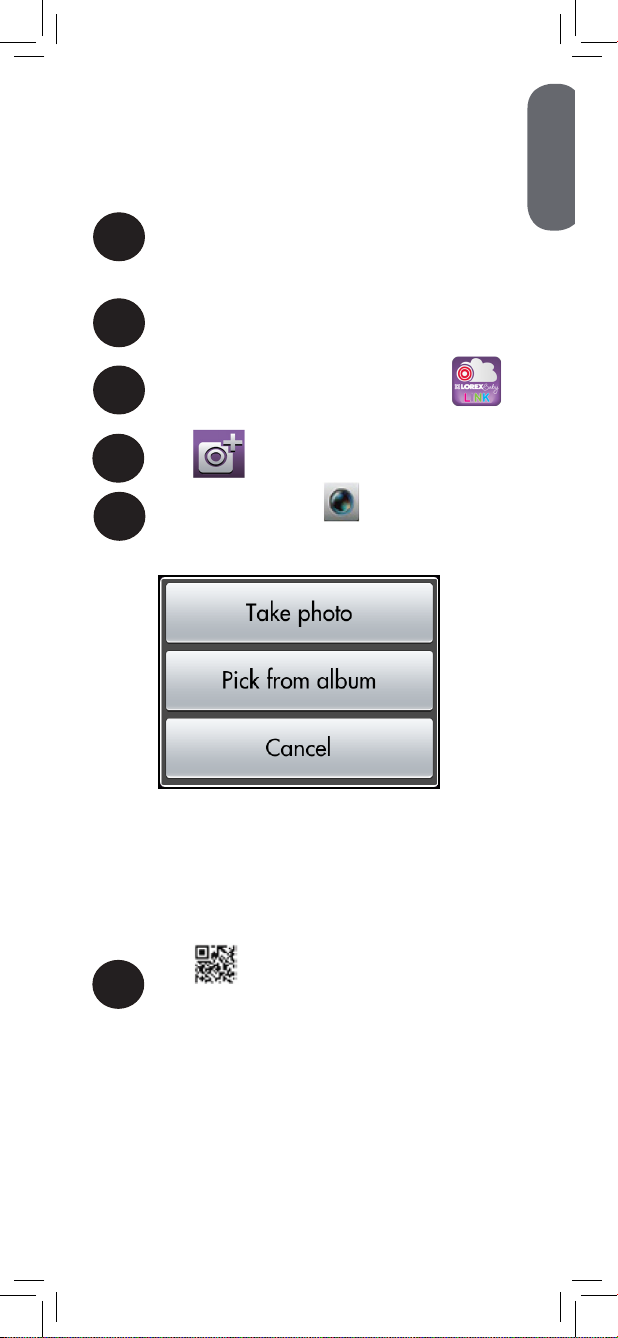
(OPTIONAL) Tap to select a picture
5
that will appear next to the camera on the
main screen of the app.
• Tap Take photo to snap a picture using the
camera on your smartphone / tablet.
• Tap Pick from album to choose an image
saved to your smartphone / tablet.
• Tap Cancel to return to the Add Camera
screen.
Tap to scan the QR code on the
6
back of the camera. You may be asked
to download Barcode Scanner if it is not
already installed on your smartphone /
tablet.
OR
Manually enter the camera’s Device ID
written underneath the QR code.
13
Page 16
Enter the password you wrote down in
7
Step 5 of “Cloud Setup” on page 10,
then tap Save.
8
Tap the camera name.
Live video from your camera
appears on a second
smartphone or tablet!
14
Page 17
ENGLISH
Using the Mobile App
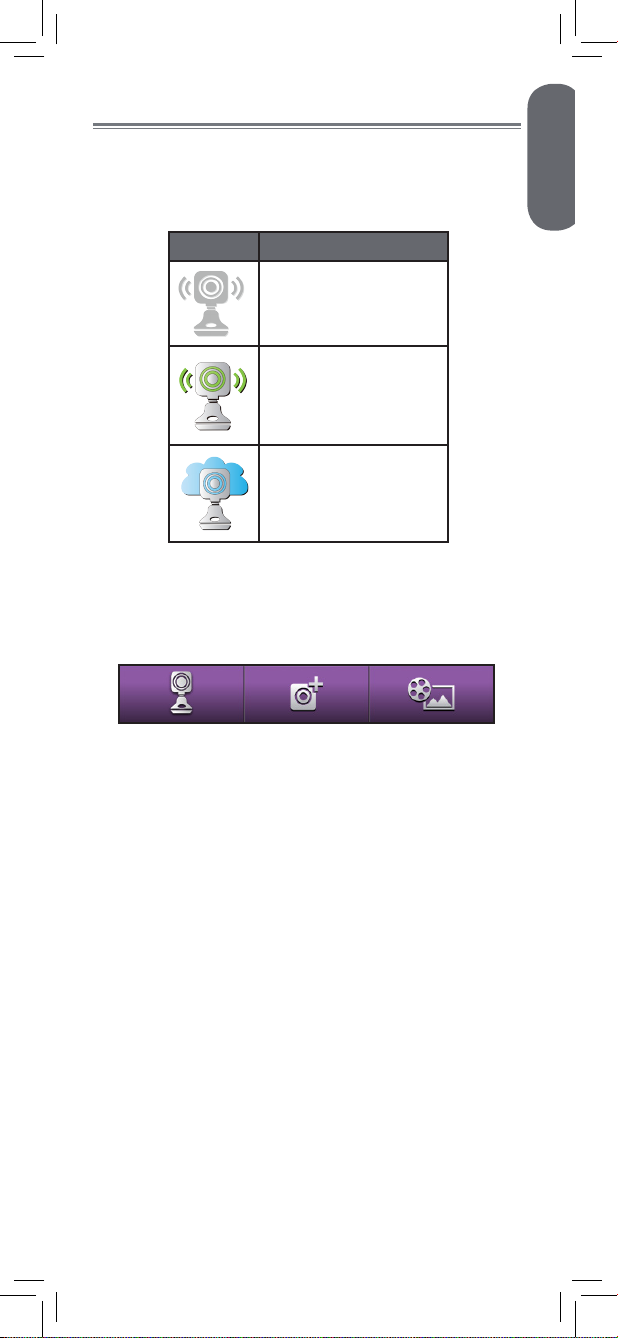
Camera List
The camera list shows all available cameras and
an icon showing the status for each camera.
Icon Meaning
The camera is
available for hotspot
connection.
Your smartphone /
tablet is connected to
the camera via hotspot
connection.
The camera is
available for cloud
connection over the
Internet.
Dashboard
The dashboard consists of three buttons at the
bottom of the main screen:
Refresh Add Camera Viewer
Refresh: Tap to refresh the camera list.
Add Camera: Once you have completed initial
setup, tap on another smartphone or tablet to
allow access to the camera. See “Adding a New
Device” on page 13 for details.
Viewer: View snapshots and videos saved to
your smartphone or tablet.
15
Page 18
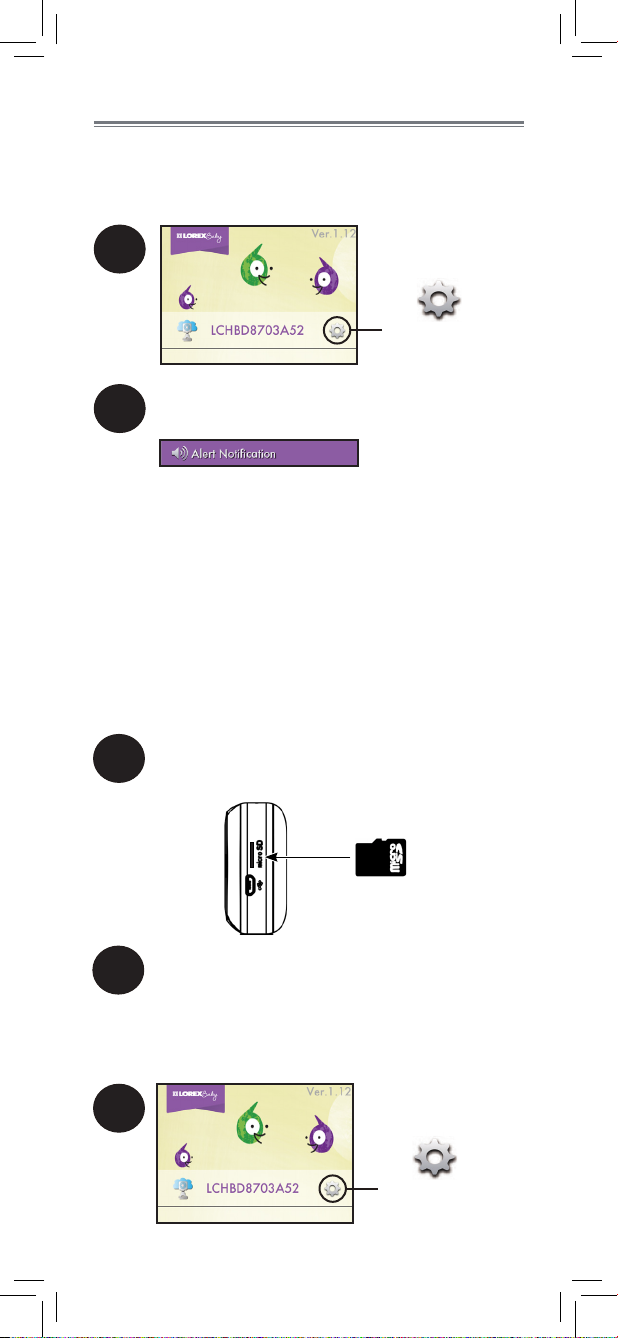
Camera Settings Menu
*
Use the app to access the Camera Settings menu.
A hotspot connection or cloud connection to
the camera is required to configure the Camera
Settings menu.
To access the Camera Settings menu:
1
Tap beside the
name of the camera
Swipe up to move down the page to
2
Camera Settings.
Setting Date & Time
The date and time are applied to the
filenames of recordings.
Option 1: Sync from device
Tap the sync icon to use your smartphone
or tablet’s date and time, then tap Save.
The time and date for the camera will be
automatically updated.
Option 2: Manual adjustment
1
2
Tap the + and - buttons to
change the date, then tap
Set
16
Tap the
date
Page 19
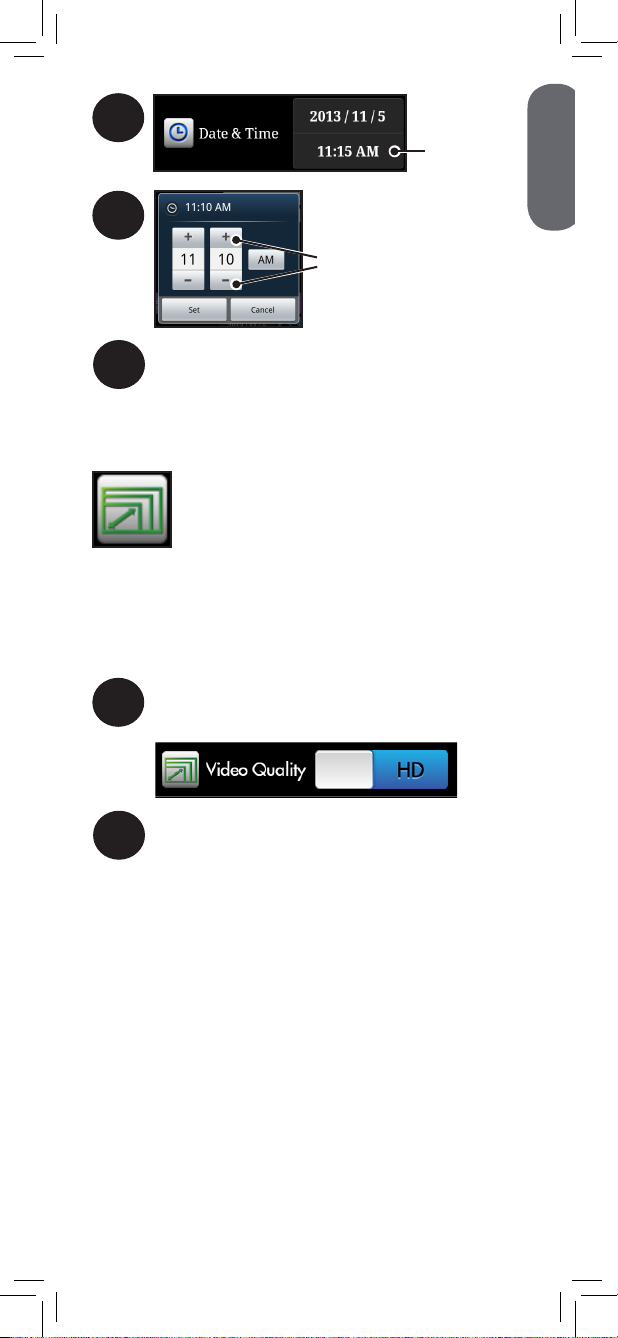
ENGLISH
3
Tap the
time
4
Tap the + and - buttons to
change the time, then tap
Set
5
Tap Save.
Video Quality
Set the viewing resolution for the
camera’s live video feed. Two
viewing options are available: HD
and SD.* It is recommended to use
SD video quality to reduce the load on your
mobile data network.
To change video quality:
Tap the switch beside Video Quality to
1
switch between HD and SD.
2
Tap Save.
Changing video quality does not affect
the camera’s recording resolution. Video
recording is always in 720p high-definition.
HD = 720p (1280x720) high-definition at 512kbps
*
SD = WVGA (960x640) standard-definition at 256kbps
17
Page 20
Setting up Mobile Notifications
Use the app to access the Alert Notification
menu.
To access the Alert Notification menu:
1
Tap beside the
name of the camera
Swipe up to move down the page to
2
Alert Notification.
You will receive a notification message whenever
an alert is triggered.
Alert Recording to microSD Card
A video sample is recorded to the camera’s
microSD card (not included) whenever an alert
is triggered. The camera supports up to 64GB
microSD cards.
To set up alert recordings:
Insert a microSD card (not included)
1
into the camera’s microSD slot as shown
below.
Press the power button on the camera to
2
switch to hotspot mode. The indicator
LED on the camera should glow
steadily orange before you
continue.
3
18
Tap beside the
name of the camera
Page 21
ENGLISH
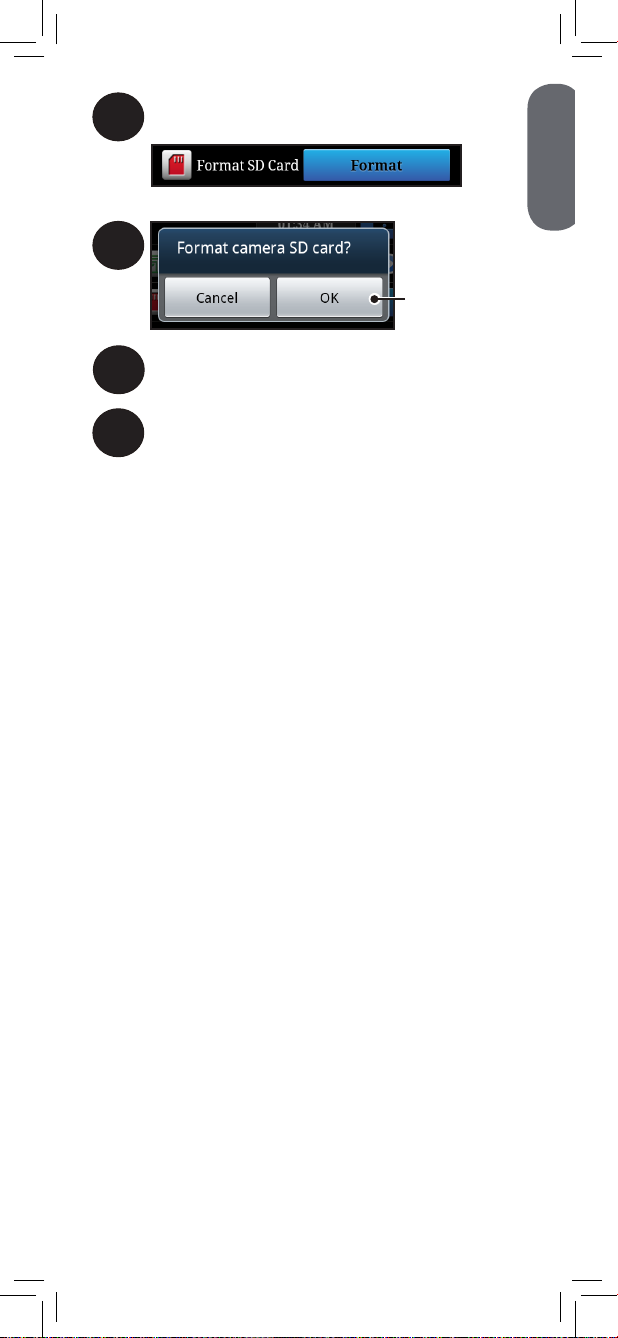
4
Tap Format beside Format SD Card.
5
6
Tap Save, then tap Back.
Enable at least one type of alert
7
notification. See the following pages
for instructions on setting up alert
notifications.
The camera automatically
overwrites the oldest recordings
saved to the microSD card (not
included) to make room for new
recordings.
Tap OK
19
Page 22
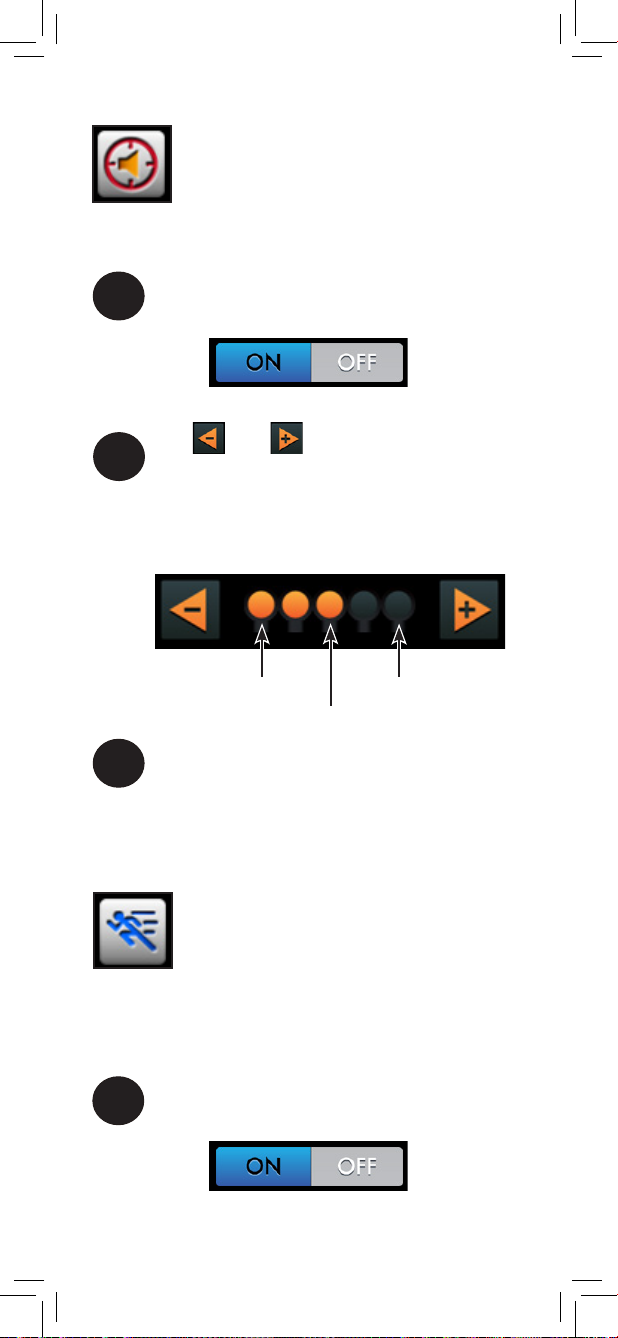
Audio Detection
Audio detection will alert you
whenever the camera detects sound
above a preset level.
To enable audio detection:
Tap ON next to Audio Detection. The ON
1
button turns blue when selected.
Tap and to configure the alert
2
sensitivity. Low sensitivity means that only
loud noises such as crying will trigger an
alert, while high sensitivity will pick up
quieter sounds, such as a whimper.
Low sensitivity
Medium sensitivity
Tap Save.
3
Motion Detection
Motion detection will alert you
whenever the camera detects
movement. You can configure how
much movement is required in order
for an alert to be triggered.
To enable motion detection:
Tap ON next to Motion Detection. The
1
ON button turns blue when selected.
20
High sensitivity
Page 23

ENGLISH
Tap and to configure the alert
2
sensitivity. Low sensitivity means that only
significant movements will trigger an alert,
while high sensitivity will pick up more
subtle movements as well.
Low sensitivity
High sensitivity
Medium sensitivity
Tap Save.
3
Temperature Alert
The temperature alert feature ensures
the baby’s room is kept at a
comfortable, safe temperature. An
alert is triggered if the temperature
gets too hot or cold. Temperature sensor is
accurate within 3°F / 1°C.
To enable temperature alerts:
Tap ON next to Temp. Alert. The ON
1
button turns blue when selected.
Tap the number beside to
2
configure the high temperature.
3
4
Tap the arrow icons
on the left to set the
desired high
temperature, then
tap OK
Tap the arrow icons on the
right to set your preferred
temperature unit
(Fahrenheit / Celsius)
21
Page 24
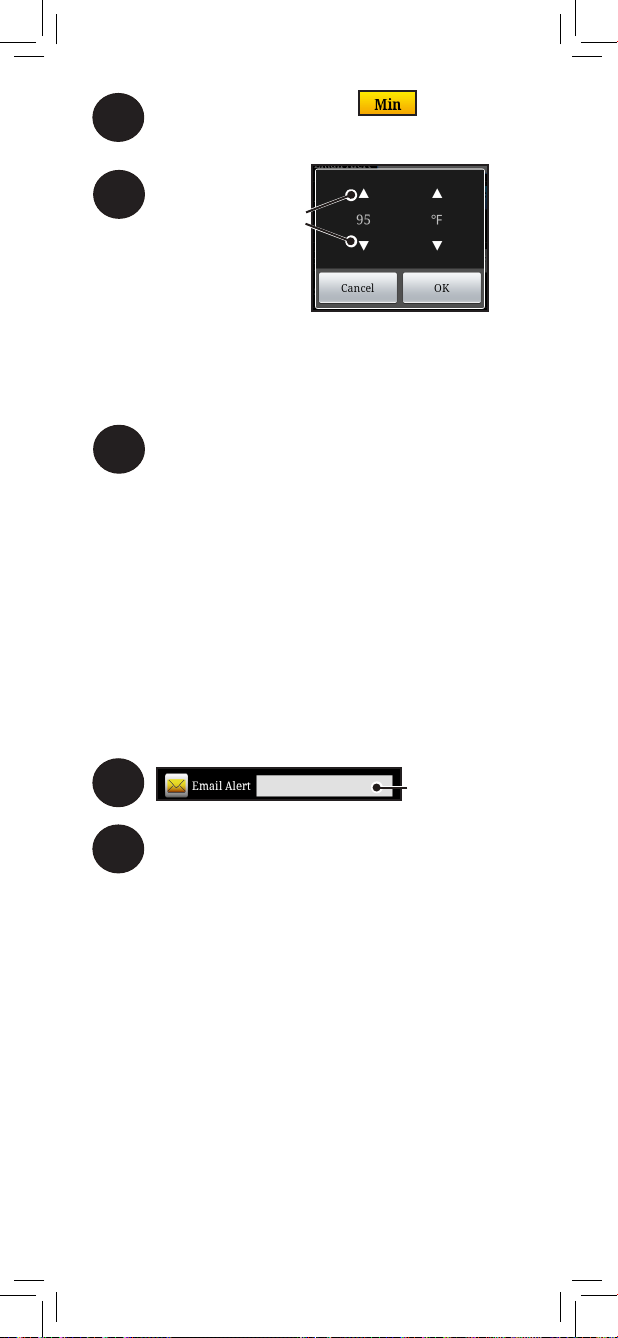
Tap the number beside to
5
configure the low temperature.
6
Tap the arrow icons
on the left to set the
desired low
temperature, then
tap OK
If the camera detects a lower temperature
than the low value or higher than the
high value, you will receive a notification
on your smartphone / tablet.
Tap Save.
7
E-mail Alerts (cloud connection only)
Receive notification via e-mail when alerts
are triggered. A cloud connection to the
camera is required to enable e-mail
alerts. The camera must be in cloud
mode in order to receive e-mail alerts.
To enable e-mail alerts:
1
2
Tap Save.
Enter your e-mail
address
When you first register for e-mail alerts, you
will receive an e-mail to confirm registration.
Follow the instructions in this e-mail to confirm
registration and begin receiving e-mail alerts.
22
Page 25
ENGLISH
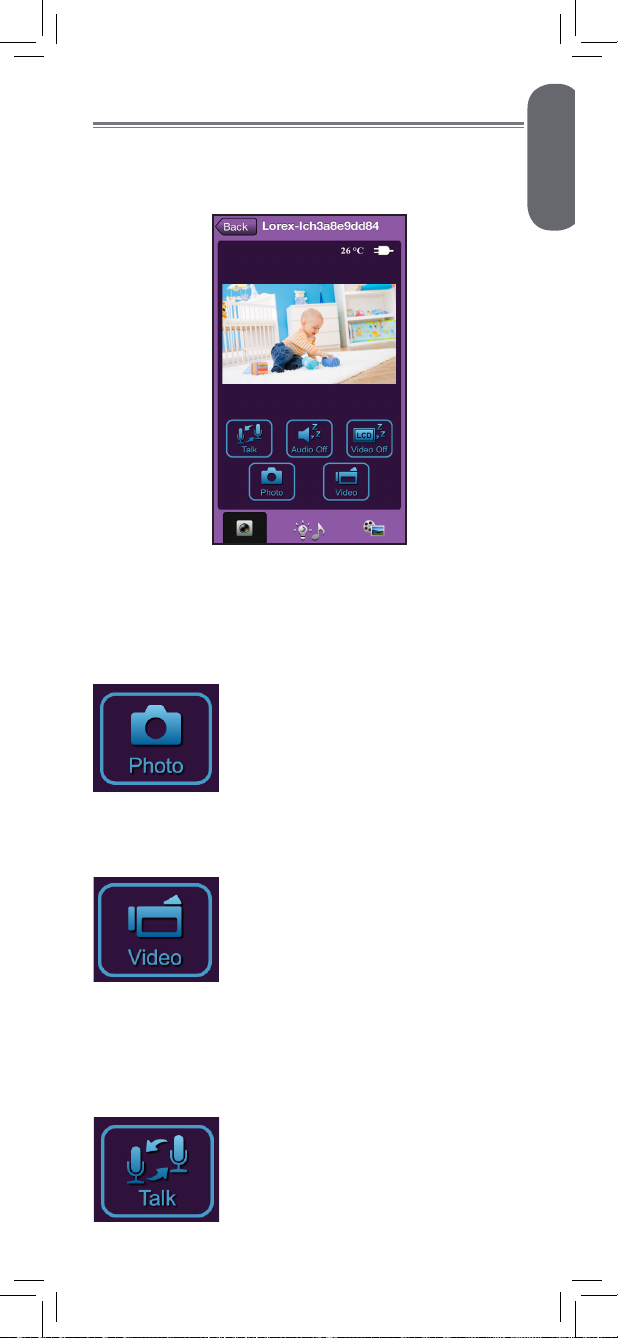
Live Viewing
Tap the name of a connected camera to begin
viewing live video. Tilt your smartphone or tablet
to view live video in fullscreen mode.
Use the icons below the video display to enable
features and configure the camera’s audio and
video settings:
Taking a Snapshot
Tap to save an image of the
camera’s current video display
to your smartphone / tablet.
To view snapshots, see “Viewing
Snapshots” on page 27.
Recording a Video
Tap to start recording video
from the camera. Tap again to
stop recording. Recorded video
is saved to your smartphone /
tablet.
To view video recordings, see “Viewing Video
Recordings” on page 26
Talking to Your Baby
Tap to enable two-way audio.
Your voice plays through the
camera’s speaker. Tap again to
disable.
23
Page 26
Audio Only Mode
Tap to enable audio only mode.
Live video is turned off and
audio from the camera plays
continuously on your smartphone
/ tablet. Tap again to turn the
video on.
Mute Audio
Tap to mute audio from the
camera. Tap again to unmute.
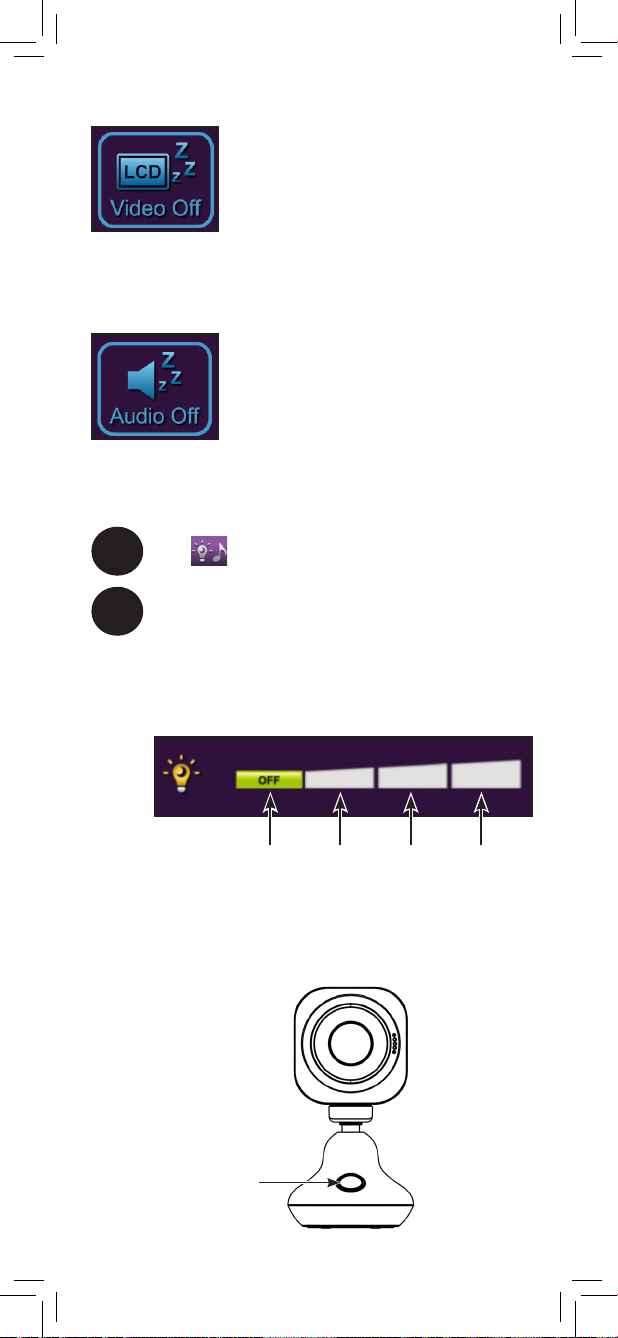
Using the Night-Light
Tap .
1
Tap one of the tiles to control the night-light
2
remotely using your smartphone / tablet.
There are four settings for the camera’s
night-light: 1x brightness, 2x brightness,
3x brightness, and off.
OFF 1X 2X 3X
OR
Press the night-light button on the camera
stand repeatedly to cycle through the
brightness levels.
Night-light
button
24
Page 27
ENGLISH
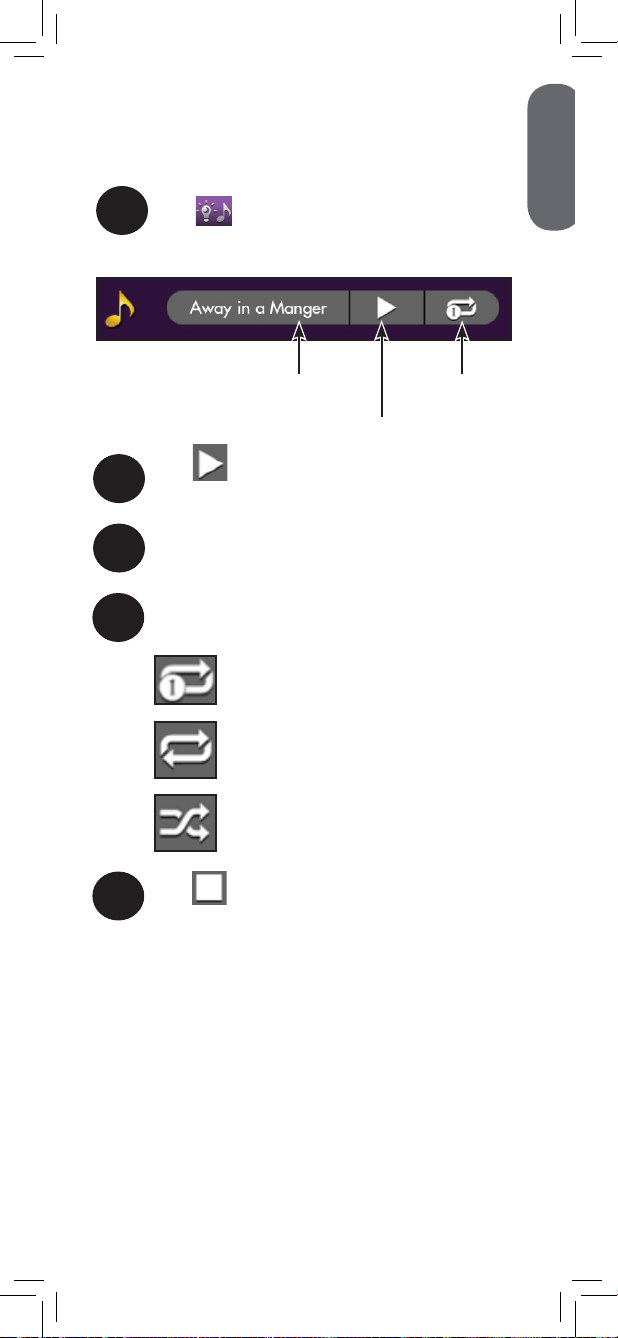
Playing Sleep ‘n’ Soothe Sounds
The camera plays pre-loaded sounds and
lullabies to help your little one drift off to sleep.
Tap .
1
The following playback controls appear:
Currently playing
Tap to play the selected Sleep ‘n’
2
Soothe sound.
Tap the Currently playing tile to switch
3
to the next sound.
Tap the Repeat options tile to choose
4
from the following playback options:
Repeat One: Plays the currently
selected sound repeatedly.
Repeat All: Plays through all of the
sounds repeatedly.
Shuffle: Plays sounds in a random
order.
Tap to stop Sleep ‘n’ Soothe.
5
Repeat options
Play / Stop
25
Page 28
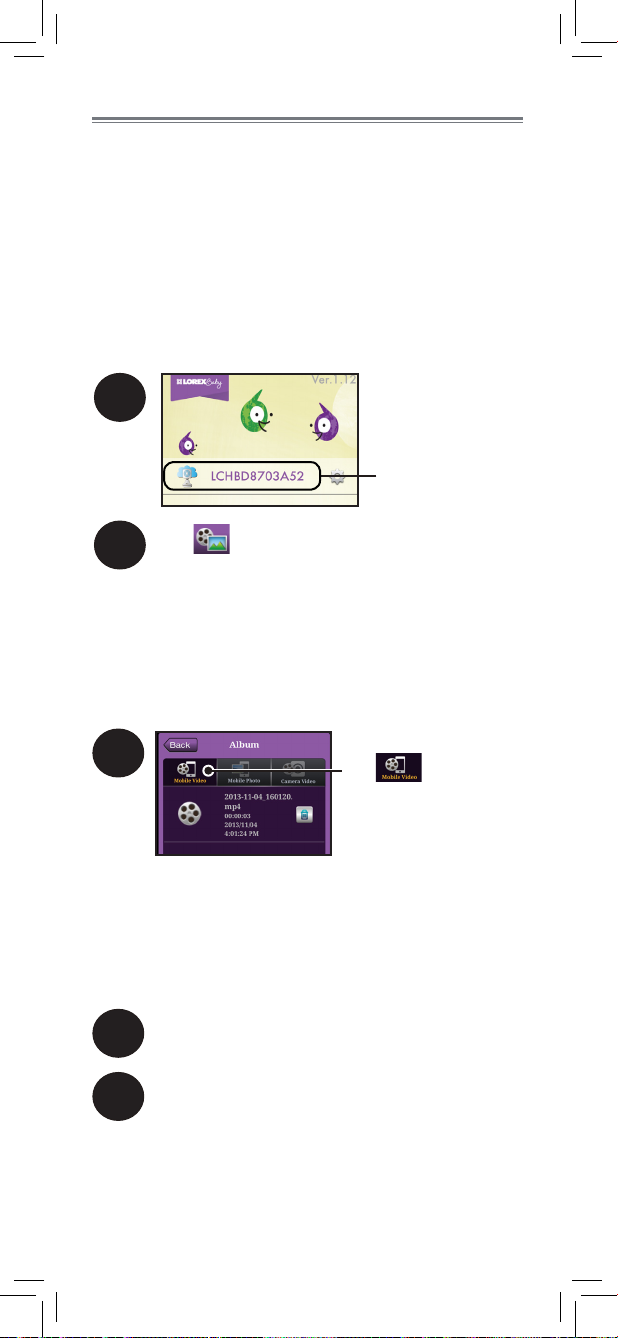
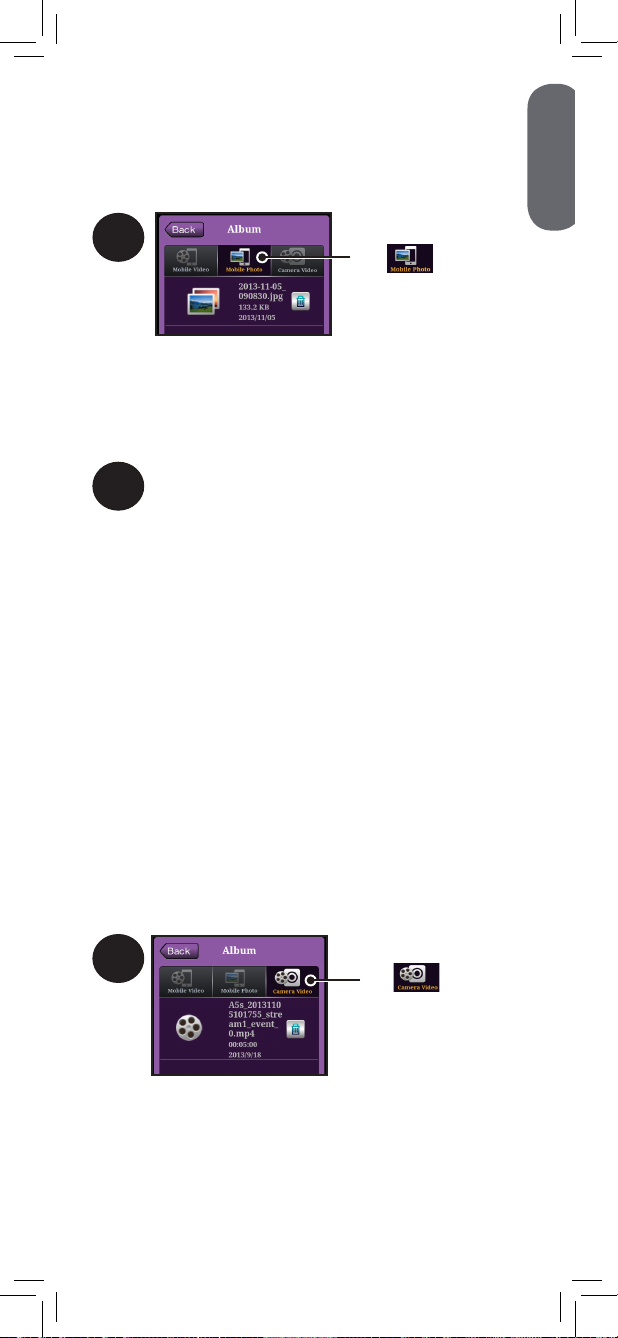
Album Mode
Use Album Mode to view snapshots, video
recordings, and alert recordings.
Snapshots and videos are stored on your
smartphone / tablet and can be viewed from
the main screen of the Lorex Baby Link app
whether or not you are connected to the camera
(see “Dashboard” on page 15 for details).
To access Album Mode:
1
Tap the camera name
2
Tap .
Viewing Video Recordings
View video recordings saved to your
smartphone / tablet. For details on taking video
recordings, see “Recording a Video” on page 23.
1
Tap for a list of
video recordings
The list is populated with video recordings
stored on your smartphone / tablet.
Recordings are titled with the date and
time they were taken (i.e., YYYY-MM-DD_
HHMMSS.mp4).
Tap the desired video file. The video will
2
immediately start playing.
Tap the video display to access playback
3
controls.
26
Page 29
ENGLISH
Viewing Snapshots
View snapshots saved to your smartphone
/ tablet. For details on taking snapshots, see
“Taking a Snapshot” on page 23.
1
Tap for a list of
snapshots
The list is populated with snapshots stored
on your smartphone / tablet. Images are
titled with the date and time they were
taken (i.e., YYYY-MM-DD_HHMMSS.jpg).
Tap the desired image file. The image will
2
immediately be displayed.
Viewing Alert Recordings
View alert recordings saved to the camera’s
microSD card (not included). You must be
connected to the camera to view alert
recordings.
For details on enabling alerts, see “Setting up
Mobile Notifications” on page 18.
For details on setting up alert recordings, see
“Alert Recording to microSD Card” on page
18.
To view alert recordings:
1
Tap for a list of
alert recordings
The list is populated with alert recordings.
Recording titles include the date and time
they were taken (i.e., A5s_
YYYYMMDDHHMMSS_stream1_event_x
.mp4).
27
Page 30
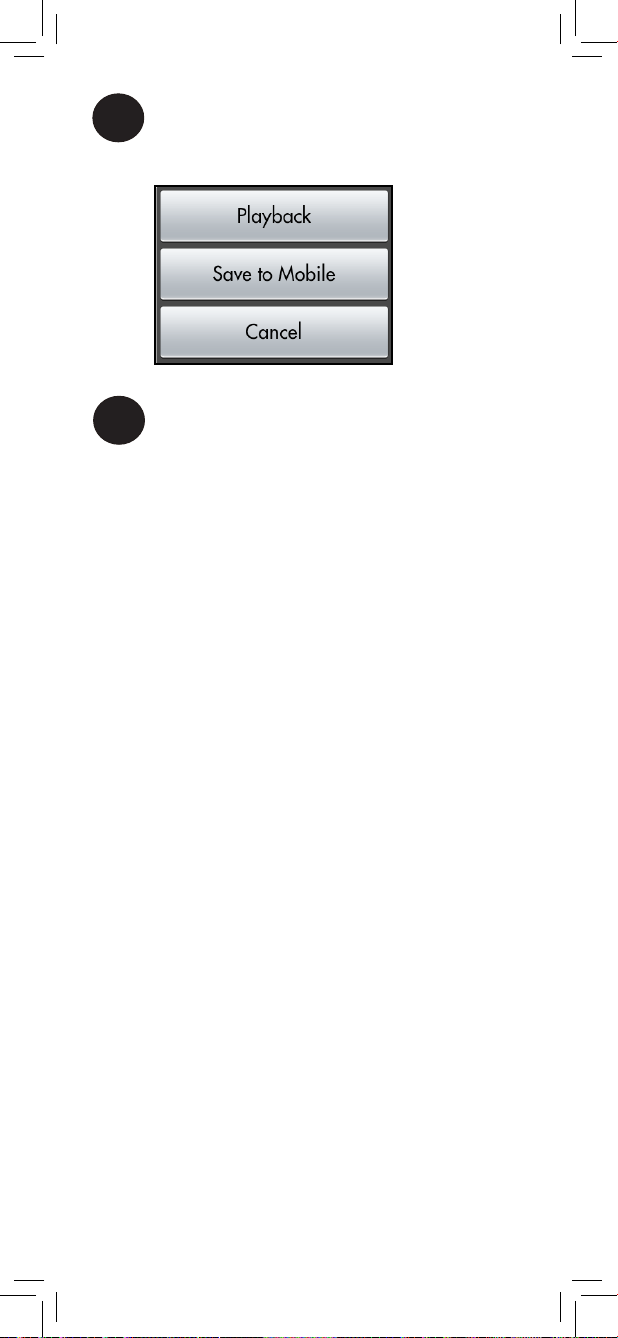
Tap the desired video file.
2
The following options appear:
Tap Playback to view the recording, tap
3
Save to Mobile to store the recording
to your smartphone / tablet, or tap
Cancel to return to the list.
28
Page 31

ENGLISH
View Alert Recordings on a PC
Only one USB cable should be
connected to the camera at a time.
Do not charge the camera while it is
connected to a PC.
Connect the camera to a PC to view and manage
alert recordings saved to the camera’s microSD
card (not included).
To connect the camera to a PC:
Slide the camera off of the base by
1
pushing the camera to the right. The
camera only slides off in one
direction.
Connect the included USB cable to the
2
camera. Connect the other end of the
cable to a USB port on your PC.
29
USB port
on PC
Page 32

3
An Autorun window
appears.
Click Open folder
to view files.
If Autorun does not appear, open Computer
and double-click Removable Disk.
Double-click on the folder video to open it.
4
The folder contains alert recordings
stored to the camera’s microSD card (not
included). From here, you can manage the
recordings stored to the microSD card and
transfer video recordings to your PC.
30
Page 33

ENGLISH
Transferring Recordings and
Snapshots to a PC (Android users only)
Connect your Android smartphone / tablet to a
PC to transfer video recordings and snapshots
taken using the Lorex Baby Link app.
Connect your smartphone / tablet to your
1
PC using the USB cable provided with
your smartphone / tablet.
2
An Autorun window
appears.
Click Open folder
to view files.
USB port
on PC
Files are stored to DCIM Lorex
3
Baby Link.
31
Page 34

Restore to Default Settings
If you have forgotten your camera’s password,
you may wish to restore the camera to its default
settings. This will revert any settings you have
configured to their out-of-the-box state.
Video recordings saved to your smartphone
/ tablet or to the camera’s microSD card (not
included) will not be affected by restoring default
settings.
To restore the camera to default settings:
1
Press and hold the
night-light button
2
The camera beeps 3 times to indicate
that default settings have been restored.
Press the WPS button
while holding the
night-light button
32
Page 35

ENGLISH
Upgrading Camera Firmware
It is important to keep your camera’s firmware
up-to-date to ensure optimal performance. The
app automatically informs you of firmware
updates when your smartphone / tablet is
connected to the Internet.
To upgrade camera firmware:
1
Tap beside the
name of the camera
When new firmware is available, the
app shows a notification asking you to
upgrade.
Tap OK to begin the upgrade.
2
The indicator LED on the camera flashes
orange and green while the upgrade is
taking place.
If the camera’s indicator LED
begins flashing orange and
green without notifying you
of an upgrade, the camera
is performing an emergency
firmware upgrade.
33
Page 36

Delete Camera (cloud connection only)
Deleting a camera will prevent the app from
recognizing it. To add the camera again after
deleting, complete “Cloud Setup” on page 10
or “Hotspot Setup” on page 12.
To delete a camera:
1
Tap beside the
name of the cloud
connected camera
2
Tap
3
Tap OK
34
Page 37

ENGLISH
Technical Specifications
Image sensor 1/4” 1.0 MP CMOS
Resolution 720p (1280 x 720)
WVGA (960 x 480)
Frame rate Up to 30 fps
Lens 3.3mm F2.2
Field of view (diagonal) 105º
Wireless interface WiFi 802.11 b/g compliance,
2.4GHz band
Mobile app Lorex Baby Link (iOS / Android)
microSD card 64GB max. capacity
Video compression H.264
Recording file format Video: MP4
Image: JPG
WiFi hotspot range Up to 328ft (100m)*
Night vision range Up to 10ft (3m)*
IR LED 4 pcs
Buttons Power / hotspot button
WPS button
Night-light button
Speaker Yes
Microphone Yes
Battery life Up to 3 hours**
Battery 3.7V DC 1050mAh
Power adapter 5.0V DC 1100mA / Micro-USB type
Weight 0.3lbs / 0.1kg (camera with stand)
0.15lbs / 0.06kg (just camera)
*Based on unobstructed line of sight. Actual range will vary
based on surroundings.
**Dependent on monitoring environment (e.g., strength of
Internet connection, lighting conditions).
2.3”
58mm
2.3”
58mm
2.2”
56mm
54mm
4.5”
113mm
1.0”
25mm
35
2.1”
Page 38

Troubleshooting
Problem Solution
Cannot connect to the
camera’s personal
hotspot
Cannot connect to the
camera over the Internet
Bright spot in video when
viewing camera at night
Cannot view alert
recordings
Feedback / squealing
noise coming from
smartphone / tablet
• Ensure your smartphone / tablet’s
WiFi is turned on.
• Ensure that the indicator LED is
glowing steadily orange. If it is
green, the camera is in cloud mode.
Press the power / hotspot button on
the camera, then repeat the steps for
“Hotspot Setup” on page 12.
• Ensure the camera is plugged in and
powered on.
• Ensure your smartphone / tablet is at
least 6ft (2m) away from the camera.
• Hotspot connection is disabled when
the camera is connected to a PC.
• Ensure your smartphone / tablet is
connected to the Internet.
• Ensure the camera is connected to a
WiFi network and that the camera is
within the network’s wireless range.
• The indicator LED on top of the
camera should glow steadily green.
Otherwise, you may have to repeat
“Cloud Setup” on page 10.
• Cloud connection is disabled when
the camera is connected to a PC.
• Night vision reflects when pointing
the camera at a window or mirror.
Move the camera to a different
location.
• You must enable at least one type
of alert notification. See “Setting up
Mobile Notifications” on page 18
for details.
• Alert recordings require a microSD
card (not included) to be inserted into
the camera.
• A hotspot connection or cloud
connection to the camera is required.
• The camera may be too close to your
smartphone / tablet. Move them
further apart.
• For optimal performance, avoid
placing the camera near televisions,
computers, cordless / mobile phones,
or other electrical equipment.
• Lower the volume on your smartphone
/ tablet.
Need Help?
Product Support is available 24/7 including product
information, user guides, quick start guides, and FAQs at
www.lorexbaby.com/support.
36
Page 39

ENGLISH
CLEANING
Clean the camera with a slightly damp cloth or an anti-static cloth.
Never use cleaning agents or abrasive solvents.
• Do not clean any part of the product with cleaners with thinners or
other solvents and chemicals. This may cause permanent damage
to the product, which is not covered by the Warranty. When
necessary, clean it with a damp cloth.
• Keep your camera away from hot, humid areas or strong sunlight,
and do not get it wet.
• Every effort has been made to ensure high standards of reliability
for your product. However, if something does go wrong, please do
not try to repair it yourself. Contact Customer Service for assistance.
DISPOSAL OF THE DEVICE
At the end of the product life cycle, you should
not dispose of this product with normal household
waste, but take the product to a collection point for
the recycling of electrical and electronic equipment.
The symbol on the product, user’s guide, and/or
box indicates this.
Some of the product materials can be re-used if you
take them to a recycling point. By reusing some
parts or raw materials from used products you make
an important contribution to the protection of the environment.
Please contact your local authorities in case you need more information
on the collection points in your area. Dispose of the battery pack in an
environmentally-friendly manner according to your local regulations.
NOTICES
WARNING: Any changes or modifications not expressly approved
by the grantee of this device could void the user’s authority to operate
the device.
FCC NOTICE
This device complies with part 15 of the FCC Rules. Operation is
subject to the following two conditions: (1) This device may not cause
harmful interference, and (2) this device must accept any interference
received, including interference that may cause undesired operation.
Changes or modifications not expressly approved by the party
responsible for compliance could void the user‘s authority to operate
the equipment.
This equipment has been tested and found to comply with the limits for
a Class B digital device, pursuant to part 15 of the FCC Rules. These
limits are designed to provide reasonable protection against harmful
interference in a residential installation. This equipment generates, uses
and can radiate radio frequency energy and, if not installed and used
in accordance with the instructions, may cause harmful interference
to radio communications. However, there is no guarantee that
interference will not occur in a particular installation. If this equipment
does cause harmful interference to radio or television reception, which
can be determined by turning the equipment off and on, the user is
encouraged to try to correct the interference by one or more of the
following measures:
• Increase the separation between the equipment and camera.
• Connect the equipment to an outlet on a circuit different from that to
which the camera is connected.
• Consult the dealer or an experienced radio/TV technician for help.
37
Page 40

This device is designed and manufactured not to exceed the emission
limits for exposure to radio frequency (RF) energy set by the Federal
Communications Commission of the U.S. Government. The exposure
standard for wireless devices employs a unit of measurement known
as the Specific Absorption Rate (SAR). The SAR limit adopted by
the FCC is 1.6W/kg for an uncontrolled environment. Tests for SAR
are conducted using standard operating positions accepted by the
FCC with the device transmitting at its highest certified power level
in all tested frequency bands. The FCC has granted an Equipment
Authorization for this device with all reported SAR levels evaluated as
in compliance with the FCC RF exposure guidelines.
Although the SAR is determined at the highest certified power level,
the actual SAR level of the device while operating can be well below
the maximum value. This is because the device is designed to operate
at multiple power levels so as to use only the power required to reach
the network. In general, the closer you are to a wireless base station
antenna, the lower the power output.
CAUTION: To maintain compliance with the FCC’s RF exposure
guidelines, place the camera at least 20cm (7.87in) from nearby
persons.
The camera has been tested and meets the FCC RF exposure
guidelines. Using the camera with accessories that are not supplied
with or designated for the product may not ensure compliance with
FCC RF exposure guidelines.
CANADA/IC NOTICE
This device complies with Industry Canada license-exempt RSS
standard(s). Operation is subject to the following two conditions:
(1) this device may not cause interference, and (2) this device must
accept any interference, including interference that may cause
undesired operation of the device.
IC RF EXPOSURE STATEMENT (SAR)
This device is tested in accordance with the measurement requirement
and procedure specified in IEEE 1528 and IEC 62209. This device
complies with SAR for general population/uncontrolled RF exposure
limits in IC RSS-102.
38
Page 41

LITTLE LINK
MONITEUR VIDÉO HD WIFI
POUR BÉBÉ
GUIDE DE L'UTILISATEUR
Version 1.0
ENGLISH
FRANÇAIS
ESPAÑOL
www.lorexbaby.com
Page 42

Mesures de sécurité
• Un assemblage effectué par un adulte est nécessaire.
Garder les petites pièces hors de portée des enfants
lors de l'assemblage.
• Ce produit n'est pas un jouet. Ne pas laisser les
enfants ou les nourrissons jouer avec ce produit.
• Ce moniteur vidéo ne remplace pas la surveillance
d'un adulte responsable.
• Ne pas utiliser dans un endroit mouillé ou humide.
• Tester l'application mobile avant de l'utiliser de
manière prolongée. Se familiariser avec ses fonctions.
• Ne pas utiliser ou installer la caméra près d'une
source de chaleur, par exemple un radiateur.
• Ne pas pointer votre caméra vers le soleil ou une
source intense de lumière.
• Garder les cordons hors de portée des enfants et des
nourrissons.
• Ne jamais utiliser de rallonges électriques avec des
blocs d'alimentation.
• Utiliser seulement les chargeurs et les blocs
d'alimentation fournis. Ne pas utiliser d'autres
chargeurs ou blocs d'alimentation, car cela pourrait
endommager la caméra.
• Ne couvrez pas la caméra avec une serviette ou une
couverture.
• N'utilisez pas la caméra près de l'eau.
• Ne pas toucher aux contacts des connecteurs avec
des objets pointus ou métalliques.
• Ne pas brancher plus d'un câble USB à la caméra à
la fois.
• Conserver ce guide de l'utilisateur pour référence
future.
Pour éviter les blessures
aux enfants et nourrissons
• ASSUREZ-VOUS que la caméra et tous les cordons
d'alimentation sont à au moins 1 m (3 pi) du lit de
l'enfant et hors de sa portée.
• Utiliser les boucles attache-câble afin de vous aider
à garder les câbles loin de votre enfant.
3 pi/1 m
Page 43

FRANÇAIS
Table des matières :
Le produit comprend .......................3
Vue d'ensemble de la caméra .........3
Mise en route ..................................5
Montage de la caméra au mur..................7
Positionner la caméra .....................8
Relier la caméra à un téléphone
intelligent ou une tablette ...............9
Configuration Internet ............................ 10
Configuration du point d'accès sans fil ....12
Ajouter un nouvel appareil ..................... 13
Utilisation de l'application mobile ..15
Liste de caméras ...................................15
Tableau de bord .................................... 15
Menu des réglages de la caméra ...16
Réglage de la date et l'heure : ................ 16
Qualité de la vidéo ...............................17
Réglage des notifications mobiles ..18
Enregistrement des alertes sur la carte
microSD ............................................... 18
Détection audio .....................................20
Détection de mouvement ........................ 20
Alerte de température ............................ 21
Alertes par courriel (connexion par Internet
seulement) ........................................................... 22
Visionnement en direct ..................23
Faire une capture d'image .....................23
Enregistrement d'une vidéo .....................23
Parler à votre bébé ................................23
Mode audio seulement ...........................24
Audio en sourdine ................................. 24
Utiliser la veilleuse .................................24
Faire jouer des sons pour relaxer et
pour s'endormir ....................................25
1
Page 44

Mode album .................................26
Visionner les enregistrements vidéos ........26
Visionnement des captures d'image ......... 27
Visionnement des enregistrements
d'alerte ................................................ 27
Visionner des enregistrements
d'alertes sur un PC ........................29
Transfert d'enregistrements et de
captures d'écran sur un PC
(utilisateurs Android seulement) ....................... 31
Rétablissement des paramètres par
défaut ...........................................32
Mise à jour du micrologiciel de la
caméra .........................................33
Supprimer une caméra (par connexion
Internet seulement) .......................................... 34
Spécifications techniques ...............35
Dépannage ...................................36
Besoin d'aide? ..............................36
2
Page 45

FRANÇAIS
Le produit comprend
x1*
Caméra Câble USB et adaptateur
d'alimentation
x2*
x2*
Vis et ancrages
x3*
Boucles attache-câble
*Le contenu peut varier selon le modèle.
Plaque de montage
x1*
x1*
Vue d'ensemble de la caméra
Hautparleur
Bouton
veilleuse
Micro-USB
3
Page 46

WPS*
Fente de
la carte
microSD
Micro-USB
Alimentation /
point d'accès
sans fil
Capteur de température
Microphone
Plaque de montage / de base
Veilleuse
* Si votre routeur sans fil est doté d'un bouton WPS, il
suffit, pour connecter votre caméra à Internet, d'appuyer
sur le bouton WPS du routeur puis sur celui de la caméra.
4
Page 47

FRANÇAIS
Mise en route
Brancher le bloc d'alimentation au
1
câble USB.
Brancher l'autre extrémité du câble
2
USB à la base de la caméra. Branchez
l'adaptateur d'alimentation à une prise
de courant.
S'assurer que les câbles d'alimentation
soient au moins à 1 m (3 pi) du lit de
votre enfant et hors de sa portée.
Utiliser les boucles attache-câble afin
de vous aider à garder les câbles loin
de votre enfant.
Maintenir le bouton d'alimentation
3
sur la caméra enfoncé pendant une
seconde.
Bouton
d'alimentation
La batterie de la caméra est déjà
rechargée. Pour les utilisations
suivantes, brancher la caméra
pendant au moins 6 heures afin de
recharger la batterie complètement.
5
Page 48

Le témoin DEL devient
rouge pour indiquer
que la caméra est sous
Après quelques
secondes, le témoin
DEL passe au orange.
tension.
Pour éteindre la caméra :
Maintenir le bouton d'alimentation sur
1
la caméra enfoncé pendant 5 secondes.
Bouton
d'alimentation
La caméra émet un signal sonore
et le témoin DEL s'éteint. La caméra
démarre en mode point d'accès sans fil
lorsqu'elle est remise en marche.
Si la caméra fige :
Maintenir le bouton d'alimentation
1
sur la caméra enfoncé pendant 10
secondes.
Bouton
d'alimentation
Le témoin DEL devient rouge.
6
Page 49

FRANÇAIS
Montage de la caméra au mur
Avant de procéder à l'installation
permanente de la caméra :
• Déterminer l'emplacement où vous aurez la
meilleure vue de votre bébé.
• S'assurer que le câble d'alimentation soit
suffisamment long pour alimenter la caméra.
S'assurer que les câbles d'alimentation
soient au moins à 1 m (3 pi) du lit de
votre enfant et hors de sa portée.
Utiliser les boucles attache-câble afin
de vous aider à garder les câbles loin
de votre enfant.
Boucles
attache-câble
À l'aide d'une pièce de monnaie, faire pivoter la
1
plaque de montage de la base de la caméra en
sens antihoraire pour l'enlever de la base.
Tenir la plaque de montage contre le mur, là où
2
la caméra sera installée.
Utilisez un crayon pour marquer l'emplacement
3
des trous des vis.
Percer les trous marqués à l'aide d'une perceuse.
4
Enfoncer les chevilles dans les trous.
5
Fixer la plaque de montage au mur en utilisant les
6
vis de montage fournies.
Fixer la base de la caméra à la plaque de montage.
7
Vérifier que le mécanisme de verrouillage de la
plaque s'aligne avec la rainure à la base de la
caméra.
Tourner la base de la caméra en sens horaire
8
pour la fixer à la plaque de montage.
L'emballage inclut une plaque de montage
supplémentaire qui doit être fixée à la
base de la caméra lorsque celle-ci est
utilisée sur une surface plane.
7
Page 50

Positionner la caméra
Vous pouvez incliner la caméra vers l'arrière
jusqu'à 60° depuis la position verticale.
60°
Cela permet aux caméras murales de se tourner
vers le bas pour voir le berceau de votre bébé.
S'assurer que les câbles d'alimentation
soient au moins à 1 m (3 pi) du lit de
votre enfant et hors de sa portée.
Utiliser les boucles attache-câble afin de
vous aider à garder les câbles loin de
votre enfant.
La caméra pivote également de gauche à droite.
Ne pas forcer la caméra à s'incliner
ou à pivoter plus qu'il n'est permis.
8
Page 51

FRANÇAIS
Relier la caméra à un téléphone
intelligent ou une tablette
Il existe deux manières de relier votre caméra à un
téléphone intelligent ou à une tablette grâce à l'application
Lorex Baby Link : connexion par Internet et connexion
à un point d'accès sans fil.
Connexion par Internet
Vous pouvez également vous connecter à la caméra de
n'importe où au monde à travers Internet. La caméra
se connecte à votre routeur sans fil afin d'envoyer des
données par Internet de manière sécuritaire.
Internet
Une connexion à la caméra par Internet vous permet de
visionner les images captées par la caméra en direct et
de configurer les options de la caméra en ligne depuis
n'importe où sur la planète. La caméra doit se
trouver à portée de votre routeur sans fil afin
d'établir une connexion Internet.
Afin de se connecter à la caméra en mode Internet, voir
« Configuration Internet » à la page 10.
Connexion à un point d'accès sans fil
Vous pouvez vous connecter à la caméra depuis votre
téléphone intelligent ou tablette de la même manière que
vous vous connectez à un réseau Wifi. Se connecter à un
point d'accès sans fil crée un lien direct entre la caméra
et votre téléphone intelligent sans besoin de connexion
Internet.
Lorsque vous êtes connecté au point d'accès sans fil de
la caméra, vous pouvez visionner les images captées
en direct par la caméra et configurer les options de la
caméras, le tout sans connexion à Internet! Seuls les
appareils se trouvant à portée du point d'accès
sans fil (jusqu'à 328 pi / 100m) peuvent s'y
connecter.
Pour se connecter à la caméra en mode point d'accès
sans fil, voir « Configuration du point d’accès sans fil » à
la page 12.
9
Page 52

Exigences du système :
• iOS v6.0 ou plus récente / Android v2.3 ou
plus récente
• Accès à une connexion Internet Wifi
Configuration Internet
Téléchargez l'application gratuite
1
Lorex Baby Link sur le App Store /
Google Play Store.
Vérifier que la fonction Wifi de votre
2
téléphone intelligent ou tablette est activée.
Voir le manuel de l'utilisateur de votre
téléphone intelligent ou tablette pour
obtenir des détails supplémentaires.
Se connecter au point d'accès sans fil
3
de la caméra. La point d'accès sans fil
apparaît alors dans votre liste de réseaux
Wifi disponibles sous la forme « Lorex »
accompagné de l'identifiant de l'appareil
(Lorex-XXXXXXX).
Tapotez sur l'icône Lorex Baby Link ( ).
4
Vous êtes maintenant connecté au point
d'accès sans fil particulier de la caméra.
Votre caméra apparaîtra sur l'écran
principal de l'application avec le statut
Connecté.
5
Appuyer sur près
du nom de la caméra.
Vous serez invité à créer un mot de passe
personnalisé pour la caméra.
Votre mot de passe doit contenir au moins
6 caractères. Notez votre mot de passe
pour ne pas l'oublier :
MOT DE PASSE :
10
Page 53

FRANÇAIS
Appuyer sous WiFi AP.
6
Sélectionner le réseau Wifi utilisé pour
7
relier la caméra à Internet
(p. ex. Wifi maison).
Entrez le mot de passe de votre réseau
8
Wifi, puis appuyez sur Retour.
Appuyez sur Enregistrer pour
9
enregistrer vos configurations à la
caméra, puis appuyer sur Retour pour
retourner à l'écran principal.
Le témoin DEL s'illuminera en
vert en clignotant. Lorsque le
témoin DEL s'arrêtera au
vers, passer à l'étape 10.
REMARQUE : Si le témoin DEL continue à
clignoter pour plus d'une minute, vous avez peutêtre entré votre mot de passe Wifi incorrectement.
Appuyez sur le bouton d'alimentation et retournez
à l'étape 3.
Assurez-vous que votre téléphone intelligent
10
ou votre tablette soit connecté à votre réseau
Wifi.
OU
Utilisez votre connexion Internet mobile.
Appuyez sur le nom de la caméra et
11
insérez le mot de passe que vous avez
créé à l'étape 5.
Une vidéo en temps réel
provenant de votre caméra
apparaît sur votre téléphone
intelligent ou tablette!
11
Page 54

Configuration du point d'accès
sans fil
Téléchargez l'application gratuite
1
Lorex Baby Link sur le App Store /
Google Play Store.
Vérifier que la fonction Wifi de votre
2
téléphone intelligent ou tablette est
activée. Voir le manuel de l'utilisateur
de votre téléphone intelligent ou
tablette pour obtenir des détails
supplémentaires.
Se connecter au point d'accès sans fil
3
de la caméra. La point d'accès sans fil
apparaît alors dans votre liste de réseaux
Wifi disponibles sous la forme « Lorex »
accompagné de l'identifiant de l'appareil
(Lorex-XXXXXXX).
Tapotez sur l'icône Lorex Baby Link ( ).
4
Vous êtes maintenant connecté au point
d'accès sans fil particulier de la caméra.
Votre caméra apparaîtra sur l'écran
principal de l'application avec le statut
Connecté.
5
Appuyer sur
près du nom de la
caméra.
Si c'est votre première connexion à la
caméra, vous serez invité à créer un mot
de passe personnalisé pour la caméra.
Votre mot de passe doit contenir au moins
6 caractères. Notez votre mot de passe
pour ne pas l'oublier :
MOT DE PASSE :
12
Page 55

FRANÇAIS
Ajouter un nouvel appareil
Une fois configurée la connexion Internet sur un
téléphone intelligent ou une tablette, vous pouvez
permettre à d'autres appareils d'accéder à la
caméra.
Téléchargez l'application gratuite Lorex
1
Baby Link sur le App Store (iPhone®
/ iPad®) ou le Google Play Store
(Android™).
Assurez-vous que votre téléphone
2
intelligent ou votre tablette soit
connecté à Internet.
3
Tapotez sur l'icône Lorex Baby Link ( ).
Appuyer sur .
4
(OPTIONNEL) Appuyer sur pour
5
choisir une image qui apparaîtra aux
côtés de la caméra dans l'écran principal
de l'application.
• Appuyer sur Prendre une photo pour
capturer une image en utilisant la caméra de
votre téléphone intelligent ou tablette.
• Appuyer sur Choisir depuis un album
pour choisir une image enregistrée sur votre
téléphone intelligent ou tablette.
• Appuyer sur Annuler pour retourner à l'écran
Ajouter une caméra.
Appuyer sur pour numériser le code
6
QR se trouvant à l'arrière de la caméra.
Si ce n'est pas déjà fait, vous pourriez
avoir à télécharger un scanneur de codebarres et l'installer sur votre téléphone
intelligent ou tablette.
OU
Indiquer manuellement l'identifiant de la
caméra écrit sous le code QR.
13
Page 56

Inscrire le mot de passe que vous avez
7
noté à l'étape 5 de la « Configuration
Internet » à la page 10, puis appuyer
sur Enregistrer.
8
Appuyer sur le nom de la caméra.
Une vidéo en temps réel
provenant de votre caméra
apparaît sur un deuxième
téléphone intelligent ou tablette!
14
Page 57

FRANÇAIS
Utilisation de l'application mobile
Liste de caméras
La liste de caméras affiche toutes les caméras
disponibles et un icône indiquant le statut de
chaque caméra.
Icône Signification
La caméra est
disponible pour une
connexion au point
d'accès sans fil.
Votre téléphone
intelligent ou tablette
est connecté à la
caméra via une
connexion au point
d'accès sans fil.
La caméra est
disponible pour une
connexion par Internet.
Tableau de bord
Le tableau de bord consiste en trois boutons
situés au bas de l'écran principal :
Actualiser Ajouter une caméra Visualiseur
Actualiser : Appuyer pour actualiser la liste de
caméras.
Ajouter une caméra : Une fois terminée la
configuration initiale, appuyer sur ce bouton
depuis un autre téléphone intelligent ou tablette
pour permettre l'accès à la caméra. Voir
« Ajouter un nouvel appareil » à la page 13
pour plus de détails.
Visualiseur : Visualiser les captures d'écran
et les vidéos sauvegardées sur votre téléphone
intelligent ou tablette.
15
Page 58

Menu des réglages de la caméra
*
Utiliser l'application pour accéder au menu des
réglages de la caméra. Une connexion à la
caméra par point d'accès sans fil ou par Internet
est requise pour configurer le menu des réglages
de la caméra.
Pour accéder au menu des réglages de
la caméra :
1
Appuyer sur
près du nom de la
caméra.
Glisser vers le haut pour aller vers le bas de
2
la page aux Réglages de la caméra.
Réglage de la date et l'heure :
La date et l'heure sont appliquées
aux noms de fichier des
enregistrements.
Option 1 : Synchroniser à partir de l'appareil
Appuyer sur l'icône de synchronisation
afin d'utiliser la date et l'heure de
votre téléphone intelligent ou tablette,
puis appuyer sur Enregistrer. La
date et l'heure de la caméra seront
automatiquement mises à jour.
Option 2 : Réglage manuel
1
Appuyer sur
la date.
2
Utiliser les boutons + et pour modifier la date, puis
appuyer sur Définir.
16
Page 59

FRANÇAIS
3
Appuyer sur
l'heure.
4
Utiliser les boutons + et pour modifier l'heure, puis
appuyer sur Définir.
5
Appuyer sur Sauvegarder.
Qualité de la vidéo
Définir la résolution de l'image pour
la vidéo en temps réel de la caméra.
Deux options de visualisation sont
disponibles : HD et SD.* Il est
recommandé d'utiliser la qualité vidéo SD pour
réduire la charge de votre réseau de données
mobile.
Pour modifier la qualité vidéo :
Appuyer à côté de Qualité vidéo pour
1
passer de HD à SD.
2
Appuyer sur Sauvegarder.
Modifier la qualité vidéo n'affecte pas la
résolution de l'enregistrement de la
caméra. L'enregistrement vidéo se fait toujours
en haute définition 720p.
HD = 720p (1280x720) haute-définition à 512kbps
*
SD = WVGA (960x640) définition régulière à 256kbps
17
Page 60

Réglage des notifications mobiles
Utiliser l'application pour accéder au menu des
notifications d'alertes.
Pour accéder au menu des notifications
d'alertes :
1
Appuyer sur
près du nom de la
caméra.
Glisser vers le haut pour aller vers le
2
bas de la page aux Notifications
d'alertes.
Vous recevrez une notification à chaque fois
qu'une alerte sera déclenchée.
Enregistrement des alertes sur la
carte microSD
Lorsque qu'une alerte est déclenchée, un
échantillon vidéo est enregistré sur la carte
microSD de la caméra (non incluse). La caméra
est compatible avec les cartes microSD allant
jusqu'à 64Gb.
Pour configurer les enregistrement
d'alertes :
Insérer une carte microSD (non incluse)
1
dans la fente microSD de la caméra tel
que montré ci-dessous.
Appuyer sur le bouton d'alimentation
2
de la caméra pour passer en mode
point d'accès sans fil. Le témoin DEL
de la caméra devrait s'arrêter
sur l'orange avant que vous ne
continuiez.
18
Page 61

FRANÇAIS
3
Appuyer sur
près du nom de la
caméra.
Appuyer sur Formater aux côtés de
4
Formater carte SD.
5
Appuyer
sur OK.
6
Appuyez sur Sauvegarder puis sur
Retour.
Activer au moins un type de notification
7
d'alerte. Se référer aux pages suivantes
pour les instructions concernant le réglage
des notifications d'alertes.
La caméra remplace
automatiquement les
enregistrements les plus vieux
en mémoire sur la carte microSD
(non incluse) afin de faire de
l'espace pour les nouveaux
enregistrements.
19
Page 62

Détection audio
La détection audio entraîne le
déclenchement d'une alerte dès que
la caméra détecte un volume sonore
excédant un niveau défini.
Pour activer la détection audio :
Appuyer sur ACTIVER près de la fonction
1
Détection audio. Le bouton ACTIVER
passe au bleu lorsqu'il est sélectionné.
Appuyer sur les touches et
2
pour configurer la sensibilité de l'alerte.
Une sensibilité plus faible signifie que
seuls les bruits forts, tels que les pleurs,
déclencheront une alarme, tandis qu'une
sensibilité élevée détectera les sons plus
faibles, tels que les gémissements.
Faible sensibilité
Appuyer sur Sauvegarder.
3
Sensibilité intermédiaire
Sensibilité élevée
Détection de mouvement
La détection de mouvement entraîne
le déclenchement d'une alerte dès
que la caméra détecte un
mouvement. Vous pouvez définir le
niveau de mouvement requis pour déclencher une
alerte.
Pour activer la détection de mouvement :
Appuyer sur ACTIVER près de la fonction
1
Détection de mouvement. Le bouton
ACTIVER passe au bleu lorsqu'il est
sélectionné.
20
Page 63

FRANÇAIS
Appuyer sur les touches et pour
2
configurer la sensibilité de l'alerte. Une
faible sensibilité signifie que seuls les
mouvements significatifs entraîneront le
déclenchement d'un alerte; tandis qu'une
sensibilité plus élevée détectera aussi des
mouvements plus subtils.
Faible sensibilité
Sensibilité intermédiaire
Appuyer sur Sauvegarder.
3
Sensibilité élevée
Alerte de température
La fonction d'alerte de température
permet d'assurer que la chambre du
bébé est à une température
confortable et sécuritaire. Une alerte
est déclenchée dès que la température devient
trop chaude ou trop froide. Le capteur de
température est précise à 3°F/1°C près.
Pour activer l'alerte de température :
Appuyer sur ACTIVER près de Temp.
1
Alerte. Le bouton ACTIVER passe au
bleu lorsqu'il est sélectionné.
Appuyer sur le nombre près de
2
pour configurer la température maximale.
3
Appuyer sur les icônes de
flèche de droite pour
définir l'unité de mesure
de la température désirée
(Fahrenheit ou Celsius).
21
Page 64

Appuyer sur les icônes
4
de flèche de gauche
pour définir la limite
supérieure de
température, puis
appuyer sur OK.
Appuyer sur le nombre près de
5
pour configurer la température minimale.
Appuyer sur les icônes
6
de flèche de gauche
pour définir la limite
inférieure de
température, puis
appuyer sur OK.
Si la caméra détecte que la température
est inférieure à la valeur minimale ou
supérieure à la valeur maximale, une
notification vous sera envoyée sur votre
téléphone intelligent ou tablette.
Appuyer sur Sauvegarder.
7
Alertes par courriel
(connexion par Internet seulement)
Une notification sera envoyée par courriel
lorsque des alertes sont déclenchées. Une
connexion à la caméra par Internet doit
être établie afin de pouvoir activer les
alertes par courriel. La caméra doit être
en mode connexion par Internet afin de
recevoir des alertes par courriel.
Pour activer les alertes par courriel :
1
Appuyer sur Sauvegarder.
2
La première fois que vous activez les alertes par
courriel, vous recevrez un courriel pour confirmer
l'activation. Suivez les instructions du courriel afin
de confirmer l'activer et commencer à recevoir
des alertes par courriel.
22
Insérez votre
adresse courriel
Page 65

FRANÇAIS
Visionnement en direct
Appuyer sur le nom d'une caméra connectée
afin de commencer à visionner la vidéo en temps
réel. Faites basculer votre téléphone intelligent ou
tablette pour visionner la vidéo en temps réel en
mode plein écran.
Utilisez les icônes au bas de l'affichage du
vidéo pour activer des options et configurer les
réglages audio et vidéo de la caméra :
Faire une capture d'image
Appuyer afin d'enregistrer une
image de l'affichage vidéo
actuel de la caméra sur la
mémoire de votre téléphone
intelligent ou tablette.
Pour voir des captures d'écran, voir
« Visionnement des captures d’image » à la page
27.
Enregistrement d'une vidéo
Appuyer pour lancer
l'enregistrement d'une vidéo de
la caméra. Appuyer à nouveau
pour arrêter l'enregistrement. La
vidéo enregistrée est conservée
dans la mémoire de votre
téléphone intelligent ou tablette.
Pour voir des enregistrement vidéo, voir
« Visionner les enregistrements vidéos » à la
page 26.
23
Page 66

Parler à votre bébé
Appuyer pour activer la
communication audio
bidirectionnelle. Votre voix est
transmise par le haut-parleur de
la caméra. Appuyer à nouveau
pour désactiver.
Mode audio seulement
Appuyer pour activer le mode
audio seulement. La vidéo en
temps réelle est désactivée et
l'audio de la caméra joue en
continu sur votre téléphone
intelligent ou tablette. Appuyer
encore une fois pour activer la vidéo.
Audio en sourdine
Appuyer pour mettre l'audio de
la caméra en sourdine. Appuyer
à nouveau pour réactiver
l'audio.
Utiliser la veilleuse
Appuyer sur .
1
Appuyer sur une des touches pour contrôler
2
la veilleuse à distance depuis votre téléphone
intelligent ou tablette.
La veilleuse de la caméra peut être réglée
de quatre manières différentes : 1x l'éclat,
2x l'éclat, 3x l'éclat et Désactivée.
OFF
(désactivée)
OU
Appuyer sur le bouton de la veilleuse sur
le support de la caméra à répétition pour
basculer d'un niveau d'éclat à l'autre.
24
1X 2X 3X
Page 67

FRANÇAIS
Bouton
veilleuse
Faire jouer des sons pour relaxer
et pour s'endormir
La caméra peut émettre des sons et des berceuses
préenregistrés pour aider votre tout petit à
s'endormir.
Appuyer sur .
1
Les contrôles de lectures suivants
apparaissent :
En cours de lecture
Options de
répétition
Jouer / Arrêter
Appuyer sur pour faire jouer le son
2
Relaxer et s'endormir sélectionné.
Appuyer sur la touche piste en cours de
3
lecture pour passer à la piste suivante.
Appuyer sur la touche options de
4
répétition pour faire votre choix parmi
les options de lecture suivantes :
Une répétition : Fait jouer la piste
sélectionnée en continu.
Répéter tout : Fait jouer toute les
pistes en boucle.
Aléatoire : Fait jouer les pistes
aléatoirement.
Appuyer sur pour éteindre relaxer et
5
s'endormir.
25
Page 68

Mode album
Utiliser le mode album pour visionner les captures
d'écrans et les vidéos et alertes enregistrées.
Les captures d'écran et les vidéos sont enregistrés
sur votre téléphone intelligent ou votre tablette
et peuvent être vues depuis l'écran principal de
l'application Lorex Baby Link, que vous soyez
connecté à la caméra ou non (voir « Tableau de
bord » à la page 15 pour plus de détails).
Pour accéder au mode album :
1
Appuyer sur le nom de
la caméra
2
Appuyer sur .
Visionner les enregistrements vidéos
Les enregistrements vidéo sont conservés dans votre
téléphone intelligent ou tablette. Pour obtenir plus de
détails sur les enregistrements vidéo, voir
« Enregistrement d’une vidéo » à la page 23.
1
Appuyer sur pour
consulter la liste des
enregistrements vidéo.
La liste est générée à partir des
enregistrements vidéo stockées sur votre
téléphone intelligent ou tablette. Les
enregistrements sont nommés en fonction
de la date et de l'heure de l'enregistrement
(p. ex. AAAA-MM-JJ_HHMMSS.mp4).
Appuyer sur le fichier vidéo désiré.
2
La lecture de la vidéo commence
immédiatement.
Appuyer sur l'affichage du vidéo pour
3
accéder aux contrôles de lecture.
26
Page 69

FRANÇAIS
Visionnement des captures d'image
Visionner les captures d'écran conservées dans
votre téléphone intelligent ou tablette. Pour obtenir
plus de détails sur les captures d'écran, voir
« Faire une capture d’image » à la page 23.
1
Appuyer sur
pour consulter la liste
des captures d'écran.
La liste est générée à partir des captures
d'écran stockées sur votre téléphone
intelligent ou tablette. Les images sont
nommées en fonction de la date et de
l'heure de leur capture (p. ex. AAAA-MMJJ_HHMMSS.jpg).
Appuyer sur le fichier image désiré.
2
L'image sera immédiatement affichée à
l'écran.
Visionnement des enregistrements
d'alerte
Visionner les enregistrements d'alerte stockés sur la
carte microSD (non incluse) de la caméra. Vous
devez être connecté à la caméra pour voir
les enregistrements d'alerte.
Pour plus de détails sur l'activation des alertes, voir
« Réglage des notifications mobiles » à la page
18.
Pour plus de détails sur l'activation des
enregistrements d'alertes, voir « Enregistrement des
alertes sur la carte microSD » à la page 18.
Pour visionner les enregistrements d'alerte :
1
Appuyer sur
pour consulter la liste.
des enregistrements
d'alertes.
La liste est générée à partir des
enregistrements d'alertes. Les enregistrements
sont nommés en fonction de la date et l'heure
27
Page 70

à laquelle ils ont été faits (p.ex.,
A5s_AAAAMMJJHHMMSS_stream1_
event_x.mp4).
Appuyer sur le fichier vidéo désiré.
2
Les options suivantes apparaissent :
Appuyer sur Lecture pour visionner
3
l'enregistrement, appuyer sur Enregistrer
à l'appareil mobile pour garder
l'enregistrement dans votre téléphone
intelligent ou tablette, or appuyer sur
Annuler pour retourner à la liste.
28
Page 71

FRANÇAIS
Visionner des enregistrements
d'alertes sur un PC
Un seul câble USB à la fois devrait
être branché à la caméra. Ne pas
recharger la caméra alors qu'elle est
branché à un PC.
Brancher la caméra à un PC pour visionner et
gérer les enregistrements d'alertes sauvegardés
sur la carte microSD (non incluse) de la caméra.
Pour brancher la caméra à un PC :
Faire glisser la caméra hors de la base
1
en poussant la caméra vers la droite.
La caméra glisse dans une seule
direction.
Brancher le câble USB inclus à la caméra.
2
Brancher l'autre extrémité du câble à un
port USB de votre PC.
Port USB
29
sur PC
Page 72

3
Une fenêtre
d'exécution
automatique s'affiche.
Cliquez sur Ouvrir
le dossier pour
afficher les
fichiers.
Si la fenêtre d'exécution automatique
n'apparait pas, ouvrir Mon ordinateur et
double-cliquer sur Disque amovible.
Double-cliquer sur le dossier video afin de
4
l'ouvrir.
Le dossier contient les enregistrements
d'alertes stockés sur la carte microSD
(non incluse) de la caméra. Vous
pouvez à partir de ce dossier gérer
les enregistrements stockés sur la carte
microSD et transférer les enregistrements
vidéo à votre PC.
30
Page 73

FRANÇAIS
Transfert d'enregistrements et
de captures d'écran sur un PC
(utilisateurs Android seulement)
Branchez votre téléphone intelligent ou
tablette Android à un PC pour transférer vos
enregistrements vidéos et captures d'écran prises
avec l'application Lorex Baby Link.
Branchez votre téléphone intelligent ou
1
tablette à votre PC grâce au câble USB
fourni avec votre téléphone intelligent ou
tablette.
Port USB
sur PC
2
Une fenêtre
d'exécution
automatique s'affiche.
Cliquez sur Ouvrir
le dossier pour
afficher les
fichiers.
Les fichiers sont stockés dans DCIM
3
Lorex Baby Link.
31
Page 74

Rétablissement des paramètres
par défaut
Si vous avez oublié le mot de passe de votre
caméra, vous pouvez restaurer les paramètres
par défaut de la caméra. Cela effacera tout
paramètre que vous aurez configuré depuis que
vous avez sorti la caméra de son emballage.
Les enregistrement vidéo conservés dans votre
téléphone intelligent ou tablette ou dans la carte
microSD (non incluse) ne seront pas affectés pas
la restauration des réglages par défaut.
Pour restaurer les paramètres par défaut
de la caméra :
1
Presser et maintenir
enfoncer le bouton
veilleuse
2
La caméra émet un bip 3 fois pour
indiquer que les paramètres par défaut
ont été restaurés.
Presser le bouton
WPS tout en
maintenant le bouton
veilleuse enfoncé
32
Page 75

FRANÇAIS
Mise à jour du micrologiciel de
la caméra
Il est important de maintenir le micrologiciel
de votre caméra à jour afin d'assurer une
performance optimale. L'application vous
informe automatiquement des mises à jour du
micrologiciel lorsque votre téléphone intelligent
ou tablette est connecté à Internet.
Pour mettre à jour le micrologiciel de la
caméra :
1
Appuyer sur
près du nom de la
caméra.
Lorsqu'un nouveau micrologiciel est
disponible, l'application affiche une
notification vous invitant à faire la mise à
jour.
Appuyer sur OK afin que la mise à jour
2
commence.
Le témoin DEL de la caméra clignote
orange et vert lorsque la mise en jour est
en cours d'exécution.
Si le témoin DEL commence à
clignoter en orange et vert sans
vous avoir notifié d'une mise à
jour, c'est que la caméra a du
faire une mise à jour d'urgence du
micrologiciel.
33
Page 76

Supprimer une caméra
113mm /
4.5 po
(par connexion Internet seulement)
Supprimer une caméra empêchera l'application
de la reconnaître. Pour ajouter une caméra après
en avoir supprimé une, effectuer la
« Configuration Internet » à la page 10 ou la
« Configuration du point d’accès
sans fil » à la page 12.
Pour supprimer une caméra :
1
Appuyer sur
près du nom de la
caméra connectée à
Internet.
2
Appuyer sur .
3
Appuyer sur OK.
34
Page 77

FRANÇAIS
Spécifications techniques
Capteur d'image 1/4 po Mémoire CMOS 1,0 MP
Résolution 720p (1280 x 720)
Cadence de prise de vue Jusqu'à 30 images/sec
Objectif 3.3mm F2.2
Champ de Vision (dia-
gonal)
Interface sans fil Conforme Wifi 802.11 b/g,
Application mobile Lorex Baby Link (iOS / Android)
Carte micro SD Capacité max. de 64 Go
Compression vidéo H.264
Format des fichiers
d'enregistrement
Portée du point d'accès
Wifi
Portée de la vision
nocturne
DEL IR 4 mcx
Boutons Bouton d'alimentation / de point
Haut-parleur Oui
Microphone Oui
Durée de vie de la pile Jusqu'à 3 heures**
Piles 3.7V DC 1050mAh
Bloc d'alimentation Type 5.0V DC 1100 mA / Micro-USB
Poids 0,3 lb / 0,1 kg (caméra avec support)
WVGA (960 x 480)
105º
Bande de 2,4 GHz
Vidéo : MP4
Image : JPG
Jusqu'à 100 m (328 pi)*
Jusqu'à 3 m (10 pi)*
d'accès sans fil
Bouton WPS
Bouton veilleuse
0,15 lb / 0,06 kg (caméra seule)
*Basé sur une ligne de visée non obstruée. La portée réelle varie
en fonction de l'environnement.
**Dépendant de l'environnement de surveillance (p. ex. la
stabilité et vitesse de la connexion Internet, l'éclairage).
58mm /
2.3 po
58mm /
2.3 po
56mm /
2.2 po
113mm /
4.5 po
35
25mm /
1.0 po
54mm /
2.1 po
Page 78

Dépannage
Symptôme Solution
Impossible de se connecter
au point d'accès sans fil
particulier de la caméra.
Impossible de se connecter
à la caméra par Internet.
L'image d'une caméra
présente des taches
brillantes la nuit.
Impossible de voir les
enregistrements d'alerte.
Rétroaction / bruit aigu
provenant du téléphone
intelligent ou de la tablette.
• Vérifier que la fonction Wifi de votre
téléphone intelligent ou tablette est
activée.
• S'assurer que le témoin DEL est arrêté
sur l'orange. S'il est vert, la caméra est
en mode connexion Internet. Presser
le bouton d'alimentation / du point
d'accès sans file de la caméra, puis
répéter les étapes de la « Configuration
du point d’accès sans fil » à la page
12.
• S'assurer que la caméra est branchée et
sous tension.
• S'assurer que votre téléphone intelligent
ou tablette est à au moins 2 m (6 pi) de
la caméra.
• La connexion au point d'accès sans fil
est désactivée lorsque la caméra est
branchée à un PC.
• Assurez-vous que votre téléphone
intelligent ou votre tablette soit connecté
à Internet.
• Assurez-vous que la caméra est
connectée à un réseau Wifi et que la
caméra est à portée de ce réseau.
• Le témoin DEL sur le dessus de la
caméra devrait présenter un éclat vert
continu. Si ce n'est pas le cas, vous
aurez peut-être à répéter les étapes de
la « Configuration Internet » à la page
10.
• La connexion par Internet est désactivée
lorsque la caméra est branchée à un PC.
• La vision nocturne se réfléchit lorsque la
caméra est pointée vers une fenêtre ou
un miroir. Déplacez votre caméra à un
autre endroit.
• Vous devez activer au moins un type de
notification d'alerte. Voir « Réglage des
notifications mobiles » à la page pour
plus de détails.
• Pour être en mesure d'effectuer des
enregistrements d'alerte, il faut qu'une
carte microSD (non incluse) soit insérée
dans la caméra.
• Une connexion à la caméra par Internet
ou au point d'accès sans fil est requise.
• La caméra est peut-être trop près du
téléphone intelligent ou tablette. Les
éloigner l'un de l'autre.
• Pour des performances optimales, éviter
de placer la caméra près de téléviseurs,
d'ordinateurs, de téléphones sans
fil ou mobiles ou d'autres appareils
électriques.
• Diminuer le volume de votre téléphone
intelligent ou tablette.
Besoin d'aide?
Le service de soutien technique est disponible 24 heures par
jour, 7 jours par semaine, vous trouverez des informations
sur les produits, guides de l'utilisateur, guides de démarrage
rapide et FAQ au www.lorexbaby.com/support.
36
Page 79

FRANÇAIS
NETTOYAGE
Nettoyer la caméra avec un chiffon légèrement humide ou un chiffon
antistatique. Ne jamais utiliser de détergents ou de solvants abrasifs.
• Ne nettoyer aucune pièce de l'appareil avec des produits
nettoyants contenant des diluants ou d'autres solvants et produit
chimique. Cela peut causer des dommages permanents au produit,
lesquels ne seraient pas couverts par la garantie. Si nécessaire, le
nettoyer avec un chiffon humide.
• Gardez votre caméra loin des zones chaudes, humides ou sous la
lumière directe du soleil, et ne la mouillez pas.
• Tous les efforts ont été déployés pour assurer des normes élevées
de fiabilité pour votre produit. Cependant, si quelque chose
ne fonctionne pas, ne pas essayer de le réparer vous-même.
Communiquer avec le service à la clientèle pour de l'assistance.
DISPOSITION DE L'APPAREIL
À la fin du cycle de vie de l'appareil, ne pas le
disposer avec les ordures ménagères, mais plutôt
l'apporter à un point de collecte de recyclage
d'équipements électriques et électroniques. Le
symbole sur le produit, le guide de l'utilisateur, ou la
boîte le mentionnent.
Certains matériaux de l'appareil peuvent être
réutilisés si vous les apportez à un centre de recyclage. En réutilisant
certaines pièces ou matières premières de produits usagés, vous
contribuez de manière importante à la protection de l'environnement.
Veuillez contacter les autorités locales au cas où vous auriez besoin
de plus d'informations sur les points de collecte dans votre région.
Disposer les piles d'une manière respectueuse de l'environnement
conformément à la réglementation locale.
AVIS
AVERTISSEMENT : Tout changement ou modification non
expressément approuvé par la garantie de cet appareil pourrait
annuler le droit de l'utilisateur à utiliser l'appareil.
AVIS DE LA FCC
Cet appareil est conforme à la partie 15 des règlements de la FCC.
Son fonctionnement est soumis aux deux conditions suivantes : (1)
Cet appareil ne doit pas provoquer d'interférences nuisibles; (2)
Cet appareil doit accepter toute interférence reçue, incluant toute
interférence pouvant causer un fonctionnement indésirable.
Toute modification non expressément approuvée par la partie
responsable de la conformité est susceptible d'annuler le droit de
l'utilisateur de faire l'usage de cet équipement.
Cet équipement a été examiné et s’est avéré conforme avec les
limites pour un dispositif numérique de classe B, conformément à
la partie 15 des règles de la FCC. Ces limites sont conçues pour
assurer une protection raisonnable contre l'interférence nocive dans
une installation résidentielle. Cet équipement produit, utilise et peut
émettre de l'énergie de radiofréquence et s'il est non installé et
utilisé selon les instructions, peut causer de l'interférence nuisible
aux radiocommunications. Cependant, il n'y a aucune garantie que
l'interférence ne se produira pas dans une installation particulière.
Si cet équipement cause de l'interférence nuisible à la radio ou
la réception des émissions télévisées, qui peut être déterminée en
allumant ou éteignant l'équipement, il est conseillé à l'utilisateur
d'essayer de corriger l'interférence par une ou plusieurs des mesures
suivantes :
• Augmentez la distance entre l'équipement et la caméra.
• Branchez l'équipement à une sortie sur un circuit différent de celui
auquel la caméra est branchée.
37
Page 80

• Consultez le revendeur ou un technicien expérimenté en radio/
télévision pour obtenir de l'aide.
Cet appareil est conçu et fabriqué de façon à ne pas excéder
les limites d'exposition aux radiofréquences (RF) émises par la
Commission fédérale des communications du gouvernement américain.
Les normes d'exposition utilisées pour les appareils sans-fil requièrent
une unité de mesure connue sous le terme de Débit d'absorption
spécifique (DAS). Dans un environnement incontrôlé, la limite DAS
reconnue par la FCC est de 1,6 W par kg. Les tests pour déterminer
les DAS sont effectués en utilisant les positions de fonctionnement
normalisées par la FCC alors que l'appareil transmet à son niveau
maximal de puissance homologué sur toutes les bandes de fréquences
testées. La FCC a accordé une autorisation d'équipement pour cet
appareil avec tous les niveaux de DAS indiqués conformes aux
directives d'exposition concernant les radiofréquences.
Bien que les DAS soient déterminés selon le niveau maximal de
puissance homologué, le niveau de DAS réel de l'appareil, en cours
d'utilisation, peut être nettement inférieur à la valeur maximale. Cela
est dû au fait que l'appareil a été conçu afin de fonctionner selon
plusieurs niveaux de puissance de façon à n'utiliser que la puissance
nécessaire pour accéder au réseau. En général, plus vous êtes à
proximité de l'antenne d'une station sans-fil, plus la puissance de sortie
sera faible.
MISE EN GARDE : Pour maintenir la conformité aux directives
de la FCC se rapportant à l'exposition aux interférences RF, placez
l'appareil à au moins 20 cm (7,87 po) des personnes à proximité.
La caméra a été testée et est conforme aux directives de la FCC se
rapportant à l'exposition aux interférences RF. L'usage de la caméra
avec des accessoires qui ne sont pas inclus ou qui ne sont pas
désignées pour le produits peut ne pas être conforme aux
directives de la FCC se rapportant à l'exposition aux interférences RF.
CANADA/AVIS D'INDUSTRIE CANADA
Cet appareil est conforme aux normes RSS d'Industrie Canada pour
les produits exempts de licence. Son fonctionnement est soumis aux
deux conditions suivantes :
(1) cet appareil ne doit pas provoquer d'interférences, et (2) cet
appareil doit accepter toute interférence, incluant toute interférence
pouvant causer un fonctionnement indésirable de l'appareil.
DÉCLARATION D'INDUSTRIE CANADA CONCERNANT
L'EXPOSITION AUX RADIOFRÉQUENCES (DAS)
Cet appareil a été testé conformément aux mesures exigées et selon
les procédures IEEE 1528 et IEC 62209. Cet appareil est conforme
aux limites d'exposition DAS incontrôlée pour la population générale
stipulées par la norme RSS-102 d'Industrie Canada.
38
Page 81

LITTLE LINK
MONITOR DE VIDEO HD WIFI
PARA BEBÉS
GUÍA DEL USUARIO
Versión 1.0
ENGLISH
FRANÇAIS
ESPAÑOL
www.lorexbaby.com
Page 82

Precauciones de
seguridad
• Se requiere que un adulto realice el armado.
Mantenga las piezas pequeñas fuera del alcance de
niños durante el armado.
• Este producto no es un juguete. No permita que niños
o bebés jueguen con él.
• Este monitor de video no sustituye la supervisión de un
adulto responsable.
• No lo use en áreas mojadas o húmedas.
• Pruebe la aplicación para móviles antes de su uso
prolongado. Familiarícese con sus funciones.
• No utilice ni instale la cámara cerca de una fuente de
calor, como un radiador.
• No apunte la cámara directamente hacia el sol o
fuentes de luz intensa.
• Mantenga los cables fuera del alcance de niños y
bebés.
• Nunca utilice extensiones de cable con adaptadores
de corriente.
• Solo utilice los cargadores y adaptadores de corriente
proporcionados. No utilice otros cargadores o
adaptadores de corriente, ya que esto podría dañar
la cámara.
• No cubra la cámara con una toalla o una manta.
• No utilice la cámara cerca del agua.
• No toque los contactos del enchufe con objetos
afilados o metálicos.
• No conecte a la vez más de un cable USB a la
cámara.
• Guarde esta guía del usuario para futuras referencias.
Para evitar lesiones a
niños y bebés:
• ASEGÚRESE de mantener la cámara y todos los
cables de alimentación al menos a 3 ft/1 m de
distancia de la cuna y fuera del alcance de su hijo.
• Utilice los sujetadores de cable incluidos para
ayudar a mantener los cables de alimentación lejos
de su hijo.
3 ft/1 m
Page 83

ESPAÑOL
Índice:
Incluido con el producto ..................3
Descripción general de la cámara ...3
Primeros pasos ...............................5
Montaje de la cámara en la pared ............7
Posicionamiento de la cámara ........8
Cómo conectarse a la cámara desde
un teléfono inteligente o una tablet .9
Configuración en la nube .......................10
Configuración del punto de acceso ......... 12
Cómo agregar un nuevo dispositivo ........13
Cómo usar la aplicación para
móviles .........................................15
Lista de cámara ....................................15
Tablero de control ................................. 15
Menú de configuración de la
cámara .........................................16
Cómo configurar fecha y hora ................ 16
Calidad del video .................................17
Cómo configurar las notificaciones
para móviles .................................18
Grabación de alerta en la tarjeta
microSD ............................................... 18
Detección de audio ............................... 20
Detección de movimiento .......................20
Alerta de temperatura ............................ 21
Alertas por correo electrónico (solo con
conexión en la nube) ............................................ 22
Visualización en vivo ....................23
Tomar una foto instantánea .................... 23
Grabación de un video ..........................23
Hablar con el bebé ...............................23
Modo solo audio ..................................24
Silenciar audio .....................................24
Uso de luz nocturna ..............................24
1
Page 84

Cómo reproducir sonidos suaves y
relajantes que inducen el sueño ..............25
Modo álbum .................................26
Visualización de grabaciones de video ....26
Visualización de fotos instantáneas .........27
Visualización de grabaciones de alertas .. 27
Ver grabaciones de alertas en una
computadora ................................29
Cómo transferir grabaciones y fotos
instantáneas a una computadora
(sólo para usuarios de Android) ....................... 31
Cómo restablecer a los valores de
configuración predeterminados .....32
Cómo actualizar el firmware de la
cámara .........................................33
Eliminar cámara (solo con conexión en
la nube) ........................................................... 34
Especificaciones técnicas ................35
Resolución de problemas ..............36
¿Necesita ayuda? .........................36
2
Page 85

ESPAÑOL
Incluido con el producto
x1*
Cámara Cable USB y adaptador
de corriente
x2*
x2*
Tornillos y anclajes
x3*
Sujetadores de cable
*Los contenidos pueden variar según el modelo.
Placa de montaje
x1*
x1*
Descripción general de la cámara
Altavoz
Botón de
luz de
noche
Micro-USB
3
Page 86

WPS*
Ranura
para
MicroSD
Micro-USB
Encendido/punto
de acceso
Sensor de temperatura
Micrófono
Placa de montaje/base
Luz de noche
* Si su router inalámbrico tiene un botón WPS, puede
conectar la cámara a Internet presionando el botón WPS
en su router y luego presionando el botón WPS en la
cámara.
4
Page 87

ESPAÑOL
Primeros pasos
Conecte el cable USB al adaptador de
1
corriente.
Conecte el otro extremo del cable
2
USB a la base de la cámara. Conecte
el adaptador de corriente a un
tomacorriente.
Asegúrese de que todos los cables de
alimentación se encuentren a por lo
menos 3 ft/1 m de la cuna y fuera del
alcance de su hijo.
Utilice los sujetadores de cable
incluidos para ayudar a mantener
los cables de alimentación lejos de su
hijo.
Mantenga presionado el botón de
3
encendido de la cámara durante un
segundo.
Botón de
encendido
La batería de la cámara se carga
fuera del empaque. Para su uso
futuro, conecte la cámara durante
al menos 6 horas para cargar
completamente la batería.
5
Page 88

El indicador LED se
ilumina en rojo para
indicar que la cámara
está encendida.
Para apagar la cámara:
Mantenga presionado el botón de
1
encendido de la cámara durante 5
segundos.
Botón de
encendido
La cámara emite un pitido una vez y
el indicador LED se apaga. La cámara
se enciende en el modo de punto de
acceso cuando se vuelve a encender.
Después de unos
segundos, el LED se
iluminará
constantemente en
naranja.
Si la cámara no responde:
Mantenga presionado el botón de
1
encendido de la cámara durante 10
segundos.
Botón de
encendido
El indicador LED se vuelve rojo.
6
Page 89

ESPAÑOL
Montaje de la cámara en la pared
Antes de montar de forma permanente la cámara:
• Determine desde dónde obtendrá la mejor vista de su
bebé.
• Asegúrese de que el cable de alimentación sea lo
suficientemente largo como para encender la cámara.
Asegúrese de que todos los cables de
alimentación estén
por lo menos a 3 ft/1 m de distancia de
la cuna y fuera del alcance de su hijo.
Utilice los sujetadores de cable incluidos
para ayudar a mantener los cables de
alimentación lejos de su hijo.
Sujetadores
de cable
Con una moneda, gire hacia la izquierda la placa
1
de montaje en la base de la cámara para quitarla
de la base.
Sostenga la placa de montaje contra la pared
2
donde le gustaría montar la cámara.
Use un lápiz para marcar los agujeros para los
3
tornillos de montaje.
Con un taladro, perfore los orificios en los lugares
4
marcados.
Inserte los anclajes incluidos dentro de los orificios.
5
Fije la placa de montaje a la pared con los
6
tornillos de montaje incluidos.
Fije la base de la cámara a la placa de montaje.
7
Asegúrese de que el mecanismo de cierre en las
líneas de la placa se alinea con la indentación de la
base de la cámara.
Gire la base de la cámara hacia la derecha para
8
fijarla a la placa de montaje.
El empaque incluye una placa de montaje
adicional para ser instalada en la base de
la cámara cuando la cámara se use sobre
una superficie plana.
7
Page 90

Posicionamiento de la cámara
Puede inclinar la cámara hasta 60° hacia atrás
desde la posición vertical.
60°
Esto permite que las cámaras montadas en la
pared miren de arriba a abajo hacia la cuna de
su bebé.
Asegúrese de que todos los cables de
alimentación estén
por lo menos a 3 ft/1 m de distancia de
la cuna y fuera del alcance de su hijo.
Utilice los sujetadores de cable incluidos
para ayudar a mantener los cables de
alimentación lejos de su hijo.
La cámara también gira hacia la izquierda y la
derecha.
No fuerce la cámara a inclinarse o
girar más de lo permitido.
8
Page 91

ESPAÑOL
Cómo conectarse a la cámara
desde un teléfono inteligente o
una tablet
Hay dos maneras en las que usted puede conectarse a la
cámara desde un teléfono inteligente o una tablet usando
la aplicación Lorex Baby Link: conexión en la nube y
conexión a punto de acceso a Internet.
Conexión en la nube
También puede conectarse a la cámara a través de
Internet desde cualquier lugar del mundo. La cámara se
conecta a su router inalámbrico para enviar datos de
forma segura a través de Internet.
Internet
Una conexión en la nube para la cámara le permite
ver vídeo en directo desde la cámara y configurar los
ajustes de la cámara en línea desde cualquier parte
del mundo. La cámara debe estar dentro del
alcance de su router inalámbrico para crear
una conexión en la nube.
Para conectar la cámara al modo en la nube, consulte
"Configuración en la nube" en la página 10.
Conexión a punto de acceso
Puede conectarse a la cámara desde su teléfono
inteligente o tablet de la misma manera en la que se
conecta a una red WiFi. Conectarse al punto de acceso
crea un vínculo directo entre la cámara y el teléfono
inteligente o la tablet que no requiere de una conexión a
Internet.
Mientras esté conectado al punto de acceso de la
cámara, puede ver video en directo desde la cámara
y configurar los ajustes de la cámara, todo ello sin
una conexión a Internet. Solo los dispositivos
dentro del alcance del punto de acceso (hasta
328 ft/100 m) pueden conectarse.
Para conectarse a la cámara en el modo de punto de
acceso, consulte la sección "Configuración del punto de
acceso" en la página 12.
9
Page 92

Requisitos del sistema:
• iOS v6.0 o superior/Android v2.3 o superior
• Acceso a una conexión WiFi de internet
Configuración en la nube
Descargue la aplicación gratuita
1
Lorex Baby Link desde la App
Store/Google Play Store.
Asegúrese de que el WiFi de su teléfono
2
inteligente o tablet esté encendido.
Consulte la guía del usuario suministrada
con su teléfono inteligente o tablet para
más detalles.
Conéctese al punto de acceso WiFi de la
3
cámara. El punto de acceso aparecerá en
sus redes WiFi disponibles como “Lorex”,
seguido por la ID del dispositivo
(Lorex-XXXXXXX).
Toque el ícono de Lorex Baby Link ( ).
4
Ahora está conectado al punto de acceso
personal de la cámara. Su cámara
aparecerá en la pantalla principal de
la aplicación mostrando un estado de
Conectado.
5
Toque al lado
del nombre de la
cámara
Se le pedirá que cree una contraseña
personalizada para la cámara.
Su contraseña debe tener al menos
6 caracteres de longitud. Escriba su
contraseña para referencia futura:
CONTRASEÑA:
10
Page 93

ESPAÑOL
Toque bajo WiFi AP.
6
Seleccione la red WiFi que se usará para
7
conectar la cámara a Internet
(por ejemplo, WiFi hogar).
Introduzca la contraseña de su red WiFi,
8
luego toque Atrás.
Toque Guardar para guardar su
9
configuración de la cámara; luego, toque
Atrás para volver a la pantalla principal.
El indicador LED se iluminará en
verde y parpadeará
encendiéndose y apagándose.
Una vez que el LED se ilumine
continuamente de color verde,
continúe con el paso 10.
NOTA: Si el LED indicador sigue parpadeando
durante más de un minuto, es posible que haya
introducido incorrectamente su contraseña WiFi.
Presione el botón de encendido de la cámara y
vuelva al Paso 3.
Asegúrese de que su teléfono inteligente
10
o tablet estén conectados a su red WiFi.
O
Use su conexión a Internet móvil.
Toque en el nombre de la cámara e
11
introduzca la contraseña que creó en el
paso 5.
El video en directo desde la
cámara aparecerá en el
teléfono inteligente o la tablet.
11
Page 94

Configuración del punto de acceso
Descargue la aplicación gratuita
1
Lorex Baby Link desde la App
Store/Google Play Store.
Asegúrese de que el WiFi de su
2
teléfono inteligente o tablet esté
encendido. Consulte la guía del usuario
suministrada con su teléfono inteligente
o tablet para más detalles.
Conéctese al punto de acceso WiFi de la
3
cámara. El punto de acceso aparecerá en
sus redes WiFi disponibles como “Lorex”,
seguido por la ID del dispositivo
(Lorex-XXXXXXX).
Toque el ícono de Lorex Baby Link ( ).
4
Ahora está conectado al punto de acceso
personal de la cámara. Su cámara
aparecerá en la pantalla principal de
la aplicación mostrando un estado de
Conectado.
5
Toque al lado
del nombre de la
cámara
Si esta es la primera vez que se conecta
a la cámara, se le pedirá que cree
una contraseña personalizada para la
cámara.
Su contraseña debe tener al menos
6 caracteres de longitud. Escriba su
contraseña para referencia futura:
CONTRASEÑA:
12
Page 95

ESPAÑOL
Cómo agregar un nuevo dispositivo
Una vez que haya configurado la conexión en
la nube en un teléfono inteligente o una tablet,
puede permitir que otros dispositivos accedan a
la cámara.
Descargue la aplicación gratuita Lorex
1
Baby Link de la App Store (iPhone®/
iPad®) o Google Play Store (Android™).
Asegúrese de que el teléfono inteligente o
2
la tablet estén conectados a Internet.
Toque el ícono de Lorex Baby Link ( ).
3
Toque .
4
(OPCIONAL) Toque para
5
seleccionar la imagen que aparecerá al
lado de la cámara en la pantalla
principal de la aplicación.
• Toque Tomar foto para tomar una fotografía
usando la cámara de su teléfono inteligente o
tablet.
• Toque Seleccionar de un álbum para
seleccionar una imagen guardada en su
teléfono inteligente o tablet.
• Toque Cancelar para regresar a la pantalla
Agregar Cámara.
Toque para escanear el código QR
6
en la parte posterior de la cámara. Se
le puede pedir que descargue Barcode
Scanner si no se encuentra instalado en
su teléfono inteligente/tablet.
O
Introduzca manualmente la ID del
dispositivo de la cámara escrito debajo
del código QR.
13
Page 96

Introduzca la contraseña que escribió en
7
el paso 5 de "Configuración en la nube"
en la página 10; a continuación, toque
Guardar.
8
Toque en el nombre de la cámara.
El video en directo desde su
cámara aparece en un
segundo teléfono inteligente
o tablet.
14
Page 97

ESPAÑOL
Cómo usar la aplicación para
móviles
Lista de cámara
La lista de cámaras muestra todas las cámaras
disponibles y un ícono que muestra el estado de
cada cámara.
Ícono Significado
La cámara está
disponible para la
conexión de punto de
acceso.
Su teléfono inteligente
o tablet están
conectados a la
cámara mediante una
conexión de punto de
acceso.
La cámara está
disponible para la
conexión en la nube
mediante Internet.
Tablero de control
El tablero de control consta de tres botones en la
parte inferior de la pantalla principal:
Refrescar Agregar cámara Visor
Refrescar: Toque para actualizar la lista de
cámaras.
Agregar cámara: Una vez que haya
completado la configuración inicial, toque en
otro teléfono inteligente o tablet para permitir
el acceso a la cámara. Vea "Cómo agregar un
nuevo dispositivo" en la página 13 para más
detalles.
Visor: Vea fotos y videos guardados en su
teléfono inteligente o tablet.
15
Page 98

Menú de configuración de la
*
cámara
Utilice la aplicación para acceder al Menú de
configuración de la cámara. Se requiere una
conexión de punto de acceso o en la nube
de la cámara para configurar el Menú de
configuración de la cámara.
Para acceder al Menú de configuración
de la cámara:
1
Toque al lado
del nombre de la
cámara.
Toque arriba para desplazarse por la
2
página hasta Configuraciones de
cámara.
Cómo configurar fecha y hora
La fecha y hora se aplica a los
nombres de archivo de las
grabaciones.
Opción 1: Sincronización desde el dispositivo
Toque el ícono de sincronización para
usar la fecha y hora de su teléfono
inteligente o tablet; a continuación, toque
Guardar. La hora y fecha de la cámara
se actualizarán de manera automática.
Opción 2: Ajuste manual
1
Toque la
fecha.
2
Toque los botones + y para cambiar la fecha;
luego, toque Configurar.
16
Page 99

ESPAÑOL
3
4
5
Toque Guardar.
Toque
la hora.
Toque los botones + y
- para cambiar la hora;
luego, toque Configurar.
Calidad del video
Configure la resolución de
visualización para el video en
directo de la cámara. Están
disponibles dos opciones de
visualización: están disponibles: HD y SD.* Se
recomienda el uso de la calidad de video SD
para reducir la carga de su red de datos móvil.
Para cambiar la calidad del video:
Toque el interruptor al lado de Calidad
1
de video para cambiar entre HD y SD.
2
Toque Guardar.
Cambiar la calidad del video no
afectará la resolución de grabación de
la cámara. La definición de grabación del
video siempre es de 720 p en alta definición.
HD = 720 p (1280 x 720) alta definición a 512 kbps
*
SD = WVGA (960 x 640) definición estándar a 256 kbps
17
Page 100

Cómo configurar las
notificaciones para móviles
Use la aplicación para acceder al menú de
Notificación de alertas.
Para acceder al menú de Notificación de
alertas:
1
Toque al lado
del nombre de la
cámara
Desplácese hacia arriba para mover la
2
página a Notificación de alertas.
Recibirá un mensaje de notificación cuando se
active una alerta.
Grabación de alerta en la tarjeta
microSD
Se graba una muestra de video en la tarjeta
microSD (que no viene incluida) de la cámara
cuando se activa una alerta. La cámara admite
tarjetas microSD de hasta 64 GB.
Para configurar las grabaciones de
alertas:
Inserte una tarjeta microSD (que no viene
1
incluida) en la ranura de microSD de la
cámara, como se indica a continuación.
Presione el botón de encendido en la
2
cámara para pasar al modo de punto
de acceso. El indicador LED en la
cámara debe encenderse de color
naranja en forma continua antes
de continuar.
18
 Loading...