


LCS-US204
USB 2.0 Hi-Speed-Port Device Server
User’s Manual
Version 1.0
1
|
|
Table of Contents |
|
CHAPTER1 |
INTRODUCTION ......................................................................................................... |
4 |
|
1.1 |
About 4 Models Described in this Manual ..................................................... |
4 |
|
1.2 |
Customer Support ........................................................................................... |
4 |
|
CHAPTER2 |
PRODUCT OVERVIEW .............................................................................................. |
5 |
|
2.1 |
Package Contents ........................................................................................... |
5 |
|
2.2 |
Product CD ..................................................................................................... |
5 |
|
2.2.1 |
Start-up Procedures ........................................................................................ |
5 |
|
2.3 |
Physical Description....................................................................................... |
5 |
|
2.4 |
Supported USB Devices .................................................................................. |
5 |
|
CHAPTER3 |
BASIC INSTALLATION .............................................................................................. |
7 |
|
3.1 |
Connecting the Hardware............................................................................... |
7 |
|
3.2 |
Wireless connection ........................................................................................ |
7 |
|
3.2.1 |
Preliminary ..................................................................................................... |
7 |
|
3.2.2 |
Set Wireless Configuration Using Control Center.......................................... |
7 |
|
3.3 |
Assigning an IP Address to the Server.......................................................... |
11 |
|
3.3.1 |
Preliminary ................................................................................................... |
11 |
|
3.3.2 |
IP Address ..................................................................................................... |
12 |
|
3.3.3 |
Methods for Setting the IP Address............................................................... |
12 |
|
3.3.4 |
Server Names and Server Name Rules ......................................................... |
12 |
|
3.3.5 |
Setting the IP Address Using DHCP............................................................. |
12 |
|
3.3.6 |
Setting the IP Address Using the Control Center ......................................... |
12 |
|
CHAPTER4 |
USING THE USB DEVICE SERVER ....................................................................... |
15 |
|
4.1 |
Introduction .................................................................................................. |
15 |
|
4.2 |
Connect & Disconnect .................................................................................. |
15 |
|
4.3 |
Subnet Issue .................................................................................................. |
15 |
|
4.4 |
Installation of USB Device Driver................................................................ |
16 |
|
4.5 |
Using the USB Device Server ....................................................................... |
18 |
|
4.6 |
Auto-Connect Printer.................................................................................... |
20 |
|
4.7 |
Network Scanner........................................................................................... |
23 |
|
4.8 |
USB Storage.................................................................................................. |
25 |
|
4.9 |
Request to Connect ....................................................................................... |
26 |
|
4.10 |
Quitting the Control Center .......................................................................... |
27 |
|
4.11 |
Limitations .................................................................................................... |
27 |
|
CHAPTER5 |
FILE SERVER ............................................................................................................... |
28 |
|
5.1 |
Preliminary ................................................................................................... |
28 |
|
5.2 |
Connecting USB Mass Storage to the Server ............................................... |
28 |
|
5.3 |
Supported Codepages ................................................................................... |
28 |
|
5.4 |
Using Shared Storages by SMB/CIFS Method for Windows ........................ |
30 |
|
5.5 |
Using Shared Storage by FTP Methods for Windows................................... |
31 |
|
CHAPTER6 |
THE SERVER’S WEB PAGES .................................................................................. |
33 |
|
6.1 |
Introduction .................................................................................................. |
33 |
|
6.2 |
Using the Server’s Web Pages ...................................................................... |
33 |
|
6.2.1 |
Displaying Server Status............................................................................... |
33 |
|
6.2.2 |
Setting up Server Configuration ................................................................... |
34 |
|
|
|
|
2 |
CHAPTER7 |
TROUBLESHOOTING .............................................................................................. |
38 |
|
7.1 |
LED Indicators ............................................................................................. |
38 |
|
7.2 |
Firewall |
......................................................................................................... |
38 |
CHAPTER8 |
RESTORE FACTORY DEFAULTS .......................................................................... |
39 |
|
8.1 |
Using the ......................................................................Server’s Web Pages |
39 |
|
8.2 |
Using Init ...........................................................................................Button |
39 |
|
8.3 |
Default Parameters ................................................................................List |
39 |
|
CHAPTER9 ............................................................................................ |
UPGRADE FIRMWARE |
41 |
|
CHAPTER10 ................................................................................................... |
THE INIT BUTTON |
42 |
|
CHAPTER11 |
FCC STATEMENT………………………………………………………………… |
40 |
|
3
Chapter1 Introduction
Thank you for purchasing LCS-US204 USB Device Server (in the following referred to as “Server”). This Server is designed to connect your Multifunction Printer, Scanner, Fax, Multifunction Printer, Hard Drive, iPhone, iPod, USB Digital TV Tuner, Digital Camera, USB Webcam, USB Speaker, USB CD, USB DVD to your network, allowing all network users’ access to these shared USB devices.
1.1About Server Described in this Manual
This manual provides introductory information as well as detailed instructions on how to set up and manage LCS-US204 in various network environments. LCS-US204 has a 10/100 Mbit/sec Lan port, wireless module (802.11b/g) and four USB ports.
To fully benefit from this document, you should be familiar with basic networking principles. The instructions described in this manual are based on the settings in a new Server. To reload the Factory Parameters, you can reset this Server back to Factory Default, which will restore most of the settings. For details, please refer to the chapter “Restore Factory Defaults”.
1.2Customer Support
Should you require any technical assistance, please contact your product reseller. Or you can visit our website for latest product information.
This document is subject to changes without prior notice.
4
Chapter2 Product Overview
2.1Package Contents
Verify that nothing is missing from the package by using the checking list below. Please contact your dealer if anything is missing or damaged. All packing materials are recyclable. Please confirm the items in the package below:
This Server
CD (Control Center and User’s Manual and Quick Installation Guide)
Power Adaptor
2.2Product CD
This CD provides easy-to-use Control Center software, and the User’s Manual and Quick Installation Guide.
2.2.1Start-up Procedures
If your computer is configured to auto start CDs, this CD will start automatically when inserted. You can also navigate to the CD and start the autorun.exe file from within the Windows file manager.
2.3Physical Description
1.Power Adaptor Connector: for DC IN 12V/1.5A power adaptor
2.Init Button: for restoring the parameters to the default values
3.Ethernet Connector: connected to a twisted pair category 5 cable
4.Wireless Station: IEEE 802.11 b/g wireless station with antenna
5.USB Host Ports: USB 1.1/2.0 low, full, and Hi-Speed compliant
6.Indicators
POWER INDICATOR is lit while power is applied. If it is not lit, or if it blinks, there is a problem with this Server or power adapter.
LAN INDICATOR blinks to indicate wired network activity. If it is lit, it indicates the wired network is applied. If it is not lit, it indicates that the server does not connect to the wired network.
WLAN INDICATOR blinks to indicate wireless network activity. If it is lit, it indicates the wireless network is applied. If it is not lit, it indicates that the server does not connect to the wireless network.
USB INDICATOR is lit while a USB device connects to a USB Port of this Server. If it is not lit, or if it blinks, there is a problem with the USB device or this Server.
2.4Supported USB Devices
The USB device server supports the following types of USB devices.
USB Printer
USB multifunction printer (MFP/AIO)
5
USB scanner
USB storage (like USB external HD, flash disk, and digital camera)
USB speaker
USB camera
USB digital TV tuner
USB webcam
USB CD
USB DVD
iPod
iPhone
6

Chapter3 Basic Installation
3.1Connecting the Hardware
1.Make sure that your USB devices are switched off and that the Server’s Power Adapter is disconnected.
2.Connect the USB devices to the USB ports with the USB cables.
3.Connect the Server to the network with a twisted-pair category 5 cable, 10baseT or 100baseTX.
4.Turn on the USB devices and make sure it is ready for use.
5.Connect the Power Adapter to the Server. The power indicator will light up and USB1 and USB2 indicators will flash in turn. When the Link indicator lights up, the Server is correctly connected to the network. When USB1 and USB2 indicators stop flashing, the Server starts to work normally.
3.2Wireless connection
3.2.1Preliminary
Before you can access wireless network, wireless parameters should be set correctly. You have to setup the first wireless parameter set through LAN (wired) connection.
Wireless access can be set as infrastructure (station) mode, which needs an access point to route network messages with the same SSID.
Wireless access can be secured by WEP (64/128), WPA-PSA (TKIP/AES), and WPA2-PSK (AES).
In infrastructure mode, if network administrator wants to change any security related parameters, LCS-US204 should be changed first, and then access point. If parameters mismatch causes wireless access is not allowed, you have to modify those parameters through LAN connection.
In infrastructure mode, the maximal transfer rate is 54 MBits depending on access point’s capability.
3.2.2Set Wireless Configuration Using Control Center
1.Install USB Device Server Control Center. It is available in the LCS-US204 USB Device Server Product CD.
2.Start USB Device Server Control Center and Auto-searching USB device server window will appear.
If the wireless parameters are not correct or not set yet, you have to use LAN to access
7

USB Device Server Control Center.
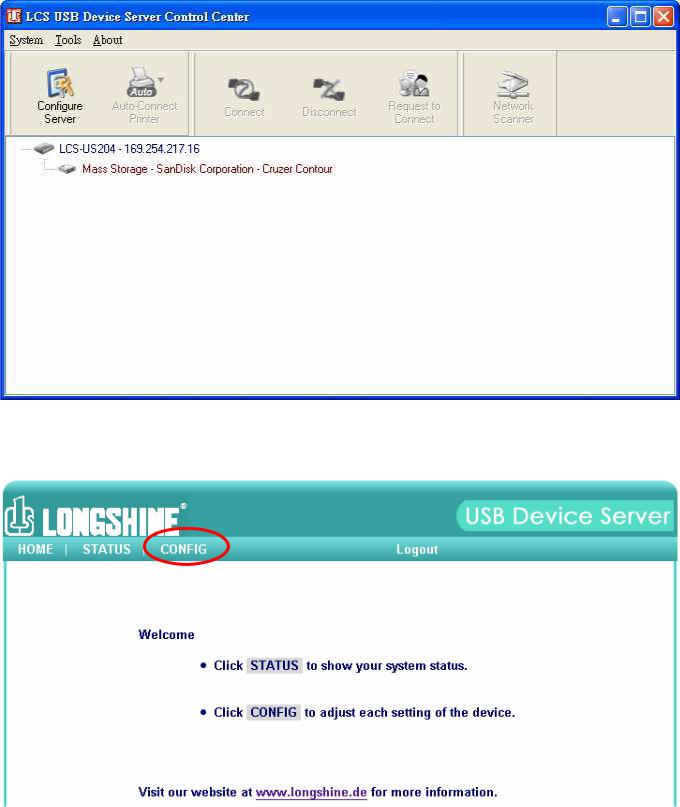
3.If the tool finds USB device servers in your local area network, then you have to select a server from the server list.
4.Double click the highlighted server (or click the “Configure Server” button) to get the server’s web pages. Click CONFIG icon.
5.Login with administrator ID (default: admin) and its password (default: admin).
8

6. Click Wireless icon.
7.In order to join an existing wireless network, you have to set the correct SSID, and the correct security method with the correct key information.
8.If the wireless network is secured by WEP64 or WEP128, key index and WEP key must be set correctly.
9

9.If the wireless network is secured by WPA-PSK or WPA2-PSK, the key formats, shared key and encryption must be set correctly.
10

10.Click Submit to save your settings. And the server will reboot.
11.You have now finished the procedure of setting the wireless parameters.
After properly configuring the wireless parameters, you can remove the network cable and reboot LCS-US204. LCS-US204 will then connect to your wireless network. LCS-US204 will detect if a network cable is plugged-in or not. If a network cable is plugged-in, LCS-US204 will always connect to the network through the network cable. Otherwise it will always connect to the network through wireless module. Once LCS-US204 connects to the network, either by network cable or by wireless module, all operations to use USB device server are exactly the same.
3.3Assigning an IP Address to the Server
3.3.1Preliminary
If you have a DHCP server on your network, your Server will receive an IP address automatically. The IP address will then appear on the Control Center or on the page of configuration report that you printed earlier. If your DHCP server does not give an IP address to the Server, the Server will use the automatic private IP addressing IP: 169.254.0.0. ~ 169.254.255.255
If you are not working in a DHCP network, you need to manually set the Server’s IP address.
11

3.3.2IP Address
Unless you are assigning an IP address using DHCP, you must obtain an unused IP address from your network administrator.
3.3.3Methods for Setting the IP Address
You can set the IP address of your Server using one of the following methods, depending on your network operating environment:
Automatic IP Address Assignment
Manual IP Address Assignment
3.3.4Server Names and Server Name Rules
The default server name of the Server is LCS-US204. If you put two or more Servers in your local area network, to avoid using the same server names you have to change the server names by using the Control Center or the Server’s web pages. If your server name is longer than 15 characters, the Server uses only the first 15 characters.
3.3.5Setting the IP Address Using DHCP
Follow the instructions below to get an IP address using DHCP:
1.Edit or create a scope in the DHCP manager of the DHCP daemon. The entries included in this scope should contain the following parameters:
range of IP addresses
subnet mask
default router IP address
DNS server IP address
lease duration
2.Activate the scope. The Server automatically gets the DHCP parameters. If you are using DNS, you may include at least one DNS server IP address in the DHCP scope or manually set the DNS server IP address using Server’s web pages or the Control Center.
3.3.6Setting the IP Address Using the Control Center
1.Install the Control Center. The Control Center is available on the Product CD.
2.Start the Control Center and Auto-searching Server window will appear.
3.If the tool finds multiple Servers in your local area network, then you have to select one Server from the Server List.
12
4.Double click the highlighted server (or click the “Configure Server” button) to get the server’s web pages. Click CONFIG icon.
5.Login with administrator ID (default: admin) and its password (default: admin).
13
 Loading...