


WLAN GENERAL
WLAN 802.11n , 300 Mbps
User’s Guide (2)
Bedienungsanleitung (36)
Notice d'emploi (71)
Instrucciones de uso (106)
Istruzioni per l'uso (140)
Gebruiksaanwijzing (175)
Instruções de uso (210)
Instrukcja obsługi (243)
Brugermanualer (278)
Bruksanvisning (312)
WLAN GENERAL
1

WLAN GENERAL
CE Mark Information
This equipment complies with the requirements relating to electromagnetic compatibility,
EN 55022 class B for ITE, the essential protection requirement of Council Directive 89/336/EEC on the approximation of the laws of the Member States relating to electromagnetic compatibility.
Company has an on-going policy of upgrading its products and it may be possible that information in this document is not up-to-date. Please check with your local distributors for the latest information. No part of this document can be copied or reproduced in any form without written consent from the company.
Trademarks:
All trade names and trademarks are the properties of their respective companies. Copyright © 2010, All Rights Reserved.
2

WLAN GENERAL
GB
OVERVIEW
Thank you for purchasing this product. Read this chapter to know about your IEEE 802.11n Wireless Adapter.
Unpacking information
Before getting started, please verify that your package includes the following items:
1.IEEE 802.11n Wireless Adapter
2.One quick installation guide
3.One Utility/ Manual CD
3

WLAN GENERAL
Introduction to the IEEE 802.11n Wireless Adapter
The IEEE 802.11n Wireless adapter provides users to launch IEEE 802.11n wireless network at 300 Mbps in the 2.4GHz frequency, which is also compatible with IEEE 802.11b/g wireless devices at 11/54Mbps. You can configure this adapter with ad-hoc mode to connect to other 2.4GHz wireless computers or with Infrastructure mode to connect to a wireless AP or router for accessing to Internet. This adapter includes a convenient Utility for scanning available networks and saving preferred networks that users usually connected with. Security encryption can also be configured by this utility.
Key Features
yComplies with IEEE 802.11b/g/n wireless standard
yHigh Speed transfer data rate up to 150/300 Mbps
ySupports auto-installation and diagnostic utilities.
ySupport wireless data encryption with 64/128-bit WEP, WPA, WPA2 (TKIP with IEEE 802.1x) and AES functions.
4

|
|
WLAN GENERAL |
LED Status |
|
|
|
|
|
LED Indications |
Status |
Working Status |
Radio/ACT LED |
Flashing green |
The Radio adapter is on |
|
|
|
|
Intermittently flashing |
The adapter is connected but is not trans- |
|
green |
mitting or receiving data |
|
|
|
|
Fats flashing green |
The adapter is active and transmitting or |
|
|
receiving data. |
|
|
|
|
Off |
The Radio adapter is off |
5

WLAN GENERAL
INSTALLATION GUIDE
Attention:
Make sure to install the software and driver BEFORE plugging the WLAN adapter into USB port.
Software Installation
Note: The following driver installation guide uses Windows XP as the presumed operation system. The procedures and screens in Windows 2000, Vista and Win7 are familiar with Windows XP.
Insert the CD-Rom that came with this product to your CD-Rom drive. The menu window pops up automatically. Please click the “Driver” button of this product.
Note: If the CD-Rom fails to auto-run, please click on “My Computer”Æ your CD-Rom Drive then dou- ble-click the “Setup” icon to start the this menu.
6

WLAN GENERAL
1.The language-selecting window pops up. Please select the language you use and click OK.
2.The welcome window pops up. Click the “Next” button to proceed.
7

WLAN GENERAL
3.Click the “Install” button to start installing.
4.Please wait while installation.
8

WLAN GENERAL
5.Click the “Finish” button to complete driver and utility installation.
9

WLAN GENERAL
6.Select “Yes, I want to restart my computer now” and click the “Finish” button.
10
WLAN GENERAL
MANAGEMENT GUIDE
Read this chapter to understand the management interface of the device and how to manage the device.
Making a Basic Network Connection
Before You Start
In the following instruction for making a network connection, we use the utility we provided to configure your wireless network settings.
Note: For Windows XP users that want to configure your wireless network using this Utility, please perform the following procedures to disable your native Windows XP wireless support (Wireless Zero Configuration Service)
1.Double click the  icon on your desktop to start the utility.
2.Make sure that the “Windows Zero Config” checkbox is unchecked.
Ad-Hoc Mode
An Ad-Hoc mode wireless network connects two computers directly without the use of a router or AP. It is also know as a peer-to-peer network. For example, we can install this wireless adapter to two computers respectively. The communication between the two computers is an Ad-Hoc mode network.
11

WLAN GENERAL
To use this adapter in Ad-Hoc Mode
1.Double click the  icon on your desktop.
2.Click the “Available Network” button to scan available wireless network adapters. Double click on the network adapter that you are going to connect to.
3. Click the OK button to confirm that you are connecting to an open wireless network.
12

WLAN GENERAL
4. Click OK to add this network into the profile list.
Note: This example is an open wireless network. If you are going to connect to a Wireless adapter with security protection, you will have to configure the encryption settings in this profile to be corresponding to the other wireless adapter. Please click on the “Network Authentication” drop list to select an authentication method, and then select a “Data encryption” type. Fill in each required blanks and click “OK”.
13

WLAN GENERAL
Infrastructure Mode
An Infrastructure Mode network contains at least one wireless client and one wireless AP or router. This client connects to Internet or intranet by communicating with this wireless AP.
To use this adapter in Infrastructure Mode:
1.Double click the  icon on your desktop.
2.Click the “Available Network” button to scan available access points. Double click on the AP that you are going to connect to.
14

WLAN GENERAL
3. Click the OK button to confirm that you are connecting to an open wireless network.
4. Click OK to add this network into the profile list.
15

WLAN GENERAL
Note:
This example is an open wireless network. If you are going to connect to an AP with security protection, you will have to configure the encryption settings in this profile to be corresponding to your AP. Please click on the “Network Authentication” drop list to select an authentication method, and then select a “Data encryption” type. Fill in each required blanks and click “OK”.
Introduction to the Wireless LAN Utility
Note: This management instruction uses Windows XP as the presumed operation system. Some functions are not supported in Windows 98se or Windows ME.
|
Starting the Wireless LAN Utility |
Double click the |
shortcut on your desktop. The Wireless LAN Utility pops up. |
You may click on the tabs above to configure this adapter. The checkboxes below provide the following functions:
|
Check this checkbox to show the utility icon on your system |
Show Tray Icon |
tray, which is in the notification area at the lower-right corner |
|
of the windows desktop. You may also uncheck it to remove |
|
the utility icon from system tray. |
|
Uncheck this checkbox to use native Windows XP wireless |
Windows Zero Config |
support (Wireless Zero Configuration Service) instead of us- |
|
ing this utility to configure your wireless network. |
|
Check this checkbox to prevent this adapter form transmitting |
Radio Off |
or receiving signals. Uncheck it to communicate. |
|
|
|
Check this checkbox to disable this wireless adapter. Un- |
Disable Adapter |
check it to enable this adapter again. |
|
|
16

WLAN GENERAL
Configuration Guide
This chapter describes how to configure your Adapter for wireless connectivity to your Wireless Local Area Network (WLAN) and how to use the data security encryption features. Configuration of the adapter in Windows 2000 is similar to configuration in Windows XP. This User Guide uses Windows XP for example.
After Installing the Adapter, the Adapter icon will appear in your system tray at the bottom of the screen. This icon shows the signal strength using color to indicate the strength of the received signal (RSSI).
 Purple: no connection.
 White: network failing.
 Partially green: good signal strength.
 Completely green: excellent signal strength.
17

WLAN GENERAL
General
After starting the utility, the general page pops up This General tab provides the information of your current wireless network connection. You may click the Renew button to refresh those listed information.
Status: |
Check if the device associated to target network. |
Speed: |
The current connection speed |
Type: |
Infrastructure mode or Ad-Hoc mode. |
Encryption: |
The performing encryption mode for connecting to current network |
|
profile. |
SSID: |
The SSID (network name) of the connected wireless network. |
Signal Strength: |
Indicates the signal strength detected by this adapter. |
Link Quality |
Indicates the link quality of this wireless connection. |
Network Address: |
Shows the current IP addresses settings for this adapter. |
18
WLAN GENERAL
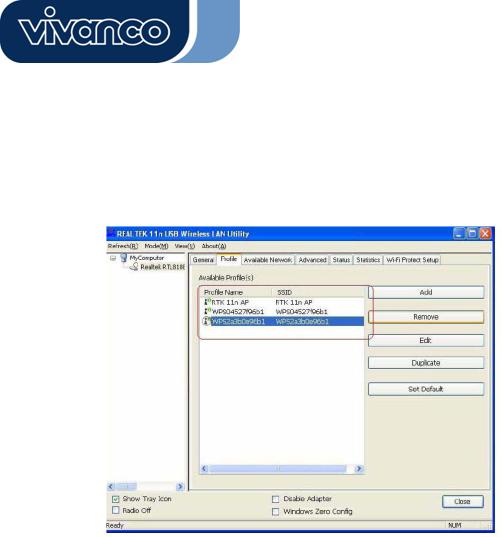
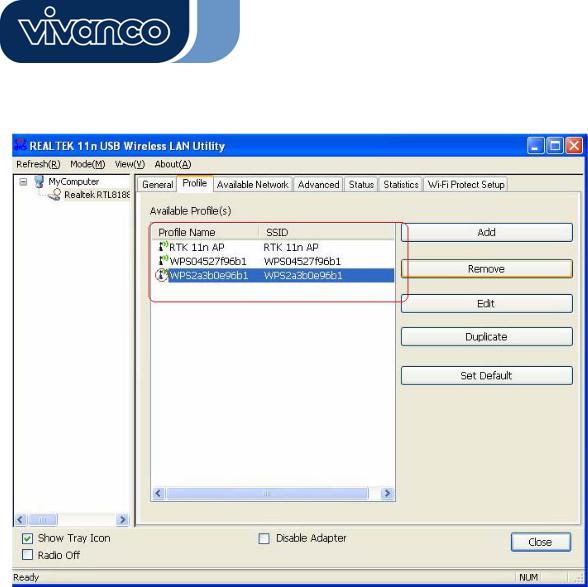
Profile
The Profile tab lists the preferred connections. You can click the buttons beside to do configure each connection.
Add |
Click this button to add a connection profile for this adapter. |
Remove |
To remove a connection profile, click this profile on the profile list and |
|
click this button to delete it. |
Edit |
To modify the configurations for a profile, click this profile on the profile |
|
list and click this button to edit. |
Duplicate |
To make a copy of a profile, click the profile that going to be copied, and |
|
click this button to copy it. |
Set Default |
To select a profile as your default wireless connection, click this profile |
|
on the list and click this button. You may also double click on each profile |
|
to select it as your default wireless connection. |
19

WLAN GENERAL
Available Network
This available tab lists the reachable wireless network of this adapter.
Refresh |
Click this button to rescan available networks around the adapter. |
Add to Profile |
To add an available Network to your profile list, select an available |
|
network and click this button to add. |
20
WLAN GENERAL
Advanced
This Advanced tab provides advanced configurations to this adapter. Every modification in this tab will be performed after clicking the Apply button.
To restore the default settings of the advanced tab, click the Set defaults button to perform restoring.
Disable Power saving function.
Minimum power consumption
Maximum power consumption
Disable turbo mode
Enable turbo mode
Enable or disable turbo automatically according to the detected environment
Fragment Threshold
The maximum size of a packet that is going to be segmented and transmitted. Select the size from 256 to 2432(default) bytes.
RTS Threshold
Select the RTS Threshold form 0 to 2432(default)
Wireless Mode
802.11g/b Connect to a 802.11b/g network (2.4GHz/54Mbps)
802.11b Connect to a 802.11b network (2.4GHz/11Mbps)
802.11b Preamble Mode
Select the preamble mode to be long, short or auto detection mode.
Region Domain
Select your region from the drop list. Please note that it is necessary for you to select a correct region. Selecting an incorrect region may again the applicable law.
21

WLAN GENERAL
Status
This tab shows the current connection status of this adapter.
22

WLAN GENERAL
Statistics
See this tab to show the transmission activity record. Clicking the “Reset” button recounts the values from zero.
23

WLAN GENERAL
WPS - Wi-Fi Protect Setup
The main purpose of Wi-Fi Protected Setup (Wi-Fi Simple Configuration) is to simplify the security setup and management of Wi-Fi networks. This adapter supports bith the PIN configuration method and PBC configuration method. If the wireless card supports Wi-Fi Protected Setup (WPS), you can set up a wireless connection between wireless card and router by using either Push Button Configuration (PBC) method or PIN method.
Two methods of configuring the QQS are shown here.
(QSS = Quick Security Settings. By selecting the wireless router and wireless card in the QSS window you can automatically set up WPA2 secure connection level without using the router or
24

WLAN GENERAL
network adapter management software. This avoids the use of complex interface settings and greatly simplifies the installation of the wireless security settings.)
Pin Code: 8-digit numbers. It is randomly generated from system
1. PIN method
Click the button “Pin Input Config (PIN)”. The following window is then displayed.
Click the button “Yes” to select an AP.
This window contains the buttons “Refresh / Select / Cancel”. Select an AP name, then click
25

WLAN GENERAL
“Select”. You can then use the PIN method to configure the QSS.
Double click the Internet WEB browser icon on your screen. Enter the IP address of your selected router/AP into the URL and press Enter. You can then enter the configuration.
Go to the WPS ( Wi-Fi ) configuration page, type the PIN code of adapter and click the confirm button to set up the WPS connection.
When the “General” window appears, the WPS has been configured successfully.
26

WLAN GENERAL
2. PBC (Push Button Configuration) method
After pushing the PBC button, push the physical button on your AP or the virtual button on the WPS configuration page, to call up the following window.
27

WLAN GENERAL
Call up the WPS ( Wi-Fi ) configuration page of your desired router/AP, and then start the PCB connection.
Once the WPS has been configured successfully, the available profiles are changed.
28
WLAN GENERAL
3. Click the “Install” button to start installing.
29

WLAN GENERAL
AP mode management guide
General
After configuring the adapter in AP mode, this “General” page shows up, which shows the general information of this
AP.
30
 Loading...