

Page 1

19” Rack-mount
Media Converter Chassis
(12-Bay Version)
User’s Manual
Page 2

COPYRIGHT
All rights reserved. No part of this publication
may be reproduced, stored in a retrieval system,
or transmitted in any form or by any means,
whether electronic, mechanical, photo copying,
recording or otherwise, without the prior written
permission of the publisher.
FCC WARNING
This equipment has been tested and found to
comply with the limits for class A device,
pursuant to part 15 of FCC rules. These limits are
designed to provide reasonable protection
against harmful interference in a commercial
installation. This equipment generates, uses and
can radiate radio frequency energy and, if not
installed and used in accordance with the
instructions, may cause harmful interference to
radio communication. Operation of this
equipment in a residential area is likely to cause
harmful interference, in which case, the user will
be required to correct the interference at the
user’s own expense.
Page 3

Table of Contents
1. Introduction
Product Overview ...................
Features ...................
Specifications ...................
Package Contents ...................
2. Installation
Installing the Bracket ...................
Installing the Converter ...................
Installing the Chassis ...................
3. Power Supplies
Power supplies ................... 17
4. Rack kit
Mounting ................... 20
5. LED Indications
LED Functions ................... 22
1
4
5
8
10
12
14
6. Cooling
Description ................... 24
Page 4

19" Rack-mount 12-port Converter Chassis
1
Introduction
Product Overview
The 19" Rack-Mount Converters Chassis offers the
user a dedicated and secure environment for multiple
Media Conversion applications. It also allows the user
to utilize existing and new Media Converters either in
the Rack or in stand-alone installation.
Flexibility - The Chassis supports up to 12-port
card-based media converters covering 10Base-2,
10Base-T, 10Base-FL, 100Base-TX and 100Base-FX,
FDDI, ATM, Gigabit 1000Base-T, Gigabit SX / LX,
RS-232, RS-422/485 conversion. In addition, both
Multi-mode and Single-mode options are supported
too.
-1-
Page 5

19" Rack-mount 12-port Converter Chassis
Reliability - The Chassis also supports two high
quality hot swappable power supplies. Either Power
unit can be removed without disturbing the Chassis’s
operation – offering total efficiency, maximum
redundancy and minimum down time. Each module is
supplied from a common shared power bus – but as
an added precaution, each is individually protected in
the event of a problem on the bus or from the power
supply. Each Converter can also be changed without
power down.
Functionality - The Chassis was carefully designed
to offer a lifetime of operation. Incorporated into the
Chassis are three long life cooling fans to ensure a
cool operating environment. Each fans is monitored
and connected to the LED Status panel. The Chassis
also features an LED Status panel. This indicates that
power is supplied to each module and that the Fans
are functioning correctly. Power supply also features a
“trigger guard” to prevent the supply from being
accidentally switched off.
-2-
Page 6
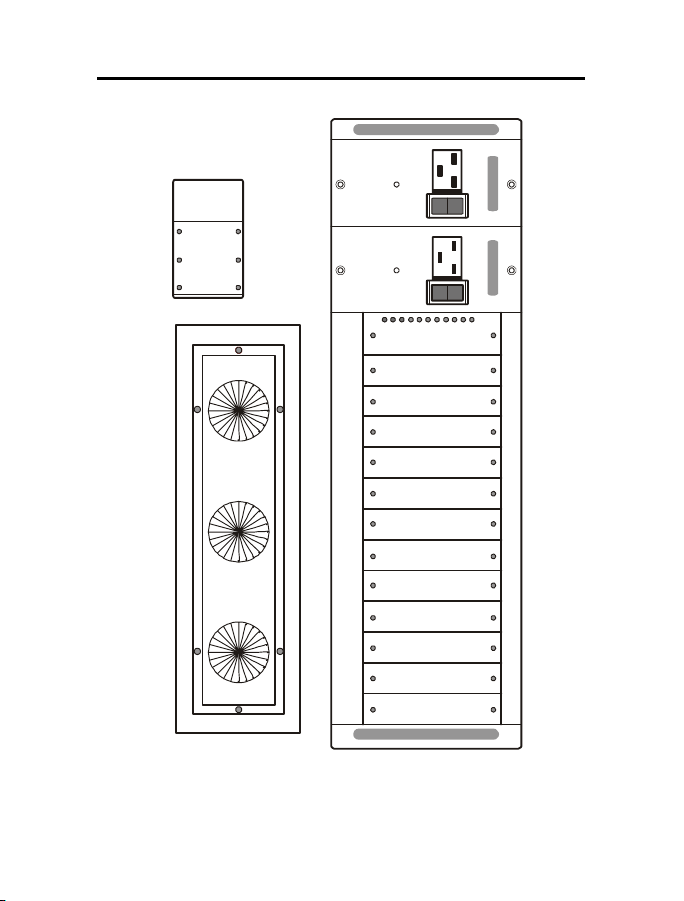
19" Rack-mount 12-port Converter Chassis
Product Outlook
12-Bay
assembly fitted
Side View with Rack-mount
Rear View showing 3 cooling fans
-3-
Front View with 12 blank bays and two power supplies
Page 7

19" Rack-mount 12-port Converter Chassis
Features
High quality 19" Rack-mountable Chassis
Supports up to 12-port card-based media
converters
Supports two load sharing, hot swappable power
supplies
Three high volume cooling fans ensure perfect
operating environment
LED Status panel with fan and bay
power status LEDs
Supports bay power isolation - ensures
each bay is electrically isolated from the next
Supports 10/100/1000Base, Copper, Fiber,
Single/Multi-mode, ST, SC, MT-RJ, VF-45, LC
RS-232, RS-422/485 connectors
Avoids network downtime and protects your
converter investments
Ideal for mission critical networks such as Large
Office Complex, Banks, Military etc.
-4-
Page 8

19" Rack-mount 12-port Converter Chassis
Specifications
Chassis Specs
Capacity 12 Bay - up to 12 card-based converters
Chassis Aluminium/Steel
Power Up to two power supplies, load sharing, hot
LEDs 3 Red for fan status, 12 Green for bay
Cooling Three 42.5 cfm rear mounted fans
Dims. 8-Bay: 430 x 290 x 133mm
(L x W x H) (EIA 3U)
Weight
12-Bay: 7.6kg (with one power supply)
13kg (loaded with 12 card-based
swappable
power status, 1 Red for each power supply
converters)
-5-
Page 9

19" Rack-mount 12-port Converter Chassis
Power Supply Specs for AC
AC input 90~260VAC @ 47~63Hz
DC Output Norm. +12V, Min. +11.88V,
Max +12.12V, 75Watts
Load Min. OA, Full. 6.4A
Total Reg. +/- 1.0%, Rip. 120mV, Load 2.0%, Line
0.5%
Overload All outputs protected against
Protection short circuit conditions, automatic
recovery
Over volts Output level exceeding + 13.2v
Protection causes shutdown – automatic recovery
Temp. Operation 0°C ~ 70°C,
Storage -55°C ~ 85°C
EMI FCC Part 15 Class A
Safety UL / cUL / TUL Approval
-6-
Page 10

19" Rack-mount 12-port Converter Chassis
Power Supply Specs for DC 48V
DC input -48V ±10%
DC Output Norm. +12V, Min. +11.76V,
Max +12.24V, 75Watts
Load Min. OA, Full. 6.4A
Total Reg. +/- 2.0%, Rip. 120mV, Load 2.0%, Line
1.0%
Overload Output protected against
Protection short circuit conditions, automatic
recovery
Over volts Output level exceeding + 13.2v
Protection causes shutdown – automatic recovery
Temp. Operation 0°C ~ 70°C,
Storage -55°C ~ 85°C
-7-
Page 11

19" Rack-mount 12-port Converter Chassis
Fans Specs
Speed 2510 rpm +/- 250,
Delivery 42.5ft3 Per Min.
Noise 36.5dB(A)(each fan)
Level
Temp Operation – 10°C ~ 70°C
Storage –40°C ~ 70°C
Bearing Precise Ball Bearing
Safety UL/cUL/TUV Approval
-8-
Page 12

19" Rack-mount 12-port Converter Chassis
Package Contents
• One 12-port Media Converter Chassis
• One Power Supply
• One Power supply Cable
• 19” Rack Mounting Kit
• 12 Blank Panels (fitted)
• 12 Converter Mounting Panels
• Four Self-Adhesive feet
• Spare Screws
• Spare Fuses
• This Operation Manual
-9-
Page 13

19" Rack-mount 12-port Converter Chassis
2
Installation
This chapter will take a look at how to install
Converters into the Chassis and the different
options available for placement of the Chassis
System within its operating environment.
First, it is important to unpack the Chassis and
ensure that all the components listed on page 1-8 are
present. In some cases, the Chassis may come
complete with certain Converters already installed.
You can either install the converters first or then place
the Chassis, or you can place the Chassis and then
install the Converters. We recommend that you do the
latter as it is more convenient.
-10-
Page 14

19" Rack-mount 12-port Converter Chassis
Installing the Bracket
All the Converters are made using a standard case.
This allows it to fit into the Chassis with ease. The
Converter can be mounted directly into the Chassis
without using the supplied panel but we strongly
advise against this.
We have supplied a special panel that easily
attaches to the Converter. This allows for the
secure placement of the converter into the Chassis. It
also seals off the front panel and allows the
Chassis cooling system to function correctly. The
Chassis also looks more professional this way.
-11-
Page 15

19" Rack-mount 12-port Converter Chassis
Place the converter into the bracket assembly, ensuring the
power supply socket is positioned at the bottom of the
converter.
Once in place, secure the converter onto the bracket using
the two original screws you removed earlier.
-12-
Page 16

19" Rack-mount 12-port Converter Chassis
Installing the Converter
Once the Converter has been attached to the bracket,
it can be installed into the Chassis. The converters
can go into the Chassis in any order and can be
placed in any available bay.
Special care must be taken to ensure the correct
mating of the power connector. Choose an available
bay and align the converter so that it fits between the
upper and lower guide rails.
Always ensure that the converter power
socket is positioned at the base of the
Chassis.
Never force the Converter into the
Chassis - check power socket position
and alignment.
-13-
Page 17

19" Rack-mount 12-port Converter Chassis
12-Bay
If necessary, you may move the converter up & down
or left & right to meet the power connector.
-14-
Page 18

19" Rack-mount 12-port Converter Chassis
Installing the Chassis
The Chassis is made from a combination of steel and
aluminum and is very sturdy in design. This allows the
Chassis to be installed in the following ways.
Rack-mount
The Chassis is built to established EIA Standards and
as such will fit into any 19” EIA designed rack. Refer
to the section “Rack-mount”
Wall-Mount
The Chassis can be mounted separately on a wall
with the use of a shelf. This should be securely
mounted on a suitable structure and must be able to
hold at least 15kg. The shelf should also be big
enough to accommodate the Chassis whilst still
offering space for adequate ventilation.
-15-
Page 19

19" Rack-mount 12-port Converter Chassis
12-Bay Version
-16-
Page 20

19" Rack-mount 12-port Converter Chassis
Desktop
The Chassis can be situated on any suitable desk top.
Simply attach the adhesive feet to the base of the
Chassis and position where suitable, again, keep
adequate space for ventilation.
12-Bay Version
-17-
Page 21

19" Rack-mount 12-port Converter Chassis
3
Power Supplies
The Converter Chassis is normally supplied with one
redundant, hot – swappable power supply as shown
below. The design of the power system is based
around flexibility and maximum redundancy. For
normal operation, one power supply is good enough
to run fully loaded 12 converters simultaneously.
However, for critical application, to install two power
supplies are always recommended.
During 2-power operation, both power supplies will be
switched on and will share the currant load between
them. In the event that a power supply should fail, the
other supply will take 100% of the load. This will
happen instantaneously and will have no adverse
effect on the operation of the Chassis.
Similarly, if a Power Supply is removed for servicing, it
can be switched off and removed while the Chassis
continues to function as normal.
-18-
Page 22

19" Rack-mount 12-port Converter Chassis
The Chassis shown as Supplied with one Hot-swappable,
Redundant 75Watt Power Supply
The Chassis shown as Supplied with two Hot-swappable,
Redundant 75Watt Power Supplies
-19-
Page 23

19" Rack-mount 12-port Converter Chassis
p
The Power Supplies can be removed from the
Chassis by simply removing the securing screws
and
ulling the supply unit out from the Chassis
Always exercise Caution when removing supplies
Always switch Power Supply off before removing
Always remove Power Cable from Supply before
removing
Do not touch Power Supply components after removal they may hold residual electrical charges
-20-
Page 24

19" Rack-mount 12-port Converter Chassis
4
Rack Kit
The Chassis comes with a 19” Rack Mounting Kit.
This basically comprises of two brackets and a set of
bolts.
The brackets are fitted to the Chassis via six bolts.
It is strongly recommended that you use all six bolts
and use the ones supplied with the Chassis. This will
ensure that no unnecessary stress is endured by the
Chassis or the brackets.
Each bracket has EIA standard mounting holes and
are symmetrical so that either bracket can be used on
either side of the Chassis.
-21-
Page 25

19" Rack-mount 12-port Converter Chassis
-22-
Page 26

19" Rack-mount 12-port Converter Chassis
5
LEDs
To enable the operator to establish the operational
status of the Chassis, a simple LED display panel is
installed.
Its simplicity hides the fact that the Chassis employs a
sophisticated power distribution system.
All Converters are supplied from the one hotswappable Power Supply. However, this is where their
common connection stops. Each bay has its own
protection system that isolates each Converter from
any problems that might occur with either the power
supplies or another faulty Converter.
This offers the best possible protection to your
investment in the various Media Converters.
-23-
Page 27

19" Rack-mount 12-port Converter Chassis
Fan Indicator LED’s
These should be
illuminated under
normal operating
conditions
Bay Power LED’s
These will illuminate
when a Converter is
supplied to the
Converter.
LEDs will be
extinguished if a
Converter is not
installed or there is a
problem with the
power.
-24-
Page 28

19" Rack-mount 12-port Converter Chassis
6
Cooling
The Chassis holds up to two Power Supplies and
twelve Media Converters, so it needs to have some
form of cooling.
This Chassis has three fans located at the rear, they
draw air into the Chassis. Each fan is connected to
the Status Monitoring Panel on the front of the
Chassis. Even with only one fan working, the Chassis
will be able to operate under normal operating
temperatures.
For the purpose of cleaning, the Fan panel assembly
can be removed for periodic maintenance. Switch the
power off to the Chassis (both power supplies!!),
remove the six securing screws and disconnect the
three power cables supplying DC to the fans.
Clean fans with a dry cloth and reverse the above
procedure.
-25-
Page 29

19" Rack-mount 12-port Converter Chassis
-26-
 Loading...