

Page 1
®
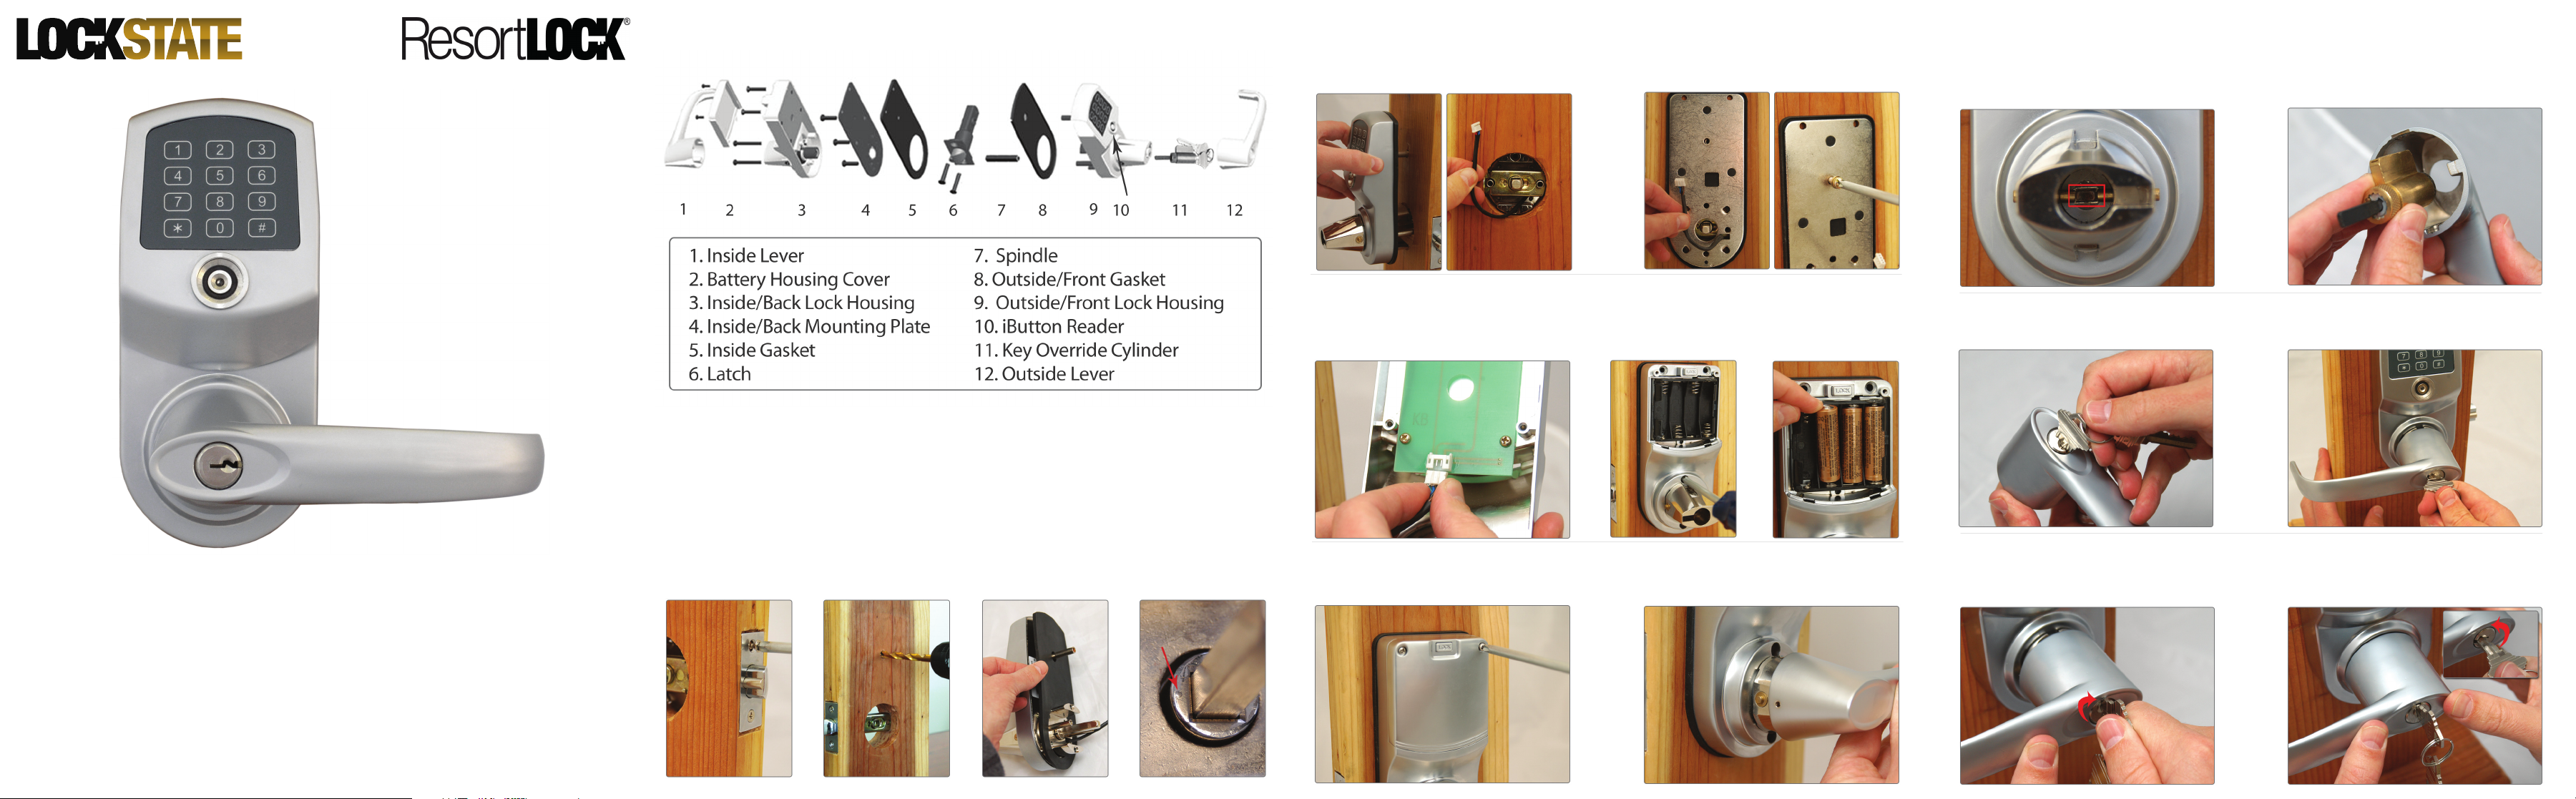
Major Lock Parts List
Fit the front lock housing onto the
front of the door. Feed the power plug
through the 2
Step 5
1/8” boring hole.
Place the inside gasket on the inside
plate. Feed power plug through and
secure to door & front lock with screw.
Step 6
Front Handle & Key Installation
1. Ensure that the key override slot
is in the horrizontal position.
2. Slide the key cylinder into the
back of the handle.
Installation & User
Manual
Step 1
Insert latch into
the door latch
hole. Secure the
latch with two
screws.
Installation Instructions
Step 2
Drill the 3/8” upper
support hole into
the door 3
above the center
of boring hole.
5/16
”
Step 3
Place the front
side rubber gasket
(if required) on the
back of the front
lock housing.
Step 4
Insert the square
spindle into the
center hub.
Ensure dot is
pointed left.
Step 7
Hold the inside lock housing up to
the inside of door. Plug the front lock
power cable into the connector.
Step 10
Secure the inside lock housing
battery cover with two screws.
Step 8
Place inside lock over
mounting place &
secure with screws.
Insert 4 AA batteries
into the battery
compartment.
Step 9
Step 11
Slide the inside lever into place. Press
rmly until handle snaps over catch pins.
3. Insert the key into the key cylinder from the front of the handle.
5. Push the key in as far as it will go
and then turn 90 degrees clockwise.
4. Slide the handle onto the drive
shaft until it hits the catch pins.
6. Firmly press the lever until it
snaps over the catch pins. Turn the
key back to the left and remove.
For use with ResortLock® RL4000 and LockState® LS-1500
Page 2
1. To set a new or change the Master Code (and not delete existing user codes):
#
mc # 01 # 1-9 digit code
#
iButton key
yymmddhhmm
#
yymmddhhmm
#
Lock Operation Guide
#
General Information:
• Door Handle: The handle is reversible so it will t both right and left-handed doors. The
handle will always turn even when the door is locked. However, when locked, the exterior
handle will not retract the latch. The interior handle will always retract the latch.
• Exit Programming Mode: Enter * to exit programming mode, or wait for 10 seconds.
• Low battery warning: When batteries are low, the red LED will ash and beep ve times after
entering a valid User Code.
• Unlocking indicator: Green light will ash and beep twice.
• Locking indicator: No light and will beep twice.
• Reset: To reset the lock back to factory default settings, press
and hold the reset button for 10 seconds until the light on the
front of the lock starts ashing green. Release the reset button
and press the # key to conrm. You will receive 3 beeps if
successful.
Manufacture Default Setting:
• Daylight Saving Mode: Disabled
• Auto Lock/Unlock: Disabled • Lock Mode: Storehouse
• Default Programming Master Code: 123456 • Test Code: 0 #
Unlocking the Door:
There are several ways to unlock the lock, including the following methods:
• Keycode: Enter a User Code, then press #
• iButton: Touch the iButton key to the lock reader
• iButton+Keycode: Touch the iButton key to the lock reader, then enter User Code and press #
• One time service code: Enter one time code, then press #
• Manual key: Insert and turn the override key 90 degrees clockwise, then turn the handle
Terms:
Master Code (MC): The master code enters the lock into programming mode. It will not lock or unlock
the lock the door. If more than 6 seconds pass in between programming entries, the lock will return to
normal operational status. For maximum security change the default Master Code.
User code: User Codes are the normal codes for day-to-day operation.
Service Code: Service codes can be used for maintenance personnel or vendors. Service codes only
grant one-time access. A total of 10 sets of service codes can be programmed into each lock.
Passage Mode: When Passage Mode is enabled, the lock will stay in an unlocked status after a valid
entry code is entered. Enter a valid entry code to re-lock the door.
Storehouse Mode: For each valid entry, the lock will automatically re-lock after 5 seconds.
Time Format: 24 hr. clock ~ 8:30AM = 0830; 5:30PM = 1730 Schedule Date: 1=Mon, 2=Tue, 7=Sun
Quick Start Guide
Step 1: Program a new Master Code into the lock.
The Master Code DOES NOT unlock or lock the door. It is only used to program your lock. The default
Master Code is 123456. For security purposes, you will need to change this to your own Master Code.
Decide on a new Master Code and write it here: _____________
To program a new Master Code, enter the following into the lock’s keypad:
# 123456 # 11 # Your Master Code # Your Master Code Again #
If done correctly, after the last # you press you’ll hear 2 beeps with 2 green ashes.
Step 2: Program the Date & Time.
Some functions on the lock will not work on the lock unless the date & time are programmed. To
program the date & time, enter the following:
# Master Code # 88 # YYMMDDHHMM #
Example: If the date and time is 05/30/2010 at 3:32PM, you would enter:
# Master Code # 88 # 1005301532 #
Step 3: Program a User Code into the lock.
**Important: Your lock will not lock until a valid User Code is programmed and used on the lock.
User Codes are the codes you will use to unlock and lock your door. These codes will remain active in
the lock until they are deleted (if desired). Up to 800 permanent codes can be programmed into the
lock. Here is how:
# Master Code # 01 # 1-9 digit user code # # # #
If done correctly, you will hear two beeps after pressing the 3rd #, then a red light after the 4th #.
Step 4: Set the Passage Mode. (Optional)
Your lock is shipped in Storehouse Mode. This means the lock will re-lock 5 seconds after it is unlocked.
To change this to passage mode, enter the following:
# Master Code # 15 # 1-7 Schedule # hhmm start, hhmm end #
Example: If you want the lock to always be in Passage Mode, enter:
# Master Code # 15 # 1234567 # 0001 2359 # (7 days of the week from 12:01AM to 11:59PM)
Step 5: Enable Daylight Saving Time.
If you live in an area that observes Daylight Saving Time, you will want to enable this function. Enabling
does not change the current time on the lock. The time wil change according to the U.S. Daylight
Saving Time schedule. To enable, enter:
# Master Code # 31 #
Complete List of
Manual Programming Functions
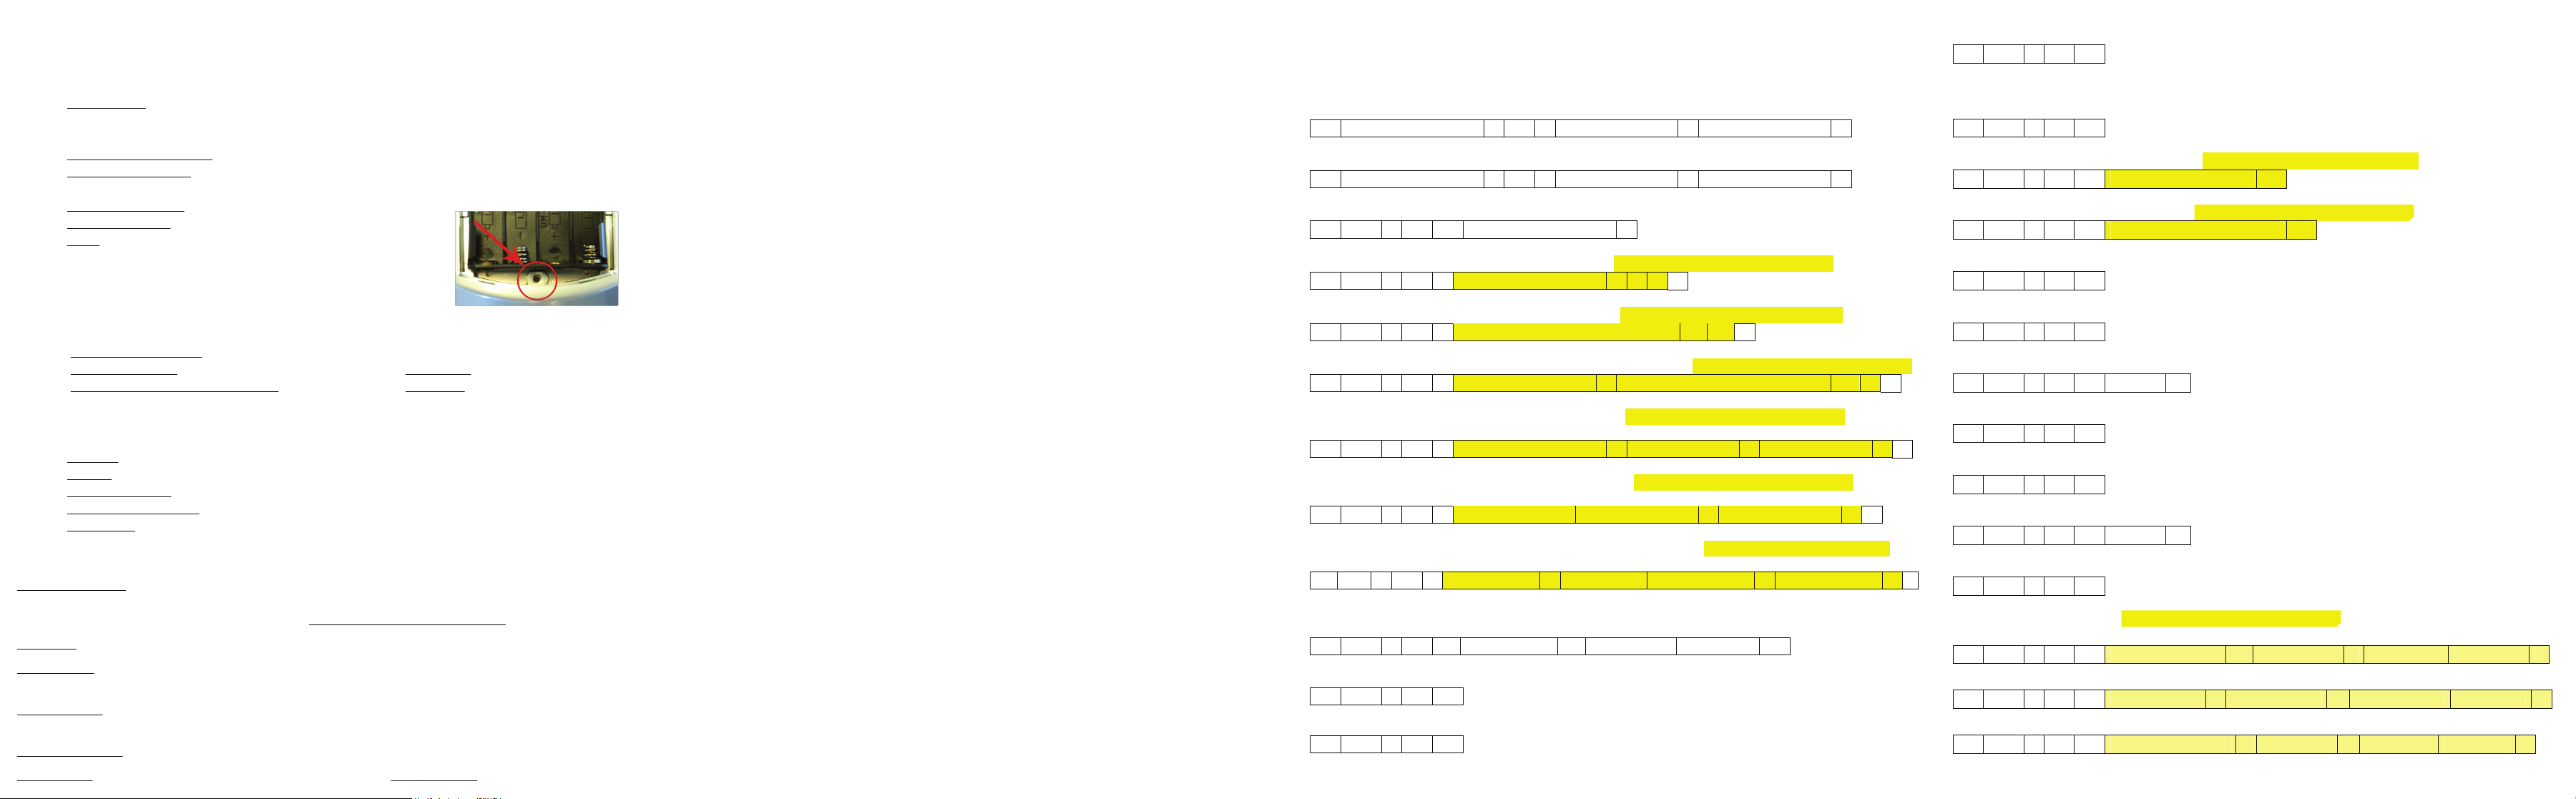
# current or default mc # 11 # 1-9 digit new mc # 1-9 digit new mc #
2. To change Master Code (and delete all user codes):
# current or default mc # 22 # 1-9 digit new mc # 1-9 digit new mc #
3. Set date & time - (24 hr. clock, Example: 2:45PM on July 12, 2010 = 1007121445)
# mc # 88 # yymmddhhmm #
4. Enter one or more User Code with no restriction (for multiple users, repeat highlighted)
# mc # 01 #
5. Enter one or more iButton key with no restriction (for multiple users, repeat highlighted)
# mc # 01 #
6. Enter one or more iButton key + User Code with no restriction (for multiple users, repeat highlighted)
# mc # 01 #
7. Enter one or more User Code with time restriction (for multiple users, repeat highlighted)
(beginning time) (ending time)
# mc # 01 #
8.
Enter one or more iButton key with time restriction (for multiple users, repeat highlighted)
(beginning time) (ending time)
# mc # 01 # iButton key yymmddhhmm # yymmddhhmm #
9. Enter one or multiple iButton + User Codes with time restriction (for multiple, repeat highlighted)
(beginning time) (ending time)
10. Enable Passage Mode
(1=Monday, 7=Sunday)
# mc # 15 # 1-7 Schedule # hhmm start hhmm end #
11. Disable Passage Mode
# mc # 16 #
12. Enable/ disable LED blink (2 beeps = blink o ~ 4 beeps = blink on)
# mc # 18 #
1-9 digit user
Hold iButton key to lock reader # #
1-9 digit user code # Hold iButton key to lock reader # #
1-9 digit user code # yymmddhhmm # yymmddhhmm #
*Warning: enabling blink mode will drain batteries more quickly.
Lock will blink red when locked, green when unlocked.
code
# # #
#
#
13.
Enable Daylight Saving Time
# mc # 31 #
* Lock time does not change when you enable this function. The time will change according to the U.S. Daylight
Saving Time schedule.
14.
Disable Daylight Saving Time
# mc # 32 #
15.
Add One Time Service codes (up to 10) (for multiple users, repeat highlighted)
# mc # 33 #
Delete one User Code or iButton user
16.
# mc # 46 #
Enable Auto-UNlock function
17.
1-9 digit user code #
(for multiple users, repeat highlighted)
User code or touch iButton #
# mc # 64 #
Disable Auto-UNlock function
18.
# mc # 65 #
Set Automatic Unlock time (Enable function #17 rst)
19.
#
# mc # 63 # hhmm #
Enable Auto-Lock function
20.
# mc # 67 #
Disable Auto-Lock function
21.
# mc # 68 #
#
Set Automatic Lock time (Enable function #20 rst)
22.
# mc # 66 # hhmm #
Enable/Disable temporary lockout of all users
#
23.
# mc # 99 #
Advanced Schedule Access
24.
Set schedule for User Code:
# mc # 45 #
25.
Set schedule for iButton user:
# mc # 45 #
(for multiple users, repeat highlighted)
(1=Monday, 7=Sunday)
1-9 digit User Code # 1-7 Schedule # hhmm start hhmm end #
(1=Monday, 7=Sunday)
iButton key # 1-7 Schedule # hhmm start hhmm end #
For Example: to set schedule from 8:00AM to 5:00PM, Mon. to Friday
# mc # 45 #
*A User Code or iButton must be programmed before Advanced Schedule Access can be applied.
1-9 digit User Code # 12345 # 0800 1700 #
 Loading...