


User's Manual

Table of contents |
|
Getting started |
|
Accessories .......................................................................... |
1 |
Important safety instructions ............................................... |
2 |
Warnings, cautions and others ............................................ |
3 |
Disk information .................................................................. |
4 |
Audio CD recording .................................................. |
20 |
Timer recording |
|
Setting the timer ................................................................ |
21 |
Controls and displays |
|
Remote control .................................................................... |
5 |
Front panel connections ...................................................... |
6 |
Display window ................................................................... |
6 |
Rear panel connections ...................................................... |
7 |
Connecting up |
|
Connecting the antenna cable and television .................... |
8 |
For better picture ................................................................. |
9 |
Component out .......................................................... |
9 |
For better sound ................................................................ |
10 |
Connection to a stereo audio amplifier or receiver ...... |
10 |
Connection to a digital audio device .......................... |
10 |
Digital out optical ..................................................... |
10 |
Digital out coaxial .................................................... |
10 |
Connecting a decoder ........................................................ |
11 |
Quick setup |
|
Initial setup ........................................................................ |
12 |
Aspect ratio ........................................................................ |
12 |
Video output ...................................................................... |
12 |
Audio ............................................................................... |
12 |
TV channel setup |
|
Automatic TV channel search ........................................... |
13 |
Adding or deleting TV channel manually ......................... |
13 |
Fine tuning TV channel manually..................................... |
13 |
Swapping TV channel manually (following TV) ............... |
13 |
Channel Editing ................................................................. |
14 |
Playback |
|
Basic playback .................................................................. |
22 |
POWER, OPEN/CLOSE, PLAY, F.F., REW. ........... |
22 |
NEXT, PREVIOUS ................................................... |
22 |
PAUSE/STEP, STOP, DISPLAY .............................. |
22 |
TOP MENU, MENU ................................................. |
22 |
Navigation operation ......................................................... |
23 |
SLOW, SEARCH .................................................... |
23 |
A-B REPEAT,SUBTITLE .......................................... |
23 |
AUDIO, ANGLE ....................................................... |
23 |
INFORMATION ........................................................ |
23 |
JPEG/MP3 file and Audio CD playback |
|
JPEG file playback ............................................................ |
24 |
MP3 file playback .............................................................. |
24 |
Audio CD playback ............................................................ |
24 |
Slide show .................................................................. |
24 |
Editing |
|
DVD menu and Edit menu ................................................. |
25 |
Naming a title .................................................................. |
25 |
Protecting a title ................................................................ |
25 |
Overwrite a title ................................................................. |
25 |
Erasing a title .................................................................. |
25 |
Recording |
|
Before recording ............................................................... |
15 |
Recording television programs ......................................... |
15 |
Adding new recordings ..................................................... |
16 |
Changing chapter intervals ............................................... |
16 |
Playback with the DVD menu ........................................... |
16 |
Recording from a VCR or V8 / Hi8 / DV ............................. |
17 |
The front panel and rear panel connection ................. |
17 |
DV recording ..................................................................... |
18 |
Use “Easy Guider” to record DV signal ...................... |
18 |
“One touch record” to record the DV signal ..................... |
19 |
DV control .......................................................................... |
19 |
Record on CD-R/CD-RW discs ............................................ |
20 |
Create a correct disc format ..................................... |
20 |
VCD/SVCD recording ............................................... |
20 |
Accessories
Please check and identify the supplied accessories.
Easy Guider |
|
Playback ............................................................................ |
26 |
Record on DVD .................................................................. |
26 |
Record on CD-R/CD-RW ..................................................... |
27 |
VCD/SVCD/Audio CD recording ............................... |
27 |
Erase ............................................................................... |
28 |
Finalize .............................................................................. |
28 |
GUI operation |
|
Firmware update |
|
Glossary |
|
Specifications |
|
Troubleshooting Guide |
|
£ 1x Remote control |
£ 1x AC Power cord |
£ 2x Batteries |
1

Important safety instructions
1)Read instructions. Read all the safety and operating instructions before operating the product.
2)Retain instructions. Keep the safety and operating instructions for future reference.
3)Heed warnings. Adhere to all warnings on the product and in the operating instructions.
4)Follow instructions. Follow all operating and use instructions.
5)Cleaning - Unplug this product from the wall outlet before cleaning. Do not use liquid cleaners or aerosol cleaners. Use a damp cloth for cleaning.
6)Attachments - Do not use attachments not recommended by the product manufacturer as they may cause hazards.
7)Water and Moisture - Do not use this product near water for example, near a bathtub, washbowl, kitchen sink, or laundry tub, in a wet basement, or near a swimming pool.
8)Accessories - Do not place this product on an unstable cart, stand, tripod, bracket, or table. The product may fall, causing serious injury to a child or adult, and serious damage to the product. Use only with a cart, stand, tripod, bracket, or table recommended by the manufacturer or sold with the product. Any mounting of the product should follow the manufacturer’s instructions and should use a mounting accessory recommended by the manufacturer.
9)CART - A product and cart combination should be moved with care. Quick stops, excessive force, and uneven surfaces may cause the product and cart combination to overturn.
10)Ventilation - Slots and openings in the cabinet provide ventilation, ensure reliable operation of the product, and protect it from overheating. Do not block or cover these openings. The openings should never be blocked by placing the product on a bed, sofa, rug, or other similar surface. Do not place this product in a built-in installation such as a bookcase or rack unless proper ventilation is provided or the manufacturer’s instructions have been adhered to.
11)Power Sources - This product should be operated only from the type of power source indicated on the marking label. If you are not sure of the type of power supply to your home, consult your product dealer or local power company. For products intended to operate from battery power, or other sources, refer to the operating instructions.
12)LOCATION - The appliance should be installed in a stable location.
13)NONUSE PERIODS - The power cord of the appliance should be unplugged from the outlet when left unused for a long period of time.
14)Grounding or Polarization -
•If this product is equipped with a polarized alternating current line plug (a plug having one blade wider than the other), it will fit into the outlet only one way. This is a safety feature. If you are unable to insert the plug fully into the outlet, try reversing the plug. If the plug should still fail to fit, contact your electrician to replace your obsolete outlet. Do not defeat the safety purpose of the polarized plug.
•If this product is equipped with a three-wire grounding type plug, it will only fit into a grounding type power outlet. This is a safety feature. If you are unable to insert the plug into the outlet, contact your electrician to replace your obsolete outlet. Do not defeat the safety purpose of the grounding type plug.
15)Power-Cord Protection - Power-supply cords should be routed so that they are not likely to be walked on or pinched by items placed upon or against them, paying particular attention to cords at plugs, convenience receptacles, and the point where they exit from the product.
16)Outdoor Antenna Grounding - If an outside antenna or cable system is connected to the product, be sure the
antenna or cable system is grounded so as to provide some protection against voltage surges and built-up static charges. Article 810 of the National Electrical Code, ANSI/NFPA 70, provides information with regard to proper grounding of the mast and supporting structure, grounding of the lead-in wire to an antenna discharge unit, size of grounding conductors, location of antenna-discharge unit, connection to grounding electrodes, and requirements for the grounding electrode.
17)Lightning - For added protection for this product during a lightning storm, or when it is left unattended and unused for long periods of time, unplug it from the wall outlet and disconnect the antenna or cable system. This will prevent damage to the product due to lightning and power-line surges.
18)Power Lines - An outside antenna system should not be located in the vicinity of overhead power lines or other electric light or power circuits, or where it can fall into such power lines or circuits. When installing an outside antenna system, take extreme care to keep it from touching such power lines or circuits; contact with them might be fatal.
19)Overloading - Do not overload wall outlets, extension cords, or integral convenience receptacles. This can result in a risk of fire or electric shock.
20)Objects and Liquids - Do not push objects of any kind into this product through openings; they may touch dangerous voltage points or short out parts, resulting in a fire or electric shock. Liquids of any kind should not be used on or around this product.
21)Servicing - Do not attempt to service this product yourself. Opening or removing covers may expose you to dangerous voltage or other hazards. Refer all servicing to qualified service personnel.
22)Damage Requiring Service - Unplug this product from the wall outlet and refer servicing to qualified service personnel under the following conditions:
•When the power supply cord or plug is damaged,
•If liquid has spilled or objects have fallen into the product,
•If the product has been exposed to rain or water,
•If the product does not function properly after following the operating instructions, contact Lite-On Customer Service for technical support.
•If the product has been dropped or damaged in any way,
•When the product exhibits a distinct change in performance. This indicates a need for service.
23)Replacement Parts - When replacement parts are required, be sure the service technician uses replacement parts specified by the manufacturer or having the same characteristics as the original part. Unauthorized substitutions may result in fire, electric shock, or other hazards.
24)Safety Check - Upon completion of any service or repairs to this product, ask the service technician to perform safety checks to determine that the product is in proper operating condition.
25)Wall or Ceiling Mounting - Mount the product to a wall or ceiling only as recommended by the manufacturer.
26)Heat – Keep this product away from heat sources, such as radiators, heat registers, stoves, or amplifiers.
27)Battery Usage – Battery leakage may result in bodily injury or damage to the unit. In order to avoid battery problems, please follow these instructions.
•Install all batteries correctly, with + and - aligned as marked on the unit.
•Do not mix batteries (old/new, carbon/alkaline, etc.).
•Remove batteries when the unit is not used for a long time.
2

Warnings, cautions and others
CAUTION!
TO REDUCE THE RISK OF ELECTRIC SHOCK,
DO NOT REMOVE THE COVER OF THIS UNIT.
THERE ARE NO USER SERVICEABLE PARTS INSIDE. REFER SERVICING TO QUALIFIED SERVICE PERSONNEL.
The lighting flash with arrowhead symbol, within an equilateral triangle, is intended to alert the user to the presence of uninsulated “dangerous voltage” within the product’s enclosure that may be of sufficient magnitude to constitute a risk of electric shock to humans.
The exclamation point within an equilateral triangle is intended to alert the user to the presence of important operating and maintenance (servicing) instructions in the literature accompanying the appliance.
CAUTION!
THIS PRODUCT UTILIZES A LASER.
USE OF CONTROLS OR ADJUSTMENTS OR PERFORMANCE OF PROCEDURES OTHER THAN THOSE SPECIFIED HEREIN MAY RESULT IN HAZARDOUS RADIATION EXPOSURE.
DO NOT OPEN THE COVER AND DO NOT REPAIR YOURSELF REFER SERVICING TO QUALIFIED PERSONNEL.
WARNING:
TO REDUCE THE RISK OF FIRE, ELECTRIC SHOCK OR PRODUCT DAMAGE, DO NOT EXPOSE THIS APPARATUSTO MOISTURE AND ENSURE THAT OBJECTS FILLED WITH LIQUIDS, SUCH AS VASES, SHALL BE PLACED AWAY FROM THE APPARATUS.
CAUTION! –– POWER 

 button
Disconnect the mains plug to shut the power off completely. The POWER 

 button in any position does not disconnect the main line. Power can be controlled from the remote.
PRODUCTS WITH 525P PROGRESSIVE SCAN OUTPUTS NOTICE REQUIREMENTS
“CONSUMERS SHOULD NOTE THAT NOT ALL HIGH DEFINITION TELEVISION SETS ARE FULLY COMPATIBLE WITH THIS PRODUCT AND MAY CAUSE ARTIFACTS TO BE DISPLAYED IN THE PICTURE. IN CASE OF 525 PROGRESSIVE SCAN PICTURE PROBLEMS, IT IS RECOMMENDED THAT THE USER SWITCH THE CONNECTION TO THE “STANDARD DEFINITION” OUTPUT. IF THERE ARE QUESTIONS REGARDING OUR TV SET COMPATIBILITY WITH THIS MODEL 525P DVD PLAYER, PLEASE CONTACT OUR CUSTOMER SERVICE CENTER.”
THE FOLLOWING APPLIES ONLY FOR U.S.A.
CAUTION!
This equipment has been tested and found to comply with the limits for a Class B digital device, pursuant to part 15 of the FCC Rules.
These limits are designed to provide reasonable protection against harmful interference in a residential installation. This equipment generates, uses and can radiate radio
frequency energy and, if not installed and used in accordance with the instructions, may cause harmful interference to radio communications. However, there is no guarantee that interference will not occur in a particular installation. If this equipment does cause harmful interference to radio or television reception, which can be determined by turning the equipment off and on, the user is encouraged to try to correct the interference by one or more of the following measures:
•Reorient or relocate the receiving antenna.
•Increase the separation between the equipment and receiver.
•Connect the equipment into an outlet on a circuit different from that to which the receiver is connected.
•Consult the dealer or an experienced radio/TV technician for help.
IMPORTANT FOR LASER PRODUCTS
1)CLASS 1 LASER PRODUCT
2)DANGER: Visible and invisible laser radiation when open and interlock failed or defeated. Avoid direct exposure to beam.
3)CAUTION: Do not open the top cover. There are no user serviceable parts inside the Unit; leave all servicing to qualified service personnel.
CAUTION!
•CD-R/RW discs recorded using a personal computer or a CD Recorder may not play if the disc is damaged or dirty, or if there is dirt or condensation on the player’s lens.
•Unfinalized CD-R/RW discs can be played, but not all time information (playing time, etc.) will be displayed.
•Check the copyright laws in your country before recording from DVD VIDEO, SVCD, Video CD, Audio CD, MP3 and JPEG discs. Recording of copyrighted material may infringe copyright laws.
Legal Notices Regarding
Macrovision’s Property Rights
“U.S. Patent Nos. 4,631,603; 4,577,216; 4,819,098; 4,907,093; and 6,516,132.”
“ This product incorporates copyright protection technology that is protected by U.S. patents and other intellectual property rights. Use of this copyright protection technology must be authorized by Macrovision, and is intended for home and other limited viewing uses only unless otherwise authorized by Macrovision. Reverse engineering or disassembly is prohibited.”
Manufactured under license from Dolby Laboratories. “Dolby” and the double-D symbol are trademarks of Dolby Laboratories.
3
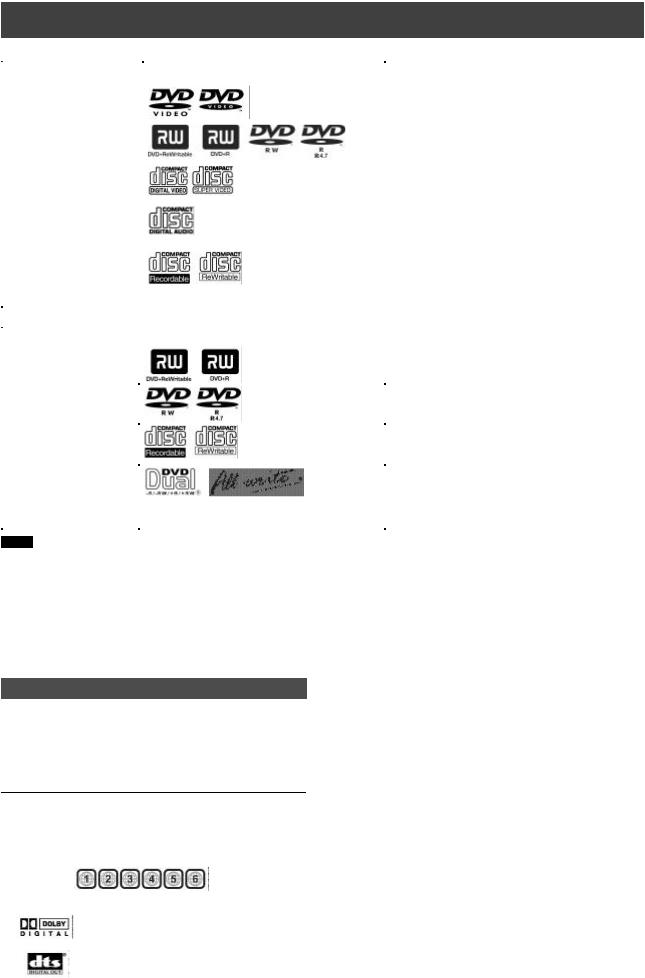
Disc information
n Playable Disc types
Disc Types |
Logos |
Characteristics |
|
|
|
|
|
DVD-VIDEO |
|
This unit can playback DVD-Video discs and the |
|
|
|
|
region code is printed on the rear of the unit. |
|
|
|
|
DVD R/RW |
|
DVD R, DVD RW and DVD R, DVD RW, discs |
|
DVD R/RW |
|
written in the DVD-Video format and finalized. |
|
|
|
||
|
|
|
|
Video CD (VCD) |
|
Video with CD sound, VHS quality & MPEG-1 |
|
Super Video CD (SVCD) |
|
compression technology. |
|
|
|
||
|
|
|
|
Audio CD (CD-DA) |
|
CD is recorded as a Digital Signal with better audio |
|
|
|
|
quality, less distortion and less deterioration of audio |
|
|
|
quality over time. |
CD-R/RW (JPEG/MP3) |
|
This unit can play CD-R and CD-RW discs recorded |
|
|
|
|
with Audio CD or Video CD format, or with |
|
|
|
JPEG/MP3 files. Close the sessions or finalize the |
|
|
|
disc after recording. |
|
|
|
|
n Recordable Disc types |
|
|
|
Disc Types |
|
Logos |
Characteristics |
DVD R/RW |
|
|
DVD R disc written in the DVD VR format. |
|
|
|
DVD RW disc written in the DVD VR format. |
|
|
|
|
DVD R/RW |
|
|
DVD R disc written in the DVD VR format. |
(LVW-5005 model only) |
|
|
DVD RW disc written in the DVD VR format. |
|
|
|
|
CD R/RW |
|
|
CD R/CD RW disc written in the MPEG1 or |
(LVW-5005 model only) |
|
|
MPEG2 video format or written in PCM Audio mode. |
|
|
|
|
“DVD Dual” & “All Write” |
|
|
“DVD Dual” -- Written on both DVD R/DVD RW/ |
(LVW-5005 model only) |
|
|
DVD R/DVD RW disc. |
|
|
|
“All Write” – Written on all recordable DVD disc and |
|
|
|
CD R/CD-RW disc. |
|
|
|
|
Notes:
The DVD-Video/DVD+RW/DVD+R/ Logos are trademarks of the respective companys.
For best result use discs with the above logos and that conform to specifications. The unit cannot play other discs correctly. Do not use irregular shaped discs (e.g. heart-shaped), as these can damage the unit.
It may not be possible to play CD-R, CD-RW, DVD-R, DVD-RW, DVD+R, DVD+RW in all cases due to the type of disc or condition of the recording.
n Video System (NTSC & PAL)
This DVD-Recorder supports both NTSC&PAL system.
nAspect Ratio
 4:3 (Letter Box) Standard
 4:3 Pan&Scan
Unplayable disc types
The unit does not playback discs listed below. If you try to play back these discs, excessive noise may cause damage to speakers.
1)Unfinalized discs from other DVD-Recorder.
2)DVD-ROM, DVD AUDIO, CD-ROM, PHOTO CD, SACD
3)DVD-RAM, DVD-VR format
n Region Code of DVD-Video
This unit can playback DVD-VIDEO discs compatible with the region code is printed on the rear of the unit.
Examples of playable DVD-VIDEO discs:
n Audio System
Dolby Digital |
Linear PCM |
DTS (Digital Theater Systems)
 16:9 (Wide-Screen)
n Others
 Audio : Appears at the beginning of a scene record with multiple audio languages.
 Subtitle : Appears at the beginning of a scene recorded with multiple subtitle languages.
 Angle: Appears at the beginning of a scene recorded from multiple angles.
n All Write Technology (LVW-5005 model only)
“ALL WRITE” technology makes it alright to record on almost all of the recordable discs. (DVD+RW, DVD+R, DVD-RW, DVD-R, CD-RW or CD-R discs)
4
Controls and displays
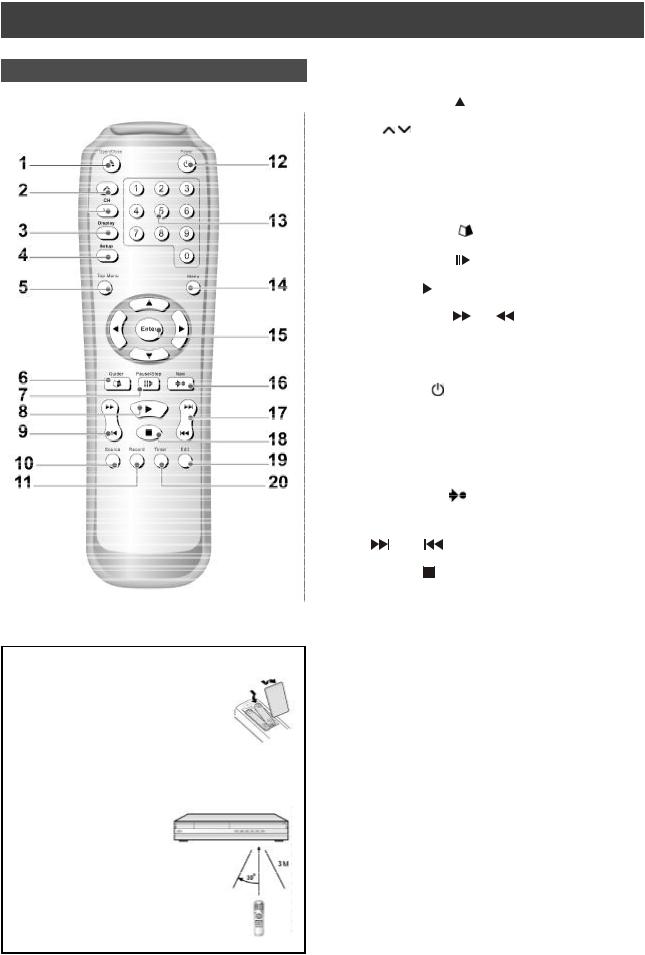
Remote Control
To install batteries
—Open the battery compartment and insert the batteries. Make sure the polarity (+ and -) matches the marks inside the remote control.
—Do not use rechargeable type batteries.
Remote sensor
The remote has a range of approximately 3M and works best when pointed directly at the unit. (at angles up to 30° from the front of the unit)
1) |
Open/Close button ( |
|
OPEN/CLOSE)............. |
See Page 12 |
|||
2) |
CH |
button (Channel) ............................. |
|
See Page 16 |
|||
3) |
Display button (DISPLAY) ................................ |
|
See Page 16 |
||||
4) |
Setup button (SETUP) |
..................................... |
|
See Page 12 |
|||
5) |
Top menu button .............................................. |
|
|
See Page 24 |
|||
6) |
Easy Guider button ( |
Guider) ...................... |
|
See Page 28 |
|||
7) |
Pause/Step button ( |
PAUSE/STEP) ............ |
See Page 24 |
||||
8) |
Play button ( |
PLAY) |
..................................... |
|
See Page 24 |
||
9) |
F.F./REW. button( |
F.F/ |
REW.) .......... |
See Page 24 |
|||
10) |
Source buttons ( SOURCE) .............................. |
|
See Page 11 |
||||
11) |
Record button ( RECORD) ............................... |
|
See Page 16 |
||||
12) |
Power button ( |
POWER) ............................ |
|
See Page 12 |
|||
13) |
Numbered button (1~9, 0) ................................ |
|
See Page 12 |
||||
14) |
Menu button (MENU) ....................................... |
|
|
See Page 22 |
|||
15) |
Cursor (pqtu), Enter button (ENTER) ........... |
See Page11 |
|||||
16) |
Navigation button ( |
NAVI) ........................... |
|
See Page 25 |
|||
17) |
Next/Previous button |
|
|
|
|||
|
( |
NEXT/ |
PREVIOUS) ......................... |
|
See Page 24 |
||
18) |
Stop button ( |
STOP) .................................... |
|
See Page 24 |
|||
19) |
Edit button (EDIT) ............................................ |
|
|
See Page 11 |
|||
20) |
Timer button (TIMER) ....................................... |
|
|
See Page 22 |
|||
5
Controls and displays
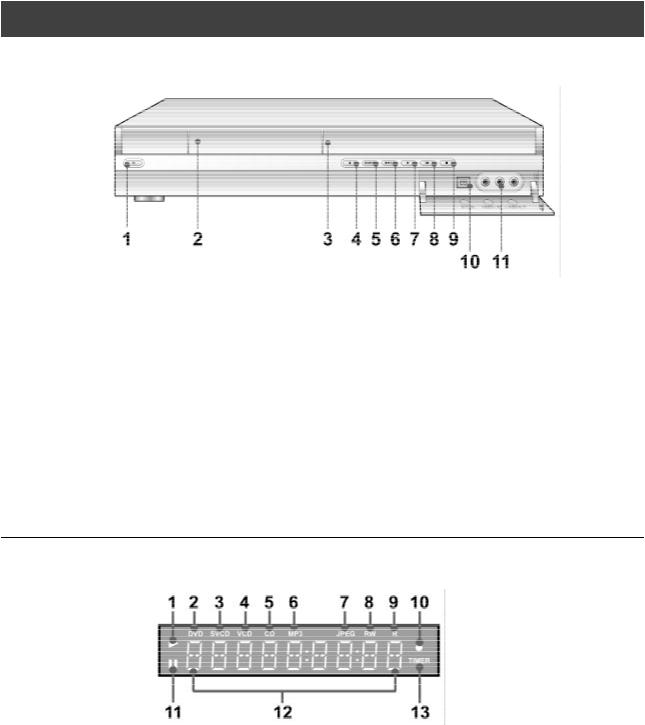
Front panel connections
Names of parts and controls
1)POWER ON / OFF
Turns the recorder on and off.
2)DISC TRAY
To accept a disc.
3)DISPLAY
Operation indicators are displayed here.
4)OPEN/CLOSE
Opens or closes the disc tray.
5)SOURCE
Select equipment connected to the line inputs.
6)RECORD
Starts recording.
7)PLAY
Plays a disc.
8)PAUSE
Pauses playing or recording a disc.
9)STOP
Stops playing or recording a disc.
10)DV-LINK (IEEE-1394) Jack
Connects digital video camcorder with this DV jack.
11)LINE IN (VIDEO/AUDIO L/R) Jacks
Connects the input of external equipment.
Display Panel
Display window function
1) |
Play indicators |
9) |
R indicators |
2) |
DVD indicators |
|
DVD+R indicators (LVW-5001, LVW- |
3) |
SVCD indicators |
|
5005 model) |
4) |
VCD indicators |
|
DVD-R indicators (LVW-5005 model) |
5) |
CD indicators |
10) |
CD-R indicators (LVW-5005 model) |
6) |
MP3 indicators |
Record indicators |
|
7) |
JPEG indicators |
11) |
Pause indicators |
8) |
RW indicators |
12) |
Multi-information window |
|
DVD+RW indicators (LVW-5001, LVW- |
13) |
Timer recording mode |
|
5005 model) |
|
|
DVD-RW indicators (LVW-5005 model)
CD-RW indicators (LVW-5005 model)
6
Controls and Displays
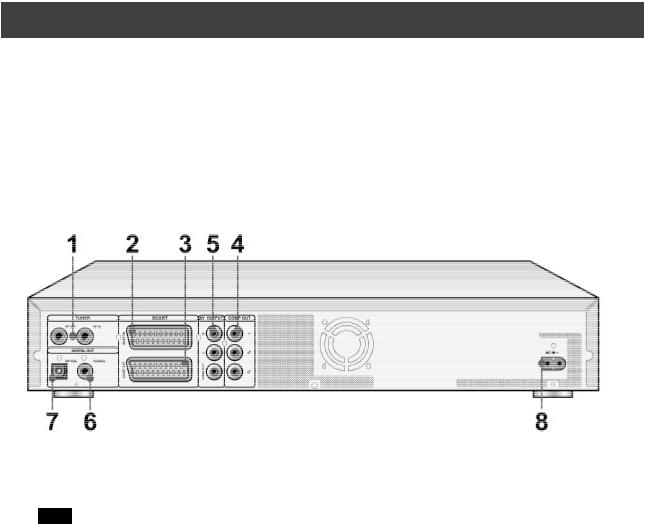
Rear panel connections
Names of parts
1)VHF/UHF IN/OUT Jacks
Antenna cables input and output.
Note: DVD signals don’t go through here. Make proper connections before use.
2)SCART IN Jack
Composite/RGB signal input.
3)SCART OUT Jack
Composite/RGB/S-Video signal output.
4)LINE OUT (VIDEO/AUDIO L/R) Jack
Composite signal output.
5)COMPONENT OUT (Y/Cb/Cr) Jacks
COMPONENT signal output.
6)DIGITAL OUT (COAXIAL) Jack
Connect to an amplifier or a receiver having a digital input jack.
7)DIGITAL OUT (OPTICAL) Jack
Connect to an amplifier or a receiver for a digital input jack.
8)AC IN Terminal
Connect the power cord.
7

Connecting up
Before making connections
1)Do not connect the AC power cord until all other connections are made.
2)Connect VIDEO OUT of the unit directly to the video input of your TV. Connecting VIDEO OUT of the unit to a TV via a VCR may cause a viewing problem when playing back a copy-protected disc. You may also have a viewing problem when connecting the unit to an integrated TV/Video system.
Connecting the antenna cable and television
Before using the unit, follow the steps below to connect the unit to the antenna cable and TV.
Connecting to a TV with SCART jacks and AUDIO/VIDEO jacks
Use a RF cable (supplied) to connect the RF IN on the unit to the antenna outlet.
Use a RF cable (same as supplied) to connect the RF OUT on the unit to the RF input on the television.
Use a SCART cable to connect the SCART OUT jack on the unit to the SCART IN jack on the television.
Notes:
1.Do not place this unit on top of other equipment that may generate heat. Excessive heat may cause this unit to malfunction.
2.For Digital Cable and Satellite TV users please connect your decoder’s output to this unit’s input.
8

For better picture
Connecting via Component video output of the unit provides higher quality viewing.
Component out
Connecting to a TV with component jacks
Use COMPONENT cables (not supplied) to connect the COMPONENT output on the unit to the COMPONENT input on the television.
Notes:
1.Enter system setup to enable COMPONENT (refer to the section titled “Quick Setup”).
2.When using COMPONENT video connections, please remove all other video output connections.
3.In this configuration, the Red and White audio connections are required.
9
For better sound
There are two types of audio connections, analog and digital.
Connecting to a stereo audio amplifier or receiver
Use an audio cord (same as supplied) to connect the AUDIO OUT on the DVD recorder to the audio input on a stereo amplifier or a receiver.
Connecting to a digital audio device
Connect an amplifier with Dolby Digital and DTS decoders to enjoy surround sound.
Digital out optical
Use a fiber-optic cable (not supplied) to connect the DIGITAL OUT OPTICAL (digital optical output) on the DVD recorder to the digital optical input on an stereo amplifier or a receiver.
Digital out coaxial
Use a coaxial cable (not supplied) to connect the DIGITAL OUT COAXIAL (coaxial digital output) on the DVD recorder to the coaxial digital input on an stereo amplifier or a receiver.
10
 Loading...