

Page 1

DMS i1000 FleetConnect
Fleet Fueling System
TM
Setup and Operation
Liquid ControLs Group
An IDEX Fluid & Metering Business
Operation: EM200-14
Page 2

TABLE OF CONTENTS
INTRODUCTION
Software License Agreement .................................. 3
DMS i1000 FleetConnect Overview ........................ 4
FleetConnect System Components ......................... 5
FleetConnect System Overview ............................... 7
FleetConnect Data Flow ......................................... 10
EZConnect Button Reader ...................................... 12
SETUP
FleetConnect Setup Overview ............................... 13
FleetConnect Security Summary ............................ 13
#1 Loading the FleetConnect Database .................. 14
#2 Launching DMS i1000 FleetConnect ................ 15
#3 Install FleetConnect Antenna for the
EZConnect Button Reader ...................................... 15
Set EZConnect Radio Address .............................. 16
OPERATION
Fueler Logon and Logoff ......................................... 17
Data Transfer .......................................................... 18
Fill Vehicles (Fuel Delivery) ..................................... 19
Miscellaneous Commands (Fueler Logon) ............. 20
Miscellaneous Commands (Fill Vehicles) ................ 21
OPERATION
Setup New Vehicles (Button Mapping) .................... 22
FleetConnect Database Management .................... 24
Add and Delete Records ......................................... 24
Button File ............................................................... 25
Customer File .......................................................... 25
Fueler File ............................................................... 26
Product File ............................................................. 27
System Denitions File ............................................ 27
Truck File ................................................................. 29
Vehicle File .............................................................. 29
Machine Status ....................................................... 30
Printer Status .......................................................... 31
Delivery Status ........................................................ 31
Delivery Code .......................................................... 33
BILL OF MATERIALS
Bill of Materials ........................................................ 34
APPENDIX
Ticket Layouts ......................................................... 35
! WARNING
• Before using this product, read and understand the instructions.
• Save these instructions for future reference.
• All work must be performed by qualied personnel trained in the proper application, installation, and
maintenance of equipment and/or systems in accordance with all applicable codes and ordinances.
• Failure to follow the instructions set forth in this publication could result in property damage, personal injury,
or death from re and/or explosion, or other hazards that may be associated with this type of equipment.
2
Page 3

SOFTWARE LICENSE AGREEMENT
Read this license carefully. You agree that by using the itemized software package, you have
agreed to the software license terms and conditions. This agreement constitutes complete and
entire agreement between you and Liquid Controls with respect to this product.
1. Liquid Controls hereby grants to Licensee a nonexclusive
license to use DMS Menu, LCP File Server, DMS i1000
FleetConnect, FleetConnect Ofce, DB Manager and
LCR Host Software (hereinafter referred to as “Licensed
Software”)
2. Under the License granted herein, Licensee may use the
eldized machine readable (executable code) copy of the
Software, including any subsequent updates which may
be provided. Licensee shall not, without Liquid Controls’
prior written consent, (a) rent, lease, lend, sublease or
otherwise transfer the materials hereunder; (b) remove or
obscure proprietary or copyright notices which may be set
forth on the Licensed Software; or (c) alter, decompile, or
disassemble the program.
3. One (1) copy of the Licensed Software, including any
software distributed on disks may be made for backup
purposes only. No other copies may be made or used
without the written consent of Liquid Controls.
4. Title. No title to ownership of any Licensed Software is
transferred to the Licensee.
5. Upagerades. License upagerades may become available
for the Licensed Software. Any cost associated with such
upagerades will solely be determined by Liquid Controls.
8. Termination. Liquid Controls may terminate this software
license granted hereunder and require return of the
Licensed Software if Licensee fails to comply with these
license terms and conditions.
9. Licensee acknowledges that it has read this agreement,
understands it, and agrees to be bound by its terms, and
further agrees that this is the complete and exclusive
statement of the agreement between Liquid Controls
and Licensee, which supersedes and merges all prior
proposals, understandings, and all other agreements, oral
or written, between the parties relating to this agreement.
This agreement may not be modied or altered except by
written instrument duly executed by both parties.
10. This Agreement and performance hereunder shall be
construed and interpreted under the laws of the State of
Illinois.
11. If any provision of this agreement is invalid under any
applicable statute or rule of law, it is to that extent to be
deemed omitted.
12. Licensee may not assign or sublicense, without the prior
written consent of Liquid Controls, its rights, duties, or
obligations under this Agreement to any person or entity
in whole or in part.
6. Warranty. Liquid Controls makes and licensee receives
no warranty express or implied and there are expressly
excluded all warranties of merchantability and tness for
a particular purpose.
7. Limitation of Liability. Licensee shall have the sole
responsibility for adequate protection and backup of
its data in connection with the Licensed Software. In
no event shall Liquid Controls be liable for (a) special,
indirect or consequential damages; (b) any damages
whatsoever resulting from loss of use, data, or prots,
product, inaccurate input or work delays, or any direct
property damage arising out of or in connection with this
agreement or the use or performance of the Licensed
Software.
13. The waiver or failure of Liquid Controls to exercise in any
respect any right provided herein shall not be deemed a
waiver of any further right hereunder.
Publication Updates and Translations
The most current English versions of all Liquid Controls publications are available on our web site, www.lcmeter.com. It is the
responsibility of the Local Distributor to provide the most current version of LC Manuals, Instructions, and Specication Sheets in
the required language of the country, or the language of the end user to which the products are shipping. If there are questions
about the language of any LC Manuals, Instructions, or Specication Sheets, please contact your Local Distributor.
3
Page 4
INTRODUCTION
Purpose
The purpose of this document is to explain the setup and operation of DMS i1000 FleetConnect.
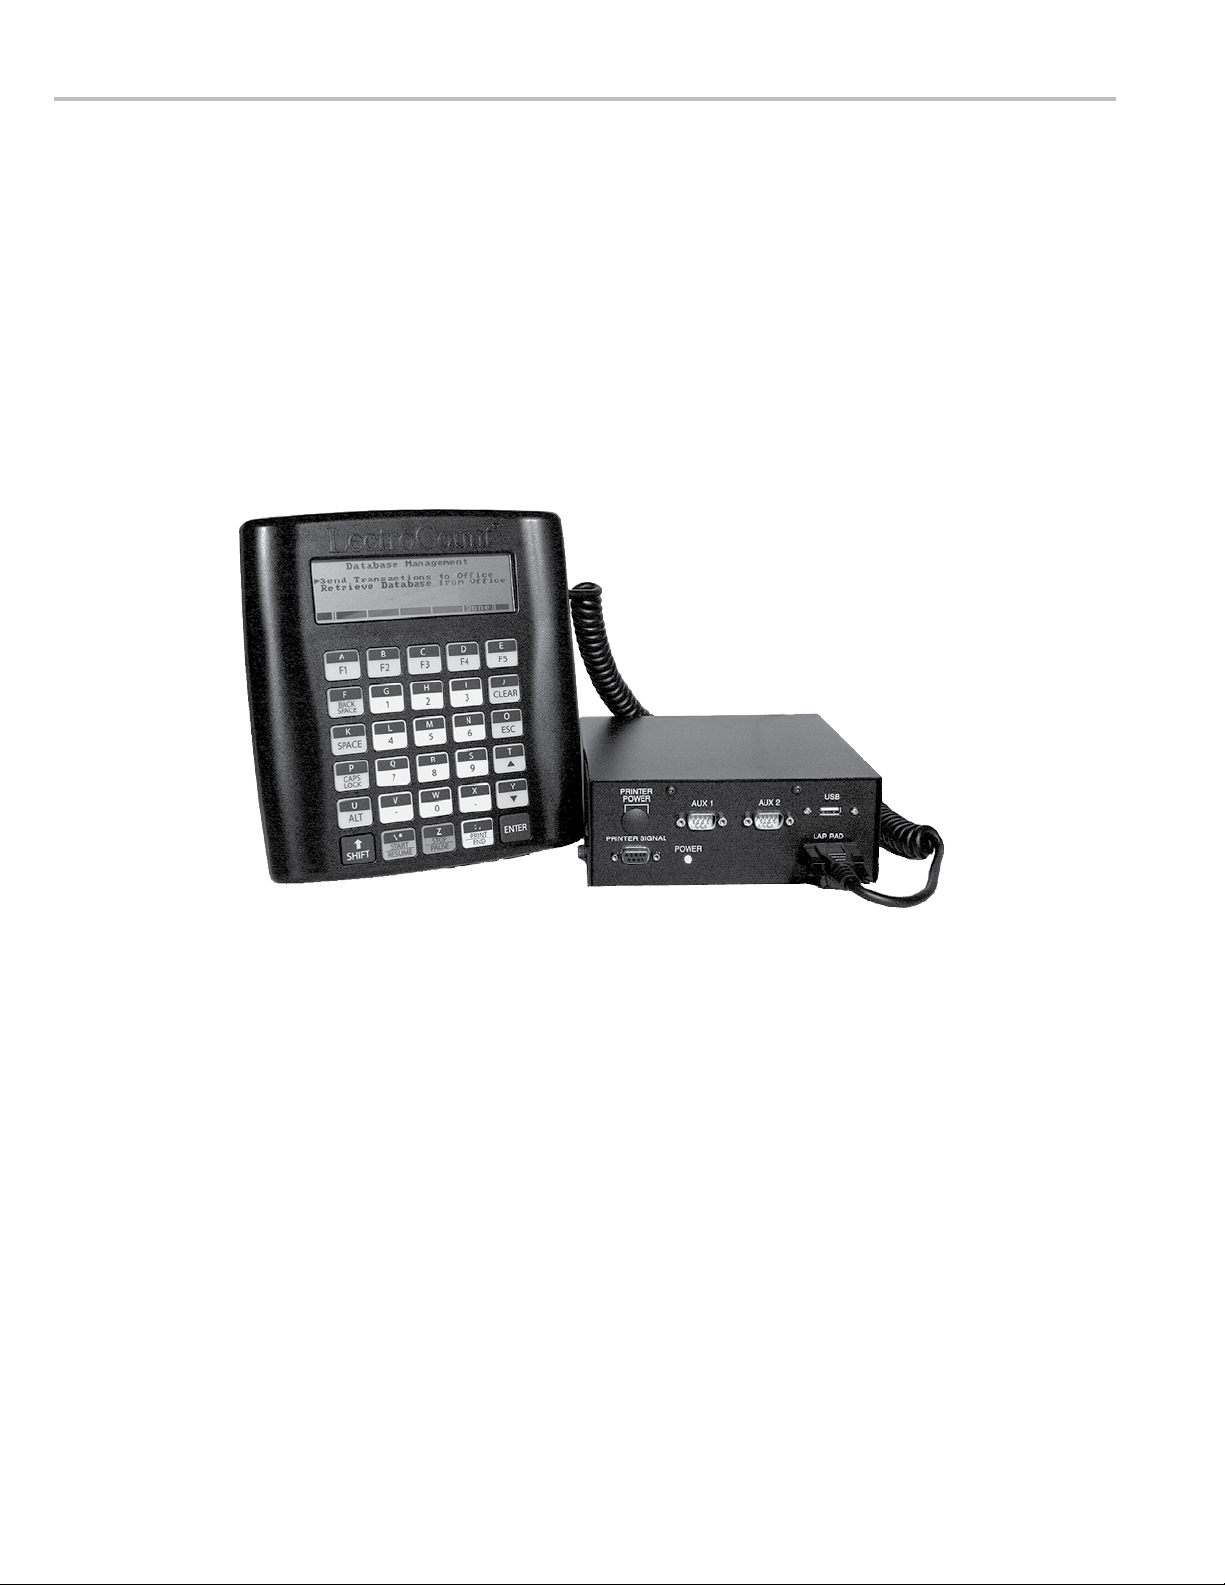
DMS i1000 Overview
The DMS i1000 is an in-cab computer with a heavy-duty lap pad interface. The DMS i1000 connects directly
to a LectroCount electronic register that is connected to a ow meter. The DMS i1000 runs application specic
software programs, such as FleetConnent, designed for specic types of fuel delivery companies. These programs
combine metrological data—received from a LectroCount register during fuel deliveries—with pricing, customer, and
operational data to provide detailed accounts of all fueling and shift activity. The collected data can be transferred
from the DMS i1000 to an ofce PC via a USB device, RF communication, or cellular transmission. Every DMS
i1000 comes equipped with two support software programs, LCP File Server and LCR Host. LCP File Server is a le
manager program used to maintain and manage les. LCR Host is used to set up LectroCount register networks and
calibrate the metering system.
DMS i1000 and Lap Pad
DMS i1000 FleetConnect Overview
DMS i1000 FleetConnect is a software application program for the DMS i1000. It is designed for companies that
fuel customers with large eets of vehicles and equipment or for companies that own a large eet of vehicles and
equipment. FleetConnect automatically captures fueling data and records all aspects of each fuel delivery. The
delivery records are organized and saved into a database from where the data can be easily transferred into the
accounting software in your ofces. DMS i1000 FleetConnect has a number of capabilities and features including:
fueler security settings, vehicle identication, delivery start and stop, recording and tracking deliveries, shift reports,
and data transmission to FleetConnect Ofce via USB memory device, RF transmission, or cellular modem.
4
Page 5
LC PD Meter
INTRODUCTION
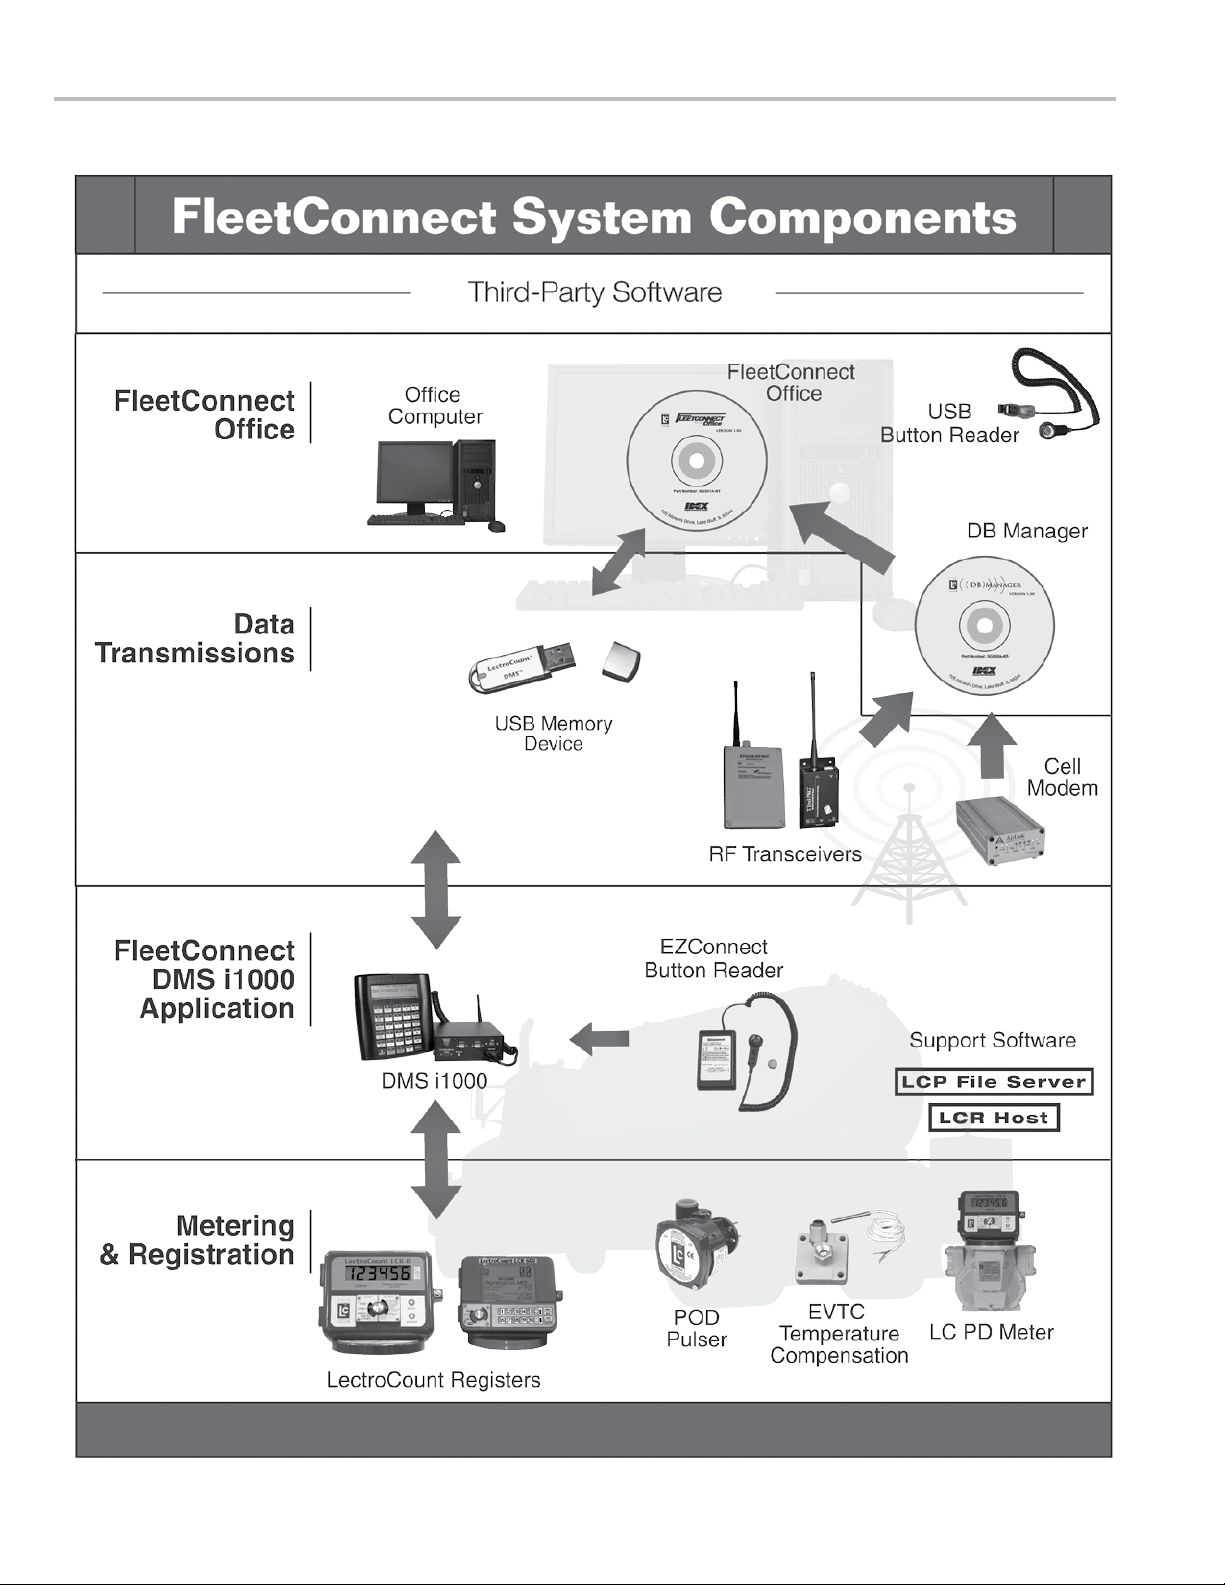
FleetConnect System Components
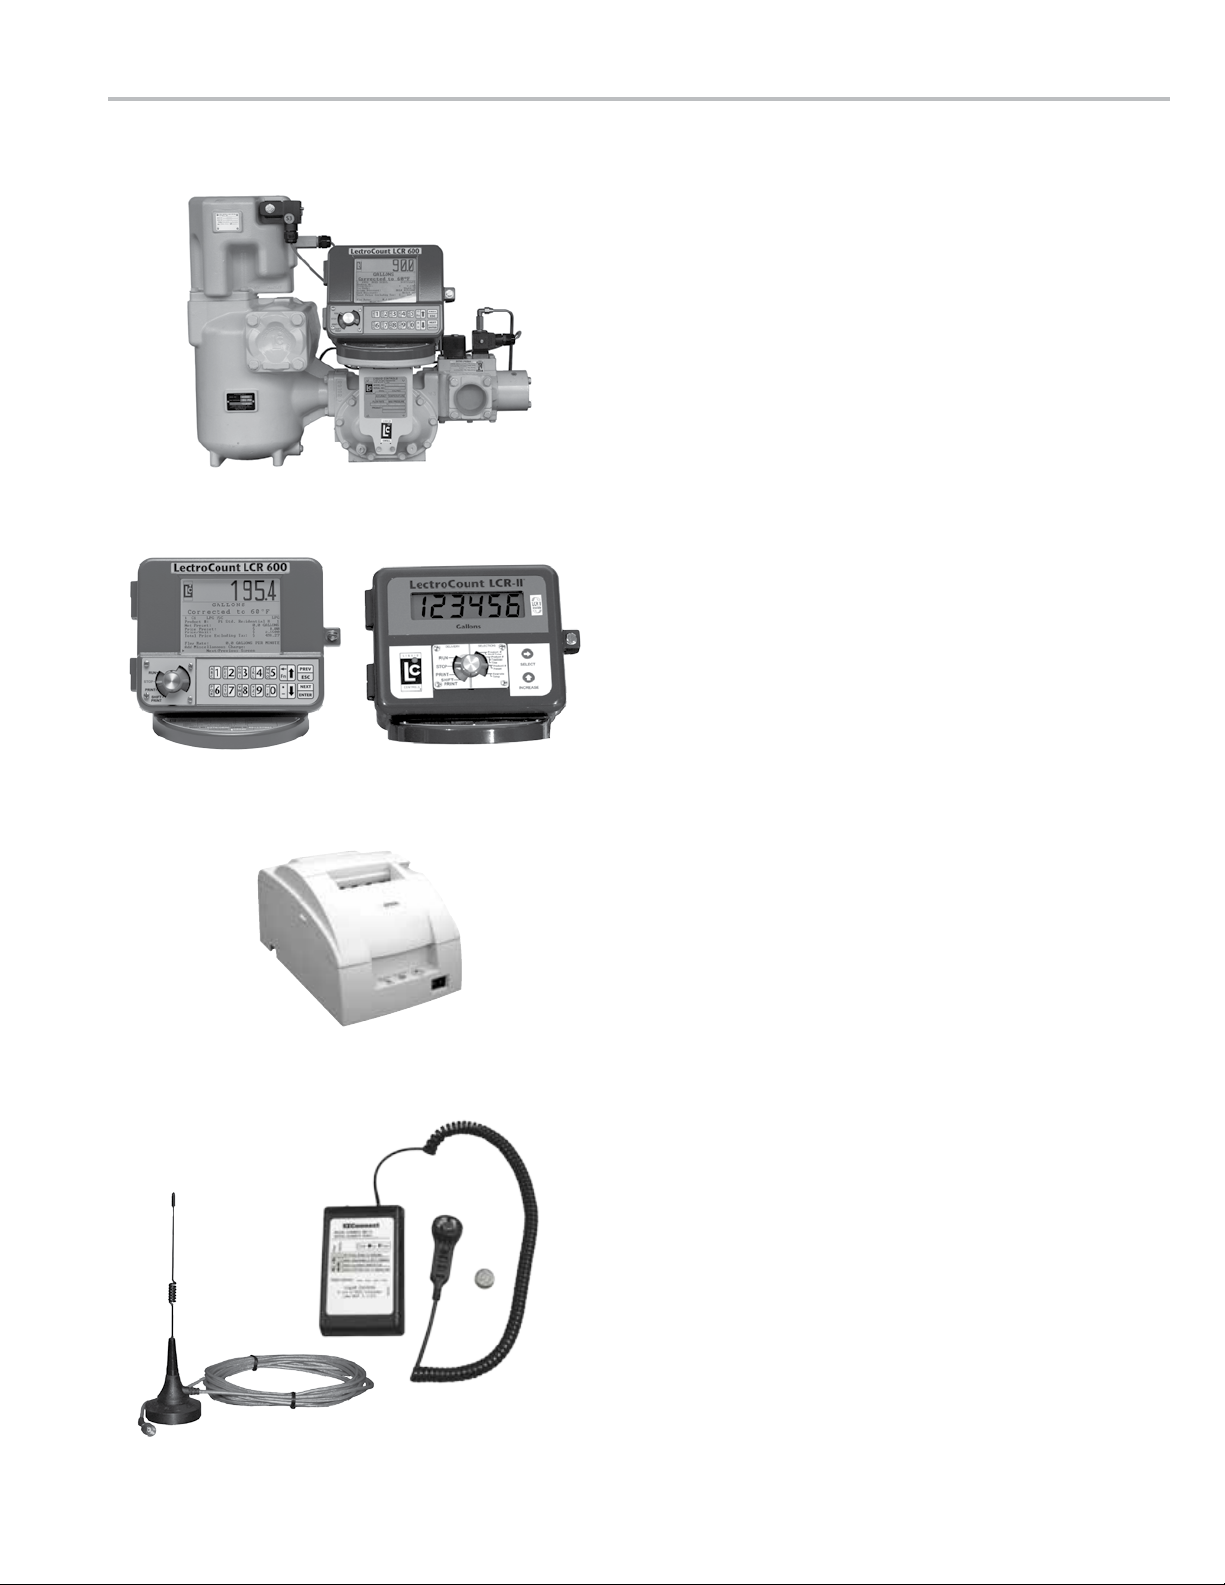
METERING SYSTEM
Typically mounted to the back or side of a delivery
vehicle, the metering system accurately measures,
controls the ow, and preserves the purity of the product.
A Liquid Controls metering system can include the meter,
LectroCount electronic register, strainer, ETVC probe
(temperature compensation), air eliminator, and control
valve. In FleetConnect systems, in order to safeguard
against misfuelings, the control valve is opened only
when vehicles are identied by the EZConnect button
reader.
LECTROCOUNT REGISTER
LectroCount registers can be Weights & Measures
approved and mounted onto the meter. LectroCount
registers provide metrological data during custody
transfers for the DMS i1000 FleetConnect.
LectroCount Registers
Epson Roll Printer
EZConnect Button Reader
with Button and FleetConnect
Antenna
PRINTER
The printer prints out a record (ticket) of the delivery.
The Epson Roll Printer is ideal for the long tickets
FleetConnect prints at the end of fueler shifts.
EZCONNECT BUTTON READER AND RFID BUTTONS
The EZConnect button reader is a handheld device that
reads the ID number of uniquely-numbered stainless
steel buttons called RFID buttons. During setup, a
vehicle record is created for every fuelable vehicle or
piece of equipment that you fuel. Then, each vehicle
record is then programmed with a RFID button number.
Finally, the RFID buttons are physically attached to the
vehicle they represent in the FleetConnect database.
Before fuel deliveries, fuelers attach the EZConnect
to a vehicle’s RFID button. A RF transceiver inside the
EZConnect transmits the ID number to the DMS i1000.
DMS i1000 FleetConnect pulls the vehicle le with the
RFID button number and records the delivery information
together according to vehicle data.
5
Page 6

INTRODUCTION
FleetConnect System Components
FLEETCONNECT OFFICE
The FleetConnect Ofce contains four executable
programs FCRead.exe, FCEdit.exe, FCLoad.exe and an
installation program for the USB button reader.
FCEdit is a graphical user interface for ofce computers
where users can manage operational data, validate any
changes made in the eld (for example adding a new
customer), congure print tickets, and change system
settings. FCEdit also plays a large role in the setup of a
FleetConnect System by helping map RFID buttons and
populating the FleetConnect database. The USB button
reader plugs into any ofce computer USB port and
reads the ID number of the RFID buttons for FCEdit to
map the RFID buttons.
FleetConnect Ofce
FCRead converts transaction les, created by DMS
i1000s in the eld, into ASCII text les for use in FCEdit
and third party software.
DB MANAGER
DB Manager is used to setup and manage wireless
communication between DMS i1000s in the trucks and
personal computers in your ofce. DB Manager contains
two programs LCPSetup.exe and DBManager.exe. The
rst program, LCPSetup.exe, aligns communication
parameters and conducts testing to conrm wireless
communication between the ofce PC and the DMS
i1000. The second, DBManager.exe, species the DMS
i1000s in the eld, sets the le paths to the ofce PC,
sets a schedule to check for modied FleetConnect
database les and sends those les to the DMS i1000s
in the eld.
CELL MODEM
Cell modems enable long distance wireless data
transmissions between DMS i1000s in the eld and
ofce PCs. Cell modems and service contracts are
purchased separately from a cellular service provider.
USB Button Reader
DB Manager
Cell Modem
RF TRANSCEIVERS
The RF transceivers are designed for short, line-of-sight
wireless transmissions between DMS i1000s in the eld
and the ofce PC. .
USB FLASH MEMORY DEVICE
The USB Flash Memory Device is a data repository used
to transfer data between the DMS i1000 Module and the
ofce PC. A USB Flash Memory Device is included with
the purchase of a DMS i1000.
6
RF Transceivers
USB Flash Memory Device
Page 7

7
Page 8
INTRODUCTION
8
Page 9

INTRODUCTION
FleetConnect Fueling System Overview
FleetConnect is an in-cab fuel delivery and data collection application for the DMS i1000 that spans from the point of
delivery to the ofce PC. FleetConnect is specially designed for businesses who have or fuel customers with large
eets of vehicles and equipment or fuel their own eet. Like other Liquid Control’s data management applications,
FleetConnect runs in conjunction with owmeters equipped with the LectroCount electronic registers.
The main functions of a FleetConnect System include:
• Account management
• Operational data management
• Delivery data tracking
• Data entry interface
• File conversions
• Security settings for fueling access and system conguration
• Print ticket conguration
• Customer equipment identication
• Delivery start and stop
COMPONENTS
There are ve main components unique to a FleetConnect System: DMS i1000 FleetConnect (DMS i1000 software),
FleetConnect Ofce (ofce PC software), the EZConnect button reader, the USB RFID button reader and the RFID
buttons (stainless steel buttons with a unique identication number that can be read by a button reader).
SETUP
During setup, each vehicle (or piece of equipment) to be fueled is assigned a RFID button number. The vehicle
information (name, fuel type, etc.) and the RFID button number are saved together in the FleetConnect database
(in this manual this is referred to as mapping). The RFID buttons are then taken into the eld and fastened to their
respective vehicles. DMS i1000 FleetConnect uses the RFID button numbers to identify vehicles before making a
delivery.
DELIVERIES
To make deliveries, fuelers simply push the EZConnect button reader over the RFID button of the vehicle. The
EZConnect button reader transmits the RFID button number to the DMS i1000. DMS i1000 FleetConnect receives the
transmission from the EZConnect button reader and pulls the vehicle data programmed to the RFID button number.
After FleetConnect conrms the identity of the vehicle, it opens the control valve on the appropriate meter system
allowing the fueler to make the delivery. FleetConnect records the metrological data of the delivery and saves it in a
record with the vehicle data. DMS i1000 FleetConnect transmits all of the transaction data compiled throughout the
shift to the ofce PC via cell modem, RF transmission, or USB memory device.
OFFICE
In the ofce, FleetConnect Ofce converts the data received from each DMS i1000 into ASCII text les. ASCII text
les can be easily transferred to third-party software. The FleetConnect database consists of operational data, like
vehicle, customer, product and fueler data. FleetConnect ofce has a graphical user interface, FCEdit, for ofce
computers where users can manage operational data, congure print tickets, and change system settings. FCEdit
also allows users to verify or reject any changes made to the database by DMS i1000s in the eld—such as new
customers or vehicles—and send the changes, if veried, out to all other DMS i1000 units.
9
Page 10
INTRODUCTION
10
Page 11

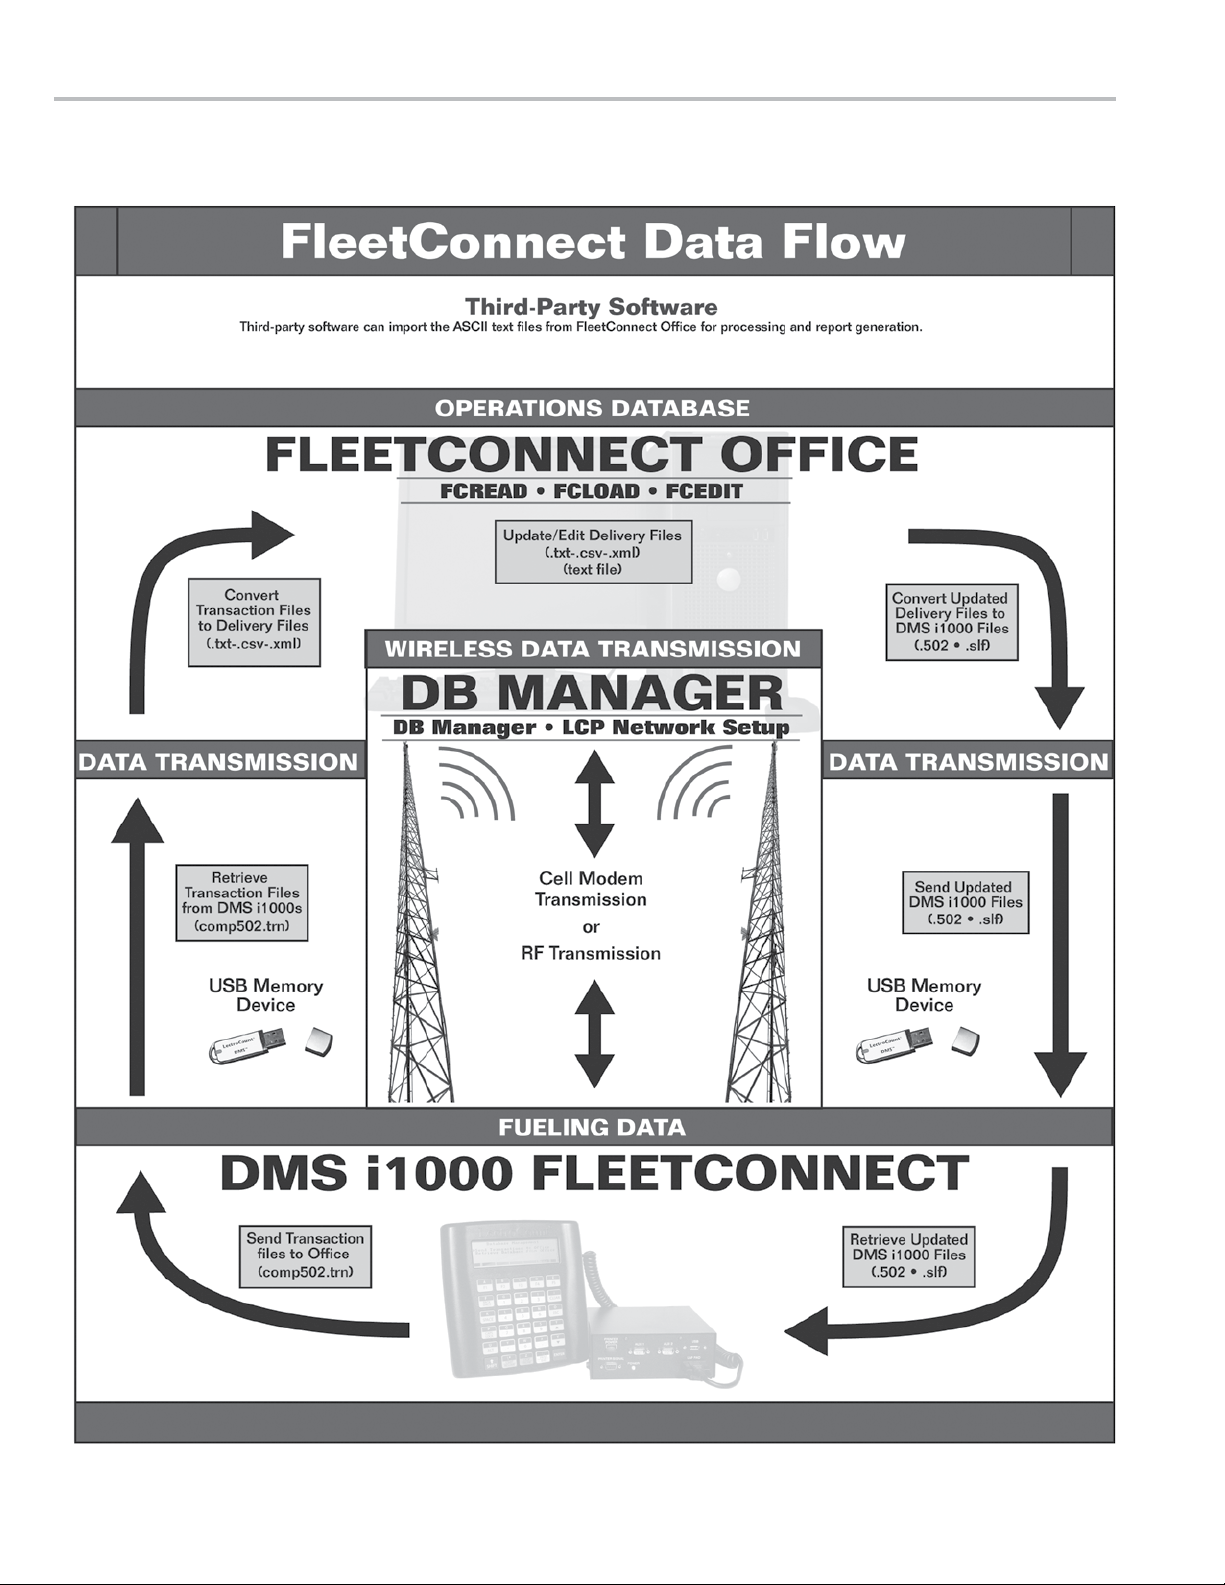
FleetConnect Data Flow
INTRODUCTION
DMS i1000 APPLICATIONS TO FLEETCONNECT OFFICE
(Begins at the bottom of the chart on page 10—DMS
i1000 FleetConnect—and ends at the middle top of the
diagram—FleetConnect Ofce.)
DMS i1000
After each delivery, the DMS i1000 compiles the
metrological, transaction, customer, driver, and product
data into transaction les (.trn). The transaction les
are then sent to the ofce PC either wirelessly (RF or
cellular), or they are downloaded to a USB memory
device.
DATA TRANSMISSION (WIRELESS)
If the transaction les are sent wirelessly (RF or cellular)
using the Send Transactions to Ofce
command, DB Manager receives the transaction les
(.trn) and noties FleetConnect Ofce that the les have
been received. Transmissions can be setup to be sent
automatically to the ofce
DATA TRANSMISSION (USB MEMORY DEVICE)
If the transaction les are sent via USB memory
device, when a shift is nished, the fuelers download
the transaction les created during their shift using the
Send Transactions to Ofce command and
return the USB device to the ofce after their shift.
FLEETCONNECT OFFICE SOFTWARE
FCRead converts the transaction les (.trn) into ASCII
text or XML les. The les can then be absorbed into
third party software.
If the les are transferred via a USB memory device,
they must be copied from the USB device and pasted
into the C:/DMS folder. From there, FCRead can convert
them into text or XML les.
THIRD PARTY SOFTWARE
Third-party software imports the ASCII text les
from FleetConnect Ofce for processing and report
generation. If any dispatch data is generated by the
third-party software, it can be converted into ASCII text
les and imported into the FleetConnect database.
FLEETCONNECT OFFICE TO DMS i1000 APPLICATIONS
(Begins at the middle top of the chart on page 10—
FleetConnect Ofce—and ends at the bottom of the
diagram—DMS i1000 FleetConnect.)
FLEETCONNECT OFFICE
FCEdit converts the text les (and any conguration
changes made in third-party software) into .502 and .slf
database les.
DATA TRANSMISSION (WIRELESS)
DB Manager sends modied transaction les to the
DMS i1000s wirelessly. By sending only modied “live”
les, cellular service costs and transmission times are
reduced. DBManager checks newly converted .502 and
.slf database les against a set of “live” les. “Live” les
are the most recent set of database les created by
FleetConnect Ofce. If a new database le is created
that differs from the “live” le, it means the le has been
modied since the last data transmission from the DMS
i1000s.
DATA TRANSMISSION (USB MEMORY DEVICE)
Transferring data via USB memory devices requires the
fuelers to bring the USB devices to the delivery truck
at the beginning of their shift, plug the USB device into
the DMS i1000, and load any new les onto the DMS
i1000 by using the Retrieve Database Updates
command. If the new .502 les have been copied to
the USB memory devices in the ofce, they will simply
rewrite the .502 les on the DMS i1000s when your
fuelers upload them.
DMS i1000
Modied .502 and .slf database les are loaded into
the LCP File Server of a DMS i1000. If a USB memory
device is being used, the Retrieve Database
Updates
les. RF and cellular transmissions can be setup to
automatically load database les every time the DMS
i1000 sends data (this applies to logging on, logging off,
completing a delivery, and editing the database). Any
changes made on the ofce PC and received by the
DMS i1000 are applied to all subsequent deliveries.
command must be used to load the database
11
Page 12

INTRODUCTION
EZConnect Button Reader
The EZConnect button reader is a handheld device that
reads the ID number of uniquely-numbered stainless
steel buttons, called RFID buttons, and radios the
number of the button back to the DMS i1000. Before
delivery, the EZConnect button reader reads the button’s
ID number, and a RF transceiver in the button reader
radios the ID number to an antenna connected to the
DMS i1000. DMS i1000 FleetConnect pulls up the
vehicle data mapped to the RFID button number, records
the metrological data from the delivery, and saves
the vehicle data and delivery data together into the
FleetConnect database.
Time Between Deliveries
If the button reader is pulled from the button, a ten second
window exists in which the button reader must be reattached
to continue the delivery on the same transaction record. This
feature is active only in the By Vehicle setting of the New
LCR Delivery: eld. See FleetConnect Ofce EM200-15.
POWER/RESET BUTTON
RED LIGHT
EZCONNECT BUTTON READER
STATUS LIGHT KEY
YELLOW LIGHT
OFF
ON
FLASH
OPERATION
The thin black button next to the status lights activates
the EZConnect. Press it immediately before or after
attaching the EZConnect to a RFID button. When
attaching the button reader to a RFID button, ensure the
button reader socket completely covers the button and
is not tilted in any manner. When the yellow light blinks,
the RFID number has been received by the DMS i1000.
Other status indications are explained on the right.
STATUSLIGHTS
Red Yellow
Off (press button to activate)
Button disconnected or not in database
Button connected ready to fuel
DMS/LCR/Printer Error or delivery initiation
! WARNING
• To prevent the ignition of a hazardous atmosphere,
batteries must only be replaced with Panasonic
6LR61XWA in a nonhazardous area.
• Only use the EZConnect button reader with the
provided cable and RFID button, as pictured.
12
Conforms to standards ANSI/ISA 82.02.12 (IEC 61010-
1 MOD) (07/12/04) and ANSI/ISA-12.12.01-2007
Class I, Div 2 Group D T4
-20°C (-4°F) ≤ Tamb ≤ +50°C (122°F)
Page 13

SETUP
FleetConnect DMS i1000 Setup Overview
There are four steps that must be completed before fuelers can begin fuel delivery with FleetConnect. The rst
step, Load FleetConnect Database onto the DMS i1000, entails moving data from the ofce PC to the DMS i1000.
The second step, Launch DMS i1000 FleetConnect, includes starting up the DMS i1000 FleetConnect application
software. The third step, Install the FleetConnect Antenna for the EZConnect Button Reader, comprises of installing
an antenna onto the roof of the truck cab and plugging it into the DMS i1000 antenna port. The fourth and nal step,
Set EZConnect Radio Address, requires setting the EZConnects to a unique address so they can transmit without
interference.
DMS I1000 FLEETCONNECT SETUP PREREQUISITES
This manual assumes that FleetConnect Ofce has been setup, the FleetConnect database is loaded onto the ofce
PC, the RFID buttons have been mapped into the database and attached to the vehicles near the fueling point, and
the DB Manager software is installed (if using cellular or RF data transmissions).
The following installation and setup must be completed prior to setup of the DMS i1000 FleetConnect:
1. Meter system installed
2. LectroCount Register(s) Installation (EM100-10 or EM150-10)
3. LectroCount Register(s) Setup (EM100-10 or EM150-11)
4. DMS i1000 Installation (EM200-10)
5. DMS i1000 Setup (EM200-11)
6. DB Manager (EM200-21) optional
7. FleetConnect Ofce Setup (EM200-14)
DMS I1000 FLEETCONNECT SETUP
After all of the setup prerequisites are fullled, only four steps are required before FleetConnect DMS i1000 is ready
for daily use.
STEP 1 Load the FleetConnect database onto the DMS i1000 (Retrieve Database from Ofce).
This step is also documented in the FleetConnect Ofce Setup (EM200-14)
STEP 2 Launch DMS i1000 FleetConnect.
STEP 3 Install the FleetConnect Antenna for the EZConnect Button Reader.
STEP 4 Set the EZConnect button readers radio addresses so that they are all unique.
This step is only required if more than one EZConnect button reader is operating in close proximity to another.
DMS i1000 FleetConnect Security
FleetConnect provides three sets of security checks: the fueler logon password, the database management password,
and the LCRHost and LCP File Server password. The fueler logon password protects access to FleetConnect’s
fuel delivery functions (see FleetConnect Ofce manual EM200-15). The database management password protects
access to the FleetConnect database. The LCRHost and LCP File Server password protects access to network setup,
calibration, and le management functions (see DMS Setup and Operation Manual EM200-12).
13
Page 14

SETUP
#1 -Load FleetConnect Database
onto the DMS i1000
Liquid Controls recommends using a USB memory
device for the initial loading of the FleetConnect
database because of the large amount of data to be
uploaded. Transmitting a large amount of data wirelessly
can be time consuming and, for cellular transmissions,
costly.
To transfer the latest FleetConnect Ofce
database to the DMS i1000s via USB device:
1. Using the ofce PC, name a USB memory device DMS_
USB and create a folder named DMS in it. (USB memory
devices from Liquid Controls are precongured with
these settings.)
2. Copy the .502 and .slf les from the C:\DMS folder into
the D:\DMS_USB\DMS folder on the USB memory
device.
.502 and .slf les are created during FleetConnect
Ofce setup.
3. Remove the USB memory device from the ofce
computer and plug it into a DMS i1000.
4. On the DMS i1000 lap pad, push ALT and ESC
simultaneously to open the DMS Application
List.
5. Press F5 (Data) to open Database Management.
6. Press F3 (USB) to boot the USB Drive.
7. Move the pointer to Retrieve Entire Database
and push Enter.
8. Move the pointer to USB Memory Device as
the Receive Mechanism and press Enter. The
Retrieving Database screen will appear while the
database loads onto the DMS i1000.
Util (F1) opens System Utilities (1/3) See page 12 EM200-11
Data (F5) opens Database Management screen
While the DMS i1000 displays the DMS Application List
screen, it is disabled from the LectroCount register(s).
When the DMS i1000 is disabled, deliveries can be made
with the register’s RUN and PRINT settings.
USB (F3) activates the USB memory device
Done (F5) opens Fueler Logon or Fill Vehicles screen, or DMS
Application List screen
9. Press Enter upon successful retrieval of the database
les.
10. Repeat steps 3-9 until all trucks equipped with DMS
i1000s are loaded with the FleetConnect database.
These instructions are also included in the
FleetConnect Ofce Setup (EM200-14) manual.
Every DMS i1000 is supplied with a USB Flash
Memory Device congured for immediate use.
14
Transfer Database Wirelessly
After initial setup, choose Retrieve Database Updates to
update only those les that have changed. Follow the same
procedure as above, but for step 8, select the Radio option,
instead of USB Memory Device, then press Enter.
The Retrieve Database Updates command inside
the DMS i1000 FleetConnect program will not
upload the whole database, only .502 and .slf les.
Page 15

SETUP
#2 -Launch DMS i1000
FleetConnect
The DMS Application List is the launch point for DMS
i1000 FleetConnect software.
To open FleetConnect:
1. Press ALT+ESC.
2. Move the pointer to select FleetConnect and press
Enter.
#3 -Install the FleetConnect
Antenna for the EZConnect Button
Reader
When the EZConnect button reader is attached to a
RFID button, a RF transceiver inside the EZConnect
transmits the RFID button number to the DMS i1000.
In order to receive the RF signal, the DMS i1000 must
be equipped with the FleetConnect antenna. The
FleetConnect antenna plugs into the back of the DMS
i1000 and is easily afxed to the roof of the truck cab.
FleetConnect Antenna
DMS i1000 Antenna Port
To install the FleetConnect antenna:
1. There is a heavy magnet in the bottom of the
FleetConnect antenna. Find a high spot on the delivery
truck, preferably the top of the truck cab, and set the
antenna down so the magnet sticks securely to the
surface.
2. Find a pathway for the antenna cable into the inside
of the cab and the DMS i1000 antenna port. If a more
convenient option isn’t apparent, use the same hole as
the LCR-II cables.
3. Run the antenna cord tight to the truck. Secure it so there
is no slack along the pathway. Tie off any excess cord in
the cab next to the DMS i1000.
4. Screw the antenna cable into the DMS i1000 antenna
port.
Liquid Controls recommends using split loom for
the antenna wire. It protects the wire and is easier
to ziptie to the truck.
15
Page 16

SETUP
#4 -Set EZConnect Radio Address
If you are running more than one DMS i1000
FleetConnect in close proximity to another, the
EZConnect button readers will not be able to transmit
data on the same radio address without interference.
The Set EZConnect Radio Address function
can set a unique address where the DMS i1000 unit and
the EZConnect can communicate without interference.
To change the radio address of an EZConnect
device:
1. Turn off all of the EZConnect devices except the one you
want to congure.
2. From the DMS Application List, select FleetConnect.
3. If the Fueler Logon screen does not appear, logoff
the fueler. See page 17.
4. Press F4 (Misc) to open Miscellaneous
Commands list box window.
4. Move the pointer to Setup DMS/EZConnect Link
and press Enter.
5. Select DMS Radio Address and enter a unique 1-4
digit hexadecimal code in DMS Radio Address. See
box to the right.
6. Move the pointer to Set EZConnect Radio
Address and press Enter.
7. Turn on the EZConnect. Wait until the red light stops
blinking.
8. Take a small screwdriver and touch the small metal disc
and the metal around the inside the socket of the button
reader extension at the same time until both EZConnect
lights turn on.
9. While both lights are on, press Enter on the lap pad. A
successful message will appear on the lap pad.
Done (F5) opens Fueler Logon screen
If the DMS Radio Address is displayed as
dashes, the DMS i1000 is not responding to
FleetConnect. Select Done (F5) and repeat the
directions from the beginning. If the problem persists,
call the Liquid Controls Service Department.
16
Page 17

OPERATION
Fueler Logon and Logoff
The Fueler Logon screen allows operators to logon
and logoff the DMS i1000 FleetConnect system. If the
previous fueler has logged off, the Fueler Logon
screen is the rst screen displayed when the DMS i1000
is turned on. If the previous fueler has not logged off,
the Fill Vehicles screen is the rst screen displayed.
To access the Fueler Logon screen from the Fill
Vehicles
Miscellaneous Commands screen. See below.
screen, log off the previous fueler using the
All (F2) opens each eld on the screen in succession
Misc (F4) opens Fueler Logon Miscellaneous list
Fwd (F5) opens Fill Vehicle screen
Before logging on, retrieve any les that have been
sent from the ofce. See Send Transactions page 20.
To logon and begin a shift:
1. Move the pointer to
2. Select your name from the list of fuelers and press Enter.
3. Press F5 (Fwd) to open the Fill Vehicles screen.
To logon with a RFID button:
1. Attach the EZConnect button reader to your designated
RFID button. Press EZConnect’s power button. When the
DMS i1000 receives the RFID number, the yellow light
will begin to blink and your Fueler information will appear
on the lap pad display.
2. Press F5 (
The Password: and Odometer: elds are optional.
The Password: option can be activated in the Fueler
File of FleetConnect Ofce or DMS i1000 FleetConnect,
and the Odometer: option can be activated in the
System Denitions File of FleetConnect Ofce or DMS
i1000 FleetConnect.
FUELER LOGOFF
Complete the following procedure to logoff from any
DMS i1000 screen.
Fwd) to open the Fill Vehicles screen.
Fueler #: and press Enter.
Examples of the End-of-Shift tickets are on page 35.
To logoff at the end of a shift:
1. From the Fill Vehicles screen, press F4 (Misc)
to
open the
window.
2. Select Logoff and press Enter to open the End-of-
Shift Ticket list box.
3. Select Detailed, None, or Summary and press
Enter. The lap pad will return to the Fueler Logon screen.
Miscellaneous Commands
list box
17
Page 18

OPERATION
Data Transfer
FleetConnect systems transfer data between the
DMS i1000 and your ofce PC via a USB memory
device or wirelessly using a cell modem. FleetConnect
systems transferring data via USB devices require no
additional setup outside of DMS i1000 FleetConnect
and FleetConnect Ofce. Systems using cell modems
require additional conguration and Liquid Controls’ DB
Manager software. See DB Manager Installation and
Setup Manual EM200-21.
CELL MODEM
FleetConnect systems setup for cell modem
transmissions send and retrieve data each time a record
is created. Every time a fueler logs on, logs off, delivers
fuel, edits the database, or enters a load truck command
from the DMS i1000 lap pad, the DMS i1000 sends new
data to and checks for new data from the ofce PC.
USB MEMORY DEVICE
If you have a FleetConnect system that relies on USB
memory devices to transfer data, the USB devices
must be physically moved between the trucks’ DMS
i1000s and the ofce PC at the beginning and end of
each shift. In the ofce, the transaction data from the
DMS i1000s must be copied from each USB memory
device and pasted into the C:\DMS folder on the ofce
PC. Database updates for the DMS i1000s must be
copied from the C:\DMS folder and pasted onto the
USB memory stick. In the eld, fuelers can manually
retrieve data from and manually save data to the
USB memory device before or after logon using the
Retrieve Database Updates and the Send
Transactions to Ofce
commands.
DMS Application List Screen
A small up arrow appears in the top line to the left of the
time when there are transactions to send to the USB
memory stick or ofce PC via cellular transmission.
Fueler Logon Miscellaneous Command Screen
The Retrieve Database Updates and the Send
Transactions to Ofce
by pressing the Data (F5) button in the DMS Application
List screen, pressing the Misc (F5) button in the Fueler
Logon screen, or pressing the Misc (F5) button in the
Fill Vehicles screen. The Send Transactions to
Ofce
i1000 onto the USB memory device for transfer to the
ofce PC.
The Retrieve Entire Database command is
typically used only when setting up the DMS i1000 unit.
It can be found in the the Database Management screen
(the screen that opens with the Data (F5) button)
retrieves the entire database from the USB memory
device onto the DMS i1000.
command is used to save data from the DMS
commands can be found
18
Fill Vehicles Miscellaneous Command Screen
Database Management Screen
Page 19

Fueler Logon Miscellaneous Command Screen
OPERATION
Miscellaneous Commands (Fueler
Logon)
In the Fueler Logon screen, the Misc (F4) opens a
Miscellaneous Commands list box that includes access
to the Database Management menu, the Reprint
Shift Ticket
commands (Retrieve Database Updates and
Send Transactions), and the Setup DMS/
EZConnect Link
DATABASE MANAGEMENT
The Database Management screen provides access to
the FleetConnect database les for viewing and editing
purposes. See page 24.
command, two data transfer
screen.
Shift Ticket Date Screen
Shift Ticket Type
Not to be confused with the Database Management
screen on page 14
REPRINT SHIFT TICKET
The Reprint Shift Ticket command opens
a list box, Shift Ticket Date, with a list of
previously printed shift tickets. To reprint a shift ticket,
move the pointer to the date and time of the ticket you
want reprinted and press Enter. After selecting the
specic shift ticket, a Shift Ticket Type list box
will open. Select Detailed or Summary. An example
of a detailed and summary shift ticket is on page 35.
RETRIEVE DATABASE UPDATES
The Retrieve Database Updates command,
when selected, brings up a list box to conrm the
command. Select Yes to send retrieve updates to les
from the ofce. Click No to cancel the command.
The Retrieve Database Updates command
manually retrieves updates from the FleetConnect
Ofce database on the ofce computer. This command
requires wireless communication through DB Manager.
This option is especially helpful when wireless
connection is intermittent or if the system is not set up to
send updates automatically.
Retrieve Database Updates
DMS/EZConnect Link
SEND TRANSACTIONS
The Send Transactions command, when
selected, opens up a list box to conrm the Send
Transactions
transaction les to the ofce. Click No to cancel the
command.
SETUP DMS/EZCONNECT LINK
The Setup DMS/EZConnect Link
command. Select Yes to send
command
opens a screen with the means to set the radio addresses
of EZConnect button readers. See page 16.
19
Page 20

OPERATION
Fill Vehicles (Fuel Delivery)
Fill Vehicles is the lap pad screen from which fuelers can
activate fuel deliveries. It appears on the lap pad display
immediately after logging on. When the EZConnect
reads an RFID button, the button ID, product type,
delivery quantities, and account information will appear
on in the Fill Vehicles screen. They will remain on the
screen until the EZConnect is removed from the button.
To make a delivery:
1. Attach the EZConnect button reader onto the RFID
button.
2. Press the power button on the EZConnect.
3. Open the nozzle and deliver the fuel
3. Remove the button reader from the RFID button to
deactivate the delivery.
If the button reader is pulled from the button, a ten second
window exists in which the button reader must be reattached
to continue the delivery on the same transaction record. This
feature is active only in the By Vehicle setting of the New
LCR Delivery: eld in System Denitions.
When the delivery is completed, the roll printer prints the
transaction information, the DMS i1000 FleetConnect
records the delivery information into the FleetConnect
database, and the Fill Vehicles screen displays the
Waiting to start a new LCR delivery.
message.
FleetConnect can be set to save delivery les to the
USB device automatically. In the System Denitions
File, set the Transaction Target to “USB”. See page 28.
Status (F3) opens Machine Status (1/2) screen
Misc (F4) opens Fill Vehicles Miscellaneous Commands list
Status (F3) opens Machine Status (1/2) screen
Misc (F4) opens Fill Vehicles Miscellaneous Commands list
FILL VEHICLES MESSAGES
There are certain conditions in which FleetConnect can
not or will not permit a delivery. FleetConnect will display
a message at the bottom of the DMS i1000 screen when
a delivery is prohibited. These include:
No button ID is being read.
The EZConnect button reader is not reading a RFID
button.
Unkown button ID.
The button ID is not in the FleetConnect database.
The customer record for the button does
not exist.
The customer record assigned to the button is not in
the FleetConnect database.
20
The vehicle record for the button does
not exist.
The vehicle record assigned to the button is not in the
FleetConnect database.
Vehicle xxxxxx does not have an assigned
product code.
A product code has not been specied for the vehicle
The Distallate product type is not
available on the truck.
The LCR(s) on the truck are not calibrated to deliver the
product type.
The LCR Red switch must be in the RUN
position before a new delivery can be
started.
The selector switch on the LectroCount LCR register(s) is
not in the RUN position. Fuel can not be delivered.
Page 21

Fill Vehicles Screen
Find (F3) search for les
PageDn (F4) opens second Miscellaneous Vehicles screen
End (F5) opens Fill Vehicles screen
OPERATION
Miscellanous Commands (Fill
Vehicles)
The Fill Vehicles screen also has a Miscellaneous
Commands menu. Press the Misc (F4) button on lap
pad to open the Miscellaneous Commands list box.
The Duplicate Ticket command reprints the
last delivery ticket. The Print Account Summary
command prints a summary of completed deliveries
to a specic customer’s account over the course of
the current shift. And the Logoff command logs off
the current fueler and prints a shift ticket. To select
a command from the list, move the pointer to the
command and press Enter on the DMS lap pad.
DUPLICATE TICKET
To print an exact copy of the last ticket printed, move the
pointer to Duplicate Ticket and press Enter.
LOAD TRUCK
The Load Truck command opens a screen where
fuelers can manually enter loading information after the
delivery truck is loaded with fuel. The roll printer prints
the loading information after it is entered and later, at log
off, onto the shift ticket.
LOGOFF
To logoff from a shift, move the pointer to Logoff and
press Enter. The End-of-Shift Ticket list box
will open. Select Detailed, None, or Summary
and press Enter. The lap pad will then return to the
Fueler Logon screen.
Back (F1) opens Fill Vehicles screen
All (F2) opens each eld on the screen in succession
Save (F5) saves entered data and opens Fill Vehicles screen
Setup New Vehicle Screen
PRINT ACCOUNT SUMMARY
The Print Account Summary prints a list of the
deliveries that have been made during the current shift.
RETRIEVE DATABASE UPDATES/SEND TRANSACTIONS
See page 20.
SETUP NEW VEHICLE
The Setup New Vehicle feature allows fuelers to
add new vehicles and customers to the FleetConnect
database and map them to a RFID button. For
instructions, see page 22.
21
Page 22

OPERATION
Setup New Vehicle
The Setup New Vehicle screen allows fuelers to add
new vehicles to the FleetConnect database, so that
when fuelers encounter a vehicle that doesn’t exist in
the FleetConnect database, they can enter it into the
FleetConnect database and fuel the vehicle on-the-spot
in the eld.
The fueler will need a RFID button to map in the DMS
i1000 and then attach to the new vehicle. It’s a good
practice to carry a bag of RFID buttons in the delivery
truck so they are on hand. To attach a RFID button to a
vehicle, nd a convenient spot near the fueling point on
the vehicle, clean it thoroughly, and stick the RFID button
onto the vehicle using double-sided tape.
To map a button using a customer account
and vehicle le that exists in the FleetConnect
database:
1. Press Misc (F4) in Fill Vehicles screen.
2. Press PgDn (F4) to scroll the Miscellaneous
Commands
Command.
list down to the Setup New Vehicles
Add (F1) creates a Button File record of the displayed data
All (F2) opens each eld on the screen in succession
New (F3) opens Customer File (Account #:) or Vehicle File
(Vehicle #:)
Done (F5) opens Fill Vehicle screen
DO NOT CREATE BUTTON RECORDS IN THE BUTTON
FILE. Liquid Controls does not recommend creating or
editing les in the Button File. It is for viewing only.
3. Move the pointer to Setup New Vehicles and press
Enter.
4. Attach the EZConnect button reader to the RFID button
and press the power button. The RFID number will
appear in the iButton eld of the Setup New Vehicles
screen.
5. Select Account # to open the Customer File screen.
6. Select Account # to open a list box of customer
accounts in the FleetConnect database.
7. Move the pointer to a customer account and press Enter.
8. Select Vehicle # to open the Vehicle File screen.
9. Select Vehicle # to open a list box of vehicles
programmed to the selected customer.
10. Move the pointer to a vehicle and press Enter.
11. Press Add (F1).
12. Press Done (F5).
Next (F1) opens Customer File (2/2)
New (F3) creates new Customer File record
Del (F4) deletes displayed Customer File record
Exit (F5) opens Database Management (1/2)
22
Selecting a Vehicle
Page 23

Home (F1) returns cursor to rst space
← (F2) moves cursor back one space
Ins (F3) allows text to be inserted above cursor
→ (F4) moves cursor ahead one space
End (F5) moves cursor to the end space
OPERATION
To map a button for a new customer and a new
vehicle that does not exist in the FleetConnect
database:
1. Press Misc (F4) in Fill Vehicles screen.
2. Press PgDn (F4) to scroll the Miscellaneous
Commands
Command.
3. Move the pointer to Setup New Vehicles and
press Enter.
4. Attach the EZConnect button reader to the RFID button
and press the power button. The RFID number will
appear in the iButton eld of the Setup New Vehicles
screen.
If the customer exists but the vehicle is new skip to step 9.
list down to the Setup New Vehicles
If Customer File or Vehicle File records currently exist in
the database, choosing Account #: brings up a list box
window of existing records. Editing the options inside the
existing records will change that customer’s records.
Home (F1) returns cursor to rst space
← (F2) moves cursor back one space
Ins (F3) allows text to be inserted above cursor
→ (F4) moves cursor ahead one space
End (F5) moves cursor to the end space
5. In the Setup New Vehicles screen, move the pointer to
Account # and press New (F3) to open the Customer
File screen.
6. In the Customer File screen, move the pointer to
Account # and press New (F3). Enter the new
account number into the eld edit box.
7. Enter the customer information for the new account into
both screens of the Customer File.
8. Press Exit (F5) to return to the Setup New Vehicles
screen.
9. In the Setup New Vehicles screen, move the pointer
to Vehicle # and press New (F3). Enter the new
account number.
10. In the Vehicle File screen, move the pointer to Vehicle
and press New (F3).
#
11. The Account # list box will open. Select a customer
account for the vehicle.
12. A Vehicle # eld edit box will open next. Enter the new
vehicle number and press Enter.
13. Complete the remaining elds in the Vehicle File screen.
Next (F1) opens Vehicle File (2/2)
New (F3) creates new Vehicle File record
Del (F4) deletes displayed Vehicle File record
Exit (F5) opens Database Management (2/2)
14. Press Exit (F5) to return to the Setup New Vehicles
screen.
15. Press Add (F1).
16. Press Done (F5).
23
Page 24

OPERATION
FleetConnect Database
Management
FleetConnect’s Database Management is DMS i1000
FleetConnect’s interface for managing customer and
operational data in the FleetConnect database. Using
eld edit and list box windows in one of the seven
Database Management les, fuelers can create new
les and edit existing les. When the DMS i1000
FleetConnect sends transactions to the ofce PC, any
changes to the database les made by the DMS i1000
will be sent as well. Database changes can be validated
by ofce personnel in FleetConnect Ofce, added to the
FleetConnect database, and transferred to other DMS
i1000s.
To access the Database Management window
perform the following:
1. From the Fueler Logon screen press Misc (F4).
2. From the Miscellaneous Commands list box, move
the pointer to Database Manager and press Enter.
Next (F1) opens Database Management (2/2)
Vers (F4) opens About Screen (Software Version Information)
Dlvy (F5) opens Fueler Logon screen
A password can be created in the Systems Denition le to
limit access to the features in Database Management.
Add and Delete Records
When a le is open, records can be added or deleted.
ADD A NEW RECORD
To add a new record, perform the following:
1. From the Database Management screen, move the
pointer to one of the le types and press Enter.
2. Press New (F3) to create a new record.
3. Enter information for the new record into an edit or list
box for each eld in the record
4. Press Exit (F5) to save the new record.
DELETE A RECORD
To delete a record, perform the following:
1. From the Database Management screen, move the
pointer to one of the le types and press Enter.
2. Open the record you would like to delete.
3. Press Del (F4) to delete the record.
4. From the Delete list box move the pointer to Yes and
press Enter.
Prev (F2) opens Database Management (1/2)
Dlvy (F5) opens Fueler Logon screen
Although data can be entered in the eld with the lap
pad, it is much easier to enter large amounts of data using
FleetConnect Ofce.
5. Press Exit (F5) to exit.
24
Customer File Screen
Page 25

New (F3) creates new Button File record
Del (F4) deletes displayed Button File record
Exit (F5) opens Database Management (1/2)
OPERATION
Button File
The Button File allows you to view the account number
and vehicle number mapped to a RFID button and to
delete a RFID button from the database.
Please use the Setup New Vehicles command
to add a RFID button and a vehicle. Adding buttons
in the Button File is not recommended.
ID: (LB)
The ID of the RFID button.
Account #: (LB)
The account associated with the RFID button.
Vehicle: (LB)
The vehicle associated with the RFID button.
Customer File
The Customer File allows you to view, create, edit or
delete customer accounts and contact information.
Next (F1) opens Customer File (2/2)
New (F3) creates new Customer File record
Del (F4) deletes displayed Customer File record
Exit (F5) opens Database Management (1/2)
Prev (F2) opens Customer File (1/2)
New (F3) creates new Customer File record
Del (F4) deletes displayed Customer File record
Exit (F5) opens Database Management (1/2)
If Customer File records exist in the database,
choosing Account #: brings up a list box window
of existing records. Changing the options inside the
existing records will edit that customer’s records.
Account: (LB)
The customer account number.
Name: (FE)
The customer name. 35 alphanumeric characters
maximum.
Phone: (FE)
The customer phone number. 14 alphanumeric
characters maximum.
Address 1: (FE)
The rst line of the customer address. 35
alphanumeric characters maximum.
Address 2: (FE)
The second line of the customer address. 35
alphanumeric characters maximum.
Zip: (FE)
The zip code of the customer address. 10
alphanumeric characters maximum.
City: (FE)
The city of the customer address. 19 alphanumeric
characters maximum.
State: (FE)
The state of the customer address. Two alphanumeric
characters maximum.
Field Type
FE - Field Edit Box
LB - List Box
25
Page 26

OPERATION
Fueler File
The Fueler File allows you to view, create, edit or delete
information for all drivers in the FleetConnect database.
Fueler records can be created by manually entering
a Fueler # or with RFID buttons. Using a RFID button
allows fuelers to logon by attaching the EZConnect
button reader to a personally designated fueler RFID
button.
To add a fueler with a RFID button:
1. Attach the EZConnect button reader to a RFID button
and press the power button. The button ID number will
appear in the ID: eld.
2. Enter the fueler information in the remaining elds. Press
Add (F2) to save fueler to the FleetConnect database.
If Fueler File records exist in the database,
choosing Fueler #: brings up a list box window
of existing records. Changing the options inside the
existing records will edit that customer’s records.
Fueler #: (LB)
The fueler number. 16 alphanumeric characters
maximum.
Password: (FE)
The fueler password. 10 alphanumeric characters
maximum.
ID: (FE)
The fueler ID. 16 alphanumeric characters maximum.
Full Name: (FE)
The fueler full name. 35 alphanumeric characters
maximum.
First Name: (FE)
The fueler rst name. 17 alphanumeric characters
maximum.
Last Name: (FE)
The fueler last name. 17 alphanumeric characters
maximum.
Security: (FE)
The security level of the fueler. Three numeric
characters maximum.
Applications: (FE)
The applications that can be run by the fueler. Five
numeric characters maximum.
Language: (LB)
The language associated with the fueler DMS i1000
Lap Pad display.
Next (F1) opens Fueler File (2/2)
New (F3) creates new Fueler File record
Del (F4) deletes displayed Fueler File record
Exit (F5) opens Database Management (1/2)
Field Type
FE - Field Edit Box
LB - List Box
Prev (F2) opens Fueler File (1/2)
New (F3) creates new Fueler File record
Del (F4) deletes displayed Fueler File record
Exit (F5) opens Database Management (1/2)
Product File
The Product File allows you to view, create, edit or
delete information that maps the product back to the
LCR, labels the product on the ticket, and designates a
product code.
26
New (F3) creates new Product File record
Del (F4) deletes displayed Product File record
Exit (F5) opens Database Management (1/2)
Page 27

New (F3) creates new Product File record
Del (F4) deletes displayed Product File record
Exit (F5) opens Database Management (1/2)
If Product File records exist in the database, choosing
Product Code: brings up a list box window of
existing records. Changing the options inside the
existing records will edit that customer’s records.
Field Type
FE - Field Edit Box
LB - List Box
Next (F1) opens System Denitions File (2/6)
Exit (F5) opens Database Management (1/2)
Next (F1) opens System Denitions File (3/6)
Prev (F2) opens System Denitions File (1/6)
Exit (F5) opens Database Management (1/2)
OPERATION
Product File (cont.)
Product Code: (LB)
The product number in the LectroCount register that
is calibrated for delivery of a product type.
Name: (FE)
The product names. 24 alphanumeric characters
maximum.
LCR Device Address: (FE)
The node address of the LCR electronic register that
will deliver the product. Value to match node address
programmed into the LectroCount register. Numeric
characters between 1 and 250.
LCR Product Number: (LB)
The calibration number in the LCR electronic register
of the product. The value can be changed using the
drop-down box.
LCR Product Type: (LB)
The product type. Must match product type on the
LectroCount register. The value can be changed
using the drop-down box.
System Denitions File
The System Denitions le denes the contact
information and system properties of your fueling
operation.
Name: (FE)
The name of the fueling operation. 35 alphanumeric
characters maximum.
Address 1: (FE)
35 alphanumeric characters maximum.
Address 2: (FE)
35 alphanumeric characters maximum.
Zip: (FE)
10 alphanumeric characters maximum.
City: (FE)
19 alphanumeric characters maximum.
State: (FE)
Two alphanumeric characters maximum.
Owner ID: (FE)
Four alphanumeric characters maximum.
Phone: (FE)
The phone number of the fueling operation. 14
alphanumeric characters maximum.
Database Password: (FE)
Password for Database Management access on
the DMS i1000 unit. 10 alphanumeric characters
maximum.
New LCR Delivery: (LB)
DMS i1000 begins a new LCR Delivery begins at
each change of Account, Product, or Vehicle.
Map Product by LCR Node: (LB)
Product selected using the LCR by node address and
calibration # instead of by product type.
27
Page 28

OPERATION
System Denitions File
Print LCR Header? (LB)
LCR Header printed onto delivery tickets.
Print Account Header? (LB)
Account Header printed onto delivery tickets.
Print Vehicle Header? (LB)
Vehicle Header printed onto delivery tickets.
Print Vehicle Footer? (LB)
Vehicle Footer printed onto delivery tickets.
Print Account Footer? (LB)
Account Footer printed onto delivery tickets.
Print LCR Footer? (LB)
LCR Footer printed onto delivery tickets.
DOT Usage: (LB)
Enables DOT check at logons and logoffs
Both • Logoff • Logon • Never
Prompt for Odometer: (LB)
Asks for odometer reading at logon.
Shared Printer Port: (LB)
Allows DMS to communicate directly to printer without
LCR.
Print GPS Coordinates: (LB)
GPS coordinate elds printed onto delivery tickets.
GMT Offset: (FE)
Location’s offset from Greenwich Mean Time. Three
alphanumeric characters maximum.
Transactions Format: (LB)
The current le format of FCRead output. .
CompTran • ASR • XML
Transactions Target: (LB)
The current target of FCRead output. .
Local • USB • Ofce
Ticket Footer 1: (FE)
The footer comment option 1 for elds printed
onto delivery tickets. 35 alphanumeric characters
maximum.
Ticket Footer 2: (FE)
The footer comment option 2 for elds printed
onto delivery tickets. 35 alphanumeric characters
maximum.
Automatic Updates: (LB)
When the current transactions update method will
occur.
Always • Both • Logoff • Logon • Never
Disable Truck DB Access: (LB)
Truck access to database management on the DMS
i1000 units.
Preset by Tank Size: (LB)
Tank size preset on the DMS i1000 units.
Next (F1) opens System Denitions File (4/6)
Prev (F2) opens System Denitions File (2/6)
Exit (F5) opens Database Management (1/2)
Next (F1) opens System Denitions File (5/6)
Prev (F2) opens System Denitions File (3/6)
Exit (F5) opens Database Management (1/2)
Next (F1) opens System Denitions File (6/6)
Prev (F2) opens System Denitions File (4/6)
Exit (F5) opens Database Management (1/2)
28
Prev (F2) opens System Denitions File (5/6)
Exit (F5) opens Database Management (1/2)
Page 29

New (F3) creates new Truck File record
Del (F4) deletes displayed Truck File record
Exit (F5) opens Database Management (1/2)
The LCR Unit ID: eld in LCRHost’s
General Setup (1/5) screen must match
LCR Unit ID: eld in the Truck File of the
FleetConnect database. See manual EM200-11.
Field Type
FE - Field Edit Box
LB - List Box
OPERATION
Truck File
The Truck File is used for viewing, creating, editing, or
deleting truck ID information, aligning FleetConnect with
the LCR Unit ID, selecting the network number used
by the truck, and names and numbers of the truck. All
fueling trucks will have a unique ID. The Truck Unit ID
must match the value in the Unit ID of the LectroCount
register on the truck.
If Truck File records exist in the database, choosing
LCR Unit ID: brings up a list box window of
existing records. Changing the options inside the
existing records will edit that customer’s records.
LCR Unit ID: (LB)
The LectroCount register unit ID code. 10
alphanumeric characters maximum.
Name: (FE)
The truck name. 16 alphanumeric characters
maximum.
Number: (FE)
The truck number. 10 numeric characters maximum.
Network #: (LB)
The truck network. Five numeric characters
maximum.
Vehicle File
The Vehicle File species the customer account and
product type for the vehicle mapped to a button.
Next (F1) opens Vehicle File (2/2)
New (F3) creates new Vehicle File record
Del (F4) deletes displayed Vehicle File record
Exit (F5) opens Database Management (2/2)
Vehicle File (2/2)
If Vehicle File records exist in the database, choosing
Account #: or Vehicle #: brings up a list box
window of existing records. Changing the options inside
the existing records will edit that customer’s records.
Account: (LB)
The account number for the fuelable vehicle
(customer).
Vehicle: (LB)
The number of the fuelable vehicle. 12 alphanumeric
characters maximum.
Name: (FE)
The name of the fuelable vehicle’s owner. 12
alphanumeric characters maximum.
Product Code: (LB)
The code of the fueling product. 8 alphanumeric
characters maximum.
Department: (FE)
The department that will be billed for fueling the
vehicle. 16 numeric characters maximum.
Tank Size: (FE)
The size of the fuelable vehicle’s tank. 10 numeric
characters maximum.
On-Road: (LB)
Whether or not the vehicle is an “on road” vehicle.
29
Page 30

OPERATION
Machine Status
The Machine Status screens display information
regarding system status. There are two Machine Status
screens. The Status (F3) key on the Fill Vehicles
screen opens the Machine Status (1/2) screen. From the
Machine Status (2/2) screen, you can open the Printer
Status, Delivery Status, and Delivery Code screens.
These screens display the current conditions of the
FleetConnect system. These status screens are helpful
for troubleshooting and maintenance purposes. For
more information, see manual EM200-11.
Security: Display Only
A description of the active security level.
Idle • Unlocked Idle • Delivery Paused
• Delivery Active • W&M Idle • Factory
Idle
Switch: Display Only
The position of the selector switch.
Run • Stop • Print • Shift Print •
Calibrate
State: Display Only
The current processing activity of the LCR 600.
Run • Stop • End Delivery • Auxiliary •
Shift • Calibrate • Waiting for No-Flow
• Unknown
Next (F1) opens Machine Status (2/2)
Diag (F3) opens list box to print a diagnostic ticket
LCR# (F4) opens list box to switch to another active LCR
Exit (F5) opens Fill Vehicles screen
Printing? Display Only
Is the printer currently printing?
Other Errors? Display Only
Are there any other errors being reported by the
LCR?
Printer Status
Select this eld to open the Printer Status screen..
Delivery Status
Select this eld to open the Delivery Status screen.
Delivery Code
Select this eld to open the Delivery Code screen.
Prev(F2) opens Machine Status (1/2)
Diag (F3) opens list box to print a diagnostic ticket
LCR# (F4) opens list box to switch to another active LCR
30
Page 31

Next (F1) opens Printer Status screen 2/2
Status (F3) opens Machine Status screen 1/2
OPERATION
Printer Status
The Printer Status screen displays the current print/ticket
conditions of the FleetConnect system. It is non-editable.
The Printer Status screen is helpful for troubleshooting
and maintenance purposes. There are two Printer Status
screens. The Printer Status screens are accessible
through the Machine Status (2/2) screen.
Delivery Ticket? Display Only
Has a delivery ticket been requested?
Shift Ticket? Display Only
Has a shift ticket been requested?
Diagnostic Ticket? Display Only
Has a diagnostic ticket been requested?
Pass-Through Print? Display Only
Is text from the host in the LCR print buffer?
Printer Error? Display Only
Has an error been detected with the printer?
Printer Busy? Display Only
Has the print processor began to print a ticket?
Prev (F2) opens Printer Status screen 1/2
Status (F3) opens Machine Status screen 1/2
Next (F1) opens Delivery Status screen 2/4
Status (F3) opens Machine Status screen 2/2
Delivery Status
The Delivery Status screen displays the current delivery
conditions of the FleetConnect system. It is non-editable.
The Delivery Status screen is helpful for troubleshooting
and maintenance purposes. There are four Delivery
Status screens. The Delivery Status screens are
accessible through the Machine Status (2/2) screen.
Delivery Status (1/4)
ROM Check Sum? Display Only
Has a delivery not started due to the checksum of the
LectroCount program code space failing?
Temperature? Display Only
Has the current delivery not started (or was
terminated) due to an error with the temperature
reading hardware?
Watchdog? Display Only
Was the processor reset due to a LectroCount
watchdog time out error?
VCF Setup? Display Only
Was there an error setting up the volume
compensation factor for the current product?
31
Page 32

OPERATION
Delivery Status
Delivery Status (2/4)
VCF Domain? Display Only
Did the temperature of the product go outside the
valid range for the compensation type of the product?
Meter Calibration? Display Only
Did an error occur while setting up the meter
calibration for the current delivery?
Pulser Failure? Display Only
Did the current delivery terminate due to too many
pulser faults?
Preset Stop? Display Only
Was the gross or net preset volume reached?
Delivery Status (3/4)
No-Flow Stop? Display Only
Was the current delivery stopped due to no-ow being
detected through the meter for a specied amount of
time?
Stop/Pause Request? Display Only
Was a stop activated by the selector switch during an
active delivery?
Print/End Request? Display Only
Was a print activated by the selector switch during an
active delivery?
Power Failure? Display Only
Did a delivery end due to a power fail condition for
more than 15 seconds?
Delivery Status (4/4)
Preset Error? Display Only
Did a delivery end due to an error condition while
attempting to set up a gross or net preset?
RS-232 Lap Pad? Display Only
Did the last delivery end due to the Lap Pad being
removed after the delivery started.
Printer? Display Only
Does the current delivery require a printed ticket but
the printer is off-line or busy?
Next (F1) opens Delivery Status screen 3/4
Prev (F2) opens Delivery Status screen 1/4
Status (F3) opens Machine Status screen 2/2
Next (F1) opens Delivery Status screen 4/4
Prev (F2) opens Delivery Status screen 2/4
Status (F3) opens Machine Status screen 2/2
Data Access? Display Only
Did a data access error occur during the delivery
which was critical to the delivery?
32
Prev (F2) opens Delivery Status screen 3/4
Status (F3) opens Machine Status screen 2/2
Page 33

Next (F1) opens Delivery Code screen 2/4
Status (F3) opens Machine Status screen 2/2
Next (F1) opens Delivery Code screen 3/4
Prev (F2) opens Delivery Code screen 1/4
Status (F3) opens Machine Status screen 2/2
Next (F1) opens Delivery Code screen 4/4
Prev (F2) opens Delivery Code screen 2/4
Status (F3) opens Machine Status screen 2/2
Prev (F2) opens Delivery Code screen 3/4
Status (F3) opens Machine Status screen 2/2
OPERATION
Delivery Code
The Delivery Code screen allows operators to review the
operating status of the currently connected device. There
are four Delivery Code screens. The Delivery Code
screens are accessible through the Machine Status (2/2)
screen.
Delivery Code (1/4)
Delivery Ticket? Display Only
Is a delivery ticket is pending? A new delivery cannot
be started until this eld is cleared by successfully
printing the last delivery ticket.
Shift Ticket? Display Only
Has a shift ticket been requested and waiting to be
printed?
Flow Active? Display Only
Is the ow active during a delivery? This eld
changes with the Delivery Active? eld, but it
also turns off when a delivery is paused and turned
on when the delivery is resumed.
Delivery Active? Display Only
Is a delivery active?
Delivery Code (2/4)
Gross Preset Active? Display Only
Is the current delivery a gross preset?
Net Preset Active? Display Only
Is the current delivery a net preset?
Stop/Gross Preset? Display Only
Has the current delivery been stopped by reaching a
gross preset value?
Stop/Net Preset? Display Only
Has the current delivery been stopped by reaching a
net preset value?
Delivery Code (3/4)
VCF Active? Display Only
Is the volume of the current delivery compensated
according to temperature?
S1 Closed? Display Only
Is the S1 solenoid closed? During preset deliveries,
the S1 solenoid should be open at full product ow
and closed at dwell ow.
Delivery Beginning? Display Only
Is a delivery in the process of being started?
New Delivery Queued? Display Only
Has a new delivery has been queued in the LCR
600?
Delivery Code (4/4)
Init Warning? Display Onlyy
Did a warning condition occur during the initialization
of the current delivery.
Cong Event? Display Only
Did a conguration event occur.
Calib Event? Display Only
Did a calibration event occur.
33
Page 34

BILL OF MATERIALS
EZConnect Button Reader with RFID Button Reader Cable E4363
RFID Button and Mounting Kit (Qty. 10) 82696
Roll Printer Kit without Cable, without RS232 & Power, without Reel E49005
Description Part Number
USB Button Reader Adapter 71707
USB Button Reader Cable 71395
USB Flash Memory Device 82684
FleetConnect Ofce CD ROM SG502CD
DB Manager CD ROM SH252CD
EZConnect Button Reader with RFID Button Reader Cable
USB Flash Memory Device
USB Button Reader Adapter with Cable
DB Manager CD ROM
34
Epson Roll Printer
FleetConnect Ofce CD ROM
Page 35

LOAD TICKET
Appendix
Ticket Layouts
DETAILED SHIFT TICKETDELIVERY TICKET
SUMMARY SHIFT TICKET
SHIFT TICKET
35
Page 36

105 Albrecht Drive
Lake Bluff, IL 60044-2242
1.800.458.5262 • 847.295.1050
Fax: 847.295.1057
www.lcmeter.com
© 2010 Liquid Controls
Pub. No. 500351
(06/2010)
 Loading...