

Page 1

A Division of Cisco Systems, Inc.
GHz
2.4
802.11g
Wireless
®
Package Contents
• One Wireless-G Range Expander
• One Setup Wizard CD with User Guide
• One Quick Installation
• One Ethernet Cable
• One Custom AC Power Cord
• One Power Plate (only included for regions
with EU or US style power plugs)
Wireless-G
Range Expander
Quick Installation
Before you begin installation of the Range Expander, make sure your
wireless network is operational.
If your existing wireless network has security disabled, follow the instructions
in Step 1: Connecting the Range Expander and Step 2: Using the Auto
Configuration Button.
If your existing wireless network has security enabled, follow the instructions
in Step 1: Connecting the Range Expander and Step 3: Using the Setup
Wizard.
1
Connecting the Range Expander
A For best results, connect the
Range Expander to a wired
network for setup. First, flip up
the lid covering the Ethernet
network port on the Range
Expander’s front panel. Then,
connect the Ethernet network
cable to the Range Expander
and your router. Proceed to
step B.
If, however, you prefer to use
the Auto Configuration button,
place the Range Expander
next to your wireless router or
access point. Then proceed to
step B.
B
OR
B Connect the appropriate
power plate to the Range
Expander, and then plug it into
a power outlet, preferably a
surge protector.
If your existing wireless network
has security disabled, proceed
to Step 2: Using the Auto
Configuration Button.
If your existing wireless network
has security enabled, proceed
to Step 3: Using the Setup
Wizard.
NOTE: The wall mount Power
Plate is only included for regions
with EU or US style power plugs.
Using the Auto Configuration Button
2
A Press the Range Expander’s
Auto configuration button and
hold it down for five seconds.
Then release the button.
The LEDs on the Range
Expander will flash for up to
one minute while it is being
auto-configured. When both of
the LEDs are solidly lit blue, the
Range Expander is properly
configured and ready for use.
B To move the Range Expander,
unplug it from the power outlet.
C Place the Range Expander in
an optimum location. The best
placement is usually at the
edge of your wireless network.
D Fix the direction of the
antenna. Normally, the higher
you place the Range
Expander’s antenna, the better
the performance will be.
Proper positioning of the
antenna can enhance its
receiving sensitivity.
E Connect the power plate or
cord to a power outlet,
preferably a surge protector.
Congratulations! The installation of
the Wireless-G Range Expander is
complete.
D
IMPORTANT:If you install the
Range Expander into your
network using the Auto
configuration button and decide
that you want to enable wireless
security on your entire network,
use the Web-based Utility to
enable wireless security on the
Range Expander. (Refer to the
User Guide on the CD for details
or use the Setup Wizard to
configure the unit.)
Model No.
Model No.
WRE54G (EU/UK/LA)
Page 2
3
Using the Setup Wizard
After you have powered on the
Range Expander and placed it near
your wireless router or access point,
run the Setup Wizard.
A
Insert the Setup Wizard CD into
your PC's CD-ROM drive. The
Setup Wizard should run
automatically, and the
Welcome
appear. If it does not, click the
Start
the field that appears, enter
D:\setup.exe
of your CD-ROM drive).
B
Click the
C
Make sure your access point or
wireless router is working
properly. Then click
Range Expander is connected
through the Ethernet port,
continue to Step E.
D
When using a wireless
connection, the Setup Wizard
will run a search for your wireless
network’s settings. If found, you
will be asked to confirm the
settings. If the settings are
correct, click
to step G. If you ’d like to choose
a different wireless network,
proceed to step E.
You will be notified if no wireless
network is found. Make sure
your wireless network is
operational. Then click
Continue
again, and proceed to step E.
screen should
button and choose
(if “D” is the letter
Setup
button.
Next
Yes
and proceed
to run the search
Run
. In
. If the
NOTE: If your wireless network
fails to detect the Range
Expander, run the Setup Wizard again using the Ethernet
connection.
B
D1
D2
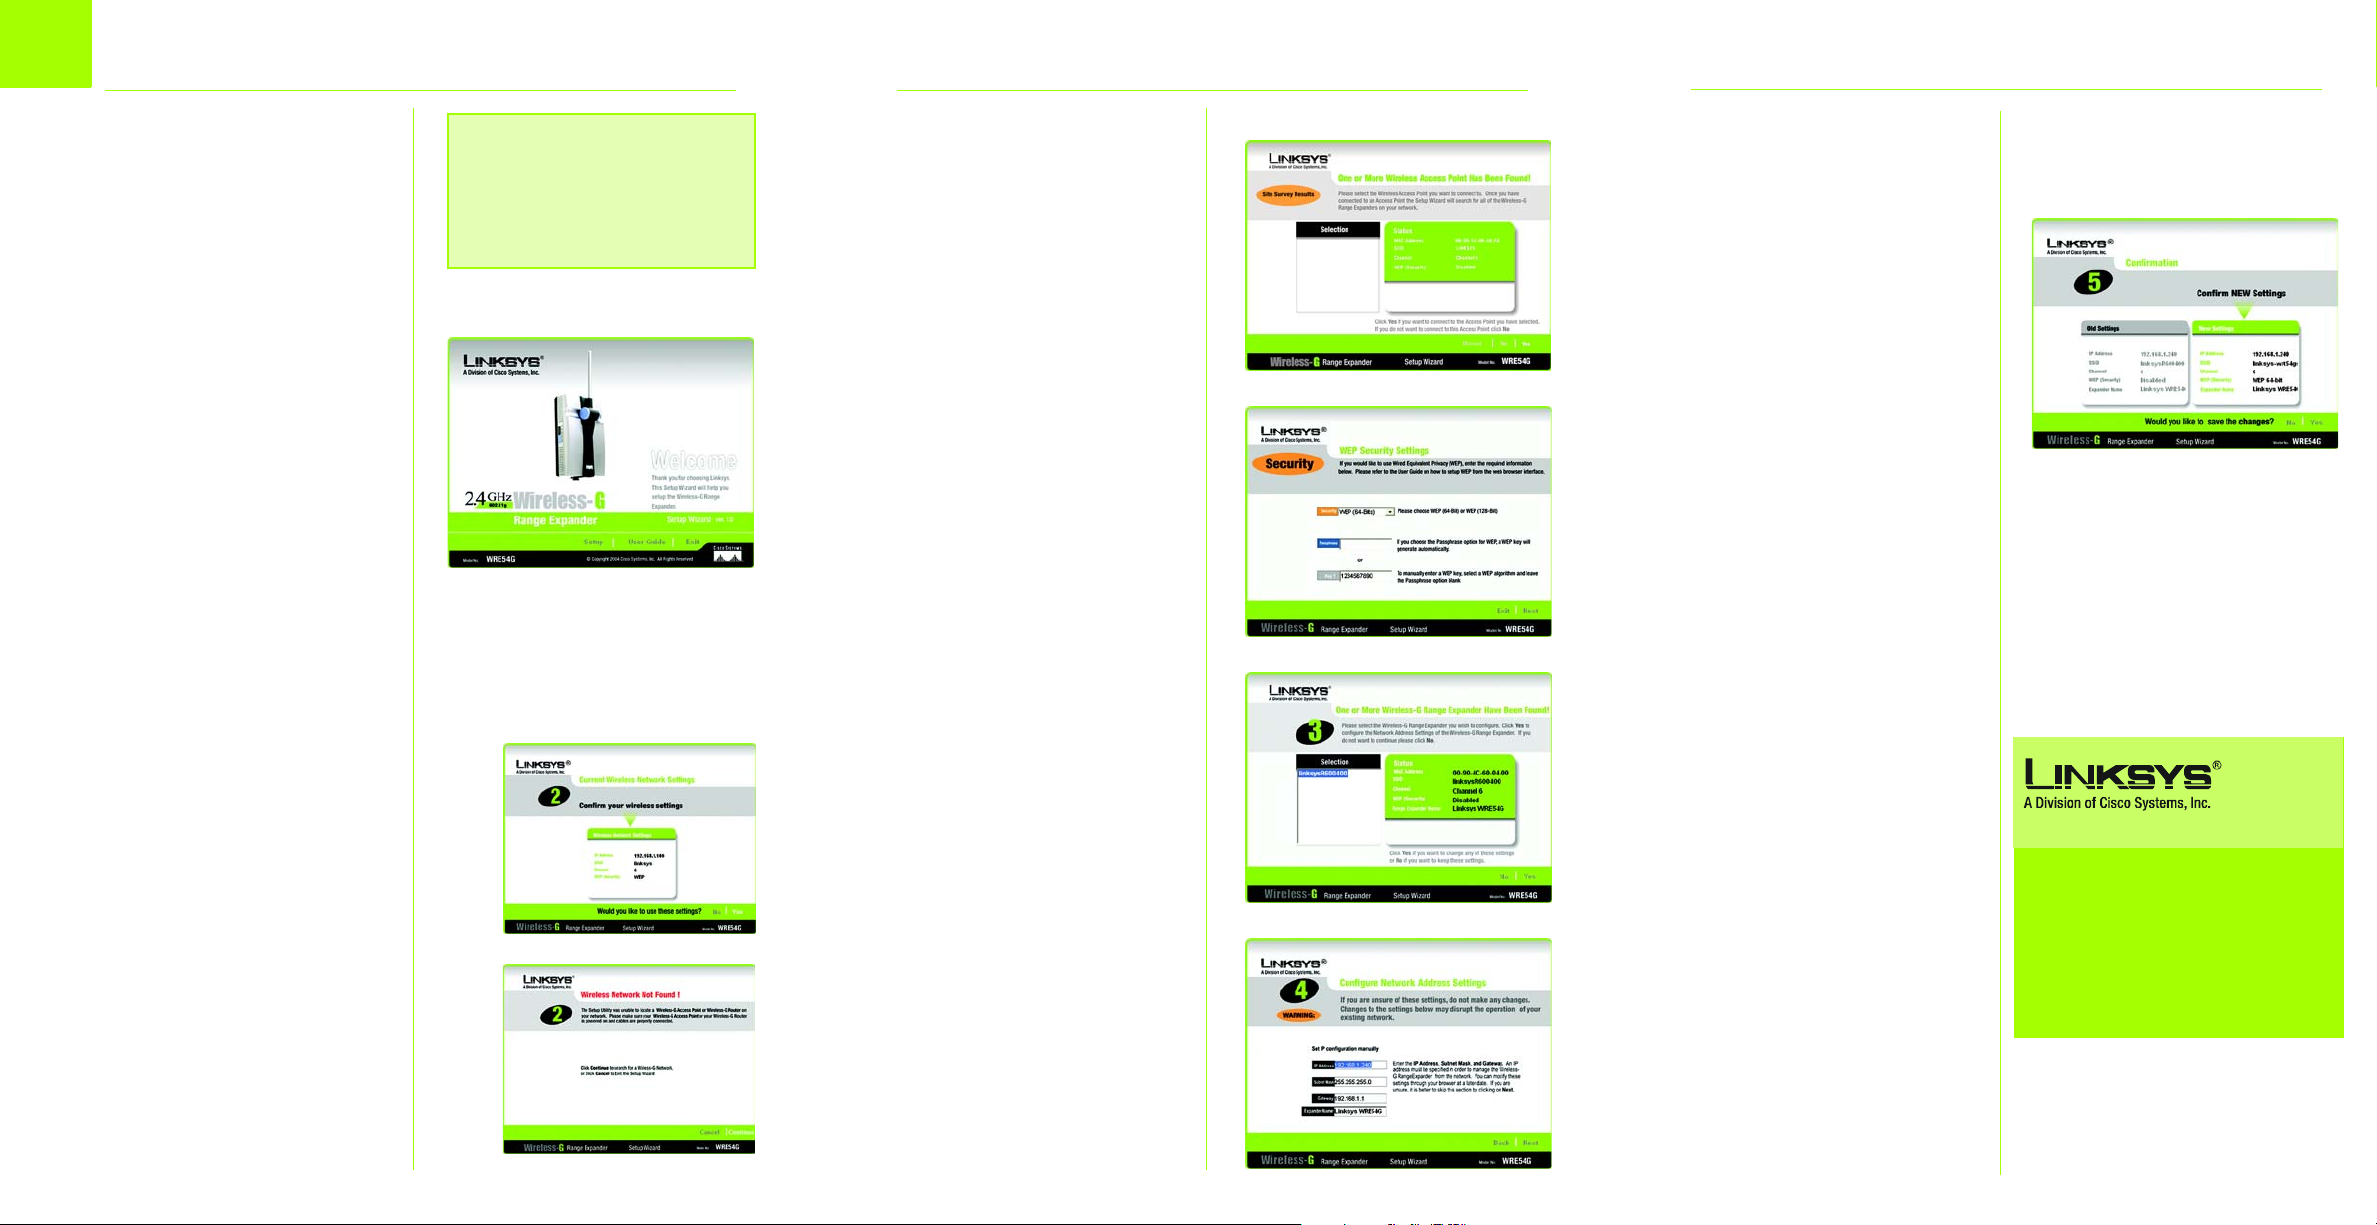
E
The site survey results will display
all available access points and
wireless routers. Select the one
you want and click
F
If security is disabled, then
proceed to step G. If security is
enabled, the appropriate
Security Settings
appear. Enter the WEP or WPAPSK settings. Then click
WEP
- Select the level of WEP
encryption,
(128-Bits)
passphrase or the WEP key.
WPA-PSK or pre-shared key.
G
Now that the Setup Wizard has
found an access point or
wireless router with which to
communicate, it will now search
for the Range Expander. Select
the one you want and click
H
Enter the Range Expander’s
default password,
Enter
click
networks may require additional
security settings, such as that
shown in Step F, at this time.)
I
Enter an IP Address and
appropriate Subnet Mask. Then
enter the IP Address of your
network gateway, as well as a
descriptive name for the Range
Expander. If you are not sure
what to enter, keep the default
settings. Click
WEP (64-Bits)
. Then enter the
Enter the passphrase
. (Some wireless
Yes
screen will
admin
Next
.
.
Next
or
, and
.
WEP
Yes
J Review the new settings, and
click Yes to save them.
K Click Online Registration to
register the Range Expander, or
click Exit to exit the Setup
Wizard.
E
L Unplug the Range Expander
from the power outlet and
remove the Ethernet cable, if
necessary.
J
M Locate an optimum location
for the Range Expander. The
best placement is usually at
the edge of your wireless
network.
F
N Fix the direction of the
antenna. Normally, the higher
you place the Range
Expander’s antenna, the better
.
G
I
the performance will be.
Proper positioning of the
antenna can enhance its
receiving sensitivity.
O Connect the power plate to a
power outlet, preferably a
surge protector.
Congratulations! The installation of
the Wireless-G Range Expander is
complete.
For additional information or troubleshooting help, refer to
the User Guide on the Setup CD-ROM. You can also email
for further support.
Website
http://www.linksys.com/international
Product Registration
http://www.linksys.com/registration
Linksys is a registered trademark or trademark of
Cisco Systems, Inc. and/or its affiliates in the U.S.
and certain other countries. Copyright © 2005
Cisco Systems, Inc. All rights reserved.
WRE54G_V2-QI-EUUKLA-50615 KL
Model No.
 Loading...