

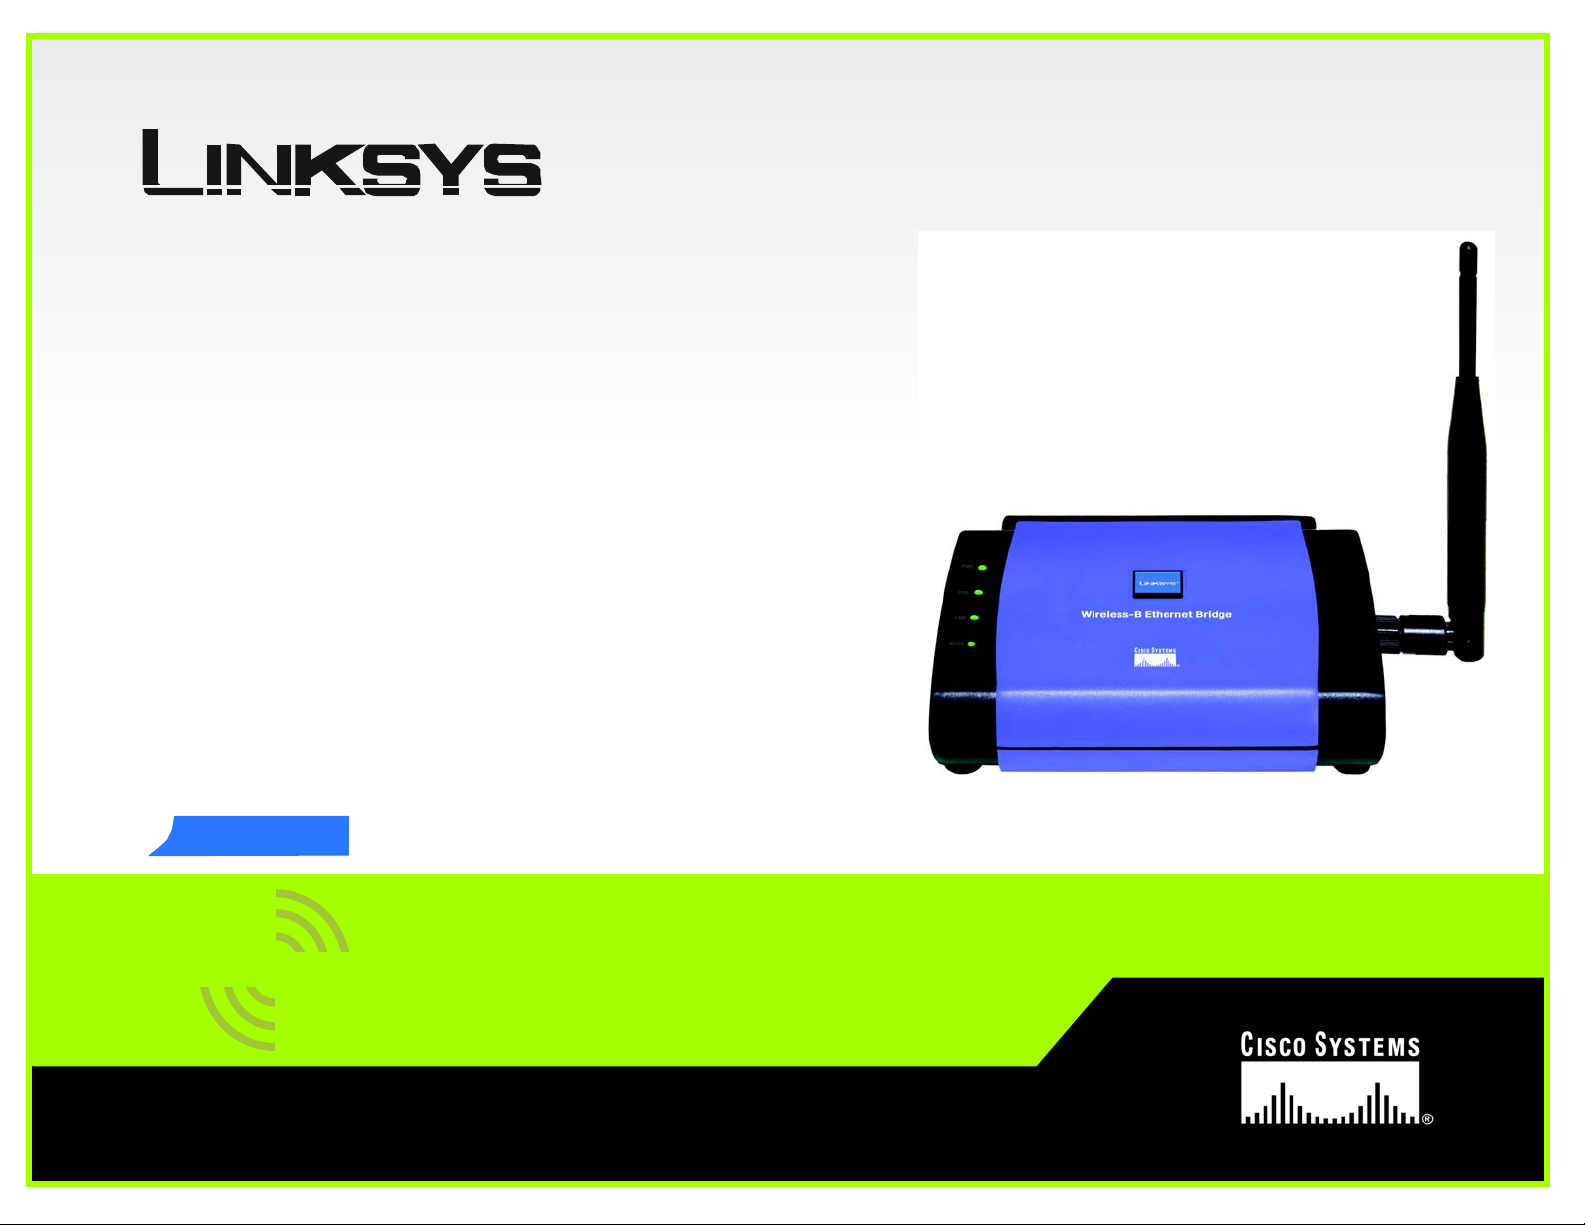
Linksys WET11 User Manual
A Division of Cisco Systems, Inc.
GHz
2.4
®
Model No.
802.11b
WIRELESS
WET11
Wireless-B
Ethernet Bridge
User Guide

Wireless-B Ethernet Bridge
Copyright and Trademarks
Specifications are subject to change without notice. Linksys is a registered trademark or trademark of Cisco
Systems, Inc. and/or its affiliates in the U.S. and certain other countries. Copyright © 2003 Cisco Systems, Inc. All
rights reserved. Other brands and product names are trademarks or registered trademarks of their respective
holders.
How to Use this Guide
Your guide to the Wireless-B Ethernet Bridge has been designed to make understanding networking with the
Wireless-B Ethernet Bridge easier than ever. Look for the following items when reading this guide:
This checkmark means there is a Note of interest and
is something you should pay special attention to while
using the Wireless-B Ethernet Bridge.
This exclamation point means there is a Caution or
warning and is something that could damage your
property or the Wireless-B Ethernet Bridge.
This question mark provides you with a reminder about
something you might need to do while using the Wireless-B
Ethernet Bridge.
In addition to these symbols, there are definitions for technical terms that are presented like this:
word: definition.
Also, each figure (diagram, screenshot, or other image) is provided with a figure number and description, like
this:
Figure numbers and descriptions can also be found in the “List of Figures” section in the “Table of Contents”.
WET11_v2-UG-30918NC JL
Figure 0-1: Sample Figure Description

Wireless-B Ethernet Bridge
Table of Contents
Chapter 1: Introduction 1
Welcome 1
What’s in this Guide? 2
Chapter 2: Planning Your Wireless Network 4
Network Topology 4
Ad-Hoc versus Infrastructure Mode 4
Chapter 3: Getting to Know the Wireless-B Ethernet Bridge 6
The Back Panel 6
The Front Panel 7
Chapter 4: Connecting the Wireless-B Ethernet Bridge for Setup 8
Chapter 5: Setting Up the Wireless-B Ethernet Bridge 9
Overview 9
Setup Wizard 9
Chapter 6: Connecting the Wireless-B Ethernet Bridge for Network Use 13
Chapter 7: Using the Wireless-B Ethernet Bridge Web-based Utility 14
Overview 14
Starting the Web-based Utility 14
Setup 15
Password 17
Advanced 18
Status 19
Help 20
Appendix A: Troubleshooting 21
Common Problems and Solutions 21
Frequently Asked Questions 22
Appendix B: Wireless Security 25
A Brief Overview 25
What Are the Risks? 25
Appendix C: Upgrading Firmware 32
Appendix D: Windows Help 33
Appendix E: Glossary 34

Wireless-B Ethernet Bridge
Appendix F: Specifications 40
Appendix G: Warranty Information 42
Appendix H: Regulatory Information 43
Appendix I: Contact Information 46

Wireless-B Ethernet Bridge
List of Figures
Figure 2-1: Infrastructure Mode 4
Figure 2-2: Ad-Hoc Mode 5
Figure 2-3: Wireless Bridging Using Two Bridges 5
Figure 3-1: Back Panel 6
Figure 3-2: Front Panel 7
Figure 4-1: Connect the Ethernet Network Cable 8
Figure 4-2: Connect the Power Adapter 8
Figure 5-1: Welcome 9
Figure 5-2: Check Connection 9
Figure 5-3: List of Bridges 10
Figure 5-4: Password 10
Figure 5-5: Mode Settings 10
Figure 5-6: Wireless Settings 11
Figure 5-7: IP Settings 11
Figure 5-8: Security Settings 11
Figure 5-9: WEP Key 12
Figure 5-10: Confirmation 12
Figure 5-11: Congratulations 12
Figure 7-1: Access the Web-based Utility 14
Figure 7-2: Setup Tab 15
Figure 7-3: Site Survey 16
Figure 7-4: WEP Encryption 17
Figure 7-5: Password Tab 17
Figure 7-6: Advanced Settings Tab 18
Figure 7-7: Status Tab 19
Figure 7-8: Help Tab 20
Figure B-1: Warchalking 25
Figure B-2: WEP Encryption 31

Wireless-B Ethernet Bridge
Chapter 1: Introduction
Welcome
Thank you for choosing the Wireless-B Ethernet Bridge. The versatile Wireless-B Ethernet Bridge can make any
wired Ethernet-equipped device a part of your wireless network. At home, use the Wireless-B Ethernet Bridge to
connect game consoles, set-top boxes, or computers into your wireless network to share your high-speed
network connection. In the office, convert your Ethernet-wired printer, scanner, camera, notebook or desktop
into a wireless networked device.
802.11b: an IEEE wireless networking
standard that specifies a maximum
data transfer rate of 11Mbps and an
operating frequency of 2.4GHz.
It's completely driver-free, so it works on any platform and under any operating system! Since there are no
drivers to load, setup is a snap—just plug it into your device and configure the network settings through your
web browser.
You can also use the Wireless-B Ethernet Bridge as a kind of “cable-less cable” to connect remote areas
together. Maybe Shipping is all the way across the warehouse from Receiving. Or maybe you want to set up a
home office in your detached garage. With a Wireless-B Ethernet Bridge in the garage, and another one (or a
Wireless Access Point) in the house, you're connected—with no cabling hassle.
Let the Wireless-B Ethernet Bridge from Linksys open up exciting new possibilities for your wireless network.
Ethernet: an IEEE standard network
protocol that specifies how data is
placed on and retrieved from a
common transmission medium.
Chapter 1: Introduction
Welcome
1

Wireless-B Ethernet Bridge
What’s in this Guide?
This user guide covers the steps for setting up and using the Wireless-B Ethernet Bridge.
• Chapter 1: Introduction
This chapter describes the Wireless-B Ethernet Bridge applications and this user guide.
• Chapter 2: Planning your Wireless Network
This chapter describes the basics of wireless networking.
• Chapter 3: Getting to Know the Wireless-B Ethernet Bridge
This chapter describes the physical features of the Bridge.
• Chapter 4: Connecting the Wireless-B Ethernet Bridge for Setup
This chapter instructs you on how to connect the Bridge to your network for setup.
• Chapter 5: Setting Up the Wireless-B Ethernet Bridge
This chapter explains how to set up the Bridge using the Setup Wizard.
• Chapter 6: Connecting the Wireless-B Ethernet Bridge for Network Use
This chapter explains how to connect the Bridge to a network device so the device can join your wireless
network.
• Chapter 7: Using the Wireless-B Ethernet Bridge Web-based Utility
This chapter explains how to use the Web-Based Utility to configure the settings on the Bridge.
• Appendix A: Troubleshooting
This appendix describes some problems and solutions, as well as frequently asked questions, regarding
installation and use of the Wireless-B Ethernet Bridge.
• Appendix B: Wireless Security
This appendix explains the risks of wireless networking and some solutions to reduce the risks.
• Appendix C: Upgrading Firmware
This appendix instructs you on how to upgrade the firmware on the Bridge should you need to do so.
• Appendix D: Glossary
This appendix gives a brief glossary of terms frequently used in networking.
• Appendix E: Windows Help
This appendix describes how you can use Windows Help for instructions about networking, such as installing
the TCP/IP protocol.
Chapter 1: Introduction
What’s in this Guide?
2

Wireless-B Ethernet Bridge
• Appendix F: Specifications
This appendix provides the technical specifications for the Bridge.
• Appendix G: Warranty Information
This appendix supplies the warranty information for the Bridge.
• Appendix H: Regulatory Information
This appendix supplies the regulatory information regarding the Bridge.
• Appendix I: Contact Information
This appendix provides contact information for a variety of Linksys resources, including Technical Support.
Chapter 1: Introduction
What’s in this Guide?
3

Wireless-B Ethernet Bridge
Chapter 2: Planning Your Wireless Network
Network Topology
A wireless local area network (WLAN) is exactly like a regular local area network (LAN), except that each
computer in the WLAN uses a wireless device to connect to the network. Computers in a WLAN share the same
frequency channel and SSID, which is an identification name shared by the wireless devices belonging to the
same wireless network.
LAN (Local Area Network): the
computers and networking products
that make up your local network.
Ad-Hoc versus Infrastructure Mode
Unlike wired networks, wireless networks have two different modes in which they may be set up: infrastructure
and ad-hoc. An infrastructure configuration is a WLAN and wired LAN communicating to each other through an
access point. An ad-hoc configuration is wireless-equipped computers communicating directly with each other.
Choosing between these two modes depends on whether or not the wireless network needs to share data or
peripherals with a wired network or not.
If the computers on the wireless network need to be accessible by a wired network or need to share a peripheral,
such as a printer, with the wired network computers, the wireless network should be set up in Infrastructure
mode. The basis of Infrastructure mode centers around an access point, which serves as the main point of
communications in a wireless network (see Figure 2-1). Access points transmit data to PCs equipped with
wireless network cards, which can roam within a certain radial range of the access point. Multiple access points
can be arranged to work in succession to extend the roaming range, and can be set up to communicate with your
Ethernet hardware as well.
If the wireless network is relatively small and needs to share resources only with the other computers on the
wireless network, then the Ad-Hoc mode can be used. Ad-Hoc mode allows computers equipped with wireless
transmitters and receivers to communicate directly with each other, eliminating the need for an access point. The
drawback of this mode is that in Ad-Hoc mode, wireless-equipped computers are not able to communicate with
computers on a wired network. And, of course, communication between the wireless-equipped computers is
limited by the distance and interference directly between them.
Figure 2-2 shows a typical scenario of four Wireless-B Ethernet Bridges in ad-hoc mode. Figure 2-3 shows a
typical wireless bridging scenario using two Wireless-B Ethernet Bridges. Each wireless network is connected to
a Wireless-B Ethernet Bridge through a switch. A separate notebook computer is equipped with a wireless
network adapter and can communicate with either wireless network when it is configured with the appropriate
SSID and channel.
SSID: your wireless network’s name.
Infrastructure: a wireless network
that is bridged to a wired network via
an access point.
Figure 2-1: Infrastructure Mode
Ad-hoc: a group of wireless devices
communicating directly to each other
(peer-to-peer) without the use of an
access point.
Chapter 2: Planning Your Wireless Network
Network Topology
4

Wireless-B Ethernet Bridge
With these, and many other, Linksys products, your networking options are limitless. Go to the Linksys website at
www.linksys.com for more information about products that work with the Wireless-B Ethernet Bridge.
Figure 2-2: Ad-Hoc Mode
Chapter 2: Planning Your Wireless Network
Ad-Hoc versus Infrastructure Mode
Figure 2-3: Wireless Bridging Using Two Bridges
5

Wireless-B Ethernet Bridge
Chapter 3: Getting to Know the Wireless-B Ethernet Bridge
The Back Panel
All connections to the Bridge are made through the ports in its back panel, shown in Figure 3-1.
Figure 3-1: Back Panel
Reset The Reset button resets the Bridge to its factory default settings.
X-II The X-II (MDI/MDI-X) slide switch offers a choice between two settings. Use the X setting if you
are connecting the Bridge to a network adapter. Use the II setting if you are connecting the
Bridge to a hub or switch.
LAN The LAN port is where you will connect the Ethernet network cable.
Power The Power port is where you will connect the power adapter.
Chapter 3: Getting to Know the Wireless-B Ethernet Bridge
The Back Panel
Important: Resetting the Wireless-B Ethernet
Bridge will erase all of your settings (WEP
encryption, wireless settings, etc.) and replace
them with the factory defaults. Do not reset the
Wireless-B Ethernet Bridge if you want to retain
these settings.
6
Wireless-B Ethernet Bridge
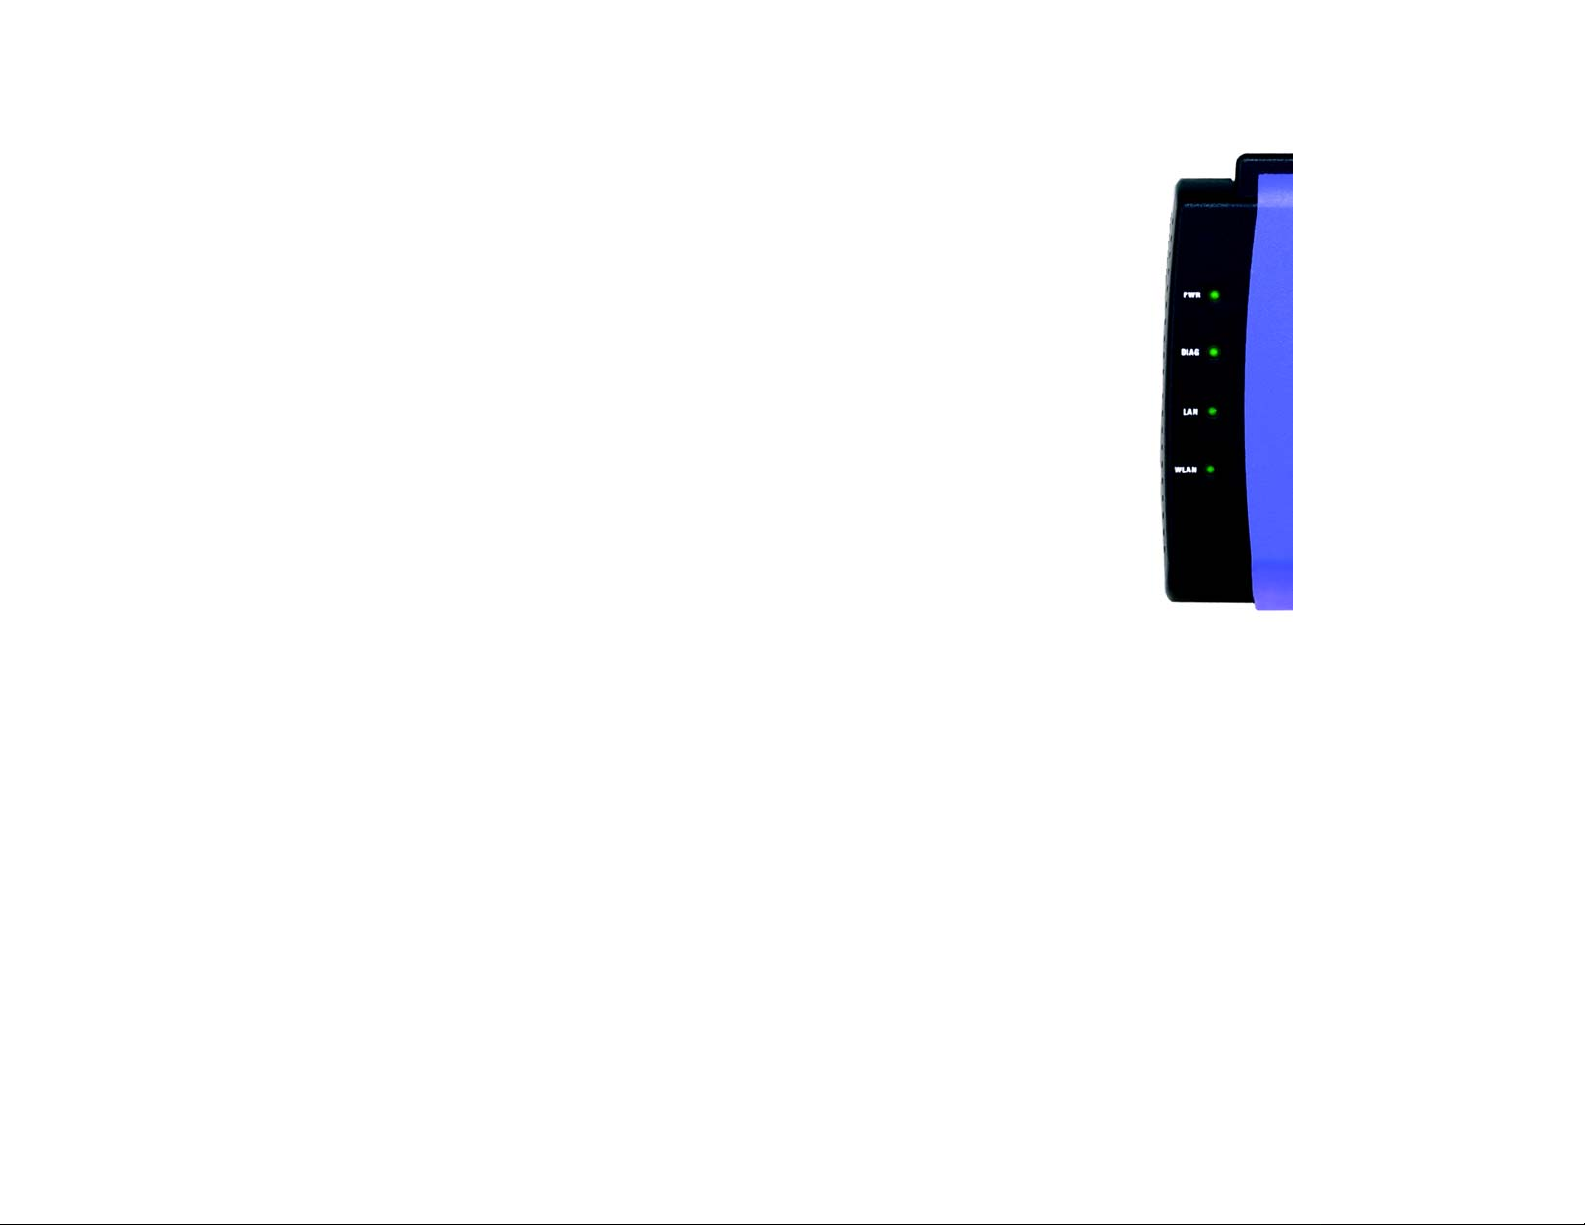
The Front Panel
Network activity with the Bridge is shown on the LEDs, shown in Figure 3-2.
PWR Green. The PWR LED will light up when the Bridge is powered on.
DIAG Green. The DIAG LED will light up when there is a connection error. Re-establish the
connection to eliminate the error.
LAN Green. The LAN LED will be lit steadily when the Bridge is connected to the wired network. The
LED will flash when there is wired network traffic.
WLAN Green. The WLAN LED will be lit steadily when the Bridge is connected to the wireless
network. The LED will flash when there is wireless network traffic.
Figure 3-2: Front Panel
Chapter 3: Getting to Know the Wireless-B Ethernet Bridge
The Front Panel
7

Wireless-B Ethernet Bridge
Chapter 4: Connecting the Wireless-B Ethernet Bridge for Setup
1. Attach the Bridge’s antenna.
2. Plug the included Ethernet network cable into the LAN port on the back panel of the Bridge, shown in Figure
4-1.
3. The X-II (MDI/MDI-X) slide switch offers a choice between two settings. Slide the X-II switch to the X position
if you are connecting the Bridge to a PC’s network adapter. Slide the X-II selection switch to the II position if
you are connecting the Bridge to a hub or switch.
4. Plug the other end of the Ethernet network cable into the RJ-45 port of the hub, switch, or PC you wish to use
to configure the Bridge.
5. Plug the supplied power adapter into the Power port on the back panel of the Bridge, shown in Figure 4-2.
Then plug the other end into an electrical outlet.
Proceed to the next section, “Chapter 5: Setting Up the Wireless-B Ethernet Bridge.”
Figure 4-1: Connect the Ethernet Network Cable
Chapter 4: Connecting the Wireless-B Ethernet Bridge for Setup
Figure 4-2: Connect the Power Adapter
8
Wireless-B Ethernet Bridge
Chapter 5: Setting Up the Wireless-B Ethernet Bridge
Overview
Now that you’ve connected the Wireless-B Ethernet Bridge to your wired network, you are ready to set it up. The
Setup Wizard will guide you through all the necessary steps.
Setup Wizard
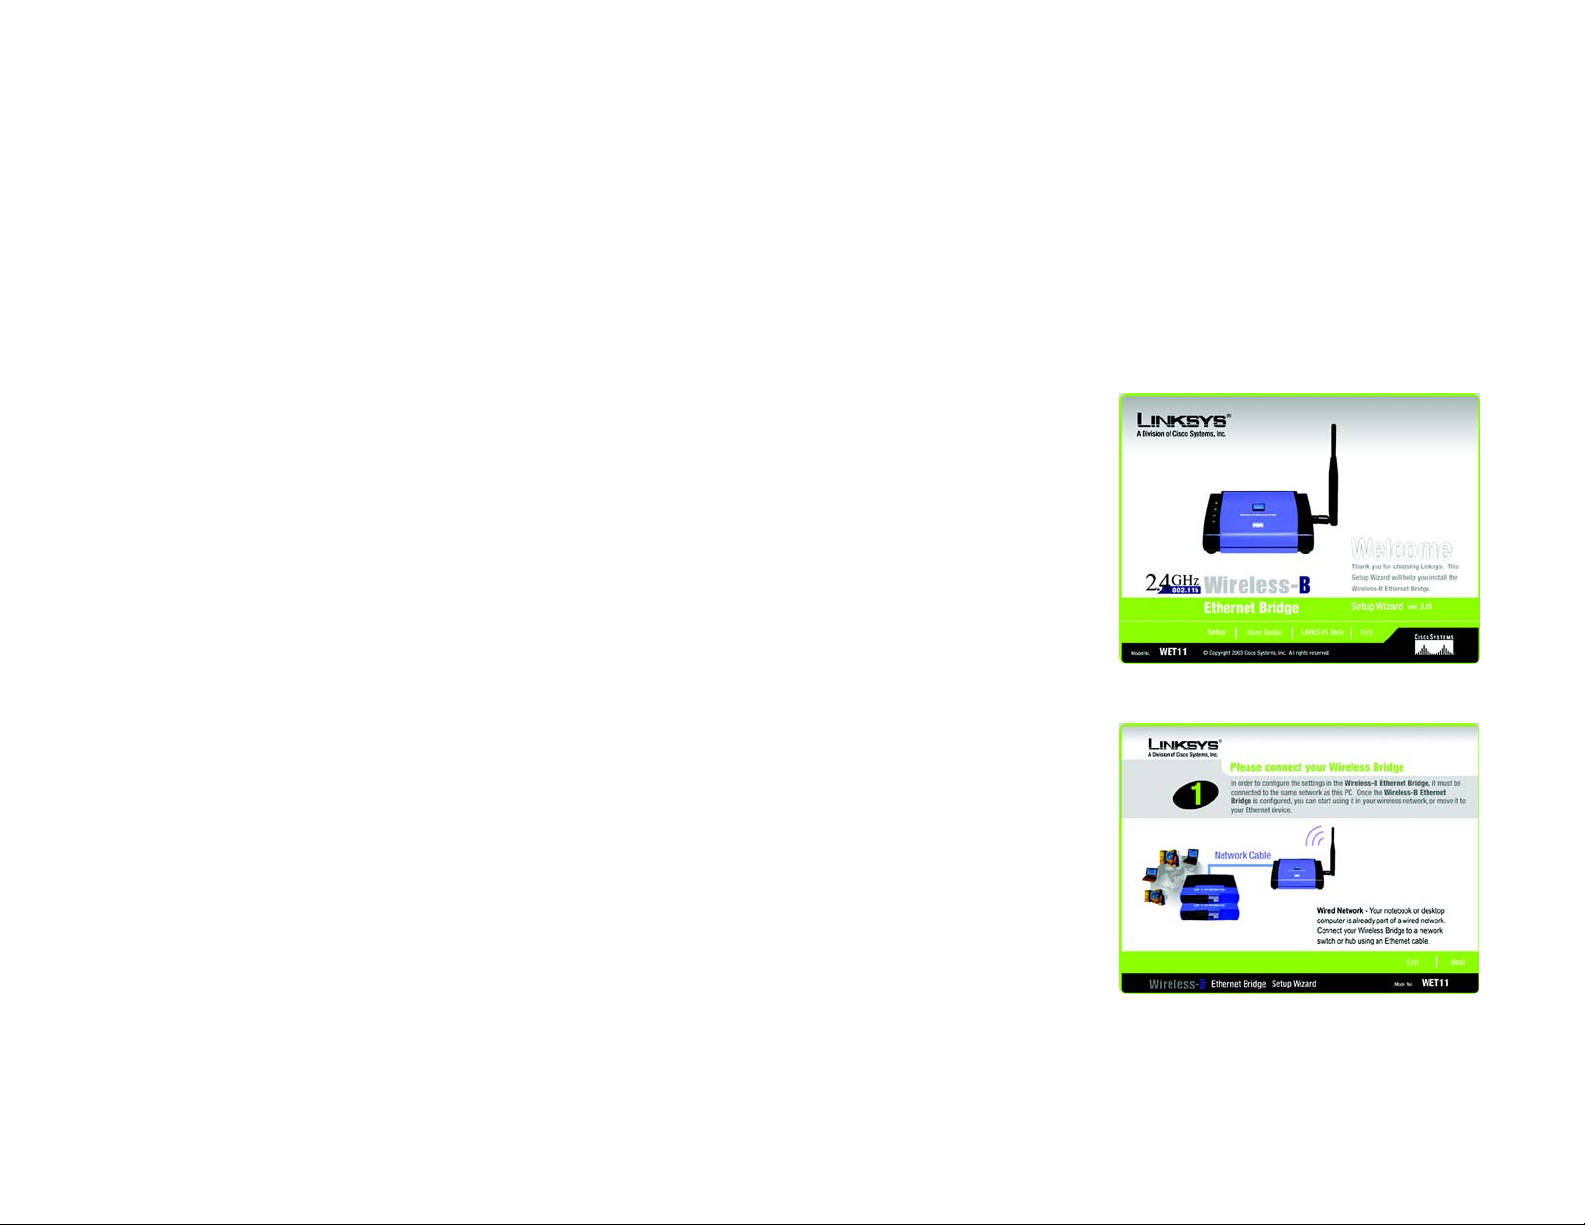
1. Insert the Setup CD-ROM into your PC’s CD-ROM drive. The Setup Utility should run automatically, and the
screen in Figure 5-1 should appear. If it does not, click the Start button and choose Run. In the field that
appears, enter D:\setup.exe (if “D” is the letter of your CD-ROM drive).
• Setup - Click the Setup button to proceed with the Setup Wizard.
• User Guide - Click the User Guide button to open the PDF file of this User Guide.
• LINKSYS Web - Click the LINKSYS Web button to access the Linksys website using an active Internet
connection.
• Exit - Click the Exit button to exit the Setup Wizard.
2. Click the Setup button to begin the setup process.
3. Make sure the Bridge is correctly connected to your wired network (see Figure 5-2). Then click the Next
button.
Chapter 5: Setting Up the Wireless-B Ethernet Bridge
Overview
Figure 5-1: Welcome
Figure 5-2: Check Connection
9
Wireless-B Ethernet Bridge
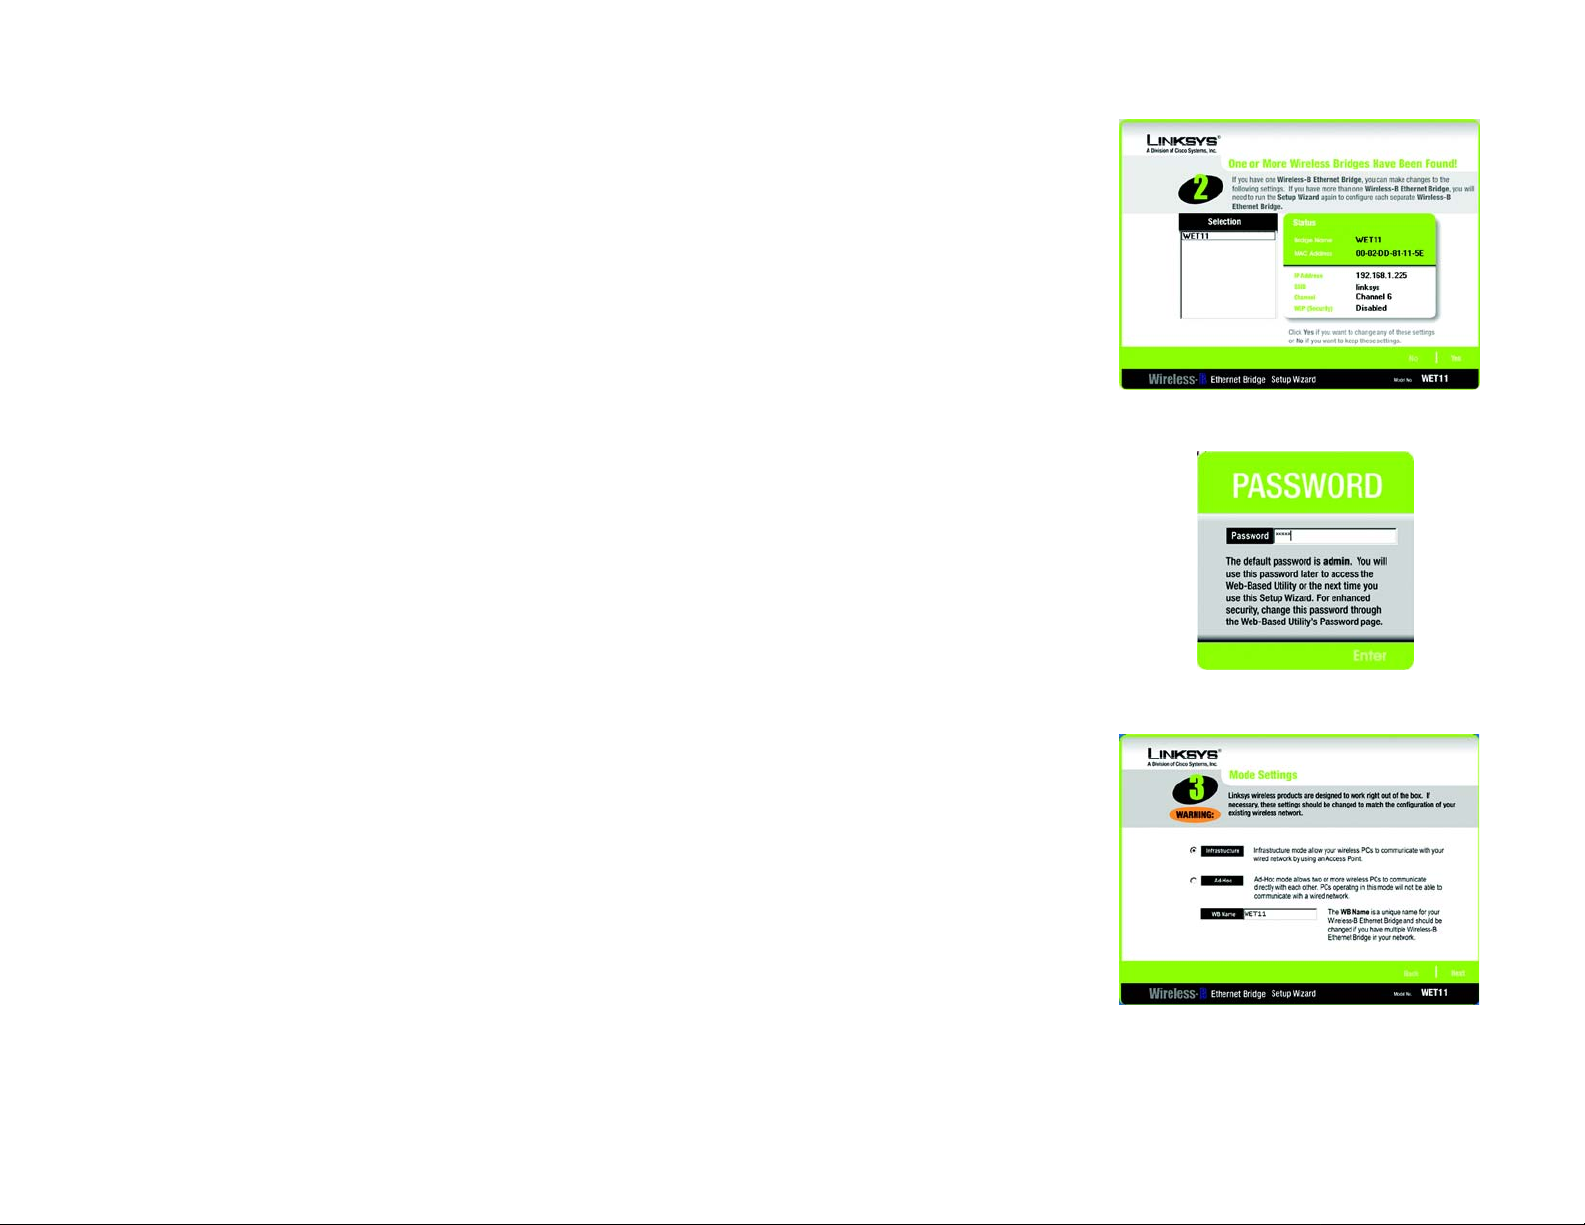
4. The screen shown in Figure 5-3 displays a list of Wireless-B Ethernet Bridges on your network, along with the
status information for each Bridge. (If you have only one Bridge on your network, it will be the only one
displayed.) Select the Bridge you are currently installing by clicking its name in the Selection box. Write down
the IP address of the Wireless-B Ethernet Bridge, so you can use it to access the Web-based Utility later. Then
click the Yes button.
5. For security purposes, you will be asked for your password in order to access the Bridge, as shown in Figure
5-4. In lowercase letters, enter admin in the Password field (later you can change the password through the
Web-based Utility). Then click the Enter button.
6. The screen shown in Figure 5-5 shows a choice of two wireless modes. Click the Infrastructure radio button
if you want your wireless computers to network with computers on your wired network using a wireless
access point. Click the Ad-Hoc radio button if you want multiple wireless computers to network directly with
each other. Do not use the Ad-Hoc mode if you want to network your wireless computers with computers on
your wired network.
In the WB Name field, enter a unique name for the Bridge. Memorable names are helpful, especially if you are
using multiple bridges on the same network. Click the Next button to continue or the Back button to return to
the previous screen.
Figure 5-3: List of Bridges
Chapter 5: Setting Up the Wireless-B Ethernet Bridge
Setup Wizard
Figure 5-4: Password
Figure 5-5: Mode Settings
10

Wireless-B Ethernet Bridge
7. The Wireless Settings screen, shown in Figure 5-6, will now appear. Enter your wireless network’s SSID. If
you chose Ad-Hoc mode, select the channel at which the network broadcasts its wireless signal. Then click
the Next button.
• SSID - The SSID is the unique name shared among all devices in a wireless network. The SSID must be
identical for all devices in the wireless network. It is case-sensitive and must not exceed 32 alphanumeric
characters, which can be any keyboard character.
• Channel - From the drop-down menu, select the appropriate channel to match your network’s channel setting
(available for Ad-Hoc mode only). All devices in your wireless network must use the same channel in order to
function correctly.
8. The IP Settings screen will appear next, shown in Figure 5-7. If your network has a router or DHCP server
automatically assigning IP addresses, click the radio button next to Automatically obtain an IP address
(DHCP). Click the Next button to continue or the Back button to return to the previous screen. Then proceed
to step 9.
If you need to set a static IP address on the Bridge, click the radio button next to Set IP configuration
manually to select this option. Enter an IP Address, IP Mask, and Gateway appropriate to your network. You
must specify an IP address on this screen. If you are unsure about the IP Mask and Gateway, it is better to
leave these two fields blank. Click the Next button to continue or the Back button to return to the previous
screen. Then proceed to step 9.
• IP Address - This IP address must be unique to your network.
• IP Mask - The Bridge’s IP Mask (also known as Subnet Mask) must be the same as your wired network’s
Subnet Mask.
• Gateway - Enter the IP address of your network’s Gateway (usually this is the router’s IP address).
9. The Security Settings screen, shown in Figure 5-8, appears next. Enable or disable Wired Equivalent Privacy
(WEP) encryption for your wireless network. If you enable WEP, select the level of WEP encryption, and then
enter a Passphrase. (If you want to enter a WEP key manually, then click the Next button.) If you want to
disable WEP encryption, keep the default, Disabled. Click the Next button to continue.
• WEP (Disabled/64-bit WEP/128-bit WEP) - In order to utilize WEP encryption, select 64-bit or 128-bit WEP
from the drop-down menu. Then enter a Passphrase. (If you want to enter a WEP key manually, then click the
Next button.) If you do not want to use WEP encryption, keep the default setting, Disabled.
Figure 5-6: Wireless Settings
Figure 5-7: IP Settings
• Passphrase - Instead of manually entering a WEP key, you can enter a Passphrase, so a WEP key will be
automatically generated after you click the Next button. The Passphrase is case-sensitive and should have 16
Chapter 5: Setting Up the Wireless-B Ethernet Bridge
Setup Wizard
Figure 5-8: Security Settings
11
 Loading...