

Page 1

A Division of Cisco Systems, Inc.
®
2
Model No.
4
,
Wireless
WET11-UK
GHz
802.11b
Package Contents
• Wireless-B Ethernet Bridge
• Quick Installation Guide
•Setup CD-ROM
• User’s Guide on CD
• Detachable Antenna
• Power Adapter
• Network Cable
Wireless-B
Ethernet Bridge
Quick Installation Guide
1
Page 2
Connecting the Wireless-B
1
Ethernet Bridge for Setup
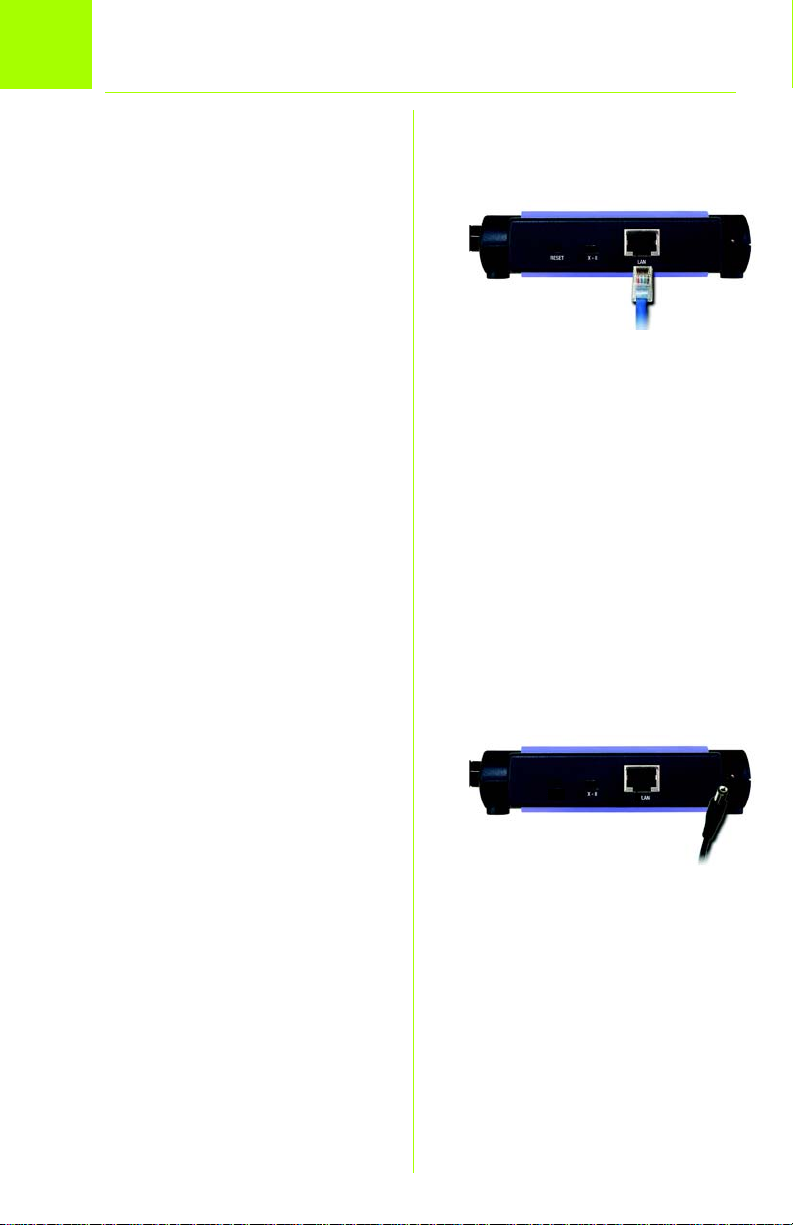
A Attach the Bridge’s antenna.
B Plug the included Ethernet
network cable into the LAN port
on the back panel of the
Bridge.
C The X-II (MDI/MDI-X) slide switch
offers a choice between two
settings. Slide the X-II switch to
the X position if you are
connecting the Bridge to a
PC’s network adapter. Slide the
X-II switch to the II position if
you are connecting the Bridge
to a hub or switch.
D Plug the other end of the
Ethernet network cable into the
RJ-45 port of the hub, switch,
or PC you wish to use to
configure the Bridge.
B
E Plug the supplied power
adapter into the Power port on
the back panel of the Bridge.
Then plug the other end into
an electrical outlet.
2
E
Page 3
Setting up the Wireless-B
2
Ethernet Bridge
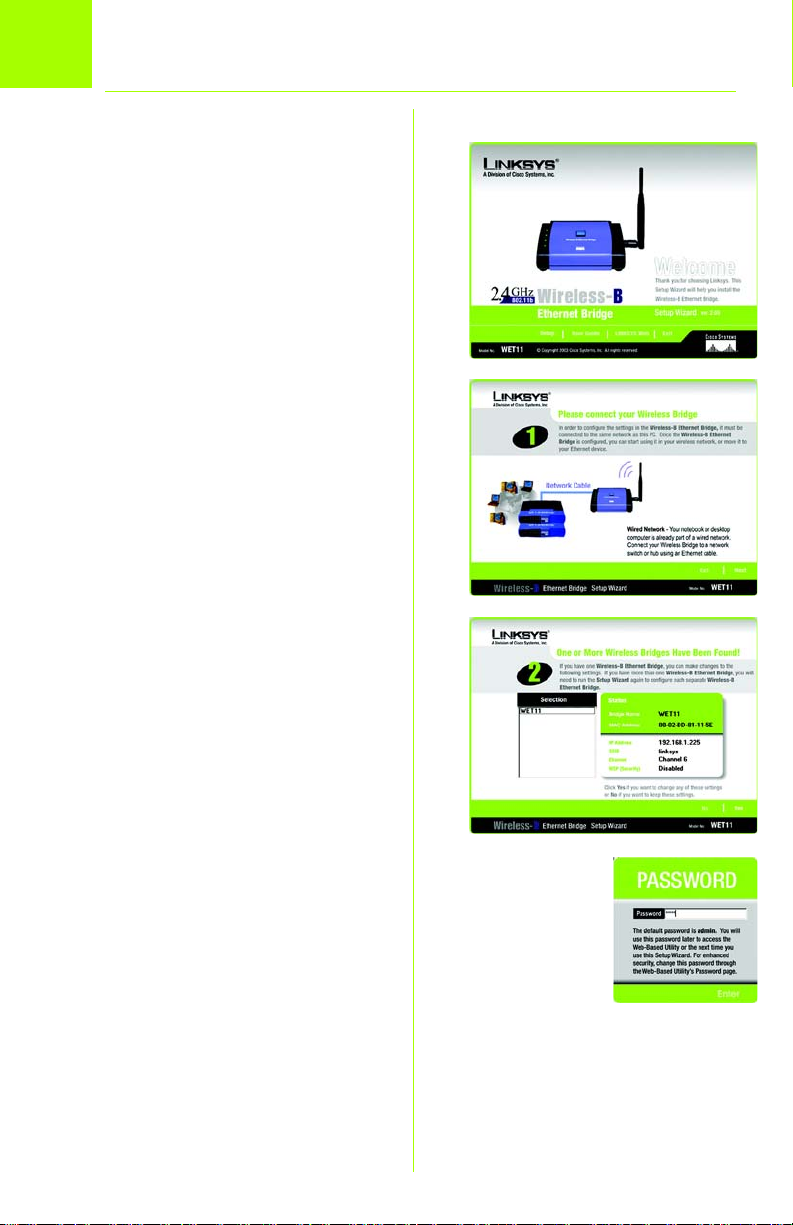
A Insert the Setup CD-ROM into
your PC’s CD-ROM drive. The
Setup Utility should run
automatically, and the
Welcome screen should
appear. If it does not appear,
click the Start button and
choose Run. In the field that
appears, enter D:\setup.exe (if
“D” is the letter of your CD-ROM
drive).
B Click Setup to begin the setup
process.
C Make sure the Bridge is
correctly connected to your
wired network. Click Next.
A
C
D The screen displays a list of
Wireless-B Ethernet Bridges on
your network, along with their
status information. Select the
Bridge you are currently
installing by clicking its name in
the Selection box. Click Yes.
E The Password screen will
appear. In lowercase letters,
enter admin in the Password
field. Then click Enter.
D
E
3
Page 4

On the Mode Settings screen,
F
click the Infrastructure radio
button if you want your wireless
and wired networks to
communicate using a wireless
access point. Click the Ad-Hoc
radio button if you want
wireless computers to
communicate directly with
each other.
In the WB Name field, enter a
unique name for the Bridge.
Click Next.
G On the Wireless Settings
screen, enter your wireless
network’s SSID. If you chose AdHoc mode, select the channel
at which the network
broadcasts its wireless signal.
Then click Next.
F
H The IP Settings screen will
appear. If your network has a
router or DHCP server that
automatically assigns IP
addresses, click the radio
button next to Automatically
obtain an IP address (DHCP).
Click Next and proceed to
step I.
If you need to assign a static IP
address to the Bridge, click the
radio button next to Set IP
configuration manually. Enter
an IP Address, IP Mask (also
known as Subnet Mask), and
4
G
H
NOTE: The default IP address of
the Bridge is 192.168.1.225.
Page 5

Gateway appropriate for your
network. You must specify an IP
address on this screen. If you
are unsure about the IP Mask
and Gateway, leave these two
fields blank. Click Next and
proceed to step I.
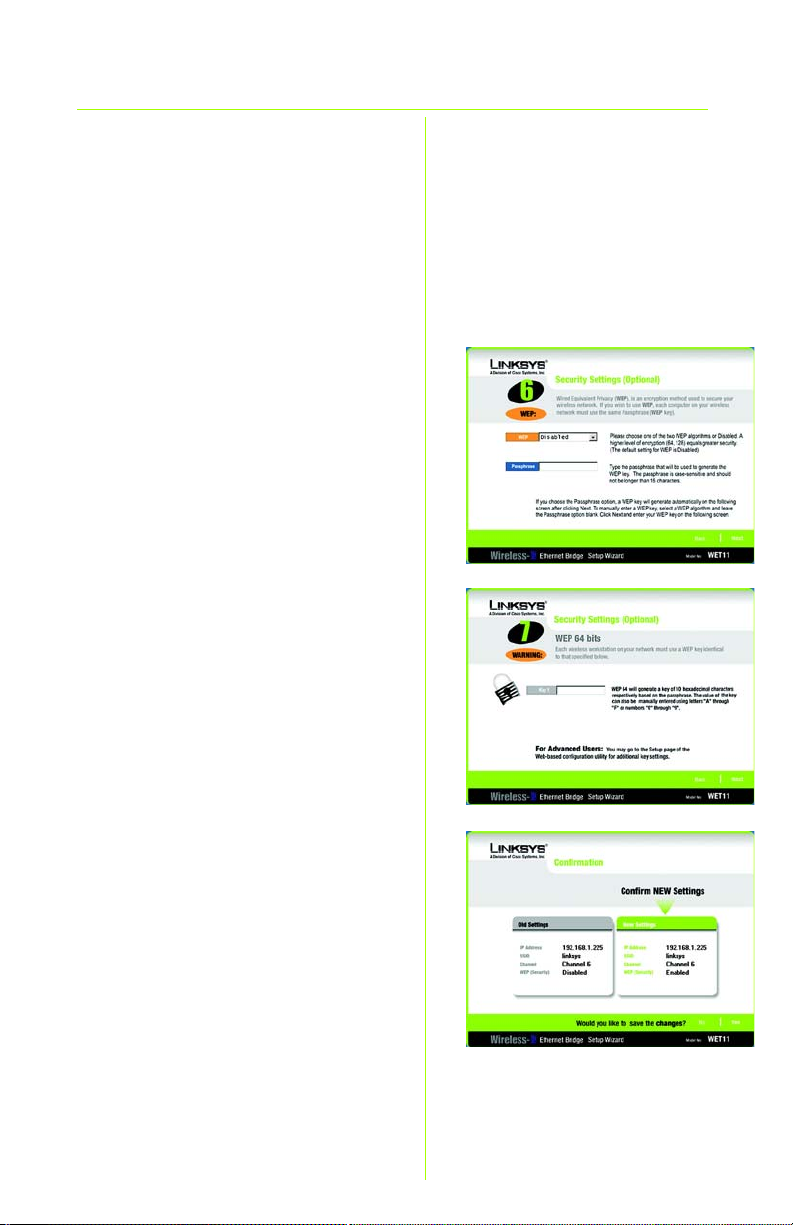
I The Security Settings screen will
appear. If your network has
WEP encryption enabled, then
select the level of WEP
encryption, and enter a
Passphrase. If you do not have
a Passphrase and want to
manually enter a WEP key,
leave the Passphrase field
blank. If your network has WEP
encryption disabled, keep the
default, Disabled.
Then click Next.
I
J If you entered a Passphrase,
you will see the automatically
generated WEP key. (See Figure
J.) Otherwise, manually enter
the WEP key in the Key 1 field.
Click Next.
K Review your settings on the
Confirmation screen. Write
down the Bridge’s IP Address if
you want to access the
Bridge’s Web-based Utility. Click
Yes to save these settings.
L On the Congratulations
screen, click Exit.
J
K
5
Page 6

Connecting the Wireless-B
3
Ethernet Bridge for Network Use
A After configuration, unplug the
power adapter from the
electrical outlet, and unplug
the Ethernet network cable
from the PC.
B Plug the Ethernet network
cable into the RJ-45 port on
the Ethernet-ready network
device you wish to add to the
wireless network.
C Plug the power adapter into a
local electrical outlet.
NOTE: If you do not have an active con-
nection to the Ethernet-ready network
device, then change the position of the
X-II switch.
Congratulations! The installation of
the Wireless-B Ethernet Bridge is
complete.
6
®
A Division of Cisco Systems, Inc.
For additional information or troubleshooting
help, refer to the User Guide on the Setup CDROM. You can also e-mail for further support.
E-mail Support
United Kingdom and Ireland
support.uk@linksys.com
Latin America
support.la@linksys.com
Website
http://www.linksys.com/international or
http://www.linksys.com/uk
Linksys is a registered trademark or trademark of
Cisco Systems, Inc. and/or its affiliates in the U.S.
and certain other countries. Copyright © 2003
Cisco Systems, Inc. All rights reserved.
WET11-UK_V2-QIG-31013NC JL
Page 7

A Division of Cisco Systems, Inc.
®
Modèle
GHz
4
2
,
802.11b
Sans fil
WUSB54G (IT)
Contenu de l'emballage
• Pont Ethernet sans fil B
• Guide d'installation rapide
• CD-ROM d'installation
• Guide de l'utilisateur sur CD (en anglais uniquement)
• Antenne amovible
• Adaptateur électrique
Câble réseau
Sans fil-B
Pont Ethernet
Guide d'installation rapide
1
Page 8

Connexion du
1
A
Pont Ethernet sans fil-B
Fixez l'antenne du pont.
B Reliez le câble réseau Ethernet
fourni au port LAN situé sur le
panneau arrière du pont.
C Le commutateur à glissière X-II
(MDI/MDI-X) propose deux
paramètres. Placez le
commutateur X-II en position X
si vous connectez le pont à la
carte réseau d'un ordinateur.
Placez le commutateur X-II en
position II si vous connectez le
pont à un concentrateur ou à
un commutateur.
D Branchez l'autre extrémité du
câble réseau Ethernet dans le
port RJ-45 du concentrateur,
du commutateur ou de
l'ordinateur que vous souhaitez
utiliser pour configurer le pont.
B
E Branchez l'adaptateur
électrique fourni sur le port
d'alimentation situé sur le
panneau arrière du pont.
Branchez ensuite l'autre
extrémité du câble à une prise
d'alimentation électrique.
2
E
Page 9

C
onfiguration du
2
Pont Ethernet sans fil B
A Insérez le CD-ROM
d'installation dans le lecteur
correspondant de votre
ordinateur. L'utilitaire de
configuration devrait démarrer
automatiquement et l'écran
Welcome (Bienvenue) devrait
apparaître S'il n'apparaît pas,
cliquez sur le bouton D
puis sur E
champ qui apparaît, entrez
D:\setup.exe («D» représentant
votre lecteur de CD-ROM).
Exécuter. Dans le
Démarrer,
B Cliquez sur SSetup (Installation)
pour commencer le processus
d'installation.
C Vérifiez que le pont est
correctement connecté à
votre réseau sans fil. Cliquez sur
Next (Suivant).
A
C
D L'écran affiche une liste de
ponts Ethernet sans fil B de
votre réseau ainsi que les
données relatives à leur statut.
Sélectionnez le pont que vous
êtes en train d'installer en
cliquant sur son nom dans la
boîte de Sélection. Cliquez sur
Yes (Oui).
E L'écran Password (Mot de
passe) apparaît. Saisissez
admin en minuscules dans le
champ Password (Mot de
passe). Cliquez ensuite sur
Enter (Entrée).
D
E
3
Page 10

Sur l'écran Mode Settings
F
(Paramètres du mode), cliquez
sur la case d'option
Infrastructure (Infrastructure) si
vous souhaitez que vos
réseaux sans fil et câblés
communiquent en utilisant un
point d'accès sans fil. Cliquez
sur la case d'option A
(Ad hoc) si vous souhaitez que
vos ordinateurs sans fil
communiquent directement
entre eux.
Dans le champ WB Name
(Nom WB), entrez un nom
unique pour le pont. Cliquez
Next (Suivant).
sur N
Ad-Hoc
G Sur l'écran Wireless Settings
(Paramètres sans fil), entrez le
nom SSID de votre réseau sans
fil. Si vous avez sélectionné AdHoc Mode (Mode Ad hoc),
sélectionnez le canal sur
lequel le réseau diffuse son
signal sans fil. Cliquez ensuite
Next (Suivant).
sur N
H L'écran IP Settings (Paramètres
IP) apparaît. Si votre réseau
intègre un routeur ou serveur
DHCP qui affecte
automatiquement une
adresse IP, cliquez sur la case
d'option Automatically obtain
an IP address (Obtenir une
adresse IP automatiquement
(DHCP)). Cliquez sur N
(Suivant) et passez à l'étape I.
Si vous devez attribuer une
adresse IP statique au pont,
cliquez sur la case d'option
située en regard de Set IP
configuration manually (Définir
une configuration IP
manuellement). Entrez une
adresse IP, un masque IP
Next
F
G
H
REMARQUE : L'adresse IP par défaut
du pont est 192.168.1.225.
4
Page 11
A (aussi appelé masque de sous-
réseau) et unepasserelle
appropriés à votre réseau. Dans
cet écran, vous devez entrer
une adresse IP. Si vous n'êtes
pas certain du masque IP et de
la passerelle, laissez ces deux
champs vides. Cliquez sur N
(Suivant) et passez à l'étape I.
Next
B L'écran Security Settings
(Paramètres de sécurité)
apparaît. Si le cryptage WEP est
activé sur votre réseau,
sélectionnez le niveau de
cryptage WEP et entrez une
phrase mot de passe. Si vous
n'avez pas de phrase mot de
passe et souhaitez entrer une
clé WEP manuellement, laissez
le champ Passphrase (Phrase
mot de passe) vide. Si le
cryptage WEP est désactivé sur
votre réseau, conservez le
paramètre par défaut, D
(Désactivé).
Disabled
I
Cliquez ensuite sur N
(Suivant).
Next
C Si vous avez entré une phrase
mot de passe, la clé WEP est
générée automatiquement.
(Voir figure J). Dans le cas
contraire, entrez la clé WEP
manuellement dans le champ
Key 1 (Clé 1). Cliquez sur N
(Suivant).
Next
D Vérifiez les paramètres que
vous avez définis sur l'écran de
Confirmation. Notez l'adresse IP
du pont si vous souhaitez
accéder à l'utilitaire Web du
pont. Cliquez sur Y
enregistrer ces paramètres.
Yes (Oui) pour
E Dans l'écran Congratulations
(Félicitations), cliquez sur E
(Quitter).
5
Exit
J
K
Page 12

Connexion du point d'accès sans fil B
3
Pont Ethernet pour utilisation en réseau
A Une fois la configuration
terminée, débranchez
l'adaptateur électrique et le
câble réseau Ethernet de
l'ordinateur.
B Branchez le câble réseau
Ethernet dans le port RJ-45 aux
périphériques réseau
compatibles que vous
souhaitez ajouter au réseau
sans fil.
C Branchez l'adaptateur
d'alimentation à une prise
électrique.
REMARQUE : Si vous n'avez pas de
connexion active aux périphériques réseau
compatibles Ethernet, changez la position
du commutateur X-II.
®
Félicitations! L'installation du pont
Ethernet sans fil B est terminée.
6
A Division of Cisco Systems, Inc.
Pour obtenir de plus amples informations ou
une assistance technique, reportez-vous au
Guide de l'utilisateur figurant sur le CD-ROM
d'installation. Pour plus d'informations, vous
pouvez également nous envoyer un e-mail ou
vous reporter à l'encart Support technique.
Consultez notre site Web pour des informations de vente ou de contact mises à jour.
E-mail du support technique
support.fr@linksys.com
Site Web
http://www.linksys.com/international
ouhttp://www.linksys.com/fr
Linksys est une marque déposée ou une marque
commerciale de Cisco Systems, Inc. et/ou se
filiales aux États-Unis et dans certains autres
pays. Copyright © 2003 Cisco Systems, Inc. Tous
droits réservés.
WET11-FR_V2-QI-31031NC KL
Page 13

A Division of Cisco Systems, Inc.
®
2
Modell
,
4
GHz
802.11b
Wireless
WET11 (DE)
Lieferumfang
• Wireless-B Ethernet Bridge
• Kurzanleitung
• Installations-CD-ROM
• Benutzerhandbuch auf CD (nur Englisch)
• Abnehmbare Antenne
• Netzstromadapter
• Netzwerkkabel
Wireless-B
Ethernet Bridge
Kurzanleitung
1
Page 14

A
nschließen der Wireless-B
1
A Schließen Sie die Antenne der
B Schließen Sie das im
C Mit dem Schiebeschalter X-II
Ethernet Bridge für die Installation
Bridge an.
Lieferumfang enthaltene
Ethernet-Netzwerkkabel an den
LAN-Port auf der Rückseite der
Bridge an.
(MDI/MDI-X) können zwei
verschiedene Einstellungen
gewählt werden. Schieben Sie
den Schalter X-II auf die
Position X, wenn Sie die Bridge
an einen PC-Netzwerkadapter
anschließen möchten.
Schieben Sie den Schalter X-II
auf die Position II, wenn Sie die
Bridge an einen Hub oder
Switch anschließen möchten.
B
D Schließen Sie das andere
Ende des EthernetNetzwerkkabels an den RJ-45Port des Hubs, Switches oder
PCs an, den Sie zum
Konfigurieren der Bridge
verwenden möchten.
E Schließen Sie den im
Lieferumfang enthaltenen
Netzstromadapter an den
Stromanschluss auf der
Rückseite der Bridge an.
Stecken Sie anschließend das
andere Ende in eine
Steckdose.
2
E
Page 15

Einrichten der Wireless-B
2
A Legen Sie die Installations-CD-
B Klicken Sie auf SSetup
C Vergewissern Sie sich, dass die
Ethernet Bridge
ROM in das CD-ROM-Laufwerk
Ihres PCs ein. Das SetupDienstprogramm sollte
automatisch gestartet und das
Willkommensfenster angezeigt
werden. Wenn dies nicht der
Fall ist, klicken Sie auf die
Schaltfläche S
Ausführen aus. Geben Sie
Sie A
im darauffolgend angezeigten
D:\setup.exe ein (wobei
Feld D
„D“ für den Buchstaben Ihres
CD-ROM-Laufwerks steht).
(Einrichten), um den
Installationsvorgang zu starten.
Bridge korrekt an Ihr
verdrahtetes Netzwerk
angeschlossen ist. Klicken Sie
Next (Weiter).
auf N
Start und wählen
A
C
D Im Fenster wird eine Liste mit
den im Netzwerk verfügbaren
Wireless-B Ethernet Bridges
sowie deren Status angezeigt.
Wählen Sie die zu installierende
Bridge aus, indem Sie im Feld
Selection (Auswahl) auf den
entsprechenden Namen
klicken. Klicken Sie auf Y
Yes (Ja).
E Das Fenster Password
(Kennwort) wird angezeigt.
Geben Sie im Feld Password
(Kennwort) das Kennwort
admin in Kleinschreibung ein.
Klicken Sie anschließend auf
Enter (Eingabe).
D
E
3
Page 16

Klicken Sie im Fenster Mode
A
Settings (Moduseinstellungen) auf
die Optionsschaltfläche
Infrastructure (Infrastruktur), wenn
Ihre drahtlosen und verdrahteten
Netzwerke über einen drahtlosen
Zugriffspunkt miteinander
kommunizieren sollen. Klicken Sie
auf die Optionsschaltfläche A
Hoc (Ad-Hoc), wenn mehrere
drahtlose Computer direkt
miteinander kommunizieren sollen.
Geben Sie im Feld WBName (WBName) einen eindeutigen Namen
für die Bridge ein. Klicken Sie auf
Next (Weiter).
Ad-
B Geben Sie im Fenster Wireless
Settings (Wireless-Einstellungen) die
SSID Ihres drahtlosen Netzwerks ein.
Wenn Sie den Ad-Hoc-Modus
gewählt haben, wählen Sie den
Kanal aus, über den das drahtlose
Netzwerksignal gesendet wird.
Klicken Sie anschließend auf N
(Weiter).
C Das Fenster IP Settings (IP-
Einstellungen) wird angezeigt. Wenn
Ihr Netzwerk über einen Router oder
einen DHCP-Server verfügt, der
automatisch IP-Adressen zuweist,
klicken Sie auf die
Optionsschaltfläche neben
Automatically obtain an IP address
(DHCP) (IP-Adresse (DHCP)
automatisch beziehen). Klicken Sie
auf N
Next (Weiter), und fahren Sie mit
Schritt I fort.
F
Next
G
Wenn Sie der Bridge eine statische
IP-Adresse zuweisen müssen,
klicken Sie auf die
Optionsschaltfläche neben Set IP
configuration manually (IPKonfiguration manuell einrichten).
Geben Sie eine IP-Adresse, IPMaske (auch als Subnetzmaske
4
H
HINWEIS: Die Standard-IP-Adresse
der Bridge lautet
192.168.1.225.
Page 17

bezeichnet) und das Ihrem
Netzwerk entsprechende Gateway
ein. Sie müssen in diesem Fenster
eine IP-Adresse eingeben. Wenn
Sie sich über die IP-Maske und das
Gateway nicht sicher sind, lassen
Sie diese beiden Felder leer.
Klicken Sie auf N
fahren Sie mit Schritt I fort.
Das Fenster Security Settings
(Sicherheitseinstellungen) wird
angezeigt. Wenn Sie für Ihr
Netzwerk die WEP-Verschlüsselung
aktiviert haben, wählen Sie die
WEP-Verschlüsselungsebene aus
und geben sie die Passphrase ein.
Falls Sie über keine Passphrase
verfügen und manuell einen WEPSchlüssel eingeben möchten,
lassen Sie das Feld Passphrase
(Passphrase) leer. Wenn die WEPVerschlüsselung für Ihr Netzwerk
deaktiviert ist, behalten Sie die
Standardeinstellung D
(Deaktiviert) bei.
Next (Weiter), und
Disabled
I
Klicken Sie anschließend auf N
(Weiter).
Wenn Sie eine Passphrase
eingegeben haben, wird der
automatisch erstellte WEP-Schlüssel
angezeigt (siehe Abbildung J).
Andernfalls geben Sie den WEPSchlüssel manuell in das Feld Key 1
(Schlüssel 1) ein. Klicken Sie auf
Next (Weiter).
Überprüfen Sie die Einstellungen
im Fenster Confirmation
(Bestätigung). Notieren Sie sich die
IP-Adresse der Bridge, wenn Sie auf
das webbasierte Dienstprogramm
derselben zugreifen möchten.
Klicken Sie auf Y
Einstellungen zu speichern.
Klicken Sie im Fenster
Congratulations (Herzlichen
Glückwunsch) auf E
Yes (Ja), um diese
Exit (Beenden).
Next
J
K
5
Page 18

A
nschließen der Wireless-B Ethernet
3
A Ziehen Sie nach der
B Schließen Sie das Ethernet-
C Stecken Sie den
HINWEIS: Wenn noch keine aktive
Verbindung zu dem für das Ethernet
vorbereiteten Netzwerkgerät besteht,
ändern Sie die Position des Schalters X-II.
Installation der Wireless-B Ethernet
Bridge ist hiermit abgeschlossen.
Bridge für die Verwendung im Netzwerk
Konfiguration den
Netzstromadapter aus der
Steckdose, und trennen Sie das
Ethernet-Netzwerkkabel vom PC.
Netzwerkkabel an den RJ-45-Port
des Ethernet-Netzwerkgeräts an,
das Sie zum drahtlosen Netzwerk
hinzufügen möchten.
Netzstromadapter in eine
Steckdose am Aufstellort.
Herzlichen Glückwunsch! Die
®
A Division of Cisco Systems, Inc.
Weitere Informationen sowie Anleitungen zur
Fehlerbehebung finden Sie im
Benutzerhandbuch auf der InstallationsCD-ROM. Sie können auch per E-Mail weitere
Unterstützung anfordern oder finden weitere
Informationen in der Technischen SupportBeilage. Wenn Sie Informationen zum Verkauf
oder aktualisierte Kontaktinformationen
benötigen, besuchen Sie unsere Website.
Unterstützung per E-Mail
support.de@linksys.com
Website
http://www.linksys.com/international
oder http://www.linksys.com/de
Linksys ist eine eingetragene Marke bzw. eine
Marke von Cisco Systems, Inc. und/oder deren
Zweigunternehmen in den USA und anderen
Ländern. Copyright © 2003 Cisco Systems, Inc.
Alle Rechte vorbehalten.
WET11-DE_V2-QI-31101NC KL
6
Page 19

A Division of Cisco Systems, Inc.
®
2
,
N. modello
4
Wireless
GHz
802.11b
WET11-IT
Contenuto della confezione
• Ponte Ethernet Wireless-B
• Guida di installazione rapida
• Setup CD-ROM (CD per l'installazione guidata)
• User Guide (Guida per l'utente) su CD
• Antenna staccabile
• Adattatore di corrente
• Cavo di rete
Wireless-B
Ponte Ethernet
Guida di installazione rapida
1
Page 20

1
Wireless-B per l'installazione
A Collegare l'antenna del ponte.
B Collegare il cavo di rete
Ethernet, fornito in dotazione,
alla porta LAN situata sul
pannello posteriore del ponte.
C Lo switch X-II (MDI/MDI-X)
consente di scegliere fra due
impostazioni. Spostare lo
switch X-II nella posizione X se
si collega il ponte alla scheda
di rete di un PC. Spostare lo
switch X-II nella posizione II se si
collega il ponte a un hub o a
uno switch.
D Collegare l'altra estremità del
cavo di rete Ethernet alla porta
RJ-45 dell'hub, dello switch o
del PC da usare per
configurare il ponte.
E Inserire l'adattatore di corrente
fornito nella porta di
alimentazione sul pannello
posteriore del ponte e l'altra
estremità in una presa di
corrente.
B
E
2
Page 21

Installazione del Ponte
2
A Inserire il Setup CD-ROM (CD
B Fare clic su SSetup (Installa) per
C Assicurarsi che il ponte sia
Ethernet Wireless-B
per l'installazione) nell'apposita
unità del computer.
L'installazione guidata
dovrebbe avviarsi
automaticamente
visualizzando la schermata
Welcome (Benvenuti). In caso
contrario, fare clic sul pulsante
Start e scegliere E
Immettere D
"D" è la lettera dell'unità
CD-ROM) nel campo
visualizzato.
avviare l'installazione.
correttamente collegato alla
rete cablata. Fare clic su Next
(Avanti).
Esegui.
D:\setup.exe (dove
A
C
D La schermata mostra un
elenco dei ponti Ethernet
Wireless-B presenti nella rete e
le informazioni relative al loro
stato. Selezionare il ponte da
installare facendo clic sul
nome corrispondente nella
casella Selection (Selezione).
Fare clic su Y
Yes (Sì).
E Viene visualizzata la
schermata Password.
Immettere a
minuscole nel campo
Password, quindi premere
Invio.
admin in lettere
D
E
3
Page 22

Nella schermata Mode Settings
A
(Impostazioni modalità), fare
clic sul pulsante di opzione
Infrastructure (Infrastruttura) per
consentire la comunicazione
tra le reti cablate e wireless
tramite un punto di accesso
wireless. Fare clic sul pulsante di
opzione A
collegare direttamente più
computer wireless.
Nel campo WBName (Nome
ponte wireless), immettere un
nome univoco per il ponte.
Fare clic su Next (
Ad-Hoc (Ad hoc) per
(Avanti).
B Nella schermata Wireless
Settings (Impostazioni wireless),
immettere l'SSID della rete
wireless. Se è stata scelta la
modalità Ad-Hoc (Ad hoc),
selezionare il canale tramite il
quale la rete trasmette il
segnale wireless. Quindi, fare
clic su Next (
(Avanti).
C Viene visualizzata la schermata
IP Settings (Impostazioni IP). Se
la rete dispone di un router o un
server DHCP che assegna
automaticamente indirizzi IP,
selezionare il pulsante di
opzione accanto a
Automatically obtain an IP
address (DHCP) (Ottieni
automaticamente un indirizzo
IP - DHCP). Fare clic su N
(Avanti) e passare alla fase I.
Next
F
G
Se è necessario assegnare un
indirizzo IP statico al ponte, fare
clic sul pulsante di opzione
accanto a Set IPconfiguration
manually (Configura IP
manualmente). Immettere un
indirizzo IP, una maschera IP (o
di sottorete) e un gateway
adatti alla rete. È necessario
4
H
NOTA: L'indirizzo IPpredefinito del
ponte è 192.168.1.225.
Page 23

A immettere un indirizzo IP in
questa schermata. Se non si
conoscono la maschera IP e il
gateway, lasciare vuoti questi
due campi. Fare clic su Next
(Avanti) e passare alla fase I.
B Viene visualizzata la schermata
Security Settings (Impostazioni
protezione). Se sulla rete è
attivata la cifratura WEP,
selezionarne il livello ed
immettere una Passphrase. Se
non si dispone di una
Passphrase e si desidera
immettere la chiave WEP
manualmente, lasciare vuoto il
campo Passphrase. Se sulla rete
non è attivata la cifratura WEP,
mantenere l'impostazione
predefinita D
(Disabilitata).
Disabled
I
Quindi, fare clic su Next (
(Avanti).
C Se è stata immessa una
passphrase, viene visualizzata la
chiave WEP generata
automaticamente (vedere la
Figura J). In caso contrario,
immettere la chiave WEP
manualmente nel campo Key 1
(Chiave 1). Fare clic su Next
(Avanti).
D Rivedere le impostazioni nella
schermata Confirmation
(Verifica). Prendere nota
dell'indirizzo IP del ponte se si
desidera accedere all'utilità
basata sul Web del ponte. Fare
clic su Y
impostazioni.
Yes (Sì) per salvare le
E Nella schermata
Congratulations
(Congratulazioni), fare clic su E
(Esci).
J
K
Exit
5
Page 24

Collegamento del Ponte Ethernet
3
A Terminata la configurazione,
B Inserire il cavo di rete Ethernet
C Collegare l'adattatore di
NOTA: se non si dispone di una
connessione attiva alla periferica di rete
Ethernet, cambiare la posizione dello
switch X-II.
Wireless-B per l'uso in rete
scollegare l'adattatore di
corrente dalla presa elettrica e
il cavo di rete Ethernet dal PC.
nella porta RJ-45 della
periferica Ethernet che si
desidera aggiungere alla rete
wireless.
corrente a una presa elettrica.
Congratulazioni. L'installazione del
ponte Ethernet Wireless-B
è completata.
6
®
Una divisione di Cisco Systems, Inc.
Per ulteriori informazioni o istruzioni relative
alla risoluzione dei problemi, consultare la
User Guide (Guida per l'utente) nel Setup
CD-ROM (CD per l'installazione guidata). Per
maggiore assistenza, è possibile anche
inviare un messaggio di posta elettronica o
consultare il Supplemento per l'assistenza
tecnica. Per informazioni aggiornate sulle
vendite e sui contatti, visitare il sito Web.
Supporto e-mail
support.it@linksys.com
Sito Web
http://www.linksys.com/international
Linksys è un marchio registrato o un marchio di
Cisco Systems, Inc. e/o dei relativi affiliati negli
Stati Uniti e in altri paesi. Copyright © 2003 Cisco
Systems, Inc. Tutti i diritti riservati.
WET11-IT_V2-QI-31017NC BW
Page 25

A Division of Cisco Systems, Inc.
®
2
Modelo
4
,
Wireless
GHz
802.11b
WET11 (PT)
Conteúdo da embalagem
• Ponte Ethernet sem fios B
• Manual de Instalação Rápida
• CD-ROM de configuração
• Manual do Utilizador em CD
• Antena amovível
• Transformador
• Cabo de rede
Sem fios-B
Ponte Ethernet
Instalação rápida
1
Page 26

Ligar a Ponte Ethernet sem fios B
1
para configuração
A Ligue a antena da Ponte.
B Ligue o cabo de rede Ethernet
incluído à porta de rede local
no painel posterior da Ponte.
C O comutador X-II (MDI/MDI-X)
disponibiliza a opção entre
duas configurações. Coloque
o comutador X-II na posição X
se estiver a ligar a Ponte à
placa de rede de um
computador. Coloque o
comutador X-II na posição II se
estiver a ligar a Ponte a um
concentrador ou comutador.
D Ligue a outra extremidade do
cabo de rede Ethernet à porta
RJ-45 do concentrador,
comutador ou computador
que pretende utilizar para
configurar a Ponte.
B
E Ligue o cabo de alimentação
fornecido à porta de
alimentação no painel
posterior da Ponte. Em
seguida, ligue a outra
extremidade a uma tomada.
2
E
Page 27

Configurar a Ponte Ethernet
2
sem fios B
A Coloque o CD-ROM de
configuração na unidade de
CD-ROM do computador. O
Utilitário de configuração
deverá ser executado
automaticamente e deverá
ser apresentado o ecrã
Welcome (Bem-vindo). Se tal
não acontecer, clique no
botão Iniciar e escolha
Executar. No campo
apresentado, introduza
D:\setup.exe (se “D”
corresponder à letra da
unidade de CD-ROM).
B Clique em Setup (Configurar)
para iniciar o processo de
configuração.
C Certifique-se de que a Ponte
está correctamente ligada à
rede com fios. Clique em Next
(Seguinte).
A
C
D O ecrã apresenta uma lista de
Pontes Ethernet sem fios B na
rede, juntamente com as
informações sobre os
respectivos estados.
Seleccione a Ponte que está
actualmente a instalar
clicando no respectivo nome
na caixa Selection (Selecção).
Clique em Yes (Sim).
E Será apresentado o ecrã
Password (Palavra-passe).
Introduza admin em
minúsculas no campo
Password (Palavra-passe). Em
seguida, clique em Enter.
D
E
3
Page 28

No ecrã Mode Settings
F
(Definições de modos), clique no
botão de opção Infrastructure
(Infra-estrutura) se pretender que
as redes com e sem fios
comuniquem utilizando um
ponto de acesso sem fios. Clique
no botão de opção Ad-Hoc se
pretender que os computadores
sem fios comuniquem
directamente uns com os outros.
No campo WB Name (Nome da
ponte sem fios), introduza um
nome exclusivo para a Ponte.
Clique em Next (Seguinte).
G No ecrã Wireless Settings
(Definições da rede sem fios),
introduza o SSID da rede sem fios.
Se escolher o modo Ad hoc,
seleccione o canal no qual será
emitido o sinal da rede sem fios.
Em seguida, clique em Next
(Seguinte).
H Será apresentado o ecrã IP
Settings (Definições IP). Se a rede
tiver um router ou servidor DHCP
que atribua endereços IP
automaticamente, clique no
botão de opção junto a
Automatically obtain an IP
address (DHCP) (Obter
automaticamente um endereço
IP (DHCP)). Clique em Next
(Seguinte) e avance para o
passo I.
Se necessitar de atribuir um
endereço IP estático à Ponte,
clique no botão de opção junto
a Set IP configuration manually
(Definir manualmente a
configuração IP). Introduza um
Endereço IP, uma Máscara IP
(também denominada Máscara
F
G
H
NOTA: O endereço IP predefinido
da Ponte é 192.168.1.225.
4
Page 29

de sub-rede) e um Gateway
adequados para a rede. Tem de
especificar um endereço IP
neste ecrã. Se não tiver a certeza
da Máscara IP e Gateway que
deve utilizar, deixe estes dois
campos em branco. Clique em
Next (Seguinte) e avance para o
passo I.
I Será apresentado o ecrã
Security Settings (Definições de
segurança). Se a rede tiver a
encriptação WEP activada,
seleccione o nível de
encriptação e, em seguida,
introduza uma Frase-passe. Se
não tiver uma Frase-passe e
pretender introduzir uma chave
WEP manualmente, deixe o
campo Passphrase (Frase-passe)
em branco. Se a rede tiver a
encriptação WEP desactivada,
mantenha a predefinição,
Disabled (Desactivada).
Em seguida, clique em Next
(Seguinte).
I
J Se introduziu uma frase-passe,
será apresentada a chave WEP
gerada automaticamente.
(Consulte a Figura J). Caso
contrário, introduza a chave WEP
manualmente no campo Key 1
(Chave 1). Clique em Next
(Seguinte).
K Reveja as definições no ecrã
Confirmation (Confirmação).
Escreva o Endereço IP da ponte
se pretender aceder ao Utilitário
baseado na Web da ponte.
Clique em Yes (Sim) para
guardar estas definições.
L No ecrã Congratulations
(Parabéns), clique em Exit (Sair).
J
K
5
Page 30

Ligar a Ponte Ethernet sem fios B
3
para utilização de rede
A Depois da configuração,
desligue o transformador da
tomada e o cabo de rede
Ethernet do computador.
B Ligue o cabo de rede Ethernet
à porta RJ-45 no dispositivo de
rede preparado para Ethernet
que pretende adicionar à
rede sem fios.
C Ligue o transformador a uma
tomada.
NOTA: Se não tem uma ligação activa ao
dispositivo de rede preparado para
Ethernet, altere a posição do comutador
X-II.
Parabéns! O processo de insta-
lação da Ponte Ethernet sem fios B
está concluído.
®
Uma divisão da Cisco Systems, Inc.
Para obter informações adicionais ou ajuda
para resolução de problemas, consulte o
Manual do Utilizador no CD-ROM de
configuração. Também poderá enviar uma
mensagem de correio electrónico ou
consultar a Folha de suporte técnico para
obter mais informações de suporte. Visite o
nosso Web site para obter informações de
vendas ou contacto actualizadas.
Endereço de correio electrónico para
suporte
Brasil e Portugal
support.pt@linksys.com
América Latina
support.la@linksys.com
Web site
http://www.linksys.com/international
Linksys é uma marca registada ou marca
comercial da Cisco Systems, Inc. e/ou das
respectivas filiais nos E.U.A. e noutros países.
Copyright © 2003 Cisco Systems, Inc. Todos os
direitos reservados..
WET11-PT_V2-QIG-31013NC JL
6
Page 31

A Division of Cisco Systems, Inc.
®
2
Modelo
4
,
Wireless
GHz
802.11b
WET11 (ES)
Contenido del paquete
• Puente Ethernet Wireless-B
• Guía de instalación rápida
• CD-ROM de configuración
• Guía del usuario en el CD
• Antena desmontable
• Adaptador de corriente
•Cable de red
Wireless-B
Puente Ethernet
Guía de instalación rápida
1
Page 32

Conecte el puente Ethernet
1
Wireless-B para configuración
A Conecte la antena del
puente.
B Conecte el cable de red
Ethernet que se incluye en el
puerto LAN de la parte
posterior del puente.
C El conmutador deslizante X-II
(MDI/MDI-X) permite
seleccionar entre dos
parámetros. Inserte el
conmutador X-II en la posición
X si va a conectar el puente a
un adaptador de red del PC.
Inserte el conmutador X-II en la
posición II si va a conectar el
puente a un concentrador o a
un conmutador.
D Conecte el otro extremo del
cable de red Ethernet en el
puerto RJ-45 del
concentrador, conmutador u
ordenador que desee utilizar
para configurar el puente.
B
E Conecte el adaptador de
corriente proporcionado al
puerto de alimentación de la
parte posterior del puente. A
continuación, enchufe el otro
extremo en una toma de
corriente.
2
E
Page 33

Configure el puente
2
Ethernet Wireless-B
A Inserte el CD-ROM de
configuración en la unidad de
CD-ROM del ordenador. La
utilidad de configuración se
debe ejecutar de forma
automática y debe aparecer
la pantalla Welcome (pantalla
de bienvenida). Si no es así,
haga clic en el botón Inicio y
seleccione Ejecutar. En el
campo que aparece, escriba
D:\setup.exe (donde “D” es la
letra de la unidad de
CD-ROM).
B Haga clic en Setup
(Configurar) para comenzar el
proceso de configuración.
C Asegúrese de que el puente
está conectado
correctamente a la red con
cables. Haga clic en Next
(Siguiente).
A
C
D La pantalla muestra una lista
de puentes Ethernet Wireless-B
de la red e información sobre
sus estados. Seleccione el
puente que va a instalar. Para
ello, haga clic en el cuadro
Selection (Selección). Haga
clic en Yes (Sí).
E Aparece la pantalla Password
(Contraseña). En el campo
Password (Contraseña) escriba
admin en minúsculas. A
continuación, haga clic en
Enter (Entrar).
D
E
3
Page 34

En la pantalla Mode Settings
F
(Configuración de modo), haga
clic en el botón de radio
Infrastructure (Infraestructura)
si desea que las redes
inalámbrica y con cables se
comuniquen mediante un
punto de acceso inalámbrico.
Haga clic en el botón de radio
Ad-Hoc (Modo ad-hoc) si
desea comunicar varios
ordenadores inalámbricos
directamente entre sí.
En el campo WBName
(Nombre de puente
inalámbrico), introduzca un
nombre único para el puente.
Haga clic en Next (Siguiente).
G En la pantalla Wireless Settings
(Configuración inalámbrica),
introduzca el SSID de la red
inalámbrica. Si ha seleccionado
el modo Ad-Hoc, seleccione el
canal en el que la red emite su
señal inalámbrica. Haga clic en
Next (Siguiente).
H Aparece la pantalla IP Settings
(Parámetros IP). Si la red dispone
de un ruteador o servidor DHCP
que asigne direcciones IP de
forma automática, haga clic en
el botón de radio de
Automatically obtain an IP
address (DHCP) (Obtener una
dirección IP de forma
automática, DHCP). Haga clic
en Next (Siguiente) y vaya al
paso I.
F
G
H
Si necesita asignar una
dirección IP estática al puente,
haga clic en el botón de radio
de Set IP configuration manually
(Establecer la configuración IP
manualmente). Introduzca una
dirección IP (IP Address), una
4
NOTA: La dirección IP predetermi-
nada del puente es
192.168.1.225.
Page 35

máscara IP (IP Mask, también
denominada Máscara de
subred) y una puerta de enlace
(Gateway) correspondientes a la
red. En esta pantalla debe
especificar una dirección IP. Si no
está seguro de cuáles son la
máscara IP y la puerta de enlace,
deje los dos campos en blanco.
Haga clic en Next (Siguiente) y
vaya al paso I.
I Aparece la pantalla Basic
Settings (Parámetros básicos). Si la
red tiene activada la
encriptación WEP, seleccione el
nivel de encriptación e introduzca
una frase de paso. Si no dispone
de frase de paso y desea
introducir una clave WEP de
forma manual, deje el campo
Passphrase (Frase de paso) vacío.
Si la encriptación WEP está
desactivada en la red,
mantenga el parámetro
predeterminado, Disabled
(Desactivada).
I
Haga clic en Next (Siguiente).
J Si ha introducido una frase de
paso, verá la clave WEP
generada automáticamente.
(Consulte la figura J.) Si no es así,
introduzca la clave WEP de forma
manual en el campo Key 1
(Clave 1). Haga clic en Next
(Siguiente).
K Revise los parámetros en la
pantalla Confirmation
(Confirmación). Escriba la
dirección IP del puente si desea
acceder a la utilidad basada en
Web del mismo. Haga clic en Yes
(Sí) para guardar los parámetros.
L En la pantalla Congratulations
(Enhorabuena), haga clic en Exit
(Salir).
J
K
5
Page 36

Conecte el puente Ethernet
3
Wireless-B para uso en red
A Tras la configuración,
desenchufe el adaptador de
corriente de la toma de
corriente y desenchufe el
cable de red Ethernet del PC.
B Enchufe el cable de red
Ethernet en el puerto RJ-45 del
dispositivo de red preparado
para Ethernet que desee
agregar a la red inalámbrica.
C Enchufe el adaptador de
corriente a una toma de
corriente local.
NOTA: Si no dispone de una conexión
activa al dispositivo de red preparado
para Ethernet, cambie la posición del
conmutador X-II.
Enhorabuena. La instalación del
puente Ethernet Wireless-B ha
finalizado.
®
A Division of Cisco Systems, Inc.
Para obtener información adicional o ayuda
para resolución de problemas, consulte la
guía del usuario proporcionada en el
CD-ROM. También nos puede escribir por
correo electrónico o consultar el suplemento
de asistencia técnica para obtener más
información. Consulte nuestra página Web
para obtener información sobre ventas o de
contacto actualizada.
Asistencia por correo electrónico
España
support.es@linksys.com
Latinoamérica
support.la@linksys.com
Página Web
http://www.linksys.com/international
Linksys es una marca comercial registrada o
marca comercial de Cisco Systems, Inc. y/o sus
filiales de EE.UU. y otros países. Copyright ©
2003 Cisco Systems, Inc. Todos los derechos
reservados.
WET11-ES_V2-QIG-31013NC JL
6
 Loading...