

Page 1
CENTRAL VACUUM
CENTRAL VACUUM
CENTRAL VACUUMCENTRAL VACUUM
SYSTEM
SYSTEM
SYSTEMSYSTEM
THIS PAGE INTENTIONALLY LEFT BLANK
Page 2
IMPORTANT SAFETY INSTRUCTIONS
The AIRVAC Red Series Cleaning Systems
Through many years of continuous use -- and through quality tests that are ongoing at our
factory -- AirVac central vacuums, attachments and accessories have built a remarkable
record for cleaning effectiveness and safety. However, there are potential haz ards that c ould
occur if the system is not operated correctly and safely. The following l i s t of Do’s and Don’ts
will help you avoid problems and ensure many hours of safe and efficient cleaning.
< READ this manual before assem b l i ng or using your vacuum cleaner.
< USE your cleaner only as directed in this manual. Use only with recommended attachments.
< KEEP hair, loose clothing, fingers and all parts of body away from openings and moving parts.
< DISCONNECT electric power head before servicing or cleaning the brush area. Failure to do
so could result in elect ri cal shock or sudden start -up of the brush.
< ALWAYS turn electric power head off before connecting or disconnecting the hos e or power
nozzle.
< USE extra care when cleaning on stairs.
< DO NOT use outdoors, on wet surfaces, or to pic kup spills of any k ind . Ele ct ric shock c ould
occur.
< DO NOT unplug by pulling on cord. To unplug, pull the plug, not the cord.
< DO NOT operate the system if t he power cord, hos e or power nozzle is damaged or the
equipment has been left out doors. Send the unit to a qualified service repair center.
< DO NOT pull or carry the unit by the cord, or pull around sharp edges or corners. Do not run the
power nozzle over the cord. Keep cord away from heated surfaces.
< DO NOT use the vacuum system to pick up wet spills of any kind.
< DO NOT allow the system to be us ed as a t oy. Cl ose at tent ion is neces sary when used by or
near children.
< DO NOT handle the plug or electric power head with wet hands.
< DO NOT operate the cleaner with a punctured hose. The hose contains electrical wires. If the
hose is cut or worn, it should be repl aced immediately. Avoid vacuuming sharp objects.
< DO NOT put any objects into openings. Do not use with all openings blocked; keep free of dust,
lint, hair and anything that may reduce airflow.
< DO NOT use the cleaner to pick up hard, sharp objects. They may damage the cleaner.
< DO NOT use the cleaner to pick up flammable or combustible liquids (gasoline, cleaning fluids,
perfumes, etc.) or use in areas where they may be present. Fumes from these substances can
create a fire hazard or explosion.
< DO NOT use without filters in place.
< DO NOT use system to clean ashes from a fireplace, as smoldering embers can burn for days
after the fire is out.
The dirt canister in your centra l vacuum s ystem m ust be chec ked periodic ally and
emptied when it becomes 3/4 full. Regular emptying will enhance performance and
conform to the terms of the product warranty. The dirt canister is the removable lower
section of the power unit. This canis ter should be de tached and emptied at regular
intervals.
Dirt and debris are deposited in the dirt canister attached to bottom of the power unit,
and should be empt ied five to six times a year under normal use. T o empty the
canister, follow these easy steps:
1 Make sure power unit is disconnected from the electrical wall outlet.
2 Unsnap two latches on each side of the central vacuum by pulling up from the
bottom of the latch.
3 Empty the dirt canister into a refuse container.
4 To reattach the canister, position latches over hooks, press down to lock each
latch.
5 Reconnect the power unit into an electrical wall outlet.
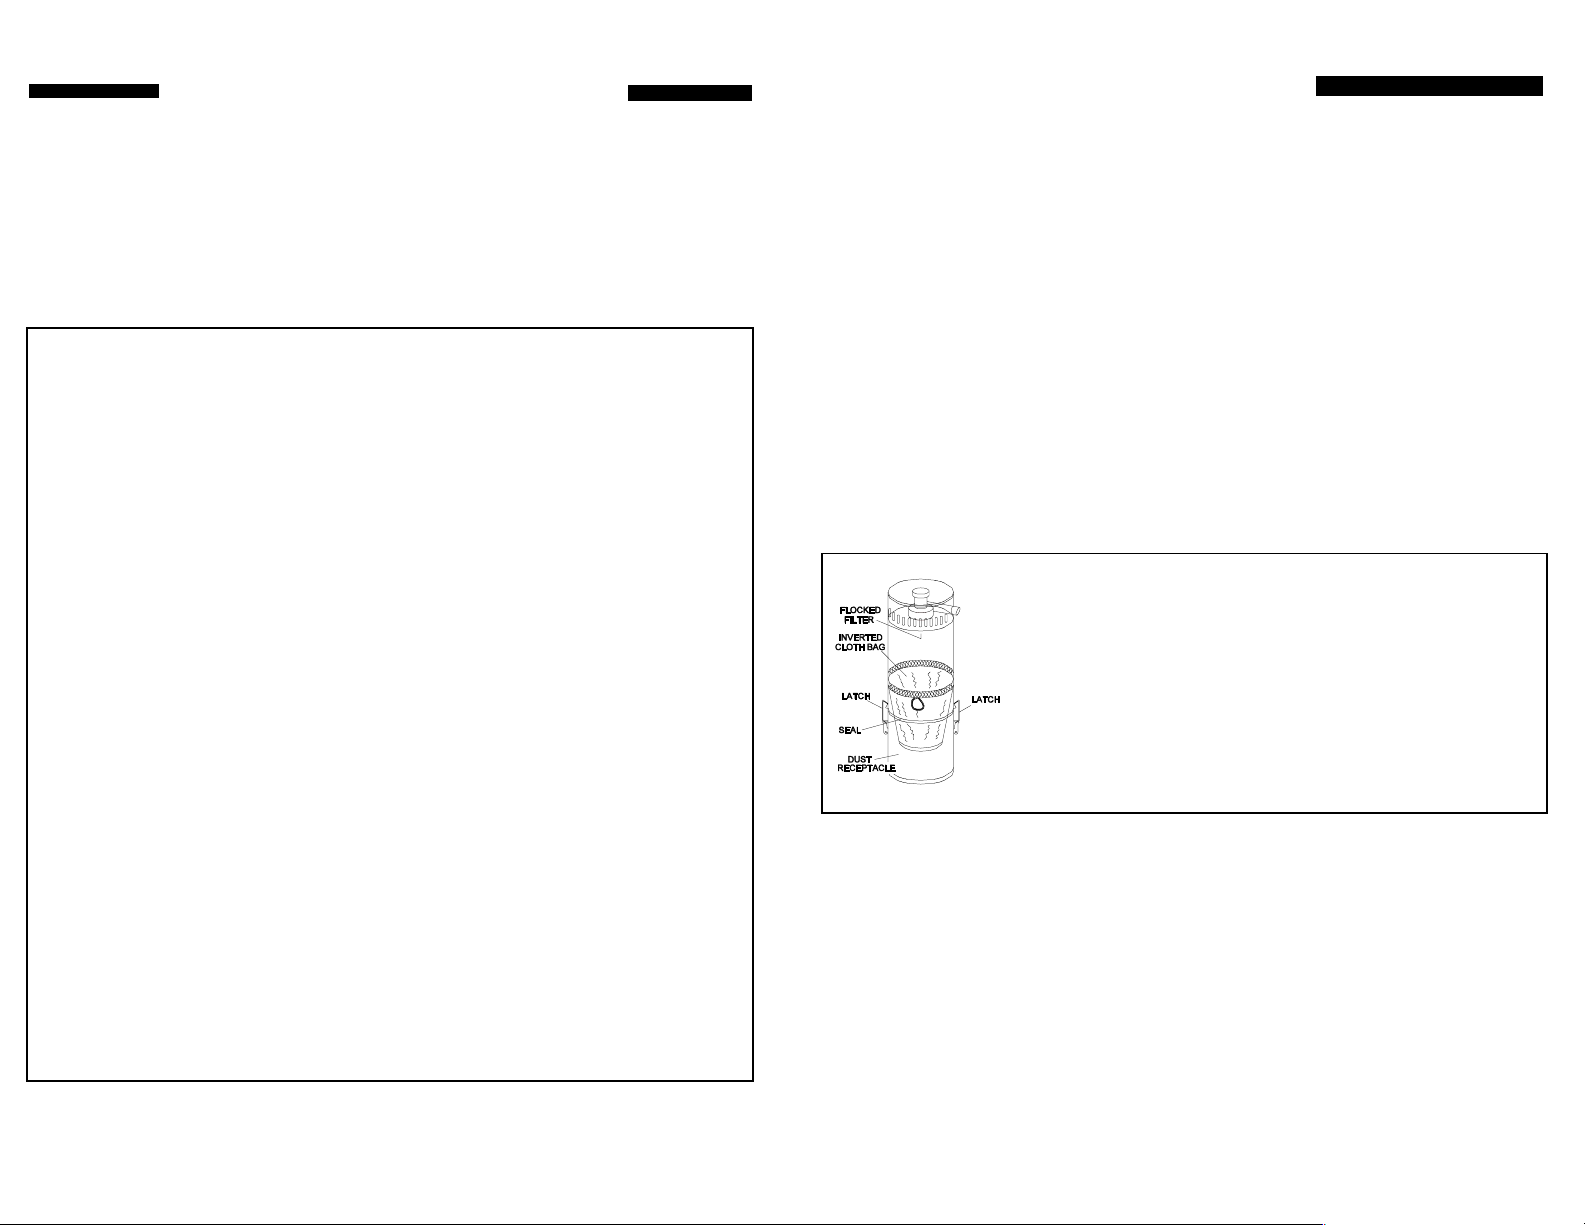
The Red series VA C is a m aintenance free power unit which uses a s elf
cleaning inverted cloth bag. When the power unit is running, the cloth bag is
inverted to m aximi ze fil trat ion from t he com pl ete s urfac e area of t he fil te r .
When the power unit is tur ned off, the weighted center of the bag drops, thus
removing most of the debris. When empt ying the dust receptacle, som e
accumulation of dirt will be present on the filter - THIS IS NORMAL. The
cloth bag should not be removed for any reason except to replace it if i t
becomes damaged or torn.
NOTE: Removal of the inverted cloth ba g is NOT required for cleaning.
Page 3

The AIRVAC Blue & Gold Series Cleaning System
The Blue/Gold central vacuum power units operate in the same way as the Red units.
However, the dirt and debris are contained in a disposable paper bag. To replace the
disposable bag, follow the procedure below:
1 Make sure power unit is disconnected from the electrical wall outlet.
2 Unsnap the two latches on each side of the vacuum lid. Lif t the lid assembly
vertically off the power unit.
3 Remove the disposable paper bag and discard. Do not remove the permanent
cloth bag assembly. Replace the cloth bag only if damaged or torn.
4 Install a new disposable bag (VM502) . Do not reuse paper bags as they may
easily tear.
5 Reinstall lid and position latches over hooks, press down to lock each latch.
6 Reconnect the power unit into an electrical wall outlet.
Central Vacuum Accessories
Standard Hose
This hose is made of
durable wire and vinyl or
lightweight crushproof
material. It is used between
the vacuum valve and attachments.
Low Voltage Hose
This hose has a low voltage switch to t urn t he
system On or Off.
Deluxe Turbo Carpet Brush
This powerful attachment is
designed to get deepdown dirt and dust from
carpeting.
Dusting Brush
This attachment is designed
to help you with much of your
dusting. It can be used t o
clean and dust decorative
pieces, light fixtures, Venetian
and mini-blinds, lamp shades.
NOTE: When using t he dusting brush on
delicate items such as lamp shades, you
should adjust the suct i on control located on
the handle to reduce suction and prevent
damage.
Wands
These are used to
connect the
vacuum hose to
either carpet
brushes or
accessories.
Blue/Gold vacuum power unit
Combination Floor/Carpet Tool
This attachment is
designed to allow
movement from carpets
to hard floors without
stopping, by adjusting the
lever on top.
Floor/Wall Tool
(with horsehair
bristles)
This attachment is used
for cleaning hard surfaces
such as vinyl, hard wood
floors, walls, ceram i c tile and others.
Air-driven mini-Turbo Brush
Used for stairways and furniture
or cleaning cars.
Air-driven Brush
Used for
indoor/outdoor carpet.
Automatic Dust Pans
This accessory is used
under kitchen cabinets.
Dirt can be swept with
a broom into the dust
pan.
Crevice Tool
This attachment is
designed for use in
narrow spaces, in
cracks and crevices,
along edges and other narrow, hard-to-clean
areas.
Upholstery Tool
w/brush
This attachment is
designed for
cleaning all types of
upholstery, drapes and curtains. It can be
used with or without the slip-on brush.
Wireless Remote Control
This accessory is for
use with standard
hoses to give remote
On/Off control of your
system.
Hose Sock
This hose cover protects
walls and corners when
maneuvering the
vacuum hose.
Page 4

Electric Accessories
Deluxe High
Performance 30' High/Low Volt age Hose.
Feature High/Low voltage switch to turn both
on electric carpet brush On/ Off and the
system On/Off.
Electric Carpet Brush
Features an electric-powered beater bar and
brush to get the deepest ground-in dirt and
grime. Turn off the power brush to cl ean hard
surfaces.
Assembling the Super Latch System
1. Slide wands together.
2. Push assembled wands into electric brush
swivel socket.
3. Place electric cord between cord guides;
turn into position.
(w/10 cord ties)
30' Extension Cord
Used to plug the electrical outlet to the
electric brush when using the st andard hose.
Stretch Hose
This attachment is
used for quick clean-up
jobs. The hose expands
from 3.5' to 21'.
Wall Valve or canister which contains LED’s
The wall valves or vacuum canister in your home may have a LED indicator. This
LED provides information on the system performance.
Red and Blue Series
•Green . . . . Indicates that power is present at the vacuum canister.
•Off . . . . Indicates that power is not present at the vacuum canister.
Gold Series
• Green . . . . Indicates the power is present at the vacuum canister.
Flashing Green or Flashing Amber . . . . Indicates the bag or bucket
is full.
• Amber . . . . Indicates the motor has passed 50% of its brush life.
• Red . . . . Indicates the end of motor brush life. Call your local dealer
for service.
Reset: To reset a flashing LED, pre ss the main power switch on the front of the vacuum canister down
momentarily and release. The flashing LED should return to sol i d.
4. Press cord into channels. Push wands
into swivel.
5. Insert handle end of hose into assembled
wands.
6. Press wand position pedal at Power
Nozzle to move wand into vacuuming
position.
7. To release entire wand assembly, hold
hose and lift firmly while stepping on wand
release lever. DO NOT remove plug by
pulling on cord; this may cause wire
damage.
Wand Position Lever
Height Adjustm ent
Lever
Wand Release Lever
could result in electrical shock or injury.
WARNING
ELECTRICAL SHOCK HAZARD
Do not plug into electrical supply until
assembly is complete. Failure to do so
Page 5

Assembling the Deluxe Electric System
1. Snap the two interlocking wands
together.
2. Push cord plug up as far as it will go
into plug holder, then press into plug
holder until firmly seated.
3. Press cord into clip.
4. Push downward until wand lock button
snaps into place.
5. Insert SUPERHOSE handle into
wands.
Troubleshooting
1. No Power:
Check circuit breaker on unit and house power panel breaker to see if they have
tripped. If they have tripped, then reset. If they t rip ag ai n , c a ll your lo c al M & S
Systems distributor for service.
2. Low Suction:
Check suction at utility inlet on the power unit.
Check for blockage in hose.
Check for blockage in pipe by using a plumber's snake to free any obstruction.
Check for air leaks at inlet valves not in use. A missing or damaged gasket
could cause air leaks.
Check the 2.75" flock filter located in t he screen below t he motor plate behind
the filter. If blocked or clogged, this can cause low suction.
6. Plug electric brush cord into hose
handle.
WARNING
ELECTRICAL SHOCK HAZARD
Do not plug into electrical supply until
assembly is complete. Failure to do so
could result in electrical shock or injury.
If you encount er any problems with your equipment, verify the operation against
the information contained in this booklet. If, after checking your system y ou are
unable to determine the cause of the problem, contact your local dealer for
assistance or our technical support department at (800) 366-9422. Be sure to
have the exact model number, serial number and the nature o f the problem
ready. If possible, CALL FROM THE SITE. We cannot effectively troubleshoot
your system if you are not calling from the location where the equipment is
installed or used.
Page 6

Warranty Information
M&S SYSTEMS Limited 2-Year No-Fault Product Warranty
M&S SYSTEMS warrants for 2 years all products to be free of defects (M&S SYSTEMS honors the 10Year No-Fault warranty for AirVac Gold power units. See section below). The warranty period begins from
either (1) the date of “first user” purchase of this prod uct or (2) the first close of escrow date on a residence
in which this ne w product was or iginally installed. This warranty extends to the original us er of the product
and to each subseque nt owner of the product d uring the term of this warranty. M&S SYSTEMS will repair
or replace, at its option, parts and materials at no charge. Parts supplied under this warranty may be new or
rebuilt at the option of M&S SYSTEMS.
If, during the limited warranty period, it appears as though this product contains a defect which is covered
by this limited warran ty, call ou r toll free service number before dismantling the product (1-800-877-
6631). Remember to attain a Return Authorization Number (RAN) before returning any product to
M&S SYSTEMS. Send this product freight pre-paid and insured to our service center for warranty
repair. You will be advised on shipping instructions when you call the toll free service number. M&S
SYSTEMS will return the re paired product freight pre-paid within the U.S.A. The installing dealer or
distributor may assist you, at your choice and expense, with returning product for repair. Please include a
brief description of the prob lem and a dated proof-of-purchase receipt with any product that is retu rned for
warranty repair. ANY PRODUCT RETURNED WITHOUT A RETURN AUTHORIZATION
NUMBER WILL BE REFUSED.
THIS LIMITED WARRANTY IS IN LIEU OF ANY OTHER WARRANTIES, EXPRESS OR
IMPLIED, INCLUDING ANY IMPLIED WARRANTY OF MERCHANTABILITY OR FITNESS
FOR A PARTICULAR PURPOSE OR OTHERWISE, AND OF ANY OTHER OBLIGATIONS OR
LIABILITY ON THE SELLER’S PART. THIS LIMITED WARRANTY DOES NOT COVER
DAMAGE CAUSED BY IMPROPER INSTALLATION, THE VIOLATION OF APPLICABLE
BUILDING OR ELECTRICAL CODES, O R THE USE OF NON-M&S/NON-AIRVAC WIRE,
CABLE OR WALL HOUSINGS. THIS LIMITED WARRANTY APPLIES ONLY TO PRODUCTS
INSTALLED IN A PRIVATE RESIDENCE.
UNDER NO CIRCUMSTANCES SHALL THE SELLER BE LIABLE FOR CONSEQUENTIAL,
INCIDENTAL OR SPECIAL DAMAGES ARISING IN CONNECTION WITH USE, OR
INABILITY TO USE THIS PRODUCT. IN NO
BREACH OF WARRANTY, BREACH OF CONTRACT, NEGLIGENCE, OR STRICT
LIABILITY, EXCEED THE COST OF THE PRODUCT COVERED HEREBY. NO PERSON IS
AUTHORIZED TO ASSUME FOR US ANY OTHER LIABILITY IN CONNECTION WITH THE
SALE OF THIS PRODUCT.
EVENT SHALL SELLER’S LIABILITY, FOR
Some states do not allow the exclusion or limitation of consequential, incidental or special damages, so the
limitation or exclusion may not apply to you. This limited warranty gives you specific legal rights,
above
and you may also have other rights which vary from state to state.
M&S SYSTEMS Limited 10-Year No-Fault Product Warranty
M&S SYSTEMS honors the 10-Year No-Fault Warranty applied to the AirVac Gold power unit as of
January 1, 2000. This warranty is identical to the M&S
exception that this warranty covers the AirVac Gold power unit for 10 years instead of 2. The M&S
SYSTEMS 10-Year No-Fault Warranty applies ONLY to the AirVac Gold power unit, and no other M&S
SYSTEMS, M&S or AirVac product.
SYSTEMS 2-Year No-Fault Warranty, with the
for AirVac Gold Power Units
2861 Congressman Lane
Dallas, Texas 75220
www.mssystems.com
115747 Rev E
 Loading...