

Page 1

®
XD-V70 Wireless
Advanced Guide
For single and multi-channel
operation of XD-V70 Wireless
Electrophonic Limited Edition - Rev A
Page 2

Table of Contents
About The XD-V70 System .................................................. 1•1
XD-V70 Receiver ................................................................... 2•1
User Interface ................................................................................................. 2•1
Front Panel LED Ladders ............................................................................... 2•2
Mute ............................................................................................................... 2•2
Antenna Management ................................................................................... 2•3
Audio Outputs ............................................................................................... 2•4
Rack Mounting .............................................................................................. 2•5
Power Supplies ............................................................................................... 2•5
XD-V70 Wireless Microphone .............................................. 3•1
User Interface ................................................................................................. 3•1
Mic Capsules .................................................................................................. 3•3
Beltpack Transmitter ............................................................. 4•1
User Interface ................................................................................................. 4•1
Inserting And Removing The Microphone ................................................... 4•3
Pinout To TA4F Connector ........................................................................... 4•3
Advanced Applications .......................................................... 5•1
Recommendations for best performance ....................................................... 5•1
Wi-fi................................................................................................................ 5•1
Near / Far ........................................................................................................ 5•1
Cell Phone Interference ................................................................................. 5•2
Batteries .......................................................................................................... 5•2
SAR ................................................................................................................ 5•3
Page 3

Appendix: Specifications ...................................................... A•1
System ........................................................................................................... A•1
V70 Handheld Transmitter ........................................................................... A•2
V70 Beltpack Transmitter ............................................................................. A•2
V70 Receiver ................................................................................................. A•3
Page 4

About the XD-V70 SyStem
• 24 bit digital converters
• Up to 120 dBA dynamic range, compander free
• DCL™ and PDP™ technologies eliminate audio interference and minimize dropouts
• Full bandwidth 10 – 20kHz frequency response
• 12 user selectable channels (for simultaneous use) always available, no
intermodulation issues. No scanning for channels is required
• Quick setup- no gain, pads, squelch or level adjustments necessary
• “Future Proof” 2.4GHz ISM band operation prevents concerns from DTV/
DSO/700MHz channel assignments and White Space Devices and avoids
competition from high power transmitters such as commercial TV, mobile phone
and public safety
• Real-time LCD indicators display critical performance indication including:
operating channel, RF status, Link Status, Battery Life and Diversity Mode
• 2 x AA Alkaline batteries provide 8 hour operation on “high” power, 10 hours on
“low” power
About The XD-V70 System
1•1
Page 5

About The XD-V70 System
Supplied System Components
• half rack receiver (RX212)
• power supply; 9Vdc/500mA, input – 90 – 240 Vac (DC-1G)
1•2
• ½ wave rubber ducky antennas, pair (model RDrac)
• Rackmount kit (includes short and long rack ears, mounting screws and dovetail
key)
• Front mount antenna kit (including BNC connectors and antenna cables)
• 50 ohm BNC termination plugs (pair)
Handheld TX
• Handheld transmitter (THH12)
• Mic clip
• 2 x AA alkaline batteries
• Rugged zippered carry case
Beltpack System
• Beltpack transmitter (TBP12)
• LM4-T cardioid lav mic w/ clip and windscreen
• 2 x AA alkaline batteries
• Rugged zippered carry case
Page 6
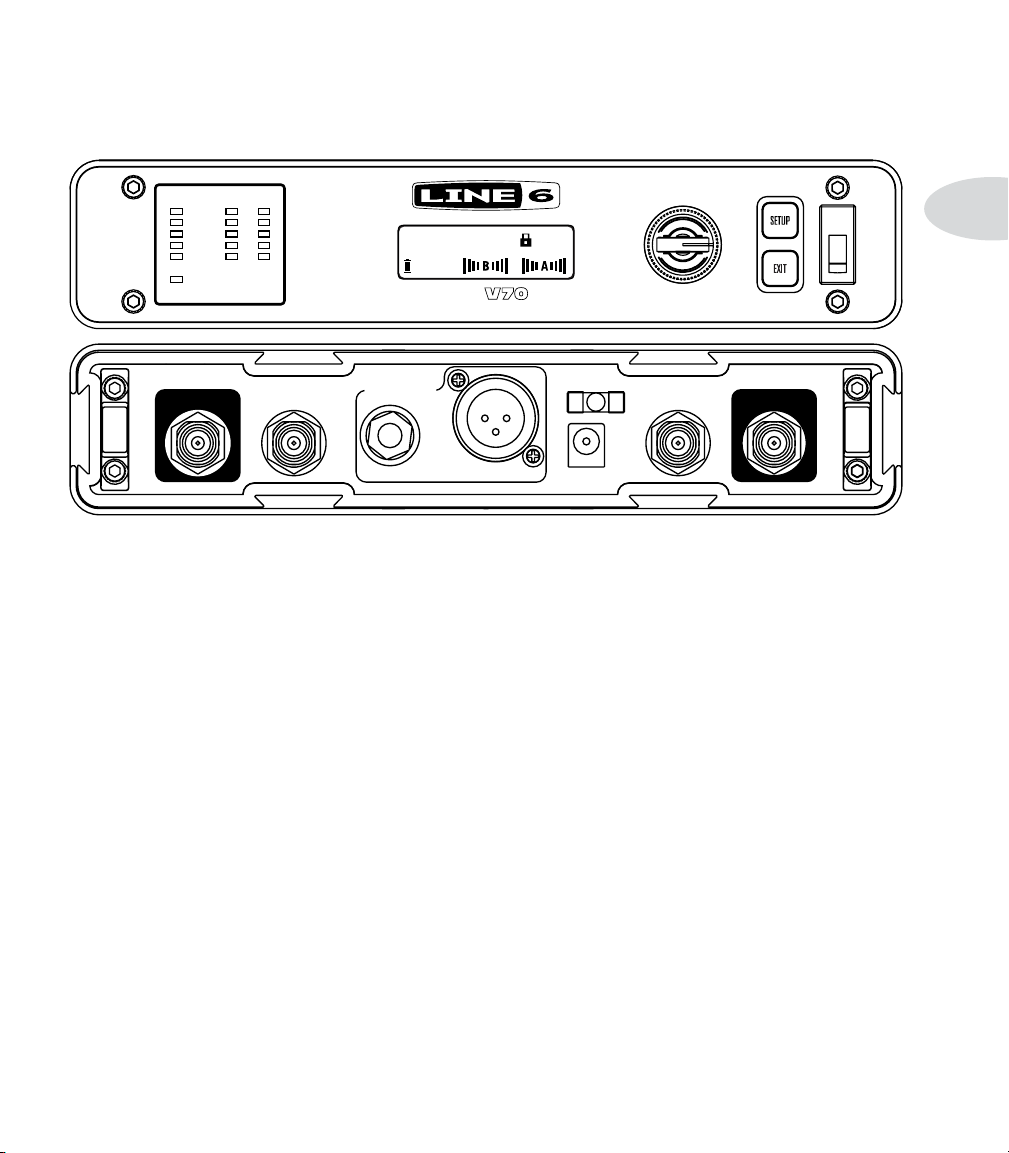
XD-V70 ReceiVeR
XD-V70 Receiver
RFBATTERYAUDIO
PUSH TO SET
CH 1:THH12 MIC
TRANSMITTER
MUTE
STATUS
ANTENNA A ANTENNA B
A OUT
8:00
XD-
2.4GHz DIGITAL WIRELESS SYSTEM
MAIN OUTS
UNBAL BALANCED
B OUT
9VDC IN
User Interface
Pressing the “SETUP” button will select the setup mode. Rotate the “EDIT” knob to scroll
through the menu options. Press the “EDIT” knob while the desired option is highlighted
in the LCD to select it for editing. Rotate the “EDIT” knob to change the option then
press the knob to save the change.
1. Channel Select
When selected the channel number displayed will be the currently selected receiving
channel number. Push the encoder wheel and brackets will appear around the channel
number. Turn the encoder knob to scroll through the 12 channels. When you arrive at
the desired channel number, push the encoder knob to set it. The brackets disappear
indicating the change is complete. The receiver will not actually switch to the new
channel until the encoder knob is pushed. Press the EXIT button to exit editing
2•1
2. Find Open Chan
The “Find Open Chan” feature allows the user to determine what channels are available
for use and what channels already have Line 6 XD-V or Relay transmitters operating
on them. “TX” will appear above any channel number if it is occupied by an operating
Line 6 XD-V or Relay transmitter. You may turn the encoder to the right or left and the
underscore will follow. Place the underscore under any open channel, press the encoder
to set, and that channel will be selected from this screen.
Page 7

XD-V70 Receiver
3. Environmental Filter
The Environment filter combines a downward expander with a dynamic high pass filter.
It should be used to minimize handling noise and stage vibrations that are not intended
2•2
to be a part of your program material. When the microphone falls below a fixed threshold
the filter backs down the overall level by about 6 dB while simultaneously rolling off
frequencies below 200 Hz. “Norm” is the default setting for musical performance. The
filter may be bypassed entirely by selecting “off”, or may be increased by selecting “Talk”
which is more appropriate for speech applications of the system.
Front Panel LED Ladders
The XD-V70 receiver features an array of LED ladders so that critical performance
elements can be viewed when you are too far away to read the LCD screen.
Audio
This row shows the relative strength of the audio output. The more lights the stronger
the signal at the output connector. This ladder will be off when the system is muted. It
is normal in operation for these LEDs to move around between a single LED to all five
being on.
Mute
A red LED will signal that the mute switch has been engaged on the transmitter and
output to the rear panel output jacks will be turned off.
Battery
Each LED lit represents approximately 1.5 hours of remaining battery life when green. The
bottom LED will light red when approximately two hours of operating time or less remain,
and will flash red when approximately .5 hour remains. For more detailed information on
remaining batter life, please read the LCD screens on the transmitter or receiver.
Page 8

XD-V70 Receiver
RF
These LEDs indicate Radio Frequency signal strength. When all five LEDs are lit green
the receiver is receiving full signal. As signal strength is diminished, LEDs will begin to
turn off. If you experience fewer than all five LEDs, one or more of the following steps
should be attempted:
• Antenna placement should be moved closer to transmitter
• Move transmitter closer to receiver
• Provide a clearer line of sight between transmitter and receiver
• Place transmitter into high power mode
• Utilize external antennas when receiver and transmitter positioning cannot be
improved
When no transmitter is turned on, these LEDs may light red indicating that there is some
non-Line 6 RF in the area. This is usually not a concern. When an XD-V transmitter
is turned on the receiver will lock to it and disregard the RF noise because of DCL™
technology.
Antenna Management
1. External Antennas
The XD-V70 system must be operated with external antennas. The supplied “rubber
duckie” antennas should be connected to the BNC connectors marked “Antenna A”
and “Antenna B” before operating. The user may wish to front mount the antennas by
installing the supplied BNC bulkhead connectors in the long rack ear when installing in
a rack. Connect the supplied antenna cables from the BNC terminals to the “Antenna
A” and “Antenna B” connectors on the rear panel. Optional Line 6 P180 or P360 paddle
antennas may be used in place of the standard “rubber ducky” antennas for increased
performance or when the receiver cannot be physically placed in a location within range
of the transmitter. See the Paddle antenna owner’s manuals for details.
2•3
2. Looping – Antenna Distribution System
If you are operating more than one system you may conveniently connect multiple receivers
to a single pair of antennas using XD-V70’s built-in antenna distribution system. After
attaching antennas to the primary receiver, simply use the supplied cables and connect
from the BNC connector marked “A Out” to the “Antenna A” input of the second unit.
Similarly, connect from the “B Out” on the primary unit to the “Antenna B” input on the
second receiver. You may continue this process connecting up to 12 systems total. For
Page 9

XD-V70 Receiver
best results, no more than 6 receivers should be connected to a pair of antennas.The last
receiver in the chain must be terminated by connecting the supplied “BNC terminators”
to the last “A & B Outs”. It is highly recommended to use a 50 ohm low leakage type of
antenna cable such as LMR-195 for these connections (such as the ones supplied with the
2•4
XDV-70).
3. Terminating
The supplied “BNC terminators” should be installed on any unused “A & B Outs” for
maximum performance.
Audio Outputs
The XD-V70 receiver is equipped with both a balanced three pin XLR connector and
an unbalanced ¼” output. These are “mic level” and are basically “unity” compared to
the input microphone used. Treat the XLR connector just the way you would treat the
output jack of a wired microphone. The ¼” is convenient should you wish to plug into an
instrument amplifier or an unbalanced input on a mixer.
As different mic models are selected on the handheld transmitter the output level will
vary just as it would if you were to “hot-swap” the wired versions of these mics .
44.47
219.93
Page 10

XD-V70 Receiver
Rack Mounting
XD-V70 systems include all necessary hardware to make rack mounting simple. The unit
can be setup as either left or right sided to make mounting in your rack convenient. A
“long” and a “short” rack ear are screwed to the sides of a single receiver and fit in the
dovetail slots.
A “dovetail key” is provided to couple two receivers into a single rack pair. Slide the
dovetail key into a side channel of receiver one from the rear towards the front. Then
slide the second receiver to the other edge of the dovetail key and slide until the two front
surfaces meet. A small tap with a mallet will seat the dovetail key into place flush with
the rear panel. Install the “short” rack ear that was supplied with each receiver into the
outside slots and you are ready to bolt the pair into a rack.
When additional “pairs” are constructed, the un-used dovetail keys can be used in the top
and bottoms between the pairs locking them together into a single block.
Power Supplies
The XD-V70 is supplied with the Line 6 DC-1G power supply. The supply can be used
with any AC input voltage from 90-240VAC.
2•5
Page 11

XD-V70 Wireless Microphone
XD-V70 WiReleSS micRophone
MUTE SELECT
The Line 6 XD-V70 handheld transmitter is constructed with a metal body and mic
capsule and features a polycarbonate battery cover. It features six mic models based on
some of the world’s leading wired dynamic microphones, as well as the L6-DC7 Line 6
model. In addition, the mic capsule is interchangeable with many other popular models.
An LCD screen provides real time performance data, and a pair of recessed buttons allow
users to edit performance parameters while protecting from unintentional button pushes.
To turn on the microphone, press and hold the “POWER/MUTE” button for two seconds.
The display light up, indicating that the unit is on. To turn the transmitter off, hold the
“POWER/MUTE” button for more than two seconds. The display will momentarily say
“OFF”, and the unit will power down.
3•1
The buttons on the microphone are intentionally recessed sufficiently to avoid the
possibility of them accidentally being pressed while in normal use. As a result, it will
require deliberate force downward into the button cavities in order to make the buttons
function.
User Interface
Basic operation: Press and hold (for two seconds) the “SELECT” button to enter the edit
mode. once in edit mode press the “SELECT” button to advance edit screens. Press the
“POWER/MUTE” button to advance the adjustable parameters.
Transmit Channel (“Chan” )
Press and hold the “SELECT” button for two seconds to enter the edit mode. The LCD
backlight will illuminate and the LCD screen will flash the current transmit channel.
Each press of the “POWER/MUTE” button will advance through the 12 user channels,
however the transmit channel will not be activated until the “SELECT” button is again
Page 12

XD-V70 Wireless Microphone
pushed, or no further action occurs for several seconds causing the edit time out to return
the user to the main screen.
RF Power (“Power”)
The second push to the “SELECT” button will advance the user to the Transmit Power
high/low select page. If the anticipated range usage falls short of about 100 feet, it is
recommended to switch the Tx power range to “low” as it will conserve battery life and
reduce RF interference to other devices. If sufficient range is not possible in low power
mode then the user should switch up to high power mode. Press the “POWER/MUTE”
3•2
button to toggle between the two power modes.
Microphone (“Model”)
There are seven available mic models for the user to choose from in this screen. The
models are labeled in the display as follows:
Display Model based on*
58 Shure® SM58®
b58 Shure® Beta 58A
835 Sennheiser® e 835
41 Audio-Technica® AE4100
767 Audix® OM5
o5 Electro-Voice® N/D767
L6 Line 6 optimized model
*All product names used in this
webpage are trademarks of their
respective owners, which are in no
way associated or affiliated with
Line 6. These trademarks of other
manufacturers are used solely to
identify the products of those manufacturers whose tones and sounds
were studied during Line 6’s sound
model development.
Pushing the “POWER/MUTE” button will scroll through the model choices, and they
may be auditioned in real time. Switching models will affect the frequency response,
the proximity effect, and the output level at the receiver output just as though you were
to “hot-swap” the wired mics that the models are based on. Mic models do not change
the basic cardioid polar pattern of the microphone. Should a different polar pattern be
desired, third party capsules may be used (see the section on mic capsules below).
Page 13

XD-V70 Wireless Microphone
Transmitter Name (“Name”)
The default for the name feature is off. Pressing the “POWER/MUTE” button and selecting
“On”, advances the user to the naming screen. Here you may scroll through the alphanumerical list by pressing the “POWER/MUTE” button and assign up to 6 characters
(A-Z, blank space, -, and 0-9 are available) to name the transmitter. Pressing “SELECT”
advances the user to the next character to the right. This name will be transmitted to the
receiver, where it will be displayed in the receiver’s LCD window allowing easy match-up
of transmitter to receiver. When the name feature is off, the receiver will show the model
name of the transmitter (e.g., “THH12” for the handheld microphone).
Exit Edit Mode
Pressing and holding the “SELECT” button stores the performed edits into the microphone’s
memory. The edits are remembered when powering down and then turning back on, and
when the batteries are replaced. They are also remembered should the batteries die during
a performance. If no actions are performed for 10 seconds, “time out” will occur and the
transmitter will automatically exit edit mode (and save any edits that had been made).
Mute Function
While not in Edit Mode, press the “POWER/MUTE” button for approximately one second
to initiate the mute function. Press again to return to active mode. The LCD will remain
illuminated while in Mute mode.
3•3
Lock Out Switch
A small slide switch is provided under the battery cover and behind the battery
compartment for user lockout. Sliding the switch locks out all button functions on the
top panel including channel selection, muting and power off. If the switch in engaged
before the power is turned on the performer is allowed to turn on the transmitter. At that
point all button function is locked until the switch is physically reset.
Mic Capsules
Certain third party wireless mic capsules may be installed in place of the Line 6 Mic
capsule, offering users even more flexibility in choosing performance characteristics and
Page 14

XD-V70 Wireless Microphone
0
Microphone Directional Characteristic
for pattern control. Approved elements include Shure® SM58, Beta58 and Beta 87a
capsules and Heil RC-22 and RC-35 capsules. When a third party capsule is used, the
internal Line 6 mic modeling is disabled. Performance and level will be determined by
the output of the installed capsule. The output from the capsule should not exceed 3.6V
p-p to insure best performance.
Pattern & freq response L6-DC7 model shown [1” (black) and 18” (red)]
3•4
Type: ............... 250Ω
Top Level: .......57.8 dB
Range: .............30 dB
Frequency: ......1000 Hz
Source Level:.. 0.1 Pa
300
270
240
Measure Distance..... 50 cm
Test Instrument ........Bruel & Kjaer 2012 & 9640
330
210
30
60
90
120
150
180
Page 15

XD-V70 Beltpack Transmitter
beltpAck tRAnSmitteR
BATT AUDIO
2.4GHz DIGITAL WIRELESS SYSTEM
BATT AUDIO
OFF/ON
MUTE
HOLD FOR
SETUP
SELECT VALUE
User Interface
Basic operation: Press and hold (for two seconds) the “SELECT” button to enter the edit
mode. once in edit mode press the “SELECT” button to advance edit screens. Press the
“VALUE” button to advance the adjustable parameters.
4•1
Transmit Channel (“Chan”)
Press and hold the “SELECT” button for two seconds to enter the edit mode. The LCD
backlight will illuminate and the LCD screen will flash the current transmit channel. Each
press of the “VALUE” button will advance through the 12 user channels, however the new
transmit channel will not be activated until the “SELECT” button is again pushed, or no
further action occurs for several seconds causing the edit time out to return the user to the
main screen.
Page 16

XD-V70 Beltpack Transmitter
RF Power (“Power”)
The second push to the “SELECT” button will advance the user to the Transmit Power
high/low select page. If the anticipated range usage falls short of about 100 feet, it is
recommended to switch the Tx power range to “low” as it will conserve battery life and
reduce RF interference to other devices. If sufficient range is not possible in low power
mode then the user should switch up to high power mode. Press the “VALUE” button to
toggle between the two power modes.
Transmitter Name (“Name”)
The default for the name feature is off. Pressing the “VALUE” button and selecting “On”,
advances the user to the naming screen. Here you may scroll through the alpha-numerical
4•2
list by pressing the “VALUE” button and assign up to 6 characters (A-Z, blank space, -,
and 0-9 are available) to name the transmitter. Pressing “SELECT” advances the user
to the next character to the right. This name will be transmitted to the receiver, where
it will be displayed in the receiver’s LCD window allowing easy match-up of transmitter
to receiver. When the name feature is off, the receiver will show the model name of the
transmitter (e.g., “TBP12” for the handheld microphone).
Exit Edit Mode
Pressing and holding the “SELECT” button stores the performed edits into the microphone’s
memory. The edits are remembered when powering down and then turning back on, and
when the batteries are replaced. They are also remembered should the batteries die during
a performance. If no actions are performed for 10 seconds, “time out” will occur and the
transmitter will automatically exit edit mode (and save any edits that had been made).
Mute Function
Press the “MUTE” button for approximately one second to initiate the mute function.
Press again to return to active mode. The LCD screen will remain illuminated while in
Mute mode.
Lockout Switch
After the transmitter is powered up, simultaneously press and hold the “SELECT”
and “VALUE” buttons to lock the beltpack transmitter from unauthorized editing by
performers. In Lockout mode no changes can be made to the user interface, including
channel selection, muting or power on/off. The LCD screen will show “LOCKED” and a
small lock icon will appear in the bottom left of the screen. To return to active, again press
and hold simultaneously the “SELECT” and “VALUE” buttons.
Page 17

XD-V70 Beltpack Transmitter
0
Inserting And Removing The Microphone
Plug the TA4 connector into the input jack on the beltpack transmitter. To remove the
mic, push in the locking button and carefully pull the plug out while holding it by the
body. Avoid pulling the cable.
LM4-T Microphone Specs
Element: Back Electret Condenser
Polar pattern: Uni-directional
Frequency response: 50Hz – 16kHz
Sensitivity: -46dB, +/- 3dB (0dB=1v/pa @ 1kHz)
Output Impedance: 680 ohms (+/- 30%)
Bias voltage needed: 1.5 – 10V
4•3
20
10
0
-10
-20
50 100 200
500 1k 2k 5k 10k 20k
Pinout To TA4F Connector
• 1= gnd
• 2=V+
• 3=Signal
• 4=Z (tie to signal for mics & to gnd or open for inst)
240
330
210
180
30
60300
90270
120
150
Page 18

Advanced Appications
ADVAnceD ApplicAtionS
Recommendations for best performance
• Maintain a clear line of sight between the transmitter and receiver antennas.
Typically the receiver antennas should be above head level. Avoid placing the
receiver in the bottom of the rack unless remote antennas are employed.
• Avoid placing the receiver behind walls. When this is necessary the receiver’s
antennas should be remotely located as to be in sight of the transmitter.
• Avoid placing the receiver in close proximity to RF generating equipment including
computers, wireless access points and microwave ovens (see “near/far” below).
• Point the antennas up and 45 degrees from vertical while avoiding touching metal
objects like rack or rack rails.
• Avoid blocking antennas in the transmitters. Do not “cup” the bottom of the
handheld transmitter. Avoid placing the beltpack transmitter in pockets.
Wi-fi
Because Wi-Fi and Line 6 2.4GHz wireless products share the same bandwidth, some users
may experience a slowing down of their Wi-Fi capabilities when using microphone or
instrument transmitters near computers. This is an example of a near/far interference
problem. If your Line 6 transmitter gets within 6 feet of your laptop, you may witness this
situation especially if your Wi-Fi access point is some distance away. Typically, simply
moving your Line 6 transmitter farther away from your computer will remedy the situation.
Switching your transmitters to the “low power” setting will aid in mitigating the problem
as well. Users in Europe or Japan should switch their Wi-Fi channels to 12, 13 or 14 as
Line 6 2.4GHz systems operate below the frequency of these channels.
5•1
Near / Far
The Near/Far interference problem is common to most radio systems and happens when a
strong signal captures a receiver making it difficult or impossible for the receiver to decode
the weaker signal.
Imagine having a conversation in a quiet room with a person 20 feet away from you. It
is likely that you can carry on a conversation with normal voice levels. Now if you move
to a noisy environment, with lots of other voices right around your ears, it may be very
difficult for the conversation to continue with your long distance friend without the both
of you shouting.
Page 19

Advanced Applications
A similar circumstance occurs with radios, and since the long distance transmitter is
incapable of increasing its power output, it is possible for a very near transmitter may
interfere with it.
In the real world, this is rarely an unmanageable problem. You should avoid being closer
than 3 feet to a receiver that is not on your channel if the intended transmitter is more
than 50 feet from this receiver. If this is a regular requirement, you will need to remote
your antennas.
Cell Phone Interference
The use of cell phones should be avoided when very close to XD-V70 transmitters. They
will not cause audio interference in the RF section of XD-V wireless systems, but these
cell phones emit a signal that can penetrate input cables and mic elements themselves,
thereby creating audio that becomes part of your signal. The result will leave most users
5•2
with familiar “brap-ap-ap” buzz. The only certain cure is to leave them completely shut
off or to move them sufficiently away from your XD-V systems.
Batteries
Line 6 2.4GHz wireless transmitters have a circuit that measures the actual real-time voltage
of the installed batteries and transmits that data to the battery meters in the receivers.
The battery meters are very accurate when they have been running continuously from
the time new batteries were installed in the transmitter and the transmitter power has
not been cycled on and off. However, due to the chemical nature of Alkaline batteries,
when they have been shut off the voltage begins to “rebound “ and the voltage actually
increases compared to its value at shutoff. This rebound effect does not last long and the
voltage reverts to true self over twenty minutes or so. For this reason when you first turn
on a Transmitter that has been run but allowed to rest, the meter will give a higher reading
that quickly falls over the first few minutes. This is normal behavior for Alkaline batteries.
Rechargeable batteries may be used in XD-V70 transmitters. NiMH are recommended
in the 2400-2800 mAh range. It is essential that the charger and charge rate correspond
to the actual batteries used. Make certain that any batteries selected fit properly in the
transmitters as these batteries vary in maximum outside diameter. Do not charge these
batteries inside XD-V70 transmitters. The battery meters in the XD-V70 units are
calibrated for Alkaline battery discharge rates and will not be as accurate when using
rechargeable batteries. Carbon-zinc batteries are not recommended.
Page 20

Advanced Appications
SAR
Specific Absorption Rate, or SAR, is a measure of the heating value of radiated RF energy
on human tissue. SAR evaluates the relative safety of low‐power transmitters in close
proximity to the human body or high‐power transmitters at greater distances. Line 6
XD-V wireless transmitters are not required to have SAR testing as they fall below the
24.49 mW power limit established by the FCC. Line 6 XD-V output power is 10mW in
“high” power mode and 3.3mW in “low” power mode.
5•3
Page 21

AppenDiX: SpecificAtionS
System
Working Range
Audio Freq Response
THD%
Dynamic Range
Operating Temperature
Range
Transmitter Audio Polarity
RF Channel
System Latency Total
100M/300Ft Line of sight, actual range depends on
10 Hz( -0.5 dB) to 20 kHz (-2.5 db)
0.03% typical
>115 dBA V70
>120 dBA V70L
1°C to 50°C battery characteristics may limit this
positive pressure on mic diaphragm produces positive voltage
on pin 2 of XLR output and on Tip
of 1/4 output
2.4GHz ISM band
<4ms Audio in to audio out
interference, reection and RF signal
absorption high & low
system total audio in to audio out
- no compander
range
Appendix: Specifications
A•1
NOTES
Page 22

Appendix: Specifications
V70 Handheld Transmitter
A•2
Audio Input (max)
Gain Range
RF Output
Dimensions (overall)
Weight
NOTES
3.6Vpp ~3% THD (clipping)
N/A patent pending auto gain compensation
circuitry optimizes A/D converter bit rate
10 mW (high power)
3.3 mW (low power)
107mm x 40mm x 40mm
11 oz. (w/o batteries)
Housing
Battery Life
Power
metal body, polycarbonate
battery cover
8 hours (high power)
10 hours (low power) -alkaline
2 x “AA” Alkaline
V70 Beltpack Transmitter
Audio Input Level (max)
Input Z
Gain Range
Supplied Bias Voltage
RF Output
Dimensions (overall)
Weight
Housing
Battery Life
Power
6.5Vpp ~3% THD (clipping)
1.3M ohms
N/A patent pending auto gain compensation
5 VDC Pin 2 of TA4 Connector
10 mW (high power)
3.3 mW (low power)
107 mm x 70mm x 30mm
6.5 oz (w/o batteries)
metal body
8 hours (high power)
10 hours (low power) -alkaline
2 x “AA” Alkaline
NOTES
circuitry optimizes A/D converter bit rate
Page 23

V70 Receiver
Audio Output Level
Output Z
Sensitivity
Appendix: Specifications
NOTES
Unity referenced to mic model selected
XLR: 150 ohm
¼”: 1kohms
95dBm
balanced
unbalanced
A•3
Image Rejection
Power Requirements
Antenna
Dimensions (overall)
Weight
Housing
56dB
9 Vdc, 350 mA
BNC 50 ohm
220mm x 217mm x 45mm
(half-rack)
42 oz.
extruded aluminum
Page 24

Appendix: Specifications
N222
N222
N222
A•4
Line 6 Digital Wireless Inc.
26580 Agoura Road
Calabasas, CA 91302-1921
Phone: (818) 575-3600
Fax: (818) 575-3607
FCC IDENTIFIER: UOB916THH12
Model: XD-V70
Equipment Class: Digital Transmission System
Description: 2.4 GHz Wireless handheld Microphone
Line 6, Inc. declares under our sole responsibility that Line 6 product XD-V70, to
which this declaration relates, has been tested and found in compliance with the
requirements of Part 15 of the FCC rules.
This device complies with Part 15 of the FCC rules; operation is subject to the
following two conditions:
(1) This device may not cause harmful interference.
(2) This device must accept any interference received, including interference that
may cause undesired operation.
Jorge Aguila Date: September 30, 2010
Manager, Engineering Technical Services
Line 6, Inc.
USA
Line 6 Digital Wireless Inc.
26580 Agoura Road
Calabasas, CA 91302-1921
Phone: (818) 575-3600
Fax: (818) 575-3607
FCC IDENTIFIER: UOB916TBP12
Model: XD-V70L
Equipment Class: Digital Transmission System
Description: 2.4 GHz Wireless handheld Microphone
Line 6, Inc. declares under our sole responsibility that Line 6 product XD-V70L, to
which this declaration relates, has been tested and found in compliance with the
requirements of Part 15 of the FCC rules.
This device complies with Part 15 of the FCC rules; operation is subject to the
following two conditions:
(1) This device may not cause harmful interference.
(2) This device must accept any interference received, including interference that
may cause undesired operation.
FCC DECLARATION OF CONFORMITY
FCC DECLARATION OF CONFORMITY
LINE 6, Inc.
26580 Agoura Road
Calabasas, CA 91302-1921
Phone: (818) 575-3600
Fax: (818) 575-3607
Line 6, Inc. declares under our sole responsibility that Line 6 product XD-V70, to
which this declaration relates, is in conformity
with the following standards:
EMI and EMC Directive:
European Standards:
ETSI EN 301 489-1 V1.6.1 (2005-09)
ETSI EN 301 489-3 V1.4.1 (2002-08) [Ar ticle 3.1 (b) of R&TTE Directive]
ETSI EN 300 440-2 V1.2.1 (2008-05)
The specification ETSI EN 301 489-1 V1.4.1 (2002-08) is an EMC generic
immunity standard which references the following test
specifications:
EN 55022: 2006
EN 61000-3-2: 2000
EN 61000-3-3: 1995
EN61000-4-2
EN61000-4-3
EN61000-4-4
EN61000-4-5
EN61000-4-6
EN 61000-4-11
Low Voltage Directive:
Relay XD-V70 is powered by the Line 6, DC-1g wall transformer which meets all
applicable standards. Please refer to Declaration of Conformity for the DC-1g.
Year CE Markings Affixed: 11 (2009)
The authorized representative located in the European Community is:
Authorized Representative:
Jorge Aguila
Manager, Engineering Technical Services
Line 6, Inc.
CE DECLERATION OF CONFORMITY
N222
Jorge Aguila Date: September 30, 2010
Manager, Engineering Technical Services
Line 6, Inc.
USA
2.4 XX 8
 Loading...