

Page 1
1.0 OWNER’S MANUAL
®
Rev B (For use with DL4 MkII Firmware 1.00) © 2022 Yamaha Guitar Group, Inc. All rights reserved.
Page 2

Contents
Welcome to DL4 MkII ..............................................................4
What’s In the Box? ................................................................................................ 4
Features ................................................................................................................. 4
Updating DL4 MkII Firmware ................................................................................ 4
Top Panel ............................................................................................................... 5
Rear Panel ............................................................................................................. 7
Quick Start ............................................................................... 8
Hooking It All Up ................................................................................................... 8
Basic Operation ..................................................................... 10
Working with Presets ........................................................................................... 10
Loading Presets A, B, and C ............................................................................... 10
Loading Presets D, E, and F ............................................................................... 10
Loading Presets 1 - 128 via MIDI ........................................................................ 10
Saving a Preset.................................................................................................... 11
Restoring Factory Presets ................................................................................... 12
About Tap Tempo ................................................................................................ 12
Configuring Delay and Reverb Routing .............................................................. 13
Stereo vs. Mono Output ...................................................................................... 13
Setting up an Expression Pedal and Footswitches ............................................ 14
Configuring One or More Parameters for Pedal Control .................................... 15
Configuring Footswitch Control Options ............................................................ 17
Controlling The Classic Looper Parameters ....................................................... 17
Using a Microphone ............................................................................................ 18
Effects Models.......................................................................25
MkII Delays List ................................................................................................... 25
Legacy Delays List .............................................................................................. 26
Secret Reverbs List and Controls ....................................................................... 27
Model Gallery ...................................................................................................... 29
MkII Delays .......................................................................................................... 29
Legacy Delays ..................................................................................................... 34
Secret Reverbs .................................................................................................... 39
U.S. Registered Trademarks ............................................................................... 42
Global Settings ......................................................................43
Accessing the Global Settings ............................................................................ 43
Global Settings Table .......................................................................................... 44
MIDI ........................................................................................49
Using MIDI Clock for Tempo Sync ...................................................................... 49
Accessing all 128 Presets ................................................................................... 50
Controlling Parameters ........................................................................................ 51
Controlling the Looper ......................................................................................... 53
Additional Resources ............................................................54
Product Specifications ........................................................................................ 54
Online Resources ................................................................................................ 54
Using the Looper ...................................................................19
“Should I Use the Classic Looper or the 1 Switch Looper?” ............................. 19
Using a microSD Card ......................................................................................... 20
Preparing your microSD Card for Use with DL4 MkII ......................................... 20
Setting the Looper to Mono vs. Stereo ............................................................... 20
Configuring the Looper Pre/Post Effects ............................................................ 20
Using the Classic Looper .................................................................................... 21
Using the 1 Switch Looper .................................................................................. 23
More Tasty Looping Tidbits ................................................................................. 24
Page 3

Supplier’s Declaration of Conformity
47 CFR § 2.1077 Compliance Information
Unique Identifier: Line 6® DL4™ MkII
Responsible Party - U.S. Contact Information:
Yamaha Guitar Group, Inc.
26580 Agoura Road
Calabasas, CA 91302-1921
(818) 575-3600
https://line6.com/
FCC Compliance Statement:
This device complies with Part 15 of the FCC Rules. Operation is subject to the following two
conditions: (1) This device may not cause harmful interference, and (2) this device must accept
any interference received, including interference that may cause undesired operation.
© 2022 Yamaha Guitar Group, Inc. All rights reserved.
Line 6, the Line 6 logo, DL4, Helix, HX, and Powercab are trademarks or registered trademarks of Yamaha Guitar Group, Inc. in the U.S. and/or other jurisdictions. Mac is a trademark
of Apple, Inc. registered in the U.S. and other countries. Apple is not responsible for the operation of this device or its compliance with safety and regulatory standards. Windows is
a registered trademark of Microsoft Corporation in the United States and/or other countries.
Page 4

Welcome to DL4 MkII
“I never read manuals!”
Yeah, we’ve heard that. Yet, despite our hurt feelings, we’ve tirelessly persisted to
document all the glorious features, tips, and tricks for the Line 6® DL4™ MkII effects
pedal. There are plenty of pictures, and even a "Quick Start" section to get you up and
running (and don’t forget to read the printed Cheat Sheet that came with your device).
If video is your preferred medium of choice, we’ve got something for you too!
Go here, line6.com/meet-dl4mkii:
What the heck did I just buy?
Thanks for your purchase, and congratulations on being the proud owner of a shiny new
DL4 MkII effects pedal. We hope that your recent acquisition will make your creative life
more fun, exciting, and bring you one step closer to achieving inner peace with your
audio gear agglomeration.
If you’re savvy with the original, award-winning Line 6 DL4 Delay Modeler (wow, was
that really over 20 years ago?), then you pretty much already know how to get going
with this new green machine. But when it comes to features, you don’t know the half
of it! We’ve packed in all the sonic goodies and functionality of the classic DL4, plus
an entirely new set of MkII delays & reverbs, improved looping, mic input, MIDI control,
and more! So, you’ll want to give this manual at least a quick look—Don’t worry, we’ll
try and make it as painless as possible.
What’s In the Box?
• Line 6 DL4 MkII effects pedal
• Line 6 DC-1g power adapter
• DL4 MkII Cheat Sheet (read that one first!)
Features
• 15 new MkII delay models
• 15 original DL4 delay models
• 15 “secret” reverb models
• An improved Looper, plus a new 1 Switch Looper option, offering 240 seconds
mono or 120 seconds stereo record time—and much longer with a microSD™
card (not included)
• 128 customizable preset locations (6 via footswitches, and an additional 122
via MIDI)
• MIDI IN, OUT/THRU, and USB MIDI for preset, parameter, and Looper control
• Stereo in/Stereo out, via 1/4" (unbalanced) jacks
• True analog bypass, as well as options for DSP or Buffered bypass
• Tap Tempo and MIDI Clock tempo sync
• 4 on-board, multi-function footswitches with colored LED indicators
•
External expression pedal + footswitch (or dual external footswitch) connectivity,
configurable for preset, parameter, or Looper control
• XLR Mic In, with built-in preamp and input level adjustment
• USB C for external MIDI control and easy firmware updating
Updating DL4 MkII Firmware
If a newer firmware version becomes available for your DL4 MkII device, it is highly
recommended to update, which can be accomplished easily using the free Line 6
Updater application!
First, install the latest Line 6 Updater software on your Mac or PC (available at line6.
com/software), connect DL4 MkII to your computer’s USB port, and Line 6 Updater will
check online and let you know if a newer firmware version is available. If so, the Line 6
Updater app will then walk you through performing a firmware update within minutes.
4
Page 5
Top Panel
5
Page 6
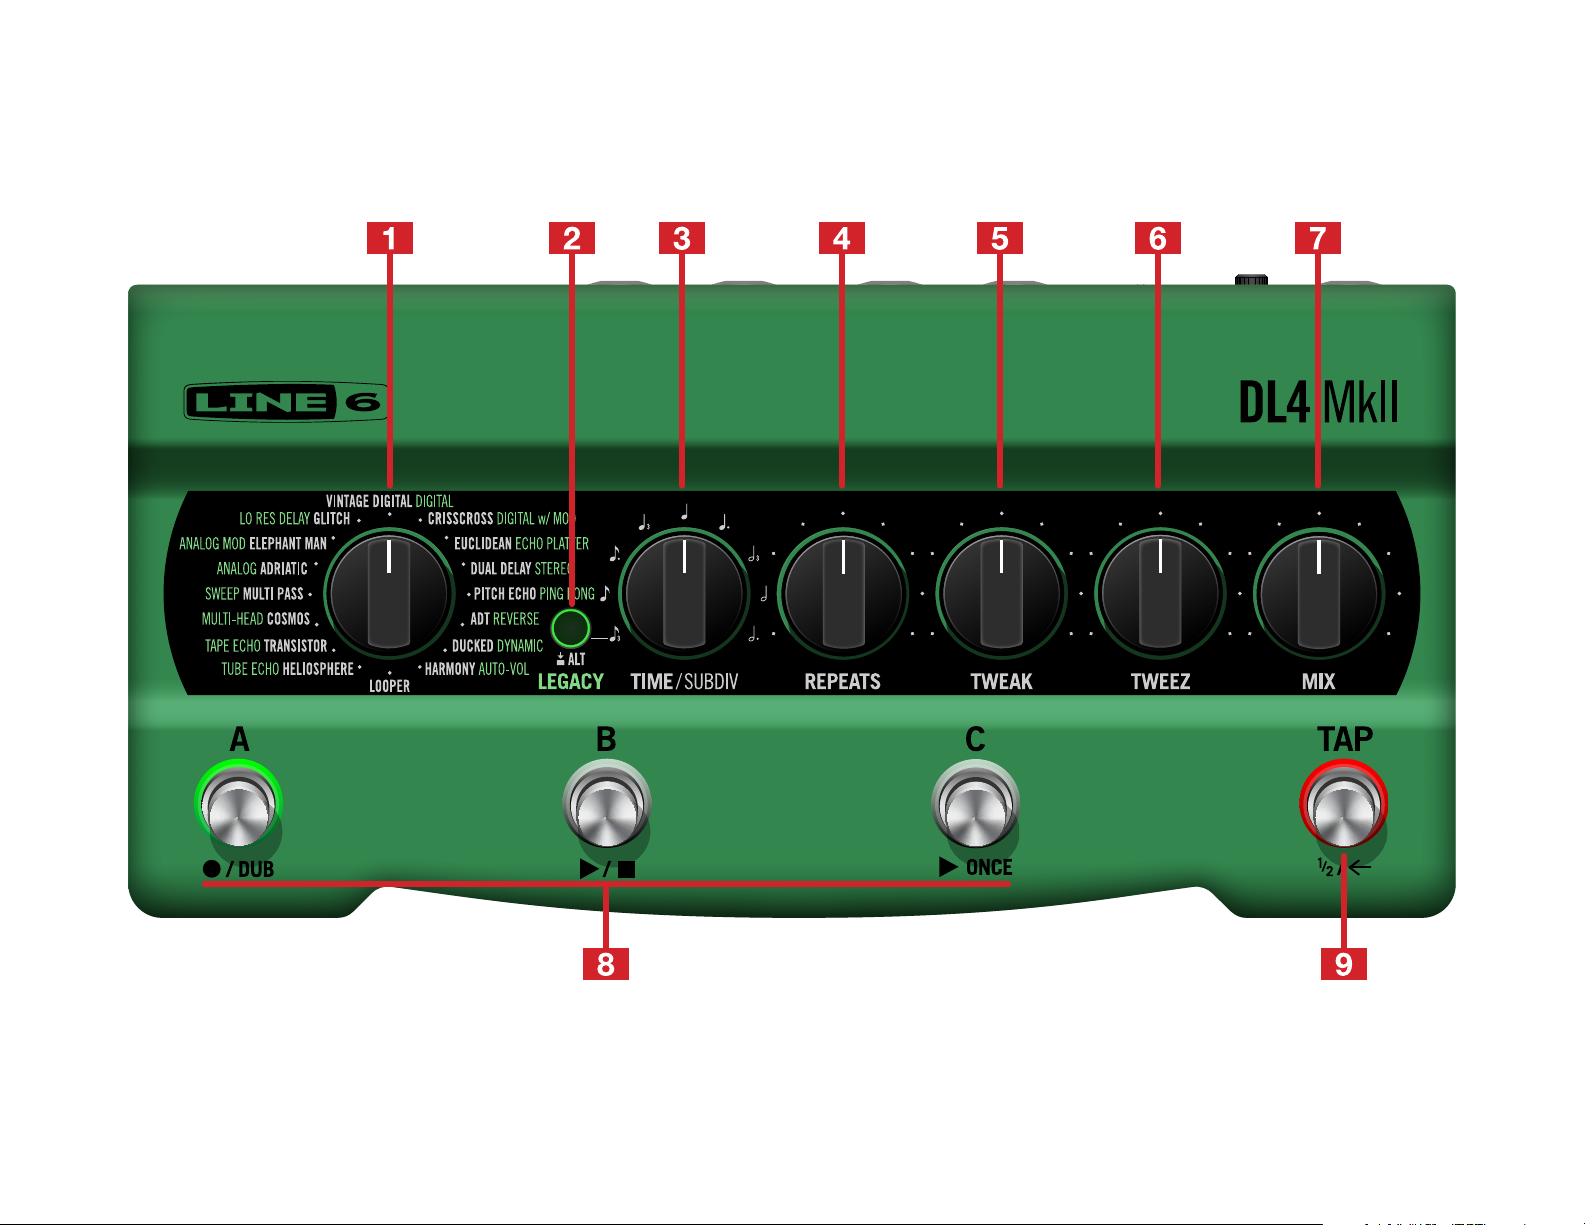
1.
Model Selector
Toggle the ALT/LEGACY button to MkII (LED is not lit) and turn the knob to choose
any MkII delay. The MkII delays are those labeled in white text. See "MkII Delays"
on page 29.
Toggle the ALT/LEGACY button to Legacy (LED is lit green) and turn the knob to
choose any classic DL4 delay. The Legacy delays are those labeled in green text.
See "Legacy Delays" on page 34.
Press and hold the ALT/LEGACY button while turning the knob to choose any reverb.
See "Secret Reverbs List and Controls" on page 27.
2.
ALT/LEGACY Button
hold this button to modify the behavior of the knobs to access alternate functions,
such as MkII vs. original DL4 delay models and parameters, secret reverb options,
Looper functions, global settings, and more.
3.
TIME/SUBDIV
LEGACY button while turning to choose a note subdivision value (from 1/8th note
triplet to dotted 1/2 note) of the current Tap Tempo. Note that your TIME setting
and Tempo are stored individually per saved preset (or your Tempo can be set as
Global—see "Global Settings" on page 43).
Turn to choose the desired delay, Classic Looper, or reverb model.
As noted throughout this manual, you’ll press or press-
Turn to choose the desired delay repeat time. Hold the ALT/
4. REPEATS Turn to get the desired number of delay repeats, or press-hold the
ALT/LEGACY button while turning to adjust the amount of decay time for the reverb.
For most delay models, you’ll get a single repeat at the minimum setting, and infinite
repeats at maximum for that runaway feedback effect (or “Squeal,” as we like to call
it), reminiscent of the tape echo machines of yore.*
For reverb models, you can adjust the decay from 0 ms at minimum, with the maximum decay time varying up to several seconds, depending on the specific reverb
model you’re using.
*TIP: You can set a footswitch to "Squeal" to instantly toggle the infinite delay repeats
setting to trigger it at will—see "Global Settings" on page 43.
5.
TWEAK
ALT/LEGACY and turn the knob to adjust the assigned reverb model’s parameter.
See "Effects Models" on page 25 for the lists of TWEAK-assigned parameters
per model).
When you have the Model Selector set to LOOPER, use the TWEAK knob to adjust
the amount of modulation for the Classic Looper’s built-in echo effect—also see
"Using the Classic Looper" on page 21.
Turn to adjust the assigned delay model’s parameter, or press-hold
6.
TWEEZ
on page 25 for the lists of TWEEZ-assigned parameters per delay model).
Hold the ALT/LEGACY while turning to choose the signal routing for the delay and
reverb effects. See "Configuring Delay and Reverb Routing" on page 13.
When you have the Model Selector set to LOOPER, use this knob to adjust the volume
of the repeats for the Classic Looper’s echo effect, from 0 (essentially, echo is "off")
to a 50/50 mix of dry signal/echo repeats. See "Using the Looper" on page 19
for more details.
7.
MIX Turn to adjust the balance between the dry and delay-effected signal, or press
and hold ALT/LEGACY to adjust the mix of the reverb-effected signal.
When using the Classic Looper, turn to adjust the playback level of your recorded loop.
Turn to adjust the assigned delay model’s parameter. See "Effects Models"
8. Footswitches A, B, and C Press these footswitches to recall and toggle
presets A, B, or C, respectively.* You’ll see the footswitch’s LED lit green when the
preset is active—press the lit footswitch to bypass the pedal. Press and hold the current footswitch until the LED flashes to save your current settings to its preset location.
When you have the Model Selector set to LOOPER, these switches perform the Looper
functions as labeled below each switch: Record/Overdub, Play/Stop, and Play Once.
*NOTE: Optionally, configure the TAP footswitch for Presets DEF to allow you to toggle
footswitches A, B, C to access either presets A, B, and C or D, E, and F. See "Global
Settings" on page 43.
You can alternatively access 128 presets via external MIDI—see "MIDI" on page 49.
9. TAP Footswitch You’ll see the red LED surrounding this footswitch flash to
indicate the current rate for your delay repeats. Turn the TIME knob to change the
rate from fast to slow. (The longest delay time varies among delay model types.)
Alternatively, stomp on this footswitch rhythmically to set a "tap tempo" to which the
delay models can follow. Press-hold ALT/LEGACY and turn TIME to choose a note
subdivision value for your delay repeats to follow. See "About Tap Tempo" on page 12.
When you have the Model Selector set to LOOPER, toggling this switch changes
the Looper between half and full speed, and double-pressing this switch changes
between forward and reverse.
TIP: You can alternatively configure the TAP footswitch to be a dedicated on/off switch for
the 1 Switch Looper, or for other functions—see the Global Settings - "TAP Footswitch
Assign" on page 44.
6
Page 7
Rear Panel
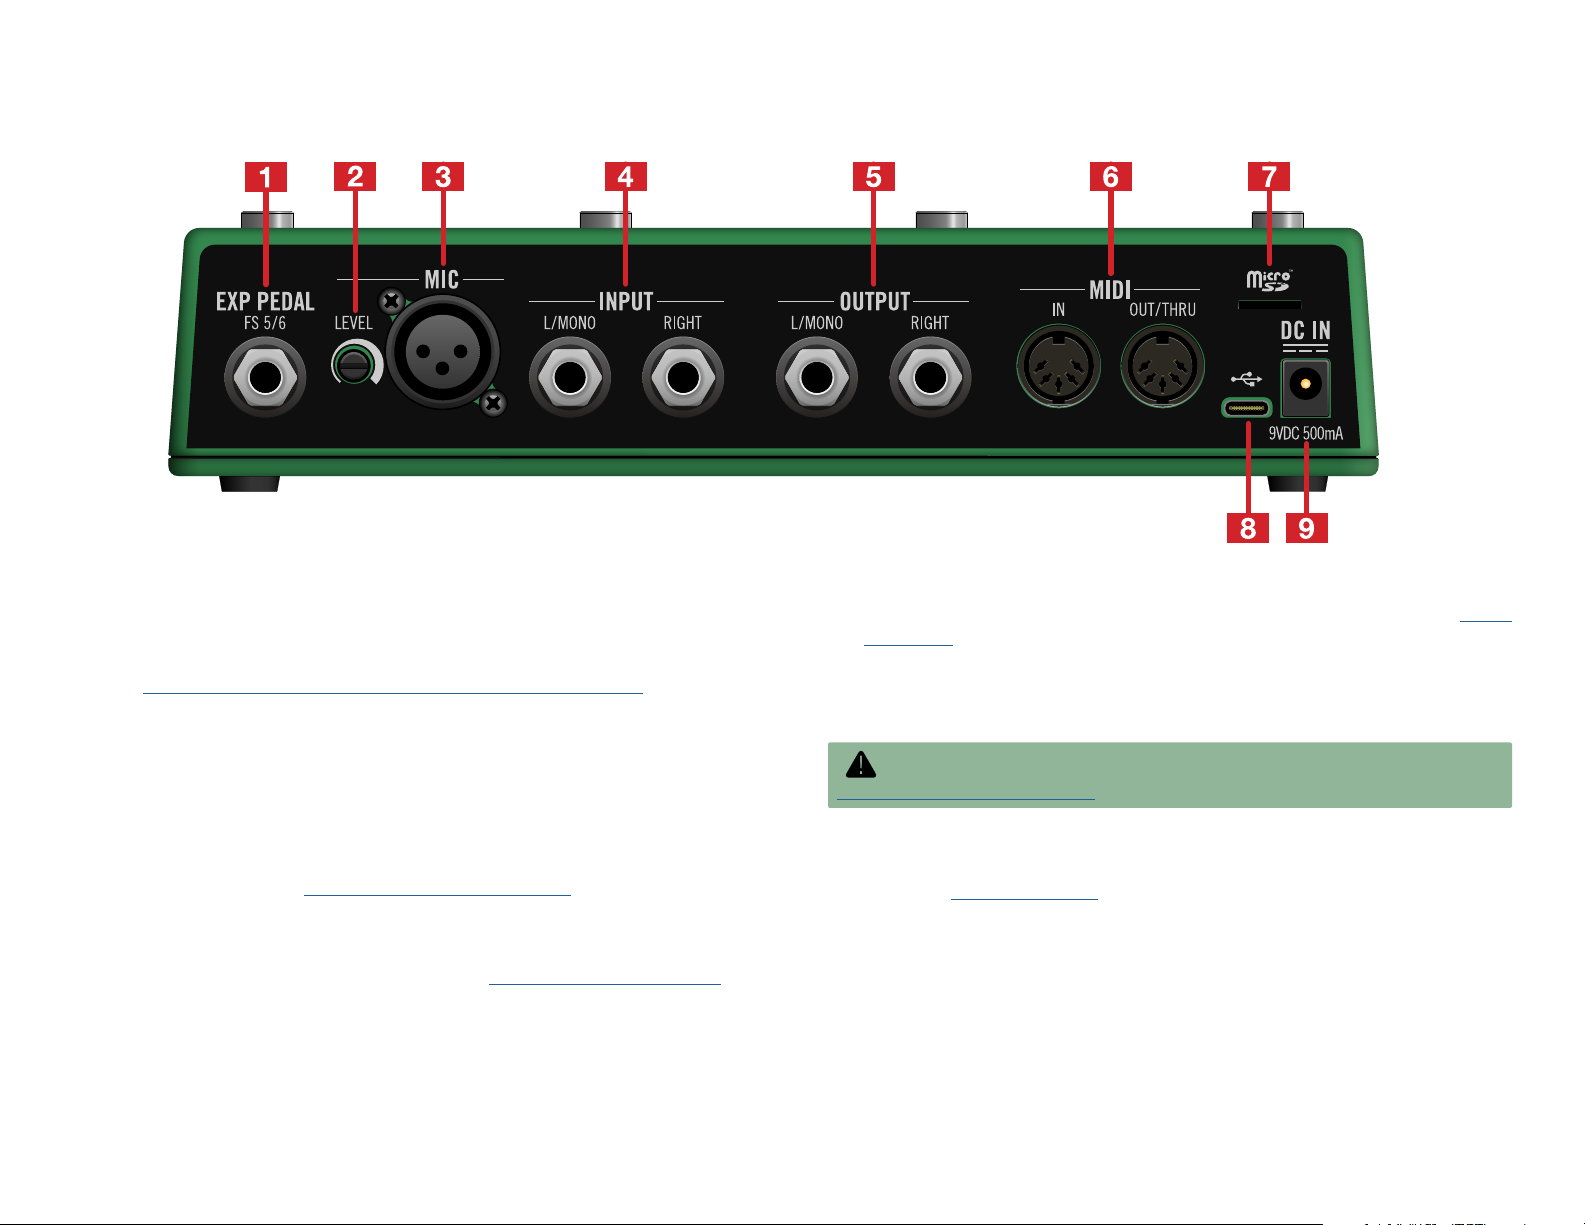
1. EXP PEDAL - FS 5/6 Connect an expression pedal here to adjust a wide
variety of parameters. With a Y-cable adapter, you can connect an expression pedal
plus a footswitch, or connect two footswitches, for even greater control! When purchasing external footswitches, you’ll want to get the momentary (unlatched) type.
See "Setting up an Expression Pedal and Footswitches" on page 14 for details.
2. MIC LEVEL Knob Adjust this trim knob to optimize the level for the signal
coming into the XLR Mic Input. If you see the LED ring around the top panel’s ALT/
LEGACY button light up red, it indicates the signal is too hot—turn the LEVEL down
to avoid clipping and unwanted distortion.
3. MIC Input Plug your dynamic microphone into this XLR input, adjust the MIC
LEVEL knob, and see just what DL4 MkII can do with some vocals—or anything else
you want to mic up. See "Using a Microphone" on page 18.
4.
INPUT L/MONO, RIGHT
the L/MONO input. Connect those fancy stereo pedals, keyboards, synths, or modelers to both the L/MONO and RIGHT inputs. See "Hooking It All Up" on page 8.
Connect your guitar, bass guitar, or mono pedals to
5. OUTPUT L/MONO, RIGHT Connect these 1/4" (unbalanced) outputs to
connect to other pedals or directly to your guitar amp input. When connecting to a
mono pedal or single amp, connect only the L/MONO 1/4" jack.
6.
MIDI IN, OUT/THRU
changes, continuous controllers, MIDI Clock, and other MIDI messages. See "MIDI"
on page 49.
7.
microSD
automatically uses the card’s memory. This allows you to record a loop up to hours
long, and retains your recorded loop even after you’ve powered DL4 MkII off.
IMPORTANT! DL4 MKII requires that your microSD does not include any existing data
(other than DL4 MkII Looper files), and be formatted with the FAT32 file system. See
"Using a microSD Card" on page 20.
8.
USB C
to use your MIDI software to control DL4 MkII’s presets, parameters, tempo, and
more. See "MIDI" on page 49 for more information. The USB connection can also
be used for any DL4 MkII firmware updates that may become available.
When you insert a 4 GB or larger microSD card into this slot, the Looper
Connect to your Mac or Windows computer’s USB port (USB 2.0 or higher)
Connect your MIDI gear to here to receive program
9. DC In It is recommended to use the included Line 6 DC-1g AC adapter to power
your DL4 MkII. The provided AC adapter serves as the power disconnect device.
7
Page 8
Quick Start
GUITAR IN
RIGHT OUT
Hooking It All Up
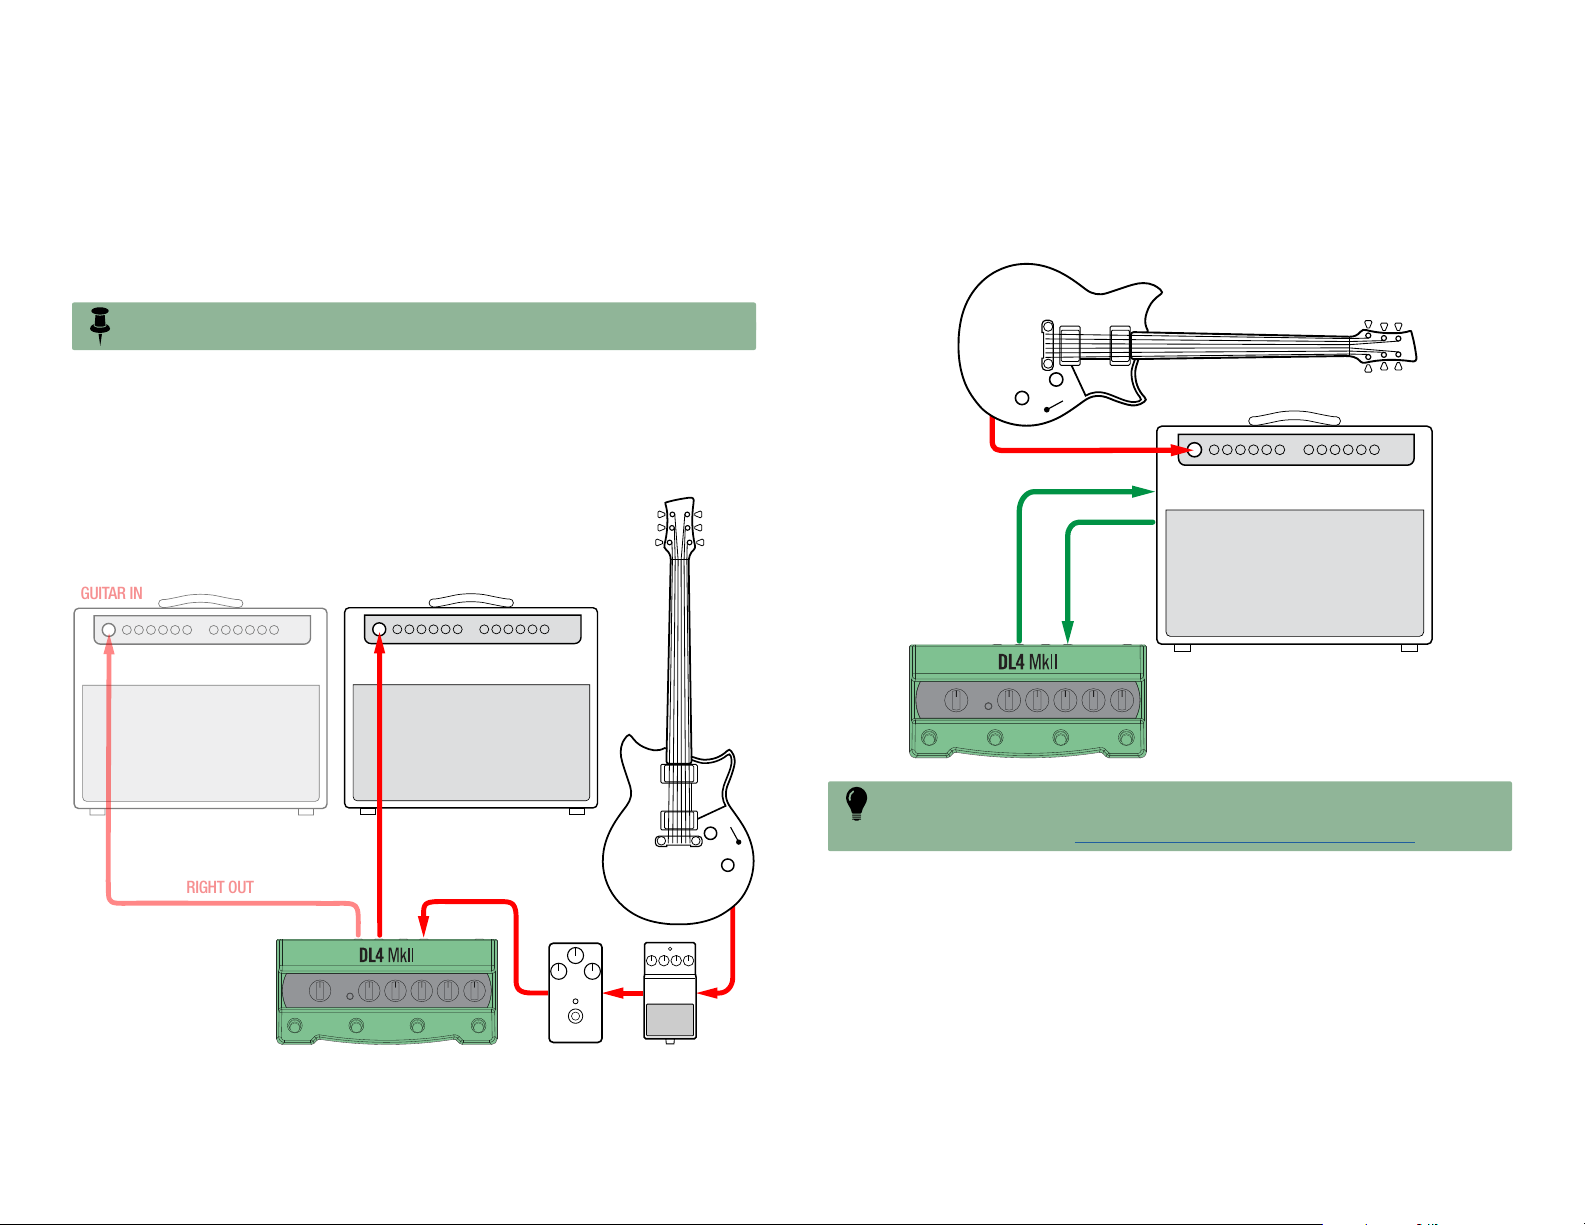
To follow we’ve provided several common setup examples for your DL4 MkII.
NOTE: DL4 MkII’s Inputs and Outputs are Instrument Level.
Into Your Amp’s Effects Loop
When using an amplifier that includes an effects loop, it is often preferred to connect
some effects (most often drives, distortions, wahs, and compressors) into the amp’s front
input (which places them before your amp’s preamp), and time-based effects (like delays
and reverbs) in the amp’s effects loop. Placing DL4 MkII in your amp’s effects loop can
provide a smoother tone to the delay and reverb tails, especially with distorted tones.
Into Your Amp’s Input
The simplest setup is to connect DL4 MkII in between your guitar output and amplifier
input, as shown below. Optionally, you can connect other pedals in series, and DL4
MkII’s form factor makes it quite pedalboard-friendly too.
GUITAR IN
L/MONO OUT
L/MONO IN
GUITAR IN
AMP RETURN
AMP SEND
L/MONO INL/MONO OUT
TIP: Optionally, you can also connect a MIDI 5-pin cable from the MIDI Out of another
pedal or controller device into the DL4 MkII’s MIDI In to control DL4 parameters, or to
sync tempo via MIDI Clock—see "Using MIDI Clock for Tempo Sync" on page 49.
8
Page 9
DI into Mixer, Audio Interface, or Other Outboard Gear
+ RIGHT OUT (for stereo)
RIGHT
OUT
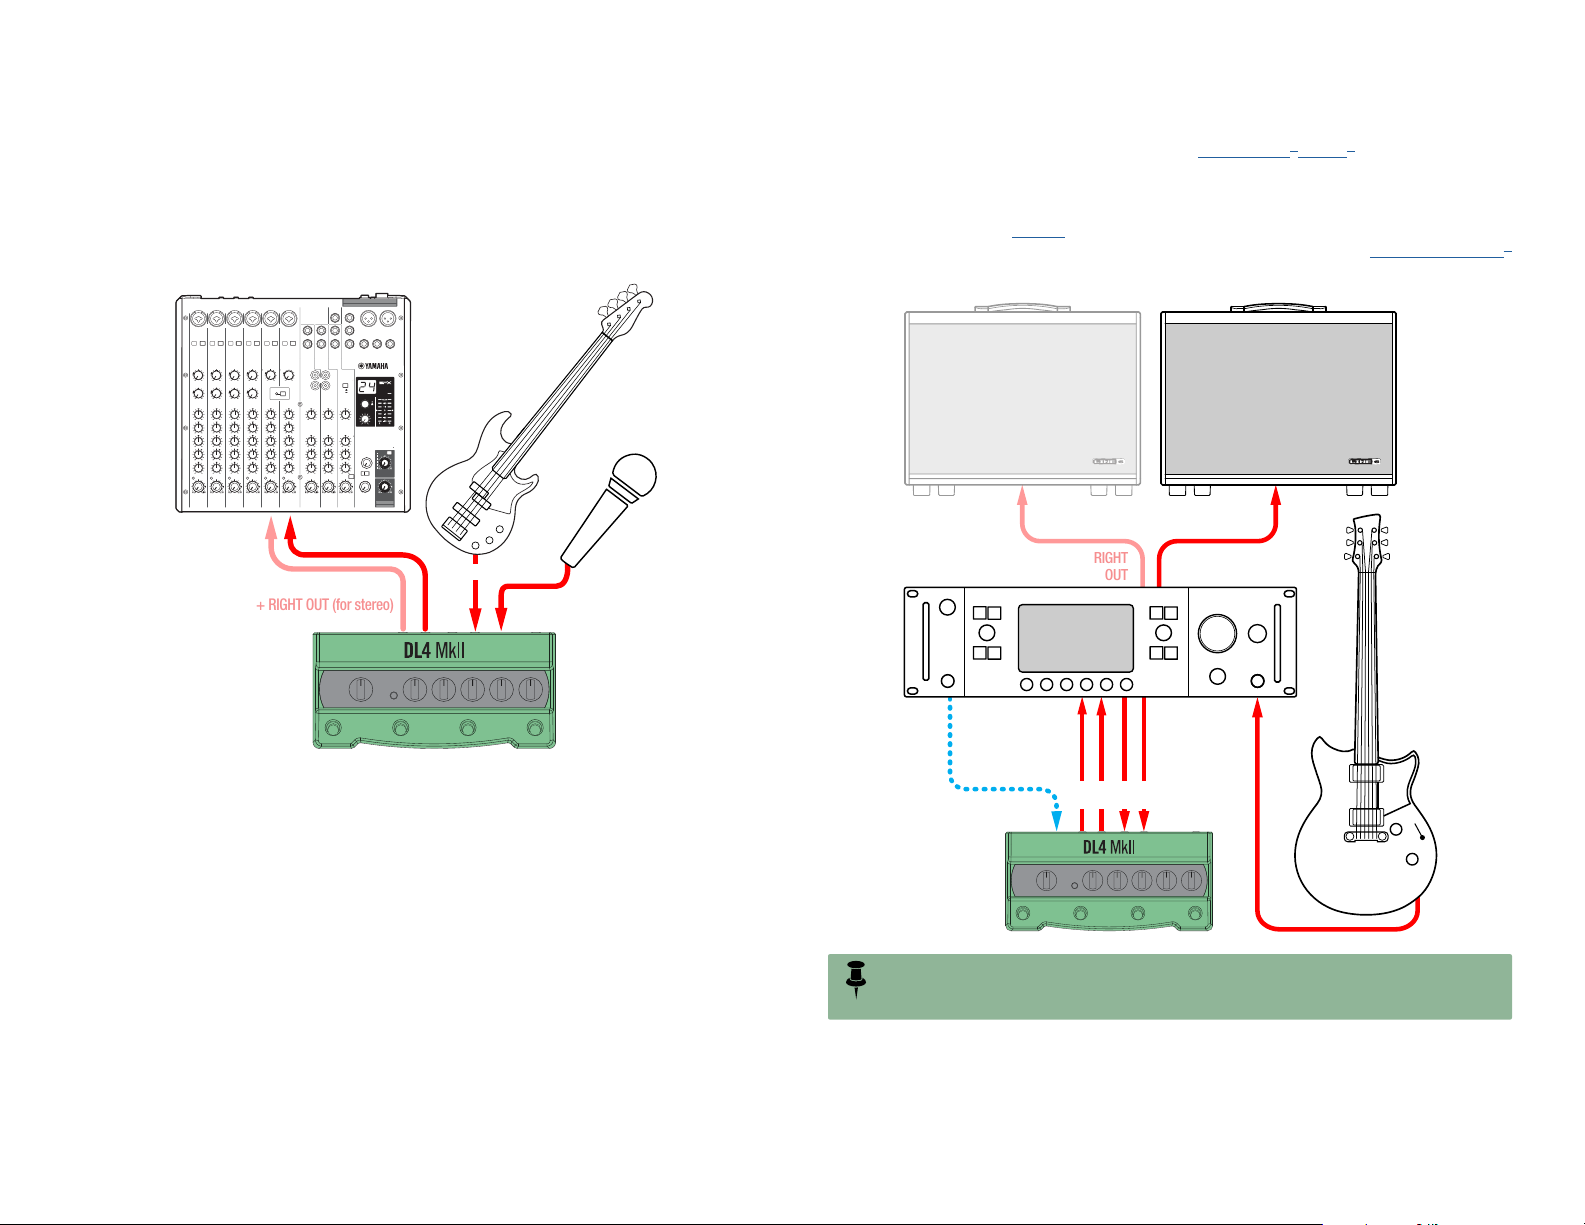
There is no sense relegating DL4 MkII to your pedalboard! You can also put it into your
signal chain when running D.I. into a mixer, audio interface, or other outboard gear to
wreak havoc in other sonic domains. Connect your guitar, bass, or keyboard into the
L/MONO IN. Or, connect your dynamic microphone into the XLR MIC IN. Then, run the
output (L/MONO out for mono, or include the RIGHT OUT for stereo) directly into your
line level device’s inputs.
Using with a Modeler
If you happen to be using a modeler, such as a Line 6 Helix® or HX® device (or one from
one of those other companies—we won’t judge), and you’ve been wanting to squeeze
even more tones out of it... You can now just patch DL4 MkII into the modeler’s effects
loop and let DL4 MkII handle the heavy lifting for your delay/reverb/looping. Optionally,
you can also connect a "MIDI" cable to sync presets and/or tempi between the devices,
and then run the whole rig out into a stereo amplifier (or even better, Line 6 Powercab®
units!), for a super lean-and-mean setup. The following illustration shows you how.
L/MONO OUT
L/MONO IN
MIC IN
LEFT
OUT
L/R
IN
SEND L/R
MIDI
OUT
NOTE: If you’re connecting to a modeler’s mono FX Loop, you only need to connect the
modeler’s (mono) Send to the DL4 MkII L/MONO IN, and the modeler’s (mono) Return to
the DL4 MkII L/MONO OUT.
RETURN L/R GUITAR IN
MIDI
IN
L/R
OUT
9
Page 10
Basic Operation
Working with Presets
The Presets D, E, and F Bank
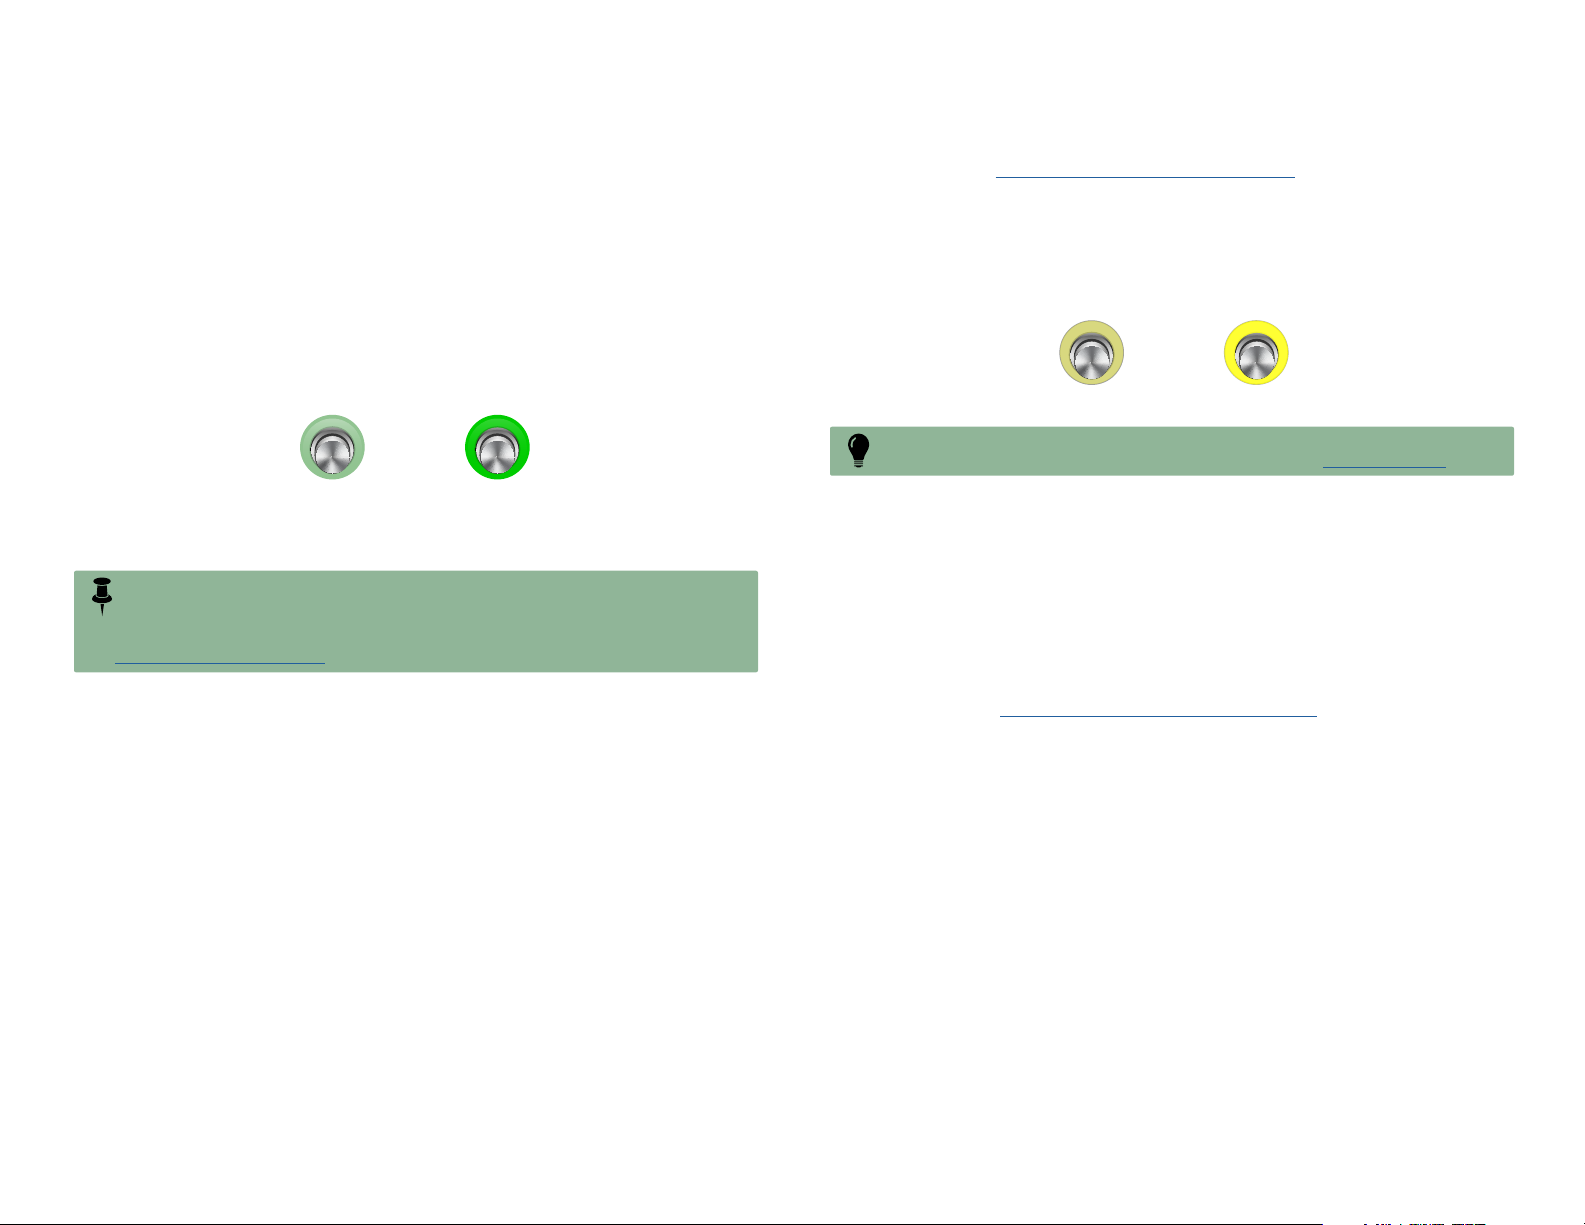
You can optionally re-purpose the TAP switch by choosing the Presets DEF Global
Settings option–see "TAP Footswitch Assign" on page 44.* This allows you to toggle
the device’s A, B, and C labelled footswitches to access the default, first Presets ABC
Bank (TAP is lit dim yellow) versus the second Presets DEF Bank (TAP is lit bright yellow). We’ve also pre-loaded the D, E, and F locations with factory presets, which you
can optionally modify.
Being the clever operator you are, you’ve likely already deduced that you can simply
press-release footswitch A, B, or C to toggle its respective preset between bypassed
(lit dim green), versus active (lit bright green). We’ve pre-loaded these three locations
with factory presets to get you started, which you can optionally replace with your own.
Bypassed
Dim Green
Figure 1: The A, B, and C switches indicate the Bypassed or Enabled state for the current preset
But there is more lurking below the surface... DL4 MkII includes an additional bank of three
presets accessible from the device, as well as MIDI access to 128 presets individually!
NOTE: If you bypass the current preset and enable the same preset again, it remains in
its edited state. If you load a different preset, your previously edited preset is recalled in
its last-saved state the next time you stomp its footswitch to enable it again. In short —if
you want to keep your modified preset settings, be sure to save it before loading another preset!
See "Saving a Preset" on page 11.
Enabled
Bright Green
Loading Presets A, B, and C
In its factory default state, DL4 MKII is set to access the Presets ABC Bank, which is
pretty self-explanatory—toggling the A, B, or C labeled footswitch bypasses and enables
preset A, B or C, respectively, as depicted above. These three preset locations come
pre-loaded with factory presets to get you started, which you can modify as desired.
To gain access to more presets, read on.
Presets ABC Bank
Dim Yellow
Figure 2: The TAP footswitch, when configured, selects and indicates the current preset bank
*TIP: If you don’t want to contemplate life without a dedicated TAP Tempo switch, you
can optionally connect a footswitch to FS 5/6 and configure its "Global Settings" for TA P.
Presets DEF Bank
Bright Yellow
Loading Presets 1 - 128 via MIDI
As covered in the preceding sections, the first six presets are arranged in banks of three
(A,B,C and D, E, F), and can be accessed via DL4 MkII’s footswitches. Alternatively,
these first six presets can also be accessed individually by sending MIDI Program
Change messages 000 through 005, respectively, to DL4 MkII.
The additional presets, 7 through 128, are not accessible from the DL4 MkII footswitches,
but are accessed individually, strictly via MIDI Program Change messages 006 through
127. Please also see "Accessing all 128 Presets" on page 50.
Note that, once you recall any preset via MIDI, its delegated DL4 MkII footswitch will
light up, allowing you to toggle its bypass, or press and hold the footswitch to save
your settings to the preset location. However, the current preset bank in use on DL4
MkII is not changed by MIDI preset loading. Thus, if you’ve configured the TAP switch
for the (yellow) Presets DEF bank select option, note that pressing any unlit A, B, or
C labelled DL4 MkII footswitch will still select the respective preset within the current
bank, indicated by the TAP switch’s dim yellow (Presets ABC Bank) or bright yellow
(Presets DEF Bank) state, as shown in Figure 2 above.
Loading Presets D, E, and F
In addition to the default bank of A, B, and C presets, also included is a second bank,
which includes the D, E, and F presets, as well as 125 additional presets accessible
strictly via MIDI that you can utilize for your own creations. These can be accessed
as follows.
10
Page 11
Saving a Preset
When you see current preset footswitch’s LED flashing approximately once every
two seconds, this tells you that your loaded preset is edited from its last-saved state.
Once you dial in that magical combination of settings, it’s a great idea to save them
to your current preset location. Saving captures the current delay and reverb, all knob
settings, tempo, and any existing expression pedal or external footswitch parameter
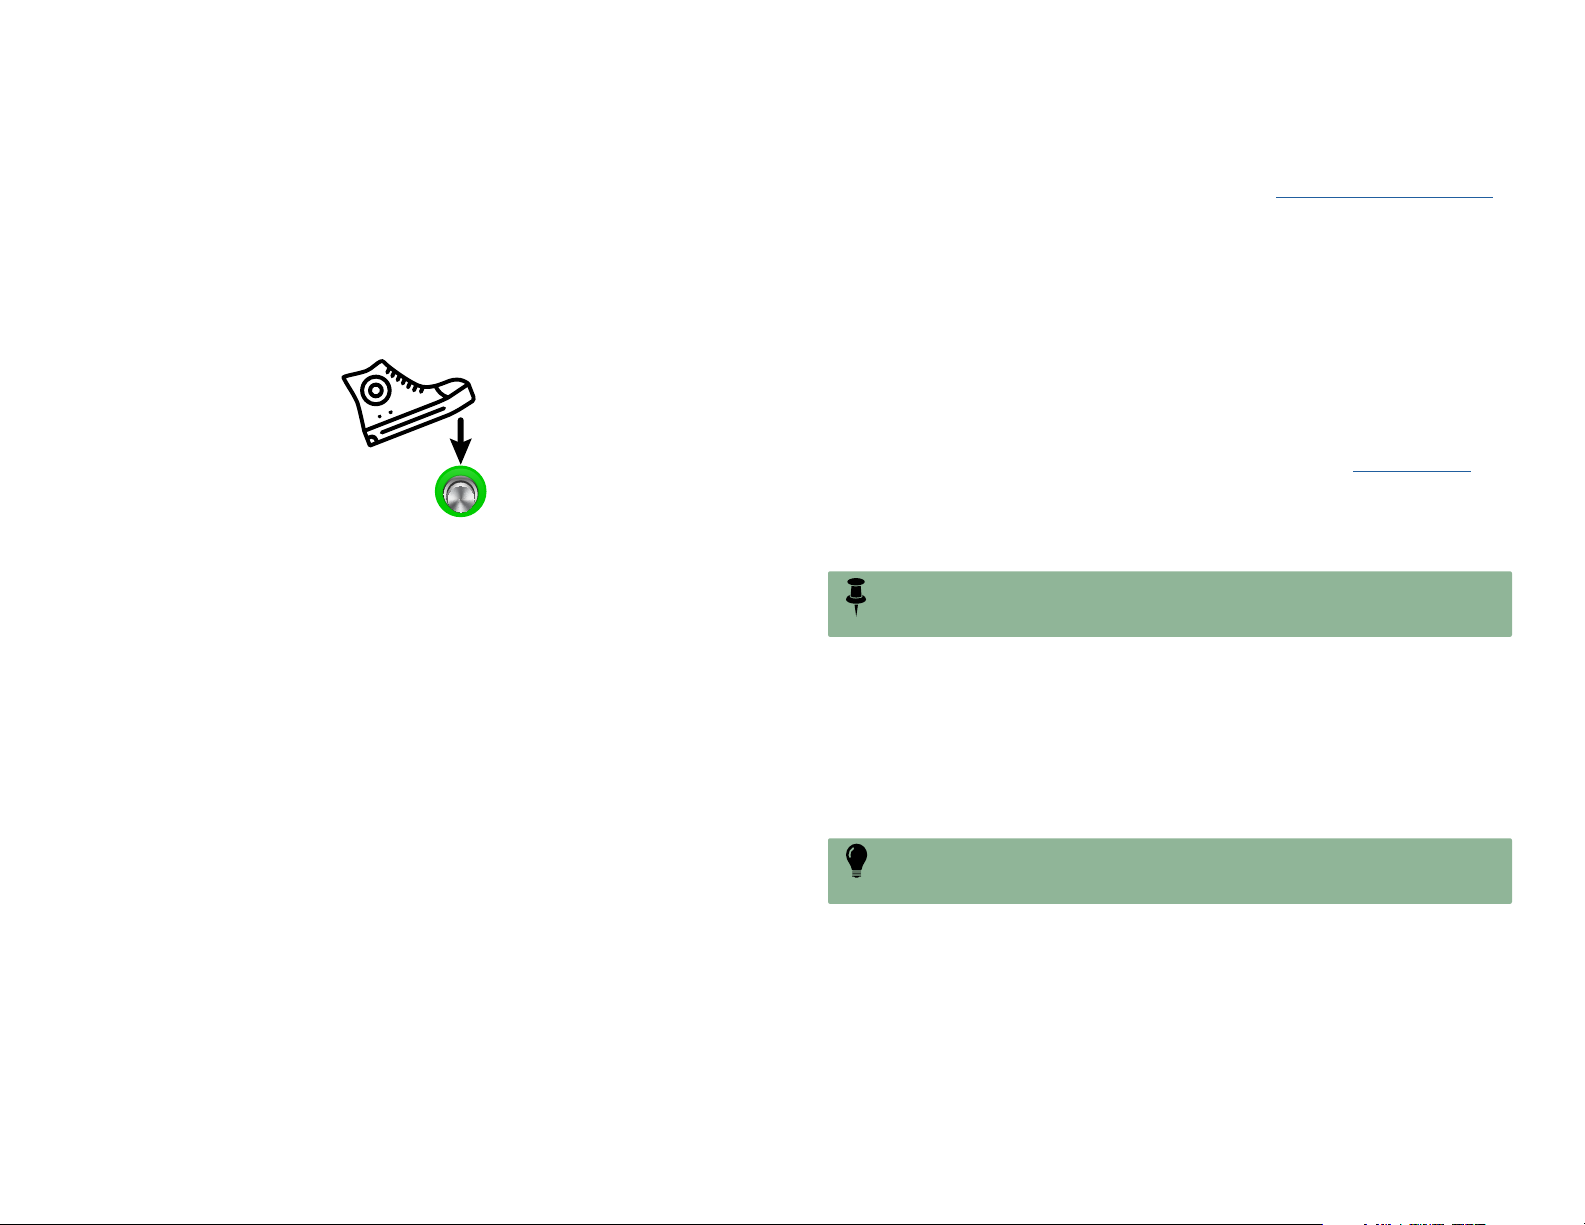
assignments. If you’d like to save your current settings, press and hold the currently-lit
A, B, or C footswitch for three to four seconds until you see its green light flash four
times rapidly, then release and your preset is saved, replacing the preset that previously
occupied this slot.
Press and hold the currently lit A, B, or C footswitch to save
Note that by performing the press-and-hold as described above, you’ll always be
saving to the specific preset location for the currently loaded preset. For example, if
switch A is currently lit:
• When your footswitches are controlling the default presets A, B, and C bank
(Global Settings - "Presets ABC" is selected), then press-hold switch A saves
to the preset A location.
• When your footswitches are controlling the presets D, E, and F bank (Global
Settings - "Presets DEF" is selected), then press-hold switch A saves to the
preset D location.
•
When you’ve recalled a preset via MIDI Program Change, the presets 1 through
128 are mapped to the A, B, C footswitches sequentially. Therefore, when loading preset 7 (via MIDI Program Change 006), you’ll see switch A lit, for preset
8, you’ll see switch B lit, for preset 10, you’ll see switch A list, etc.
Saved Parameter Value Indicator
When turning any of DL4 MkII’s six knobs to edit your preset’s selected delay model or
parameters (or when holding ALT/LEGACY and turning knobs to edit your reverb model
or parameters), you’ll see the ALT/LEGACY button’s LED temporarily light up bright white
at specific locations on the knob. When you see this white LED, it indicates this as the
parameter’s value that is saved in the current preset. This makes it easy to tell which
delay or reverb model, or to what value each knob is saved for the current preset. Note
that you’ll need to turn the knob fairly slowly to see where the LED lights up—and it will
remain lit white only for a few seconds before returning to its previous state.
Hit the Trails?
One rather important consideration is how to configure the behavior for Trails (the
repeats of your delay and decay of your reverb) when you bypass your preset. This
option can be changed within the Global Settings—see "Bypass Trails" on page 47.
Off - (The factory default setting) Bypassing your active preset abruptly silences the
delay and reverb trails.
On - Your delay and reverb trails decay naturally once the preset is bypassed.
Your delay and reverb trails for the current preset are always silenced once you activate
another preset, regardless of the Trails setting. The type of bypass you choose can be
a sonic factor for your trails as well—see the next section.
What Type of Bypass?
When you bypass a preset, you’re actually bypassing the entire DL4 MkII device, so a
few decisions are in order for exactly how you prefer things to behave. You can choose
one of the following options within the device’s Global Settings > "Bypass Type"
True Bypass - Your input signal is sent directly through DL4 MkII with no A/D/A
(Analog to Digital to Analog) conversion and all DSP is bypassed. This means that
all Trails (if “On”), Looper playback, and the MIC IN are muted when you bypass the
current preset.
NOTE: For the following three options, we’re describing the audible behaviors assuming
you have Bypass Trails set to On (see preceding section). If Trails is Off, you’ll not hear
any trails, regardless of the Bypass Type selected.
Buffered Bypass - (The factory default) Your input signal continues to be sent directly
through DL4 MkII with no A/D/A conversion, its signal to the DSP is muted, and the
DSP’s existing delay and reverb trails are allowed to decay naturally.
DSP Bypass - Your input is sent through the DSP path, along the delay and reverb,
but any further delay processing is bypassed. The DSP’s existing trails decay naturally.
Dry Kill - Your input is completely muted, but any existing DSP’s trails decay naturally.
This behavior is akin to muting a mixer or effects loop send to a rack processor while
the effects return is still active.
TIP: You can still tap in a tempo using your TAP (or other Tap-assigned) switch when DL4
MkII is bypassed. (You couldn’t do that on the original DL4, so there’s something to gloat
about at that next after-gig party.)
11
Page 12
Restoring Factory Presets
DL4 MkII is pre-programmed with a set of great factory presets at birth, containing
six unique settings within the presets A~F locations. The MIDI-accessible preset
locations, 7~128, include a common preset, which differs from the six A~F factory
presets (also, see "Factory Presets - Existing Expression Pedal Assignments" on
page 16). All factory presets are over-written with your custom settings whenever
you perform a preset save. Should you ever wish to restore the factory presets—and
erase the sounds you might have saved in any of the 128 preset locations—you
can perform a Factory Restore.
1.
Press and hold both the A and TAP footswitches while connecting the
power adapter to the DC IN.
2. Continue to hold the switches for approximately 8 seconds, until you
see the green LEDs light up.
Your DL4 MkII device is restored with all factory presets and original default global
settings.
Fortunately, no calculators or math are required with DL4 MkII. By default, all delay
models are configured so that you’ll see the TAP switch’s LED flashing at 1/4 note
subdivisions of the current Tap Tempo. If you stomp several times on the TAP switch,
counting in 1/4 notes, this changes the current Tap Tempo and your repeats dutifully
follow. When you change to a different delay model, you’ll see the tempo changes to
the new model’s default delay time (unless you’ve set a note subdivision, or changed
to the Global Tempo option—see the following sections for all about those topics).
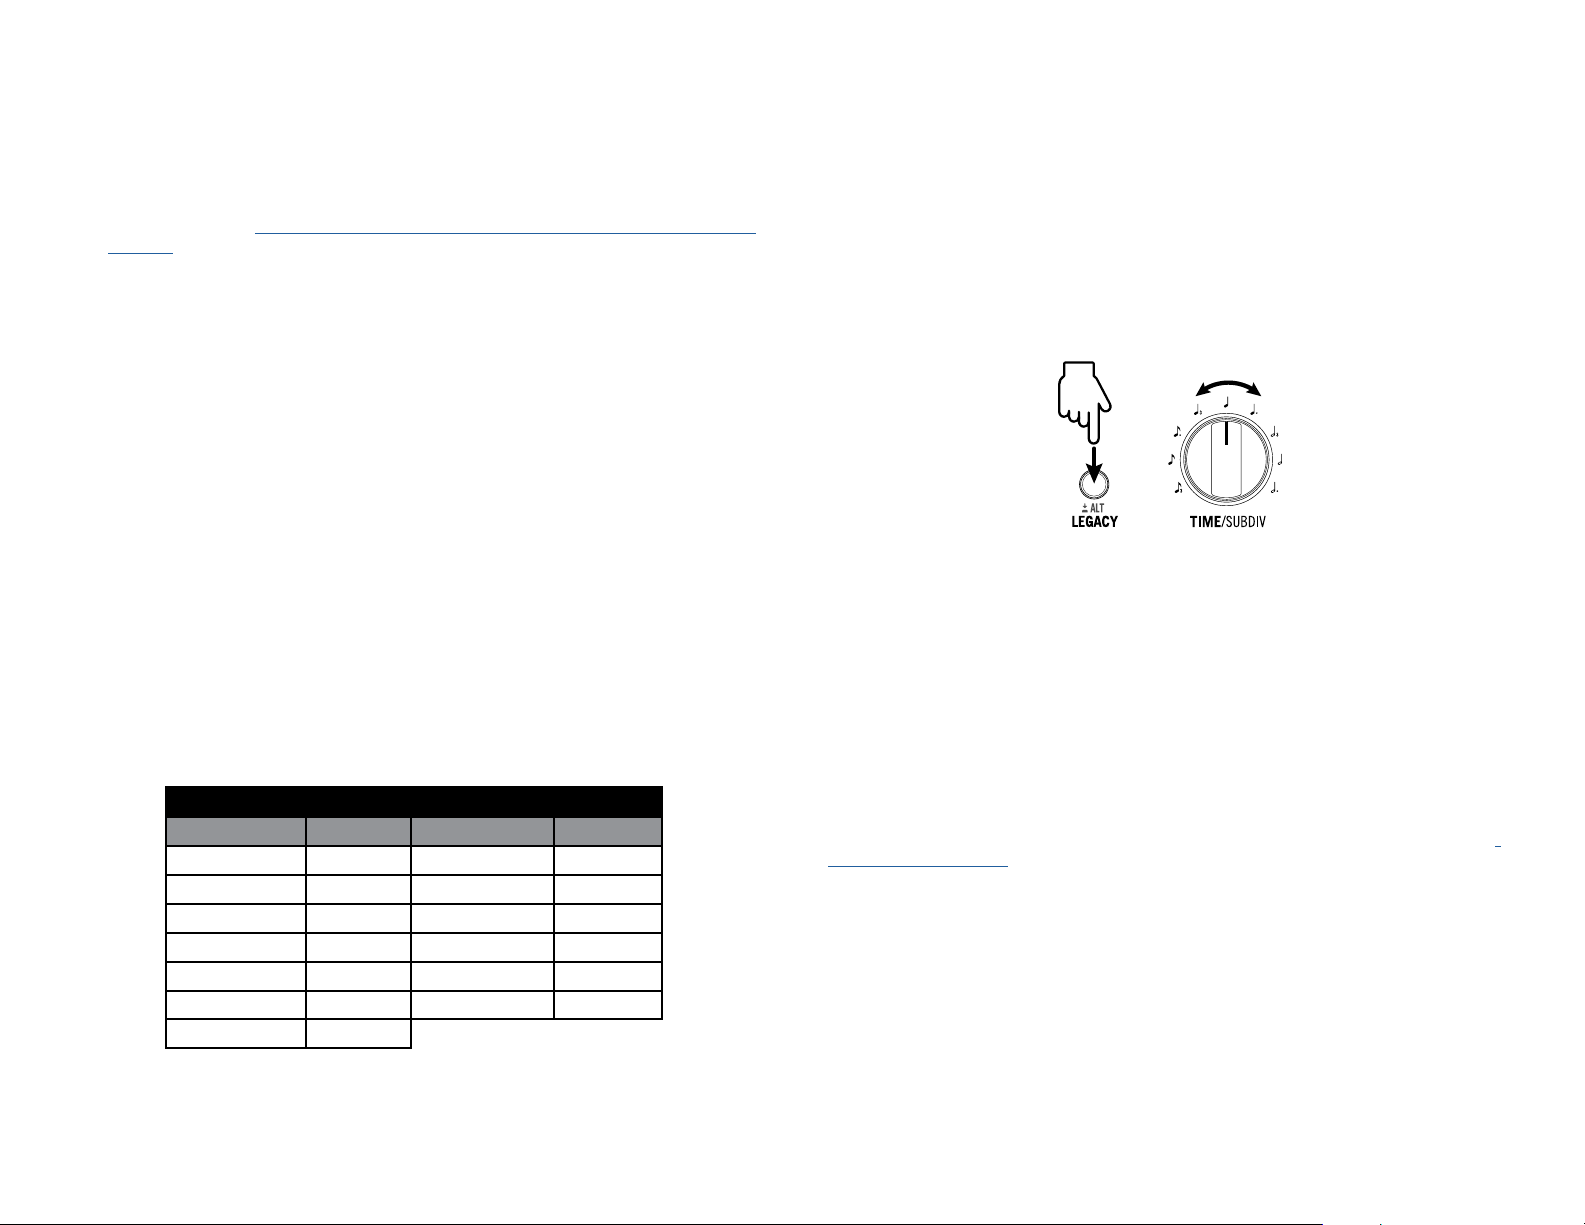
Note Subdivisions
To change to a different note subdivision of the tempo, press-hold the ALT/LEGACY
button while turning the TIME/SUBDIV knob to the selected note value on the knob label.
+
About Tap Tempo
As you’ve likely surmised by now, you can set a tempo on your DL4 MkII simply by "tapping" on the TAP footswitch rhythmically a few times —you’ll see the TAP light flash to
indicate the current tempo. But you may be wondering what all this fuss is about "Tap
Tempo" and "Note Subdivisions," and why you might want to use them.
In the early days, when tape and mechanical echo units first roamed the Earth, engineers in lab coats had to manually calculate the correct delay time for the tempo of a
song by dividing 60,000 into the tempo to determine the 1/4 note delay value. From
there they could calculate all of the wonderful possible rhythmic subdivisions, using a
multiplier table like this:
1/4 Note Delay Time Multiplier Table
Note Value Multiplier Note Value Multiplier
Whole Note 4 Dotted 1/8 .75
Dotted 1/2 3 1/8 Note .5
1/2 Note 2 Triplet 1/8 .333
Triplet 1/2 1.333 Dotted 1/16 .375
Dotted 1/4 1.5 1/16 Note .25
1/4 Note 1 Triplet 1/16 .167
Triplet 1/4 .667
When slathering your signal with spacious delay, it is often most pleasing to hear those
repeats in sync with the song’s tempo—and perhaps at a specified note value subdivision (like the ubiquitous dotted 1/8th note salvo employed by The Edge).
Press-hold ALT/LEGACY button and turn TIME/SUBDIV knob to choose a note subdivision
The red TAP light continues to flash at the 1/4 note of the current Tap Tempo for reference,
but you’ll hear your delay repeats at the selected subdivision of the current tempo. Once
you’ve set a note subdivision, your specific tempo and selected note subdivision will
not change when selecting a different a different delay model within your current preset.
If you prefer to just return to just setting your tempo "by ear," simply turn the TIME/
SUBDIV knob (without touching the LEGACY button) to exit the “note subdivision mode”
and adjust your delay time manually. The red TAP light returns to flashing at 1/4 notes
of your new tempo rate for reference.
Per Preset or Global Tempo
By default, the current Tap Tempo is stored and recalled individually Per Preset. If
you prefer, you can change this behavior to Global, by way of the Global Settings >
"Tempo Preset/Global" option, so that your Tap Tempo remains unfettered across preset
changes, until you change it again manually.
12
Page 13
Configuring Delay and Reverb Routing
Stereo vs. Mono Output
Maybe this has kept you up at night pondering —is it better to "delay" your reverbs,
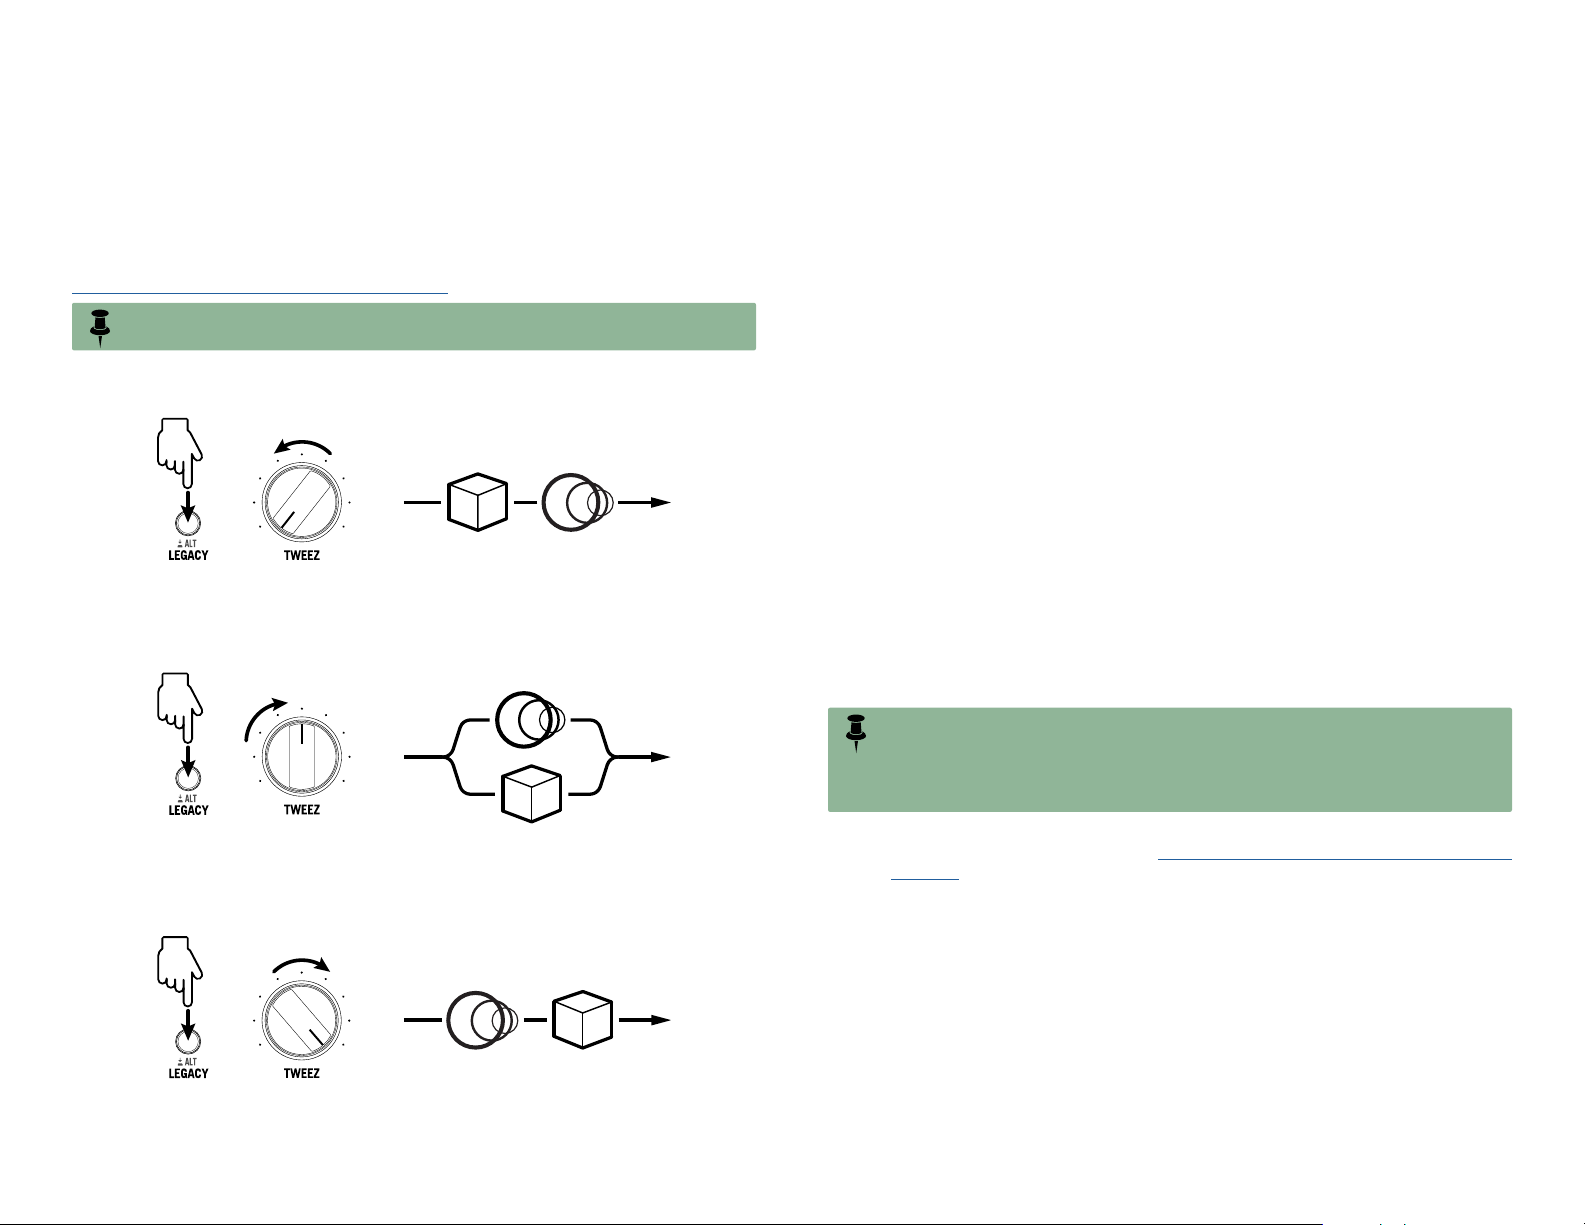
“reverb” your delays, or neither? If delay follows reverb, the reverb’s tail will have distinct echoes applied. If reverb follows delay, the delay’s echoes will have a schmear of
reverb administered. Conversely, if the reverb and delay are on separate parallel paths,
they won’t affect one another, resulting in cleaner, more defined notes. Exploit these
options as follows—your routing is saved and recalled individually, per preset (also see
"Secret Reverbs List and Controls" on page 27).
NOTE: No matter which of these routing options you choose, it never affects the stereo
aspect of your signal—all delays and reverbs process in stereo. See the next section.
To Set the Reverb before the Delay - Press-hold the ALT/LEGACY button and turn
TWEEZ to minimum.
+
To Set the Delay and Reverb in Parallel - Press-hold the ALT/LEGACY button and
turn TWEEZ to 50%.
+
=
Reverb before delay
=
For those of you that care to know about such details... Many models included on
your DL4 MkII create a wide, wonderful stereo effect when you’ve connected both the
L/MONO and RIGHT 1/4" outputs to a stereo amplifier setup or monitoring system.
Here’s the deal:
•
If you connect a single, mono source into the L/MONO (or MIC IN), the source is
fed into DL4 MkII’s left and right audio channels and processed by these effects
in stereo. As long as you utilize both the L/MONO and RIGHT outs, you’ll hear
all your DL4 MkII effects in stereo.
• If you connect a stereo sound source into the L/MONO and RIGHT inputs, the
left and right sound sources are processed discretely, keeping your stereo signal
intact throughout DL4 MkII’s entire circuit (assuming you are also utilizing both
the L/MONO and RIGHT outputs).
But the above then begs the question—what happens to these stereo effects when
you’re using only DL4 MkII’s single L/MONO output? The answer is that the result is
always going to be mono. DL4 MkII treats some stereo effects differently than others
to provide the best sonic results in mono:
•
The Harmony Delay, Stereo Delay, Dual Delay, Euclidian Delay, Crisscross, Ping
Pong, and Multi Pass models all create distinct left and right echo outputs in
stereo. Therefore, for these delay models we ever so gently fold both signals
down to mono so you don’t miss out on any of those coveted repeats.
• The models that include modulation typically have some left/right offset sweep
for a widening impression. But folding these models’ modulation down to a
mono output can result in phasing or other irksome artifacts. Therefore, in most
cases, DL4 MkII passes along only the left channel of these models as your
mono signal for the most satisfying results.
NOTE: In the odd case where you might be connecting a stereo source into both DL4
MkII’s LEFT and RIGHT inputs, but only using the L/MONO output, then some effects just
aren’t going to include your right input signal at all. The moral of the story here is, if you’re
wanting full stereo throughput in and out of DL4 MkII, you should utilize both the L/MONO and
RIGHT outputs.
Reverb and delay in parallel
To Set the Reverb after the Delay - Press-hold the ALT/LEGACY button and turn
TWEEZ to maximum.
+
=
Reverb after delay
13
•
The Classic Looper, as well as the 1 Switch Looper, can be configured as mono
or stereo—see Global Settings - "Setting the Looper to Mono vs. Stereo" on
page 20. The factory default Looper setting is Stereo. Therefore, if you are
using both the L/MONO and RIGHT inputs to feed a stereo signal into DL4
MkII, you’ll want to keep the current Stereo setting to record and play back
your loops that way.
Page 14
Setting up an Expression Pedal and Footswitches
You can connect an expression pedal for dutiful foot control of one or more effect
parameters while your hands are busy making music (or whatever your hands are busy
doing—we don’t care to know). Optionally, connect a footswitch (or two!) to toggle DL4
MkII’s “Footswitch 5” and/or “Footswitch 6” selectable options. Note that it is also
required that you adjust the device’s Global Settings options for your specific pedal/
footswitch configuration, as indicated within the following examples.
NOTE: You’ll need to purchase an expression pedal and footswitch(es) separately to
use with DL4 MkII:
The Line 6 EXP-1 pedal is a fine choice, or most 3rd party expression pedals will work as well.
For single or dual external footswitches, you’ll want to get the “momentary” (unlatched) type.
It is possible to configure your expression pedal and/or footswitch(es) to control numerous
parameters simultaneously for the preset’s current delay and reverb model, and your
assignments are stored with the current preset once you save it. Just remember that
when you change the delay or reverb model within the preset, all existing assignments
are cleared (and gone permanently if you then save the preset). The best practice is to
load your preset, choose your preferred delay and reverb models and their settings,
then perform the steps to configure your preferred delay and/or reverb parameter pedal
or footswitch assignments, as provided in the following sections.
TS versus TRS Cable Types
First things first... In case you are not already familiar, you’ll want to be able to identify
the difference between these two types of 1/4" cable connections for your expression
pedal or footswitches for our examples in this section:
• A Tip-Sleeve (TS) type cable consists of two conductors, the Tip (positive) and
Sleeve (ground).
•
A Tip-Ring-Sleeve (TRS) type cable consists of three conductors: the Tip (positive 1), Ring (positive 2), and Sleeve (common ground).
IMPORTANT! To avoid potentially triggering signals that could get loud through
your amplifier or monitoring system, please reduce your volume before connecting
anything into the DL4 MkII EXP PEDAL jack, and be sure to configure the Global Settings
> "Pedal Jack Functionality" to the settings recommended in the following examples to
match your specific setup.
Connecting an Expression Pedal
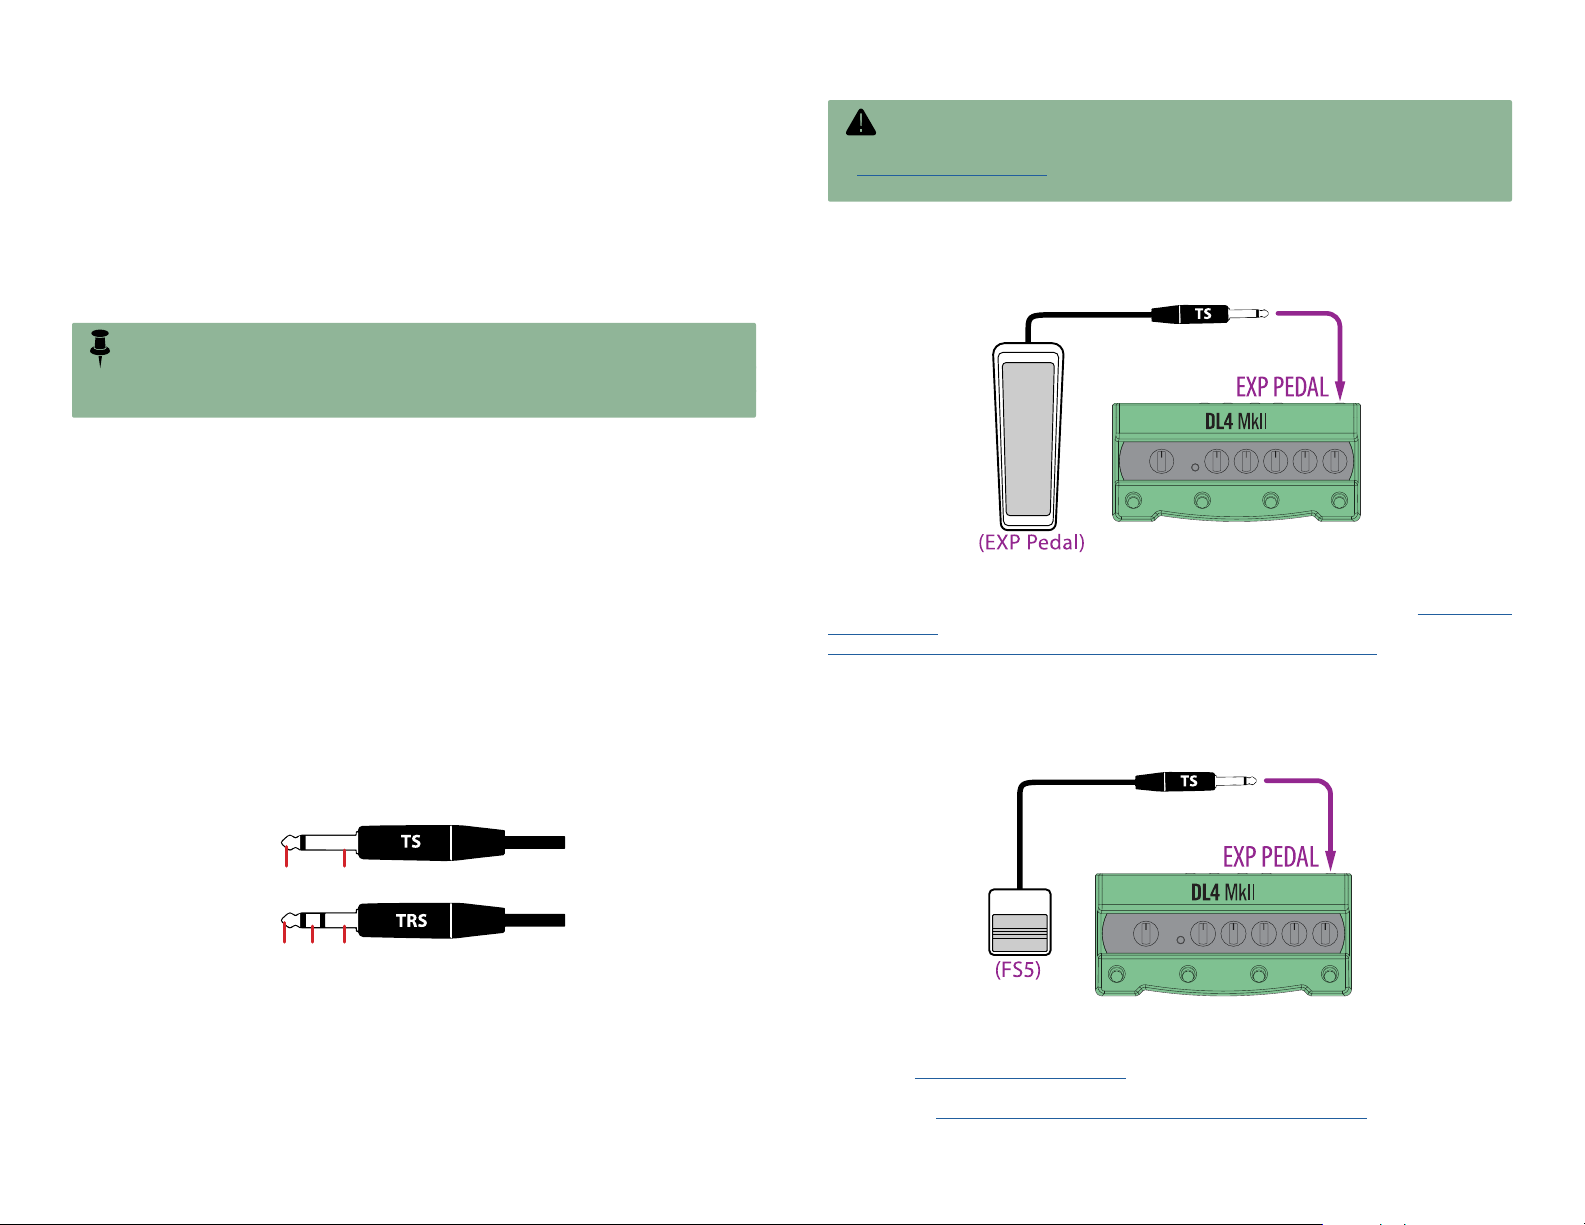
If you’re connecting only an expression pedal, use a TS instrument cable and plug into
the EXP PEDAL jack.
Connecting an expression pedal (TS cable connection)
For this expression pedal connection, you’ll want to keep Global Settings > "Pedal Jack
Functionality" on the default EXP Pedal Only option. To put your pedal to use, skip to
"Configuring One or More Parameters for Pedal Control" on page 15.
Connecting a Single Footswitch
If you’re connecting only a single footswitch, including the typical affixed TS cable, you
can plug it into the EXP PEDAL jack.
Tip
Sleeve
Tip Ring
The EXP PEDAL jack on the rear of DL4 MkII is a TRS type jack, into which you can
connect a single expression pedal or single footswitch using a TS cable, or a dualfootswitch using a TRS cable. It is also possible to connect an expression pedal with
a TS cable and a footswitch with a TS simultaneously, provided you connect them into
a dual TS-to-TRS splitter (or “Y” adapter). Please see the following hookup examples.
Sleeve
Connecting a single footswitch (TS cable connection)
For this type of single footswitch-TS connection, you’ll need to change the Global
Settings > "Pedal Jack Functionality" to the Single Footswitch option—The
footswitch is then able to control the FS5 function. To choose a different FS5
function, see "Configuring Footswitch Control Options" on page 17.
14
Page 15
Connecting an Expression Pedal and Footswitch
TIP
RING
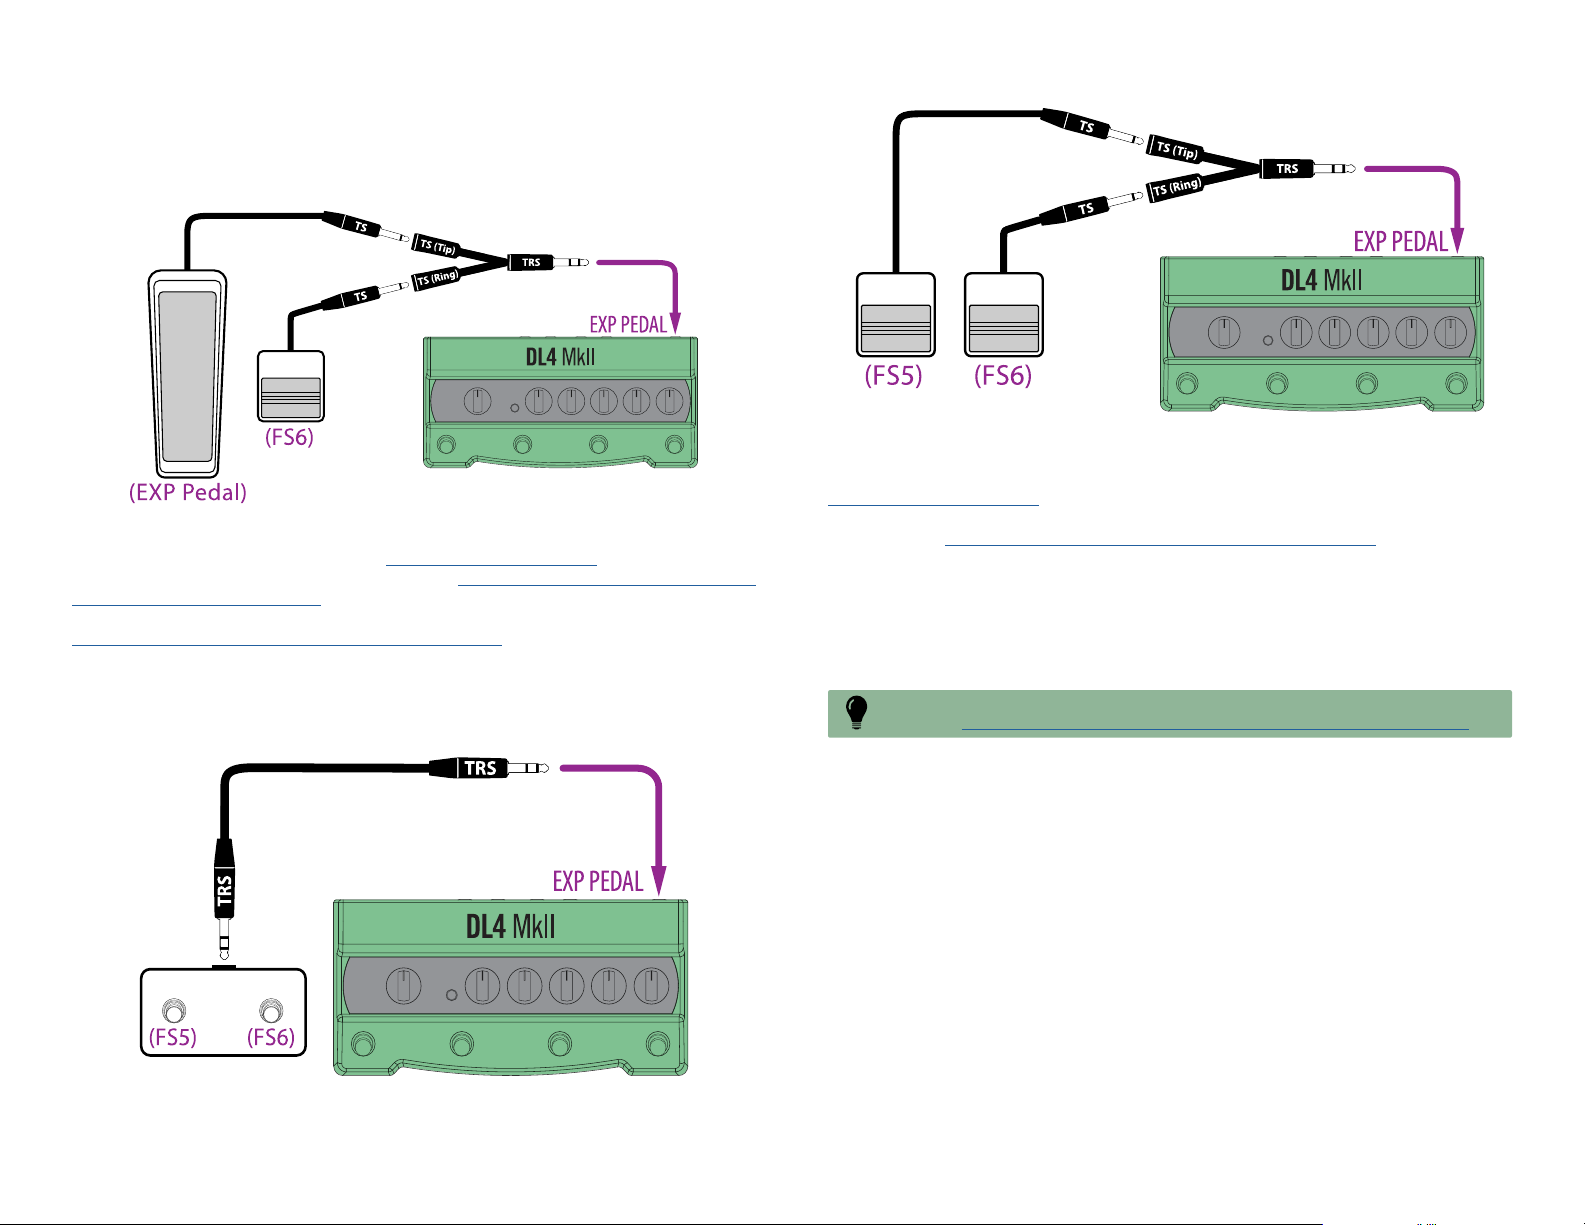
For this setup, use a dual TS-to-TRS splitter and plug into the EXP PEDAL jack. Your
expression pedal should connect to the "Tip" and the footswitch to the "Ring" leads
of the splitter.
Connecting an expression pedal and footswitch (dual TS-to-TRS splitter connection)
You’ll need to set the Global Settings > "Pedal Jack Functionality" to the EXP Pedal +
Footswitch option. To put your pedal to use, see "Configuring One or More Parameters
for Pedal Control" on page 15. The footswitch controls FS6 which, by default, trig-
gers the “Squeal” delay repeats option—to change your footswitch’s FS6 function, see
"Configuring Footswitch Control Options" on page 17.
Connecting Two Footswitches
You can achieve this type of setup using either a dual-footswitch unit (which typically utilizes
a TRS cable) or two individual footswitches (each of which typically utilizes a TS cable).
Connecting two individual footswitches (dual TS-to-TRS splitter connection)
For either of these footswitch connections, you’ll need to configure Global Settings >
"Pedal Jack Functionality" to the Two Footswitches option. By default, FS5 is set for
“Expression Toggle” and FS6 for the “Squeal” delay repeats option—to change these
functions, see "Configuring Footswitch Control Options" on page 17.
Configuring One or More Parameters for Pedal
Control
TIP: The A~F factory presets already include pre-assigned parameters for an expression
pedal—see "Factory Presets - Existing Expression Pedal Assignments" on page 16.
To create your own pedal assignments, operation is designed to be simple. For the
following example, we’ll configure the MIX knob for the current delay model of preset
A to be controlled by an expression pedal.
Connecting a dual-footswitch (TRS - TRS connection)
1. Load any preset on DL4 MkII, preferably one you’re OK with editing
and saving with your new changes.
2.
Change the delay and/or reverb model and adjust their settings to
your liking.
Changing the models removes any existing pedal and footswitch assignments, and
provides you with a clean start for creating your new assignments. (Optionally, you
can leave the preset’s models and your new assignments will be created in addition
to any existing ones.)
3. Plug your expression pedal into the EXP PEDAL jack.
See the preceding illustrations for how to connect your pedal.
4. Move your expression pedal to the full heel-down position.
15
Page 16
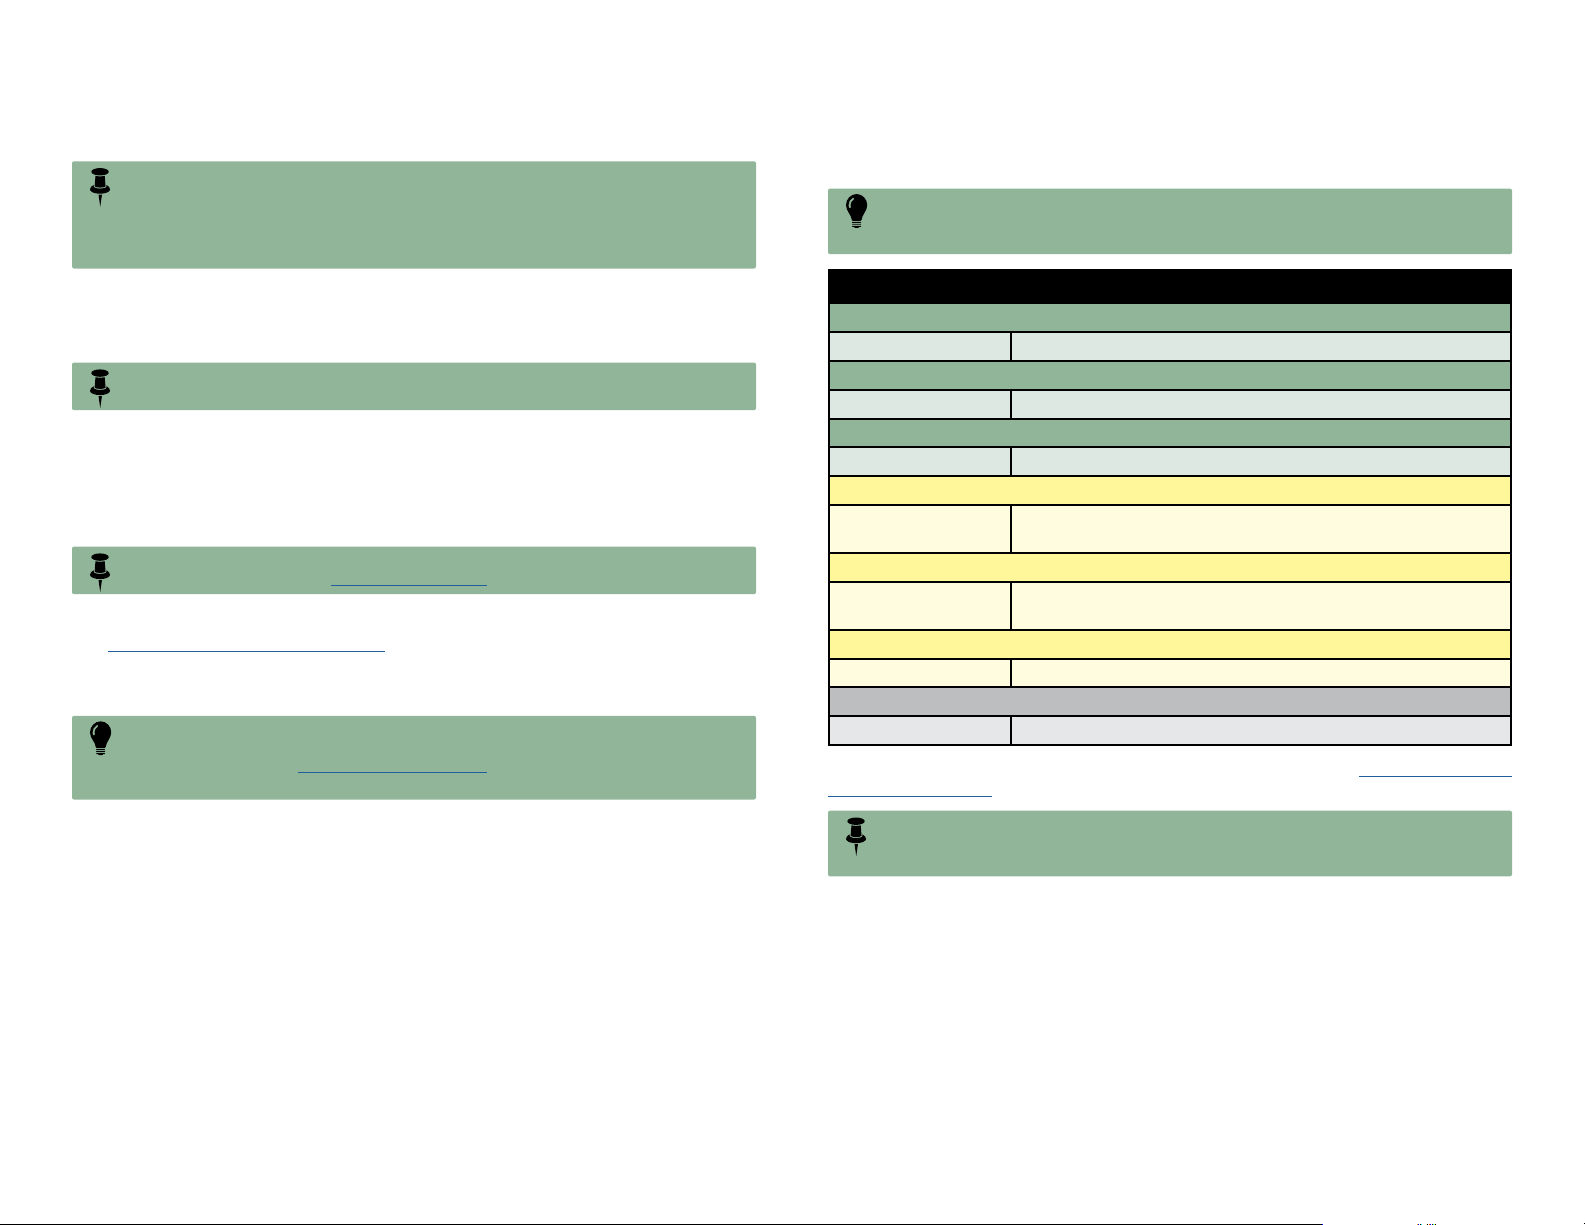
5. Turn the MIX knob to a very low setting.
This new MIX knob setting is stored for the pedal’s minimum, heel-down value.
NOTE: Optionally, you can adjust other parameters for the current delay to the pedal as
well before proceeding to the next step. Just like with MIX, any knob you adjust—and the
value you choose—will be assigned to the heel-down position of the pedal.
Remember that you are not limited to just controlling delay parameters—you can also press-hold
the LEGACY button and turn the desired knobs to assign the current reverb effect’s parameters!
Factory Presets - Existing Expression Pedal Assignments
The following expression pedal assignments are already configured within factory
presets A~F. Just connect your pedal and give them a try!
TIP: In most of the presets, where the expression pedal is set to control the delay’s
REPEATS, pushing your pedal to the maximum toe position will send the delay into “squeal”
with infinite, runaway repeats!
6. Move your expression pedal forward to the fully toe-down position,
and set the MIX knob to 50%.
This new MIX knob setting is stored for the pedal’s maximum, toe-down value.
NOTE: If you assigned additional parameters in the previous step, also adjust each to the
value you wish to be assigned to the pedal’s toe-down position.
7. Rock your expression pedal back and forth and you’ll hear the MIX
(and any additional assigned parameters) adjust accordingly.
Don’t change your current delay or reverb model once you’ve created your pedal
assignments—doing so will clear your assignments on each. (Of course, if you want
to clear your assignments, you can change the models and go back to step 4.)
NOTE: If your expression pedal happens to control parameters in the reverse direction,
change the Global Settings > "EXP/Switch Polarity" option to Inverted.
8. Save the preset to store your new expression pedal assignment (see
"Saving a Preset" on page 11).
Your pedal-assigned parameter(s) will be recalled at the specific values at which
they are set when you save the preset.
TIP: Once your pedal assignment(s) are configured for your preset, note that you can
optionally connect a single footswitch in place of the expression pedal (via a TS cable),
change the Global Settings > "Pedal Jack Functionality" to the Footswitch Only option and
the footswitch will toggle the expression pedal-assigned parameters’ min. and max. values!
Factory Presets: Models & Expression Pedal Assignments
Preset A: Adriatic Delay and Ganymede Reverb
Pedal Assignments
Preset B: Cosmos Echo and Plate Reverb
Pedal Assignments
Preset C: Multi-Pass Delay and Searchlights Reverb
Pedal Assignments
Preset D: Vintage Digital Delay and Hall Reverb
Pedal Assignments
Preset E: Glitch Delay and Particle Verb Reverb
Pedal Assignments
Preset F: Transistor Tape Delay and Hot Springs Reverb
Pedal Assignments
Presets 7~128 (via MIDI*): Ping Pong Delay and Double Tank Reverb
Pedal Assignments
*The Preset 7~128 locations are accessible only via MIDI—see "Accessing all 128
Presets" on page 50.
NOTE: Factory presets A~F each have a Reverb model loaded, as indicated in the above
table, but with the Reverb - Mix set at 0% (dry). Hold ALT/LEGACY and turn the MIX knob
to blend in some reverb to taste!
Delay TIME, REPEATS, and TWEEZ (modulation depth)
Delay REPEATS and TWEEZ (wow & flutter)
Delay REPEATS and MIX
Delay REPEATS, FEEDBACK, and TWEAK (sample rate and
bit depth)
Delay REPEATS, TWEAK (pitch), and TWEEZ (slice feedback,
sequence drift, and shuffle)
Delay TIME, REPEATS, and TWEEZ (wow and flutter)
None
16
Page 17
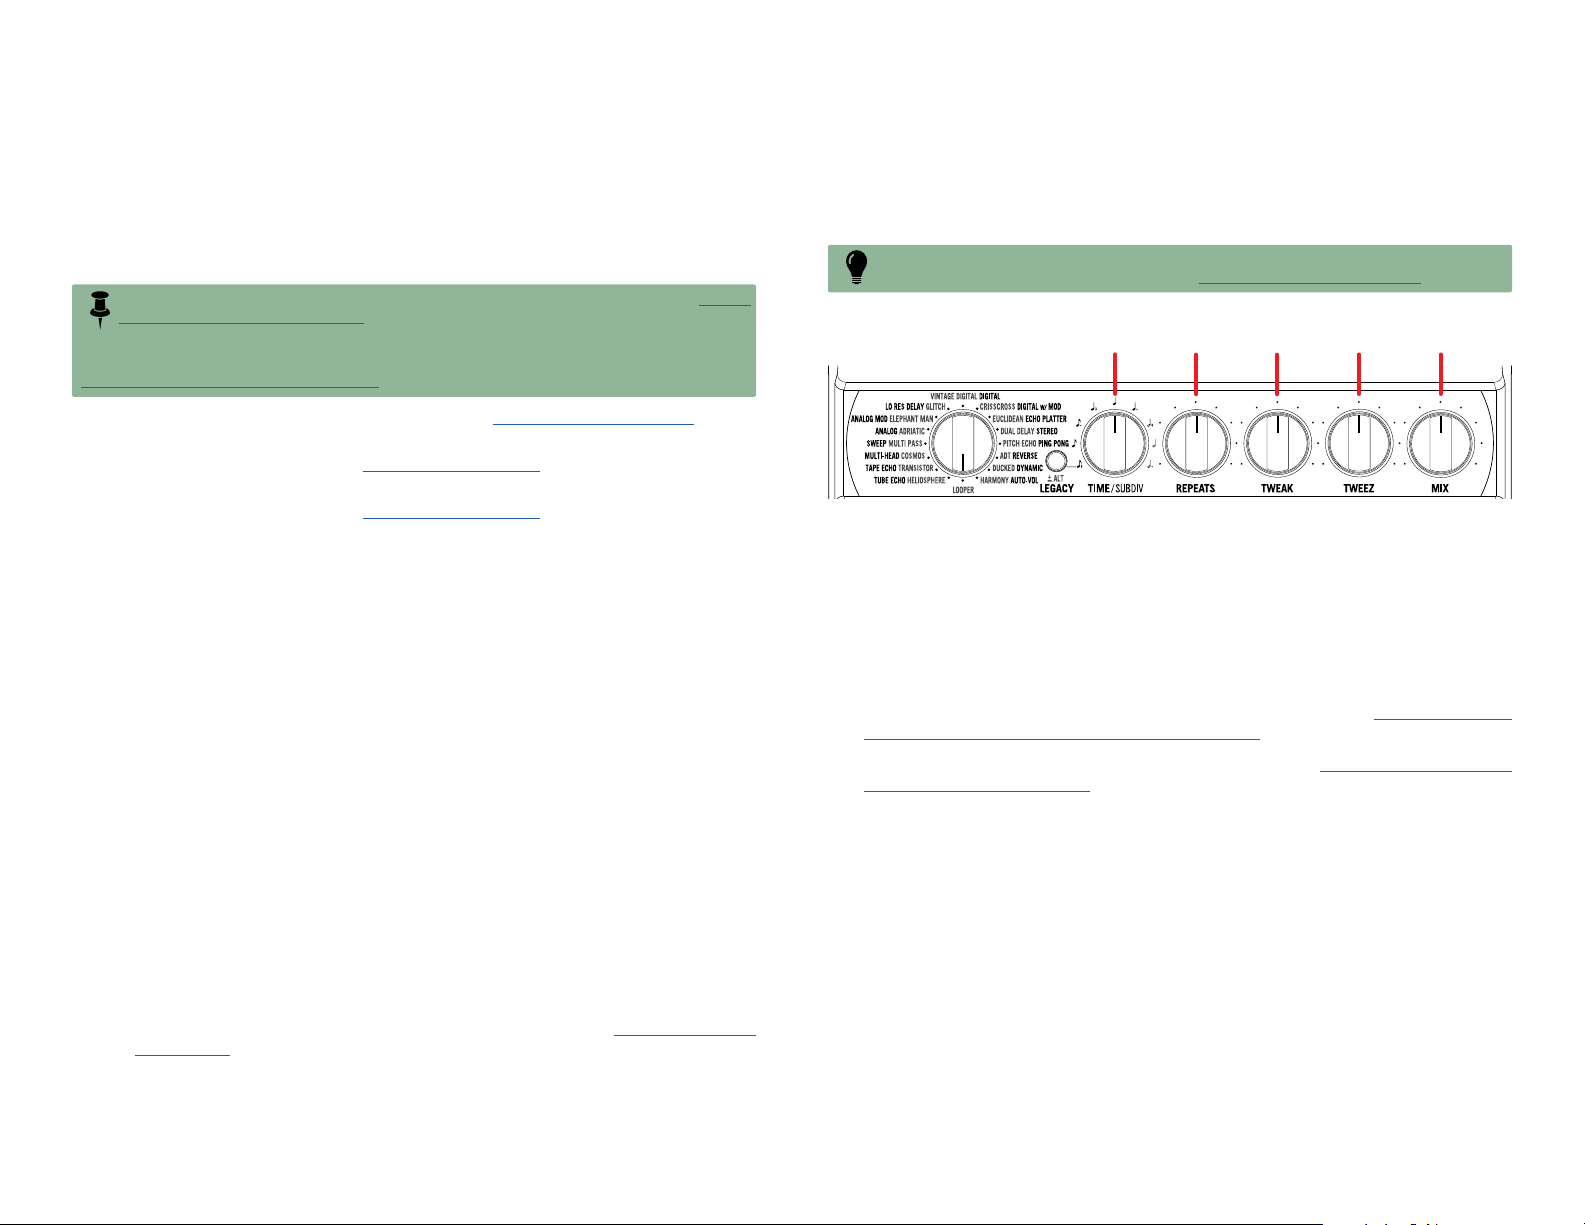
Configuring Footswitch Control Options
Controlling The Classic Looper Parameters
Your footswitches can be set up to each control the desired function by managing their
Global Settings, as follows.
1.
Choose the preferred footswitch function for each, as described
within the Global Settings table (Tap Tempo, Looper Mode, Expression
Toggle, or Squeal).
NOTE:
The TAP footswitch offers the option to control the 1 Switch Looper (see "Using
the 1 Switch Looper" on page 23), and external footswitches 5 and 6 offer the option
to enter/exit the Classic Looper mode.
The TAP footswitch also offers the additional option to control the Presets DEF bank (see
"Loading Presets D, E, and F" on page 10).
• For the on-board TAP footswitch, go to the "TAP Footswitch Assign" option.
The Factory default setting is TAP Tempo.
• For Footswitch 5, go to the "Footswitch 5 Assign" option. The factory default
setting is Expression Toggle.
• For Footswitch 6, go to the "Footswitch 6 Assign" option. The factory default
setting is Squeal.
2.
If choosing Expression Toggle, you can then configure the footswitch
to control any parameter (or multiple parameters) per preset—much
like is possible with an expression pedal, where the switch toggles
between your two defined parameter values.
To configure an Expression Toggle footswitch:
•
Load a saved preset and choose the desired delay and reverb models and
their settings.
• Press and release the footswitch once.
• Turn a DL4 MkII knob to the desired setting (for example, turn the MIX knob
to a low value).
• Press and release the footswitch once again.
• Turn the same DL4 MkII knob to a different value (turn the MIX knob to a higher
value).
•
Optionally, repeat the above previous four steps on the current preset to assign
another parameter for simultaneous control.
• Now when you toggle the Expression Toggle switch, it will toggle the current
delay model’s mix level (as well as any other configured parameter) between
the two set values.
• Save the preset to retain your footswitch assignments (see "Saving a Preset"
on page 11). You can repeat the steps on the same preset to update them
to a different parameter—and configure other presets as well.
There is even more control to be had with your expression pedal and footswitches—you
can also configure them to control the Classic Looper mode parameters. This allows
you to perform feats such as manipulating the Looper’s built-in echo parameters and
the loop playback volume, all while actively using the Classic Looper!
TIP: If not yet familiar, it would probably be a good idea to read up on the Classic Looper
before jumping into the following steps—see "Using the Looper" on page 19.
Echo
Time
Functions of knobs while in Classic Looper mode
1.
Set the DL4 MkII’s Selector knob to LOOPER to enter the Classic
Echo
Repeats
Mod
Depth
Echo
Volume
Loop
Volume
Looper mode.
2. With your expression pedal and/or footswitches connected, you can
create an assignment to any (or more than one, for simultaneous
control) of the Looper mode’s TIME, REPEATS, TWEAK, TWEEZ, or
MIX knobs.
For creating expression pedal assignments to these knobs, see "Configuring One
or More Parameters for Pedal Control" on page 15.
For creating footswitch assignments to these knobs, see "Configuring Footswitch
Control Options" on page 17.
Once you’ve create pedal or footswitch assignments to these knobs,
your assignments remain intact whenever you come back to the Classic
Looper mode from any preset, and even after you’ve powered DL4
MkII off and back on again!
17
Page 18
Using a Microphone
Yet another new addition to the DL4 MkII incarnation is the inclusion of a Mic input. This
opens up a new world of possibilities for your new little green box! Not only can you
now embellish your verses, choruses, and poetry readings, but imagine the potential
looping creations with acoustic instruments and other mic’d up sources.
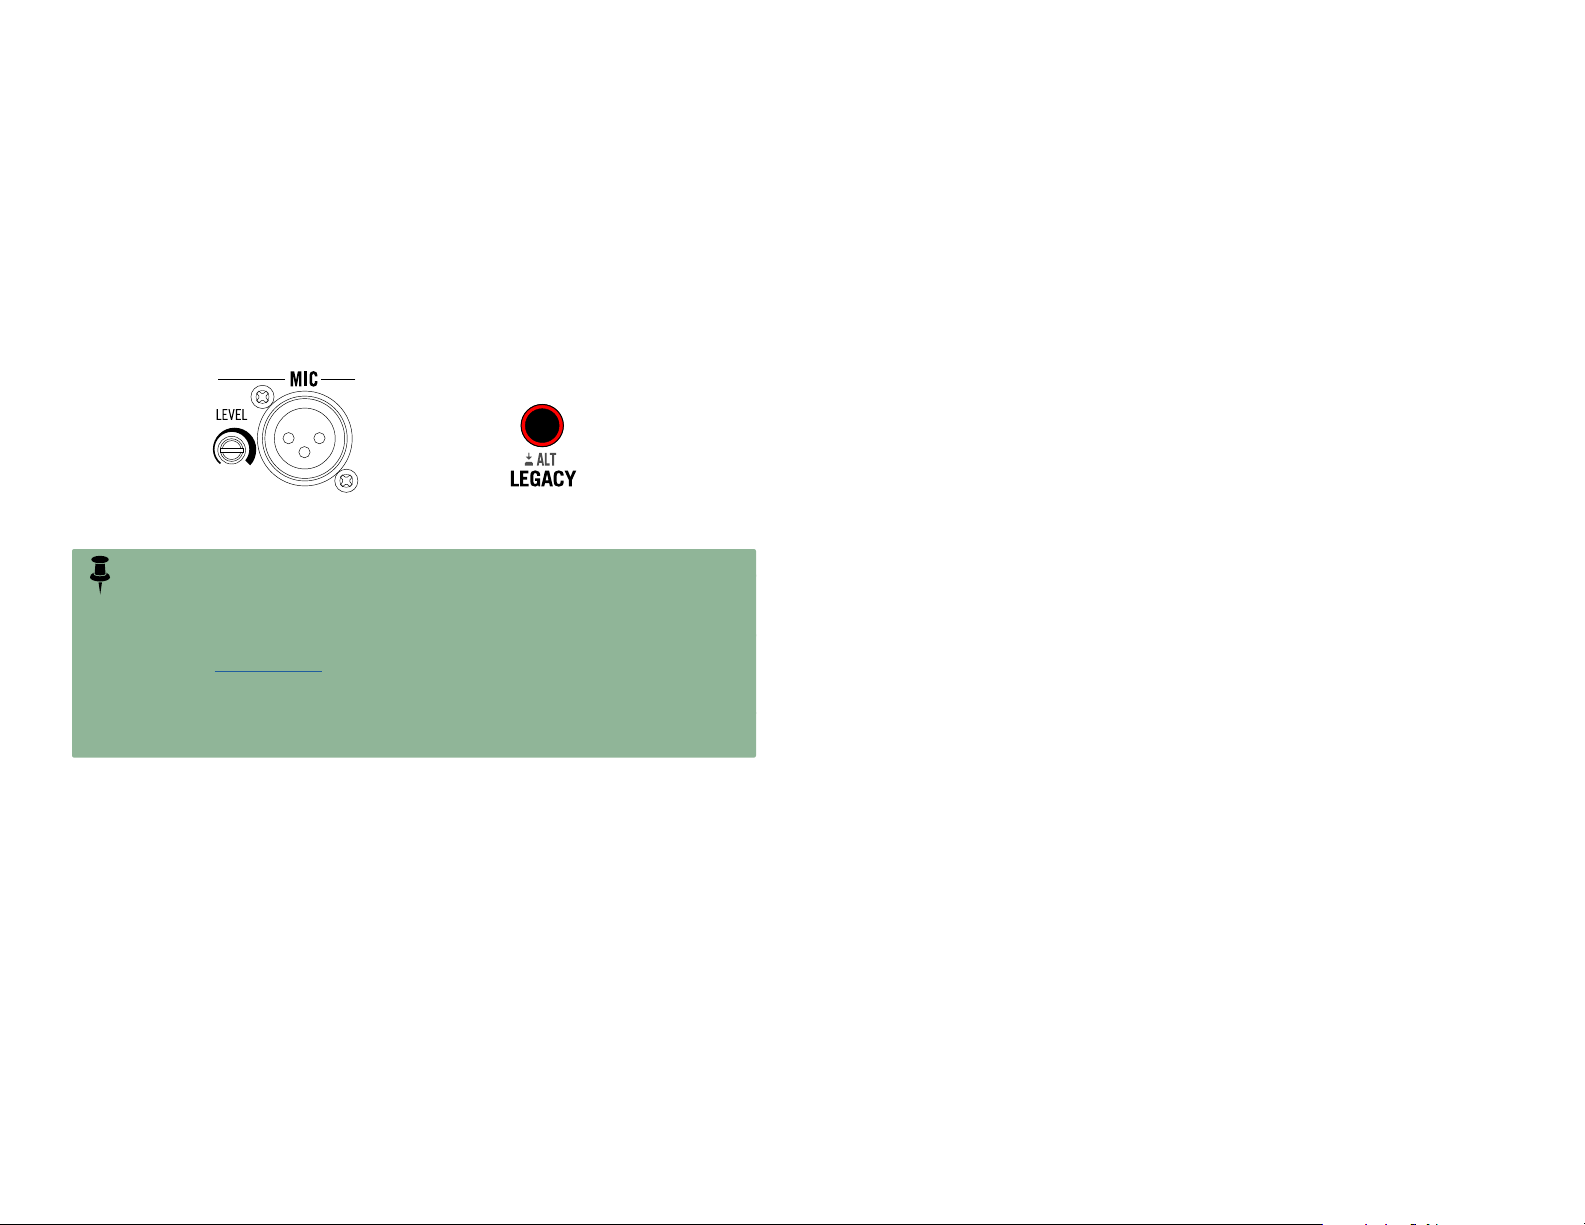
Connect your dynamic microphone into the XLR MIC IN jack and use the LEVEL trim
knob to adjust the built-in preamp’s input gain to optimize your signal.* If your Mic
input signal is too hot, you’ll see the ALT/LEGACY button light up red to indicate clipping—at which point you should apologize profusely, and turn the LEVEL knob to the
left to reduce your input and avoid that nasty input distortion.
Use the LEVEL trim knob
to adjust the mic input level
*NOTES:
The MIC IN does not include phantom power. If you’re wanting to use a mic that requires
phantom power, you’ll need to first connect to a separate mic preamp or other unit that provides
power to your mic, and then feed the audio signal into the DL4 MkII MIC IN.
The MIC IN preamp circuit requires DSP power to do its thing, so you’ll need to avoid setting
Global Settings > "Bypass Type" to the True Bypass option, which mutes the MIC IN. (By
default, DL4 MkII is set to the Buffered Bypass option, so the MIC IN all works just dandy if
you haven’t messed with the Global Settings yet.)
When not using the MIC IN, we recommend turning the LEVEL down to minimum to reduce
potential input noise.
The ALT/LEGACY button
lights red to indicate clipping
18
Page 19
Using the Looper
/
One of the coolest and most beloved features of the classic DL4 was its built-in "Loop
Sampler," and indeed one of the reasons you still see that big, road-worn green box
on so many players’ pedalboards to this day! We’ve not only included all the features
and fun of the original Loop Sampler, but we’ve also expanded loop times, added a
microSD card slot for huge recording capacity, and even appended a new, simple 1
Switch Looper. We also changed the name to just "Looper" for simplicity (and because
"Loop Sampler" is, well... so 1999).
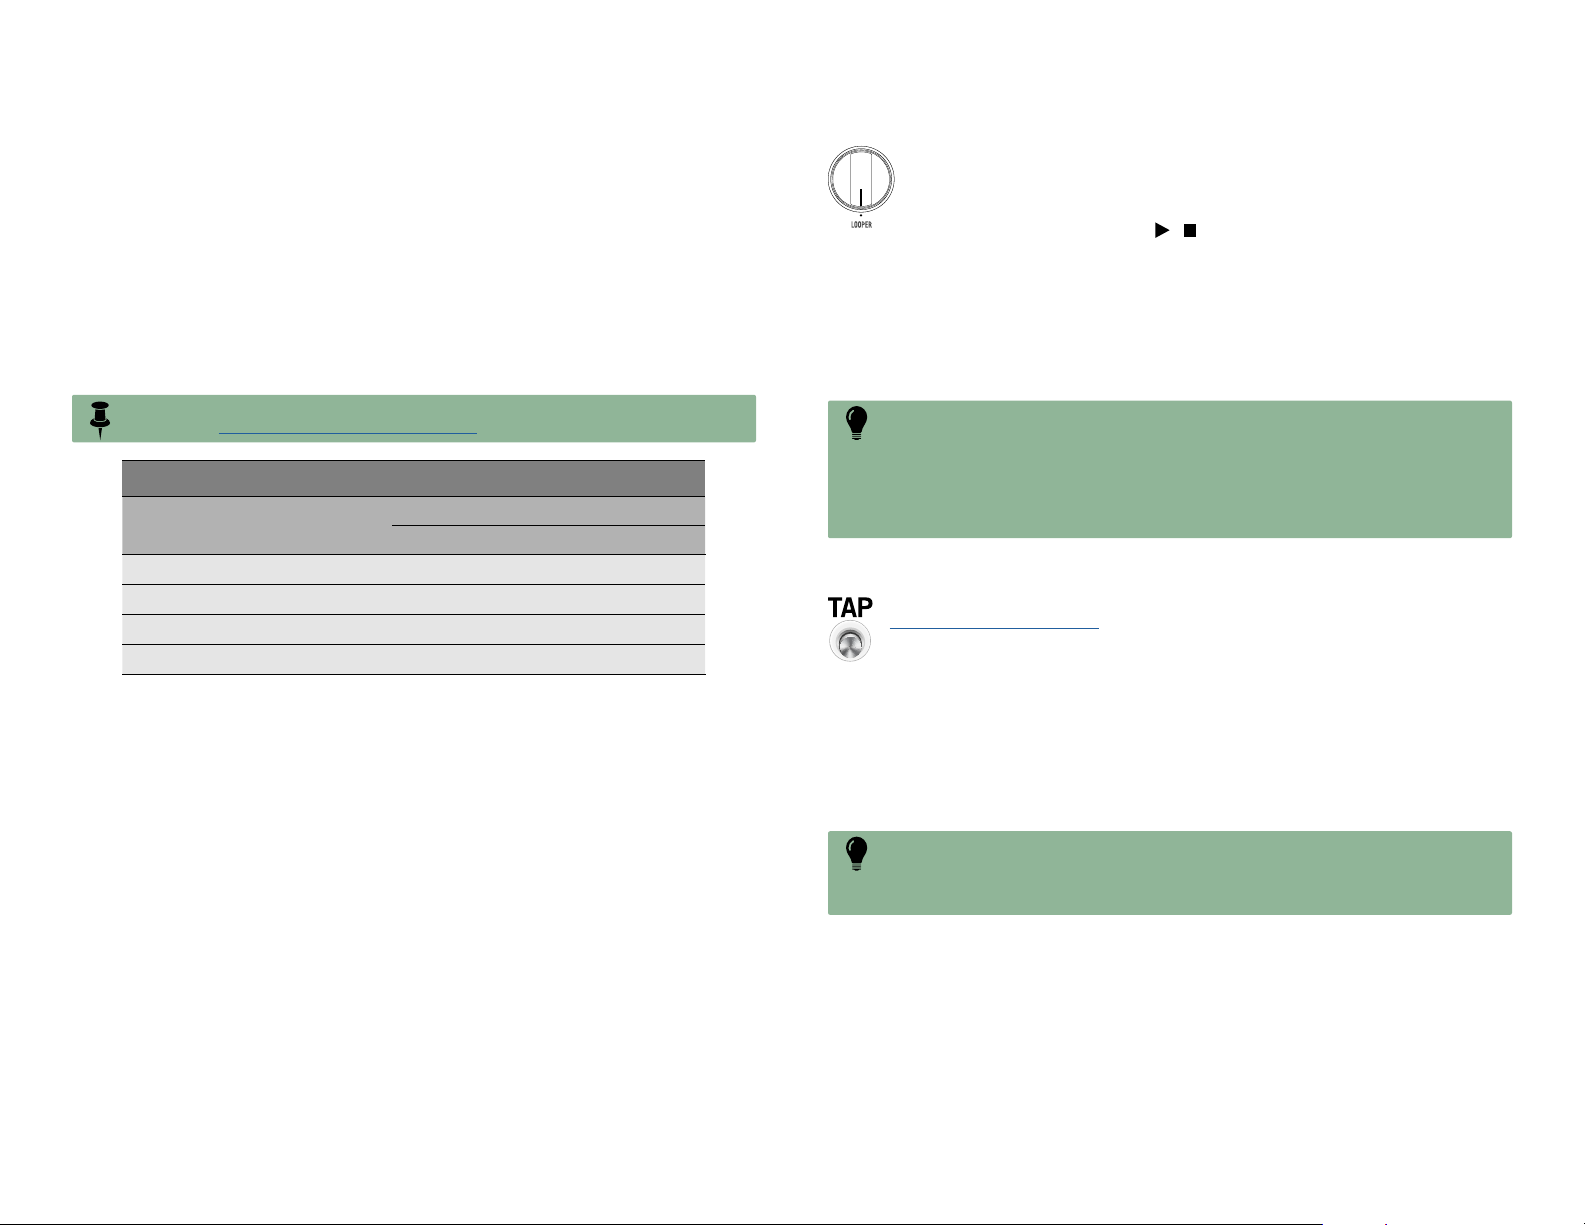
The Looper offers up to 240 seconds of recording time in the internal memory, depending on your settings (see the table below).*
*NOTE: Optionally, you can insert a microSD card—which increases the loop record time
to hours! See "Using a microSD Card" on page 20.
Looper Record Time (Mono & Stereo)
Model
Looper (Mono) 240 seconds 120 seconds
1 Switch Looper (Mono) N/A 120 seconds
Looper (Stereo) 120 seconds 60 seconds
1 Switch Looper (Stereo) N/A 60 seconds
Half Speed Full Speed
“Should I Use the Classic Looper or the 1 Switch Looper?”
Good question! There is only one Looper “mechanism” within DL4 MkII, but you can
utilize either the Classic Looper Mode or the 1 Switch Looper as the interface to access
it. Use either to record your loop to memory, and the loop remains in memory until you
choose to delete it, or until you power DL4 MkII off. You can then use either the Classic
Looper mode or the 1 Switch Looper to play/stop the loop, add overdubs, and more.
See the handy tutorials within this chapter for details. Using the Classic or 1 Switch
Looper each has its advantages—summarized as follows.
Max. Loop Length
Classic Looper
Turn the device’s Selector knob to LOOPER. (Note that the ALT/LEGACY
button always remains unlit when the LOOPER is selected.) This essentially
places all the devices’ knobs and footswitches over to a dedicated Looper
mode, where they control Looper-specific functions and parameters. You’ll
see the LED for the Play/Stop
when a loop is in memory.
When using the Classic Looper, one advantage is that you have the convenient, dedicated footswitches (and their LED indicators) to control Record/Overdub, Play/Stop,
Play Once, 1/2 Speed, and Reverse. The Looper mode also includes a simple and
effective, built-in echo effect that is controlled via the device’s knobs (although, you
won’t hear any of your presets’ MkII/Legacy delay and reverb effects applied to your
input signal while within the Classic Looper mode).
TIP: You can actually start out recording your loop using the Classic Looper and start
playback, and then turn the Selector knob to switch out of the Classic Looper mode and
your loop playback continues uninterrupted! This is a nice option if you want to exit Looper
mode to load a preset with your preferred delay and reverb and have the effects applied to your
input signal while jamming along. Just remember that you’ll need to switch back into Classic
Looper mode to stop loop playback (unless you’ve configured the TAP switch to access the
1 Switch Looper, in which case you can use the TAP switch stop and control your loop.
switch appear lit dim green to indicate
1 Switch Looper
To access the 1 Switch Looper, you’ll need to configure the Global Settings >
"TAP Footswitch Assign" to control the 1 Switch Looper. You can use the
1 Switch Looper to record or access a recorded loop while not in Classic Looper
mode. You’ll see the TAP switch’s LED lit bright white to indicate when a loop
is in memory.
The advantages of using the 1 Switch Looper are (since you are not in the dedicated
Classic Looper mode) the current preset’s delay and reverb effects are applied to your
input signal, and you can continue to tweak the effects’ settings. Having all Looper
controls available on the one (TAP) switch also makes looping fast and simple (albeit
without the added controls offered within the Classic Looper mode, such as dedicated
playback level control, 1/2 Speed, and Reverse functions).
TIP: You can actually start out recording your loop using the 1 Switch Looper and start
playback, and then turn the Selector knob to switch into the Classic Looper mode and
your loop playback continues uninterrupted! This is a nice option if you want to utilize the Classic
Looper’s enhanced switching and playback options.
19
Page 20
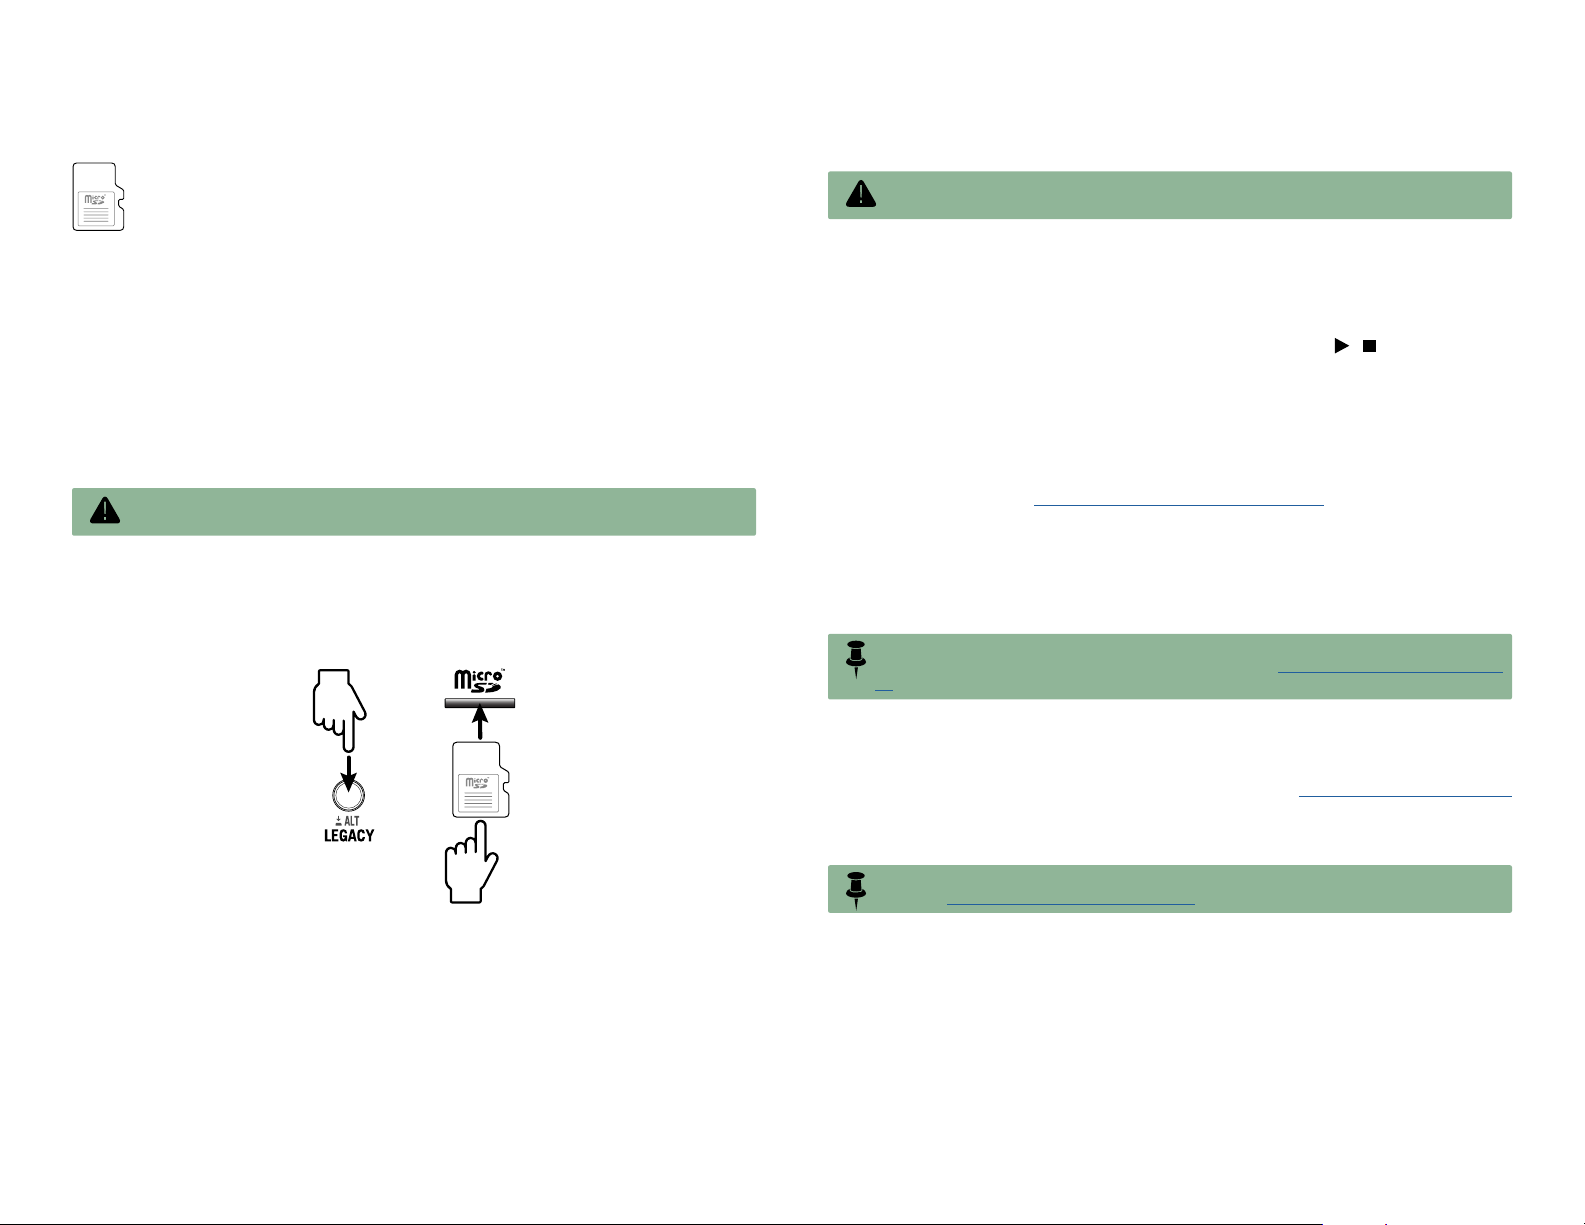
Using a microSD Card
/
Once a microSD card is initially formatted for use with DL4 MkII (see next section), when you insert the card into the microSD slot on the rear of DL4 MkII,
the Classic and 1 Switch Looper automatically use the card instead of the
internal device memory for loop recording and playback, offering you greatly
extend recording time for your loop masterpieces!
Preparing your microSD Card for Use with DL4 MkII
The microSD card must be either the SDHC or SDXC type, 4 GB or larger capacity, and
initially formatted by DL4 MkII before it is functional with the Looper. Once formatted,
your card must include no other existing files on it (other than DL4 MkII’s own Loopercreated data). The best idea is to just purchase or dedicate a microSD card exclusively
for DL4 MkII use (and, since the Looper will only ever utilize 4 GB, it’s not necessary
to use a large capacity card). The process for doing the initial format of your microSD
card is as follows.
IMPORTANT! The following process will permanently erase any files you may have
stored on your microSD card.
1.
Power on and turn your DL4 MkII’s Selector knob to LOOPER. Be
sure the Looper is stopped (not actively recording or playing a loop).
2. Press and hold the ALT/LEGACY button while inserting your microSD
card into the slot on the back of DL4 MkII.
To remove the microSD card, push the card inward to trigger the spring-loaded
mechanism and the card will be ejected from the slot. When no microSD card is present
in the DL4 MkII device, the internal memory is utilized for loop recording and playback.
IMPORTANT! To avoid loss of your recorded loop or potential damage to your card, do
not eject the microSD card from DL4 MkII during looper recording or playback.
The big advantage to using a microSD card is that your loop recording memory is
expanded to several GB of space, which allows you to record a loop that is a few hours
in length (or even longer with the Looper set to mono)! Another benefit is that, unlike
when recording your loop to the DL4 MkII internal memory, your last recorded loop
remains accessible on the card—even after the card has been ejected or the device
powered off. Just reinsert the microSD card and you’ll see the
dim green when in the Classic Looper mode (or your TAP switch LED lit bright white
when using the 1 Switch Looper), indicating your loop is there and ready to play.
looper switch lit
Setting the Looper to Mono vs. Stereo
Go to Global Settings > "Looper Mono/Stereo" on page 46 to configure option to
Mono or Stereo (the factory default). This option affects both the Classic Looper and
1 Switch Looper. As you can see in the Looper Record Time table at the start of this
chapter, when set to Mono, this effectively doubles the loop recording time capacity.
The trade-off, however, is that if you happen to be utilizing both the L/MONO and RIGHT
inputs on DL4 MkII to input a stereo signal, the Looper will sum these inputs and your
recorded loop will be folded down to mono.*
*NOTE: Mono and stereo behaviors also depend upon whether you are using both the
device’s the Left and Right Input and Output jacks—see "Looper Mono/Stereo" on page
46 for the full details.
+
3.
Once the card is fully seated in the slot, release the ALT/LEGACY
button when you see its LED start flashing through different colors.
DO NOT power off or touch any controls on DL4 MkII while you see
the LED flashing, which lasts only a few seconds.
4. When the ALT/LEGACY button’s LED stops flashing, the formatting
process is complete. You can then use your microSD card with the
Classic Looper or 1 Switch Looper!
Configuring the Looper Pre/Post Effects
You’ll probably want to consider your preferred option for the "Looper Pre/Post Position"
global setting, since this affects the behavior of the loop recording and playback with
respect to your delay and reverb effects. This Pre/Post setting affects both the Classic
Looper and 1 Switch Looper.
NOTE: The Looper Pre/Post setting can also impact the Looper Mono/Stereo global setting—see "Looper Mono/Stereo" on page 46 for details.
• Looper “Pre” positions the Looper before the built-in echo (in Classic Looper
mode), or delay/reverb models (when using the 1 Switch Looper), which means
that you’ll hear effects repeats applied to your input signal and to the playback of
your recorded loops, but the effects are not captured within your loop recordings.
• Looper “Post” (the factory default) positions the Looper after the built-in echo
(in Classic Looper mode), or delay/reverb models (when using the 1 Switch
Looper), which results in those lovely effects that you hear on your input signal
also being captured within your loop recordings.
20
Page 21
Using the Classic Looper
/ DUB
/ DUB
/
/ DUB
/
/ DUB
/
/ DUB
/ DUB
/
ONCE
ONCE
ONCE
ONCE
Similar to the original DL4 device of yore, we’ve included a similar (but more powerful!)
Looper, where you turn the Selector knob to LOOPER, and the device’s knobs and
switches change their job descriptions from handling model and preset settings to
instead covering Looper duties. We’ve covered all the details here.
NOTE: As mentioned on the previous page, you can also utilize the 1 Switch Looper for
loop recording, or for loop playback even if you’ve recorded your loop using the Classic
Looper. Also see the section cleverly titled "Using the 1 Switch Looper" on page 23.
Using the Classic Looper’s Built-in Echo
Let’s face it, looping is more fun with some echo thrown into the mix! When you choose
the classic LOOPER on the DL4 MkII Selector knob, you’ll hear that a terrific little echo
effect is built right in. You can utilize the re-purposed knobs to adjust this echo’s time,
repeats, modulation, and level (see "Looper Knobs" on page 22).
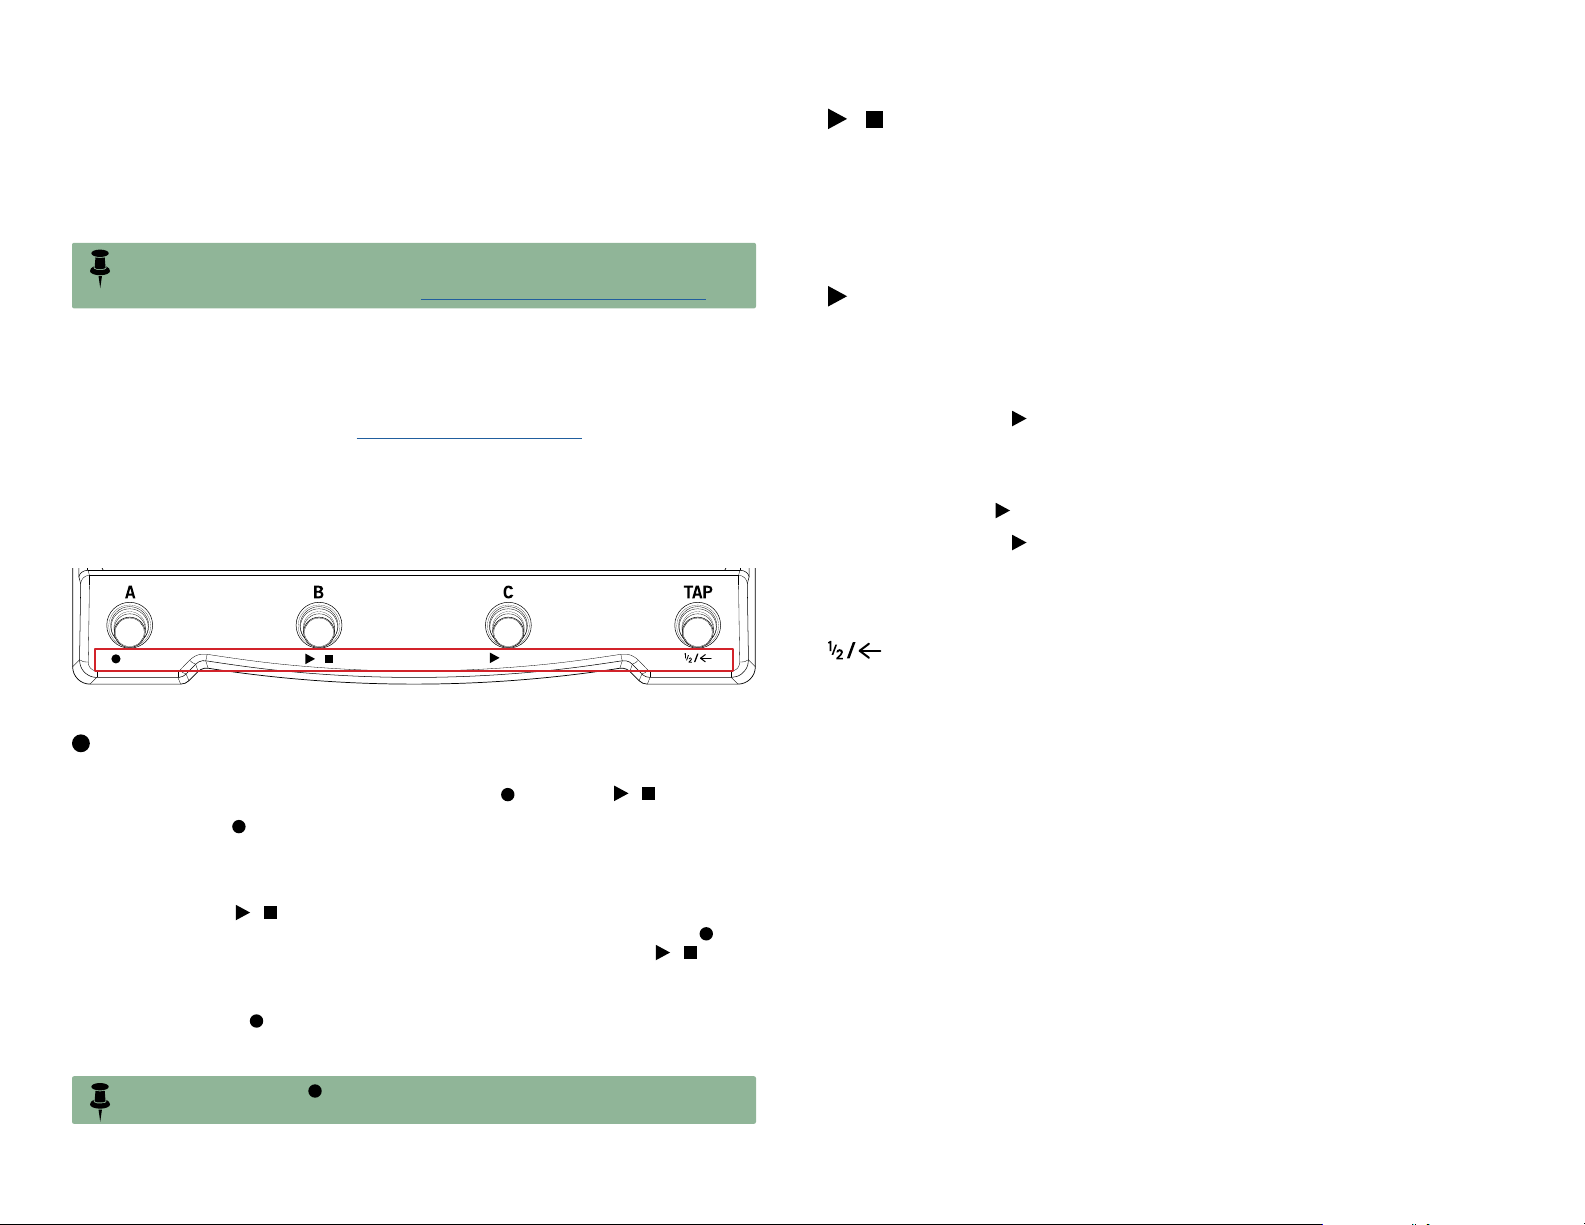
Looper Footswitches
You’ll see that each of the four footswitches include a secondary label beneath—these
pertain to their Classic Looper mode functions.
Play/Stop
Once you’ve recorded a loop you like, you can start and stop playback any time by
toggling the Play/Stop switch—you’ll see it light solid, bright green when playback is
active. From Stop, playback starts from the beginning of the loop.
If you’re currently in active playback or overdub mode, pressing this switch stops playback/overdub. You can also press this switch while recording to stop the recording and
immediately start loop playback.
Play Once
When playback or recording is stopped, press this switch for “one-shot” playback,
where your recorded loop plays from the start for its full length and then stops automatically—you’ll see both Play Once and Play/Stop light solid, bright green when Play
Once is active.
From Record, press
immediately.
If you’re currently in loop playback, press this switch to immediately trigger a one-shot
playback of your loop from its start. (You can achieve a dandy “stuttering” effect by
repeatedly pressing
From Record, press
immediately.
If you’re currently in Overdub mode, press the switch to immediately terminate overdub
recording and start Play Once playback, which will stop at the end of the loop.
to stop recording and start a one-shot playback
.)
to stop recording and start a one-shot playback
/ DUB /
The Looper footswitch labels
ONCE
Record/Overdub
Press this switch start recording your loop. You’ll see it light green while it is recording.
To stop recording your loop, you can press either the
• If you press
loop and put you into Overdub recording mode, which will continue to cycle
your loop, layering whatever you play as an additional overdub on each cycle.
You’ll see the switch flash to indicate Overdub mode.
• If you press
end recording and start playback of your recorded loop. You’ll see the
switch change to unlit to indicate recording has stopped, and the
lit solid green to indicate playback is active.
You can also enter Overdub anytime once your original loop is recorded. While your
loop is playing, press
active. With each cycle in overdub mode, the already-recorded sound gets a little quieter,
fading away entirely after many overdub passes.
NOTE: Any time you press
ing a new loop and erase whatever was previously recorded.
while recording, this will automatically stop recording your
while recording (or while in Overdub), this will immediately
and play —its LED flashes to indicate Overdub mode is
while loop playback is not active, this will start record-
or the
switch:
switch
Half Speed/Reverse
This is a dual function switch —tap once to change to half speed, and a double-tap to
change to reverse. You can even use both at the same time!
Half Speed
Hit this switch with a single tap to go into in half speed, or to return to normal speed.
Once you’ve turned Half Speed on, it stays on until you turn it off, and you’ll see it
light solid green to indicate when active.
When a loop is playing forward and at normal speed, press this switch once and the
loop drops down one octave and plays at half its originally recorded speed. Press
this button a second time to return the loop to normal speed.
You can utilize Half Speed for recording as well. Before you start recording, tap this
switch once to enable Half Speed and then record your loop. When you play your
recorded loop, playback sounds normal (and you’ve effectively doubled the available
loop record time for the device, as an added perk). For the loop you’ve recorded
(and/or overdubbed) at Half Speed, if you tap the switch once again to return to Full
Speed, your playback will commence at double the speed at which it was recorded,
and pitched an octave higher. Let that sink in for a minute.
21
Page 22
Reverse
/ DUB
/
/
Double-tap the switch to activate/deactivate Reverse. You’ll see the switch’s LED
flash slowly when Reverse is active.
If you double-tap the switch while your loop is playing, it reverses playback. If you
double-tap this the switch again, playback is returned to forward (normal).
It is not possible to toggle Reverse during recording—double-taps of the switch are
ignored while record is active. However, once you’ve got a loop recorded, you can
double-tap the switch to reverse your recorded loop’s playback, and then record an
overdub. Now, if you double-tap the switch, you’ll hear normal playback of
your original loop, with your overdub reversed!
To really get creative, you can enable and use Half Speed and Reverse at the same
time. You’ll see the switch’s LED flash quickly to indicate when both functions are
active.
TIP: You can also access all the same Looper footswitch commands via an external MIDI
controller. This opens up some wicked flexibility, considering that you can engage and
manipulate Looper functions without needing to touch the device at all—and even trigger multiple
functions simultaneously! See "MIDI" on page 49.
Looper Knobs
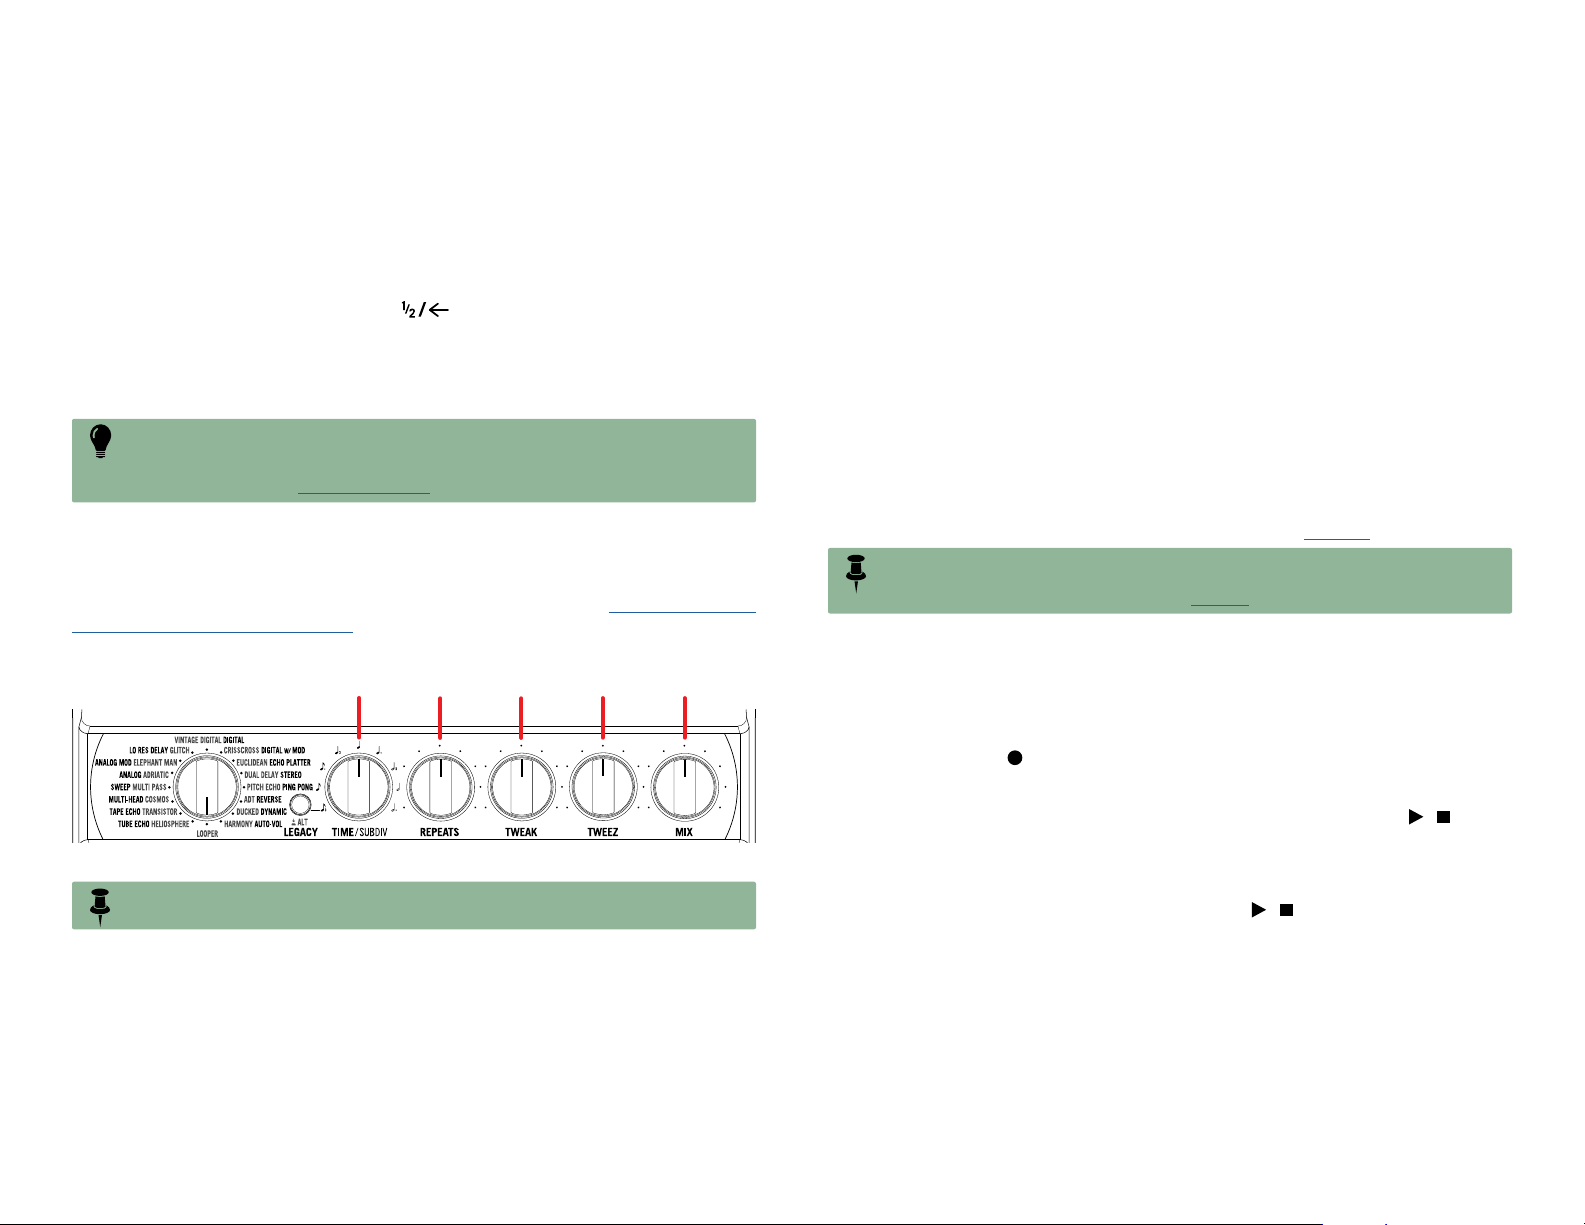
When you set the Selector to LOOPER, the other five knobs on DL4 MkII are re-purposed
to enhance your looping experience. Most offer control of the Looper’s built-in echo,
while the MIX knob controls the Looper playback volume (also see "Using the Classic
Looper’s Built-in Echo" on page 21).
Echo
Time
Echo
Repeats
Mod
Depth
Echo
Volume
Loop
Volume
TWEAK (Mod Depth)
Use to add some swirly modulation to the echo repeats, from none to enough pitchy
warble to make you dizzy.
TWEEZ (Echo Volume)
Twist to dial in just the right balance of echo to go along with your input signal. You can
set this from all the way left to essentially turn the echo "off," where no echo effect is
heard, to all the way right to achieve a 50/50 mix level.
MIX (Loop Volume)
Turn to adjust your loop’s playback volume. Set the knob at 50% for unity gain with
your input signal - or you might want to reduce this slightly when overdubbing layers
to allow your input signal to be easily heard—such as when you’re ready to rip into that
majestic solo on top of your loop sound-scape.
Classic Looper Tutorial
To follow we’ve provided a real-world, step-by-step example for using the Classic
Looper. Of course, the number of possibilities for how you combine and utilize all the
features is practically endless, but you’ll get the idea. For this example, we have our
DL4 MkII’s Global Settings set to their factory defaults (see page 43).*
*NOTE: Configuring the Global Settings’ “Looper Mono/Stereo” and “Looper Pre/Post”
options will determine whether your loop recordings are captured in mono, stereo, and
with or without the built-in echo effect—see page 46.
1. Set the Selector knob to LOOPER.
2. Turn TWEEZ to minimum to turn off the built-in echo effect, and set
MIX to 50%.
Functions of knobs while in Looper mode
*NOTE: These alternate knob functions only apply to the Classic Looper, while the Selector
knob is set to LOOPER—they do not apply to the 1 Switch Looper.
TIME/SUBDIV (Echo Time)
Twist this knob to set the time for the built-in echo’s repeats.
REPEATS (Echo Repeats)
Turn to set the number of audible repeats for the built-in echo. You can set this to
minimum to achieve a single repeat, or throw caution to the wind and max the knob to
get into some runaway madness.
3. Start strumming an up-tempo rhythm guitar part. Once you’ve got a
groove, tap the
(Record/Overdub) switch once at the downbeat
of your measure to start recording your loop.
4. Record four measures of your rhythm, then stomp on the
Stop) switch at the downbeat of what would be the fourth measure to
stop recording.
Your loop now automatically starts playing back. If you didn’t get your timing solid
enough to create and good sounding loop, just tap
step 3 until you capture a worthy performance.
You’ve now recorded a loop that you can play along with to your heart’s content.
Turn the MIX knob to adjust the volume of the loop playback as desired. Go to the
next step if you want to overdub some lead on top of your loop.
5.
Optionally, turn up TWEEZ if you want some echo on your lead. DELAY,
to stop playback and repeat
TIME, and REPEATS control the echoes, and TWEAK lets you add
some modulation.
22
(Play/
Page 23
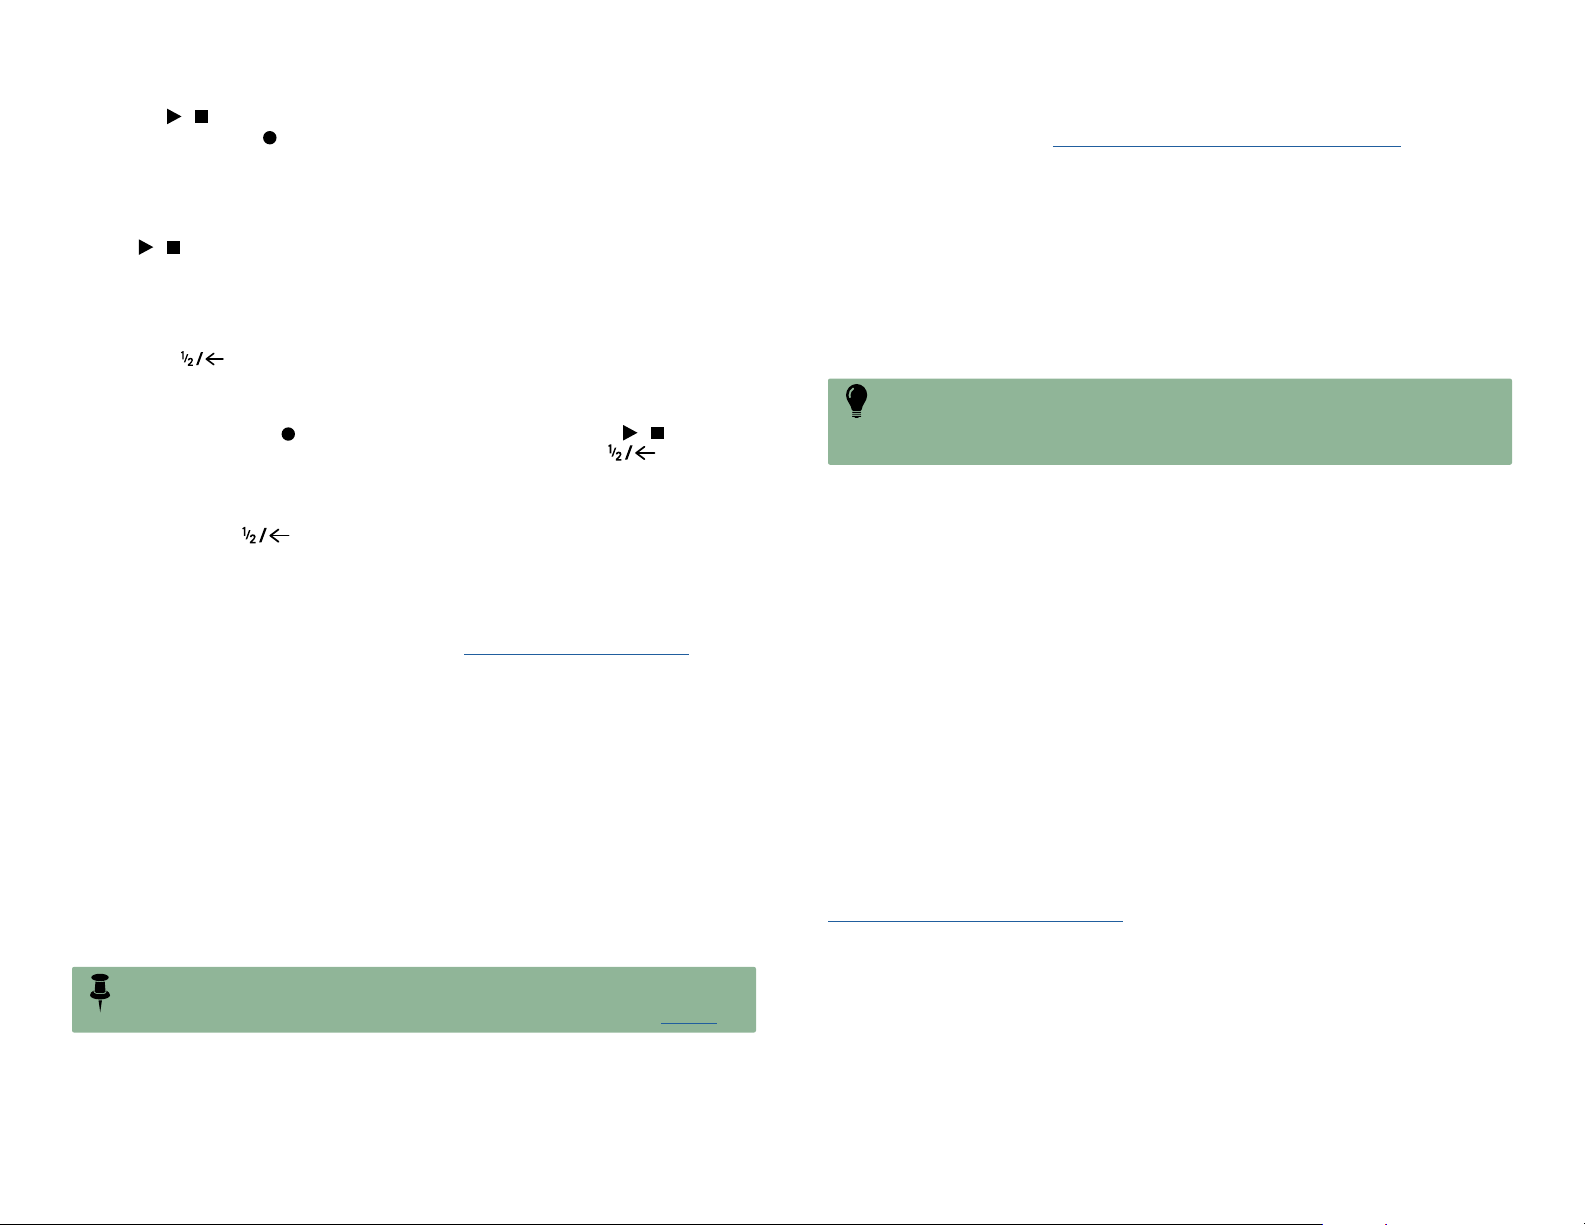
6. Press
/
/ DUB
/
/ DUB
/
big moment, hit
to start your loop’s playback. Once you’re ready for your
as the loop plays to enter Overdub mode and
go wild for four bars.
If you’re really feeling fancy, you can keep the overdub running after the first loop
cycle and record a second layer for a doubled solo.
7.
Hit
at the end of your four bars to turn off overdub, and your loop
will keep playing—now featuring both your rhythm and solo parts.
You can keep repeating step 6 to add additional overdub layers as desired. See the
next step for some more fun tricks to try with your loop.
8.
Hit the (Half Speed/Reverse) switch once and you’ll hear the
whole thing at half speed. Then, double-tap this switch and you’ll be
playing backwards, and still at half speed.
As the loop plays, tap
overdubbing and play the whole shebang, and then double-tap .
Now the loop is playing forward again, and the last part you recorded is backward
in relation to everything else.
One more tap on and half speed turns off. You can imagine where a half hour
of this kind of thing could get you.
Once you’ve recorded your loop, you can also access the loop using the 1 Switch Looper.
This allows you to play and even add overdubs while not in the Classic Looper mode,
where you’ll be able to hear your presets’ delay and reverb applied to your input signal
as you play along with the loop. See the following "Using the 1 Switch Looper" section.
and lay down some more guitar. Hit
to stop the
Using the 1 Switch Looper
All new for the DL4 MkII device, and independent of the afore described Classic Looper,
we’ve included a simple 1 Switch Looper, that you can set up to be accessed easily
by—you guessed it—a single switch (your TAP switch, in this case). There is no need
to choose LOOPER via the Selector knob. Once you’ve configured your TAP switch,
you can stomp that thing anytime inspiration strikes and indulge in instantaneous loop
shenanigans.
When using the 1 Switch Looper, once you’ve recorded and started playing your loop,
you’ll continue to hear your current preset’s delay and reverb effects applied to your
input signal as you play along. All knobs and switches continue to control the delays,
reverbs, and preset options.
NOTE: Just as with the Classic Looper, configuring the Global Settings’ Looper Mono/
Stereo and Looper Pre/Post options will determine whether your loop recordings are cap-
tured in mono, stereo, and with or without your current delay and reverb—see page 46.
1.
Configure the Global Setting > TAP switch so that it controls the 1
Switch Looper (see "TAP Footswitch Assign" on page 44).
Once the TAP switch is configured, you’ll see its LED lit dim white, indicating the
switch is assigned to control the 1 Switch Looper and no loop is yet recorded.
2. Press the 1 Switch Looper (TAP) switch.
The LED lights bright red, indicating the loop is recording.
3. Press the 1 Switch Looper switch again.
The LED lights bright green, indicating the loop is playing back. You can now jam
along endlessly with your loop. Note that you can also still choose and edit the
settings for the delay and reverb that continues to be applied to your input signal.
TIP: Note that the loop playback volume level follows the value set within the Classic
Looper mode (via the MIX knob). If desired, you can switch to Classic Looper mode to
adjust the playback level there and return the Selector to any delay model to continue using
the 1 Switch Looper.
4. Press the 1 Switch Looper switch again.
The LED lights bright amber, indicating the loop is in overdub mode. Subsequent
presses of the switch toggle between play and overdub mode.
5.
While the Looper is in play or overdub mode, press and hold the switch
for 1 second.
The most recent recording is undone. Holding the switch again will redo the recording.
6. Quickly double-press the 1 Switch Looper switch.
Playback/recording stops, and the LED lights bright white, indicating a loop is in
memory.
7.
While Looper playback/recording is stopped, press and hold the switch.
The recording is deleted, and the LED lights dim white.
Once you’ve recorded a loop, your loop remains in memory until you either manually
delete it (as in step 7 above), or power your DL4 MkII off. Note that you can optionally access your current loop using the Classic Looper by turning the Selector knob
to LOOPER. This allows you to utilize all the added features within the Classic Looper
mode, such as playback level control, half speed, reverse, and more! Also see the
"Classic Looper Tutorial" on page 22.
23
Page 24

More Tasty Looping Tidbits
The fun doesn’t stop yet—here are more things to explore when using either the Classic
or 1 Switch Looper:
• Record some rhythmic muted strums or hits on your guitar to lay down a per-
cussion “track,” over which you can record some overdubs.
• Try recording “volume swells” of guitar chords on an overdub or two for ambi-
ent pad backgrounds.
• Use the Mic In for vocals, acoustic instruments, or various bodily functions for
some multifarious, layered compositions.
• The Half-Speed and Reverse loop playback options, once enabled within the
Classic Looper mode, remain active for the 1 Switch Looper as well. You can
temporarily switch the Selector knob to LOOPER to access these functions via
the TAP switch, then exit Looper mode and use the 1 Switch Looper.
•
Connect an external MIDI controller device to remotely trigger any of the Looper
functions. There are even Undo and Redo commands available via MIDI. See
"Controlling the Looper" on page 53.
• You can control the Classic Looper knob parameters via expression pedal or
footswitches—see "Controlling The Classic Looper Parameters" on page 17.
• Remember that when you record your loop to the DL4 MkII’s internal memory,
your loop is discarded once you power the device off. But if you record your
loop with a microSD card inserted, your last recorded loop remains on the card,
even after ejecting and powering your DL4 MkII off.
24
Page 25
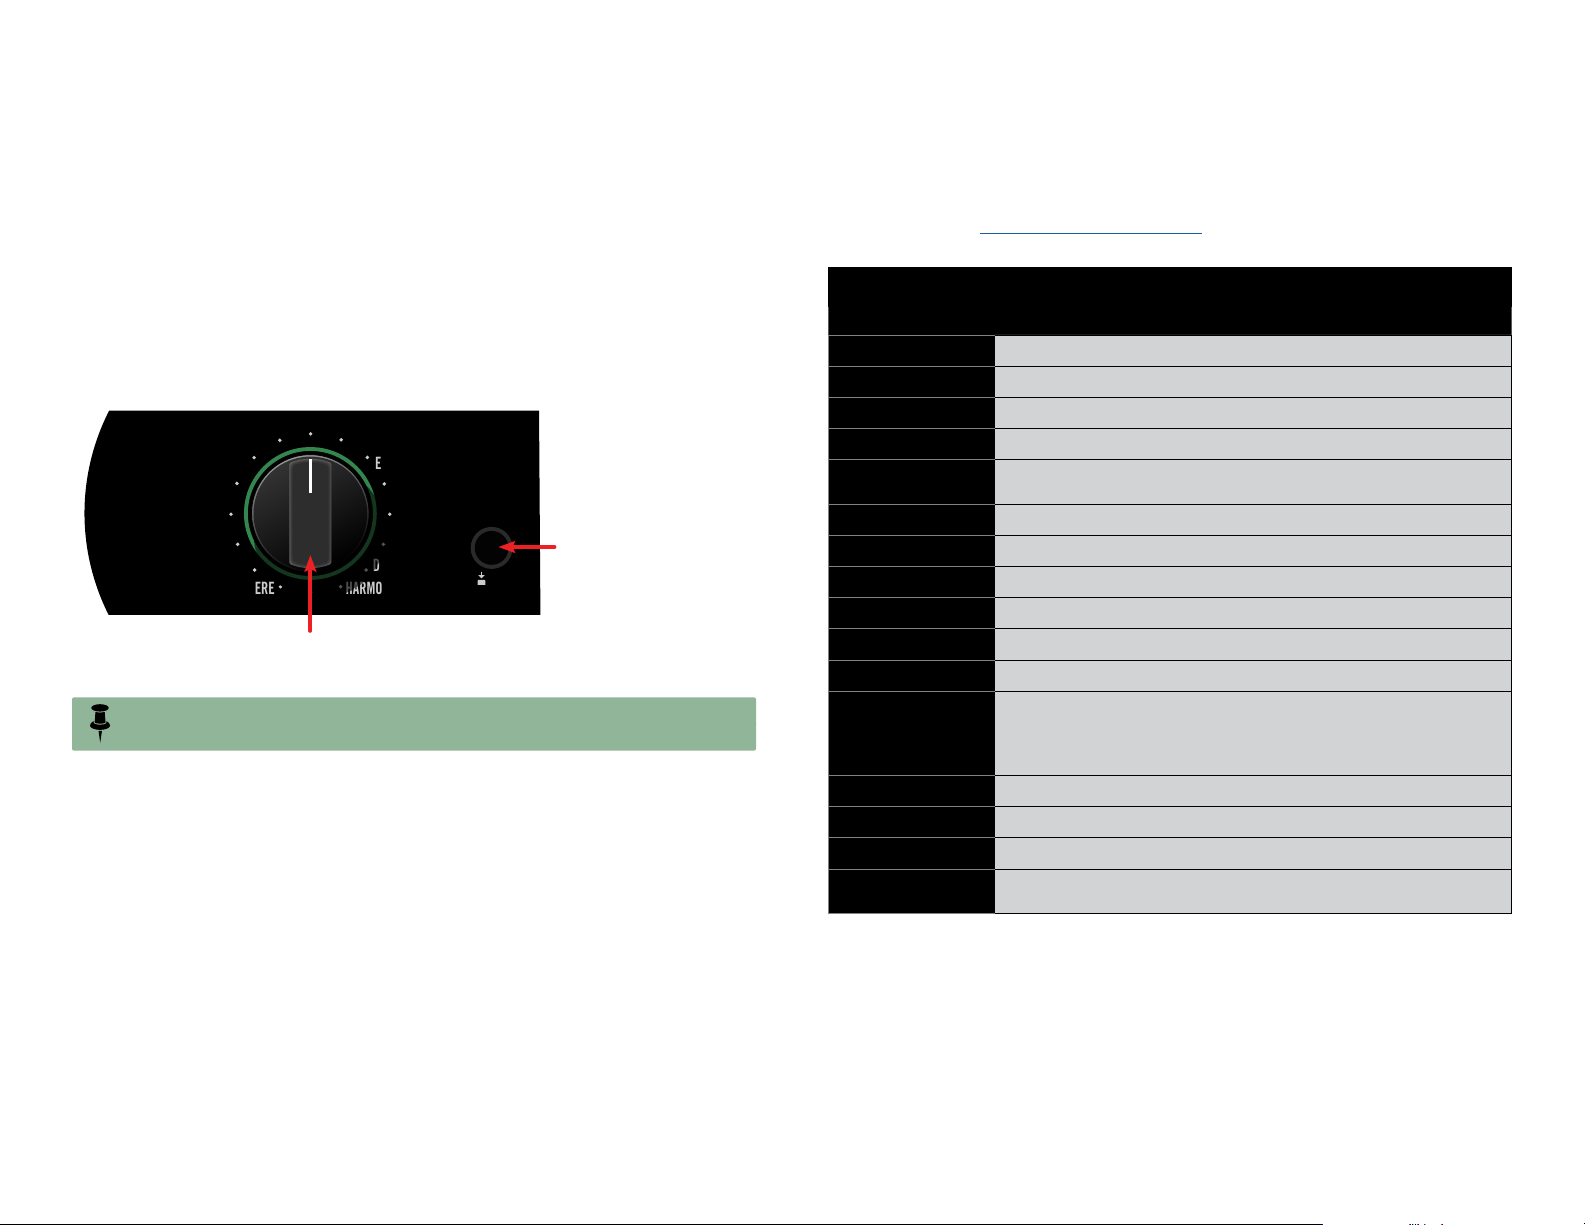
Effects Models
VINTAGE DIGITAL DIGITAL
LOOPER
To follow we’ve listed all the MkII and Legacy delay models, as well as all the "secret" reverb models, along with what the TWEAK and TWEEZ knobs control for each, within handsome tables for quick reference. For more illustrious model and parameter details, please be sure to also see the "Model Gallery" on page 29.
MkII Delays List
To choose one of the MkII delays as your active delay model, toggle the ALT/LEGACY
button so that it is not lit, then turn the Selector knob to any of the delay model names
that appear in white text.
LO RES DELAY GLITCH
ANALOG MOD ELEPHANT MAN
ANALOG ADRIATIC
SWEEP MULTI PASS
MULTI-HEAD COSMOS
TAPE ECHO TRANSISTOR
Turn the Selector to choose the desired
MkII model (white labels)
NOTE: The ALT/LEGACY button remains unlit when the Selector knob is set to LOOPER.
CRISSCROSS DIGITAL w/ MOD
EUCLIDEAN ECHO PLATTER
DUAL DELAY STEREO
PITCH ECHO PING PONG
ADT REVERSE
DUCKED DYNAMIC
HARMONY AUTO-VOLTUBE ECHO HELIOSPHERE
LEGACY
Toggle the ALT/LEGACY
button to unlit
ALT
MkII Delay Models
MODEL TWEAK TWEEZ
VINTAGE DIGITAL Bit Depth and Sample Rate Mod Depth
CRISSCROSS Delay Time B Cross Amount
EUCLIDEAN Step Fill Rotate
DUAL DELAY Right Delay Time Right Feedback
PITCH ECHO
DUCKED Threshold Ducking Amount
HARMONY Key (A—G#) Pitch Modes
LOOPER Echo Mod Echo Volume
HELIOSPHERE Reverb Mix and Decay Mod Depth
TRANSISTOR Headroom Wow & Flutter
COSMOS
MULTI PASS Tap Pattern Delay Mode
ADRIATIC Mod Rate Mod Depth
ELEPHANT MAN Mod Depth Mode (Chorus/Vibrato)
GLITCH Pitch
Pitch Interval
(-13 to +13 semi-tones)
ADT Distortion Deck 2 Mod Depth
Heads Select
(1, 2, 3, 1+3, 2+3, 1+2+3)
Pitch Cents (-50 to +50 cents)
Wow & Flutter (increases to
right)
Feedback Tone (decreases to
right)
Slice Feedback, Sequence Drift,
& Shuffle
25
Page 26
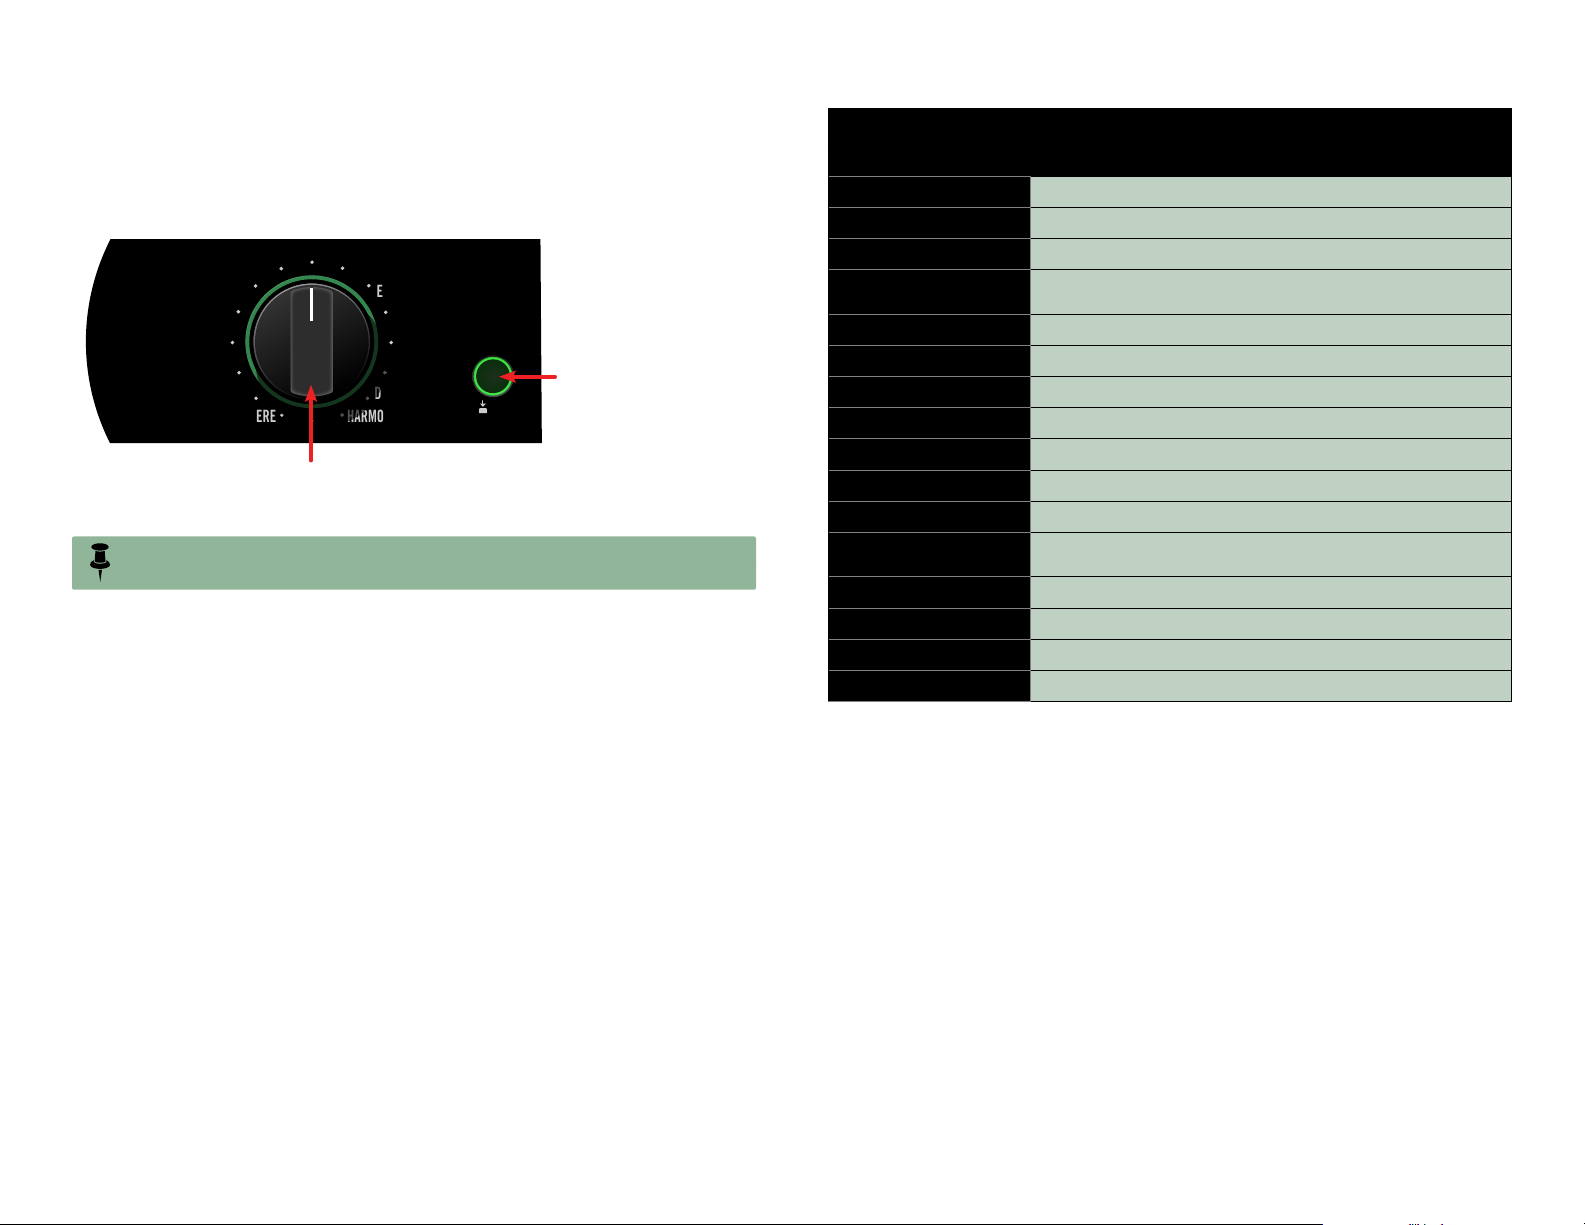
Legacy Delays List
VINTAGE DIGITAL DIGITAL
LOOPER
To choose one of the Legacy delays as your active delay model, toggle the ALT/LEGACY
button so that it is lit green, then turn the Selector knob to the desired delay model
name that appears in green text.
LO RES DELAY GLITCH
ANALOG MOD ELEPHANT MAN
ANALOG ADRIATIC
SWEEP MULTI PASS
MULTI-HEAD COSMOS
TAPE ECHO TRANSISTOR
Turn the Selector to choose the desired
Legacy model (green labels)
NOTE: The ALT/LEGACY button remains unlit when the Selector knob is set to LOOPER.
CRISSCROSS DIGITAL w/ MOD
EUCLIDEAN ECHO PLATTER
DUAL DELAY STEREO
PITCH ECHO PING PONG
ADT REVERSE
DUCKED DYNAMIC
HARMONY AUTO-VOLTUBE ECHO HELIOSPHERE
LEGACY
Toggle the ALT/LEGACY
button to lit green
ALT
Legacy Delay Models
MODEL TWEAK TWEEZ
DIGITAL Bass Treble
DIGITAL w/ MOD Mod Rate Mod Depth
ECHO PLATTER Wow & Flutter Drive
STEREO
PING PONG Time Offset Stereo Spread
REVERSE Mod Rate Mod Depth
DYNAMIC Threshold Ducking
AUTO-VOL Mod Depth Swell Time
LOOPER Echo Mod Echo Volume
TUBE ECHO Wow and Flutter Drive
TAPE ECHO Bass Treble
MULTI-HEAD
SWEEP Sweep Rate Sweep Depth
ANALOG Bass Treble
ANALOG MOD Mod Rate Mod Depth
LO RES DELAY Tone Resolution
Right Delay Time
(as a % of Left Delay Time)
Heads 1/2
(1-2 off, 1 on, 1-2 on, 2 on)
Right Repeats
Heads 3/4
(3-4 off, 3 on, 3-4 on, 4 on)
26
Page 27
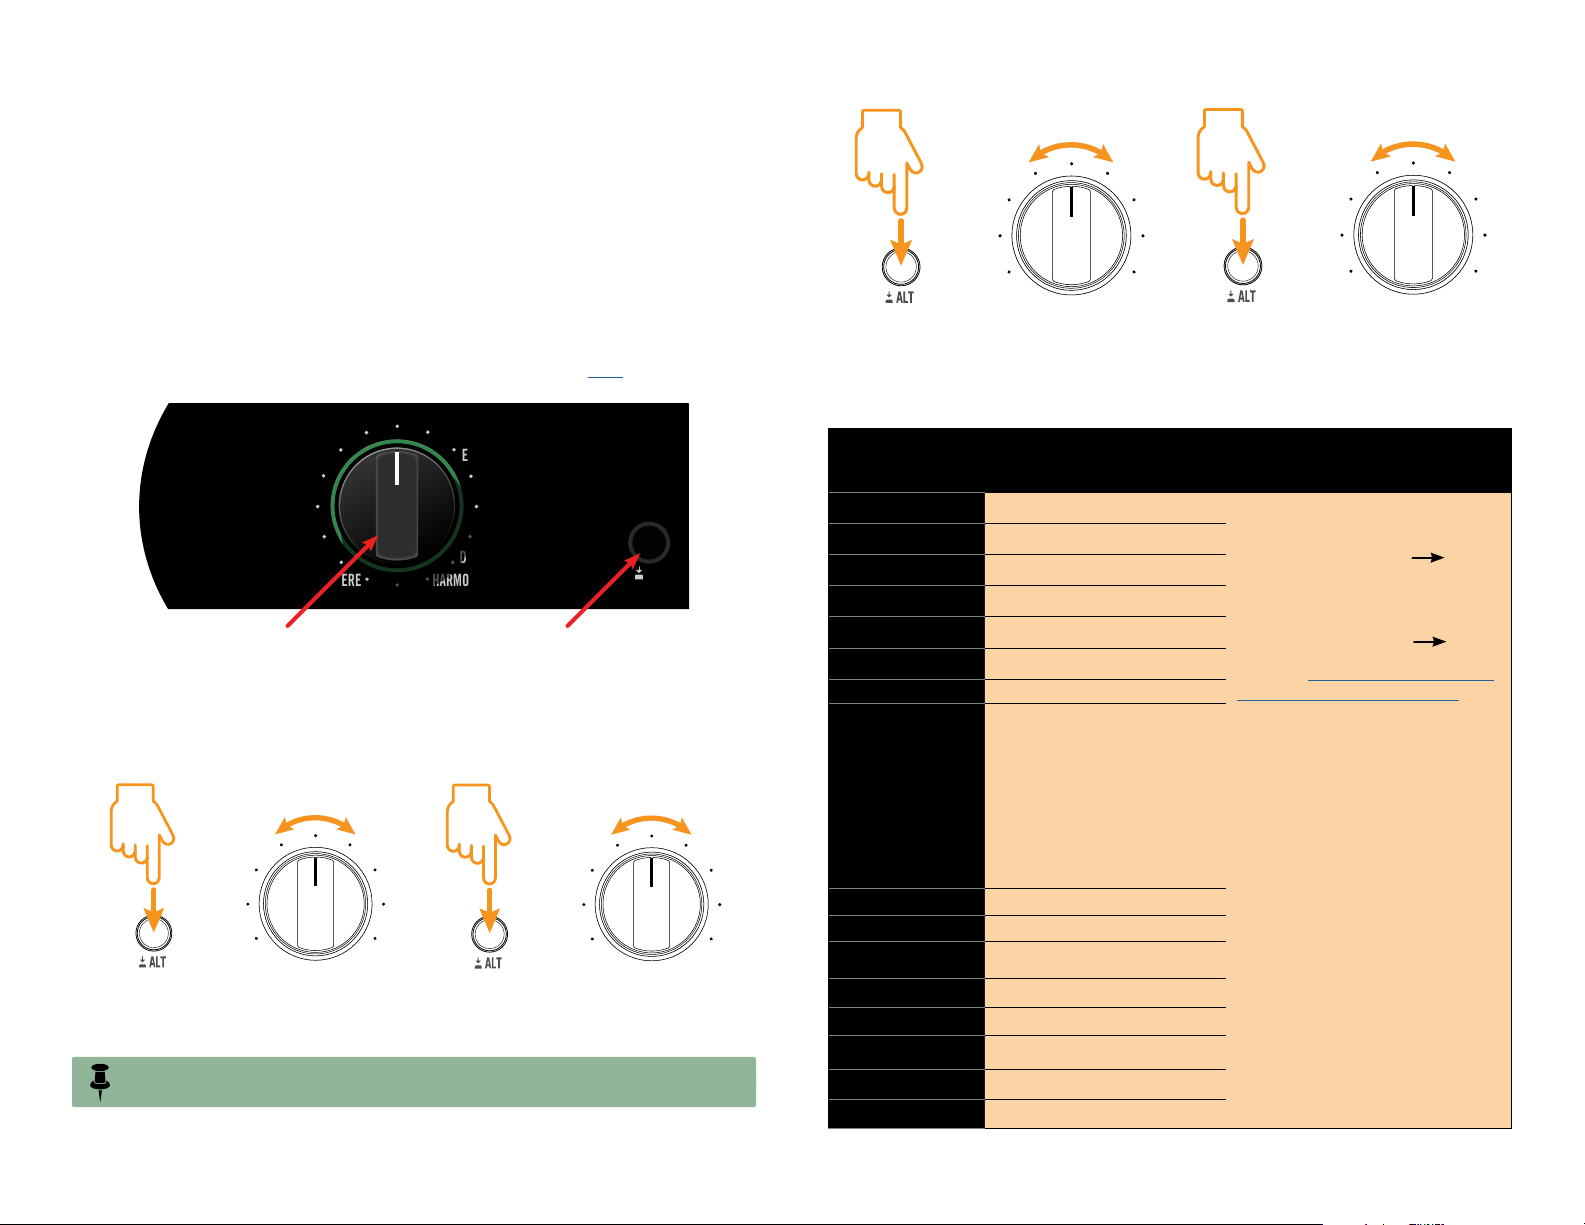
Secret Reverbs List and Controls
VINTAGE DIGITAL DIGITAL
REVERB OFF
ROOM
LOOPER
LEGACY
REVERB MIX
REVERB DECAY
TWEAK
LEGACY
REVERB-DELAY ROUTING
The fifteen exquisite reverb models are not labeled on the Selector knob of your DL4
MkII (hence the “secret” nomenclature) but be assured, they are there, lurking within
the depths of your device just waiting to be unleashed. You can use any reverb along
with your currently active MkII or Legacy delay model—and who wouldn’t want a little
bit of reverb along with their delays?
To select a reverb, press and hold the ALT/LEGACY button while turning the Selector
knob to the position that corresponds to the desired model.
To follow, we’ve provided an illustration you can use as a “decoder ring” to see where
each reverb model is plotted on the Selector dial. You can also reference the handy,
printed Cheat Sheet that came with your DL4 MkII, or available here.
TILE
DUCKING
PLATEAUX
SEARCHLIGHTS
PARTICLE VERB
DOUBLE TANK
OCTO
ALT
MIX
GLITZ
LO RES DELAY GLITCH
HALL
ANALOG MOD ELEPHANT MAN
HOT SPRINGS
CHAMBER
GANYMEDE
ANALOG ADRIATIC
SWEEP MULTI PASS
MULTI-HEAD COSMOS
PLATE
TAPE ECHO TRANSISTOR
Selector Knob
Turn to choose the desired secret reverb model
(added here as orange labels for reference)
The reverbs’ parameters are a bit of a secret as well, but easy to access. Again, just
press and hold the ALT/LEGACY button while turning the knobs, as shown below.
+
LEGACY
NOTE: The TIME/SUBDIV knob has no function for the reverb models.
REPEATS
CRISSCROSS DIGITAL w/ MOD
EUCLIDEAN ECHO PLATTER
DUAL DELAY STEREO
PITCH ECHO PING PONG
ADT REVERSE
DUCKED DYNAMIC
HARMONY AUTO-VOLTUBE ECHO HELIOSPHERECAVE
ALT/LEGACY Button
Push and hold while
turning the Selector knob
+
LEGACY
The MIX knob controls reverb mixThe REPEATS knob controls reverb decay
+
The TWEAK knob controls a different
parameter for each reverb model
See the TWEAK and TWEEZ columns in the following table
Reverb Models
MODEL TWEAK TWEEZ
ROOM Predelay
SEARCHLIGHTS Mod Mix & Intensity
PARTICLE VERB Condition
DOUBLE TANK Mod Depth
OCTO Intensity
TILE Predelay
DUCKING Predelay
Pitch Modes (in semi-tones):
1 = -24 / -12
2 = -24 / +24
3 = -12 / +12
PLATEAUX
REVERB OFF N/A
PLATE Predelay
GANYMEDE Mod Depth
CHAMBER Predelay
HOT SPRINGS Spring Count
GLITZ Mod Depth
4 = +12 / +24
5 = -12 / -5
6 = -12 / +7
7 = -5 / +7
8 = +7 / +12
CAVE Predelay
HALL Predelay
+
LEGACY
The TWEEZ knob controls the
reverb-delay routing order
When any model selected Reverb/Delay signal flow routing:
Knob at 0% = Reverb Delay
Knob at 50% = Delay and Reverb
in parallel
Knob at 100% = Delay Reverb
Also see "Configuring Delay and
Reverb Routing" on page 13
TWEEZ
27
Page 28
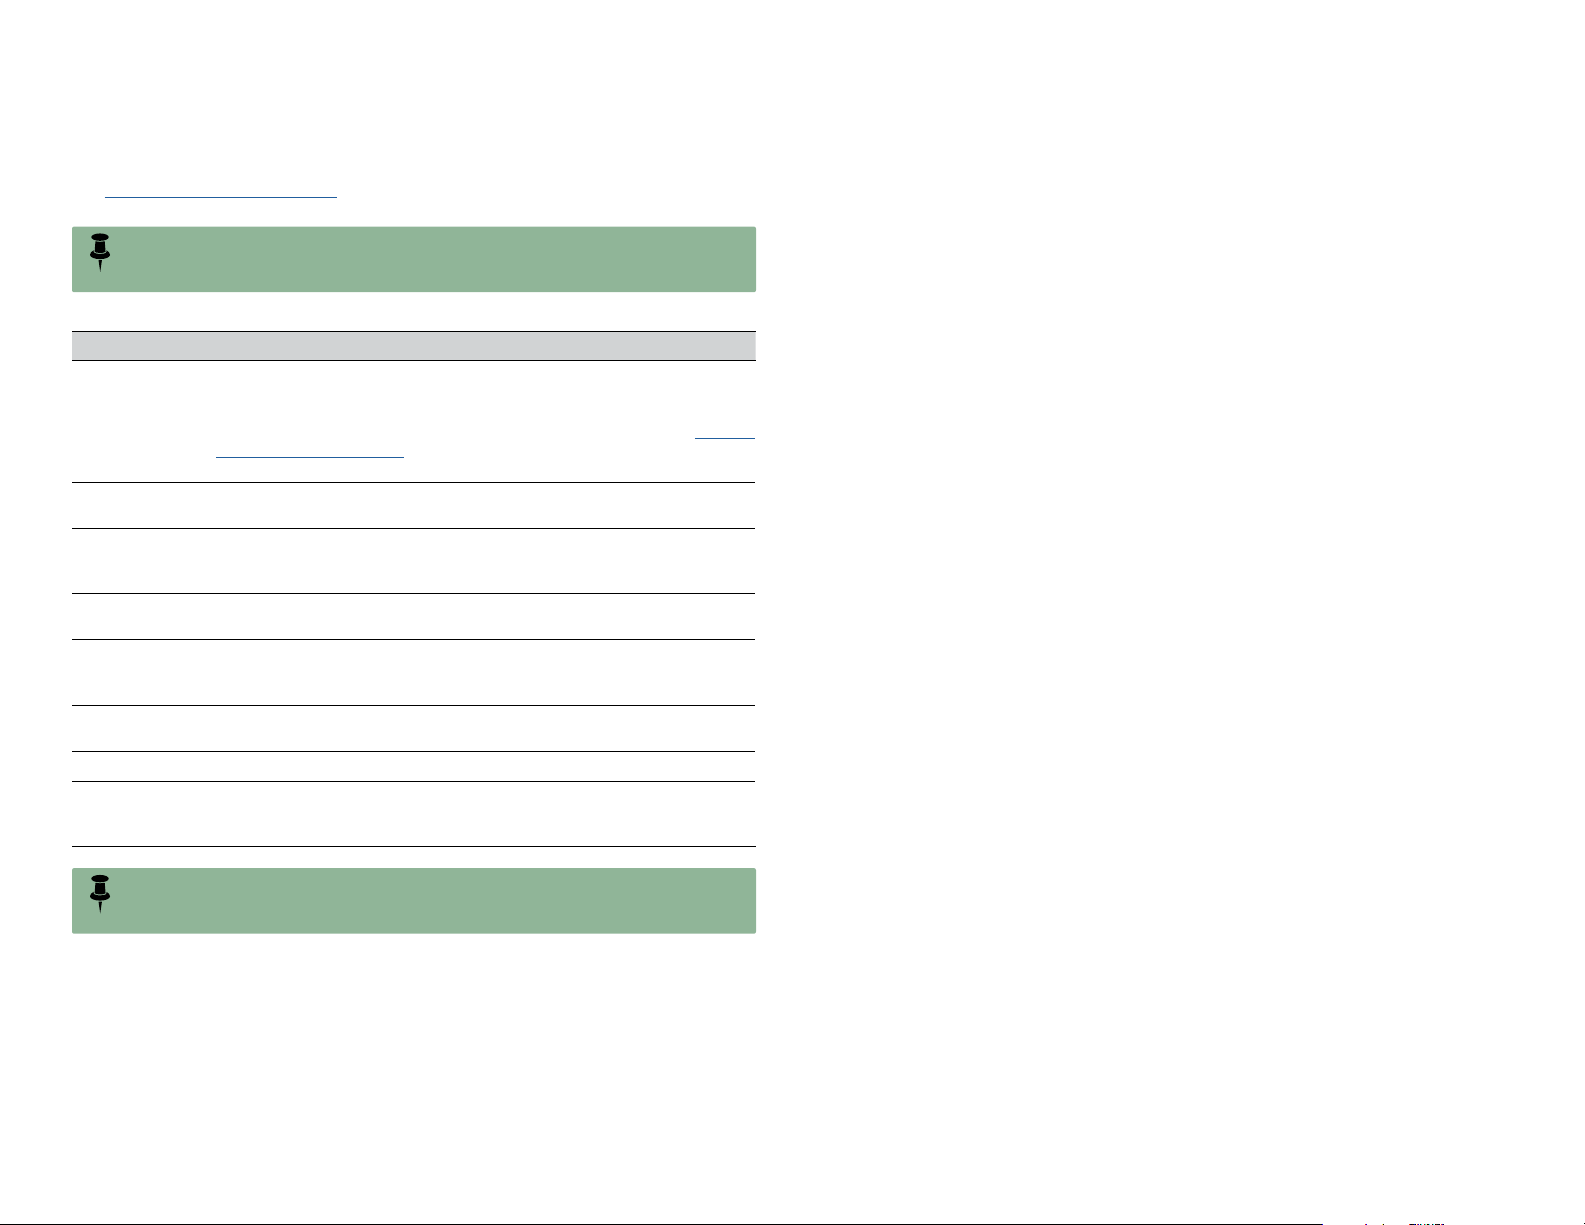
Common Delay and Reverb Parameters
As you’ll see in the above tables, many delays and reverbs include several common
parameters via the TWEAK and TWEEZ knobs. To follow are descriptions for these. See
the "Model Gallery" on page 29 for more about specific delay and reverb models’
options.
NOTE: The parameters controlled via the TWEAK and TWEEZ knobs typically affect only
the sound of the delay’s repeats or reverb’s decay, and do not affect your dry input
signal.
Parameter Description
For delays that offer a secondary channel echo (such as Dual and
Stereo types), the TIME/SUBDIV knob adjusts the delay time for the
Time
Bass
Treble
Mod Rate
Mod Depth
Wow & Flutter
Decay Sets the length of time the reverb effect sustains.
Predelay
left channel’s delay repeats. You can use the TWEAK and TWEEZ
knob to configure the right channel’s delay repeats. Also see "About
Tap Tempo" on page 12 for info on Note Subdivisions for your
delay repeats.
Adjusts the amount of low frequency content. Reducing the bass
can remove some boom or mud.
Adjusts the amount of high frequency content. Reducing the treble
can make your repeats blend in and become more of a wash behind
your dry signal.
Adjusts the speed of the pitch modulation, with higher settings providing faster rates, applied to the delay or reverb trails.
Adjusts the intensity of the pitch modulation. Higher settings result
in more extreme pitch bending, wobble, or throb, depending on the
model.
Adjusts the amount of the pleasantly lo-fi warble, such as typically
inherent with the old tape-based echo units.
Determines the time before the reverb effect is heard. Higher settings emulate a larger space and usually provide a more evident
“slap-back” reflection.
NOTE: Be sure to Save your preset after adjusting you delay and reverb models and
parameters to your liking—all settings will otherwise be lost once you load a different
preset.
28
Page 29
Model Gallery
Here we’ve posted all the delay and reverb models on display, including some historic tidbits covering what classic machines some of these are based on, as well as helpful details
for each model’s settings and abilities. You can tour the collection by category: "MkII Delays", "Legacy Delays", and "Secret Reverbs"
MkII Delays
This section includes all the MkII delay models included in DL4 MkII, as listed with white labels on your device’s Selector knob.
VINTAGE DIGITAL
A Line 6 original.
What collection would be complete without a delay that harkens back to those exciting early 80s rack-mount digital wonders? The earliest digital units
sported some pretty lo-fi bit and sample rate specs as compared to even the cheapest of today’s gear. But sometimes that digital grit is just the character needed. Put down the
hairspray and dial up some modulation to really capture that 80s vibe.
TWEAK adjusts the Bit Depth, from 6 bit to 24 bit, and Sample Rate, from 8 kHz to 48 kHz.
TWEEZ adjusts the Modulation Depth.
CRISSCROSS
A Line 6 original.
A combo of two digital delays (A and B) panned hard left and right, complete with a helping of lower bit/sample rate grunge for flavor. While the TIME/
SUBDIV knob offers control of the delay A’s time, the TWEAK knob offers delay B’s time to be independently controlled. With the "Crossfeed" parameter (via the TWEEZ knob) set at
zero, the two delays remain discrete. But things get more interesting as you increase TWEEZ—where the two delays interact and start creating clouds of sound in the middle of your
stereo field. Try setting the two delay’s times to mathematically unrelated values, and TWEEZ to about 75% for some pleasantly chaotic interaction.
TWEAK adjusts the Time independently for Delay B.*
TWEEZ adjusts the Crossfeed amount.
*NOTE: As with other delay models, you can press-hold the ALT/LEGACY button and turn the TIME/SUBDIV knob to choose a note subdivision for the delay time to follow. Note that the Crisscross
has two delays (A and B)—pressing-holding ALT/LEGACY and turning TIME/SUBDIV sets both delays times to the selected note subdivision value. Also see "About Tap Tempo" on page 12.
*See "U.S. Registered Trademarks" on page 42. All product names used in this document are trademarks of their respective owners and neither Yamaha Guitar Group nor Line 6 are associated or affiliated with
them. These trademarks appear solely to identify products whose tones and sounds were studied by Line 6 during sound model development.
29
Page 30
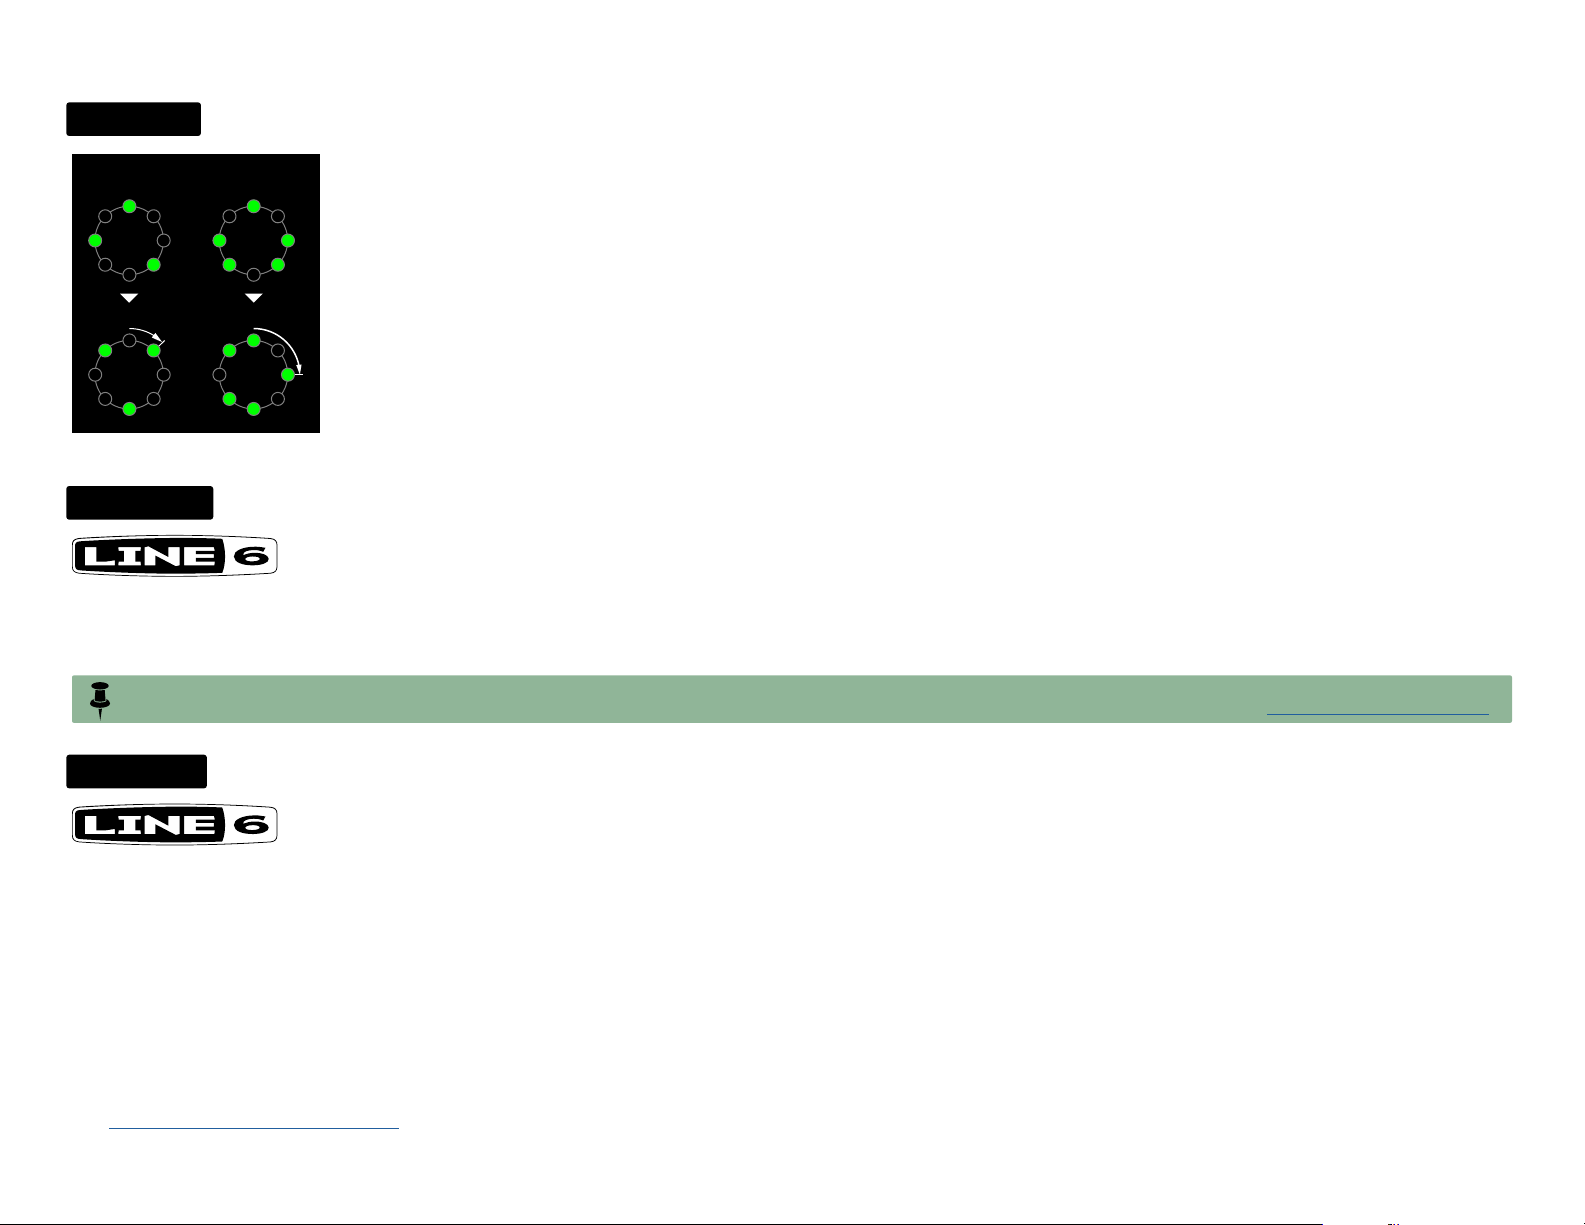
EUCLIDEAN
Steps: 8
Fill: 3
Steps: 8
Fill: 5
A Line 6 original.
Not just for the geeks in the room, this one is based on Euclidean rhythm algorithms which result in eight-step sequence patterns, as we’ve attempted
to illustrate at the left. Full understanding requires complex diagrams, charts, and whatnot, but feel free to ignore all that and just dive in for some
truly unique delay patterns.
REPEATS controls the overall number of repeats heard for the entire sequence. If you want to hear all fills in the sequence only once, set this to 0%.
Rotate: 1 Rotate: 2
TWEAK adjusts the Step Fill. Using Euclidean math, this evenly "fills" the sequence with repeats (1-8; see diagram at left).
TWEEZ adjusts Rotate, which fills forward within the sequence by the same amount (see diagram at left). Turn this knob to the right if you like the
sound of the repeated pattern, but want the fills and gaps shifted forward.
DUAL DELAY
A Line 6 original.
Why settle for one delay, when you really want two? And why not have them completely discrete, each with their own controls, and panned hard left and
right? We knew you’d ask, so that’s exactly what this is. Use the TIME/SUBDIV and REPEATS for the Time and Repeats for the left delay, and use TWEAK and TWEEZ for the right.
TWEAK adjusts the Time for the right delay.*
TWEEZ adjusts the number of Repeats for the right delay.
*NOTE: As with other delay models, you can press-hold the ALT/LEGACY button and turn the TIME/SUBDIV knob to choose a note subdivision for the delay time to follow. Note that the Dual Delay
has two delays (Left and Right)—pressing-holding ALT/LEGACY and turning TIME/SUBDIV sets both delays times to the selected note subdivision value. Also see "About Tap Tempo" on page 12.
PITCH ECHO
A Line 6 original.
If you’re getting bored with the same old repeats, here’s something different. Every time a repeat is heard, its pitch is altered by the semi-tone interval and/
or cents that you define (via TWEAK and TWEEZ, respectively), resulting in an auditory ladder of ascending or descending trails. Start with the TIME/SUBDIV, REPEATS, and MIX,
each at around 50%, then play around with TWEAK and TWEEZ to dial in the preferred pitch changes. Shift happens.
TWEAK adjusts the Pitch Interval, from -13 to +13 semi-tones.
TWEEZ adjusts the Pitch Cents, from -50 to +50 cents.
*See "U.S. Registered Trademarks" on page 42. All product names used in this document are trademarks of their respective owners and neither Yamaha Guitar Group nor Line 6 are associated or affiliated with
them. These trademarks appear solely to identify products whose tones and sounds were studied by Line 6 during sound model development.
30
Page 31

ADT
A Line 6 original.
That stands for “Automatic Double-Tracking” (or sometimes referred to as “Artificial Double Tracking”) in studio-speak. Early on, savvy recording engineers
discovered they could "double-track" vocals and other instruments to fatten up the sound. Shortly after, some other clever studio cats figured out they could use two recording decks
simultaneously to capture and playback the same part to "automatically” double-track. The magic would really happen when those old decks would distort a bit and flail in and out
of sync ever so slightly. Now you can replicate this process automatically all with this one effect.
Inside DL4 MkII, your input signal is split into two virtual "tape decks," with the MIX knob allowing you to blend between Deck 1 and Deck 2. You can introduce a bit of Delay Time (0 to
200 milliseconds) to Deck 2 by simply adjusting the TIME/SUBDIV knob to taste.* Additionally, you can try coloring the Deck 2 signal by adding some Wow & Flutter using REPEATS,
tape machine Saturation & Distortion via TWEAK, and a bit of swirly Modulation with the TWEEZ knob.
REPEATS adjusts the Wow & Flutter.
TWEAK adjusts the tape Saturation & Distortion.
TWEEZ adjusts the Modulation Depth.
DUCKED
Based on* the TC Electronic® 2290 Dynamic Digital Delay.
We’ve added this new MkII revision of the original DL4’s Dynamic Delay (see page 36), where the new incarnation includes automatic Attack
and Release of the ducking level. This is a sort of “smart” volume control for your delay effect’s echoes, which automatically sets the loudness
of the delay repeats based on how hard you play. While you’re playing, the Ducked Delay keeps the volume of the repeats turned down, so that they don’t overwhelm what you’re
doing. Then, when you stop playing for a moment, the volume level of the repeats turns up to allow the repeats to be heard.
The TWEAK knob sets the Threshold—as your input level is analyzed, the threshold is the breakpoint level where this automatic volume control stops working and lets the delay
repeats through at full volume. The TWEEZ knob adjusts the speed at which the attack and release “ducks” (reduces) and restores the level of the repeats—lower TWEEZ knob settings provide faster attack & release speeds. Try setting TWEAK to approximately 50% and you’ll hear how the delay effect gets partially muted while you play, helping to avoid that
unwanted “muddy” sound.
TWEAK adjusts the Threshold value.
TWEEZ adjusts the ducking’s Attack and Release together.
HARMONY
A Line 6 original.
What do you do when your everyday delay repeats just aren't stimulating enough? The Harmony Delay may just hold the answer! This model allows you
to select the Key for your performance via the TWEAK knob (choose any Key, from A to G#) and apply one of the eight Pitch Modes via the TWEEZ knob for endless arpeggiated
entertainment. Each Pitch Mode provides an intelligently pitch-shifted triad pattern, creating a cascade of harmonic repeats that accompany your plucked notes. Use the TIME to set
the rate of the cycling repeats, and the MIX to blend the delay signal with your input.
TWEAK selects the Key, chromatically, from A to G#.
TWEEZ selects between the eight Pitch Modes, which consist of the following pitched intervals:
1) 1, 3, and 5 major
2) 1, 3, and 5 minor
*See "U.S. Registered Trademarks" on page 42. All product names used in this document are trademarks of their respective owners and neither Yamaha Guitar Group nor Line 6 are associated or affiliated with
them. These trademarks appear solely to identify products whose tones and sounds were studied by Line 6 during sound model development.
3) 1, 2, and 3 major
4) 1, 2, and 3 minor
5) 1, -8, and +8 octaves
6) 1, 5, and 8 major
31
7) 1, -3, and +3 major
8) 1, -3, and +3 minor
Page 32
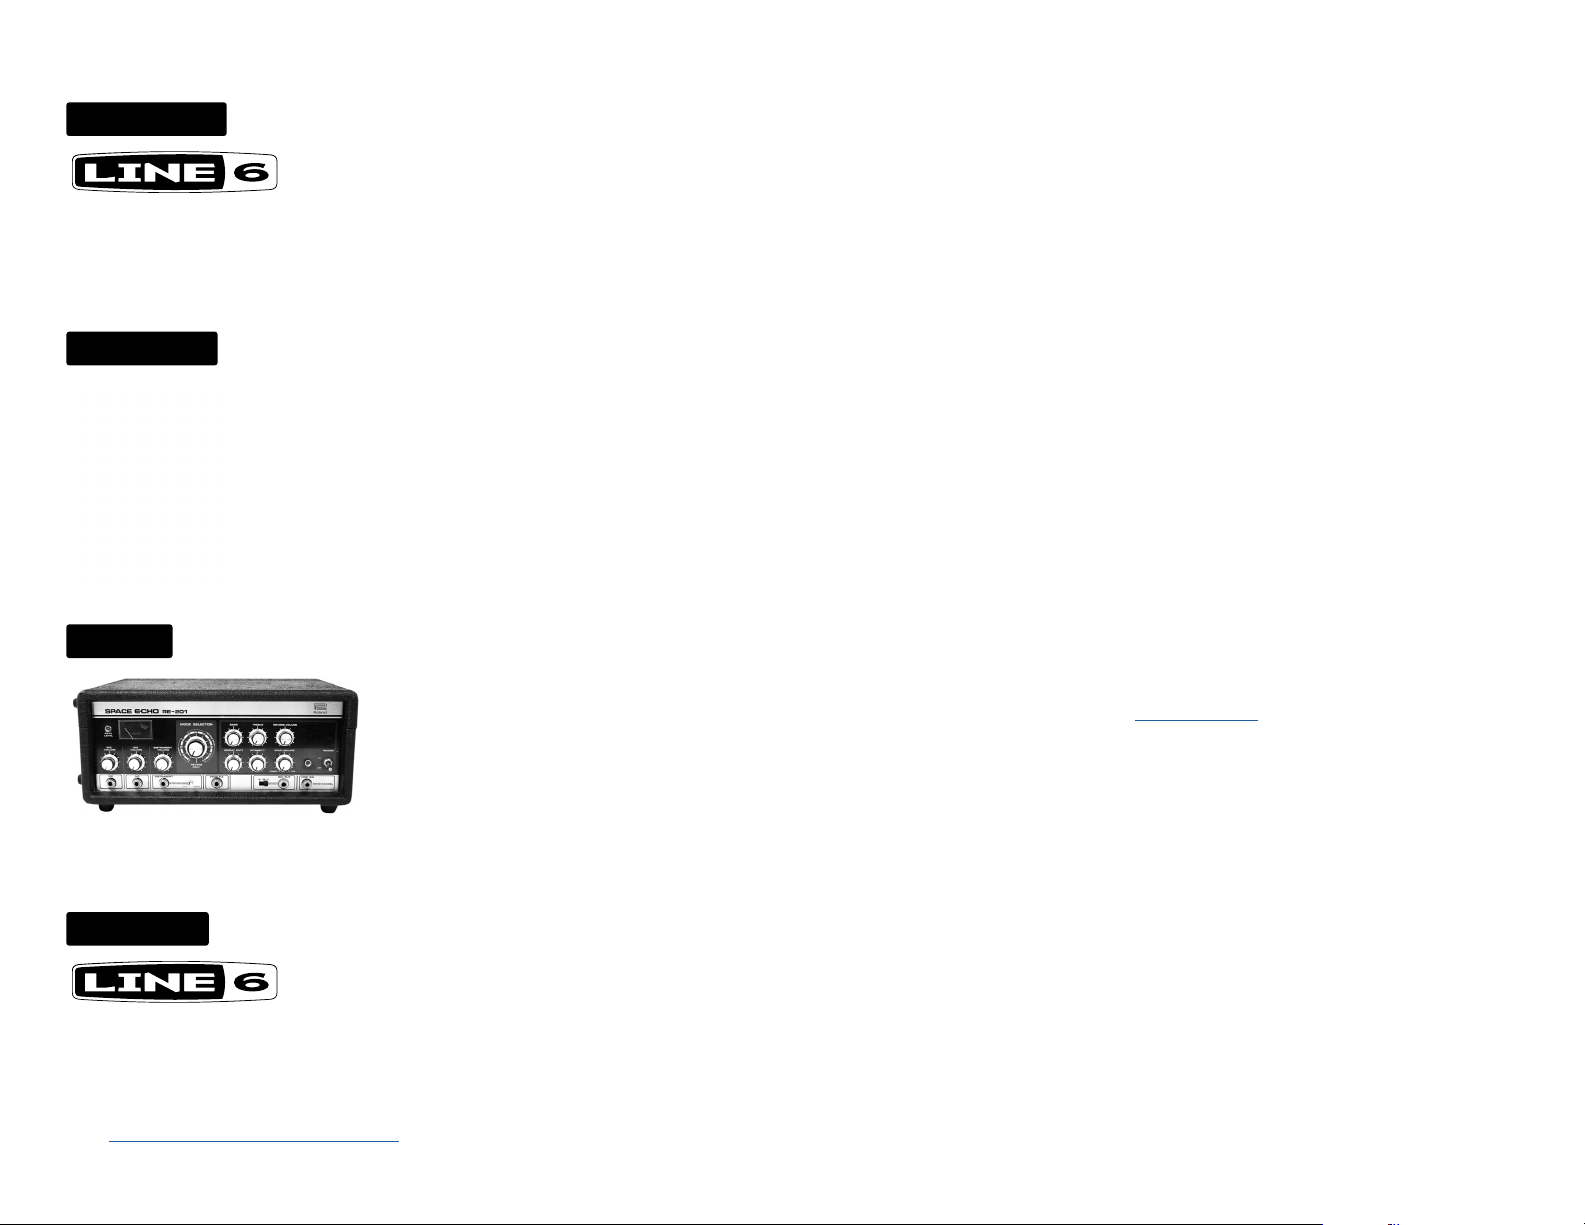
HELIOSPHERE
A Line 6 original.
This is like a tasty combo meal—not only is there a luscious stereo delay with some soft, chewy modulation, but we’ve also thrown in a long, tall reverb to
wash it all down. The reverb is applied only to the delay repeats. Use the TIME, REPEATS, and MIX knobs to serve up these aspects of the delay, then use the TWEAK and TWEEZ
to ladle on reverb and modulation and raise the calorie count.
TWEAK adjusts the reverb’s Mix and Decay, from none of either at minimum to 100% wet signal only and the longest decay length at maximum.
TWEEZ adjusts the Modulation Depth.
TRANSISTOR
Based on* the Maestro® EP-3.
After introducing the tube-based EP-1 and EP-2 tape echo marvels, Maestro introduced the solid-state EP-3, with transistors instead of tubes for the sound
electronics. The EP-3 uses the same basic mechanical design as the original Echoplex, including the looped 1/4" tape, but does not have the tube distortion
sound of the EP-1. EP-3s contributed to many classic recordings of the 70s. Eddie Van Halen and Jimmy Page were both avid EP-3 users.
This MkII model incarnation includes enhanced realism, and offers up more of that coveted EP-3 tape saturation. As you reduce the TWEAK knob, the headroom
drops, warming the tone up with some pleasant grit. Use the TWEEZ knob to dial in some tape wow & flutter.
TWEAK adjusts the Headroom. Range: –15.2dB to +8.8dB.
TWEEZ adjusts Treble cut or boost. Range: –15.2dB to +8.8dB.
COSMOS
Based on* the Roland® Space Echo RE-201
In 1974 Roland introduced its third iteration of the Space Echo, preceded by the RE-100 (see the "MULTI-HEAD" Legacy model) and the RE-200.
This unit added a spring reverb and additional EQ to its uniquely quirky analog, motor-driven, multi-head design.
Use the TWEEZ knob to select the machine record heads 1 through 3 that are active, to create different tapped delay patterns. The TWEEZ
knob does double-duty—your repeats are most clear set at minimum and as you turn the knob to the right, more wow & flutter is added and
the feedback tone darkens.
TWEAK selects active Heads: 1, 2, 3, 1+3, 2+3, or 1+2+3.
TWEEZ adjusts both Wow & Flutter (increases to the right), and Feedback Tone (decreases to the right).
MULTI PASS
A Line 6 original.
This multi-tap style delay is infused with automatic filtering, for somewhat of a sweeping, synth type effect. There are eight different "tap patterns," selectable via the TWEAK knob. These patterns each yield different combinations of band pass frequency sweeps, which add interesting, angular rhythm movements to your playing. Use
the TWEEZ knob to choose between two different sonic emulation Modes—Delay for a shiny digital character, or Echo for a bit darker, saturated tape vibe.
TWEAK chooses from among eight Tap Patterns.
TWEEZ adjusts the Mode between Delay or Echo.
*See "U.S. Registered Trademarks" on page 42. All product names used in this document are trademarks of their respective owners and neither Yamaha Guitar Group nor Line 6 are associated or affiliated with
them. These trademarks appear solely to identify products whose tones and sounds were studied by Line 6 during sound model development.
32
Page 33

ADRIATIC
ELEPHANT MAN
GLITCH
Based on* the Boss® DM-2 Analog Delay, special Ben Adrian-modded version.
This one is a re-do of the original DL4’s DM-2 Analog Delay, this time personally modified by Line 6’s own audio architect, Ben Adrian. It features an increased
delay time of up to 1.8 seconds, and some sweet modulation added for even more kicks. You’ll find this one to be a warm and friendly example of a classic
analog delay that really sits comfortably in the mix.
TWEAK adjusts the Modulation Rate.
TWEEZ adjusts the Modulation Depth.
Based on* the Electro-Harmonix® Deluxe Memory Man.
As one of the most flavorful delay pedals ever modeled for the original DL4 (see the "ANALOG MOD" Legacy model), we chose to do this one again as
a MkII offering, more authentically matched to the pedal specimen on hand.
The Deluxe Memory Man pedal utilized the warm-sounding “bucket brigade” electronics of other analog echoes of the day, and included a switchable
Chorus/Vibrato circuit. Just like the original pedal, our model’s delay time has a maximum of 500 milliseconds.
TWEAK adjusts Modulation Depth.
TWEEZ selects the Mode between Chorus or Vibrato.
A Line 6 original.
This twisted brainchild of the Line 6 audio team is a delay that is almost an instrument in itself, where it slices up your input signal and then allows you to
repeat the slices as a sequence, with octave and reverse effects applied and shuffled in different repeating variations. This one warrants some more parameter details, which we’ve
provided below—or, as with all delay models, feel free to just twist the knobs and experiment!
TWEAK determines how Octaves are applied to your repeats, with none at minimum and lots of low and high octaves at maximum.
TWEEZ adjusts the Slice Feedback, Sequence Drift, and Shuffle in tandem, with more of each applied as you turn the knob to the right.
Slice Feedback controls the number of repeats heard for individual slices. At higher values, you could call this "Super Chaotic Feedback." (Note that you can also use the REPEATS
knob to control the overall number of repeats for the entire sequence.)
Sequence Drift determines the likelihood of the entire sequence changing every time it loops around. When at minimum, the same sequence loops forever.
Shuffle determines the likelihood of repeats shuffling/reordering, with things getting more wonderfully random at higher values.
*See "U.S. Registered Trademarks" on page 42. All product names used in this document are trademarks of their respective owners and neither Yamaha Guitar Group nor Line 6 are associated or affiliated with
them. These trademarks appear solely to identify products whose tones and sounds were studied by Line 6 during sound model development.
33
Page 34

Legacy Delays
This section includes all the Legacy DL4 delay models included in DL4 MkII, as listed with green labels on your device’s Selector knob.
DIGITAL
A Line 6 original.
This model is a straight-forward digital delay with bass and treble tone controls. The excellent processing quality and true stereo audio path of the DL4
MkII make it one of the best digital delays you’ll find.
TWEAK adjusts Bass from -15.2dB to +8.8dB.
TWEEZ adjusts Treble from -15.2dB to +8.8dB.
DIGITAL w/ MOD
A Line 6 original.
Choose this model to add some lush chorus effect to your digital delays. Like the chorus of the Analog Delay w/ Mod, this modulation is applied to the
delay repeats only, leaving your direct sound unaffected.
TWEAK adjusts Modulation Speed from 0.05 to 9.40 Hz.
TWEEZ adjusts Modulation Depth from 0% to 100%
ECHO PLATTER
Based on* the Binson® EchoRec
The Echo Platter was inspired by magnetic platter echo units similar to the Binson EchoRec used by psychedelli-clinicians like Pink Floyd. At the heart of these
units is a spinning metal platter and a record/playback head that floated on the platter (kind of like a primitive hard drive!).
This delay is straddles the line between the tube and solid-state Echoplexes in tone, with a very hip Wow and Flutter that you can dial up to suit your mood.
Turn up the Drive to dirty things up a bit. See you on the dark side of the moon...
TWEAK adjusts Wow and Flutter from 0% to 100%.
TWEEZ adjusts Drive from 0% to 100%.
®
*See "U.S. Registered Trademarks" on page 42. All product names used in this document are trademarks of their respective owners and neither Yamaha Guitar Group nor Line 6 are associated or affiliated with
them. These trademarks appear solely to identify products whose tones and sounds were studied by Line 6 during sound model development.
34
Page 35
STEREO
A Line 6 original.
as a slow delay with just a few repeats. Voila, you’re famous!
This model highlights one of the features of your DL4 MkII—the true stereo nature of both the direct path and the delay processing. When you connect and send signals into both
the Left and Right Inputs, the signals are kept discrete, processed separately, and passed individually to the Left and Right Outputs (for a mono in/out hookup, left and right delays
are both sent to the left/mono out). Thus, your stereo signals that you process with your DL4 MkII will retain their stereo separation, rather than collapsing to mono, as happens with
some of those lesser effect units (we’re not mentioning any names here).
TIME/SUBDIV sets the Delay Time for the left channel.*
REPEATS sets number of Repeats for the left channel.
TWEAK sets the Delay Time for the right channel.*
TWEEZ sets the number of Repeats for the right channel.
*NOTE: As with other delay models, you can press-hold the ALT/LEGACY button and turn the TIME/SUBDIV knob to choose a note subdivision for the delay time to follow. Note that the Stereo
Delay has two delays (Left and Right)—pressing-holding ALT/LEGACY and turning TIME/SUBDIV sets both delays times to the selected note subdivision value. Also see "About Tap Tempo" on
page 12.
Stereo delays, my friend... It’s one of the secrets of the “Big L.A. Solo” sound of the late 80s. Set one side as a fast echo with many repeats, and the other
PING PONG
A Line 6 original.
The Ping Pong Delay has two separate channels of delay, with the output of each flowing into the other, going back and forth like an auditory game of ping
pong. The TIME/SUBDIV knob sets the overall delay time, and the TWEAK knob sets the time differential between the left and right channels’ delays as a percentage value.
If that all sounds a bit too technical, just turn TIME/SUBDIV to set the longer delay’s time and turn TWEAK to adjust the shorter delay’s time. If you set TWEEZ straight up at 12 o’clock,
your delays are panned evenly left and right. As you might guess, this one sounds quite a bit more fun in stereo—but if you’re utilizing just the L/MONO output of your device, you’ll
hear the two delay paths interacting in mono.
TWEAK adjusts the Offset between the two delays from 0% - 98%
TWEEZ adjusts the Stereo Spread from 0% to 100% (at 0%, the signal is mono).
REVERSE
A Line 6 original.
!seltaeB eht dna xirdneH imiJ ekil tsuJ. Take a step back in time with your cool reverse delay. Whatever you play in comes back at you backward, delayed
by the time you set with the TIME/SUBDIV knob. To use this little wonder most effectively, try playing a legato lick. Longer licks can translate into very cool reverse phrases. When
using Reverse, try setting MIX fully-clockwise (100% wet) so all you hear is the reversed sound—instant backward guitar solo fun.
If you have an expression pedal connected (see "Setting up an Expression Pedal and Footswitches" on page 14), try setting the pedal’s toe-down position to a very short delay
time —this will give you a weird “resonant filter” effect. Set the heel-down position to a nice long reverse time. Then start playing and sweep the pedal back from for the hippest time
warp ever available for guitar.
TWEAK adjusts Modulation Speed from 0.05 Hz to 9.40 Hz.
TWEEZ adjusts Modulation Depth from 0% to 100%
*See "U.S. Registered Trademarks" on page 42. All product names used in this document are trademarks of their respective owners and neither Yamaha Guitar Group nor Line 6 are associated or affiliated with
them. These trademarks appear solely to identify products whose tones and sounds were studied by Line 6 during sound model development.
35
Page 36

DYNAMIC
Based on* the TC Electronic 2290 Dynamic Digital Delay.
This is a sort of “smart” volume control for your delay effect’s echoes, which automatically sets the loudness of the delay repeats based on how
hard you play. While you’re playing, the Dynamic Delay keeps the volume of the repeats turned down, so that they don’t overwhelm what you’re
doing. Then, when you stop playing for a moment, the volume level of the repeats turns up to allow the repeats to be heard.
The TWEAK knob sets the Threshold—as your input signal is analyzed, this is the breakpoint where this automatic volume control stops working and lets the delay repeats through at
full volume. The TWEEZ knob adjusts the level of the “ducked” repeats—higher settings will reduce the delay level down more aggressively. Try setting TWEAK and TWEEZ to around
50%, and hear how the delay effect gets partially muted while you play, helping to avoid that unwanted “muddy” sound.
TWEAK adjusts the Threshold from -20dB to -60dB.
TWEEZ adjusts the Ducking from 0 to -138dB
AUTO VOL
A Line 6 original.
This model gives you two effects in one. The Auto-Volume part of the equation is a volume fade-in swell, like the attack time on a synthesizer’s envelope
generator. Since, unlike other effects in DL4 MkII, the swell affects your dry signal, this can be used for a bowing effect, like the one you get by turning the volume knob on your guitar
quickly up from zero just after you pick a note. Higher settings for the TWEEZ knob will give you a longer swell time, so that the sound slowly fades in, like a wave.
The other effect is an echo, complete with tape-style wow & flutter modulation goodness, adjustable via the TWEAK knob.
TWEAK sets Modulation Depth from 0% to 100%.
TWEEZ sets Ramp Time for the auto-volume swell. Range: 0.030-1.900 seconds
TUBE ECHO
Based on* the 1963 Maestro EP-1
This Maestro unit was the first of a series of “Echoplex” designs distributed by the company and made by Harris-Teller in Chicago. As touted in a Maestro
advertisement, the Echoplex’s “...special effects range all the way from a controlled high speed reverberation to a full, throbbing echo!”
The Echoplex design centers on a special cartridge of looped 1/4" tape that wraps past separate record and playback heads. The position of the playback head
can be moved to adjust the delay time from 60 to 650 milliseconds. Your DL4 MkII’s Tube Echo emulates the classic Echoplex tone with the extra advantage
of up to 2.57 seconds of delay time (and you’ll never need to buy new tape cartridges!).
TWEAK adjusts the emulated tape’s Wow and Flutter from 0-100%
TWEEZ adjusts Drive, which is the amount of distortion created by the unit’s tube electronics and tape saturation.
*See "U.S. Registered Trademarks" on page 42. All product names used in this document are trademarks of their respective owners and neither Yamaha Guitar Group nor Line 6 are associated or affiliated with
them. These trademarks appear solely to identify products whose tones and sounds were studied by Line 6 during sound model development.
36
Page 37

TAPE ECHO
Based on* the Maestro EP-3.
After the tube-based EP-1 and EP-2, Maestro introduced the solid-state EP-3, with transistors instead of tubes for its preamp electronics. The EP-3 uses the
same basic mechanical design as the original Echoplex, including the looped 1/4" tape, but does not have the tube distortion sound of the EP-1.
EP-3s contributed to many classic recordings of the 70s. Eddie Van Halen and Jimmy Page were both avid EP-3 users. Unlike the Tube Echo model based on
the EP-1, which gives you control of wow, flutter and distortion, our EP-3 emulation is designed to give you a tape saturation emulation with adjustable tone
controls.
TWEAK adjusts Bass response. Range: –15.2dB to +8.8dB.
TWEEZ adjusts Treble. Range: –15.2dB to +8.8dB.
MULTI-HEAD
TWEAK turns Heads 1 & 2 off and on.
TWEEZ turns Heads 3 & 4 off and on.
Based on* the Roland RE-101 Space Echo.
Long before Boss® pedals, the Space Echo was Roland’s first venture into the world of effects processing. Instead of having one movable playback head (like the Echoplex) this machine has multiple stationary heads. You change delay times by switching amongst these heads, and then
fine-tune delay time with a motor speed control. The groovy part is that you can play back on multiple heads at the same time to get multi-tap
delay effects.
The Multi-Head model has a maximum delay length of 2.57 seconds, with the delay time divided evenly between the 4 heads.
SWEEP
A Line 6 Original.
Starting with the basic tone of our "TUBE ECHO" EP-1 tape delay emulation, we added a sweeping filter effect to the delay repeats to give you unique new
creative possibilities for adjusting the tone of your delays. In technical terms, the TWEAK and TWEEZ knobs adjust the speed and depth of a sine wave used to modulate the tone of
the tape emulation. You can use these controls to create and explore your own shifting landscape of tonal possibilities. .
Things get really interesting when you play with the sweep’s depth (via the TWEEZ knob, or even better, via an expression pedal!) where you can go from zero to extreme.
TWEAK adjusts the Sweep Speed from 0.1 to 20 Hz.
TWEEZ adjusts the Sweep Depth from 0% to 100%.
*See "U.S. Registered Trademarks" on page 42. All product names used in this document are trademarks of their respective owners and neither Yamaha Guitar Group nor Line 6 are associated or affiliated with
them. These trademarks appear solely to identify products whose tones and sounds were studied by Line 6 during sound model development.
37
Page 38

ANALOG
Based on* the Boss DM-2 Delay.
Analog units like the DM-2 Delay were designed as "improvements" over the tape echoes that preceded them, using “bucket brigade” electronics to give guitarists echo units that were more reliable than the tape-based delays, with the added advantage of a low-power circuit that could be run on batteries.
Analog delays are treasured for the warm, distorted tones they produce, and are also great for creating more experimental sounds. Try this, for instance; set the
TIME/SUBDIV to 1 second and the REPEATS knob to max and play in some guitar, so the delay circuit “overloads.” Now spin the TIME/SUBDIV knob quickly
to get something like the sound of a space-aged speeding race car imploding on itself.
TWEAK adjusts the Bass from -15.2dB to +8.8dB.
TWEEZ adjusts the Treble from -15.2dB to +8.8dB.
ANALOG MOD
Based on* the Electro-Harmonix® Deluxe Memory Man.
This pedal uses the “bucket brigade” electronics of other analog echoes, and adds a chorus circuit. This adjustable chorus is applied to the echoes
only, leaving the direct sound unaffected. This popular pedal, with its warm, distorted tone and swimming echoes, became an important tool for many
guitarists, and was an essential part of the guitar sounds for the first U2 album.
Part of the "Deluxe" in the Deluxe Memory Man was the increased delay time of 500 milliseconds. Your DL4 MkII emulates classic Memory Man tone
with the added advantage of 2.5 seconds of delay time.
TWEAK adjusts Modulation Speed from 0.05 to 9.40 Hz.
TWEEZ adjusts Modulation Depth from 0% to 100%.
LO RES DELAY
A Line 6 original.
The first digital delay units were introduced in the early 80s. These pedals and rack units took advantage of emerging digital technology to provide guitarists with longer delay times. Unlike the 16 bit digital format of CDs, and the even higher resolution provided by today’s audio gear, these early digital units generally had only 8 bit
resolution. Low bit resolution can create a unique sort of grunge and noise that is sometimes just the sound you’re looking for, and that’s why these old delays are still employed to
give a particular shape to the sounds that are run through them.
Try this model on a low resolution setting to get that characteristic digital grunge. Use the TWEEZ knob to adjust its processing anywhere from its normal 24 bit resolution, down to
as little as 6 bits. Your direct sound, of course, will not be affected. Tone control of the delay is also provided, via the TWEAK knob.
TWEAK adjusts tone with a Low-Pass Filter ranging from 0.3kHz to 12.0kHz
TWEEZ adjusts digital Resolution from 6 bit (lo-fi) up to 24 bit (hi-fi).
*See "U.S. Registered Trademarks" on page 42. All product names used in this document are trademarks of their respective owners and neither Yamaha Guitar Group nor Line 6 are associated or affiliated with
them. These trademarks appear solely to identify products whose tones and sounds were studied by Line 6 during sound model development.
38
Page 39
Secret Reverbs
This section includes all the reverb models included on the device, which are accessed by pressing and holding the ALT/LEGACY button while turning the Selector knob. Remember
to press and hold the ALT/LEGACY button while turning the REPEATS, TWEAK, TWEEZ, and MIX knobs to adjust the Reverb parameters.
ROOM
A Line 6 original.
This reverb is a more subtle one. As its name suggests, it adds a bit of ambience and the feel of a reflective small room space. It can be a great choice to
add some liveliness to your overall sound.
TWEAK sets the Predelay from 0 to 200 milliseconds.
SEARCHLIGHTS
A Line 6 original.
There is nothing subtle about this one—a spacious reverb that sounds like you’re soaring through the clouds. Try turning up the TWEAK to add a dense
wash of modulation to the decay.
TWEAK sets Modulation Mix and Intensity from 0% to 100%.
PARTICLE VERB
A Line 6 original.
A big lush ‘verb that additionally layers on some pitch effects for creating dreamy sound-scapes. Try some volume swells from your guitar to create big
sustaining pad effects, and switch through the three Conditions via the TWEAK knob to go from smooth to chaotic pitch shifts.
TWEAK sets the Condition: 0-33% = Stable, 34-66% = Critical, 67-100% Hazard.
DOUBLE TANK
A Line 6 original.
The masterminds at Line 6 took advantage of virtual development for this creation, combining the smooth reflections of a plate style reverb with an extra
“tank” component as used in our Cave model. The result is a bigger plate with added bounce and texture. You can also turn up the TWEAK knob to create a liquid wash of modulation over the decay.
TWEAK sets Modulation Depth from 0% to 100%.
OCTO
A Line 6 original.
If you’re after an expansive celestial effect to add to your chords, the Octo delivers. It offers a super sized reverb with the added “shimmer” of harmonized
tones, reminiscent of an angelic choir singing up above.
TWEAK sets the Intensity from 0% to 100%.
39
Page 40

‘
TILE
A Line 6 original.
to the instruments. Now you can add a bright, reflective reverb effect with just the twist of the Selector knob.
TWEAK sets Predelay from 0 to 200 milliseconds.
Way back in the day, some recording studios went to the expense of building a tiled room for capturing natural sound reflections to add some liveliness
DUCKING
A Line 6 original.
If you’ve ever wished that big reverb tail wold just get out of the way while you’re picking, this one is for you. Much like the "DUCKED" delay, this Ducking
reverb automatically adjusts its mix based on your input signal. While you’re playing, it politely stays quieter, and once it detects your playing level drops down, it ramps up its level
so the reverb decay is heard on the end of your phrase.
TWEAK sets Predelay from 0 to 200 milliseconds.
PLATEAUX
A Line 6 original.
Plate reverbs were mechanical units consisting essentially of a metal sheet (or “plate”) in a box that sound was played into, for which a transducer then
picked up and amplified its reflections. Due to the density of the metal plate, the resulting reverberations are very full sounding, with softer reflections and a smooth tail. As a bonus,
our Plateaux plate reverb adds two pitch-shifted overtones your signal with a bit of modulation to add color and atmosphere. The TWEAK knob offers several different modes for these
added pitch shifts. Here’s another tip—if you love the sound of the Plateaux reverb, but don’t want the added pitch shift embellishments, check out the "GANYMEDE" (it’s essentially
the same reverb without the pitch shifting).
TWEAK chooses the Pitch Mode, There are two pitches per Mode (pitches are listed in positive or negative, semi-tone intervals):
Mode 1 = -24 / -12
Mode 2 = -24 / +24
Mode 3 = -12 / +12
Mode 4 = +12 / +24
Mode 5 = -12 / -5
Mode 6 = -12 / +7
Mode 7 = -5 / +7
Mode 8 = +7 / +12
REVERB OFF
If you really just don’t care about all that effort we put into the nice reverb models, set the Selector knob to this option to bypass the reverb completely.
CAVE
A Line 6 original.
History tells us that nine out of ten audibly discriminating Neanderthals agreed that nothing was better at enhancing yells and percussive performances
than a large subterranean space. Now you can experience what the ancestors did by placing your DL4 MkII tones in the depths of a cavern, figuratively speaking.
TWEAK sets Predelay from 0 to 200 milliseconds.
40
Page 41

PLATE
A Line 6 original.
MIX to add a little or a lot as needed to burnish just about any type of signal.
TWEAK sets Predelay from 0 to 200 milliseconds.
As described for the "PLATEAUX" model, plate reverbs are regarded as the most smooth and versatile types around. Use the REPEATS (for decay) and
GANYMEDE
A Line 6 original.
Yet another fine plate-style reverb. This one goes deeper than the Plate model above, with added richness and modulation on tap to really expand your
senses. Essentially, the Ganymede is very similar to the "PLATEAUX" model, but without pitch shifting enhancements.
TWEAK sets Modulation Depth from 0% to 100%.
CHAMBER
A Line 6 original.
In the golden days of R&B and early Rock & Roll, studios often utilized a specially built, reflective chamber to pump music into, which was then re-miked
to capture and add ambience to those classic hits. This model has a slightly warmer texture than other early reverbs and adds a nice retro vibe.
TWEAK sets Predelay from 0 to 200 milliseconds.
HOT SPRINGS
A Line 6 original.
Spring reverbs units were one of the early portable and cost-effective solutions for integrating reverb into those great old tube guitar amps, like your
daddy-o has in the basement. They offer a bright, bouncy character that was heavily used in the rockabilly and surf guitar genres, as well as other vintage styles. Our Hot Springs
reverb is a bigger and badder incarnation, where you can use the TWEAK knob put up to 3 spring units into action for greater depth.
TWEAK sets the number of Springs in use, from 1 to 3 (and any fractional amount in between).
HALL
A Line 6 original.
This one emulates a large concert hall environment, for when only that grandiose, classical character will do. Turn up the REPEATS knob to see how huge
you can make it.
TWEAK sets Predelay from 0 to 200 milliseconds.
41
Page 42

GLITZ
A Line 6 original.
where the reverberations would feedback on themselves and expand in a unique way. The Glitz reverb has bloom generation built right in—increase the MIX knob to get more of the
bloom, and use the TWEAK knob to add modulation for some murky swirl.
TWEAK sets Modulation Depth from 0% to 100%.
In attempts by some sound engineers to soften reverb tails, diffusers were added to reduce reflections. This sometimes also resulted in a “blooming” effect,
U.S. Registered Trademarks
All product names used in this document are trademarks of their respective owners and neither Yamaha Guitar Group nor Line 6 are associated or affiliated with them. These trademarks appear solely to identify products whose tones and sounds were studied by Line 6 during sound model development.
Binson is a registered trademarks of Universal Audio, Inc.
BOSS and Roland are registered trademarks of Roland Corporation U.S.
EchoRec is a registered trademark of Nicholas Harris.
Electro-Harmonix is a registered trademark of New Sensor Corp.
Maestro is a registered trademark of Gibson Guitar Corp.
TC Electronic is a registered trademark of MUSIC Group IP Ltd.
42
Page 43
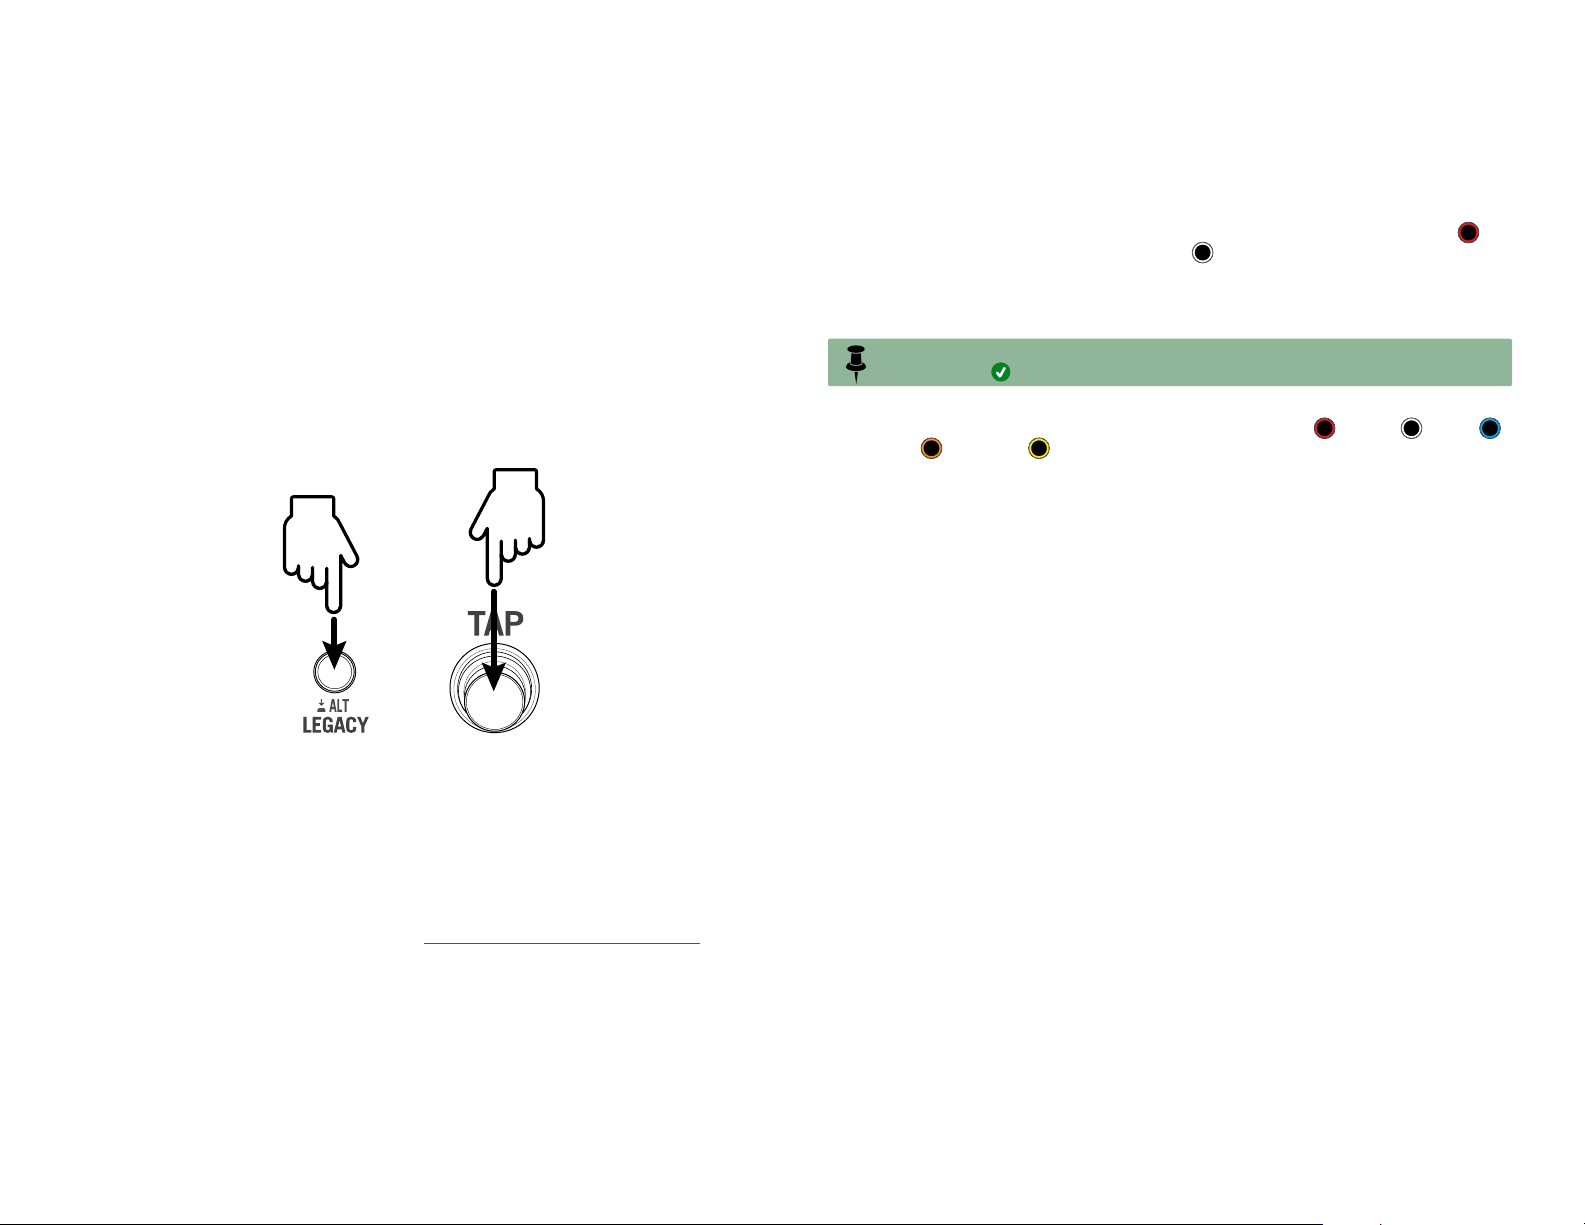
Global Settings
The DL4 MkII Global Settings include parameters that apply to all presets, such as
input and output levels, pedal and footswitch behaviors, MIDI options, and more. It’s a
good idea to review these options listed here since they allow you to customize many
aspects of the device to work best for your particular setup.
Accessing the Global Settings
To enter the Global Settings mode on your device, use the following steps:
1.
Press and hold the ALT/LEGACY button, press the TAP footswitch,
and then release both.
+
3. Consult the table once again, this time referring to the "Values - ALT/
LEGACY LED Color" column for the Global Setting you selected in the
previous step. Push and release the ALT/LEGACY button repeatedly to
cycle through the colored LED options to choose the one you prefer.
For example, if you’ve selected the Tempo Preset/Global setting in the previous
step, you have two choices: Per Preset (indicated by a red colored LED ) or
Global (indicated by a white colored LED ).
For this Tempo Preset/Global setting, the button’s LED is initially lit red, since Per
Preset is the factory default.* If you want to keep this default setting, keep the ALT/
LEGACY button set to red. To change to Global, press the button to where it is lit white.
*NOTE: Within the Global Settings table, the factory default option is indicated for each
setting with the symbol.
As you can see in the table, some Global Settings have several options, for which each
will be indicated by one of five different LED colors: red , white , blue ,
orange , or yellow ).
4. Repeat steps 2 and 3 to configure any additional Global Settings.
5. Once you’ve made all the desired changes, press any footswitch to
exit Global Settings and your changes are automatically retained.
You can repeat these steps anytime to edit your Global Settings.
You’ll see all footswitch LEDs go dark and the ALT/LEGACY button’s LED lit with a
color other than green to indicate you have entered the Global Settings. Note that the
ALT/LEGACY button’s LED color is an important indicator for referencing your selected
options, as you’ll see in the following steps.
2.
Referring to the Global Settings table on the next page, turn the
device’s Selector knob to choose the specific Global option you wish
to configure.
For example, as documented within the "Global Settings Table" on page 44:
To configure the Tempo Preset/Global option, turn the Selector knob to VINTAGE
DIGITAL/DIGITAL. Or...
To configure the TAP Footswitch Assign, turn the Selector knob to CRISSCROSS/
DIGITAL w/MOD, etc.
43
Page 44
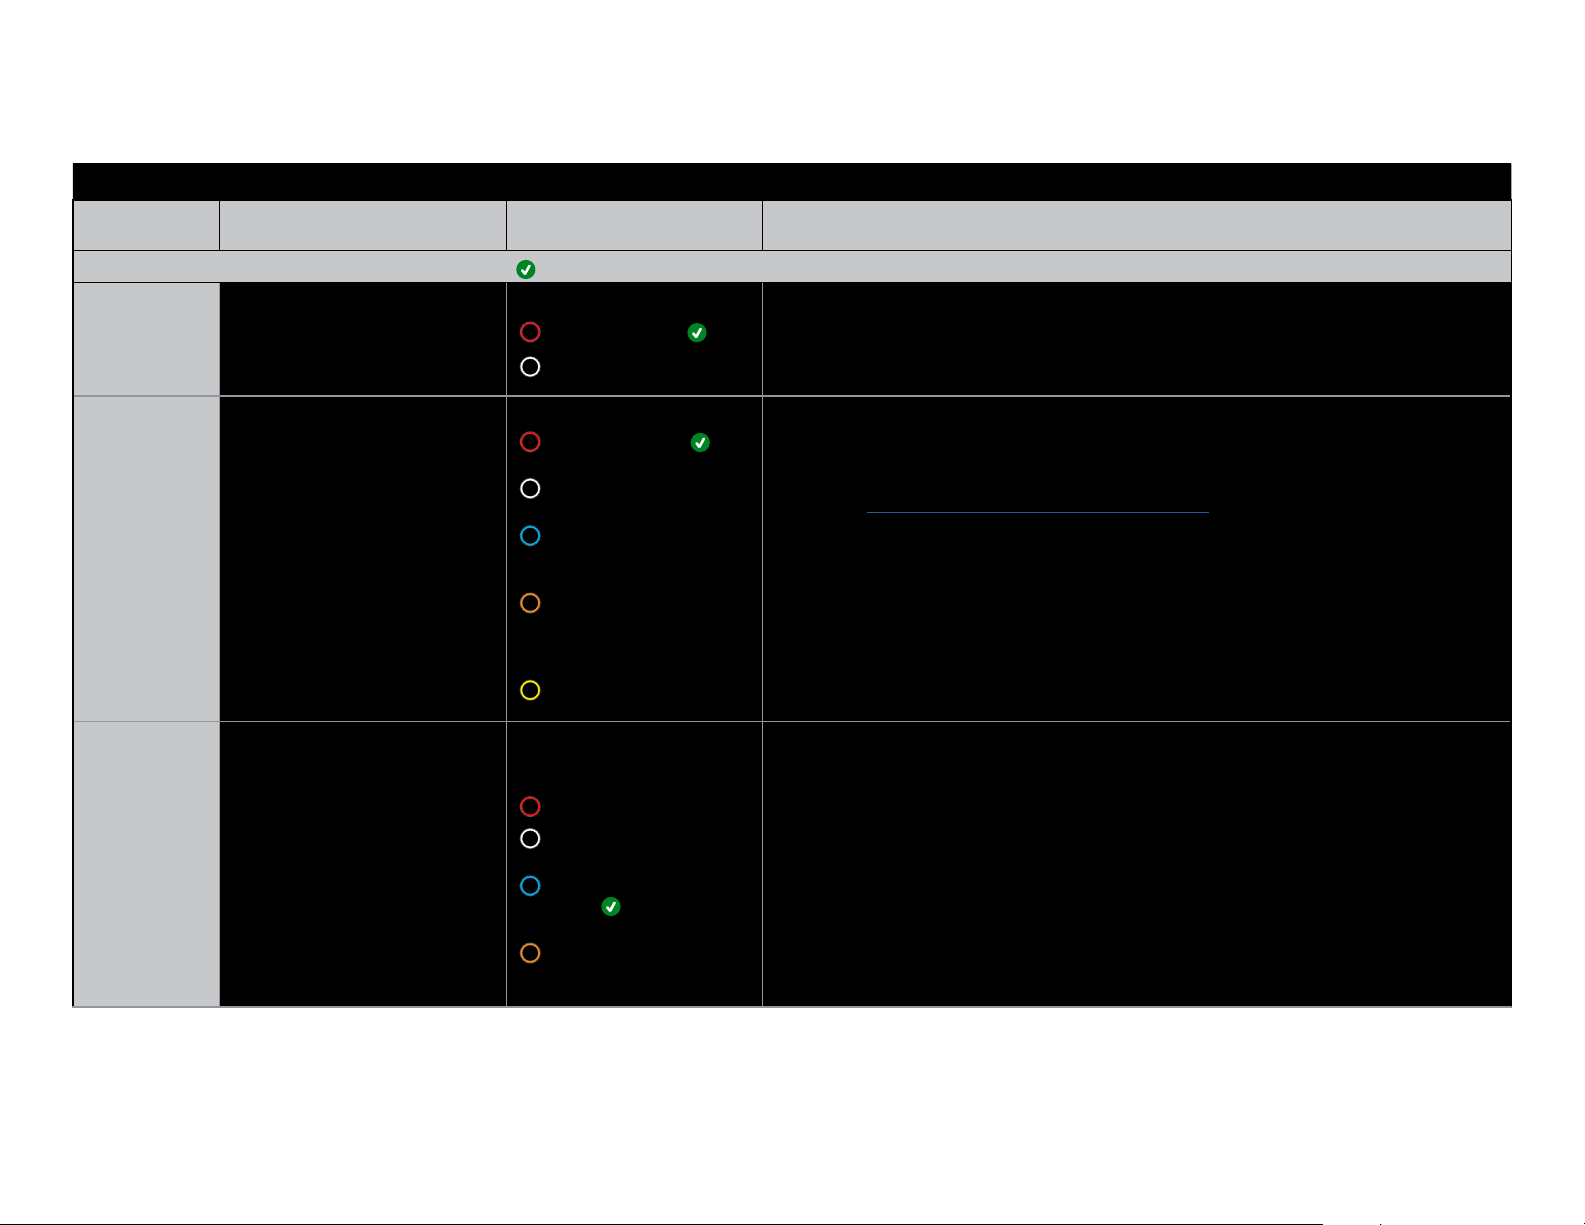
Global Settings Table
Setting Selector Knob Position
Tempo
Preset/Global
Footswitch
Assign
Footswitch 5
Assign
VINTAGE DIGITAL DIGITAL
TAP
CRISSCROSS DIGITAL w/MOD
EUCLIDEAN ECHO PLATTER
Global Settings
Values
ALT/LEGACY LED Color
Indicates the factory default value for each global setting.
Per Preset (red)
Global (white)
Tap Tempo (red)
1 Switch Looper (white)
Expression Toggle
(blue)
Squeal (orange)
Preset DEF (yellow)
Tap Tempo (red)
Looper On/Off (white)
Expression Toggle
(blue)
Squeal (orange)
Description
Set the behavior for the device’s Tap Tempo to be either per preset or global:
— Tempo is saved and recalled individually, per preset.
— Tempo is applied globally to all presets. Choose this option if you prefer the tempo
does not change until you manually change it.
Configure the desired function for the TAP Footswitch:
— Stomp the switch several times to "tap" in a tempo. The switch LED flashes red to
indicate the current tempo.
— Use the switch to access and control the 1 Switch Looper. The LED lights dim
white (see "Using the 1 Switch Looper" on page 23).
— When configured to control a parameter, the switch toggles between two values,
emulating the "heel" and "toe" positions of an expression pedal controller. The LED
lights dim blue to indicate heel position, and bright blue for toe position.
— Pressing and holding the switch momentarily sets the delay’s REPEATS parameter
to 100%, allowing you to get the infinite delay repeats effect on demand! Releasing
the switch returns the REPEATS to its previous setting. The switch LED lights dim
orange, and appears bright orange while held.
— Pressing the switch changes between the preset banks “ABC” (the LED lights dim
yellow) and “DEF” (the LED lights bright yellow).
Configure the desired function for the optional Footswitch 5:
(Note that you’ll additionally need to configure the "EXP Pedal - FS 5/6 Jack Assign"
global setting as "FS 5/6" for a connected FS 5 to be functional.)
— Stomp the switch several times to “tap” in a tempo.
— Use the switch to toggle between the currently-loaded preset and the Classic
Looper.
— When configured to control a parameter (such as Delay - Mix), the switch toggles
between two values, much like the "heel" and "toe" positions of an expression pedal
controller.
— Pressing and holding the switch momentarily sets the delay’s REPEATS parameter
to 100%, allowing you to get the infinite delay repeats effect on demand! Releasing
the switch returns the REPEATS to its previous setting.
44
Page 45
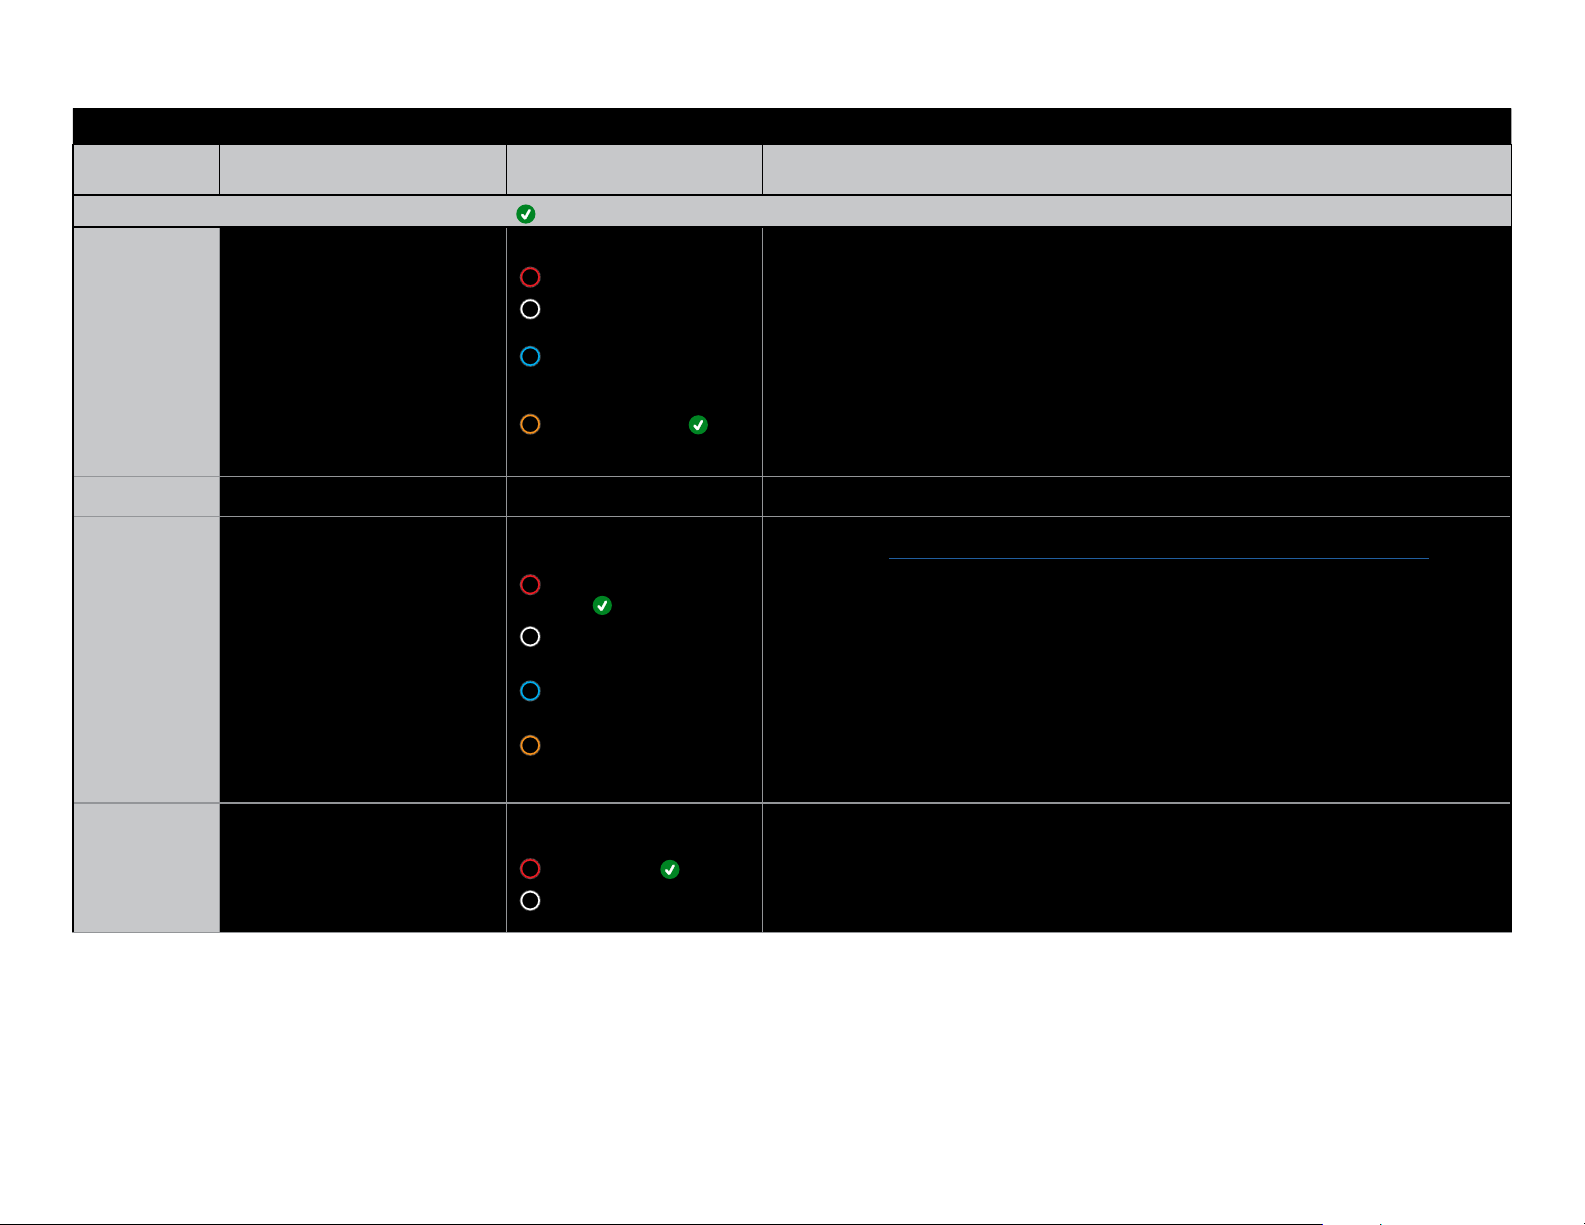
Setting Selector Knob Position
Footswitch 6
Assign
Pedal Jack
Functionality
DUAL DELAY STEREO
N/A PITCH ECHO PING PONG
ADT REVERSE
Global Settings
Values
ALT/LEGACY LED Color
Indicates the factory default value for each global setting.
Tap Tempo (red)
Looper On/Off (white)
Expression Toggle
(blue)
Squeal (orange)
EXP Pedal Only
(red)
Single Footswitch
(white)
EXP Pedal + Footswitch
(blue)
Two Footswitches
(orange)
Description
Configure the desired function for optional Footswitch 6:
— Stomp the switch several times to “tap” in a tempo.
— Use the switch to toggle between the currently-loaded preset and the Classic
Looper.
— When configured to control a parameter (such as Delay - Mix), the switch toggles
between two values, much like the "heel" and "toe" positions of an expression pedal
controller.
— Pressing and holding the switch momentarily sets the delay’s REPEATS parameter
to 100%, allowing you to get the infinite delay repeats effect on demand! Releasing
the switch returns the REPEATS to its previous setting.
(Reserved for potential future Global Setting.)
Configure the EXP PEDAL - FS 5/6 jack for either pedal + switch or dual switch functionality (see "Setting up an Expression Pedal and Footswitches" on page 14 ):
— Accommodates a single expression pedal, connected using a TS cable.
— Accommodates a single footswitch, connected using a TS cable. [The footswitch
triggers FS5]
— Accommodates an expression pedal and a single footswitch, connected using a Y
cable (two TS to a TRS). [The footswitch triggers FS6]
— Accommodates two footswitches, connected either as a dual footswitch using a
TRS cable, or two individual footswitches using a Y cable (to TS to a TRS). [FS5=Tip,
FS6=Ring]
EXP/Switch
Polarity
DUCKED DYNAMIC
Normal (red)
Inverted (white)
Configure the +/- polarity for your connected EXP PEDAL and footswitches. If your
pedal or footswitch is controlling parameters backward, try changing this setting.
— Pedal jack accommodates a Line 6 or Mission expression pedal.
— Pedal jack accommodates a Yamaha or similar expression pedal.
Note that this setting also inverts the polarity for Footswitches 5 and 6.
45
Page 46
Setting Selector Knob Position
Looper Mono/
Stereo
Looper Pre/
Post Position
Dry Path TUBE ECHO HELIOSHPERE
HARMONY AUTO-VOL
LOOPER
Global Settings
Values
ALT/LEGACY LED Color
Indicates the factory default value for each global setting.
Mono (red)
Stereo (white)
Pre (red)
Post (white)
Analog (red)
DSP (white)
Description
Configure the Looper as mono or stereo.* This setting applies to both the classic and
1 Switch Looper:
— The Looper records in mono.
— The Looper records in stereo.
*Note that mono and stereo behaviors also depend upon the following “Looper Pre/
Post Position” global setting:
When Looper is set to “Pre,” the mono/stereo behavior follows the Input jack’s
sensing:
• If the Right Input is connected, a newly recorded loop can be mono or stereo,
depending on the Mono/Stereo setting.
• If the Right Input is not connected, a newly recorded loop is mono, regardless of
the Mono/Stereo setting.
When Looper is set to “Post” (the factory default), the mono/stereo behavior follows
the Output jack’s sensing:
• If the Right Output is connected, a newly recorded loop can be mono or stereo,
depending on the Mono/Stereo setting.
• If the Right Output is not connected, a newly recorded loop is mono, regardless of
the Mono/Stereo setting.
Configure how you prefer the Looper to be positioned in respect to the effects within
the signal flow. This setting applies to both the Classic and 1 Switch Loopers.
Note that this Pre/Post setting also impacts the Looper Mono/Stereo global setting—
see previous item.
— The Looper is positioned before the delay and reverb effects. (Delay and reverb
effects are heard on your input signal, but not captured in loop recordings.)
— The Looper is positioned after the delay and reverb effects. (Delay and reverb
effects are heard on your input signal and captured in loop recordings.)
Configure the properties of your non-effected, “Dry Path” signal through the device:
— The dry signal is sent through the device without any digital conversion. The MIX
knob controls the blend of the dry (analog) and the wet (digital) signals.
— The dry signal is converted to digital and the combined wet/dry signal is controlled
via the MIX knob.
46
Page 47
Setting Selector Knob Position
Bypass Trails TAPE ECHO TRANSISTOR
Bypass Type MULTI-HEAD COSMOS
MIDI Channel SWEEP MULTI PASS
MIDI THRU ANALOG ADRIATIC
Global Settings
Values
ALT/LEGACY LED Color
Indicates the factory default value for each global setting.
Off (red)
On (white)
True (red)
Buffered (white)
[Bypass Trails on]
DSP (blue)
[Bypass Trails On]
Dry Kill (orange)
[Bypass Trails on]
Channel 1 (red)
Channel 2 (white)
Channel 3 (blue)
Channel 4 (orange)
Assigned based on next
received PC message
(yellow)
Off (red)
On (white)
Description
Set whether the "trails" of your current delay and reverb effects are heard when you
bypass DL4 MkII:
— The delay and/or reverb’s trails are abruptly muted when you press the active A, B,
or C preset footswitch to bypass DL4 MkII.
— The current delay and/or reverb trails decay naturally when you press the active
preset footswitch to bypass DL4 MkII.
Select your preferred Bypass behavior for DL4 MkII (also see "What Type of Bypass?"
on page 11):
— Your input signal continues to be sent directly through DL4 MkII with no A/D/A
conversion, and all DSP is bypassed. (MIC IN is muted when bypassed in this mode.)
— Your input continues to be sent directly through DL4 MkII with no A/D/A conversion, its signal to the DSP is muted, and the DSP’s existing delay/reverb trails are
allowed to decay naturally.
— Your input is sent through the DSP path along with delay/reverb, but any further
delay/reverb processing is bypassed. Any existing delay/reverb trails are allowed to
decay naturally.
— All input is completely muted, but the DSP’s echoes decay naturally.
Choose the MIDI Channel the DL4 MkII uses for MIDI In and Out.
Once the ALT/LEGACY button is set to yellow, DL4 MkII will listen for a Program
Change message sent on any MIDI Channel 1 - 16. DL4 MkII will then “learn” the
received MIDI Channel and set it as the new MIDI Channel for sending and receiving.
Choose whether DL4 MkII’s MIDI THRU is active or not:
Does not send incoming MIDI messages out the MIDI OUT/THRU or USB MIDI ports.
Sends incoming MIDI messages out the MIDI OUT/THRU and USB MIDI ports.
47
Page 48
Setting Selector Knob Position
Receive MIDI
Clock
ANALOG MOD ELEPHANT
MAN
N/A LO RES DELAY GLITCH
Global Settings
Values
ALT/LEGACY LED Color
Indicates the factory default value for each global setting.
Off (red)
On (white)
Auto (blue)
Description
Choose whether DL4 MkII receives and syncs to incoming MIDI Clock messages. See
"Using MIDI Clock for Tempo Sync" on page 49.
— DL4 MkII uses only its internal tempo and ignores any incoming MIDI Clock messages. Note that incoming MIDI Clock is still routed to MIDI THRU.
— DL4 MkII automatically syncs to incoming MIDI Clock. You cannot enter your own
tempo manually via the DL4 MkII TAP switch.
— DL4 MkII automatically syncs to incoming MIDI Clock tempo, and allows you to
still enter your own tempo via the DL4 MkII TAP switch.
(Reserved for potential future Global Setting.)
48
Page 49
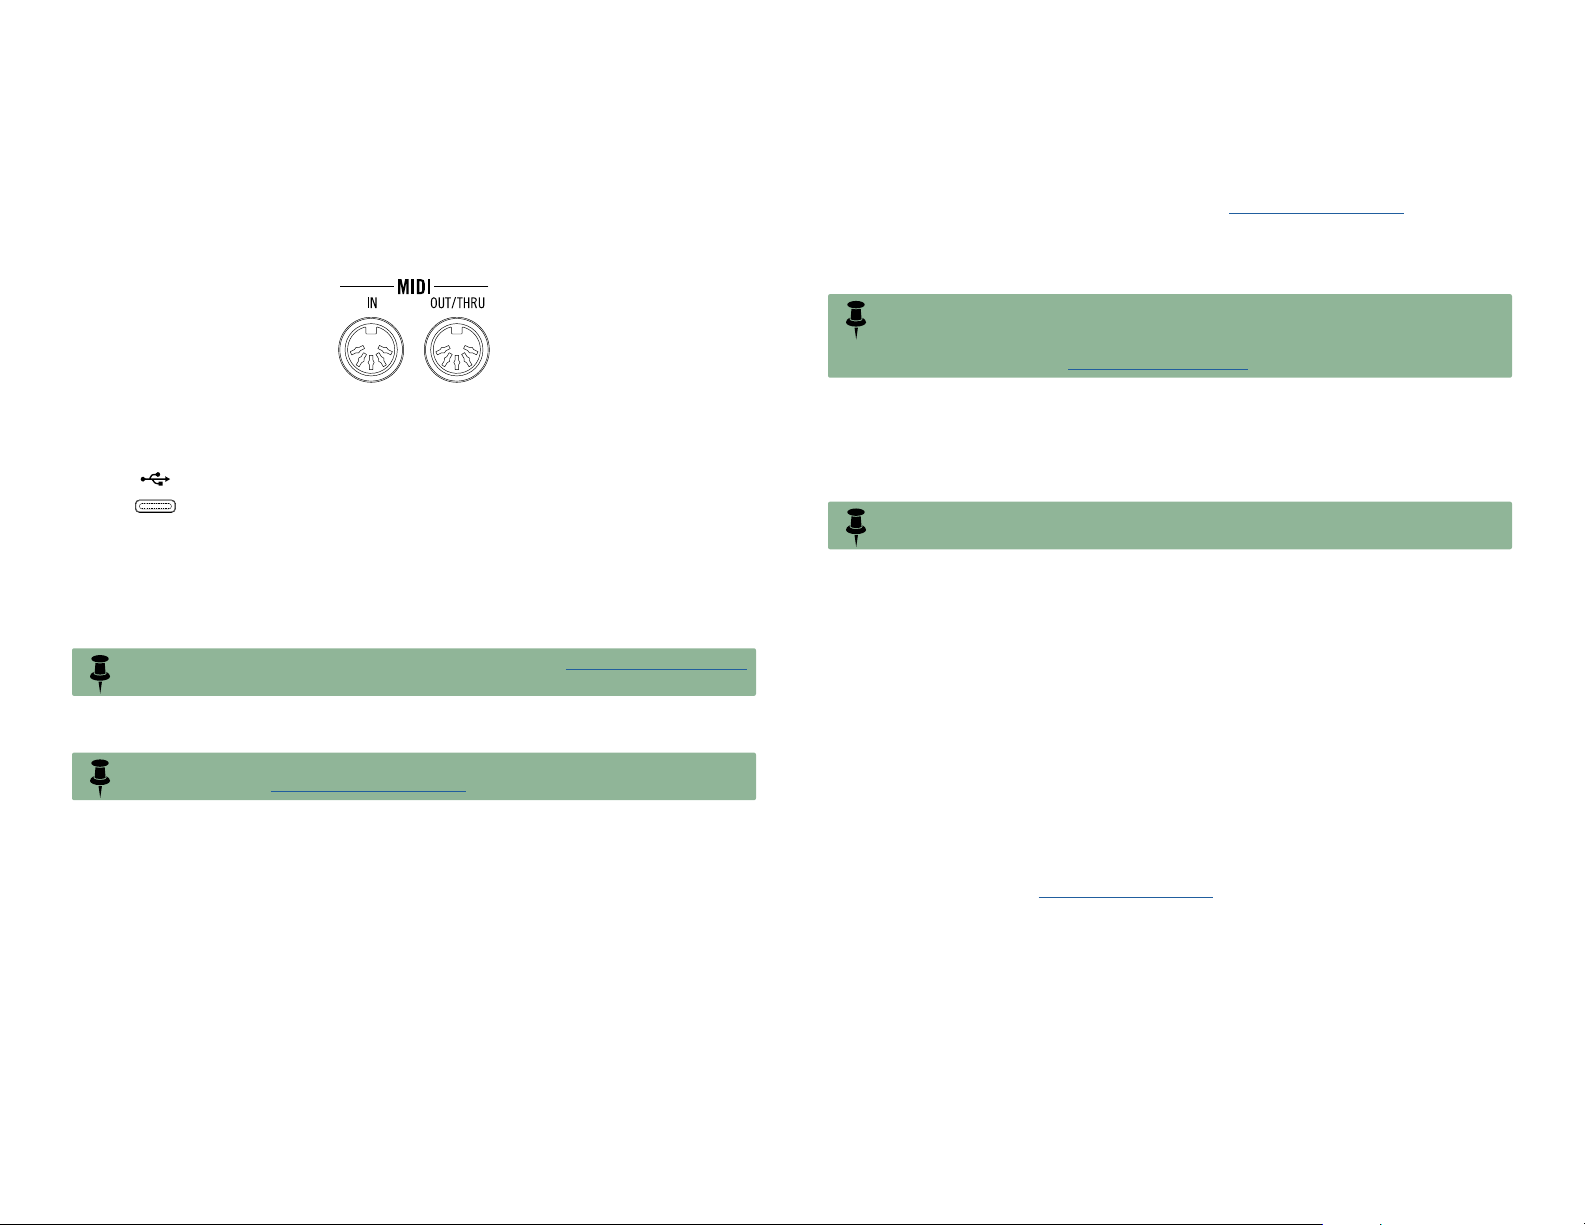
MIDI
With great power comes great responsibility—therefore, we did the responsible thing
and provided robust MIDI external control for you to take command of your DL4 MkII’s
presets, parameters, looping, tempo, and more.
Using MIDI Clock for Tempo Sync
DL4 MkII can receive MIDI Clock via its MIDI IN, as well as via USB MIDI, to allow
you to sync your DL4 MkII delay repeats to the tempo from other effects devices and
computer applications. Use the Global Settings - "Receive MIDI Clock" option to set
the desired MIDI clock option:
• Off - DL4 MkII ignores MIDI Clock messages received.* The tempo can be set
manually by tapping on the TAP footswitch.
*NOTE: Whenever MIDI Clock is sent to DL4 MkII, even if the Receive MIDI Clock option
is set to Off, the MIDI Clock data is routed “THRU,” out DL4 MkII’s MIDI OUT/THRU and
USB MIDI ports, allowing other connected devices to follow the MIDI Clock for tempo
sync. Use the Global Settings - "MIDI THRU" on page 47 option to disable it if desired.
•
Connect the MIDI output of your external MIDI controller device to the DL4 MkII
MIDI IN, and DL4 MkII will respond to MIDI Program Change (PC), Note On,
MIDI CC, and MIDI Clock messages, as covered within this chapter.
•
• Connect DL4 MkII’s MIDI OUT/THRU to your other MIDI gear (or connect USB
NOTE: To disable MIDI THRU, configure the Global Settings - "MIDI THRU" on page 47
option to Off (it is On as the factory default setting).
•
NOTE: DL4 MkII uses MIDI channel 1 as the factory default, but this can be changed via
the Global Settings - "MIDI Channel" on page 47.
When connected to your computer, DL4 MkII also receives and transmits
the same MIDI messages via USB (with the exception of MIDI Clock
messages, which can only be received for sync and routed to MIDI THRU).
to your computer) to optionally pass any incoming MIDI messages “THRU” to
another device or computer app.
• DL4 MkII does not transmit MIDI messages for any of its own actions, but
will pass incoming MIDI out via its MIDI OUT/THRU and USB MIDI ports.
All MIDI control is global, meaning, all commands listed in this chapter will control
their respective DL4 MkII functions regardless of the currently loaded preset.
• On - DL4 MkII's TAP tempo syncs to incoming MIDI Clock messages. While
set to On, presses of the TAP footswitch are ignored.
• Auto - DL4 MkII's TAP tempo syncs to incoming MIDI Clock messages. The
TAP switch’s LED flashes blue once MIDI Clock sync is established. While set to
Auto, tempo can optionally be set manually by tapping on the TAP footswitch.
NOTE: If you manually tap a tempo on DL4 MkII with MIDI Clock set to Auto, the TAP
switch LED flashes at your new tempo while remaining blue.
Once you’ve selected the preferred Auto or On option described above, use the following steps to sync DL4 MkII to your source MIDI Clock device’s tempo.
1.
Connect your source MIDI Clock device’s MIDI OUT to DL4 MkII’s MIDI
IN port. Or, USB-connect DL4 MkII to your computer and select the
DL4 MkII USB MIDI port within your MIDI/DAW software.
2. On the source device, set the desired tempo rate and start the MIDI
Clock send.
3. Once DL4 MkII receives the MIDI Clock “start” command, you’ll see
DL4 MkII’s TAP switch LED change to flashing blue to indicate it is
actively following the received MIDI Clock tempo rate.
When MIDI Clock is stopped on the source device, you’ll see the TAP switch LED
return to flashing red, and the tempo remains at the last synced tempo rate.
If the Global Settings > "Tempo Preset/Global" is set to Per Preset (the default option),
when changing to a different preset, the TAP Tempo rate will change to the new preset’s saved tempo rate. You’ll see the TAP switch LED flashing blue at the new rate.
49
Page 50
Accessing all 128 Presets
As covered on page 10, you can recall the first six presets (A~F) via the devices onboard footswitches. But with the power of MIDI Program Change (PC) messages, you
can individually access any of the 128 preset locations that reside within your device.
Configure your MIDI controller to send PC messages as shown in the following table.
Please also see "Loading Presets 1 - 128 via MIDI" on page 10.
Preset Change - MIDI Program Change Messages
Message Function
PC 000 Preset A
PC 001 Preset B
PC 002 Preset C
PC 003 Preset D
PC 004 Preset E
PC 005 Preset F
PC 006 ~ 127 Presets 7 ~128
NOTE: Presets 7 through 128 are not accessible on the DL4 MkII
device itself—only via MIDI!
NOTE: In the table above, we’re listing the Program Change message values as ranging
from “000” to “127,” which follows the MIDI Specification. Within the software or hardware
displays of some MIDI controllers, however, the range can be shown as “001” to “128.” If
your MIDI controller happens to display 001 - 128, just know that you’ll need to send “PC 001”
for DL4 MkII preset A, “PC 002” for preset B, “PC 006” for preset 7, etc.
50
Page 51
Controlling Parameters
If you really want to get into some serious real-time, remote control, MIDI CCs are the ticket! Configure your MIDI controller device to send the following CCs to DL4 MkII, and the
corresponding parameters will respond accordingly. As indicated in the following table’s Device Responds In: titled column, the device will respond to some MIDI commands only
while in Preset Mode, only in Classic Looper mode, or in both modes.
Parameter Control - MIDI CC Messages
CC Parameter or Function CC Value Device Responds In:
MkII Delays:
0 = Vintage Digital
1 = Crisscross
2 = Euclidean
3 = Dual Delay
4 = Pitch Echo
5 = ADT
CC1 Delay Model Select
CC2 Reverb Model Select
CC3 Emulates expression pedal 0-127 Preset and Classic Looper modes
CC4
CC9 Classic Looper Mode On/Off
Preset Bypass
(same as pressing the active preset switch)
6 = Ducked
7 = Harmony
8 = Heliosphere
9 = Transistor
10 = Cosmos
11 = Multi Pass
12 = Adriatic
13 = Elephant Man
14 = Glitch
Reverbs:
0 = Room
1 = Searchlights
2 = Particle Verb
3 = Double Tank
4 = Octo
5 = Tile
6 = Ducking
7 = Plateaux
8 = Cave
9 = Plate
10 = Ganymede
11 = Chamber
12 = Hot Springs
13 = Hall
14 = Glitz
15 = Reverb Off
0-63: Enables preset (Bypass Off);
64-127: Bypasses preset (Bypass On)
0-63: Classic Looper mode Off;
64-127: Classic Looper mode On
Legacy Delays:
15 = Digital
16 = Digital w/ Mod
17 = Echo Platter
18 = Stereo
19 = Ping Pong
20 = Reverse
21 = Dynamic
22 = Auto-Vol
23 = Tube Echo
24 = Tape Echo
25 = Multi-Head
26 = Sweep
27 = Analog
28 = Analog Mod
29 = Lo Res Delay
Preset mode
Preset mode
Preset mode
Preset and Classic Looper modes
51
Page 52
Parameter Control - MIDI CC Messages
CC
CC11 Delay Time 0-127 = 0-100% Preset and Classic Looper modes
CC12 Time Subdivisions - Note Values
CC13 Delay Repeats (Feedback) 0-127 Preset and Classic Looper modes
CC14 Delay Tweak 0-127 Preset and Classic Looper modes
CC15 Delay Tweez 0-127 Preset and Classic Looper modes
CC16 Delay/Looper Mix knob 0-127 Preset and Classic Looper modes
CC17 Reverb Decay 0-127 Preset mode
CC18 Reverb Predelay/Diffusion 0-127 Preset mode
CC19 Reverb-Delay Routing
CC20
CC64 TAP Tempo 64-127 Preset and Classic Looper modes
Parameter or Function CC Value Device Responds In:
0 = 1/8 Triplet
1 = 1/8
2 = 1/8 Dotted
3 = 1/4 Triplet
Reverb Mix (DSP Dry Path) / Reverb Level (Analog Dry
Path)
4 = 1/4
5 = 1/4 Dotted
6 = 1/2 Triplet
7 = 1/2
8 = 1/2 Dotted
0 = Reverb before delay
1 = Reverb and delay in parallel
2 = Reverb after delay
0-127 Preset mode
Preset mode
Preset mode
52
Page 53
Controlling the Looper
With the use of either MIDI Note On or MIDI CC messages, you can control numerous aspects of the Looper. Be sure to read through "Using the Looper" on page 19
to get familiar with all functions, then try sending the following MIDI messages to DL4
MkII for your looping performance. Incidentally, Line 6 follows Yamaha’s MIDI note
spec, where middle C is “C3” (unlike some other gear manufacturers that prefer to say
middle C is “C4”).
NOTE: DL4 MkII will respond to the following MIDI Looper commands regardless if the
device is currently in the Classic Looper mode or not. However, you won’t see any switch
LED indication of the current Looper function (record, play, overdub, etc.) unless you turn
the Classic Looper Mode on, or have the Global Settings > TAP switch configured to control
the 1 Switch Looper.
Looper Control - MIDI Note On Messages
Message Function
Note C -1 Toggles on each press between Record and Overdub
Note D -1 Toggles on each press between Play and Stop
Note E -1 Play Once
Note F -1 Record
Note F# -1
Note G -1 Overdub
Note G# -1 Toggles on each press between Forward and Reverse
Note A -1 Play
Note A# -1 Toggles on each press between Half Speed and Full Speed
Note B -1 Stop
Toggles on each press between Undo and Redo, for overdub
recordings
Looper Control - MIDI CC Messages
CC
60
61
62 64-127 Play Once
63
65
66
Value Function
0-63: Off
0
64-127: On
0-63: Overdub
64-127: Record
0-63: Stop;
64-127: Play
0-63: Undo;
64-127: Redo
0-63: Forward
64-127: Reverse
0-63: Full;
64-127: Half
TIP:
You can also utilize MIDI CCs to control the Classic Looper’s built-in Echo parameters
while in Classic Looper mode—see the table within "Controlling Parameters" on page 51.
Classic Looper Mode On/Off
Record/Overdub
Play/Stop
Undo/Redo overdub recordings
Forward/Reverse
Full Speed/Half Speed
53
Page 54
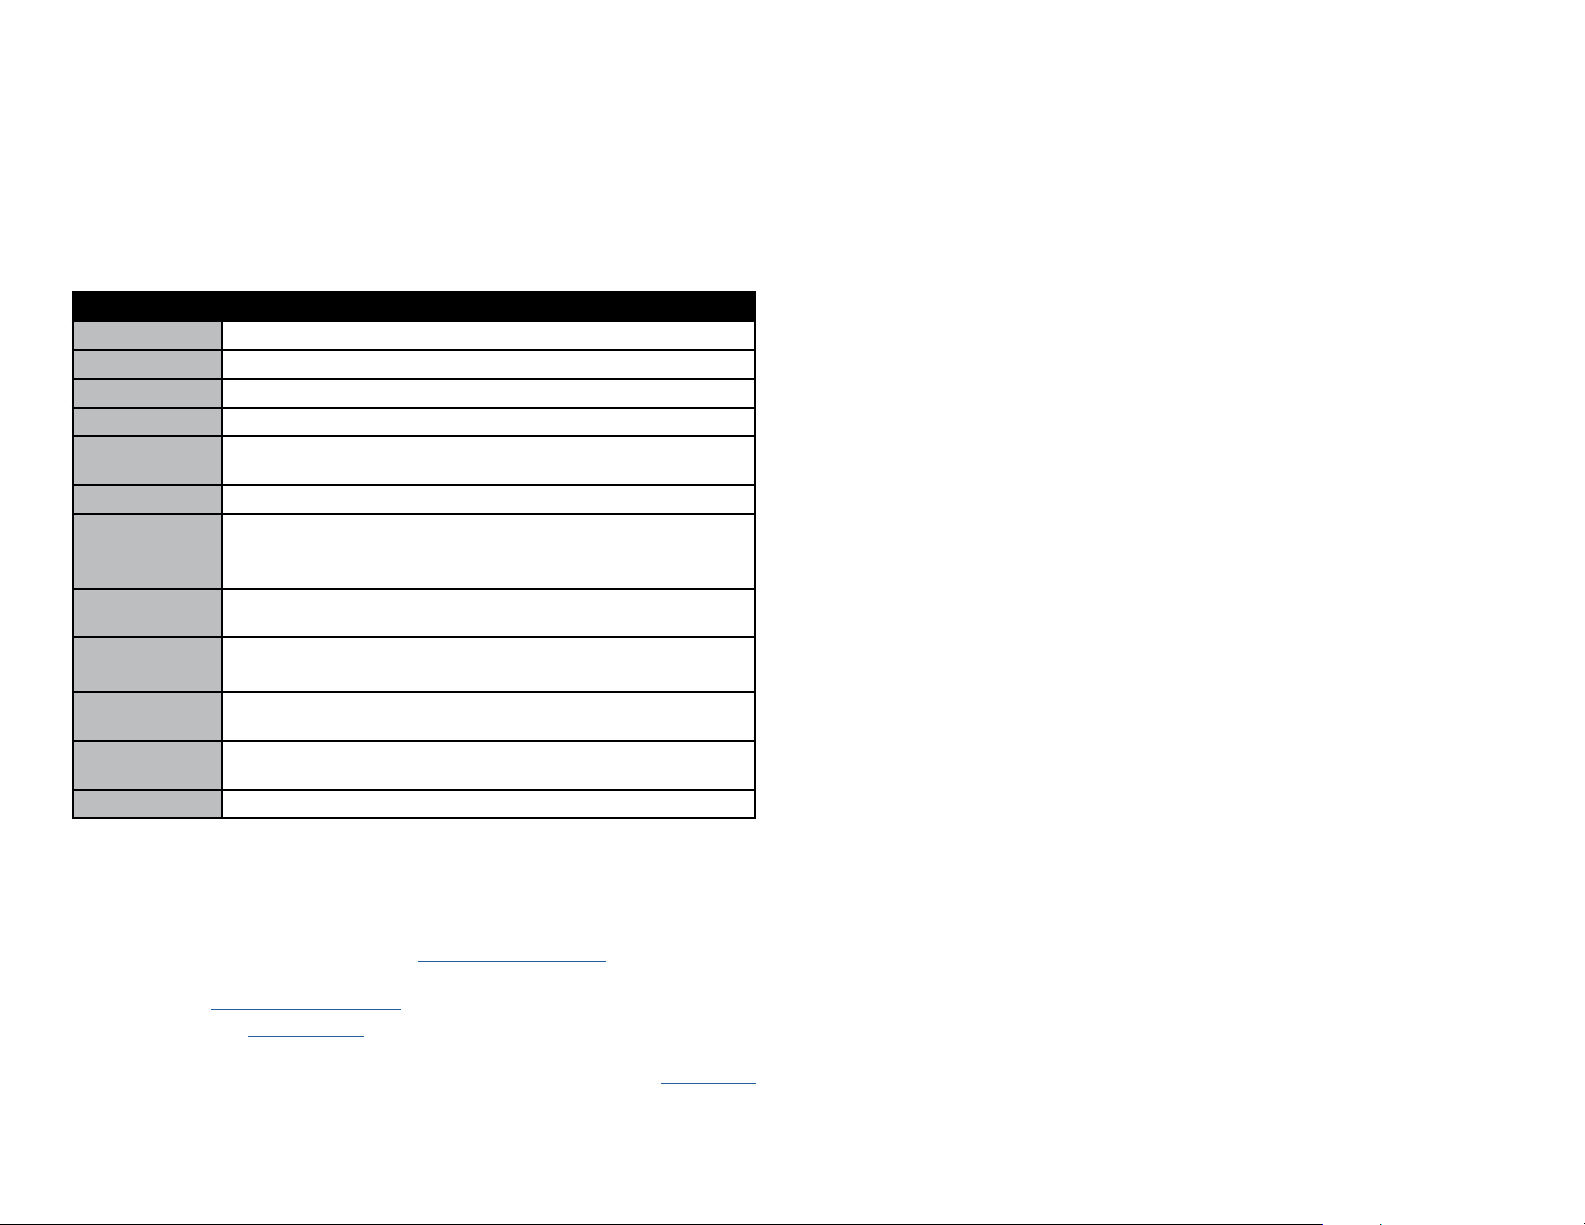
Additional Resources
Product Specifications
DL4 MkII Specifications
Delays 30
Reverbs 15
Looper Yes, with both a 4-Switch and 1-Switch Looper user interface
Mono/Stereo Mono or stereo input and output
USB USB-C port - for potential future firmware updates and USB
MIDI control via computer
SD Card 1 x microSD card slot - for expanded Looper memory
Audio Inputs 2 x 1/4" unbalanced Left (mono) and Right, Instrument level,
Impedance = 1 MΩ, Max input level = +11.25 dBu (8Vpp)
1 x XLR Mic In, with preamp
Audio Outputs 2 x 1/4" unbalanced Left (mono) and Right, Instrument level,
Impedance = 100 Ohms
MIDI MIDI 5-pin IN and OUT/THRU
USB MIDI In and OUT/THRU - for use via computer applications
Requirements
Power
Dimensions
(H x W x D)
Weight 2.03 lbs. / .92 kg
9VDC, 500mA, center pin negative, 2.1 mm. It is recommended
to use the included Line 6 DC-1g power adapter
2 x 9.25 x 4.5 inches / 5.1 x 23.5 x 11.4 cm
Online Resources
Looking for more info? We’ve got plenty of online resources, just a click away:
• See our DL4 MkII tutorial videos at line6.com/meet-dl4mkii.
• Download additional Help documentation covering DL4 MkII and all other Line
6 gear at Line 6 Product Manuals
•
Check out the Line 6 Support page for access to helpful tips, videos, discussion
forums, or to contact Line 6 Technical Support
• Can’t get enough Line 6 Gear & accessories? Head on over to the Line 6 Store
54
Page 55
®
55
 Loading...