

Page 1

®
CROWN JEWEL SOFTWARE FOR WINDOWS
SOFTWARE REV. 2.00 AND UP
Crown Jewel (with Camera) Crown Jewel (Brass Enclosure)
User’s Guide
CJWin
CJWin
Page 2

Getting Started
System Requirements . . . . . . . . . . . . . . . . . . . . . . . . . . . . . . . . .3
Installing CJWin . . . . . . . . . . . . . . . . . . . . . . . . . . . . . . . . . . . . . .3
Starting CJWin . . . . . . . . . . . . . . . . . . . . . . . . . . . . . . . . . . . . . . .4
The Main Menu . . . . . . . . . . . . . . . . . . . . . . . . . . . . . . . . . . . . . .4
CJWin “Help” Features . . . . . . . . . . . . . . . . . . . . . . . . . . . . . . . . .5
Set Up a New Unit (Overview) . . . . . . . . . . . . . . . . . . . . . . . . .5-6
Unit Management
Creating a Unit File . . . . . . . . . . . . . . . . . . . . . . . . . . . . . . . . . . . .7
Adding Multiple Units That Share a Single Phone Line . . . . . . . .8
Opening a Unit File . . . . . . . . . . . . . . . . . . . . . . . . . . . . . . . . . . . .8
Setting a Unit's Date and Time . . . . . . . . . . . . . . . . . . . . . . . . .8-9
Using the “Save As” Feature . . . . . . . . . . . . . . . . . . . . . . . . . . . .9
Deleting a Unit File . . . . . . . . . . . . . . . . . . . . . . . . . . . . . . . . . . . .9
Communications
Configuring the Port and Modem Settings . . . . . . . . . . . . . . . .10
Connecting to a Unit . . . . . . . . . . . . . . . . . . . . . . . . . . . . . . . . .11
Receiving (Downloading) Data from a Unit . . . . . . . . . . . . . . . .12
Sending (Uploading) Data to a Unit . . . . . . . . . . . . . . . . . . . . . .13
Edit Unit Features
Editing Unit Features . . . . . . . . . . . . . . . . . . . . . . . . . . . . . . . . .14
Call Waiting . . . . . . . . . . . . . . . . . . . . . . . . . . . . . . . . . . . . . . . .14
Visitor Ring Type . . . . . . . . . . . . . . . . . . . . . . . . . . . . . . . . . . . .14
Visitor Ring Limit . . . . . . . . . . . . . . . . . . . . . . . . . . . . . . . . . . . .15
Visitor Time Limit . . . . . . . . . . . . . . . . . . . . . . . . . . . . . . . . . . .15
Maximum Keypad Errors . . . . . . . . . . . . . . . . . . . . . . . . . . . . . .15
Visitor Calls to Other Tenants (Dialing Codes) . . . . . . . . . . . . . .15
Edit Unit Configuration
Editing the Unit Configuration . . . . . . . . . . . . . . . . . . . . . . . . . .16
Alarm Conditions . . . . . . . . . . . . . . . . . . . . . . . . . . . . . . . . . . . .17
Visitors . . . . . . . . . . . . . . . . . . . . . . . . . . . . . . . . . . . . . . . . .17-18
Unit Communication Configuration . . . . . . . . . . . . . . . . . . .18-20
Telephone Company (Telco) Connected . . . . . . . . . . . . . . . . . . .20
Unit and FID Number . . . . . . . . . . . . . . . . . . . . . . . . . . . . . . . . .20
TABLE OF CONTENTS
2
Time Zones and Holidays
About Time Zones . . . . . . . . . . . . . . . . . . . . . . . . . . . . . . . . . . .21
Creating or Editing Time Zones . . . . . . . . . . . . . . . . . . . . . . . . .22
Erasing a Time Zone . . . . . . . . . . . . . . . . . . . . . . . . . . . . . . . . .22
About Holidays . . . . . . . . . . . . . . . . . . . . . . . . . . . . . . . . . . . . . .22
Creating or Editing Holiday Schedules . . . . . . . . . . . . . . . . . . . .23
Erasing a Holiday Schedule . . . . . . . . . . . . . . . . . . . . . . . . . . . .23
Other Schedules
About the Do Not Disturb Schedule . . . . . . . . . . . . . . . . . . . . . .24
Setting Up a Do Not Disturb Schedule . . . . . . . . . . . . . . . . . . . .25
Editing a Do Not Disturb Schedule . . . . . . . . . . . . . . . . . . . . . .25
Erasing a Do Not Disturb Schedule . . . . . . . . . . . . . . . . . . . . . .26
About Unlock Schedules . . . . . . . . . . . . . . . . . . . . . . . . . . . . . .26
Main Gate Unlock Schedule . . . . . . . . . . . . . . . . . . . . . . . . .26-27
Auxiliary Relay Unlock Schedule . . . . . . . . . . . . . . . . . . . . . . . .27
Entry Codes
About Entry Codes . . . . . . . . . . . . . . . . . . . . . . . . . . . . . . . . . . .28
Adding Entry Codes . . . . . . . . . . . . . . . . . . . . . . . . . . . . . . . . . .29
Editing Entry Codes . . . . . . . . . . . . . . . . . . . . . . . . . . . . . . . . . .29
Erasing Entry Codes . . . . . . . . . . . . . . . . . . . . . . . . . . . . . . . . .29
Call Forwarding
About Call Forwarding . . . . . . . . . . . . . . . . . . . . . . . . . . . . . . . .30
Enabling Call Forwarding . . . . . . . . . . . . . . . . . . . . . . . . . . . . . .30
Setting Up a Call Forwarding Schedule . . . . . . . . . . . . . . . . . . .31
Unit Transactions
About Unit Transactions . . . . . . . . . . . . . . . . . . . . . . . . . . . . . . .32
Retrieving Unit Transactions . . . . . . . . . . . . . . . . . . . . . . . . . . .32
Viewing and Erasing Transactions . . . . . . . . . . . . . . . . . . . . . . .32
Using the Control Panel
Accessing the Control Panel . . . . . . . . . . . . . . . . . . . . . . . . . . .33
Main Gate Commands . . . . . . . . . . . . . . . . . . . . . . . . . . . . . . . .34
Auxiliary Relay Commands . . . . . . . . . . . . . . . . . . . . . . . . . . . .34
Special Control Panel Commands . . . . . . . . . . . . . . . . . . . . . . .34
Printing
Printing Transactions . . . . . . . . . . . . . . . . . . . . . . . . . . . . . .35-36
Printing the Unit's Current Information . . . . . . . . . . . . . . . . . . .36
Page 3

3
GETTING STARTED
This section will cover . . .
• System Requir
ements Page 3
• Installing CJW
in Page 3
• Starting CJWin Page 4
• The Main Menu
Page 4
• CJW
in “Help” Features Page 5
• Set Up a New Unit (Overview) Page 5
System Requirements
To run CJWin software, your system must have an IBM PC-compatible computer running Windows 95 (full version) or higher, Internet
Explorer 4.01 (Service Pack 2) or higher (5.0 or higher recommended) and the following:
MINIMUM RECOMMENDED
Pentium 166 Processor Pentium II Processor
32 MB of RAM 128 MB of RAM
200 MB hard disk free 300 MB hard disk free
Hayes-compatible modem connected
to a COM port
CD ROM
Mouse
Installing CJWin
In order for CJWIN to operate properly, it must be installed onto the computer hard disk drive.CJWIN cannot be executed directly from
the CD.
CJWin is compatible with Windows 95 (full version) or higher.
• Windows 95 Users: You must have Y2K Update installed on your machine.
• Windows 98 (before Second Edition) Users: You must have Y2K Update 2 installed on your machine - does not apply to Windows
98, Second Edition.
• Windows NT 4 Users: You must have Service Pack 6 (or greater) installed on your machine.
• Windows NT/2000/XP Users: You must have administrator privileges to install CJWin.
NOTE:
CJWin will not run in Windows 3.1 or 3.11.You must be running Windows 95 (full version) or above to run the application.
To install CJWIN Software, perform the following steps:
1. Start Windows.
2. Place the CJWin CD in the CD ROM drive. CJWin will automatically start the installation process; follow the on-screen prompts.If
the installation process does not automatically start, continue with step 3.
3. From the taskbar, select the Start Button, point to Settings, then click on Control Panel.
4. From the Control Panel window, double-click on Add/Remove Programs.
5. From the Add/Remove Programs screen, under the Install/Uninstall tab, click Install.
6. Follow the on-screen prompts.
NOTE:
CJWin may prompt you to reboot your machine a few times during the installation process. This is required by Microsoft.If
after each reboot CJWin does not automatically continue with the installation process, double-click on the Setup.exe file in the
CJWin software installation CD.
WINDOWS NT/2000/XP USERS ONLY
If there are multiple CJWin users, you must perform these last two steps after CJWin has completed its installation:
• Provide shared privileges for the entire CJWin subdirectory (and any other directory that will store the databases) AND
• Grant “Full Control” permission for each CJWin user to each subdirectory storing the CJWin databases.
Page 4
4
GETTING STARTED
Starting CJWin
From the Desktop (if a shortcut exists): Double-click the CJWin32 icon.
OR
From the Start menu:
1. Click on Start.
2. From the fly-up Start menu, select Programs.
3. From the fly-out Programs menu, select Sentex Applications.
4. From the Sentex Applications menu, select CJWin32.
NOTES:
• Sentex Applications is the default name of the program group and will appear unless you change the program group name at
installation.
• To create a shortcut to CJWin, drag the CJWin32.EXE file icon onto the desktop (see Windows User Guide for details).
• The first time you start CJWin after installation, it will automatically display the Modem Setup screen. For information on this
screen, see Configuring the Port and Modem Settings on page 14.
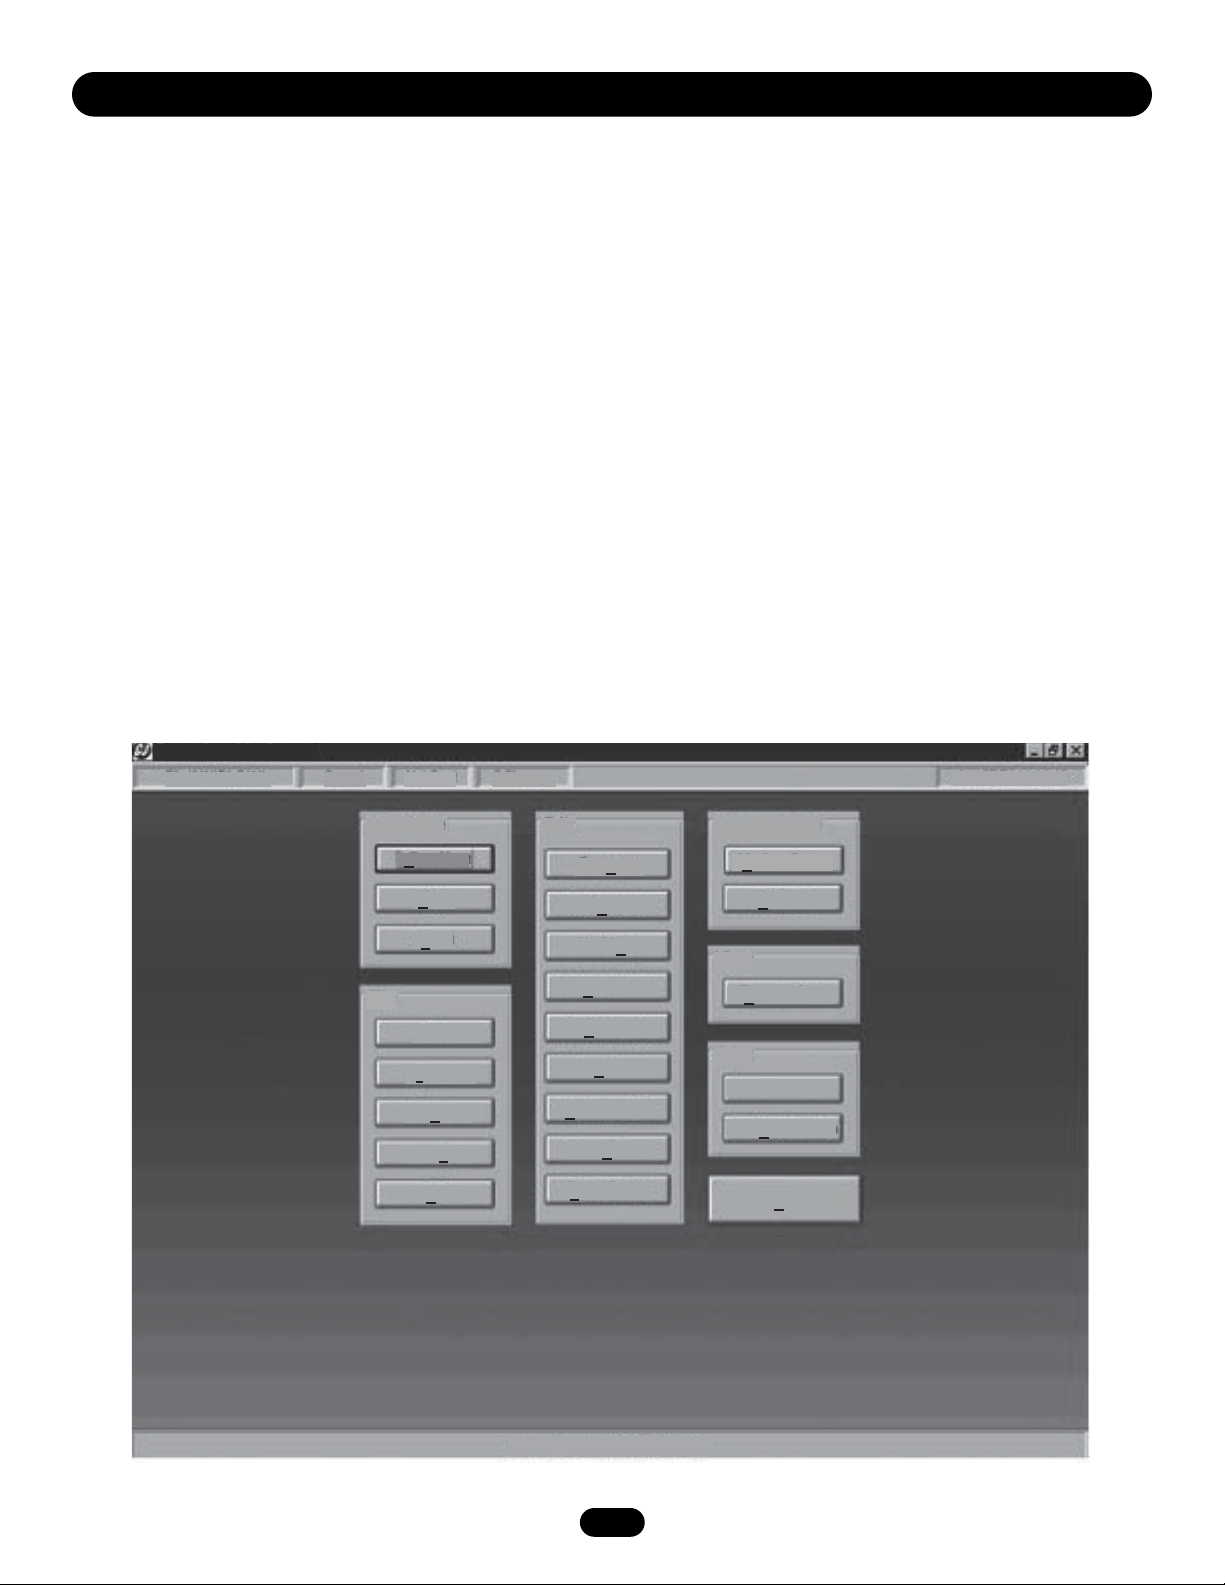
The Main Menu
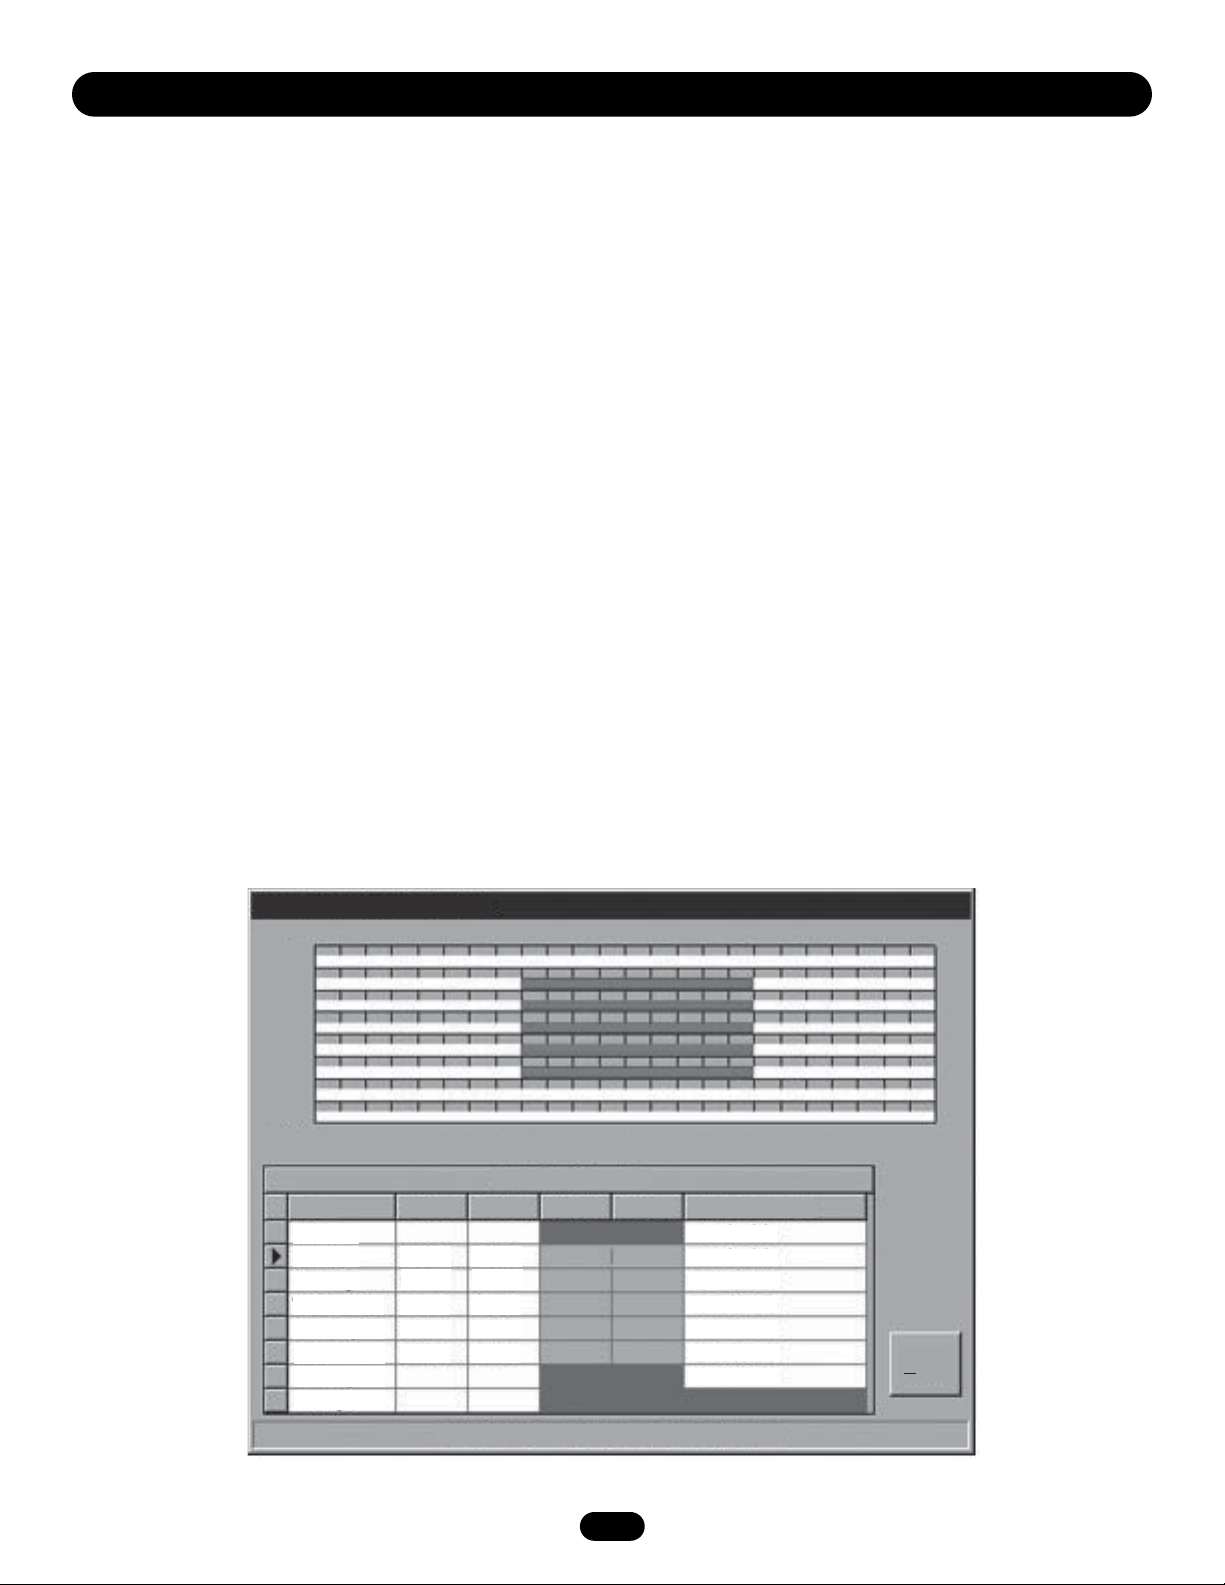
Each time you activate the CJWin program, the Main Menu will be displayed (Figure 1).
The Main Menu is divided into different areas: Start Here, File, Edit, Communicate, View, and Print.Each area contains a series of
“buttons” allowing you to enter different setup areas.
Crown Jewel by Sentex
File "UNIT1.CJ1"
Saved
Not Sent
3 Changes
Jun 07 Fri 11:14:43
Start Here
What Next
Edit
Communicate
Features
Modem Setup
File
View
Print
Help
About
New
Open
Save
Save As
Exit
Configuration
Holidays
Do Not Disturb
Main Schedule
Aux Schedule
Time Zones
Call Forwarding
Entry Codes
Transactions
Unit Information
All Done
Transactions
Connect
See suggestions for getting started
Figure 1: The Main Menu
Crown Jewel by Sentex
File "UNIT1.CJ1"
Saved
Not Sent
Start Here
What Next
Help
About
File
New
Open
Save
Save As
Exit
3 Changes
Edit
Features
Configuration
Holidays
Do Not Disturb
Call Forwarding
Main Schedule
Aux Schedule
Time Zones
Entry Codes
Communicate
Modem Setup
Connect
View
Transactions
Print
Transactions
Unit Information
All Done
Jun 07 Fri 11:14:43
See suggestions for getting started
Page 5

5
GETTING STARTED
CJWin “Help” Features
HTML help - Press F1 on your keyboard to open the CJWin Help file.Use the help to answer questions about CJWin or to learn more
about it.
Balloon help - Balloon help is available on most screens, providing a brief identifying statement describing most buttons and many
screen features. The “balloon” is a small yellow box that appears near the item it describes.
Status bar - The status bar is located at the bottom of most screens and provides screen information or helpful suggestions.
What Next - The What Next feature is located in the Start Here box of the Main Screen.Click it for What Next suggestions.
Set Up a New Unit (Overview)
When setting up new units, Sentex recommends that you follow the setup sequence provided below.
• You do not have to use all the features listed below. Only the steps marked with an asterisk (*) are required.
• After entering information in each area, do not forget to save the data in the Main Menu. All unsaved data will be lost!
1. PROGRAM THE MODEM SETTINGS:*
Find the modem port; then identify and test the modem initialization string. For more details, see Configuring the Port and Modem
Settings on page 10.
2. CREATE A NEW UNIT:*
Create a file for your Crown Jewel units. For more details, see Creating a Unit File on page 7. If you have more than one unit
sharing a telephone line, CJWin will create a file for each unit (see Adding Multiple Units That Share a Single Phone Line
on page 8).
3. RECEIVE SETTINGS FROM THE UNIT:*
CJWin needs to know the current configuration of your unit(s). If you have more than one unit, perform this step for each unit. For
more details, see Receiving (Downloading) Data from a Unit on page 12.
4. SET THE UNIT'S DATE AND TIME:*
Some of the Crown Jewel's most powerful access controls are time-based and date-based. If you have more than one unit, perform
this step for each unit. For more details, see Setting a Unit's Date and Time on page 9.
5. EDIT UNIT FEATURES:
This feature allows you to set call waiting, visitor ring type, visitor ring limit, maximum keypad errors, and visitor call to guest
houses, etc. If you have more than one unit, you will need to perform this step for each unit. For more details, see Edit Unit
Features on page 14.
6. EDIT UNIT CONFIGURATION:
This feature allows you to determine how the unit will respond to alarm conditions, visitors, specifics of communicating with the
unit, telephone company information, and the unit's number and FID number. If you have more than one unit, you will need to
perform this step for each unit. For more details, see Edit Unit Configuration on page 16.
7. TIME ZONES:*
This features allows you to restrict or allow access on different days at varying times. If you have more than one unit, you will need
to perform this step for each unit. For more details, see Time Zones and Holidays on page 21.
Page 6

6
GETTING STARTED
8. ENTRY CODES:*
This feature allows you control access in several ways. If you have more than one unit, you will need to perform this step for each
unit. For more details, see Entry Codes on page 28.
NOTE:
You must set up Time Zones before setting up Entry Codes.
9. HOLIDAYS:
This features gives you the ability to restrict or allow access for holidays. If you have more than one unit, you will need to perform
this step for each unit. For more details, see Time Zones and Holidays on page 21.
10. DO NOT DISTURB SCHEDULES:
This feature allows you to deny visitor access during the hours you specify (such as late night/early morning hours). If you have
more than one unit, you will need to perform this step for each unit. For more details, see Setting Up a Do Not Disturb Schedule on
page 25.
11. CALL FORWARDING:
This feature allows you to have visitor calls forwarded to another telephone number. If you have more than one unit, you will need to
perform this step for each unit. For more details, see Call Forwarding on page 30.
12. UNLOCK SCHEDULES:
This feature gives you the ability to allow unlimited access during certain hours on certain days. For example, you may wish to allow
unrestricted access on weekdays from 7:00 am to 9:00 am. If you have more than one unit, you will need to perform this step for
each unit. For more details, see About Unlock Schedules on page 26.
13. SEND CHANGES TO THE UNIT:·
Once you have completed programming CJWin, you must then send all the changes to the unit. If you have more than one unit, you
will need to perform this step for each unit. For more details, see Sending (Uploading) Data to a Unit on page 13.
MULTIPLE CROWN JEWEL UNITS SHARING A PHONE LINE
If you have more than one Crown Jewel unit and they will be sharing a telephone line, program each unit individually.
1. When you create a new unit, enter the number of Crown Jewel units sharing the same telephone line. CJWin will create a file for
each unit. See Adding Multiple Units That Share a Single Phone Line on page 8 for more information.
2. Program each unit.
Set Up a New Unit (Overview continued)
Page 7

Creating a Unit File
Before programming your Crown Jewel unit with CJWin, you will need to let CJWin know about your unit's current configuration by
following these steps:
1. Set the Port and Modem Settings in CJWin. For more details, see page 10.
2. Open a New or Current Unit File. For more details on opening a current system, see page 8.
3. Receive data from the unit(s). For more details, see page 12.
To create a new unit file:
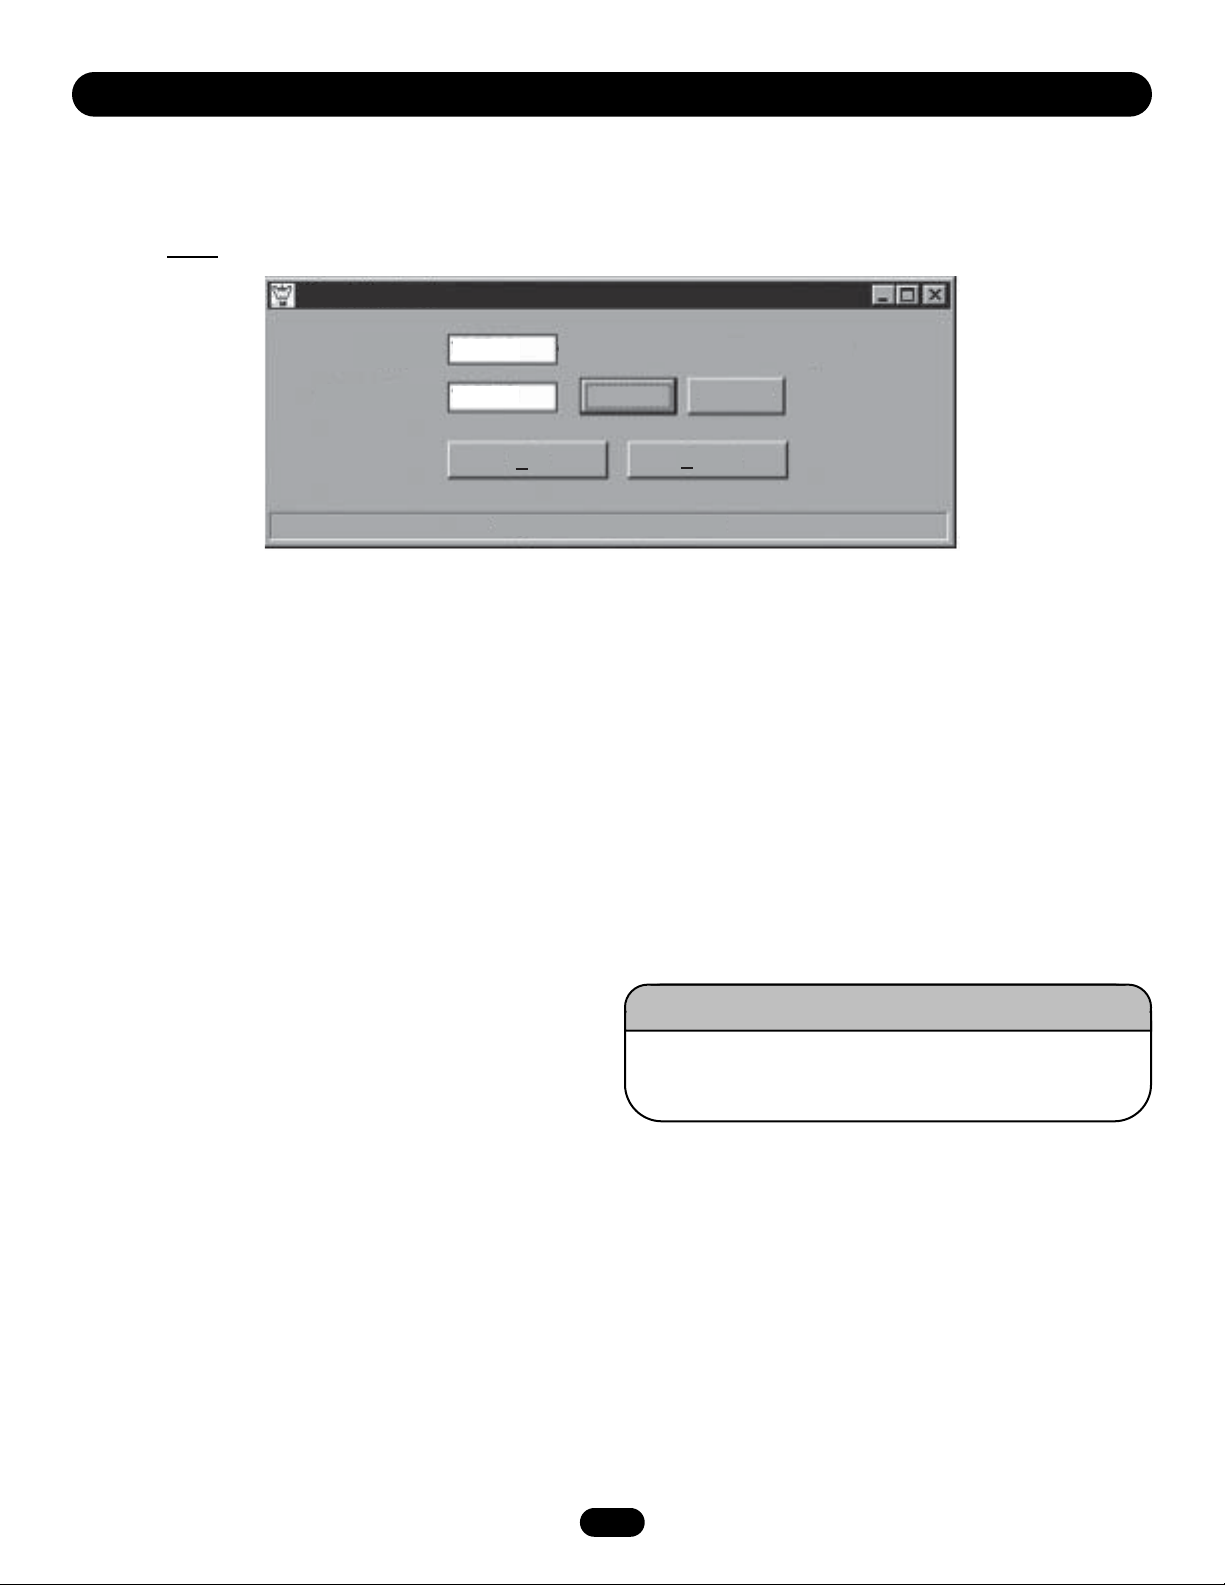
1. From the Main Menu, click New in the File box. The Data File Names Screen will be displayed (see Figure 2).
Figure 2: Data File Names
2. Type in a File name for the new unit. This name can be up to 8 characters in length and can include letters, numbers, and
punctuation.
3. Click Save.
4. CJWin will display a dialogue box asking how many units you have in your system. Enter the number of units.
NOTE:
If you have more than one unit sharing the same telephone line, see page 8.
5. Click OK and CJWin will return you to the Main Menu.
6. Click Save.
7
UNIT MANAGEMENT
This section will cover . . .
• Cr
eating a Unit File Page 7
• Adding Multiple Units That Shar
e a Single Phone Line Page 8
• Opening a Unit File Page 8
• Setting a Unit's Date and T
ime Page 8-9
• Using the ”Save As” Featur
e Page 9
• Deleting a Unit File Page 9
SaveSave
CancelCancel
File name:File name:
Save as type:Save as type:
Open as read-onlyOpen as read-only
Crown Jewel Data File NamesCrown Jewel Data File Names
Unit2Unit2
Data (*.cj?)Data (*.cj?)
Crownjwl.cj1Crownjwl.cj1
Mark.cj1Mark.cj1
Mark.cj2Mark.cj2
Unit1.cj1Unit1.cj1
Save in:Save in: CJWinCJWin
Page 8

8
UNIT MANAGEMENT
Adding Multiple Units That Share a Single Phone Line
When more than one unit share a single phone line, follow the instructions below when adding them to CJWin.
1. From the Main Menu, click New in the File box. The Data File Names Screen will be displayed (see Figure 2).
2. Type in a File name for the new unit. This name can be up to 8 characters in length and can include letters, numbers, and
punctuation.
3. Click Save.
4. CJWin will display a dialogue box asking how many units you have in your system. Enter the number of units that will be sharing
a single telephone line.
CJWin will create a unit file for each unit. The name of each unit will be the name you entered, with an extension of “CJ1” for the
first unit, “CJ2” for the second unit, “CJ3” for the third unit, etc.
Example: If you name the units “MyHouse”, the name of the first unit will be “MyHouse.cj1”; the second unit “MyHouse.cj2”; etc.
5. Click OK and CJWin will return you to the Main Menu.
6. Click Save.
IMPORTANT NOTE:
You will need to follow all the programming steps for each unit individually.
Opening a Unit File
To view or edit a unit file, you must first open it:
1. From the Main Menu, click Open in the File box.
2. At the Data File Names screen, select the unit's file name.
3. Click Open. When CJWin displays the Main Menu, the name of the unit you just opened will appear in the upper left-hand corner
of the top status bar.
Setting a Unit's Date and Time
NOTE:
If you have not yet configured the port and modem settings for the unit, do so before continuing. See page 11 for details.
The Crown Jewel unit's internal calendar and clock are used for:
Before you use any of the following features, set the unit's date and time. In the upper-right hand corner of the Main Menu is the date
and time currently set in your computer. If this information is not correct, correct it before continuing (refer to your Windows User's
Guide).
• Time Stamping of Transactions
• The Do Not Disturb Feature
• Entry Codes with Time Zones
• Gate Unlock Schedules
• Call Forwarding Schedules
1. If you have more than one Crown Jewel unit: Open the unit you wish to work on. See Opening a Unit File above.
2. Connect to the unit. See page 15 for details.
3. If the computer's clock is correct, verify that the unit's clock matches the computer's.
4. If the clock's match, you do not need to change the unit's clock. Go to step 6.
If the clock's
do not
match, click the Set Clock button and continue with step 5.
Page 9
9
UNIT MANAGEMENT
Setting a Unit's Date and Time (continued)
5. If you see the Time Adjustment screen (Figure 3), set the correct time for the unit. Click OK.CJWin will then send your computer's
information to the Crown Jewel unit.
If you
do not
see the Time Adjustment screen continue with step 6.
Figure 3: Time Adjustment Screen
6. Click Disconnect to end communication.
7. Click Done to return to the Main Menu.
Using the “Save As” Feature
Use this feature to save a copy of a unit. When you select a unit to “Save As”, CJWin will create a copy of the unit and all its data, but
with a different name that you define.
NOTE:
When using the “Save As” feature, all data (including unsaved data) will be copied to the new unit.
To save a copy of a unit:
1. At the Main Menu, click Save As from the File box.
2. At the Data File Names screen, select the unit to copy.
3. Change the File name.
4. Click Save.
Deleting a Unit File
Deleting a unit file will delete all the unit's data from CJWin.
To delete a unit file:
1. At the Main Menu, click Open from the File box.
2. At the Data File Names screen, select the unit to delete.
3. Right-click over the unit and select Delete from the pop-up menu.
4. Click Save.
Time AdjustmentTime Adjustment
My TimeMy Time
Set Unit Time toSet Unit Time to
<--Use Windows Control Panel to adjust<--Use Windows Control Panel to adjust
Adjust unit time one hour earlierAdjust unit time one hour earlier
OKOK
CancelCancel
- 1 hour- 1 hour + 1 hour+ 1 hour
13:57:1913:57:19
13:57:1913:57:19
Delete ONLY if you are absolutely sure you DO NOT need the
unit file or its data in CJWin.
WARNING
CAUTION
WARNING
WARNING
Page 10

COMMUNICATIONS
10
This section will cover . . .
• Configuring the Port and Modem Settings Page 10
• Connecting to a Unit Page 11
• Receiving (Downloading) Data from a Unit Page 12
• Sending (Uploading) Data to a Unit Page 13
Configuring the Port and Modem Settings
Before you first communicate with your Crown Jewel unit, you must enter your communication port and your modem settings in
CJWin. Unless your port or modem settings change, you will only have to perform these instructions once.
MODEM NOTE:
CJWin may not be able to identify your modem. If CJWin does not connect with your Crown Jewel unit using the
recommended string, you may need to modify the initialization commands to make your modem work correctly. To modify the
modem initialization string so that it can communicate with the Crown Jewel unit, it must have the following features:
• BELL103 protocol • DTE speed 300 bits per second
• No data compression • No error correction
• No protocol negotiation • No automatic speed changing
If you need assistance with your modem, including help with editing the modem initialization string, contact your computer retailer
or modem manufacturer.
To configure your port and modem settings:
1. From the Main Menu, click the Modem Setup button in the Communicate box. The Modem Setup Screen will appear (Figure 4).
Figure 4: Modem Setup Screen
2. Click the Find Modem button. CJWin will display the port in the Modem Port box located to the right of the Find Modem button.
3. Click the Identify Modem button to identify the type of modem that is connected to your computer. CJWin will display a
recommended modem initialization string in the Modem Initialization box.
4. Click the Test Modem Initialization button. CJWin will test the Modem Initialization string.
If the Modem Initialization string is acceptable, CJWin will respond with an “OK“ message. If the Modem Initialization string is not
acceptable, “ERROR” will appear on the screen. In this case, edit the commands according to the instructions for your modem
and try again.
5. Select the preferred Modem Speaker Volume.
6. Click Done. You will be returned to the Main Menu.
7. Click Save.
Modem Setup
Modem Port
Com2
Identify Modem
Done
Find Modem
&FB1F1S37=0
Test Modem Initialization
Modem Initialization Commands
Modem Speaker Volume
Be sure modem is turned on, Click to have computer search for your modem
Soft
Medium
Loud
Modem Setup
Modem Port
Find Modem
Modem Initialization Commands
&FB1F1S37=0
Test Modem Initialization
Com2
Identify Modem
Modem Speaker Volume
Soft
Medium
Done
Loud
Be sure modem is turned on, Click to have computer search for your modem
Page 11
11
COMMUNICATIONS
Connecting to a Unit
Once you have established your computer's port and modem settings (refer to page 10), you can connect to the unit.
1. Open the unit file (refer to page 10 for details).
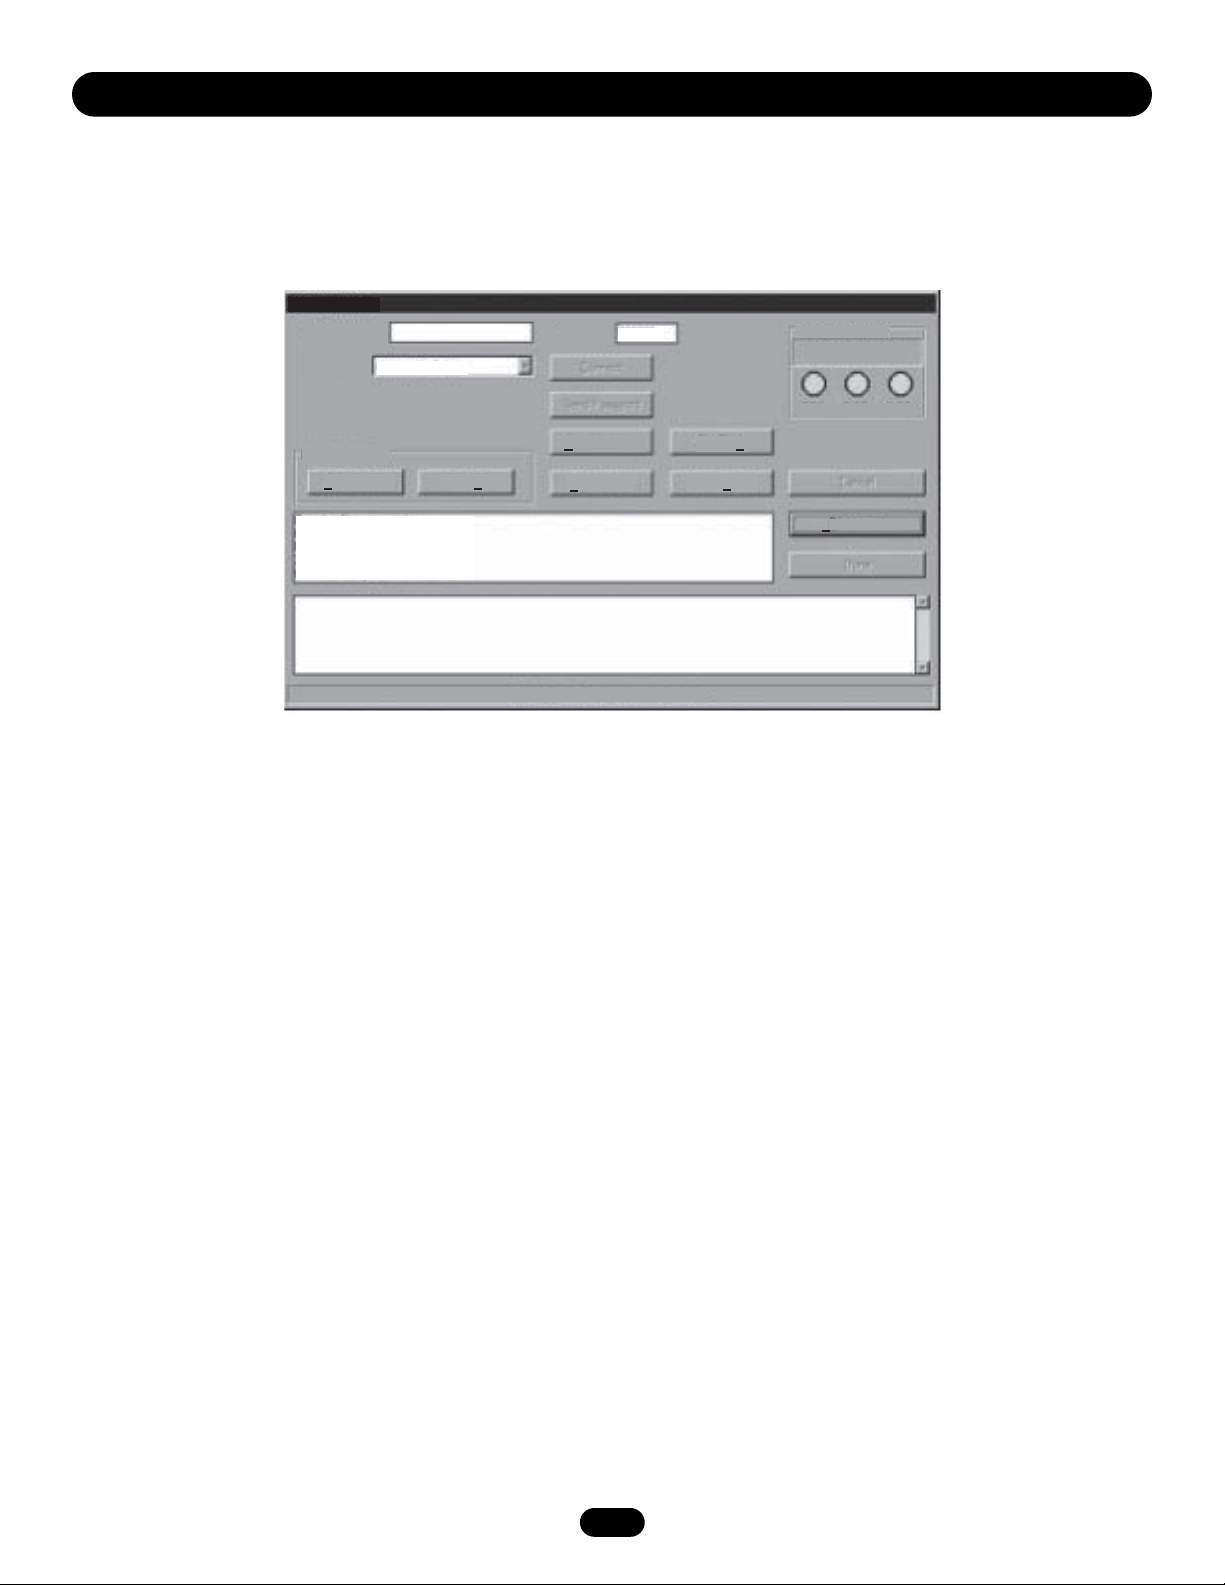
2. Click the Connect button in the Communicate box of the Main Menu. The Communicate screen will appear (Figure 5).
Figure 5: Communicate Screen
3. In the Connection drop-down box, enter the connection type:
• House - When programming the unit via the telephone line.
• Remote, Automatic - When programming the unit through a telephone line other than the line connected to the Crown Jewel
unit. If you choose this selection, the programming password will be sent automatically during initial communication.
• Remote, Auto. Override - Tells CJWin that the telephone company answering service or voice mail usually answers the phone
before the Crown Jewel unit, interfering with remote programming. The Remote Automatic Override selection allows CJWin to
override this remote programming interference. (See the Using the Advanced Features of the Crown Jewel System manual).
• Remote, Manual - Requires you to manually enter the programming password during initial communication.
• Remote, Man. Override - Allows CJWin to override the telephone company's interference with remote programming (see the
Using the Advanced Features of the Crown Jewel System manual). You will also need to manually enter the programming
password during initial communication.
• House, No Telco - The House, No Telco selection notifies the CJWin program that you are programming the unit through the
house telephone, but there is no telephone company connection on this line.
• Other - This selection is for factory use only.
4. If you are communicating with the system via a telephone line other than the one connected to the unit, enter the telephone
number of the Crown Jewel unit in the Phone Number box.
5. Enter the unit Password.
6. Click the Connect button.
The communication box (located in the middle of the screen) will provide status text of CJWin connecting with the Crown Jewel
unit. Once communication has been established, the phrase “On-Line, Modem” will be displayed in the Connect Status box in the
upper right-hand corner of the screen.
You may break the connection at any time by clicking the Disconnect button.
Communicate
Phone Number
Password
Connection
House, No Telco
000000
New Unit Only
Connect Status
On-Line, Modem
CTS
DSR
DCD
Send Changes
Set Clock
Receive All
Send All
Transactions
Control Panel
Disconnect
Querying firmware version
CJ v9260
Unit FID number 322410
204 new transactions available
Unit time: 02Apr25 Thu 09:50:45
Cancel or discontinue communications
Communicate
Phone Number
Connection
New Unit Only
House, No Telco
Receive All
Send All
Password
000000
Send Changes
Transactions
Set Clock
Control Panel
Connect Status
On-Line, Modem
CTS
DSR
DCD
Querying firmware version
CJ v9260
Unit FID number 322410
204 new transactions available
Unit time: 02Apr25 Thu 09:50:45
Cancel or discontinue communications
Disconnect
Page 12
12
COMMUNICATIONS
Receiving (Downloading) Data from a Unit
There are two common cases when it's best to receive data from a unit:
• When a New Unit is Installed: After a new unit is installed, receive the data from the unit before you begin entering data into
CJWin. If you enter data into CJWin before receiving data from the unit, perform a Send Changes command first (see page 13 for
more details) followed by a Receive All command.
• When Data is Entered at the Unit: When data is entered manually at the Crown Jewel unit, CJWin will not have this data in its
database until you perform a Receive All command. Before you perform a Receive All command, perform a Send Changes
command.
IMPORTANT NOTE:
When you perform a Receive All command, CJWin will remove the unit's data from the CJWin database and
replace it with the data from the unit. If you have edited the CJWin database since your last Send or Receive command, perform a Send
Changes command before receiving data from the unit.
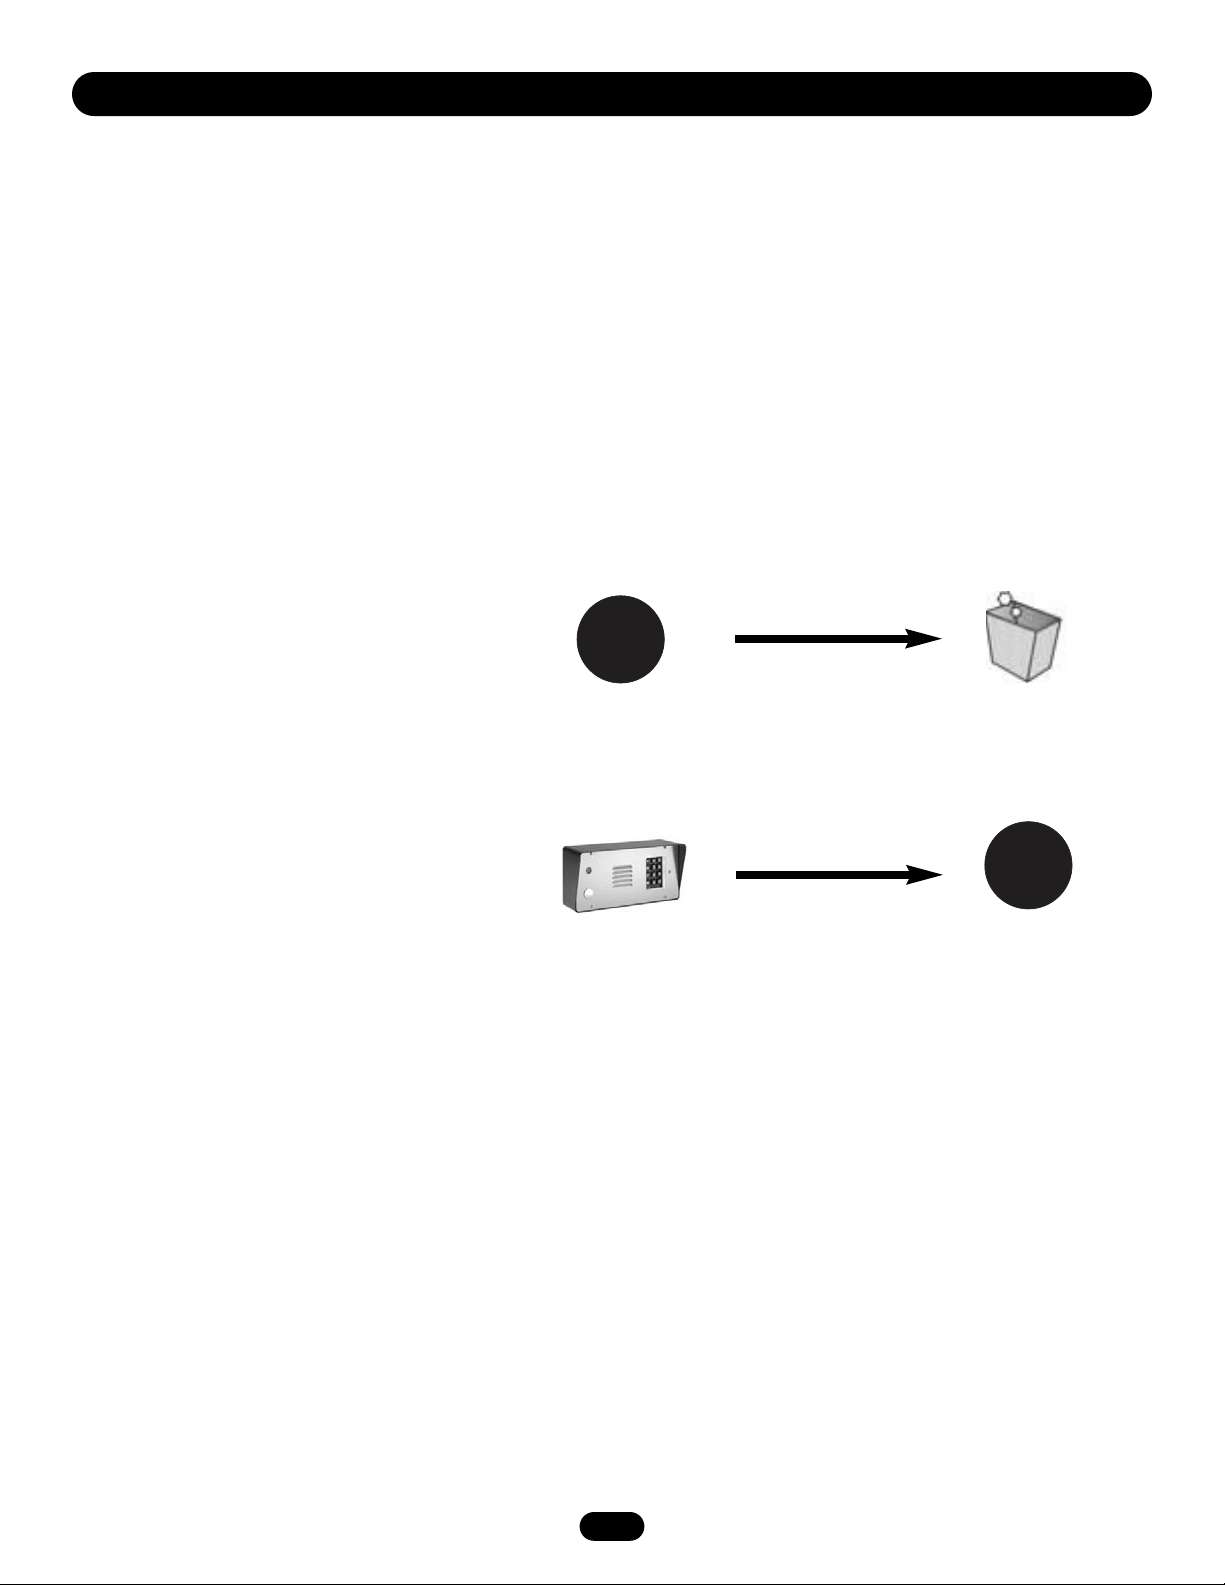
THE RECEIVE ALL COMMAND (HOW IT WORKS)
When you perform a Receive All command:
Step 1: CJWin deletes the unit's data from the
CJWin database.
Step 2: CJWin receives (downloads) all the data
from the Crown Jewel Unit.
CJWin Database
Crown Jewel Unit
All Unit Data
All Unit Data
Deleted Files
CJWin Database
CJWin
CJWin
PERFORMING A RECEIVE ALL COMMAND
1. Open the unit file (refer to page 8 for details).
2. Connect to the unit (see page 11 for details).
3. At the Communicate screen, click Receive All.CJWin will begin receiving data from the Crown Jewel unit. A status bar showing
the amount of data received from the unit will be displayed at the bottom of the screen.
4. When downloading is complete, CJWin will display a message in the status bar stating that all of the data has been received.
CJWin
CJWin
Page 13

13
COMMUNICATIONS
Sending (Uploading) Data to a Unit
There are two ways to send data to a unit:
• Send Changes: This command sends ONLY the changes entered into the CJWin database since the last send command to the
Crown Jewel unit. Once the Crown Jewel unit and CJWin database is current, to save time, Send Changes after all subsequent edits
to the CJWin database.
• Send All: This command deletes all the Crown Jewel unit data and replaces it with the data from the CJWin database. Use if a
Crown Jewel unit is replaced, you want to reconfigure the unit, or if the unit and CJWin have mismatched data and the data from
the CJWin Unit database is correct.
SEND CHANGES (HOW IT WORKS)
When you perform a Send Changes command:
CJWin sends ONLY the changes entered into the CJWin database
since the last send command to the Crown Jewel unit.
SEND ALL (HOW IT WORKS)
When you perform a Send All command:
Step 1: The Crown Jewel Unit deletes the data from its database.
Step 2: CJWin sends (uploads) all the data to the Crown Jewel
Unit.
CJWin Database Crown Jewel Unit
Changes
All Unit Data
Deleted Files
CJWin Database
CJWin
CJWin
Crown Jewel Unit
All Unit Data
Crown Jewel Unit
PERFORMING A SEND CHANGES OR SEND ALL COMMAND
Use the Send Changes command for normal maintenance and changes.
Use the Send All command to transmit the entire CJWin database.
1. Open the unit file (refer to page 8 for details).
2. Connect to the unit (see page 11 for details).
3. At the Communicate screen, click Send Changes or Send All.
4. When CJWin completes the transmission, click Disconnect.
CJWin
CJWin
Page 14

EDIT UNIT FEATURES
This section will cover . . .
• Editing Unit Features Page 14
• Call Waiting Page 14
• Visitor Ring Type Page 14
• Visitor Ring Limit Page 15
• Visitor Time Limit Page 15
•Maximum Keypad Errors Page 15
• Visitor Calls to Other Tenants (Dialing Codes) Page 15
Editing Unit Features
1. Open the unit file (refer to page 8 for details).
2. From the Main Menu, click the Features button in the Edit box. The Edit Unit Features screen will appear (Figure 6).
Figure 6: Edit Unit Features Screen
3. Make any necessary edits.
4. Once you have completed all of your entries in this screen, click the Done button to return to the Main Menu.
5. Click Save.
6. Remember to Send Changes to the Crown Jewel unit when you finish editing the CJWin unit data. See page 13 for more details.
Call Waiting
The Call Waiting feature lets you know, during a regular telephone call, that a visitor is at the entrance.
If your telephone is in use when a visitor presses the “#” key, you will hear two short beeps to signal you that you have a visitor
attempting to call. Pressing the “2” on your tone dial phone will put the telephone call on hold and connect your phone to the Crown
Jewel unit.
NOTE:
This feature applies only to calls made to the main residence phone, not to other tenants via Dialing Codes.
Visitor Ring Type
The Visitor Ring Type feature allows you to assign the type of ring the Crown Jewel unit will use to signal you that there is a visitor call
coming in from the unit.
• If you choose Double for this setting, the telephone will emit two short rings when a call is coming from the Crown Jewel unit.
• If you choose Single for this setting, a visitor call coming from the unit will sound like a normal outside telephone call.
Call WaitingCall Waiting
Visitor Ring TypeVisitor Ring Type
Visitor Ring LimitVisitor Ring Limit
Maximum Keypad ErrorsMaximum Keypad Errors
Edit Unit Features
Dialing CodesDialing Codes
Number to dial when visitor presses 1#, up to 11 digitsNumber to dial when visitor presses 1#, up to 11 digits
Visitor Time LimitVisitor Time Limit
secondsseconds
DoneDone
Code Phone NumberCode Phone Number
55577635557763
6060
1212
SingleSingle
DoubleDouble
1#1#
2#2#
3#3#
5 5
NoNo Ye sYes
14
Page 15

EDIT UNIT FEATURES
Visitor Ring Limit
The Visitor Ring Limit feature allows you to program the number of rings the unit will allow before it automatically discontinues the call
placed to the residence. This entry can be from 1 to 24 rings.
Factory Settings: 12 rings.
Visitor Time Limit
The Visitor Time Limit feature allows you to program the maximum number of seconds allowed for a visitor call from the Crown Jewel
unit. This entry can be from 15 to 250 seconds.
Factory Settings: 90 seconds.
Maximum Keypad Errors
The Maximum Keypad Errors feature allows you to program the number of wrong entries that can be entered consecutively on the
unit's keypad before the unit stops accepting codes for 3 minutes. This setting can be from 0 to 9 keypad errors (“0” will disable the
feature for the specified keypad).
Factory Settings: 5 keypad errors.
There are two boxes in the Maximum Keypad Errors area:
• The first box on the Edit Unit Features screen is for Keypad 1.
• The second box on the Edit Unit Features screen is for Keypad 2.
Visitor Calls to Other Tenants (Dialing Codes)
A visitor can place a call to another tenant (any location other than the main residence) through the use of dialing codes.
Example: If the owner of a residence has a renter living in a guest house and the owner does not want to be bothered with visitor calls
to the renter, s/he can program a dialing code to dial the telephone number in the guest house. The visitor can dial the renter directly
without having to disturb the owner.
Each unit has the capacity to program up to three (3) single-digit dialing codes.
When entering dialing codes:
1. At the Edit Unit Features screen, move the cursor into the box next to the code you wish to program.
2. Enter the telephone number that you want associated with that code. The telephone number can be up to 12 digits in length.
15
Page 16

16
EDIT UNIT CONFIGURATION
This section will cover . . .
• Editing the Unit Configuration
Page 16
• Alar
m Conditions Page 17
• Visitors Page 17-18
• Unit Communication Configuration
Page 18-19
• T
elephone Company (Telco) Connected Page 20
• Unit and FID Number Page 20
Editing the Unit Configuration
This section describes in detail how to enter information in the Edit Unit Configuration screen.
1. Open the unit file (refer to page 8 for details).
2. From the Main Menu, click the Configuration button in the Edit box. The Edit Unit Configuration screen will appear (Figure 7).
Figure 7: Edit Unit Configuration Screen
3. Make any necessary edits.
4. Once you have completed all of your entries in this screen, click the Done button to return to the Main Menu.
5. Click Save.
6. Remember to Send Changes to the Crown Jewel unit when you finish editing the CJWin unit data. See page 17 for more details.
Alarm ConditionAlarm Condition
Alarm Phone NumberAlarm Phone Number
Rings Before AnswerRings Before Answer
Pulse Dial 9 EnablePulse Dial 9 Enable
Visitor Response KeysVisitor Response Keys
Alternate PrefixesAlternate Prefixes
DoneDone
Allow Direct Commands fromAllow Direct Commands from
Sets the direct command (##) and programming (***) prefixesSets the direct command (##) and programming (***) prefixes
Activation TimesActivation Times
Auxillary Relay isAuxillary Relay is
Status Input 2 isStatus Input 2 is
Telco ConnectedTelco Connected
Thresholds: Off-HookThresholds: Off-Hook
Unit numberUnit number
InstallationInstallation
Override IntervalOverride Interval
Edit Unit ConfigurationEdit Unit Configuration
On-HookOn-Hook
Position SensePosition SenseExit RequestExit Request
ofof
FIDFID
NoNo
NoNo
YesYes
NoneNone
HouseHouse
RemoteRemote
BothBoth
NormalNormal MixedMixed
*
# None
None NumNum
Command Prefix = 1# Password Prefix = 11*Command Prefix = 1# Password Prefix = 11*
Breach or StrikeoutBreach or Strikeout
55544335554433
5
20
20
YesYes
5
2
1 *
9
ControlControl
1010 1010
2020 200200
322410322410
1 1
2#2#
3#3#
4#4#
5#5#
6#6#
7#7#
8#8#
1#1#
1#1#
Page 17

17
EDIT UNIT CONFIGURATION
Alarm Conditions
The Alarm Condition feature allows you to program the Crown Jewel to generate an alarm call when specific conditions occur. These
specific conditions are the choices that you will make in this area.
IMPORTANT NOTE:
When enabling the Alarm Condition feature, program the destination of the alarm call by entering a telephone
number in the Alarm Phone Number area (see below for more information regarding the Alarm Phone Number area).
• None: The unit will disable the alarm call feature and no action will be taken by the Crown Jewel.
• Gate Breach: The unit will place an alarm call if the door/gate attached to Relay 1 has been forced or left open.
NOTE:
To use this
option, install a positioning switch on the door or gate.
• Keypad Strikeout: The unit will place an alarm call if the Maximum Keypad Errors feature is activated.
• Breach or Strikeout: The unit will place an alarm call if either the door/gate attached to Relay 1 is forced or left open or the
Maximum Keypad Errors feature is activated (for more information regarding the Maximum Keypad Errors feature, see page 15).
ALARM PHONE NUMBER
The Alarm Phone Number area allows you to program the telephone number that the Crown Jewel will dial in an alarm condition. The
Alarm Phone Number can be up to 12 digits in length.
IMPORTANT NOTE:
The factory setting for the Alarm Condition feature is disabled. Therefore, even if you enter a telephone number in
this area, you must enable the Alarm Condition feature (see above) in order for the Alarm Call to be placed.
Visitors
RINGS BEFORE ANSWER
The Rings Before Answer feature allows you to set the number of rings the Crown Jewel will overlook before it answers your telephone
line. This entry can be set from 0 to 24 rings.
To Disable: Set the ring count to “0”.
Factory Setting: 12 rings.
NOTES:
• In a multiple unit installation, set the ring count for unit 1 since it is the only unit that will answer.
• To use the remote programming feature, set the answer ring count to some value other than zero (0).
PULSE DIAL ACTIVATION
The pulse dialing feature will give you the ability to allow entry to a visitor by dialing a “9” on a pulse (rotary) dialing telephone.
• To
enable
the Pulse Dial Activation feature, select “Yes”.
• To
disable
the Pulse Dial Activation feature, select “No”.
Page 18

18
EDIT UNIT CONFIGURATION
VISITOR RESPONSE KEYS
The Visitor Response Keys area allows you to program the digits that the resident will press on his/her telephone keypad to either
activate the relays, toggle the call waiting, extend the talk time, or disconnect the visitor call.
There are five boxes in this area:
RELAY 1 RELAY 2 CALL WAITING TOGGLE DIGIT EXTEND TALK TIME DIGIT HANG-UP DIGIT
You may change any of these settings to a different digit, as long as that digit also appears on a standard telephone keypad and is not
currently being used. The factory settings for these boxes are as follows:
RELAY 1 RELAY 2 CALL WAITING EXTEND TALK HANG-UP
TOGGLE DIGIT TIME DIGIT DIGIT
95 2 1 *
NOTE:
If you have entered a digit that is currently being used for a different function, CJWin will automatically change the digit to a
number that is not being used.
Unit Communication Configuration
ALTERNATE PREFIXES
You may send Direct Commands to the unit, or enter programming mode, from the keypad, resident telephone, or a remote telephone.
• To send Direct Commands, enter “##”.
• To enter programming mode, enter “***”.
This causes the Crown Jewel to disconnect from the telephone call in order to receive instructions.
Some telephone companies offer special features that require dialing either “#” or “*“. If you subscribe to such services and the Crown
Jewel interferes with them, you can change the Direct Command prefix or the programming prefix for the Crown Jewel. For more
information about Direct Commands and programming, see Crown Jewel Advanced Features Programming.
The selections include:
• Normal: The telephone operates normally and the prefix for Direct Commands is “##” and the prefix for entering the programming
mode is “***“.
• Mixed: The prefix for the Direct Commands is a combination of the two keys (i.e., “#*“ or “*#”) and the prefix for programming is
a combination of three keys (i.e., “#*#” or “*#*“).
• Stars: The Direct Commands prefix is “**“ and the prefix for programming is “***“.
• Pounds: The Direct Commands prefix is “##” and the prefix for programming is “###”.
• None: The resident will not be able to program from the house or use the Direct Commands feature.
• NUM: Allows you to choose from a list of preset alternate prefixes. The prefixes are displayed on the line below Alternate Prefixes
choice (see Figure 8).
NOTE:
If you select NUM, you will need to select the prefixes from the list of presets (see Figure 8).
Example: You could choose NUM for the prefix, then select “2#” from the drop-down menu of choices. To send direct commands, you
would press “2#”; to enter programming mode (the Password Prefix) you would press “22*” (see Figure 8).
Visitor Response Keys
921
5
*
Page 19

19
EDIT UNIT CONFIGURATION
Alarm Condition
Alarm Phone Number
Rings Before Answer
Pulse Dial 9 Enable
Visitor Response Keys
Alternate Prefixes
Done
Allow Direct Commands from
Sets the direct command (##) and programming (***) prefixes
Activation Times
Auxillary Relay is
Status Input 2 is
Telco Connected
Thresholds: Off-Hook
Unit number
Installation
Override Interval
Edit Unit Configuration
On-Hook
Position Sense
Exit Request
of
FID
No
No
Yes
None
House
Remote
Both
Normal
Mixed
None
Num
Command Prefix = 1# Password Prefix = 11*
Breach or Strikeout
5554433
20
Yes
Control
10
200
322410
2#
3#
4#
5#
6#
7#
8#
1#
1#
Figure 8: Alternate Prefixes (NUM)
ALLOW DIRECT COMMANDS FROM
To enter direct commands from a remote telephone, enable the Allow Direct Command From option.
Example: If you forgot to latch the gate attached to Relay 1, you can call the Crown Jewel unit and give it the direct command to latch
the relay. For exact instructions, see the Crown Jewel Advanced Features Programming manual.
• To
enable
the Allow Direct Commands From feature, select “Yes”.
• To
disable
the Allow Direct Commands From feature, select “No”.
ACTIVATION TIMES
Activation Time sets the period of time (in seconds) when the relays will remain activated.
RELAY 1 RELAY 2
The relay activation time can be set anywhere from 1 to 250 seconds.
Factory Setting: 10 seconds.
IMPORTANT NOTE:
If one (or both) of the relays activate a gate operator with a momentary closure, set the relay activation time for a
short period of time (for example, 2 seconds). If you set the relay activation time for a longer period of time, there is a possibility that
the gate will continue to open and close until the relay activation period has ended.
Activation TimesActivation Times
1010
1010
Edit Unit Configuration
Alarm Condition
Alarm Phone Number
Rings Before Answer
Pulse Dial 9 Enable
Visitor Response Keys
Alternate Prefixes
Allow Direct Commands from
Installation
Breach or Strikeout
5554433
9
Activation Times
Auxillary Relay is
Status Input 2 is
Telco Connected
Thresholds: Off-Hook
Unit number
Sets the direct command (##) and programming (***) prefixes
Override Interval
5
20
No
Normal
None
Yes
5
Command Prefix = 1# Password Prefix = 11*
101010
Control
1 1
1 *
2
Mixed
House
Exit Request
No
2020200
of
*
Remote
Yes
# None
Position Sense
On-Hook
FID
Both
322410
Num
Done
1#
1#
2#
3#
4#
5#
6#
7#
8#
Page 20

20
EDIT UNIT CONFIGURATION
AUXILIARY RELAY AND STATUS INPUT 2
The area titled “Auxiliary Relay Is” allows you to select the mode of operation for the unit's second relay and status input. The
selections include:
• Relay 2=Control, Status 2=Exit Request 2: Relay 2 will activate when you dial a “5” on your telephone during a visitor call or when
the Exit Request Device has been activated.
• Relay 2=Shunt, Status 2=Position Sense 1: Relay 2 will activate whenever the main relay activates to temporarily bypass an alarm
sensor monitoring this entry.
• Relay 2=Alarm, Status 2=Position Sense 1: Relay 2 will activate if (1) the controlled entry is forced open, (2) if the entry is held
open for more than one minute after the main relay has deactivated, or (3) the Maximum Keypad Errors feature has been violated.
• Relay 2=CCTV Manual, Status 2=Position Sense 1: Relay 2 will activate the closed circuit TV when you dial a “5” on your
telephone during a visitor call.
• Relay 2=CCTV Instant, Status 2=Position Sense 1: Relay 2 will activate the closed circuit TV when the main relay activates.
• Relay 2=Control, Status 2=Position Sense 1: Relay 2 will activate when you dial a “5” on your telephone during a visitor call or
when the Position Sense device has been activated.
Telephone Company (Telco) Connected
The Telco Connected area tells the Crown Jewel if there is a telephone company line connected to it. The Crown Jewel will need this
information because if it thinks that there is a telephone company line attached and it does not detect a dial tone, normal operation may
be interrupted.
• If the unit isconnected to a telephone company line, select “Yes”.
• If the unit
is not
connected to a telephone company line, select “No”.
Unit and FID Number
• Unit Number: Sequential number that the installer assigned to the unit that has the telephone line attached to it. This number can
be between 1 and 7 but, in most installations, it will be “1”.
• FID Number: (6) six-digit factory set number located on the processor chip label (Main Processor Board). Your installer should
have given you these numbers when the unit was installed.
Page 21

21
TIME ZONES AND HOLIDAYS
About Time Zones
Time Zones are periods you specify that can restrict the use of certain access codes.
Example: You can restrict the entry code that you give to the gardener to only allow access on Mondays between the hours of 9:00
A.M. and 3:00 P.M.
The Crown Jewel has (7) seven different Time Zones with (2) two segments to each Time Zone. Use segments to program schedules
that extend past midnight and run into the following day.
Example: If you wish to set up a time zone that allows access between the hours of 8:00 P.M. and 4 A.M. Monday through Friday, then
you would enter one segment between 8:00 P.M. and Midnight Monday through Thursday and a second segment between Midnight
and 4 A.M. Tuesday through Friday.
This section will cover . . .
• About T
ime Zones Page 21
• Creating or Editing Time Zones
Page 22
• Erasing a T
ime Zone Page 22
• About Holidays Page 22
• Creating or Editing Holiday Schedules Page 23
• Erasing a Holiday Schedule Page 23
Time Zone Segments
Zone
From
Until
Sun
Mon
Tue
Wed
Thu
Fri
Sat
Hol
1, Seg 1
Seg 2
2, Seg 1
Seg 2
3, Seg 1
Seg 2
4, Seg 1
Seg 2
5, Seg 1
Seg 2
6, Seg 1
Seg 2
7, Seg 1
Seg 2
09:00
20:30
09:00
17:00
22:30
17:00
No
No
Yes
No
No
Yes
No
No
Yes
Yes
Yes
No
Yes
Yes
No
Yes
Yes
No
Yes
Yes
No
Yes
Yes
No
Valid on Wednesdays? Enter Yes or No.
Done
Figure 9: Edit Time Zones Screen
Edit Time Zones
Time Zone Segments
Zone
1, Seg 1
Seg 2
2, Seg 1
Seg 2
3, Seg 1
Seg 2
4, Seg 1
Seg 2
5, Seg 1
Seg 2
6, Seg 1
Seg 2
7, Seg 1
Seg 2
From
09:00
20:30
09:00
Until
17:00
22:30
17:00
Valid on Wednesdays? Enter Yes or No.
Sun
No
No
Yes
Mon
Yes
Yes
No
Tue
Yes
Yes
No
Wed
Yes
Yes
No
Thu
Yes
Yes
No
Fri
Yes
Yes
No
Sat
No
No
Yes
Hol
No
Done
No
Yes
Page 22

22
TIME ZONES AND HOLIDAYS
Creating or Editing Time Zones
1. Open the unit file (refer to page 12 for details).
2. From the Main Menu, click the Time Zones button in the Edit box. The Edit Time Zones screen will appear (Figure 9).
3. Select the From box.Enter the time (in 24 hour format) when the time zone will begin.
4. Select the Until box.Enter the time (in 24 hour format) when the time zone will end.
5. Click and enter a “Y” on each day that you wish this time zone to be valid. If you do not enter a “Y” on a specific day, CJWin will
automatically enter an “N” in that day.
6. To invalidate a day, select the box for that day and press the “N” key.
7. To program additional time zones, repeat steps 3 through 5.
8. Once you have completed programming your time zones, click Done.
Erasing a Time Zone
1. Open the unit file (refer to page 12 for details).
2. From the Main Menu, click the Time Zones button in the Edit box. The Edit Time Zones screen will appear (see Figure 9).
3. Select the time zone to delete.
4. Press the DELETE key on your computer's keyboard until all of the information in that box has been erased.
5. To erase more than one time zone, repeat steps 3 and 4.
6. Once you have erased all of the time zones you wish to delete, click Done.
About Holidays
Holidays are special calendar dates with more access control
flexibility. Special holiday schedules can be programmed for:
• Do Not Disturb Schedules
• Gate Unlock Schedules
• Entry Codes with Time Zones
• Call Forwarding Schedules
Example: If New Year's Day is set up as a holiday, then codes
programmed for access on regular business days only will not be
granted entry on January 1.
Holidays
Done
Year Day of Week
2003 Wednesday
2002 Wednesday
2002 Thursday
2002 Monday
2002 Thursday
Month Date
January
December
July
May
November
25
27
28
Click spin arrows to change month
Figure 10: Holidays Screen
Holidays
Month Date
January
December
July
May
November
Year Day of Week
1
2003 Wednesday
2002 Wednesday
25
2002 Thursday
4
2002 Monday
27
2002 Thursday
28
Click spin arrows to change month
Done
Page 23

23
TIME ZONES AND HOLIDAYS
Creating or Editing Holiday Schedules
1. Open the unit file (refer to page 12 for details).
2. From the Main Menu, click the Holidays button in the Edit box. The Holidays screen will appear (see Figure 10on page 22).
3. To program the month, use the up or down arrow buttons next to the Month box to select the month.
4. To program the date, use the up or down arrow buttons next to the Date box to select the desired date.
Once the desired date is present in the Date box, CJWin will display the year and the day of the week on which the holiday falls.
5. To program additional holidays, repeat steps 3 and 4.
6. Once you have finished programming all of your holidays, click Done.
Erasing a Holiday Schedule
1. Open the unit file (refer to page 12 for details).
2. From the Main Menu, click the Holidays button in the Edit box. The Holidays screen will appear (see Figure 10on page 22).
3. Use the up and down arrow buttons next to the Holiday box you wish to erase until the blank selection is present in the box.
4. Use the up and down arrow button next to the Date box you wish to erase until the blank selection is present in the box.
Once the blank selection is located in the Date box, the year and the day of the week for that holiday should disappear.
5. To erase additional holidays, repeat steps 3 and 4.
6. Once you have finished erasing all of your holidays, click Done.
Page 24

24
OTHER SCHEDULES
About the Do Not Disturb Schedule
The Do Not Disturb Schedule allows you to program times when
all of the visitor calls will be blocked.
Example: You can program the Crown Jewel to block calls
between 11:00 P.M. Monday night and 7:00 A.M. Tuesday
morning.
This section will cover . . .
• About the Do Not Disturb Schedule
Page 24
• Setting Up a Do Not Disturb Schedule Page 25
• Editing a Do Not Disturb Schedule Page 25
• Erasing a Do Not Disturb Schedule Page 26
• About Unlock Schedules Page 26
• Main Gate Unlock Schedule Page 26-27
• Auxiliary Relay Unlock Schedule Page 27
Schedule enabled
Activates or deactivates the Do-Not-Disturb Schedule
Do Not Disturb
Edit Schedule
No
Yes
Done
Figure 11: Do Not Disturb Screen
Feature Schedule
SUN
MON
TUE
WED
THU
FRI
SAT
HOL
0 1 2 3 4 5 6 7 8 9 10 11 12 13 14 15 16 17 18 19 20 21 22 23 24
Sunday
Monday
Tuesday
Wednesday
Thursday
Friday
Saturday
Holidays
00:00
20:00
20:00
20:00
20:00
00:00
00:00
23:59
06:00
06:00
06:00
06:00
23:59
23:59
Holiday Schedule
no schedule
no schedule
no schedule
no schedule
no schedule
no schedule
Done
Enter 24 hour time as hh:mm, tab to next column
Do-Not-Disturb Schedule
Day
From
Until
On Holidays Use
Figure 12: Feature Schedule Screen
Do Not Disturb
Schedule enabled
Activates or deactivates the Do-Not-Disturb Schedule
No
Edit Schedule
Yes
Done
Feature Schedule
SUN
MON
TUE
WED
THU
FRI
SAT
HOL
0 1 2 3 4 5 6 7 8 9 10 11 12 13 14 15 16 17 18 19 20 21 22 23 24
Do-Not-Disturb Schedule
Day
Sunday
Monday
Tuesday
Wednesday
Thursday
Friday
Saturday
Holidays
Enter 24 hour time as hh:mm, tab to next column
From
00:00
20:00
20:00
20:00
20:00
00:00
00:00
Until
23:59
06:00
06:00
06:00
06:00
23:59
23:59
On Holidays Use
Holiday Schedule
no schedule
no schedule
no schedule
no schedule
no schedule
no schedule
Done
Page 25

25
OTHER SCHEDULES
Setting Up a Do Not Disturb Schedule
NOTE:
This feature applies only to calls made to the main residence phone, not to other tenants via Dialing Codes.
1. Open the unit file (refer to page 12 for details).
2. From the Main Menu, click the Do Not Disturb button in the Edit box. The Do Not Disturb screen will appear
(see page 24).
3. At the Do Not Disturb screen, select “Yes”.
4. Click the Edit Schedule button. The Feature Schedule screen will appear (see Figure 12 on page 24).
5. Click in the From box next to the day you wish to program. Enter the time in 24 hour format (HH:MM) when the DND schedule
will begin.
6. Click in the Until box for the day you are programming. Enter the time in 24 hour format (HH:MM) when the schedule will end.
7. Click in the “On Holidays Use” box. Click the link button. The “Holiday Options” screen will appear (Figure 13).
Sunday Holiday Options
When this day falls on a holiday use
No schedule
Today’s schedule
Holiday schedule
Cancel
OK
Figure 13: Holiday Options Screen
8. Select one of the following:
No Schedule: The Crown Jewel will not activate the Do Not Disturb feature on days that are programmed as holidays.
Today's Schedule: The Crown Jewel will treat holidays in the same manner as a “regular” day.
Example: If July 4th is programmed as a holiday and it lands on a Wednesday, and You have the Holiday option for
Wednesdays set to “Today's Schedule”, and You have the Do Not Disturb schedule for Wednesdays programmed to begin at
11:00 P.M. and end at 6:00 A.M
Then Crown Jewel will activate the Do Not Disturb feature at 11:00 P.M. on July 4th and deactivate the feature at 6:00 A.M.
Holiday Schedule: The Crown Jewel will activate the Do Not Disturb feature according to the times programmed in the “Holiday”
day area on dates that are programmed as holidays.
Example: If January 1st is programmed as a holiday and it lands on a Saturday, and you have the Holiday option for
Saturdays set to “Holiday Schedule”, and you have the Do Not Disturb schedule for Holidays programmed to activate at 8:00
P.M. and deactivate at 11:00 A.M.
Then the Crown Jewel will automatically activate the Do Not Disturb feature at 8:00 P.M. and deactivate it at 11:00 A.M.
9. Click OK.
10. After programming all of your Do Not Disturb schedules, click Done.
Editing a Do Not Disturb Schedule
1. Open the unit file (refer to page 8 for details).
2. From the Main Menu, click the Do Not Disturb button in the Edit box. The Do Not Disturb screen will appear
(see Figure 11 on page 24).
3. Click the Edit Schedule button. The Feature Schedule screen will appear (see Figure 12 on page 24).
4. Click in the area of the schedule you wish to edit. Type in the new entry. Be sure that the time is entered in 24-hour format
(HH:MM).
5. After completing all of your changes, click Done. CJWin will return you to the Do Not Disturb screen.
6. Click Done.
Sunday Holiday Options
When this day falls on a holiday use
No schedule
Today’s schedule
Holiday schedule
OK
Cancel
Page 26
26
OTHER SCHEDULES
Erasing a Do Not Disturb Schedule
1. Open the unit file (refer to page 8 for details).
2. From the Main Menu, click the Do Not Disturb button in the Edit box. The Do Not Disturb screen will appear
(see Figure 11 on page 24).
3. Click the Edit Schedule button. The Feature Schedule screen will appear (see Figure 12 on page 24).
4. Select the From box for the schedule you wish to erase. Press the DELETE key until the entire box has been erased.
5. Press the TAB key and the entire schedule for that day will be erased.
6. After completing all of your changes, click Done. CJWin will return you to the Do Not Disturb screen.
7. Click Done.
About Unlock Schedules
The Crown Jewel can automatically open any gate and close it later that day. This feature is known as the Unlock Schedules
feature.Each day of the week can have up to 2 time segments. In addition, on programmed holidays, the schedule can automatically be
ignored or changed to an alternate programmed schedule reserved for holidays.
IMPORTANT NOTE:
Before using the Unlock Schedule feature, set the Crown Jewel's date and time (see page 8).
Main Gate Unlock Schedule
The Unlock Schedule for the Main Gate allows you to automatically activate and deactivate Relay 1 at times you specify. Once you set
up a schedule for the Main Gate, CJWin will display the schedule on the chart located at the top of the screen. The schedule will be
shown on the chart as a red bar between the times it will be activated.
1. Open the unit file (refer to page 8 for details).
2. From the Main Menu, click the Main Schedule button in the Edit box. The Automatic Unlock Schedule screen will appear
(see Figure 14).
3. Select the Unlock box for the day you wish to program. Enter the time (in 24 hour format) when the main gate relay will
activate
.
4. Select the Relock box for the same day you programmed in step 1. Enter the time (in 24 hour format) when the main gate will
deactivate
.
SUN
MON
TUE
WED
THU
FRI
SAT
HOL
0 1 2 3 4 5 6 7 8 9 10 11 12 13 14 15 16 17 18 19 20 21 22 23 24
Automatic Unlock Schedule
Main Gate Schedule
Sunday
Monday
Tuesday
Wednesday
Thursday
Friday
Saturday
Holidays
08:00
08:00
08:00
08:00
08:00
17:00
17:00
17:00
17:00
17:00
no schedule
no schedule
no schedule
no schedule
no schedule
no schedule
no schedule
Enter 24 hour time as hh:mm tab to next column
Done
Day
Unlock
Relock
Unlock
Relock
On Holidays Use
Figure 14: Automatic Unlock Schedule Screen
Automatic Unlock Schedule
SUN
MON
TUE
WED
THU
FRI
SAT
HOL
0 1 2 3 4 5 6 7 8 9 10 11 12 13 14 15 16 17 18 19 20 21 22 23 24
Day
Sunday
Monday
Tuesday
Wednesday
Thursday
Friday
Saturday
Holidays
Main Gate Schedule
Unlock
08:00
08:00
08:00
08:00
08:00
Relock
Unlock
17:00
17:00
17:00
17:00
17:00
Enter 24 hour time as hh:mm tab to next column
Relock
On Holidays Use
no schedule
no schedule
no schedule
no schedule
no schedule
no schedule
no schedule
Done
Page 27

27
OTHER SCHEDULES
Main Gate Unlock Schedule (continued)
5. To set up more automatic unlock schedules for the main gate on that day, repeat steps 3 and 4 in the second Unlock and Relock
boxes.
6. Click in the “On Holidays Use” box.Click the link button. The “Holiday Options” screen will appear (refer to Figure 13
on page 25).
7. Select one of the following:
No Schedule:
The Crown Jewel will not activate the Automatic Unlock Schedule for Relay 1 on days that are programmed as
holidays.
Today's Schedule: The Crown Jewel will treat holidays in the same manner as a “regular” day.
Example: If July 4th is programmed as a holiday and it lands on a Wednesday, and You have the Holiday option for
Wednesdays set to “Today's Schedule”, and You have the Main Unlock Schedule for Wednesdays programmed to begin at
11:00 A.M. and end at 6:00 P.M.
Then Crown Jewel will activate Relay 1 at 11:00 A.M. on July 4th and deactivate the relay at 6:00 P.M.
Holiday Schedule: The Crown Jewel will activate the Main Unlock Schedule according to the times programmed in the “Holiday”
day area on dates that are programmed as holidays.
Example: If January 1st is programmed as a holiday and it lands on a Saturday, and you have the Holiday option for
Saturdays set to “Holiday Schedule”, and you have the Main Unlock Schedule for Holidays programmed to activate at 8:00
A.M. and deactivate at 11:00 A.M.
Then the Crown Jewel will automatically activate Relay 1 at 8:00 A.M. and deactivate it at 11:00 A.M.
8. Click OK.
9. After programming all of your Automatic Unlock Schedules, click Done.
Auxiliary Relay Unlock Schedule
The Unlock Schedule for the auxiliary relay allows you to automatically activate and deactivate the device attached to Relay 2 at times
you specify.
1. Open the unit file (refer to page 8 for details).
2. From the Main Menu, click the Aux Schedule button in the Edit box. The Automatic Unlock Schedule screen will appear (refer to
Figure 14 on page 26).
3. Select the Unlock box for the day you wish to program. Enter the time (in 24 hour format) when the auxiliary relay will activate.
4. Select the Relock box for the same day you programmed in step 1. Enter the time (in 24 hour format) when the auxiliary relay will
deactivate.
5. To set up more automatic unlock schedules for the auxiliary relay on that day, repeat steps 3 and 4 in the second Unlock and
Relock boxes.
6. Click in the “On Holidays Use” box.Click the link button. The “Holiday Options” screen will appear (refer to Figure 13
on page 25).
7. Select one of the following:
No Schedule: On holidays, the Crown Jewel will not unlock or re-lock Relay 2.
Today's Schedule: The Crown Jewel will treat holidays as“regular” days.
Example: If July 4th is programmed as a holiday and it lands on a Wednesday, and You have the Holiday option for
Wednesdays set to “Today's Schedule”,and You have the Auxiliary Schedule for Wednesdays programmed to begin at 11:00
A.M. and end at 6:00 P.M.
Then Crown Jewel will activate Relay 2 at 11:00 A.M. on July 4th and deactivate the relay at 6:00 P.M.
Holiday Schedule: The Crown Jewel will activate the Auxiliary Schedule according to the times programmed in the “Holiday” day
area on dates that are programmed as holidays.
Example: If January 1st is programmed as a holiday and it lands on a Saturday, and you have the Holiday option for
Saturdays set to “Holiday Schedule”, and you have the Auxiliary Schedule for Holidays programmed to activate at 8:00 A.M.
and deactivate at 11:00 A.M.
Then the Crown Jewel will automatically activate Relay 2 at 8:00 A.M. and deactivate it at 11:00 A.M.
8. Click OK.
9. After programming all of your Automatic Unlock Schedules, click Done.
Page 28

28
ENTRY CODES
This section will cover . . .
• About Entr
y Codes Page 28
• Adding Entr
y Codes Page 29
• Editing Entry Codes Page 29
• Erasing Entr
y Codes Page 29
About Entry Codes
Entry Codes are unique 4-digit codes assigned to authorized personnel that grant them access to the residence.
When this code is entered on the keypad, the specified gate/door will open. You may also restrict the use of entry codes by assigning a
time zone to the code (see page 22 for more information).
Code
Action
Zone
Name
Save
Erase
Done
8878
Tomassetti, Steve
Cycle Default
Creating new code record
Capacity used
Remaining
70
Code
Action
Zone
Name
Entry Code List
1224
1234
3321
4553
9004
Cycle Aux
Cycle Default
Cycle Main
Cycle Default
Cycle Default
Wisner, Deidra
Pitts, Vikki
Diaz, William
Bauer, Mark
Westlake, Mary
Enter optional name then TAB
Figure 15: Edit Entry Code Screen
Edit Entry Codes
8878
Action
Cycle Default
Code
Creating new code record
1224
1234
3321
4553
9004
Action
Cycle Aux
Cycle Default
Cycle Main
Cycle Default
Cycle Default
Code
Name
Zone
0 Tomassetti, Steve
Capacity used
Entry Code List
Zone
Name
1
Wisner, Deidra
0
Pitts, Vikki
Diaz, William
1
0
Bauer, Mark
2
Westlake, Mary
Enter optional name then TAB
Save
70
5
Remaining
Erase
Done
Page 29

29
ENTRY CODES
Adding Entry Codes
1. Open the unit file (refer to page 8 for details).
2. From the Main Menu, click the Entry Codes button in the Edit box. The Edit Entry Codes screen will appear (see Figure 15).
3. In the Code box, enter a (4) four-digit entry code (0000 to 9999). Two records cannot share the same code.
4.Select the Action that this code, when entered at a unit, will prompt:
• Cycle Default: The Crown Jewel will activate the default relay (Keypad 1 will open Relay 1, Keypad 2 will open Relay 2) for its
programmed activation time.
• Cycle Main: The Crown Jewel will activate Relay 1 for the relay's programmed open time.
• Cycle Aux: The Crown Jewel will activate Relay 2 for the relay's programmed open time.
• Latch Main: The Crown Jewel will activate Relay 1 until it is released by an entry code that has its action programmed as either
“Release Main” or “Release Both”.
• Latch Aux: The Crown Jewel will activate Relay 2 until it is released by a code that has its action programmed as either “Release
Aux” or “Release Both”.
• Release Main: The Crown Jewel will deactivate Relay 1. Therefore, if the gate attached to Relay 1 was previously latched open,
then an entry code programmed as “Release Main” will close that gate.
• Release Aux: The Crown Jewel will deactivate Relay 2. Therefore, if the gate attached to Relay 2 was previously latched open,
then an entry code programmed as “Release Aux” will close that gate.
• Release Both: The Crown Jewel will deactivate Relays 1 and 2. Therefore, if the gates attached to Relays 1 and 2 were
previously latched open, then an entry code programmed as “Release Both” will close both gates.
5. At the Zone box, assign a Time Zone (0 to 7) when the code will be valid (see Time Zones for more information).
0 = Allows access all day, any day.
6. Enter the Name associated with the entry code. Assigning a name to an entry code allows you to easily locate transactions that
have occurred for that code. This entry can be up to 31 characters in length and can include all letters, numbers, and punctuation
marks.
7. Click Save.
8. After adding all your entry codes, click Done.
Editing Entry Codes
1. Open the unit file (refer to page 8 for details).
2. From the Main Menu, click the Entry Codes button in the Edit box. The Edit Entry Codes screen will appear (see Figure 15
on page 28).
3. Click to highlight the record you want to edit.
4. Make any necessary edits in the boxes at the top of the screen.
5. Click Save.
Erasing Entry Codes
1. Open the unit file (refer to page 8 for details).
2. From the Main Menu, click the Entry Codes button in the Edit box. The Edit Entry Codes screen will appear (see Figure 15
on page 28).
3. Click to highlight the record you want to delete.
4. Click Erase.
5. Click Save.
Page 30

30
CALL FORWARDING
This section will cover . . .
• About Call For
warding Page 30
• Enabling Call For
warding Page 30
• Setting Up a Call Forwarding Schedule Page 31
About Call Forwarding
The Call Forwarding feature allows you to program your Crown Jewel unit to call an outside telephone number when a visitor calls the
main residence (by pressing the “#” key on the front panel of the unit). This feature enables you to allow access to a visitor from a
remote location.
The Call Forwarding Number can be:
• A phone number of up to 12 digits
• Scheduled Call Forwarding
Figure 16: Call Forwarding Screen
Enabling Call Forwarding
1. Open the unit file (refer to page 8 for details).
2. From the Main Menu, click the Call Forwarding button in the Edit box. The Call Forwarding screen will appear (see Figure 16).
3. At the Call Forwarding screen, select On.
4. Enter the Phone Number. Visitor calls will be forwarded to this number.
5. If the phone number has an Extension, enter the number (up to 6 digits) and the Pause time (in seconds). When the unit calls the
phone number, it will pause the defined number of seconds before dialing the extension.
Maximum Visitor Digits: This area allows you to set the maximum number of digits that a visitor may dial on the unit's keypad
after a visitor call has been answered. This entry can be between 0 to 6 digits.
6. Click Done.
Numbers to dial when Call Forwarding feature is active up to 11 digitsNumbers to dial when Call Forwarding feature is active up to 11 digits
Call ForwardingCall Forwarding
Maximum Visitor DigitsMaximum Visitor Digits
Phone NumberPhone Number
PausePause
ExtensionExtension
OffOff OnOn
ScheduledScheduled
Edit ScheduleEdit Schedule
DoneDone
55544675554467 0
0
Page 31

31
CALL FORWARDING
Setting Up a Call Forwarding Schedule
A Call Forwarding Schedule allows you to set a time period during which calls will be forwarded to the main residence. All calls that
occur outside the schedule will not be forwarded.
NOTE:
This feature applies only to calls made to the main residence phone, not to other tenants via Dialing Codes.
1. Open the unit file (refer to page 8 for details).
2. From the Main Menu, click the Call Forwarding button in the Edit box. The Call Forwarding screen will appear (see Figure 16
on page 30).
3. At the Call Forwarding screen, select the Scheduled radio button.
4. Click Edit Schedule. The Feature Schedule screen will appear (Figure 17).
Figure 17: Feature Schedule Screen
5. Select the From box for the day you wish to program. Enter the time (in 24 hour format) when visitor calls will begin being
forwarded.
Example: For visitor calls to be automatically forwarded at 8:30 A.M. on Mondays, enter “0830” in the From box for Mondays.
6. Select the Until box for the same day. Enter the time (in 24 hour format) when visitor calls will be directed back to the residence.
7. Select the “On Holidays Use” box for the day you are programming. Click the link button.The “Holiday Options” screen will appear
(refer to Figure 13 on page 22).
8. Select one of the following:
No Schedule:
The Crown Jewel will not activate the Call Forwarding feature on days that are programmed as holidays.
Today's Schedule: The Crown Jewel will treat holidays as “regular” days.
Example: If July 4th is programmed as a holiday and it lands on a Wednesday, and You have the Holiday option for
Wednesdays set to “Today's Schedule”, and You have the Call Forwarding Schedule for Wednesdays programmed to begin at
8:00 A.M. and end at 6:00 P.M.
Then Crown Jewel will activate the Call Forwarding feature at 8:00 A.M. on July 4th and deactivate the feature at 6:00 P.M.
Holiday Schedule: The Crown Jewel will activate the Call Forwarding feature according to the times programmed in the Holiday
schedule.
Example: If January 1st is programmed as a holiday and it lands on a Saturday, and you have the Holiday option for
Saturdays set to “Holiday Schedule”, and You have the Call Forwarding Schedule for Holidays programmed to activate at 8:00
A.M. and deactivate at 12:00 P.M.
Then the Crown Jewel will automatically activate the Call Forwarding feature at 8:00 A.M. and deactivate it at 12:00 P.M.
9. After completing all of your Forwarding Schedules, click Done.
Feature ScheduleFeature Schedule
SUNSUN
MONMON
TUETUE
WEDWED
THUTHU
FRIFRI
SATSAT
HOLHOL
0 1 2 3 4 5 6 7 8 9 10 11 12 13 14 15 16 17 18 19 20 21 22 23 240 1 2 3 4 5 6 7 8 9 10 11 12 13 14 15 16 17 18 19 20 21 22 23 24
SundaySunday
MondayMonday
TuesdayTuesday
WednesdayWednesday
ThursdayThursday
FridayFriday
SaturdaySaturday
HolidaysHolidays
00:0000:00
20:0020:00
20:0020:00
20:0020:00
20:0020:00
00:0000:00
00:0000:00
23:5923:59
06:0006:00
06:0006:00
06:0006:00
06:0006:00
23:5923:59
23:5923:59
Holiday ScheduleHoliday Schedule
no scheduleno schedule
no scheduleno schedule
no scheduleno schedule
no scheduleno schedule
no scheduleno schedule
no scheduleno schedule
DoneDone
Enter 24 hour time as hh:mm, tab to next columnEnter 24 hour time as hh:mm, tab to next column
Do-Not-Disturb ScheduleDo-Not-Disturb Schedule
DayDay
FromFrom UntilUntil
On Holidays UseOn Holidays Use
Page 32

32
UNIT TRANSACTIONS
This section will cover . . .
• About Unit T
ransactions Page 32
• Retrieving Unit T
ransactions Page 32
• Viewing and Erasing Transactions Page 32
About Unit Transactions
CJWin allows you to retrieve, view, edit, print, and analyze your Crown Jewel's transactions.
Transactions are records that the Crown Jewel makes each time an action is performed by the system. These records contain
information such as the date and time an action has taken place, what keypad the action took place at, the type of action that was
performed, and the action that was taken by the system. The Crown Jewel will then store these records in its memory until you retrieve
them with the use of the CJWin program.
Figure 18: View or Erase Transactions Screen
Retrieving Unit Transactions
Before you can view, edit or analyze your Crown Jewel unit's
transactions, you will need to retrieve these transactions from the
unit's memory.
1. Open the unit file (refer to page 8 for details).
2. Connect to the unit (see page 11 for details).
3. When CJWin is connected to the unit, click Transactions.
CJWin will begin retrieving the transactions from your unit's
memory. Once retrieved, the transactions will be displayed
in the box located at the bottom of the screen, beginning
with the oldest transaction.
4. When CJWin is finished receiving transactions, click
Disconnect.
5. Once CJWin has disconnected from the unit, click Done.
NOTE:
To print transactions, refer to page 35.
Viewing and Erasing Transactions
1. Retrieve the transactions from the unit (see above).
2. From the Main Menu, click the Transactions button in the
View area. The View or Erase Transactions screen will
appear (Figure 18).
3. To Erase a transaction: Click to highlight the transaction you
wish to erase. Press the DELETE key; or click the Erase
Selected Records button.
At the confirmation dialog box, click OK.
4. When finished, click Done.
NOTE:
To print transactions, refer to page 35.
View or Erase Transactions
Database
Record Date and Time Category Details
198 Apr 25 Thu 09:50 Program House, Password, Valid
199 Apr 25 Thu 13:44 Program House, Command 91 Cycle main
200 Apr 25 Thu 13:45 Program House, Command 92 Cycle aux
201 Apr 29 Mon 11:40 Other Internal, Reset, Power up
202 Apr 29 Mon 11:40 Program Keypad, Password, Valid
203 Apr 30 Tue 14:16 Other Internal, Reset, Power up
204 Apr 30 Tue 14:28 Program House, Password, Valid
205 Apr 30 Tue 14:42 Program House, Password, Valid
206 Apr 30 Tue 15:14 Program House, Password, Valid
207 Apr 30 Tue 15:15 Program Modem, Step 96 Release aux
208 Apr 30 Tue 15:58 Program House, Password, Valid
209 May 17 Fri 09:40 Other Internal, Reset, Power up
210 May 17 Fri 09:40 Program House, Password, Valid
211 May 17 Fri 09:40 Program Modem, Step 27 Date & Time was /17 09:42
212 May 20 Mon 10:53 Other Internal, Reset, Power up
213 May 20 Mon 10:57 Program House, Password, Valid
C:\PROGRAM FILES\CJWIN\UNIT1.MDB
Bytes
61440
Recordset Records
CJUNIT1
Previously Retrieved Transaction Records
213
Erase Selected Records
To erase transactions, select 1 or more rows, then press the 'Delete' key
Done
Page 33

33
USING THE CONTROL PANEL
This section will cover . . .
• Accessing the Contr
ol Panel Page 33
• Main Gate Commands
Page 34
• Auxiliary Relay Commands Page 34
• Special Contr
ol Panel Commands Page 34
Accessing the Control Panel
The Control Panel allows you to open a relay, activate the Do Not Disturb Until feature, change the system's programming password,
and reset the unit.
1. Open the unit file (refer to page 8 for details).
2. Connect to the unit (see page 11 for details).
3. Once the CJWin is connected with the unit, click Control Panel. The Crown Jewel Unit Immediate Control screen will appear
(Figure 19).
Gate is now
Closed
Cycle Main
Open Main
Close Main
Open Main Until
Main Gate
Special
DND Until:
Change Password
Reset Unit
Crown Jewel Unit Immediate Control
Auxillary Relay
Auxillary is now
Released
Cycle Aux
Activate Aux
Release Aux
Activate Aux Until
Release auxillary relay
Done
Figure 19: Crown Jewel Unit Immediate Control Screen
Crown Jewel Unit Immediate Control
Main Gate
Gate is now
Cycle Main
Open Main
Close Main
Open Main Until
Special
Change Password
Auxillary Relay
Auxillary is now
Closed
DND Until:
Release auxillary relay
Released
Cycle Aux
Activate Aux
Release Aux
Activate Aux Until
Reset Unit
Done
Page 34

34
USING THE CONTROL PANEL
Main Gate Commands
Gate Is Now: This area describes the gate's current status.
Cycle Main: The Cycle Main button allows you to activate the main gate for the amount of time that was programmed in the Relay
Activation Time setup area (refer to page 19).
Open Main: The Open Main button allows you to open the main gate until you release it by selecting the Close Main button.
Close Main: The Close Main button allows you to release the main gate from its open status. The gate may have been activated by
either an entry code, a visitor call, the Open Main Until feature, the Open Main feature, or the Main Unlock Schedule feature.
Open Main Until: The Open Main Until button allows you to activate the main gate until the time of the day that you specify.
To set the Open Main Until feature:
1. In the box next to the Open Main Until button, enter the time (in 24 hour format) when the main gate will close.
Example: To close the gate at 5:00 A.M., enter “0500”. To close the gate at 5:00 P.M., enter “1700”.
2. Click Open Main Until. The main gate will open and remain open until the time you programmed.
Auxiliary Relay Commands
Auxiliary Is Now: This area describes the auxiliary relay's current status.
Cycle Aux: The Cycle Aux button allows you to activate the auxiliary relay for the amount of time that was programmed in the Relay
Activation Time setup area (refer to page 19).
Activate Aux: The Activate Aux button allows you to open the auxiliary relay until you release it by clicking the Release Aux button.
Release Aux: The Release Aux button allows you to release the auxiliary relay from its activated status. The relay may have been
activated by an entry code, a visitor call, the Activate Aux Until feature, the Activate Aux feature, or the Auxiliary Unlock Schedule
feature.
Activate Aux Until: The Activate Aux Until area allows you to activate the auxiliary relay until the time you specify.
To set the Activate Aux Until feature:
1. In the box next to the Activate Aux Until button, enter the time (in 24 hour format) when the auxiliary relay will deactivate.
Example: To close the relay at 5:00 A.M., enter “0500”. However, to close the relay at 5:00 PM, enter “1700”.
2. Click Open Aux Until.The auxiliary relay will activate and remain activated until the time you programmed.
Special Control Panel Commands
Do Not Disturb Until (DND Until): The DND Until feature allows you to activate the Do Not Disturb feature until a time that you specify.
Please note, this feature will temporarily override any Do Not Disturb Schedule that may have been previously programmed into the
unit.For more details about Do Not Disturb Schedules, refer to page 24.
To set the DND Until feature:
1. In the box next to the DND Until button, enter the time (in 24 hour format) when the DND Until feature will end.
Example: To end the feature at 5:00 A.M., enter “0500”.However, to end the feature at 5:00 P.M., enter “1700”.
2. Click DND Until.
NOTE:
To end the DND Until feature prior to the time that you programmed, repeat steps 1 & 2 and enter “99” as the ending time.
Change Password: This button enables you to change the unit's password.
To change the password:
1. In the box next to the Change Password button, enter the new (6) six-digit password.
2. Click Change Password.
CJWin will send the new password to the unit and also change the password areas in the Communicate screen and the Phone
Number and Password screen.
NOTE:
If you must reset the unit contact your installing dealer. This may be an indication of a larger problem with the system or
installation.
Reset Unit: The Reset Unit feature allows you to reset the unit without having to disconnect the power to the unit.
Page 35

35
PRINTING
This section will cover . . .
• Printing Transactions Page 35
• Printing the Unit's Cur
rent Information Page 36
Printing Transactions
For all other information about transactions, refer to page 32.
ACCESSING THE REPORT SETUP SCREEN
1. Open the unit file (refer to page 8 for details).
2. Retrieve the transactions from the unit if you haven't done so already (refer to page 32 for details).
3. From the Main Menu, click the Transactions button in the Print area. The Transaction Report Setup screen will appear
(see Figure 20).
Figure 20: Transaction Report Setup Screen
Click to select first record to print
Transaction Report Setup
Transaction Report Setup
Range of Records to Print
Starting Record
First
Last
Categories
Ending Record
Up 10 Up 1 Down 1 Down 10 Up 10 Up 1 Down 1 Down 10
Record
1
213 5/20/02 10:57:00 AM
Entry Code
Visitor
Time Stamp Details
4/3/02 1:21:00 PM Modem, Step 14 Call Forwarding number 166122...
House, Password, Valid
Optional Columns
Record Number
Category
Margins (Inches)
To p
0.000
Left
0.000
Program Step
Font
Other
All
Print
Done
Click to select first record to print
Page 36

36
PRINTING
Printing Transactions (continued)
CONFIGURING THE REPORT OPTIONS
Range of Records to Print: The range of transactions that are currently located in CJWin's memory are displayed in the two boxes at
the bottom of the Range of Records to Print area.
1. To begin the printed list of transactions with a transaction other than 1, click UP 1 or UP 10 until the desired transaction is located
in the starting transaction box.
2. To end the printed list of transaction with a transaction other than the last record stored in CJWin's memory, click Down 1 or
Down 10 until the desired transaction is located in the ending transaction box.
Categories: A transaction record can be generated by one of three actions: an entry code, a visitor call, or a programming step. CJWin
has the ability to filter and print the transactions according to these actions.
To filter the transactions, click to select the filter(s) from the Categories area.
Optional Columns: A normal transaction printout includes the following columns: Time and Date the transactions have occurred; the
details of what generated the transaction; and the details of what actions the system took.
To include the record number and/or the category on the transaction printout, select Record Number and/or Category from the
Optional Columns area.
Margins: This area allows you to configure the Top and Left margins of the report.
Font: Transactions are printed using a size 10 Sans Serif font. If you wish to change the font, the font size, or the font style to a setting
that is available on your computer, click the Font button. The Font Selection Screen is the same as the default Windows font screen.
Print: When all report options are configured, click Print.
Printing the Unit's Current Information
CJWin allows you to print your unit's current configurations onto your computer's local printer.
1. Open the unit file (refer to page 8 for details).
2. From the Main Menu, click the Unit Information button in the Print area. The Unit Information Report Setup screen will appear
(see Figure 21).
Figure 21: Unit Information Report Setup
3. Select Report Sections: Click to select the feature(s) that will be included in the report.
4. To change the type and size of font that is used in the printout, click the Font button. The Font Selection Screen will appear. The
Font Selection Screen is the same as the default Windows font screen.
5. Once you have set up the printout information, click Print.CJWin will then print the unit's information to your computer's local
printer.
6. After completing all of your entries in this area, click Done.
Unit Information Report Setup
Select Report Sections
Features
Configuration
Holidays
Do Not Disturb Schedule
Call Forwarding
Main Unlock Schedule
Auxillary Activation Schedule
Time Zones
Entry Codes
All
Margins (Inches)
To p
0.000
Left
0.000
Font
Print
Done
Page 37

SOFTWARE NOTES
________________________________________________________________________________
________________________________________________________________________________
________________________________________________________________________________
________________________________________________________________________________
________________________________________________________________________________
________________________________________________________________________________
________________________________________________________________________________
________________________________________________________________________________
________________________________________________________________________________
________________________________________________________________________________
________________________________________________________________________________
________________________________________________________________________________
________________________________________________________________________________
________________________________________________________________________________
________________________________________________________________________________
________________________________________________________________________________
________________________________________________________________________________
________________________________________________________________________________
________________________________________________________________________________
________________________________________________________________________________
________________________________________________________________________________
________________________________________________________________________________
________________________________________________________________________________
________________________________________________________________________________
________________________________________________________________________________
________________________________________________________________________________
________________________________________________________________________________
________________________________________________________________________________
________________________________________________________________________________
________________________________________________________________________________
________________________________________________________________________________
________________________________________________________________________________
________________________________________________________________________________
________________________________________________________________________________
________________________________________________________________________________
________________________________________________________________________________
________________________________________________________________________________
________________________________________________________________________________
________________________________________________________________________________
________________________________________________________________________________
________________________________________________________________________________
________________________________________________________________________________
________________________________________________________________________________
________________________________________________________________________________
________________________________________________________________________________
________________________________________________________________________________
________________________________________________________________________________
37
Page 38

SOFTWARE NOTES
________________________________________________________________________________
________________________________________________________________________________
________________________________________________________________________________
________________________________________________________________________________
________________________________________________________________________________
________________________________________________________________________________
________________________________________________________________________________
________________________________________________________________________________
________________________________________________________________________________
________________________________________________________________________________
________________________________________________________________________________
________________________________________________________________________________
________________________________________________________________________________
________________________________________________________________________________
________________________________________________________________________________
________________________________________________________________________________
________________________________________________________________________________
________________________________________________________________________________
________________________________________________________________________________
________________________________________________________________________________
________________________________________________________________________________
________________________________________________________________________________
________________________________________________________________________________
________________________________________________________________________________
________________________________________________________________________________
________________________________________________________________________________
________________________________________________________________________________
________________________________________________________________________________
________________________________________________________________________________
________________________________________________________________________________
________________________________________________________________________________
________________________________________________________________________________
________________________________________________________________________________
________________________________________________________________________________
________________________________________________________________________________
________________________________________________________________________________
________________________________________________________________________________
________________________________________________________________________________
________________________________________________________________________________
________________________________________________________________________________
________________________________________________________________________________
________________________________________________________________________________
________________________________________________________________________________
________________________________________________________________________________
________________________________________________________________________________
________________________________________________________________________________
________________________________________________________________________________
38
Page 39

SOFTWARE NOTES
________________________________________________________________________________
________________________________________________________________________________
________________________________________________________________________________
________________________________________________________________________________
________________________________________________________________________________
________________________________________________________________________________
________________________________________________________________________________
________________________________________________________________________________
________________________________________________________________________________
________________________________________________________________________________
________________________________________________________________________________
________________________________________________________________________________
________________________________________________________________________________
________________________________________________________________________________
________________________________________________________________________________
________________________________________________________________________________
________________________________________________________________________________
________________________________________________________________________________
________________________________________________________________________________
________________________________________________________________________________
________________________________________________________________________________
________________________________________________________________________________
________________________________________________________________________________
________________________________________________________________________________
________________________________________________________________________________
________________________________________________________________________________
________________________________________________________________________________
________________________________________________________________________________
________________________________________________________________________________
________________________________________________________________________________
________________________________________________________________________________
________________________________________________________________________________
________________________________________________________________________________
________________________________________________________________________________
________________________________________________________________________________
________________________________________________________________________________
________________________________________________________________________________
________________________________________________________________________________
________________________________________________________________________________
________________________________________________________________________________
________________________________________________________________________________
________________________________________________________________________________
________________________________________________________________________________
________________________________________________________________________________
________________________________________________________________________________
________________________________________________________________________________
________________________________________________________________________________
39
Page 40

6001151D Printed in Mexico
®
This document is protected by copyright and may not be copied or adapted without the prior written consent of Sentex Systems. This
documentation contains information proprietary to Sentex and such information may not be distributed without the prior written
consent of Sentex. The software and firmware included in the Sentex product as they relate to this documentation are also protected by
copyright and contain information proprietary to Sentex.
FOR TECHNICAL SUPPORT, PLEASE CONTACT YOUR LOCAL SENTEX SYSTEMS DEALER
Copyright© 2005, All Rights Reserved
 Loading...