

Page 1

CLOSED
OPEN
Indoor Receiver
AC Adapter
Sensor
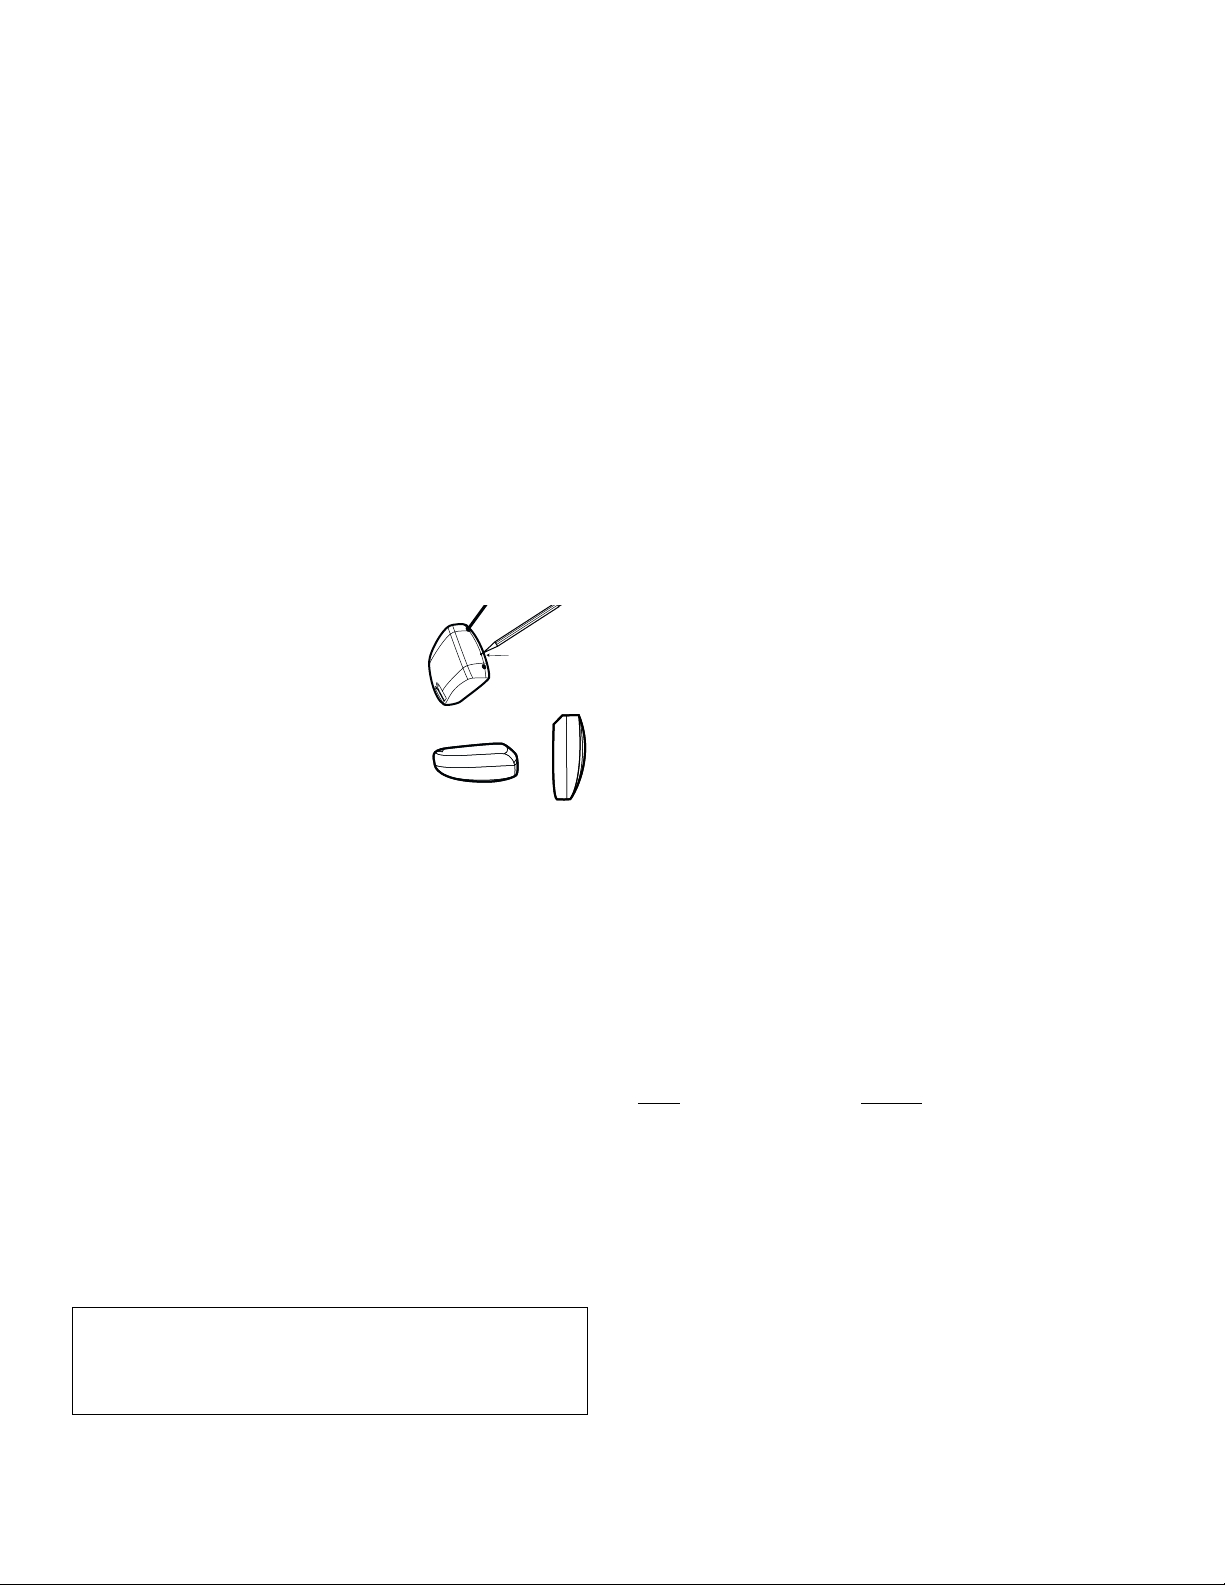
CR2032
3 VOLTS
Lithium Battery
(CR2032 type) Double-Sided Velcro
To prevent possible SERIOUS INJURY or DEATH from a closing garage
door:
• Activate door ONLY when it can be seen clearly, is properly adjusted,
and there are no obstructions to door travel.
• ALWAYS keep garage door in sight until completely closed. NEVER
permit anyone to cross path of closing garage door.
WARNING
GARAGE DOOR
MONITOR SYSTEM
PRE-INSTALLATION SYSTEM TEST
1. The sensor and receiver are pre-matched (programmed) at the
factory. Test the system by flipping the sensor over while it is a
few feet away from the receiver. The receiver will show a
green light for closed when the sensor is face up in the vertical
position with the round end of the case pointing down
(Figure 1). The red light will flash when the sensor is face
down in the horizontal position (Figure 2).
2. If the green or the red receiver lights do not come on, or do not
react as described, see the Troubleshooting or Learning
section of these instructions.
INSTALLING THE BATTERY IN THE GARAGE
DOOR INDICATOR SENSOR
1. Place the screw driver blade on the tab at
the end of the case and gently press down
and in toward the case.
2. Insert the the lithium battery into the battery
clip with the + (positive) side face up.
3. Push the case back together tightly by
inserting the top hooks into the back cover,
then snap shut the bottom of the case.
NOTE: It is normal to hear a rattle from the tilt
switch in the sensor when tilted or rotated to
another position.
INDOOR RECEIVER SETUP
1. Plug the AC adapter into any
standard 110 volt AC electrical
wall outlet and the small plug
into the back of the indoor
receiver.
2. The receiver has a 9" antenna
wire which comes out the back.
The antenna should be straight
and not touching metal.
3
V
O
L
T
S
Figure 1 Figure 2
NOTE: Because radio control devices are inherently susceptible
to RF interference, this product should NOT be used as a
stand-alone security device. This product is considered a
monitoring and notification device ONLY, and as such, should not
be used as a substitute for a dedicated home security system.
To ensure that your Garage Door Monitor continues to operate
properly, the following checks should be performed on a
monthly basis:
• Check that the sensor is mounted properly on the garage door
(see Mounting the Sensor section of this manual.)
• Ensure the 3 volt lithium battery is installed properly.
• Check to see that the receiver system is plugged into a wall
outlet and the jack is properly connected to the back of the
receiver. Make sure the antenna is straight and not in contact
with any metal objects.
• Check that the receiver is properly recognizing sensor
signals (see Troubleshooting section of this manual.)
MOUNTING THE SENSOR
Attach the sensor to the inside of the garage door using the
double-sided velcro. Mount the sensor near the top of the garage
door for best results. The round end of the case should be
pointing down when the garage door is closed.
Know when your garage door is open
or closed!
Thank you for purchasing the LiftMaster Garage Door Monitor.
Monitor the status of your garage door from inside your home. No
longer will you have to run downstairs or go outside just to see if
you or your children have left the garage door open.
Garage Door Monitor
Models 915LMC • 916LMC • 2C507-2
WARNING
C
L
O
S
E
D
O
P
E
N
Antenna
Learn
Button
AC
Adapter
Location
Double-Sided Velcro
Round End
Down
Inside of Garage
Page 2
GARAGE DOOR MONITOR OPERATION
When the receiver is powered up, both red and green LED’s
will blink once. The receiver will then show a solid green LED
until it receives a signal from a programmed sensor.The receiver
will display the current status of the programmed door sensor. If
no door sensor(s) is programmed to the receiver, the green and
red LED will flash simultaneously. See Learning section.
The sensor sends a closed signal when the garage door is
closed (vertical) and an open signal as the sensor changes to
open (horizontal) position.
Up to 4 door mounted sensors will work in conjunction with one
receiver.
The red LED will blink once every half-second if one or more of
the programmed sensors are not in the closed position. The
green LED comes on steady only when all the programmed
sensors are in the closed position.
NOTE: The system will sometimes take a few seconds to send a
signal. The sensor updates the receiver by transmitting an open
or closed signal every few minutes.
LEARNING MORE THAN ONE SENSOR(S)
1. Door must be closed and the green
LED on steadily.
2. Press and hold the learn button for 2
seconds, the receiver will enter the learn
mode. The green LED will blink on and off
in 1/2 second increments.
3. The additional sensor(s) must be moved
from a vertical position to a horizontal
position or vice versa.
4. Both green and red LED’s will turn on for 1 second to indicate
a successful learn. Upon success, the receiver immediately
exits the learn mode and returns to normal operation.
5. If no signal is received within 30 seconds, the receiver will exit
the learn mode and return to normal operation.
ERASING OR CLEARING THE MEMORY
1. Unplug the small plug from the AC adapter on the
indoor receiver.
2. Make sure the AC adapter is plugged into a wall outlet.
3. To erase the memory of all programmed sensors, press and
hold the learn button while plugging the small plug on the AC
adapter into the indoor receiver.
4. Both red and green LED’s will blink simultaneously. This also
indicates that no sensor(s) are in memory.
5. Proceed to Step 2 of Learning More Than One Sensor to
program the sensor to the receiver.
TROUBLESHOOTING
The sensor battery must be replaced every year to assure
consistent operation. Flashing of the red and green LED’s in a
special sequence normally indicates intermittent operation or a
dead battery.
Loss of signal: The Sensor sends a signal periodically to
synchronize to the receiver. Should the receiver not receive the
signal in approximately 20 minutes, the red and green LED’s will
blink as follows. The green LED will blink once, then the red LED
will blink one to four times depending upon the sensor
number. This indicates the receiver has not received the signal
from this sensor for over 20 minutes and therefore
requires attention.
If replacing the battery does not rectify the issue, move the
receiver into the garage for additional troubleshooting. If the
monitor works flawlessly in close proximity, the sensor(s) signal is
being either blocked or interfered with in the previous location
and may require placement in a room closer to the garage
door(s).
Garage Door Monitor system just installed:
The sensor and receiver set are factory coded prior to shipment
and should work out of the package. If you encounter a situation
where the sensor and receiver work properly upon initial
installation, but show a loss of signal after 20 minutes you may
have an additional factory code in the receivers memory. In this
instance, the receiver will then appear to be unresponsive to the
sensor. In this instance, do the following:
1. Clear Receiver Memory – See Erasing or Clearing the
Memory section. Upon clearing memory, the receiver will
power up and show simultaneously flashing green and red
LED’s – this indicates that memory is cleared.
2. Proceed to Step 2 of Learning More Than One Sensor. Note
that the procedures to learn 1 sensor or multiple sensors are
the same.
If the receiver is still showing a loss of signal after following the
above procedure, then the receiver is located too far away from
the sensor. Relocate the receiver closer to the sensor.
Garage Door Monitor suddenly malfunctions after
working properly:
The sensors battery power is low. Replace the battery.
OPTIONAL ACCESSORIES
You can purchase additional sensors if you have more than one
garage door. The receiver will learn up to 4 sensors and the red
light will blink if any one of the garage doors is open.
ITEM
PART #
Sensor 916LMC
Indoor Receiver 2C507-2
12 Volt AC Adapter 2C508-2
Specifications:
Sensor
Battery: Lithium Type 2032. 1 year life.
Temperature: -180F to 1400F (-250C to 600C).
Codes: 254 randomly set codes.
Receiver
Power Supply: 12 volt DC, 50 mA.
Temperature: 140F to 1220F (-100C to 500C).
Codes: Learns codes of up to 4 sensors
FOR SERVICE DIAL OUR TOLL FREE NUMBER:
1-800-654-4736
© 2003, Chamberlain Group Inc.
114A2711C All Rights Reserved
NOTICE: To comply with FCC and or Industry Canada (IC) rules, adjustment or modifications of
this receiver and/or transmitter are prohibited, except for changing the code setting or replacing
the battery. THERE ARE NO OTHER USER SERVICEABLE PARTS.
Tested to Comply with FCC Standards FOR HOME OR OFFICE USE. Operation is subject to the
following two conditions: (1) this device may not cause harmful interference, and (2) this device
must accept any interference received, including interference that may cause undesired operation.
Press
and Hold
the Learn
Button
Page 3

ESSAI AVANT LA POSE
1. L’émetteur et le récepteur sont appariés (programmés) à l’usine.
Vérifier le système en renversant l’émetteur lorsqu’il est à quelques
pieds du récepteur. L’indicateur vert s’allume lorsque
la face de l’émetteur est vers le haut en position verticale avec
l’extrémité ronde du boîtier pointant vers le bas (Figure 1). La
lumière rouge clignotera lorsque l’émetteur est face vers le bas en
position horizontale (Figure 2).
2. Si les indicateurs vert ou rouge ne s’allument pas ou ne fonctionnent
pas comme prévu, consulter les sections de Dépannage ou
Mémorisation du détecteur du présent document.
Figure 1 Figure 2
MONTAGE DE L’ÉMETTEUR
Fixer l’émetteur à l’intérieur de la porte de garage à l’aide du velcro à
double face. Poser l’émetteur près du haut de la porte de garage afin
d’obtenir de meilleurs résultats. L’extrémité ronde du boîtier devrait
être dirigée vers le bas lorsque la porte de garage est fermée.
Savoir quand sa porte de garage est ouverte
ou fermée!
Nous vous remercions d’avoir acheté le système de détection
d’ouverture de porte LiftMaster. Il est maintenant possible de
surveiller l’état de votre porte de garage à partir de votre demeure.
Il ne sera plus nécessaire de se déplacer ni de sortir à l’extérieur pour
vérifier si quelqu’un a oublié de fermer la porte de garage.
Afin d’éliminer les risques de BLESSURES GRAVES ou de MORT découlant de
l’actionnement d’une porte de garage :
• Actionner la porte UNIQUEMENT lorsqu’elle est vue clairement, qu’elle est
bien réglée et que rien n’en gêne la course.
• TOUJOURS garder la porte de garage en vue jusqu’à ce qu’elle soit
complètement fermée. Ne JAMAIS laisser personne croiser le chemin d’une
porte de garage qui se ferme.
WARNING
CAUTION
WARNING
WARNING
AVERTISSEMENT
AVERTISSEMENT AVERTISSEMENT
REMARQUE : Puisque les dispositifs de la radiocommande sont
fondamentalement sujets au brouillage RF, ce produit ne devrait PAS
être utilisé à titre de dispositif de sécurité autonome. Ce produit est
UNIQUEMENT considéré comme un dispositif de surveillance et
d’avertissement, et à ce titre, ne devrait pas remplacer un système de
sécurité spécialisé pour le domicile.
Afin de s’assurer que le système de détection d’ouverture de porte de
garage demeure fonctionnel, les vérifications suivantes devraient être
effectuées chaque mois :
• Vérifier que l’émetteur soit monté correctement sur la porte de garage
(consulter la section Montage de l’émetteur du manuel).
• S’assurer que la pile au lithium de 3 volts soit installée correctement.
• Vérifier si le système du récepteur est branché dans une prise murale
et si la prise est branchée correctement à l’arrière du récepteur.
S’assurer que l’antenne soit droite et qu’elle ne touche aucun objet de
métal.
• Vérifier que le récepteur reconnaisse sans ambiguïté les signaux de
l’émetteur (consulter la section Dépannage du présent manuel).
INSTALLATION DE LA PILE DANS l’ÉMETTEUR DE
DÉTECTION D’OUVERTURE DE PORTE DE GARAGE
1. Poser la lame d’un tournevis sur la
languette à l’extrémité du boîtier et
appuyer légèrement vers le bas et vers
l’intérieur du boîtier.
2. Insérer la pile au lithium dans la pince de
pile avec le côté positif (+) vers le haut.
3. Refermer le boîtier solidement en insérant
les crochets supérieurs à l’intérieur du
couvercle arrière, puis fermer d’un coup
sec le fond du boîtier.
REMARQUE : Il est normal d’entendre un
cliquetis provenant de l’interrupteur à bascule
de l’émetteur lorsque ce dernier est penché ou
tourné dans une autre position.
INSTALLATION DU RÉCEPTEUR
INTÉRIEUR
1. Brancher l’adaptateur c.a. dans
n’importe quelle prise de
courant murale standard c.a.
de 110 volts et la petite fiche à
l’arrière du récepteur intérieur.
2. Le récepteur est muni d’un fil
d’antenne de 9 po qui sort de
l’arrière. L’antenne doit être
droite sans toucher le métal.
3
V
O
L
T
S
Système de détection
d’ouverture de porte de garage
Modèlès 915LMC • 916LMC • 2C507-2
CLOSED
OPEN
Récepteur Intérieur
Adaptateur c.a.
Émetteur
CR2032
3 VOLTS
Pile au Lithium
(type CR2032) Velcro à Double Face
SYSTÈME DE DÉTECTION D’OUVERTURE
DE PORTE DE GARAGE
C
L
O
S
E
D
O
P
E
N
Antenne
Emplacement de
l'adaptateur c.a.
Bouton
LEARN
Velcro à Double Face
Extrémité Ronde
Vers le bas
Intérieur du Garage
Page 4

FONCTIONNEMENT DU SYSTÈME DE DÉTECTION
D’OUVERTURE DE PORTE DE GARAGE
Lorsque le récepteur est sous tension, les indicateurs DEL rouge et vert
clignoteront une fois. Le voyant DEL du récepteur émettra alors une
lumière verte continue jusqu’à réception d’un signal d’un tranmetteur
programmé. Le récepteur affichera l’état courant de l’émetteur
programmé de la porte. Si aucun émetteur de porte n’est programmé
au récepteur, les indicateurs DEL vert et rouge clignoteront
simultanément. Voir la section Mémorisation du détecteur.
L’émetteur envoie un signal de fermeture lorsque la porte de garage est
fermée (position verticale) et un signal d’ouverture alors que l’émetteur
est modifié à la position ouverte (horizontale).
Jusqu’à 4 émetteurs montés sur la porte fonctionneront conjointement
avec un récepteur.
L’indicateur DEL rouge clignotera une fois à chaque demi-seconde si
l’un ou plusieurs des émetteurs programmés n’est pas en position
fermée. L’indicateur DEL vert se stabilise seulement lorsque tous les
émetteurs programmés sont en position fermée.
REMARQUE : Le système prend parfois quelques minutes pour
transmettre un signal. Le récepteur est mis à jour par l’émetteur
qui lui envoie un signal « ouvert » ou « fermé » toutes les
quelques minutes.
MÉMORISATION DE PLUS D’UN
ÉMETTEUR
1. La porte doit être fermée et l’indicateur DEL
vert constamment allumé.
2. Enfoncer et retenir le bouton LEARN pour 2
secondes, puis le récepteur se mettra en
mode de mémorisation. L’indicateur DEL vert
clignotera par intervalles d’une 1/2 seconde.
3. Les émetteurs supplémentaires doivent passer de la position
verticale à la position horizontale ou vice versa.
4. Les indicateurs DEL rouge et vert s’allumeront pour une (1)
seconde afin d’indiquer que la mémorisation est réussie. Le
récepteur quitte alors automatiquement le mode Mémorisation
et retourne au mode normal de fonctionnement.
5. Si aucun signal n’est reçu en 30 secondes, le récepteur quitte
le mode Mémorisation et retourne au mode normal de
fonctionnement.
EFFACER LA MÉMOIRE
1. Débrancher la petite fiche de l’adaptateur c.a. sur le récepteur
intérieur.
2. S’assurer que l’adaptateur c.a. est branché dans la prise murale.
3. Afin d’effacer la mémoire de tous les émetteurs programmés :
appuyer et retenir le bouton LEARN tout en branchant la petite fiche
dans l’adaptateur c.a. du récepteur intérieur.
4. Les indicateurs DEL rouge et vert clignoteront simultanément. Ceci
indique aussi qu’aucun émetteur n’est enregistré en mémoire.
5. Passer à l’étape 2 intitulée Mémoriser Plus d’un Émetteur afin de
programmer l’émetteur au récepteur.
DÉPANNAGE
La pile de l’émetteur doit être remplacée à chaque année afin d’en
assurer le bon fonctionnement. Le clignotement des indicateurs DEL
rouge et vert dans une séquence particulière indique habituellement un
fonctionnement discontinu ou une pile à plat.
Perte de signal : L’émetteur transmet un signal périodique afin de
synchroniser le récepteur. Si le récepteur ne reçoit pas le signal dans
environ 20 minutes, les indicateurs DEL rouge et vert
clignoteront de la façon suivante : l’indicateur DEL vert clignotera une
fois, puis le rouge d’une à quatre fois selon le numéro de l’émetteur.
Cela indique que le récepteur n’a pas reçu de signal de cet émetteur
depuis plus de 20 minutes et qu’il doit être vérifié.
Si le remplacement de la pile ne règle pas la situation, déplacer le
récepteur dans le garage pour un dépannage supplémentaire. Si le
détecteur fonctionne bien lorsqu’il est à proximité, le signal de
l’émetteur est alors bloqué ou en interférence à l’emplacement
précédent et peut exiger d’être placé dans une pièce située plus près
de la porte de garage.
Moniteur de Porte de Garage venant d’être installé :
L’ensemble transmetteur et récepteur est encodé à l’usine avant
l’expédition et devrait fonctionner dès qu’il est déballé. Au cas où, après
un bon fonctionnement initial du transmetteur et du récepteur, vous
constateriez une perte de signal au bout de 20 minutes, il est possible
que la mémoire du récepteur contienne un code d’usine
supplémentaire. En ce cas le récepteur apparaîtra insensible au
transmetteur, et vous aurez à prendre les mesures suivantes :
1. Débarassez la mémoire du récepteur – Voyez la section Effacer ou
Débarrasser la Mémoire. La mémoire étant débarrassée, le
récepteur se met en marche et ses DELs clignotent simultanément
en vert et rouge – indiquant que le mémoire est vide.
2. Allez à la phase 2 du chapitre Plus qu’un seul transmetteur. Notez
que la procédure est la même pour apprendre à se servir d’un seul
transmetteur ou de plusieurs transmetteurs.
Si la perte de signaux persiste dans le récepteur à la suite de la
procédure ci-dessus, c’es t que le récepteur est à une trop grande
distance du transmetteur. Placez le récepteur plus près du
transmetteur.
Défaillance soudaine du Moniteur de la Porte de Garage après un
bon fonctionnement :
La pile du transmetteur est basse. Remplacez la pile.
ACCESSOIRES FACULTATIFS
Il est possible de se procurer des émetteurs additionnels s’il y a plus
d’une porte de garage. Le récepteur est en mesure de mémoriser
jusqu’à 4 émetteurs et l’indicateur rouge clignotera si n’importe laquelle
des portes est ouverte.
ARTICLE NO PIÈCE
Émetteur 916LMC
Récepteur intérieur 2C507-2
Adaptateur c.a. 12 volts 2C508-2
Spécifications :
Émetteur
Pile : Type lithim 2032. Durée 1 an
Température : -18°F à 140°F (-25°C à 60°C)
Codes : 254 codes programmés de
façon aléatoire
Récepteur
Alimentation : 12 volts CC, 50 mA
Température : 14°F à 122°F (-10°C à 50°C)
Codes : mémorise les codes d’un maximum
de 4 émetteurs
POUR LE SERVICE, COMPOSER NOTRE NUMÉRO :
1-800-654-4736
AVIS : Les règles de la FCC ou d’Industrie Canada (IC), ou les deux, interdisent tout ajustement ou
toute modification de ce récepteur et/ou de cet émetteur, sauf pour modifier le code ou pour
remplacer la pile. IL N’EXISTE AUCUNE AUTRE PIÈCE SUSCEPTIBLE D’ÊTRE ENTRETENUE PAR
L’UTILISATEUR.
Vérifié pour conformité avec les normes de la FCC POUR UTILISATION À LA MAISON OU AU
BUREAU. L’utilisation est sujette aux deux conditions ci-après : (1) ce dispositif ne peut causer
des interférences nuisibles, et (2) ce dispositif doit accepter toute interférence reçue, y compris
une interférence pouvant causer un fonctionnement non désiré.
© 2003, Chamberlain Group Inc.
114A2711C Tous droits réservés
Enfoncer et
Retenir le
Bouton
LEARN.
 Loading...