

Page 1

Treadmill Desk
Owner’s Manual for models:
TR800-DT5
TR1200-DT5
TR5000-DT5
1
Page 2

Welcome to LifeSpan Workplace!
Congratulations on stepping into the growing movement of workplace activity.
You’re joining an enthusiastic community, one that’s dedicated to a gentle pace
towards better living and more productive work environments.
You’ve picked the right partner. LifeSpan is the originator of active workstations
and the global leader in safe and ecient workplace motion. We trust our mission
will directly benet your own, a task we don’t take sitting down. With our companywide dedication to quality and reliability, we’re certain you’ll be satised with your
newfound health.
Before you assemble or operate your product, please read this manual thoroughly.
Important information regarding safety precautions, product maintenance,
assembly instructions, and proper operation are included.
If you need to contact LifeSpan customer service, please visit the customer service
section of www.LifeSpanFitness.com. Submitted service requests will be responded
to within one business day. Consumers in the United States and Canada can also
dial (877) 654-3837, option 4.
We recommend you take a personal approach to adding movement to your day.
Begin slowly, gently increasing your activity in a way that is both comfortable and
enjoyable. We have a wealth of helpful information available on our website, feel
free to use us as a resource as you utilize your new product. We’d love to share our
strategies and provide you with proven methods for success.
Neither LifeSpan nor its representatives can accept responsibility for any damages or injury incurred as a
Please thoroughly read this manual before you assemble or operate your treadmill.
result of information presented in this manual except under the terms of the product warranty.
3
Page 3

Contents
Getting Started
Warranty
Registration
Safety First
Children & Pets
Safety Tips While in Use
Treadmill Base
8
About Your Treadmill Base
Specications
Proper Grounding
Power Cord Options
Maintenance and Tips
Daily Cleaning
Monthly Cleaning
Safety and Integrity
Belt Lubrication
Belt Tensioning
Belt Alignment
Moving the Treadmill
14
16
4
Page 4

DT5 Desk
Contents
Desk Assembly
Console Assembly
Final Connection
Treadmill to DT5 Desk Assembly
Leveling and Height Adjustment
Treadmill Desk Operations
Specications
Setting the Clock
Starting the Treadmill Desk
Console Buttons
Preset Speed Button
Bluetooth Operation
Innovative Features
Troubleshooting
Personal Settings
Display Details
22
32
36
37
39
5
Page 5

Getting Started
7
Page 6

Getting Started
Warranty
Your LifeSpan treadmill desk comes with the following limited warranty valid in
North America. If you are outside of this area contact your local distributor for
warranty information or visit www.LifeSpanFitness.com.
Warranty Item
Frame
Motor
Parts
Labor
TR800-DT5
Lifetime
3 Years
1 Year
1 Year
TR1200-DT5
Lifetime
3 Years
2 Years
1 Year
TR5000-DT5
Lifetime
3 Years
2 Years
1 Year
LifeSpan warrants the equipment it manufactures is free from defects in
materials and workmanship under normal use and services. The periods above
are based on the date of purchase. During these periods, LifeSpan will repair
or replace any defective part. Free labor is included on all parts that are not
normally assembled or replaced by the customer within the labor period.
If within the time frames specied above, any part fails to operate properly,
login to our website at www.LifeSpanFitness.com, click on “Customer Service”
and complete the form to request assistance or call 877.654.3837 option 4 for a
Customer Service Agent (please note that certain kinds of service should only
be performed by a qualied service technician).
LifeSpan reserves the right to make changes and improvements to our products
without incurring any obligations to similarly alter any product purchased.
In order to insure our product warranty and to ensure the safe and ecient
operation of your LifeSpan product, only authorized parts can be used. The
warranty is void if any parts other than those provided by LifeSpan are used.
Exclusions and Limitations:
• This warranty does not apply to any defects caused by negligence, misuse,
improper assembly, or maintenance, accident, or “act of God.”
• This warranty does not apply to discoloration of paints or plastics.
• LifeSpan shall not be responsible for incidental or consequential damages.
• This warranty is non-transferable from the original owner.
Registration
Should you need to process a warranty claim make sure you retain your
purchase receipt to verify the date of purchase and register your LifeSpan
product online. To complete the registration go to www.LifeSpanFitness.com
and select “Product Registration”.
8
Page 7

Getting Started
Safety First
When using active workstations, basic precautions should always be followed,
including:
• Never drop or insert any object into any opening. If an object falls into an
opening, turn the power o and unplug the power cord from the outlet.
Remove the object or call customer service at 877.654.3837 option 4.
• Never operate this treadmill if it has been damaged or partially
submersed in water.
• To reduce the risk of electric shock, unplug the treadmill from the wall
outlet when not in use, before performing any maintenance, or before
moving the treadmill.
• Do not use outdoors or in areas of high humidity or extreme temperature
changes.
• Do not operate where aerosol spray products are being used or where
oxygen is being administered.
• Never place the power cord under carpeting or place any object on top
of the cord, this may pinch or damage the cord causing re damage or
personal injury.
• Use this product for its intended use as described in this Owner’s Manual.
Do not use attachments that are not recommended by LifeSpan.
• Do not leave your treadmill running while not in use.
Children and Pets
• Keep children from playing on your treadmill at all times.
• When in use children and pets should be kept at least 10 feet (3m) away.
• This treadmill should only be used by those 12 years of age and older.
Users, especially those with known health conditions, should consult a
physician prior to beginning an activity program..
• Cleaning and user maintenance shall not be made by children without
supervision.
9
Page 8
Getting Started
Safety Tips While in Use
• Always consult a physician before beginning an exercise program.
• If you experience chest pains, nausea, dizziness or shortness of
breath, stop exercising immediately and consult your physician before
continuing. Do not wear clothing or jewelry that might catch on any
part of the treadmill.
• Wear shoes with high traction rubber soles. Do not wear shoes with
heels, leather soles, cleats or spikes.
• Do not walk or run backwards on the treadmill, always face forward.
• Allow the running belt to fully stop prior to getting o the treadmill.
• Make sure the area behind the treadmill remains completely clear
during use. A minimum of 3 feet (1m) of clearance is required for safety
reasons. There should be a minimum of 2 ft. (.6 m) on at least one side of
the treadmill.
Safety Clearance
10
Min. 3 Ft.
(.9 m)
Note: Read all instructions and save for future reference.
Min. 2 Ft.
(.6 m)
Page 9

Treadmill Base
13
Page 10

About Your Treadmill Base
Specications
TR800B
Speed Range 0.4 - 4.0 mph (0.6 - 6.4 kph)
Walking Belt Size 18" x 45" (45.7 cm x 111.7 cm)
Roller Size Tapered Front 2.4” (6 cm), Rear 2.0” (5 cm)
Deck 3/4" (1.9 cm) Phenolic Deck
Deck Suspension 6 Independent Compression Shocks
Drive Motor 2.0 HP Continuous Duty DC
Max User Weight 300 lbs. (136 kg)
Dimensions 60.5” L x 26” W (153.6 cm x 66 cm)
TR1200B
Speed Range 0.4 - 4.0 mph (0.6 - 6.4 kph)
Walking Belt Size 20" x 50" (51 cm x 127 cm)
Roller Size Tapered Front 2.4” (6 cm), Rear 2.0” (5 cm)
Deck 3/4" (1.9 cm) Phenolic Deck
Deck Suspension 6 Independent Compression Shocks
Drive Motor 2.25 HP Continuous Duty DC
Max User Weight 350 lbs. (159 kg)
Dimensions 64” L x 29” W (160 cm x 73.7 cm)
TR5000B
Speed Range 0.4 - 4.0 mph (0.6 - 6.4 kph)
Walking Belt Size 20" x 50" (51 cm x 127 cm)
Roller Size Tapered Front 2.4” (6 cm), Rear 2.0” (5 cm)
Deck 1" (2.5 cm) Phenolic Deck
Deck Suspension 6 Independent Compression Shocks
Drive Motor 3.0 HP Continuous Duty DC
Max User Weight 400 lbs. (182 kg)
Dimensions 64” L x 29” W (160 cm x 73.7 cm)
14
Page 11
About Your Treadmill Base
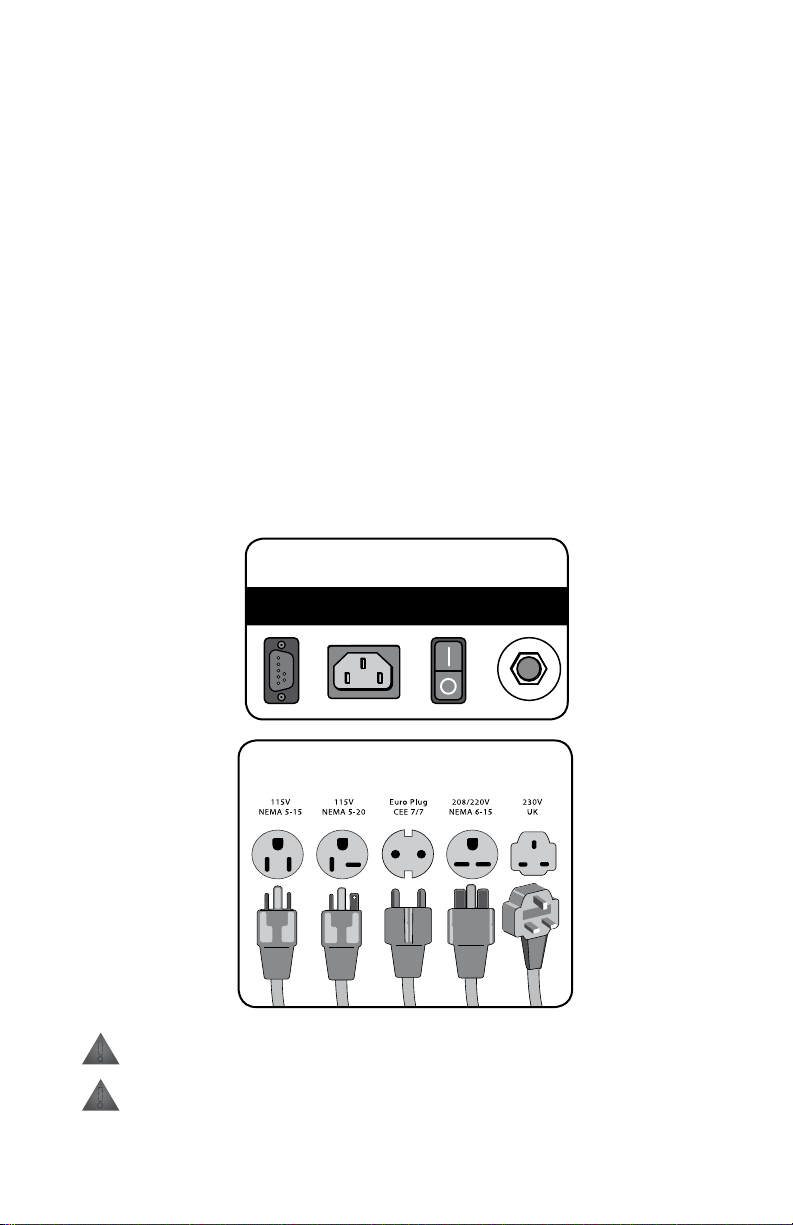
C
I
R
C
U
I
T
B
R
E
A
K
E
R
POWER
SOCKET
DATA
PORT
SWITCH
AC POWER
OVERLOAD
SWITCH
Treadmill Outlet
P
R
E
S
S
T
O
R
E
S
E
T
Power Cord Options
Proper Grounding
LifeSpan equipment must be grounded. Improper connection of the
equipment’s grounding conductor can result in the risk of electric shock.
Check with a qualied electrician or service person if you are in doubt as to
whether the outlet is properly grounded. Do not modify the plug provided
with the product or use a ground plug adapter to adapt to a non-grounded
outlet. If the plug will not t in the outlet, have the proper outlet installed by a
qualied electrician.
Power Cord Options
This treadmill should only be used with the proper power cord and power
outlet. Several power cord options (shown below) are available from LifeSpan.
We do our best to include the correct power cord with the treadmill for your
area. In the event that the correct power cord is not included in the packaging
please contact your local distributor.
!
!
Do not use extension cords between the treadmill and power outlet.
Do not plug into a GFI outlet or circuit as it may trip the breaker.
15
Page 12

Maintenance and Tips
Daily Cleaning
It is recommended to wipe the treadmill down after each use to keep the
treadmill clean and dry. A mild detergent may be used at times to help
remove all dirt and salt from the belt, painted parts and the display.
Monthly Cleaning
This cleaning includes removing the motor cover and cleaning around the
motor and electronics. It is recommended to clean the motor compartment if
the treadmill is in an area where there might be plush carpet bers that could
get pulled up into the motor compartment. It is a good idea at this time to
tighten all assembly hardware and check power cord for damage, or anything
else that would indicate the need for service.
Safety and Integrity
The safety and integrity designed into the machine can only be maintained
when the treadmill is regularly examined for damage and repaired. Worn
or damaged components shall be replaced immediately or the treadmill
be removed from service until the repair is made. Pay special attention to
components most susceptible to wear.
!
WARNING: Keep treadmill stable on at ground.
!
WARNING: Unplug the power cord before removing the motor cover.
IMPORTANT: If service is required, turn the power o and remove the
power cord to ensure the unit cannot be used. Let all other users know
the treadmill needs service.
CAUTION: Acidic cleaning detergents may damage painted or powder
coated surfaces and should not be used. Such cleaners may void the
LifeSpan warranty.
16
Page 13
Maintenance and Tips
Belt Lubrication
Use only 100% silicone and avoid using aerosol silicone sprays which include
additives and petroleum distillates. One ounce of silicone should be used for
each application. LifeSpan oers 100% silicone lubricant that can be ordered
at www.LifeSpanFitness.com.
The walking belt comes pre-lubricated from the factory. The TR800B and
TR1200B should be lubricated every 50 hours of use. The TR5000B comes with
a maintenance free belt and doesn’t require lubrication.
To lubricate, unplug your TR800B and TR1200B. Slide your hand under the
belt and lift the belt away from the deck. Apply about a dozen sprays toward
the center of the belt from each side. Rotate the belt 1/3 and repeat this
application. Rotate another 1/3 and repeat once more. Plug the treadmill in
and walk for a few minutes to disperse lube evenly.
NOTE: When lubricating the belt, make sure the treadmill is on a surface
that can be easily cleaned. After lubricating clean any excess silicone o
the walking surface of the belt and side rails.
For a full video demonstration on lubricating your treadmill go to
https://www.lifespantness.com/tness/accessories/silicone-treadmill-belt-lubricant
17
Page 14

Maintenance and Tips
Belt Tensioning
If the belt begins to slip and needs to be tensioned, tension bolts are
accessible from the back of the treadmill. Before tensioning the belt, start the
treadmill and set the speed to 3 mph (5 kph).
A. Using a 6 mm Allen wrench, included in your hardware bag, turn the
right and left tension bolts 1/2 turn clockwise.
B. Test to see if the slipping is eliminated. If the belt slips repeat step A and
test again.
Note: Adjusting one side more than the other will cause the belt to
drift to the side of the treadmill and will require belt alignment. Check
to be sure the running belt is still aligned. If belt alignment is o as
shown below, refer to Belt Alignment section.
Turn both
Clockwise
to Tighten belt
Turn both
Counter-clockwise
to Loosen belt
CAUTION: DO NOT tighten more than 2 full turns on each side.
Over tensioning the belt can cause unnecessary friction and wear
and tear on the belt, motor and electronics.
Belt Alignment
A. Press Start, then increase the treadmill speed to 3 mph (5 kph).
B. Stand behind the treadmill to see which way the belt is drifting.
C. If the belt drifts to the left, turn the left adjustment bolt 1/4 turn
clockwise and the right adjustment bolt 1/4 turn counter-clockwise.
(See FIG. 1)
D. If the belt drifts to the right, turn the left adjustment bolt 1/4 turn
counter-clockwise and the right adjustment bolt 1/4 turn clockwise.
(See FIG. 2)
E. Observe the alignment for two minutes. Repeat steps A-D as needed.
18
Page 15

Belt Alignment (continued)
Maintenance and Tips
To move belt to the Right
Figure 1
To move belt to the Left
Figure 2
Visit https://www.lifespantness.com/support/frequently-asked-questions for
a full video demonstration on the aligning your treadmill belt.
Moving the Treadmill
1. Make sure the ON/OFF switch is turned OFF. Unplug the power cord and
data cable from the treadmill.
2. Make sure nothing is on or near your treadmill which might spill, be
knocked o, or prevent the treadmill from moving.
3. Place both hands under the support bar located under the back of the
walking belt to make sure you have a solid lifting point.
4. Lift the back of the treadmill and roll to the desired location.
CAUTION: When lifting, use proper safety precautions and lifting
techniques. Bend your knees and elbows, keep your back straight
and lift evenly with both arms.
1919
Page 16

Desk
DT5
21
Page 17

Desk Assembly
At LifeSpan we strive to make our equipment easy to assemble and use.
Prior to starting the assembly process, take all the parts out of the box,
remove plastic bags, and lay everything out on the oor to become familiar
with the components.
Since your desk is a heavy piece of equipment, it is recommended that you
use two people during assembly and follow these assembly instructions to
reduce any problems that may occur.
Desktop Ships Separately
8
11
5
3
1
9
10
11
4
2
7
22
6
Tool Bag - Contents
5mm Allen
Wrench
w/Phillips
4mm Allen
Wrench
13mm Open
Wrench
Page 18

Desk Assembly
Hardware Included
Item# Part Description Item# Part Description
1 Reinforcement Frame 8 Left Desk Support Bracket
2 Data Cable 9 Right Desk Support Bracket
3 Desktop 10 Cable Routing Ties
4 Right Leg 11 Height Adjustment Knob
5 Left Leg
6 Left Base Foot
7 Right Base Foot
Bag # Item # Qty. Part Description
1 11 2 Height Adjustment Knobs
2 12 6 M8 x 12L Screws/Washers
3 13 8 M8 x 55L Bolts/Washers
4 14 4 M8 x 70L Bolts/Washers/Nuts
5 15 8 M6 x 15L Screws/Washers
6 10 2 Cable Routing Ties
Adjustment
Knob (x2)
STEP 1 BAG
M8x70L (x4)
STEP 4 BAG
M8x12L (x6)
STEP 2 BAG
M6x15L Screw
(x8)
STEP 5 BAG
M8x55L (x8)
STEP 3 BAG
Cable Ties (x2)
STEP 6 BAG
23
Page 19

LLL
RRR
Desk Assembly
Step 1: Install the Height Adjustment Knobs onto the Right and Left Legs
LOCATE BAG LABELED 1
Contents: 2 each Height Adjustmemt Knobs
A. Install a Height Adjustment Knob(11) on both the Right Leg(4) and Left
Leg(5) being sure that the locking pin goes into one of the adjustment
holes in each leg.
B. Tighten the Height Adjustment Knobs. Be sure the Legs are adjusted to the
same height when installing the Height Adjustment Knobs.
NOTE: Make sure that the
Data Cable isn’t set hard
on the ground which
could damage the wire.
24
5
4
11
Adjustment
Knob (x2)
Page 20

RRR
RRR
Desk Assembly
Step 2: Attach Right and Left Side Bracket
LOCATE BAG LABELED 2
Contents: 6 each M8x12L Screws with Washers
A. Add the Right Desk Support Bracket(9) to the Right Leg(4). Each will have an
“RRR” sticker attached for easy identication.
B. Stand the Right Leg(4) shown in the illustration below and align the Right
Desk Support Bracket(9).
C. Attach Right Bracket to the Leg with the M8x12L Screws(12). Securely
tighten with the included 5mm Allen Wrench.
D. Repeat for the Left Desk Support Bracket(8) and Left Leg(5).
NOTE: Make sure that the
Data Cable isn’t set hard
on the ground which
could damage the wire.
4
5mm Allen
Wrench w/
Phillips
9
M8x12L (x6)
25
Page 21

RR R
RR R
RR R
R R R
Desk Assembly
Step 3: Attach Base Feet
LOCATE BAG
LABELED 3
Contents: 8 each M8x55L
Bolts with Washers
A. Align Right Base Foot(7)
labelled 'RRR" with the
Right Leg(4) and connect
the wires.
B. Push ALL extra wiring into
the Right Base Foot(7).
7
7
26
Page 22

C. Connect the Right Base
RR R
Foot(7) to the Right Leg(4)
with the four M8x55L Bolts
with Washers(13).
D. Be careful not to damage
wires inside the Right Base
Foot(7) while installing the
bolts.
E. Tighten the four bolts.
F. Tip the left post on its side.
G. Repeat the same procedure
on the left side.
Desk Assembly
7
4
5mm Allen
Wrench w/
Phillips
M8x55L (x8)
27
Page 23

RRR
RRR
Desk Assembly
Step 4: Attach the Desktop Reinforcement Frame to the Right and Left Legs
LOCATE BAG
LABELED 4
Contents: 4 each M8x70L
Bolts,Washers and Nuts
A. Align the Desktop
Reinforcement Frame(1)
with Right Leg(4). The
Desktop Mounting Flanges
should be facing up as
shown in illustration.
B. Carefully attach the
Desktop Reinforcement
Frame(1) to the Right
Leg(4) by loosely installing
the two M8 x 70L Bolts,
Washers, and Nuts(14) as
shown in the illustration.
Be sure that the wire
harness from the Leg and
the Reinforcement Frame
are routed out through the
space provided.
C. Connect the 7-pin wire
harness cables and
carefully tuck excess wire
into the Reinforcement
Frame(1).
D. Repeat Step B with Left
Leg(5).
Desktop
Mounting
Flanges
Step 4A
1
1
4
After Connecting
Wires Tuck Inside
Frame in Space
Provided
4
NOTE: Do not fully
tighten the four M8 x
70L bolts and nuts at this
time. Keeping them loose
will help with
the next step in the
assembly process.
28
Step 4B, 4C
13mm Open
Wrench
Connect the
wires
M8x70L (x4)
Page 24

Step 5: Attach the Leg Assembly to the Desktop
Desk Assembly
LOCATE BAG
LABELED 5
Contents: 8 each M6x15L
Screws with Washers
A. Lay the Desktop(3) on a clean non-
abrasive surface with the bottom side up.
B. Set the Leg Assembly on the bottom of
the Desktop as shown in the illustration.
C. Line up the holes in the Desk Support
Brackets with the mounting holes in the Desktop and loosely install the
M6 x 15L Screws(15) into each Desktop Support Bracket rst.
D. Install the remaining two M6 x 15L Screws(15) into the Desktop
Reinforcement Bracket.
E. Tighten all eight M6 x 15L Screws.
F. Tighten the four M8 x 70L Bolts, washers and nuts previously installed in
step 4 B & D.
NOTE:
Be sure to line
everything up
exactly as shown in
the illustration.
M6x15L Screw
(x8)
4mm
29
Page 25

Desk Assembly
Step 6: Install the Cable Routing Ties
LOCATE BAG LABELED 6
Contents: 2 each Cable Routing Ties
A. See illustration for placement of the two Cable Routing Ties(10).
B. Peel the paper backing o the Cable Tie and press the tie onto the
Desktop(3) in the locations shown in the illustration.
C. Run the cable through the Tie and press the two Cable Tie Halves together
30
10
Cable Ties (x2)
Page 26

Console Assembly
DT5 Console Box
Item # Qty. Part Description
18 1 DT5 Console
19 8 #8 x 5/8"L Screw
20 2 #8 x 1/2"L Screw
21 1 Wire Harness Cover
18
M4x15L
Screw
Wire Harness
Cover
M4x10L
Screw
32
Page 27
Step 1: Turn Upright
A. Use 2 people to lift and turn the desk upright.
Console Assembly
33
Page 28
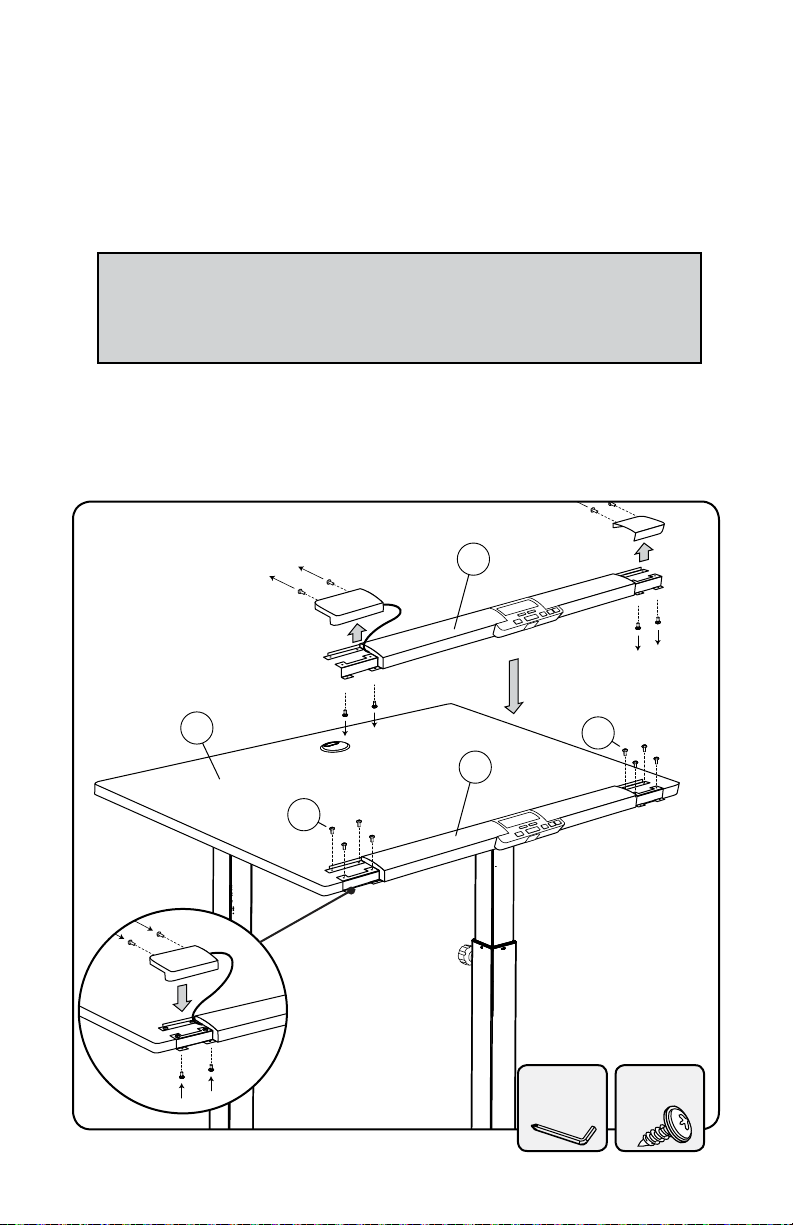
Console Assembly
18
18
19
19
3
Step 2: Console Assembly
A. Using the 5mm Allen Wrench with Screwdriver remove the two pre-
installed screws from the back and two screws from the bottom of each
console end cap so you can remove the end caps.
NOTE:
Notice the dierence in the screws from the back and bottom as
you will be replacing them back into their proper place
B. Center the Console(18) on the Desktop(3) and attach using eight #8 x 5/8"L
Screws(19).
C. Re-install the end caps with the pre-installed screws you removed in
Step A.
Step 3A: Remove End Caps
Back Screws
Step 3B:
Attach Console
Bottom Screws
Step 3C:
Re-install
End Caps
34
5mm Allen
Wrench w/
M4x15L
Screw
Phillips
Page 29

Console Assembly
D. Connect the Cable Connectors (E, F).
E. Attach the Console Wire Harness Cover(21) to the underside of the
Desktop(3) using two #8 x 1/2"L Screws(20). Tuck wire connections under
Cover.
18
21
Connect the
20
wires
E
F
NOTE:
Tuck excess
cable back into
Reinforcement Fame
35
Page 30

Final Connection
Treadmill to DT5 Desk Assembly
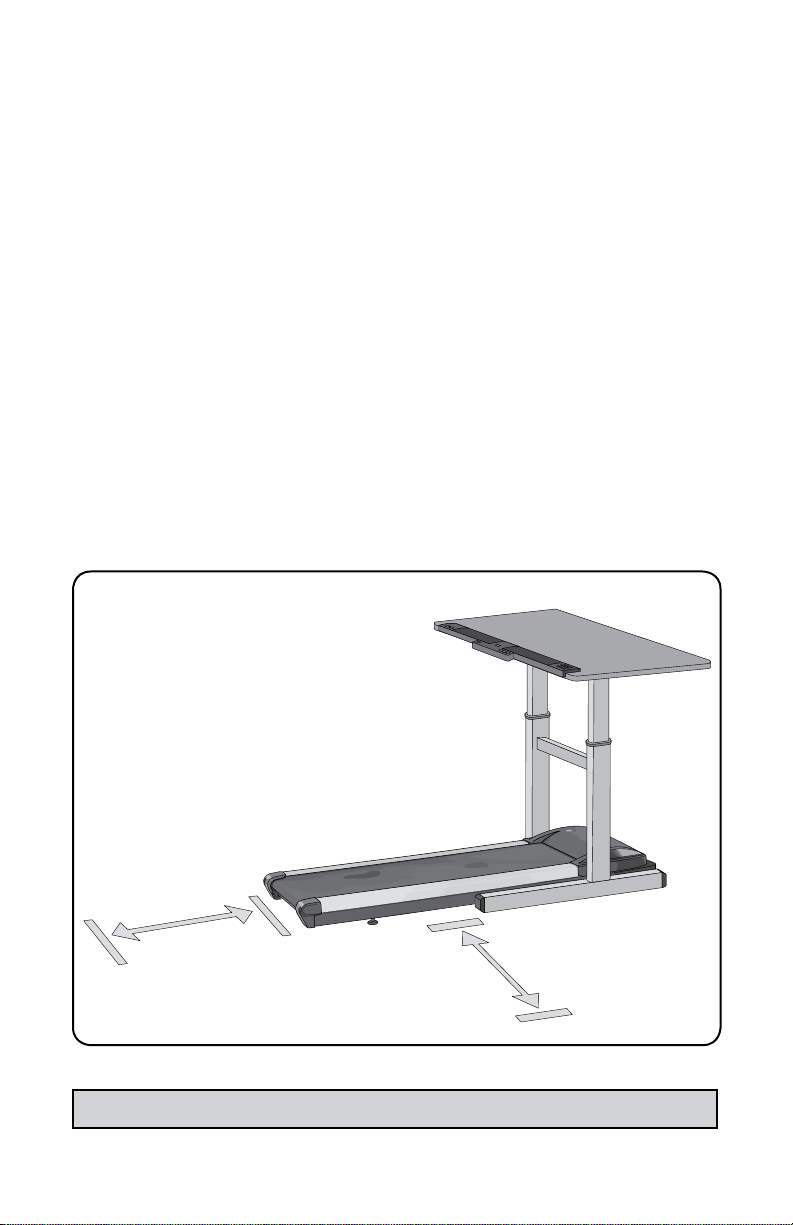
A. Position the pre-assembled treadmill as shown below.
B. Lift the rear of the treadmill and roll it forward under the desk until the
treadmill is in the desired position.
Roll Forward
Lift
Treadmill Connections
Desk D-Connector
9 Pin
Data Cable
7
Be sure all connectors
are plugged in prior to
connecting the power cord
Power Switch
2
Power Receptacle
Console Port
NOTE:
C. Connect the 9 Pin Data Cable(2) into the desk D-Connector on the Right
Base Foot(7) and treadmill Console Port and tighten the thumb screws.
D. Plug the Power Cord into the treadmill Power Receptacle and wall outlet.
F. Turn the treadmill Power Switch on.
36
Page 31

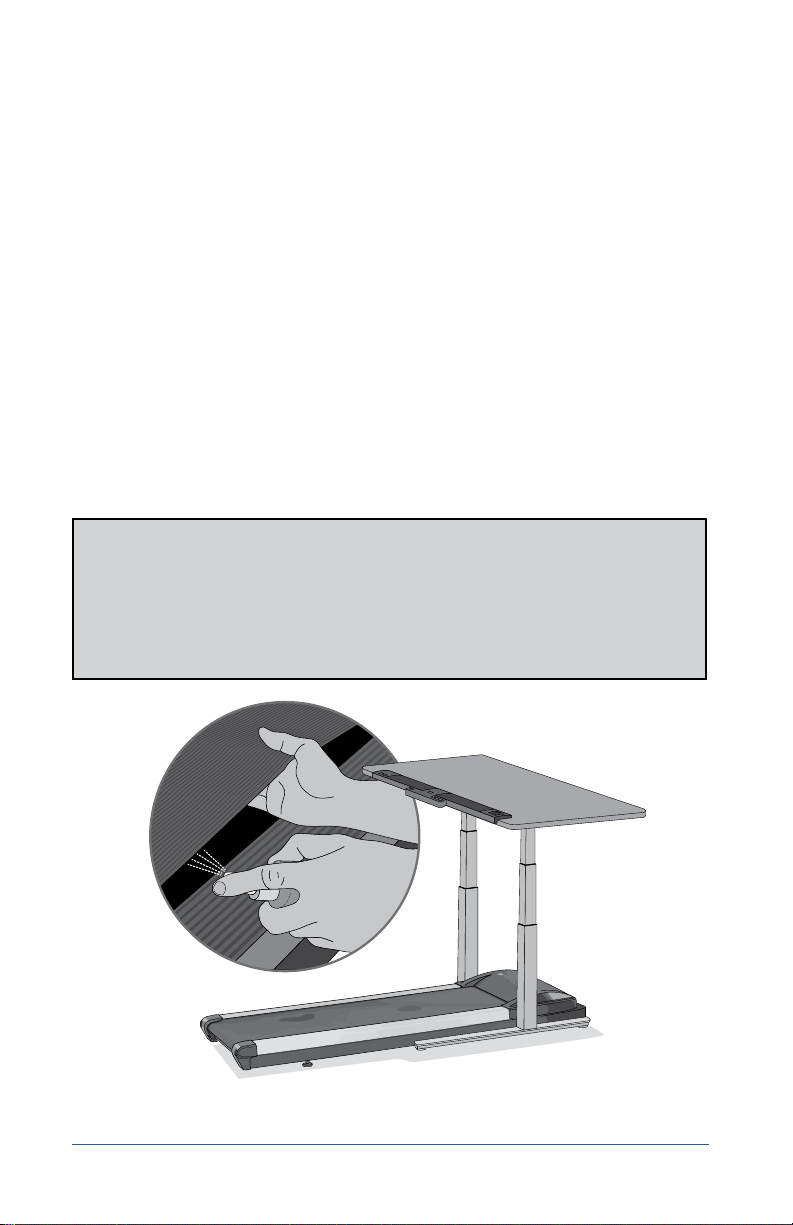
Desk Leveling
The desk needs to be leveled
prior to use. The desk comes
with four Adjustable Feet that
can be used to level the desk
and eliminate rocking. If the
desk is rocking on two of the
feet, adjust the necessary feet
until all four feet are sitting
securely on the oor.
Desk Height Adjustment
A. Loosen the Adjustment Knobs (A)
on each upright by turning it no
more than two turns counterclockwise.
B. While rmly holding each
side of the Desktop, pull both
Adjustment Knobs out and slowly
raise or lower the desktop.
C. Release the Adjustment Knob as
the desired level is reached. The
Adjustment Knob will click into
place.
D. Check to make sure the desk
height is set at the same level on
both sides. Turn the Adjustment
Knobs clockwise to lock in place.
Leveling and Height Adjustment
Desk Adjustment Feet
37
Page 32

Treadmill Desk
Operation
39
Page 33
Treadmill Desk Operations
Specications
CONSOLE
Readouts
Display
Bluetooth
Buttons
MECHANICS & PERFORMANCE
Speed Range
Dimensions
Desktop Height
Adjustment Range
User Height Range
DT5
Time, Steps, Calories,
Distance, Speed
White LED
Yes
Power, Start, Stop, Pre-Set Speed, Up/Down,
Change Display, Bluetooth
DT5
0.4 - 4.0 mph*
0.6 - 6.4 kph
Optional
38” w x 29” d in– (96.52” w x 73.66 d cm)
48” w x 29” d in – (120.65 w x 73.66 d cm)
Sizes:
33.5 in. to 52.5 in. with 1" Desktop
85.1 cm to a131.3 cm with 1" Desktop
Up to 6’5”
Up to 195 cm
Height Adjustment Method
Desktop Material
Desktop Surface
Maximum Load on Desktop
* Default setting is 2 mph. Can be changed to max speed of 4 mph/3.2 kph in personal settings
1” (2.54 cm) thick high-density
Manual
Composite Board
Durable Laminate
220 lbs
100 kg
40
Page 34

Treadmill Desk Operations
Setting the Clock
The console has a built-in clock that should be re-set to your time zone.
This will allow your exercise data to be recorded correctly. There are two ways
to set the time and date: through a smart phone or with the console keypad.
Smart Phone Automatic Adjustment
The clock will automatically adjust to the correct date and time if you use the
LifeSpan phone app when you sync your exercise results via Bluetooth. The
app can be downloaded in Google Play or the Apple iTunes store.
Console Keypad Manual Adjustment
Using the console keypad, follow these step-by-step instructions:
1. Press and hold Up and Down buttons together for one second.
2. Press the Change Display button once.
* The display will FLASH and is ready to adjust.
3. Use the Up and Down buttons to change the Month.
4. Press the Change Display again to save the Month and move to the next setting.
5. Continue this process to adjust Day, Year, Hour, and Minute.
Legend
Month
Day
Year
Hour
Minute
41
Page 35

Treadmill Desk Operations
Starting the Treadmill Desk
1. Turn the On/O toggle switch located on the front right corner of the
treadmill to the On position. If this is already On, press the On/O button
on the console.
2. Make sure the Safety Key is engaged in the console.
NOTE: The display will show "–––" if the Safety Key is not engaged.
Please make sure that the Safety Key is fully engaged. It is possible
the display will not show "–––" when just partially engaged.
3. Press the Start button to start the treadmill belt. The console will start
counting up from 0:00.
4. Press the Up/Down buttons to adjust speed, or use the Preset button to
go directly to your preferred speed (which defaults to 1.5 mph). See the
separate section on Preset, as well as the section on Settings, for more
details.
42
Page 36
Treadmill Desk Operations
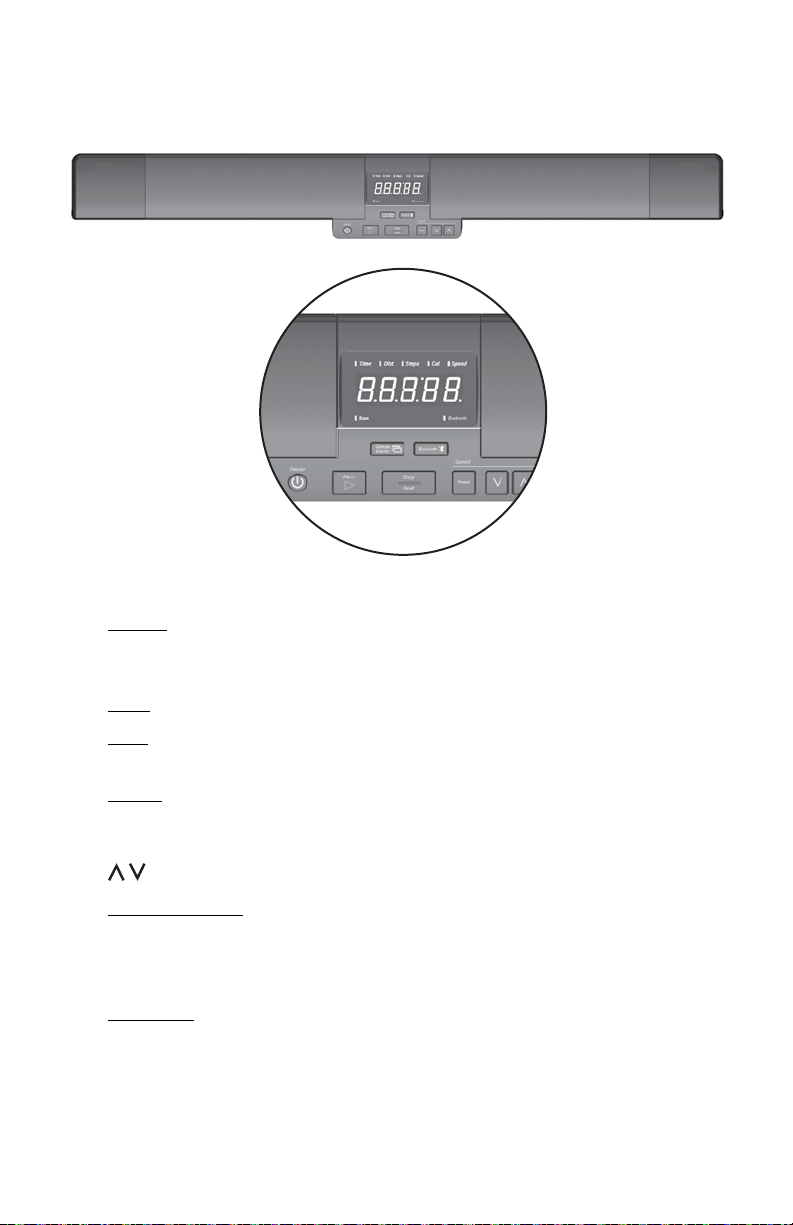
Console Buttons
1. On/O: Turns on the console. When pressed again, turns o the console;
the console must be in standby mode (displaying the current time) for
the power o function to work.
2. Start: Starts the treadmill belt. Performs other functions in Settings.
3. Stop: Stops the treadmill belt, Pausing your use. If pressed for one second,
resets the console (all data readouts are reset to zero).
4. Preset: When the treadmill belt is moving, changes the speed to 1.5
mph, or to a custom speed that is set in Settings. See separate section on
Preset, as well as the section on Settings.
5. : Increases or decreases speed by 0.1 mph.
6. Change Display: Changes the data readout between Time (the default),
Distance, Steps, Calories, and Speed. Press and hold for one second to
automatically change readouts every ve seconds; press again to stop
this automatic change.
7. Bluetooth: Turns on Bluetooth communications. Phone apps available
from LifeSpan can use this system to track your activity. See the Bluetooth
section for more details. You can change the function of this button in
Settings.
43
Page 37

Treadmill Desk Operations
Preset (Speed) Button
Out of the box, the Preset button activates 1.5 mph with a treadmill.
Change the speed or resistance in Personal Settings.
This feature may be disabled in Settings, setting Preset to OFF. Default is ON.
Bluetooth Operation
To sync your activity data with your LifeSpan app, launch the app, press the
Bluetooth button, and hold your phone a couple of inches from the console.
Syncing will take only a few seconds.
Innovative Features
Bluetooth – The Bluetooth communications system in this Workplace
Solutions console can send activity information to LifeSpan apps. Your phone
must be equipped with Bluetooth 4.0 or later, also known as Bluetooth Low
Energy. All iPhones and most Android phones have this.
Intelli-StepTM – LifeSpan treadmill desks come with Intelli-Step, our exclusive
step counting feature that senses each time your foot lands on the walking
belt, then counts your step total on the display console. If you’re in the habit
of counting daily steps, or want to incorporate a daily or weekly step count
goal, this feature will provide more accurate step counting than using a
smartwatch or other wearable step counting device. Accuracy does require
that the treadmill desk is able to detect your steps, and will be less accurate
for those who walk lightly including those individuals under 100 pounds
(45.5 KG).
Intelli-Guard™ - This unique safety feature is engaged when the treadmill belt
speed reaches 1.0 MPH (1.6 KPH) or faster and automatically pauses the belt
20 seconds after you stop walking, ensuring that no one else steps on the
treadmill desk without noticing that it's already running. When Intelli-Guard
senses that the treadmill is no longer being used, after 20 seconds the audible
beep will rst notify you that the treadmill belt is going to pause. This feature
can be controlled in Personal Settings.
44
Page 38

Treadmill Desk Operations
Personal Settings – there are several features that can be set using our
Personal Settings feature to tailor LifeSpan treadmill desks to your specic
preferences. These include:
• Maximum Speed: Select 2MPH (3.2KPH) or 4MPH (6.4 KPH)
maximum speed options.
• Intelli-Guard Selection: On / O setting
• Resume Speed: after pressing pause, then starting again, the default
belt speed will be 0.4 MPH (0.6 KPH), which is the normal starting
speed. The resume starting speed can be modied to be the
previous running speed.
In addition, the following features are applicable to both treadmill desk and
bike desk users.
• Audible Safety Beep: On / O setting. Each time the control buttons
on the console are depressed, an audible beep is used as an alert
that a change was made. This is designed to prevent accidental
speed adjustments being made without users being aware that they
may be accidentally depressing a button.
• Bluetooth Pairing: Manual or Automatic. The Bluetooth feature can
be set to automatically sync with your phone. If th desk is used by
more than one person, we suggest keeping it in manual mode and
only sync your results when the Bluetooth button is depressed.
• Metric versus Standard Readouts: Change the display readouts for
speed and distance to Metric or back to standard readouts.
Arm Rest – Foam padding on the front of the desk give you a comfortable
place to rest your arms and provide a location to hold onto the desk to keep
you located when actively engaged in other activities like walking meetings.
45
Page 39

Treadmill Desk Operations
Troubleshooting
The LifeSpan Treadmill Desk is designed and manufactured to be reliable and
easy to use. However, if you have a problem, these troubleshooting steps may
help you nd the cause.
Problem: The console is erratic or not lighting up.
Solution: Check to make sure the treadmill desk is properly plugged in.
Turn the power switch o and back on again and make sure the Safety Key
is in place. Make sure the connectors located in the front of the treadmill
and under the desktop are fully plugged in. If the problem persists contact
LifeSpan customer service.
Problem: The treadmill motor seems strained or E1 comes up after several
minutes of use.
Solution: The silicone lubricant that is applied to the deck and belt is wearing
down and the belt needs to be lubricated with 100% silicone spray (nonaerosol). Available at www.LifeSpanFitness.com.
Problem: The treadmill automatically pauses during a workout.
Solution: The treadmill is not picking up the step count. Go into the Personal
Settings section (page 34) to turn the Intelli-Guard feature o.
Problem: The treadmill speed doesn’t feel right (either too fast or too slow).
Solution: Go into the Personal Settings section (page 34) and check if you are
in Metric or English mode. If you are in the correct mode, contact LifeSpan
customer service.
Problem: “UART” appears in the display.
Solution: Turn the treadmill desk power switch o. Unplug and re-plug the
connections made in Step C on page 22. Make sure the thumb screws are
properly tightened. Turn the treadmill desk power back on and check to see if
it functions properly.
46
Page 40

Treadmill Desk Operations
Problem: “dc-6” appears in the display.
Solution: Turn the treadmill desk power switch o. Unplug and re-plug the
connections made in Step C on page 22. Make sure the thumb screws are
properly tightened. Turn the treadmill desk power back on and check to see if
it functions properly.
Problem: The console isn’t connecting to the app via Bluetooth.
Solution: Go to lifespantness.com/support, and click to the Apps section of
FAQs.
If further assistance is needed, contact LifeSpan Customer Service.
Problem: The desktop surface is not level.
Solution: Check to make sure the base feet are on a level surface. Make sure
the manual height adjustment knobs are in the same location holes on each
leg.
Problem: The treadmill belt is beginning to slip and needs to be tensioned.
Solution: Refer to the owners manual included with the treadmill base.
Problem: The treadmill belt is beginning to drift to the left or right and
needs to be aligned.
Solution: Refer to the owners manual included with the treadmill base.
47
Page 41

Treadmill Desk Operations
Personal Settings
Press and hold Change Display for one second to enter Settings mode.
Press the up or down arrows to move through the various settings. Press Start
to choose a setting to change.
Press the up or down arrows to move through the various choices for that
setting.
Press Start to select a choice. This takes you back to settings mode, where you
can move through the other settings.
Press Stop to exit Settings mode.
Intelli-Guard — Intelli-Guard ON/OFF.
Speed Reset — Controls whether, after a Pause, the treadmill resumes the
most recent walking speed, or resets to 0.4 mph. If ON, the speed resets to 0.4
mph.
Beep — Turns o the normal treadmill beep that happens at every button
press.
Speed Limit — The maximum speed of the treadmill.
Pre Set — Turns on and o the Preset feature. Turning this o is desirable in a
group environment.
Preset Speed — Changes the preset speed from something other than the
default of 1.5.
Weight — Changes the default bodyweight from something other than the
default of 150 pounds / 70 kilograms.
Units of measure — Choose English (Imperial) or Metric.
Multi-User — Choose yes if more than one person will be using the
treadmill desk.
Bluetooth-Auto — Choose whether to automatically pair.
Sleep Function — Choose whether the console has a Sleep, or Auto-Power-
O function when the console is paused. The default function is No Sleep. If
you choose to enable the Sleep function, you can choose to wait 10 minutes
before sleep, or 20 minutes.
48
Page 42

Display Details
Treadmill Desk Operations
Setting
Enter Settings
mode:
Intelli-Guard GUARD ON OFF
Speed Reset: RESET OFF ON
Beep: BEEP ON OFF
Speed Limit: L 2 4
Pre Set: SET ON OFF
Preset Speed SPEED 1.5 +/- 0.1
User Weight: T 150/70 +/- 1
Units of measure: UNITS ENGL (M)TRIC
Setting
Displayed
SET TG n/a n/a
Choice 1
(Default)
Choice 2
Multi-User: USER NO YES
Bluetooth-Auto: BT-A OFF ON
Sleep SLEEP NO 10/20
49
Page 43

LifeSpan Fitness
785 West 1700 South Suite 1
Salt Lake City, UT. 84104
Phone: 877.654.3837
www.LifeSpanFitness.com
TR800B/TR1200B/TR5000B – DT5
TR800B/1200B/5000B Version 1.3
DT5 Version 1.0 Feb 2017
Treadmill Base – Treadmill Desk
 Loading...