

Life Fitness M051-00K70-B030 User Manual

Plat inum Club Ser ies Treadmil l 15”
C onsole
operation manual

1
M051-00K70-B030
12/07
C
ORPORATE HEADQUARTERS
5100 North River Road
Schiller Park, Illinois 60176 • U.S.A.
847.288.3300 • FAX: 847.288.3703
800.735.3867 (Toll-free within U.S.A., Canada)
INTERNATIONAL
O
FFICES
AMERICA’S
North America
Life Fitness Inc.
5100 N River Road
Schiller Park, IL 60176 U.S.A
Telephone: (847) 288 3300
Fax: (847) 288 3703
Service Email: internationalservicesupport@lifefitness.com
Sales/Marketing Email: commercialsales@lifefitness.com
Operating Hours: 7:00 am-6:00 pm (CST)
Brazil
Life Fitness Do Brazil
Av. Dr. Dib Sauaia Neto 1478
Alphaville, Barueri, SP
06465-140
BRAZIL
Telephone: (800) 773 8282
Fax: (+55) 11.4133.2893
Service Email: suporte@lifefitness.com.br
Sales/Marketing Email: lifefitness@lifefitness.com.br
Operating Hours: 8:30 am-17:30 pm (BRT)
Latin America & Caribbean*
Life Fitness Inc.
5100 N River Road
Schiller Park, IL 60176 U.S.A
Telephone: (847) 288 3300
Fax: (847) 288 3703
Service Email: internationalservicesupport@lifefitness.com
Sales/Marketing Email:commercialsales@lifefitness.com
Operating Hours: 8:00am-5:00pm (CST)
E
UROPE, MIDDLE EAST, &AFRICA
(EMEA)
Netherlands & Luxemburg
Life Fitness Atlantic BV
Bijdorpplein 25-31
2992 LB Barendrecht
THE NETHERLANDS
Telephone: (+31) 180 646 666
Fax: (+31) 180 646 699
Service Email: service.benelux@lifefitness.com
Sales/Marketing Email:marketing.benelux@lifefitness.com
Operating Hours: 9.00h-17.00h (CET)
United Kingdom & Ireland
Life Fitness UK LTD
Queen Adelaide
Ely, Cambs, CB7 4UB
Telephone: General Office (+44) 1353.666017 Customer
Support (+44) 1353.665507
Fax: (+44) 1353.666018
Service Email: uk.support@lifefitness.com
Sales/Marketing Email: life@lifefitness.com
Operating Hours:
General Office: 9.00am - 5.00pm (GMT)
Customer Support: 8.30am - 5.00pm (GMT)
Germany & Switzerland
Life Fitness Europe GMBH
Siemensstrasse 3
85716 Unterschleissheim
GERMANY
Telephone: (+49) 89.31 77 51.0 (Germany)
(+41) 0848 000 901 (Switzerland)
Fax: (+49) 89.31 77 51.99 (Germany)
(+41) 043 818 07 20 (Switzerland)
Service Email: kundendienst@lifefitness.com
Sales/Marketing Email: kundenberatung@lifefitness.com
Operating Hours: 9.00h-17.00h (CET)
Austria
Life Fitness Austria
Vertriebs G.m.b.H.
Dückegasse 7-9/3/36
1220 Vienna
AUSTRIA
Telephone: (+43) 1.61.57.198
Fax: (+43) 1.61.57.198.20
Service Email: kundendienst@lifefitness.com
Marketing/Sales Email: kundenberatung@lifefitness.com
Operating Hours: 9.00h-17.00h (CET)
Spain
Life Fitness IBERIA
C/Frederic Mompou 5,1º1ª
08960 Sant Just Desvern Barcelona
SPAIN
Telephone: (+34) 936 724 660
Fax: (+34) 936 724 670
Service Email: info.iberia@lifefitness.com
Sales/Marketing Email: info.iberia@lifefitness.com
Operating Hours:
9.00h-18.00h (Monday-Thursday)
8.30h-15.00h (Friday)
Italy
Life Fitness ITALIAS.R.L.
Via Crivellin 7/N
37010 Affi Verona
ITALY
Telephone: (+39) 045.7237811
Fax: (+39) 045.7238197
ServiceEmail: assistenzatecnica@lifefitness.com
Sales/Marketing Email: info@lifefitnessitalia.com
Operating Hours: 8.30h -18.00h (CET)
Belgium
Life Fitness Benelux NV
Parc Industrial de Petit-Rechain
4800 Verviers
BELGIUM
Telephone: (+32) 87 300 942
Fax: (+32) 87 300 943
Service Email: service.benelux@lifefitness.com
Sales/Marketing Email: marketing.benelux@lifefitness.com
Operating Hours: 9.00h -17.00h (CET)
All Other EMEA countries &
distributor business C-EMEA*
Bijdorpplein 25-31
2992 LB Barendrecht
THE NETHERLANDS
Telephone: (+31) 180 646 666
Fax: (+31) 180 646 699
Service Email: service.db.cemea@lifefitness.com
Sales/Marketing Email:
marketing.db.cemea@lifefitness.com
Operating Hours: 9.00h-17.00h(CET)
ASIA PACIFIC (AP)
Japan
Life Fitness Japan
Nippon Brunswick Bldg., #8F
5-27-7 Sendagaya
Shibuya-Ku, Tokyo
Japan 151-0051
Telephone: (+81) 3.3359.4309
Fax: (+81) 3.3359.4307
Service Email:
service@lifefitnessjapan.com
Sales/Marketing Email
sales@lifefitnessjapan.com
Operating Hours: 9.00h-17.00h (JAPAN)
China and Hong Kong
Life Fitness Asia Pacific LTD
Room 2610, Miramar Tower
132 Nathan Road
Tsimshatsui, Kowloon
HONG KONG
Telephone: (+852) 2891.6677
Fax: (+852) 2575.6001
Service Email: HongKongEnquiry@lifefitness.com
Sales/Marketing Email: ChinaEnquiry@lifefitness.com
Operating Hours: 9.00h-18.00h
All Other Asia Pacific countries &
distributor business Asia Pacific*
Room 2610, Miramar Tower
132 Nathan Road
Tsimshatsui, Kowloon
HONG KONG
Telephone: (+852) 2891.6677
Fax: (+852) 2575.6001
Service Email: HongKongEnquiry@lifefitness.com
Sales/Marketing Email: ChinaEnquiry@lifefitness.com
Operating Hours: 9.00h-18.00h

Before using this product, it is essential to read
this ENTIRE operation manual and ALL installation instructions.
It describes equipment setup and instructs
members on how to use it correctly and safely.
Avant d'utiliser ce produit, il est indispensable de lire ce manuel d'utilisation dans son INTÉGRALITÉ, ainsi que TOUTES
les instructions d'installations.
Ce manuel explique comment installer l'équipement et comment
l'utiliser correctement et sans danger.
Class HB (Home): Domestic use.
CAUTION: Any changes or modifications to this equipment could void the
product warranty.
Mise en garde : tout changement ou toute modification de ce matériel peut annuler la garantie du pro-
duit.
Any service, other than cleaning or user maintenance, must be performed by an authorized service representative.
There are no user serviceable parts.
2

3
TABLE OF
CONTENTS
Section Description Page
1. Getting Started . . . . . . . . . . . . . . . . . . . . . . . . . . . . . . . . . . . . . . . . . . . . . . . . . . . . . . . . . . . . . . . . .5
1.1 Important Safety Instructions . . . . . . . . . . . . . . . . . . . . . . . . . . . . . . . . . . . . . . . . . . . . . . . . . . . . . .5
2. The Display Console and Activity Zone . . . . . . . . . . . . . . . . . . . . . . . . . . . . . . . . . . . . . . . . . . . . . . .7
2.1 Display Console and Activity Zone Overview . . . . . . . . . . . . . . . . . . . . . . . . . . . . . . . . . . . . . . . . . .7
2.2 Display Console and Activity Zone Descriptions . . . . . . . . . . . . . . . . . . . . . . . . . . . . . . . . . . . . . . . .8
2.3 Reading Rack and Accessory Trays . . . . . . . . . . . . . . . . . . . . . . . . . . . . . . . . . . . . . . . . . . . . . . . .16
3. Heart Rate Zone Training®Exercise . . . . . . . . . . . . . . . . . . . . . . . . . . . . . . . . . . . . . . . . . . . . . . . .17
3.1 Why Heart Rate Zone Training Exercise? . . . . . . . . . . . . . . . . . . . . . . . . . . . . . . . . . . . . . . . . . . . .17
3.2 Heart Rate Monitoring . . . . . . . . . . . . . . . . . . . . . . . . . . . . . . . . . . . . . . . . . . . . . . . . . . . . . . . . . . .18
The Lifepulse
TM
System // The Optional Heart Rate Chest Strap
4. The Workouts . . . . . . . . . . . . . . . . . . . . . . . . . . . . . . . . . . . . . . . . . . . . . . . . . . . . . . . . . . . . . . . . .19
4.1 Workout Overviews . . . . . . . . . . . . . . . . . . . . . . . . . . . . . . . . . . . . . . . . . . . . . . . . . . . . . . . . . . . . .19
4.2 Using the Workouts . . . . . . . . . . . . . . . . . . . . . . . . . . . . . . . . . . . . . . . . . . . . . . . . . . . . . . . . . . . . .21
Beginning a Workout // Selecting a Workout // Entering Workout Goals //
Entering Workout Values // Using Marathon Mode // Changing/Ending Workouts
4.3 Workout Hierarchy . . . . . . . . . . . . . . . . . . . . . . . . . . . . . . . . . . . . . . . . . . . . . . . . . . . . . . . . . . . . .24
Workout Descriptions . . . . . . . . . . . . . . . . . . . . . . . . . . . . . . . . . . . . . . . . . . . . . . . . . . . . . . . . . . .26
Quick Start // Classic: Manual, Random, Hill // Heart Rate +: Fat Burn, Cardio, Heart Rate Hill
TM
, Heart
Rate IntervalTM, Extreme Heart RateTM// Hill +: Around the World, Cascades, Foothills, Kilimanjaro //
Advanced Workouts: Fit Tests (Life Fitness, Army PFT, Navy PRT, Marines PFT, Air Force PRT, Gerkin
Protocol, Physical Efficiency Battery) // Create Your Own (Speed Interval and Heart Rate Interval) //
Sport Training
TM
: Sport Training (5K), Sport TrainingTM(10K), Speed Training, Speed Interval
Workout Landscape
TM
Perspectives . . . . . . . . . . . . . . . . . . . . . . . . . . . . . . . . . . . . . . . . . . . . . .33
4.4 Maximizing Workouts on a Life Fitness Treadmill . . . . . . . . . . . . . . . . . . . . . . . . . . . . . . . . . . . . . . .34
Selecting a Level // Cool-Down
4.5 Additional Features . . . . . . . . . . . . . . . . . . . . . . . . . . . . . . . . . . . . . . . . . . . . . . . . . . . . . . . . . . . . .34
Audio Cues//iPod Compatibility//Virtual Trainer//USB Connectivity//Zoom Feature//Media Center
5. System Options Menu . . . . . . . . . . . . . . . . . . . . . . . . . . . . . . . . . . . . . . . . . . . . . . . . . . . . . . . . . . .36
5.1 Using the System Options Menu . . . . . . . . . . . . . . . . . . . . . . . . . . . . . . . . . . . . . . . . . . . . . . . . . . .36
5.2 Configuration Menu . . . . . . . . . . . . . . . . . . . . . . . . . . . . . . . . . . . . . . . . . . . . . . . . . . . . . . . . . . . . .37
Manager’s Configuration 1
Language // Units // Workout Duration Configuration // Standby Configuration
Manager’s Configuration 2
Acceleration Rate // Deceleration Rate // Custom Message // Create Your Own // Program Timeout //
Fit Tests // Marathon Mode // Audio Cues Manager Configuration
TV / FM Radio
TV Setup // TV Channel Favorites // TV Channel Name/Sort // Promo Channel Setup // Advanced
Promo Channel Settings // FM Radio Setup
Touch Screen Configuration
Export / Import Settings
5.3 Configuration Settings . . . . . . . . . . . . . . . . . . . . . . . . . . . . . . . . . . . . . . . . . . . . . . . . . . . . . . . . . . .41
5.4 Life Fitness Platinum Club Series 15” Console Specifications . . . . . . . . . . . . . . . . . . . . . . . . . . . . .42
5.5 Warranty Information . . . . . . . . . . . . . . . . . . . . . . . . . . . . . . . . . . . . . . . . . . . . . . . . . . . . . . . . . . . .43
© 2007 Life Fitness, a division of Brunswick Corporation. All rights reserved. Life Fitness, FlexDeck, and Heart Rate Zone Training are registered trademarks, and Go
System, Sport Training, Heart Rate Hill, Heart Rate Interval, Extreme Heart Rate, Lifepulse and Lifespring are trademarks of Brunswick Corporation. Polar is a registered trademark of Polar Electro, Inc. Fitlinxx is a registered trademark of the Integrated Fitness Corp. Any use of these trademarks, without the express written consent of Life Fitness or the corresponding companies is forbidden.

4
This Operation Manual describes the functions of the following products:
Life Fitness Treadmills:
Platinum Club Series Treadmill
See "Specifications" in this manual for product specific features.
Statement of Purpose: The treadmill is an exercise machine that enables users to walk or run, in place, on a moving surface.
Health-related injuries may result from incorrect or excessive use of exercise equipment. Life Fitness STRONGLY recommends seeing a physician for a complete medical exam before undertaking an exercise program, particularly if the user has a family history of high blood pressure or heart disease, or is over the age of 45, or
smokes, has high cholesterol, is obese, or has not exercised regularly in the past year.
If, at any time while exercising, the user experiences faintness, dizziness, pain, or shortness of breath, he or she
must stop immediately.
Des problèmes de santé peuvent être causés par une utilisation incorrecte ou excessive de l'équipement. Life
Fitness recommande FORTEMENT de consulter un médecin pour subir un examen médical complet avant de
commencer tout programme d'exercice, et tout particulièrement si l'utilisateur a des antécédents familiaux d'hypertension ou de troubles cardiaques, s'il a plus de 45 ans, s'il fume, s'il a du cholestérol, s'il est obèse ou n'a
pas fait d'exercice régulièrement depuis un an.
Si, pendant l'utilisation de l'appareil, l'utilisateur ressent un malaise, des vertiges, des douleurs ou des difficultés
à respirer, il doit s'arrêter immédiatement.

1GETTING STARTED
1.1 IMPORTANT SAFETY INSTRUCTIONS
Read all instructions before using the treadmill.
OPERATION
• Always follow the console instructions for proper operation.
• Never insert objects into any opening in this product. If an object should drop inside, turn off the power, unplug the
power cord from the outlet, and carefully retrieve it. If the item cannot be reached, contact Life Fitness Customer
Support Services.
• Do not reach into, or underneath, the unit or tip it on its side during operation.
• Never place liquids of any type directly on the unit, except in an accessory tray or holder. Containers with lids are
recommended.
• Do not use this product in bare feet. Always wear shoes. Wear shoes with rubber or high-traction soles. Do not use
shoes with heels, leather soles, cleats or spikes. Make sure no stones are embedded in the soles.
• Keep all loose clothing, shoelaces, and towels away from moving parts.
• Handrails may be held to enhance stability as needed, but are not for continuous use.
• Never mount or dismount the treadmill while the running belt is moving. Use the handrails whenever additional stability is required. In case of an emergency, such as tripping, grasp the handrails, and place the feet on the side platforms.
• Never walk or jog backwards on the treadmill.
• The system issues immobilization of the treadmill when a pre-defined hard key sequence has been activated by the
user. This sequence is currently defined as 3 STOP key presses followed by 3 SPEED DOWN ARROW key presses.
To prevent false toggling of the Immobilized feature, this sequence should be limited to a pre-defined time period
(i.e. sequence must be done in a 5-10 second period). Sequence should also enforce that only PRESSED events
are used (i.e. if HELD or RELEASED are detected during the sequence then, the sequence is rejected). Once the
Workout Logic sees this event, it toggles the Immobilization configuration item, saves it in the registry, and then
issues an ImmobilizationStatus event to the system.
SAVE THESE INSTRUCTIONS
FOR FUTURE REFERENCE.
5

1DÉMARRAGE
1.1 CONSIGNES DE SÉCURITÉ IMPORTANTES
Lire toutes les instructions avant d'utiliser le tapis roulant.
F
ONCTIONNEMENT
• Les instructions de la console doivent toujours être suivies pour obtenir un fonctionnement correct.
• Ne jamais rien insérer dans les ouvertures de cet appareil. Si un objet tombe à l'intérieur de l'appareil, couper l'alimentation électrique, débrancher le cordon de la prise et le récupérer avec précaution. S'il est impossible de l'atteindre, communiquer avec le service à la clientèle de Life Fitness.
• Ne jamais placer aucun liquide directement sur l'appareil, sauf dans le plateau pour accessoires ou un support
prévu à cet effet. Il est recommandé d'utiliser des conteneurs munis de couvercles.
• Ne pas utiliser cet appareil pieds nus. Toujours porter des chaussures. Porter des chaussures avec des semelles en
caoutchouc ou fournissant une très bonne adhérence. Ne pas utiliser de chaussures à talons, à semelles en cuir ou
munies de crampons. S'assurer qu'aucun caillou n'est incrusté dans les semelles.
• Éloigner les vêtements lâches, les lacets et les serviettes des pièces en mouvement.
• Ne pas placer les mains sous l'appareil ou dans l'appareil, et ne pas le renverser sur le côté pendant le fonctionnement.
• Les rampes latérales peuvent servir à rétablir son équilibre, mais ne sont pas destinées à un usage continu.
• Ne jamais monter sur le tapis de course et ne pas en descendre jamais pendant qu'il tourne. Utiliser les rampes
latérales afin de ne pas perdre l'équilibre. En cas d'urgence, par exemple, en cas de trébuchement ou de faux pas,
saisir les barres latérales et placer les pieds sur les plates-formes latérales.
• Ne jamais marcher ni courir à reculons sur le tapis roulant.
• S'il est nécessaire d'immobiliser le tapis roulant, régler l'afficheur sur SELECT WORKOUT (SÉLECTIONNER EXERCICE). (Appuyer deux fois sur la touche REMISE À ZÉRO si l'afficheur n'en est pas déjà à ce point.) Maintenir
ensuite la touche SPEED DOWN (RALENTISSEMENT) enfoncée et appuyer sur la touche PAUSE. L'appareil
affiche désormais IMMOBILIZED (Immobilisé). Il ne peut alors plus fonctionner, Le moteur principal, le moteur en
ligne et le cireur sont désactivés. Le tapis roulant restera immobilisé, même s'il est réinitialisé, mis hors tension, puis
remis sous tension, etc. Le mode de fonctionnement normal ne peut être rétabli qu'au moyen de la même séquence
de touches : maintenir la touche SPEED DOWN (RALENTISSEMENT) enfoncée et appuyer sur PAUSE. L'appareil
affichera SELECT WORKOUT (SÉLECTIONNER EXERCICE) à nouveau.
CONSERVER CES INSTRUCTIONS POUR LE
CONSULTER À L'AVENIR.
6
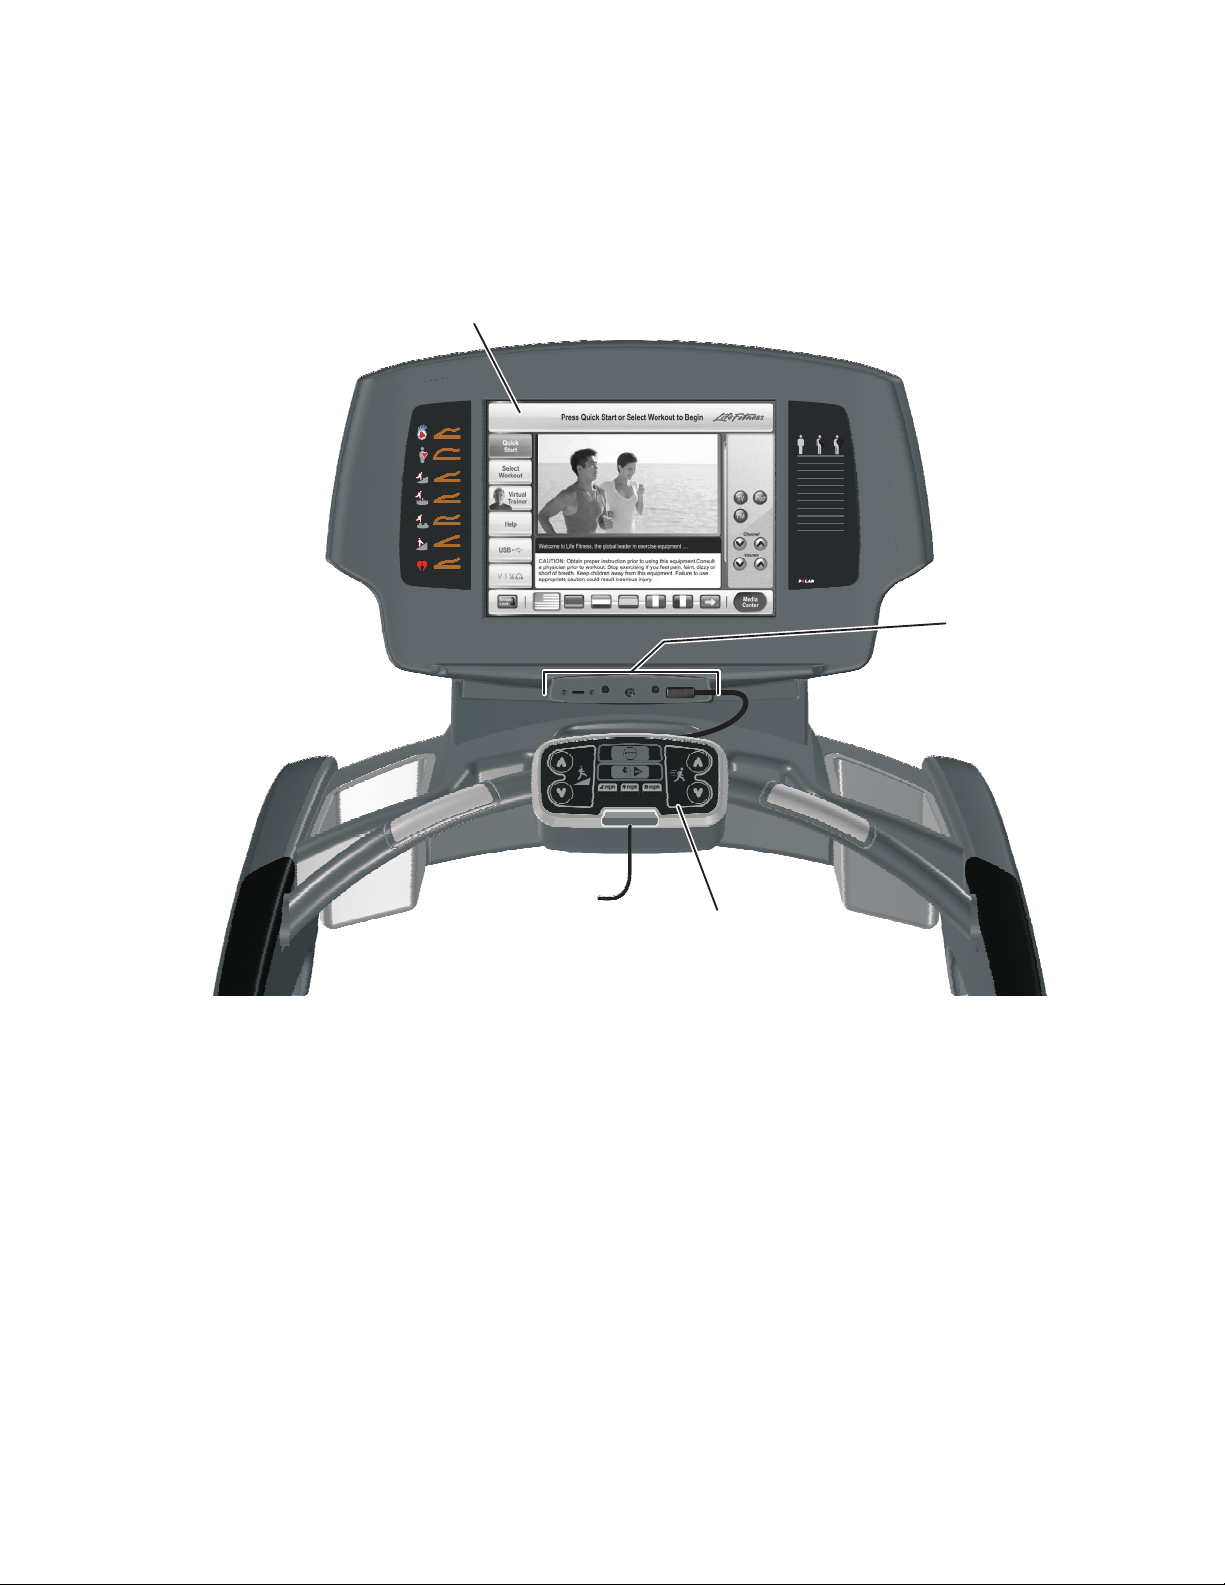
2THE DISPLAY CONSOLE AND ACTIVITY ZONE
2.1 DISPLAY CONSOLE AND ACTIVITY ZONE OVERVIEW
The computerized display console on the treadmill allows the user to tailor a workout to personal fitness abilities and
goals and to monitor progress. With this easy-to-use console, the user can track fitness improvement from one workout
to the next.
a. Touchscreen Display: The Touchscreen Display (the LCD screen) allows the user to choose, set up, and monitor a
workout.
b. Activity Zone: The Activity Zone allows the user to quickly adjust the incline and speed during a workout using the
UP and DOWN arrows. The Activity Zone also includes a QUICK START button, WALK, JOG, and RUN preset buttons.
A STOP button is located on top of the Activity Zone. A STOP magnet is located on the bottom of the Activity Zone.
c. Options Panel: The Options Panel allows the user to plug in headphones, iPod®, or USB stick.
7
a
10+
65%
80%
136 168
10
160
130
20
152
H
I
S
E
123
30
144
117
40
136
110
50
128
104
60
120
97
70
112
91
80
104
84
90
96
78
100
c
b
8
2.2 D
ISPLAY
CONSOLE AND ACTIVITY ZONE DESCRIPTIONS
This section lists and describes the functions for the buttons on the Touchscreen Display on the Life Fitness Treadmill.
See Section 4, The Workouts, for detailed information on using the console to set up workouts.
1) T
OUCHSCREEN DISPLAY
The Touchscreen Display allows the user to move from screen to screen by simply touching buttons to access other
screens. Among many features, the Touchscreen Display enables users to access:
1) SELECT WORKOUT— choose a workout.
2) V
IRTUAL TRAINER
SETUP
— choose a Virtual Trainer for workout motivation.
3) USB PRESET SELECTION — select a saved preset from a USB stick.
4) W
ORKOUT SETUP
— enter workout values and goals.
5) W
ORKOUT PROGRESS
— monitor progress, edit workout goals, and access
TV viewing.
6) WORKOUT SUMMARY INFORMATION — view and save workout summary information.
7) MEDIA CENTER — setup media options.
8) L
ANGUAGE SELECT — choose from available languages.
2) HOME SCREEN
A. QUICK START: Press this button to begin a manual workout immediately, bypassing any setup or goal setting. Once
started, the user can then make adjustments to the workout. Once the workout is in progress choose SPEED, or
INCLINE to determine the level of intensity, and ENTER WEIGHT so that Calories Burned/Calories per Hour can be
computed and displayed. Select the COOL DOWN button on the bottom of the screen to enter a cool down phase
when ready.
B. SELECT WORKOUT: Allows the user to choose from a variety of different programs.
See Section 4.1, Workout Overviews for a description of each workout.
C. VIRTUAL TRAINER: Allows the user to select a male or female trainer to assist during workout setup and provide
audible feedback during a workout.
A
B
C
D
E
F
G

9
D. USB: Allows the user to access previously saved workout setup data bypassing the workout setup procedure and
immediately entering a workout.
E. SCREEN LOCK/UNLOCK: (Cannot be used during a workout.) Freezes the screen for the purpose of routine main-
tenance/screen cleaning. The screen automatically unlocks after ten seconds. Pressing SCREEN LOCK a second
time will unlock it as well.
F. LANGUAGE SELECTION: Allows users to change the language of the interface to one of thirteen possible lan-
guages. Select the appropriate language flag from the bottom of the screen.
G. MORE LANGUAGES: select this button to see additional language flags.
See Section 5.2, Configuration Menu, Manager’s Configuration 1, Language, for language setup details.
3) WORKOUT SETUP
Workouts are accessed through the WORKOUT SELECTION button. Workouts are located under one of four workout categories: CLASSIC, HILL +, HEART RATE and ADVANCED. Workouts are listed to the right of each category label. Advancing
through the categories will show individual workout descriptions.
WORKOUT SETUP screens are accessed upon selection of a workout program button. They allow the user to enter values or
to choose a goal for the workout selected. These depend on the workout, but might include goal type (time, distance and calories), level, age, weight, distance, speed, incline, and target heart rate
* (for heart rate programs).
H. DATA DISPLAY: Displays the data input value.
I. ARROW BUTTONS: Use the UP and DOWN arrows to adjust workout values/goals such as length of workout,
weight, age, incline, speed, distance, target heart rate, and intensity level. Press ENTER to record the selection.
J. NUMERIC KEYPAD:Another way for the user to enter workout parameters. Key in the desired number on the key-
pad and press ENTER.
K. CLEAR: Clears any entry and returns to the default setting.
L. ENTER: Press this button after entering a value to register the value and move to the next screen.
M. GOALTYPE: Select a desired workout goal type. Choose from Time, Distance, Calories, Pace, Distance Climbed,
Time in Zone or Marathon Mode (if enabled).
N. BACK: Returns to the previous screen.
O. START OVER: Exits workout setup and returns to the Home Screen.
* Target Heart Rate (THR) is a percentage of the theoretical maximum. For example, a 40-year-old user's THR for the FAT BURN workout is 117. This
workout targets 65 percent of the maximum, so the equation would be (220-40)*.65=117.
H
O
J
N
L
K
M
I
10
TYPES OF WORKOUT SETUP SCREENS
GOAL SETUP SCREENS
• Goal Type: The default setting of Goal Type is TIME (length of workout) allowing the user to set a predeter-
mined length of time for the workout.
Users may also choose a more advanced Goal Type such as DISTANCE, CALORIES, or TIME IN ZONE (only
available for heart rate programs).
For Distance, Calories, Pace, Distance Climbed, and Time in Zone, the length of the workout depends on how long it
takes to reach the goal. The workout continues until the goal is met. To exit early, either choose COOL DOWN from
the bottom of the display to go immediately into the cool down phase, or choose CHANGE WORKOUT to access a
different program. For more information, see Section 4.2, Using the Workouts, Selecting a Goal Type.
For information on how to set, and get maximum benefit from, these type of workout goals consult a Personal Trainer.
For further information on Zone Training see section 3.1, Heart Rate Zone Training, Why Heart Rate Zone Training
Exercise.
• Level: Choose the programmed intensity level of the workout. Levels range from 1 to 20.
• Incline: Choose the amount of incline on the treadmill.
• Speed: Use to set the striding belt speed of the treadmill.
• Target Heart Rate*: (heart rate workouts only) Gives a recommended heart rate according to age. For Fat
Burn, the target heart rate is computed at 65% of the theoretical maximum†heart rate. For Cardio, the target
heart rate is computed at 80%. For more information on Target Heart Rate, see Section 3, Heart Rate Zone
Training Exercise.
VALUE SETUP SCREENS
• Weight: Entering an accurate weight allows calories to be calculated, and enables Calories Burned and Calories
per Hour.
• Age: Allows heart rate programs to accurately determine target heart rate.
• Gender: Used in the fit test prediction equation and associated fitness rating.
4) WORKOUT PROGRESS
The Workout Progress screen opens automatically upon completion of the setup, signaling the user to start the workout. This
screen allows the user to monitor the progress of the workout. It provides a visual representation of the workout as it proceeds
and monitors distance, pace, elapsed time, heart rate, incline, speed, and calories expended/calories per hour.
From the Workout Progress Screen, goals including Time, Incline, Speed and Target Heart Rate* (for heart rate programs) can
be changed at any point during the workout. This screen also accesses TV viewing. Not every goal item is available in every
workout. Only valid goal times are shown and accessible in the workout progress screen during a workout.
†
Defined by the American College of Sports Medicine's "Guidelines for Exercise Testing and Prescription" as equal to 220 minus an individual’s age.
* Target Heart Rate (THR) is a percentage of the theoretical maximum. For example, a 40-year-old user's THR for the FAT BURN workout is 117. This work-
out targets 65 percent of the maximum, so the equation would be (220-40)*.65=117.
C1
A1
D1
E1
V1
B1
F1
G1
H1
K1
U1
J1
L1
S1
O1
M1
N1P1Q1T1R1

11
A1. WORKOUT LABEL / MINI PROFILE AREA: Shows the user the workout type, shows a miniature profile when media is
active and covering the main profile area.
B1. WORKOUT PROFILE WINDOW:
This window displays workout progress using one of four workout landscapes.
C1. WORKOUT LANDSCAPE SELECTION BUTTONS: These buttons allow the user to toggle between four workout land-
scapes; CLASSIC PROFILE, MOUNTAIN, 400-METER TRACK and 5K NATURE TRAIL. These can be toggled between at
will without losing workout progress information.
D1. ON-THE-FLY BUTTONS: Enables users to access workout change or workout information during a workout without losing
workout progress.
CHANGE WORKOUT: Choose this button to go back to the SELECT WORKOUT screen and choose a new workout, or to change a goal type or value, while retaining workout progress. To change workouts, choose the new program, enter any remaining values, and press ENTER.
To return to the current workout without making any changes, choose BACK. Select the RESET button on the workout
selection screen to clear all the stored information about the current workout, before changing to a new program.
VIRTUAL TRAINER: Choose this button to enable or disable the VIRTUAL TRAINER.
E1. GOAL DISPLAYS:
HEART RATE: (replaces level on heart rate workouts only) Displays the target heart rate* the user has specified in the
workout setup screens. Can be changed anytime during a workout, by using the arrow keys directly below it, or by touching the HEART RATE button on the Touchscreen, and accessing the Target Heart Rate Workout Setup Screen.
ACTUAL HEART RATE: Displays the heart rate if the user grasps the Lifepulse sensors or wears a Polar-compatible heart
rate chest strap. NOTE: Heart rate can be checked on any of the screens, whether before a workout begins, or during a
workout.
DISTANCE: Displays the accumulated distance traveled or distance climbed during a workout.
CALORIES: Displays the accumulated calories burned.
F1. TV SELECTION: TV ON/OFF: If enabled, use to access TV viewing. See Section 5.2, Configuration Menu, Manager ’s
Configuration 2, TV / FM Radio, for more information.
G1. IPOD SELECTION: If detected, use to access an iPod media device. Once detected, the iPod menus can be navigated on
the Touchscreen Display. The unit is capable of playing both music and video.
NOTE: Headphones must be plugged into the treadmill to access the sound for the iPod. The jack is located on the
lower center of the Activity Zone. The jack is a user-replaceable feature. Contact Life Fitness Customer Support
Services for more information. (See Base Assembly Manual for contact information.)
H1. FM SELECTION: FM ON/OFF: If enabled, use to access FM Radio. See Section 5.2, Configuration Menu, Manager ’s
Configuration 2, TV / FM Radio, for more information.
J1.
VOLUME: Volume control for all media and system sounds.
NOTE: Headphones are necessary to access the sound for the treadmill or media. The jack is located on the lower
center of the Activity Zone. The jack is a user-replaceable feature. Contact Life Fitness Customer Support Services
for more information. (See Base Assembly Manual for contact information.)
K1. CHANNEL: Channel control for the TV.
L1. MEDIACENTER: Allows the user to access TV controls when the TV is viewed at full screen. The media center will
appear over the TV picture. It will automatically close after 10 seconds of idle time.
M1. TV SIZE TOGGLE: Enables the user to toggle through three sizes of TV display.
N1. VIEW PROFILE / TV TOGGLE: Enables the user to toggle between the workout profile and TV display.
O1. ZOOM BUTTON: Select this button to view Incline, Time, and Speed in a large, easy to read display. The workout profile is
not viewable while ZOOM mode is active.
P1. SPEED DISPLAY / CONTROL: Press the UP or DOWN ARROW KEYS to increase or decrease the striding belt speed.
Q1. TIME DISPLAY / CONTROL: ELAPSED TIME: Select this button to view the time of day, change the length of the workout
or to choose a different view for time. To change workout length, select ELAPSED TIME, use the arrow buttons or the
numerical keypad to adjust the time, and then select ENTER. To change the time view, select ELAPSED TIME, choose a
different time view (REMAINING TIME or HIDDEN TIME) and press ENTER.
To change the length of a workout without leaving the workout progress screen, use the arrow keys on the Touchscreen
Display directly underneath ELAPSED TIME.
NOTE: Changing the length of a workout by using the TIME ELAPSED button has no effect on the time elapsed, which is
an ongoing measurement of the time already spent in a workout.

R1. INCLINE DISPLAY / CONTROL: (Hill, Random, Sport Training 5K and 10K) Level refers to a range of incline per-
centages. The treadmill features 20 levels, with Level 1 having the lowest average incline grade and Level 20 having the highest. See Section 4.4, Maximizing Workouts on a Life Fitness Treadmill, Selecting a Level, for more
information.
Press the UP or DOWN ARROW KEYS to increase or decrease the incline of the treadmill deck.
S1. COOL DOWN: Workout programs end automatically in a cool down phase, which lowers the intensity level. In this
phase of a workout the body begins to remove lactic acid and other accumulated by-products of exercise, which
build up in muscles during a workout and contribute to muscle soreness.
Press the COOL DOWN key to enter the cool down stage at any point during the workout. Each workout’s cool
down level is automatically adjusted according to the individual user’s performance. (Cool down times are preset in
proportion to the duration of a workout.) The cool down time can be changed by using the corresponding arrow
keys on the Touchscreen Display. At the end of cool down, a workout summary box appears.
T1. PAUSE: Press this key to stop the belt and hold the current workout. A RESUME WORKOUT button and EXIT but-
ton appear on the Touchscreen. Continue the workout by selecting RESUME WORKOUT or end the workout by
selecting EXIT.
U1. WALK / JOG / RUN / SET BUTTONS: Press these keys to preset a walk (2 mph), jog (4 mph), or run (6 mph)
pace. Press the SET button to set a pace for the walk, jog, or run options. Use the numeric keypad or the UP and
DOWN ARROW KEYS to select a pace. Press ENTER for the selection to be accepted.
V1. WORKOUT STATISTICS: Continually updates workout progress by showing Distance, Pace in minutes per
mile/kilometer, Calories Expended/Calories per Hour, Target Heart Rate (for heart rate programs), Heart Rate (on
any workout if the user is grasping the Lifepulse sensors of wearing a telemetry strap), and Time in Zone (if selected as a workout goal).
Cal/Hr has a button beneath the display which give added functionality. This button can be used to lock the display
or to force the display to toggle. To lock the display, (for instance, turn off the toggle so only calories burned is displayed) simply press the button once while the desired setting is displayed. To toggle press the button twice in succession.
Changeable information either appears as a button (Time, Level, Incline, Target Heart Rate*, and Speed) or is
accessible through CHANGE WORKOUT.
12
* Target Heart Rate (THR) is a percentage of the theoretical maximum. For example, a 40-year-old user's THR for the FAT BURN workout is 117. This work-
out targets 65 percent of the maximum, so the equation would be (220-40)*.65=117.
13
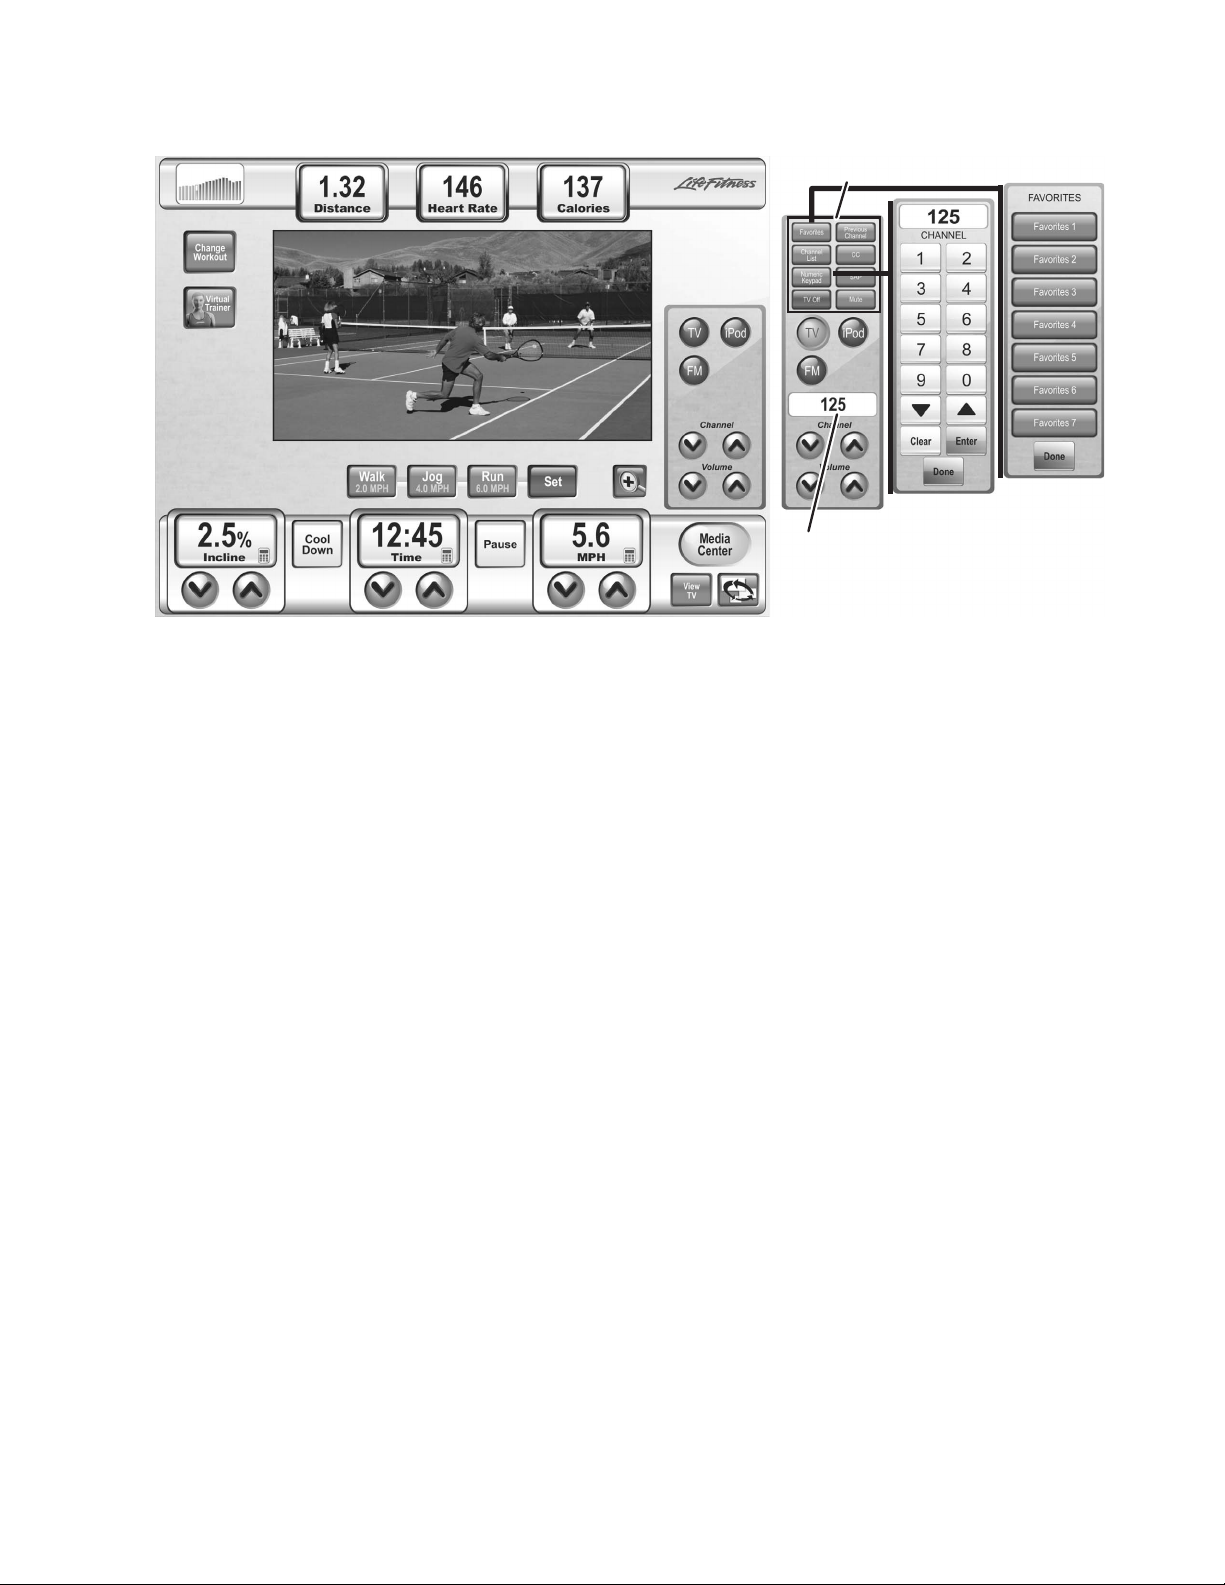
4) TV
If Favorites and/or Channel List options are enabled, an Options menu will be enabled for selecting a desired channel
selection interface.
A2. TV CONTROLS: Use to access TV viewing options.
FAVORITES: If enabled, use to toggle to Favorite Channel selection menu. The Favorites menu will stay visible as
long as buttons are actively pressed. The menu will automatically disappear after 10 seconds of idle time. See
Section 5.2 Configuration Menu, Manager’s Configuration 2, Tv/FM Radio for more information.
CHANNELS LIST: If enabled, use to toggle to Channel List selection menu. The Channel List menu will stay visible
as long as buttons are actively pressed. The menu will automatically disappear after 10 seconds of idle time. See
Section 5.2 Configuration Menu, Manager’s Configuration 2, Tv/FM Radio for more information.
NUMERIC KEYPAD: Press to access the NUMERIC KEYPAD for manual channel input. The NUMERIC KEYPAD
will stay visible as long as buttons are actively pressed. The menu will automatically disappear after 10 seconds of
idle time.
PREVIOUS CHANNEL: Press to jump to the last TV channel viewed.
SAP (SECONDARY AUDIO PROGRAMMING): Press to activate Secondary Audio Programming when available.
MUTE: Press to silence the audio of the TV.
TV OFF: Press to turn TV viewing off.
B2. CURRENT CHANNEL / NOW PLAYING: Displays the current TV or FM channel name. If iPod is active, the name
and artist of the currently playing song or movie is displayed.
2
A
B2
 Loading...