


95X Cross-Trainer - Engage Console
operation manual

1
M051-00K70-A035
12/07
CORPORATE HEADQUARTERS
5100 North River Road
Schiller Park, Illinois 60176 • U.S.A.
847.288.3300 • FAX: 847.288.3703
800.735.3867 (Toll-free within U.S.A., Canada)
I
NTERNATIONAL OFFICES
AMERICA’S
North America
Life Fitness Inc.
5100 N River Road
Schiller Park, IL 60176 U.S.A
Telephone: (847) 288 3300
Fax: (847) 288 3703
Service Email: internationalservicesupport@lifefitness.com
Sales/Marketing Email: commercialsales@lifefitness.com
Operating Hours: 7:00 am-6:00 pm (CST)
Brazil
Life Fitness Do Brazil
Av. Dr. Dib Sauaia Neto 1478
Alphaville, Barueri, SP
06465-140
BRAZIL
Telephone: (800) 773 8282
Fax: (+55) 11.4133.2893
Service Email: suporte@lifefitness.com.br
Sales/Mareketing Email: lifefitness@lifefitness.com.br
Operating Hours: 8:30 am-17:30 pm (BRT)
Latin America & Caribbean*
Life Fitness Inc.
5100 N River Road
Schiller Park, IL 60176 U.S.A
Telephone: (847) 288 3300
Fax: (847) 288 3703
Service Email: internationalservicesupport@lifefitness.com
Sales/Marketing Email:commercialsales@lifefitness.com
Operating Hours: 8:00am-5:00pm (CST)
EUROPE, MIDDLE EAST, & AFRICA
(EMEA)
Netherlands & Luxemburg
Life Fitness Atlantic BV
Bijdorpplein 25-31
2992 LB Barendrecht
THE NETHERLANDS
Telephone: (+31) 180 646 666
Fax: (+31) 180 646 699
Service Email: internationalservicesupport@lifefitness.com
Sales/Marketing Email:marketing.benelux@lifefitness.com
Operating Hours: 9.00h-17.00h (CET)
United Kingdom & Ireland
Life Fitness UK LTD
Queen Adelaide
Ely, Cambs, CB7 4UB
Telephone: General Office (+44) 1353.666017 Customer
Support (+44) 1353.665507
Fax: (+44) 1353.666018
Service Email: uk.support@lifefitness.com
Sales/Marketing Email: life@lifefitness.com
Operating Hours:
General Office: 9.00am - 5.00pm (GMT)
Customer Support: 8.30am - 5.00pm (GMT)
Germany & Switzerland
Life Fitness Europe GMBH
Siemensstrasse 3
85716 Unterschleissheim
GERMANY
Telephone: (+49) 89.31 77 51.0 (Germany)
(+41) 0848 000 901 (Switzerland)
Fax: (+49) 89.31 77 51.99 (Germany)
(+41) 043 818 07 20 (Switzerland)
Service Email: kundendienst@lifefitness.com
Sales/Marketing Email: kundenberatung@lifefitness.com
Operating Hours: 9.00h-17.00h (MEZ)
Austria
Life Fitness Austria
Vertriebs G.m.b.H.
Dückegasse 7-9/3/36
1220 Vienna
AUSTRIA
Telephone: (+43) 1.61.57.198
Fax: (+43) 1.61.57.198.20
Service Email: kundendienst@lifefitness.com
Marketing/Sales Email: kundenberatung@lifefitness.com
Operating Hours: 9.00h-17.00h (MEZ)
Spain
Life Fitness IBERIA
C/Frederic Mompou 5,1º1ª
08960 Sant Just Desvern Barcelona
SPAIN
Telephone: (+34) 936 724 660
Fax: (+34) 936 724 670
Service Email: info.iberia@lifefitness.com
Sales/Marketing Email: info.iberia@lifefitness.com
Operating Hours:
9.00h-18.00h (Monday-Thursday)
8.30h-15.00h (Friday)
Italy
Life Fitness ITALIAS.R.L.
Via Crivellin 7/N
37010 Affi Verona
ITALY
Telephone: (+39) 045.7237811
Fax: (+39) 045.7238197
ServiceEmail: assistenzatecnica@lifefitness.com
Sales/Marketing Email: info@lifefitnessitalia.com
Operating Hours: 8.30h -18.00h (CET)
Belgium
Life Fitness Benelux NV
Parc Industrial de Petit-Rechain
4800 Verviers
BELGIUM
Telephone: (+32) 87 300 942
Fax: (+32) 87 300 943
Service Email: internationalservicesupport@lifefitness.com
Sales/Marketing Email: marketing.benelux@lifefitness.com
Operating Hours: 9.00h -17.00h (CET)
All Other EMEA countries &
distributor business C-EMEA*
Bijdorpplein 25-31
2992 LB Barendrecht
THE NETHERLANDS
Telephone: (+31) 180 646 666
Fax: (+31) 180 646 699
Service Email: service.db.cemea@lifefitness.com
Sales/Marketing Email:
marketing.db.cemea@lifefitness.com
Operating Hours: 9.00h-17.00h(CET)
ASIA PACIFIC (AP)
Japan
Life Fitness Japan
Nippon Brunswick Bldg., #8F
5-27-7 Sendagaya
Shibuya-Ku, Tokyo
Japan 151-0051
Telephone: (+81) 3.3359.4309
Fax: (+81) 3.3359.4307
Service Email:
service@lifefitnessjapan.com
Sales/Marketing Email
sales@lifefitnessjapan.com
Operating Hours: 9.00h-17.00h (JAPAN)
China and Hong Kong
Life Fitness Asia Pacific LTD
Room 2610, Miramar Tower
132 Nathan Road
Tsimshatsui, Kowloon
HONG KONG
Telephone: (+852) 2891.6677
Fax: (+852) 2575.6001
Service Email: HongKongEnquiry@lifefitness.com
Sales/Marketing Email: ChinaEnquiry@lifefitness.com
Operating Hours: 9.00h-18.00h
All Other Asia Pacific countries &
distributor business Asia Pacific*
Room 2610, Miramar Tower
132 Nathan Road
Tsimshatsui, Kowloon
HONG KONG
Telephone: (+852) 2891.6677
Fax: (+852) 2575.6001
Service Email: HongKongEnquiry@lifefitness.com
Sales/Marketing Email: ChinaEnquiry@lifefitness.com
Operating Hours: 9.00h-18.00h
* Also check www.lifefitness.com for local representation or distributor/dealer.

2
Before using this product, it is essential to read
this ENTIRE operation manual and ALL installation instructions.
It describes equipment setup and instructs
members on how to use it correctly and safely.
Avant d'utiliser ce produit, il est indispensable de lire ce manuel d'utilisation dans son INTÉGRALITÉ, ainsi que TOUTES
les instructions d'installations.
Ce manuel explique comment installer l'équipement et comment
l'utiliser correctement et sans danger.
FCC Warning - Possible Radio / Television Interference
NOTE: This equipment has been tested and found to comply with the limits for a Class A digital device, pursuant to part
15 of the FCC rules. These limits are designed to provide reasonable protection against harmful interference when the
equipment is operated in a commercial environment. This equipment generates, uses and can radiate radio frequency
energy, and if not installed and used in accordance with the instruction manual, may cause harmful interference to radio
communications. Operation of this equipment in a residential area is likely to cause harmful interference in which case
the user will be required to correct the interference at his own expense.
Class SB (Studio): Professional and / or commercial use.
CAUTION: Any changes or modifications to this equipment could void the
product warranty.
Mise en garde : tout changement ou toute modification de ce matériel peut annuler la garantie du pro-
duit.
Any service, other than cleaning or user maintenance, must be performed by an authorized service representative.
There are no user serviceable parts.

3
TABLE OF CONTENTS
Section Description Page
1. Getting Started . . . . . . . . . . . . . . . . . . . . . . . . . . . . . . . . . . . . . . . . . . . . . . . . . . . . . . . . . . . . . . . . .5
1.1 Important Safety Instructions . . . . . . . . . . . . . . . . . . . . . . . . . . . . . . . . . . . . . . . . . . . . . . . . . . . . . .5
2. The Engage Display Console . . . . . . . . . . . . . . . . . . . . . . . . . . . . . . . . . . . . . . . . . . . . . . . . . . . . .7
2.1 Engage Display Console Overview . . . . . . . . . . . . . . . . . . . . . . . . . . . . . . . . . . . . . . . . . . . . . . . . . .7
2.2 Engage Display Console Description . . . . . . . . . . . . . . . . . . . . . . . . . . . . . . . . . . . . . . . . . . . . . . . .8
2.3 Reading Rack and Accessory Tray . . . . . . . . . . . . . . . . . . . . . . . . . . . . . . . . . . . . . . . . . . . . . . . . .15
3. Heart Rate Zone Training®Exercise . . . . . . . . . . . . . . . . . . . . . . . . . . . . . . . . . . . . . . . . . . . . . . . .16
3.1 Why Heart Rate Zone Training Exercise? . . . . . . . . . . . . . . . . . . . . . . . . . . . . . . . . . . . . . . . . . . . .16
3.2 Heart Rate Monitoring . . . . . . . . . . . . . . . . . . . . . . . . . . . . . . . . . . . . . . . . . . . . . . . . . . . . . . . . . . .17
The Lifepulse
TM
Digital Heart Rate Monitoring System // The Optional Heart Rate Chest Strap
4. The Workouts . . . . . . . . . . . . . . . . . . . . . . . . . . . . . . . . . . . . . . . . . . . . . . . . . . . . . . . . . . . . . . . . .19
4.1 Workout Overviews . . . . . . . . . . . . . . . . . . . . . . . . . . . . . . . . . . . . . . . . . . . . . . . . . . . . . . . . . . . . .19
4.2 Using the Workouts . . . . . . . . . . . . . . . . . . . . . . . . . . . . . . . . . . . . . . . . . . . . . . . . . . . . . . . . . . . . .21
Beginning a Workout // Selecting a Workout // Entering Workout Goals //
Entering Workout Values // Using Marathon Mode // Changing/Ending Workouts
4.3 Workout Hierarchy . . . . . . . . . . . . . . . . . . . . . . . . . . . . . . . . . . . . . . . . . . . . . . . . . . . . . . . . . . . . .24
Workout Descriptions . . . . . . . . . . . . . . . . . . . . . . . . . . . . . . . . . . . . . . . . . . . . . . . . . . . . . . . . . . .25
Quick Start // Classic: Manual, Random, Cross-Train Aerobics, Cross-Train Reverse, Hill //
Heart Rate +: Fat Burn, Cardio, Heart Rate Hill
TM
, Heart Rate IntervalTM, Extreme Heart RateTM//
Hill +: Around the World, Cascades, Foothills, Kilimanjaro // Advanced Workouts: Fit Test //
Create Your Own (Level Interval and Heart Rate Interval) //
Custom (Level Interval and Heart Rate Training)
Workout Landscape
TM
Perspectives . . . . . . . . . . . . . . . . . . . . . . . . . . . . . . . . . . . . . . . . . . . . . .32
4.4 Maximizing Workouts on a Life Fitness Cross-Trainer . . . . . . . . . . . . . . . . . . . . . . . . . . . . . . . . . . .33
Selecting a Level // Cool Down
4.5 Additional Features . . . . . . . . . . . . . . . . . . . . . . . . . . . . . . . . . . . . . . . . . . . . . . . . . . . . . . . . . . . . .33
Audio Cues // iPod
®
Compatibility // Virtual Trainer // USB Connectivity // Zoom Feature // Media Center
5. System Options Menu . . . . . . . . . . . . . . . . . . . . . . . . . . . . . . . . . . . . . . . . . . . . . . . . . . . . . . . . . . .34
5.1 Using the System Options Menu . . . . . . . . . . . . . . . . . . . . . . . . . . . . . . . . . . . . . . . . . . . . . . . . . . .34
5.2 Configuration Menu . . . . . . . . . . . . . . . . . . . . . . . . . . . . . . . . . . . . . . . . . . . . . . . . . . . . . . . . . . . . .35
Manager’s Configuration 1
Language // Units // Workout Duration Configuration // Standby Configuration
Manager’s Configuration 2
Custom Message // Create Your Own // Program Timeout // Fit Test // Marathon Mode // System
Beeps // Pause Time // Telemetry // Virtual Trainer // Network // Audio Cues Manager Configuration
TV / FM Radio
TV Setup // TV Channel Favorites // TV Channel Name/Sort // Promo Channel Setup // Advanced
Promo Channel Settings // FM Radio Setup
Touch Screen Configuration
Export / Import Settings
5.3 Configuration Settings . . . . . . . . . . . . . . . . . . . . . . . . . . . . . . . . . . . . . . . . . . . . . . . . . . . . . . . . . . .39
5.4 95 Xe Specifications . . . . . . . . . . . . . . . . . . . . . . . . . . . . . . . . . . . . . . . . . . . . . . . . . . . . . . . . . . . .40
5.5 Warranty Information . . . . . . . . . . . . . . . . . . . . . . . . . . . . . . . . . . . . . . . . . . . . . . . . . . . . . . . . . . . .41

4
This Operation Manual describes the functions of the following products:
95 Xe Engage Cross-Trainer Console
See "Specifications" in this manual for product specific features.
Health-related injuries may result from incorrect or excessive use of exercise equipment. Life Fitness STRONGLY recommends seeing a physician for a complete medical exam before undertaking an exercise program, particularly if the user has a family history of high blood pressure or heart disease, or is over the age of 45, or
smokes, has high cholesterol, is obese, or has not exercised regularly in the past year.
If, at any time while exercising, the user experiences faintness, dizziness, pain, or shortness of breath, he or she
must stop immediately.
Des problèmes de santé peuvent être causés par une utilisation incorrecte ou excessive de l'équipement. Life
Fitness recommande FORTEMENT de consulter un médecin pour subir un examen médical complet avant de
commencer tout programme d'exercice, et tout particulièrement si l'utilisateur a des antécédents familiaux d'hypertension ou de troubles cardiaques, s'il a plus de 45 ans, s'il fume, s'il a du cholestérol, s'il est obèse ou n'a
pas fait d'exercice régulièrement depuis un an.
Si, pendant l'utilisation de l'appareil, l'utilisateur ressent un malaise, des vertiges, des douleurs ou des difficultés
à respirer, il doit s'arrêter immédiatement.

5
1GETTING STARTED
1.1 IMPORTANT SAFETY INSTRUCTIONS
Read all instructions before using the Cross-Trainer.
• If this Life Fitness product does not function properly after it has been dropped, damaged, or even partially
immersed in water, contact Life Fitness Customer Support Services for assistance.
• Always follow the console instructions for proper operation.
• Close supervision is necessary when used by children, invalids or disabled persons.
• Do not use this product outdoors, near swimming pools or in areas of high humidity.
• Never operate Life Fitness exercise equipment with the air openings blocked. Keep air openings free of lint, hair or
any obstructing material.
• Never insert objects into any opening in this product. If an object should drop inside, carefully retrieve it. If the item
cannot be reached, contact Life Fitness Customer Support Services.
• Never place liquids of any type directly on the unit, except in the accessory tray water bottle holder. Containers with
lids are recommended.
• Wear shoes with rubber or high-traction soles. Do not use shoes with heels, leather soles, cleats or spikes. Make
sure no stones are embedded in the soles.
• Keep all loose clothing, shoelaces and towels away from moving parts.
• Do not use this product in bare feet.
• Do not tip the unit on its side during operation.
• Ensure that there is at least one foot of clearance in front of Life Fitness cross-trainers.
• Use caution when mounting or dismounting Life Fitness exercise equipment. Use the stationary handlebar whenever
additional stability is required. While exercising, hold onto the moving arms.
• Never face backward while using Life Fitness exercise equipment.
• Do not stand or sit on pedal lever covers or motor housings.
SAVE THESE INSTRUCTIONS
FOR FUTURE REFERENCE.

6
1DÉMARRAGE
1.1 CONSIGNES DE SÉCURITÉ IMPORTANTES
Lire toutes les instructions avant d'utiliser le tapis roulant.
F
ONCTIONNEMENT
• Les instructions de la console doivent toujours être suivies pour obtenir un fonctionnement correct.
• Ne jamais rien insérer dans les ouvertures de cet appareil. Si un objet tombe à l'intérieur de l'appareil, couper l'alimentation électrique, débrancher le cordon de la prise et le récupérer avec précaution. S'il est impossible de l'atteindre, communiquer avec le service à la clientèle de Life Fitness.
• Ne jamais placer aucun liquide directement sur l'appareil, sauf dans le plateau pour accessoires ou un support
prévu à cet effet. Il est recommandé d'utiliser des conteneurs munis de couvercles.
• Ne pas utiliser cet appareil pieds nus. Toujours porter des chaussures. Porter des chaussures avec des semelles en
caoutchouc ou fournissant une très bonne adhérence. Ne pas utiliser de chaussures à talons, à semelles en cuir ou
munies de crampons. S'assurer qu'aucun caillou n'est incrusté dans les semelles.
• Éloigner les vêtements lâches, les lacets et les serviettes des pièces en mouvement.
• Ne pas placer les mains sous l'appareil ou dans l'appareil, et ne pas le renverser sur le côté pendant le fonctionnement.
• Les rampes latérales peuvent servir à rétablir son équilibre, mais ne sont pas destinées à un usage continu.
• Ne jamais monter sur le tapis de course et ne pas en descendre jamais pendant qu'il tourne. Utiliser les rampes
latérales afin de ne pas perdre l'équilibre. En cas d'urgence, par exemple, en cas de trébuchement ou de faux pas,
saisir les barres latérales et placer les pieds sur les plates-formes latérales.
• Ne jamais marcher ni courir à reculons sur le tapis roulant.
• S'il est nécessaire d'immobiliser le tapis roulant, régler l'afficheur sur SELECT WORKOUT (SÉLECTIONNER EXERCICE). (Appuyer deux fois sur la touche REMISE À ZÉRO si l'afficheur n'en est pas déjà à ce point.) Maintenir
ensuite la touche SPEED DOWN (RALENTISSEMENT) enfoncée et appuyer sur la touche PAUSE. L'appareil
affiche désormais IMMOBILIZED (Immobilisé). Il ne peut alors plus fonctionner, Le moteur principal, le moteur en
ligne et le cireur sont désactivés. Le tapis roulant restera immobilisé, même s'il est réinitialisé, mis hors tension, puis
remis sous tension, etc. Le mode de fonctionnement normal ne peut être rétabli qu'au moyen de la même séquence
de touches : maintenir la touche SPEED DOWN (RALENTISSEMENT) enfoncée et appuyer sur PAUSE. L'appareil
affichera SELECT WORKOUT (SÉLECTIONNER EXERCICE) à nouveau.
CONSERVER CES INSTRUCTIONS POUR LE
CONSULTER À L'AVENIR.
7
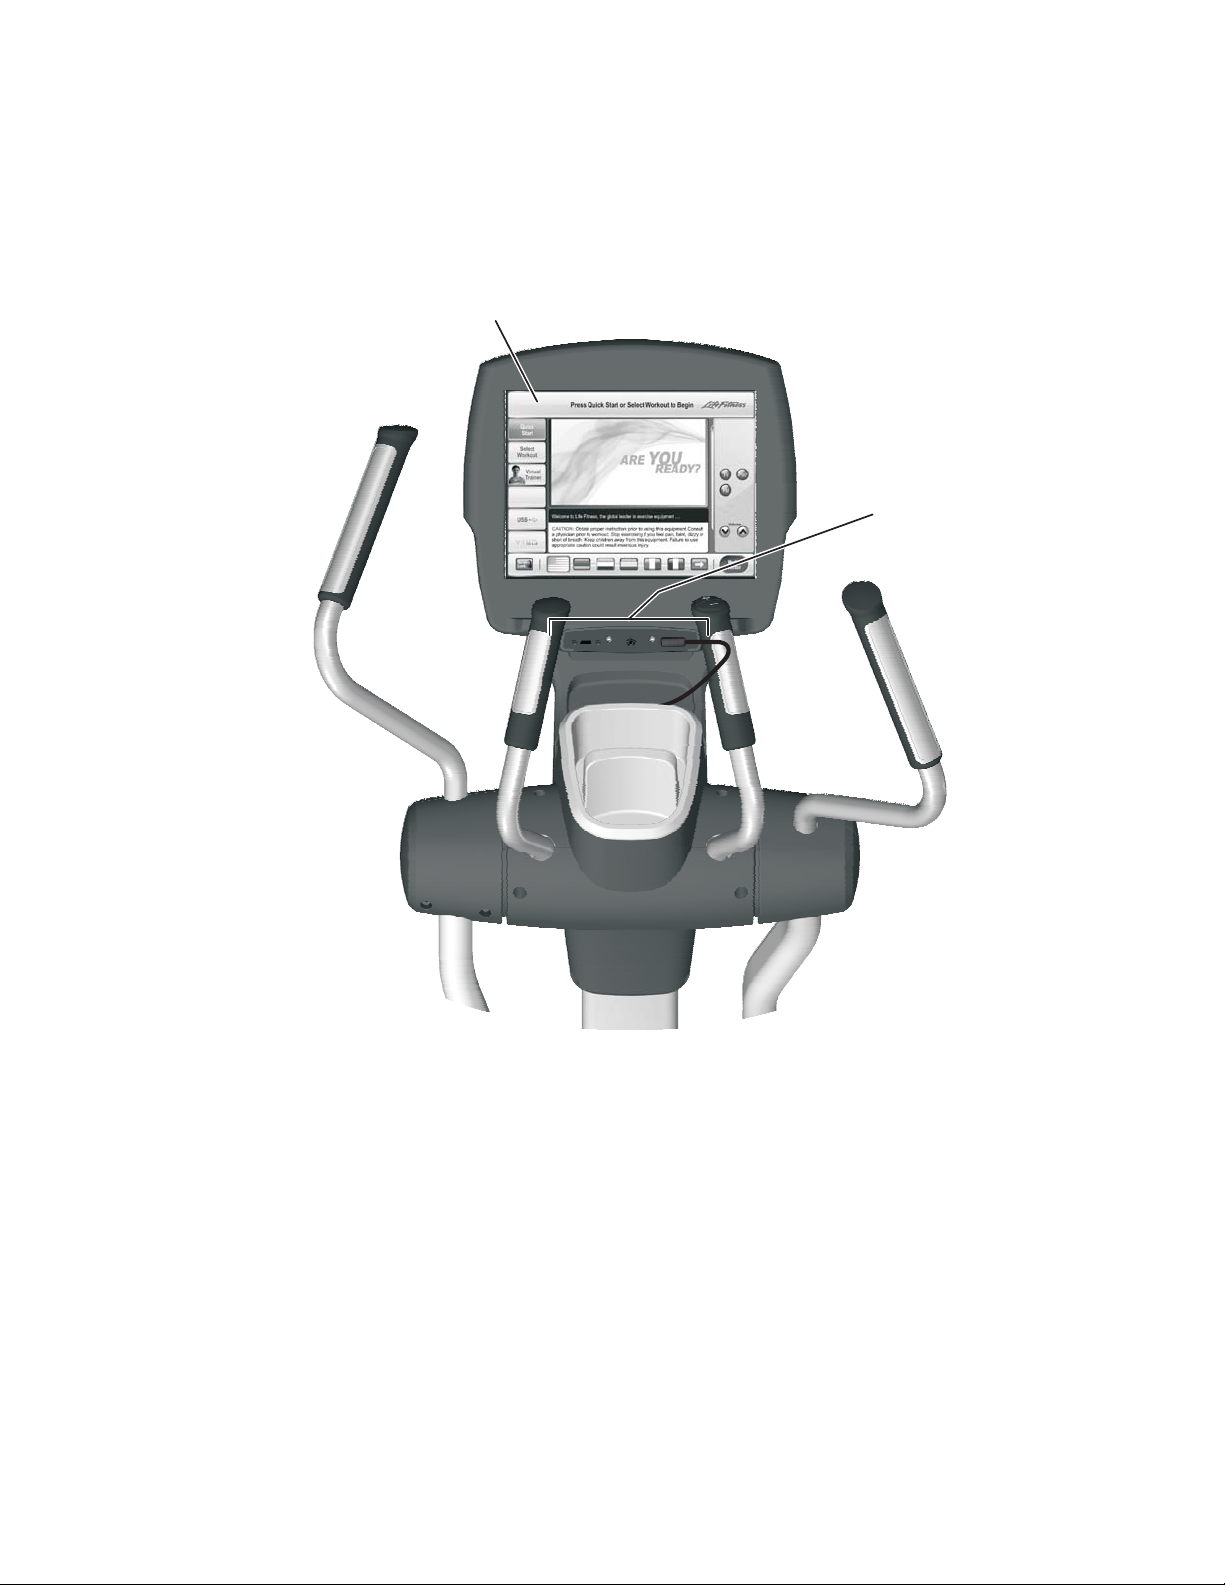
2THE ENGAGE DISPLAY CONSOLE
2.1 ENGAGE DISPLAY CONSOLE OVERVIEW
The Engage LCD console on the cross-trainer allows the user to tailor a workout to personal fitness abilities and goals
and to monitor progress. With this easy-to-use console, the user can track fitness improvement from one workout to the
next.
a. Touchscreen Display: The Touchscreen Display (the LCD screen) allows the user to choose, set up, and monitor a
workout.
b. Options Panel: The Options Panel allows the user to plug in headphones, iPod®, or USB stick.
a
b
8
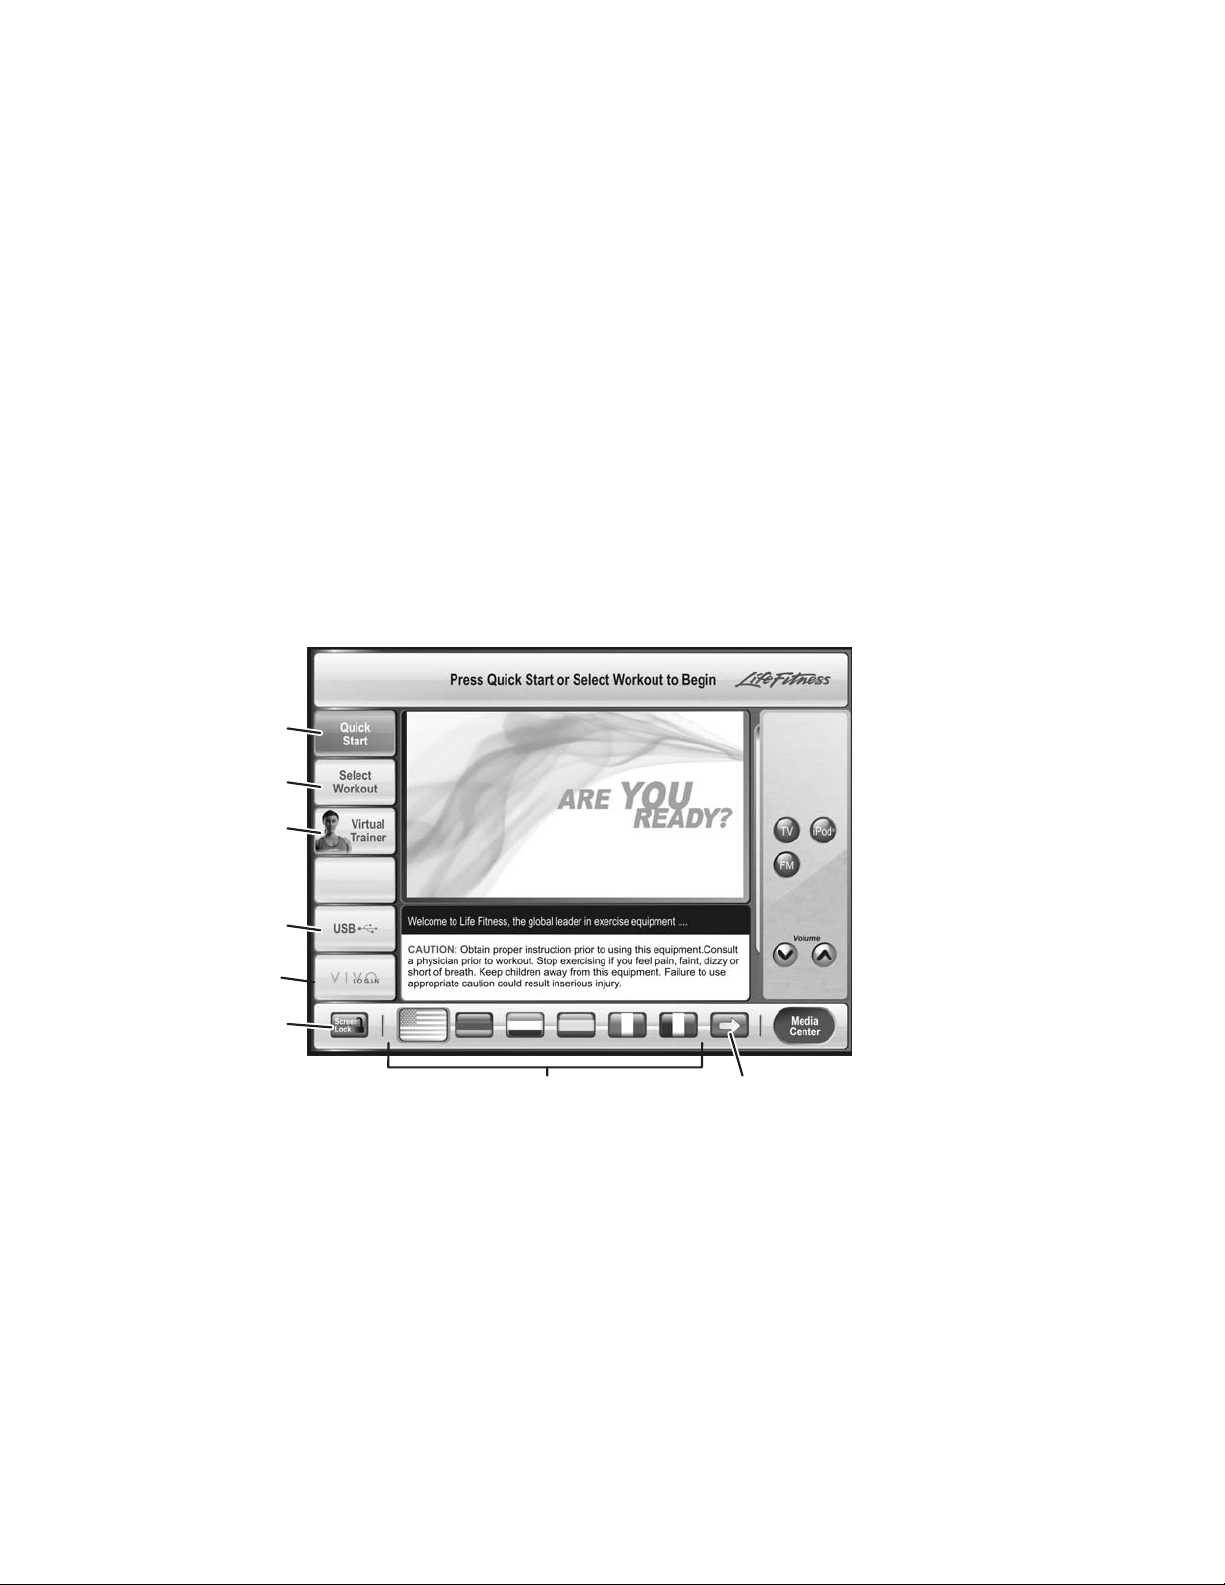
2.2 ENGAGE DISPLAY CONSOLE DESCRIPTION
This section lists and describes the functions of the buttons on the Touchscreen Display for the Engage LCD console on
the 95X Cross-Trainer. See Section 4, The Workouts, for detailed information on using the console to set up workouts.
1) TOUCHSCREEN DISPLAY
The Touchscreen Display allows the user to move from screen to screen by simply touching buttons to access other
screens. Among many features, the Touchscreen Display enables users to access:
1) S
ELECT WORKOUT— choose a workout.
2) V
IRTUAL TRAINER SETUP — choose a Virtual Trainer for workout motivation.
3) USB P
RESET SELECTION — select a saved preset from a USB stick.
4) W
ORKOUT SETUP — enter workout values and goals.
5) W
ORKOUT PROGRESS
— monitor progress, edit workout goals, and access
TV viewing.
6) W
ORKOUT SUMMARY INFORMATION
— view and save workout summary information.
7) MEDIA CENTER — setup media options.
8) L
ANGUAGE SELECT — choose from available languages.
9) VIVO — fitness networking access.
2) HOME SCREEN
A. QUICK START: Press this button to begin a manual workout immediately, bypassing any setup or goal setting. Once
started, the user can then make adjustments to the workout. Once the workout is in progress choose LEVEL to
determine the resistance level, and ENTER WEIGHT so that Calories Burned/Calories per Hour and METs can be
computed and displayed. Select the COOL DOWN button on the bottom of the screen to enter a cool down phase
when ready.
B. SELECT WORKOUT: Allows the user to choose from a variety of different programs.
See Section 4.1, Workout Overviews for a description of each workout.
C. VIRTUAL TRAINER: Allows the user to select a male or female trainer to assist during workout setup and provide
audible feedback during a workout.
D. USB: Allows the user to access previously saved workout setup data bypassing the workout setup procedure and
immediately entering a workout.
A
B
C
D
P
E
F
G
9
E. SCREEN LOCK/UNLOCK: (Cannot be used during a workout.) Freezes the screen for the purpose of routine main-
tenance/screen cleaning. The screen automatically unlocks after ten seconds. Pressing SCREEN LOCK a second
time will unlock it as well.
F. LANGUAGE SELECTION: Allows users to change the language of the interface to one of thirteen possible lan-
guages. Select the appropriate language flag from the bottom of the screen.
G. MORE LANGUAGES: Select this button to see additional language flags.
P. VIVO: Allows users to access a club’s fitness networking system if available.
3) WORKOUT SETUP
Workouts are accessed through the WORKOUT SELECTION button. Workouts are located under one of four workout categories: CLASSIC, HILL +, HEART RATE and ADVANCED. Workouts are listed to the right of each category label. Advancing
through the categories will show individual workout descriptions.
WORKOUT SETUP screens are accessed upon selection of a workout program button. They allow the user to enter values or
to choose a goal for the workout selected. These depend on the workout, but might include goal type (time, distance and calories), level, age, weight, distance, and target heart rate
* (for heart rate programs).
H. DATA DISPLAY: Displays the data input value.
I. ARROW BUTTONS: Use the UP and DOWN arrows to adjust workout values/goals such as length of workout,
weight, age, distance, target heart rate, and resistance level. Press ENTER to record the selection.
J. NUMERIC KEYPAD:Another way for the user to enter workout parameters. Key in the desired number on the key-
pad and press ENTER.
K. CLEAR: Clears any entry and returns to the default setting.
L. ENTER: Press this button after entering a value to register the value and move to the next screen.
M. GOALTYPE: Select a desired workout goal type. Choose from Time, Distance, Calories, Pace, Time in Zone or
Marathon Mode (if enabled).
N. BACK: Returns to the previous screen.
O. START OVER: Exits workout setup and returns to the Home Screen.
* Target Heart Rate (THR) is a percentage of the theoretical maximum. For example, a 40-year-old user's THR for the FAT BURN workout is 117. This work-
out targets 65 percent of the maximum, so the equation would be (220-40)*.65=117.
H
O
J
L
N
M
I
K

10
TYPES OF WORKOUT SETUP SCREENS
GOAL SETUP SCREENS
• Goal Type: The default setting of Goal Type is TIME (length of workout) allowing the user to set a predeter-
mined length of time for the workout.
Users may also choose a more advanced Goal Type such as DISTANCE, CALORIES, or TIME IN ZONE (only
available for heart rate programs).
For Distance, Calories, Pace, and Time in Zone, the length of the workout depends on how long it takes to reach the
goal. The workout continues until the goal is met. To exit early, either choose COOL DOWN from the bottom of the display to go immediately into the cool down phase, or choose CHANGE WORKOUT to access a different program. For
more information, see Section 4.2, Using the Workouts, Selecting a Goal Type.
For information on how to set, and get maximum benefit from, these type of workout goals consult a Personal Trainer.
For further information on Zone Training see section 3.1, Why Heart Rate Zone Training Exercise?
• Level: Choose the programmed resistance level of the workout. Levels range from 1 to 25.
• Target Heart Rate*: (heart rate workouts only) Gives a recommended heart rate according to age. For Fat
Burn, the target heart rate is computed at 65% of the theoretical maximum†heart rate. For Cardio, the target
heart rate is computed at 80%. For more information on Target Heart Rate, see Section 3, Heart Rate Zone
Training Exercise.
VALUE SETUP SCREENS
• Weight: Entering an accurate weight allows calories to be calculated, and enables Calories Burned, Calories per
Hour, and METs to appear on the Workout Screen.
• Age: Allows heart rate programs to accurately determine target heart rate.
• Gender: Used in the Fit Test prediction equation and associated fitness rating.
†
Defined by the American College of Sports Medicine's "Guidelines for Exercise Testing and Prescription" as equal to 220 minus an individual’s age.
* Target Heart Rate (THR)is a percentage of the theoretical maximum (HRmax). A 40-year-old user’s recommended THR for the HEART RATE HILL and
HEART RATE INTERVAL workouts is 144, or 80 percent of the maximum; so the equation would be (220-40)*.80=144.

11
4) WORKOUT PROGRESS
The Workout Progress screen opens automatically upon completion of the setup, signaling the user to start the workout. This
screen allows the user to monitor the progress of the workout. It provides a visual representation of the workout as it proceeds
and monitors distance, pace, elapsed time, heart rate, level, speed, Watts/METs, and calories expended/calories per hour.
From the Workout Progress Screen, goals including Time, Level, and Target Heart Rate* (for heart rate programs) can be
changed at any point during the workout. This screen also accesses TV viewing. Not every goal item is available in every
workout. Only valid goal times are shown and accessible in the workout progress screen during a workout.
A1. WORKOUT LABEL / MINI PROFILE AREA: Shows the user the workout type, shows a miniature profile when media is
active and covering the main profile area.
B1. WORKOUT PROFILE WINDOW:
This window displays workout progress using one of four workout landscapes.
C1. WORKOUT LANDSCAPE SELECTION BUTTONS: These buttons allow the user to toggle between four workout land-
scapes; CLASSIC PROFILE, MOUNTAIN, 400-METER TRACK and 5K NATURE TRAIL. These can be toggled between
at will without losing workout progress information.
D1. ON-THE-FLY BUTTONS: Enables users to access workout change or workout information during a workout without losing
workout progress.
CHANGE MODE: Choose this button to switch between the Cross-Train Aerobics and Cross-Train Reverse modes.
CHANGE WORKOUT: Choose this button to go back to the SELECT WORKOUT screen and choose a new workout, or to change a goal type or value, while retaining workout progress. To change workouts, choose the new program, enter any remaining values, and press ENTER.
To return to the current workout without making any changes, choose BACK. Select the RESET button on the workout
selection screen to clear all the stored information about the current workout, before changing to a new program.
VIRTUAL TRAINER: Choose this button to enable or disable the VIRTUAL TRAINER.
E1. GOAL DISPLAYS:
HEART RATE: (replaces level on heart rate workouts only) Displays the target heart rate* the user has specified in the
workout setup screens. Can be changed anytime during a workout, by using the arrow keys directly below it, or by touching the HEART RATE button on the Touchscreen, and accessing the Target Heart Rate Workout Setup Screen.
ACTUAL HEART RATE: Displays the heart rate if the user grasps the Lifepulse sensors or wears a Polar-compatible heart
rate chest strap. NOTE: Heart rate can be checked on any of the screens, whether before a workout begins, or during a
workout.
DISTANCE: Displays the accumulated distance traveled during a workout.
CALORIES: Displays the accumulated calories burned.
* Target Heart Rate (THR)is a percentage of the theoretical maximum (HRmax). A 40-year-old user’s recommended THR for the HEART RATE HILL and
HEART RATE INTERVAL workouts is 144, or 80 percent of the maximum; so the equation would be (220-40)*.80=144.
C1
E1
V1
B1
A1
F1
D1
G1
H1
K1
J1
L1
S1
O1
M1
N1P1Q1T1R1

12
F1. TV SELECTION: TV ON/OFF: If enabled, use to access TV viewing. See Section 5.2, Configuration Menu, Manager’s
Configuration 2, TV / FM Radio, for more information.
G1. iPod SELECTION: If detected, use to access an iPod media device. Once detected, the iPod menus can be navigated on
the Touchscreen Display. The unit is capable of playing both music and video.
NOTE: Headphones must be plugged into the Cross-Trainer to access the sound for the iPod. The jack is located on the
bottom of the Options Panel. If the jack is faulty, the Options Panel needs to be replaced. Contact Life Fitness Customer
Support Services for more information. (See page 1 for contact information.)
H1. FM SELECTION: FM ON/OFF: If enabled, use to access FM Radio. See Section 5.2, Configuration Menu, Manager’s
Configuration 2, TV / FM Radio, for more information.
J1. VOLUME: Volume control for all media and system sounds.
NOTE: Headphones must be plugged into the Cross-Trainer to access the sound for all media options. The jack is located
on the bottom of the Options Panel. If the jack is faulty, the Options Panel needs to be replaced. Contact Life Fitness
Customer Support Services for more information. (See page 1 for contact information.)
K1. CHANNEL: Channel control for the TV.
L1. MEDIA CENTER:Allows the user to access TV controls when the TV is viewed at full screen. The media center will
appear over the TV picture. It will automatically close after 10 seconds of idle time.
M1. TV SIZE TOGGLE: Enables the user to toggle through three sizes of TV display.
N1. VIEW PROFILE / TV TOGGLE: Enables the user to toggle between the workout profile and TV display.
O1. ZOOM BUTTON: Select this button to view Level, Time, and Speed in a large, easy to read display. The workout profile is
not viewable while ZOOM mode is active.
P1. SPEED DISPLAY: The Speed Display shows the pedaling speed or rate in miles per hour (or kilometers per hour if
enabled).
Q1. TIME DISPLAY: Select this button to view the time of day, change the length of the workout or to choose a different view
for time. To change workout length, select ELAPSED TIME, use the arrow buttons or the numeric keypad to adjust the
time, and then select ENTER. To change the time view, select ELAPSED TIME, choose a different time view (REMAINING
TIME or HIDDEN TIME) and press ENTER.
To change the length of a workout without leaving the workout progress screen, use the arrow keys on the Touchscreen
Display directly underneath ELAPSED TIME.
NOTE: Changing the length of a workout by using the TIME ELAPSED button has no effect on the time elapsed, which is
an ongoing measurement of the time already spent in a workout.
R1.
LEVEL DISPLAY: Adjust the resistance level of the workout. Choose between 25 resistance levels.
S1. COOL DOWN: Workout programs end automatically in a cool down phase, which lowers the intensity level. In this phase
of a workout the body begins to remove lactic acid and other accumulated by-products of exercise, which build up in muscles during a workout and contribute to muscle soreness.
Press the COOL DOWN key to enter the cool down stage at any point during the workout. Each workout’s cool down level
is automatically adjusted according to the individual user’s performance. (Cool down times are preset in proportion to the
duration of a workout.) The cool down time can be changed by using the corresponding arrow keys on the Touchscreen
Display. At the end of cool down, a workout summary box appears.
T1. PAUSE: Press this key to pause the current workout. A RESUME WORKOUT button and EXIT button appear on the
Touchscreen. Continue the workout by selecting RESUME WORKOUT or end the workout by selecting EXIT.
NOTE: The workout will also pause if the user stops pedaling. To continue the workout, resume pedaling. The pause dura-
tion lasts 60 seconds, after which the console automatically shuts down.
U1. WORKOUT STATISTICS: Continually updates workout progress by showing Distance, Distance Climbed, Pace in minutes
per mile/kilometer, Calories Expended/Calories per Hour, Target Heart Rate (for heart rate programs), Heart Rate (on any
workout if the user is grasping the Lifepulse sensors of wearing a telemetry strap), Time in Zone (if selected as a workout
goal) and METs/Watts (toggles between the two if weight has been entered, otherwise only shows Watts).
The following data can be toggled: Calories, Calories per Hour, Watts, and METs. To customize the toggled information,
press the data display button to access a separate menu. All four choices, along with check boxes, will appear.
Checkmarks indicate which choices will be toggled. For example, if Calories is the only display desired, uncheck the other
three choices. If both Calories and Calories per Hour are desired, uncheck the other two choices. When finished making
the selection, hit CLOSE. Select HIDE ALL to hide all choices.
Changeable information either appears as a button (Time, Level, and Target Heart Rate) or is accessible through
CHANGE WORKOUT.

4) TV
If Favorites and/or Channel List options are enabled, an Options menu will be enabled for selecting a desired channel
selection interface.
A2. TV CONTROLS: Use to access TV viewing options.
FAVORITES: If enabled, use to toggle to Favorite Channel selection menu. The Favorites menu will stay visible as
long as buttons are actively pressed. The menu will automatically disappear after 10 seconds of idle time. See
Section 5.2 Configuration Menu, Manager’s Configuration 2, TV/FM Radio, for more information.
CHANNELS LIST: If enabled, use to toggle to Channel List selection menu. The Channel List menu will stay visible
as long as buttons are actively pressed. The menu will automatically disappear after 10 seconds of idle time. See
Section 5.2 Configuration Menu, Manager’s Configuration 2, TV/FM Radio, for more information.
NUMERIC KEYPAD: Press to access the NUMERIC KEYPAD for manual channel input. The NUMERIC KEYPAD
will stay visible as long as buttons are actively pressed. The menu will automatically disappear after 10 seconds of
idle time.
PREVIOUS CHANNEL: Press to jump to the last TV channel viewed.
SAP (SECONDARYAUDIO PROGRAMMING): Press to activate Secondary Audio Programming when available.
MUTE: Press to silence the audio of the TV.
TV OFF: Press to turn TV viewing off.
CC: Press to activate Closed Captioning.
B2. CURRENT CHANNEL / NOW PLAYING: Displays the current TV or FM channel name. If iPod is active, the name
and artist of the currently playing song or movie is displayed.
13
B2A2

14
5) FM
E2. FM CONTROLS: Use to access pre-set FM Radio stations. Use the SCAN and SEEK buttons to browse available sta-
tions. See Section 5.2 Configuration Menu, Manager’s Configuration 2, TV / FM Radio, for more information.
F2. NUMERIC KEYPAD: Press this button to view a numeric keypad and enter stations manually.
G2. HIDE FM RADIO: Press this button to hide the FM display to view the workout profile. Hiding the playlist does not turn off
the FM playback.
H2. FM RADIO OFF: Press this button to turn FM radio off.
6) iPod
I2. iPod CONTROLS: If detected, use to access iPod data. Use the controls next to the menu item list to navigate through
categories, songs, movies, etc. Press SELECT to accept the highlighted list item.
J2. HIDE PLAYLIST: Press this button to hide the iPod playlist to view the workout profile. Hiding the playlist does not turn off
the iPod.
Additional information appearing in the Workout Progress Screen for different workouts:
ENTER WEIGHT: Appears in the Quick Start workout. Choose ENTER WEIGHT FOR ACCURATE CALORIES so that
METs and Calories Burned/Calories per Hour can be computed and displayed as workout statistics.
TIME IN ZONE: Displays the accumulated time that the heart rate stays within the selected target zone for a Heart Rate
Zone Training workout. See Section 3, Heart Rate Zone Training Exercise, for more information.
PACE DISPLAY:
Allows the user to track whether his or her pace is ahead, behind or on target with his or her desired
pace.
E2
G2 H2
F2
I2
J2

2.3 READING RACK AND ACCESSORY TRAYS
A built-in reading rack (A) allows a book or magazine to be supported during the workout. A built-in accessory tray (B)
provides storage for items such as water bottles, personal media devices, and cell phones.
NOTE: Since reading materials will be in front of the Touchscreen Display, use care when placing reading materials on
the rack, and when turning pages, to ensure that buttons aren’t accidentally toggled.
15
A
B

16
3HEART RATE ZONE TRAINING EXERCISE
3.1 WHY HEART RATE ZONE TRAINING EXERCISE?
Research shows that maintaining a specific heart rate while exercising is the optimal way to monitor the intensity of a
workout and to achieve maximum results. That is the idea behind the Life Fitness Heart Rate Zone Training approach to
exercise.
Zone Training identifies an exerciser's ideal heart rate range, or zone, for burning fat or increasing cardiovascular fitness. The zone is a percentage of the theoretical maximum
†
(HRmax), and its value depends on the workout. The Life
Fitness Cross-Trainer features five exclusive workouts designed to take full advantage of the benefits of Heart Rate
Zone Training exercise:
• FAT BURN • HEART RATE HILL • EXTREME HEART RATE
• CARDIO • HEART RATE INTERVAL
Each workout offers different benefits, as discussed in Section 4, The Workouts.
NOTE: Consulting a fitness trainer is recommended for defining specific fitness goals and designing a workout program.
The Heart Rate Zone Training workout programs measure heart rate. Wear the optional telemetry chest strap, or grip the
Lifepulse sensors, to enable the cross-trainer’s on-board computer to monitor the heart rate during a workout. The computer automatically adjusts the resistance level to maintain the target heart rate* based on the actual heart rate.
To change the target heart rate during a workout, simply enter a new target heart rate either by typing in the desired
number on the keypad or by pressing the Heart Rate button on the Touchscreen.
To switch between programs during a workout, use the CHANGE WORKOUT
button.
†
Defined by the American College of Sports Medicine's "Guidelines for Exercise Testing and Prescription" as equal to 220 minus an individual’s age.
Target Heart Rate (THR) is a percentage of the theoretical maximum. For example, a 40-year-old user's THR for the FAT BURN workout is 117. This work-
out targets 65 percent of the maximum, so the equation would be (220-40)*.65=117.

17
3.2 HEART RATE MONITORING
THE LIFEPULSETMDIGITAL HEART RATE MONITORING SYSTEM
The patented Lifepulse system sensors are the built-in heart rate monitoring system. For the most accurate reading possible, during a workout:
• Grasp the sensors (A) on the arms or bull horns firmly.
• Hold each sensor at the vertical midpoint.
• Keep hands steady and in place.
The console displays the heart rate within 10 to 40 seconds after the user grasps the sensors.
NOTE: Sensors are located on both the arms and bull horns.
A
A

18
3.2 HEART RATE MONITORING
THE OPTIONAL HEART RATE CHEST STRAP
The Life Fitness Cross-Trainer is equipped with Polar® telemetry, a heart rate monitoring system in which electrodes,
pressed against the skin, transfer heart rate signals to the cross-trainer console. These electrodes are attached to a chest
strap that the user wears during the workout. The chest strap is optional. To order it, call Life Fitness Customer Support
Services at 1-800-351-3737.
See the diagram below for correct positioning of the strap. The electrodes (A), which are the two grooved surfaces on
the underside of the strap, must remain wet to transmit accurately the electrical impulses of the heart back to the receiver. Moisten the electrodes. Then, secure the strap as high under the chest muscles as possible. The strap should be
snug, but comfortable enough to allow for normal breathing.
The transmitter strap delivers the most accurate heart rate reading when the electrodes are in direct contact with bare
skin. However, it functions properly through a thin layer of wet clothing.
If it becomes necessary to re-moisten the chest strap electrodes, grasp the center of the strap, pull it away from the
chest to expose the two electrodes, and re-moisten them.
NOTE: If the Lifepulse system sensors are grasped while the chest strap is worn, and if the signals from the sensors
are valid, the on-board computer uses the sensor signals for measuring the heart rate instead of those transmitted with
the chest strap.
A A

19
4THE WORKOUTS
4.1 WORKOUT OVERVIEWS
The following workouts are preprogrammed for the Life Fitness Cross-Trainer.
QUICK START is the fastest way to begin exercising and it bypasses the steps involved in selecting a specific workout program. After the QUICK START key is pressed, a constant level workout begins. The intensity level does not change automatically. To change the level, use the LEVEL ARROW keys or the NUMERIC KEYPAD to enter a higher or lower level number.
After the workout has been in progress for 12 seconds, the touchscreen displays “ENTER WEIGHT”, which the computer
requires to calculate total calories. Using the ARROW KEYS, increase or decrease the displayed weight to the correct value (or
enter the weight using the NUMERIC KEYPAD).
CLASSIC W
ORKOUTS
CLASSIC WORKOUTS are workouts in which intensity levels increase and decrease in set patterns. The following work-
outs may be accessed with this button:
MANUAL is a constant effort workout in which the user can change resistance level or speed at any time.
RANDOM is an interval training workout of constantly changing intensity levels that occur in no regular pattern or
progression.
HILL is an interval training workout. Intervals are periods of intense aerobic exercise separated by regular periods
of lower-intensity exercise.
CROSS-TRAIN AEROBICS simulates the experience of working with a personal trainer. The Message Area dis-
plays prompts at different times to emphasize pushing, pulling, total body, lower body, speed changes, and forward/reverse motion. This versatile workout promotes maximum cross-training benefits.
CROSS-TRAIN REVERSE continuously alternates five minutes of forward motion with two minutes of backward
motion to cross-train different muscle groups.
H
EART RATE + WORKOUTS
HEART RATE + workouts are workouts in which intensity levels increase and decrease in set patterns. The following
workouts may be accessed with this button:
FAT BURN is a low-intensity workout for burning the body’s fat reserves. The user wears a heart rate chest strap, or
grasps the Lifepulse sensors continuously. The program adjusts the intensity level through changing the incline (elevation), based on the actual heart rate, to maintain the rate at 65 percent of the theoretical maximum
†
.
CARDIO is a higher intensity workout for more fit users, emphasizing cardiovascular benefits and maximum fat
burning. The user wears a heart rate chest strap, or grasps the Lifepulse sensors continuously. The program
adjusts the intensity level, based on the actual heart rate, to maintain the rate at 80 percent of the theoretical
maximum.
HEART RATE HILL takes the user through three different hills based on the target heart rate*. The user wears a
heart rate chest strap, or grasps the Lifepulse sensors continuously.
HEART RATE INTERVAL alternates between a hill and a valley based on the target heart rate*. The user wears a
heart rate chest strap, or grasps the Lifepulse sensors continuously.
EXTREME HEART RATE is an intense workout for more experienced users. It is designed to get the heart rate
up and down as quickly as possible. The user wears a heart rate chest strap, or grasps the Lifepulse sensors
continuously.
†
Defined by the American College of Sports Medicine's "Guidelines for Exercise Testing and Prescription" as equal to 220 minus an individual’s age.
* Target Heart Rate (THR)is a percentage of the theoretical maximum (HRmax). A 40-year-old user’s recommended THR for the HEART RATE HILL and
HEART RATE INTERVAL workouts is 144, or 80 percent of the maximum; so the equation would be (220-40)*.80=144.

20
HILL +WORKOUTS
HILL PLUS are workouts in which intensity levels increase and decrease in set patterns. The following workouts may be
accessed with this button:
AROUND THE WORLD is an interval-training workout in which the hills resemble scenes of various geographical
areas.
CASCADES is a two-peak workout in which intensity levels gradually increase and decrease.
FOOTHILLS is a rolling hill workout with low intensity levels.
KILIMANJARO is a Hill workout in which the intensity levels gradually incline toward one ultimate peak and then
gradually decline.
A
DV ANCED WORKOUTS
ADVANCED WORKOUTS are customized workouts designed for the advanced user not used in connection with a per-
sonal trainer. These workouts include:
FIT TEST predicts cardiovascular fitness compared to other people of the same age and gender.
CREATE YOUR OWN
CREATE YOUR OWN workouts enable the user to design personalized workouts based on HEART RATE
INTERVAL and LEVEL INTERVAL.
C
USTOM
CUSTOM WORKOUTS allow the user to select from four custom HEART RATE INTERVAL workouts and four
custom LEVEL INTERVAL workouts pre-defined by the facility fitness professional.

21
4.2 USING THE WORKOUTS
Select a workout. See the chart at the beginning of Section 4.3 for an overview of the steps required to set up each workout.
1) BEGINNING A WORKOUT
There are three ways to begin a workout: Quick Start, Select Workout (see Section 4.22) and Virtual Trainer (see Section
4.5).
SELECTING AND USING QUICK START
QUICK START is the fastest way to begin exercising. It bypasses the steps of selecting a specific workout program. On
the home screen, press the QUICK START button. The workout begins at an intensity level that remains the same unless
manually changed. Choose ENTER WEIGHT so that METs and Calories Burned/Calories per Hour can be computed and
displayed as workout statistics.
2) SELECTING A W
ORKOUT
Press the select workout button to begin the workout selection process. The touchscreen will bring up the top level workout categories which include Classic, Heart Rate +, Hill + and Advanced. Each workout button includes a listing of workout programs or an easy to understand description of the workout. Once a workout is selected, the corresponding
Workout Setup Screens which include goal type (time, distance, calories, and pace), level, age, weight, distance, and target heart rate* will appear. Press ENTER after each selection to record it. After values are set, the workout progress
screen appears and the workout begins.
See section 4.3 for detailed information on available workouts.
3) ENTERING WORKOUT GOALS
SELECTING A GOAL TYPE
Goal Type defaults to TIME (length of workout.) When prompted to enter a Goal Time, use the ARROW KEYS to
increase or decrease the displayed time to the desired value, or key in the desired value with the NUMERIC KEYPAD,
and press ENTER.
Workouts can be programmed to target advanced goals other than the default time goal:
• DISTANCE
• CALORIES
• PACE
• TIME IN ZONE (for heart rate workouts only)
The Distance Goal feature is designed to build endurance. The user sets a distance goal during the workout setup.
Once the goal is met, the workout automatically goes into a cool down phase and ends afterward. To use this feature:
1. Select a workout.
2. In the Goal Type setup screen, choose DISTANCE, enter the desired distance goal, and select ENTER.
3. Finish the setup steps for the selected workout.
4. Begin the workout.
The Calories Goal feature is designed to promote weight loss and weight control. The user sets a calorie goal during the
workout setup. Once the goal is met, the workout automatically goes into a cool down phase and ends afterward. To use
this feature:
1. Select a workout.
2. In the Goal Time setup screen, choose CALORIES, enter the desired calorie goal, and select ENTER.
3. Finish the setup steps for the selected workout.
4. Begin the workout.

22
The Pace Goal feature is designed to allow the user to set the pace of a workout. The user sets a pace goal during the
workout setup. Once the goal is met, the workout automatically goes into a cool down phase and ends afterward. A pace
readout is displayed at the left of the screen showing numeric feedback regarding the user’s progress relating to the
selected pace. To use this feature:
1. Select a workout.
2. In the Goal Time setup screen, choose MORE, select PACE, enter the desired pace goal, and select ENTER.
3. For Units, choose either ENGLISH (to set a pace speed in miles/time) or METRIC (to set a pace speed in
kilometers/time).
4. Enter the distance and time of the workout.
5. The console will calculate the pace the user must maintain to finish the workout in the desired time.
6. Select ENTER to approve the displayed pace or reenter the chosen time and distance.
7. Begin the workout.
The Time in Zone Goal program enhances a workout by setting a certain duration within the target heart rate* as a
workout goal. The program automatically alters the resistance to maintain a pace that will meet that objective within that
duration. Once the objective is met, the workout automatically goes into a cool down phase. To use the Time In Zone
Goal feature:
1. Select a workout.
2. In the Goal Time setup screen, choose TIME IN ZONE (some workouts require the user to choose the MORE option
first), enter the desired amount of time, and select ENTER.
3. Finish the setup steps for the selected workout.
4. Begin the workout.
NOTE: Time in Zone is directly correlated to fitness level. Since the program will continue to increase resistance until the goal
is met, it may be wise to start low and work towards a higher goal. Choose COOL DOWN at any time, to exit the workout and
immediately enter a cool down phase.
For help setting TIME IN ZONE goals, consult a personal trainer. For more information on Heart Rate Zone Training, see
Section 3.1, Why Heart Rate Zone Training?
RESISTANCE LEVEL
The Life Fitness Cross-Trainer provides several different ways to adjust the resistance level of a workout. When prompted,
use the ARROW keys to increase or decrease the displayed resistance level or target heart rate* to the desired value, or
choose the desired value with the NUMERIC KEYPAD, and press ENTER. Adjust the level as needed or desired during the
workout.
• Resistance level: The Life Fitness Cross-Trainer provides a selection of 25 resistance levels. The resistance level
appears in the WORKOUT PROFILE window as rows of lights arranged in columns. Selecting a low intensity level at
first is recommended. As physical conditioning improves, the levels can increase.
TARGET HEART RATE
• Target heart rate: Programs that calculate a target heart rate* base this number on the age of the user and the type of
workout. The user accepts or adjusts the rate when setting up the workout. During the workout itself, the program
reads the heart rate, which is transmitted via the Polar heart rate chest strap or the Lifepulse system sensors; and it
uses this data to adjust the resistance. Manually raising the rate increases the intensity of the cardiovascular exercise.
* Target Heart Rate (THR) is a percentage of the theoretical maximum. For example, a 40-year-old user's THR for the FAT BURN workout is 117. This work-
out targets 65 percent of the maximum, so the equation would be (220-40)*.65=117

23
4) ENTERING WORKOUT VALUES
AGE: When prompted to enter Age, use the ARROW KEYS to increase or decrease the displayed age to the correct
value, or key in the correct value with the NUMERIC KEYPAD, and press ENTER.
Life Fitness Cross-Trainer workout programs that set a target heart rate
* zone first calculate the user’s theoretical maxi-
mum heart rate
†
by subtracting the user’s age from the number 220. The programs then calculate the target zone as a
percentage of the theoretical maximum.
WEIGHT: Select weight and press ENTER. Entering an accurate weight allows for a more accurate calorie calculation
and for METs to be computed and displayed. The on-board computer calculates the number and rate of calories burned
using the entered weight as well as the pedaling speed.
GENDER: Select gender and press ENTER. (Used for the Fit Test).
5) USING M
ARATHON MODE
If Marathon Mode is enabled, a Marathon Mode button will appear in the time entry screen when configuring a workout.
Selecting Marathon Mode sets the workout to an unlimited time workout. The workout can then be ended only by the
user or one of the emergency stop systems.
Within a workout, Marathon Mode can be changed by pressing the Time Key. Pressing the Time Key makes it possible
to set a time goal as long as it's not less than the time already spent in the workout. Anew time goal must be set and
entered to override Marathon Mode.
6) CHANGING/ENDING A WORKOUT
SWITCHING WORKOUTS “ON-THE-FLY”
It is possible during a workout, to switch to another workout program. After a switch, the console retains all the progress
information about the workout since its beginning. To change workouts “on the fly,” simply press CHANGE WORKOUT
and then choose a new workout. To switch to a new workout, and restart the progress information, choose CHANGE
WORKOUT and then RESET. To switch between Cross-Train Aerobics and Cross-Train Reverse, choose CHANGE
MODE.
PAUSING WORKOUTS
Press the PAUSE key or stop pedaling to hold the current workout. A RESUME WORKOUT button and EXIT button
appear on the Touchscreen. Continue the workout by selecting RESUME. The pause duration defaults to 1 minute (configurable by the manager), after which, the console returns to the Home Screen. End the workout by selecting EXIT.
ENDING
WORKOUTS EARLY
To end a workout early, press COOLDOWN on the bottom of the Touchscreen to go directly into the cool down phase. The
COOL DOWNbutton changes into an END WORKOUT button. A user can stop a workout by pushing the END WORKOUT
button; otherwise the cool down phase will automatically begin. The program will designate a cool down time period in proportion to the amount of time spent in the workout. Upon completion of cool down, the Workout Summary screen will appear. To
exit the program without a cool down press the STOP button or select CHANGE PROGRAM, and then RESET.
WORKOUT SUMMARY
Upon ending a workout, a workout summary will appear. The workout summary information displayed depends on the workout
selected. Information may include: Average Level, Distance, Distance Climbed, Calories Burned, Average Heart Rate and
Elapsed Time. The duration of the Workout Summary screen defaults to 1 minute. To extend the screen time, press the More
Time button to reset the counter to 1 minute. Workout summary data can be saved to a USB stick for use in future review and
tracking.
†
Defined by the American College of Sports Medicine's "Guidelines for Exercise Testing and Prescription" as equal to 220 minus an individual’s age.
* Target Heart Rate (THR) is a percentage of the theoretical maximum. For example, a 40-year-old user's THR for the CARDIO workout is 144. This workout
targets 80 percent of the maximum, so the equation would be (220-40)*.80=144.

24
4.3 WORKOUT DESCRIPTIONS
WORKOUT HIERARCHY
Select Workout
Classic
Manual
Random
Hill
Aerobics
& Reverse
Cross-Train
Aerobics
Cross-Train
Reverse
Heart Rate +
Fat Burn and
Cardio
Heart Rate Hill
Heart Rate Interval
Extreme Heart
Rate
Hill +
Around the World
Cascades
Foothills
Kilimanjaro
Advanced
Fit Test
Create Your Own
CYO -
Level Interval
CYO -
Heart Rate Interval
Custom
Custom -
Level Interval
Custom
Heart Rate Interval

25
4.3 WORKOUT DESCRIPTIONS
QUICK START
QUICK START is the fastest way to begin exercising, and it bypasses the specific steps of selecting a specific workout pro-
gram. After pressing the QUICK START button (Touchscreen Display), a MANUALworkout begins. For METs and Calories
Burned/Calories per Hour to be computed and displayed during a workout, select the ENTER WEIGHT button which is
required to calculate these values.
The level is set to the minimum level. To change the level and stay in the Workout Progress screen, press the LEVEL button or
the corresponding UP and DOWNARROW KEYS on the Touchscreen Display.
CLASSIC
WORKOUTS
MANUAL
The MANUAL program is a constant effort workout in which the user can change resistance level at any time.
RANDOM
The RANDOM program creates a terrain of hills and valleys that varies with each workout. More than one million different patterns are possible.
CROSS-TRAIN AEROBICS
During this workout, the Message Area displays prompts to emphasize different muscle groups. To emphasize upperbody muscles, the Message Area displays prompts to focus on pushing and pulling the moving arms at various times. To
emphasize lower-body muscles, the Message Area displays prompts to rest the hands on the stationary handlebar, thus
forcing the legs to do all the work. The program also alternates between forward and reverse motion as well as different
speeds.
Ten seconds after prompting the user to change pedaling direction, the workout applies “braking resistance,” that is, a high
resistance level that essentially forces the user to stop pedaling. Once the user stops pedaling, the workout resumes the
normal resistance level. The actual level of braking resistance depends on the user’s pedaling speed. If the user is pedaling
at a rate equal to, or faster than 6.2 mph (10.0 km/h), the workout applies the maximum level of braking resistance. If the
user is pedaling at a speed below 6.2 mph (10.0 km/h), the workout applies 92 percent of the maximum.
CROSS-TRAIN REVERSE
This workout features alternating periods of pedaling forward and pedaling backwards. If the user chooses a workout duration 14 minutes or above, the unit displays alternating prompts to pedal forward for five minutes and then backward for two
minutes. If the user selects a goal of 13 minutes or below, the display prompts the user to pedal forward for two minutes and
then backward for one minute. If the user selects a goal other than time (distance or calorie), the program uses the default
setting of prompting forward motion for five minutes and reverse for two minutes.
This feature varies the emphasis on different leg muscles. Ten seconds after prompting the user to change pedaling direction, the workout applies “braking resistance,” that is, a high resistance level that essentially forces the user to stop pedaling.
Once the user stops pedaling, the workout resumes the normal resistance level. The actual level of braking resistance
depends on the user’s pedaling SPEED. If the user is pedaling at a rate equal to, or faster than, 6.2 mph (10.0 km/h), the
workout applies the maximum level of braking resistance. If the user is pedaling at a speed below 6.2 mph (10.0 km/h), the
workout applies 92 percent of the maximum.

26
HILL
The Life Fitness-patented HILL workout offers a variety of configurations for interval training. Intervals are periods of intense
cardiovascular exercise separated by regular periods of lower-intensity exercise. The CLASSIC PROFILE WINDOW represents these high and low intervals as columns of light, which together have the appearance of hills and valleys. The computerized interval training workout has been scientifically demonstrated to promote greater cardiorespiratory improvement than
steady-pace training.
The HILL workout goes through four phases, each marked by different intensity levels. The CLASSIC PROFILE WINDOW displays the progress of these phases. As noted in the descriptions below, the heart rate should be measured at two stages in the
workout to gauge its effectiveness. Wear the chest strap or continuously grip the Lifepulse
TM
handles. The Message Area does
not display a request for a heart rate measurement, as it does with CARDIO, FAT BURN and the HEART RATE ZONE
TRAINING programs.
1 Warm-up is a phase of low, gradually rising resistance, which brings the heart rate into the lower end of the target
zone and increases respiration and blood flow to working muscles.
2 Plateau increases the intensity slightly, and keeps it steady, to bring the heart rate to the low end of the target zone.
Check the heart rate at the end of this phase.
3 Interval Training is a series of increasingly steeper hills, alternating with valleys, or stints of recovery. The heart rate
should rise to the high end of the target zone. Check the heart rate at the end of this phase.
3 Cool-down is a low-intensity phase that allows the body to begin removing lactic acid, and other exercise by-prod-
ucts, which build up in muscles and contribute to soreness.
Each column, as seen in the CLASSIC PROFILE WINDOW and the chart above, represents one interval. The overall
duration of the workout determines the length of each interval. Each workout is made up of 20 intervals, so the duration
of each interval is equal to the duration of the entire workout divided by 20.
1 to 9 minutes: Aworkout with a duration of less than 10 minutes is insufficient for the HILL program to complete all
four phases adequately. The program, therefore, condenses a workout of this duration at various stages.
10 to 19 minutes: The interval durations initially are set at 30 seconds for a 10-minute workout. For every minute over
10, each interval increases by three seconds. A15-minute workout consists of 20 intervals at 45 seconds each.
20 to 99 minutes: All intervals last 60 seconds. If the user adds minutes to the pre-set duration while the workout is in
progress, the program adds hills and valleys that are identical to the first eight intervals of the Interval Training phase.
This pattern repeats until the workout is completed.

27
HEART RATE + WORKOUTS
FAT
BURN
The FAT BURN workout is designed to maintain a user’s heart rate at 65 percent of the theoretical maximum†. Throughout the
workout, the user wears a Polar heart rate chest strap or grips the Lifepulse system sensors. If the user is not wearing a chest
strap or grasping the sensors, the WORKOUT PROFILE window displays a heart shape, and the display prompts the user to
grip the sensors. The console continuously monitors and displays the heart rate, adjusting the intensity level of the CrossTrainer to reach and maintain the target*. This workout uses the body’s fat stores and carbohydrates as sources of fuel. A
high percentage of total expended energy is from fat.
CARDIO
The CARDIO workout is virtually identical to FAT BURN; however the target heart rate* is calculated at 80 percent of the
theoretical maximum and more calories from fat are burned in this workout. The user wears a chest strap or grips the
Lifepulse system sensors. The higher target promotes cardiovascular improvement by placing a heavier workload on the
heart muscle.
HEART RATE
HILL
TM
This program combines the standard HILL workout profile with the concept of Heart Rate Zone Training. The default target heart rate* is calculated as 80 percent of the theoretical maximum† (HRmax), but the user can adjust the target rate
during the workout setup. All hills and valleys are percentages of HRmax. The workout consists of three hills that target
three heart rate goals: The first hill brings the heart rate to 70 percent of HRmax. The second hill increases the rate to
75 percent of HRmax. The third hill matches the Target Heart Rate brining the heart rate to 80 percent of HRmax. The
valley always is defined as 65 percent of HRmax.
After a standard three-minute warm-up, the workout progresses toward the first hill and heart rate goal. Once the user reaches 70 percent of HRmax, the hill continues for one minute. When the minute expires, the level decreases into a valley. Once
the user's heart rate falls to 65 percent of HRmax, the valley continues for one minute. Then the next hill begins with its corresponding heart rate goal. After the user completes the third hill/valley pair, the program returns to the first hill and repeats
the cycle as long as the duration allows. At the end of the duration, the workout goes into a cool down phase. If the heart rate
goes above the theoretical maximum for more than 45 seconds, the cross-trainer automatically goes into pause mode. The
program does not proceed to a new heart rate goal until the user reaches the current goal. The user must wear a heart rate
chest strap or grip the Lifepulse sensors throughout the workout.
80% HRmax
75% HRmax
70% HRmax
Hill
65% HRmax
HEART RATE HILL Workout Profile
127 BPM
Hill
Valley Valley Valley
85% THR
65% HRmax 65% HRmax65% HRmax
135 BPM
Hill
144 BPM
117 BPM
User Example: 80 (40 year old / 144 recommended BPM)percent of theoretical maximum (HR )max
117 BPM 117 BPM 117 BPM

28
HEART RATE INTERVAL
This program also combines the standard HILL workout profile with the concept of Heart Rate Zone Training. The default
target heart rate* is calculated as 80 percent of the theoretical maximum† (HRmax), but the user can adjust the target
rate during the workout setup. The workout alternates between a hill, which brings the heart rate up to the target rate of 80
percent of HRmax, and a valley, which brings the heart rate down to 65 percent of HRmax. After a standard three-minute
warm-up, the workout progresses toward the first hill and heart rate goal. Once the goal is reached, the hill continues for three
minutes. Then the level decreases into a valley. Once the 65 percent of HRmax goal is reached, the valley continues for three
minutes, after which the next hill begins. The user's fitness level determines the number of hills and valleys encountered within
the duration. At the end of the duration, the workout goes into a cool down phase. If the heart rate goes above the theoretical maximum
†
for more than 45 seconds, the cross-trainer automatically goes into pause mode. The program does not proceed to a new heart rate goal until the user reaches the current goal. The user must wear a heart rate chest strap or grip the
Lifepulse sensors throughout the workout.
EXTREME HEART RATE
This intense, varied workout is designed to help more experienced users break through fitness improvement plateaus. The
workout alternates between two target heart rates* as quickly as possible. The effect is similar to that of running sprints. The
user must wear a chest strap or grip the Lifepulse
TM
sensors throughout the workout.
When setting up the workout, the user enters a target heart rate. After a standard three-minute warm-up, the intensity
increases, until the user reaches the target heart rate goal of 85 percent of the theoretical maximum
†
(HRmax). That target rate is maintained for a stabilizing period. Then, the intensity decreases. When the heart rate falls to the 65 percent
of HRmax goal, it is maintained there for a stabilizing period. The program repeats the alternating of intensity levels, continuing this pattern throughout the duration. The program does not proceed to a new heart rate goal until the user reaches the current goal.
†
Defined by the American College of Sports Medicine's "Guidelines for Exercise Testing and Prescription" as equal to 220 minus an individual’s age.
* Target Heart Rate (THR)is a percentage of the theoretical maximum (HRmax). A 40-year-old user’s recommended THR for the HEART RATE HILL and
HEART RATE INTERVAL workouts is 144, or 80 percent of the maximum; so the equation would be (220-40)*.80=144.
Warm-up
80% HRmax
Hill
Valley
65% HRmax
80% HRmax
Hill
Hill
Valley
65% HRmax
80% HRmax
Valley
65% HRmax
HEART RATE INTERVAL Workout Profile
144 BPM144 BPM144 BPM
117 BPM
117 BPM 117 BPM 117 BPM
User Example: 80 (40 year old / 144 recommended BPM)percent of theoretical maximum (HR )max
85% HRmax
Stabilizing Period
Walk Speed
Jog Speed
Warm-up
65% HRmax
EXTREME HEART RATE Workout Profile
153 BPM
Stabilizing Period
Walk Speed
Jog Speed
118 BPM
User Example (40 year old / 153 recommended BPM)85 percent of theoretical maximum (HR )max
118 BPM
85% HRmax
Stabilizing Period
Jog Speed
153 BPM
Stabilizing Period
Jog Speed
Walk Speed
65% HRmax
Walk Speed
118 BPM
85% HRmax
Stabilizing Period
Jog Speed
153 BPM
Stabilizing Period
Jog Speed
Walk Speed
Cool Down
Walk Speed
118 BPM

29
HILL + WORKOUTS
HILL
PLUS
The Life Fitness patented HILL PLUS workouts give even more ways to vary interval training. Based on the same principles as the HILL workout, Hill Plus workouts are customized to resemble different locations/training scenarios to add
variety and challenge to Hill workouts
1) AROUND THE WORLD
An interval-training workout in which the hills resemble scenes of various geographical areas.
2) C
ASCADES
A two-peak workout in which intensity levels gradually increase and decrease.
3) FOOTHILLS
A rolling hill workout with low intensity levels.
5) KILIMANJARO
A Hill workout in which the intensity levels gradually incline toward one ultimate peak and then gradually decline.
ADVANCED
WORKOUTS
FIT TEST
The Life Fitness Cross-Trainer Fit Test program is another exclusive feature of this versatile cross-trainer. The Fit Test
workout calculates cardiovascular fitness and can be used to monitor improvements in endurance every four to six
weeks. The user must grasp the hand sensors when prompted or wear a heart rate chest strap, as the test score calculation is based on a heart rate reading. The workout duration will be five minutes at the chosen resistance level.
Immediately afterward, the console will take the user's heart rate reading, calculate a fitness score, and display the
score in the Message Area.
The Fit Test is considered to be a submax VO2 (volume of oxygen) test. It gauges how well the heart supplies oxygenated blood to the exercising muscles, and how efficiently those muscles receive oxygen from the blood. Physicians and
exercise physiologists generally regard this test as a good measure of aerobic capacity.
To set up the Fit Test:
• Begin pedaling.
• Choose ADVANCED, FIT TEST.
• Go through the setup screens for the Fit Test, including weight, age and gender. Press ENTER after each selection to record the entry. (Gender does not require selecting ENTER afterwards.)
• The setup screen for a workout level will appear. (ENTER LEVEL). Consult the following recommended fit test
level chart for an appropriate effort level based on age, gender and activity level. Press ENTER after the selection.
• As the test continues, a message will prompt the user to maintain a pedaling rate between 50-60 rpm (equivalent
to 4.2-5.5 mph). The user must maintain this rate throughout the 5-minute test duration. After 16 seconds, if 50-60
rpm is not maintained, the fit test will automatically terminate.
After the five-minute FIT TEST is completed, a FIT TEST score will be displayed.
FIT TEST PROGRAM SUGGESTED EXERTION LEVELS
Inactive Active Very Active
Cross-Trainer L2-4 men L3-10 men L7-15 men
Fit Test Level L1-2 women L2-5 women L3-10 women
Suggested exertion levels should be used as a guideline for setting up the Fit Test program. The goal is to elevate the
user’s heart rate to a level that is between 60%-85% of their theoretical maximum heart rate.

30
Within each suggested range, these additional guidelines can be used:
Lower Half of Range Upper Half of Range
higher age lower age
lower weight higher weight*
shorter taller
* In cases of excessive weight, use lower half of range.
The computer will not accept:
z
heart rates less than 52 or greater than 200 beats per minute
z
body weights less than 75 pounds (34 kg) or greater than 400 pounds (181 kg)
z
ages below 10 or over 99 years
z
data input that exceeds human potential
If an error is made when entering any Fit Test data, correct it by pressing CLEAR, inputting the correct information, and
pressing ENTER.
It is important to take the Fit Test under similar circumstances each time. Heart rate is dependent on many factors,
including:
z
amount of sleep the previous night (at least seven hours is recommended)
z
time of day
z
time of last meal (two to four hours after the last meal is recommended)
z
time since last beverage containing caffeine or alcohol, or cigarette (at least four hours is recommended)
z
time since last exercised (at least six hours is recommended)
For the most accurate Fit Test results, perform the Fit Test on three consecutive days and average the three scores.
NOTE: To receive a proper Fit Test score, the work done must be within a training heart rate zone that is 60 percent to
85 percent of the theoretical maximum heart rate (HRmax). This rate is defined by the American College of Sports
Medicine's "Guidelines for Exercise Testing and Prescription" as equal to 220 minus an individual's age.
The tables below list fit test results.
RELATIVE FITNESS CLASSIFICATION FOR MEN
Men Estimated VO2 Max (ml O2/kg/min) Per Age Category
Rating 20-29 30-39 40-49 50-59 60+
Elite 55+ 52+ 51+ 47+ 43+
Excellent 53-54 50-51 49-50 45-46 41-42
Very Good 50-52 48-49 46-48 43-44 39-40
Above Average 45-49 43-47 42-45 39-42 35-38
Average 40-44 38-42 37-41 34-38 31-34
Below Average 38-39 36-37 34-36 32-33 29-30
Low 35-37 34-35 31-33 29-31 26-28
Very Low <35 <34 <32 <29 <26

31
RELATIVE FITNESS CLASSIFICATION FOR WOMEN
Women Estimated VO2 Max (ml O2/kg/min) Per Age Category
Rating 20-29 30-39 40-49 50-59 60+
Elite 47+ 44+ 42+ 37+ 35+
Excellent 45-46 42-43 40-41 35-36 33-34
Very Good 43-44 40-41 38-39 33-34 31-32
Above Average 38-42 36-39 34-37 30-32 27-30
Average 33-37 31-35 30-33 26-29 24-26
Below Average 31-32 29-30 28-29 24-25 22-23
Low 28-30 27-28 25-27 22-23 20-21
Very Low <28 <27 <25 <22 <20
Life Fitness developed this rating scale based on VO2 max percentile distributions referenced in American College of
Sports Medicine's "Guidelines for Exercise Testing and Prescription" (7th Ed. 2006) which were obtained from the data
collected by the Cooper Institute Aerobics Center Longitudinal Study, 1970-2002. It is designed to provide a qualitative
description of a user’s VO2 max estimation; and a means of guiding assessment and tracking improvement.
CREATE
YOUR OWN
CREATE YOUR OWN workouts enable the user to design personalized workouts based on LEVEL INTERVAL or on
HEART RATE INTERVAL. CREATE YOUR OWN WORKOUTS may be disabled through the manager’s configuration
screen (See Section 5.2, Configuration Menu, Manager’s Configuration 2, Create Your Own Manager Configuration, for
details). Users cannot name and save their workout.
C
USTOM WORKOUTS
These training programs are preset custom workouts created by the facility training professional. The workouts may be
LEVEL INTERVAL or HEART RATE INTERVAL workouts created for specific results. Each Custom Workout can have
up to four different setups. The training professional can create customized workout names for each setup. Consult the
facility training professional for details on individual Custom Workouts.

32
WORKOUT LANDSCAPE™ PERSPECTIVES
Workout Landscapes provide users with three additional ways to visualize progress through a workout.
1) 400-METER TRACK (DEFAULT)
The 400-Meter Track appears whenever a workout begins. This Landscape
shows the current workout as an indicator line that traces a path around a
400-meter track, marking off 100-meter intervals. Every time the user travels 400 meters, taking the indicator line all the way around the track, the lap
counter in the lower left of the profile screen increases by one and the indicator line starts over at the beginning of the track. To return to the 400Meter Track after selecting a Workout Landscape, touch the 400-Meter
Track icon in the top left of the profile screen.
2) CLASSIC P
ROFILE
Switch to the Classic Profile by touching the Classic Profile icon in the top
left of the profile screen. This view shows the level of intensity in a workoutin-progress as proportional columns. The height of the column furthest to
the left is proportional to the current level of intensity.
3) MOUNTAIN
Switch to the Mountain Landscape by touching the Mountain icon in the top
left of the profile screen. This Landscape shows the current workout as an
indicator line that traces a path up the face of a 2,000 foot / 610 meter high
mountain. Every time the user climbs the equivalent of 2,000 feet / 610
meters, taking the indicator line to the top of the mountain, the mountain
counter in the lower left of the profile screen increases by one and the indicator line starts over at the base of the mountain.
4) 5K NATURE TRAIL
Switch to the 5K Nature Trail Landscape by touching the Trail icon in the top
left of the profile screen. This Landscape shows the current workout as an
indicator line that traces a path around a 5-kilometer trail, marking off 1-kilometer intervals. Every time the user travels 5 kilometers, taking the indicator
line all the way around the trail, the lap counter in the lower left of the profile
screen increases by one and the indicator line starts over at the beginning of
the trail.

33
4.4 MAXIMIZING WORKOUTS ON A LIFE FITNESS CROSS-TRAINER
SELECTING A LEVEL
The Life Fitness Cross-Trainer provides a selection of 25 intensity levels. Each level represents a range of resistance percentages. Selecting a low intensity level at first is recommended. As physical conditioning improves, the levels can increase.
COOL DOWN
Life Fitness' unique cool down protocol automatically customizes every cool down based on each user's workout performance. Workout performance factors, such level, duration, and heart rate, determine the duration and intensity of the
cool-down.
4.5 ADDITIONAL FEATURES
A
UDIO CUES
Audio Cues alert users to stages of their workout. Note that audio events are disabled while the TV or FM radio features
are in operation. The manager may also disable Audio Cues through the Manager's Configuration screen (See Section
5.2, Manager’s Configuration 2, Audio Cues, for details).
• Startup Sound: Plays when a workout begins, such as when the Quick Start key is pushed or the workout
timer starts running on any other workout.
• Pause Sound: Plays when a workout is paused and when a paused workout resumes.
• Finish Sound: Plays when a workout enters the cool down phase, when a workout is complete, and when
the Workout Summary is displayed.
• Heartbeat Sound: Plays to prompt the user to grasp the contact heart rate sensors.
iPod C
OMPATIBILITY
This compatibility makes it possible for iPod users to plug in and charge their iPods and iPod nanos, control their iPod
playlists from the console and watch iPod-delivered video on the equipment's large LCD screen. Users can plug their
headphones directly into the equipment console while safely storing their player in the iPod holding tray.
VIRTUAL TRAINER
Created for beginners as well as the frequent fitness equipment user, the Virtual Trainer takes the intimidation out of
beginning a new workout and provides ongoing encouragement. With the push of a button, a male or female face
appears on the integrated LCD screen and advises the user on every aspect of the workout, from describing workout
programs and general product usage to updates on workout statistics including distance, calories and time.
USB CONNECTIVITY
Users can create and save workouts and personal settings, such as weight, goals and speed on any USB stick so that
they don’t have to enter the data again the next time they work out. This feature also enables users to track workout performance by allowing them to save their workout results to the USB stick at the end of the workout.
Z
OOM FEATURE
This feature enlarges the speed, level and time displays for easier viewing of data.
MEDIA CENTER
Allows the user to access TV controls when the TV is viewed in full screen. The media center will appear over the TV
picture. It will automatically close after 10 seconds of idle time.

34
5SYSTEM OPTIONS MENU
5.1 USING THE SYSTEM OPTIONS MENU
Fitness club managers and other authorized personnel can use the Systems Options feature to change default settings,
or to enable or disable certain programs or displays on the Engage console, and to run systems checks. To enter the
Systems Options, press SELECT WORKOUT. Then touch the Life Fitness logo in the upper right hand corner of the
screen three consecutive times.
SYSTEM O
PTIONS OVERVIEW
SYSTEM
TEST
Allows technicians to run systems diagnostics. NOTE: These tests should only be used by (or with the explicit instruction
of) a trained Life Fitness service technician.
SYSTEM TEST MENU 1 SYSTEM TEST MENU 2
System Comm Test External Serial EE Test
System Diagnostics CSafe Network Test/Status
Key Pad Test CSafe Loopback Test
iPod Test
Heart Rate Test
INFORMATION
Allows authorized personnel to access statistics on machine usage (Statistics and Usage Log). All other information is
designed for use by trained Life Fitness service technicians.
Statistics Date & Time Information
Software Versions System Errors
Maintenance Information
Usage Log
C
ONFIGURATION
Allows access to all of the configurable settings of the unit. Configurations which should only be changed by qualified
technicians are password protected.
Manager Create Your Own
Manufacturer (password protected) Export / Import Settings
TV Clock
MAINTENANCE
Allows service technicians to submit part replacements. Only for use by qualified service technicians.
Replacing Console

35
5.2 CONFIGURATION MENU
MANAGER
Allows the manager to set unit defaults, configure workout duration, set stand by, and program custom messages.
Choosing Manager accesses Manager’s Configuration 1. The forward button on the bottom right of the screen opens
Manager’s Configuration 2.
Manager’s Configuration 1 accesses defaults for Language, Units (English or Metric), Workout Duration Configuration,
and Stand By Configuration.
Manager’s Configuration 2 accesses defaults for Custom Message, Create Your Own, Program Timeout, Fit Test,
Marathon Mode, System Beeps, Pause Time, Telemetry, Virtual Trainer, Network, and Audio Cues.
T
O SET DEFAULTS
Select appropriate radio buttons to select toggle settings. Use the arrow keys to modify variable default values. Select
DEFAULTS to return all values to original factory settings. See chart 5.3 for an overview of adjustable configurations and
factory defaults of the Life Fitness Cross-Trainer.
1) M
ANAGERS CONFIGURATION 1
L
ANGUAGE (DEFAULT:ENGLISH)
To enable the Language option, select the Language button to enter the Language Setup screen. Toggle the mode
from DISABLED to ENABLED. The following can be configured:
1. Default language.
2. Which of 13 languages are available to the user.
3. What order the language flags appear on the Home Screen.
4. Which flag will appear to represent those languages that may have multiple options.
The available language flags appear on the Home Screen. The user must select a language change before beginning a
workout. If more than six languages are configured available, a More Flags button will appear which will open a language selection screen for the user. Upon selecting a language flag, the language will immediately become active and
the selection screen will close.
The following languages are available:
English, German, French, Italian, Japanese, Dutch, Spanish, Portuguese, Korean, Russian, Turkish, Traditional Chinese,
and Simplified Chinese.
UNITS (DEFAULT:ENGLISH)
Toggle the default units displayed between ENGLISH and METRIC. Choose “User Selectable” to allow users to choose
desired units on-screen during a workout.
WORKOUT DURATION CONFIGURATION (DEFAULT: 60 MINUTES)
Workout Duration Configuration: Allows the manager to set a maximum workout limit. The default Max Workout
Duration is 60 minutes. The time can be modified using the up or down arrow keys.
STANDBY CONFIGURATION (DEFAULT:ENABLED)
Inactivity Timer: Under Stand By Configuration choose INACTIVITY TIMER, then select ENABLED. Set the desired
amount of time of inactivity before the system automatically turns the LCD screen backlight off. The LCD screen will illuminate the next time activity is detected. To turn off the Inactivity Timer, choose DISABLED.
2) MANAGERS CONFIGURATION 2
CUSTOM MESSAGE (DEFAULT:ENABLED)
This configuration allows for a custom message to be displayed across the Home Screen.
Creating/Changing a Custom Message — Upon entering the Custom Message Setup screen, a message can be
entered using the on-screen keyboard. Use the Shift button to input special characters and capital letters. The message
will scroll across the top of the screen as the message is being input, giving real-time feedback.
Accepting a Custom Message — To accept the Custom Message, simply select the Main Menu button.
Erasing a Custom Message — To erase a Custom Message, enter the Custom Message Setup screen. Select the Clear
Message button and then select Main Menu.

36
CREATE YOUR OWN (DEFAULT:ENABLED)
The manager can enable or disable the Create Your Own workout feature.
PROGRAM TIMEOUT (DEFAULT: 60 SECONDS)
Sets the amount of time the user can go without touching the Touchscreen while setting up their workout, before the
console resets back to the Home Screen. Program Timeout can be set from 20 to 255 seconds.
FIT TEST (DEFAULT:ENABLED)
Choose OFF to disable the Life Fitness Fit Test.
MARATHON MODE (DEFAULT:DISABLED)
Marathon Mode has no preset or settable goal. It allows the user to workout indefinitely. If enabled, a workout in
Marathon Mode ends only if the user chooses to end it or a stop system is activated.
SYSTEM BEEPS (DEFAULT:ON)
The System Beeps Configuration allows the manager to disable the beeping sound.
PAUSE T
IME (DEFAULT:ONE MINUTE)
Managers can adjust the Pause Time from 1 to 99 minutes.
TELEMETRY (DEFAULT:ENABLED)
The telemetry feature makes it possible to use the Polar®-compatible Heart Rate Zone Training exercise chest strap for
monitoring the heart rate.
VIRTUAL TRAINER (DEFAULT:ON)
The Virtual Trainer feature makes it possible for a male or female face to appear on the integrated LCD screen and
advise the user on every aspect of the workout.
NETWORK (DEFAULT:VIVO)
Managers can select from the following options: Vivo, Other (network), and None.
AUDIO CUES MANAGER CONFIGURATION
The Audio Cues Manager Configuration allows the manager to enable or disable the Audio Cues feature.
3) TV / FM R
ADIO
Brings up TV / FM Radio configuration screen, which is used to set and customize TV and FM radio reception options.
TV SETUP
Opens the TV Setup screen allowing adjustment of brightness, contrast, saturation, and hue. Also allows choice of TV
format and channel setup.
• To Set Up Channels: select Channel Setup; Auto, Start.
Audio Only option: Allows only the TV audio to be heard. TV video is disabled.
• To Delete an Unwanted Channel: Choose Channel Setup; Manual, use the Channel Controls to choose the chan-
nel to be deleted, select delete, return the Channel Setup to Auto.
• To Restore a Channel: Choose Channel Setup, Manual; use the Channel Controls to choose the channel to be
restored, select Add, return the Channel Setup to Auto.
• To Adjust Picture Setup: Brightness, Contrast, Saturation, and Hue can be adjusted by using the corresponding
arrow buttons. To return to the unit defaults, select Default.
Max Volume Setup: Opens the Max Volume controls. (Headphones must be used for this function.) The upper set
of arrows adjusts the volume capacity higher or lower, allowing clubs to compensate for average noise levels within.
The maximum volume returns to this default after each workout.
The Volume Down, Volume Up arrows control the volume of the unit for the current usage. After each session ends,
the unit resets to a mid-range volume corresponding to the maximum volume set up.
TV Format: Opens the TV Format window. Choose the appropriate country, TV format (NTSC-M, PAL-I, PAL-B/G,
SECAM-L), and Audio format (M-Korea, B/G FM, D/K1, D/K2, D/K Mono HDEV3, D/K3, B/G NICAM, L NICAM-AM, I
NICAM, D/K NICAM, D/K NICAM HDEV2, D/K NICAM HDEV3, BTSC-Stereo) from the provided listings. Select OK
to accept the settings.

37
Frequency Tuning: Opens the Frequency Tuning window. Allows channel scanning through all available frequencies beginning at 45 MHZ. Begin a scan by selecting Start. Scroll through found channels using the Channel Up and
Down arrow keys on the screen.
Channels can be fine tuned using the arrow keys located below the Frequency Tuning Start button. Use the Channel
Up and Down arrow keys to select a channel to fine tune. Press the Fine Tuning arrow keys to adjust the frequency
for the best possible picture.
Select OK to accept channels.
TV C
HANNEL FAVORITES
Opens the Favorite Channel configuration screen. Up to 9 favorite channels can be stored for quick access during a
workout. This feature may be enabled or disabled.
NOTE: Setting channels using the auto channel setup procedure, as instructed in TV SETUP, is recommended before
attempting to setup favorite channels.
To Set Up a Favorite Channel: Select (touch) the ENABLE radial button, select the radial button next to the input slot
desired, select Enter Name, input the channel name using the keyboard display, select OK to accept the channel
name, select the desired channel using the Up or Down ARROW Keys. Continue as desired to set up to 9 favorite
channels. Select OK to set the channels to memory.
TV C
HANNEL NAME
/SORT
Opens the Channel Name / Sort configuration screen. Allows the facility manager to customize the TV channel list order. This
feature may be enabled or disabled.
NOTE: Setting channels using the auto channel setup procedure, as instructed in TV SETUP, is recommended before attempting to setup favorite channels.
Validation: The validation checkbox enables or disables viewing of the channel in the list. Select the checkbox to
enable the channel. If Channel Name / Sort and Channel Favorites are both enabled, channels not marked as valid
(enabled) in Channel Name / Sort will be removed from Channel Favorites.
Channel Swap: To swap channels within the channel listing, select Channel Swap. Select the radio button next to
the desired channel. The Channel Swap window will appear showing the channel selected for swapping. Use the Up
or Down arrow keys to select the second channel to swap with the previous channel. Select the swap button to preview the channel swap information. Press OK to confirm the channel swap or CANCEL to exit without swapping
channels.
PROMO CHANNEL SETUP
Opens the Promo Channel Setup screen. If enabled, one existing input channel can be selected to be a dedicated channel for internal promotional broadcast use. Select the Channel Change button to scroll up or down to the desired channel.
ADVANCED PROMO CHANNEL SETTINGS
When Promo Channel is enabled, the option becomes available to choose how Promo Channel may be configured when
viewed in the attract screen.
If “Promo Channel Only” is selected, only the channel selected as the Promo Channel is available for display in the
attract screen.
If “Allow User to Change Channel” is selected, users may change the channel displayed in the attract screen using
the CHANNEL UP or DOWN arrow keys.
Within this option, the number of minutes before the TV display returns to the Promo Channel is set. Whether or not
the unit starts up with the Promo Channel displayed can also be configured.
If “Start with Promo Channel” is not selected, the unit will startup and display the last channel selected by the user.
FM RADIO SETUP
Opens the FM Radio Setup screen allowing FM channel setup. This feature may be enabled or disabled.
To Set Up Channels: Select Channel Setup; Auto, Start.
To Delete an Unwanted Channel: Choose Channel Setup; Manual, use the Channel Controls to choose the channel
to be deleted, select delete, return the Channel Setup to Auto.
To Restore a Channel: Choose Channel Setup; Manual, use the Channel Controls to choose the channel to be
restored, select Add, return the Channel Setup to Auto.

4) TOUCH SCREEN CONFIGURATION
Follow the instructions on the screen to recalibrate the Touch Screen. If calibration was successful, a prompt will appear
along with a 30 second countdown. Touch the screen anywhere to save the calibration data. if calibration was unsuccessful, a “+” will appear in the center of the screen and the calibration will have to be redone. Contact Life Fitness if
repeated attempts at calibration were unsuccessful.
5) EXPORT / IMPORT SETTINGS
Brings up the Export / Import Settings screen which is used to import or export manager and manufacturer configurable
settings. This can be advantageous when many or all optional features are enabled and configured.
To Import or Export Settings: Insert a USB stick into the USB port. Enter the Import/Export Settings through the
Configuration Menu. Select “Import Settings to USB” or “Export Settings To USB”. Upon notification, remove the
USB stick from the USB port.
NOTE: It is important to turn the unit off before inserting or removing the USB stick.
NOTE: Exported setting information is product specific. Cross-Trainer settings can only be imported into other, same
model cross-trainers. Cross-trainer settings cannot be used to update settings of any other product.
NOTE: This method is not recommended for the setup of basic TV or FM channels. See TV Setup or FM Radio Setup to
set basic channel configuration.
38

5.3 CONFIGURATION SETTINGS
MANAGER’S CONFIGURATION 1
SETTING DEFAULT DESCRIPTION
LANGUAGE ENGLISH The language of the Message Area display. Choices include English, German, French,
Italian, Japanese, Dutch, Spanish, Portuguese, Korean, Russian, Turkish, Traditional Chinese
and Simplified Chinese.
ENGLISH/METRIC UNITS ENGLISH The measurement unit type for weight, distance, and speed.
WORKOUT DURATION 60 MINUTES This feature enables fitness club managers to set workout duration limits during peak and non-
peak hours of club traffic. If the setup is off, no duration limits are set. See the topic Section 5.1,
Workout Duration Configuration. The allowed range is 1 to 99 minutes.
STANDBYCONFIGURATION ENABLED Inactivity Timer: Enables the LCD screen backlight to be turned off due to inactivity. See Section
5.1, Standby Configuration.
MANAGER’S CONFIGURATION 2
SETTING DEFAULT DESCRIPTION
CUSTOM MESSAGE SETUP ENABLED See Using the Custom Message Setup in this section.
CREATE YOUR OWN ENABLED This feature allows the manager to enable or disable the Create Your Own Workout feature.
PROGRAM TIMEOUT 60 SECONDS The amount of time the user can go without touching the Touchscreen during workout setup,
before the unit returns to the Home Screen. The allowed range is 20 to 255 seconds.
FIT TEST ENABLED Enable/Disable Fit Test.
MARATHON MODE DISABLED Enable/Disable Marathon Mode.
SYSTEM BEEPS ON Enable/Disable System Beeps.
PAUSE TIME 1 (minute) The amount of time the unit can be inactive before it reverts back to the Home Screen. The
allowed range is 1 to 99 minutes.
TELEMETRY ENABLED Switching on the telemetry feature makes it possible to use the Polar®-compatible Heart Rate
Zone Training exercise chest strap for monitoring the heart rate.
VIRTUALTRAINER ON Enable/Disable the Virtual Trainer feature.
NETWORK VIVO Choose from the following three network options: Vivo, Other (network), and None.
AUDIO CUES ENABLED Enable/Disable Audio Cues.
39

5.4 SPECIFICATIONS
L
IFE FITNESS 95X ENGAGE CONSOLE SPECIFICATIONS
Console Option: 15” E3Integrated LCDTMSystem with Touch Screen Technology
Resolution: 1024x768
Channel Coverage: CATV: 1-125
Headphone Jack: 300 milliwatt, 3.5mm Stereo
Broadcast Capabilities: PAL/SECAM and NTSC require separate tuners. NTSC tuner supports NTSC-Japan, NTSC-HRC, NTSC-M,
NTSC-N. NTSC also supports PAL-M and PAL-N which are unique PAL encodings for Argentina, Brazil,
Paraguay and Uruguay. PAL/SECAM tuner supports PAL, PAL-M, PAL-N, SECAM-B/G and SECAM-D/K.
Touch Screen: 5-Wire Resistive Touch Screen
Touch Screen Display: Select Workout, Virtual Trainer, USB Preset Selection, Workout Setup, Workout Progress, Workout Summary
Information, Media Center, Language Select, Quick Start, VIVO, Screen Lock/Unlock
Workouts: Quick Start // Classic: Manual, Random, Hill, Cross-Train Aerobics, Cross-Train Reverse // Heart Rate +: Fat
Burn, Cardio, Heart Rate Hill
TM
, Heart Rate IntervalTM, Extreme Heart RateTM// Hill +: Around the World,
Cascades, Foothills, Kilimanjaro // Advanced Workouts: Fit Test // Create Your Own: Level Interval and Heart
Rate Interval // Custom: Level Interval and Heart Rate Interval
Modes: Aerobics and Reverse modes during all workouts except for Fat Burn, Cardio, Heart Rate Hill, Heart Rate
Interval, or Extreme Heart Rate
Levels: 25 (speed independent)
Manager-Defined/
User-Selected Languages: English, Spanish, Portuguese, Italian, French, German, Dutch, Russian, Chinese (traditional and simplified),
Japanese, Turkish, and Korean
Display Readout: Level, Heart Rate, Pace, Elapsed Time, Time Remaining, Time in Zone, Time of Day, Distance, Distance
Climbed, Distance Remaining, Calories, Calories per Hours, Watts, METs
iPod Compatibility: iPod video capability on LCD screen
iPod/iPod nano playlist management and LCD screen
iPod/iPod nano power and charging
TV Special Features: 125 available channels, Favorite Channels, Previous Channel Viewed, Channel Renumbering, Secondary
Audio Programs (SAP), Promo Channel, Mute
PHYSICAL DIMENSIONS:
95 XE Engage Console
Length: 16.5 inches / 41.9 centimeters
Width: 15.5 inches / 39.4 centimeters
Height: 4.5 inches / 11.4 centimeters
Weight: 10.75 pounds / 4.9 kilograms
SHIPPING DIMENSIONS:
95 XE Engage Console
Length: 20 inches / 50.8 centimeters
Width: 18.5 inches / 47 centimeters
Height: 7.625 inches / 19.37 centimeters
Weight: 13.6 pounds / 6.2 kilograms
40

5.5 WARRANTY INFORMATION
WARRANTY COVERAGE 95 XE ENGAGE CROSS-TRAINER
Model 2 Years 1 Year
95X Mechanical and Labor
Electrical components
*NOTE - Once any commercial product is placed in a private residence (home), it automatically becomes covered under that product category's consumer
warranty. Warranty coverage begins at the original date of sale.
41
WHAT IS COVERED:
This Life Fitness commercial exercise equipment (“Product”) is warranted to be
free of all defects in material and workmanship.
WHO IS COVERED:
The original purchaser or any person receiving the Product as a gift from the
original purchaser.
HOW LONG IS IT COVERED:
All coverage is provided by specific Product according to the guidelines listed
on the chart accompanying this warranty card.
WHO PAYS TRANSPORTATION & INSURANCE FOR SERVICE:
If the Product or any covered part must be returned to a service facility for
repairs, We, Life Fitness, will pay all transportation and insurance charges for
the first year. You are responsible for transportation and insurance charges during the second and third years (if applicable).
WHAT WE WILLDO TO CORRECT COVERED DEFECTS:
We will ship to you any new or rebuilt replacement part or component, or, at our
option, replace the Product. Such replacement parts are warranted for the
remaining portion of the original
warranty period.
WHAT IS NOT COVERED:
Any failures or damage caused by unauthorized service, misuse, accident, negligence, improper assembly or installation, debris resulting from any construction activities in the Product’s environment, rust or corrosion as a result of the
Product’s location, alterations or modifications without our written authorization
or by failure on your part to use, operate and maintain the Product as set out in
your Operation Manual (“Manual”). All terms of this warranty are void if this
product is moved beyond the continental borders of the United States of
America (excluding Alaska, Hawaii and Canada) and are then subject to
the terms provided by that country’s local authorized Life Fitness representative.
WHAT YOU MUST DO:
Retain proof of purchase (our receipt of the attached registration card assures
registration of purchase information but is not required); use, operate and
maintain the Product as specified in the Manual; notify Customer Support
Services of any defect within 10 days after discovery of the defect; if instructed,
return any defective part for replacement or, if necessary, the entire Product for
repair.
OPERATION MANUAL:
It is VERY IMPORTANT THAT YOU READ THE MANUAL before operating the
Product. Remember to perform the periodic maintenance requirements specified in the Manual to assure proper operation and your continued satisfaction.
WARRANTYREGISTRATION:
Please COMPLETE and MAIL the attached registration card IMMEDIATELY.
Our receipt assures that your name, address and date of purchase are on file
as a registered owner of the Product. Failure to return the card will not affect
your rights under this warranty. Being a registered owner assures coverage in
the event you lose your proof of purchase. In any event, always retain proof of
purchase, such as your bill of sale.
HOW TO GET PARTS & SERVICE:
Simply call Customer Support Services at (800) 351–3737 or (847) 451–0036,
Monday through Friday from 8:00 a.m. to 6:00 p.m. Central Standard Time, and
tell them your name, address and the serial number of your Product. They will
tell you how to get a replacement part, or, if necessary, arrange for service
where your Product is located or advise you on how and where to ship the
Product for service.
Before shipping:
1. obtain a Return Authorization Number (RA#) from Customer Support
Services
2. securely pack your Product (use the original shipping carton, if possible)
3. write the RA# on the outside of the carton
4. insure the Product, and
5. include a letter explaining the defect or problem and a copy of your proof of
purchase if you believe the service is covered by warranty
EXCLUSIVE WARRANTY:
THIS LIMITED WARRANTYIS IN LIEU OF ALLOTHER WARRANTIES OF
ANY KIND EITHER EXPRESSED OR IMPLIED, INCLUDING BUT NOT LIMITED TO THE IMPLIED WARRANTIES OF MERCHANTABILITYAND FITNESS
FOR APARTICULAR PURPOSE, AND ALL OTHER OBLIGATIONS OR LIABILITIES ON OUR PART. We neither assume nor authorize any person to assure
for us any other obligation or liability concerning the sale of this Product. Under
no circumstances shall we be liable under this warranty, or otherwise, of any
damage to any person or property, including any lost profits or lost savings, for
any special, indirect, secondary, incidental or consequential damages of any
nature arising out of the use of or inability to use this Product. Some states do
not allow the exclusion or limitation of implied warranties or of liability for incidental or consequential damages, so the above limitations or exclusions may
not apply to you.
CHANGES IN WARRANTYNOT AUTHORIZED:
No one is authorized to change, modify or extend the terms of this limited warranty.
EFFECT OF STATE LAWS:
This warranty gives you specific legal rights and you may have other rights
which vary from state to state.
OUR PLEDGE TO YOU:
Our Products are designed and manufactured to the highest standards.
We want you completely satisfied with our Products and will do everything
possible under the terms of this warranty to keep you secure in knowing you
have bought the best!

Life Fitness World Headquarters
5100 North River Road
Schiller Park, IL 60176 USA
M051-00K70-A035
 Loading...