

This booklet is printed with soy ink. Printed in Mexico
This booklet is made from 95% post-consumer recycled paper.
VS810PP
VS810PP
User Guide
Usuario
Guía del
User Guide
XXXXXXXXXX (1.0)
ME
VS810PP

Copyright©2014 LG Electronics, Inc. All rights reserved.
LG and the LG logo are registered trademarks of LG Corp.
All other trademarks are the property of their respective
owners.

Important Customer Information
Before you begin
Before reading this user guide and getting started, please review the
separate Product Safety and Warranty Information guide for important
product safety and warranty information about your device.
1

Table of Contents
2
Important Customer Information...........................................................1
Table of Contents ...................................................................................2
The Basics ...............................................................................................4
Phone overview..................................................................................................... 4
Installing the battery .............................................................................................7
Charging the phone ............................................................................................. 8
The memory card ................................................................................................10
Locking and unlocking the screen ......................................................................11
Touch screen tips ................................................................................................15
Home screen ........................................................................................................17
Google Account Setup .........................................................................27
Connecting to Networks and Devices ................................................29
Wi-Fi ....................................................................................................................29
Bluetooth .............................................................................................................30
Connecting to Virtual Private Networks ............................................................31
USB Connection .................................................................................................32
Calls .......................................................................................................33
Making a call .......................................................................................................33
Calling your contacts .........................................................................................33
Call settings ........................................................................................................ 36
Communication ....................................................................................37
Contacts .............................................................................................................. 37
Messaging ............................................................................................................41
Email ....................................................................................................................42
Entertainment ...................................................................................... 45
Camera and Video ..............................................................................................45
Gallery .................................................................................................................49
Clock ..................................................................................................................... 51
Tools ....................................................................................................... 51
Calendar ...............................................................................................................51
Google+ ...............................................................................................................54
Voice Search ....................................................................................................... 55
Voice Command ................................................................................................. 55

Table of Contents
Downloads ........................................................................................................... 55
Chrome ................................................................................................................56
Settings .................................................................................................59
Phone Software Update....................................................................... 81
FAQ ....................................................................................................... 82
Safety .................................................................................................... 88
Consumer Information About Radio Frequency Emissions ...........................90
Consumer Information on SAR .......................................................................94
FCC Hearing-Aid Compatibility (HAC) Regulations for Wireless Devices ... 96
Caution:
Avoid potential hearing loss. ............................................................................. 98
TIA Safety Information ......................................................................................99
Safety Information ........................................................................................... 102
FDA Consumer Update ....................................................................................107
LIMITED WARRANTY STATEMENT ................................................. 118
Index .................................................................................................... 122
3
The Basics
4
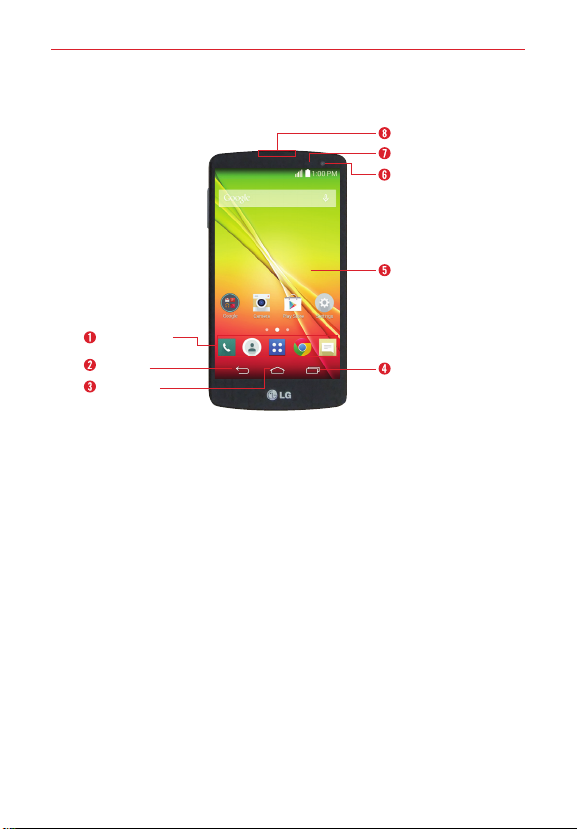
Phone overview
Front View
QuickTap Bar
Back Key
Home Key
NOTES • All screen shots in this guide are simulated. Actual displays may vary.
• Instructions to perform tasks in this guide are based on the default settings and may
change depending on the mode and software version on your phone.
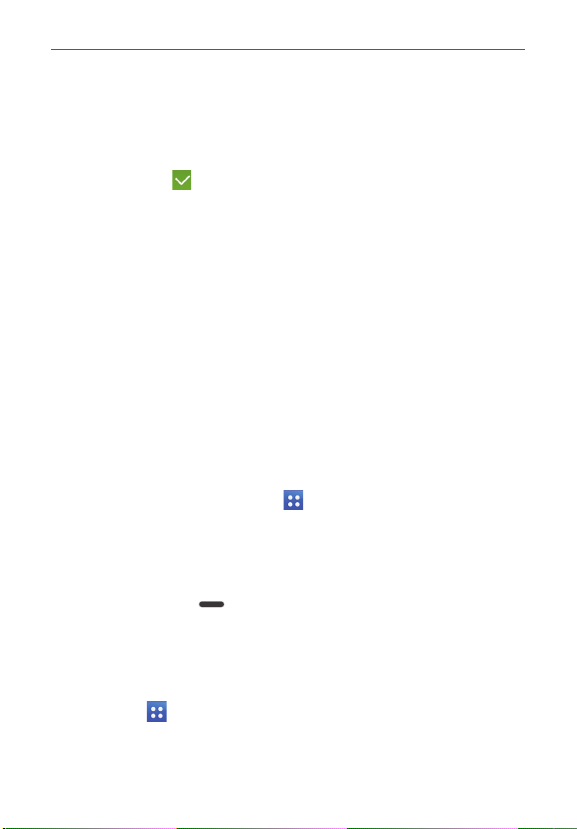
1. QuickTap Bar Provides icons for quick, one-touch access to the
Applications screen and the apps you use most often.
NOTE You can change the icons in the QuickTap bar to suit your needs. To reposition, add, or
remove an icon, see page 17.
2. Back Key Tap this Touch Key to return to the previous screen or close
pop-up items (such as menus, dialog boxes, and the on-screen
keyboard). Touch and hold it to access the Dual window function which
allows you to use two apps at the same time.
3.
Home Key Tap this Touch Key to return to the Home screen (or your
default Home screen panel from any of the Home screen extension
panels) Touch and hold it to access Google now.
Recent Apps Key Tap this Touch Key to display recently used apps.
4.
Touch and hold it to open an Options menu with options that affect the
current screen or app. This only applies when available, depending on
the screen or app.
Earpiece
Proximity Sensor
Front Camera
Home Screen
Recent Apps Key
The Basics
5. Home Screen Displays all of the items needed to operate your phone
including icons for app access, widgets, and the Status Bar (with status
icons) allowing simple touch access to all of its functions and features.
WARNING! Placing a heavy object on the phone or sitting on it can damage the LCD and
touchscreen functions.
6. Front Camera Use to take pictures and record videos of yourself. You
can also use this for video chatting. Keep it clean for optimal
performance.
Proximity Sensor Senses proximity toward other objects (such as your
7.
head) so that tap commands are not accidentally activated (during a call,
when inside a pocket, etc.).
It also employs an ambient sensor which measures the surrounding light
and adjusts the LCD brightness to provide a vivid screen.
NOTE Don't block the sensor or near the sensor to avoid problems with the touchscreen.
8. Earpiece Lets you hear callers and automated prompts.
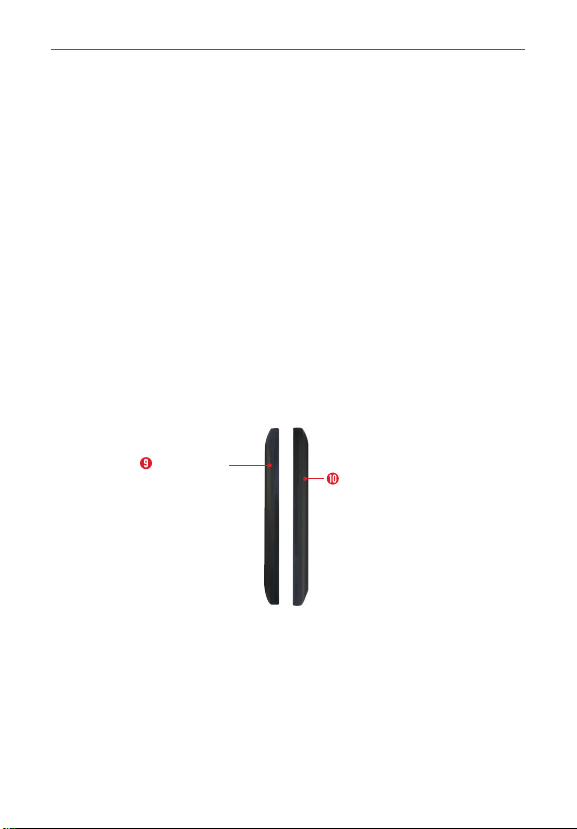
Side Views
5
Volume keys
Power/Lock key
9. Volume keys Press to adjust the ringer, the media volumes, or the in-call
volume during a call.
Power/Lock key Press to turn off the screen backlight and lock the
10.
screen, or turn the screen backlight back on. Press and hold to turn the
phone on/off, restart it, activate/deactivate Airplane mode, and change
the sound settings.
The Basics
6
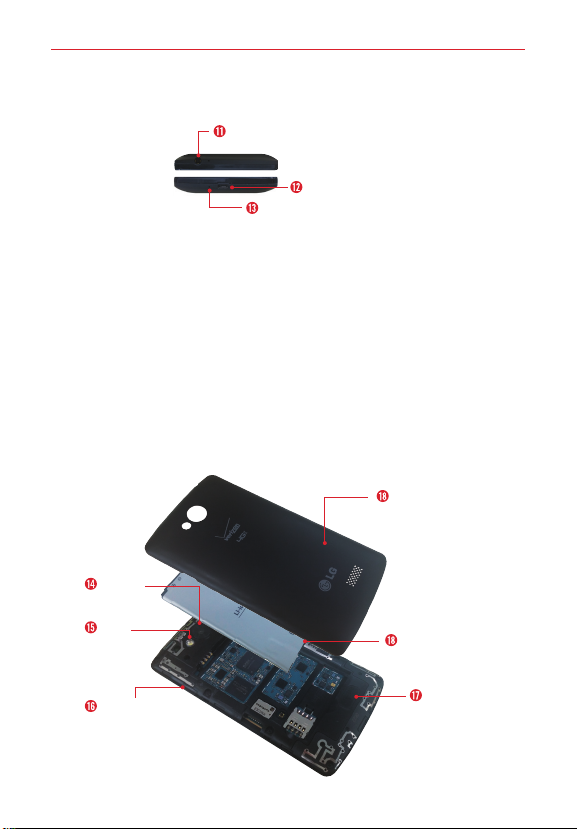
Top and Bottom View
3.5mm Headset jack
Charger/USB port
Microphone
11. 3.5mm Headset jack Allows you to plug in an optional headset for
convenient, hands-free conversations. You can also plug in headphones
to listen to music.
USB/Charging port Allows you to connect the phone and the USB Cable
12.
for use with the Charger Adapter, or other compatible accessories.
NOTE You may purchase a separate fast data cable from LG for higher data transfer speed with
compatible devices (e.g. laptop).
13. Microphone Transmits your voice to the other caller. It's also used for
voice-activated functions and voice recorder functions.
NOTE Please be careful not to block the microphone with your hand during calls.
Rear View
Back cover
Camera
lens
Flash
Battery
microSD Card
slot
Speaker
The Basics
14. Camera lens Use to take photos and record videos. Keep it clean for
optimal performance.
15. Flash Brightens up the captured image or recorded video when you
turn on the flash.
16. MicroSD Card slot Use for additional storage space of items such as
pictures, videos, music, etc.
Speaker Use to listen to the audio from the selected function (e.g.,
17.
music, videos, sound clips, etc.).
Battery Fully charge the battery before initial use to optimize your
18.
battery life.
Back cover Protects the battery and internal antenna. Keep it from
19.
getting scratched or damaged.
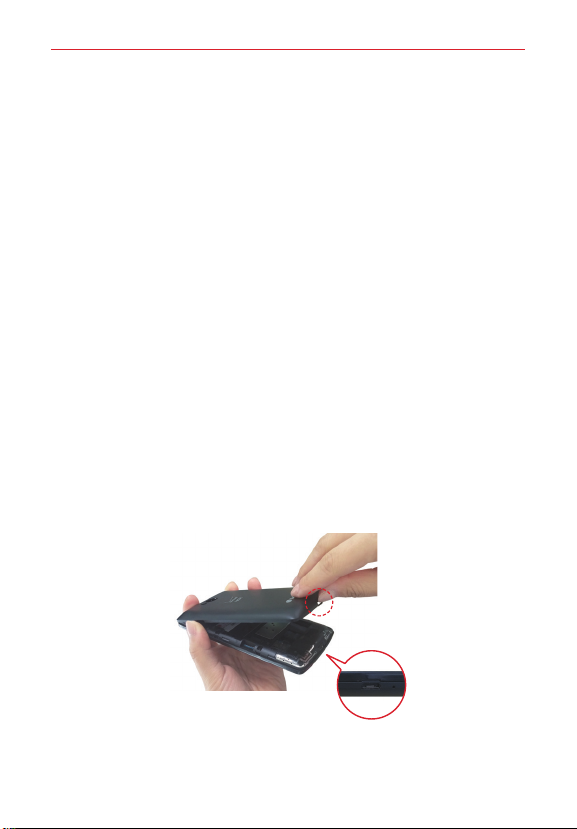
Installing the battery
Before you can start using your new phone, you'll need to do a little set up
such as installing and charging the battery.
1. To remove the back cover, hold the phone firmly in one hand. With your
other hand, place your thumbnail in the cutout on the side of the phone
as shown in the illustration below.
NOTE Make sure to turn the phone off before removing the battery.
7
The Basics
8
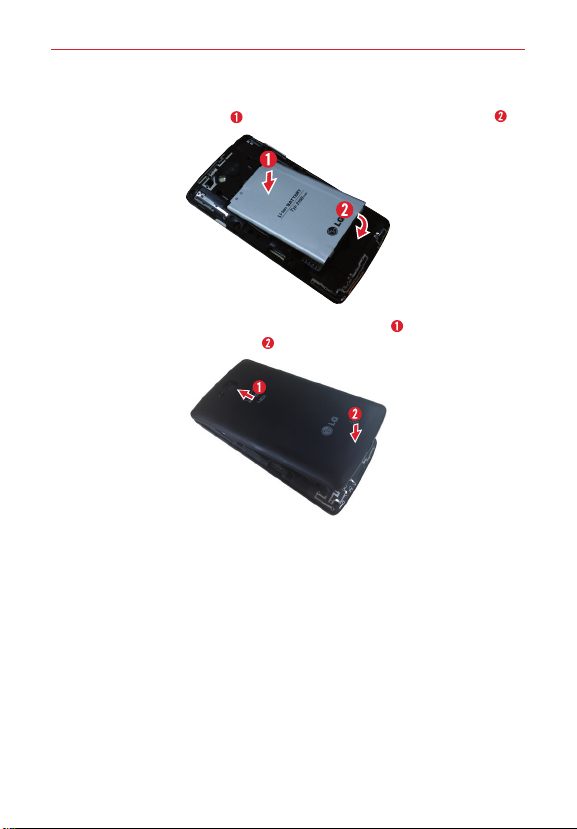
2. Insert the battery into the opening on the back on the phone, making
sure the connectors align and press down until it clicks into place .
3. Align the back cover over the battery compartment and press down
along the outer edge of phone .
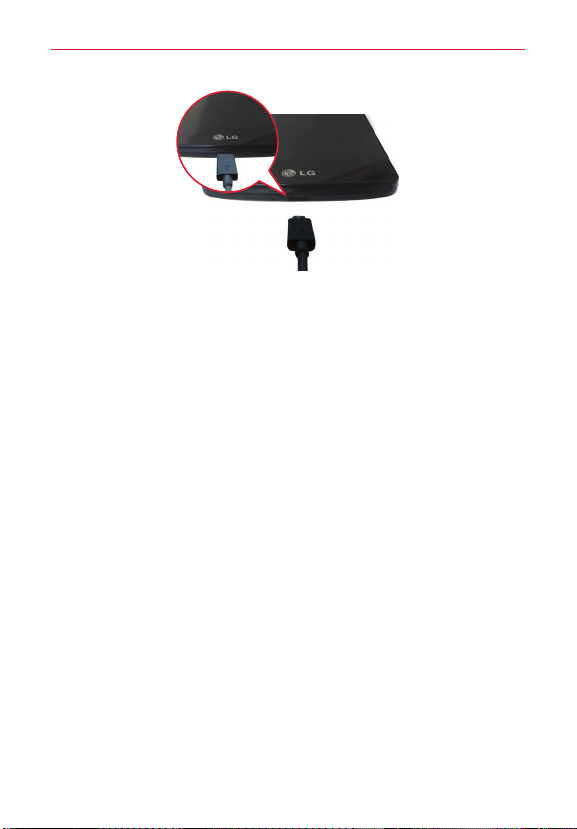
Charging the phone
Your phone comes with a USB Cable and a Charger Adapter which connect
together to charge your phone. Fully charge the battery before using your
phone for the first time to improve your battery lifetime.
The USB/Charging port is at the bottom of the phone. Insert one end of the
USB Cable into the port and plug the Charger Adapter into an electrical
outlet.
The Basics
9
WARNING! To avoid damage to your phone's port and cable plug, orient the plug with the port
NOTE Do not open the back cover while your phone is charging.
NOTE Only use approved charging accessories to charge your LG phone. Improper handling of
before inserting it.
the USB/Charging Port, as well as the use of an incompatible charger, may cause
damage to your phone and void the warranty.
Optimizing Battery Life
Extend your battery's life between charges by turning off features that you
don't need to have running constantly in the background.
Extending your phone's battery life:
Reduce the screen brightness setting and set a shorter screen timeout.
Turn off radio communications (such as Wi-Fi, Bluetooth, GPS, etc.) that
you're not actively using.
Turn off automatic syncing for Gmail, Calendar, Contacts, and other apps.
Monitor the battery use screen to identify if apps you've downloaded are
consuming a large percentage of your battery power.
NOTE Allowing other devices to use your phone's hotspot connection will also drain your
battery more quickly.

The Basics
10
To check the battery power level:
From the Home screen, touch and hold the
Settings
>
About phone
>
Battery
.
The battery status (charging or discharging) and battery level (percentage
charged) are displayed.
Recent Apps Key
>
To monitor and control how battery power is being used:
From the Home screen, touch and hold the
Settings
>
About phone > Battery
>
A battery usage graph is displayed along with battery usage time,
estimated time remaining, and last 3 hours usage. The screen also lists
the apps or services using battery power, listed in order from the
greatest to the least amount used.
Recent Apps Key
Battery use
.
>
Battery saver mode
Battery saver mode changes certain settings to conserve battery power
until you can recharge your phone. If you turn Battery saver mode on
automatically activate when the battery charge level drops to the level you
set. If Battery saver mode is off, you will be prompted to turn on Battery
saver mode when the battery reaches low levels.
1. From the Home screen, touch and hold the
Settings
>
Battery > Battery saver > Turn Battery saver on
2. Select the option you want. Choose from
drops to
10%, 20%, 30%
3. Tap the switch
, and
50%.
at the top of the screen to turn the feature on.
Recent Apps Key
Immediately
, when the charge
>
.
,
it will
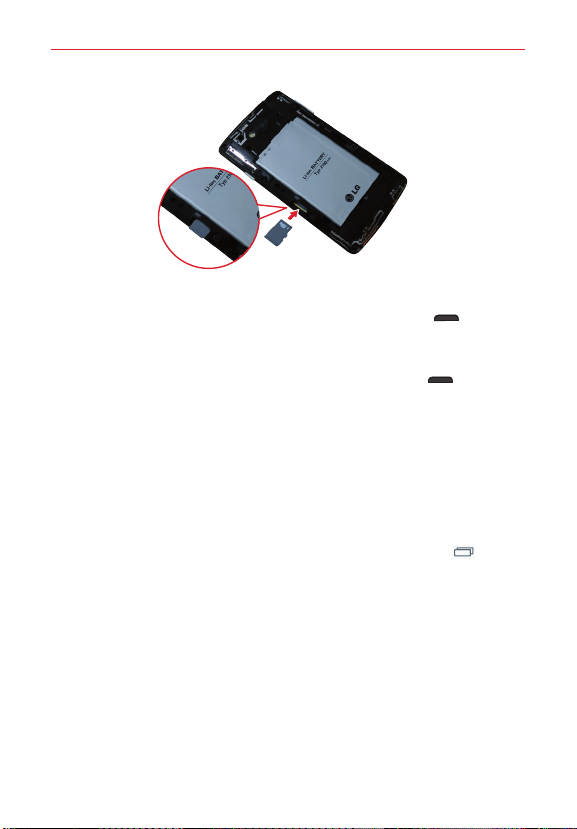
The memory card
WARNING! Unmount the microSD card before removing it from the phone to avoid damaging
it. From the Home screen, touch and hold the
Storage > Unmount SD card.
1. Remove the back cover.
2. Insert the memory card into the slot (on the right side of the back of the
phone) with the gold contact area facing downward.
Recent Apps Key
> Settings >
The Basics
Turning the Phone On and Off
To turn on your phone, press and hold the
right side of the phone) for a couple of seconds until the screen lights
up.
To turn off the phone, press and hold the
right side of the phone), tap
OK
to confirm.
Power off
Power/Lock key
Power/Lock key
(on the
(on the
in the menu that appears, then tap
Locking and unlocking the screen
Using a Screen Lock
Set a screen lock to secure your phone and prevent unauthorized use.
From the Home screen, touch and hold the
Settings
>
(
Swipe, Knock Code, Pattern, PIN
NOTE If you choose
CAUTION Sign in to (or create) a Google Account before setting a screen lock (and remember
WARNING
Lock screen > Select screen lock
, or
Pattern
case you forget your unlock pattern.
the Backup PIN you created when creating your screen lock) to reduce the risk of
needing to perform a Hard Reset which erases all of your data.
It's very important to remember the screen lock you set. After five incorrect
attempts you'll be prompted to enter a phrase to verify that you're trying to unlock
your phone. The phone will automatically reset itself and erase all of the phone's
data after ten incorrect attempts.
, you'll be prompted to create a Backup PIN as a safety measure in
Recent Apps Key
, then select your lock type
Password
).
>
11

The Basics
12
When you can't recall your screen lock:
If you activated a Google Account on the phone, after 5 unsuccessful
attempts you'll be prompted to enter a phrase to verify that you're
attempting to unlock the phone. Then:
If you forgot your unlock pattern, you can tap
bottom of the screen). You can sign in to your Google Account or enter
Forgot pattern?
your Backup PIN to regain access to your phone.
If a Google Account wasn't activated on the phone before setting the lock
(or you also forgot your Backup PIN), the only way to regain access to the
phone is to perform a Hard Reset which erases all of your user data.
CAUTION If you perform a Hard Reset, all user apps and user data will be deleted.
Performing a Hard Reset (Factory Reset)
If your phone does not restore to its original condition after an error or you
forgot your screen lock, perform a Hard Reset (Factory Reset) to initialize it.
WARNING If you perform a Hard Reset, all user apps, user data, and DRM licenses will be
1. Turn the phone off.
2. Press and hold the
and the
same time.
3. When the Factory data reset screen appears, release both of the keys.
4. Use the
the
5. Use the
Lock key
6. Your phone will perform a factory reset.
deleted. Please remember to backup any important data before performing a Hard
Reset.
Down Volume key
Volume keys
Power/Lock key
Volume keys
Power/Lock key
(on the left side of the phone) at the
to highlight
to confirm.
to highlight
(on the right side of the phone)
Factory data reset
Ye s
, then press the
to confirm one more time.
, then press
(at the
Power/

The Basics
To unlock the phone
If you don’t use the phone for a while, the screen backlight will turn off to
conserve battery power. To wake up the phone and unlock the screen:
1. Turn the screen on.
Press the Power/Lock key
on the right side of the phone.
2. The default Lock screen will appear.
To unlock the screen, swipe your finger across the screen in any
direction.
To use a Swipe Lock screen shortcut, swipe the shortcut icon (at the
bottom of the screen) in any direction. The screen will unlock and
launch the app.
NOTE The default Lock screen simply locks the screen to prevent unintentional actions. For
more security to guard against unauthorized use, you can set an unlock requirement (such
as a pattern, PIN, or password) that will need to be entered to unlock it. Please refer to
Using a Screen Lock on page 11 for more information.
TIP Swiping from the left edge of the Lock screen to add a widget to your Lock screen.
Automatic timeout
If you'ren't actively using your phone, it will automatically timeout by
turning off the backlight and locking the screen. This helps to prevent
accidental taps and saves battery power.
Changing the screen timeout
From the Home screen, touch and hold the
Settings
>
Display
>
Screen timeout.
Recent Apps Key
>
13
To manually turn off and lock the screen:
Press the
Apps do not stop running when you lock the screen. It's recommended
that you exit or stop all apps before entering Lock mode to avoid
unnecessary charges (e.g. phone calls, web access, and data
communications).
Power/Lock key
(on the right side of the phone).

The Basics
14
To exit or stop apps:
To use the Recent apps screen, tap the
swipe the app to the left or right off of the screen.
To use the Battery use screen, touch and hold the
>
Settings
>
apps list, then tap
About phone
>
Stop
Battery
next to each app to stop it from running.
Recent Apps Key
>
Battery use
, then
Recent Apps Key
. Scroll to the Running
Camera shortcuts
When the screen backlight is off, press and hold either of the
keys
Camera app.
From the Swipe Lock screen, swipe the Camera icon in any direction.
(on the left side of the phone) to automatically open the
Swipe Lock screen shortcuts
There are four shortcut icons displayed at the bottom of the Swipe Lock
screen. Swipe across any of the icons to open and use that app without
unlocking the screen first.
When your phone is set to the Swipe Lock screen, you can change its
shortcuts. From the Home screen, tap the
settings
>
you want, then tap
Shortcuts
. Tap the icon you want to change, tap the application
Save
.
Menu key
>
Lock screen
Global access shortcuts
There are two Global access shortcuts that you can access from any
screen: Google Now. To access these shortcuts, drag your finger upward
from the main touch key area (Back, Home, Menu), move your finger over
the icon you want to use, then lift your finger.
Volume
Phone sounds off
You can quickly silence your phone.
From the Home screen, press and hold the
right side of the phone), then tap the Silent mode icon .
OR
Power/Lock key
(on the

The Basics
15
Press the
vibration is set, then press it again to turn off all sounds.
OR
Swipe the Status Bar downward to open the Notifications panel, then
tap the Sound icon until the Silent icon
Down Volume key
(on the left side of the phone) until
is displayed.
Data communications off
Airplane mode turns off all data communications.
From the Home screen, press and hold the
right side of the phone), then tap
OR
Swipe the Status Bar downward to open the Notifications panel, then
tap the Airplane mode icon
Turn on Airplane mode
(blue is on and gray is off).
Power/Lock key
.
(on the
To wake up your phone
Press the
Or
Press the
screen in any direction to unlock the screen. The last screen you viewed
will open.
Power/Lock key
Home key
. The Lock screen will appear. Swipe the Lock
(on the right side of the phone).
Touch screen tips
Here are some tips on how to navigate on your phone.
Touch or tap
on the on-screen keyboard.
NOTES • To select an item, tap the center of the icon.
Touch and hold
not lifting your finger until an action occurs. For example, to open a
– A single finger tap selects items, links, shortcuts, and letters
• Don't press too hard on the touchscreen. It's sensitive enough to pick up a light, yet
firm tap.
• Use the tip of your finger to tap the option you want. Be careful not to tap any other
keys.
– Touch and hold an item on the screen by touching it and

The Basics
16
contact's available options, touch and hold the contact in the Contacts list
until the Context menu opens.
Drag
– Touch and hold an item for a moment and then, without lifting your
finger, move your finger on the screen until you reach the target position.
For example, you can drag items on the Home screen to reposition them.
Swipe, slide, or flick
screen, without pausing when you first touch it (so you don't drag an item
instead). For example, you can browse through the different Home screens
by swiping to the left or right, slide the screen up or down to scroll through
a list, or remove an application from the Recent Apps screen by flicking its
graphic off the screen.
Double-tap
the screen off. For example, quickly double-tap a section of a webpage to
adjust that section to fit the width of the screen and zoom in and out when
viewing a picture and when using Maps. Double-tap a word to highlight it.
Double-tap on the Lock screen, the Status Bar, or an empty spot on the
Home screen to turn the screen off.
Pinch-to-zoom
zoom out) or spreading motion (to zoom in) when using Chrome, a map,
photos, the Contacts list, the Favorites list, the Groups list, a music list, and
Polaris Viewer 5 documents. Spread apart to make screen information
larger (easier to see and read), or pinch together to view more area and
information. The pinch gesture also changes the Home screen. Pinch in on
the Home screen to change to mini canvas view, then spread apart to
return to the normal Home screen view. Spread apart on the normal Home
screen to hide all of your Home screen items, then pinch in to redisplay
them.
Rotate the screen
screen adjusts to the device's physical orientation. You can deactivate this
function in the Display settings menu.
– Move your finger quickly across the surface of the
– Tap the screen twice quickly to zoom, highlight text, or turn
– Use your index finger and thumb in a pinching motion (to
– From many apps and menus, the orientation of the

The Basics
Home screen
The Home screen is the starting point to access all of your phone's features
using simple motions on the touchscreen. It's comprised of multiple panels
you can customize with shortcuts.
Simply swipe your finger to the left or right to view the Home screen
panels. Tap any icon to open, access, and use it.
The QuickTap Bar is at the bottom of all of the Home screen panels. The
icons displayed in this bar provide easy and one-tap access to the functions
you use the most.
Tap the
Phone
is displayed, but this icon also provides access to other tabs (Recent,
Contacts, Favorites, and Groups) at the top of the screen to make calls
from information stored in your phone.
Tap the
displayed, but this icon also provides access to other tabs (Dial,
Recent, Favorites, and Groups) at the top of the screen to help you find
information stored in your phone.
Tap
Apps
and use it.
Tap the
Tap the
view and create text and multimedia messages.
Changing the QuickTap Bar:
To add an icon, drag it into the QuickTap Bar and release it.
To remove an icon, drag it out of the QuickTap Bar to the
(that appears at the top of the screen) and release it.
To change the order of the icons, drag an icon to the new position.
icon to bring up the dialpad to make a call. The Dial tab
Contacts
icon to open your contacts. The Contacts tab is
to view all of your installed apps. Simply tap any icon to open
Chrome
app to browse the web.
Messaging
icon to access the Messaging app, where you can
Remove
icon
17

The Basics
18
Customizing the Home screen
For more convenience using your phone, add your favorite apps, widgets,
and downloads to the Home screen for quick access. You can also change
the wallpaper to reflect your personal style.
To add items on your Home screen:
1. Touch and hold the empty part of any Home screen panel.
2. Tap the
3. Tap the app icon you want to automatically place it on the Home screen
4. To exit, tap the
To remove an item from the Home screen:
Touch and hold the icon you want to remove, drag it to the
Moving items and creating folders
Drag an icon or widget to move it to any of the other Home screen panels.
Drag an icon onto another icon to create a folder with both of the icons in it.
Drag another icon onto the folder to add it to the folder to help keep you
organized.
Customizing app icons
You can create your own custom app icons using the images in your
Gallery. Your customized icons are only applied to the Home screen. The
Apps screen isn't affected by your changes.
1. Touch and hold the icon you want to customize, then release the icon.
2. Tap the icon.
3. Tap the image you want then tap
Apps
or
Widgets
tab at the bottom of the screen.
panel.
Back key
or tap the Home screen panel.
NOTE You can also drag the app icon you want to any of the Home screen panels.
Remove
(that appears at the top of the screen), then release it.
NOTE To view the details of an app, drag the icon to the App info icon (that appears at the top
of the screen).
An editing icon
appears in its upper-right corner.
OK
.
icon

The Basics
Changing an icon into a widget
Some app icons can be changed into a convenient widget to use on your
Home screen.
1. Touch, hold, and release a Home screen icon.
A blue frame appears around the icon if it can be resized and changed
into a widget (if it can't, only the Edit icon is displayed).
2. Drag the corners of the frame to make it larger and change it into a
widget.
Touch, hold, and release the widget again to change the size of the
widget, if necessary.
You can also change it back into a normal icon by dragging the corners
of the resizing frame back in.
Home screen Options menu
From the Home screen, touch and hold the
the following options:
Add apps & widgets
apps, widgets, and wallpaper.
Home screen settings
(These are the same settings as in the full Settings menu in the Home
screen sub-menu.)
Lock screen settings
(These are the same settings as in the full Settings menu in the Lock
screen sub-menu.)
Settings
– Opens the full Settings menu.
– Allows you to customize your Home screen with
– Sets the settings specific to the Home screen.
– Allows you to change your Lock screen settings.
Recent Apps Key
to access
19

The Basics
20
Mini panel view
Pinch in on the Home screen to change to mini panel view. Mini panel view
allows you to manage your Home screen panels. You can add, delete,
rearrange, and set your default panel.
Tap the Add icon
Drag a panel to the Remove icon
screen to delete it.
Drag a panel to a new position to rearrange your panels.
To set another panel as the default Home screen, tap the
icon
at the upper-right corner of the mini panel you want to be your
default Home screen panel.
NOTE Tap any of the panels in mini panel view to go directly to that panel.
to add a new panel.
that appears at the top of the
Default Home
Hide view
Place two fingers on the Home screen and spread them apart to hide all of
the items on your Home screen. In hide view, only your wallpaper and the
Status Bar are seen.
To return to normal view, place two fingers on the Home screen and pinch
them in. You can also press the
Home key
or the
Back key
.

The Basics
Dual view
Dual view allows you to customize your Home screen panels by displaying
your Home screen panels (on top) and the Apps screen (on the bottom) at
the same time.
Touch and hold an empty spot on a Home screen panel.
OR
From the Home screen, touch and hold the
tap
Add apps & widgets
In dual view, the current Home screen is displayed above selection choices.
Three tabs are displayed along the bottom. Tap
.
Recent Apps Key
App, Widgets
, or
, then
Wallpaper
The Apps screen
The Apps screen allows you to access all of the apps installed on your
phone.
From the Home screen, tap
Apps
.
Apps screen Options menu
While viewing the Apps screen, tap the
following options:
View apps by
downloaded date, or user customized.
: Tap to sort your apps either in alphabetical order, by
Menu
icon to access the
21
.
The Basics
22
Show small/large icons
large, then tap
Hide/Show apps
Applications screen. Checkmark the icons you want to hide, then tap the
Checkmark icon (at the upper-right corner of the screen).
Edit/Uninstall apps
screen, or uninstall apps from the Application screen or uninstall the app.
Tap an app icon to view its information.
Home screen settings
: Tap to change the app icons to either small or
Ye s
to set your choice.
: Tap to set which app icons will be displayed in your
: Tap to view app information, move apps on the
: Tap to access the Home screen settings menu.
Opening, switching, and stopping apps
Multi-tasking is easy with Android because you can keep multiple apps
running at the same time. Use and switch between several open apps.
Android manages each running app to ensure that idle apps don't consume
resources unnecessarily, but you can also manually stop apps from running.
Opening an app
On the Home screen: Tap the app icon you want to open.
OR
From the Home screen: Tap
tap the icon you want to open.
Apps
> the
Apps
tab (if necessary), then
Opening apps and switching apps
1. Open an app by tapping its icon.
2. Press the
3. Open another app.
Tap another app icon (on the Home screen or in the QuickTap Bar).
Tap
Home key
OR
Apps
you want.
, tap the
.
Apps
tab (if necessary), then tap the app icon
The Basics
23
4. Tap the
Recent Apps Key
open app to switch to it.
to open the Recent apps screen. Tap an
Stopping apps from running
1. From the Home screen, touch and hold the
Settings
>
Application manager
2. Scroll horizontally to display the
app, then tap
Stop
(or
Force stop
.
RUNNING
) to stop it.
Recent Apps Key
app list tab, tap the desired
>
Notifications
Notifications alert you to the arrival of new messages, calendar events, and
alarms, as well as to ongoing events, such as video and music downloads.
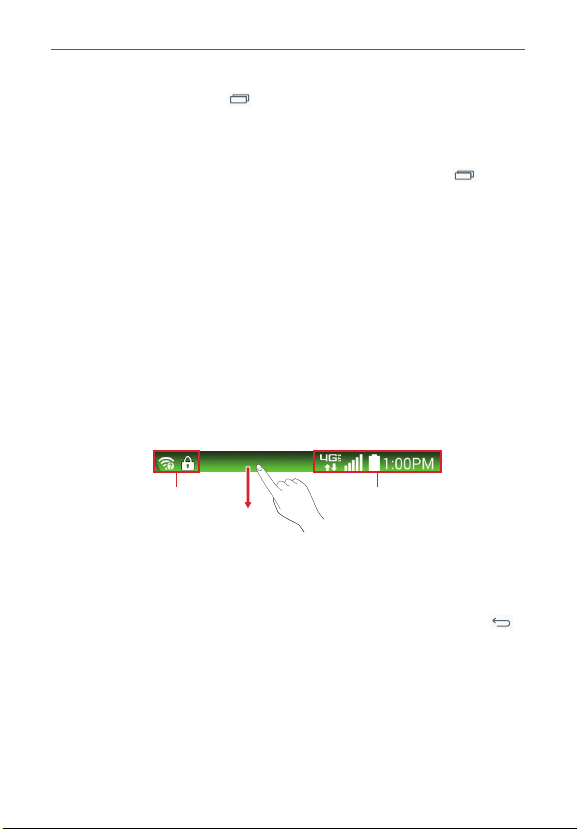
The Status Bar displays your phone's current status and pending
notifications.
When a notification arrives, its icon appears at the top of the screen.
Pending notification icons appear on the left and system icons (that indicate
things like Wi-Fi or bat tery strength) are displayed on the right.
Pending notifications System notifications
Accessing the Notifications Panel
Swipe the Status Bar downward to open the Notifications Panel. Tap a
notification to open its associated app. To close the Notifications Panel,
swipe the bar at the bottom of the screen upward or tap the
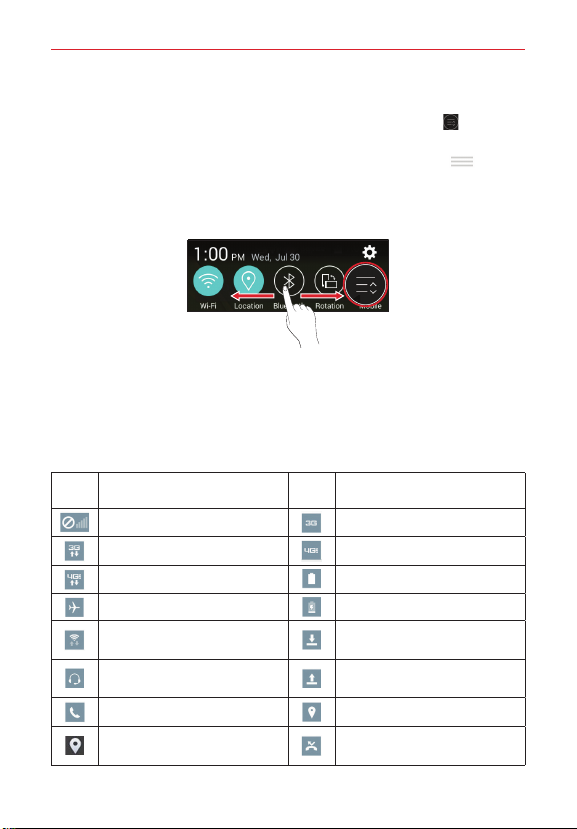
Quick Settings
The Quick Settings allow you to easily toggle function settings like Wi-Fi,
manage display brightness, and more. To access the Quick Set tings, open
the Notifications Panel. The Quick Settings bar is located at the top of the
Notifications Panel.
Back key
.
The Basics
24
To rearrange Quick Setting items on the Notification Panel
Swipe the Quick Settings bar to the left, then tap the
customize the Quick Settings bar. Checkmark the desired icons to display
them (or remove the checkmark to hide). Drag an icon's handle
it to another position on the bar.
NOTE
Changing
the checkmark(s) also reorganizes the icons in the Quick Settings bar.
TIP Touch and hold an icon on the Quick Settings bar to directly access its settings menu.
Edit
icon to
Notification icons on the Status Bar
Notification icons appear on the Status Bar at the top of the screen to
report missed calls, new messages, calendar events, device status, and
more.
The following table lists some of the most common icons.
Icon Description Icon Description
No signal 3G connection
3G in use 4G LTE connection
4G LTE in use Battery is fully charged
Airplane mode is on Battery is charging
Connected to a Wi-Fi
network
Wired headset (with
microphone) is connected
Call is in progress Acquiring GPS
Receiving location data from
GPS
Downloading data
Uploading data
Missed call
move

The Basics
Icon Description Icon Description
Data is syncing Bluetooth is on
New Gmail message System warning
New Hangouts message Alarm is set
New text or multimedia
message
New voicemail
Song is playing Ringer is silenced
Phone is connected to PC
via USB Cable
NOTE The location of the icons in the Status Bar may differ depending on the functions,
features, and apps being used.
Battery saver is on
On-screen keyboard
You can enter text using the on-screen keyboard. The on-screen keyboard
appears automatically on the screen when you need to enter text. To
manually display the keyboard, simply tap a text field where you want to
enter text.
Using the keyboard and entering text
Tap once to capitalize the next letter you type. Double-tap for all caps.
Tap to switch to toggle between keyboards (normal letters and
the numbers/symbols keyboard that also includes graphics,
such as faces and images).
Tap to enter text using your voice. This is only available when you
activate Google voice typing in the keyboard settings. Touch and
hold to access the LG Keyboard settings.
Tap to access the LG Keyboard settings. Touch and hold to access
voice input mode.
Tap to enter a space.
25

The Basics
26
Tap to create a new line in the message field.
Tap to delete the previous character.
Entering special characters
The LG Keyboard allows you to enter special characters (e.g. “á”) when
entering text.
For example, to enter “á”, touch and hold the “a” key. When the pop-up
with its additional characters is displayed, slide your finger over the "á", then
lift your finger to enter it.
NOTE A symbol at the top right corner of a key indicates that additional characters are available
for that key.
Cut, copy, and paste text
You can highlight text to cut or copy it, then paste it into another text field.
To highlight a word, double-tap it.
To highlight a range of text, double-tap the word, then drag the blue
highlight markers to encompass the text you want.
To cut or copy highlighted text, tap
appears.
To paste text, tap the location where you want to place the text, then tap
the marker
. Tap
Paste
in the action box that appears.
Cut
or
Copy
in the action box that

Google Account Setup
The first time you open a Google app on your phone, you'll be required to
sign in with your existing Google Account. If you don't have a Google
Account, you'll be prompted to create one.
Your Google Account
You must sign into a Google Account to use Gmail, Hangouts, Google
Calendar, and other Google apps; to download apps from Play Store; to back
up your settings to Google servers; and to take advantage of other Google
services on your phone.
IMPORTANT
• If you don’t sign into a Google Account during setup, you're prompted to sign in or to
create a Google Account the first time you start an app that requires one, such as Gmail
or Play Store.
• When you sign in, you’re prompted to enter your username and password using the
on-screen keyboard.
• After you sign in, your contacts, Gmail messages, Calendar events, and other information
from these apps and services on the web are synchronized with your phone.
• If you've an enterprise account through your company or other organization, your IT
department may have special instructions on how to sign into that account.
Setting up your Google Account
If you use Setup Wizard to set up your Google Account, it guides you through
the following steps.
1. At the Google Account setup screen, tap
Account, or tap No if you want to create a new account.
2. Enter your username and password (and any other necessary information
if creating an account), then tap the
the screen). Tap OK to agree to your Google Account terms and conditions.
NOTE Tap the
Back Key
(in the Touch Keys bar) to close the on-screen keyboard.
3. On the Google Services screen, checkmark the services you want to use
(Backup & Restore, Location, and Communication), then tap the
icon (at the lower-left corner of the screen).
Ye s
if you already have a Google
Continue
icon (on the right side of
Continue
27

Google Account Setup
28
4. On the Entertainment screen, choose whether or not to set up your credit
card information for Play Store purchases by tapping
Not Now
.
Set up credit card
Your Gmail, Google Contacts, and Google Calendar events will all be
synchronized with your phone automatically.
NOTE This is automatic for the first Google Account you add. When adding additional Google
accounts, you've to select which options to synchronize.
5. Confirm your setup checklist choices on the Setup Wizard Summary
screen, then tap
Done
.
You can use the area below to record your Google Account information for
future reference.
Username:___________________________________________@gmail.com
Password:____________________________________________
or

Connecting to Networks and Devices
Wi-Fi
By connecting with Wi-Fi, you can use high-speed Internet access within
the coverage of the wireless access point (AP). Enjoy wireless Internet
using Wi-Fi, without extra charges.
Connecting to Wi-Fi networks
To use Wi-Fi on your phone, you need to access a wireless access point or
'hotspot'. Some access points are open and you can simply connect to
them. Others are hidden or use security features, you must configure your
phone to be able to connect to them.
Turn off Wi-Fi when you're not using it to extend the life of your battery.
NOTE If you're out of the Wi-Fi zone or have set Wi-Fi to off, additional charges may be applied
by your mobile service provider for mobile data use.
Turning Wi-Fi on and connecting to a Wi-Fi network
1. From the Home screen, touch and hold the
Settings
>
Wi-Fi
.
2. Tap the Wi-Fi switch
to turn it on and start scanning for available
Wi-Fi networks.
Secured networks are indicated by a lock icon.
3. Tap a network to connect to it.
If the network is secured, you're prompted to enter a password or
other credentials. (Ask your network administrator for details).
NOTE
The Status Bar displays a Wi-Fi icon to indicate its status.
Adding a Wi-Fi network
1. Turn on Wi-Fi, then tap
2. Tap the
Menu
3. Enter the Wi-Fi name (SSID).
Tap
Security
secured.
Wi-Fi
to access its settings.
icon >
Add network
and select the network security type, if the network is
Recent Apps Key
.
>
29

Connecting to Networks and Devices
30
Enter the required passwords and security credentials.
4. Tap
Connect
to save the network information.
Removing a Wi-Fi network
1. Turn on Wi-Fi, then tap
2. Touch and hold the network that you want to remove from your phone's
memory.
Forget network
3. Tap
Wi-Fi
to access its settings.
in the Context menu that appears.
Bluetooth
Bluetooth allows you to share data with other Bluetooth-enabled devices
and connect to Bluetooth headsets.
NOTES • LG is not responsible for the loss, interception, or misuse of data sent or received via
Turning on Bluetooth and pairing your phone with a Bluetooth
device
You must pair your phone with another device before you connect to it.
1. From the Home screen, touch and hold the
2. Tap the
3. Tap the check box next to your phone's name to make your phone
4. A list of available devices will be displayed. Tap the device you want to
NOTE Depending on the type of device, you may have to enter matching codes, confirm
the Bluetooth wireless feature.
• Always ensure that you share and receive data with devices that are trusted and
properly secured. If there are obstacles between the devices, the operating distance
may be reduced.
• Some devices, especially those that are not tested or approved by Bluetooth SIG, may
be incompatible with your phone.
Recent Apps Key
Settings
>
Bluetooth
Bluetooth
.
switch to turn it on.
visible to other Bluetooth devices.
pair with from the list.
matching codes, or the devices may automatically pair.
>

Connecting to Networks and Devices
Once pairing is successful, your phone will connect to the other device.
NOTE Some devices, especially headsets or hands-free car kits, may have a fixed Bluetooth
PIN, such as 0000. If the other device has a PIN, you will be asked to enter it.
Send data using the Bluetooth wireless feature
1. Select a file or item (such as a contact, calendar event, or media file)
from an its app or from the
2. Tap
Bluetooth
NOTE The method for selecting an item may vary by data type.
in the sharing options list.
Downloads
app.
3. Search for and pair with a Bluetooth-enabled device.
Receive data using the Bluetooth wireless feature
1. From the Home screen, touch and hold the
Settings
>
2. Tap the
Bluetooth
Bluetooth
.
switch to turn it on.
3. Tap the check box next to your phone's name to make your phone
visible to other Bluetooth devices.
NOTE To select the length of time that your phone will be visible, tap the
4. Tap
Visibility timeout
Accept
.
to confirm that you're willing to receive data from the device.
Recent Apps Key
Menu
>
icon >
Connecting to Virtual Private Networks
Virtual private networks (VPNs) allow you to connect to resources inside a
secure local network, from outside that network.
To add a VPN
1. From the Home screen, touch and hold the
Settings
>
More...
>
VPN
.
2. Tap the type of VPN you want to add. Choose
NOTE You must configure a screen lock to use VPN.
3. Tap
Add VPN network
.
Recent Apps Key
Basic VPN
or
>
LG VPN
.
31

Connecting to Networks and Devices
32
4. In the screen that opens, follow the instructions from your network
administrator to configure each component of the VPN settings.
5. Tap
Save
. The VPN will be added to the list on the VPN settings screen.
USB Connection
USB connection is a feature that allows your phone to connect to a PC using
a USB Cable.
To select a USB mode for a connection
1. From the Home screen, touch and hold the
Touch Keys bar) >
connection
Settings > Storage
.
2. Tap Media sync (MTP), or Camera (PTP) to connect to the PC.
Tap Charge phone to use only the charging function and not the USB
function. It also allows you to safely disconnect your phone from your
PC.
NOTE The MTP driver may not be installed on your PC by default. The driver is dependent on the
PC's versions of Windows
®
and Windows Media Player (WMP).
Using the Status Bar to change the connection mode setting
The Status Bar displays the USB connection icon.
When connected via USB, the current USB connection mode appears on the
Notifications panel. Tap the connection setting to display a screen where you
can change the USB connection mode.
Recent Apps Key
>
Menu
icon >
(in the
USB PC

Calls
Making a call
Dialing a number
1. From the Home screen, tap the
the Phone app.
2. Enter the number using the dial pad. To delete a digit, tap the
.
3. Tap the
4. To end a call, tap the
TIP To enter “+” to make international calls, touch and hold .
Call button
to call the number you entered.
End
Phone
button .
icon to open the dial pad in
Delete key
Calling your contacts
From your Contacts list
1. From the Home screen, tap the
list.
2. Scroll through the contact list or tap the
the contact's name. You can also scroll the alphabet bar along the right
side of the screen.
3. In the list, tap the
number.
Call
icon next to the desired contact to call that
Using Speed dial
Designate Speed dial numbers to your contact entries to use this calling
feature.
1. From the Home screen, tap the
2. Touch and hold the Speed dial number you set.
NOTE For 2-digit speed dials, tap the first number, then touch and hold the second number
until the phone begins dialing the number.
Contacts
icon to open your contact
Search contacts
Phone
icon .
box and enter
33

Calls
34
Using Direct dial
Place a Direct dial widget on one of your Home screen panels (or even in
the QuickTap Bar) to use this calling feature.
Tap the Direct dial widget on the Home screen to call the number with a
single tap.
To end a call
Tap the
End
button on the Call screen to end the call.
If you accessed other apps while the call was in progress, there are several
ways to return to the Call screen to end the call.
Press the
button on the Call screen.
Press the
screen, then tap the
Drag the Notifications panel down and tap
NOTE You can also press the
Home key
Home key
, tap the
Phone
icon , then tap the
, tap the timer at the top left corner of the Home
End
button on the Call screen.
End call
call, if you activated this feature in the Call settings menu.
Power/Lock key
(on the right side of the phone) to end the
.
Answering and rejecting a call
When the screen is locked
Swipe the
Swipe the
When the screen is unlocked
Tap the
Tap the
TIP Ignore with message
You can send a message quickly using the Ignore with message function. This is useful
Answer
icon in any direction to answer the incoming call.
Ignore
icon in any direction to decline an incoming call.
Answer
icon to answer the incoming call.
Ignore
icon to decline the incoming call.
if you need to reject a call with message during a meeting.
End

Calls
Adjusting the in-call volume
To adjust the in-call volume during a call, press the Volume Up and Volume
Down keys on the left-hand side of the phone.
Making a second call
1. During your first call, tap
use the recently dialed numbers list by tapping the
your contacts by tapping the
want to call.
2. Tap the
3. Your initial call is placed on hold.
4. Tap the
5. To end active calls, tap the
NOTE You're charged for each call you make.
Call
icon to make the call.
Merge calls
Add call
and dial the number. You can also
Contacts
tab and selecting the contact you
icon if you want to start a conference call.
End
icon .
Recent
tab or search
Viewing your call logs
From the Home screen, tap the
complete list of all dialed, received, and missed calls is displayed.
Viewing call entries
Open the
entries for that phone number. Calls are listed chronologically and each one
includes the call type (received
and the time of the call. Tap any entry to view its details.
Recent
tab in the
Phone
icon, then tap the
Phone
app, then tap an entry to view all of the
, dialed , and missed ), the date,
Recent
tab. A
35
Filtering your list of calls
To view a specific call list, from the
tap
Filter
. Select the call type you want to view. Tap the
return to the Recent tab screen.
Recent
tab, tap the
Menu
icon , then
Back key
to

Calls
36
Clearing Recent call entries
You can delete the entire list of recent calls all at once, or selectively delete
entries.
1. Open the
2. Tap the
Tap
Menu
Clear
entries to delete, tap
Tap
Clear all
tab in the
icon .
to select entries to remove from the list. Checkmark the
to remove all of the entries from the list. Tap
Clear
Phone
, then
app.
Ye s
.
Ye s
Recent
confirm.
NOTE You can also select a specific number to be deleted. Touch and hold an entry in the
Recent
tab to open its Context menu. Tap
confirm.
Clear all logs of this number
, then tap
Call settings
You can configure phone call settings such as call forwarding, as well as
other special features offered by your carrier.
Phone
1. From the Home screen, tap the
Menu
2. Tap the
3. Tap
Call settings
icon .
and choose the options that you want to adjust.
Call Options menu
1. From the Home screen, tap the
access the following options:
Speed dial
Assisted dialing
as when you're traveling outside your home area).
Edit tabs
app screen.
Call settings
same settings as in the full Settings menu in the Call sub-menu.)
– Allows you to assign a speed dial to Contact entries.
– Checkmark to enable assisted dialing features (such
– Allows you to customize the tabs at the top of the Phone
– Allows you to change your call settings. (These are the
icon .
Phone
icon > the
Menu
icon to
to
Yes
to

Communication
Contacts
Add contacts to your phone and synchronize them with the contacts in your
Google Account or other accounts that support contact syncing.
Searching for a contact
1. From the Home screen, tap the
list.
2. Tap the
Search contacts
scroll the alphabet bar along the right side of the screen.
Adding a new contact
1. From the Home screen, tap the
contact's number.
2. Tap
New contact
3. Tap the drop-down menu
account you want to save the contact to.
4. If you want to add a picture to the new contact, tap the
Choose
5. Enter the contact's information by tapping each category of information
and entering the details about your contact.
6. Tap
Save
Take photo
.
(above the keypad).
or
Favorite contacts
You can classify frequently called contacts as favorites.
Contacts
icon to open your contact
box and enter the contact's name. You can also
Phone
icon then enter the new
(at the top of the screen), then select the
Image
Select from Gallery
.
icon .
37
Adding a contact to your favorites
1. From the Home screen, tap the
list.
2. Tap a contact to view its details.
3. Tap the gray star
changes to yellow.
in the upper-right corner of the screen. The star
Contacts
icon to open your contact

Communication
38
Removing a contact from your favorites list
1. From the Home screen, tap the
list.
2. Tap the
Favorites
tab (at the top of the screen), then tap a contact to
view its details.
3. Tap the yellow star
in the upper-right corner of the screen. The star
changes to gray and the contact is removed from your favorites.
Contacts
icon to open your contact
Creating a group
1. From the Home screen, tap the
list.
2. Tap the
Groups
tab, then tap the
3. Enter a name for the new group.
Tap
Add members
Tap the
Group ringtone
to add contact entries to your new group.
members call your phone.
Account
Tap the
field to change the account(s) you want to save the
new group to.
4. Tap
Save
to save the group.
NOTE If you delete a group, the contacts assigned to that group won't be lost. They will remain
in your contacts.
Contacts settings
From the Home screen, tap the
Settings
to access the settings specific to the Contacts app. These settings
are not found in the full settings menu.
Contacts to display
contacts.
Sort search result by
Frequency of contact
– Sets which account(s) to use to display your
– Sets how to display your search results. Choose
or
Contacts
icon to open your contact
Menu
icon >
New group
field to set a ringtone when any of the group
Contacts
icon > the
Alphabetical order
.
Menu
.
icon >

Communication
View contact names as
Choose
First name first
Sort list by
or
Only contacts with phones
include a phone number.
Sync now
Accounts & sync
on the schedule you set and displays your accounts list so you can also
manage your account(s).
Online search
accounts for your contacts.
Transfer type
one file
– Sets how to display your Contacts list. Choose
Last name
.
– Allows you to manually sync your Contacts accounts.
– Sets how to transfer your Contacts files. Choose
or
Send separately
– Sets how to display your contact names.
or
Last name first
– Checkmark to display only entries that
– Allows you to set your Contacts to automatically sync
– Checkmark to allow you to search online directory
.
.
First name
Contacts Options menu
From the
the screen) to access the Options menus:
Contacts
app, tap the
From the
Speed dial, Manage contacts (Copy contacts, Import/Export, and Join
Contacts), Edit tabs, and Settings.
From the
message, Send email, List/Grid view, Edit tabs, and Settings.
From the
and Settings.
Contacts
: Cloud, Delete, Share, Send message, Send email,
Favorites
: Add favorites, Remove favorites, Share, Send
Groups
: New group, Delete, Share, Change order, Edit tabs,
Menu
icon (at the upper-right corner of
Send as
39
Joining and separating contacts
When you have two or more entries for the same contact, you can join
them into a single entry. You can also separate contacts that were joined.
1. Open the
another entry.
Contacts
app, then tap the contact entry you want to join with

Communication
40
2. Tap the
3. Tap
Join
Menu
icon (at the upper-right corner of the screen).
.
4. Tap the entry to join with the first entry.
Separate
Once entries have been joined,
is included in the Options menu
to allow you to separate the joined entries.
1. Open the
2. Tap the
3. Tap
4. Tap
Contacts
Menu
icon (at the upper-right corner of the screen).
Separate
.
Ye s
(in the dialog box).
app, then tap the contact entry you want to separate.
Communicating With Your Contacts
The Contacts app shares information with many other apps allowing you to
quickly and easily initiate communication with your saved entries.
General communication
The communication icons displayed depend on the types of information
you have saved for individual contacts.
1. Tap a contact to view the entry details (from
or
Recent
).
2. Tap the icon corresponding to the type of communication you want to
start.
Dial icon
The
The
The
NOTE You can also tap the contact's picture on the left side of the entry to display the Quick
places a call to the number.
Message
icon starts a message.
Mail
icon starts an email.
Contact icons.
Contacts, Favorites, Groups
,

Communication
Messaging
Your phone combines text and multimedia messages into one intuitive,
easy-to-use menu.
NOTE You must set the
the Home screen, touch and hold the
Default message app
Sending a message
1. From the Home screen, tap the
icon (in the upper-right corner of the screen).
2. Enter the recipient(s) in the
Tap the
one or more entries from your contacts.
Manually enter a name or number. Matching contact entries will
appear (below the
the number.
NOTE Enter a comma to separate manual number entries.
3. Tap the text field and enter your message.
4. Tap the
TIP Tap the
5. Tap
NOTE The 160-character limit may vary from country to country, depending on the language
WARNING
Menu
Contacts, Insert smiley, Add subject, Discard
share.
Send
(or
and how the text message is coded.
Messaging
app as the default messaging app in order to use it. From
>
Messaging
Recent Apps Key
.
Messaging
To
field.
Contacts
icon (to the right of the To field) to easily select
To
field). Tap one to enter it, or continue entering
icon to access messaging options including
Attach
icon (on the right side of the screen) to attach a file you want to
Send MMS
• If you enter multiple recipients to a text message, it's automatically converted into
a multimedia message and you'll be charged for each person you send the
message to.
• If an image, video, or audio file is added to a text message, it's automatically
converted into a multimedia message and you're charged accordingly.
) to send your message.
>
Settings
>
More...
icon , then tap the
Add to
, and
Priority
.
>
New
41

Communication
42
View mode
Unread messages are located at the top of the screen. Opened messages
that you've exchanged with others are displayed in threads in chronological
order making it easy to see an overview of your conversation.
Changing your message settings
Your phone message settings are pre-defined so you can send messages
with less hassle, but you can change these settings according to your
preferences.
Open the
Message settings include:
signature, and callback number),
priority),
priority),
message with Enter key
Messaging
Multimedia message
Group Conversation, Conversation theme, Notification
app and tap the
Set default message app, Storage
(sets delivery reports, auto-retrieve, and
.
Menu
Text message
icon >
(sets delivery reports and
Settings
(sets limits,
Messaging Options menu
Open the
following options:
Messaging
Search
– Allows you to search for a message or text in a message.
Delete
– Allows you to select one (or more) messages to delete.
Settings
– Allow you to change the settings specific to the Messaging
app.
app and tap the
Menu
icon to access the
.
, and
Send
Email
You can use the Email app to send, receive, and read emails from a variety
of email providers. The Email app supports the following account types:
POP3, IMAP, and Exchange.
Your service provider or system administrator can provide you with the
account settings you need to set up your account(s).

Communication
Managing an email account
Tap the
Email
Email app, a set-up wizard opens to help you to set up your email
account(s).
After the initial set-up, the Email app displays the contents of your Inbox.
icon on the Home screen. The first time you open the
To add another email account:
Open the
Email
app, then tap the
Menu
icon >
Settings > Add account
Switching between accounts
If you've added more than one account, you can easily switch between
them. From any email folder, tap the current account (at the top of the
screen), then tap the account you want to access.
To change an email account's settings:
Open the
settings
individual account to configure settings only for that particular account.
Email
app, then tap the
to configure settings that apply to all of your accounts. Tap an
Menu
icon >
Settings
. Tap
General
To delete an email account:
Open the
icon
Ye s
Email
again, then tap
.
app and tap the
Remove account
Menu
icon >
> tap an account >
Settings
. Tap the
Remove
Menu
>
Working with account folders
Open the
Each account has an Inbox, Outbox, Sent, and Drafts folder. Depending on
the features supported by your account's service provider, you may have
additional folders.
Email
app, then tap the
Menu
icon >
Folders
.
43
.
Composing and sending email
1. From the Home screen, tap the
icon (in the upper-right corner of the screen).
Email
icon , then tap the
Compose

Communication
44
2. Enter the recipient(s) in the To field (and the
Contact
Tap the
or more entries from your contacts.
Manually enter a name or email address. Matching contact entries will
appear (below the field). Tap one to enter it, or continue entering the
address.
NOTE Enter a semicolon to separate manual email entries.
3. Tap the message field and enter your message.
4. Tap the
5. Tap the
Attach
needed.
Send
If you'ren't connected to a network, for example, if you're working in
Airplane mode, the messages that you send will be stored in your
Outbox folder until you connect to a network again.
icon (to the right of the field) to easily select one
icon (at the top of the screen) to attach files, if
button (at the top of the screen) to send the email.
Cc/Bcc
field, if necessary).
Receiving emails
When a new email arrives in your Inbox, you'll be notified by a sound or
vibration (depending on your sound and vibration settings) and its
notification icon appears on the Status Bar.
Email Options menu
From the Home screen, tap
following options:
Refresh
– Updates your email Inbox.
Folders
– Allows you to access your email folders including Drafts,
Outbox, Sent, and Trash.
Sort by
– Allows you to change the order of your email list. Choose from
Date (Most recent), Date (Oldest), Sender (A to Z), Sender (Z to A), Size,
Subject, Read/Unread, Attachment, Priority
Downloads
Settings
– Allows you to access your downloaded email files.
– Allow you to change the settings specific to the Email app.
Email
icon >
Menu
icon to access the
, and
Star
.

Entertainment
Camera and Video
You can use the Camera app to take and share pictures and videos. Your
phone comes with a 5 megapixel camera that lets you capture sharp
pictures and videos. It has many state-of-the-art features, such as laser
auto-focus, that will allow you to easily and creatively capture your world.
NOTE Be sure to clean the protective lens cover with a microfiber cloth before taking pictures.
A lens cover with smudges from fingers can cause blurry pictures with a "halo" effect.
To open the Camera app
From the Home screen, tap
OR
With the backlight off, press and hold the
left of the phone).
Getting to know the viewfinder
Swap camera – Tap to swap between the rear camera lens and the front camera lens.
Flash – Tap to turn the flash On , Off or set it to Auto .
Menu Icon – Tap to hide and display the Camera settings menus.
Taking Pictures
Taking pictures with your phone’s built-in camera is as simple as choosing a
subject, pointing the lens, and tapping an icon. When you take a picture,
the Multi-point Auto Focus (AF) function operates automatically to allow
you to see a clear image.
Camera
(in the QuickTap bar).
Volume Keys
Gallery Icon
– Tap to access your Gallery.
Record Button
Capture Button
Back Icon
Camera app.
– Tap to start recording a video.
– Tap to take a photo.
– Tap to close the selected menu or exit the
(on the
45

Entertainment
46
To take a picture:
1. From the Home screen, tap
2. Frame your subject on the screen.
Tap the screen to choose the focus point. A square around the subject
indicates that the camera has focused.
Place two fingers on the screen and spread them apart to zoom in (a
zoom bar indicates the zoom level) and pinch in to zoom back out.
3. Tap the
Capture
focus. You'll hear the shutter sound and your picture will be automatically
saved to the Gallery.
button, or tap the screen where you want the camera to
Camera
(in the QuickTap bar).
Record Videos
In addition to taking pictures, you can record, view, and send videos with
your phone’s built-in video camera.
1. From the Home screen, tap
2. Frame your subject on the screen.
3. Tap the
The length of the recording is displayed at the top of the screen.
You can use the pinch gesture to use the dynamic zoom feature while
You can tap the
You can tap the
4. Tap the
Record
button to start recording the video.
you’re recording video. Spread your fingers on the screen to zoom in
and pinch to zoom back out.
resume recording again by tapping the
Stop
automatically saved to the Gallery.
button to stop recording. Your video will be
Camera
(in the QuickTap bar).
Capture
icon to take pictures while recording.
Pause
button to pause recording video, then
Record
button .

Entertainment
Camera and Video Settings
When you open the Camera app, the Camera menu settings are displayed
on the viewfinder: The icons displayed depend on the current lens (rear
camera lens or front camera lens).
NOTE Some settings will display an information pop-up the first time you select its icon.
Tap the
Menu
Camera settings. Tap it again to hide the settings icons. Tap each icon to
adjust the settings.
Flash
Swap camera
camera lens.
Mode
•
•
Settings
•
•
•
•
•
NOTE This menu is displayed only when a microSD card is inserted.
icon (at the top corner of the viewfinder to display the
: Sets the flash mode. Choose from
On , Off
and
Auto
: Swaps between the rear camera lens and the front
: Allows you to change the camera mode.
Panorama
: Creates a wide panoramic view shot. Hold the phone
horizontally, press the shutter to start and slowly sweep the camera
across the scene.
Auto
: Takes a picture using automatic settings.
: Allows you to access the following settings.
Image size
from
Choose
Voice shutter
: Sets the file size of your pictures and video. Choose
5M(2560x1920), W4M(2560x1536)
FHD(1920x1080)
or
HD(1280x720)
, and
1M(1280x720)
for videos.
: Allows you to take pictures with voice commands.
for photos.
When on, you just say “Cheese”, “Smile”, “Whiskey”, “Kimchi” or
“LG” to take a picture. Choose On or
Timer
: Sets your camera’s timer. This is ideal if you want to be a
part of the picture. Choose from
seconds
.
Grid
: Displays an overlay grid on the viewfinder to help you to take
Off
,
Off
.
3 seconds
, and
10
better pictures by allowing you to align your subject with the horizontal
or vertical lines. Choose
Storage
: Sets the storage location for your pictures and videos.
Choose
Internal
or
On
or
SD card
.
Off
.
47
.

Entertainment
48
•
Help
: Displays a quick guide so you can learn how each Camera
function works.
Switch camera
Swipe to switch front and rear cameras, and take photos, including selfies.
Gesture shot
Allows you to take a picture with hand gesture. This is ideal for taking
selfies because there’s no awkward movement to tap the Capture button.
To take a photo with a gesture
1. Activate the front camera lens.
2. Raise your hand, with an open palm, until the front camera detects it (a
box appears on the screen).
3. Make a fist to start a countdown before the shot is taken (allowing you
time to position yourself).

Entertainment
Gallery
Open the Gallery app to view albums of your pictures and videos.
To open the Gallery app
From the Home screen, tap the
Apps
tab (if necessary) >
View Your Pictures
The Gallery is where you can access all of your stored camera images. You
can view them in a slideshow, share them with your friends, as well as
delete and edit them.
1. From the Home screen, tap the
Apps
tab (if necessary) >
2. Tap an image to view your picture.
Assign Pictures
After taking a picture, assign it as a picture ID for a Contacts entry or as
your wallpaper (the background for your Home screen or Lock screen).
1. From the Home screen, tap the
Apps
tab (if necessary) >
2. Tap an image to view it.
3. With the picture displayed, tap the
corner of the screen) >
4. Select an option.
Contact photo
Tap an entry from Contacts, crop the image, then tap
Lock screen wallpaper
crop the image, then tap
Wallpaper
image, then tap
screen) to assign the picture.
to assign the picture to a Contact entry as a picture ID.
to assign the picture as a background image, crop the
SET WALLPAPER
Apps
Google folder
Google folder
Google folder
Set image as
to assign the picture as a background image,
OK
icon (in the QuickTap bar) > the
>
Photos
.
Apps
icon (in the QuickTap bar) > the
>
Photos
.
Apps
icon (in the QuickTap bar) > the
>
Photos
.
Menu
icon (at the upper-right
.
OK
.
(at the upper-left corner of the
.
49

Entertainment
50
Working with Photos
Use the Gallery app to view pictures that you’ve taken with the Camera app
or downloaded.
To view and browse photos
1. From the Home screen, tap the
Apps
tab (if necessary) >
2. Tap a picture or a video, then tap the screen to display the available
controls and options.
3. Tap the screen to display the icon bar (at the top of the screen) and the
Touch Keys bar (at the bottom of the screen). The following options are
available.
Edit
Tap the
Tap the
necessary.
Tap the
icon to edit the photo.
Share
icon , tap the sharing method, then complete as
Delete
icon , then tap Yes to delete the picture.
Apps
Google folder
icon (in the QuickTap bar) > the
>
Photos
.

Clock
Setting your alarm
1. From the Home screen, tap
Clock
> the
Alarms
bottom of the screen.
2. Set the time and select
3. Set
Repeat, Snooze duration, Vibration, Alarm sound, Alarm volume
Auto app starter, Puzzle lock
4. Tap
Save
to save the alarm and automatically enable it.
Alarm settings
To change the alarm settings, tap the
then tap
Settings
button behavior
. The Alarm settings include
, and
Managing your alarms
After you create one (or more alarms):
Tap the
Alarm
between enable (blue) and disable (gray).
Tap the alarm time to change any of that alarm's settings and save it.
NOTE The
icon (to the right of the alarm) to between enable
Clock
app has four tabs across the top of the screen giving you access to a variety of
time functions. You can tap
horizontally to scroll through and access these functions.
Apps
> the
tab (if necessary) > the
AM
or PM.
, and
Memo
Menu
Puzzle lock
.
Alarms, Timer, World clock
Apps
tab (if necessary) >
New alarm
icon at the
, as necessary.
icon on the Alarms screen,
Alarm in silent mode, Volume
, or
Stopwatch
, or swipe
Tools
,
51
Calendar
Viewing Your Calendar and Events
The Calendar app allows you to track your schedule of events (that you
created or that you’ve been invited to), organized by day, week, month,
year, or agenda.

Tools
52
When you first set up your phone, you configured it to use an existing
Google Account or you created a new account. The first time you open the
Calendar app on your phone, it displays any existing calendar events from
your Google Account on the web.
To open the Calendar app
From the Home screen, tap the
Apps
tab (if necessary) >
Events from each account you’ve added to your phone and configured to
synchronize calendars is displayed in your Calendar.
Events from each calendar account are displayed in a different color.
Apps
Calendar
icon (in the QuickTap bar) > the
.
To change your calendar view
No matter where you are in the Calendar app, you can easily switch
calendar views. Simply tap
to display a drop-down list of your calendar views. Tap Day, Week, Month,
Year
, or
Agenda
calendars to display from each of your accounts.
. You can also select
Calendar
(at the upper-left corner of the screen)
View Tasks
, as well as selecting
Calendar title bar icons
Tap the
Calendar
your account view.
Tap the
date in the calendar you’re viewing.
Tap the
to any of your accounts.
Tap the
dars to sync, Delete
menu icon to change the calendar view or change
Current date
Add
Menu
icon to immediately jump back to the current
icon (at the top right of the screen) to add a new event
icon to access
, and
Go to date, Search, Sync now, Calen-
Settings
.
Adding an event to your calendar
1. From the Home screen, tap the
Apps
tab (if necessary) >
Apps
Calendar
icon (in the QuickTap bar) > the
.

Tools
2. Tap
Calendar
calendar view that you want to use.
3. Choose the date to create a new calendar event.
Tap the
calendar views, and manually enter the event date.
OR
Double-tap the date from the Day, Week, or Month calendar view to
automatically enter the event date.
NOTE From the Day, Week, or Month calendar view, you can touch and hold the date to quickly
4. Tap the necessary fields to enter the event details.
Event name
Graphic
identify the event in your Calendar.
Location
Graphic
the event location.
From Date/Time
To Date/Time
All day
Time zone
Repeat
Repeat until
Description
event.
Reminders
Show me as
Privacy
(at the upper-left corner of the screen), then tap the
Add
icon (at the top right of the screen) from any of the
save an event.
identifies the event.
(to the right of the event name) sets an image to easily
identifies where the event takes place.
(to the right of the location) allows you to attach a map for
sets when the event starts.
sets when the event ends.
checkmark to set it as an all-day event.
sets which time zone to use for the event.
sets if the event will repeat.
sets when to stop displaying the event in your Calendar.
sets additional detailed information or notes about the
sets the reminder notification for the event.
sets your Google status during the event.
sets the event as Calendar default, private, or public.
53

Tools
54
5. Tap
Save
(at the bottom of the screen) to save the event in the calendar.
Viewing Event Details
You can view more information about an event in a number of ways,
depending on the current calendar view.
To view information about an event
Days with saved calendar event(s) are indicated with text and color within
the selected calendar.
In Day, Week, or Agenda view, tap an event to view its details.
In Month view, tap a day to display the event(s) in a pop-up dialog box.
Tap an event to view its details.
While viewing an event’s Details view:
Tap the
Reminders
reminder
(to the right of the reminder) to remove the reminder.
If you have permission to change the event, you can tap
the top of the screen)
right of the screen) to delete the event.
To share an event, from the event’s details screen, tap the Menu icon
(at the upper-right corner of the screen), then tap Share in the Options
menu. Choose the method for sharing and complete as necessary. The
Options menu also accesses
fields to change the reminder settings, tap Add
to add another reminder, or tap the
to edit the event or tap the Delete icon (at the top
Copy
.
Remove reminder
the Edit icon (at
Google+
Use the Google+ app to stay connected with people via Google’s social
network service.
From the Home screen, tap
Google
folder >
NOTE This app may not be available depending on the region or service provider.
Google+
Apps
> the
.
Apps
tab (if necessary) >
icon

Tools
Voice Search
The Voice Search app allows you to search webpages using your voice
instead of typing.
Apps
1. From the Home screen, tap
Google
folder >
2. Say a keyword or phrase when
Select one of the suggested keywords that appear.
NOTE This app may not be available depending on the region or service provider.
Voice Search
> the
Speak now
Apps
.
tab (if necessary) >
appears on the screen.
Voice Command
The Voice Command app allows you to verbally activate phone functions.
Apps
1. From the Home screen, tap the
>
Voice Command
2. Say the voice command you want to execute.
For example, the voice command "Call Home" will automatically dial
the number stored in your "Home" Contacts entry.
.
> the
Apps
tab (if necessary) >
Downloads
Use the Downloads app to view and access the files you've downloaded
through your various apps.
From the Home screen, tap
Downloads
.
Apps
> the
Apps
tab (if necessary) >
55

Web
56
Chrome
Use the
Chrome
Access and selections within this feature are dependent upon your service
provider.
From the Home screen, tap
Viewing webpages
Tap the address field (at the top of the screen), enter a web address or
search criteria, and tap
NOTE You can also tap any of the search results that appear below the address bar.
Opening a page
The
Chrome
and browse several webpages simultaneously.
To open a new webpage tab, tap the Tabs icon
corner of the screen) >
When you create a new webpage tab, icons appear at the bottom of the
screen help you to quickly open the page you want.
Most visited
most. Tap one to open it. Touch and hold a snapshot to access
new tab, Open in incognito tab
Bookmarks
filepath above the displayed bookmarks, if necessary). Tap one to open
it. Touch and hold the icon to access
tab, Edit bookmark
Other devices
devices. You must be signed into Chrome to sync your open tabs across
devices. Tap one to open it on your phone.
To go to an open webpage, tap the Tabs icon
of the screen), scroll up or down and tap the page to select and open it.
app to search for information and browse webpages.
Chrome
on the keyboard.
app displays webpages in a tab format allowing you to open
+ New tab
Displays snapshots of the webpages that you visit the
Displays icons for sites that you've bookmarked (tap the
, and
Delete bookmark
Displays Chrome tabs that are opened on your other
.
(in the upper-left corner of the screen).
, and
Remove
Open in new tab, Open in incognito
(in the upper-right
.
.
(in the upper-right corner
Open in

Web
Searching the web by voice
Tap the address field in the
the right side of the address field), say a keyword, then tap one of the
displayed results.
NOTE This feature may not be available depending on the region or service provider.
Chrome
app, tap the Microphone icon (on
Syncing with other devices
The
Chrome
when you're logged into the same Google Account on your phone and on
the other devices.
To view open tabs on your other devices, open the
Menu
app allows you to sync all of your open tabs and bookmarks
icon >
Other devices
. Tap a webpage to open it.
Chrome
app, tap the
Bookmarks
To bookmark a webpage, open the page, tap the
the
Favorite
information (if necessary), then tap
To view your bookmarks, open a new tab, then tap the
at the bottom of the screen. Tap one to select and open it.
NOTE To find the bookmark you're looking for, you can tap the filepath (above the displayed
icon at the top of the Options menu. Edit the bookmark
Save
bookmarks) to change the displayed bookmark folder.
Chrome Options menu
Open the
menu. Besides the options, there are three icons in a bar at the top of the
menu.
Chrome
app, then tap the
– Displays the previously accessed page.
– Displays the page accessed before the Back icon was tapped.
– Tap to bookmark the current page.
New tab
– Tap to create a new webpage tab.
New incognito tab
– Tap to create a new incognito tab.
Menu
Menu
icon , then tap
.
Bookmark
icon to access its Options
icon
57

Web
58
Bookmarks
Other devices
History
Print...
Find in page
Request desktop site
view webpages on your phone.
Settings
Help
– Displays your bookmarked webpages.
– Displays your browsing data (webpages you've visited).
– Allows you to use the Cloud print function.
– Allows you to search for text on the current webpage.
– Allows you to change the settings specific to the Chrome app.
– Displays information about using the Chrome app on your phone.
– Displays your open webpages on other devices.
– Checkmark to access the desktop site when you

Settings
Settings
The Settings app contains most of the tools for customizing and configuring
your phone. All of the settings in the Settings app are described in this
section. For settings specific to the Chrome app, see the Chrome section
and for settings specific to the Google account, see the Gmail section.
To open the Settings app
From the Home screen, tap the
Apps
tab (if necessary) >
OR
From the Home screen, touch and hold the
Touch Keys bar) >
Settings
WIRELESS NETWORKS
The Wireless and Networks category allows you to configure and manage
your device’s wireless radio communications.
Airplane mode
Tap the
Airplane mode
wireless connections.
Wi-Fi
Tap the
Wi-Fi
network (from your list of available, detected networks). Tap
access the following settings to manage your Wi-Fi connection(s):
Show Wi-Fi pop-up
range when you launch an app.
WI-FI NETWORKS
The list of all of the Wi-Fi networks that are within access range. Tap one
to access it.
NOTE Tap Search (at the bottom of the screen) to scan for available Wi-Fi networks.
Tap the
to access the following options.
switch to toggle it On or Off. On connects to a Wi-Fi
Menu
switch to toggle it On or Off. On disables all
: Checkmark to be notified when a Wi-Fi network is in
icon (at the upper-right corner of the Wi-Fi menu screen)
Settings
.
Apps
icon (in the QuickTap bar) > the
.
Recent Apps Key
Wi-Fi
(in the
to
59

60
Settings
Connect by WPS button
: Information to connect to a secured Wi-Fi network
with a WPS button.
Connect by WPS PIN
: Information to connect to a secured Wi-Fi network
with a WPS PIN.
Add network
enter the
Wi-Fi Direct
: Tap to enter a
Password
Wi-Fi name (SSID),
choose the
to manually add Wi-Fi networks.
: Allows direct connection with Wi-Fi devices without any
access point.
Advanced Wi-Fi
: Accesses the following advanced Wi-Fi settings.
NOTIFICATIONS
Wi-Fi notifications
: Checkmark to notify if Wi-Fi networks are available
nearby or when your device is connected to a Wi-Fi network.
Avoid unstable connections
: Checkmark to disconnect the Wi-Fi router
automatically when the Internet is unavailable.
USEFUL SETTINGS
Manage networks
: Allows you to specify the order in which your Wi-Fi
networks will be detected.
Sort list by
strength
Keep Wi-Fi on when screen is off
backlight is off (asleep). Choose from
No
Allow Wi-Fi scanning
: Sets how your Wi-Fi networks are listed. Choose
or
Alphabetical order
.
: Sets the Wi-Fi status when the screen
Ye s, Only when plugged in
.
: Checkmark to let Google's location service and
other apps scan for networks, even when Wi-Fi is off.
Wi-Fi signal weak
: Checkmark to disconnect Wi-Fi automatically when
the Wi-Fi signal is weak.
Battery saving for Wi-Fi
: Checkmark to minimize battery usage when
Wi-Fi is on.
PERSONAL
Install certificates
: Opens a screen to install certificates from storage.
Security
Signal
and
, and

Settings
INFORMATION
MAC address
: Displays your phone's MAC address (which may need to
be entered in the router to connect to some wireless networks with
MAC filters).
IP address
: Displays your phone's IP address.
Bluetooth
Tap the
Bluetooth
and connect with other Bluetooth devices. Turn it on and tap
use and manage your Bluetooth devices.
NOTE Tap Search for devices (at the bottom of the screen) to search for in-range Bluetooth
MAKE PHONE VISIBLE
VS810PP
phone for pairing and connection.
AVAILABLE DEVICES
The list of all of the available in-range Bluetooth devices.
Tap the
Bluetooth menu to access the following options.
Edit phone name
when pairing and connecting. Enter your new phone name, then tap
Save
.
Visibility timeout: Sets the amount of time other Bluetooth devices can see
your phone for pairing and connection
Show received files
Help
: Displays information about Bluetooth features.
switch to toggle it On or Off. On allows you to pair
Bluetooth
devices.
: Checkmark to allow other Bluetooth devices to see your
Menu
icon (at the upper-right corner of the screen) in the
: Changes your phone name for easy identification
.
: Displays a list of your Bluetooth received files.
to
61
Mobile data
Tap the
Mobile data
from the mobile network so you can't use the Internet unless you use a
Wi-Fi connection. This allows you to manage your mobile data usage. Tap
switch to toggle it On or Off. Off disconnects you

62
Settings
Mobile data
usage:
Limit mobile data usage: Checkmark to limit your mobile data. Your mobile
Alert me about data usage
Data usage cycle
Data usage graph
Data usage applications
Tap the
to access the following settings to manage your mobile data
data connection will be disabled when you reach the limit you set. Set your
data usage limit by dragging the red line on the graph provided.
:
your mobile data usage reaches the warning amount you set. Set your
warning amount by dragging the orange line on the graph provided.
(at the top of the graph)
bar graph. Tap one to see more detailed information.
the following advanced options.
Display in MB/GB
Data roaming
when you're roaming outside your home network area.
Restrict background data
background while using a mobile network.
Auto-sync data
email, bookmark, and social network image data automatically.
Show Wi-Fi usage
screen) to display your Wi-Fi usage information.
Mobile hotspots
mobile network as a mobile hotspot for mobile data usage. Turn on Wi-Fi
and search for mobile hotspots, if necessary. Apps can be restricted
from using these networks when in the background. Apps may also
warn before using these networks for large downloads.
Help
: Displays information about Mobile data features.
: Displays your current data usage cycle. Tap the date
: Displays your data usage on a graph.
Menu
icon (at the upper-right corner of the screen) to access
: Displays data usage in MB or GB.
: Checkmark to allow you to use a mobile data connection
: Checkmark to set your phone to sync contact, calendar,
: Displays a list to select and use another device's
Checkmark to set your phone to alert you when
to change the cycle date.
: Apps are displayed with their data usage on a
: Checkmark to disable syncing in the
: Displays a Wi-Fi tab (at the top of the Mobile data

Settings
Call
Voice mail
OUTGOING CALL
Auto retry
a call that failed to connect. Choose from
Assisted dialing: Configures the Assisted dialing options when you're
traveling outside of your home country.
INCOMING CALL
Incoming voice call pop-up: Checkmark to display an incoming call
when an app is in use. Use the Answer, Ignore, or Ignore with message
options during an incoming call.
Allow ignore with message
message icon on the Incoming Call screen which allows you to ignore
an incoming call and respond to the caller with a specified Quick text
message instead. Tap
messages. Tap the
message to edit it, or tap the
Privacy keeper: Sets whether the phone displays the caller's
information when you receive a call. Choose from Hide all info., Show
number only, and
Call forwarding
Auto answer
automatically answers an incoming call. Choose from
and
ONGOING CALL
Show dialpad: Sets which types of calls will automatically display the dialpad.
Choose from Voicemail / Toll-Free, All calls, and Customized number.
TTY mode
Hearing aids
Voice privacy: Checkmark to turn on enhanced privacy mode.
: Sets up your standard voicemail settings.
: Sets the amount of time to wait before automatically redialing
: Checkmark to enable the Ignore with
the Settings icon
New
icon to create a new quick message, tap a
Delete
Show caller info
: Configures call forwarding options.
: Sets the time before a connected hands-free device
5 secs.
,
:
Sets the TTY mode to communicate with other TTY devices.
:
Checkmark to turn on hearing aid compatibility.
Off, 10 sec, 30 sec
to manage your Quick text
icon to delete a message.
.
, and 60
Off, 1 sec., 3 secs.
sec
pop-up
63
.
,

Settings
64
END CALL
Power key ends call
pressing the
: Checkmark to allow you to end voice calls by
Power/Lock Key
(on the back of the phone) instead of
returning to the Call screen to end the call.
OTHERS
DTMF tones: Sets the length of the DTMF tones.
Share & connect
Media server
NOTE Tap the
Content sharing
content on your phone.
YOUR PHONE
VS810PP
identification when connecting with other devices. Tap the
Content to share
share. Checkmark
Receive content
to your phone.
NEARBY DEVICES
Sharing request
devices. Choose
Allowed devices
Not-allowed devices
phone.
Menu
icon (at the upper-right corner of the the Media server screen) to
access
Use DLNA feature
.
: Checkmark to allow nearby devices to access
: Allows you to change your phone name for easy
to set your phone image.
: Sets the types of content your phone is allowed to
Photos, Videos
: Checkmark to allow nearby devices to send content
: Sets when to accept sharing requests from nearby
Always allow
: Displays nearby devices accessible to your phone.
: Displays nearby devices not accessible to your
or/and
or
Always ask
Choose Normal or Long.
Image
Music
.
.
icon

Settings
More...
TETHERING
Tethering allows you to connect other devices to your phone's Internet
connection and select your connection method.
Mobile Broadband Connect:
to toggle it On or Off. On allows you to share your phone's mobile
data connection using a USB connection. This setting is gray if not
connected via USB.
Mobile Hotspot
: Tap the
On allows you to use your phone as a Mobile Hotspot for other devices
to use your mobile network connection. Tap
access to your mobile hotspot.
Configure: Sets the name and password for your Mobile Hotspot.
Manage device: Allows you to add devices and control which devices
can connect.
Connected devices are listed at the bottom of the screen.
NOTE Tap the Menu icon (at the upper-right corner of the screen), then tap Advanced to
access additional settings including
Hotspot help information.
Bluetooth tethering
On or Off. On shares the phone's Internet connection with other
Bluetooth devices.
Help
: Displays information regarding mobile broadband connection,
mobile hotspot, and Bluetooth tethering.
NETWORK
Mobile networks:
Sets up options for data roaming, networks, and APNs
(Access Point Names).
Default message app
Messaging, Hangouts
VPN
: Sets up and manages Virtual Private Networks (VPNs).
Tap the
Mobile Broadband Connect
Mobile Hotspot
: Tap the
Bluetooth tethering
switch to toggle it On or Off.
Mobile Hotspot
Power
Management. Tap Help to display Mobile
switch to toggle it
to manage
: Sets your default messaging app. Choose from
.
switch
65

Settings
66
Basic VPN
: Sets your phone to use the built-in Android VPN client
supporting basic features.
LG VPN
: Sets your phone to use an advanced LG VPN client
supporting full IP Security features and interoperability. You can add an
LG VPN network or select from your list of VPN connections.
NOTE Tap the
Menu
settings. From the Basic VPN setting, it accesses
screen it access
icon (at the upper-right corner of the screen) to access additional
Import certificates, Settings
, and
Always on VPN
About
.
DEVICE
The Device category allows you to configure and manage the general
device functions such as sound and display options.
Sound
BASIC
Silent mode: Sets the Silent mode to Off, Vibrate, or On
Volumes: Sets individual volume levels for phone Ringtone, Notification
sound, Touch feedback & system, and Music, video, games, and other
media. Move the slider button on each volume bar to set its volume
RINGTONES & VIBRATIONS
Ringtone
: Sets the ringtone for calls. You can also add a ringtone by
tapping the
Notification sound
notification sound by tapping the
New
icon (at the upper-right corner of the screen).
: Sets the sound for notifications. You can also add a
New
icon (at the upper-right corner
of the screen).
Ringtone with vibration
: Checkmark to play a ringtone and vibrate for
notifications.
Vibration type
: Sets the incoming call vibration option. Choose from
Long Lasting, Rapid, Short repeated, Standard
New
icon (at the upper-right corner of the screen) to create your own
vibration pattern.
, and
.
Ticktock
and from the LG VPN
.
. Tap the

Settings
ADVANCED SETTINGS
Vibrate on tap
touch keys, selections, etc.).
Sound effects
sound, sound when roaming, or emergency tone.
Dial pad touch tones
Touch sounds
selections.
Screen lock sound
unlock the screen.
Sound when roaming
Emergency tone
Choose from
Message/call voice notifications: Tap the switch to toggle it On or Off.
On
allows your phone to automatically read your incoming calls and/or
messages out loud. Checkmark Calls for caller information, Messages for
sender information, and Read messages for message content. You can also
set the Voice notifications language.
: Checkmark to vibrate when you touch the screen (e.g.,
: Tap to set dial pad touch tones, touch sounds, screen lock
: Checkmark to play tones when you use dial pad.
: Checkmark to play a sound when you make screen
: Checkmark to play a sound when you lock and
: Checkmark to play a sound when roaming.
: Sets the behavior when an emergency call is placed.
Off, Alert
, and
Vibrate
.
Display
SCREEN
Brightness
adjustment, or you can manually set the brightness percentage. For best
battery performance, use the dimmest comfortable brightness.
Screen timeout
to inactivity.
Screen-off effect
Choose from
Auto-rotate screen
the screen based on the phone orientation (portrait or landscape).
: Sets the brightness of the screen. You can choose automatic
: Sets the amount of time before the screen turns off due
: Sets the effect seen when you turn off the screen.
Retro TV, Black hole
: Checkmark to set the phone to automatically rotate
, and
Fade out
.
67

Settings
68
Daydream
allows the set screensaver to be displayed when the phone is sleeping
while docked and/or charging. Choose from
Photos
FONT
Font type
Font size: Sets the size of the font displayed in the phone and menus
: Tap the
Daydream
.
:
Sets the type of font used for the phone and menus
switch to toggle it On or Off. On
Clock, Colors
Home screen
SCREEN
Wallpaper
from Live wallpapers, Photos, or Wallpaper gallery.
Screen swipe effect:
Choose from Slide, Breeze, Accordion, Panorama, Carousel, Layer,
and Domino.
Allow Home screen looping
screen scrolling (loop back to first screen after the last screen).
Allow apps list looping
screen scrolling (loop back to first screen after the last screen).
DATA
Home backup & restore
wallpaper.
TIPS
Help
functions.
: Sets the wallpaper to use on your Home screen. Select it
Sets the effect when you swipe to change screens.
: Checkmark to allow continuous Home
: Checkmark to allow continuous Application
: Sets to back up and restore app layout and
: Displays information regarding the Home screen items and
or
Google
.
.
Lock screen
SCREEN SECURITY
Select screen lock
and/or unauthorized use. Choose from None, Swipe, Face Unlock,
Knock Code
: Sets how to secure your phone from unintentional
, Pattern, PIN, and Password.

Settings
Quick unlock
Bluetooth connection.
CUSTOMIZE
Wallpaper
Widgets
Missed calls & new messages
new messages on Lock screen.
Shortcuts: Allows
screen.
Contact info for lost phone
event your phone is lost.
LOCK TIME
Security lock timer: Sets the amount of time before the screen
automatically locks after the screen backlight turns off (times-out due to
inactivity).
Power button instantly locks: Checkmark to instantly lock the screen
when the Power/Lock Key is pressed. This setting overrides the
Security lock timer setting.
: Sets to bypass lock screen security for selected Wi-Fi and
: Sets your Lock screen wallpaper.
: Checkmark to show widgets on your Lock screen.
: Show notifications of missed calls and
you to change the shortcuts on the Swipe Lock
: Show contact info on Lock screen in the
Gestures
Silence incoming calls:
to silence the incoming call ringtone.
Snooze or stop alarm:
to snooze or stop the alarm.
Pause video:
the currently playing video.
Help:
device.
SENSOR
Motion sensor calibration
speed of the sensor.
Checkmark to enable you to turn the phone over to pause
Opens a help guide on how to use the Gestures features of your
Checkmark to enable you to turn the phone over
Checkmark to enable you to turn the phone over
:
Allows you to improve the accuracy of the tilt and
69

Settings
70
Storage
Use the Storage menu to monitor the used and available space in your
phone.
INTERNAL STORAGE
Total space
: Displays the total amount of space in the phone’s memory.
It’s listed in Gigabytes and also on a colored bar graph with a colorcoordinated list of the apps as well as the amount of space they use.
Remaining memory space is gray.
SD CARD
Total space
Available
: Displays the total amount of your external memory.
: Displays the amount of space available in your external
memory.
Mount/Unmount SD card
: Allows your phone to recognize your microSD
card and release it to safely remove your microSD card.
Erase SD card
NOTE Tap the
: Erases all of the data stored on your microSD card.
Menu
icon (at the upper-right corner of the Storage screen) to access
(or GB) and
in MB
USB PC connection
.
Battery
BATTERY INFORMATION
The Battery charge information is displayed on a battery graphic along with the
percentage of the remaining charge and its status
Touch the Battery charge icon to display the Battery use screen to see the
battery usage level and battery use details. It displays which components and
apps are using the most battery power. Tap one of the entries to see more
detailed information
Battery percentage on status bar:
.
Checkmark to display the battery level
percentage on the Status Bar next to the battery icon.
Battery saver
Tap the
Battery saver
switch to toggle it On or Off. Tap
access the following settings:
.
Battery saver
Display
to

Settings
71
Turn Battery saver on:
automatically turn on Battery saver. Choose from
battery, 20% battery, 30% battery
BATTERY SAVING ITEMS
Auto-sync
activated.
Wi-Fi:
Bluetooth:
Vibrate on tap:
Brightness:
Screen timeout:
Help:
Checkmark to turn Wi-Fi off when data is not being used while
Battery saver is activated.
while Battery saver is activated.
saver is activated.
saver is activated. Tap
Battery saver is activated. Tap
setting.
Displays tips for using the Battery saver function.
Sets the battery charge percent level that will
, and
50% battery
: Checkmark to turn off Auto-sync when Battery saver is
Checkmark to turn Bluetooth off when not connected
Checkmark to turn off touch feedback when Battery
Checkmark to reduce the screen brightness when Battery
the Settings icon
Checkmark to reduce the screen timeout when
the Settings icon
Immediately, 10%
.
to change the setting.
to change the
Application manager
Use the Application manager menu to view details about the apps installed on
your phone, manage their data, and force them to stop.
Swipe left and right to select one of the three tabs across the top of the screen
to view detailed information for DOWNLOADED, ON SD CARD, RUNNING,
and ALL apps. Tap an entry to view more information, tap Stop (or Force stop),
then OK to stop an app from running.
Tap the
Menu
Sort by, Reset app preferences, Reset default apps, and Uninstall apps.
icon (at the upper-right corner of the screen) to access
PERSONAL
The Personal category allows you to configure and manage your personal
information.

Settings
72
Location
Use the Location access menu to set your preferences for using and
sharing your location when you search for information and use locationbased apps, such as Maps.
Tap the Location switch (at the upper-right corner of the screen) to toggle
it On or Off.
E911 Location
phone.
Mode
networks), Battery saving (Networks only), and Device sensors only (GPS
only).
RECENT LOCATION REQUEST
Displays information about apps that have requested your location
information.
LOCATION SERVICES
Camera
Google Location Reporting
Location History
phone's most recent location data in connection with your Google
Account.
On
enables sharing of your location.
:
E911 Location cannot be turned off on any mobile celluar
:
Tap location mode to choose from High accuracy (GPS and
: Checkmark to tag photos or videos with their locations.
. Allows Google to periodically store and use your
: Tap to check
Location Reporting
Security
Use the Security menu to configure how to help secure your phone and its
data.
ENCRYPTION
Encrypt phone
Each time you turn on your phone, a PIN or password will be required to
decrypt your data.
Encrypt SD card storage:
card data. Encrypted data is not accessible to other devices.
: Allows you to encrypt data on the phone for security.
Allows you to encrypt or decrypt external SD
and

Settings
PASSWORDS
Password typing visible
the password as you type so that you can see what you enter.
PHONE ADMINISTRATION
Phone administrators
deactivate device administrators.
Unknown sources
apps.
Verify apps
that may cause harm to your phone.
Notification access
CREDENTIAL STORAGE
Storage type
Hardware-backed).
Trusted credentials
of secure certificates, related passwords, and other credentials. The
screen has a System tab and a User tab. Credential storage is used to
establish some kinds of VPN and Wi-Fi connections.
Install from storage: Allows you to install a secure certificate from
storage.
Clear credentials
and erases the secure storage’s own password. you’re prompted to
confirm you want to clear this data.
This setting is dimmed if you haven’t set a password to secure your
credential storage.
: Checkmark to disallow or warn before installation of apps
: Displays the current storage type for credentials (e.g.,
: Checkmark to briefly show each character of
: Displays the list of administrators, allowing you to
: Checkmark to allow installation of non-Play Store
: Allows you to set what apps can read notifications.
: Allows apps to access your phone’s encrypted store
: Deletes all secure certificates and related credentials
73
Language & input
Use the Language & input menu to select the language for the text on your
phone and for configuring the on-screen keyboard. You can also manage
your language dictionary for personal words that you’ve added.
Language
: Sets the language to use on your device.

Settings
74
KEYBOARD & INPUT METHODS
Default
: Sets the default on-screen keyboard to use when entering text.
LG Keyboard: Checkmark to select the LG Keyboard to enter data. Tap
Settings
icon
MY KEYBOARD
to change the following settings
:
Input language and keyboard layout: Sets the keyboard language
and layout (QWERTY and Phone).
Keyboard height and layout
: Allows you to adjust various height and
layout options for your keyboard to make it easier to use.
Bottom row keys
: Sets the default keys to display on either side of
the Space Key (on the bottom row of the keyboard).
Keyboard height
: Sets the height of the keyboard in comparison to
the screen you’re typing on.
SMART INPUT
Path input
: Checkmark to enter a word by drawing a path through all
of the letters.
Show word suggestions
: Checkmark to show words through text
prediction.
Auto-correction
from
Off, Mild, Moderate
Update word suggestions
: Sets your level for automatic word correction. Choose
, and
Aggressive
.
: Uses Swype Connect to provide more
word suggestions. To use this feature, accept the Agreement Rights.
Additional settings
Vibrate on keypress
Sound on keypress
: Sets advanced settings including:
: Checkmark to vibrate when you tap each key.
: Checkmark to play a sound when you tap each
key.
Pop-up on keypress
: Checkmark to show an expanded bubble when
you tap each key.
the

Settings
INPUT TOOLS
Auto-capitalization
letter of each sentence.
Auto-punctuation
is double-tapped.
Spell checker
Bilingual suggestions
suggestions.
Clear word suggestion history
word history.
Personal dictionary
dictionary to assist you in entering text quickly and accurately.
Help
: Displays additional keyboard help information.
Google voice typing
data. Tap the
Choose input languages
voice typing.
GENERAL
Block offensive words
Offline speech recognition
SPEECH
Voice Search
Text-to-speech output
rate (very slow to very fast). Also plays a short demonstration of speech
synthesis and displays the language status.
MOUSE/TRACKPAD
Pointer speed
Settings
: Sets voice search options.
: Sets the pointer speed on a slide bar.
: Checkmark to automatically capitalize the first
: Checkmark to insert a period when the space key
: Checkmark to alert you to possible spelling errors.
: Allows you to select two languages for word
: Allows you to clear your prediction
: Allows you to add words to your personal
: Checkmark to select Google voice typing to enter
icon to change the Google voice settings.
: Sets the languages supported with Google
: Checkmark to hide recognized offensive text.
: Enables voice input while offline.
: Sets the preferred speech engine and speech
75

Settings
76
Backup & reset
This menu allows you to back up and/or erase your data.
BACKUP & RESTORE
Back up my data
other settings to Google servers.
Backup account
Automatic restore
restore backed up settings and data when an app is reinstalled on the
phone.
PERSONAL DATA
Factory data reset
Read the warning, then tap Reset phone at the bottom of the screen,
then tap
Reset settings
: Checkmark to backup app data, Wi-Fi passwords, and
: Sets the account to backup.
: Checkmark to allow your phone to automatically
: Allows you to erase all of the data on the phone.
Erase everything
: Tap to restore the default system settings.
to confirm.
ACCOUNTS
Add account
: Allows you to add accounts to your phone.
SYSTEM
The System category allows you to view your phone’s system information,
as well as manage various system settings.
Shortcut key
Tap the
Shortcut key
toggle it
On
the back of the phone) to access shortcuts when the screen is off or
locked. When enabled, the
switch (at the upper-right corner of the screen) to
or
Off
. On allows you to enable the
Volume Keys
Volume Keys
open the
Camera
app.
(on
Date & time
Automatic date & time: Checkmark to use the network-provided date and
time.
Automatic time zone
:
Checkmark to use the network-provided time zone.

Settings
Set date: Tap to manually set the date to use for your phone. This setting is
grayed-out when the Automatic date & time setting is checkmarked.
Set time
:
Tap to manually set the time to use for your phone. This setting is
grayed-out when the Automatic date & time setting is checkmarked.
Select time zone
:
Tap to select select a time zone other than the one
provided by the network. This setting is grayed-out when the Automatic time
zone setting is checkmarked.
Use 24-hour format
: Checkmark to display the time using the 24-hour
time format (for example, 13:00 instead of 1:00 pm).
Select date format
: Sets the format for displaying dates.
Accessibility
Improves accessibility for users who have impaired vision, hearing, or
reduced dexterity.
VISION
: Tap the
TalkBack
TalkBack
screen) to toggle it On or Off. On allows you to set up the TalkBack
function which assists people with impaired vision by providing verbal
feedback. Tap
Settings
TalkBack settings.
When TalkBack is turned on, the touchscreen settings require the user
to first tap an item they want to select, and then double tap the item
again in order to access this feature.
NOTE Passwords can be heard as they are entered when headsets are connected to the phone
unless settings are changed to read passwords aloud without a headset.
Font size: Sets the font size. Choose from Minimum, Small, Medium,
Large, Very large, and Maximum.
Invert colors
:
Checkmark to invert the screen color contrast for people with
difficulty perceiving colors.
Color adjustment
corner of the screen) to toggle it On or Off. On allows you to adjust the
screen colors by dragging your finger across the screen to define the hue and
contrast for easier viewing of screen content.
switch (at the upper-right corner of the
(at the bottom of the screen) to adjust the
:
Tap the Color adjustment switch (at the upper-right
77

Settings
78
Touch zoom: Tap the Touch zoom switch (at the upper-right corner of the
screen) to toggle it On or Off. On allows you to zoom in and out by tripletapping the screen.
Message/call voice notifications
:
Tap the Voice notifications switch (at
the upper-right corner of the screen) to toggle it On or Off. On allows you to
hear automatic spoken alerts for incoming calls and messages.
Lower screen brightness
: Checkmark to dim the screen's backlight for
less contrast.
Accessibility shortcut:
Open accessibility options quickly on any screen.
Text-to-speech output: Tap to customize text-to-speech (TTS) settings.
HEARING
Audio type
Sound balance
: Sets the audio type. Choose
Mono
or
Stereo
.
: Routes the sound through both the right and left channel
when a headset is connected. To manually set the audio route, move the
slider on the sound balance slide bar to set it.
Flash alerts
: Checkmark to set the LED (at the upper-left of the phone) to
flash (or blink) for incoming calls and notifications.
Turn off all sounds
Captions
: Checkmark to turn off all device sounds.
: Tap the
Captions
switch (at the upper-right corner of the
screen) to toggle it On or Off. On customizes caption settings for those
with hearing impairments. Set
Language, Font size,
and
Caption style
PHYSICAL AND MOTOR
Touch feedback time
:
Sets the touch feedback. Choose from Short,
Medium, and Long.
Universal touch
On
allows you to replace the hardware keys with a Universal touch board .
Tap the Universal touch icon
:
Tap the Universal touch switch to toggle it On or Off.
to be able to tap its Power button, Home
button, Volume down button, Volume up button, and the more button
(Screen capture button, Back button, Settings button, and Pinch button).
Draw a "C" ("call") on the board to automatically display the Dial tab. Draw an
"M" on the board to automatically display the Messaging application. Draw a
"W" ("web") on the board to automatically launch the Chrome app. Draw an "S"
.

Settings
("Settings") on the board to automatically display the settings app. Draw an "L"
("Lock screen") on the board to go directly to the Lock screen.
Screen timeout
RECOGNITION
Touch control areas
upper-right corner of the screen) to toggle it On or Off. On allows you to
select an area of the screen to limit touch activation to just that area of the
screen. Press the Volume Down Key and tap the Home Key at the same
time to activate and deactivate this feature.
SYSTEM
Auto-rotate screen
depending on the phone orientation (portrait or landscape).
Password voice confirmation
passwords you touch.
Power key ends call
pressing the
enabled, pressing the
screen.
Accessibility settings shortcut: Sets quick, easy access to selected features
when you triple-tap the Home Key
Off, Show all, TalkBack, Invert colors, Universal touch, and Accessibility
settings.
One-touch input
finger touch to enter a letter or character on the LG keyboard.
SERVICES
Displays the list of accessibility services installed on your phone.
:
Sets the screen timeout.
:
Tap the Touch control areas switch (at the
: Checkmark to allow the phone to rotate the screen
: Checkmark so that your phone can read
: Checkmark so that you can end voice calls by
Power/Lock Key
: Checkmark to enable one-touch input. It allows each
(on the back of the phone). When
Power/Lock Key
during a call won't lock the
(in the Touch Keys bar). Choose from
Printing
Cloud Print
Cloud print screen) to toggle it On or Off. On allows you to select a printer
via the Cloud feature.
: Tap the
Cloud Print
switch (at the top right corner of the
79

Settings
80
About phone
This menu allows you to manage your software updates and view various
information relating to your device.
Phone name: Tap to edit your phone name.
:
Displays your Network, Network type and strength, Service state,
Network
Roaming state, Mobile network state, and IP address.
:
Displays your phone number, ERI version, IMEI, IMEISV, PRL
Status
Version, IMS registration status, ERI version, ICCID, and Last factory data
reset.
Battery
:
Displays Battery status, Battery level, and Battery use.
:
Hardware information
time, Lifetime calls, Warranty Date Code, Wi-Fi MAC address and Bluetooth
address.
Software information
version, Build number, and Software version and status.
Legal information
Software, open source licenses and Google legal information.
Patent information
Displays Model number, Hardware version, Up
:
Displays Android version, Baseband version, Kernel
:
Displays the Terms of Use and Privacy Policy for LG
:
Displays LG patent information.

Phone Software Update
Update your smart phone without a PC (FOTA)
This feature allows you to conveniently update your phone's software to a
newer version via Firmware Over-the-Air (FOTA), without connecting with a
USB Cable.
NOTE Firmware is a specialized type of software embedded into your phone's hardware which
allows it to run correctly (e.g., functions, speed, communication, etc.) and determines
how it stores bits of information. The firmware on your phone comes from LG and is
written specifically for it. On the other hand, software can come from a variety of
sources and can be used on various compatible devices. For more information on
firmware and software updates, please visit:
1. From the Home screen, touch and hold the
Settings
>
System updates
.
2. The current version is displayed. Tap your desired option.
Check for new system update
and conducts the update.
Check system update status
NOTES • After download, you can install the software immediately or select a later time for the
installation.
• Each software version is updated sequentially. Even after the update is completed,
check if there is any newer version available.
• LG reserves the right to make firmware updates available only for selected models at
its own discretion and does not guarantee the availability of the newer version of the
firmware for all phone models.
– Displays the System update history.
http://www.lg.com
Recent Apps Key
>
– Checks for any new software updates
81

FAQ
82
Please check to see if any problems you have encountered with your
phone are described in this section before taking the phone in for service or
calling a service representative.
CATEGORY
SUB-CATEGORY QUESTION ANSWER
Bluetooth
Bluetooth
Devices
Data Contacts Backup
Data Synchronization
Data Synchronization
Data Synchronization
Google™
Gmail Log-In
Service
Google
Google Account
Service
What are the
functions available via
Bluetooth?
How can I back up
Contacts?
Is it possible to set up
one-way-sync with
Gmail?
Is it possible to
synchronize all of the
Email folders?
Is it possible to
transfer Contacts data
from a feature phone
to an Android™
phone?
Should I have to log
into Gmail whenever I
want to access
Gmail?
Is it possible to filter
emails?
Stereo/Mono Headset, Car Kit, and FTP
connections are available. When your
phone is connected to another phone
via Bluetooth, you can receive Contacts
data.
The Contacts data can be synchronized
between your phone and Gmail™.
Only two-way synchronization is
available.
All of your Email folders are
synchronized. Tap the
the upper-right corner of the screen),
Folders
then tap
Yes, if your contacts can be extracted
into a .CSV file.
How to transfer:
1. Create “.CSV” file with the contacts
on your current phone (you may be
able to use the PC suite software
provided by LGE).
2. Log into Gmail with your PC.
Contacts
3. Click
Import
4. Click
5. Attach the “.CSV” file.
6. Your contacts will then be
synchronized between your Android
phone and Gmail.
Once you log into Gmail, you don’t
need to log into Gmail again.
No, email filtering is not supported via
the phone.
Menu
to view them.
.
.
icon (at

FAQ
83
CATEGORY
Phone
Function
Phone
Function
Phone
Function
Phone
Function
Phone
Function
Phone
Function
SUB-CATEGORY QUESTION ANSWER
YouTube™
Email
Ringtone
Navigation
Synchronization
Wait and Pause
Is it possible to play
YouTube videos?
What happens when I
access another app
while writing an
email?
Is there a file size
limitation for when I
want to use an .MP3
file as a ringtone?
Is it possible to install
another navigation
app on my phone?
Is it possible to
synchronize my
contacts from all of
my email accounts?
Why don't my phone
numbers with Wait
and Pause work?
Yes, YouTube videos are supported but
may have to be viewed through the
YouTube app (instead of the
app).
Your email is automatically saved as a
draft when you access another app. It's
still displayed when you return to Email,
until you close the
you open the
your Inbox, tap the
the upper-right corner of the screen),
Folders
then
There's no file size limitation.
Any app that's available on Play Store
and is compatible with the hardware
can be installed and used.
Only Gmail and MS Exchange server
(Company Email Server) contacts can
be synchronized.
If you transferred a contact with the
Wait and Pause functions saved into
the number, you'll need to re-save each
number to use these features.
To re-save numbers with Wait and
Pause
1. From the Home screen, tap the
Phone
2. Dial the number, then tap the
icon (at the upper-right corner of
the screen).
3. Tap
enter the remaining numbers, then
tap
number for the Contact.
Email
Email
app again, from
Menu
>
Drafts
to access it.
icon (in QuickTap bar).
Add 2-sec pause
Save to Contacts
Chrome
app. When
icon (at
or
Add wait
to save the
Menu
,

FAQ
84
CATEGORY
Phone
Function
Phone
Function
Phone
Function
Phone
Function
SUB-CATEGORY QUESTION ANSWER
You can set the phone to require the
Security
Unlock Pattern
Unlock Pattern
Speed Dial
What are the phone’s
security functions?
What should I do if I
forget my Unlock
Pattern?
How do I create the
Unlock Pattern?
Is Speed Dialing
supported?
entry of an unlock sequence (face
recognition, Knock Code, pattern, PIN,
or password) before the phone can be
accessed or used.
After attempting the Unlock Pattern 5
times, you can tap the
option and use your Google Account
information or Backup PIN to unlock
your phone.
1. From the Home screen, touch and
Recent Apps Key
hold the
Touch Keys bar ).
Lock screen settings
2. Tap
3. Tap
Select screen lock
4. Tap
Pattern
. The first time you do
this, a short tutorial about creating an
unlock pattern appears.
5. Set up by drawing your pattern once,
Continue
, draw it again, then tap
tap
Confirm
.
Yes. You can set Speed Dials as well as
save a contact directly on your Home
screen.
To set a Speed Dial:
1. Open the
Contacts
app.
Menu
2. Tap the
upper-right corner of the screen) >
Speed dial
3. Tap the speed dial location and select
the desired contact.
NOTE Use can also use the
icon
number in the Contacts screen to set
the speed dial.
To set a Direct Dial shortcut to your
Home screen:
1. Touch and hold an empty area on
your Home screen.
2. Tap the
3. Tap the contact in your Contacts list.
icon (at the
.
displayed next to the phone
Widgets
tab
Forgot Pattern?
(in the
.
.
Speed dial
> Direct dial.

FAQ
85
CATEGORY
Phone
Function
Phone
Function
Phone
Function
Phone
Function
Phone
Function
SUB-CATEGORY QUESTION ANSWER
Memory
Language
Support
Language
Support
VPN
Screen Timeout
Will I know when my
memory is full?
Is it possible to
change the language?
Which languages are
supported when
using Play Store?
How do I set up a
VPN?
My screen turns off
after only 30 seconds.
How can I change the
amount of time for
the backlight to turn
off?
Yes, you'll receive a notification.
The phone has multi-lingual capabilities.
To change the language:
1. From the Home screen, touch and
Recent Apps Key
hold the
Touch Keys bar ) >
Language & input > Language
2. Tap
3. Tap the desired language.
NOTE To set multiple languages for
your on-screen keyboard, from the
Language & input screen, tap the
Settings
icon (next to LG Keyboard),
Input language and keyboard
tap
layout, then checkmark the languages
you want to be able to type.
Play Store
The
and Spanish. Third party apps may not
support all languages.
VPN access configuration is different
according to each company. To
configure VPN access from your phone,
you must obtain the details from your
company’s network administrator.
1. From the Home screen, touch and
2. Tap
3. Tap the preferred screen backlight
NOTE You can also turn on the Smart
screen and Smart video features to
keep the screen from turning off when
the device detects your eyes looking at
the screen. From the Settings menu,
tap
screen
app supports English
Recent Apps Key
hold the
Touch Keys bar ).
Settings
>
.
timeout
timeout time.
Display
, then checkmark
.
Display
Settings
>
(in the
.
(in the
Screen
Smart
.

FAQ
86
CATEGORY
Phone
Function
Phone
Function
Phone
Function
Phone
Function
Phone
Function
Phone
Function
SUB-CATEGORY QUESTION ANSWER
When using data, your phone may
default to the Wi-Fi connection (if Wi-Fi
connectivity on your phone is set to
On). However, there will be no
notification when your phone switches
from one to the other.
To know which data connection is
being used, use the 4G
in the Status Bar at the top of your
screen.
Yes. Just touch and hold the icon until
Remove
bar appears at the top of
the
the screen. Then, without lifting your
finger, drag the icon to the
then lift your finger.
1. From the Home screen, touch and
Recent Apps Key
hold the
Touch Keys bar ).
Settings
>
2. Tap
3. Tap the app >
Yes. After saving a music file as a
ringtone, you can use it anywhere you
can set ringtones as an alert.
Touch and hold a song in a library list. In
the Context menu that opens, tap
as ringtone
No, that functionality isn't supported.
Your alarm is programmed to be audible
,
even in these scenarios.
Application manager
Uninstall
.
Wi-Fi and 4G
Home Screen
Application
Ringtones
Alarm
Alarm
When Wi-Fi and 4G
are both available,
which service will my
phone use?
Is it possible to
remove an app from
the Home screen?
I downloaded an app
and it causes a lot of
errors. How do I
remove it?
Can I use music files
for my ringtones?
Will my alarm be
audible or will it go off
if the phone is turned
off?
If my ringer volume is
set to
Off
or
Vibrate
will I hear my alarm?
or Wi-Fi icon
Remove
bar,
(in the
.
Set
.
Phone
Spec
Battery Time
What is the maximum
amount of time my
phone’s battery will
last before I need to
recharge it?
Talk time: Approx. 15 Hours
Standby: Approx. 20 days

FAQ
87
CATEGORY
Phone
Spec
Recovery
Solution
SUB-CATEGORY QUESTION ANSWER
Band
Factory Reset
Which wireless bands
are supported by the
phone?
How can I perform a
factory reset if I can’t
access the phone’s
Settings
menu?
Your phone is able to operate on the
800MHz and 1900MHz bands.
How to perform a factory reset:
Read ALL steps before attempting.
1. Turn the phone off.
Press and hold the following keys (on
the back of the phone) at the same
time:
Volume Down Key
Power/Lock Key
2. Release both of the key when the
System recovery screen is displayed.
3. Press either of the
reset, then press the
Key
NOTE Highlight
simply restart your phone without
performing a hard reset.
The Factory data reset screen is
displayed. Press either of the
Keys
to exit), then press the
Key
4. Your phone will perform a hard reset
and erase all of your personal data.
Attention:
If a factory reset is performed, all
installed apps and user data will be
erased. Please remember to back up
any important data before performing a
factory reset.
.
Volume Keys
to highlight Factory data
.
Continue Power up
to highlight
to continue.
+
Power/Lock
Volume
Yes
(or No
Power/Lock
to
Power Reset
The phone is
locked-up and doesn't
function. How can I
reset it?
In the case of a malfunction or lock up
error, remove the battery and reinsert it
and then turn on your phone.

88
Safety
WARNING:
California to cause cancer and birth defects or reproductive harm.
Call (800) 243-0000 for more information.
Wash hands after handling.
This product contains chemicals known to the State of
HAC
This phone has been tested and rated for use with hearing aids for some of
the wireless technologies that it uses. However, there may be some newer
wireless technologies used in this phone that have not been tested yet for
use with hearing aids. It is important to try the different features of this
phone thoroughly and in different locations, using your hearing aid or
cochlear implant, to determine if you hear any interfering noise. Consult
your service provider or the manufacturer of this phone for information on
hearing aid compatibility. If you have questions about return or exchange
policies, consult your service provider or phone retailer.
Any changes or modifications not expressly approved in this user guide
could void your warranty for this equipment. Use only the supplied antenna.
Use of unauthorized antennas (or modifications to the antenna) could impair
call quality, damage the phone, void your warranty and/or violate FCC
regulations.
Don’t use the phone with a damaged antenna. A damaged antenna could
cause a minor skin burn. Contact your local dealer for a replacement
antenna.
FCC RF Exposure Information
WARNING! Read this information before operating the phone.
In August 1996, the Federal Communications Commission (FCC) of the
United States, with its action in Report and Order FCC 96-326, adopted an
updated safety standard for human exposure to Radio Frequency (RF)
electromagnetic energy emitted by FCC regulated transmitters. Those
guidelines are consistent with the safety standard previously set by both
U.S. and international standards bodies. The design of this phone complies
with the FCC guidelines and these international standards.

Safety
Bodily Contact During Operation
This device was tested for typical use with the back of the phone kept 0.39
inches (1.0 cm) from the body. To comply with FCC RF exposure
requirements, a minimum separation distance of 0.39 inches (1.0 cm) must
be maintained between the user’s body and the back of the phone.
Third-party belt-clips, holsters, and similar accessories containing metallic
components may not be used. Avoid the use of accessories that cannot
maintain 0.39 inches (1.0 cm) distance between the user’s body and the
back of the phone and have not been tested for compliance with FCC RF
exposure limits.
FCC Notice and Cautions
This device and its accessories comply with part 15 of FCC rules. Operation
is subject to the following two conditions: (1) This device and its
accessories may not cause harmful interference, and (2) this device and its
accessories must accept any interference received, including interference
that causes undesired operation.
Any changes or modifications not expressly approved in this user guide
could void your warranty for this equipment. Use only the supplied antenna.
Use of unauthorized antennas (or modifications to the antenna) could impair
call quality, damage the phone, void your warranty and/or violate FCC
regulations.
Don’t use the phone with a damaged antenna. A damaged antenna could
cause a minor skin burn. Contact your local dealer for a replacement
antenna.
Part 15.19 statement
This device complies with part15 of FCC rules. Operation is subject to the
following two conditions:
(1) This device may not cause harmful interference.
(2) This device must accept any interference received, including
interference that may cause undesired operation.
89

Safety
90
Part 15.21 statement
Changes or modifications that are not expressly approved by the
manufacturer could void the user’s authority to operate the equipment.
Part 15.105 statement
This equipment has been tested and found to comply with the limits for a
class B digital device, pursuant to Part 15 of the FCC rules. These limits are
designed to provide reasonable protection against harmful interference in a
residential installation. This equipment generates, uses, and can radiate
radio frequency energy and, if not installed and used in accordance with the
instructions, may cause harmful interference to radio communications.
However, there is no guarantee that interference will not occur in a
particular installation. If this equipment does cause harmful interference or
television reception, which can be determined by turning the equipment off
and on, the user is encouraged to try to correct the interference by one or
more of the following measures:
- Reorient or relocate the receiving antenna.
- Increase the separation between the equipment and receiver.
- Connect the equipment into an outlet on a circuit different from that to
which the receiver is connected.
- Consult the dealer or an experienced radio/TV technician for help.
Consumer Information About Radio Frequency
Emissions
Your wireless phone, which contains a radio transmitter and receiver, emits
radio frequency energy during use. The following consumer information
addresses commonly asked questions about the health effects of wireless
phones.
Are wireless phones safe?
Scientific research on the subject of wireless phones and radio frequency
(“RF”) energy has been conducted worldwide for many years, and

Safety
continues. In the United States, the Food and Drug Administration (“FDA”)
and the Federal Communications Commission (“FCC”) set policies and
procedures for wireless phones. The FDA issued a website publication on
health issues related to cell phone usage where it states, “The scientific
community at large … believes that the weight of scientific evidence does
not show an association between exposure to radiofrequency (RF) from cell
phones and adverse health outcomes. Still the scientific community does
recommend conducting additional research to address gaps in knowledge.
That research is being conducted around the world and FDA continues to
monitor developments in this field. You can access the joint FDA/FCC
website at http://www.fda.gov (under “c”in the subject index, select Cell
Phones > Research). You can also contact the FDA toll-free at (888)
463-6332 or (888) INFO-FDA. In June 2000, the FDA entered into a
cooperative research and development agreement through which additional
scientific research is being conducted. The FCC issued its own website
publication stating that “there is no scientific evidence that proves that
wireless phone usage can lead to cancer or a variety of other problems,
including headaches, dizziness or memory loss.” This publication is
available at http://www.fcc.gov/cgb/ cellular.html or through the FCC at
(888) 225-5322 or (888) CALL-FCC.
What does “SAR” mean?
In 1996, the FCC, working with the FDA, the U.S. Environmental Protection
Agency, and other agencies, established RF exposure safety guidelines for
wireless phones in the United States. Before a wireless phone model is
available for sale to the public, it must be tested by the manufacturer and
certified to the FCC that it does not exceed limits established by the FCC.
One of these limits is expressed as a Specific Absorption Rate, or “SAR.”
SAR is a measure of the rate of absorption of RF energy in the body. Tests
for SAR are conducted with the phone transmitting at its highest power
level in all tested frequency bands. Since 1996, the FCC has required that
the SAR of handheld wireless phones not exceed 1.6 watts per kilogram,
averaged over one gram of tissue.
Although the SAR is determined at the highest power level, the actual SAR
value of a wireless phone while operating can be less than the reported
91

Safety
92
SAR value. This is because the SAR value may vary from call to call,
depending on factors such as proximity to a cell site, the proximity of the
phone to the body while in use, and the use of hands-free devices. For
more information about SARs, see the FCC’s OET Bulletins 56 and 65 at
http://www.fcc.gov/Bureaus/Engineering_Technology/Documents/bulletins
or visit the Cellular Telecommunications Industry Association website at
http://www.ctia.org/consumer_info/index.cfm/AID/10371. You may also
wish to contact the manufacturer of your phone.
Can I minimize my RF exposure?
If you're concerned about RF, there are several simple steps you can take
to minimize your RF exposure. You can, of course, reduce your talk time.
You can place more distance between your body and the source of the RF,
as the exposure level drops off dramatically with distance. The FDA/FCC
website states that “hands-free kits can be used with wireless phones for
convenience and comfort. These systems reduce the absorption of RF
energy in the head because the phone, which is the source of the RF
emissions, will not be placed against the head. On the other hand, if the
phone is mounted against the waist or other part of the body during use,
then that part of the body will absorb more RF energy. Wireless phones
marketed in the U.S. are required to meet safety requirements regardless
of whether they are used against the head or against the body. Either
configuration should result in compliance with the safety limit.” Also, if you
use your wireless phone while in a car, you can use a phone with an
antenna on the outside of the vehicle. You should also read and follow your
wireless phone manufacturer’s instructions for the safe operation of your
phone.
Do wireless phones pose any special risks to children?
The FDA/FCC website states that “the scientific evidence does not show a
danger to users of wireless communication devices, including children.”
The FDA/FCC website further states that “some groups sponsored by
other national governments have advised that children be discouraged from
using wireless phones at all”. For example, the Stewart Report from the
United Kingdom [“UK”] made such a recommendation in December 2000.
In this report a group of independent experts noted that no evidence exists

Safety
that using a cell phone causes brain tumors or other ill effects. [The UK’s]
recommendation to limit cell phone use by children was strictly
precautionary; it was not based on scientific evidence that any health
hazard exists. A copy of the UK’s leaflet is available at http://www.dh.gov.uk
(search “mobile”), or you can write to: NRPB, Chilton, Didcot, Oxon OX11
ORQ, United Kingdom. Copies of the UK’s annual reports on mobile phones
and RF are available online at www.iegmp.org.uk and http://www.hpa.org.
uk/radiation/ (search “mobile”). Parents who wish to reduce their children’s
RF exposure may choose to restrict their children’s wireless phone use.
Where can I get further information about RF emissions?
For further information, see the following additional resources (websites
current as of April 2005):
U.S. Food and Drug Administration
FDA Consumer magazine November-December 2000
Telephone: (888) INFO-FDA
http://www.fda.gov (Under “c” in the subject index, select Cell Phones >
Research.)
U.S. Federal Communications Commission
445 12th Street, S.W. Washington, D.C. 20554
Telephone: (888) 225-5322
http://www.fcc.gov/oet/rfsafety
Independent Expert Group on Mobile Phones
http://www.iegmp.org.uk
Royal Society of Canada Expert Panels on Potential Health Risks of Radio
Frequency Fields from Wireless Telecommunication Devices
283 Sparks Street Ottawa, Ontario K1R 7X9 Canada
Telephone: (613) 991-6990
http://www.rsc.ca/index.php?page=Expert_Panels_RF&Lang_id=120
93

Safety
94
World Health Organization
Avenue Appia 20 1211 Geneva 27 Switzerland
Telephone: 011 41 22 791 21 11
http://www.who.int/mediacentre/factsheets/fs193/en/
International Commission on Non-Ionizing Radiation Protection
c/o Bundesamt fur Strahlenschutz Ingolstaedter Landstr. 1 85764
Oberschleissheim Germany
Telephone: 011 49 1888 333 2156
http://www.icnirp.de
American National Standards Institute
1819 L Street, N.W., 6th Floor Washington, D.C. 20036 Telephone: (202)
293-8020
http://www.ansi.org
National Council on Radiation Protection and Measurements
7910 Woodmont Avenue, Suite 800 Bethesda, MD 20814-3095
Telephone: (301) 657-2652
http://www.ncrponline.org
Engineering in Medicine and Biology Society, Committee on Man and
Radiation (COMAR) of the Institute of Electrical and Electronics Engineers
http://ewh.ieee.org/soc/embs/comar/
Consumer Information on SAR
(Specific Absorption Rate)
This model phone meets the government's requirements for exposure to
radio waves. Your wireless phone is a radio transmitter and receiver. It is
designed and manufactured not to exceed the emission limits for exposure
to Radio Frequency (RF) energy set by the Federal Communications
Commission of the U.S. Government. These limits are part of

Safety
0.83
1.02
ZNFVS810PP
comprehensive guidelines and establish permitted levels of RF energy for
the general population. The guidelines are based on standards that were
developed by independent scientific organizations through periodic and
thorough evaluation of scientific studies. The standards include a
substantial safety margin designed to assure the safety of all persons,
regardless of age and health.
The exposure standard for wireless mobile phones employs a unit of
measurement known as the Specific Absorption Rate, or SAR. The SAR
limit set by the FCC is 1.6 W/kg. Tests for SAR are conducted using
standard operating positions specified by the FCC with the phone
transmitting at its highest certified power level in all tested frequency
bands. Although SAR is determined at the highest certified power level, the
actual SAR level of the phone while operating can be well below the
maximum value. Because the phone is designed to operate at multiple
power levels to use only the power required to reach the network, in
general, the closer you're to a wireless base station antenna, the lower the
power output.
Before a phone model is available for sale to the public, it must be tested
and certified to the FCC that it does not exceed the limit established by the
government-adopted requirement for safe exposure. The tests are
performed in positions and locations (e.g., at the ear and worn on the body)
as required by the FCC for each model.
The highest SAR value for this model phone when tested for use at the ear
is X.XX W/kg and when worn on the body, as described in this user guide,
is X.XX W/kg (body-worn measurements differ among phone models,
depending upon available accessories and FCC requirements). While there
may be differences between SAR levels of various phones and at various
positions, they all meet the government requirement for safe exposure.
The FCC has granted an Equipment Authorization for this model phone with
all reported SAR levels evaluated as in compliance with the FCC RF
emission guidelines. SAR information on this model phone is on file with
the FCC and can be found under the Display Grant section of http://www.
fcc.gov/oet/fccid after searching on FCC ID XXXXXXXXXX. Additional
information on Specific Absorption Rates (SAR) can be found on the
95

Safety
96
Cellular Telecommunications Industry Association (CTIA) website at http://
www.ctia.org/.
* In the United States and Canada, the SAR limit for mobile phones used
by the public is 1.6 watts/kg (W/kg) averaged over one gram of tissue.
The standard incorporates a substantial margin of safety to give additional
protection for the public and to account for any variations in
measurements.
FCC Hearing-Aid Compatibility (HAC) Regulations
for Wireless Devices
On July 10, 2003, the U.S. Federal Communications Commission (FCC)
Report and Order in WT Docket 01-309 modified the exception of wireless
phones under the Hearing Aid Compatibility Act of 1988 (HAC Act) to
require digital wireless phones be compatible with hearing-aids. The intent
of the HAC Act is to ensure reasonable access to telecommunications
services for persons with hearing disabilities.
While some wireless phones are used near some hearing devices (hearing
aids and cochlear implants), users may detect a buzzing, humming, or
whining noise. Some hearing devices are more immune than others to this
interference noise, and phones also vary in the amount of interference they
generate.
The wireless telephone industry has developed a rating system for wireless
phones, to assist hearing device users to find phones that may be
compatible with their hearing devices. Not all phones have been rated.
Phones that are rated have the rating on their box or a label located on the
box.
The ratings are not guarantees. Results will vary depending on the user's
hearing device and hearing loss. If your hearing device happens to be
vulnerable to interference, you may not be able to use a rated phone
successfully. Trying out the phone with your hearing device is the best way
to evaluate it for your personal needs.

Safety
M-Ratings: Phones rated M3 or M4 meet FCC requirements and are likely
to generate less interference to hearing devices than phones that are not
labeled. M4 is the better/higher of the two ratings.
T-Ratings: Phones rated T3 or T4 meet FCC requirements and are likely to
generate less interference to hearing devices than phones that are not
labeled. T4 is the better/ higher of the two ratings.
Hearing devices may also be rated. Your hearing device manufacturer or
hearing health professional may help you find this rating. Higher ratings
mean that the hearing device is relatively immune to interference noise.
The hearing aid and wireless phone rating values are then added together.
A sum of 5 is considered acceptable for normal use. A sum of 6 is
considered for best use.
In the above example, if a hearing aid meets the M2 level rating and the
wireless phone meets the M3 level rating, the sum of the two values equal
M5. This should provide the hearing aid user with “normal usage” while
using their hearing aid with the particular wireless phone. “Normal usage”
in this context is defined as a signal quality that’s acceptable for normal
operation.
The M mark is intended to be synonymous with the U mark. The T mark is
intended to be synonymous with the UT mark. The M and T marks are
recommended by the Alliance for Telecommunications Industries Solutions
(ATIS). The U and UT marks are referenced in Section 20.19 of the FCC
Rules. The HAC rating and measurement procedure are described in the
American National Standards Institute (ANSI) C63.19 standard.
When you’re talking over the cell phone, it’s recommended you’d turn the
BT (Bluetooth) or WLAN mode off for HAC.
97
FCC Hearing Aid Compatibility and Volume Control
http://www.fcc.gov/cgb/consumerfacts/hac_wireless.html

Safety
98
Caution:
Avoid potential hearing loss.
Prolonged exposure to loud sounds (including music) is the most common
cause of preventable hearing loss. Some scientific research suggests that
using portable audio devices, such as portable music players and cellular
telephones, at high volume settings for long durations may lead to
permanent noise-induced hearing loss. This includes the use of
headphones (including headsets, earbuds and Bluetooth
devices). Exposure to very loud sound has also been associated in some
studies with tinnitus (a ringing in the ear), hypersensitivity to sound and
distorted hearing. Individual susceptibility to noise-induced hearing loss and
other potential hearing problems varies.
The amount of sound produced by a portable audio device varies depending
on the nature of the sound, the device, the device settings and the
headphones. You should follow some commonsense recommendations
when using any portable audio device:
• Set the volume in a quiet environment and select the lowest volume at
which you can hear adequately.
• When using headphones, turn the volume down if you cannot hear the
people speaking near you or if the person sitting next to you can hear
what you're listening to.
• Do not turn the volume up to block out noisy surroundings. If you choose
to listen to your portable device in a noisy environment, use noisecancelling headphones to block out background environmental noise.
• Limit the amount of time you listen. As the volume increases, less time is
required before your hearing could be affected.
• Avoid using headphones after exposure to extremely loud noises, such as
concerts, that might cause temporary hearing loss. Temporary hearing
loss might cause unsafe volumes to sound normal.
• Do not listen at any volume that causes you discomfort. If you experience
ringing in your ears, hear muffled speech or experience any temporary
®
or other wireless
 Loading...