

LG SXSLRSC26980TT User Manual

#LG
website :http ://www.1gservice.com
LRSC 26980TT
sxs
__ _
REFRIGERATOR
User's Guide
Please read this guide thoroughly
before operating and keep it handy for
reference at all times.
SXS
REFRIGERATEUR
felinuel d'utilisation
ï^ièfë de lire atteritiverrient le présent manuel
avairt d’utiliser le réfrigérateur.
consulter à tout rndhiénf
FRIGORIFICO
SXS
Giiía dë;iiiarid
antes hdlízíff iel fn y guárdelas
como referencia para el futuro.

Table of Contents
Introduction
Installation
Operation
Entry
Important Safety Instruction
Identification of Parts
Where to Install ------------------------------Door Removal
Door Replacement
Feed Water Pipe Installation
Water Connection Instruction Guide
Operation Instruction Guide
Height Adjustment
External Equipment Connections
Starting
Adjusting the Temperatures and functions
(Dispenser/Automatic Icemaker)
Shelf
-----------------------------------------------------
--------------------------------
----------
--------------------------
-------------
-------------
--------------------------
- -
Suggestion on
Food Storage
Care and
Maintenance
Wine Holder
Can Server Adjustment -------------------------------------Egg Bin
Humidity Control in the Vegetable Compartment
Vegetable/meat compartment
Optichill Temperature Transition Corner
Location of Foods
Storing Foods -
How to Dismantle Parts
General Information
Cleaning
Troubleshooting
-----------------------------------------------------------
-----------------------------
----------------------
- -

Recommended
Grounding
Method
Accessibility of
Supply Plug
Supply Cord
Replacement
Entry
The model and serial numbers are found on the inner case or back of refrigerator
compartment of this unit. These numbers are unique to this unit and not
available to others. You should record requested information here and retain
this guide as a permanent record of your purchase. Staple your receipt here.
Date of purchase
Dealer
Dealer address
Dealer phone no.
Model no.
Serial no.
Important safety instruction
Before use, this refrigerator must be properly installed and located in accordance with
the installation instructions in this manual.
Never unplug your refrigerator by pulling on the power cord. Always grip the plug firmly
and pull it straight out from the outlet.
When moving your appliance away from the wall, be careful not to roll over the power
cord or to damage it in any way. Do not crush or damage the water line.
After your refrigerator is in operation, do not touch the cold surfaces in the freezer
compartment particularly when your hands are damp or wet. Skin could adhere to
these extremely cold surfaces.
Unplug the power cord from the power outlet for cleaning or other requirements. Never
touch it with wet hands because you can get an electric shock or be injured.
Never damage, bend, kink, pull out or twist the power cord because damage to the
power cord can cause product failure, fire, or electric shock. If you have doubts the
appliance is properly grounded, consult a qualified electrician.
Never place glass products in the freezer because they may be broken from expansion
when their contents are frozen.
Never put your hands within the ice storage bin of the automatic icemaker. You can be
injured by the operation of the automatic icemaker.
The appliance is not intended for use by young children without supervision.
Young children should be supervised to ensure that they do not play with the appliance.
Never allow anyone to climb, sit, stand, or hang on the door. These actions may
damage the refrigerator and even tip it over, causing severe personal injury.
Before you move your refrigerator into its final location,
it is important to make sure you have the proper electrical
connection:
A115 Volt, 60 Hz., AC only 15, or 20 ampere fused, grounded
electrical supply is required. It is recommended that a separate
circuit serving only your refrigerator be provided. Use an outlet that
cannot be turned off by a switch. Do not use an extension cord.
The refrigerator-freezer should be so positioned that the supply plug
is accessible for quick disconnection in the event of an emergency.
If the supply cord is damaged, it must be replaced by the manufacturer or its service agent or
a similarly qualified person in order to avoid any hazard.
Child Entrapment
Warning
DANGER: Risk of child entrapment.
Before you throw away your old refrigerator or freezer:
Take off the doors but leave the shelves In place so that children may not easily climb
inside.
The appliance is not intended for use by young children without supervision.
Young children should be supervised to ensure that they do not play with the appliance.
Don’t Store
Grounding (Earthing)
Door Rack
Automatic
Icemaker
Lamp
Shelf
(steel or glass)
Jet Freezing
Don't store or use gasoline or other flammable vapor and liquids in the vicinity of this or
any other appliance.
In the event of an electric short circuit, grounding (earthing) reduces the risk of electric
shock by providing an escape wire for the electric current.
In order to prevent possible electric shock, this appliance must be grounded,
improper use of the grounding plug can result in an electric shock. Consult a qualified
electrician or service person if the grounding instructions are not completely
understood, or if you have doubts on whether the appliance is properly grounded.
......
'v
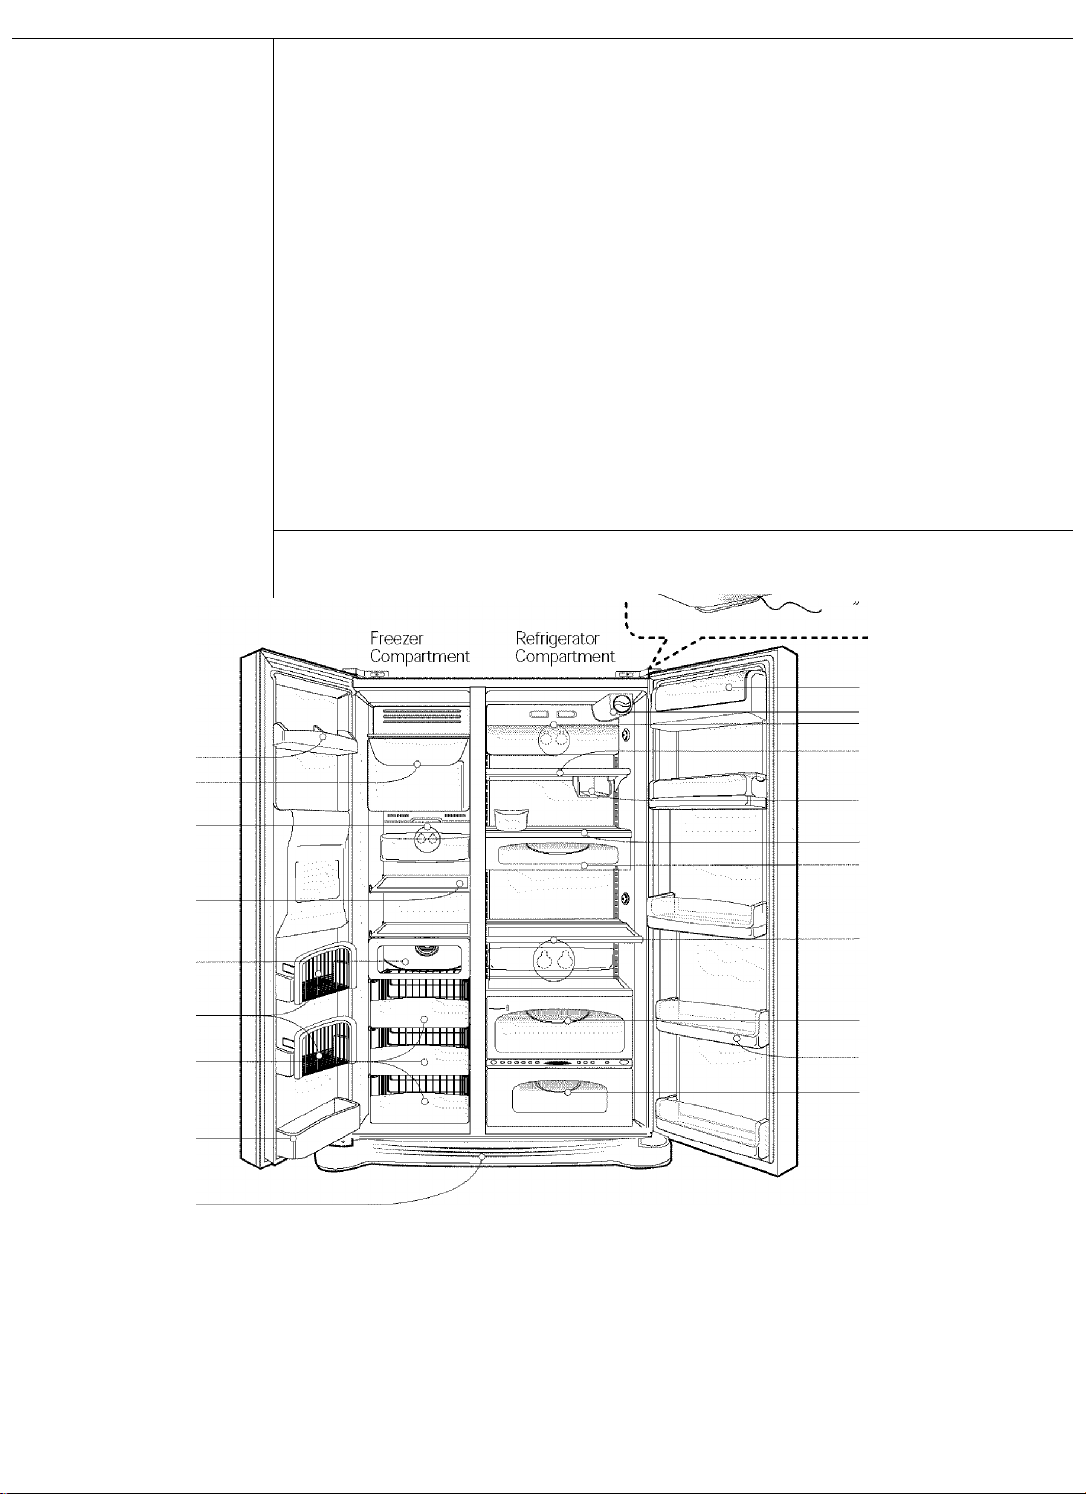
Identification of Parts i i
i TO' ■ I
Dairy Corner
Water Filter
Lamp
Shelf
Can Server
Shelf
Snack Drawer
Lamp
Door Rack
Drawer
Door Rack
Lower Cover
NOTE
lfrf/otj:1;tiyti(:] sivrfji.; (;j;irtLi tiiiybfirig tvtvJtlTijricjiFirctii
tjCeatl iijiAtljit;r:t-hi)tJcil::rJi}:t::JrUi(:rOptit;hilin:tcf‘ii.:JrJi:i(:lij(Jf}d
Vegetable Drawer
Door Rack
Optichill
ijriii,:tfitty rfitiy'liii;.(Jiirfittiiily-.
ilr tlH nvodctlsi r r r r C r r r r r r r r

Where to Locate
Select a Good
Location
1. Place your appliance where it is easy to use.
2. Avoid placing the unit near heat sources, direct sunlight, or moisture.
3. To avoid vibrations, the appliance must be leveled.
4. Do not install this refrigerator in areas where the ambient temperature is below 41 °F.
It will have an adverse effect on performance.

Door removal
/f\ Warning
Remove Lower
Cover and
Water Feed Tube
Remove the
Freezer
Compartment
Door
Electric Shock Hazard
Disconnect electrical supply to the refrigerator before installing,
Failure to do so could result in death or serious injury,
If your entrance door is too narrow for the
refrigerator to pass through, remove the
refrigerator door and pass the refrigerator laterally.
Remove the lower cover by lifting upward, and
then pull up the water feed tube while pressing
,'i[e.a X shown in the iigure to the tight.
NOTE
tufid f|i;k.l;is (■J(tfctt.rtié(i (¡r !.J;i:niagodXtritTrth(L [wsttìif.’ Ijatf [Lirh t .■ :|X .. /. ..
ttfdhcvrrXrirjfirator.lias txxaì.r;;piìt;iG.i;tc<jtpv:i water:litics;discpnfiectihg ttieX
rttfO: door .will! cause about d ,:a:liitcvs.walor:to.fk;vv0ut:, IFdcsase l:iavo:a jorq.o;(:cl)ntait.iör I
ready, I : ,r | ■' .
1) Removing the hinge cover by loosening the
screws. Disconnect all connections except
the ground line.
Upper Hinge
2) Remove the keeper by rotating it counter
clockwise ® and then lifting the upper
hinge up ®.
::e- ree:lT:.!~
Lower Cover
Remove the
Refrigerator
Door
NOTE
Whtgii t'emoyii.tgdlriouppor ;i lirigecbcccaroful; tltrit'the. dOT
3) Remove the freezer compartment door by lifting it
upward. This time, the door should be lifted enough
for the water feed tube to be completely pulled out
pulled out of the lower hinge.
NOTE
Afl' ■ "
rerfioyirifj tjie;(Ì!;Kìr. itakè.ìt j.intri ttiè .kitcfiH.ij:wliére, yn.ù firedn
er
■gHrat(;ircl.fryJ'fd.()wh'.t|)r;i:r! rin.ci ti)e;f.;àrèfii:f.tr.taycjiti:i;J^
rètri
drn'ti. lubii,;
1) Loosen the hinge cover screws and remove
the cover. Remove connection wire, if any,
except for the ground line.
2) Remove keeper by rotating it clockwise ®
and then remove the upper hinge by lifting
it up @ , '
3) Remove the refrigerator compartment door
by lifting it up.
Enough for water
feed pipe tube to be :
\completely pulled out
Lower hinge
laì.iirig' tjiè
igijig ttiè vvatet:

Move the
Refrigerator
Push the refrigerator sideways through the
entrance door as shown in the right picture,
Door replacement
After the refrigerator is moved to the installation area, install the doors in the reverse
order in which they were removed.
Feed water tube installation
Before
Installation
/t\ Warning
"Automatic icemaker operation needs water pressure of Zl.S-IZIpsi is too
much(lb/inch^) (That a 7 ounce paper cup will fill within 3 sec.).
■ If the water pressure does not reach 21.3psi(lb/inch^), it is necessary to purchase a
separate pressure pump for the cool water feed.
■ Keep the total length of the water feed tube less than 40 feet and be careful not to
bend or kink the tube. If the tube is longer than 40 feet, the icemaker and water
dispenser will not operate properly.
■ Install the water feed tube away from any heat sources.
Connect to potable water supply only.
Refer to instructions with water filter kit for installation.
Water Connection Instruction Guide
Connecting
the Refrigerator
to a Water Source
/!\ Warning
Tools Required
Read all directions carefully before you begin.
Connect to potable water supply only.
IMPORTANT
• .If .¡;i|;x:riiiing Thc :r(!frigcy;:)tC)r tiitCffir inst lO.'AMtcty t::f)n(K;;ót:i(;;n.,d;i.irj} jt;ei.ii;ikcír;
.:tO:ti:‘io QFFt:iqsit.ioi;rtQ: provoi.it. pperat.ion witlioüt.yvíitoí. i i t . .
•.Al:í ír.|St;al|atitir.|STín.!‘;)dt,x:Hryác!;:or(;iárK:y:-pilurfibirif:) riiflg
lj.Sf;|'co[jport;ub¡iigÓ!fid.x;l'K feiksr / /'/ r' .Á ■■. ' :'''''' .■ S
I ristallarx jppQrtijf/it:ig .pi ily :ii isart idO wfioro t.ptriÍ3proturcA.i: w.i:lf roni^
it.riiay take dp. ix.iurs frir: ycxjrjctiriiákcydPtxocjíngifPdú :::::: ::::::
> Standard screwdriver
i 7/16-inch and 1/2-inch open-end wrenches or two adjustable wrenches
' 1 /4-inch nut driver
0/4-inch drill bit
i Hand driil or eiectric driii (properly grounded)
rioquifrrtTjdnts.:
NOTE
;• YourrrelrigPrataf doálcrTas
/■/á.Xrniofi;, ár id t:pp(x)f luhiric:);
■■-.ciirti plies Wifttyritir. i'irialTsIl
:: sáíjdtepíaive.whif:ír reduces
cvkit ¿ivailabl tS witITa 1 íA Bc4;ór(.r jajriditicjnf).; rñaki
.tTiflirii;) ctiric-'si rpc!) notr us'
^ Wíitér.flovx. rihdT4íX|S. rni
richp;;add]c-typo sliUt*Qfl valvó./)));
vsufo a sadfilp-tv|.ie valve. .: ......
} a |)ierciri(i-{yi)0.or ,:vi
ire.éaidly..-.
.
...................
.
Cold Water Supply
The icemaker water valve contains a flow washer which is used as a water
pressure regulator.
The icemaker needs to be connected to a cold water line with water pressure
21.3-121 psi(lb/inc№)
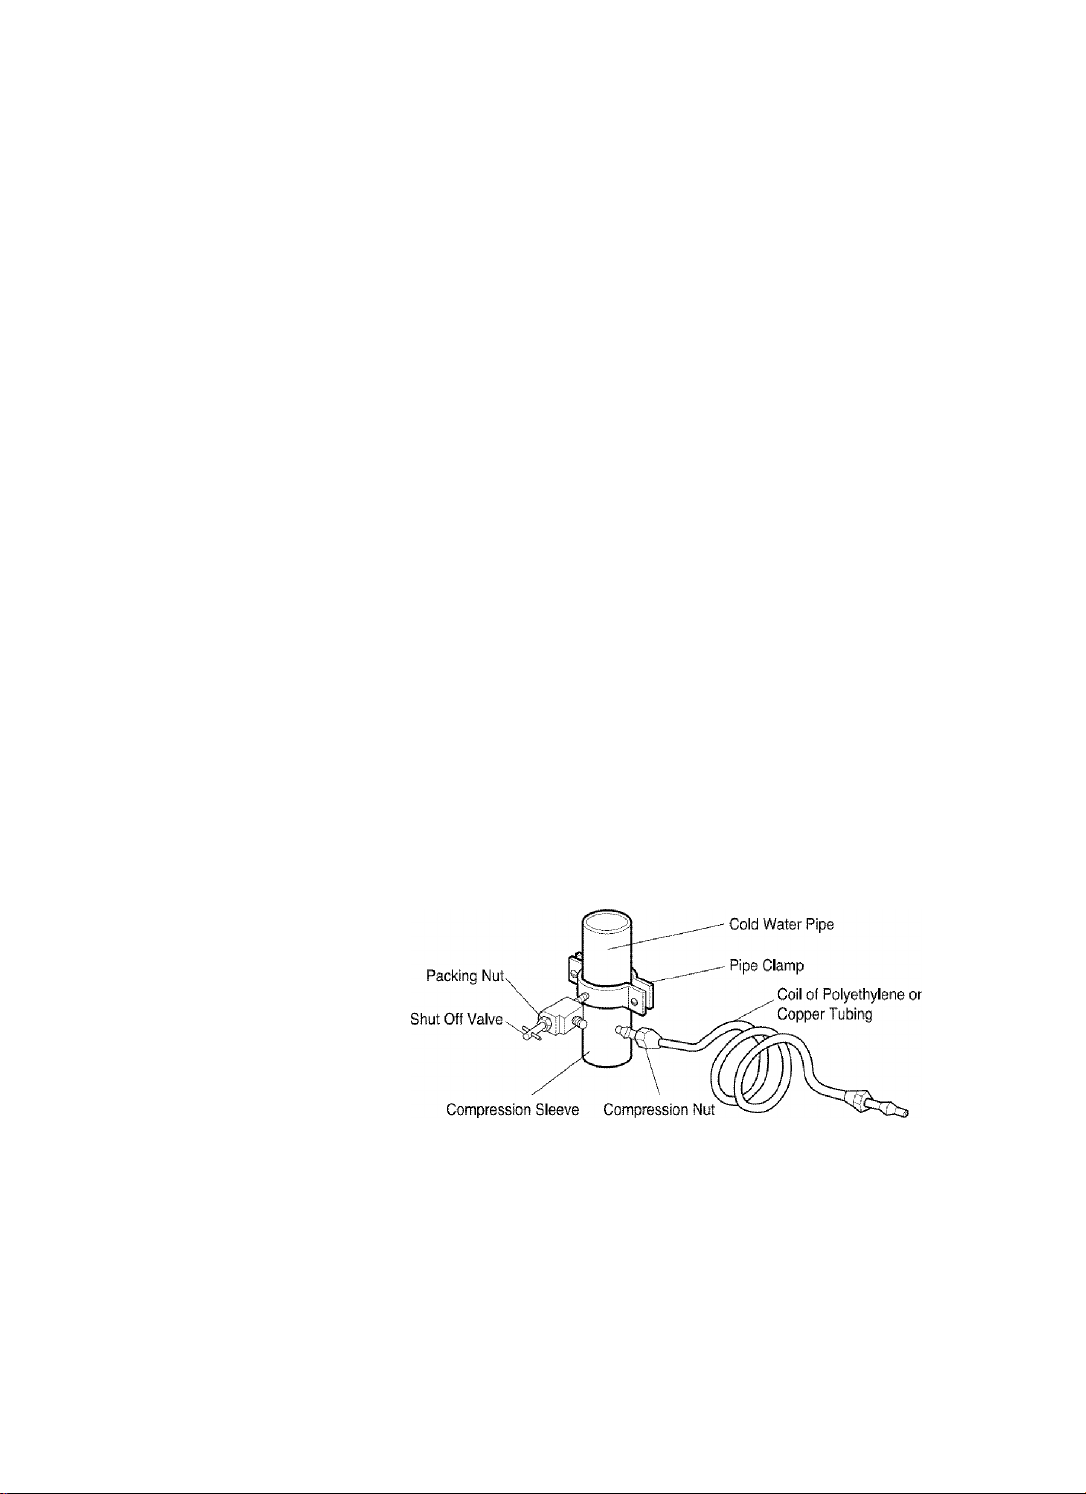
Connect
the Tubing to
Water Line
1. Unplug refrigerator or disconnect power.
2. Turn off the main water supply. Turn on the nearest faucet to relieve the
pressure on the line. It may help to open an outside faucet to allow the water to
drain from the line in the house.
3. Find a 1/2anch to 1-1/4-inch vertical COLD water pipe near the refrigerator.
NOTE
H.i-)r(/(;)iitlil.:f:)!|.}(rwill wixk: htit:il:icFfo:y0y.4ny f)rtF:ritftiL)t! ri'iuiit i.ikfa
■l;l'icfpiix;::.;fKT:thrrtx.!ftc-ni:rTh;i!Vvdl:l,lhTi|a.kfKj^^ jti.xtjg:fic-drill.;This;alsd:fe
laoririfjl'.s.edinyyrit frorryecdlcxfiriglii flic; yalyrr-. r r r r r r r r r r p r r r r r r r r r r 2 r r r r r r r r r r 2 r F-.
4. To determine the length of copper tubing you will need, measure from the
connection on the lower left rear of the refrigerator to the water pipe. Add 7
feet (2.1 m) to allow for moving refrigerator for cleaning. Use 1/41nch O.D.
(outside diameter) copper tubing. Be sure both ends of copper tubing are cut
square.
5. Using a drill, drill a 1/4-inch hole in the cold water pipe you have selected.
6. Fasten the shutoff valve to cold water a pipe with pipe clamp. Be sure outlet
end is securely in the 1/4-inch drilled hole and the washer is under the pipe
clamp. Tighten the packing nut. Tighten the pipe clamp screws carefully and
evenly so the washer makes a watertight seal. Do not overtighten or you may
crush the copper tubing, especially if soft (coiled) copper tubing is used. Now
you are ready to connect the copper tubing.
7. Slip the compression sleeve and compression nut onto the copper tubing as
shown. Insert end of the tubing into outlet end squarely as far as it will go.
Screw compression nut onto the outlet end with an adjustable wrench. Do not
over tighten.
8. Place the free end of the tubing into a container or sink, and turn ON main
water supply. Flush out tubing until water is clear. Turn OFF the shutoff valve
on the water pipe. Coil the copper tubing as shown below.
Operation Instruction Guide
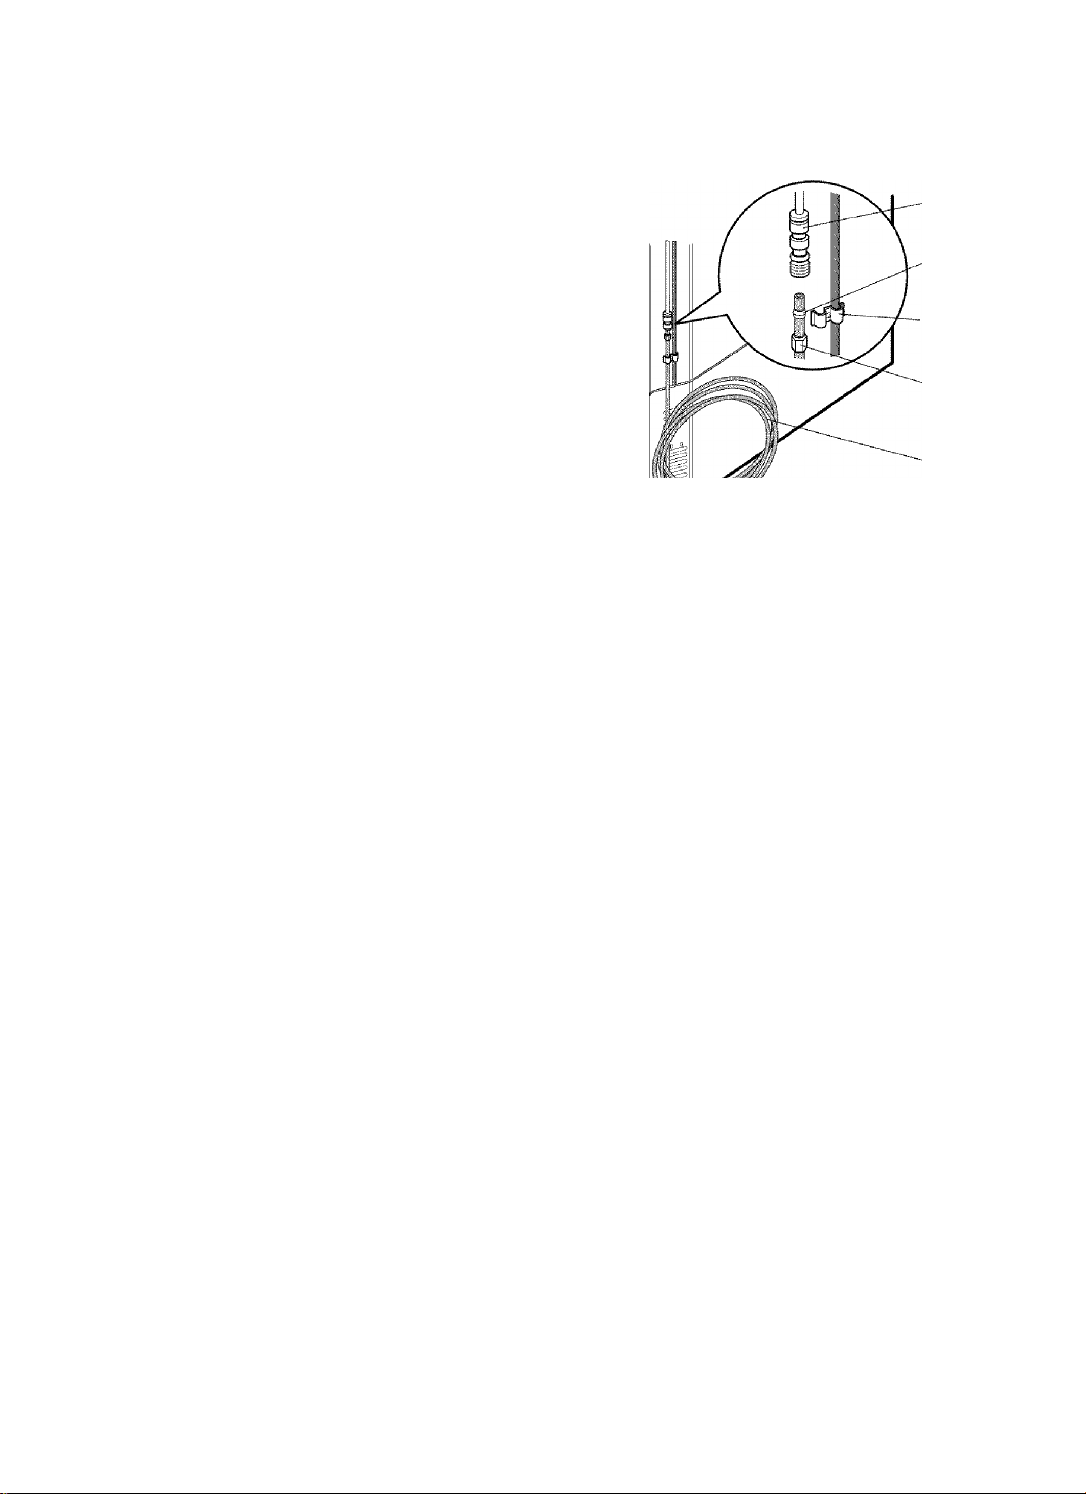
Connect the Tubing
to the Refrigerator
Turn the Water On at
the Shutoff Valve
Before making the connection to the refrigerator, be sure the refrigerator
power cord is not plugged into the
wall outlet.
• If your refrigerator does not have a
water filter, we recommend
installing one. sand or particles
could clog the screen of the
refrigerator's water valve. Install
the filter in the water line near the
refrigerator.
1. Remove the plastic flexible cap
from the water valve.
2. Place the compression nut and
ferrule (sleeve) onto the end of the
tubing as shown.
3. Insert the end of the copper tubing into the connection as far as possible. While
holding the tubing, tighten the fitting.
Tighten any connections that leak.
■ Plug In the Refrigerator
Arrange the coil of copper tubing behind the refrigerator so it does not vibrate
against the back of the refrigerator or against the wall. Push the refrigerator
back to the wall.
■ Start the Icemaker
Set the icemaking stop switch to the ON position The icemaker will not begin
to operate until it reaches its operating temperature of 15 °F (-9 °C). It will then
begin operation automatically if the icemaking stop switch is in the ON
position.
Refrigerator
Connection
Ferrule
■ Tubing
Clamp
1/4"
Compression
Nut
1/4"
Tubing
Automatic Ice maker
m
The automatic icemaker makes 8 cubes at a time, 120/150 pieces per day.
But these quantities may vary according to circumstance, including ambient
temperature, door openings, freezer load.etc.
The Icemaker stops when the bin is full.
NOTE
/It;is11.prmal;tóiii0ar(i.'i noiseiydien iccTdrpp'LvihtDitliO;bin))
 Loading...