

Page 1
DELUXE LOW WATT
MODELS :
S05DVX-3 S07DVX-3 S09DVX-3 S05DLX-3
S07DLX-3 S09DLX-3 S12DLX-3 S18DLX-3
OWNER’S MANUAL
AIR CONDITIONER
Please read this manual carefully before operating
your set and retain it for future reference.
TYPE : WALL MOUNTED
MODELS :
S05LPBX-R2 S09LPBX-R S12LPBX-R
ArtCool
MODELS :
S05ACR S09ACR S12ACR
STANDARD INVERTER
MODELS :
S10KMV S10SIV-2 S13SIV S18SIV-2
DELUXE INVERTER
MODELS :
S18DLV-2
ArtCool Inverter
MODELS :
S10ACNV S13ACNV
*MFL67658903*
P/NO : MFL67658903
www.lg.com
Page 2

TIPS FOR SAVING ENERGY
For your records
2
ENGLISH
TIPS FOR SAVING ENERGY
Here are some tips that will help you minimize the power consumption when you use the air
conditioner. You can use your air conditioner more eciently by referring to the instructions
below:
• Do not cool excessively indoors. This may be harmful for your health and may consume more
electricity.
• Block sunlight with blinds or curtains while you are operating the air conditioner.
• Keep doors or windows closed tightly while you are operating the air conditioner.
• Adjust the direction of the air ow vertically or horizontally to circulate indoor air.
• Speed up the fan to cool or warm indoor air quickly, in a short period of time.
• Open windows regularly for ventilation as the indoor air quality may deteriorate if the air con-
ditioner is used for many hours.
• Clean the dual protection lter once every 2 weeks. Dust and impurities collected in the
dual protection lter may block the air ow or weaken the cooling / dehumidifying functions.
Staple your receipt to this page in case you need it to prove the date of purchase or for warranty
purposes. Write the model number and the serial number here:
Model number :
Serial number :
You can nd them on a label on the side of each unit.
Dealer’s name :
Date of purchase :
Page 3
SAFETY PRECAUTIONS
READ ALL INSTRUCTIONS BEFORE USING THE APPLIANCE.
IMPORTANT SAFETY INSTRUCTIONS
Always comply with the following precautions to avoid dangerous situations and ensure peak
performance of your product
WARNING
!
It can result in serious injury or death when the directions are ignored
CAUTION
!
It can result in minor injury or product damage when the directions are ignored
WARNING
!
in hazards to you and others.
• Installation MUST conform with local building codes.
• The information contained in the manual is intended for use b
familiar with safety procedures and equipped with the proper tools and test instruments.
• Failure to carefully read and follow all instructions in this manual can result in equipment malfunction, property damage, personal injury and/or death.
• This appliance is not intended for use by persons (including children) with reduced physical,
sensory or mental capabilities, or lack of experience and knowledge, unless they have been
given supervision or instruction concerning use of the appliance by a person responsible for
their safety.
• Children should be supervised to ensure that they do not pla
• When the power cord is to be replaced,replacement work shall be performed by authorized
personnel only genuine replacement parts.
Installation
• Use a standard circuit breaker and fuse conforming with the rating of the air conditioner. Fail-
ure to do so may result in electric shock or product failure.
• Contact an authorized service center when you install or relocate the air conditioner. Failure to
do so may result in serious injury or product failure.
• Always use a power plug and socket with a ground terminal.Failure to do so may result in
electric shock or product failure
• Install the panel and the cover of the control box safely. Failure to do so may result in explo-
y with the appliance.
3
ENGLISH
• Install a dedicated electric outlet and circuit breaker before you use the air conditioner. Failure
to do so may result in electric shock or product failure.
• Use a standard circuit breaker and fuse conforming with the rating of the air conditioner. Fail-
ure to do so may result in electric shock or product failure.
• Do not modify or extend the power cable. If the power cable or cord has scratches or skin
peeled off or deteriorated then it must be replaced. It may resu
• Be cautious when you unpack or install the air conditioner. Failure to do so may result in seri-
ous injury or product failure.
• Contact an authorized service center when you install or relocate the air conditioner. Failure to
do so may result in serious injury or product failure.
• Do not install the air conditioner on an unstable surface or where there may be a danger of it
falling. It may result in death, serious injury, or product failure.
Page 4
4
ENGLISH
Operation
SAFETY PRECAUTIONS
• Do not let the air conditioner run for a long time when the humidity is very high or when a door or
window has been left open. Failure to do so may result in product failure.
• Make sure that the power cord is not pulled or damaged while the air conditioner is operating. Fail-
ure.
• Do not place any objects on the power cord. It may result in electric shock or product failure.
• Do not turn on or off the air conditioner by plugging in or unplugging the power plug. It may result in
• Do not touch, operate or repair the air conditioner with wet hands. It may result in electric shock or
product failure.
• Do not place a heater or other heating appliances near the po
shock, or product failure.
• Do not allow water to run into the air conditioner. It may re
d thinner near the air conditioner.
• Do not use the air conditioner for an extended period of time in a small place without ventilation.
Ventilate the place regularly. Failure to do so may result in e
• When there is a gas leak, ventilate sufficiently before using the air conditioner again. Failure to do so
• Unplug the power plug if there is a noise, smell or smoke coming from the air conditioner. Failure to
• Stop operating and close the window in strom or hurricane.If possible remove the product from the
window before hurricane arrives
grille. Failure to do so may result in elec-
tric shock or product failure.
• Contact an authorized service center when the air conditioner
• Be cautious water could not enter the product
• Make sure to ventilate sufficiently when this air conditioner and a heating appliance such as a heater
• Turn the main power off and unplug the power plug when you clean or repair the air conditioner.
Failure to do so may result in death, serious injury, or product failure.
• Unplug the power plug when the air conditioner is not used for an extended period of time. Failure
to do so may result in product failure.
• Do not place any objects on the air conditioner. It may resul
• For inner cleaning, contact an Authorized Service Center or a dealer. Do not use harsh detergent that
causes corrosion or damange on the unit. Hash detergent may also cause failure of product, re,or
electronic shock.
rious injury, or product failure.
t in product failure.
Page 5

SAFETY PRECAUTIONS
CAUTION
Installation
• Make sure to check if there is a refrigerant leak after you install or repair the air conditioner. Failure
to do so may result in product failure.
• Install the drain hose properly for smooth drainage of condensed water. Failure to do so may result
in product failure.
• Keep level even when installing the product.
• Install the air conditioner where the noise from the outdoor unit or the exhaust gas will not inconvenience the neighbors. Failure to do so may result in conflict between neighbors.
• When transporting the equipment, there should be at least 2 or more people, or a forklift. It may result in serious injury.
• Do not install the air conditioner where it will be exposed to sea wind (salt spray) directly. It may result in product failure.
Operation
• Do not expose people, animals or plants to the cold or hot wind from the air conditioner. It may result in serious injury.
• Do not use the product for special purposes, such as preserving foods, works of art, etc. It is a consumer air conditioner, not a precision refrigeration system. It may result in death, fire or electric
shock.
• Do not block the inlet or outlet of air flow. It may result in explosion or product failure.
• Do not use strong cleaning agents or solvents when you clean the air conditioner, or spray water.
Use a smooth cloth. It may result in serious injury or product failure.
• Never touch the metal parts of the air conditioner when you remove the air filter. It may result in serious injury or product failure.
• Do not place any objects on the air conditioner. It may result in product failure.
• Always insert the filter securely after cleaning. Clean the filter every two weeks or more often if
necessary.
• Do not insert hands or other objects through the air inlet or outlet while the air conditioner is operating. It may result in electric shock.
• Do not drink the water drained from the air conditioner. It may result in serious health complications.
• Use a sturdy stool or ladder when you clean, maintain or repair the air conditioner at a height. Failure
to do so may result in serious injury or product failure.
• Do not mix the batteries for the remote control with other types of batteries or mix new batteries
with used batteries. Failure to do so may result in product failure.
• Do not recharge or disassemble the batteries. Failure to do so may result in explosion, fire or serious
injury.
• Stop using the remote control if there is a battery fluid leak. If your cloth or skin is exposed to the
battery fluid from a leak, wash it off with clean water. Failure to do so may result in serious injury.
• If you swallow the battery fluid from a leak, wash out the inside of your mouth thoroughly and then
consult a doctor. Failure to do so may result in serious health complications.
!
5
ENGLISH
Page 6
TABLE OF CONTENTS
6
ENGLISH
TABLE OF CONTENTS
2
TIPS FOR SAVING ENERGY
3 IMPORTANT SAFETY
INSTRUCTIONS
7 BEFORE USE
7 Components
9 Using the remote control
11 - Inserting batteries
11 - Installing the remote control holder
12 BASIC FUNCTIONS
12 Cooling your room
12 Removing humidity
13 Airing your room
13 Adjusting the fan speed
13 Adjusting the air flow direction
13 Setting the timer
13 - Setting the current time
14 - Turning on the air conditioner
automatically at a set time
14 - T
automatically at a set time
14 - Canceling the timer setting
14 - Setting sleep mode
15 ADVANCED FUNCTIONS
15 Changing room temperature quickly
15 Indoor air purification
15 - Auto Clean operation
15 Skin Care Mode
16 Plasma Purification operation (Optional)
16 Auto operation (Optional)
17 A
uto Changeover operation (Optional)
17 °C/°F Conversion
17 Energy saving cooling mode
17 Display screen brightness
18 Operating the air conditioner without the
remote control
18 Restarting the air conditioner
automatically
19 MAINTENANCE
20
20 Cleaning the anti-allergy filter and triple
filter (Optional)
20 Cleaning the plasma filter (Optional)
20 Cleaning the 3M multi protection lter&
3M micro protection lter(Optional)
21 TROUBLESHOOTING
21 Self-diagnosis function
21 Before requesting service
Page 7
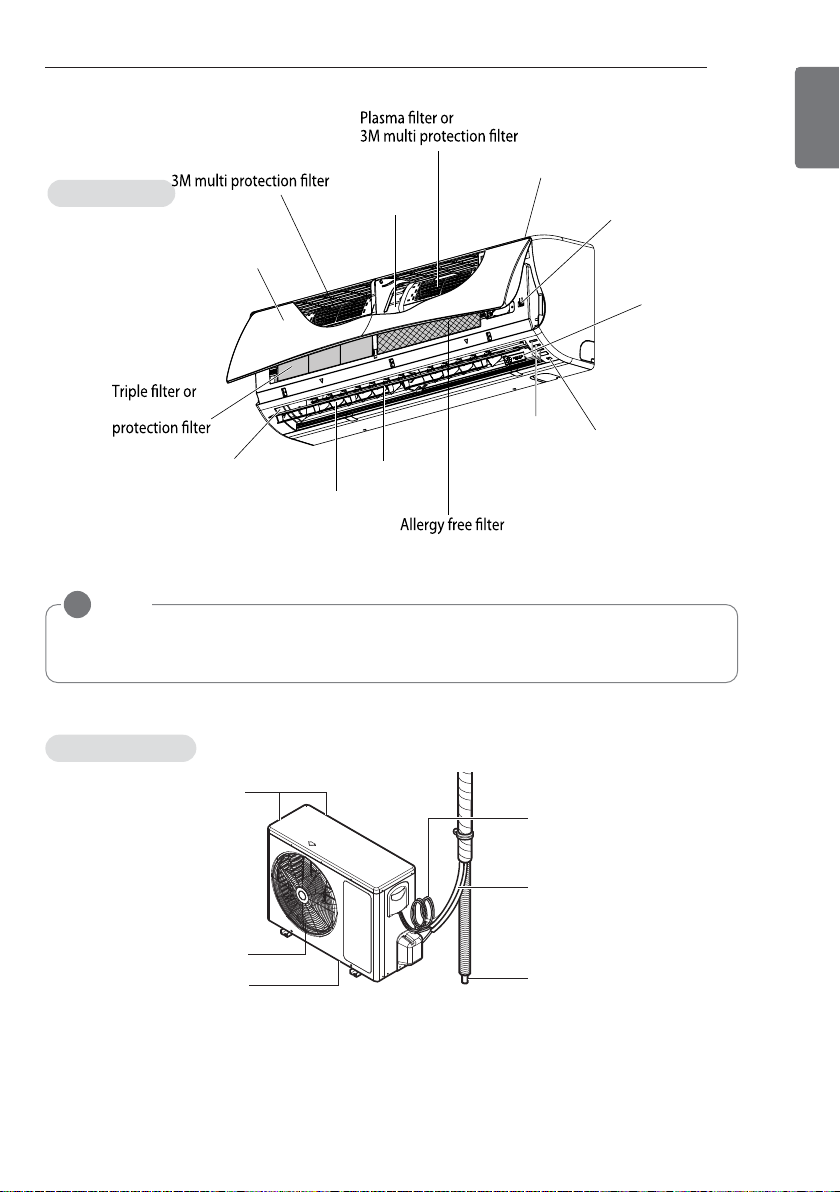
BEFORE USE
Components
Indoor unit
Front grille
(Optional)
Dual Protection Filter
(Optional)
Air inlet
ON/OFF button
BEFORE USE
Plasmaster Ionizer(Optional)
7
ENGLISH
3M micro-
(Optional)
* The feature can be changed according to type of model.
NOTE
!
The number of operation lamps and their locations may vary, depending on the model of the
air conditioner.
Air outlet
Vertical louver
Horizontal vaneHorizontal vane
(Optional)
Operation lamp
Signal Receiver
(Optional)
Outdoor unit
Air Inlet
Connecting
Wires
Piping
Air Outlet
B ase Plate
Drain Hose
* The feature can be changed according to type of model.
Page 8
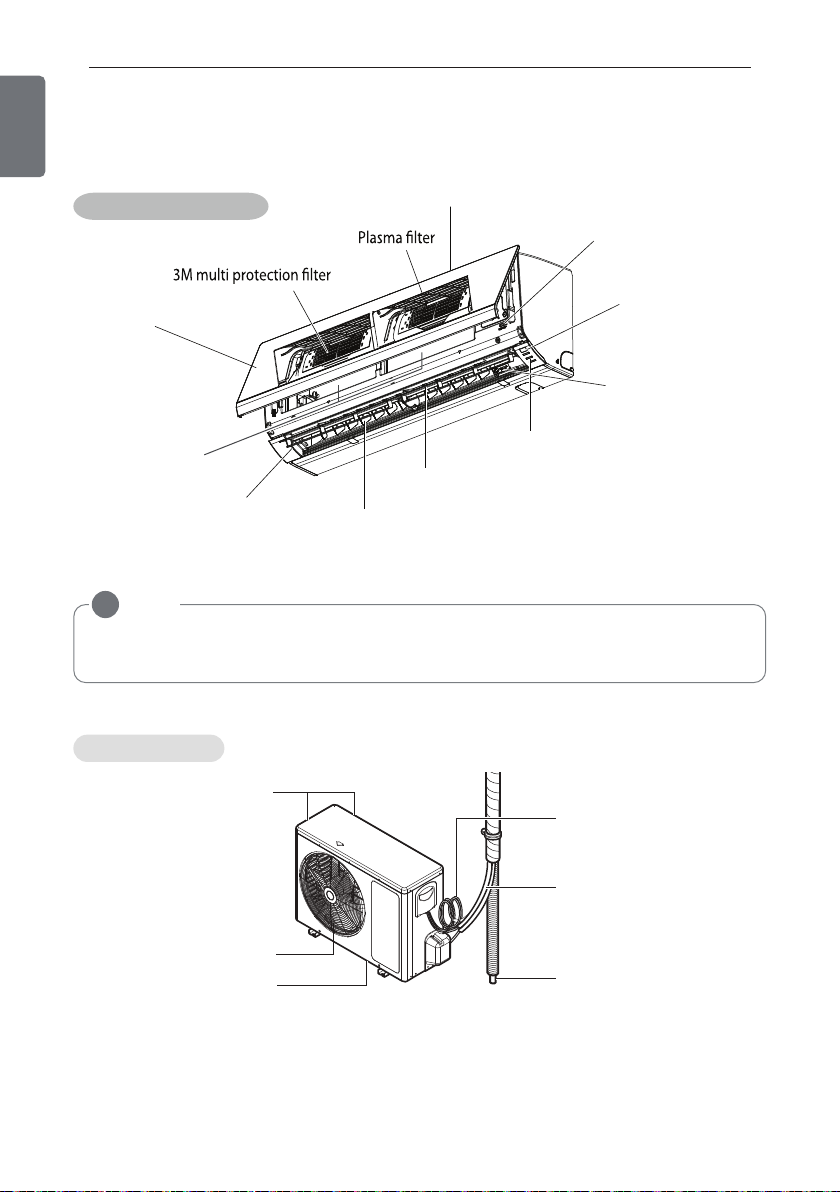
BEFORE USE
8
ENGLISH
BEFORE USE
Components
Indoor unit (Artcool)
Air inlet
(Optional)
ON/OFF button
(Optional)
Front grille
Operation lamp
Dual Protection Filter
Air outlet
Vertical louver
* The feature can be changed according to type of model.
NOTE
!
The number of operation lamps and their locations may vary, depending on the model of the
air conditioner.
Horizontal vaneHorizontal vane
(Optional)
Signal Receiver
Plasmaster Ionizer(Optional)
Outdoor unit
Air Inlet
Connecting
Wires
Air Outlet
B ase Plate
* The feature can be changed according to type of model.
Piping
Drain Hose
Page 9
Using the remote control
You can operate the air conditioner more conveniently with the
buttons for the additional functions under the cover of the remote control.
Wireless remote control
Plasma Remote
Non - Plasma Remote
BEFORE USE
9
ENGLISH
C
F
ON
AM
OFF
PM
TEMP
SWING
TIMER
ON
SET
CLEAR
A/CLEAN PLASMA
MODE
JET
COOL
ROOM
TEMP
C/ F [5SEC]
OFF
123
hr.
ON
OFF
FAN
SPEED
SWING
SLEEP
LIGHT TIME [3SEC]
E/SAVING
Skin Care Remote
C
F
ON
AM
OFF
hr.
PM
SKIN
A/
CLEAN PLASMA
CARE
FAN
SPEED
SWING
SLEEP
LIGHT TIME [3SEC] ROOM TEMP
TEMP
SWING
TIMER
ON
SET
CLEAR
MODE
JET
COOL
SAVING
C/ F [5SEC]
OFF
C
AM
hr.
PM
E/SAVING
TEMP
LIGHT
TIMER
SET
CLEAR
TIME [3SEC]
F
ON
OFF
123
A/CLEANFAN
MODE
JET
COOL
ROOM
TEMP
C/ F [5SEC]
OFF
ON
Display
screen
Control
panel
ON
OFF
FAN
SPEED
SWING
SLEEP
Operation Mode
123
Plasma Remote, Skin Care Remote
•
Non - Plasma Remote
Cooling Operation
Artificial Intelligence or Auto changeover
Healthy Dehumidification Operation
Air Circulation
( )
( )
Page 10
BEFORE USE
10
ENGLISH
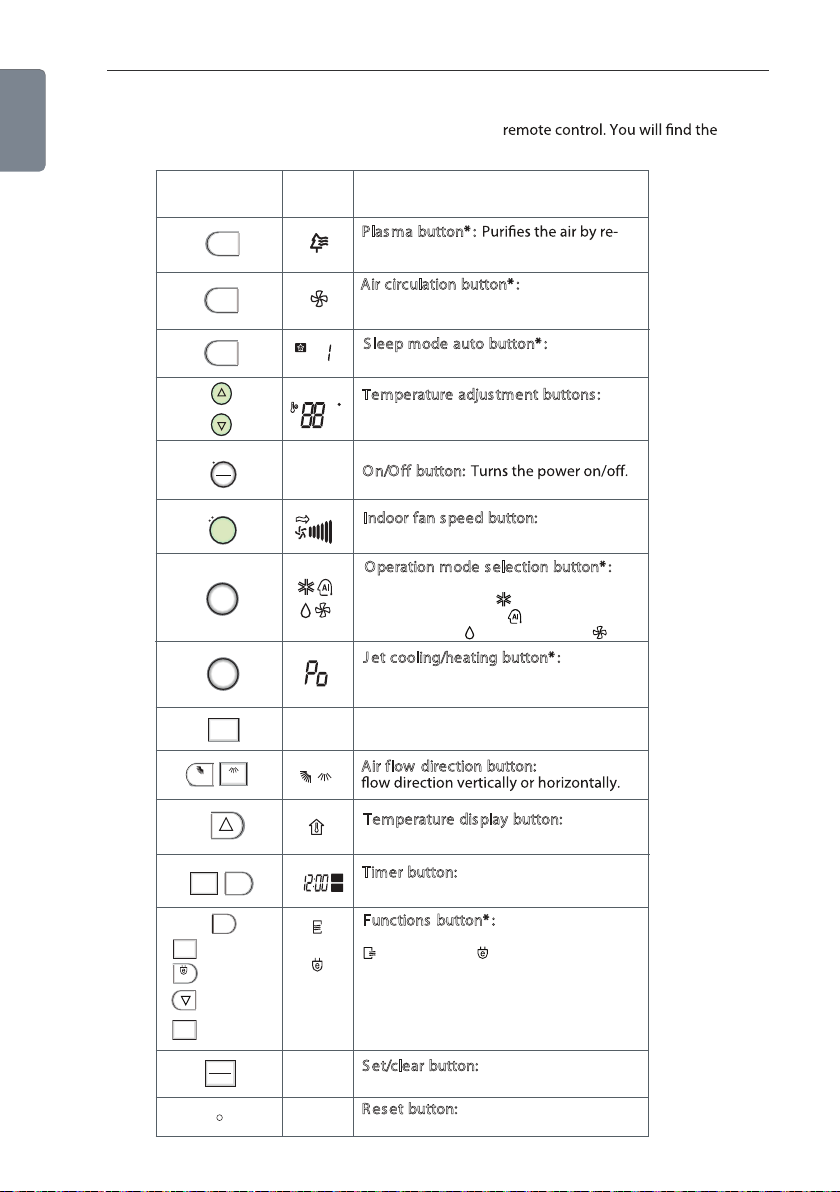
Using the remote control
LIS HNGE
You can operate the air conditioner more conveniently with the
buttons for the additional functions under the cover of the remote control.
Control
panel
PLASMA
Display
screen
Description
lasma button* :
P
moving particles that enter the indoor
unit.
FAN
Air circ ulation button* : Used to circulate the room air without cooling or
heating.
S
SLEEP
TEMP
leep mode auto button* : Sets the
hr
sleep mode auto operation.
emperature adjus tment buttons: Ad-
T
C
justs the room temperature when cooling and heating.
SWING SWING
ON
(Plasma &
E/SAVING
Non plasma model)
(Skin care model)
SAVING
(Plasma &
Skin care model)
LIGHT
(Non plasma model)
LIGHT
ON
OFF
FAN
SPEED
MODE
JET
COOL
SKIN
CARE
ROOM TEMP
A/CLEAN
n/Off button:
O
-
Indoor fan s peed button: Adjusts the
fan speed.
Operation mode s election button* : Selects the operation mode.
Cooling operation ( ) / Auto operation
or auto changeover ( ) / Dehumidifying operation ( ) /
J
et cooling/heating button* : Warms up
Air circulation
( )
or cools down the indoor temperature
within a short period of time.
-
Skin Care
: keeps skin moisturized.
Air flow direction button: Adjusts the air
Tempe rature display button: Displays
the room temperature.
OFF
AM
OFF
PM
the start / end time.
unctions button* : Adjusts the time
F
and sets the special functions.
: Auto clean / : Operates energy
saving cooling / Adjusts the brightness
T
imer button: Sets the current time and
ON
of the indoor unit display
-
et/clear button: Sets or cancels func-
SET
CLEAR
S
-
tions.
R ese t button: Initialize the air condi-
-
tioner settings.
* Some functions may not be supported, depending on the model.
Page 11
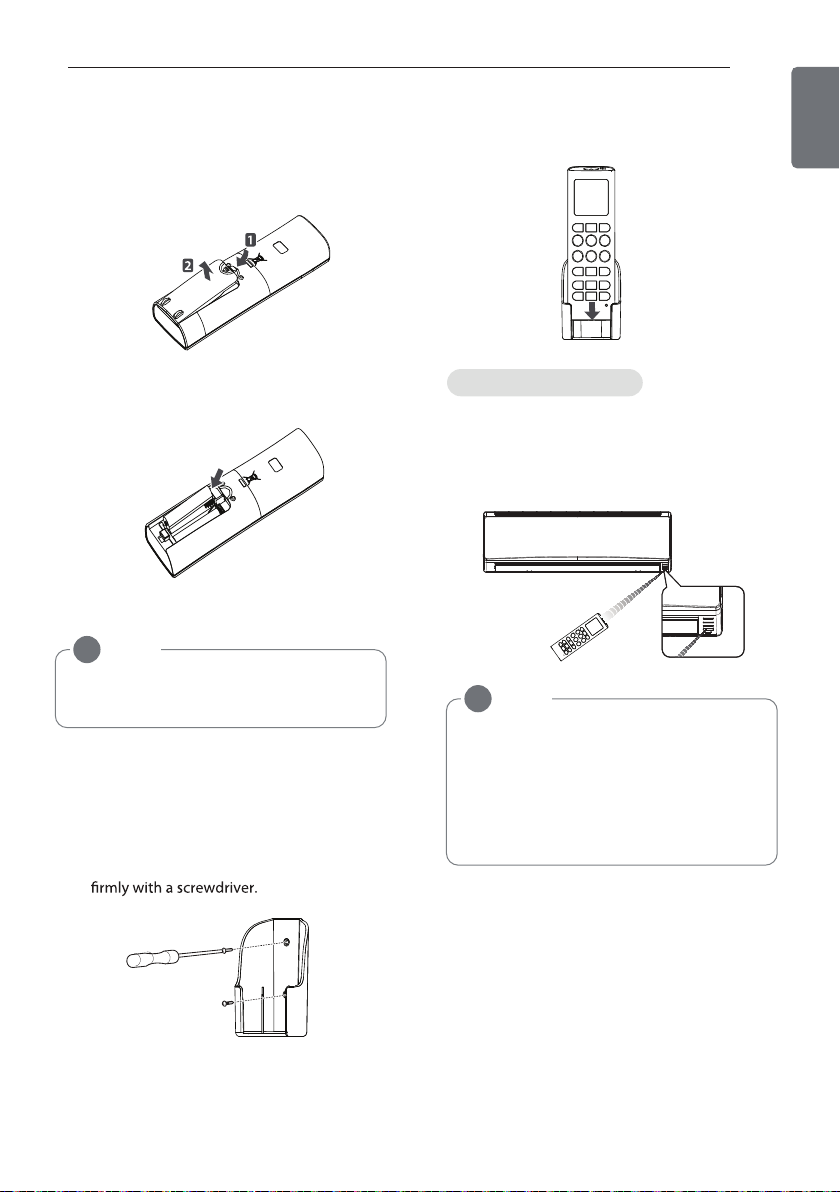
Inserting batteries
Insert batteries before using the remote
control. The battery type used is AAA (1.5 V).
1 Remove the battery cover.
BEFORE USE
3 Slide the remote control into the holder.
11
ENGLISH
2 Insert the new batteries and make sure
that the + and - terminals of the batteries
are installed correctly.
3 Reattach the battery cover.
NOTE
!
If the display screen of the remote control
starts to fade, replace the batteries.
Installing the remote control holder
Install the holder where there is no direct sunlight to protect the remote control.
1 Choose a safe and easily-accessible place.
2 Fix the holder by fastening the 2 screws
Operating method
Point the remote control towards the signal
receiver at the bottom of the air conditioner to
operate it.
NOTE
!
• The remote control may operate other
electronic devices if pointed towards
them. Make sure to point the remote
control towards the signal receiver of
the air conditioner.
• For proper operation, use a soft cloth to
clean the signal transmitter and receiver.
Page 12
BASIC FUNCTIONS
12
ENGLISH
BASIC FUNCTIONS
Cooling your room
(Cool ing o peration)
ON
1 Press to turn on the power.
2 Press repeatedly to select the cooling
3 Press or to set the desired tempera-
OFF
MODE
operation.
- is displayed on the display screen.
ture.
- The temperature range is 18°C (64°F)30°C (86°F).
Removing humidity
(Dehumidifying operation)
This mode removes excess moisture from an
environment with high humidity or in the rainy
season, in order to prevent mold from setting
in. This mode adjusts the room temperature
and the fan speed automatically to maintain
the optimal level of humidity.
1 Press to turn on the power.
2 Press repeatedly to select the dehu-
ON
OFF
MODE
midifying operation.
- is displayed on the display screen.
!
• In this mode you cannot adjust the room
temperature, as it is adjusted automatically. Also, the room temperature is not
displayed on the display screen.
NOTE
Page 13
BASIC FUNCTIONS
13
ENGLISH
Airing your room
(Air Circulation operation)
This mode only circulates the indoor air
without changing the room temperature. The
cooling lamp lights up in air circulation mode.
1 Press to turn on the power.
2
3 Press to adjust the fan speed.
ON
OFF
Fan button : Press turn on the air cuicu-
Mode button : Press repeatedly to se-
- is displayed on the display screen.
FAN
SPEED
FAN
lation operation.
MODE
lect air circulation operation.
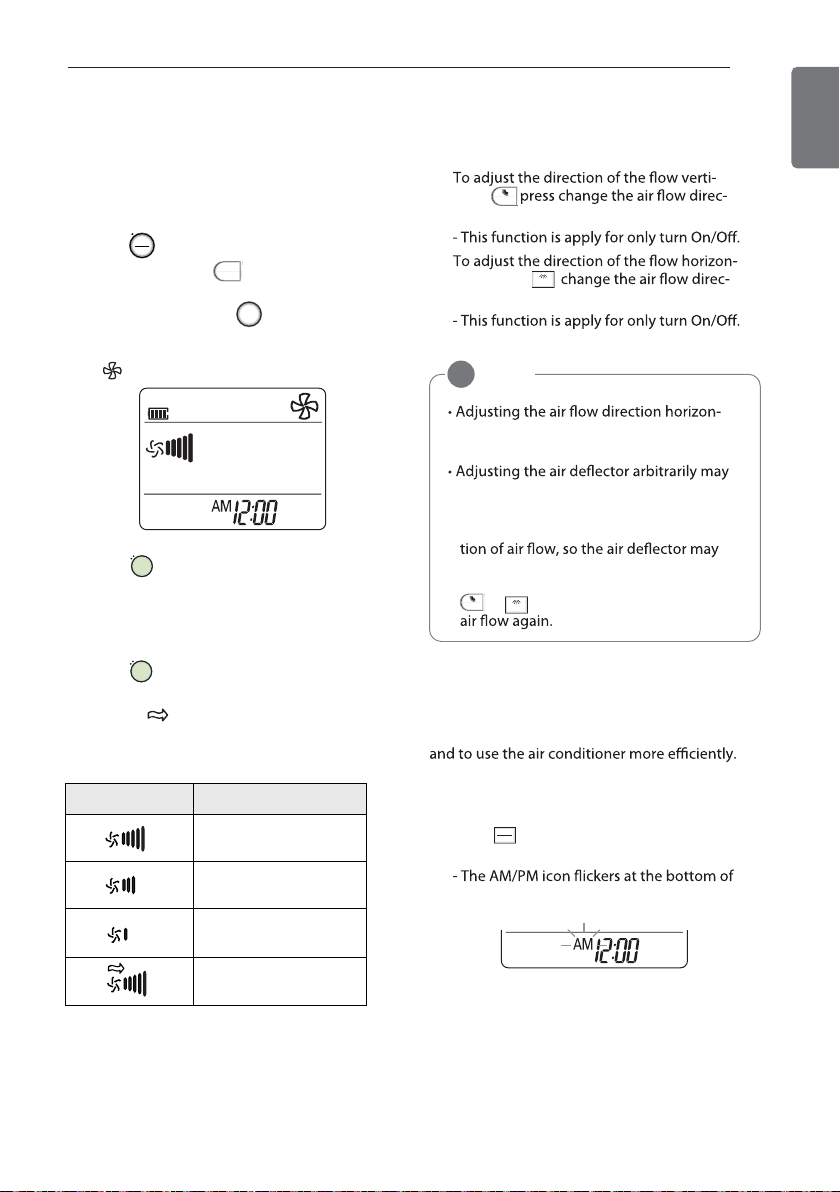
Adjusting the fan speed
FAN
SPEED
1 Press repeatedly to adjust the fan
speed.
- Select if you want natural air.
The fan speed adjusts automatically.
Adjusting the air flow direction
1
2
cally,
SWING
tion automatically.
tally, press
tion automatically.
!
tally may not be supported, depending
on the model.
cause product failure.
• If you restart the air conditioner, it starts
to operate with the previously set direc-
not match the icon displayed on the remote control. When this occurs, press
SWING
SWING
NOTE
or to adjust the direction of the
SWING
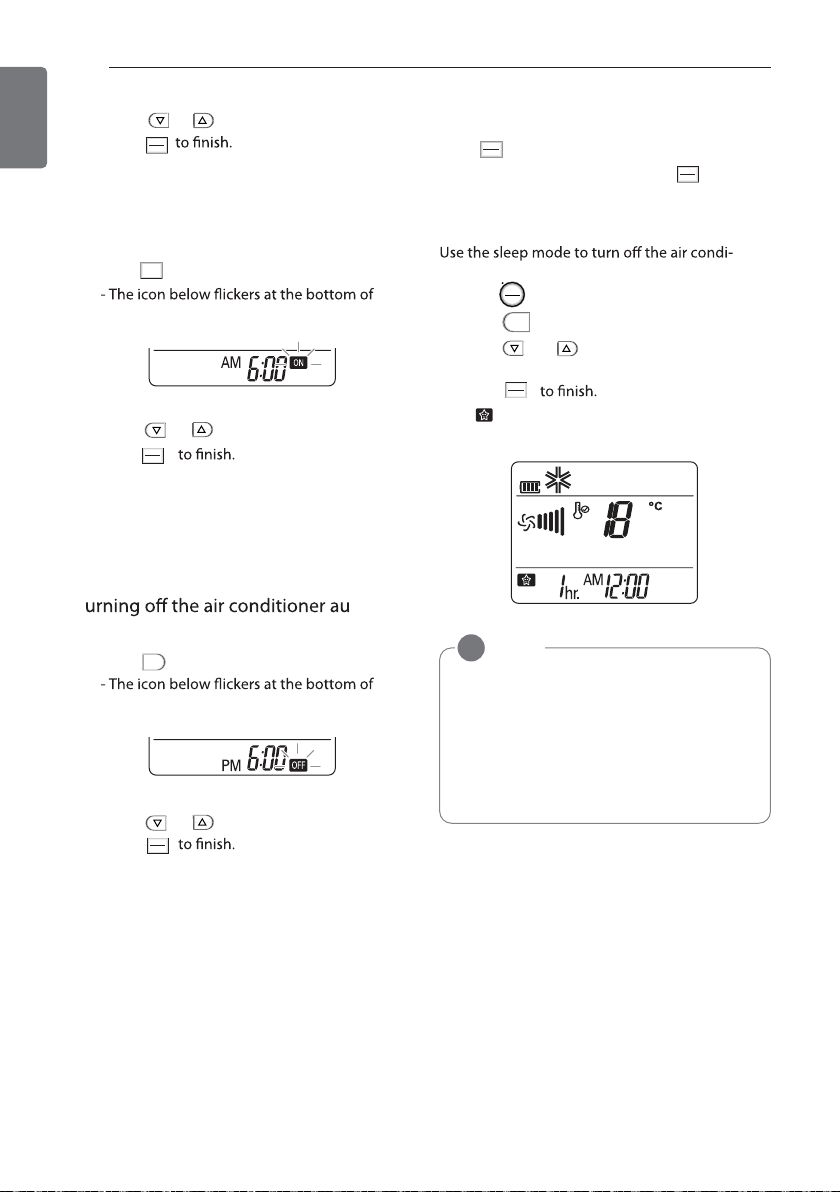
Setting the timer
You can use the timer function to save energy
Remark Speed
High
Medium
Low
Natural Wind
Setting the current time
SET
1 Press and hold it for longer than 3 sec-
CLEAR
onds.
the display screen.
Page 14
14
ENGLISH
BASIC FUNCTIONS
2 Press or to select the times.
3 Press
SET
CLEAR
Turning on the air conditioner automatically at a set time
1 Press .
2 Press or to select the times.
3 Press
4 When setting the timer, current time and
ON
the display screen.
SET
CLEAR
ON icon are displayed on the display
screen indicating that the desired time is
set.
T tomatically at a set time
1 Press .
2 Press or to select the times.
3 Press
4 When setting the timer, current time and
OFF
the display screen.
SET
CLEAR
OFF icon are displayed on the display
screen indicating that the desired time is
set.
Canceling the timer setting
SET
Press .
CLEAR
- To cancel all timer settings, press
SET
CLEAR
Setting sleep mode
tioner automatically when you go to sleep.
1 Press to turn on the power.
2 Press
3 Press or to select the hour
4 Press
ON
OFF
SLEEP
(up to 7 hours).
SET
CLEAR
- is displayed on the display screen in
sleep mode.
NOTE
!
In the Cooling and Dehumidifying modes,
the temperature increases by 1°C(2°F)
after 30 minutes and by a further
1°C(2°F) after another 30 minutes for a
more comfortable sleep. The temperature
increases with up to 2°C(4°F) from the
preset temperature.
.
Page 15

ADVANCED FUNCTIONS
vanced functions.
Changing room temperature
quickly
(Jet Cool)
This mode allows you to cool indoor air quickly
in summer or warm it quickly in winter.
1 Press to turn on the power.
2 Press
ON
OFF
JET
COOL
ADVANCED FUNCTIONS
ates for 30 minutes and cleans the inside
of the indoor unit.
NOTE
!
Some buttons cannot be used while the
auto cleaning function is in operation.
15
Skin Care Mode
Use the Skin Care mode to keeps skin moisturized.
ENGLISH
- In jet cooling mode, strong air blows out
at a temperature of 18°C (64°F)- 30°C
cooling.
NOTE
!
• Powerful Cooling
- C/O Model
Enable in Cooling/Dehumidifying/Fan/
• This function may not be supported, de-
pending on the model.
Indoor air purification
Auto Clean operation
In the cooling and dehumidifying operations,
moisture is generated inside the indoor unit.
Use the auto cleaning function to remove
such moisture.
1 Press .
A/CLEAN
- is displayed on the display screen.
1 Press to turn on the power.
2 Press to enter the Skin Care mode
- Nothing is going to change on the remote control
display screen.
- This mode operates with high fan speed and setting
However, temperature is not changed.
- In this mode, you can change the setting temperature,
fan speed and vane directions.
SKIN
CARE
NOTE
!
- This function may not be supported,
depending on the model.
- This function can be operated on Cooling
mode, Fan Mode and Plasma mode
environment.
Page 16

16
ENGLISH
ADVANCED FUNCTIONS
Plasma Purification operation
(Optional)
microscopic contaminants from the intake air
completely to supply clean and fresh air.
1 Press to turn on the power.
2 Press .
ON
OFF
PLASMA
- is displayed on the display screen.
NOTE
!
• You can use this function by pressing
PLASMA
without turning the air conditioner
on.
• Both the plasma lamp and the cooling
in operation.
• This function may not be supported, de-
pending on the model.
Auto operation (Optional)
(Artificial intelligence)
Cooling-only models
In this mode, the fan speed and the temperature adjust automatically, based on the room
temperature.
1 Press to turn on the power.
2 Press repeatedly to select auto opera-
3 Press or to select the desired oper-
ON
OFF
MODE
tion.
ation code if the temperature is higher or
lower than the desired temperature.
Code Description
2 Cool
1 Cool slightly
Maintain
0
room
temperature
-1 Heat slightly
-2 Heat
NOTE
!
• In this mode, you cannot adjust the fan
to rotate automatically.
• This function may not be supported, de-
pending on the model.
Page 17

ADVANCED FUNCTIONS
17
ENGLISH
Auto Changeover operation
(Optional)
This mode changes the operation mode automatically to maintain the set temperature
at ±2°C(4°F).
1 Press to turn on the power.
2 Press repeatedly to select the auto
3 Press or to set the desired temper-
4 Press repeatedly to select the fan
ON
OFF
MODE
changeover operation.
- is displayed on the display screen.
ature.
- The temperature range is 18°C(64°F) 30°C(86°F).
FAN
SPEED
speed.
NOTE
!
This function may not be supported,
depending on the model.
Energy saving cooling mode
This mode minimizes power consumption during cooling and increases the set temperature
to the optimal level for a more comfortable environment.
The temperature automatically sets at
22°C(72°F) if ambient temperature is below
22°C(72°F).
The temperature maintains if ambient temper-
ature is above 22°C(72F).
1 Press to turn the power on.
2 Press repeatedly to select the cooling
3 Press .
ON
OFF
MODE
operation.
E/SAVING
- is displayed on the display screen.
NOTE
!
- This function may not be supported,
depending on the model.
- Possible to display dierent temperature
between remote controller and air conditioner during operation.
°C/°F Conversion
ROOM
TEMP
Press (Plasma & Non plasma model)
C/ F [5SEC]
or press (Skin care model)
The unit converses from °C to °F
or from °Fto °C if pressed for 5 seconds.
SAVING
C/ F [5SEC]
Display screen brightness
You can adjust the brightness of the indoor
unit display screen.
1 Press or
NOTE
!
This function may not be supported,
depending on the model.
LIGHT
LIGHT
Page 18

18
ENGLISH
ADVANCED FUNCTIONS
Operating the air conditioner
without the remote control
unit to operate the air conditioner when the
remote control is unavailable. However, the
fan speed is set to high.
1 Open the front cover.
- Lift up both sides of the cover slightly.
* The feature can be changed according to
type of model.
2
ON/OFF
button
Restarting the air conditioner
automatically
When the air conditioner is turned on again
after a power failure, this function restores the
previous settings. This function is a factory default setting.
Disabling auto restart
1 Open the front cover.
- Lift up both sides of the cover slightly.
* The feature can be changed according to
type of model.
2
seconds.
- The unit will beep twice and the lamp will
blink 4 times.
* The feature can be changed according to
type of model.
- For cooling and heating models, the operation mode changes, depending on the
room temperature.
Room temp. Set temp.
Above
21°C(70°F)
And
Below
24°C(76°F)
Above
24°C(76°F)
- For cooling-only models, the temperature
is set to 22°C (72°F).
23°C(74°F)
22°C(72°F)
Operation
mode
Dehumidifying operation
Cooling
operation
ON/OFF
button
* The feature can be changed according to
type of model.
- To re-enable the function, press the On/
unit will beep twice and the blue lamp will
blink 4 times.
NOTE
!
for 3 – 5 seconds instead of 6 seconds,
the unit will switch to the test operation.
In the test operation, the unit blows out
strong air for cooling for 18 °F and
then returns to the factory default settings.
Page 19

MAINTENANCE
MAINTENANCE
Clean the product regularly to maintain optimal performance and to prevent possible breakdown.
* This may not be provided, depending on the model.
(Optional)
Dual Protection Filter
(Optional)
Plasmaster Ionizer(Optional)
3M micro-
(Optional)
* The feature can be changed according to type of model.
Item Cleaning interval Cleaning method
Dual Protection Filter
2 weeks
3 months
3 months
3 months
See”Cleaning dual Protection Filter”
(Optional)
19
ENGLISH
1 months
Indoor unit surface
Regularly
Outdoor unit Regularly
CAUTION
!
• Turn off the power and unplug the power cord before you perform any maintenance; otherwise it may cause electric shock.
• Never use water that is hotter than 40°C(104°F)
deformation or discoloration.
the product.
NOTE
!
• Make sure to clean the heat exchanger coils of the outdoor unit regularly, as dirt collected
Use a soft, dry cloth. Do not use bleach or
abrasives.
Use steam to clean the heat exchanger coils
and the panel vents (consult with technician).
may damage the surface of
the model.
Page 20

MAINTENANCE
20
ENGLISH
once every 2 weeks or more if necessary.
1
cord.
2 Open the front cover.
- Lift up both sides of the cover slightly.
Cleaning the plasma filter
(Optional)
1
cord.
2 Open the front cover and remove
dual protection lter
3
* The feature can be changed according to
type of model.
3
lift it up slightly and remove it from the unit.
* The feature can be changed according to
type of model.
4
with warm water.
in lukewarm water with detergent.
5
Cleaning the anti-allergy filter
and triple filter (Optional)
1
cord.
2 Open the front cover and remove
dual protection lter
3
* The feature can be changed according to
type of model.
4 Use a vacuum cleaner to remove any dirt.
with lukewarm water.
5
Cleaning the 3M multi protection-
(Optional)
1
cord.
2 Open the front cover and remove
dual protection lter
3
(Optional)
(Optional)
4 Use a vacuum cleaner to remove any dirt.
NOTE
!
pending on the model.
4
NOTE
!
included in some model.
(Depending on the model)
Page 21

MAINTENANCE
TROUBLESHOOTING
Self-diagnosis function
This product has a built-in self-diagnosis function. If an error occurs, the lamp of the indoor unit
will blink in 2 second intervals. If this occurs, contact your local dealer or service center.
Before requesting service
Please check the following before you contact the service center. If the problem persists, contact
your local service center.
Problem Possible causes Corrective action
There is a burning smell and
a strange sound coming
from the unit.
Water leaks from the indoor
unit even when the humidity
level is low.
The power cord is damaged
or generating excessive
heat.
A switch, a circuit breaker
(safety, ground) or a fuse is
not operated properly.
The air conditioner is
unplugged.
A fuse is blown or the
power supply is
blocked.
Turn o the air conditioner, unplug the
power cord and contact the service center.
Check whether the power cord is plugged
into the outlet.
Replace the fuse or check if the circuit
breaker has tripped.
21
ENGLISH
The air conditioner does not
work.
A power failure has
occurred.
The voltage is too
high or too low.
The air conditioner
turned o automatically at a preset time.
Turn o the air conditioner when a power
failure occurs. When the power is restored,
wait 3 minutes, and then turn on the air
conditioner.
Check if the circuit breaker has tripped.
Press the power button again.
Page 22

22
ENGLISH
TROUBLESHOOTING
Problem Possible causes Corrective action
The air conditioner does not
generate cool air.
It is not possible to adjust
the fan speed.
Air is not circulating
properly.
Dual protection lter
is dirty.
The room temperature is too high.
Cold air is escaping
from the room.
The desired temperature is higher than the
set temperature.
There is a heating
source nearby.
Air circulation operation is selected.
The auto operation,
jet operation or dehumidifying operation is
selected.
Make sure that there are no curtains,
blinds or furniture blocking the front of the
air conditioner.
Clean dual protection lter once every
2 weeks See “Cleaning dual protection lter”
for more information.
In summer, it may take some time to cool
indoor air. In this case, select the jet cool
operation to cool indoor air quickly.
Make sure that no cold air is escaping
through ventilation points in the room.
Set the desired temperature to a level
lower than the current temperature.
Avoid using a heat generator such as an
electric oven or a gas burner while the air
conditioner is in operation.
In the air circulation operation, air blows
from the air conditioner without cooling or
heating the indoor air. Switch the operation mode to the cooling operation.
In some operation modes, such as the jet
or dehumidifying operation modes, you
cannot adjust the fan speed. Select an operation mode in which you can adjust the
fan speed.
It is not possible to adjust
the temperature.
The air circulation operation or jet operation is selected.
In some operation modes, such as the air
circulation or jet operation mode, you cannot adjust the temperature. Select an operation mode in which you can adjust the
temperature.
Page 23

MEMO
Page 24

PT. LG ELECTRONICS INDONESIA
Kawasan Industri MM2100 Blok G
Cikarang Barat, Bekasi, Jawa Barat 17520
INDONESIA
Page 25

DELUXE LOW WATT
MODELS :
S05DVX-3 S07DVX-3 S09DVX-3 S05DLX-3
S07DLX-3 S09DLX-3 S12DLX-3 S18DLX-3
PANDUAN PEMILIK
PENYEJUK UDARA
Bacalah buku panduan ini dengan seksama sebelum
mengoperasikan peralatan Anda dan simpanlah
sebagai referensi mendatang.
TIPE: PEMASANGAN DI DINDING
MODELS :
S05LPBX-R2 S09LPBX-R S12LPBX-R
ArtCool
MODELS :
S05ACR S09ACR S12ACR
STANDARD INVERTER
MODELS :
S10KMV S10SIV-2 S13SIV S18SIV-2
DELUXE INVERTER
MODELS :
S18DLV-2
ArtCool Inverter
MODELS :
S10ACNV S13ACNV
www.lg.com
Page 26

KIAT MENGHEMAT ENERGI
2
INDONESIA
KIAT MENGHEMAT ENERGI
Berikut ini adalah beberapa kiat yang akan membantu Anda meminimalkan konsumsi daya ketika
udara Anda dengan membaca instruksi di bawah ini:
• Jangan dinginkan ruangan dalam secara berlebihan. Hal ini akan membahayakan kesehatan
Anda dan dapat mengonsumsi listrik lebih banyak.
• Halangilah sinar matahari dengan kerai atau gorden ketika Anda sedang mengoperasikan
penyejuk udara.
• Tetap tutup pintu atau jendela rapat-rapat ketika Anda tengah mengoperasikan penyejuk
udara.
• Sesuaikan arah aliran udara secara vertikal atau horizontal untuk menyirkulasikan udara dalam
ruangan.
• Percepatlah kipas angin untuk mendinginkan atau menghangatkan udara dalam ruangan
secara cepat, dalam waktu yang singkat.
• Bukalah jendela secara teratur untuk mendapatkan ventilasi, karena kualitas udara dalam
ruangan dapat merosot jika penyejuk udara digunakan selama berjam-jam.
•
lter proteksi ganda dapat menghambat aliran udara atau memperlemah fungsi pendinginan
/ pelembapan.
lter proteksi ganda
Untuk catatan Anda
Klipkan kuitansi Anda ke halaman ini, bila sewaktu-waktu Anda memerlukannya untuk
membuktikan tanggal pembelian atau untuk keperluan garansi. Tuliskan nomor model
dan nomor seri di sini:
Nomor model :
Nomor seri:
Anda dapat menemukannya di label pada bagian sisi setiap unit.
Nama dealer:
Tanggal pembelian:
Page 27

INSTRUKSI KESELAMATAN PENTING
BACALAH SELURUH INSTRUKSI SEBELUM MENGGUNAKAN
PERALATAN INI.
Patuhilah selalu tindak antisipasi berikut ini untuk menghindari situasi yang berbahaya dan
memastikan produk Anda tetap pada kinerja tertinggi.
PERINGATAN
Dapat mengakibatkan cedera serius atau kematian bila petunjuk diabaikan
PERHATIAN
Dapat mengakibatkan cedera ringan atau kerusakan produk bila petunjuk diabaikan
PERINGATAN
•
mengakibatkan bahaya bagi Anda dan orang lain.
• Pemasangan HARUS sesuai dengan aturan bangunan setempat.
• Informasi yang tercantum di dalam buku panduan ini dimaksudkan untuk digunakan oleh
instrumen pengujian dan alat yang tepat.
• Kelalaian membaca secara seksama dan kelalaian mengikuti seluruh instruksi panduan ini
dapat mengakibatkan malafungsi peralatan, kerusakan properti, cedera diri, dan/atau kematian.
•
keterbatasan mental, atau keterbatasan pengetahuan dan pengalaman, terkecuali dibawah
pengawasan seseorang yang bertanggung jawab atas keselamatannya.
• Anak – anak harus diawasi untuk memastikan mereka tidak bermain – main dengan unit AC
• Ketika kabel daya harus diganti, pekerjaan penggantian harus dilakukan oleh teknisi resmi dan hanya
menggunakan komponen pengganti yang asli.
Pemasangan
• Gunakan sekering dan pemutus sirkuit standar yang sesuai dengan nilai rating penyejuk udara.
Kelalaian melakukan hal ini dapat menimbulkan kejutan listrik atau kegagalan produk.
• Hubungilah pusat servis resmi bila Anda memasang atau memindahkan penyejuk udara.
Kelalaian melakukan hal ini dapat menimbulkan cedera serius atau kegagalan produk.
• Gunakan selalu steker daya dan soket dengan terminal arde. Kelalaian melakukan hal ini dapat
menimbulkan kejutan listrik atau kegagalan produk
• Pasanglah panel dan penutup kotak kendali dengan aman. Kelalaian melakukan hal ini dapat
menimbulkan ledakan atau kebakaran.
• Pasanglah pemutus sirkuit dan stopkontak listrik tersendiri sebelum Anda menggunakan
penyejuk udara. Kelalaian melakukan hal ini dapat menimbulkan kejutan listrik atau kegagalan
produk.
• Gunakan sekering dan pemutus sirkuit standar yang sesuai dengan nilai rating penyejuk udara.
Kelalaian melakukan hal ini dapat menimbulkan kejutan listrik atau kegagalan produk.
• Jangan mengubah atau memperpanjang kabel daya. Jika kabel atau kawat daya tergores atau
kulitnya terkelupas atau usang, maka harus diganti. Hal itu dapat menimbulkan kebakaran atau
kejutan listrik.
• Berhati-hatilah saat Anda membuka kemasan atau memasang penyejuk udara. Kelalaian
melakukan hal ini dapat menimbulkan cedera serius atau kegagalan produk.
• Hubungilah pusat servis resmi bila Anda memasang atau memindahkan penyejuk udara.
Kelalaian melakukan hal ini dapat menimbulkan cedera serius atau kegagalan produk.
• Jangan pasang penyejuk udara di permukaan yang tidak stabil atau bila ada kemungkinan
bahaya terjatuh. Hal itu dapat menimbulkan kematian, cedera serius, atau kegagalan produk.
NATAMALESEK ISAPISITNA
3
INDONESIA
Page 28

ANTISIPASI KESELAMATAN
INDONESIA
4
Pengoperasian
• Jangan biarkan penyejuk udara beroperasi dalam waktu yang lama ketika kelembapan udara
sangat tinggi atau ketika pintu atau jendela dibiarkan terbuka. Kelalaian mematuhi hal ini dapat
menimbulkan kegagalan produk.
• Pastikan kabel daya tidak terkelupas atau rusak ketika penyejuk udara beroperasi. Kelalaian
melakukan hal ini dapat menimbulkan kebakaran, kejutan listrik, atau kegagalan produk.
• Jangan letakkan benda apa pun di atas kabel daya. Hal itu dapat menimbulkan kejutan listrik
atau kegagalan produk.
• Jangan nyalakan atau matikan penyejuk udara dengan mencolokkan atau melepas colokan
steker daya. Hal itu dapat menimbulkan kebakaran atau kejutan listrik.
• Jangan menyentuh, mengoperasikan, atau memperbaiki penyejuk udara dengan tangan
basah. Hal itu dapat menimbulkan kejutan listrik atau kegagalan produk.
• Jangan letakkan pemanas atau peralatan pemanas lain di dekat kabel daya. Hal itu dapat
menimbulkan kebakaran, kejutan listrik, atau kegagalan produk.
• Jangan biarkan ada air yang merembes ke dalam penyejuk udara. Hal itu dapat menimbulkan
ledakan atau kebakaran.
• Jangan biarkan ada zat yang mudah terbakar seperti bensin, benzena, dan thinner di dekat
penyejuk udara.
Hal itu dapat menimbulkan ledakan atau kebakaran.
• Jangan gunakan penyejuk udara dalam waktu lama di ruang kecil yang tidak berventilasi.
Berilah ventilasi pada tempat itu secara teratur. Kelalaian melakukan hal ini dapat
menimbulkan ledakan atau kebakaran.
• Ketika ada kebocoran gas, beri ventilasi yang memadai sebelum menggunakan penyejuk
udara kembali. Kelalaian melakukan hal ini dapat menimbulkan ledakan atau kebakaran.
• Lepaslah colokan steker daya jika ada suara berisik, bau, atau asap yang keluar dari penyejuk
udara. Kelalaian melakukan hal ini dapat menimbulkan ledakan atau kebakaran.
• Hentikan pengoperasian dan tutuplah jendela saat ada badai atau topan. Jika memungkinkan,
lepaskan produk dari jendela sebelum topan datang
•
dapat menimbulkan kejutan listrik atau kegagalan produk.
• Hubungi pusat servis resmi ketika penyejuk udara terendam dalam air karena banjir. Kelalaian
melakukan hal ini dapat menimbulkan ledakan atau kebakaran.
• Berhati-hatilah agar air tidak masuk ke dalam produk
• Pastikan memberikan ventilasi yang memadai ketika penyejuk udara ini dan peralatan
pemanas seperti heater digunakan secara bersamaan. Kelalaian melakukan hal ini dapat
menimbulkan kebakaran, cedera serius, atau kegagalan produk.
• Matikan daya utama dan lepaskan steker daya ketika Anda membersihkan atau memperbaiki
penyejuk udara. Kelalaian melakukan hal ini dapat menimbulkan kematian, cedera serius, atau
kegagalan produk.
• Lepaskan steker daya ketika penyejuk udara tidak digunakan dalam waktu lama. Kelalaian
mematuhi hal ini dapat menimbulkan kegagalan produk.
• Jangan letakkan benda apa pun di atas penyejuk udara. Hal ini dapat menimbulkan kegagalan
produk.
•
Untuk pencucian bagian dalam, hubungi Service Center Resmi atau dealer.
Dilarang mengunakan diterjen yg keras sebab akan menimbulkan karat dan kerusakan
didalam unit.
Diterjen yang keras dapat juga menyebabkan kerusakan pada produk, kebakaran atau
korsleting listrik.
Page 29

ANTISIPASI KESELAMATAN
PERHATIAN
Pemasangan
• Pastikan Anda sudah memeriksa adanya kebocoran zat pendingin setelah memasang atau
memperbaiki penyejuk udara. Kelalaian mematuhi hal ini dapat menimbulkan kegagalan
produk.
• Pasanglah selang penguras dengan baik agar pengurasan air kondensasi dapat berlangsung
lancar. Kelalaian mematuhi hal ini dapat menimbulkan kegagalan produk.
• Posisikan produk tetap datar saat memasangnya.
• Pasanglah penyejuk udara sedemikian rupa, sehingga suara berisik dari unit luar atau gas
buang tidak mengganggu tetangga. Kelalaian melakukan hal ini dapat menimbulkan konik
dengan tetangga Anda.
• Ketika mengangkut peralatan ini, harus ada setidaknya 2 orang atau lebih, atau forklift. Hal ini
dapat menimbulkan cedera serius.
• Jangan pasang penyejuk udara di tempat yang terpapar ke angin laut (semburan garam) secara
langsung. Hal ini dapat menimbulkan kegagalan produk.
Pengoperasian
• Jangan biarkan orang, hewan, atau tanaman terpapar pada angin panas atau dingin dari
penyejuk udara. Hal ini dapat menimbulkan cedera serius.
• Jangan gunakan produk untuk tujuan yang khusus, seperti menyimpan makanan, pekerjaan
seni, dll. Unit ini adalah penyejuk udara konsumen, bukan sistem pendingin presisi. Hal itu
dapat menimbulkan kematian, kebakaran, atau kejutan listrik.
• Jangan hambat masukan atau keluaran aliran udara. Hal ini dapat menimbulkan ledakan atau
kegagalan produk.
• Jangan gunakan larutan atau zat pembersih yang kuat ketika Anda membersihkan penyejuk
udara, atau air semprotan. Gunakanlah kain yang halus. Hal ini dapat menimbulkan cedera
serius atau kegagalan produk.
• Jangan menyentuh komponen logam penyejuk udara saat Anda memindahkan lter udara. Hal
ini dapat menimbulkan cedera serius atau kegagalan produk.
• Jangan letakkan benda apa pun di atas penyejuk udara. Hal ini dapat menimbulkan kegagalan
produk.
• Masukkan selalu lter dengan akurat setelah membersihkan. Bersihkan lter setiap dua
minggu atau lebih sering lagi jika perlu.
• Jangan masukkan tangan atau benda lain ke dalam masukan atau keluaran udara ketika
penyejuk udara beroperasi. Hal itu dapat menimbulkan kejutan listrik.
• Jangan meminum air yang dikuras dari penyejuk udara. Hal ini dapat menimbulkan komplikasi
kesehatan yang serius.
• Gunakan platform atau tangga yang kokoh ketika Anda membersihkan, merawat, atau
memperbaiki penyejuk udara di ketinggian. Kelalaian melakukan hal ini dapat menimbulkan
cedera serius atau kegagalan produk.
• Jangan gunakan tipe baterai yang lain bersama baterai remote control unit ini, dan jangan
menggunakan baterai lama bersama baterai baru. Kelalaian mematuhi hal ini dapat
menimbulkan kegagalan produk.
• Jangan isi ulang atau bongkar baterai. Kelalaian mematuhi hal ini dapat menimbulkan ledakan,
kebakaran, atau cedera serius.
• Hentikan penggunaan remote control bila ada kebocoran cairan baterai. Jika kain atau kulit
Anda terkena cairan baterai dari kebocoran itu, bilaslah dengan air bersih. Kelalaian mematuhi
hal ini dapat menimbulkan cedera serius.
• Jika Anda menelan cairan baterai akibat kebocoran, cucilah bagian dalam mulut Anda
seluruhnya, dan periksakan ke dokter. Kelalaian mematuhi hal ini dapat menimbulkan
komplikasi kesehatan yang serius.
5
INDONESIA
Page 30

DAFTAR ISI
6
INDONESIA
DAFTAR ISI
KIAT MENGHEMAT
2
ENERGI
INSTRUKSI
3
KESELAMATAN PENTING
SEBELUM
7
MENGGUNAKAN
7 Komponen
9 Penggunaan remote control
11 - Memasukkan baterai
11 - Memasang dudukan remote control
12 FUNGSI DASAR
12 Mendinginkan ruangan Anda
12 Menghilangkan kelembapan
13 Menganginkan ruangan Anda
13 Menyesuaikan kecepatan kipas
13 Menyesuaikan arah aliran udara
13 Mengatur timer
13 - Mengatur waktu saat ini
14 - Menyalakan penyejuk udara secara
otomatis pada waktu tertentu
14 - Mematikan penyejuk udara secara
otomatis pada waktu tertentu
14
- Membatalkan pengaturan timer
14
- Mengatur mode tidur
FUNGSI TINGKAT
15
LANJUT
15 Mengubah suhu ruangan dengan cepat
15 Pemurnian udara dalam ruangan
- Pengoperasian Auto Clean
15
(Pembersihan Otomatis)
Mode perawatan kulit
15
16
Pengoperasian Pemurnian Plasma
(Opsional)
Pengoperasian otomatis (Opsional)
16
17
Pengoperasian Perubahan Metode
Otomatis (Auto Changeover) (Opsional)
Konversi °C/°F
17
Mode pendinginan penghemat energi
17
Kecerahan layar tampilan
17
18 Mengoperasikan penyejuk udara tanpa
remote control
18 Menyalakan ulang penyejuk udara secara
otomatis
19 PERAWATAN
20
20
triple (Opsional)
20
20
21 PEMECAHAN MASALAH
21 Fungsi diagnosis mandiri
21 Sebelum menelepon petugas servis
Page 31

SEBELUM MENGGUNAKAN
SEBELUM MENGGUNAKAN
7
INDONESIA
Komponen
Filter plasma atau
Filter 3M multi proteksi (Opsional)
Unit dalam ruangan
Filter 3M multi proteksi (Opsional)
Filter proteksi ganda
Gril depan
Filter triple atau Filter 3M
mirco proteksi
* Fitur ini bisa berubah menurut tipe model.
(Optional)
Keluaran udara
Bingkai bukaan
(louver) vertikal
(Opsional)
CATATAN
!
Jumlah lampu pengoperasian dan lokasinya dapat bervariasi, tergantung model penyejuk
udara.
Baling-baling
horizontal
Filter bebas alergi
(Opsional)
Masukan udara
Lampu
pengoperasian
Tombol ON/OFF
Pengubah Ion Plasma(Opsional)
Penerima Sinyal
Unit luar ruangan
Masukan udara
Keluaran udara
Pelat Dasar
* Fitur ini bisa berubah menurut tipe model.
Kabel
penghubung
Pemipaan
Selang Penguras
Page 32

SEBELUM MENGGUNAKAN
8
INDONESIA
SEBELUM MENGGUNAKAN
Komponen
Unit dalam ruangan
( Artcool)
Filter plasma (Opsional)
Masukan udara
Tombol ON/OFF
Filter 3M multi proteksi (Opsional)
Gril depan
Lampu
Filter proteksi ganda
Keluaran udara
* Fitur ini bisa berubah menurut tipe model.
CATATAN
!
Jumlah lampu pengoperasian dan lokasinya dapat bervariasi, tergantung model penyejuk
udara.
Bingkai bukaan
(louver) vertikal
(Opsional)
Baling-baling
horizontal
pengoperasian
Penerima Sinyal
Pengubah Ion Plasma(Opsional)
Unit luar ruangan
Masukan udara
Kabel
penghubung
Keluaran udara
Pelat Dasar
* Fitur ini bisa berubah menurut tipe model.
Pemipaan
Selang Penguras
Page 33

INDONESIA
SEBELUM MENGGUNAKAN
Penggunaan remote control
Anda dapat mengoperasikan penyejuk udara lebih nyaman dengan remote control. Anda dapat
menemukan tombol fungsi tambahan di balik penutup remote control.
Remote control nirkabel
9
Remote control Plasma
C
Layar
F
tampilan
ON
AM
OFF
PM
TEMP
SWING
TIMER
ON
SET
CLEAR
AM
PM
SKIN
CARE
TEMP
SWING
TIMER
ON
SET
CLEAR
A/CLEAN PLASMA
MODE
JET
COOL
ROOM
TEMP
C/ F[5SEC]
OFF
ON
OFF
A/
CLEAN PLASMA
MODE
JET
COOL
SAVING
C/ F [5SEC]
OFF
123
Panel
kontrol
C
F
123
hr.
E/SAVING
ON
OFF
FAN
SPEED
SWING
SLEEP
LIGHT TIME [3SEC]
Remote control perawatan kulit
hr.
FAN
SPEED
SWING
SLEEP
LIGHT TIME [3SEC] ROOM TEMP
Remote control Non Plasma
C
F
ON
AM
OFF
PM
TEMP
LIGHT
TIMER
SET
CLEAR
123
A/CLEANFAN
MODE
JET
COOL
ROOM
TEMP
C/ F[5SEC]
OFF
ON
ON
OFF
FAN
SPEED
SWING
SLEEP
hr.
E/SAVING
TIME [3SEC]
Mode Pengoperasian
Pengoperasian Pendinginan
Pengoperasian Otomatis atau
Pengubahan Otomatis
Pengoperasian Pengeringan
Udara yang Sehat
Sirkulasi Udara
Remote Plasma, Remote perawatan kulit ( )
•
Remote Non - Plasma
( )
AI
Page 34

10
INDONESIA
ENGLISH
SEBELUM MENGGUNAKAN
Penggunaan remote control
Anda dapat mengoperasikan penyejuk udara lebih nyaman dengan remote control. Anda dapat
menemukan tombol fungsi tambahan di balik penutup remote control.
Panel
kontrol
PLASMA
SWING SWING
ROOM TEMP
ON
(Plasma &
E/SAVING
Non plasma model)
(Perawatan kulit model)
SAVING
(Plasma &
Perawatan kulit model)
LIGHT
(Non plasma model)
LIGHT
FAN
SLEEP
TEMP
ON
OFF
FAN
SPEED
MODE
JET
COOL
SKIN
CARE
A/CLEAN
Layar
tampilan
Deskripsi
Tombol Plasma*: Memurnikan udara
dengan menghilangkan partikel yang
memasuki unit dalam ruangan.
Tombol sirkulasi udara*: Digunakan
untuk menyirkulasikan udara ruangan
tanpa mendinginkan atau memanaskan.
Tombol otomatis mode tidur*:
Mengatur pengoperasian otomatis mode
hr
tidur.
Tombol penyesuaian suhu:
C
Menyesuaikan suhu ruangan ketika
mendinginkan dan memanaskan.
Tombol On/Of: Mematikan/
-
menghidupkan daya.
Tombol kipas angin dalam ruangan:
Menyesuaikan kecepatan kipas
Tombol pemilihan mode pengoperasian*:
Memilih mode pengoperasian.
Operasi pendinginan (
) / operasi otomatis
atau perubahan metode otomatis \
(auto changeover) ( )/ Operasi penghilangan
lembap ( ) / Sirkulasi udara ( )
Tombol pemanasan/pendinginan
singkat (jet cool/heat)*: Menghangatkan
atau mendinginkan suhu di dalam ruangan
dalam waktu yang singkat.
Mode perawatan kulit :
-
menjaga kelembapan kulit.
Tombol arah aliran udara:
Menyesuaikan arah aliran udara secara
vertikal atau horizontal.
Tombol tampilan suhu: Menampilkan
suhu ruangan.
OFF
AM
OFF
PM
dan waktu mulai / selesai.
Tombol timer: Mengatur waktu saat ini
ON
Tombol fungsi*: Menyesuaikan waktu
dan mengatur fungsi khusus.
: Pembersihan otomatis /
: Mengoperasikan pendinginan hemat
energi / Menyesuaikan kecerahan layar
tampilan unit dalam ruangan
-
SET
CLEAR
Tombol Set/clear (Setel/hapus):
-
Menyetel atau membatalkan fungsi.
Tombol reset: Memulai pengaturan
-
penyejuk udara.
* Beberapa fungsi mungkin tidak didukung, tergantung model.
Page 35

SEBELUM MENGGUNAKAN
11
INDONESIA
Memasukkan baterai
Masukkan baterai sebelum menggunakan
remote control. Tipe baterai yang digunakan
adalah AAA (1,5 V)
1. Lepaskan penutup baterai.
2. Masukkan baterai baru dan pastikan
terminal + dan - baterai dipasang dengan
benar.
3. Pasang kembali penutup baterai.
CATATAN
!
Jika layar tampilan remote control mulai
memudar, gantilah baterai.
.
Memasang dudukan remote
control
Pasang dudukan di tempat yang tidak terkena
sinar matahari langsung untuk melindungi
remote control.
1. Pilihlah tempat yang aman dan mudah
dijangkau.
3. Geser masuk remote control ke dalam
dudukannya.
Cara mengoperasikan
Arahkan remote control ke penerima sinyal
di bagian bawah penyejuk udara untuk
mengoperasikannya.
CATATAN
!
• Remote control mungkin dapat
mengoperasikan perangkat elektronik lain
jika diarahkan padanya. Pastikan untuk
mengarahkan remote control ke arah
penerima sinyal penyejuk udara.
• Agar pengoperasiannya tetap baik, gunakan
kain lembut untuk membersihkan penerima
dan pemancar sinyal.
2. Pasang dudukan dengan mengencangkan 2
sekrup dengan erat menggunakan obeng.
Page 36

FUNGSI DASAR
INDONESIA
12
FUNGSI DASAR
Mendinginkan ruangan Anda
(Operasi pendinginan)
1. Tekan
2. Tekan
ON
untuk menyalakan daya.
OFF
MODE
berulang-ulang untuk me m ilih
operasi pendinginan.
–
ditampilkan di layar tampilan.
Menghilangkan kelembapan
(Operasi penghilangan lembap)
Mode ini menghilangkan kelebihan uap air
dari lingkungan sekitar yang berkelembapan
tinggi atau dalam musim hujan, agar dapat
mencegah masuknya jamur. Mode ini
menyesuaikan suhu ruangan dan kipas angin
secara otomatis untuk mempertahankan level
kelembapan yang optimal.
1. Tekan
2. Tekan
ON
untuk menyalakan daya.
OFF
MODE
berulang-ulang untuk me m ilih
penghilangan lembap.
operasi
– ditampilkan di layar tampilan.
3. Tekan
atau untuk mengatur s uhu
yang diinginkan.
– Kisaran suhu adalah 18°C (64°F) 30°C
(86°F).
CATATAN
!
• Dalam mode ini Anda tidak dapat
menyesuaikan suhu ruangan, karena akan
disesuaikan secara otomatis. Di samping
itu, suhu ruangan tidak ditampilkan di layar
tampilan.
Page 37

FUNGSI DASAR
13
INDONESIA
Menganginkan ruangan Anda
(Operasi Sirkulasi Udara)
Mode ini hanya menyirkulasikan udara dalam
ruangan tanpa mengubah suhu ruangan.
Lampu pendinginan menyala dalam mode
sirkulasi udara.
1. Tekan
2. Tombol kipas angin : Tekan
3. Tekan
ON
untuk menyalakan daya.
OFF
FAN
untuk
menyalakan operasi sirku lasi udara.
MODE
Tombol Mode : Tekan
berulang-ulang
untuk memilih operasi sirkulasi udara.
– ditampilkan di l ayar tampilan.
FAN
SPEED
untuk menyesuaikan kipas
angin.
Menyesuaikan kecepatan
kipas
FAN
1. Tekan
SPEED
untuk menyesuaikan
kecepatan kipas angin.
– Pilih
jika Anda menginginkan
udara yang alami. Kecepatan kipas
disesuaikan secara otomatis
Menyesuaikan arah aliran
udara
1. Untuk menyesuaikan arah aliran secara
vertikal, tekan
untuk mengubah arah
SWING
aliran udara secara otomatis.
– Fungsi ini berlaku hanya untuk
Menyalakan/Mematikan.
2. Untuk menyesuaikan arah aliran secara
horizontal, tekan
SWING
untuk mengubah
arah aliran udara secara otomatis.
– Fungsi ini berlaku hanya untuk
Menyalakan/Mematikan.
CATATAN
!
• Penyesuaian arah aliran udara secara
horizontal mungkin tidak didukung,
tergantung model.
• Penyetelan pembelok udara secara acak
dapat menyebabkan kegagalan produk.
• Jika Anda menyalakan ulang penyejuk
udara, unit akan mulai beroperasi
dengan arah aliran udara yang disetel
sebelumnya, sehingga pembelok udara
mungkin tidak sesuai dengan ikon yang
ditampilkan di remote control. Bila ini
terjadi, tekan atau
SWING
SWING
untuk
menyesuaikan kembali arah aliran udara.
Mengatur timer
Anda dapat menggunakan fungsi timer
untuk menghemat energi dan menggunakan
Ucapan Kecepatan
Tinggi
Sedang
Rendah
Angin alami
Mengatur waktu saat ini
SET
1. Tekan
CLEAR
dan tahan lebih dari 3 det ik.
– Ikon AM/PM berkedip di bawah layar
tampilan.
Page 38

FUNGSI DASAR
14
INDONESIA
2. Tekan atau untuk memilih waktu.
3. Tekan
SET
untuk menyelesaikan.
CLEAR
Menyalakan penyejuk udara secara
otomatis pada waktu tertentu
1. Tekan ON.
– Ikon di bawah ini berkedip di bawah layar
tampilan.
2. Tekan
3. Tekan
atau untuk memilih waktu.
SET
CLEAR
untuk menyelesaikan.
4. Ketika mengatur timer, waktu saat ini dan
ikon ON ditampilkan di layar tampilan, yang
menunjukkan bahwa waktu yang diinginkan
telah disetel.
Mematikan penyejuk udara secara
otomatis pada waktu tertentu
1. Tekan ON.
– Ikon di bawah ini berkedip di bawah layar
tampilan.
2. Tekan atau untuk memilih waktu.
3. Tekan
4. Ketika mengatur timer, waktu saat ini dan
SET
CLEAR
untuk menyelesaikan.
ikon OFF ditampilkan di layar tampilan, yang
menunjukkan bahwa waktu yang diinginkan
telah disetel.
Membatalkan pengaturan timer
SET
CLEAR
Tekan
– Untuk membatalkan seluruh pengaturan
timer, tekan
SET
CLEAR
Mengatur mode tidur
Gunakan mode tidur untuk mematikan
penyejuk udara secara otomatis saat Anda
tidur.
1. Tekan
2. Tekan
3. Tekan
4. Tekan
ON
OFF
untuk menyalakan daya.
SLEEP
atau untuk memilih jam
(hingga 7 jam).
SET
CLEAR
untuk menyelesaikan.
–
ditampilkan di layar tampilan dalam
mode tidur.
CATATAN
!
Dalam mode Pendinginan dan
Penghilangan Lembap, suhu meningkat
sebesar 1°C (2°F) setelah 30 menit
dan sebesar 1°C (2°F) lagi setelah 30
menit berikutnya agar tidur Anda lebih
nyaman. Suhu meningkat sebesar hingga
2°C (4°F) dari suhu yang sebelumnya
disetel.
Page 39

FUNGSI TINGKAT LANJUT
Penyejuk udara ini menawarkan beberapa
fungsi tambahan tingkat lanjut.
Mengubah suhu ruangan
dengan cepat
(Jet Cool)
Mode ini memungkinkan Anda mendinginkan
udara dalam ruangan dengan cepat di musim
panas atau menghangatkannya dengan cepat
di musim dingin.
1. Tekan
2. Tekan
• Pendinginan Kuat
• Fungsi ini mungkin tidak didukung,
Pemurnian udara dalam
ruangan
Operasi Auto Clean (Pembersihan
Otomatis)
Dalam operasi pendinginan dan penghilangan
lembap, uap air terbentuk di dalam unit
dalam ruangan. Gunakan fungsi auto cleaning
(pembersihan otomatis) untuk menghilangkan
uap air tersebut.
1. Tekan
ON
OFF
untuk menyalakan daya.
JET
COOL
.
– Dalam mode pendinginan singkat,
udara berhembus kuat dengan suhu
18°C (64°F)- 30°C (86°F).
CATATAN
!
– Model C/O
Aktif dalam Operasi Pendinginan/
Penghilangan Kelembapan/Kipas/
Kecerdasan Buatan/Pembersihan
Otomatis
tergantung model.
– ditampilkan di layar tampilan.
PLASM
A
.
FUNGSI TINGKAT LANJUT
– Jika Anda mematikan daya, kipas
akan beroperasi selama 30 menit dan
membersihkan bagian dalam unit
dalam ruangan.
CATATAN
!
Beberapa tombol tidak dapat
digunakan saat mengoperasikan fungsi
pembersihan otomatis.
15
Mode Perawatan Kulit
Gunakan mode Perawatan Kulit untuk menjaga
supaya kulit tetap lembap.
1. Tekan untuk mengaktifkan daya.
2. Tekan
Perawatan Kulit.
remote control.
tinggi dan perubahan arah bilah untuk proses
kelembaban yang maksimal. Bagaimanapun
suhu ruangan tetap tidak berubah.
pengaturan suhu, kecepatan kipas dan arah
baling-baling.
!
tergantung modelnya.
Pendinginan, mode Kipas, dan mode
Plasma.
keadaan luar lingkungan.
SKIN
CARE
CATATAN
untuk memilih mode
habugnem tapad adnA ,ini edom adaP–
gnukudid kadit nikgnum ini isgnuF–
adap gnutnagreb nababmelek lisaH–
INDONESIA
rayal nalipmat adap habureb gnay ada kadiT–
sapik natapecek nagned isareporeb ini isgnuF–
edom adap nakisarepoid tapad ini isgnuF–
Page 40

FUNGSI TINGKAT LANJUT
16
INDONESIA
Pengoperasian Pemurnian
Plasma (Opsional)
Filter plasma yang dikembangkan oleh LG
menghilangkan kontaminan renik dari udara
asupan secara tuntas untuk menyuplai udara
yang bersih dan segar.
1. Tekan
2. Tekan
ON
OFF
untuk menyalakan daya.
A
PLASM
.
–
ditampilkan di layar tampilan.
CATATAN
!
• Anda dapat menggunakan fungsi
ini dengan menekan
PLASM
A
tanpa
menghidupkan penyejuk udara.
• Baik lampu plasma maupun lampu
pendinginan akan menyala ketika
pemurnian plasma dioperasikan.
• Fungsi ini mungkin tidak didukung,
tergantung model.
Pengoperasian otomatis
(Opsional)
(Kecerdasan buatan)
Model pendinginan saja
Dalam mode ini, kecepatan kipas dan suhu
disesuaikan secara otomatis, berdasarkan
suhu ruangan.
ON
1. Tekan
2. Tekan
3. Tekan atau untuk memilih kode
OFF
untuk menyalakan daya.
MODE
berulang-ulang untuk memilih
pengoperasian otomatis.
operasi yang diinginkan jika suhu lebih
tinggi atau lebih rendah daripada suhu
yang diinginkan.
Kode Deskripsi
2 Dingin
1 Agak Dingin
0 Pertahankan
suhu
ruangan
-1 Sedikit panas
-2 Panas
CATATAN
!
• Dalam mode ini, Anda tidak dapat
menyetel kecepatan kipas, tapi Anda
dapat mengatur pembelok udara agar
berputar otomatis.
• Fungsi ini mungkin tidak didukung,
tergantung model.
Page 41

FUNGSI TINGKAT LANJUT
17
INDONESIA
Pengoperasian Perubahan
Metode Otomatis (Auto
Changeover) (Opsional)
Mode ini mengubah mode pengoperasian
secara otomatis untuk mempertahankan suhu
yang ditentukan di ±2°C(4°F).
1. Tekan
2. Tekan
3. Tekan atau untuk mengatur suhu
4. Tekan
ON
OFF
untuk menyalakan daya.
MODE
berulang-ulang untuk memilih
perubahan metode pengoperasian
otomatis.
ditampilkan di layar tampilan.
–
yang diinginkan.
– Kisaran suhu adalah 18°C (64°F) - 30°C
(86°F).
FAN
SPEED
berulang-ulang untuk memilih
kecepatan
!
kipas.
CATATAN
Fungsi ini mungkin tidak didukung,
tergantung model.
Mode pendinginan penghemat
energi
Mode ini meminimalkan konsumsi daya
selama pendinginan dan meningkatkan suhu
yang ditentukan hingga level optimal agar
lingkungan menjadi lebih nyaman.
Suhu otomatis disetel di 22°C (72°F) jika
suhu sekitar berada di bawah 22°C (72°F) .
Suhu dipertahankan jika suhu sekitar berada di
atas 22°C (72°F).
1. Tekan
2. Tekan
3. Tekan
ON
OFF
untuk menyalakan daya.
MODE
operasi pendinginan.
berulang-ulang untuk memilih
E/SAVING
.
ditampilkan di layar tampilan.
–
CATATAN
!
- Fungsi ini mungkin tidak didukung,
tergantung model.
- Memungkinan untuk menampilkan
temperatur yang berbeda antara
remote kontrol dan AC selama
beroperasi.
Konversi °C/°F
ROOM
TEMP
Tekan
Atau tekan
Unit ini mengonversikan °C ke °F atau °F
ke °C jika TOMBOL Suhu Ruangan ditekan
selama 5 detik.
(Plasma & Non plasma model)
C/ F [5SEC]
( Perawatan kulit model)
SAVING
C/ F [5SEC]
Kecerahan layar tampilan
Anda dapat menyesuaikan kecerahan layar
tampilan unit dalam ruangan.
atau
LIGHT
untuk menyalakan/
1. Tekan
LIGHT
mematikan layar Tampilan.
CATATAN
!
Fungsi ini mungkin tidak didukung,
tergantung model.
Page 42

FUNGSI TINGKAT LANJUT
18
INDONESIA
Mengoperasikan penyejuk
udara tanpa remote control
unit dalam ruangan untuk mengoperasikan
penyejuk udara bila remote control tidak
tersedia. Namun, kecepatan kipas diatur ke
tinggi.
1. Buka penutup depan.
– Angkat sedikit kedua sisi penutup.
* Fitur ini bisa berubah menurut tipe model.
2. Tekan tombol ON/OFF
Tombol ON/
OFF
* Fitur ini bisa berubah menurut tipe model.
– Untuk model pendinginan dan
pemanasan, mode pengoperasian
Suhu
ruangan
Di atas
21°C(70°F)
dan di
Bawah
24°C(76°F)
Di atas
24°C(76°F)
Suhu yang
ditentukan
23°C(74°F) Operasi
22°C(72°F) Operasi
– Untuk model pendinginan saja, suhu
diatur ke 22°C (72°F).
Mode
pengoperasian
penghilangan
lembap
pendinginan
Menyalakan ulang penyejuk
udara secara otomatis
Ketika penyejuk udara dinyalakan kembali
setelah terjadi kegagalan daya, fungsi ini akan
kembali ke pengaturan sebelumnya. Fungsi ini
merupakan pengaturan bawaan pabrik.
Menonaktifkan penyalaan ulang
otomatis
1. Buka penutup depan.
– Angkat sedikit kedua sisi penutup.
* Fitur ini bisa berubah menurut tipe model.
2.
detik.
– Unit ini akan mengeluarkan bunyi bip dua
kali dan lampu akan berkedip 6 kali.
Tombol ON/
OFF
* Fitur ini bisa berubah menurut tipe model.
– Untuk mengaktifkan kembali fungsi ini,
detik. Unit ini akan mengeluarkan bunyi
bip dua kali dan lampu akan berkedip 4
kali.
CATATAN
!
Jika Anda menekan dan menahan tombol
unit ini akan beralih ke operasi tes. Dalam
operasi tes, unit menghembuskan udara
yang kuat untuk mendinginkan selama 18
menit dan kembali ke pengaturan bawaan
pabrik.
Page 43

PERAWATAN
PERAWATAN
Bersihkan produk secara teratur untuk mempertahankan kinerja yang optimal dan mencegah
kemungkinan kerusakan.
* Fungsi ini mungkin tidak didukung, tergantung model.
Filter plasma atau
Filter 3M multi proteksi (Opsional)
Filter proteksi ganda
Filter 3M multi proteksi (Opsional)
Pengubah Ion Plasma(Opsional)
Filter triple atau Filter 3M
mirco proteksi
* Fitur ini bisa berubah menurut tipe model.
Item
(Optional)
Interval pembersihan
2 mingguFilter proteksi ganda
Filter bebas alergi
(Opsional)
Metode pembersihan
19
INDONESIA
Filter Triple*
Filter Anti Virus*
Filter plasma*
Filter 3M multi proteksi &
Filter 3M micro proteksi*
Permukaan unit
dalam ruangan
Unit luar ruangan
3 bulan
3 bulan
3 bulan
1 bulan
Secara teratur
Secara teratur
triple."
triple."
Gunakan kain lembut dan kering. Jangan gunakan
zat pengikis atau pemutih.
Gunakan uap untuk membersihkan kabel
pertukaran panas dan ventilasi panel (hubungi
teknisi).
PERHATIAN
• Matikan daya dan cabut steker kabel daya sebelum Anda melakukan perawatan apa
pun; bila tidak, hal itu dapat menimbulkan kejutan listrik.
•
Hal ini dapat mengakibatkan perubahan bentuk atau perubahan warna.
•
merusak permukaan produk.
CATATAN
!
•
• Pastikan untuk membersihkan kabel pertukaran panas unit luar ruangan secara teratur,
meningkatkan biaya energi.
Page 44

PERAWATAN
20
INDONESIA
Member
ganda
sekali ataulebih sering jika perlu.
1. Matikan daya dan cabut steker kabel
daya.
2. Buka gril depan.
– Angkat sedikit kedua sisi penutup.
* Fitur ini bisa berubah menurut tipe model.
3.
sedikit, dan lepaskan dari unit.
* Fitur ini bisa berubah menurut tipe model.
4.
atau dengan air hangat.
–
dalam air suam kuku berdeterjen.
5.
Membersihkan filter anti-alergi
dan filter triple (Opsional)
1. Matikan daya dan cabut steker kabel daya.
2.
3.
Membersihkan filter plasma
(Opsional)
1. Matikan daya dan cabut steker kabel
daya.
2.
3.
* Fitur ini bisa berubah menurut tipe model.
4. Gunakan pembersih vakum untuk
menghlangkan segala kotoran.
– Jika kotoran sulit dibersihkan, cucilah
5.
Membe
r
micro proteksi(Opsional)
1. Matikan daya dan cabut steker kabel daya.
2.
3.
* Fitur ini bisa berubah menurut tipe model.
Gunakan vacuum cleaner untuk
4.
menghilangkan kotoran.
* Fitur ini bisa berubah menurut tipe model.
4.
terkena sinar matahari selama 2 jam.
CATATAN
!
tergantung model.
CATATAN
!
Lokasi lter/saringan air mungkin berbeda
(sesuai model).
Jenis Plasma Filter, Filter 3M multi proteksi dan
3M mikro proteksi hanya tersedia dibeberapa
model.
Filter 3M multi proteksi dapat ditempatkan
dalam 2 posisi (tergantung/sesuai model)
Page 45

PERAWATAN
PEMECAHAN MASALAH
Fungsi diagnosis mandiri
Produk ini memiliki fungsi diagnosis mandiri yang sudah terpasang. Jika terjadi kesalahan, lampu
unit dalam ruangan akan berkedip dalam selang 2 detik. Jika terjadi, hubungi pusat servis atau
dealer setempat.
Sebelum menelepon petugas servis
Periksalah hal berikut sebelum Anda menghubungi pusat servis. Jika masalah tidak terselesaikan,
hubungilah pusat servis di tempat Anda.
21
INDONESIA
Masalah
Ada bau terbakar dan suara
yang aneh dari dalam unit.
Ada kebocoran air dari unit
dalam ruangan meskipun
level kelembapan rendah.
Kabel daya rusak atau
menghasikan panas
berlebihan.
Ada sakelar, pemutus
sirkuit (pengaman, arde)
atau sekring yang tidak
berfungsi baik.
Penyejuk udara tidak hidup.
Kemungkinan
penyebab
-
Steker penyejuk
udara belum
dipasang.
Sekring putus atau
suplai daya terblokir.
Telah terjadi
kegagalan daya.
Voltase terlalu tinggi
atau terlalu rendah.
Tindakan koreksi
Matikan penyejuk udara, lepaskan steker
kabel daya, dan hubungi pusat servis.
Periksa apakah kabel daya sudah dipasang
ke stopkontaknya.
Gantilah sekring dan periksa apakah
pemutus sirkuit tersangkut.
Matikan penyejuk udara saat kegagalan
daya terjadi. Bila daya sudah hidup lagi,
tunggulah 3 menit, dan nyalakan kembali
penyejuk udara.
Periksalah apakah pemutus sirkuit
tersangkut.
Penyejuk udara mati
otomatis pada waktu
yang ditentukan
sebelumnya.
Tekan kembali tombol daya.
Page 46

PEMECAHAN MASALAH
22
INDONESIA
Masalah
Penyejuk udara tidak
mengeluarkan udara dingin.
Anda tidak bisa mengatur
kecepatan kipas angin.
Kemungkinan
penyebab
Udara tidak
tersirkulasi dengan
benar.
Filter proteksi ganda
kotor.
Suhu ruangan terlalu
tinggi.
Udara dingin keluar
dari dalam ruangan.
Suhu yang diinginkan
lebih tinggi dibanding
suhu yang disetel.
Ada sumber panas di
sekitar.
Operasi sirkulasi
udara telah dipilih
Operasi otomatis,
operasi singkat
(jet), atau operasi
penghilangan lembap
telah dipilih.
Tindakan koreksi
Pastikan tidak ada gorden, kerai, atau
perabotan yang menghambat bagian depan
penyejuk udara.
ganda” untuk informasi lebih lanjut.
Di musim panas, perlu waktu untuk
mendinginkan udara di dalam ruangan. Bila
demikian, pilihlah operasi jet cool untuk
mendinginkan udara di dalam ruangan
dengan singkat.
Pastikan tidak ada udara dingin keluar
melalui titik-titik ventilasi ruangan.
Aturlah suhu yang diinginkan ke level yang
lebih rendah dari suhu saat ini.
Hindari penggunaan generator panas
seperti kompor gas atau oven listrik saat
penyejuk udara dioperasikan.
Dalam operasi sirkulasi udara, udara
berhembus dari penyejuk udara tanpa
mendinginkan atau memanaskan
udara dalam ruangan. Alihkan mode
pengoperasian ke operasi pendinginan.
Dalam mode operasi tertentu, seperti
mode operasi penghilangan lembap atau
jet, Anda tidak dapat mengatur kecepatan
kipas. Pilihlah mode operasi yang
membuat Anda dapat mengatur kecepatan
kipas.
Anda tidak bisa mengatur
suhu.
Operasi sirkulasi
udara atau operasi
jet telah dipilih
Dalam mode operasi tertentu, seperti
mode operasi sirkulasi udara atau jet,
Anda tidak dapat mengatur suhu. Pilihlah
mode operasi yang membuat Anda dapat
mengatur suhu.
Page 47

MEMO
Page 48

PT. LG ELECTRONICS INDONESIA
Kawasan Industri MM2100 Blok G
Cikarang Barat, Bekasi, Jawa Barat 17520
INDONESIA
 Loading...