

LG SN11RG User manual
OWNER’S MANUAL
LG Wi-Fi
Sound Bar
Please read this manual carefully before operating your set and retain it for future reference.
MODEL
SN11RG (SN11RG, SPN8-W, SPN11-SL, SPN11-SR)
www.lge.com
2001_Rev01 |
Copyright © 2020 LG Electronics Inc. All Rights Reserved. |

1
<![if ! IE]><![endif]>Started Getting
2 Getting Started
Safety Information |
product identification and supply ratings, please refer |
|||
|
|
|
NOTICE: For safety marking information including |
|
|
|
|
to the main label on the bottom or the other surface |
|
|
|
|
of the product. |
|
|
CAUTION |
|
||
|
|
|
||
|
RISK OF ELECTRIC SHOCK |
|
CAUTION concerning the Power Cord |
|
|
DO NOT OPEN |
|
||
|
|
The Power Plug is the disconnecting device.In case |
||
CAUTION: TO REDUCE THE RISK OF ELECTRIC |
||||
of an emergency, the Power Plug must remain readily |
||||
SHOCK DO NOT REMOVE COVER (OR BACK) |
||||
accessible. |
||||
NO USER-SERVICEABLE PARTS INSIDE REFER |
||||
Check the specification page of this owner’s manual |
||||
SERVICING TO QUALIFIED SERVICE PERSONNEL. |
||||
to be certain of the current requirements. |
||||
|
|
|
||
This lightning flash with arrowhead symbol within an equilateral triangle is intended to alert the user to the presence of uninsulated dangerous
 voltage within the product’s enclosure that may be of sufficient magnitude to constitute a risk of electric shock to persons.
The exclamation point within an equilateral triangle is intended to alert the user to the presence of important operating and
maintenance (servicing) instructions in the literature accompanying the product.
WARNING: TO PREVENT FIRE OR ELECTRIC SHOCK HAZARD, DO NOT EXPOSE THIS PRODUCT TO RAIN OR MOISTURE.
WARNING: Do not install this equipment in a confined space such as a book case or similar unit.
CAUTION: Do not use high voltage products around this product. (ex. Electrical swatter)This product may malfunction due to electrical shock.
CAUTION: The apparatus should not be exposed to water (dripping or splashing) and no objects filled with liquids, such as vases, should be placed on the apparatus.
CAUTION: Do not block any ventilation openings. Install in accordance with the manufacturer’s instructions.
Slots and openings in the cabinet are provided for ventilation and to ensure reliable operation of the product and to protect it from over heating. The openings should never be blocked by placing the product on a bed, sofa, rug or other similar surface.This product shall not be placed in a builtin installation such as a bookcase or rack unless
proper ventilation is provided or the manufacturer’s instruction has been adhered to.
Do not overload wall outlets. Overloaded wall outlets, loose or damaged wall outlets, extension cords, frayed power cords, or damaged or cracked wire insulation are dangerous. Any of these conditions could result in electric shock or fire. Periodically examine the cord of your device, and if its appearance indicates damage or deterioration, unplug it, discontinue use of the device, and have the cord replaced with an exact replacement part by an authorized service center. Protect the power cord from physical or mechanical abuse, such as being twisted, kinked, pinched, closed in a door, or walked upon. Pay particular attention to plugs, wall outlets, and the point where the cord exits the device.
CAUTION: Be careful to make sure children do not put their hands or any objects into the *speaker duct.
* speaker duct: A hole for plentiful bass sound on speaker cabinet. (enclosure)
CAUTION: No naked flame sources, such as lighted candles, should be placed on the apparatus.

Getting Started |
3 |
|
|
Symbols
~Refers to alternating current (AC).
0 |
Refers to direct current (DC). |
1 |
||
|
Refers to classII equipment. |
|
<![if ! IE]> <![endif]>Getting |
|
1 |
Refers to stand-by. |
|
||
|
|
|
<![if ! IE]> <![endif]>Started |
|
! |
Refers to “ON” (power). |
|||
|
|
|||
|
Refers to dangerous voltage. |
|
|
|
|
|
|
|
|

4 Table of Contents
Table of Contents
1 |
Getting Started |
|
2 |
Connecting |
2 |
Safety Information |
19 |
Network connection |
|
6 |
Introduction |
19 |
– Installing “Google Home” App |
|
7 |
Front panel |
20 |
– Launch the app to connect Wi-Fi |
|
9 |
Rear panel |
21 |
Organizing cables (Optional) |
|
10 |
Remote control |
22 |
Wireless subwoofer and rear speaker |
|
13 |
Speakers position |
|
connection |
|
14 |
Installing the sound bar |
22 |
– Wireless subwoofer connection |
|
15 |
Mounting the unit on a wall |
23 |
– Wireless rear speakers connection |
|
17 |
– Mounting the wireless rear speakers |
25 |
– Surround sound |
|
|
|
|
28 |
Connecting to your TV |
|
|
|
28 |
– Using an OPTICAL cable |
|
|
|
28 |
– LG Sound Sync |
|
|
|
29 |
– Using an HDMI cable |
|
|
|
30 |
– ARC (Audio Return Channel) function |
|
|
|
30 |
– eARC (Enhanced Audio Return Channel) |
|
|
|
|
function |
|
|
|
30 |
– What is SIMPLINK? |
|
|
|
31 |
– Additional information for HDMI |
|
|
|
32 |
Optional equipment connection |
|
|
|
32 |
– DOLBY ATMOS® |
|
|
|
32 |
– DTS:X® |
|
|
|
33 |
– HDMI IN connection |
|
|
|
33 |
– OPTICAL IN connection |

Table of Contents |
5 |
|
|
3 |
Operating |
4 |
Troubleshooting |
||
|
|
|
|
|
|
35 |
How to use the Google Assistant |
47 |
Troubleshooting |
||
35 |
– Talk to the Google Assistant |
47 |
– General |
||
37 |
– Reference site for Google Assistant Help |
49 |
– Network |
||
38 |
Control your TV and Sound Bar with Voice |
49 |
– Application |
||
|
command |
50 |
– NOTES to use wireless |
||
38 |
– Available voice commands |
50 |
– NOTES to release Demo mode |
||
40 |
“LG Wi-Fi Speaker” |
|
|
|
|
40 |
– Installing “LG Wi-Fi Speaker” App |
5 |
Appendix |
||
41 |
Using a BLUETOOTH Wireless Technology |
||||
|
|
|
|||
41 |
– About BLUETOOTH |
51 |
Trademarks and licenses |
||
41 |
– BLUETOOTH profiles |
52 |
Specifications |
||
41 |
– Listening to Music of a BLUETOOTH Device |
54 |
Handling the Unit |
||
44 |
Other operations |
54 |
Important Information Relating to Network |
||
44 |
– Using your TV remote control |
|
|
Services |
|
44 |
– AUTO POWER On/Off |
55 |
TERMS OF USE |
||
45– Auto function change
46Standby mode
46 – Standby mode
46 – Networked standby mode
46 Reset the Speaker
1
2
3
4
5

1
<![if ! IE]><![endif]>Started Getting
6 Getting Started
Introduction
Symbol used in this manual
,,Note
Indicates special notes and operating features.
>>Caution
Indicates cautions for preventing possible damages from abuse.

Getting Started |
7 |
|
|
Front panel
1
<![if ! IE]><![endif]>Started Getting
A  Microphone
1 (Standby)
-- |
Switches the unit ON or OFF. |
|
|
F (Function) |
|
||
-- |
Select the function and input source by pressing F repeatedly. |
||
|
|
|
|
|
Input source / Function |
Display |
|
|
|
|
|
|
Wi-Fi |
WI-FI |
|
|
|
|
|
|
Bluetooth |
BT |
|
|
|
|
|
|
Optical |
|
|
|
ARC |
OPT/HDMI ARC |
|
|
e-ARC |
||
|
|
||
|
LG Sound Sync (Wired) |
|
|
B |
|
|
|
HDMI IN 1 |
HDMI1 |
||
|
|||
|
|
|
|
|
HDMI IN 2 |
HDMI2 |
|
|
|
|
|
,You can use Bluetooth function after making Wi-Fi network connection by using Google Home app.
o/p(Volume)
-- Adjusts volume level.
N
-- Starts playback. / Pauses playback.
>(Mic mute)
-- Disables the detect voice recognition by pressing >on the unit. All the Google Assistant LED turns amber and “The mic is muted.” is heard.
To cancel it, press >on the unit again. Google Assistant LED turns off and “The mic is back on.” is heard.

1
<![if ! IE]><![endif]>Started Getting
8 Getting Started
B-- Enables Google Assistant to receive your voice commands. To cancel it, press again. (Page 35)
C Remote sensor
Google Assistant LED
-- Changes LED status according to Google Assistant performance.
LED |
Status |
Description |
D |
All four LEDs are on. |
Ready to listen to your voice |
|
command. |
|
|
All four LEDs blink. |
Responds to your voice command. |
|
Microphone is off and the solid |
Voice recognition is disable |
|
amber LED will be on. |
|
Display Window
E -- Display window will be darkened automatically if there is no key input for 15 seconds. When you press any button, the display window will brighten.
Precautions in using the touch buttons
yy Use the touch buttons with clean and dry hands.
-- In a humid environment, wipe out any moisture on the touch buttons before using.
. yy Do not press the touch buttons hard to make it work.
-- If you apply too much strength, it can damage the sensor of the touch buttons. yy Touch the button that you want to work in order to operate the function correctly.
yy Be careful not to have any conductive material such as metallic object on the touch buttons.It can cause malfunctions.
This unit will turn itself off to save electric consumption when the main unit is not connected to an external device and is not used for 15 minutes.
Remove foreign materials between the grill and the case by using a cotton swab.
,

Getting Started |
9 |
|
|
Rear panel
1
<![if ! IE]><![endif]>Started Getting
USB (Service only)
A-- S/W download connector
OPTICAL IN
B-- Connect the OPTICALIN jack on the back of the unit to OPTICAL OUT jack on theTV.
HDMI OUT (TV eARC/ARC)
C-- Connect the HDMI OUT (TV eARC/ARC) jack on the back of the unit to ARC jack on theTV.
HDMI IN (1)/HDMI IN (2)
D-- Connect HDMIIN jack on the back of the unit to HDMI OUT jack on the external device. You can enjoy the sound and picture from HDMI connection on an external device.

1
<![if ! IE]><![endif]>Started Getting
10 Getting Started
Remote control
Replacement of Battery
Remove the battery cover on the rear of the remote control, and insert the battery with 4 and 5 matched correctly.
Risk of fire or explosion if the battery is replaced by an incorrect type.
1 (Standby)
-- |
Switches the unit ON or OFF. |
A yy |
Networked standby: It allows the unit to switch to standby mode. |
|
To turn on Networked standby function, Press 1. |
|
To turn off Networked standby function, press 1 for about 3 seconds. |
VOL (Volume) o/p |
|
B -- |
Adjusts speaker volume. |
Getting Started 11
SOUND EFFECT |
|
|
-- |
Selects a sound effect mode by using SOUND EFFECT. |
|
|
|
|
|
On Display |
Description |
|
|
|
|
AI SOUND PRO |
Analyzes the property of the input sound and provides the |
|
sound optimized for the content in real time. |
|
|
|
|
|
|
|
|
BASS BLAST or BASS BLAST+ |
Reinforces the bass and powerful sound. |
|
|
|
|
STANDARD |
You can enjoy premium sound with MERIDIAN technology. |
|
|
|
|
MOVIE |
You can enjoy more immersive and cinematic surround sound. |
|
|
|
C |
MUSIC |
You can enjoy more good sound for music source. |
|
|
|
, When this unit detects DOLBY ATMOS or DTS:X stream, you cannot change sound effect to any |
||
|
other.In this case, even though you press SOUND EFFECT, this unit does not respond. And you can |
|
|
see only “NOT SUPPORTED” on the display window. |
|
yy |
TV remote: It allows you to control the volume of this unit by yourTV remote control even by other |
|
|
company’s product. (Page 44) |
|
|
To turn on or off theTV Remote function, press and hold SOUND EFFECT for about 3 seconds and |
|
|
press it again. |
|
, SupportedTV brands
LG |
Panasonic |
Philips |
Samsung |
Sharp |
Sony |
Toshiba |
Vizio |
|
|
|
|
|
|
|
|
C/V(Skip)
D-- Press Cor Vto go to next or previous file.
N(Play/Pause)
E-- Starts playback. / Pauses playback.
8 (Night time)
F-- It is useful when you want to watch movies at low volume late at night.It makes to reduce the sound intensity and improve fineness and softness.
Press 8 to activate Night time mode.To cancel it, press 8 again.
AUTO POWER
G-- It allows the unit to turn on and off automatically by input signal: Optical (Page 44)
F (Function)
H-- Select the function and input source by pressing F repeatedly.
[(Mute)
I-- Press [to mute your unit.To cancel it, press [again.
-- Enables Google Assistant to receive your voice commands while watching TV (not necessary when
Jlistening to music through Wi-Fi or Bluetooth, you can just say “Hey Google”).
1
<![if ! IE]><![endif]>Started Getting
To cancel it, press again. (Page 35)
1
<![if ! IE]><![endif]>Started Getting
12 Getting Started
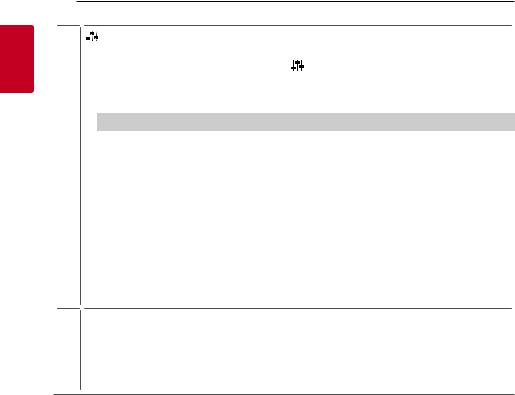
(Sound tuning) |
|
-- Adjusts sound level of each speaker. |
|
Select the speaker you want to adjust by using |
and adjust the sound level by using VOL o/p. |
,Adjusting rear speakers level is applied only when the rear speakers are connected.
,See the page 13 for more information of speakers.
|
Display |
Description |
Range |
|
|
|
|
|
|
|
WF |
Sub Woofer |
-15 ~ 6 |
|
|
|
|
|
|
|
C |
Center |
-6 ~ 6 |
|
K |
|
|
|
|
OVC |
Overhead Volume Control |
-6 ~ 6 |
||
|
||||
|
|
|
|
|
|
S |
Side |
-6 ~ 6 |
|
|
|
|
|
|
|
R |
Rear |
-6 ~ 6 |
|
|
|
|
|
|
|
ROV |
RearTop |
-6 ~ 6 |
|
|
|
|
|
|
|
TRE |
Treble |
-5 ~ 5 |
|
|
|
|
|
|
|
BAS |
Bass |
-5 ~ 5 |
|
|
|
|
|
yy Surround sound: It allows you to enjoy surround sound with rear speakers. (Page 25)
To turn on or off the surround sound, press and hold
 for about 3 seconds and press it again.
J(Information)
-- You can display various information of the input source by pressing J.
L-- Wi-Fi: Connected Application name
-- BT (Bluetooth): Connected Bluetooth device name
-- OPT (Optical)/ARC/E-ARC/HDMI1/HDMI2 (HDMIIN 1/HDMIIN 2): Audio format

Getting Started 13
Speakers position
1
<![if ! IE]><![endif]>Started Getting
|
|
C |
|
|
|
|
|
|
|
|
|
|
|
|
|
|
C |
|
|
|
|
|
|
|
|
|
|
|
|
|
|
|
|
||
|
|
D |
|
|
|
|
|
|
|
|
|
|
|
|
|
|
D |
|
|
|
|
|
|
|
|
|
|
|
|
|
|
|
|
||
|
|
|
|
|
|
|
|
|
|
|
|
|
|
|
|
|
|
|
|
|
|
|
|
|
|
|
|
|
|
||||||
E |
|
|
|
|
|
B |
|
A |
|
B |
|
||||||
|
|||||||||||||||||
F

 F
F
G G
A Center speaker
B Front speakers
C Top speakers
D Side speakers
E Subwoofer
F Rear top speakers
GRear speakers
1
<![if ! IE]><![endif]>Started Getting
14 Getting Started
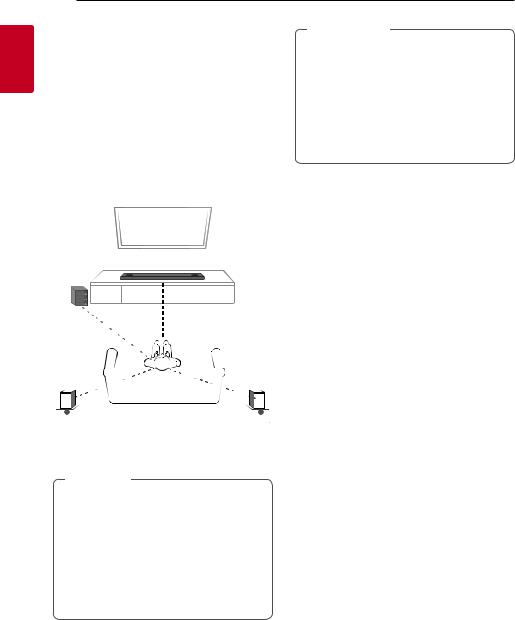
Installing the sound bar
You can hear the sound by connecting the unit to the other device:TV, Blu-ray disc player, DVD player, etc.
Place the unit in front of theTV and connect it to the device you want. (Pages 28 - 32)
You can place the wireless subwoofer anywhere in your room. But it is better to place the subwoofer near the main unit.Turn it slightly toward the center of the room to reduce the wall reflections.
For the best surround sound, place the speakers as shown below.
>>Caution
yy For best performance of wireless connection such as Bluetooth or wireless subwoofer, do not install the unit on Metallic furniture because wireless connection communicates through a module positioned on the bottom of the unit.
yy Be careful not to make scratches on the surface of the Unit /Subwoofer when installing or moving them.
|
|
|
|
|
|
|
|
|
|
|
|
|
|
|
|
||
LEFT |
RIGHT |
||||
(Left channel) |
(Right channel) |
||||
,,Note
yy If the sound bar covers the remote sensor of theTV, please separate distance between the sound bar andTV by 10 ~ 15 cm or more.
yy The illustration above may differ from actual units.
yy The wireless rear speakers are designed for a pair. When installing the speakers, make sure the position of the speakers that is marked on the rear of the speakers.

Getting Started 15
Mounting the unit on a wall
>>Caution
yy Do not install this unit upside down.It can damage the parts of this unit or be the cause of personal injury.
yy Do not hang onto the installed unit and avoid any impact to the unit.
yy Secure the unit firmly to the wall so that it does not fall off.If the unit falls off, it may result in an injury or damage to the product.
yy When the unit is installed on a wall, please make sure that a child does not pull any of connecting cables, as it may cause it to fall.
You can mount the main unit on a wall.
Preparation materials
Unit

 Wall bracket install guide

 Wall bracket

 Screws
(Not supplied)

 Screws (A)


 Wall plug
,,Note
Screws (A) and Wall Plugs are not supplied for mounting the unit. We recommend the Hilti (HUD-1 6 x 30) for the mounting.
>>Caution
Because it is difficult to make a connection after installing this unit, you should connect the cables before installation.
1
<![if ! IE]><![endif]>Started Getting

16 Getting Started
1. Match theTV’s BOTTOM EDGE of Wall bracket |
5. Put the unit on the brackets to match screw |
install guide with the bottom ofTV and attach to |
holes on the bottom of the unit. |
the position. |
|
1
<![if ! IE]><![endif]>Started Getting
2.When you mount it on a wall (concrete), use the wall plugs. You should drill some holes. A guide sheet (Wall bracket install guide) is supplied to drill. Use the sheet to check the point to drill.
3.Remove the Wall bracket install guide.
4.Fix the brackets with screws (A) as shown in the illustration below.
6. Fix the unit with the screws firmly.
,,Note
To detach the unit, perform it in reverse order.
|
Getting Started 17 |
|
|
|
|
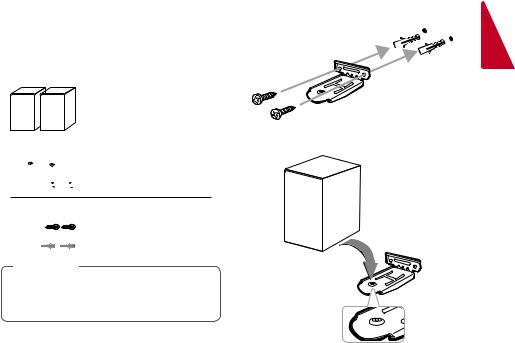
Mounting the wireless rear |
1. Fix the brackets with screws (A) to a suitable |
|
speakers |
position on a wall. |
|
|
|
|
You can mount the wireless rear speakers on a wall.
Preparation materials
Wireless rear speakers


 Wall brackets

 Screws
(Not supplied)

 Screws (A)


 Wall plug
,,Note
Screws (A) and Wall Plugs are not supplied for mounting the unit. We recommend the Hilti (HUD-1 6 x 30) for the mounting.
2.Put the wireless rear speaker on the bracket to fit the screw hole on the bottom of the speaker.
1
<![if ! IE]><![endif]>Started Getting

18 Getting Started
3.Fix the wireless surround speaker with the supplied screw firmly.
1
<![if ! IE]><![endif]>Started Getting
,,Note
To detach the unit, perform it in reverse order.
 Loading...