


 Loading...
ENGLISH
USER GUIDE
LG-RS987
MFL69366401 (1.0) |
www.lg.com |

About this user guide
ENGLISH
Thank you for choosing LG. Please carefully read this user guide before using the device for the first time to ensure safe and proper use.
ŢAlways use genuine LG accessories. The supplied items are designed only for this device and may not be compatible with other devices.
ŢThis device is not suitable for people who have a visual impairment due to the touchscreen keyboard.
ŢDescriptions are based on the device default settings.
ŢDefault apps on the device are subject to updates and support for these apps may be withdrawn without prior notice. If you have any questions about an app provided with the device, please contact a LG Service Center. For user-installed apps, please contact the relevant service provider.
ŢModifying the device’s operating system or installing software from unofficial sources may damage the device and lead to data corruption or data loss. Such actions will violate your LG licence agreement and void your warranty.
ŢSome contents and illustrations may differ from your device depending on the region, service provider, software version, or OS version, and are subject to change without prior notice.
ŢSoftware, audio, wallpaper, images, and other media supplied with your device are licensed for limited use. If you extract and use these materials for commercial or other purposes, you may be infringing copyright laws. As a user, you are fully are entirely responsible for the illegal use of media.
ŢAdditional charges may apply for data services, such as messaging, uploading,downloading, auto-syncing and location services. To avoid additional charges, select a data plan suitable to your needs. Contact your service provider to obtain additional details.
Instructional notices
 WARNING Situations that could cause injury to yourself or others.
CAUTION
Situations that could cause damage to the device or other equipment.
NOTE |
Notices or additional information. |
Table of contents
Features you will love ................... |
5 |
Dual window............................................... |
6 |
Activating the Dual window.................................... |
6 |
Using the Dual window.............................................. |
6 |
Fingerprints................................................ |
7 |
Registering your Żngerprint.................................... |
7 |
LG Health ................................................... |
8 |
Mini view .................................................... |
8 |
Second screen............................................ |
9 |
Second screen features ............................................. |
9 |
Turning the Second screen feature |
|
on and off........................................................................ |
10 |
Smart Notice............................................ |
10 |
Snap movie............................................... |
10 |
QSlide....................................................... |
11 |
Using QSlide................................................................... |
11 |
Capture+ .................................................. |
12 |
Using Capture+............................................................ |
12 |
Viewing the saved memo....................................... |
12 |
QuickRemote............................................ |
13 |
Set up QuickRemote................................................. |
13 |
Universal remote......................................................... |
13 |
Using QuickRemote................................................... |
13 |
Quick Share .............................................. |
14 |
Basics .......................................... |
15 |
Accessories .............................................. |
16 |
Phone layout ............................................ |
17 |
Turning Your Phone On and Off ............... |
19 |
Installing the Nano SIM card and battery...19
Charging the battery ............................... |
21 |
Optimizing battery life............................................. |
21 |
Inserting the memory card ...................... |
22 |
Removing the memory card ..................... |
23 |
Touch screen tips ..................................... |
23 |
Tap or touch................................................................... |
23 |
Touch and hold.............................................................. |
24 |
Drag..................................................................................... |
24 |
Swipe or slide................................................................ |
24 |
Double-tap...................................................................... |
25 |
Pinch-to-Zoom............................................................. |
25 |
Google account setup.............................. |
26 |
Creating your Google account............................ |
26 |
Signing into your Google account..................... |
26 |
Locking and unlocking the device............ |
27 |
Fingerprints.................................................................... |
27 |
KnockON.......................................................................... |
27 |
Knock Code.................................................................... |
28 |
Changing the screen lock method.................... |
28 |
Smart Lock...................................................................... |
29 |
Home screen ............................................ |
29 |
Getting to Know the Home Screen................. |
29 |
Returning to recently-used applications...... |
31 |
Customizing the Home screen........................... |
31 |
NotiŻcations panel..................................................... |
32 |
Capturing a screenshot............................ |
34 |
On-screen keyboard................................. |
35 |
Transferring data between a PC and the |
|
device ....................................................... |
36 |
LG Bridge.................................................. |
37 |
2
Features of LG Bridge ............................................. |
37 |
To download the LG Bridge software............. |
37 |
SmartShare .............................................. |
38 |
Enjoying content from nearby devices |
|
on your phone............................................................... |
38 |
Apps ............................................ |
39 |
Installing or uninstalling apps.................. |
40 |
Calls.......................................................... |
41 |
Making a call.................................................................. |
41 |
Calling your contacts................................................ |
41 |
Answering and rejecting a call............................ |
41 |
Making a second call................................................. |
42 |
Viewing your call logs............................................... |
42 |
Change your call settings...................................... |
42 |
Contacts................................................... |
43 |
Searching for a contact........................................... |
43 |
Adding a new contact.............................................. |
43 |
Favorites contacts...................................................... |
44 |
Creating a group.......................................................... |
44 |
Messaging ................................................ |
45 |
Sending a message.................................................... |
45 |
Conversation view...................................................... |
45 |
Changing your messaging settings.................. |
45 |
Camera ..................................................... |
46 |
Taking a photo.............................................................. |
46 |
Auto Mode on the viewŻnder............................. |
47 |
Manual Camera Mode on the viewŻnder..... |
49 |
Manual Video Mode on the viewŻnder......... |
50 |
Snap Video Mode on the viewŻnder............... |
50 |
Interval shot................................................................... |
51 |
Burst shot........................................................................ |
51 |
Gesture shot.................................................................. |
51 |
Gesture View................................................................. |
52 |
Multi-point Auto-focus........................................... |
52 |
8X Zooming.................................................................... |
52 |
Once you have taken a photo.............................. |
52 |
Recording a video........................................................ |
53 |
After recording a video............................................ |
53 |
Gallery...................................................... |
54 |
Viewing pictures.......................................................... |
54 |
Editing photos .............................................................. |
54 |
Setting wallpaper........................................................ |
54 |
Zooming in and out................................................... |
55 |
Playing a video.............................................................. |
55 |
Deleting photos/videos........................................... |
56 |
Email......................................................... |
57 |
Adding an account..................................................... |
57 |
Working with account folders............................. |
57 |
Composing and sending email............................ |
57 |
Changing the Email app general settings.... |
58 |
Deleting an email account..................................... |
58 |
Music........................................................ |
59 |
Playing a song............................................................... |
59 |
Music player options................................................. |
59 |
Clock......................................................... |
61 |
Alarms............................................................................... |
61 |
Timer................................................................................... |
61 |
World clock..................................................................... |
61 |
Stopwatch....................................................................... |
62 |
Calculator................................................. |
62 |
Calendar ................................................... |
62 |
Voice Recorder ......................................... |
62 |
Recording a sound or voice................................... |
62 |
Downloads................................................ |
63 |
LG Backup................................................. |
63 |
About backing up and restoring device |
|
data..................................................................................... |
63 |
Google apps.............................................. |
64 |
Settings....................................... |
66 |
3
Access the Settings menu ...................... |
67 |
Networks Settings................................... |
67 |
Airplane mode............................................................... |
67 |
Wi-Fi................................................................................... |
67 |
Wi-Fi Direct.................................................................... |
68 |
Bluetooth......................................................................... |
68 |
Mobile data..................................................................... |
70 |
Call....................................................................................... |
70 |
NFC ..................................................................................... |
71 |
Android Beam............................................................... |
72 |
SmartShare Beam...................................................... |
72 |
Media server.................................................................. |
73 |
Miracast............................................................................ |
73 |
LG AirDrive...................................................................... |
73 |
Printing.............................................................................. |
74 |
Mobile networks......................................................... |
74 |
VPN..................................................................................... |
74 |
Sound notiŻcation settings.................. |
75 |
Display settings ....................................... |
76 |
Second screen............................................................... |
76 |
Home screen.................................................................. |
76 |
Lock screen..................................................................... |
76 |
Home touch buttons................................................ |
77 |
More display settings............................................... |
77 |
General settings....................................... |
78 |
Language & keyboard............................................... |
78 |
Location............................................................................ |
78 |
Accounts & sync.......................................................... |
78 |
Cloud.................................................................................. |
79 |
Accessibility.................................................................... |
79 |
Mini view.......................................................................... |
81 |
Shortcut key .................................................................. |
81 |
Fingerprints & security............................................ |
81 |
Smart settings.............................................................. |
82 |
Quick Cover case......................................................... |
82 |
Dual window.................................................................. |
82 |
Date & time.................................................................... |
83 |
Storage.............................................................................. |
83 |
Battery & power saving.......................................... |
83 |
Smart cleaning ............................................................ |
84 |
Apps.................................................................................... |
84 |
Default message app................................................ |
84 |
Backup & reset............................................................. |
84 |
About phone.................................................................. |
85 |
System updates........................................................... |
85 |
Appendix ..................................... |
86 |
Phone software update ........................... |
87 |
FAQ........................................................... |
88 |
Anti-Theft Guide...................................... |
91 |
More information..................................... |
92 |
Open Source Software Notice Information 92 |
|
Trademarks..................................................................... |
92 |
DivX HD ............................................................................ |
93 |
Dolby Digital Plus........................................................ |
93 |
Laser safety statement........................................... |
94 |
For your safety ........................................ |
95 |
4

Features you will love |

Dual window
The Dual window function splits the screen to enable multi-tasking, drag and drop interaction, auto-linking, and recently used apps.
Activating the Dual window
1Tap  >
>  >
>  > General tab > Dual window.
2Tap  to toggle it On.
ŢCheckmark the Auto-open checkbox to automatically open the Dual window function when you tap a link on the full screen or tap an email image attachment.
Using the Dual window
1 Tap  >
>  > Dual window.
 NOTE
NOTE
ŢWhile viewing an app, you can tap  > Dual window to automatically set that app in the top window, then select the second app.
2Tap the app icon you want to use. The first app you tap opens in a window at the top of the screen. The second app opens in the bottom window.
3Tap a window to select and use it.
ŢA blue box appears around the selected window with a blue semicircle handle between the windows.
ŢDrag the blue handle to change the window sizes (one larger and one smaller).
4Tap  to access the Dual window options.
Features you will love |
6 |

Fingerprints
The Fingerprint feature allows you to place a finger on the Power/Lock Key to unlock the screen or see locked content.
Registering your fingerprint
1Tap  >
>  >
>  > General tab > Fingerprints & security > Fingerprints.
2You need to set a secure screen lock before registering your fingerprints. The lock will be used as an alternative method for fingerprints.
3Place your finger on the Power/Lock Key.
4Lift your finger when the device vibrates and then place it on the Power/Lock Key again. Repeat this action using the same finger until the fingerprint is registered.
 NOTE
NOTE
ŢMake sure that your fingers and the Power/Lock Key are clean and dry.
ŢMoisture, lotions, sweat, oils, cut or dry skin might affect fingerprint recognition. Certain activities can also temporarily affect fingerprint recognition, including exercising, showering, swimming, cooking or other conditions or changes that affect your fingerprint.
ŢCover the Power/lock Key completely. Don't press too quickly or move your finger while it is scanning.
ŢAs you use the fingerprint, it will continue to learn and improve recognition of your fingerprint.
Features you will love |
7 |

LG Health
The LG Health helps you manage your health and maintain good exercise habits by tracking logs and competing with people.
1Tap  >
>  >
>  .
.
2Read and agree to the terms and conditions.
3On the Profile and goal page, enter your profile information and tap
SAVE.
4Use the available options to begin tracking activity.
 NOTE
NOTE
Ţ This feature is provided for user convenience. Please use for reference only.
Mini view
To shrink the screen for use with one hand, swipe left or right across the Home touch buttons.
To close the Mini view, tap  .
.
Features you will love |
8 |

Second screen
The Second screen function can display app icons, notifications, contacts, useful information, and more. Set when it's enabled and what it displays. It can be enabled when the screen is on and off.
Second screen features
ŢYou can set which functions are available on Second screen when the main screen is turned on. (Recent apps, App shortcuts, Music Player, Quick contacts, Upcoming plans and Signature)
ŢYou can see notifications and use features on the Second screen while using the main screen.
ŢWhile taking pictures or recording video, you can use the additional options available on the Second screen.
ŢTo turn the Second screen feature off while the screen is off, flip the phone with the screen facing down toward other objects. It will turn back on when you flip the device with the screen facing up.

 Second screen
Features you will love |
9 |
Turning the Second screen feature on and off
You can turn the Second screen feature on and off and select what to display.
Ţ Tap  >
>  >
>  > Display tab > Second screen.
Show when main |
Displays the Second screen information when |
screen on |
the main screen is on. |
Show when main |
Displays the Second screen information when |
screen off |
the main screen is off. |
Smart Notice
Improve your lifestyle with Smart Notice cards.
These cards provide customized suggestions based on the time of day, your location, and how you use your phone.
Ţ Touch and hold the home screen > Widgets > Smart Notice.
Snap movie
You can make a 60-second short film using short video clips.
1Tap  >
>  >
>  >
> 
2Tap  to record a three-second scene. OR
Touch and hold  to record for the desired time.
3Repeat this action.
 NOTE
NOTE
Ţ Movies can only last for a duration of up to one minute.
4 After you are done recording the video clips, tap SAVE.
 NOTE
NOTE
Ţ You can edit for various video effects and background music in the Gallery.
Features you will love |
10 |

QSlide
From any screen, use the Notification panel to easily access and use the Calendar, Calculator, and more with QSlide.
Using QSlide
1 Touch and slide the status bar downward, then tap QSlide.
 NOTE
NOTE
ŢWhile using applications that support QSlide, tap  > QSlide. The function is displayed as a small window on your screen.
2 Using the following options.
Tap to expand the window to full window size.
Tap to adjust the window's transparency.
Tap to close the QSlide window.
Drag to adjust the size of the QSlide window.
3You can use and tap the screen under the QSlide windows when the transparency bar is not full  .
.
 NOTE
NOTE
Ţ QSlide can support up to two windows at the same time.
Features you will love |
11 |

Capture+
The Capture+ feature allows you to create memos.
Using Capture+
You can use Capture+ function to easily and efficiently create memos during a call, with a saved picture or on the current phone screen.
1Touch and slide the status bar downward and tap  .
.
2Create a memo using the following options:
Tap to save the memo you've created.
Tap to undo the most recent action.
Tap to redo the most recently deleted action.
Tap to insert text into your memo.
Tap to select the pen type and color.
Tap to use the eraser to erase the pen marks on the memo.
Tap to crop the image of memo.
Tap to select the share or paper style.
Tap to hide or display the toolbar.
 NOTE
NOTE
ŢPlease use a fingertip while using the Capture+ feature. Do not use your fingernail.
3 Tap  to save the current memo to the QuickMemo+ or the Gallery.
Viewing the saved memo
Tap  >
>  >
>  and select the Capture+ album.
OR
Tap  >
>  >
>  and select the desired memo.
Features you will love |
12 |
QuickRemote
QuickRemote turns your phone into a Universal Remote for your home TV, set-top box and audio system, and more.
Set up QuickRemote
1Touch and slide the status bar downward and tap  > ADD REMOTE. If you can not see
  , tap
, tap  > checkmark QuickRemote to enable it. OR
Tap  >
>  >
>  >
>  .
.
2Select the type and brand of the device, then follow the on-screen instructions to configure the device.
Universal remote
You can create your own personalized universal remote and choose where to place all of the buttons.
1Tap  >
>  >
>  >
>  > Universal remote.
2Enter the remote name.
3Place the buttons you want on the remote at the desired location.
4Follow the instructions to learn buttons.
Using QuickRemote
Once you have completed the initial set up, you can easily access the QuickRemote from the Notification panel. Open the Notification panel and use the QuickRemote functions.
 NOTE
NOTE
ŢThe QuickRemote operates the same way as an ordinary remote control infrared (IR) signals. Be careful not to cover the infrared sensor at the top of the phone when you use the QuickRemote function. This function may not be supported depending on the model, the manufacturer or service company.
Features you will love |
13 |

Quick Share
After taking a photo or recording a video, you can share the files quickly. Tap the icon that appears or slide it to the left to view more apps. Then select the app you wish to use to share the file.
Ţ Tap  >
>  >
>  > AUTO mode.
Ţ The apps that appear are arranged depending on the type and frequency used.
Features you will love |
14 |

Basics
Accessories
These accessories are available for use with the your phone.
ŢTravel Adaptor
ŢQuick Start Guide
ŢStereo Headset
ŢUSB Cable
ŢBattery
 NOTE
NOTE
ŢItems described below may be optional.
ŢAlways use genuine LG accessories. The supplied items are designed only for this device and may not be compatible with other devices.
ŢThe items supplied with the device and any available accessories may vary depending on the region or service provider.
Basics |
16 |

Phone layout
Front Camera Lens 


 Proximity/Ambient
Light Sensor
Earpiece
Headset Jack |
Charger/USB Port |
|
|
Rear Camera Lens |
|
Flash |
Laser Detection |
|
Power/Lock Key, |
Auto-Focus |
|
Volume Keys |
||
Fingerprint ID Sensor |
||
|
NFC Touch Point |
|
Speaker |
|
Basics |
17 |

Power/Lock Key |
Ţ |
Turn your phone on/off by pressing and holding |
|
|
this key. |
|
Ţ |
Press once to turn the screen on/off. |
|
|
|
Volume Keys |
While the screen is off: |
|
|
Ţ |
Press the Volume Up Key twice to launch |
|
|
Capture+. |
|
Ţ |
Press the Volume Down Key twice to launch the |
|
|
Camera and take a picture. |
|
On the Home screen: |
|
|
Ţ |
Control ringer volume. |
|
During a call: |
|
|
Ţ |
Control your earpiece volume. |
|
When playing audio/video: |
|
|
Ţ |
Control volume continuously. |
|
|
|
 NOTE : Proximity Sensor
ŢWhen receiving and making calls, the proximity sensor automatically turns the backlight off and locks the touch screen by sensing when the phone is near your ear. This extends battery life and prevents you from unintentionally activating the touch screen during calls.
 WARNING
ŢThe NFC antenna for this model is on the back cover. Be careful not to damage the NFC touch point on the phone, which is part of the NFC antenna.
 WARNING
ŢPlacing a heavy object on the phone or sitting on it can damage the display and touch screen functions. Do not cover the proximity sensor with screen protectors or any other type of protective film. This could cause the sensor to malfunction.
Basics |
18 |
Turning Your Phone On and Off
Turning your phone on
Press and hold the Power/Lock Key on the back of the phone for a couple of seconds until the screen turns on.
Turning your phone off
1Press and hold the Power/Lock Key on the back of the phone until the Phone options menu appears.
2Tap Power off in the Phone options menu.
3Tap OK to confirm that you want to turn off the phone.
Installing the Nano SIM card and battery
Insert the Nano SIM card provided by the mobile telephone service provider, and the included battery.
 WARNING
ŢDo not insert a memory card into the Nano SIM card slot. If a memory card happens to be lodged in the Nano SIM card slot, take the device to a LG Service Center to remove the memory card.
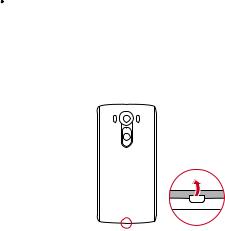
1To remove the back cover, hold the phone firmly in one hand. With your other hand, lift off the back cover with your thumbnail as shown in the figure below.
Basics |
19 |
2Slide the Nano SIM card into the Nano SIM card slot as shown in the figure. Make sure the gold contact area on the card is facing downward.
3 Insert the battery.
4To replace the cover onto the device, align the back cover over the battery compartment and press it down until it clicks into place.
Basics |
20 |

Charging the battery
Charge the battery before using it for first time. Use the charger to charge the battery. A computer can also be used to charge the battery by connecting the phone to it using the USB cable.
 WARNING
ŢUse only LG-approved chargers, batteries and cables. If you use unapproved chargers, batteries or cables, it may cause battery charging delay. Or this can cause the battery to explode or damage the device, which are not covered by the warranty.
The charger connector is located at the bottom of the phone. Insert the charger and plug it into a power outlet.
 NOTE
NOTE
Ţ Do not open the back cover while your phone is charging.
Optimizing battery life
Extend your battery's power by turning off features that you do not need to run constantly in the background. You can monitor how applications and system resources consume battery power.
Extending your phone's battery life:
ŢTurn off radio communications when you are not using. If you are not using Wi-Fi, Bluetooth or GPS, turn them off.
ŢReduce screen brightness and set a shorter screen timeout.
ŢTurn off automatic syncing for Gmail, Calendar, Contacts and other applications.
Basics |
21 |

ŢSome applications you download may consume battery power.
ŢWhile using downloaded applications, check the battery charge level.
Inserting the memory card
Your device supports up to a 2TB microSD card. Depending on the memory card manufacturer and type, some memory cards may not be compatible with your device.
 WARNING
ŢSome memory cards may not be fully compatible with the device. Using an incompatible card may damage the device or the memory card, or corrupt the data stored in it.
 NOTE
NOTE
Ţ Frequent writing and erasing of data shortens the lifespan of memory cards.
1Remove the back cover.
2Insert a memory card with the gold-colored contacts facing downwards.
3 Replace the back cover.
Basics |
22 |

Removing the memory card
Before removing the memory card, first unmount it for safe removal.
1Tap  >
>  >
>  > General tab > Storage > Unmount SD card.
2Remove the back cover and pull out the memory card.
 WARNING
ŢDo not remove the memory card while the device is transferring or accessing information. Doing so can cause data to be lost or corrupted or damage to the memory card or device. It is not responsible for losses that result from the misuse of damaged memory cards, including the loss of data.
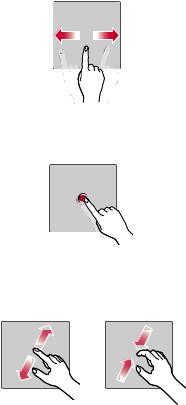
Touch screen tips
Here are some tips on how to navigate on your phone.
 NOTE
NOTE
ŢDo not press too hard; the tap screen is sensitive enough to pick up a light, yet firm tap.
ŢUse the tip of your finger to tap the option you want. Be careful not to tap any other buttons.
Tap or touch
A single finger tap selects items, links, shortcuts and letters on the on-screen keyboard.
Basics |
23 |

Touch and hold
Touch and hold an item on the screen by tapping it and not lifting your finger until an action occurs.
Drag
Touch and hold an item for a moment and then, without lifting your finger, move your finger on the screen until you reach the target position. You can drag items on the Home screen to reposition them.
Swipe or slide
To swipe or slide, quickly move your finger across the surface of the screen, without pausing when you first tap it (so you don't drag an item instead).
Basics |
24 |
Double-tap
Double-tap to zoom on a webpage or a map.
Pinch-to-Zoom
Use your index finger and thumb in a pinching or spreading motion to zoom in or out when using the browser, Maps, or when viewing pictures.
Basics |
25 |
Google account setup
The first time you open a Google application on your phone, you will be required to sign in with your existing Google account. If you do not have a Google account, you will be prompted to create one.
Creating your Google account
1Tap  >
>  >
>  > General tab > Accounts & sync.
2Tap ADD ACCOUNT > Google > Or create a new account.
3Enter your first and last name, then tap NEXT.
4Enter your phone number for security tap NEXT.
5Follow the instructions and enter the required and optional information about the account. Wait while the server creates your account.
Signing into your Google account
1Tap  >
>  >
>  > General tab > Accounts & sync.
2Tap ADD ACCOUNT > Google.
3Enter your email address and tap NEXT.
4Enter your password and tap NEXT.
5After signing in, you can use Gmail and take advantage of Google services on your phone.
6Once you have set up your Google account, your phone will automatically synchronize with your Google account on the web (if a data connection is available).
After signing in, your phone will sync with your Google services, such as Gmail, Contacts, and Google Calendar. You can also use Maps, download applications from Play Store, back up your settings to Google servers, and take advantage of other Google services on your phone.
Basics |
26 |
Locking and unlocking the device
Pressing the Power/Lock Key turns off the screen and puts the device into lock mode. The device automatically gets locked if it is not used for a specified period. This helps to prevent accidental taps and saves battery power.
To unlock the device, press the Power/Lock Key and swipe the screen in any direction.
Fingerprints
The Fingerprint feature allows you to place a finger on the Power/Lock Key to unlock screen. Refer to the Fingerprints section in Features you will love.
KnockON
The KnockON feature allows you to double-tap the screen to easily turn it on or off.
Turning the screen on
1Double-tap the center of the Lock screen to turn the screen on.
2Unlock the screen or access any of the available shortcuts or widgets.
Turning the screen off
1Double-tap an empty area of the Home screen or the status bar.
2The screen will turn off.
 NOTE
NOTE
ŢTap on the center area of the screen. If you tap on the bottom or the top area, the recognition rate may decrease.
Basics |
27 |
Knock Code
The Knock Code feature allows you to create your own unlock code using a combination of knocks on the screen. You can access the Home screen directly when the screen is off by tapping the same sequence on the screen.
 NOTE
NOTE
ŢIf you enter the wrong Knock Code 6 times, you will be required to enter your Google account login info/backup PIN.
ŢUse the fingertip instead of finger nail to tap the screen for turning it on or off.
Setting up the Knock Code feature
1Tap  >
>  >
>  > Display tab > Lock screen > Select screen lock > Knock Code.
2Tap the squares in a pattern to set your Knock Code. Your Knock Code pattern can be 3 to 8 taps.
Unlocking the screen using the Knock Code
You can unlock the screen by tapping the Knock Code pattern you already set, when the screen turns off.
Changing the screen lock method
You can change the way that you lock the screen to prevent others accessing your personal information.
1Tap  >
>  >
>  > Display tab > Lock screen > Select screen lock.
2Select a desired screen lock from None, Swipe, Knock Code, Pattern,
PIN and Password.
 NOTE
NOTE
ŢCreate a Google account before setting an unlock pattern and remember the Backup PIN you created when creating your pattern lock.
Basics |
28 |

Smart Lock
You can use Smart Lock to make unlocking your phone easier. You can set it to keep your phone unlocked when you have a trusted Bluetooth device connected to it, when it's in a familiar location like your home or work, or when it recognizes your face.
Setting up Smart Lock feature
1Tap  >
>  >
>  > Display tab > Lock screen > Smart Lock.
2Before you add any trusted devices, trusted places, or trusted face, you need to set up a screen lock (Knock Code, Pattern, PIN or Password).
Home screen
The Home screen is the starting point for many applications and functions. It allows you to add items like app shortcuts and Google widgets to give you instant access to information and applications. This is the default canvas and accessible from any menu by tapping  .
.
Getting to Know the Home Screen
1
2
Second Screen
Status Bar
3 Widget
 4 Application Icons
5 Location Indicator
 6 Quick Button Area
7 Home Touch Buttons
 NOTE
NOTE
ŢThe Home screen may differ from your device depending on your settings, region, service provider, software version or OS version.
Basics |
29 |
Loading...