


LG
Ventilation Wired Remote Controller
LG
IMPORTANT
• Please read this installation manual completely
before installing the product.
• Installation work must be performed in
accordance with the national wiring standards
by authorized personnel only.
• Please retain this installation manual for future
reference after reading it thoroughly.
Owner's & Installation Manual
Models: PZRCUSB0

2 Ventilation Wired Remote Controller
Ventilation Wired Remote Controller Owner’s & Installation Manual
TABLE OF CONTENTS
■ Safety Precaution .............................................................................................3~4
■ Part Description....................................................................................................5
■ Installation Instruction .........................................................................................6
■ Remote controller Connection Method...............................................................7
■ Connection Method Between Ventilation Remote Controller and
Air conditioner Remote Controller..................................................................8~9
■ Address Setup for Central Control....................................................................10
■ Address Setup for Airconditoner -Ventilator Connection ........................11~12
■ E.S.P(Influx).........................................................................................................13
■ E.S.P(outflow) .....................................................................................................14
■ Ventilation Mode Setting....................................................................................15
■ Rapid Ventilation/Power Saving Ventilation ....................................................16
■ Additional Function............................................................................................17
■ Weekly Reservation Setup ................................................................................18
■ Holiday Setup......................................................................................................19
■ On/Off Reservation ............................................................................................20
■ Optional Function...............................................................................................21
Plasma................................................................................................................21
Heater .................................................................................................................21
Humidifier............................................................................................................22
Method to Operate and Select Air Volume..........................................................22
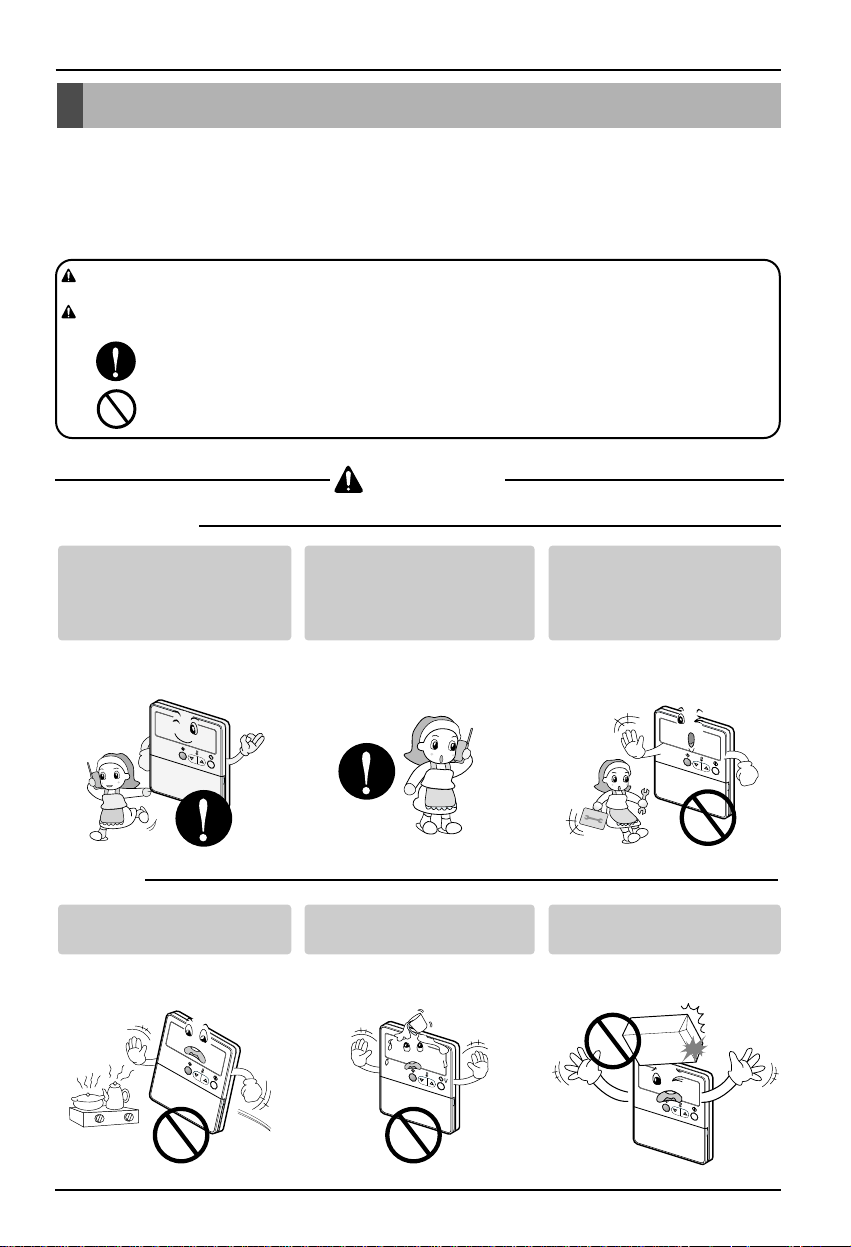
Safety Precaution
Owner’s & Installation Manual 3
Be sure to request to the
service center or installation
specialty store when
installing products.
• It will cause fire or electric shock
or explosion or injury.
Request to the service center
or installation specialty store
when reinstalling the
installed product.
• It will cause fire or electric shock
or explosion or injury.
Do not disassemble, fix, and
modify products randomly.
• It will cause fire or electric shock.
Do not place flammable
stuffs close to the product.
• It will cause fire.
Do not allow water to run
into the product.
• It will cause electric shock or
breakdown.
Do not give the shock to the
product.
• It will cause breakdown when
giving the shock to the product.
■ Installation
Safety Precaution
• The installation requires expert skills, and it should be installed by the service center or other shops specialized
in the installation and recognized by our company.
• For all the problems arising after installation by someone who has no relevant qualifications, our company will
not provide free service.
• The following safety cautions are provided to prevent unexpected dangers or losses.
: If the user does not follow the mandatory items, it may result in serious injury or death.
: If the user does not follow the mandatory items, it may cause personal injury or property
damage.
: Warning and Caution are to call the user’s attention to the possible danger. Read and follow
them carefully in order to prevent a safety accident.
: Warning and Caution are indicated in this guide and the product itself to help protect the users
from danger.
WARNING
CAUTION
WARNING
■ In-use
AUTO SWING
OPERATION
SET TEMP
Ro
o
m T
FAN SPEED
e
m
p
SUB FUNCTION
T
i
H
m
I
e
r
On
A
Oper
U
Off
TO
M
a
E
t
D
ion unit
Hea
Set
t
no.
T
er
im
T
P
i
e
m
r
L
ehea
e
O
Defro
01
t
JET
s
P
t
r
03
o
Hum
g
r
a
m
ZONE
Filter
i
dify
05
s
et
07
Out do
09
o
r
1
1
2
1
3
1
4
315
17
19
2
1
2
3
A
U
TO SWING
OPERATION
SET TE
T
Ro
im
M
o
On
P
e
m T
r
e
m
Off
Set no.
p
Oper
FAN SPE
a
t
ion unit
T
im
e
E
01
D
HI
T
03
SUB FUNCTION
im
M
A
E
e
UTO
D
P
05
r
o
g
LO
Heater
r
a
m set
07
JET
Defrost
Preheat
09
ZONE
Filter
11
Humidify
13
Out door
1
15
2
3
17
4
19
21
23
AUTO SWING
OPERATION
SET TEMP
Ro
o
m T
FAN SPEED
e
m
p
SUB FUNCTION
T
i
H
m
I
e
r
On
A
Oper
U
Off
TO
M
a
E
t
D
ion unit
Hea
Set
t
no.
T
er
im
T
P
i
e
m
reheat
L
e
O
Defr
01
JET
o
s
P
t
r
03
o
Hum
g
r
a
m
ZONE
Filter
i
dify
05
s
et
07
Out do
09
o
r
1
1
2
1
3
1
4
315
17
19
2
1
2
3
AUTO SWING
OPERATION
SET TEMP
Ro
o
m T
FAN SPEED
e
m
p
SUB FUNCTION
T
im
H
I
e
r
On
A
Oper
U
Off
TO
M
a
E
t
D
ion unit
Hea
Set
t
no.
T
er
im
T
P
i
e
m
r
L
ehea
e
O
Defro
01
t
JET
s
P
t
r
03
o
Hum
g
r
a
m
ZONE
Filter
i
dify
05
s
et
07
Out do
09
o
r
1
1
2
1
3
1
4
315
17
19
2
1
2
3
AUTO SWING
OPERATION
SET TEMP
Ro
o
m T
FAN SPEED
e
m
p
SUB FUNCTION
T
i
H
m
I
e
r
On
A
Oper
U
Off
TO
M
a
E
t
D
ion unit
Hea
Set
ter
no.
T
im
T
P
i
e
m
r
L
ehea
e
O
Defro
01
t
JET
s
P
t
r
03
o
Hum
g
r
a
m
ZONE
Filter
i
dify
05
s
et
07
Out do
09
o
r
1
1
2
1
3
1
4
3
15
17
19
2
1
2
3
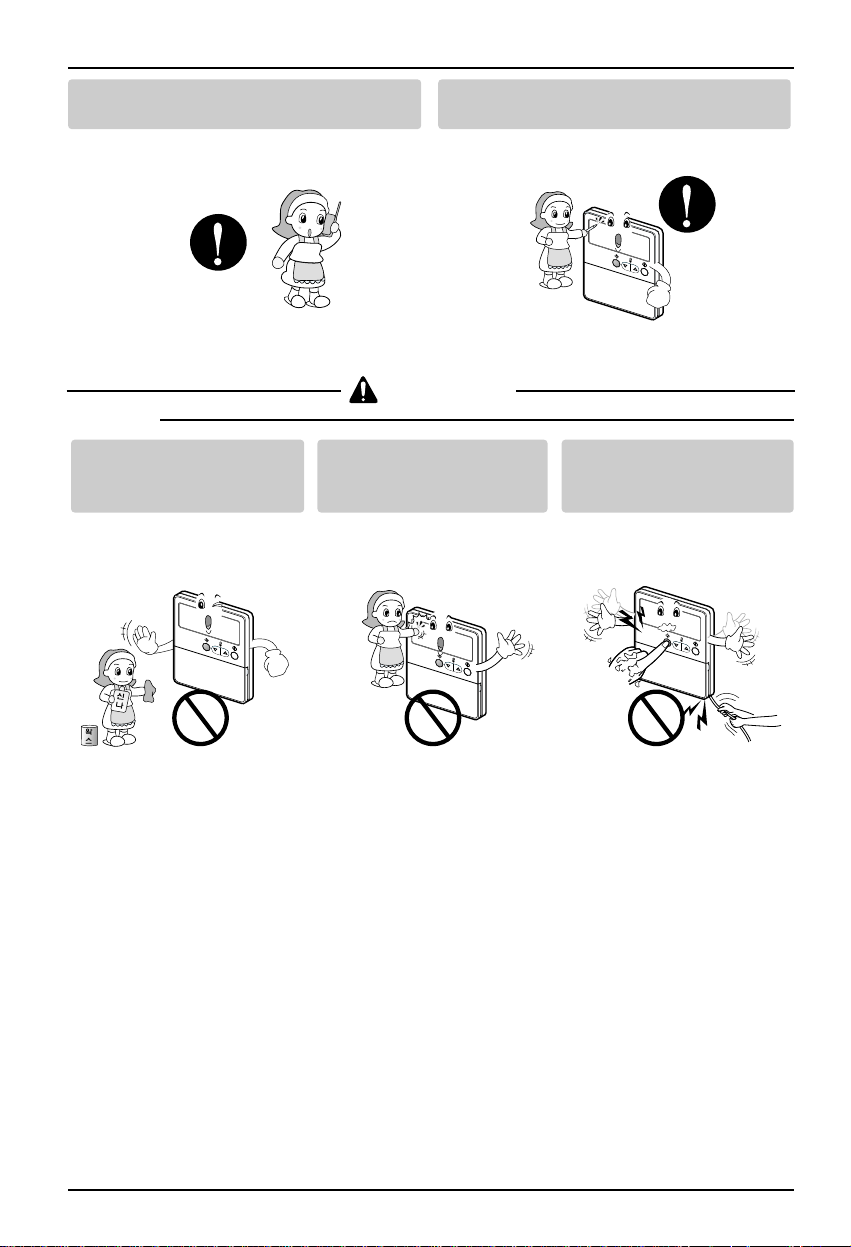
Safety Precaution
4 Ventilation Wired Remote Controller
■ In-use
CAUTION
Request to the service center or installation
specialty store when the product becomes wet.
• It will cause fire or electric shock.
Do not give the shock using sharp and
pointed objects.
• It will cause breakdown by damaging parts.
Do not clean using the
powerful detergent like
solvent but use soft cloths.
• It will cause fire or product
deformation.
Do not press the screen
using powerful pressure or
select two buttons.
• It will cause product breakdown or
malfunction.
Do not touch or pull the lead
wire with wet hands.
• It will cause product breakdown or
electric shock.
H
I
M
E
D
L
O
Z
O
N
E
1
2
3
4
T
im
e
P
r
o
g
r
a
m
s
e
t
T
i
m
e
r
O
n
S
e
t
n
o
.
T
i
m
e
O
ff
0
1
0
3
0
5
0
7
0
9
1
1
1
315
1
7
1
9
O
p
e
r
a
t
i
o
n
u
n
i
t
JE
T
H
e
a
te
r
D
e
fro
s
t
P
re
h
e
a
t
H
um
id
ify
F
ilte
r
O
u
t d
o
o
r
R
o
o
m
T
e
m
p
AUTO SWING
OPERATION
SET TEMP
FAN SPEED
S
U
B
F
U
N
C
T
I
O
N
A
U
T
O
2
1
2
3
AUTO SWING
OPERATION
SET TEMP
Ro
o
m T
FAN SPEED
e
m
p
SUB FUNCTION
T
i
H
m
I
e
r
On
A
Oper
U
Off
TO
M
a
E
t
D
ion unit
Hea
Set
ter
no.
T
im
T
P
i
e
m
r
L
ehea
e
O
Defro
01
t
JET
s
P
t
r
03
o
Hum
g
r
a
m
ZONE
Filter
i
dify
05
s
et
07
Out do
09
o
r
1
1
2
1
3
1
4
3
15
17
19
2
1
2
3
AUTO SWING
OPERATION
SET TEMP
Ro
o
m T
FAN SPEED
e
m
p
T
im
H
I
e
r
On
A
Oper
U
Off
M
a
E
t
D
ion unit
Set
no.
T
im
T
i
e
m
L
e
O
01
JET
P
r
03
o
g
r
a
m
ZONE
05
s
et
07
09
1
1
1
3
15
17
AUTO SWING
OPERATION
SET TEMP
Ro
o
m T
FAN SPEE
e
m
p
D
SUB FUNCTION
T
im
H
I
e
r
On
A
Oper
U
Off
TO
M
a
E
t
D
ion unit
Hea
Set
t
no.
T
er
im
T
P
i
e
m
r
L
ehea
e
O
Defro
01
t
JET
s
P
t
r
03
o
Hum
g
r
a
m
ZONE
Filter
i
dify
05
s
et
07
Out do
09
o
r
1
1
2
1
3
1
4
3
15
17
19
2
1
2
3
SUB FUNCTION
TO
Hea
t
er
P
r
ehea
Defro
t
s
t
Hum
Filter
i
dify
Out do
o
r
1
2
3
4
19
2
1
2
3
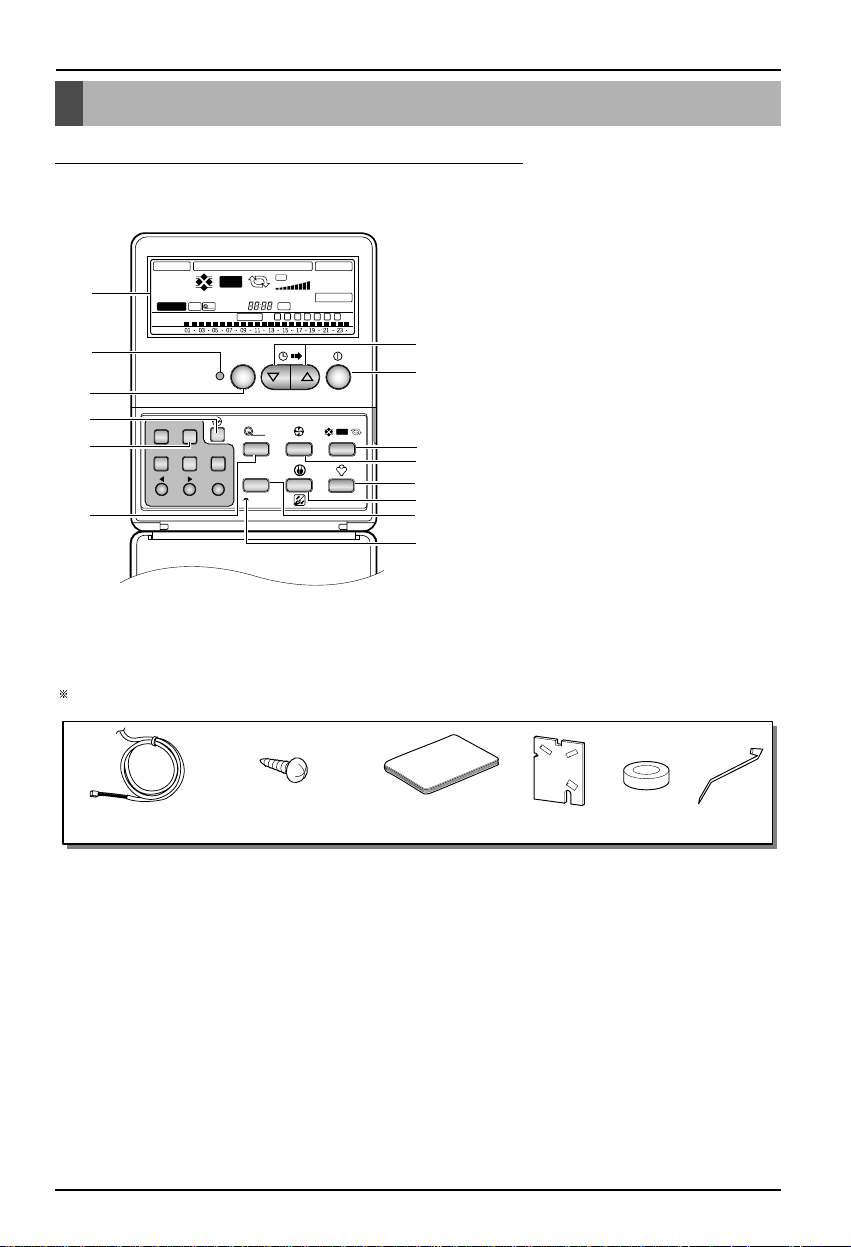
Part Description
Owner’s & Installation Manual 5
Part Description
Name and Function of Remote Controller
1. Display Window
2. Execute/Cancel of Time
Reservation, Weekly
Reservation/Week Day
Select/Holiday Select Button
3. On/Off Button
4. Time Delay Button
5. Rapid Ventilation Button
6. Ventilation Mode Button
7. Air volume Select Button
8.
Power Saving/Filter Cleaning Button
9. Time Reset Button
10. Plasma Button
11. Humidification Button
12. Heater Button
13. Wireless Data Receiver
14. Operation Lamp
TIME RESET
Linked Run
Central Run Heat XCH Auto Normal Fan Speed
Heater Preheat
Defrost
Humidify
PLASMA
Timer
Program set
Sun
Mon
Tue Wed Thu
Fri Sat
On Off
Auto
Set no. Timer
EXTERNAL VENTILATOR OPERATION
SUB FUNCTION
Filter
Time
Delay Time
e-SAVER
Z O N E
Auto
1 2 3 4
Lo
Hi
SHi
Dual Remote
fresh
Timer Cancel
Program Week
Hour Min
Holiday
Set/Clr
fresh
Auto
Cover open status
Plasma
* Functions depend on model type
1
14
2
13
4
3
6
7
11
8
10
9
12
5
Connection Wire(1) Insulation Noise filter Tie Wrap
Remote control lock
Screw(5)
Operation/Installation
Manual
Operation LED will Turn ON 'Green color' during the operation of indoor unit. If any error occurs, the LED will
turn red.
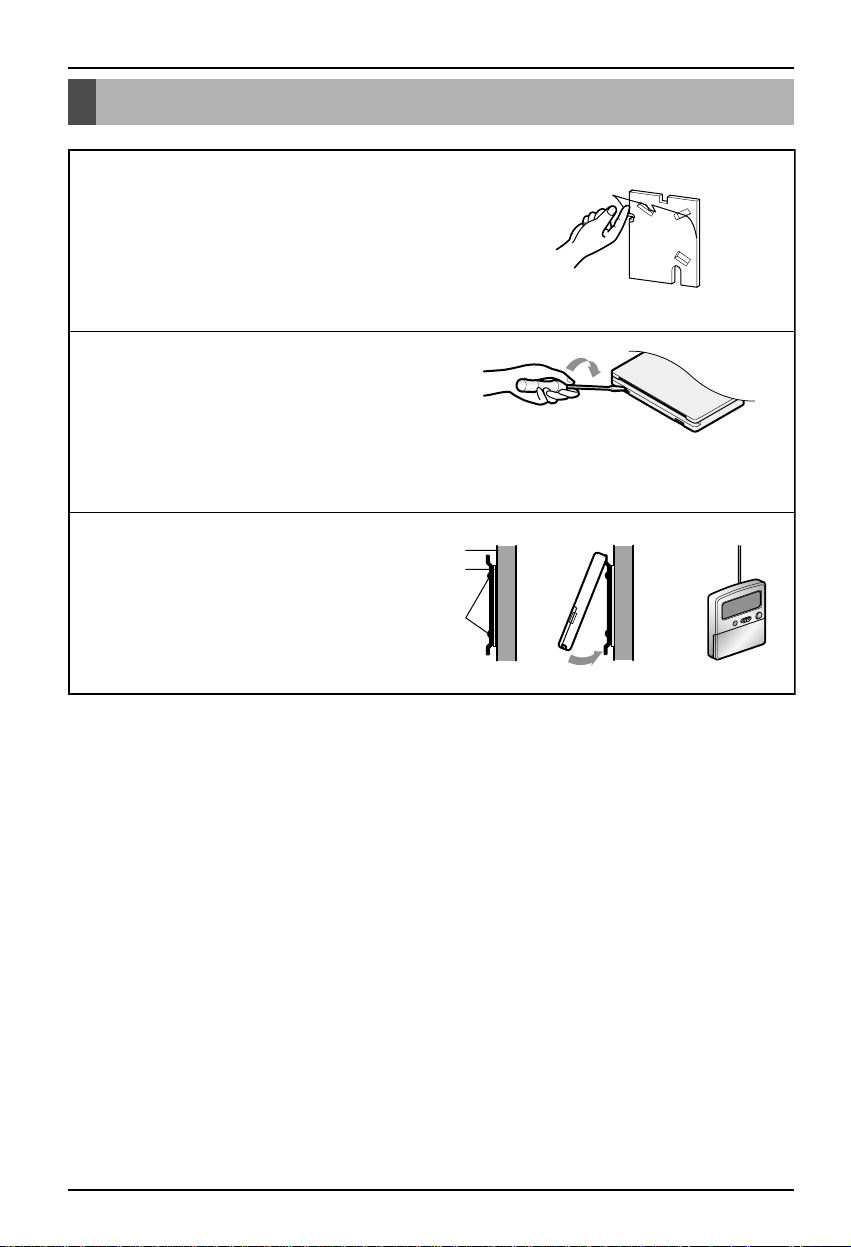
6 Ventilation Wired Remote Controller
Installation Instruction
Installation Instruction
1
Remove the sticker attached on the back of the insulation and attach it
on the wall where you want to install remote controller.
2
Separate the cover of remote control as shown on the
right hand side.
3
Fix the setup board over the insulation.
Wall
Insulation
Remote control
Lock screw
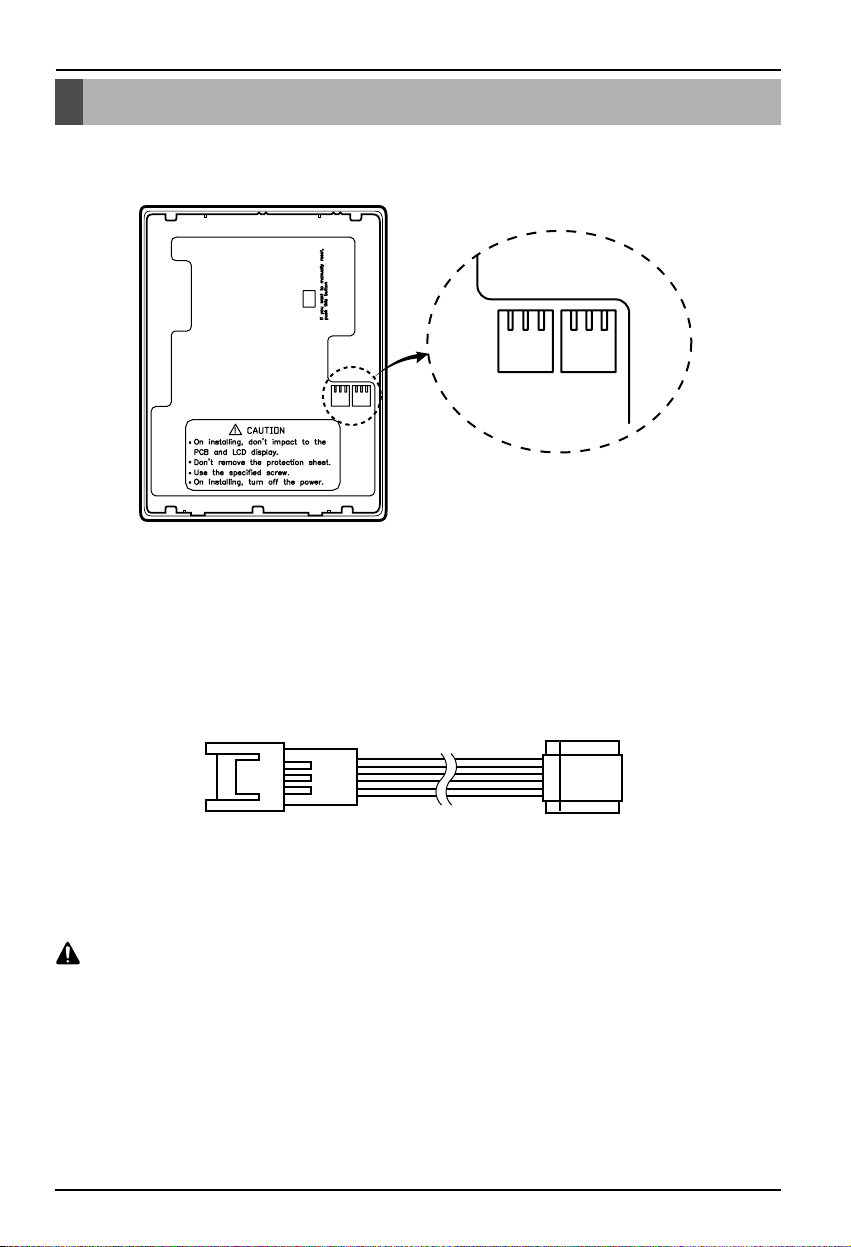
Owner’s & Installation Manual 7
Remote controller Connection Method
Remote controller Connection Method
1. Check if the cable is properly conneced to CN-REMO port
(CN-AIRCON is used if remote controller is connected with Airconditioner )
2. Connect the cables between the indoor unit and the remote controller.
* Do not install the cable longer than 50m. (It can cause a communication error.)
While installing the cable, check the connection between the remote controller and the connector.
The connector is not be connected well if extends backwards.
When cable is installated, 3~4 time it turns the cable in Noise filter
After setting the Slide switch on the back of remote controller, push the reset button necessary for
function set.
CAUTION
P/N:3850A25162L
CN-AIRCONCN-REMO
CN-REMO
CN-AIRCON
Connector for the
remote controller side
Connector for the
indoor unit side

Connection Method Between Ventilation Remote Controller and Air conditioner Remote Controller
8 Ventilation Wired Remote Controller
Connection method between ventilation
Connection Method Between Ventilation Remote
Controller and Air conditioner Remote Controller
1. Separate the back cover of the ventilation remote controller
2 Connect the link cable at CN-AIRCON at the back side of the remote controller
3. Separate the back cover of the air conditioner remote controller
P/N:3850A25162L
CN-AIRCON
CN-REMO
< Airconditioner remote controller >
< Ventilation remote controller >
4. Connect the link cable at CN-VENTIL at the back side of the remote controller
Ventilaton remote controller can be installed along with air conditioner remote controller. But connect ventilation
wired remote controller and air conditioner wired remote controller only when its necessary.

Connection Method Between Ventilation Remote Controller and Air conditioner Remote Controller
Owner’s & Installation Manual 9
TIME RESET
Linked Run
Central Run Heat XCH Auto Normal Fan Speed
Heater Preheat
Defrost
Humidify
PLASMA
Timer
Program set
Sun
Mon
Tue Wed Thu
Fri Sat
On Off
Auto
Set no. Timer
EXTERNAL VENTILATOR OPERATION
SUB FUNCTION
Filter
Time
Delay Time
e-SAVER
Z O N E
Auto
1 2 3 4
Lo
Hi
SHi
Dual Remote
fresh
Timer Cancel
Program Week
Hour Min
Holiday
Set/Clr
fresh
Auto
Plasma
Ventilation remote controller
(PZRCUSZ0)
Airconditioner remote controller
(PCRCUSZ0/PDRCUSZ0)
Terminal block
Maximum 8
connections are possible
Timer
Program
Hour
Cancel 2ndF
Week Holiday
Set/Clr
Min
RESET
PLASMA
ZONE
1234
Operation unit
No Func
Humidify
JET
SLo
AUTO
AUTO SWING OPERATION
FAN SPEED
Program set
SUB FUNCTION
SET TEMP
Room Temp
HI
MED
LO
Heater
Defrost
Filter
Preheat
Out door
Time
Timer
On
Set no. Time
Off
01 03 05 07 09 11 13 15 17 19 21 23
2ndF
Timer
Program
Hour
Cancel 2ndF
Week Holiday
Set/Clr
Min
RESET
PLASMA
ZONE
1234
Operation unit
No Func
Humidify
JET
SLo
AUTO
AUTO SWING OPERATION
FAN SPEED
Program set
SUB FUNCTION
SET TEMP
Room Temp
HI
MED
LO
Heater
Defrost
Filter
Preheat
Out door
Time
Timer
On
Set no. Time
Off
01 03 05 07 09 11 13 15 17 19 21 23
2ndF
5. Use the Terminal block to connect the ventilation remote controller and the air conditioner remote controller
(Yellow wire : Communication line, Black wire : Ground)
6. Maximum 8 air conditioner remote controllers can be connected to one ventilation remote controller.
(If more than 8 remote controllers are connected, it will not be able to operate the system.)

10 Ventilation Wired Remote Controller
Address Setup for Central Control
1
You can set the address by pressing the Program
button and the Set/Clr button for about 3 seconds at
the same time.
2
The group number can be set by Delay low button.
The indoor unit number can be set by Delay high
button (Left side picture is displaying address as 23
possibly.
Ex) Group address: 2
Indoor unit number: 3
3
Finally the address setting if completed by pressing
the Program button and the Set/Clr button about 3
seconds at the same time again.
• The address of central control consists of a group number and the indoor unit number.
Note : The remote controller displays 'HL' (Hard Lock) if central controller has locked the remote controller.
Address Setup for Central Control
EXTERNAL VENTILATOR OPERATION
Linked Run
Dual Remote
Central Run
PLASMA
Timer
On Off
Set no. Timer
Timer Cancel
Program Week
Hour Min
Auto
Heat XCH Auto Normal Fan Speed
fresh
e-SAVER
Delay Time
Program set
fresh
Holiday
Plasma
Set/Clr
TIME RESET
SUB FUNCTION
Auto
Heater Preheat
SHi
Hi
Lo
Humidify
Defrost
Z O N E
1 2 3 4
Time
Filter
Sun
Mon
Tue Wed Thu
Fri Sat
Auto

Normal Fan Speed
Linked Run
Central Run Heat XCH Auto
Auto
EXTERNAL VENTILATOR OPERATION
Dual Remote
Auto
PLASMA
Timer
Program set
Sun
Mon
Tue Wed Thu
Fri Sat
On Off
Set no. Timer
Filter
Time
Delay Time
e-SAVER
fresh
Heater Preheat
Defrost
Humidify
SUB FUNCTION
Lo
Hi
SHi
TIME RESET
Z O N E
1
Timer Cancel
Program Week
Hour Min
Holiday
Set/Clr
fresh
Auto
Plasma
Linked Run
Central Run Heat XCH Auto Normal Fan Speed
Heater Preheat
Defrost
Humidify
PLASMA
Timer
Program set
Sun
Mon
Tue Wed Thu
Fri Sat
On Off
Auto
Set no. Timer
EXTERNAL VENTILATOR OPERATION
SUB FUNCTION
Filter
Time
Delay Time
e-SAVER
Auto
Lo
Hi
SHi
Dual Remote
fresh
Z O N E
1
Address Setup for Airconditoner -Ventilator Connection
Owner’s & Installation Manual 11
1
Set the air conditioner remote control to set the
central control address of each indoor unit.
2
Press the Timer and Hour button simultaneously for
about 3 seconds. Now remote controller enters into
the mode to input a start address of the connected
air conditioner while displaying operation area 1.
3
Using the Delay low/high button, set the start
address of connected air conditioner
(ex : in case of the air conditioner's address 01~08,
set the start address 01 from ventilation remote
controller)
4
When address setting is finished, press the Timer
and Hour button simultaneously about 3 seconds.
This completes the setting of start address.
Address Setup for Airconditoner -Ventilator Connection
< Setting of start address >

Address Setup for Airconditoner -Ventilator Connection
12 Ventilation Wired Remote Controller
Z O N E
4
TIME RESET
Linked Run
Central Run Heat XCH Auto Normal Fan Speed
Heater Preheat
Defrost
Humidify
PLASMA
Timer
Program set
Sun
Mon
Tue Wed Thu
Fri Sat
On Off
Auto
Set no. Timer
EXTERNAL VENTILATOR OPERATION
SUB FUNCTION
Filter
Time
Delay Time
e-SAVER
Auto
Lo
Hi
SHi
Dual Remote
fresh
Timer Cancel
Program Week
Hour Min
Holiday
Set/Clr
fresh
Auto
Plasma
Linked Run
Central Run Heat XCH Auto Normal Fan Speed
Heater Preheat
Defrost
Humidify
PLASMA
Timer
Program set
Sun
Mon
Tue Wed Thu
Fri Sat
On Off
Auto
Set no. Timer
EXTERNAL VENTILATOR OPERATION
SUB FUNCTION
Filter
Time
Delay Time
e-SAVER
Auto
Lo
Hi
SHi
Dual Remote
fresh
Z O N E
4
Z O N E
4
Central Run Heat XCH Auto Normal Fan Speed
Heater Preheat
Defrost
Humidify
PLASMA
Timer
Program set
Sun
Mon
Tue Wed Thu
Fri Sat
On Off
Auto
Set no. Timer
Filter
Time
Delay Time
e-SAVER
Auto
Lo
Hi
SHi
Dual Remote
fresh
Linked Run
EXTERNAL VENTILATOR OPERATION
SUB FUNCTION
6
Using the Delay low/high button, set the end
address of the connected air conditioner
(ex : in case if the air conditioner's address 01~08,
set the end address 08 from ventilation remote
controller)
5
Press the Timer and Min button simultaneously
about 3 seconds.Now the remote controller enters
the mode to input an end address of the connected
air conditioner while displaying operation area 4.
7
When the address setting is finished, press the
Timer and Min button simultaneously about 3
seconds. This completes the setting of end address.
8
When the start address and end address setting is
finished, the linked run mark is indicated in the LCD
of the ventilation wired remote controller.
< Setting of end address >
< Screen display, when address setting is finished >

Owner’s & Installation Manual 13
E.S.P(Influx)
E.S.P(INFLUX)
1
If you press the Timer button and the Fan speed button
simultaneously for about 3 seconds, you can enter the
ESP value setting mode.
2
Using the Delay low/high button, set the ESP value for
each wind level (Low, Mid, High). Use the Fan Speed
button to decide the Fan Speed. (The ESP value can
be set between 1 to 255.)
3
After completing the ESP setting, press the Timer
button and Air volume simultaneously again for about
3 seconds again to exit the ESP value setting mode.
* Because the ESP value is already appropriately factory set, it is recommended that you do not change the
ESP value.
What is an E.S.P function?
This is the function that decides the strength of the air for each air speed and because this function is to make
the installation easier, please do not use this function while using the remote controller.
EXTERNAL VENTILATOR OPERATION
Linked Run
Dual Remote
PLASMA
Timer
On Off
Set no. Timer
Timer Cancel
Program Week
Hour Min
Auto
Auto Normal
fresh
e-SAVER
Delay Time
Program set
Sun
fresh
Holiday
Plasma
Set/Clr
TIME RESET
SUB FUNCTION
Auto
Heater Preheat
SHi
Hi
Lo
Defrost
Humidify
Fan SpeedCentral Run Heat XCH
Z O N E
1 2 3 4
Filter
Time
Mon
Tue Wed Thu
Fri Sat
Auto

E.S.P(Outflow)
14 Ventilation Wired Remote Controller
E.S.P(OUTFLOW)
1
If you press the Timer button and the Ventilaton mode
button simultaneously for about 3 seconds, you can
enter the ESP value setting mode.
2
Using the Delay low/high button, set the ESP value for
each air speed (Low, Mid, High). Use the Fan speed
button to decide the Fan Speed. (The ESP value can
be set between 1 to 255.)
3
After completing the ESP setting, press the Timer
button and Ventilaton mode button simultaneously for
about 3 seconds to exit the ESP value setting mode.
* Because the ESP value is already appropriately factory set, it is recommended that you do not change the
ESP value.
What is an E.S.P function?
This is the function that decides the strength of the air for each air speeds and because this function is to make
the installation easier, please do not use this function when using the remote controller.
Delay Time
Set no. Timer
Timer
Program set
Sun
Mon
Tue Wed Thu
Fri Sat
On Off
Fan SpeedCentral Run Heat XCH
PLASMA
Filter
Time
e-SAVER
fresh
Heater Preheat
Defrost
Humidify
SUB FUNCTION
Z O N E
1 2 3 4
Auto
Hi
SHi
Linked Run
Auto Normal
EXTERNAL VENTILATOR OPERATION
Auto
Dual Remote
TIME RESET
Lo
Timer Cancel
Program Week
Hour Min
Holiday
Set/Clr
fresh
Auto
Plasma

Owner’s & Installation Manual 15
Ventilation Mode Setting
Filter
Time
Delay Time
Linked Run
Central Run
Heater Preheat
Defrost
Humidify
PLASMA
Timer
Program set
Sun
Mon
Tue Wed Thu
Fri Sat
On Off
Set no. Timer
e-SAVER
Z O N E
1 2 3 4
Dual Remote
fresh
TIME RESET
EXTERNAL VENTILATOR OPERATION
SUB FUNCTION
Timer Cancel
Program Week
Hour Min
Holiday
Set/Clr
fresh
Auto
Heat XCH Auto Normal Fan Speed
Auto
Auto
Lo
Hi
SHi
Cover open status
Auto
Heat XCH
Auto
Auto
Normal
Select Mode Display Window
Functions
1.The V entilation
via T otal Heat
Exchange
mode
Mode that supply/exhaust air via Total heat exchange
method.
Appropriate for use in summer/winter when temperature
difference between indoor/outdoor air is severe.
2. The Auto mode Automatically operates in the optimum ventilation mode by
measuring the indoor/outdoor air temperature of the
ventilation system.
❈ Searches the optimum status by operation mode or
setting temperature of ventilator as well as by
indoor/outdoor temperature of the ventilation system if
linked to Multi-V system. (Only for some models)
3. The Normal
Ventilation
Mode that exhaust the air without the Total heat exchange
method.
Appropriate for use in spring/autumn or in case of the high
indoor pollution degree.
Plasma
Select the desired operation mode by
pressing the Ventilation Mode button.
• You can select the Operation Mode in
the order of Total Heat → Auto →
Normal whenever you press the
Ventilation Mode button.
Ventilation Mode Setting

16 Ventilation Wired Remote Controller
Rapid Ventilation/Power Saving Ventilation
Filter
Time
Lo
Hi
SHi
Delay Time
Auto Normal
Heater Preheat
Defrost
Humidify
Z O N E
1 2 3 4
Linked Run
Central Run
PLASMA
Timer
Program set
Sun
Mon
Tue Wed Thu
Fri Sat
On Off
Set no. Timer
Dual Remote
TIME RESET
Heat XCH Fan Speed
Auto
EXTERNAL VENTILATOR OPERATION
SUB FUNCTION
e-SAVER
fresh
Timer Cancel
Program Week
Hour Min
Holiday
Set/Clr
fresh
Auto
Cover open status
fresh
Plasma
Rapid Ventilation
Press the [Rapid Ventilation] button.
• Operation for preventing the polluted
indoor air or moisture from extending
to other rooms.
- Supply Air fan : Low.
- Exhaust fan : Super High
• [Rapid] is indicated on the remote controller and the
air volume is indicated “Auto”.
❈ It is better to use Rapid Ventilation function when
the indoor pollution degree is high.
• Inflow prevention operation means function to
improve pleasantness by preventing inflow of
outdoor smell or moisture by more increasing Supply
Air volume than Exhaust air volume.
- Supply air fan : Super high
- Exhaust fan : Low
For more information, contact the professional
installation agent.
Power Saving Ventilation
Press the [e-Saver] button.
• Operation to achieve saving of power
by searching for the best efficient
operation point.
• Promote discharge of CO2 by increased
exhaust air volume than supply air volume.
• [e-Saver] is indicated on the remote controller and
the air volume indicates ‘Auto’.
Rapid Ventilation/Power Saving Ventilation

Owner’s & Installation Manual 17
Additional Function
Setting of current time
• You can easily set the current time.
Week
TIME RESET
Linked Run
Central Run Heat XCH Auto Normal Fan Speed
Heater Preheat
Defrost
Humidify
PLASMA
Timer
Program set
Sun
Mon
Tue Wed Thu
Fri Sat
On Off
Auto
Set no. Timer
EXTERNAL VENTILATOR OPERATION
SUB FUNCTION
Filter
Time
Delay Time
e-SAVER
Z O N E
Auto
1 2 3 4
Lo
Hi
SHi
Dual Remote
fresh
Timer Cancel
Program Week
Hour Min
Holiday
Set/Clr
fresh
Auto
Cover open status
Program set
Sun
Mon
Tue Wed Thu
Fri Sat
Set no. Timer
EXTERNAL VENTILATOR OPERATION
SUB FUNCTION
Delay Time
Heat XCH NormalAuto
Auto
Heater Preheat
Defrost
Humidify
Z O N E
1 2 3 4
Linked Run
Central Run
PLASMA
Dual Remote
Fan Speed
Auto
Lo
Hi
SHi
e-SAVER
fresh
Time
Program set
Sun
Mon
Tue Wed Thu
Fri Sat
Set no. Timer
EXTERNAL VENTILATOR OPERATION
SUB FUNCTION
Delay Time
Heat XCH NormalAuto
Auto
Heater Preheat
Defrost
Humidify
Z O N E
1 2 3 4
Linked Run
Central Run
PLASMA
Dual Remote
Fan Speed
Auto
Lo
Hi
SHi
e-SAVER
fresh
Time
Program set
Set no. Timer
EXTERNAL VENTILATOR OPERATION
SUB FUNCTION
Delay Time
Heat XCH NormalAuto
Auto
Heater Preheat
Defrost
Humidify
Z O N E
1 2 3 4
Linked Run
Central Run
PLASMA
Dual Remote
Fan Speed
Auto
Lo
Hi
SHi
e-SAVER
fresh
Time
Sun
Mon
Tue Wed Thu
Fri Sat
Hour Min
Hour Min
TIME RESET
Sun
Plasma
1
Press the [Hour] button on the adjustment part of
the remote controller.
Figures change from 00 to 23 whenever you press
the button.
Adjust the current time.
2
Press the [Minute] button on the adjustment part of
the remote controller.
Figures change from 00 to 59 whenever you press
the button.
Adjust the current time.
3
Press the [Week Day Select] on the adjustment
part of the remote controller.
Weekdays change from Sunday to Saturday
whenever you press the button.
Adjust the current day.
4
Press the [Reset] button on the adjustment part of
the remote controller.
*If you press [RESET] button once, current time is set.
And if you press it once again, current set time is
cancelled.
Additional Function

18 Ventilation Wired Remote Controller
Weekly Reservation Setup
No reservation operation can be set if the current time not is not set.
Example) To operate the ventilator at 06:00 ~ 08:00 and 13:00 ~ 22:00 on Monday
TIME RESET
Linked Run
Central Run Heat XCH Auto Normal Fan Speed
Heater Preheat
Defrost
Humidify
PLASMA
Timer
Program set
Sun
Mon
Tue Wed Thu
Fri Sat
On Off
Auto
Set no. Timer
EXTERNAL VENTILATOR OPERATION
SUB FUNCTION
Filter
Time
Delay Time
e-SAVER
Z O N E
Auto
1 2 3 4
Lo
Hi
SHi
Dual Remote
fresh
Timer Cancel
Program Week
Hour Min
Holiday
Set/Clr
fresh
Auto
EXTERNAL VENTILATOR OPERATION
SUB FUNCTION
Filter
Time
Delay Time
Heat XCH NormalAuto
Auto
Heater Preheat
Defrost
Humidify
Z O N E
1 2 3 4
Linked Run
Central Run
PLASMA
Dual Remote
Fan Speed
Auto
Lo
Hi
SHi
e-SAVER
fresh
Program set
Sun
Mon
Tue Wed Thu
Fri Sat
Set no. Timer
EXTERNAL VENTILATOR OPERATION
SUB FUNCTION
Filter
Time
Delay Time
Heat XCH NormalAuto
Auto
Heater Preheat
Defrost
Humidify
Z O N E
1 2 3 4
Linked Run
Central Run
PLASMA
Dual Remote
Fan Speed
Auto
Lo
Hi
SHi
e-SAVER
fresh
Program set
Sun
Mon
Tue Wed Thu
Fri Sat
Set no. Timer
Set/Clr
Program
Week
Hour Min
Set no. Timer
Program set
Sun Tue Wed Thu
Fri Sat
EXTERNAL VENTILATOR OPERATION
SUB FUNCTION
Filter
Time
Delay Time
Heat XCH NormalAuto
Auto
Heater Preheat
Defrost
Humidify
Z O N E
1 2 3 4
Linked Run
Central Run
PLASMA
Dual Remote
Fan Speed
Auto
Lo
Hi
SHi
e-SAVER
fresh
Mon
Plasma
* Every function is not available by models.* Every function is not available by models.
1
Press the [Program] button on the adjustment part
of the remote controller.
• Display part flickers as following figure.
2
Press the [Week] button on the adjustment part of
the remote controller.
• Select Monday.
A day of the week change every time you push the
button.
3
Set the desired time by pressing the [Set/Clr]
button by using [Hour, Min] button.
Set the time as per your needs
• Holiday can't be set by [Set/Clr] buttons.
4
The setting is displayed as shown below
• Black block indicates 'operation' Blank part indicates
'standby' mode.
Weekly Reservation Setup

Owner’s & Installation Manual 19
Holiday Setup
HolidayTue
TIME RESET
Linked Run
Central Run Heat XCH Auto Normal Fan Speed
Heater Preheat
Defrost
Humidify
PLASMA
Timer
Program set
Sun
Mon
Tue Wed Thu
Fri Sat
On Off
Auto
Set no. Timer
EXTERNAL VENTILATOR OPERATION
SUB FUNCTION
Filter
Time
Delay Time
e-SAVER
Z O N E
Auto
1 2 3 4
Lo
Hi
SHi
Dual Remote
fresh
Timer Cancel
Program Week
Hour Min
Holiday
Set/Clr
fresh
Auto
Cover open status
EXTERNAL VENTILATOR OPERATION
SUB FUNCTION
Filter
Time
Delay Time
Heat XCH NormalAuto
Auto
Heater Preheat
Defrost
Humidify
Z O N E
1 2 3 4
Linked Run
Central Run
PLASMA
Dual Remote
Fan Speed
Auto
Lo
Hi
SHi
e-SAVER
fresh
Program set
Sun
Mon
Tue Wed Thu
Fri Sat
Set no. Timer
EXTERNAL VENTILATOR OPERATION
SUB FUNCTION
Filter
Time
Delay Time
Heat XCH NormalAuto
Auto
Heater Preheat
Defrost
Humidify
Z O N E
1 2 3 4
Linked Run
Central Run
PLASMA
Dual Remote
Fan Speed
Auto
Lo
Hi
SHi
e-SAVER
fresh
Program set
Sun
Mon
Tue Wed Thu
Fri Sat
Set no. Timer
Program
EXTERNAL VENTILATOR OPERATION
SUB FUNCTION
Filter
Time
Delay Time
Heat XCH NormalAuto
Auto
Heater Preheat
Defrost
Humidify
Z O N E
1 2 3 4
Linked Run
Central Run
PLASMA
Dual Remote
Fan Speed
Auto
Lo
Hi
SHi
e-SAVER
fresh
Program set
Tue
Set no. Timer
Week
Plasma
* Every function is not available by models.* Every function is not available by models.
Example) In the case it's holiday on Tuesday.
• Automatically turns off when the reservation day set up.
1
Press the [Program] button on the adjustment part
of the remote controller.
• Display part flickers as following figure.
2
Press the [Week] button on the adjustment part of
the remote controller.
• Select 'Tuesday'.
3
Press the [Holiday] button on the adjustment part
of the remote controller.
[Tue] is indicated on the adjustment part of the
remote controller.
The outside square means a holiday.
• Set up will be done automatically after 5 seconds.
Holiday Setup

20 Ventilation Wired Remote Controller
On/Off Reservation
‘On’ Reservation
• This function will automatically turn ON the units at set time.
Timer
TIME RESET
Timer
Sun
On
Timer
Timer Cancel
Program Week
Hour Min
Holiday
Set/Clr
fresh
Auto
Cover open status
Timer
Hour Min
Timer
Delay Time
e-SAVER
fresh
Linked Run
Central Run
PLASMA
Dual Remote
Fan Speed
Auto
Heater Preheat
Defrost
Humidify
Z O N E
1 2 3 4
Filter
TIME RESET
Heat XCH
Timer
Program set
Tue
On Off
Timer
EXTERNAL VENTILATOR OPERATION
SUB FUNCTION
Time
Lo
Hi
SHi
Timer Cancel
Program Week
Hour Min
Holiday
Set/Clr
fresh
Auto
Cover open status
Timer
Hour Min
Plasma
Ex) After 2 hours, the product operates automatically.
Plasma
Timer
Ex) After 2 hours, the unit stops automatically.
Timer
1
Press [Timer] button on the
adjustment part of the remote
controller.
2
Set the desired time with
[Hour, Min] button.
1
Press [Timer] button on the
adjustment part of the remote
control.
2
Set up desired time with
[Hour, Min] button.
3
Press [Timer] button once more or
press the Cancel button in order to
cancel reservation.
•
You can reserve only when the product is ‘off’ and
it automatically operates at set up time. During
operation, the ventilator operates in the previous
status memorized in the remote controller.
3
Press [Timer] button once more or
press the Cancel button in order to
cancel reservation.
• You can reserve only when the product is
during operation and operation
automatically stops at the set up time.
‘Off’ Reservation
• This function will automatically turn OFF the units at set time.
On/Off Reservation

Owner’s & Installation Manual 21
Optional Function
Heater
TIME RESET
Linked Run
Central Run Heat XCH Auto Normal Fan Speed
Heater Preheat
Defrost
Humidify
PLASMA
Timer
Program set
Sun
Mon
Tue Wed Thu
Fri Sat
On Off
Auto
Set no. Timer
EXTERNAL VENTILATOR OPERATION
SUB FUNCTION
Filter
Time
Delay Time
e-SAVER
Z O N E
Auto
1 2 3 4
Lo
Hi
SHi
Dual Remote
fresh
Timer Cancel
Program Week
Hour Min
Holiday
Set/Clr
fresh
Auto
Plasma
1
Press the Heater button. When the outside temperature
is low, it raises heat exchange efficiency by pre-heating
the air. This adds to the comfort for the user
2
Everytime you press the Heater button, it will toggle
on/off.
The Heater function can only be operated during the heating operation.
Because Heater is subfunction, some product will not operate.
CAUTION
You can use the Heater function.
Optional Function
TIME RESET
Program Week
Hour Min
Holiday
Set/Clr
Plasma
Linked Run
Central Run Heat XCH Auto Normal Fan Speed
Heater Preheat
Defrost
Humidify
PLASMA
Timer
Program set
Sun
Mon
Tue Wed Thu
Fri Sat
On Off
Auto
Set no. Timer
EXTERNAL VENTILATOR OPERATION
SUB FUNCTION
Filter
Time
Delay Time
e-SAVER
Z O N E
Auto
1 2 3 4
Lo
Hi
SHi
Dual Remote
fresh
Plasma
1
Press the plasma button.
2
The plasma function is performed so that purifies
quality the air which flows with the interior
Because Plasma is subfunction, some products will not
operate it. Also Plasma function is possible only when
operating.

22 Ventilation Wired Remote Controller
Optional Function
TIME RESET
Linked Run
Central Run Heat XCH Auto Normal Fan Speed
Heater Preheat
Defrost
Humidify
PLASMA
Timer
Program set
Sun
Mon
Tue Wed Thu
Fri Sat
On Off
Auto
Set no. Timer
EXTERNAL VENTILATOR OPERATION
SUB FUNCTION
Filter
Time
Delay Time
e-SAVER
Z O N E
Auto
1 2 3 4
Lo
Hi
SHi
Dual Remote
fresh
Timer Cancel
Program Week
Hour Min
Holiday
Set/Clr
fresh
Auto
Plasma
Method to Operate and Select Air Volume
Operation selection
Press the Operation/Stop button.
• The ventilation system operates
If you press the On/Off button.
If you press it again, the ventilation
the system stops.
Blowing operation
Select the desired air volume by pressing
the fan speed selection button.
• You can select the air volume in the
order of Low → High → Super High →
Auto whenever you press the Air
volume Select button.
• The initially fan speed is set at ‘High’.
Humidifier
TIME RESET
Linked Run
Central Run Heat XCH Auto Normal Fan Speed
Heater Preheat
Defrost
Humidify
PLASMA
Timer
Program set
Sun
Mon
Tue Wed Thu
Fri Sat
On Off
Auto
Set no. Timer
EXTERNAL VENTILATOR OPERATION
SUB FUNCTION
Filter
Time
Delay Time
e-SAVER
Z O N E
Auto
1 2 3 4
Lo
Hi
SHi
Dual Remote
fresh
Timer Cancel
Program Week
Hour Min
Holiday
Set/Clr
fresh
Auto
Plasma
1
Press the Humidifier button. When indoor air condition
is dry, the humidifier operates and it maintains the
humidity The humidification function operates when the
room temperature is low only.
2
Everytime you press the Humidifier button, it will toggle
into On/Off.
You can use the humidifier function.
Because Humidifier is subfunction, some products will not operate.
CAUTION

P/No.: 3828A20860F Printed in Korea
After reading this manual, keep it in a place easily accessible to the user for future reference.
 Loading...