
LG PW1000 Owner’s Manual

Owner's Manual

LG MiniBeam

DLP Projector

Please read the safety information carefully before using this product.

PW1500

PW1000

www.lg.com

P/No : SAC37034611 (1803-REV02)

Copyright 2017 LG Electronics Inc. All Rights Reserved.

2 LICENSE

LICENSE

Supported licenses may differ by model. For more information about licenses, visit www.lg.com.

Manufactured under license from Dolby Laboratories. Dolby and the double-D symbol are trademarks of Dolby Laboratories.

This DivX Certified® device has passed rigorous testing to ensure it plays DivX® video.

To play purchased DivX movies, first register your device at vod.divx.com. Find your registration code in the DivX VOD section of your device setup menu.

DivX Certified® to play DivX® video up to HD 1080p, including premium content.

DivX®, DivX Certified® and associated logos are trademarks of DivX, LLC and are used under license.

Covered by DivX Patents 7,295,673; 7,515,710; RE45,052; and others available

at [www.divx.com/patents]

The terms HDMI and HDMI High-Definition

Multimedia Interface, and the HDMI logo are trademarks or registered trademarks of HDMI Licensing LLC in the United States and other countries.

NOTE

Image shown may differ from your projector.

Your projector’s OSD (On Screen Display) may differ slightly from that shown in this manual.

SAFETY INSTRUCTIONS

3

SAFETY INSTRUCTIONS

Please take note of the safety instructions to prevent any potential accident or misuse of the projector.

Safety precautions are given in two forms, i.e. WARNING and CAUTION as detailed below.

WARNING Failure to follow the instructions may cause serious injury and even death.

CAUTION Failure to follow the instructions may cause injury to persons or damage to the product.

Read the owner’s manual carefully and keep it on hand.

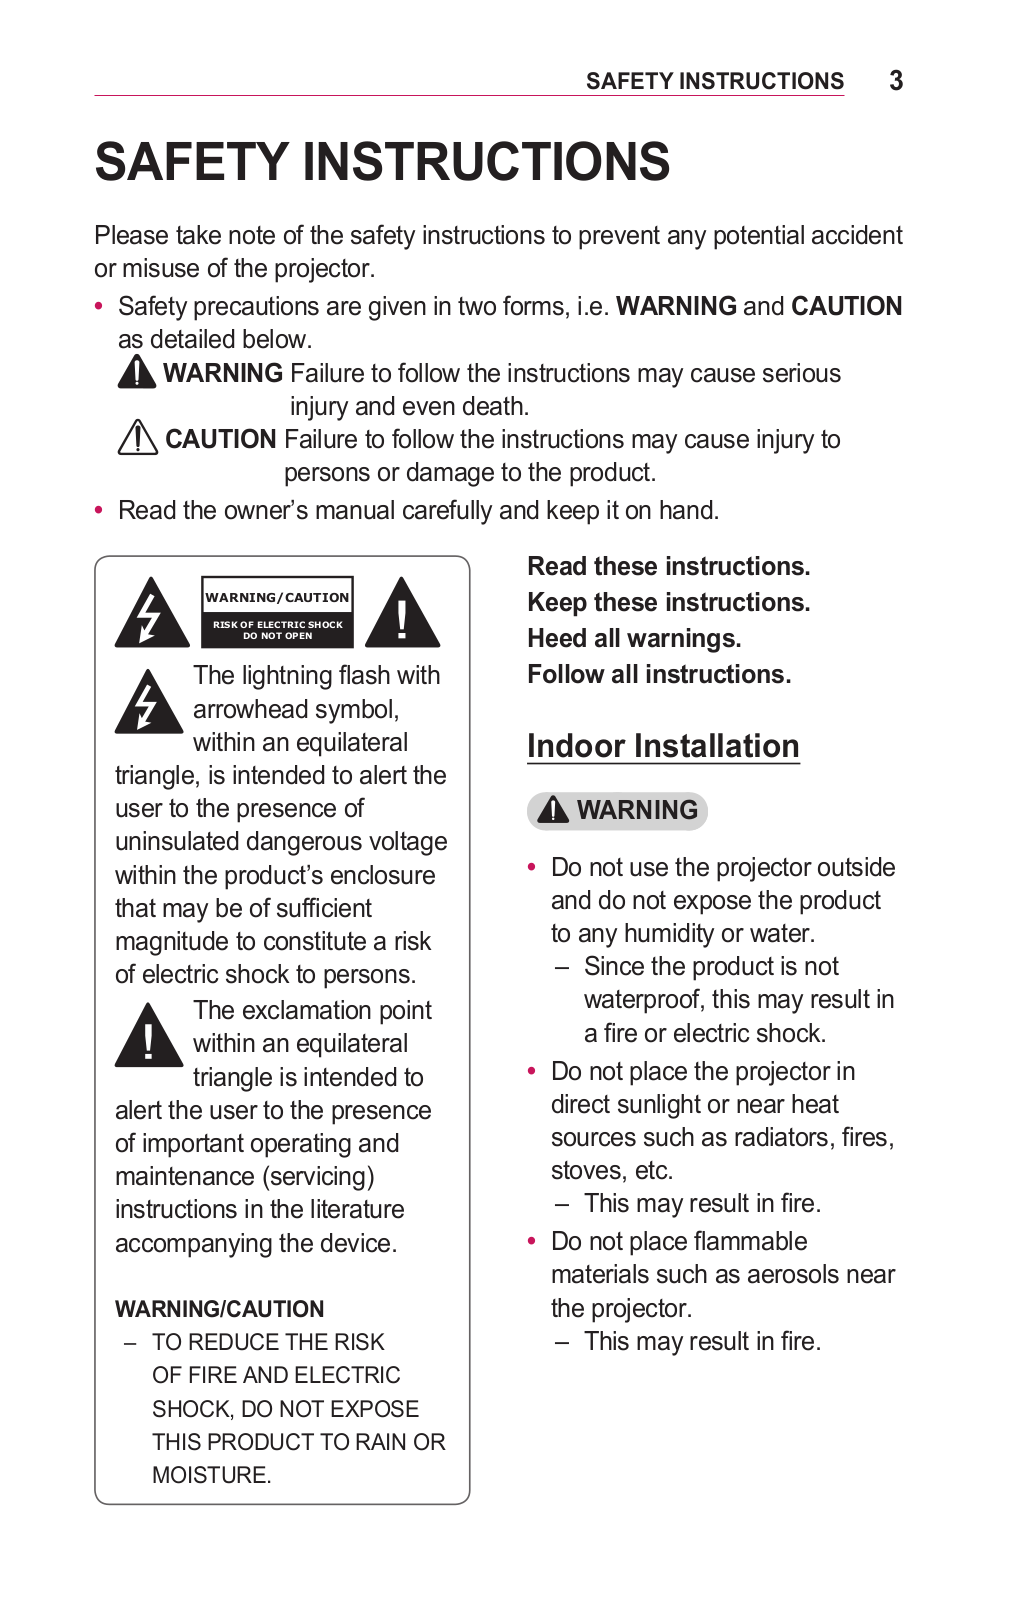
WARNING/CAUTION

RISK OF ELECTRIC SHOCK

DO NOT OPEN

The lightning flash with arrowhead symbol, within an equilateral

triangle, is intended to alert the user to the presence of uninsulated dangerous voltage within the product’s enclosure that may be of sufficient magnitude to constitute a risk of electric shock to persons.

The exclamation point within an equilateral triangle is intended to

alert the user to the presence of important operating and maintenance (servicing) instructions in the literature accompanying the device.

WARNING/CAUTION

––TO REDUCE THE RISK OF FIRE AND ELECTRIC SHOCK, DO NOT EXPOSE

THIS PRODUCT TO RAIN OR MOISTURE.

Read these instructions. Keep these instructions. Heed all warnings.

Follow all instructions.

Indoor Installation

WARNING

Do not use the projector outside and do not expose the product to any humidity or water.

––Since the product is not waterproof, this may result in a fire or electric shock.

Do not place the projector in direct sunlight or near heat sources such as radiators, fires, stoves, etc.

––This may result in fire.

Do not place flammable materials such as aerosols near the projector.

––This may result in fire.

4 SAFETY INSTRUCTIONS

Do not allow children to cling to or climb up to the projector.

––This may cause the projector to fall, causing injury or death.

Do not install the product in a place with no ventilation (e.g., on a bookshelf or in a closet) or on a carpet or cushion.

––This may result in fire due to the increase in internal temperature.

Do not place the product close to sources of steam, oil or oil mist, such as humidifiers and kitchen counters.

––Failure to do so may result in fire, electric shock, or corrosion.

Do not install the product onto a wall or ceiling that is close to sources of oil or oil mist.

––The product may be damaged and fall, resulting in serious injury.

Do not place the projector where it might be exposed to dust.

––This may result in fire.

Do not use the projector in a damp place such as a bathroom where it is likely to get wet.

––This may result in fire or electric shock.

Do not allow a tablecloth or curtain to block the air vent.

––This may result in fire due to the increase in the internal temperature.

Ensure good ventilation around the projector. The distance between the projector and the wall should be at least 30 cm.

––This will prevent fire due to the increase in the internal temperature.

CAUTION

When placing the projector on a table or shelf, be careful not to put it near the edge.

––The projector could fall due to balance problems, which may cause personal injury or damage to the product. Make sure to use the projector cabinet or stand that fits the projector.

When moving the projector, make sure to switch it off and remove the power plug and cords.

––The power cord may be damaged, resulting in fire or electric shock.

Do not place the projector on an unstable or vibrating surface such as a wobbly shelf or a slope.

––It may fall and cause injury.

Be careful not to tip the projector over when connecting external devices to the projector.

––This may cause personal injury or damage to the projector.

SAFETY INSTRUCTIONS

5

Power

WARNING

DISCONNECTING THE DEVICE FROM THE MAIN POWER

––The Power plug is the disconnecting device. In case of an emergency, the Power Plug must remain readily accessible.

The grounding wire should be connected. (Except for devices which are not grounded.)

––Ensure that you connect the grounding cable to avoid electric shock.

If it is not possible to ground the unit, have a qualified electrician install a separate circuit breaker.

Do not try to ground the projector by connecting it to telephone wires, lightning rods, or gas pipes.

The power plug should be inserted fully into the power outlet.

––An unstable connection may cause a fire.

Do not place heavy objects on the power cord.

––This may result in fire or electric shock.

Never touch the power plug with wet hands.

––This may result in electric shock.

Do not plug too many devices into one multi-power outlet.

––This may result in fire due to the power outlet overheating.

Keep the AC adapter, power plug, and the used power outlet clean from dust or foreign materials building up.

––This may result in fire.

If there is any smoke or a burning smell from the projector or AC adapter, stop using the product immediately. Disconnect the power cord from the power outlet, and then contact the customer service centre.

––This may result in fire.

To turn off the main power, remove the power plug, which should be positioned so it is easy to access for operation.

6 SAFETY INSTRUCTIONS

CAUTION

Always grab the plug to remove the AC adapter or power cord.

––Otherwise, this may result in a fire or may damage the product.

Refrain from constantly bending the power cord of the AC adapter.

––If the power cord is bent excessively for a long period of time, the cord may break inside. This may result in a fire or electric shock.

Ensure the power cord and plug are not damaged, modified, severely bent, twisted, pulled, sandwiched or hot. Do not use the product if the power outlet is loose.

––This may result in fire or electric shock.

Keep the power cord away from heating devices.

––The wire’s sheath may melt, which may result in fire or electric shock.

Place the projector where people will not trip over or step on the power cord to protect the power cord and plug from any damage.

––This may result in fire or electric shock.

Do not turn the projector on or off by plugging in the power plug or unplugging it from the power outlet.

(Do not use the power plug as a switch.)

––This may result in electric shock or damage to the product.

Do not insert a conductor into the other side of the wall outlet while the power plug is inserted into the wall outlet.

In addition, do not touch the power plug immediately after it is disconnected from the wall outlet.

––This may result in electric shock.

Only use the official power cord provided by LG Electronics. Do not use other power cords.

––This may result in fire or electric shock.

If any water or foreign materials have gone into the AC adapter, power cord, or the interior of the projector, turn off the projector by pressing the power button. Remove all the cables, and then contact the customer service centre.

––This may result in fire or electric shock.

The surface of the AC adapter is hot. Keep the AC adapter out of the reach of children and avoid touching it during use.


SAFETY INSTRUCTIONS

7

Never disassemble the power

When in Use


supply devices (AC adapter/


power cord, etc.).


WARNING


–– This may damage the power

Do not place anything


cord and result in a fire or


electric shock.


containing liquid on top of the


projector such as a vase, flower

Connect the AC adapter and the


pot, cup, cosmetics, medicine,


power cord firmly.


or ornaments, candles, etc.


–– Not doing so may result in a


–– This may result in fire or


product failure or fire.


electric shock, or cause injury

Do not place heavy objects


due to falling.


or put pressure on the power


In the event that there is a


cord and AC adapter and avoid


heavy impact or the cabinet is


damage.


damaged, switch it off, unplug


–– This may result in a fire or


it from the power outlet and


may damage the product.


contact an authorized service


Always use the AC adapter


centre.


provided or any AC adapters


–– This may result in electric


approved and certified by LG


shock.


Electronics.


Do not insert pieces of metal


–– Any other AC adapter


such as coins, hairpins, or metal


connected may result in the


debris, nor flammable materials


screen flickering.


such as paper or matches into


the projector.


–– This is to prevent electric


shock or fire.


Make sure that a child does


not swallow the batteries when


you replace the old remote


control batteries with new ones.


Keep batteries out of reach of


children.


–– If a child swallows a battery,


consult a doctor immediately.


Never open any cover on the


projector.


–– There is a high risk of electric


shock.


8 SAFETY INSTRUCTIONS

Do not look directly into the lens when the projector is in use.

––The bright light may damage your eyes.

When the lamp is on or has just been turned off, avoid touching the air vent or lamp, because these will be very hot.

If there is a gas leak in the room with the projector, do not touch the projector or power outlet. Open the windows for ventilation.

––Sparks may cause fire or burns.

Unplug the power cord from the outlet during a lightning storm.

––This will prevent shock or damage to the projector.

Do not use the projector near electronic devices that generate a strong magnetic field.

Keep the plastic film used for packaging the projector out of the reach of children.

––If not handled safely, it can cause suffocation.

Do not keep your hand on the projector for a long time when it is running.

When you play a game by connecting a game console to a projector, it is recommended that you maintain a distance of more than four times the diagonal length of the screen.

––Make sure that the connecting cable is long enough. Otherwise, the product may fall causing personal injury or damage to the product.

Do not place the projector or its remote control with battery in an extremely high temperature environment.

––This may result in fire.

Do not use 3D glasses if you do not watch 3D.

CAUTION

Do not place heavy objects on the projector.

––It may fall down and cause personal injury.

Be careful not to allow any impact to the lens during transport.

Do not touch the lens of the projector.

––The lens may be damaged.

Do not use any sharp tools on the projector such as a knife or hammer, because this may damage the casing.

In the event that no image appears on the screen or no sound is heard, stop using the projector. Switch off the projector, unplug it from the power outlet, and contact our service centre.

––This may result in fire or electric shock.

Do not drop anything onto the projector or allow anything to bang into the projector.

––This may cause damage to the projector or personal injury.


SAFETY INSTRUCTIONS

9

It is recommended that you

Cleaning


maintain a distance of more


than 5 to 7 times the diagonal


WARNING


length of the screen.

Do not spray the projector with


–– If you watch the screen at


a close distance for a long


water when cleaning. Make sure


water does not flow into the


time, your eye sight may


projector.


become worse.


–– This may result in fire or


Do not block the light beam


electric shock.


emitted from the projector using


When there is smoke or a strange


a book or other object.


–– Lengthy exposure to the


smell coming out from the


projector or a foreign object falls


projector beam may result in


into the projector,­ switch it off and


fire. In addition, the lens may


unplug it from the power outlet


be overheated and damaged


and contact our service centre.


by the reflected heat.


–– Otherwise, this may result in

Do not start the projector with


fire or electric shock.


the volume turned up high.


Use air spray, a soft cloth, or


–– High volume may damage


hearing.


a cotton swab moistened with


a lens cleaning chemical or


Do not use high voltage


alcohol to remove dust or stains


electrical equipment near the


on the front projection lens.


projector, (e.g., a bug zapper).


This may result in product


malfunction.


Do not insert your finger into the


air vent (inflow/outflow vents).


--This may cause injury or a


product malfunction.


10 SAFETY INSTRUCTIONS

CAUTION

Contact your seller or our service centre once a year to clean the internal parts of the projector.

––If you do not clean the projector for a long period of time, dust will accumulate, which may result in fire or damage to the projector.

When cleaning plastic parts such as the projector case, unplug the power first and wipe with a soft cloth. Do not spray with water or wipe with a wet cloth. Never use glass cleaner, automobile or industrial polish, abrasives, wax, benzene, or alcohol as these can damage the projector.

––This can result in fire, electric shock, or cause damage to the product (deformation and corrosion).

Remove the plug from the outlet before cleaning the product.

––Otherwise, this may result in electric shock.

Antenna

If you are using an outdoor antenna, please install it away from electrical wires to make sure it does not touch any nearby wires even when it falls down due to heavy wind.

––Failure to do so may cause electric shock or physical injury.

To prevent any raindrops flow into the product, bend the outdoor antenna wire where it comes indoors.

––Raindrops flowing into the product may cause fire or electric shock.

SAFETY INSTRUCTIONS 11

Others

WARNING

Some users may experience a seizure or other abnormal symptoms when they are exposed to a flashing light or particular patterns from a video game.

When you go out, place the projector out of reach of animals, and remove the power plug from the wall outlet.

––Using a damaged power cord may result in short circuit

or fire.

Do not use the projector near high-precision electronic devices or those that transmit weak radio signal.

––This may affect the operation of the product, causing an accident.

Only a qualified technician can disassemble or modify the projector. For diagnosis, adjustment, or repair, contact

your seller or our service centre.

––This may result in fire or electric shock.

Proper ventilation required, do not block airflow around unit. Doing so can cause injury and internal overheating.

Do not touch the lens; doing so can result in burns or damage to lens. Lens and unit may be HOT during and immediately after use. Use caution when handling unit, allowing for proper cool down.

Only use a grounded electrical outlet. (Except for devices which are not grounded.)

Do not insert anything into or cover up the exhaust vents.

––This may result in fire or electric shock.

Follow all maintenance guidelines for optimal use; service only at an authorized service centre.

Keep the batteries and remote out of reach of children.

––This will prevent personal injury or damage to the product.

12 SAFETY INSTRUCTIONS

CAUTION

Do not use or store the projector outdoors for long periods of time.

Do not mix new batteries with old ones.

––Burst or leaking batteries may result in damage or injury.

Be sure to unplug if the projector is not to be used for a long period.

––Accumulated dust may result in fire or electric shock due to overheating, ignition, or poor insulation.

Only use the specified type of battery.

––Burst or leaking batteries may result in damage or injury.

Make sure you use the same type of battery when replacing.

––In the case of a battery contact failure, the battery may drain quickly or the remote control may not work properly.

Dispose of used batteries properly.

––This may result in explosion or fire. The correct method disposal may vary depending on your country or region.

Do not throw or disassemble the battery.

––This may result in fire or explosion due to damage to the battery.

Store batteries away from metallic objects, such as keys and paper clips.

––Excess current may cause a rapid increase in

temperature, resulting in fire or burns.

Do not store the batteries near any heat source, such as a heater.

––This may result in fire or damage to the product.

Do not store batteries at temperatures higher than 60 °C or in high humidity.

––This may result in explosion or fire.

Make sure that the battery is installed correctly.

––This prevent explosion or fire.

Incorrect battery replacement may cause fire.

Batteries: Store the accessories (battery, etc.) in a safe location

Risk Group 2

CAUTION Possibly hazardous optical radiation emitted from this product. Do not stare at operating lamp. May be harmful to the eye.


CONTENTS

13

CONTENTS


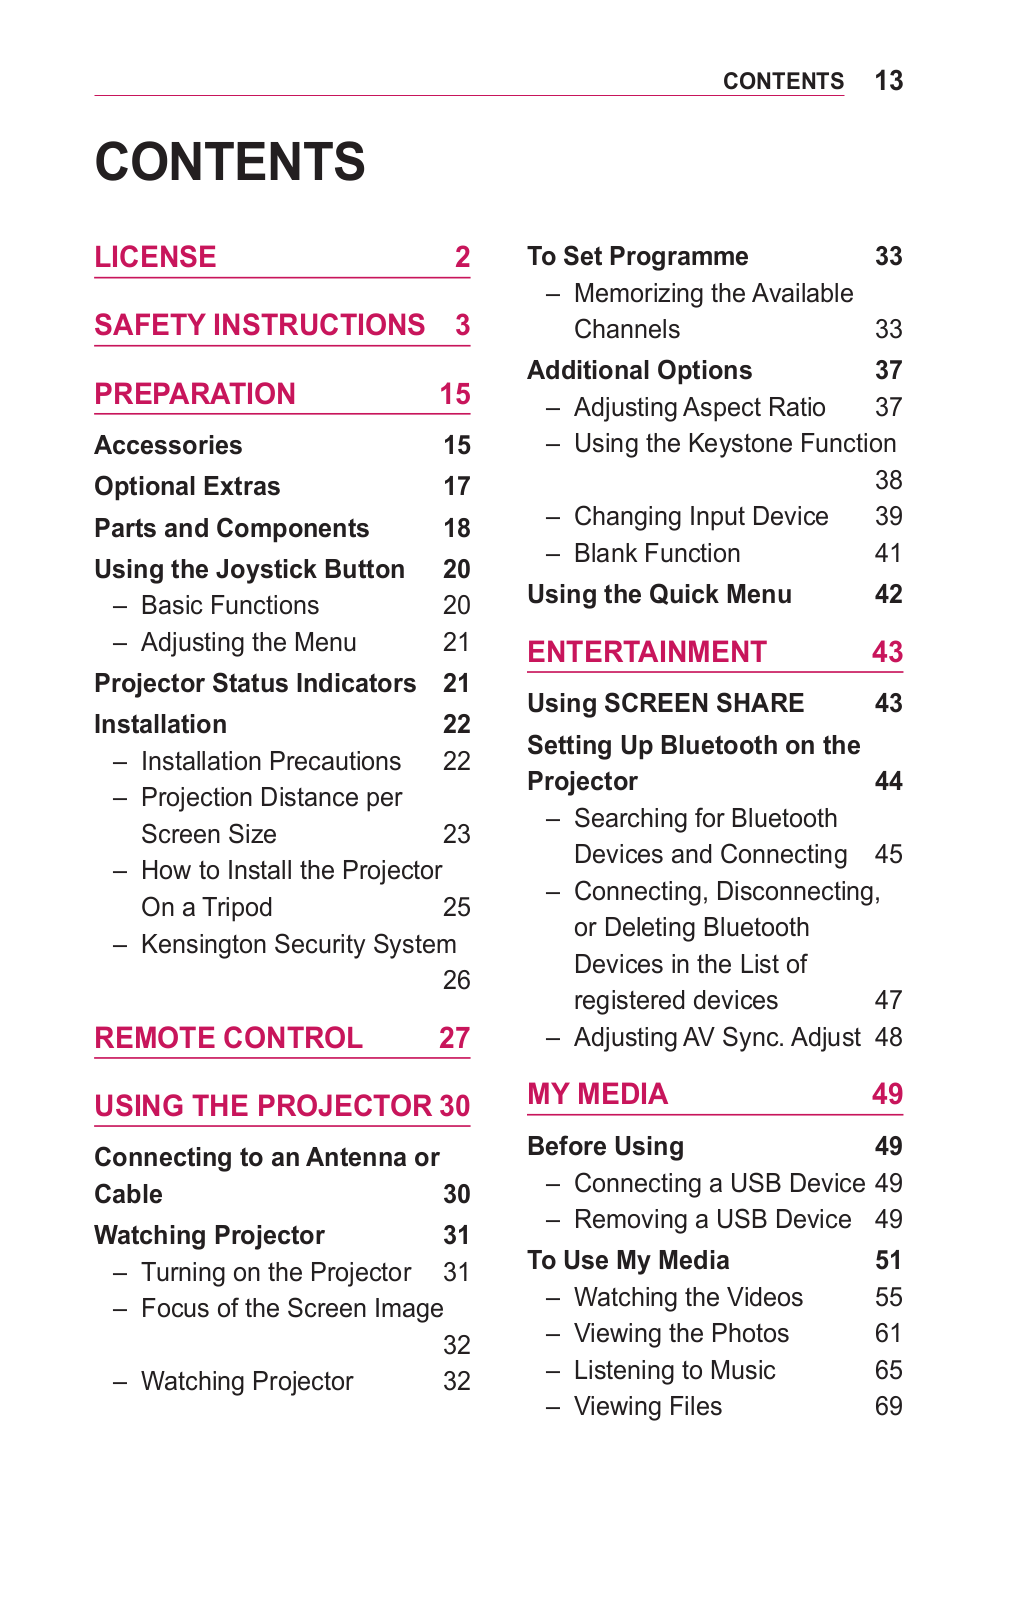
LICENSE

2

To Set Programme

33

SAFETY INSTRUCTIONS

3


–– Memorizing the Available


Channels

33

PREPARATION

15

Additional Options

37


–– Adjusting Aspect Ratio

37


Accessories

15


–– Using the Keystone Function

Optional Extras

17


38

Parts and Components

18


–– Changing Input Device

39


–– Blank Function

41

Using the Joystick Button

20


Using the Quick Menu

42

–– Basic Functions

20


–– Adjusting the Menu

21

ENTERTAINMENT

43

Projector Status Indicators

21

Using SCREEN SHARE

43

Installation

22

Setting Up Bluetooth on the


–– Installation Precautions

22


Projector

44

–– Projection Distance per


–– Searching for Bluetooth


Screen Size

23


Devices and Connecting

45

–– How to Install the Projector


–– Connecting, Disconnecting,

On a Tripod

25


or Deleting Bluetooth


–– Kensington Security System


Devices in the List of


26


registered devices

47

REMOTE CONTROL

27


–– Adjusting AV Sync. Adjust

48

USING THE PROJECTOR 30

MY MEDIA

49


Before Using

49

Connecting to an Antenna or


–– Connecting a USB Device 49

Cable

30


–– Removing a USB Device

49

Watching Projector

31


To Use My Media

51

–– Turning on the Projector

31


–– Watching the Videos

55

–– Focus of the Screen Image


–– Viewing the Photos

61


32


–– Listening to Music

65

–– Watching Projector

32


–– Viewing Files

69


14 CONTENTS

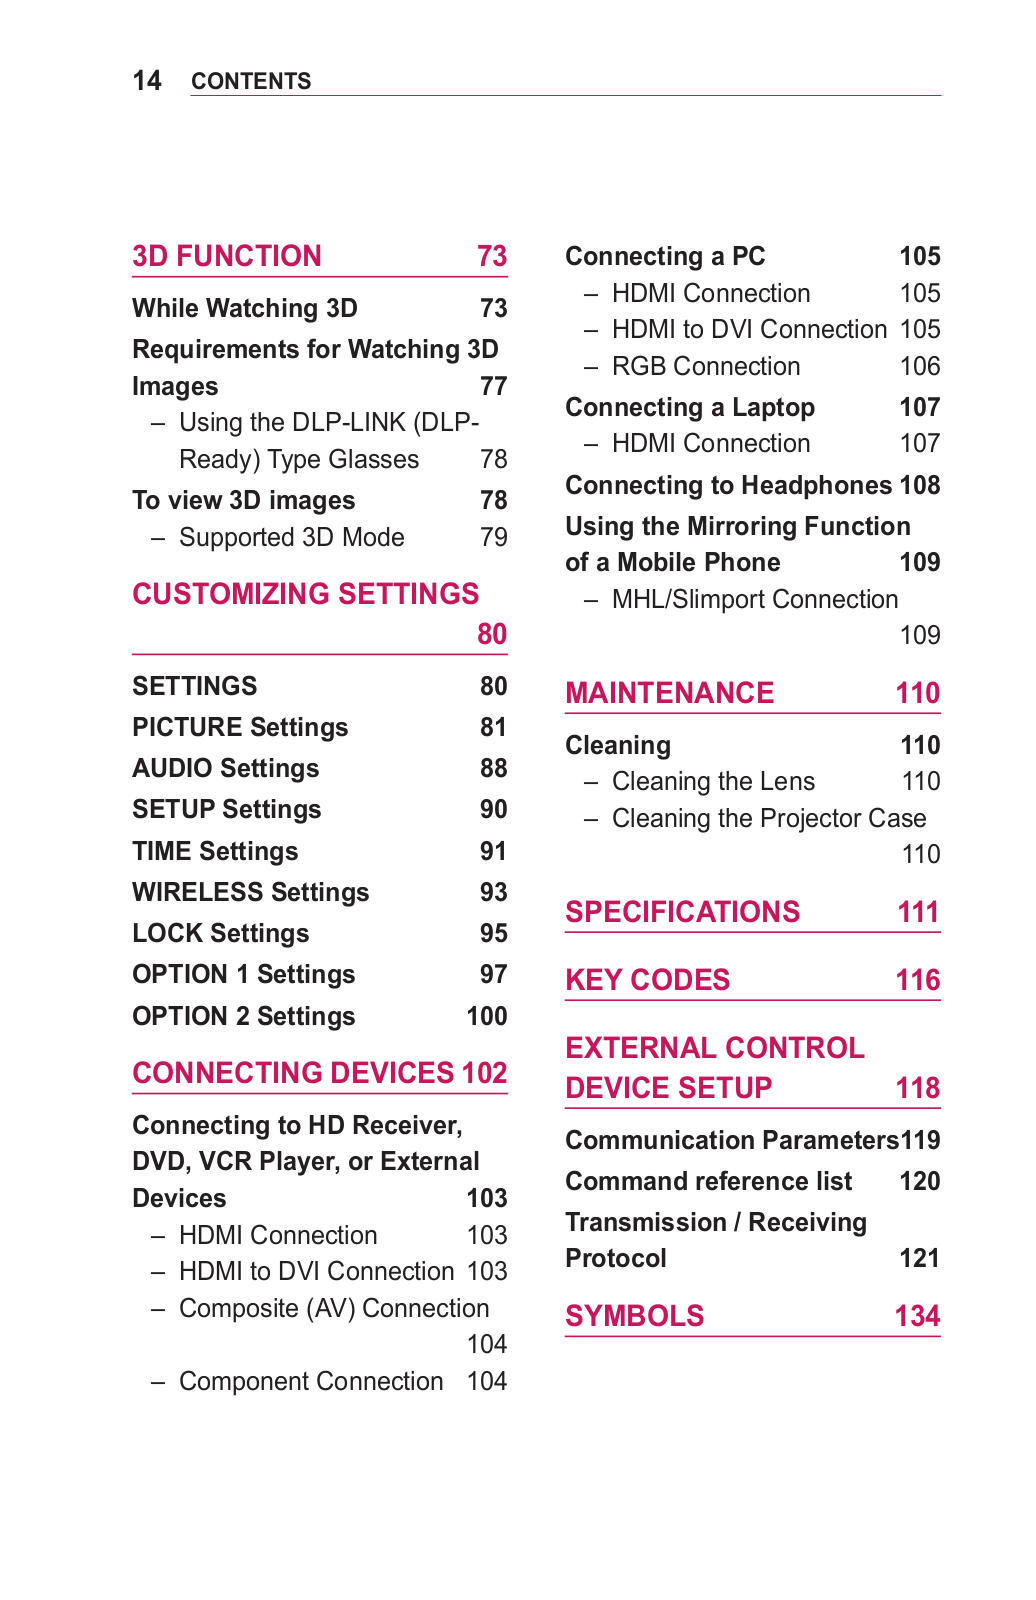
3D FUNCTION

73

While Watching 3D

73

Requirements for Watching 3D

Images

77

–– Using the DLP-LINK (DLP-


Ready) Type Glasses

78

To view 3D images

78

–– Supported 3D Mode

79

CUSTOMIZING SETTINGS


80

SETTINGS

80

PICTURE Settings

81

AUDIO Settings

88

SETUP Settings

90

TIME Settings

91

WIRELESS Settings

93

LOCK Settings

95

OPTION 1 Settings

97

OPTION 2 Settings

100

CONNECTING DEVICES 102

Connecting to HD Receiver, DVD, VCR Player, or External

Devices

103

–– HDMI Connection

103

––HDMI to DVI Connection 103

––Composite (AV) Connection

104

–– Component Connection 104

Connecting a PC

105

–– HDMI Connection

105

–– HDMI to DVI Connection 105

–– RGB Connection

106

Connecting a Laptop

107

–– HDMI Connection

107

Connecting to Headphones 108 Using the Mirroring Function

of a Mobile Phone

109

–– MHL/Slimport Connection


109

MAINTENANCE

110

Cleaning

110

–– Cleaning the Lens

110

–– Cleaning the Projector Case


110

SPECIFICATIONS

111

KEY CODES

116

EXTERNAL CONTROL


DEVICE SETUP

118

Communication Parameters119

Command reference list

120

Transmission / Receiving


Protocol

121

SYMBOLS

134

PREPARATION 15

PREPARATION

The pictures may differ slightly from the actual product.

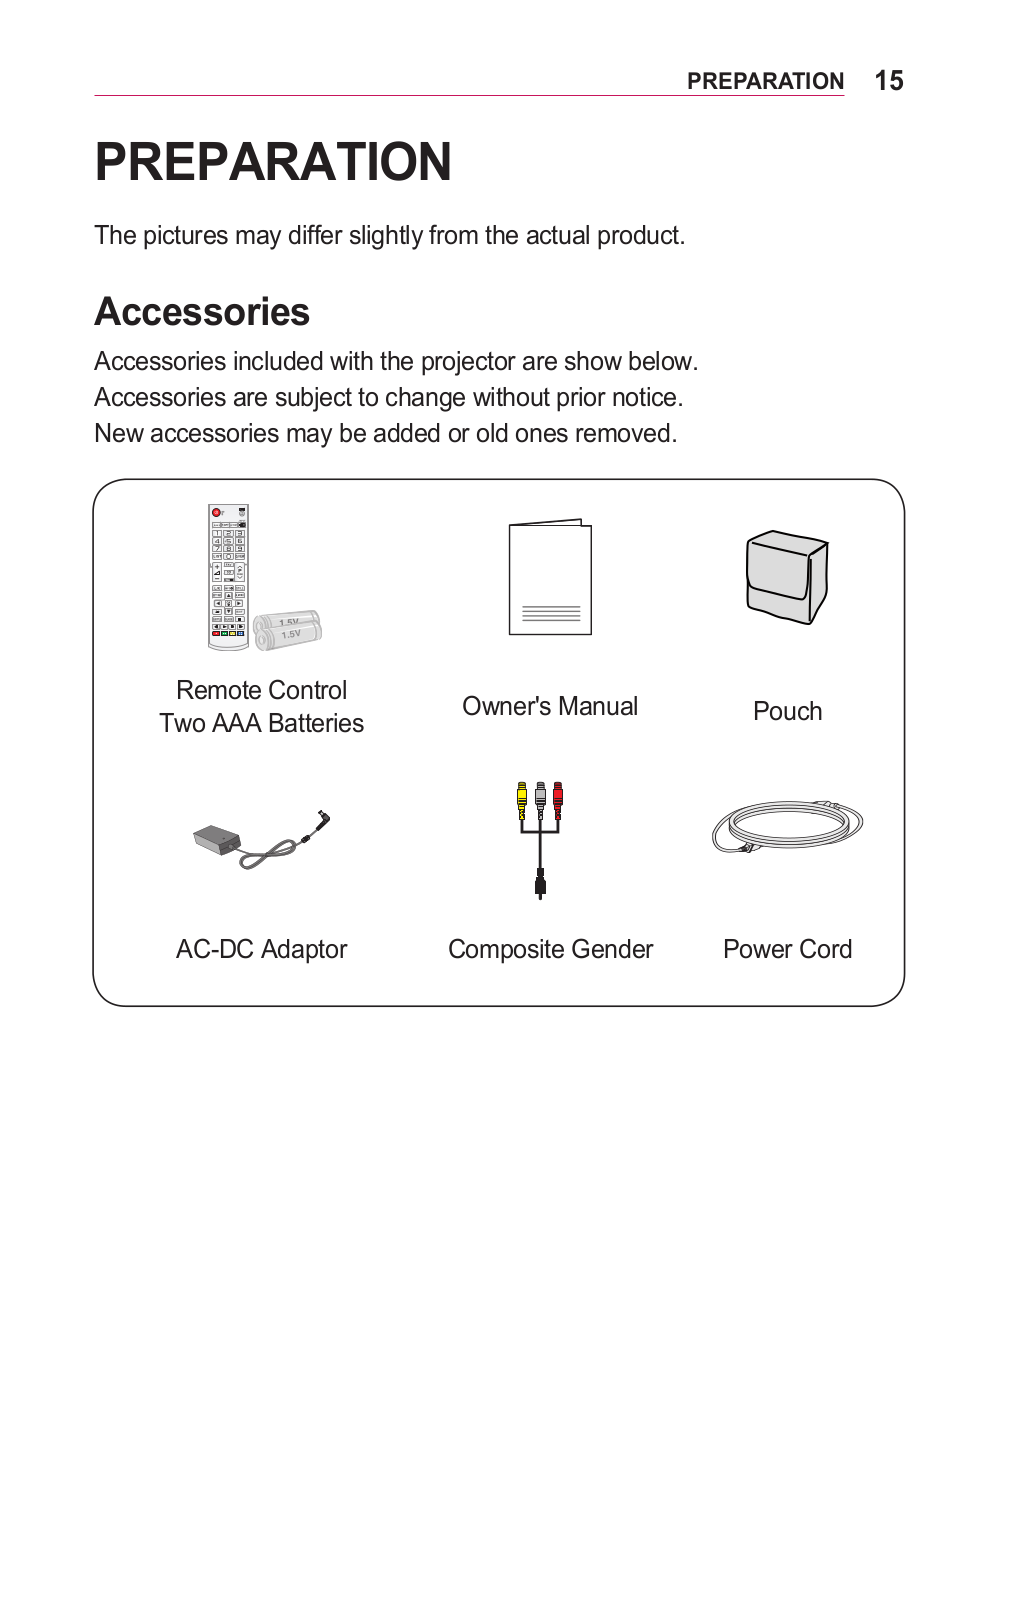
Accessories

Accessories included with the projector are show below.

Accessories are subject to change without prior notice.

New accessories may be added or old ones removed.

Remote Control


Owner's Manual

Pouch

Two AAA Batteries


AC-DC Adaptor

Composite Gender

Power Cord

16 PREPARATION

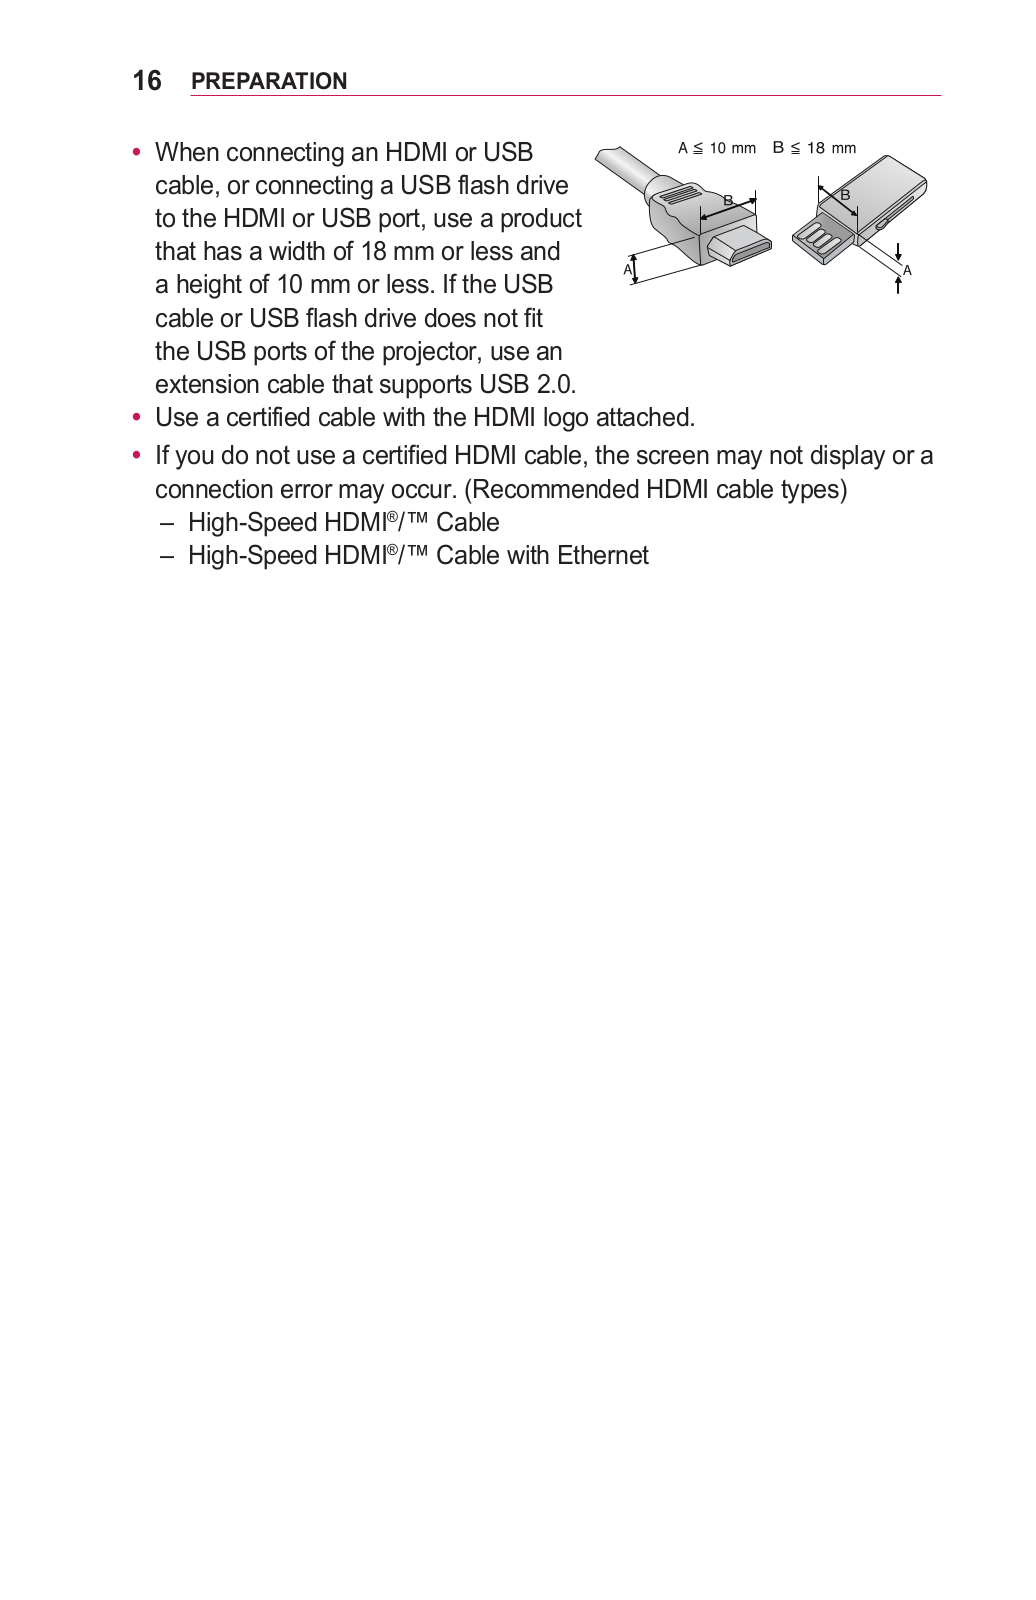
When connecting an HDMI or USB cable, or connecting a USB flash drive to the HDMI or USB port, use a product that has a width of 18 mm or less and a height of 10 mm or less. If the USB cable or USB flash drive does not fit the USB ports of the projector, use an extension cable that supports USB 2.0.

Use a certified cable with the HDMI logo attached.

If you do not use a certified HDMI cable, the screen may not display or a connection error may occur. (Recommended HDMI cable types)

––High-Speed HDMI®/™ Cable

––High-Speed HDMI®/™ Cable with Ethernet

PREPARATION 17

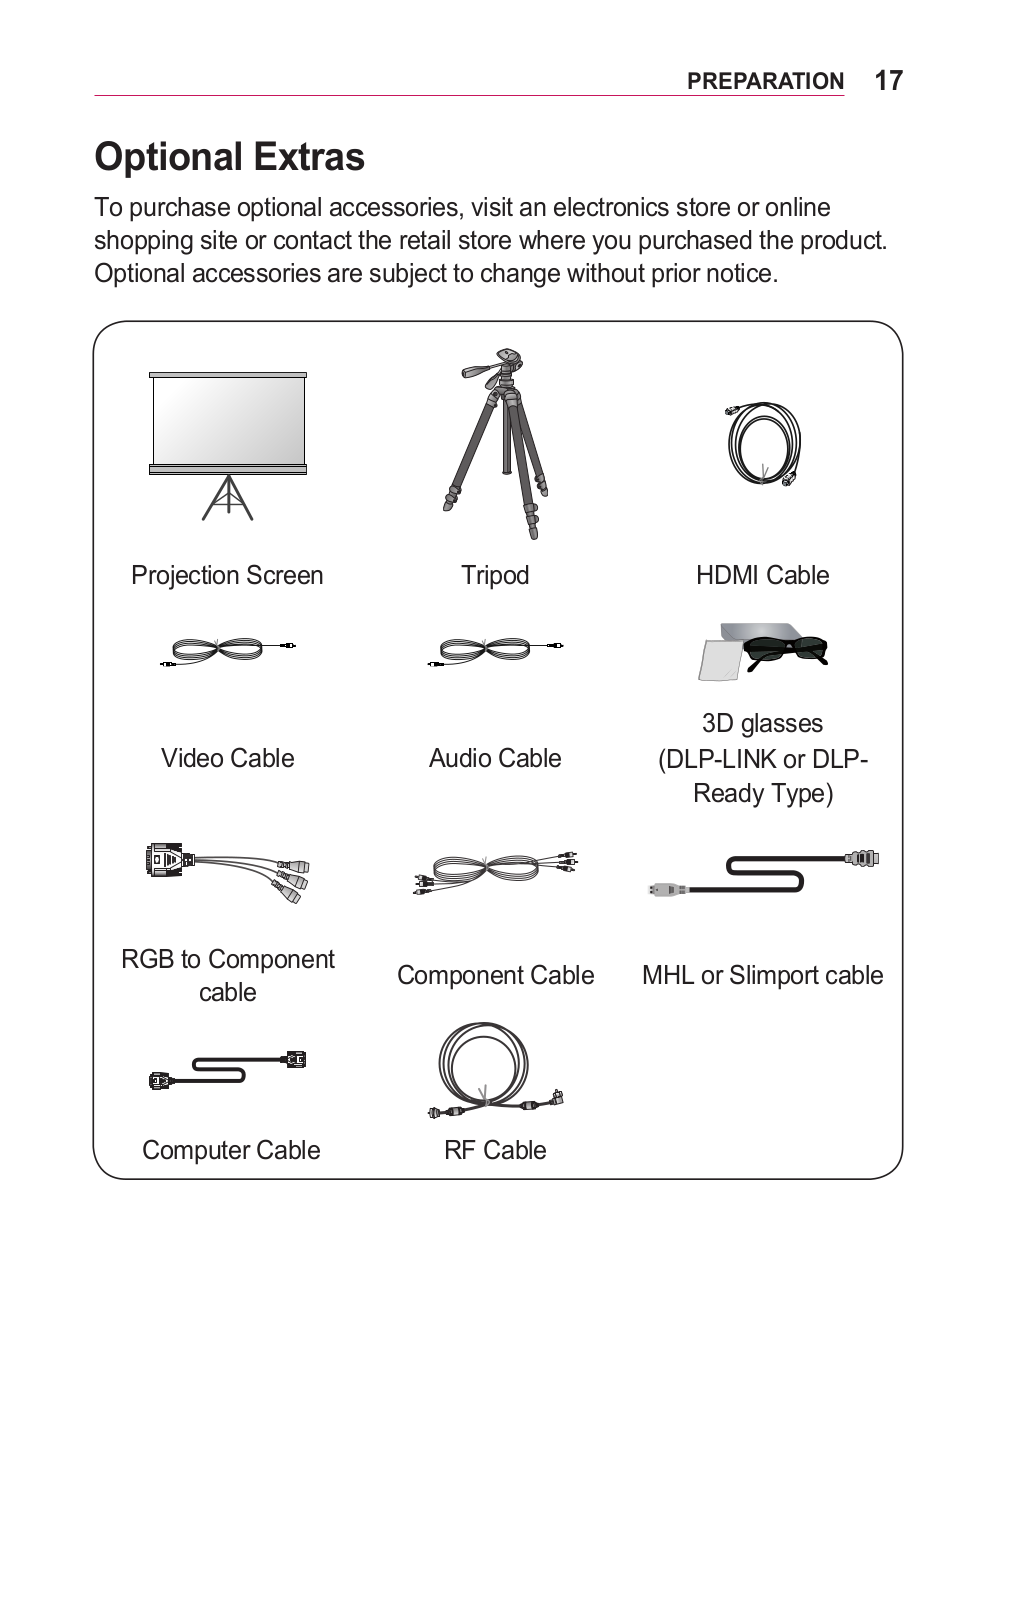
Optional Extras

To purchase optional accessories, visit an electronics store or online shopping site or contact the retail store where you purchased the product. Optional accessories are subject to change without prior notice.

Projection Screen

Tripod

HDMI Cable

Video Cable

Audio Cable

3D glasses

(DLP-LINK or DLP-


Ready Type)

RGB to Component

Component Cable

MHL or Slimport cable

cable


Computer Cable

RF Cable


18 PREPARATION

Parts and Components

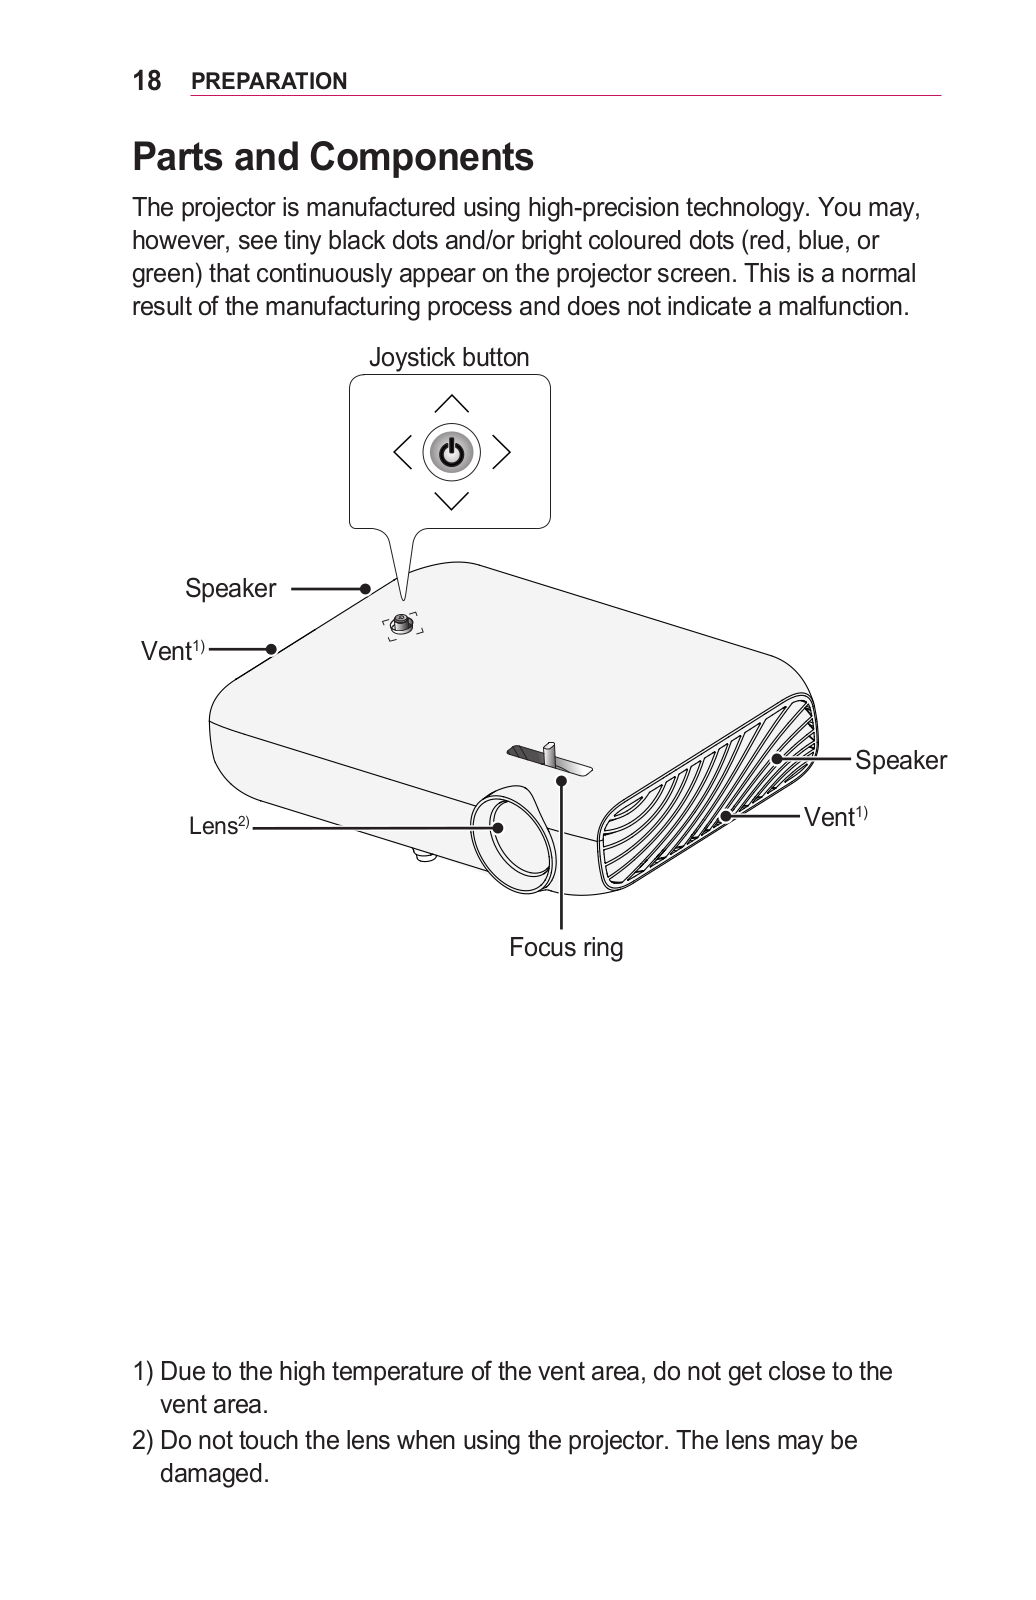
The projector is manufactured using high-precision technology. You may, however, see tiny black dots and/or bright coloured dots (red, blue, or green) that continuously appear on the projector screen. This is a normal result of the manufacturing process and does not indicate a malfunction.

Joystick button

Speaker

Vent1)


Speaker

Lens2)

Vent1)


Focus ring

1)Due to the high temperature of the vent area, do not get close to the vent area.

2)Do not touch the lens when using the projector. The lens may be damaged.

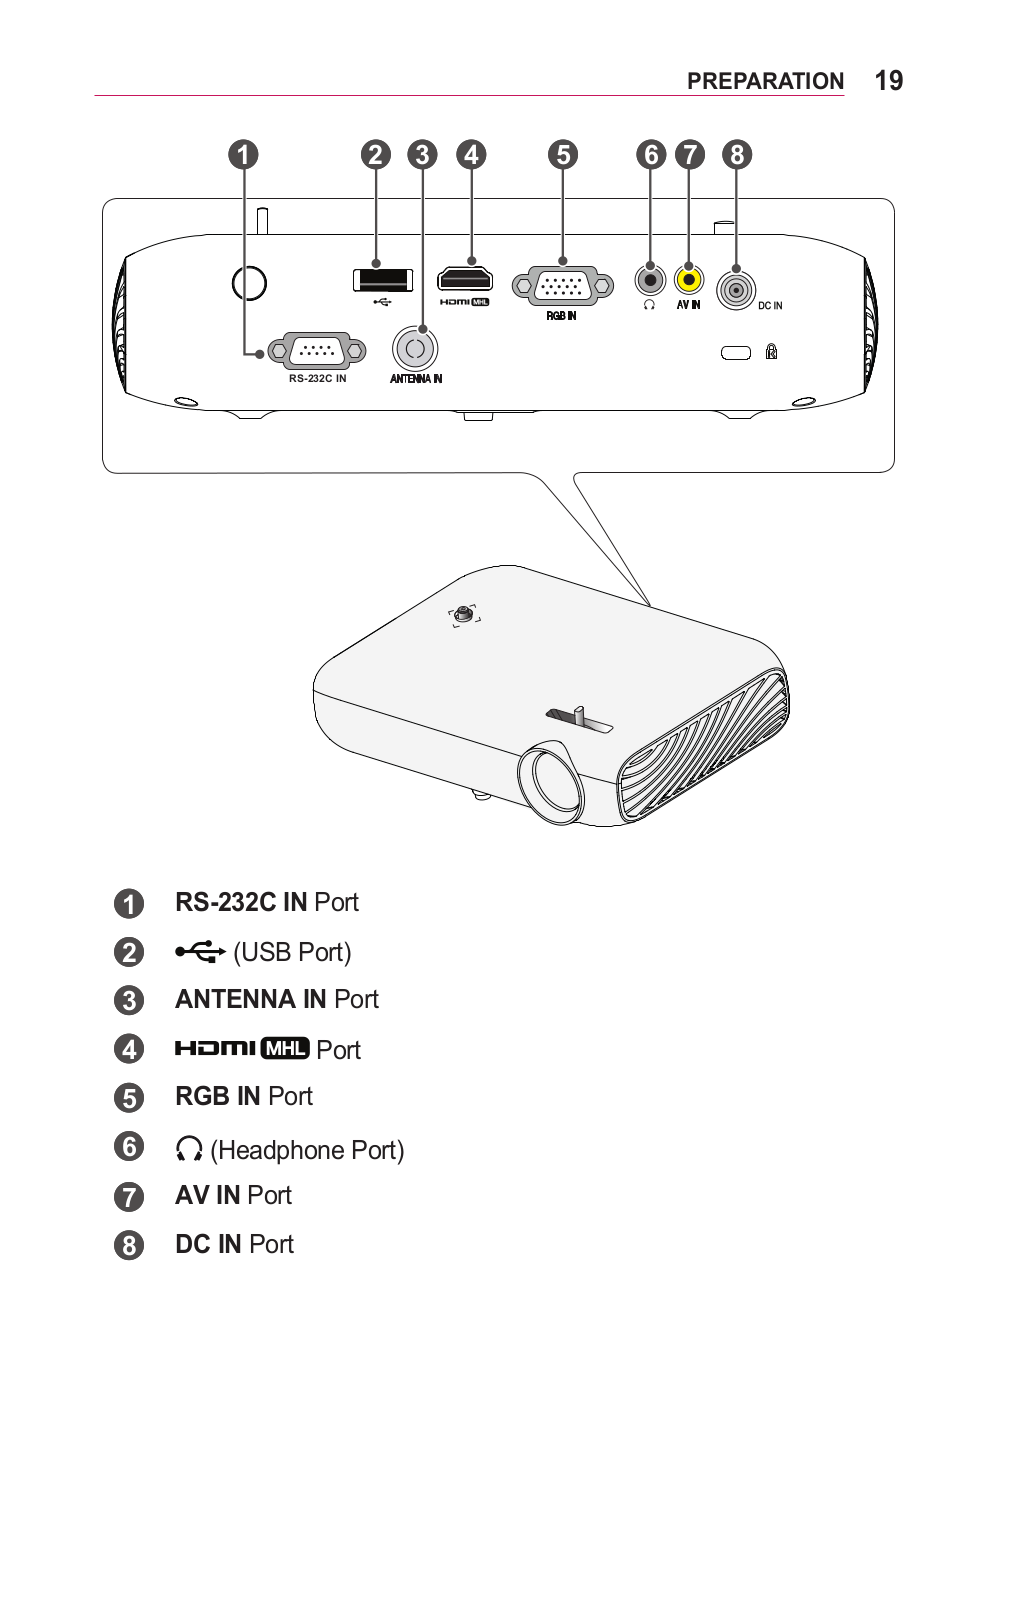
PREPARATION 19

1

2

3

4

5

6

7

8

RS-232C IN

1RS-232C IN Port

2

(USB Port)

3ANTENNA IN Port

4

Port

5RGB IN Port

6 (Headphone Port)

7 AV IN Port

8DC IN Port

20 PREPARATION

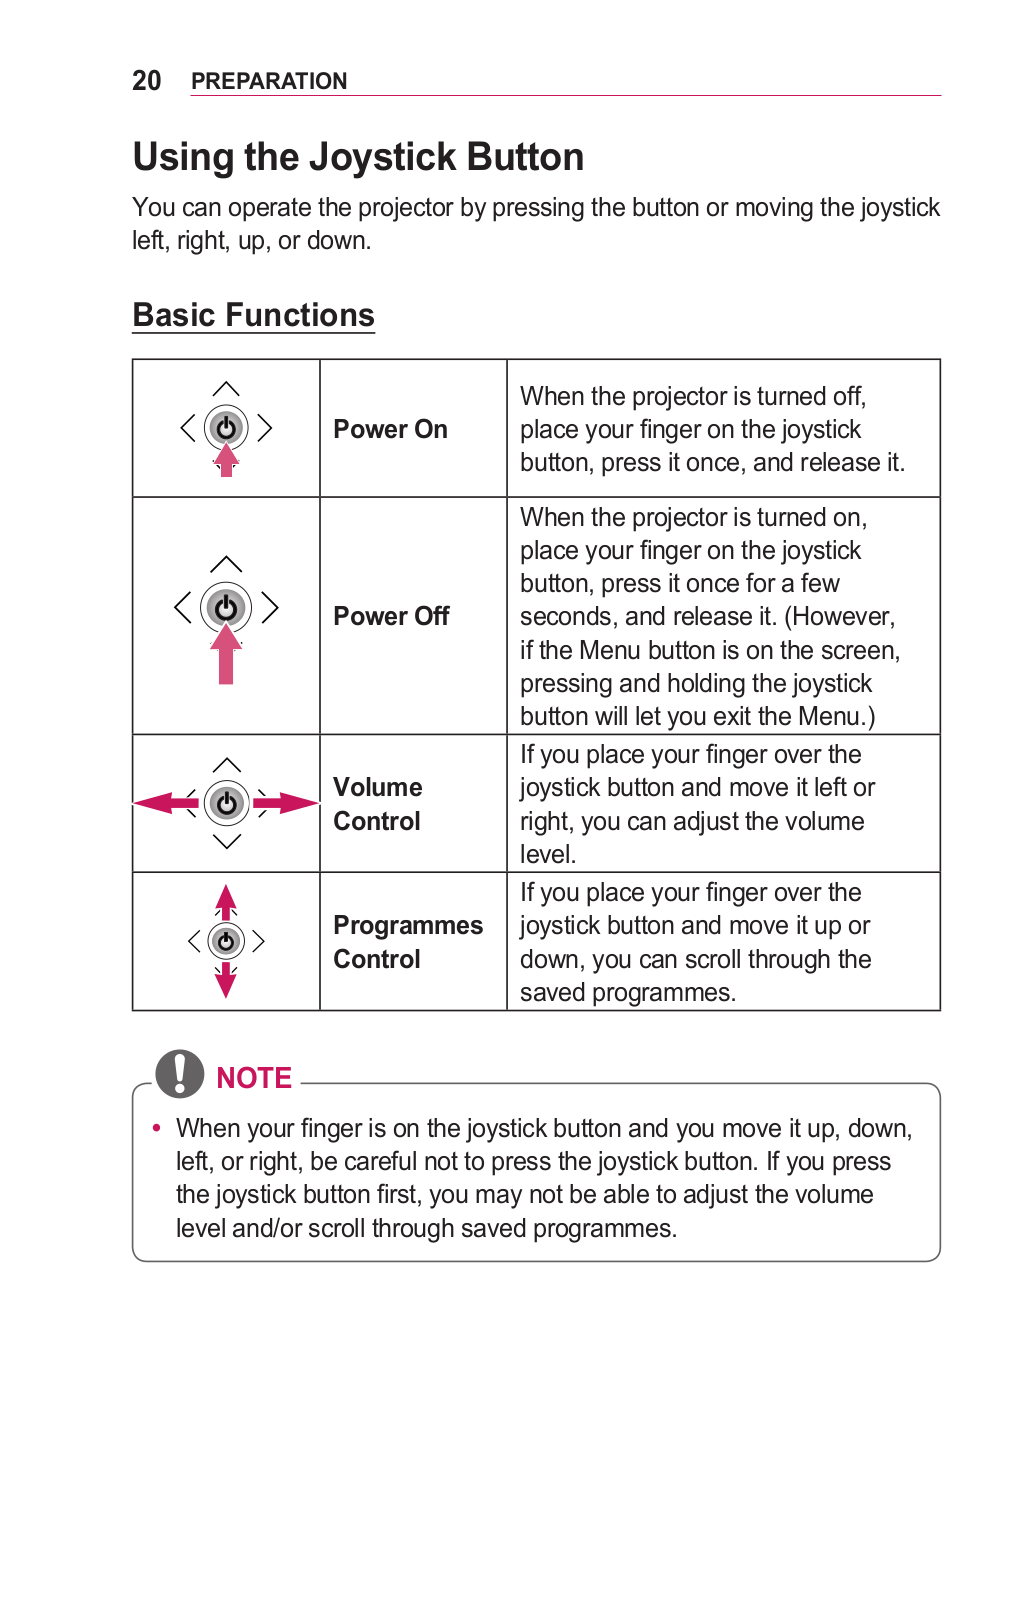
Using the Joystick Button

You can operate the projector by pressing the button or moving the joystick left, right, up, or down.

Basic Functions

Power On

When the projector is turned off,

place your finger on the joystick


button, press it once, and release it.


When the projector is turned on,


place your finger on the joystick

Power Off

button, press it once for a few

seconds, and release it. (However,


if the Menu button is on the screen,


pressing and holding the joystick


button will let you exit the Menu.)

Volume

If you place your finger over the

joystick button and move it left or

Control

right, you can adjust the volume


level.

If you place your finger over the

Programmes joystick button and move it up or Control down, you can scroll through the

saved programmes.

NOTE

When your finger is on the joystick button and you move it up, down, left, or right, be careful not to press the joystick button. If you press the joystick button first, you may not be able to adjust the volume level and/or scroll through saved programmes.

PREPARATION 21

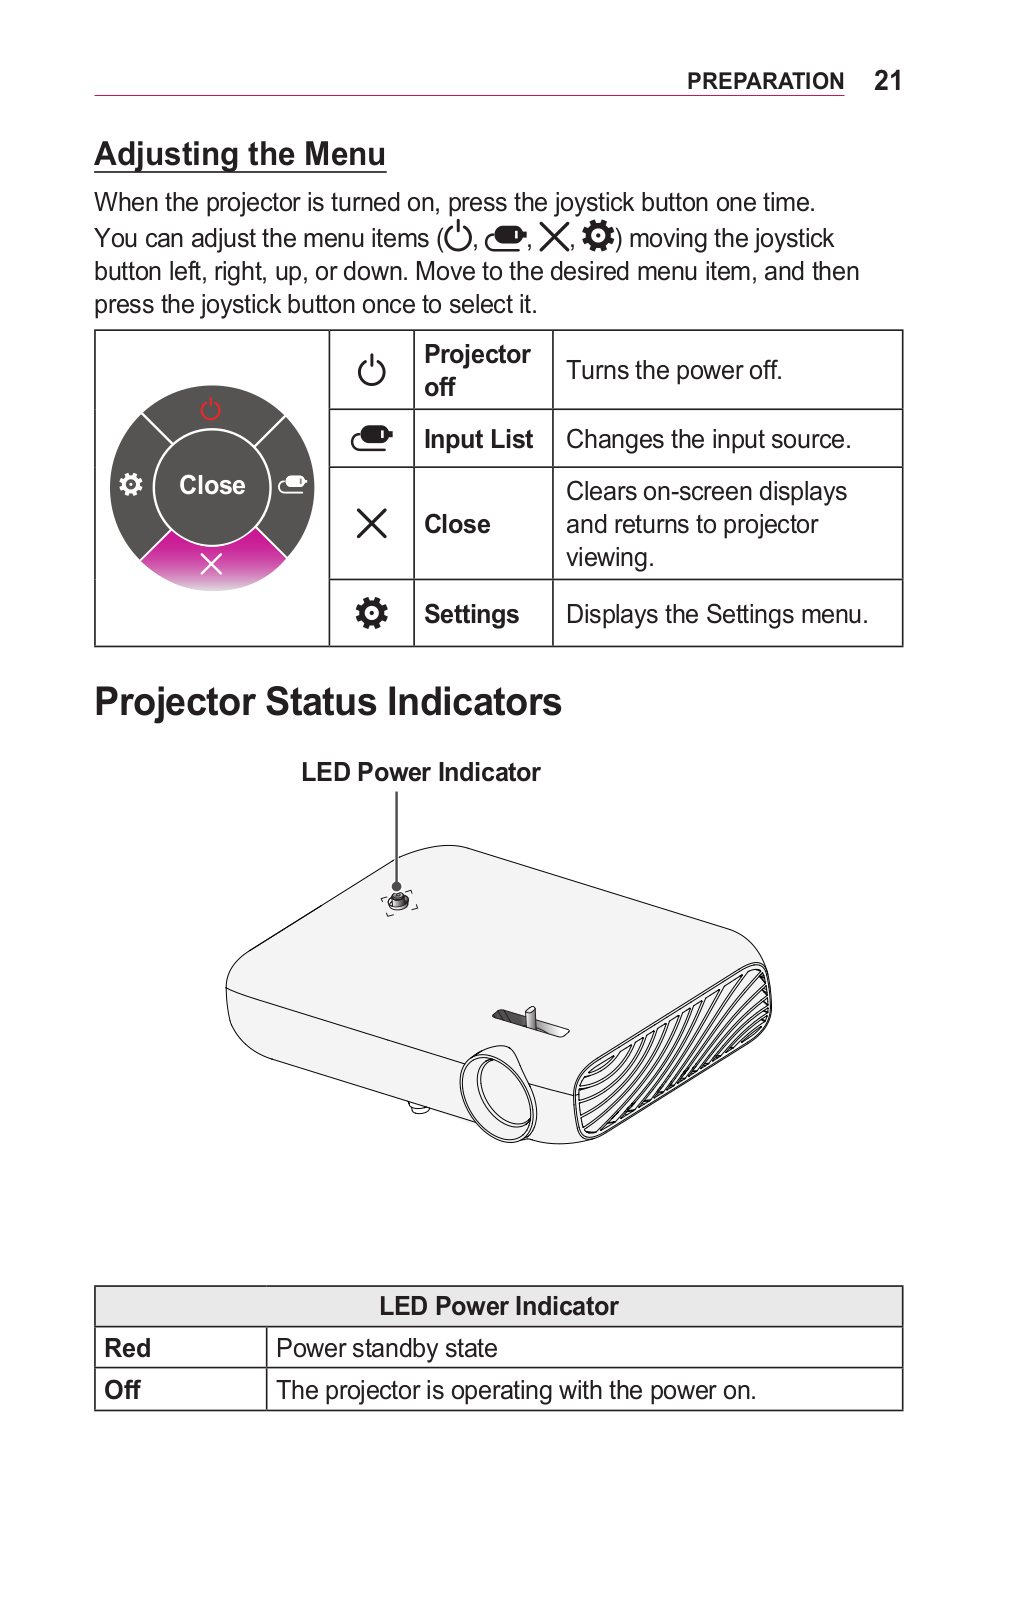
Adjusting the Menu

When the projector is turned on, press the joystick button one time.

You can adjust the menu items (, , , ) moving the joystick button left, right, up, or down. Move to the desired menu item, and then press the joystick button once to select it.


Projector

Turns the power off.


off


Input List

Changes the input source.

Close


Close

Clears on-screen displays


and returns to projector


viewing.


Settings

Displays the Settings menu.


Projector Status Indicators

LED Power Indicator


LED Power Indicator

Red

Power standby state

Off

The projector is operating with the power on.

22 PREPARATION

Installation

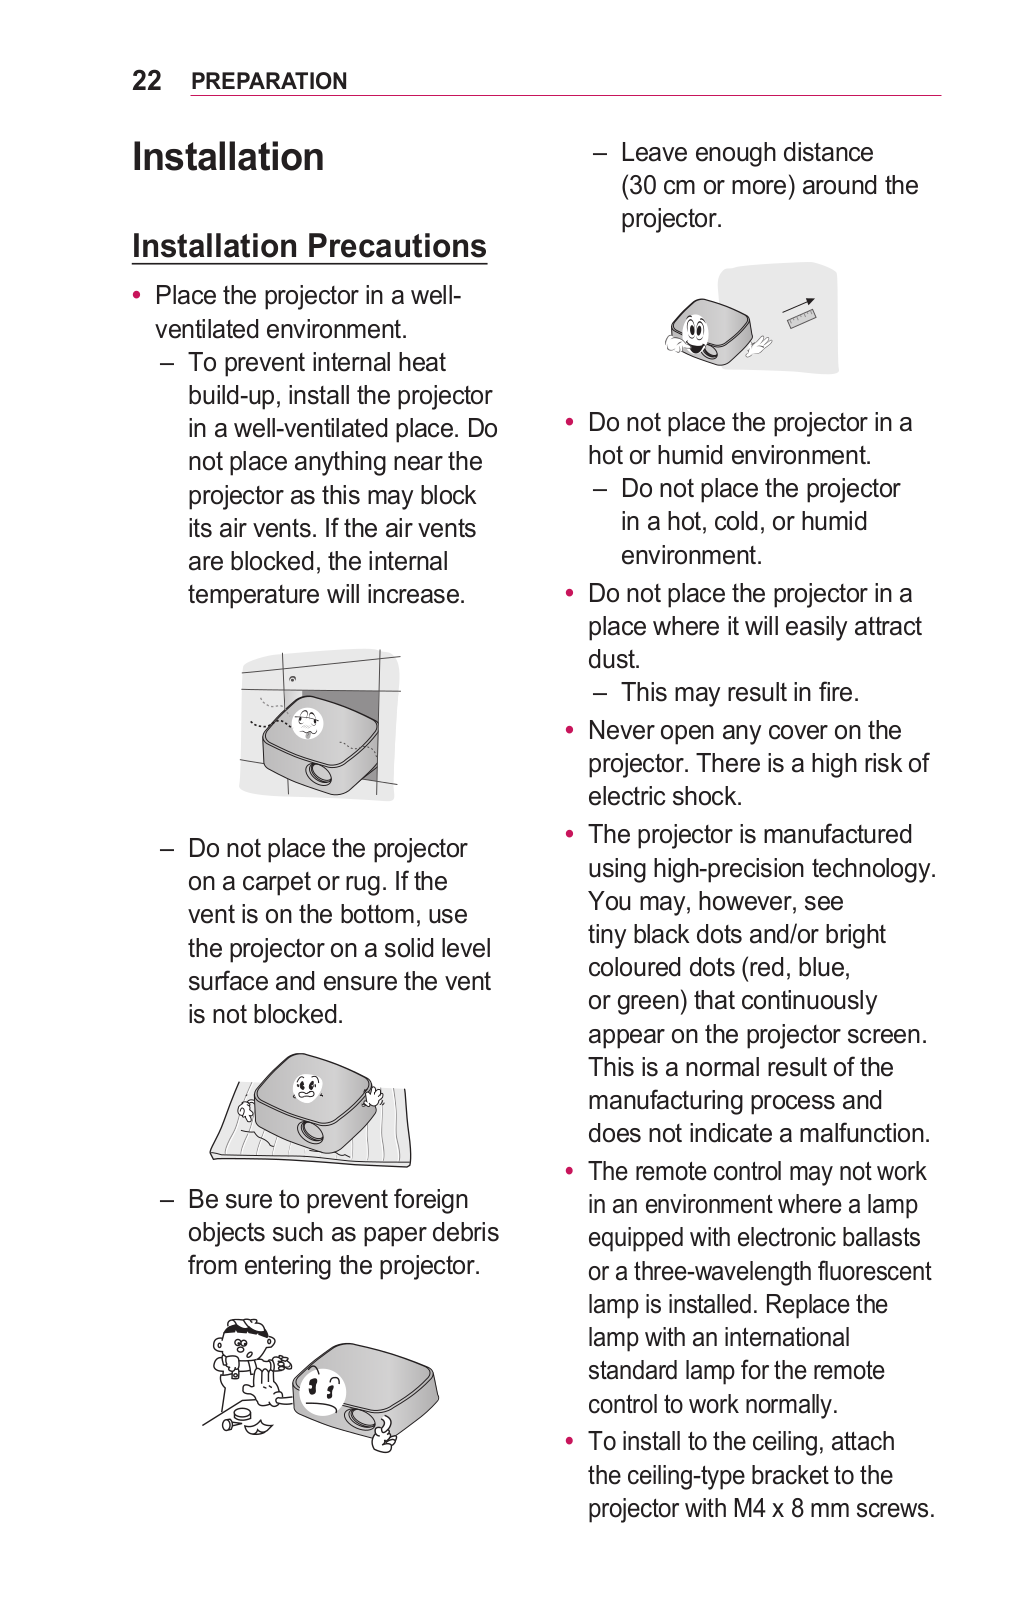
Installation Precautions

Place the projector in a wellventilated environment.

––To prevent internal heat build-up, install the projector in a well-ventilated place. Do not place anything near the projector as this may block its air vents. If the air vents are blocked, the internal temperature will increase.

––Do not place the projector on a carpet or rug. If the vent is on the bottom, use the projector on a solid level surface and ensure the vent is not blocked.

––Be sure to prevent foreign objects such as paper debris from entering the projector.

––Leave enough distance (30 cm or more) around the projector.

Do not place the projector in a hot or humid environment.

––Do not place the projector in a hot, cold, or humid environment.

Do not place the projector in a place where it will easily attract dust.

––This may result in fire.

Never open any cover on the projector. There is a high risk of electric shock.

The projector is manufactured using high-precision technology. You may, however, see

tiny black dots and/or bright coloured dots (red, blue, or green) that continuously

appear on the projector screen. This is a normal result of the manufacturing process and does not indicate a malfunction.

The remote control may not work in an environment where a lamp equipped with electronic ballasts or a three-wavelength fluorescent lamp is installed. Replace the lamp with an international standard lamp for the remote control to work normally.

To install to the ceiling, attach the ceiling-type bracket to the projector with M4 x 8 mm screws.

PREPARATION 23

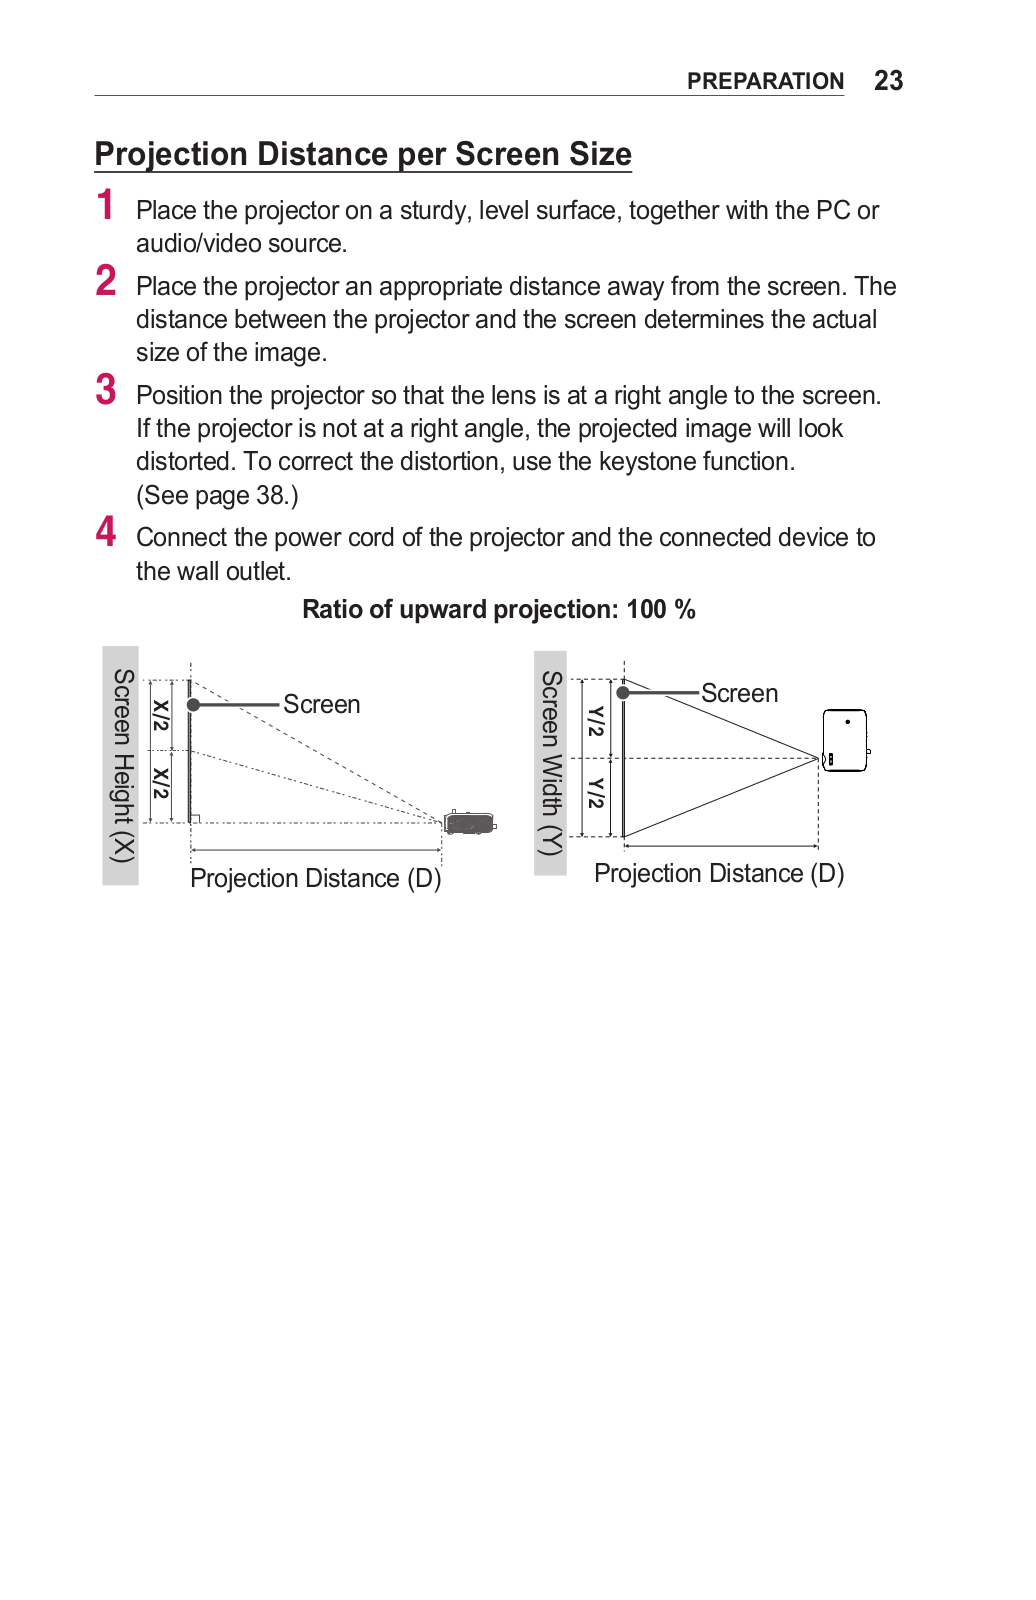
Projection Distance per Screen Size

1 Place the projector on a sturdy, level surface, together with the PC or audio/video source.

2 Place the projector an appropriate distance away from the screen. The distance between the projector and the screen determines the actual size of the image.

3 Position the projector so that the lens is at a right angle to the screen. If the projector is not at a right angle, the projected image will look distorted. To correct the distortion, use the keystone function.

(See page 38.)

4 Connect the power cord of the projector and the connected device to the wall outlet.

Ratio of upward projection: 100 %

<![if ! IE]>

<![endif]>(X) Height Screen

<![if ! IE]>

<![endif]>X/2

Screen


<![if ! IE]>

<![endif]>X/2


Projection Distance (D)

<![if ! IE]>

<![endif]>(Y) Width Screen

Screen

<![if ! IE]>

<![endif]>Y/2

<![if ! IE]>

<![endif]>Y/2

Projection Distance (D)

24 PREPARATION

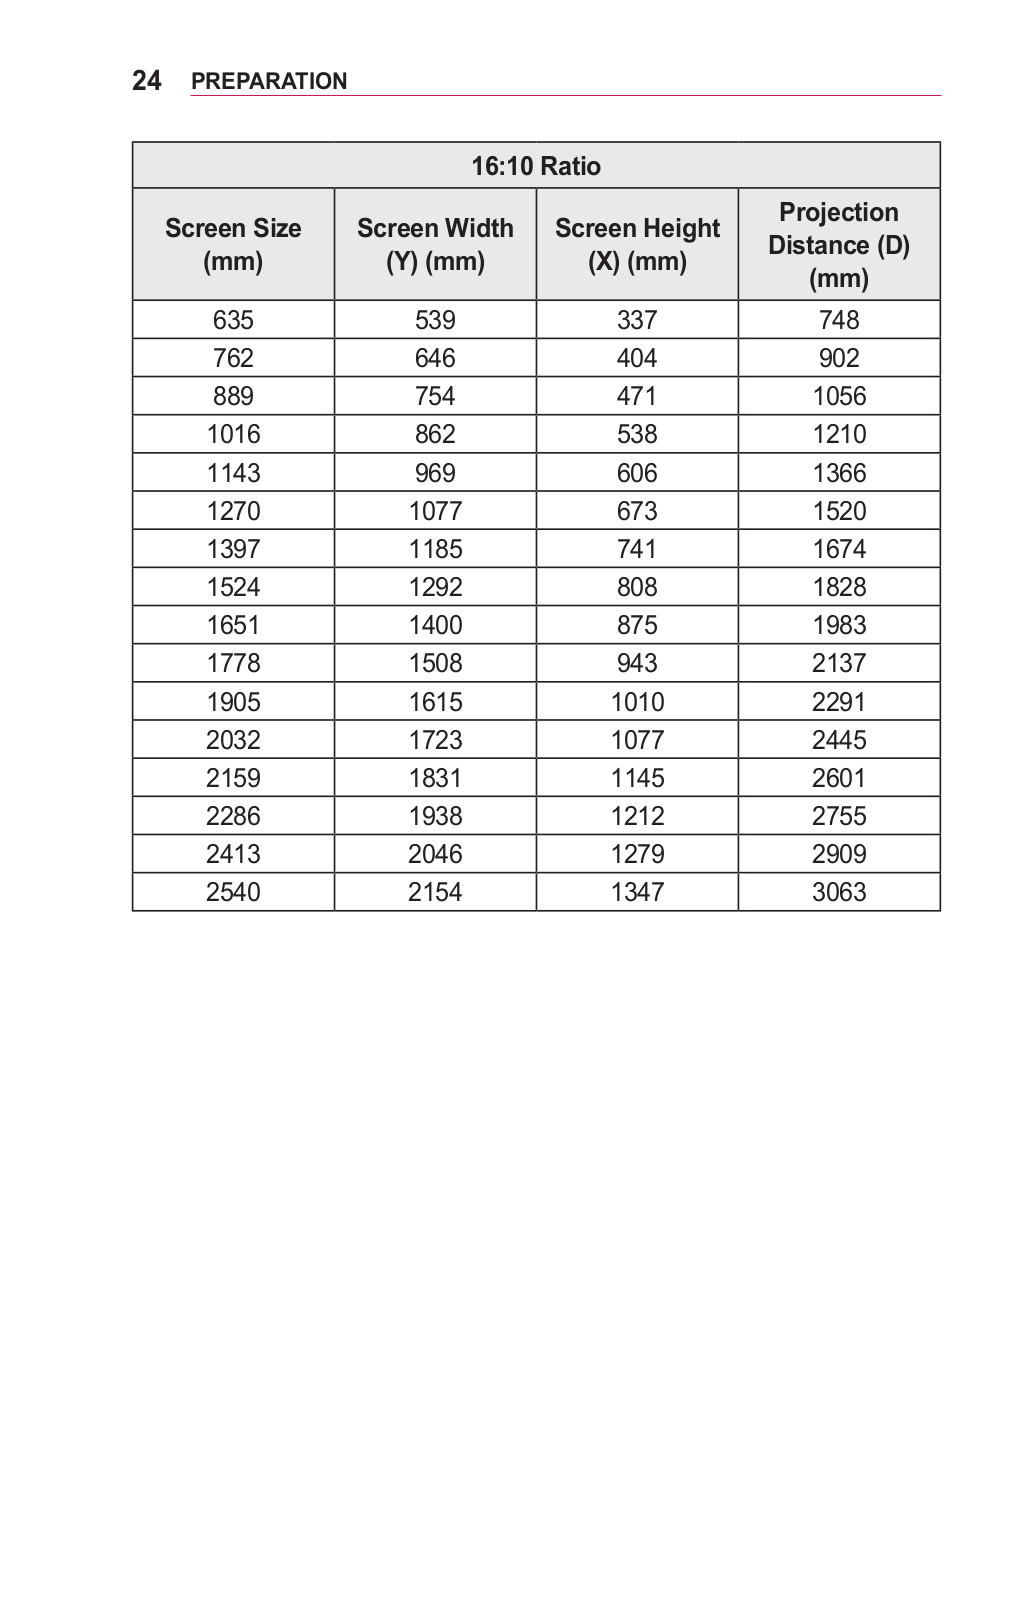
16:10 Ratio

Screen Size

Screen Width

Screen Height

Projection

Distance (D)

(mm)

(Y) (mm)

(X) (mm)

(mm)


635

539

337

748

762

646

404

902

889

754

471

1056

1016

862

538

1210

1143

969

606

1366

1270

1077

673

1520

1397

1185

741

1674

1524

1292

808

1828

1651

1400

875

1983

1778

1508

943

2137

1905

1615

1010

2291

2032

1723

1077

2445

2159

1831

1145

2601

2286

1938

1212

2755

2413

2046

1279

2909

2540

2154

1347

3063

PREPARATION 25

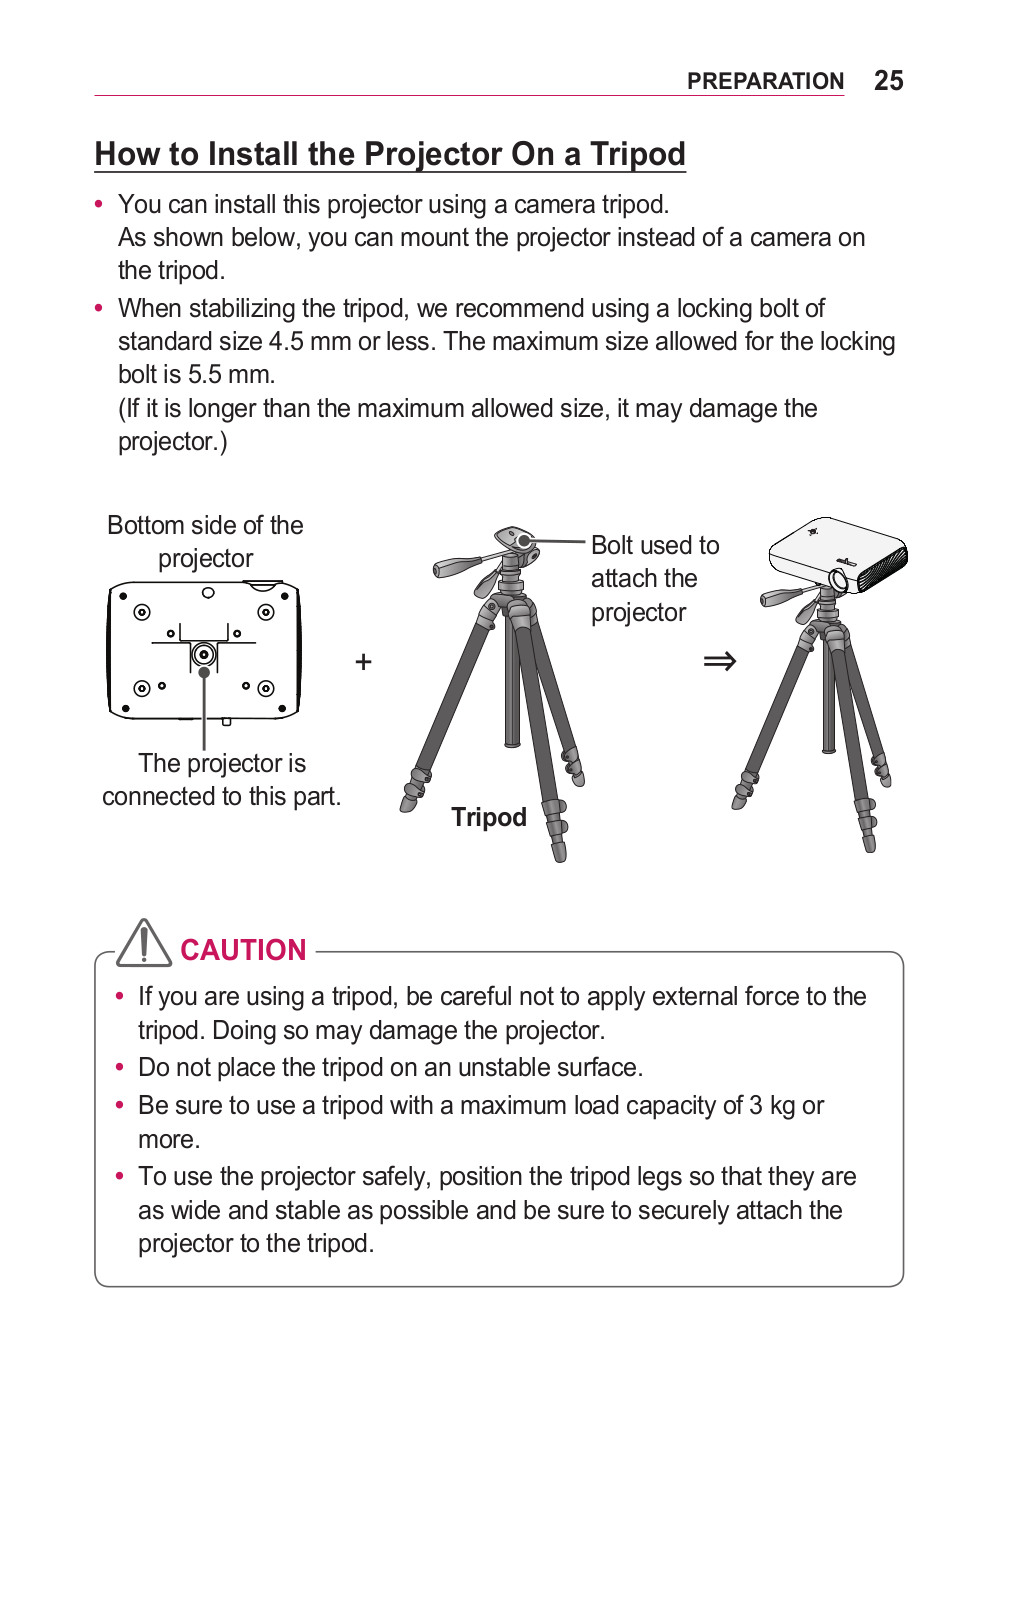
How to Install the Projector On a Tripod

You can install this projector using a camera tripod.

As shown below, you can mount the projector instead of a camera on the tripod.

When stabilizing the tripod, we recommend using a locking bolt of standard size 4.5 mm or less. The maximum size allowed for the locking bolt is 5.5 mm.

(If it is longer than the maximum allowed size, it may damage the projector.)

Bottom side of the

Bolt used to

projector

attach the


projector

+


The projector is


connected to this part.

Tripod


CAUTION

If you are using a tripod, be careful not to apply external force to the tripod. Doing so may damage the projector.

Do not place the tripod on an unstable surface.

Be sure to use a tripod with a maximum load capacity of 3 kg or more.

To use the projector safely, position the tripod legs so that they are as wide and stable as possible and be sure to securely attach the projector to the tripod.

26 PREPARATION

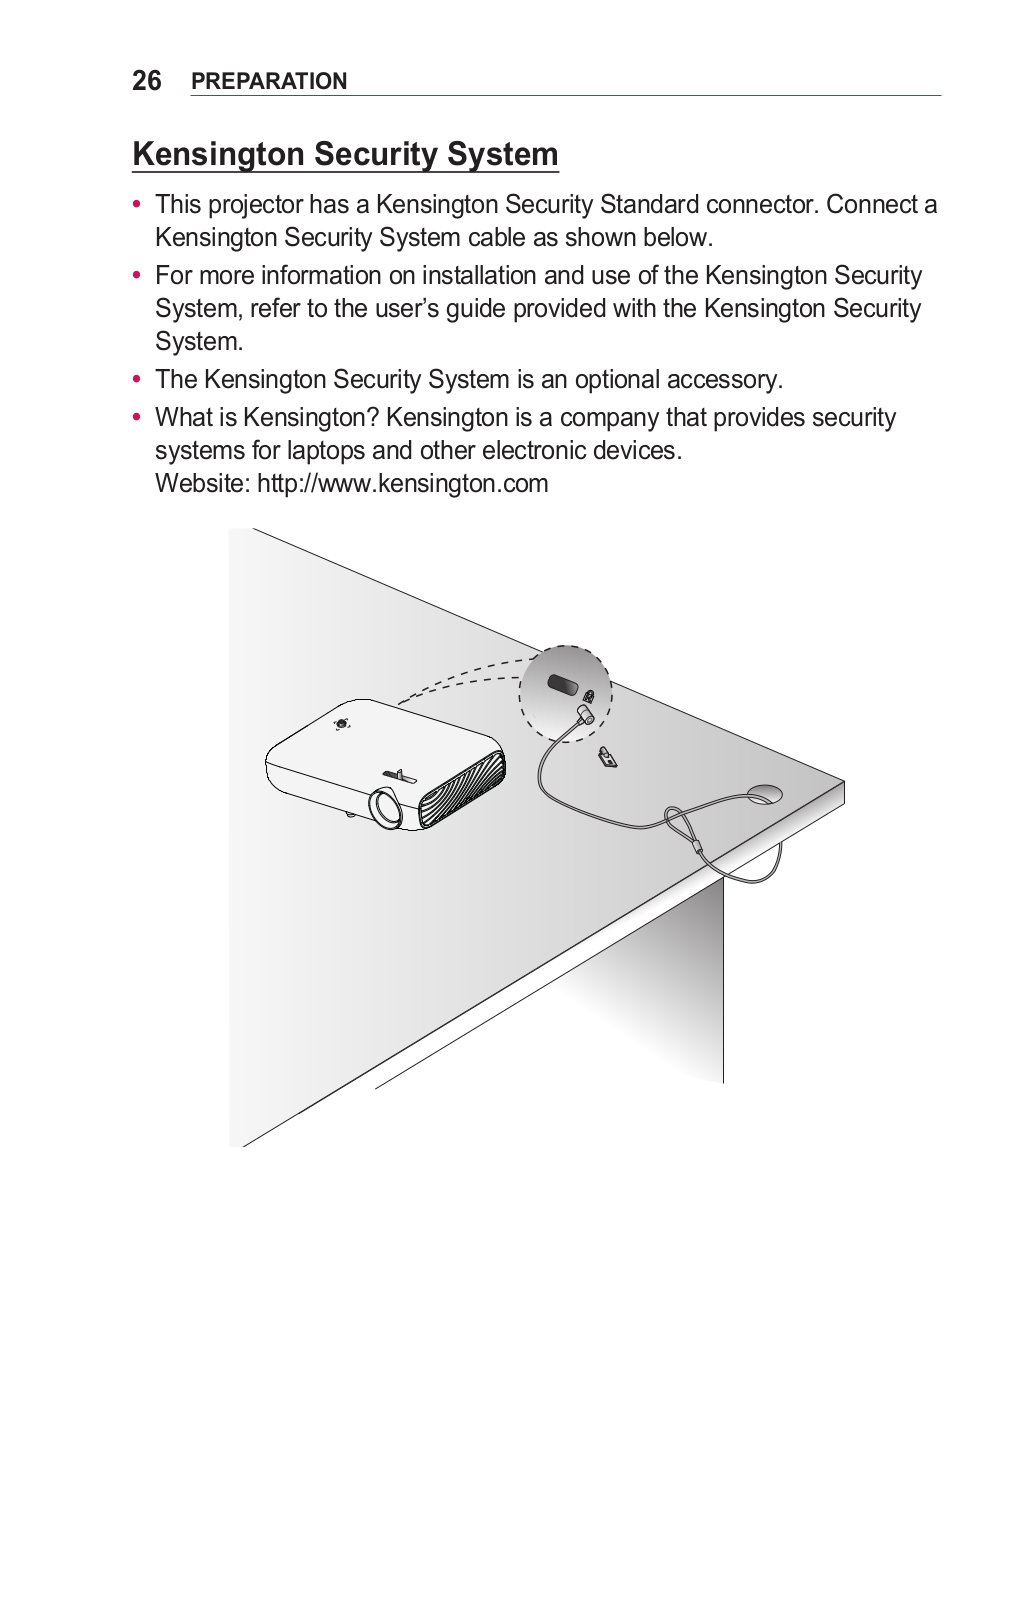
Kensington Security System

This projector has a Kensington Security Standard connector. Connect a Kensington Security System cable as shown below.

For more information on installation and use of the Kensington Security System, refer to the user’s guide provided with the Kensington Security System.

The Kensington Security System is an optional accessory.

What is Kensington? Kensington is a company that provides security systems for laptops and other electronic devices.

Website: http://www.kensington.com

LG PW1000 Owner’s Manual

REMOTE CONTROL 27

REMOTE CONTROL

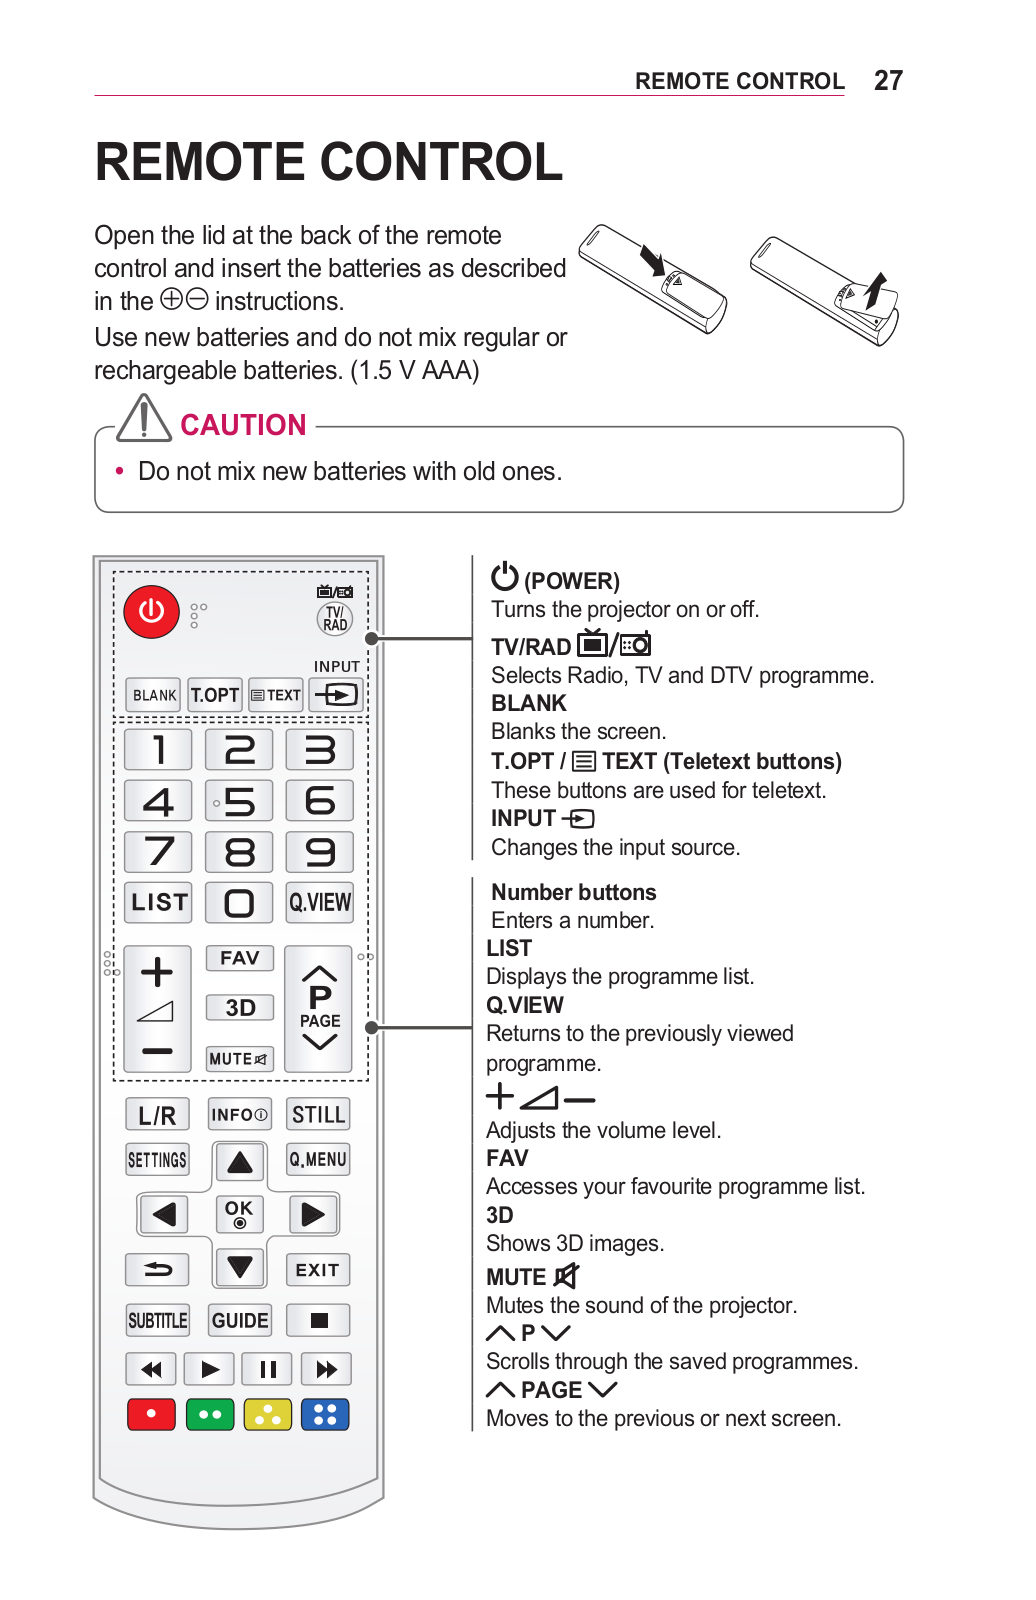
Open the lid at the back of the remote control and insert the batteries as described in the instructions.

Use new batteries and do not mix regular or rechargeable batteries. (1.5 V AAA)

CAUTION

Do not mix new batteries with old ones.


(POWER)


Turns the projector on or off.


TV/RAD

#-"/,

Selects Radio, TV and DTV programme.

BLANK


Blanks the screen.


T.OPT / TEXT (Teletext buttons)


These buttons are used for teletext.


INPUT


Changes the input source.


Number buttons


Enters a number.


LIST


Displays the programme list.


Q.VIEW


Returns to the previously viewed


programme.


Adjusts the volume level.


FAV


Accesses your favourite programme list.


3D


Shows 3D images.


MUTE


Mutes the sound of the projector.


P


Scrolls through the saved programmes.


PAGE


Moves to the previous or next screen.

28 REMOTE CONTROL


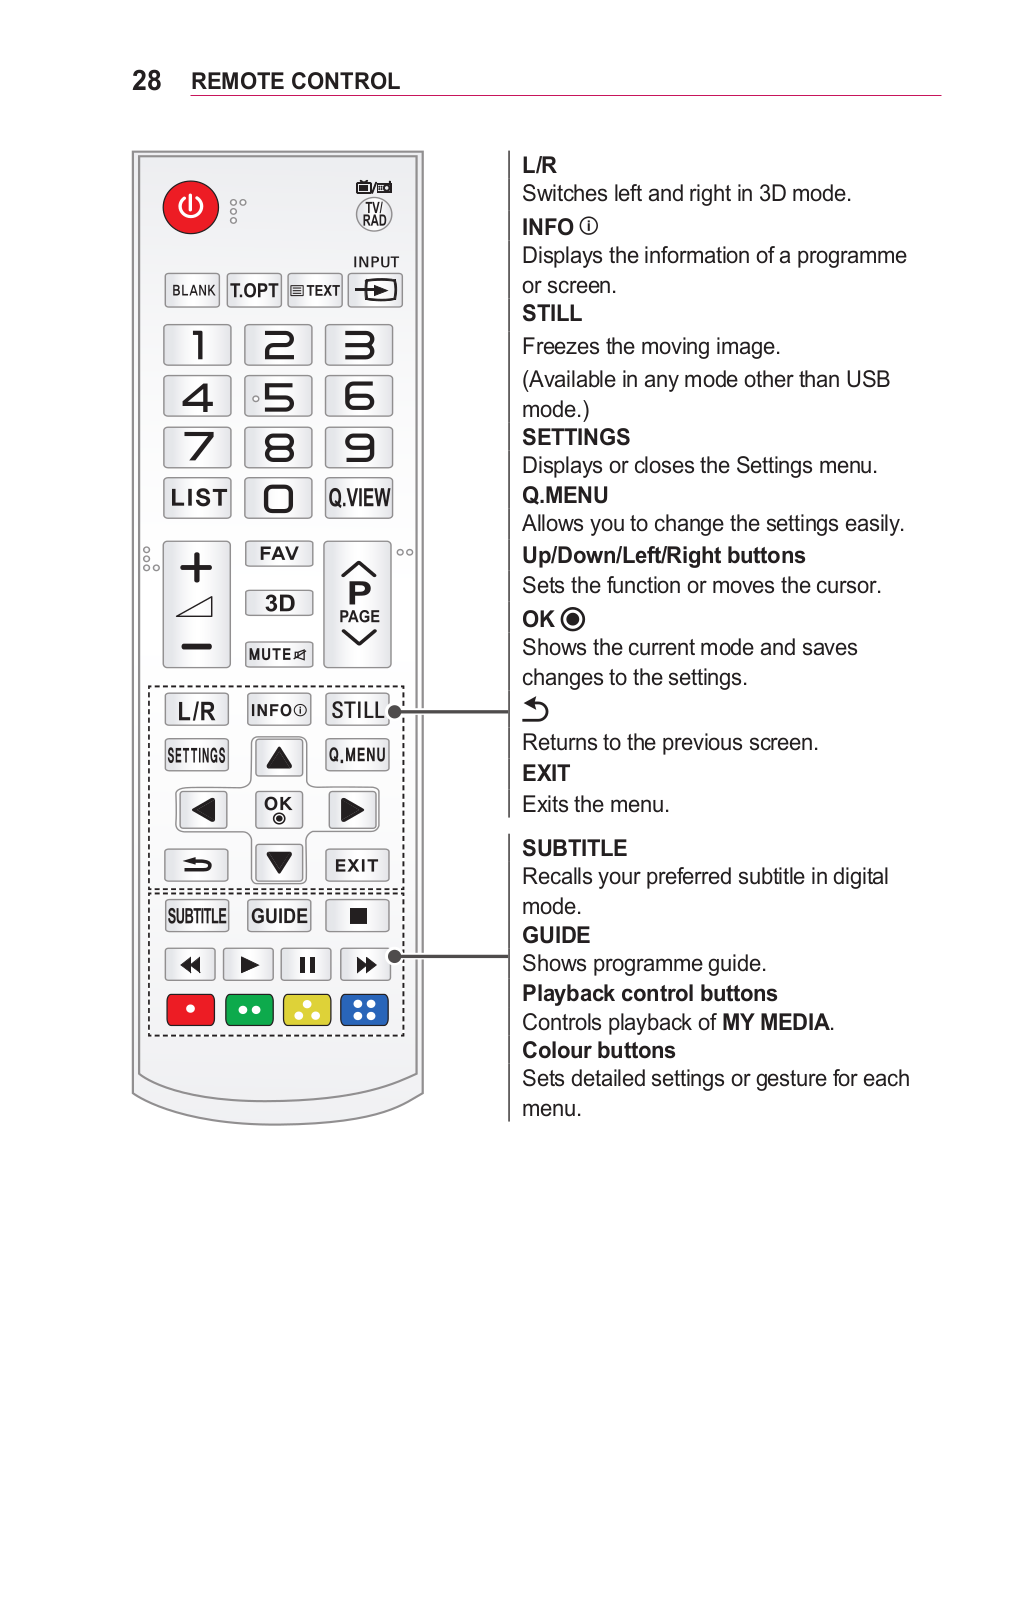
L/R


Switches left and right in 3D mode.


INFO


Displays the information of a programme

#-"/,

or screen.


STILL


Freezes the moving image.


(Available in any mode other than USB


mode.)


SETTINGS


Displays or closes the Settings menu.


Q.MENU


Allows you to change the settings easily.


Up/Down/Left/Right buttons


Sets the function or moves the cursor.


OK


Shows the current mode and saves


changes to the settings.


Returns to the previous screen.


EXIT


Exits the menu.


SUBTITLE


Recalls your preferred subtitle in digital


mode.


GUIDE


Shows programme guide.


Playback control buttons


Controls playback of MY MEDIA.


Colour buttons


Sets detailed settings or gesture for each


menu.

REMOTE CONTROL 29

NOTE

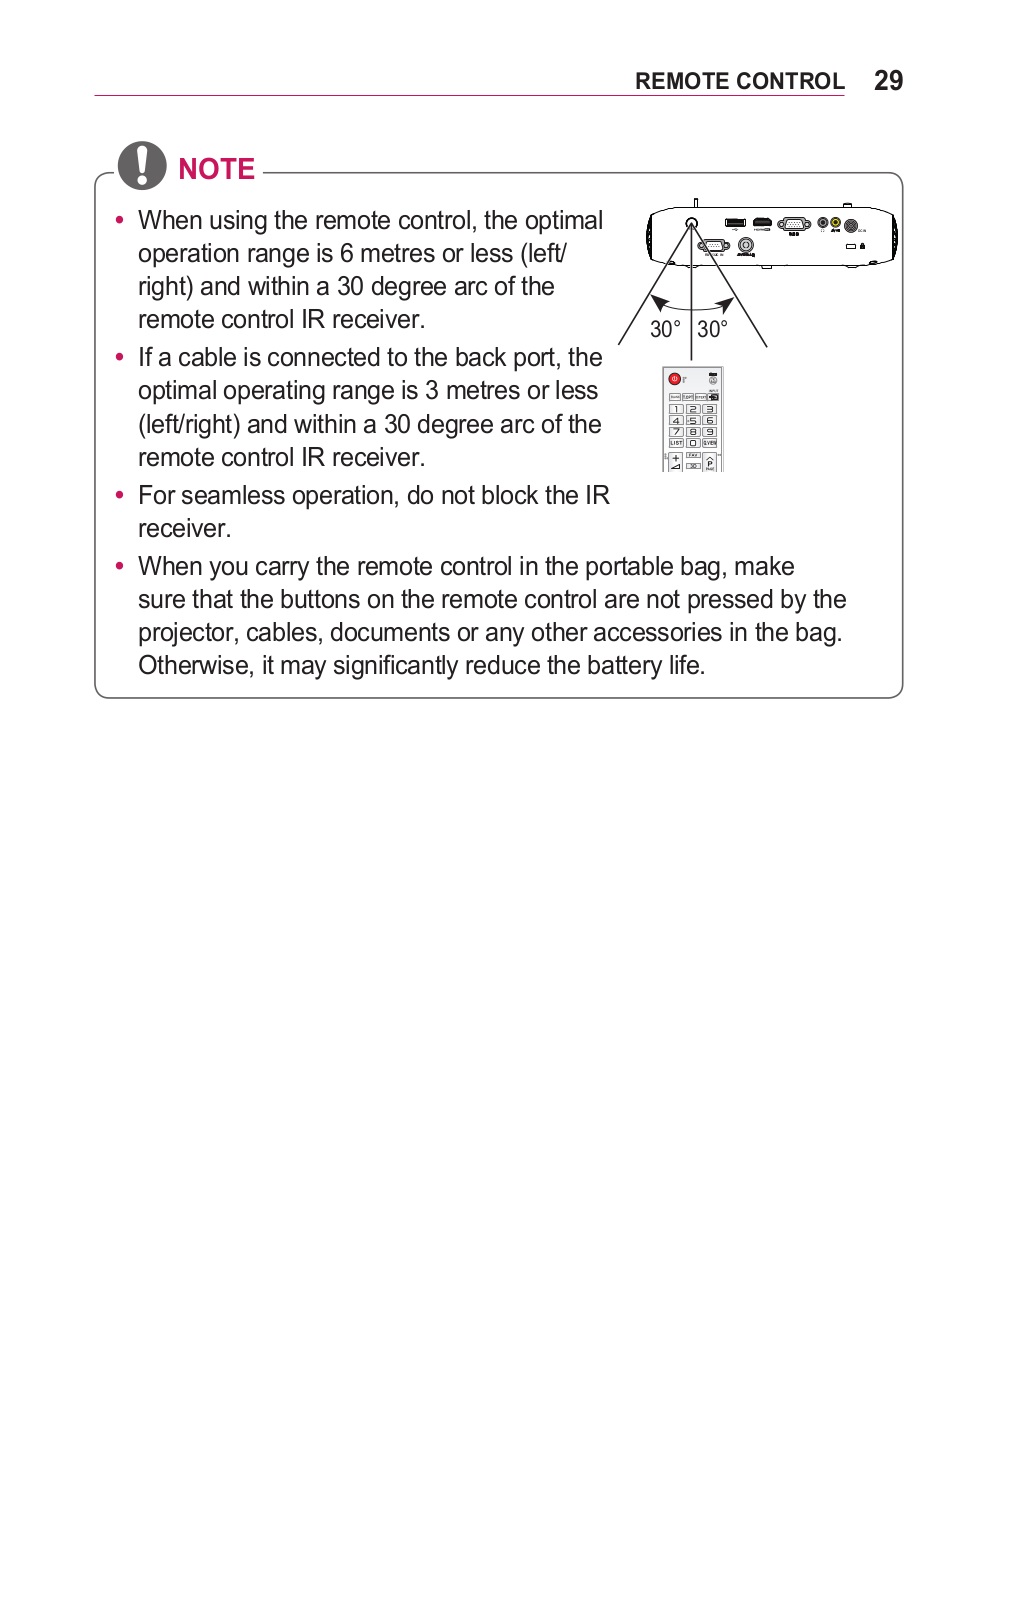
When using the remote control, the optimal


operation range is 6 metres or less (left/

RS-232C IN


right) and within a 30 degree arc of the


remote control IR receiver.

30° 30°

If a cable is connected to the back port, the


optimal operating range is 3 metres or less

#-"/,


(left/right) and within a 30 degree arc of the


remote control IR receiver.


For seamless operation, do not block the IR receiver.

When you carry the remote control in the portable bag, make sure that the buttons on the remote control are not pressed by the projector, cables, documents or any other accessories in the bag. Otherwise, it may significantly reduce the battery life.

30 USING THE PROJECTOR

USING THE PROJECTOR

Connecting to an Antenna or Cable

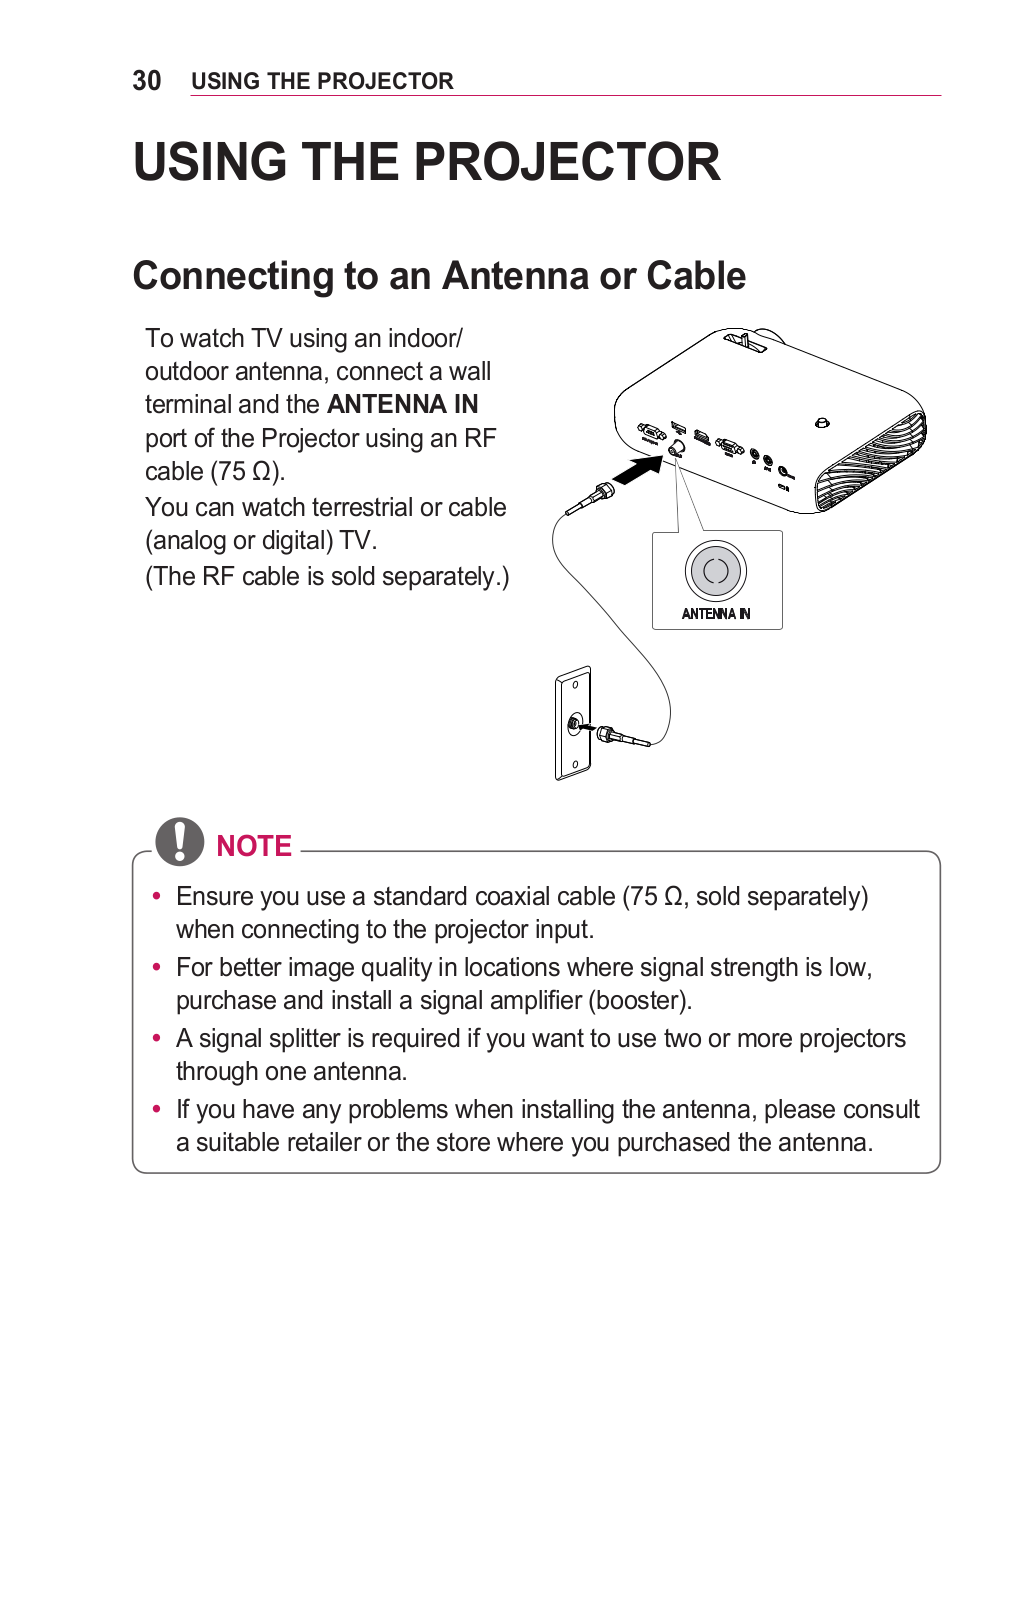
To watch TV using an indoor/ outdoor antenna, connect a wall terminal and the ANTENNA IN port of the Projector using an RF cable (75 Ω).

You can watch terrestrial or cable (analog or digital) TV.

(The RF cable is sold separately.)

NOTE

Ensure you use a standard coaxial cable (75 Ω, sold separately) when connecting to the projector input.

For better image quality in locations where signal strength is low, purchase and install a signal amplifier (booster).

A signal splitter is required if you want to use two or more projectors through one antenna.

If you have any problems when installing the antenna, please consult a suitable retailer or the store where you purchased the antenna.

Loading...
+ 105 hidden pages