

Page 1

OWNER’S MANUAL
Please read this manual carefully before operating
your set and retain it for future reference.
P/NO :MFL62077720
www.lge.com
TYPE : AC Smart II (Advanced Control Smart II)
Option function manual
ENGLISH
ITALIANO ESPAÑOL FRANCAIS DEUTSCH
NEDERLANDS
РУССКИЙЯЗЫК
繁體中文
Page 2

2
AC Smart II (Advanced Control Smart II)
AC Smart II (Advanced Control Smart II)
Content
Introduction to AC Smart II option function .........................................................................3
Characteristics of option function .....................................................................................3
Components of option function.........................................................................................4
Activation of option function .................................................................................................5
Web schedule function .........................................................................................................11
Managing schedule group ..............................................................................................12
Creating schedule pattern ..............................................................................................21
Applying schedule ..........................................................................................................38
Checking schedule .........................................................................................................46
Running/Stopping schedule............................................................................................49
Power consumption statistics function ..............................................................................51
Accumulative power consumption...............................................................................................................52
Monthly power consumption ........................................................................................................................55
Setting power consumption view condition ................................................................................................57
Saving power consumption information......................................................................................................59
Page 3

Option function manual
3
Introduction to AC Smart II option function
Introduction to AC Smart II option function
AC Smart II additionally provides various convenient option functions for the users to sue. These
additional functions are provided in SD card format. When the user inserts the SD card to the main
unit of the AC Smart II, the option function can be activated and used.
The characteristics of the option function of AC Smart II are as follows.
■ Web based schedule setting function
By using the web server function of AC SMART II, you can set and apply the schedule of AC SMART
II even from remote locations. The administrator can manage the schedule of AC SMART II through
the network free from where he or she is and reduce any unnecessary operations of the unit by using
the schedule functions.
■ Power consumption statistics function
You can view the power consumption information of the air conditioner. The power consumption is
provided in various methods including total usage, usage by period, monthly/daily usage etc. By using
the statistics information, the administrator can effectively analyze and manage the energy usage.
To use the power consumption statistics function, the PDI and watt-meter to measure the power
consumption must be connected to AC SMART II.
Characteristics of option function
ENGLISH
Reference: Type of option function sold
The option functions can be sold in 2 types.
- Web schedule + Power consumption statistics function (PQCSE342A0)
- Web schedule function (PQCSE341A0)
If you have purchased only the Web schedule function, you cannot use the Power
consumption statistics function.
Page 4

AC Smart II (Advanced Control Smart II)
4
Introduction to AC Smart II option function
The following components are included in the packaged box of AC SMART II option function as
shown below. Open the box of AC SMART II and check whether the applicable components are
included.
Quick guide Manual CD SD card (Option kit)
Components of option function
Page 5
Option function manual
5
ENGLISH
Activation of option function
To use the operation function from AC SMART II, use the SD card provided in the box to activate the
function.
To activate the option function, proceed as follows.
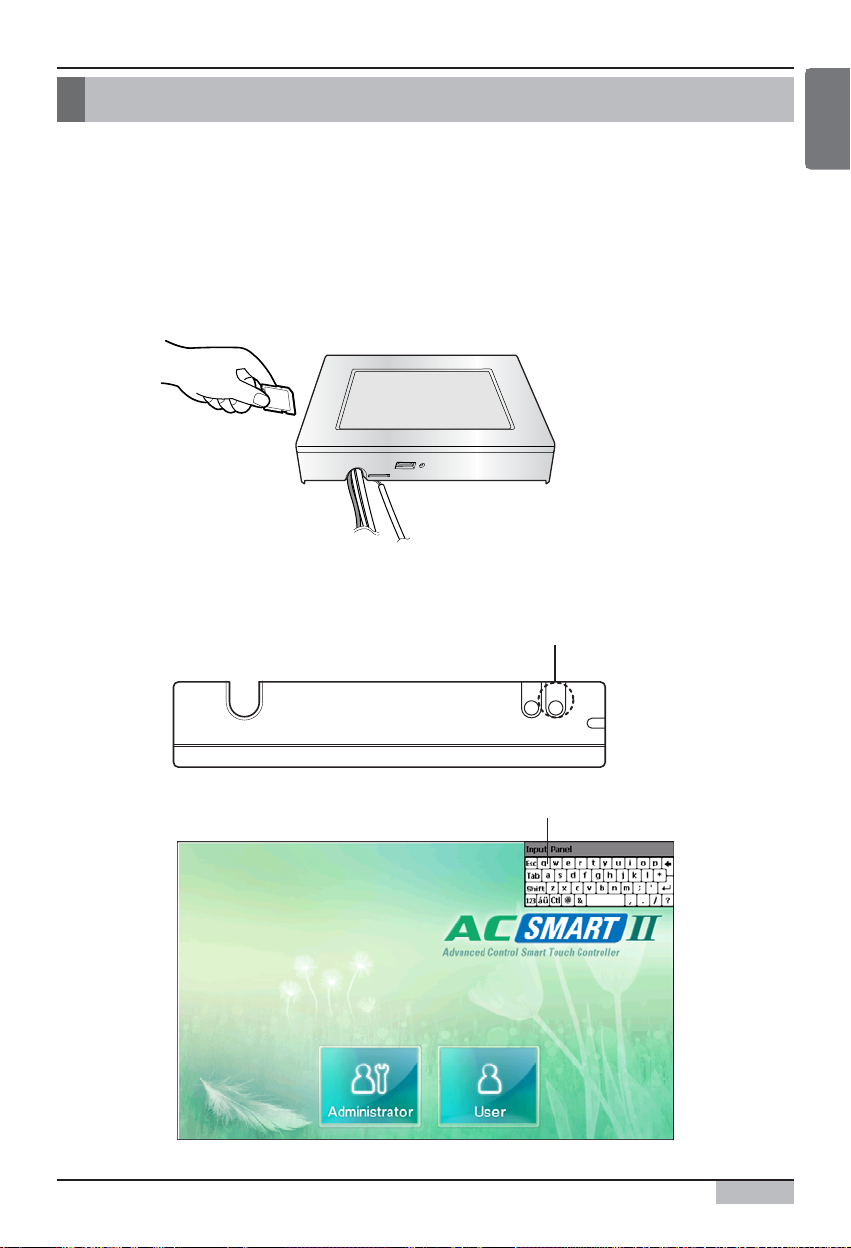
1. To use the option function, insert the provided SD card into the SD card slot located at the bottom
of the AC SMART II terminal.
Insert the card having the part with the product name facing up as shown below. Push the card in
until you hear the ʻClickʼ sound.
2. With the AC SMART II terminal turned on, press the keyboard button and the software keyboard
will be displayed on the screen.
Activation of option function
Keyboard button
Software keyboard
Page 6
Activation of option function
AC Smart II (Advanced Control Smart II)
6
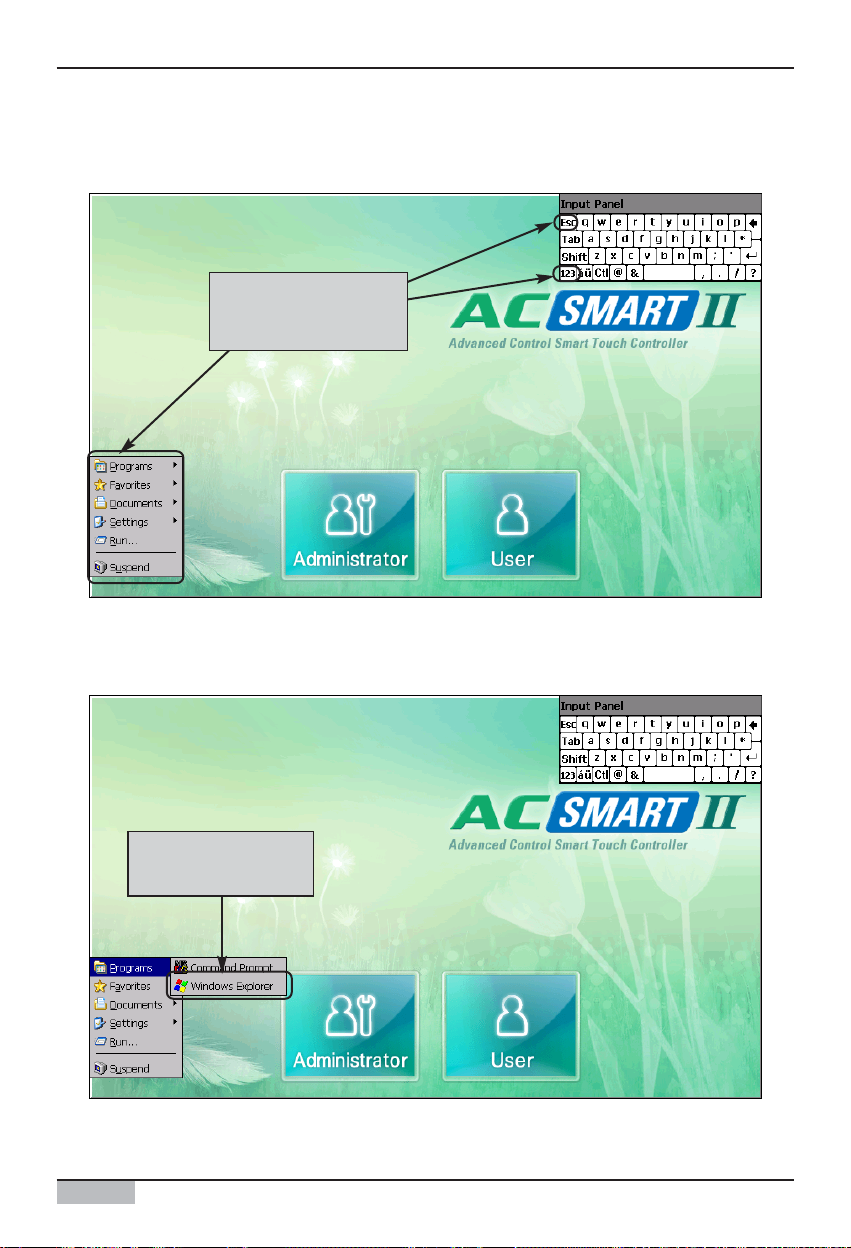
3. After pressing the ʻCtrlʼ key from the software keyboard, press the ʻEscʼ key to display the menu on
the left side of the screen.
4. Select ʻProgram (P)ʼ ➠ ʻWindows Explorerʼ from the menu.
When you press the
‘Ctrl’ and ‘Esc’ key, the
menu will be displayed
Select ‘Windows
Expl orer’ from the
menu.
Page 7
Activation of option function
Option function manual
7
ENGLISH
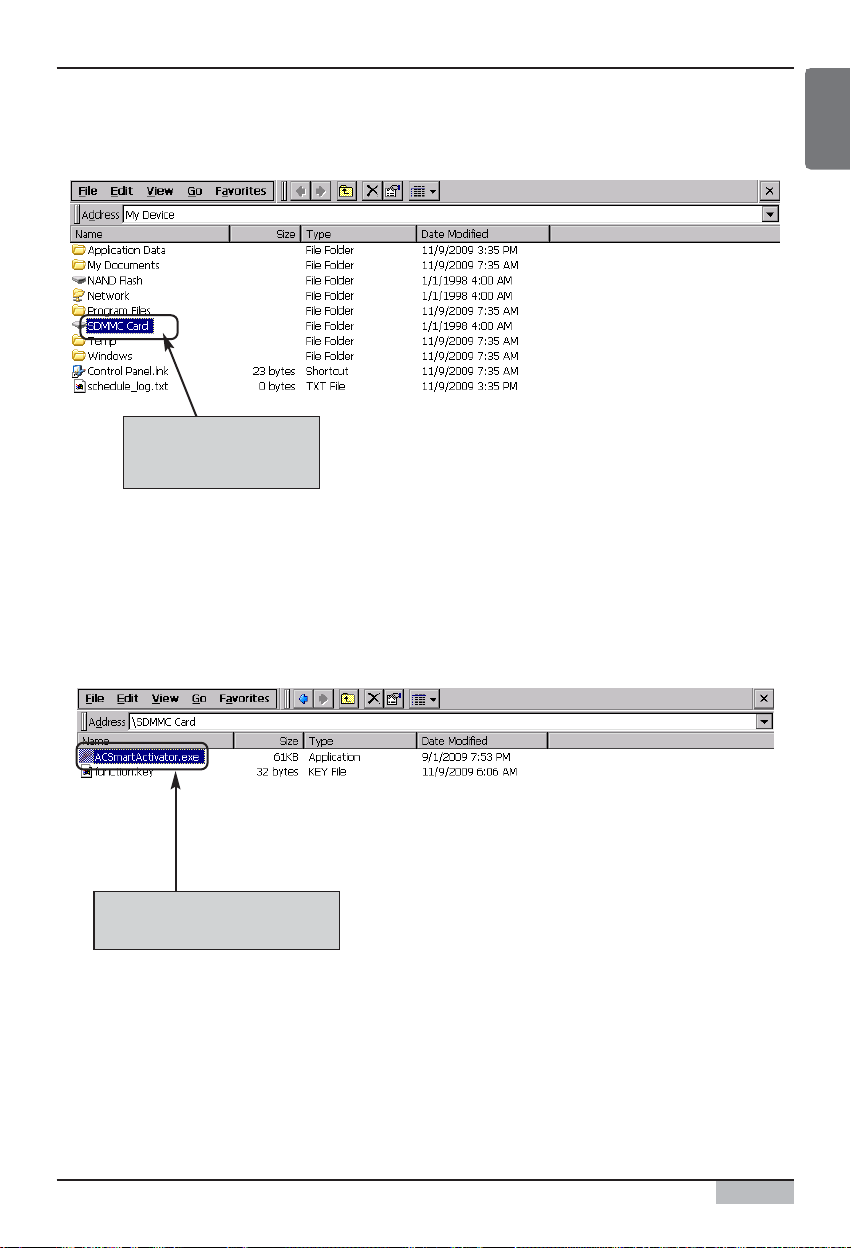
5. Windows Explorer will be displayed. Double click on the ʻSDMMC Cardʼ.
6. Double click on the ʻACSmartActivator.exeʼ file located within the SDMMC Card folder to execute
the file.
Double click on
‘SDMMC Card’ f o l der.
Double click on
‘ACSmartActivator.ex e’ fil e.
Page 8
Activation of option function
AC Smart II (Advanced Control Smart II)
8
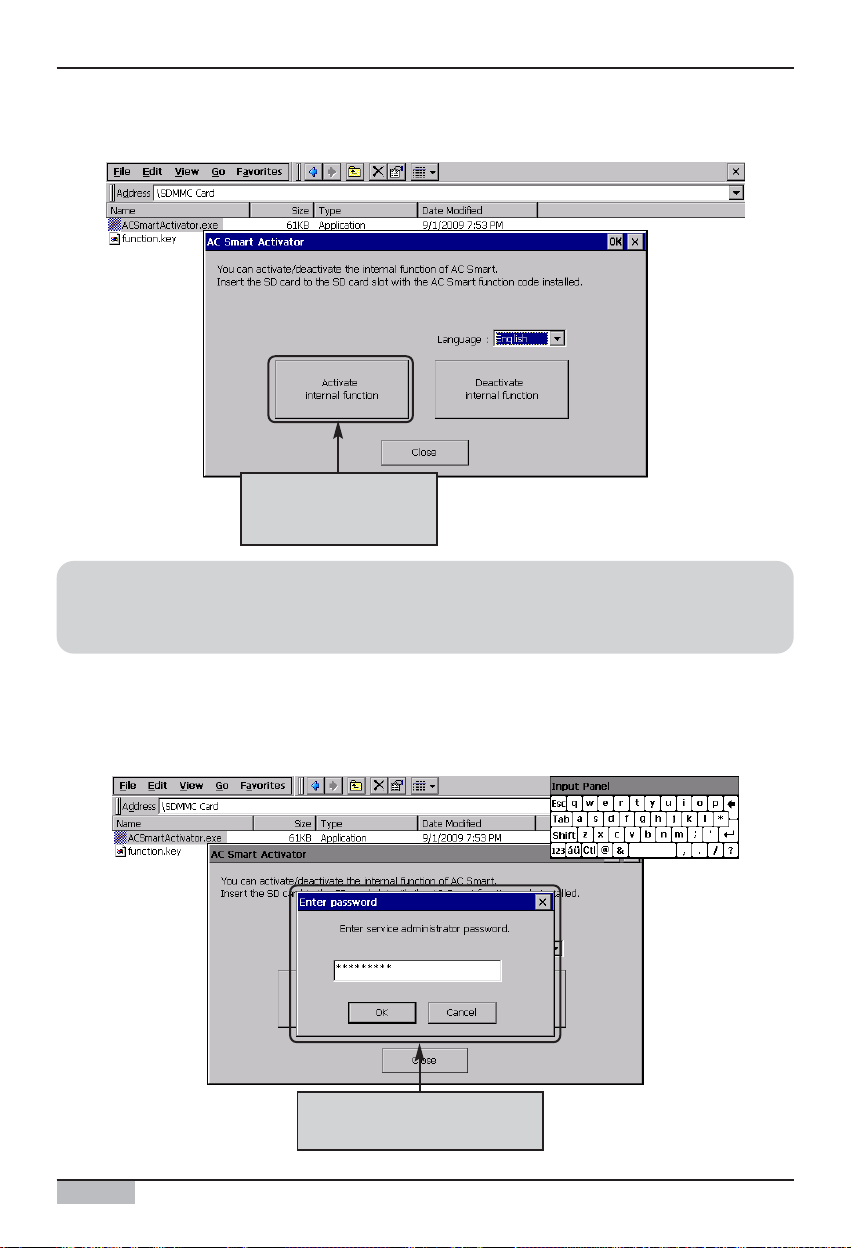
7. ʻAC Smart Activatorʼ screen will displayed. Click on ʻActivate internal functionʼ button.
8. ʻPassword inputʼ screen will be displayed. Use the software keyboard to enter the service
administrator password and click on the [OK] button.
The service administrator password is set to ʻdigital21ʼ.
Click on [Activate
internal function]
button.
After entering the pass word,
click on the [OK] button.
Reference: Change language
When you select the language from the ʻLanguageʼ item, the text displayed on the AC Smart
Activator screen will change to the selected language.
Page 9
Activation of option function
Option function manual
9
ENGLISH
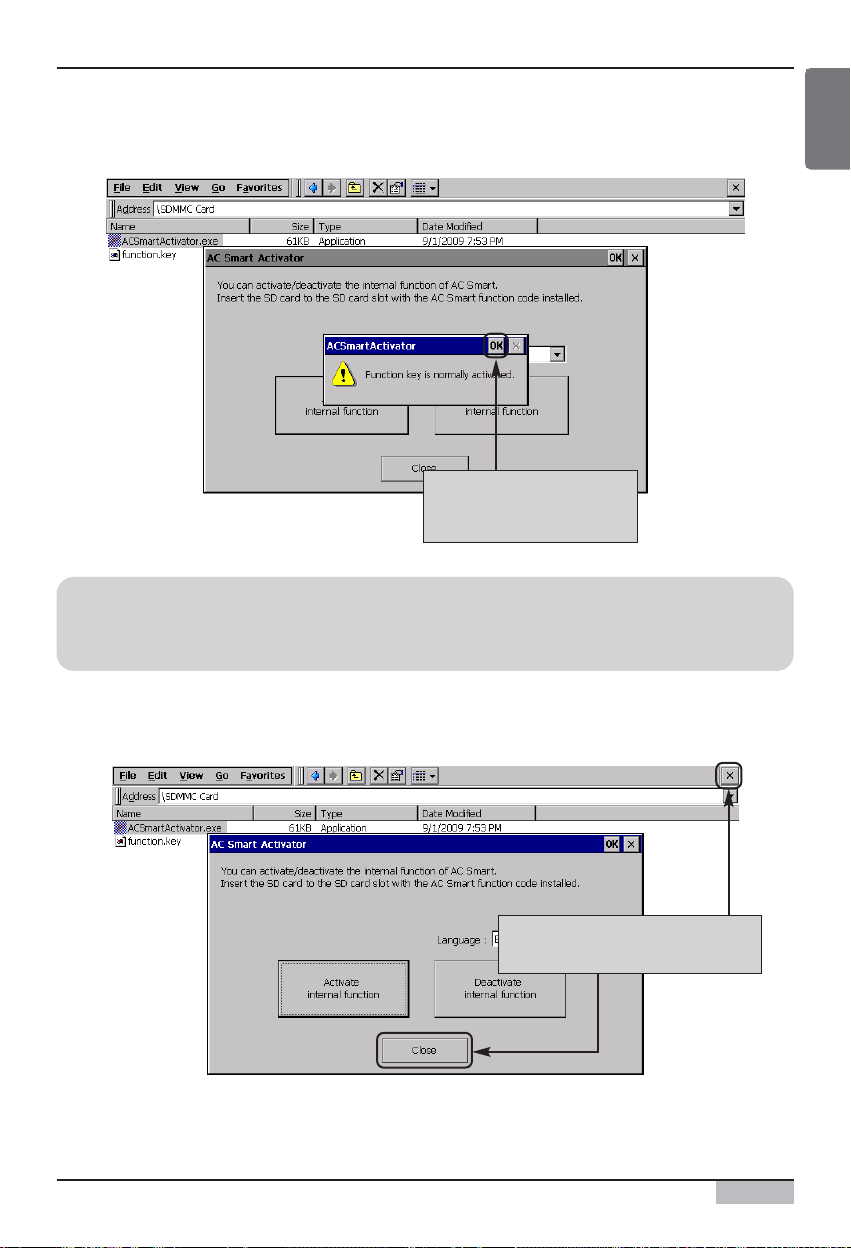
9. When you enter the password correctly, the message saying ʻFunction key has been successfully
activatedʼ will be displayed. Click on the [OK] button.
10. Click on the [Close] button of AC Smart Activator and then click on [X] button on the Windows
Explorer to end the applicable program.
When the message i s
displayed, click on the
[OK] button.
Reference: Change language
When you select the language from the ʻLanguageʼ item, the text displayed on the AC Smart
Activator screen will change to the selected language.
Click on [Close] button and [X]
button to end the program.
Page 10
Activation of option function
AC Smart II (Advanced Control Smart II)
10
11. It will return to the screen of AC SMART II. Check whether the option function is activated. For
example, connect to the AC SMART II web server function to check whether the schedule menu
can be set.
Check whether the schedule
menu can be set through the web
Page 11
Web schedule function
Option function manual
11
ENGLISH
Schedule menu throug h the
web
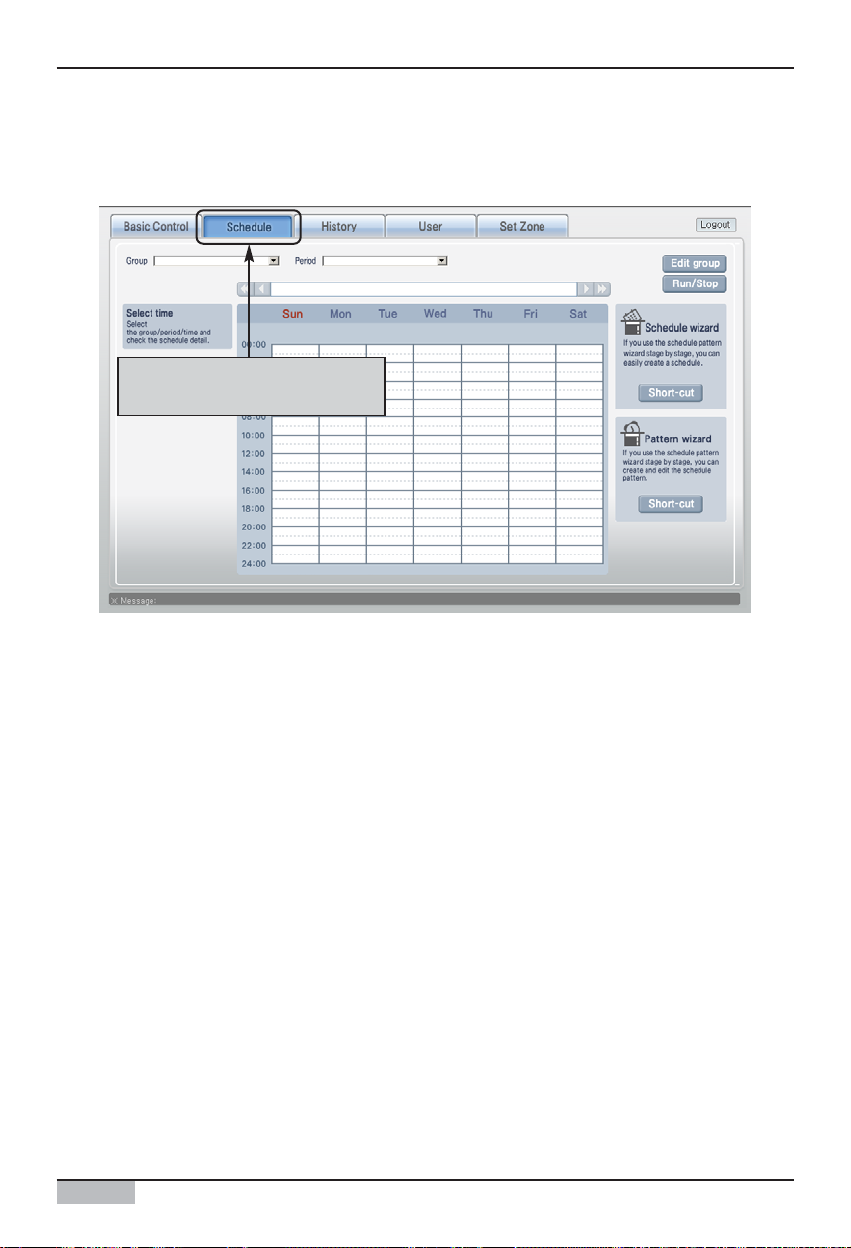
Schedule is the function to run the scheduled operation at specific time by presetting the operation of
the unit (Indoor unit, ventilator, On/Off unit, AWHP).
When the option function is added, the schedule control function and other function set on the main
unit of AC SMART II can be accessed through the web. Through this function, you can set and check
the schedule remotely.
After installing the option function, you can connect to the web server function of AC SMART II to add
the ʻScheduleʼ menu.
Web schedule function
Reference: Limitation of web schedule function use
While setting the schedule function from the AC SMART II terminal, the schedule function through
the web cannot be used and the following message will be displayed.
“Schedule is in use from the terminal. Please use again later.”
In this case, the web schedule function can be used after ending the schedule function setting
through the terminal.
Page 12
Web schedule function
AC Smart II (Advanced Control Smart II)
12
Generally the web schedule can be set in accordance to the following order.
This chapter describes the method of operating the AC SMART II function by using the web schedule.
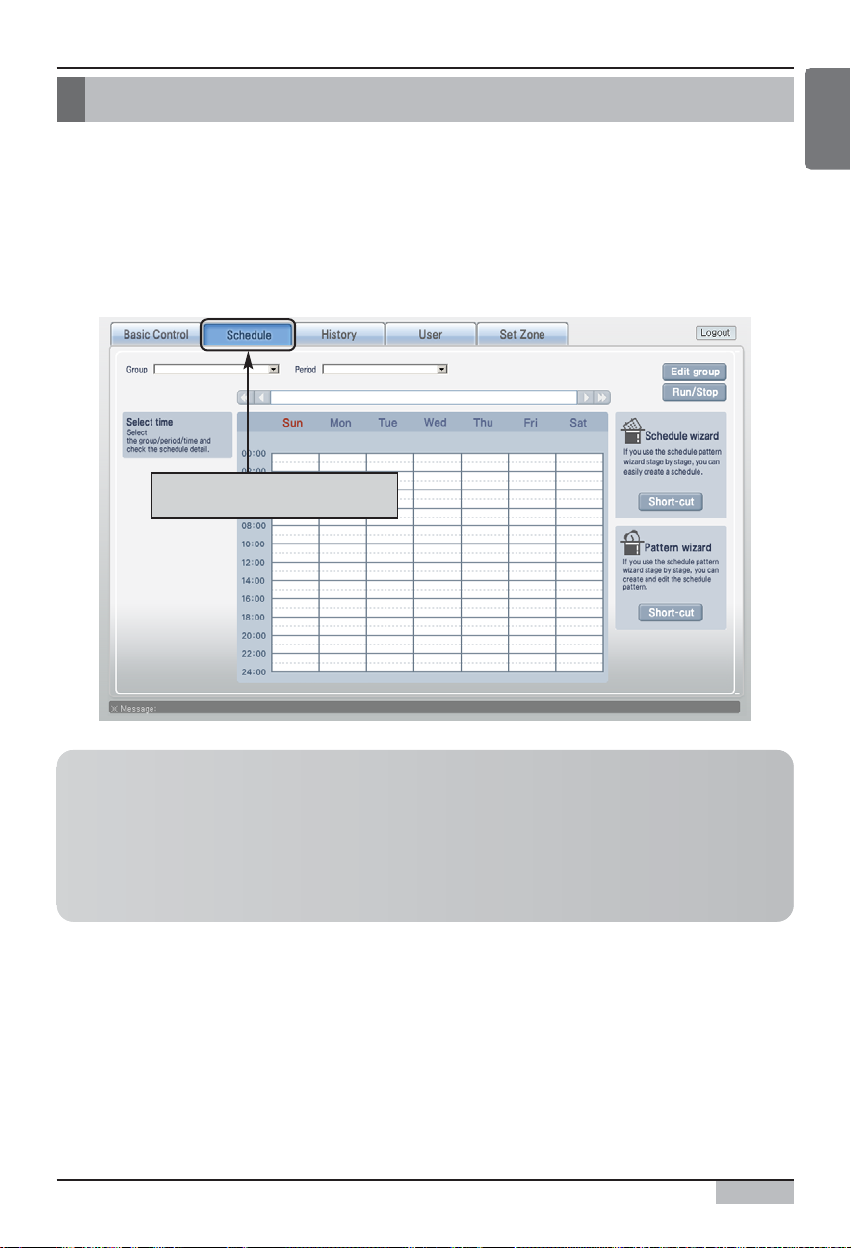
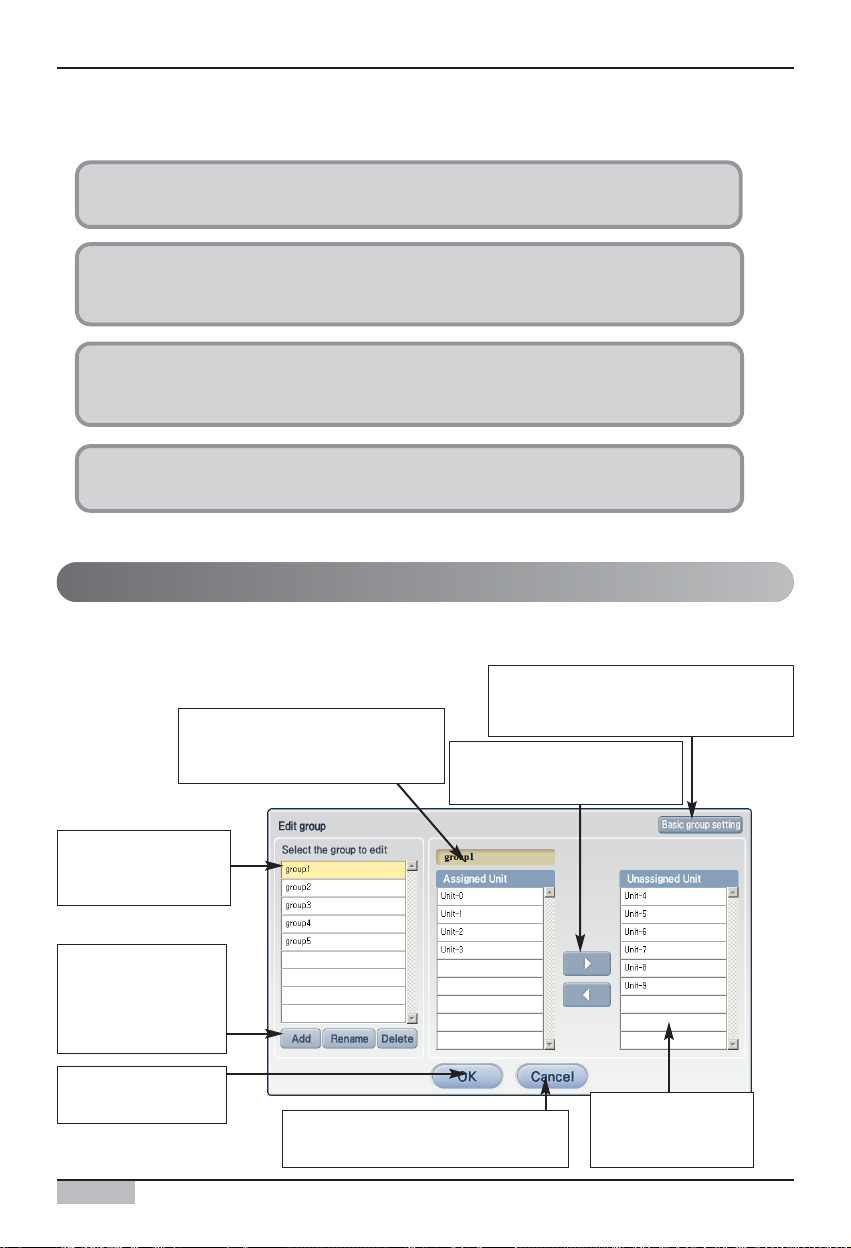
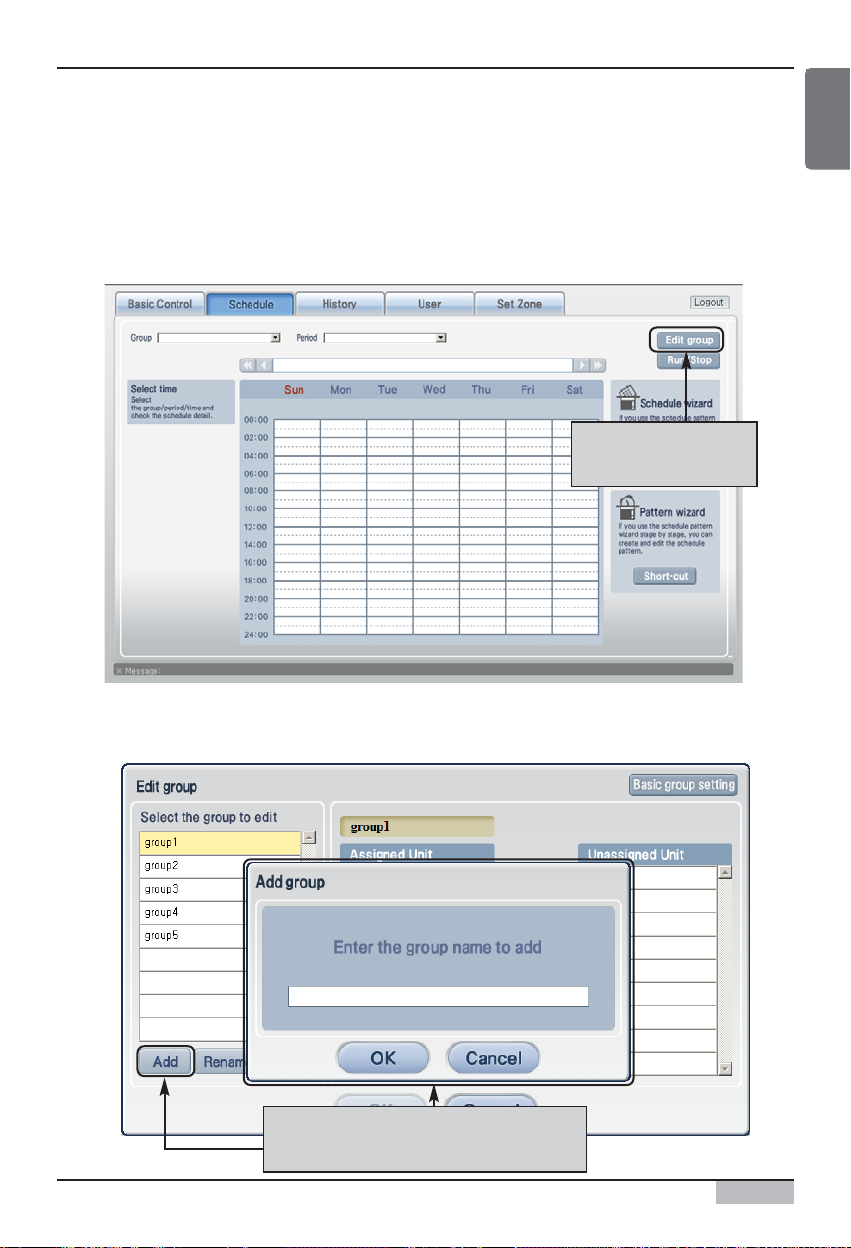
Schedule group is a collection of units running the same operation. When you press the [Edit group]
button on the top right corner, the ʻEdit groupʼ screen will be displayed to create, edit or delete the
schedule group.
1. Edit schedule group
You can create or edit the schedule group through the group edit.
2. Edit schedule pattern
You can create or edit the weekly/daily schedule pattern through schedule pattern
wizard.
3. Set schedule through schedule wizard
You can apply the schedule pattern and operating period to the schedule group
through the schedule wizard.
4. Run and stop the schedule
You can run or stop the schedule applied to the schedule group.
Managing schedule group
Currently selected group name
an d l i s t o f un i ts i ncl ude d i n t h e
applicable group are displayed.
Li s t o f c urre n t l y
regi stered schedule
group is displayed.
You can create,
rename or delete the
schedule group
depending on each
button.
Yo u c an des i g n at e
the setting.
You can cancel to save the s etting
and return to the previo us screen.
List of units not
i n c l uded i n t h e
group is displayed.
You can include or ex clude
the unit from a speci fic
group.
You can create a schedule group with
the same configuration as the g roup
set from the unit management menu.
Page 13
Web schedule function
Option function manual
13
ENGLISH
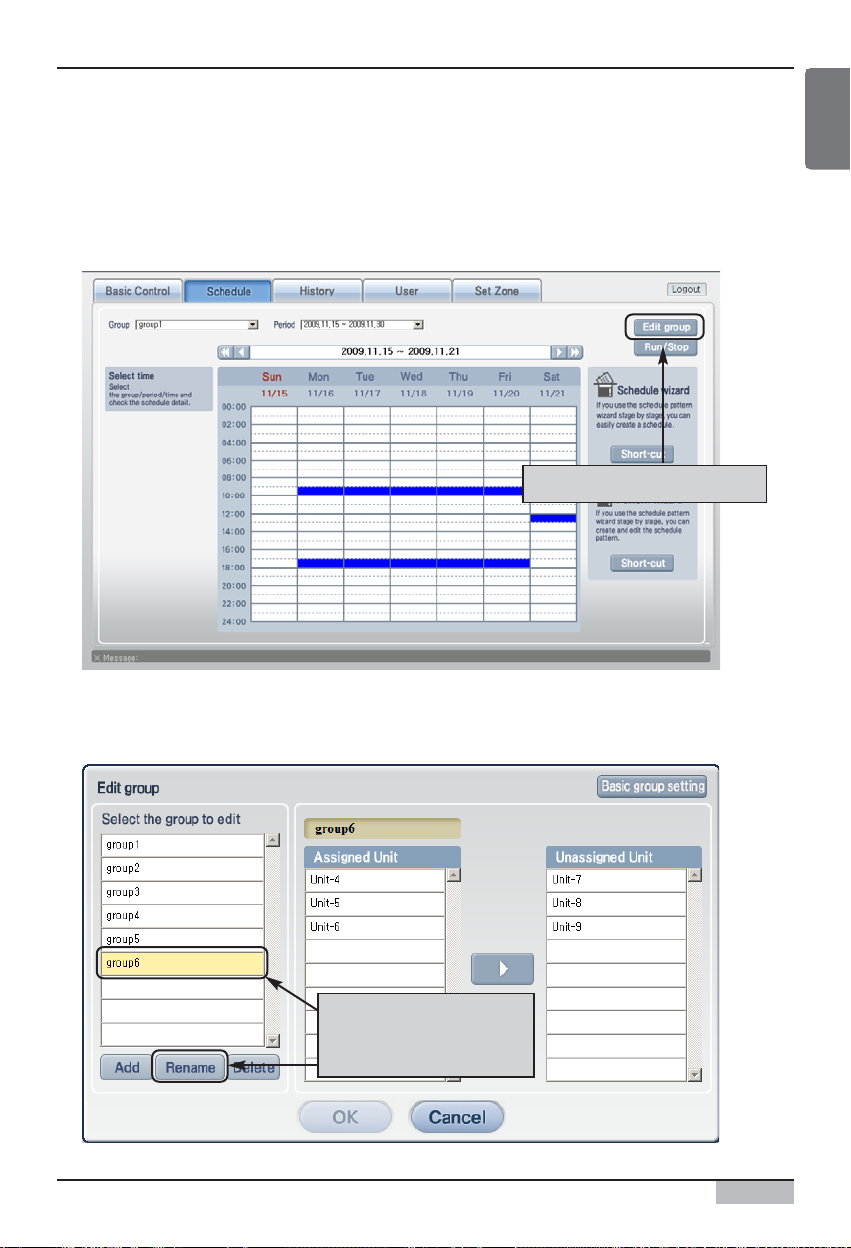
■ Creating schedule group
To create a new schedule group, proceed as follows.
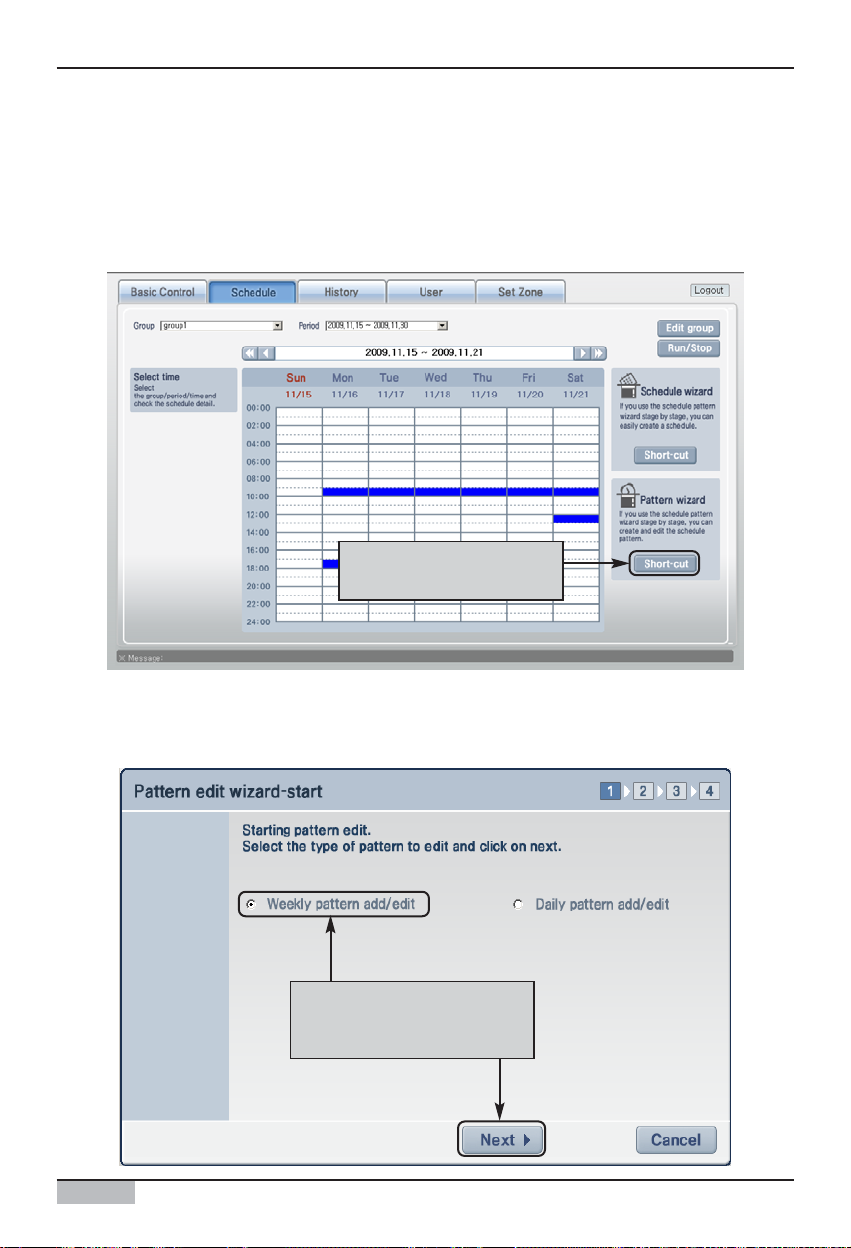
1. When you connect to web server of AC SMART II and select the ʻScheduleʼ menu, the following
screen will be displayed. To create the schedule group, click on the [Edit group] button.
Click on [Edit group]
button
2. ʻEdit groupʼ screen will be displayed. To create a new schedule group, click on the [Add] button.
ʻAdd groupʼ screen will be displayed to enter the name of the schedule group to create.
When you click on the [Add] button,
‘Add group’ screen will be displayed.
Page 14
AC Smart II (Advanced Control Smart II)
14
Web schedule function
3
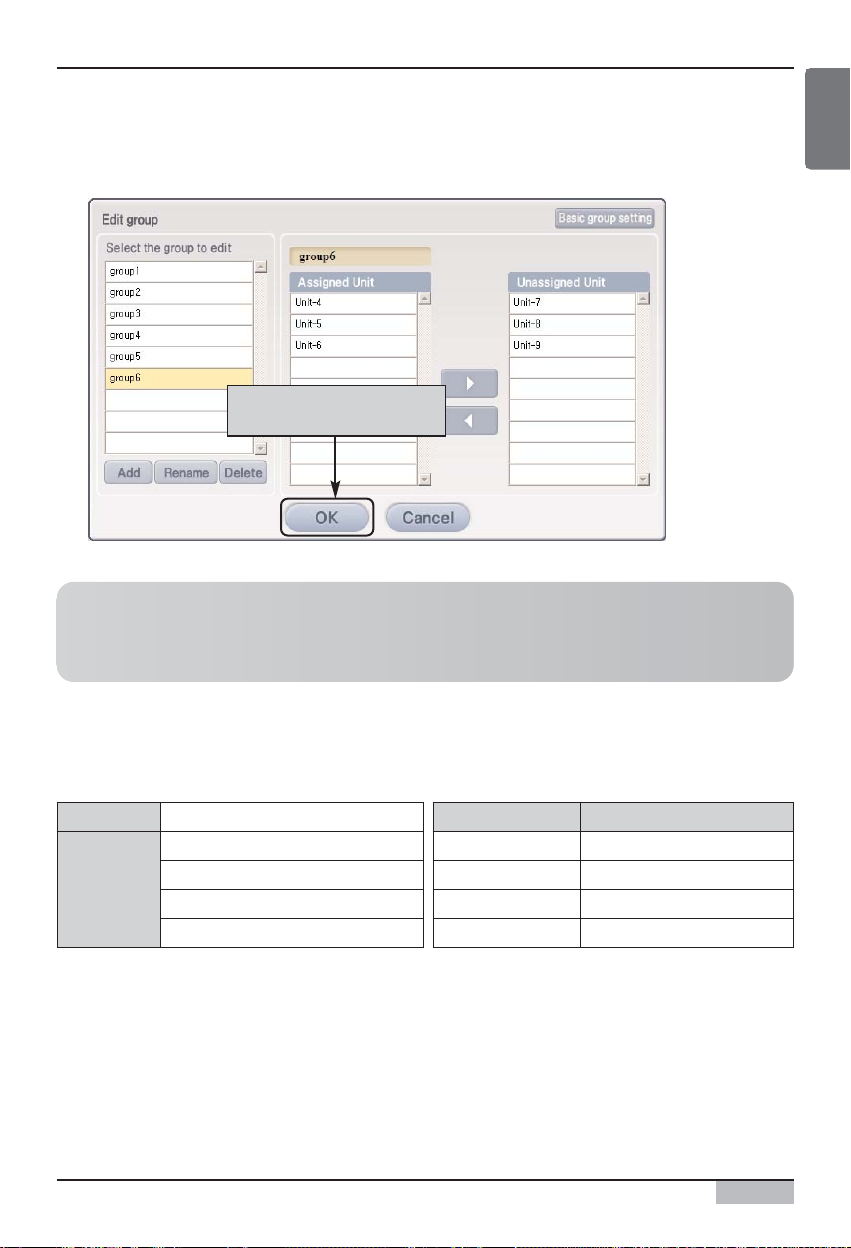
. After entering the name of the schedule group to create, click on the [OK] button.
4
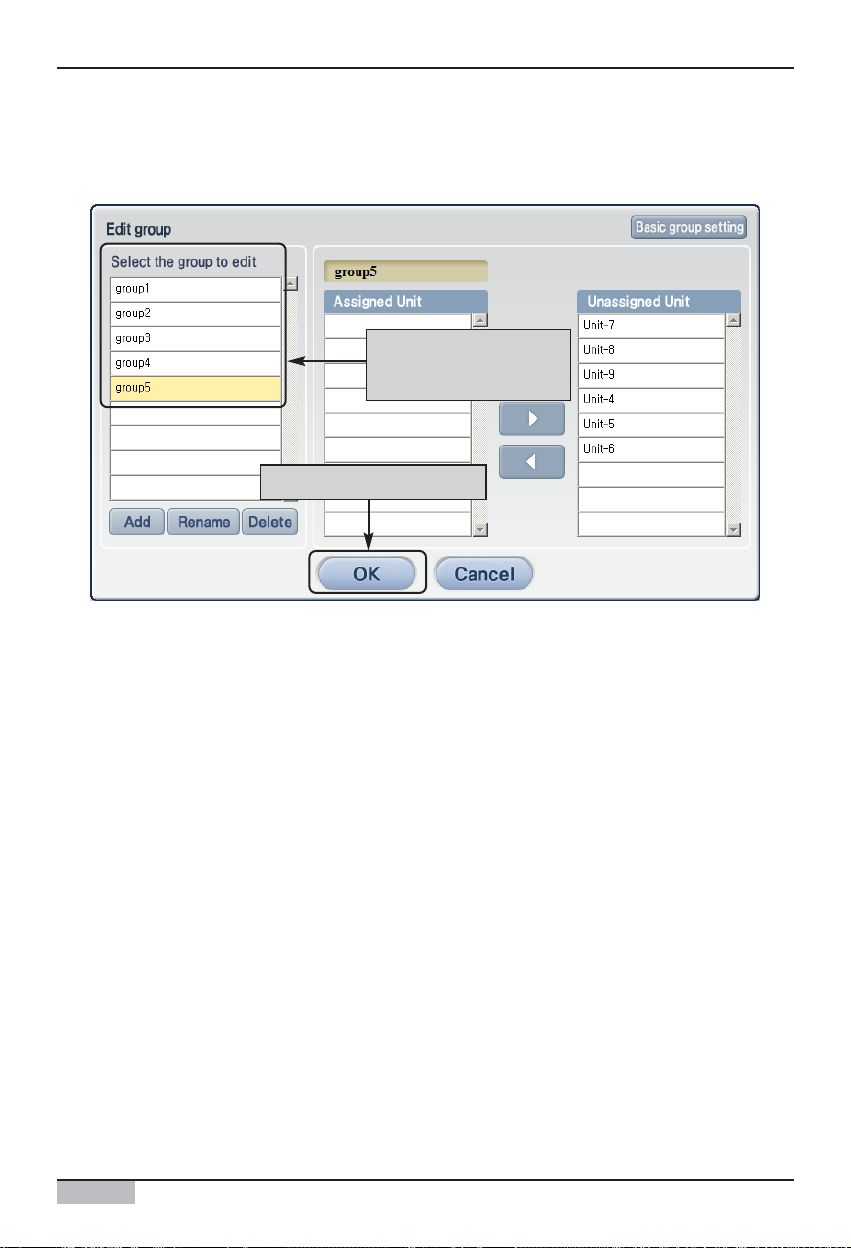
. Check whether the applicable schedule group is created in the ʻGroup nameʼ. At this time, select
the unit to include to the schedule group from the unregistered unit list and click on the [<] button to
move to the registered unit.
After entering the group
name, click on the [OK]
button.
Check whether
schedule group is
created
Click on [<] button to include
the unit to the regi stered unit
Page 15
Option function manual
15
ENGLISH
Web schedule function
5
. Click on the [OK] button to save the current setting. When the saving is completed, the group edit
screen will disappear.
Click on the [OK] button to
save the setting
Reference: Create schedule group on web server
The configuration of the schedule group and physical group created on the web server can be
different.
n Detail Guide
When use a AC Smart II Web Schedule function, have to check below caution.
If user set a specification for schedule over company guidance,
AC Smart II canʼt operate Web Schedule function.
[Guide a limitation]
installation 128 Units
Setting
Schedule
Spec.
10 Schedule Groups
4 weekly patterns For 1Month
7 daily patterns for 1 week
24 events for 1 day
AC Smart II
Schedule Gr. 10
Daily pattern 7
Weekly pattern 4
Event of day 24
Page 16
Web schedule function
AC Smart II (Advanced Control Smart II)
16
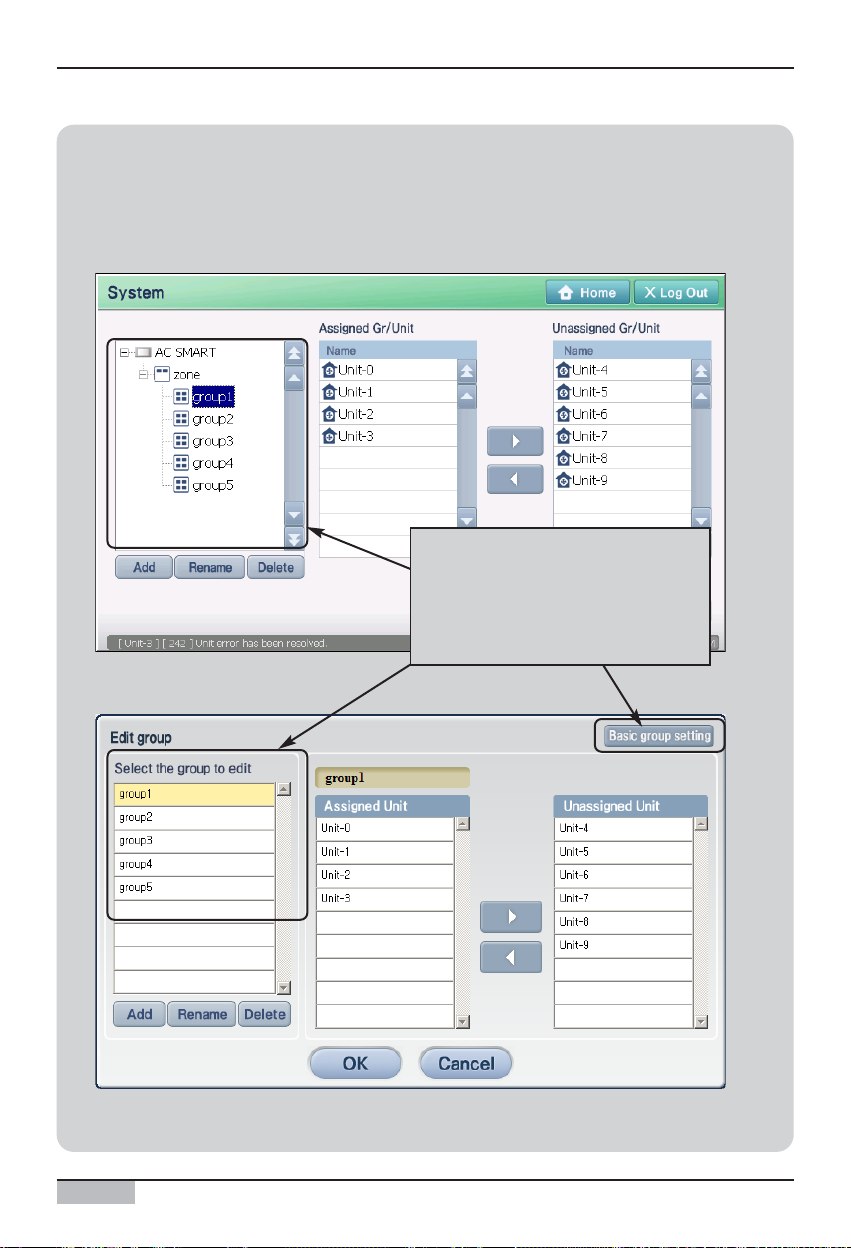
Information: Set schedule group using basic group setting button
When you click on the [Basic group setting] button located at the top right corner of the ʻEdit groupʼ
screen, same group as the basic control group set in control and monitoring of the ʻUnit
managementʼ menu of AC SMART II terminal will be created in the schedule group.
When you click on [Basic group
setting] button, the same group as
the group confi gured from the ‘Unit
manag e men t’ men u wil l
automatically be created in the
schedule group.
<Terminal unit screen>
<Web server screen>
Page 17
Web schedule function
Option function manual
17
ENGLISH
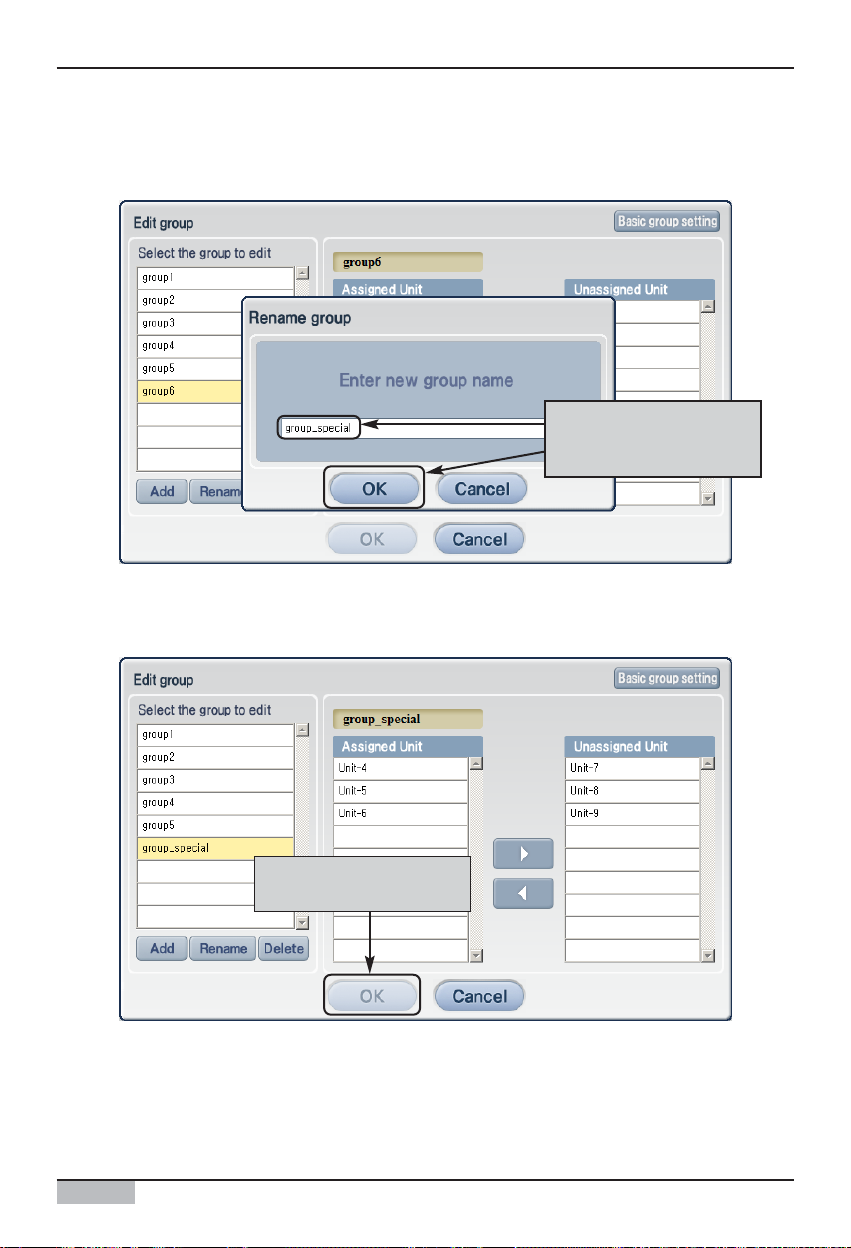
■ Renaming schedule group
To rename the schedule group, proceed as follows.
1
. When you connect to web server of AC SMART II and select the ʻScheduleʼ menu, the following
screen will be displayed. To create the schedule group, click on the [Edit group] button.
Click on [Edit g roup] button
2
. ʻEdit groupʼ screen will be displayed. Select the schedule group to rename and click on the
[Rename] button.
After selecting the
schedule group, click on
the [Rename] button.
Page 18
Web schedule function
AC Smart II (Advanced Control Smart II)
18
3
. ʻRename groupʼ screen will be displayed. After entering the name of the schedule group to
rename, click on the [OK] button.
After entering the name of
the schedule group, click
on the [OK] button.
4
. Click on the [OK] button to save the current setting. When the saving is completed, the group edit
screen will disappear.
Click on the [OK] button
to save the setti ng
Page 19
Web schedule function
Option function manual
19
ENGLISH
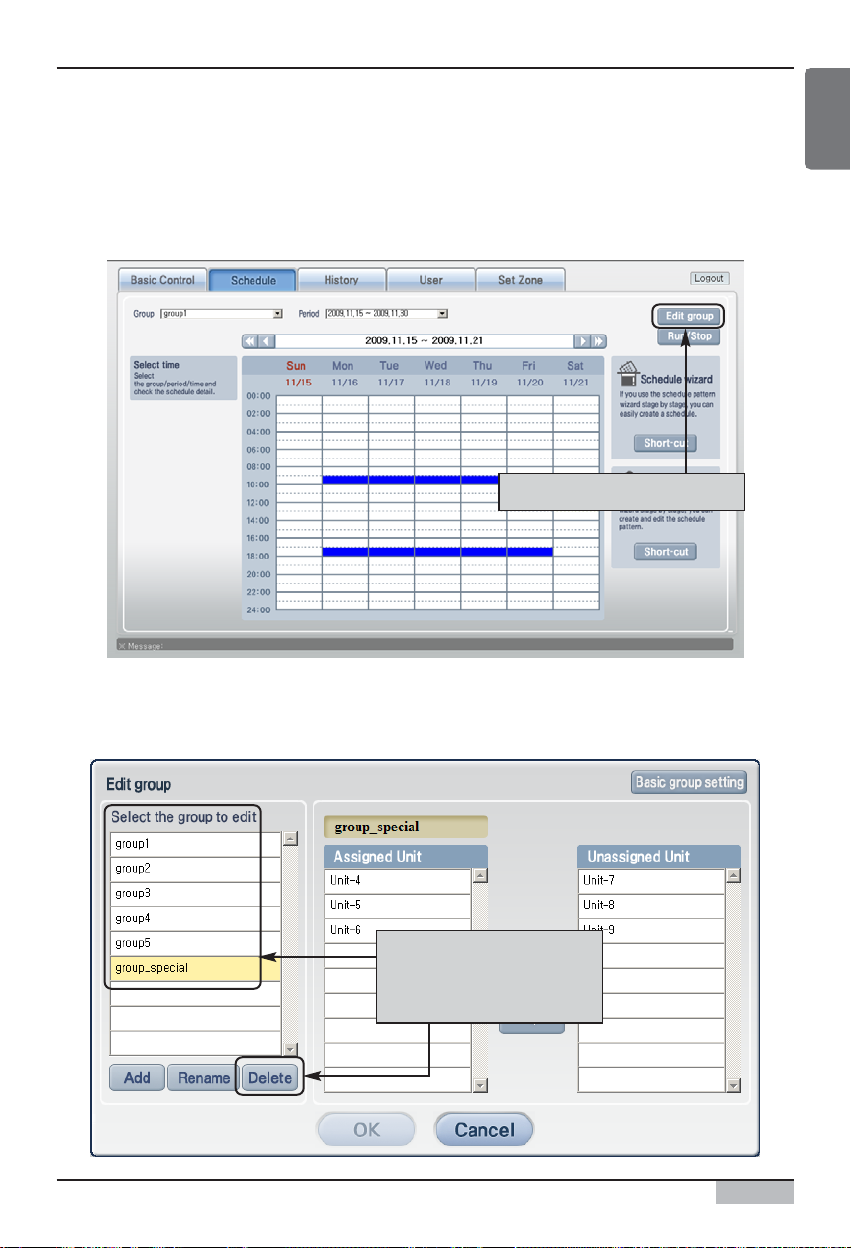
■ Deleting schedule group
To delete the schedule group, proceed as follows.
1
. When you connect to web server of AC SMART II and select the ʻScheduleʼ menu, the following
screen will be displayed. To create the schedule group, click on the [Edit group] button.
Click on [Edit g roup] button
2
. ʻEdit groupʼ screen will be displayed. Select the schedule group to delete and click on the [Delete]
button. The applicable schedule group will be deleted.
After selecting the
schedule group to delete,
click on the [Delete]
button.
Page 20
Web schedule function
AC Smart II (Advanced Control Smart II)
20
3
. Check whether the applicable schedule group is deleted and click on the [OK] button to save the
current setting. When the saving is completed, the group edit screen will disappear.
Check whether schedule
group is deleted
Click on the [OK] button
Page 21

Web schedule function
Option function manual
21
ENGLISH
Creating schedule pattern
Schedule pattern refers to a certain operation of the unit (Indoor unit, ventilator, On/Off unit, AWHP)
repeated on a weekly or daily basis.
Schedule pattern wizard enables you to configure the operation of the unit on weekly or daily pattern.
The pattern created through the schedule pattern wizard is applied as the schedule to the group
through the schedule wizard to be described in the next chapter.
Schedule pattern wizard proceeds in total of 4 stages as shown below.
1. Select schedule pattern type 2. Select to add/edit schedule pattern
3. Enter schedule pattern name 4. Edit schedule pattern
1
34
2
Page 22
AC Smart II (Advanced Control Smart II)
22
Web schedule function
■ Adding weekly schedule pattern
To add a weekly schedule pattern, proceed as follows.
1
. When you connect to web server of AC SMART II and select the ʻScheduleʼ menu, the following
screen will be displayed. To create the schedule pattern, click on the [Short cut] button of the
schedule pattern wizard.
Click on [Short cut] button
of schedule pattern wizard
2
. ʻSchedule pattern edit wizardʼ screen will be displayed. To create a new weekly schedule pattern,
select ʻAdd/Edit weekly schedule patternʼ and then click on the [Next] button.
After selecting ‘Add/Edit
weekly schedule pattern’,
click on the [Next] button.
Page 23

Option function manual
23
ENGLISH
Web schedule function
3
. Select ʻAdd patternʼ and then click on the [Next] button.
Select ‘Add pattern’ and
then click on the [Next]
button.
Reference: Edit weekly schedule pattern
When editing the weekly schedule pattern, select the weekly schedule pattern to edit from the list
and select ʻEdit schedule patternʼ. Everything is the same as the process of adding a weekly pattern
except for the fact that you cannot enter the pattern name at stage 3 of the schedule pattern edit
wizard.
Information: Rename and delete schedule pattern
In stage 2 of the schedule pattern edit wizard,
you can rename the existing schedule pattern
or delete the pattern that has been created.
To rename the schedule pattern, click on the
[Rename pattern] button and enter a new
name.
To delete the schedule pattern, select the
schedule pattern to delete, and click on the
[Delete pattern] button. After renaming and
deleting the schedule pattern, the wizard will
not proceed to the next stage.
Page 24

Web schedule function
AC Smart II (Advanced Control Smart II)
24
4
. Enter the name of weekly schedule pattern and click on the [Next] button.
Enter the name of weekly schedule
pattern and cl ick o n the [Next] button.
5
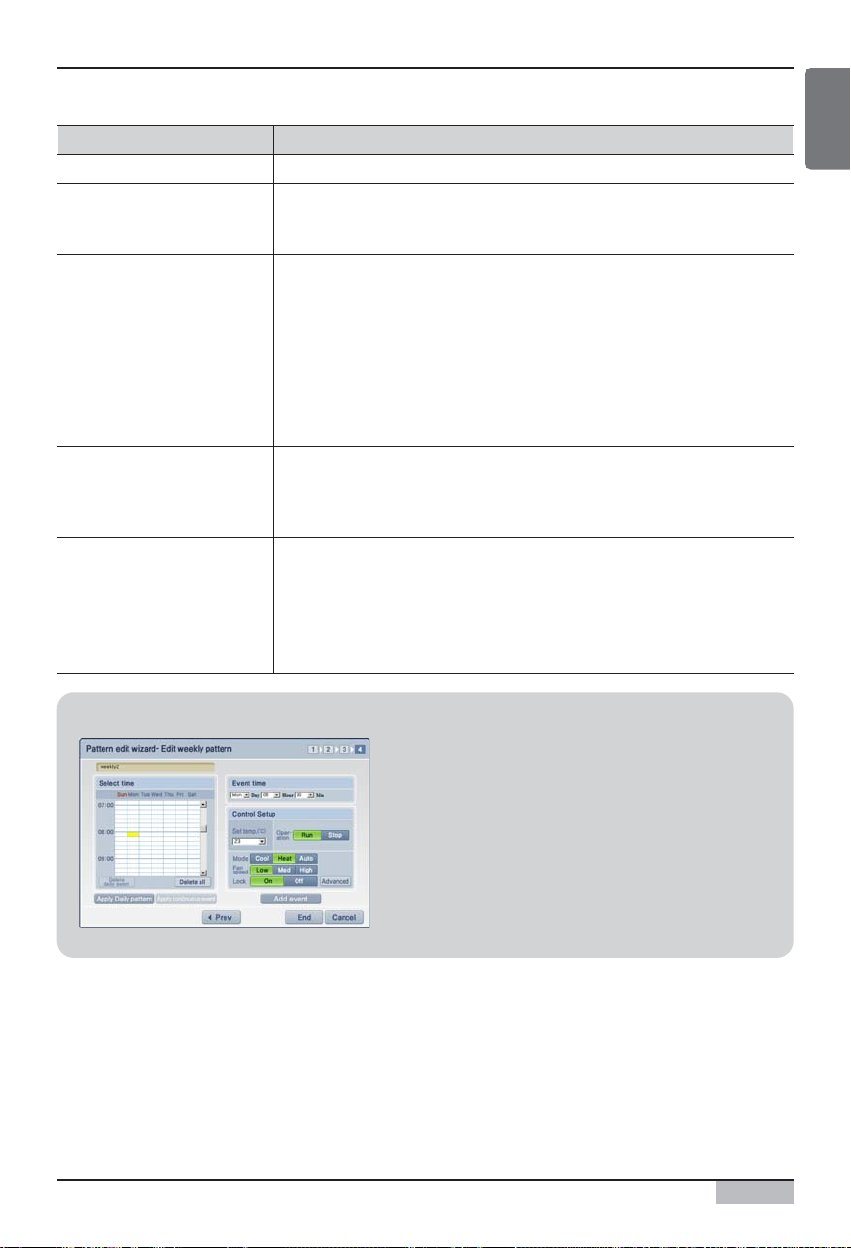
. Select the time to operate the unit from ʻSelect timeʼ or ʻSchedule timeʼ. And then from the ʻControl
settingʼ, set the operation of the unit. Refer to the operation that can be set in the following table.
Page 25
Option function manual
25
ENGLISH
Web schedule function
Item Description
You can set the desired indoor temperature you want to maintain.
You can set the unit (Indoor unit, ventilator, On/Off unit, AWHP) to run and stop.
• [Run]: This turns on the power of the unit.
• [Stop]: This turns off the power of the unit.
You can set the operating mode of the indoor unit.
• [Cooling]: This runs the unit in air conditioning mode. You can select the
desired temperature between 18°C and 30°C from the set temperature. When
the desired temperature is higher than the indoor temperature during the air
operation, the unit will run in the fan mode.
• [Heating]: This runs the unit in heating mode. You can select the desired
temperature between 18°C and 30°C from the set temperature.
• [Auto]: This judges the indoor condition and maintains at optimal condition
automatically.
This sets the Fan speed of the indoor unit.
• [Low]: This sets the Fan speed to low level.
• [Med]: This sets the Fan speed to medium level.
• [High]: This sets the Fan speed to high level.
This locks/unlocks the lock function so that the user cannot directly change the
setting of the unit (Indoor unit, ventilator, AWHP)
• [Lock]: This sets the lock function so that all the functions cannot be changed
individually.
• [Unlock]: This cancels the lock function so that all the function can be
changed individually.
Lock
Set temperature
Operation
Mode
Fan speed
Information: Delete schedule
If you want to delete all the existing schedules, click on
the [Delete all] button. If you want to delete the schedule
by day, press the time period of the day you want to
delete and then click on the [Delete daily event] button to
delete all the schedules of the applicable day.
Page 26

AC Smart II (Advanced Control Smart II)
26
Web schedule function
6
. When you click on the [Modify] button, the schedule will be added to the table. If you have
additionally planned schedules, repeat the current process and continue to add the set event.
When all the schedules are set, click on the [End] button.
Click on the [Modify ] button
to a dd t h e s c h e dul e .
When all the s chedules are s et,
click on the [End] button.
Information: Apply daily schedule pattern and apply daily
continuously
When creating or editing the weekly schedule pattern,
you can apply the daily schedule pattern. When you
click on the [Apply daily schedule pattern] button in the
4 stage process of schedule edit pattern wizard, you
can open the daily schedule pattern and apply to
specific days.
Also you can set specific schedule patterns to several
days continuously. When you select the schedule
pattern from the 4 stages of the schedule edit pattern
wizard, and click on the [Apply daily continuously], you
can apply the same pattern throughout several days.
<Screen to apply daily schedule
pattern>
<Screen to apply daily schedule
continuously>
Page 27

Web schedule function
Option function manual
27
ENGLISH
7
. A message saying that the schedule pattern edit is completed. Press the [OK] button to end the
edit.
Click on the [OK] button to
end the wizard.
Page 28

Web schedule function
AC Smart II (Advanced Control Smart II)
28
■ Adding daily schedule pattern
To add a daily schedule pattern, proceed as follows.
1
. When you connect to web server of AC SMART II and select the ʻScheduleʼ menu, the following
screen will be displayed. To create the schedule pattern, click on the [Short cut] button of the
schedule pattern wizard.
Click on [Short cut] button
of schedule pattern wizard
2
. ʻSchedule pattern edit wizardʼ screen will be displayed. To create a new daily schedule pattern,
select ʻDaily pattern add/editʼ and then click on the [Next] button.
After selecting ‘Daily
pattern add/edit’, click on
the [Next] button.
Page 29

Web schedule function
Option function manual
29
ENGLISH
3
. Select ʻAdd patternʼ and then click on the [Next] button.
Select ‘Add pattern’ and
then click on the [Next]
button.
Reference: Edit daily schedule pattern
When editing the daily schedule pattern, select the daily schedule pattern to edit from the list and
select ʻEdit schedule patternʼ. Everything is the same as the process of adding a daily pattern
except for the fact that you cannot enter the pattern name at stage 3 of the schedule pattern edit
wizard.
Information: Rename and delete schedule pattern
In stage 2 of the schedule pattern edit wizard,
you can rename the existing schedule pattern
or delete the pattern that has been created.
To rename the schedule pattern, click on the
[Rename pattern] button and enter a new
name.
To delete the schedule pattern, select the
schedule pattern to delete, and click on the
[Delete pattern] button. After renaming and
deleting the schedule pattern, the wizard will
not proceed to the next stage.
Page 30

Web schedule function
AC Smart II (Advanced Control Smart II)
30
4
. Enter the name of daily schedule pattern and click on the [Next] button.
Enter the name of dail y
s c h e dul e p atte rn an d c l ick
on the [Next] button.
5
. Select the time to operate the unit from ʻSelect timeʼ or ʻSchedule timeʼ. And then from the ʻControl
settingʼ, set the operation of the unit. Refer to the operation that can be set in the following table.
Page 31

Web schedule function
Option function manual
31
ENGLISH
Item Description
You can set the desired indoor temperature you want to maintain.
You can set the unit (Indoor unit, ventilator, On/Off unit, AWHP) to run and stop.
• [Run]: This turns on the power of the unit.
• [Stop]: This turns off the power of the unit.
You can set the operating mode of the indoor unit.
• [Cooling]: This runs the unit in air conditioning mode. You can select the
desired temperature between 18°C and 30°C from the set temperature. When
the desired temperature is higher than the indoor temperature during the air
conditioning operation, the unit will run in the fan mode.
• [Heating]: This runs the unit in heating mode. You can select the desired
temperature between 18°C and 30°C from the set temperature.
• [Auto]: This judges the indoor condition and maintains at optimal condition
automatically.
This sets the Fan speed of the indoor unit.
• [Low]: This sets the Fan speed to low level.
• [Med]: This sets the Fan speed to medium level.
• [High]: This sets the Fan speed to high level.
This locks/unlocks the lock function so that the user cannot directly change the
setting of the unit (Indoor unit, ventilator, AWHP)
• [Lock]: This sets the lock function so that all the functions cannot be changed
individually.
• [Unlock]: This cancels the lock function so that all the function can be
changed individually.
Lock
Set temperature
Operation
Mode
Fan speed
Information: Delete schedule
If you want to delete all the existing schedules, click on
the [Delete all] button. If you want to delete the schedule
by day, press the time period of the day you want to
delete and then click on the [Delete daily event] button to
delete all the schedules of the applicable day.
Page 32
Web schedule function
AC Smart II (Advanced Control Smart II)
32
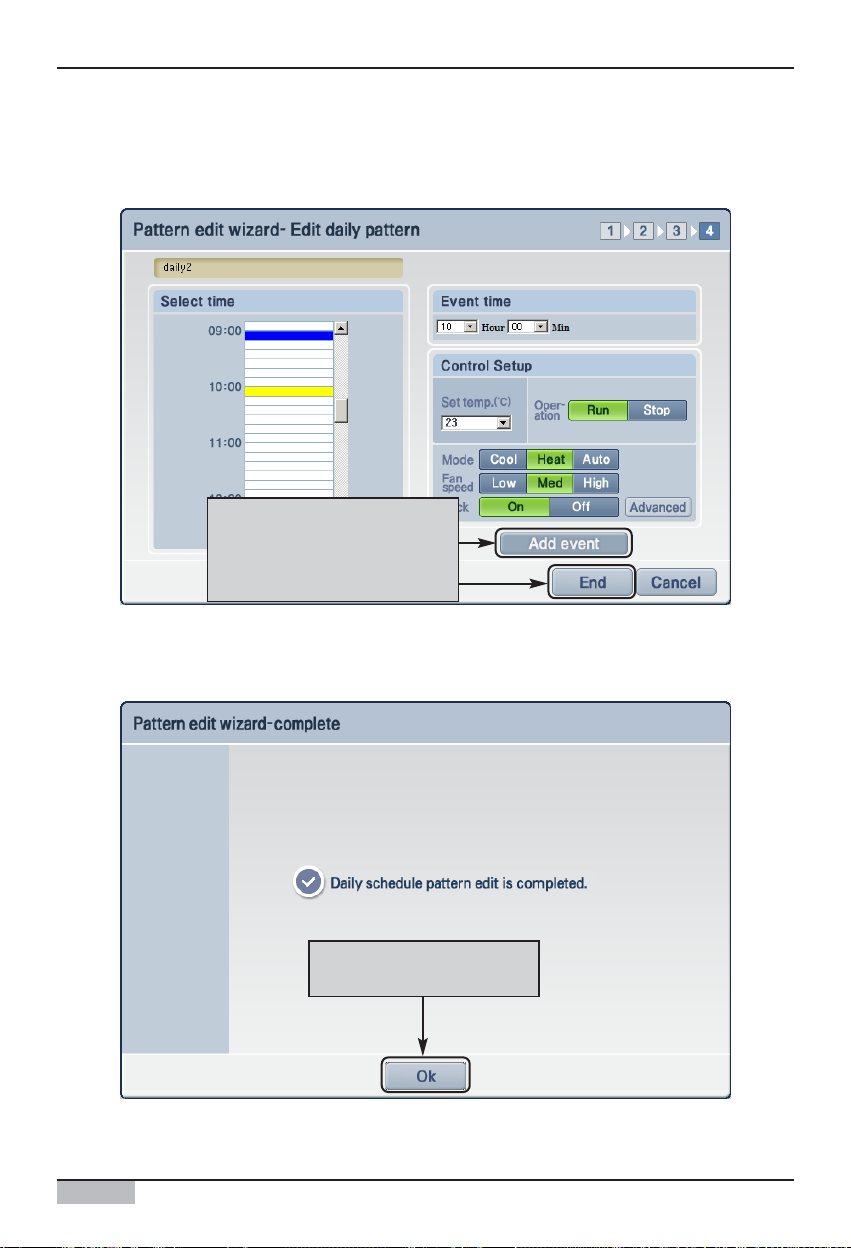
6
. When you click on the [Add event] button, the schedule will be added to the table. If you have
additionally planned schedules, repeat the current process and continue to add the set event.
When all the schedules are set, click on the [End] button.
Click on the [Add event]
button to add the schedule.
When all the s chedules are s et,
click on the [End] button.
7
. A message saying that the schedule pattern edit is completed. Press the [OK] button to end the
edit.
Click on the [OK] button to
end the wizard.
Page 33
Web schedule function
Option function manual
33
ENGLISH
■ Setting detail schedule pattern
When you add or edit the weekly and daily schedule pattern, you can set the detail operation of each
unit through detail schedule.
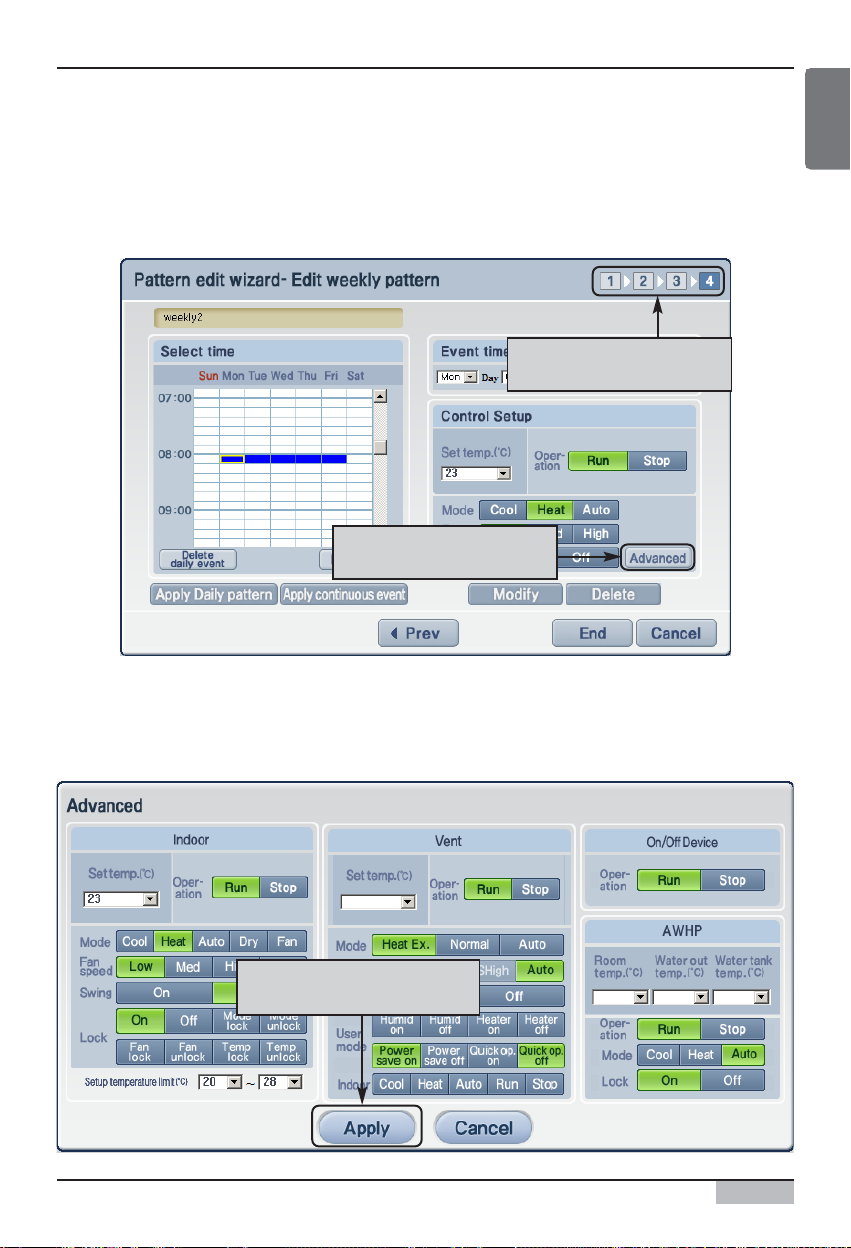
1
.In stage 4 of the weekly or daily schedule pattern wizard, click on the [Advanced] button.
Stage 4 of schedule pattern
wizard
Click on the [Advanced]
button
2
. ʻDetail schedule settingʼ screen to set the detail operation of the unit will be displayed. After setting
the schedule, click on the [Apply] button.
Refer to the following table for the operation you can select in ʻAdvancedʼ.
After setting the schedule,
click on the [Apply] button.
Page 34

Web schedule function
AC Smart II (Advanced Control Smart II)
34
Item Description
You can set the desired indoor temperature.
You can set the indoor unit to run and stop.
• [Run]: This turns on the power of the indoor unit.
• [Stop]: This turns off the power of the indoor unit.
You can set the operating mode of the indoor unit.
• [Cooling]: This runs the unit in air conditioning mode. You can select the
desired temperature between 18°C and 30°C from the set temperature. When
the desired temperature is higher than the indoor temperature during the air
conditioning operation, the unit will run in the fan mode.
• [Heating]: This runs the unit in heating mode. You can select the desired
temperature between 18°C and 30°C from the set temperature.
• [Auto]: This judges the indoor condition and maintains at optimal condition
automatically.
• [Dry]: This runs the unit in dehumidifier mode. During the rainy season or
when the humidity is high, you can effectively remove the humidity with this
mode. When you set the indoor unit to this mode, you cannot set a desired
temperature.
• [Fan]: This runs the unit in fan mode. Fresh air will be provided by running the
air purifier. It is good to use this just for air purification during the spring or fall.
When you set the indoor unit to this mode, you cannot set a desired
temperature.
This sets the fan level of the indoor unit. Adjust the fan level considering the
level of indoor contamination.
• [Low]: This sets the Fan speed to low level.
• [Med]: This sets the Fan speed to medium level.
• [High]: This sets the Fan speed to high level.
• [Auto]: This measures the level of indoor contamination automatically and
maintains the optimal condition.
Enable/Disable the lock function for the user to individually control the unit.
• [Set]: The fan direction automatically rotates.
• [Cancel]: The fan direction stays consistent.
This sets the lock function so that the user cannot control the indoor unit.
• [Lock all]: This sets the lock function so that all the functions of the indoor unit
cannot be changed individually.
• [Unlock all]: This cancels the lock all function.
• [Mode lock]: This locks the operating mode of the indoor unit so that it cannot
be controlled individually.
• [Mode unlock]: This cancels the mode lock function.
• [Fan lock]: This locks the fan level so that it cannot be controlled individually.
• [Fan unlock]: This cancels the fan level lock function.
Mode
Operation
Fan speed
Fan direction
Lock
Set temperature
[Indoor unit setting item]
Page 35

Web schedule function
Option function manual
35
ENGLISH
Item Description
• [Set temperature lock]: This locks the set temperature so that it cannot be
controlled individually.
• [Set temperature unlock]: This cancels the set temperature lock function.
You can limit the indoor temperature setting so that the indoor temperature is set
within a certain temperature range. In this case, the temperature outside of the
set temperature range cannot be controlled individually by the user.
Lock
Set limit temperature
Item Description
You can set the ventilator to run and stop.
* [Run]: This turns on the power of the ventilator.
* [Stop]: This turns off the power of the ventilator.
You can set the operating mode of the ventilator.
• [Heating]: This runs both the inlet and outlet of the ventilator through the heat
exchanger. Use this mode during the summer and winter when the
temperature and humidity difference between indoors and outdoors is
significant.
• [Normal]: This runs only the inlet of the ventilator through the heat exchanger.
Use this mode during the spring and fall when the temperature and humidity
difference between indoors and outdoors is not significant.
• [Auto]: This measures the indoor and outdoor temperature and automatically
controls the inlet and outlet. Through this, optimal condition is maintained by
maintaining a consistent balance of the indoor air.
This sets the fan level of the ventilator. Adjust the fan level considering the level
of indoor contamination.
• [Low]: This sets the Fan speed to low level.
• [High]: This sets the Fan speed to high level.
• [Super high]: This sets the Fan speed to the maximum level.
• [Auto]: This measures the level of indoor contamination automatically and
maintains the optimal condition. Auto mode cannot be selected by the user and
when the power save mode or speed mode of the user mode are set, it is
automatically set.
This sets the lock function so that the user cannot control the ventilator.
• [Lock]: ]: This sets the lock function so that all the functions of the ventilator
cannot be changed individually.
• [Unlock]: This cancels the lock function.
This designates the additional operating method of the ventilator.
• [Humid on]: This sets the plasma function. Depending on the type of the
ventilator, the function may not be set. This function is currently not supported
and is expected to be supported in the future.
• [Humid off]: This cancels the plasma function.
Mode
Fan speed
Lock
User mode
Operation
[Ventilator schedule setting item]
Page 36
Web schedule function
AC Smart II (Advanced Control Smart II)
36
Item Description
• [Heater on]: This sets the heater function to warm the flowing air during the
cold winter. Depending on the type of the ventilator, the function may not be
set.
• [Heater off]: This cancels the heater function.
• [Power save on]: This operates the ventilator in the most efficient condition to
reduce the power consumption. When the fan level is set to low, high or super
high, this setting will automatically be canceled.
• [Power save off]: This cancels the power save function.
• [Quick operation on]: This sets the ventilator to operate a maximum
performance to prevent the contaminated indoor air and humidity from
spreading into other areas. It is good to use this function when the level of
indoor contamination is high. When the fan level is set to low, high or super
high, this setting will automatically be canceled.
• [Quick operation on]: This cancels the speed function.
User mode
Reference: What is plasma?
This is the air cleaning function of providing refreshing air with
negative ion. This is the function that not only kills the
household virus or fungus but also the influenza virus, the
representative cold virus, to consider the health as well as the
environment.
Item Description
You can turn On or Off the device connected to AC SMART II.
• [Run]: This runs the On/Off unit.
• [Stop]: This stops the On/Off unit.
Operation
[On/Off unit schedule setting item]
Page 37

Web schedule function
Option function manual
37
ENGLISH
Item Description
This sets the indoor air temperature.
This sets the water temperature passing through AWHP.
This sets the water temperature within the hot water tank.
You can set the AWHP to run and stop.
• [Run]: This turns on the power of AWHP.
• [Stop]: This turns off the power of AWHP.
You can set the operating mode of AWHP.
• [Cooling]: This runs AWHP in air conditioning mode.
• [Heating]: This runs AWHP in heating mode.
• [Auto]: This judges the indoor condition and maintains at optimal condition
automatically.
This sets the lock function so that the user cannot control AWHP individually.
• [Lock]: This sets the lock function so that all the functions of AWHP cannot be
changed individually.
• [Unlock]: : This cancels the lock all function.
Room temperature
Water outlet temperature
Water tank temperature
Operation
Mode
Lock
[AWHP schedule setting item]
Reference: Air temperature and water outlet temperature setting
Even though the air temperature and water outlet temperature item can simultaneously be set in
AC SMART II, actually the AWHP unit is controlled based on one of the two items. Applying criteria
(Air temperature, water outlet temperature) can be set by the remote controller.
Page 38

Web schedule function
AC Smart II (Advanced Control Smart II)
38
Schedule refers to the process of adding the application period information to the schedule group and
schedule pattern previous set and designating the period for the unit (Indoor unit, ventilator, On/Off
unit, AWHP) to operate for the applicable period.
AC SMART II provides the schedule wizard to easily apply the schedule. The schedule wizard is
composed of total of 6 stages as shown below. But, the schedule copying between groups is done
through a separate 2 stage process.
Applying schedule
1. Select to add/edit schedule 2. Select to add/edit schedule
3. Select schedule start/end date 4. Apply set weekly schedule pattern
5. Check/edit schedule 6. Set exception date not to apply
schedule
1
2
3
56
4
Page 39
Option function manual
39
ENGLISH
Web schedule function
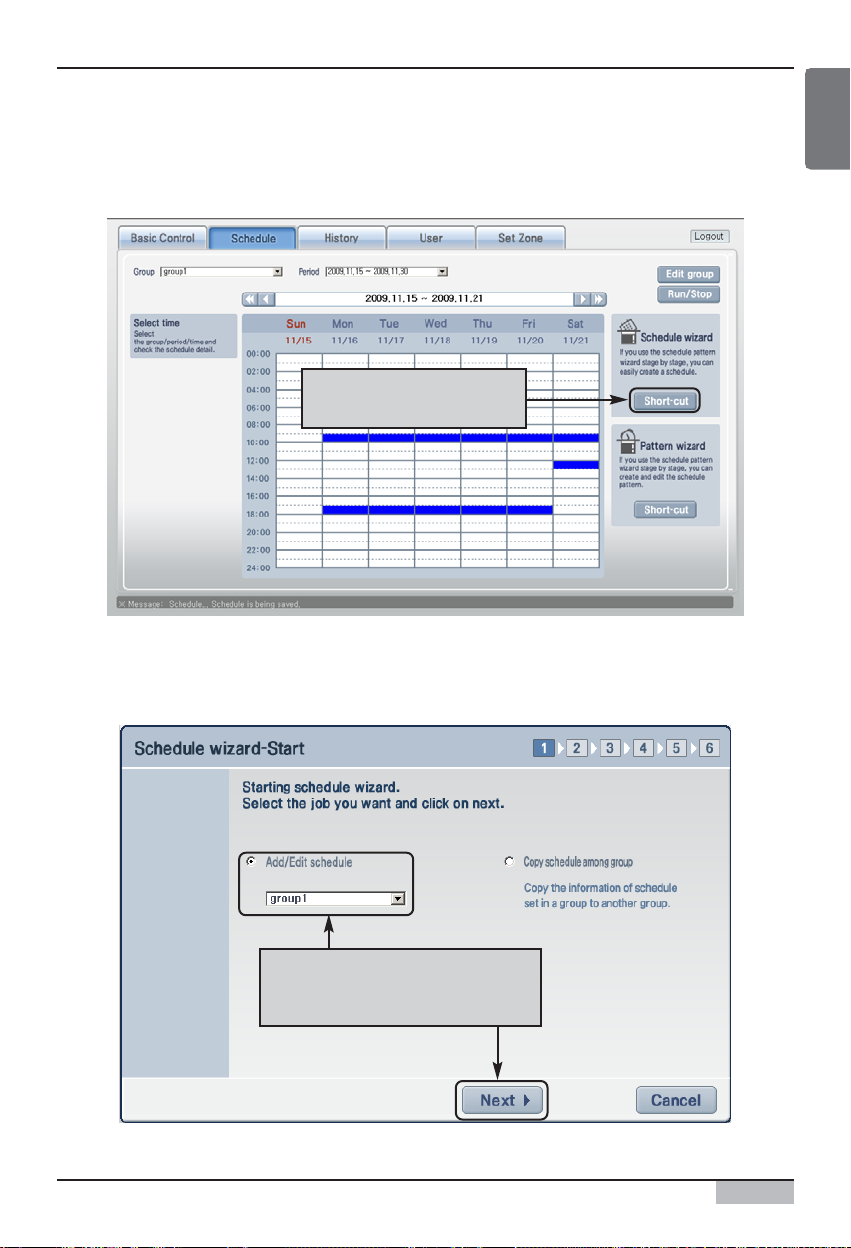
To apply the schedule, proceed as follows.
1
.
When you connect to web server of AC SMART II and select the ʻScheduleʼ menu, the following
screen will be displayed. To apply the schedule, click on the [Short cut] button of the schedule wizard.
Click on [Short cut] button
of schedule wizard
2
. Schedule wizard screen will be displayed. Select ʻAdd/Edit scheduleʼ and select the schedule
group to apply the schedule. And then click on the [Next] button.
Af t e r s el e c t i n g ‘ Add/ Edi t s c h edul e
and selecting the group, click on
the [Next] button.
Page 40
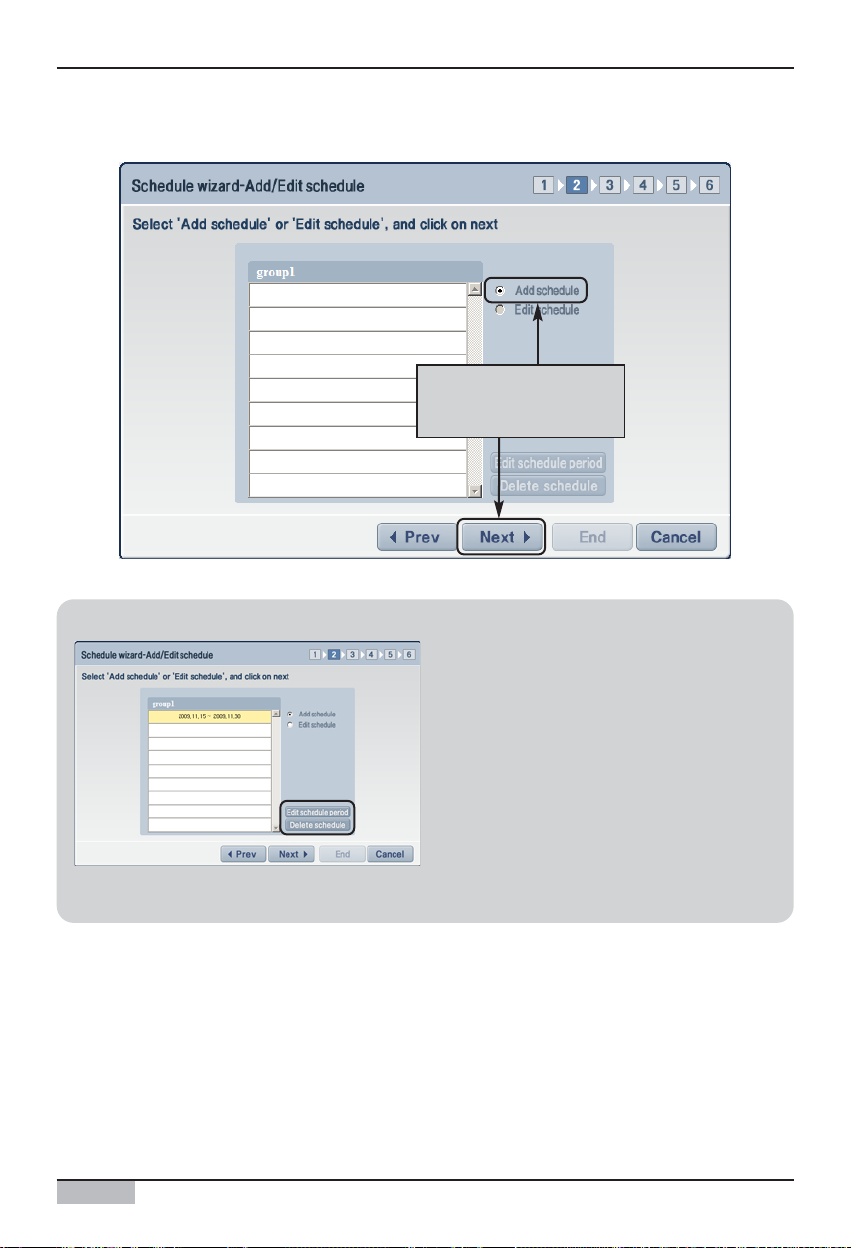
Information Edit schedule period and delete schedule
In the 2nd stage of the schedule wizard, you can
edit the period to apply the schedule and delete
the created schedule.
To edit the schedule period, press the [Edit
schedule period] button and set the new period.
To delete the schedule, select the schedule period
to delete and press the [Delete schedule] button.
After editing the schedule period and deleting the
schedule, you cannot proceed to the next stage of
the schedule wizard.
AC Smart II (Advanced Control Smart II)
40
Web schedule function
3
. Select ʻAdd scheduleʼ, and click on the [Next] button.
Se l e c t ‘Add s c h e dul e ’ and
click on the [Next]
button.
Page 41

Web schedule function
Option function manual
41
ENGLISH
4
. When you press the button, the calendar will be displayed. Use the calendar to select the period
(Start and end date) to apply the schedule. After entering the period, click on the [Next] button.
1. Use the calendar to
enter the start and end date
2. Click on the [Next] button.
5
. Set whether to apply the weekly schedule pattern. To apply the weekly schedule pattern, select the
ʻApplyʼ item and select the weekly schedule pattern to apply.
If you do not want to apply the weekly schedule pattern, select the ʻNot applyʼ item and directly
enter in 5th the stage. And then click on the [Next] button.
1. Select whether to apply
the weekly schedule pattern.
2. Click on the [Next] button.
Page 42

Web schedule function
AC Smart II (Advanced Control Smart II)
42
6
. Check the current schedule setting information. Also you can add a new schedule or add/delete
the set schedule. After checking the schedule information, click on the [Next] button.
1. Check and edit the schedule i nformation
2. Click on the [Next] button.
7
. Lastly, designate the exception date. Exception date is to set the specific dates within the period to
apply the schedule to exclude the application of the schedule.
If there is a schedule to register as exception date, select the date to designate as exception date
from the calendar and click on the [Set exception day].
Select the
exception date and
click on the [Set
exception day].
Reference: Edit schedule
When editing the schedule, the setting of the input item is the same as that of the schedule pattern
setting. For more detail on the setting item, refer to the ʻCreate schedule patternʼ section.
Page 43

Web schedule function
Option function manual
43
ENGLISH
8
. When the screen to enter the name of exception date is displayed, enter the name of the exception
day and click on the [OK] button.
After entering the name
of the exceptio n date,
click on the [OK] button.
9
. Check the content of exception day setting and click on the [End] button.
1. Check the setting
2. Click on the [End] button.
Reference: Set exception day
Setting the exception day is not a mandatory item. If you do not want to set the exception day, click
on the [End] button to end the schedule setting.
Page 44

Web schedule function
AC Smart II (Advanced Control Smart II)
44
Information: Rename and delete exception day
From the exception date edit screen, you can
rename or delete the name of the existing
exception day.
To rename the exception day, select the name of
the exception date and press the [Rename] button
to change the name.
To delete the exception day, select the exception
date and press the [Delete] button.
10
. The screen to show that the schedule edit has been completed will be displayed. Click on the
[OK] button to close the schedule wizard screen and end the schedule setting.
Click on the [OK]
button.
Page 45

Web schedule function
Option function manual
45
ENGLISH
Information: Copy schedule
You can copy the schedule set to a specific schedule group to the schedule of another schedule
group.
1. From the starting screen of the schedule wizard, select the ʻCopy schedule among groupsʼ item,
and then click on the [Next] button.
2. Designate the original group and target group to copy the schedule from and to, and then select
the period to copy. And then click on the [End] button.
3. When you see the schedule wizard completion screen, click on the [OK] button.
1. Select group
and perio d
2. Press the
[End] button.
Select the ‘Copy
schedule among groups’
item, and then click on
the [Next] button.
Page 46

Web schedule function
AC Smart II (Advanced Control Smart II)
46
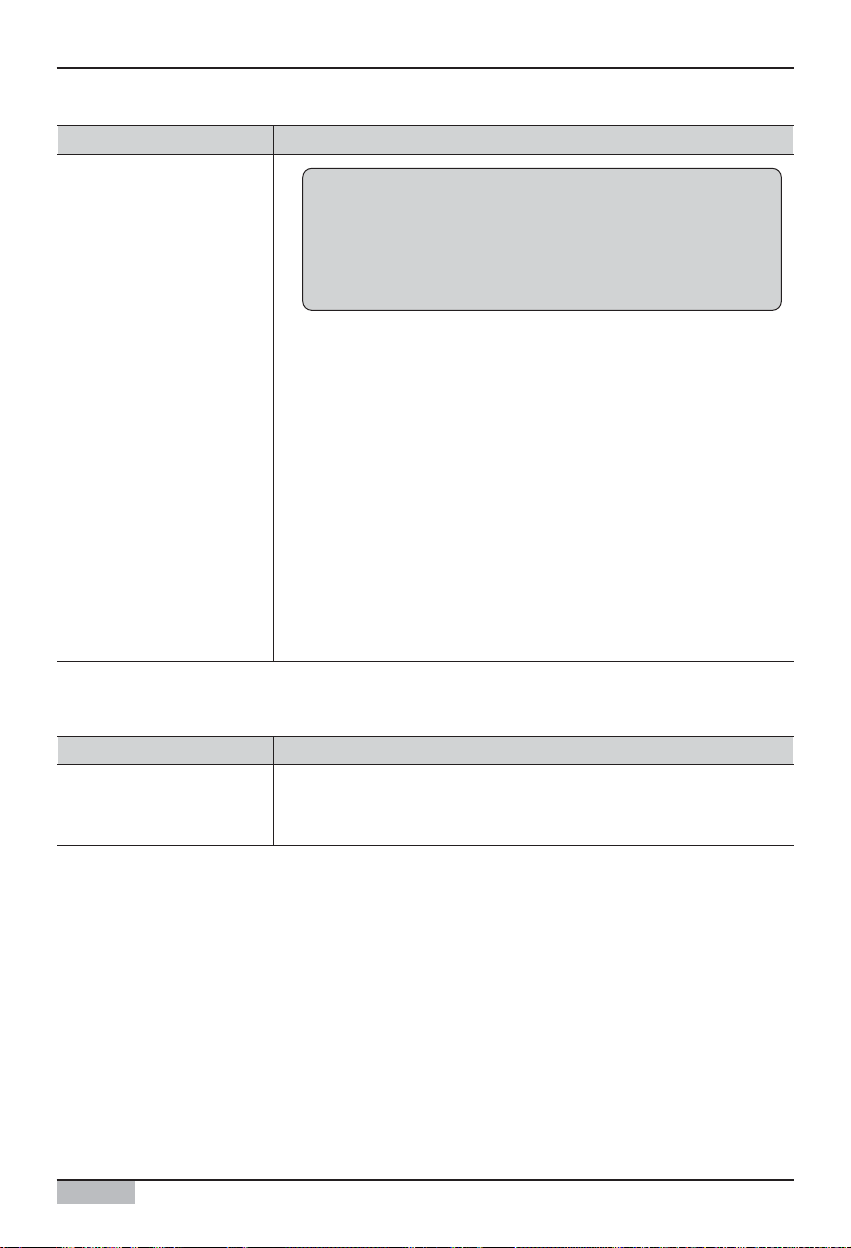
Below screen is the first screen displayed when the user selects the schedule menu. In this screen,
you can check the details of the schedule applied to a specific schedule group. Also you can edit the
schedule directly.
Checking schedule
You can select the s chedule group.
You can create, edit or delete the
schedule group.
You can
run/ s t o p t h e
set schedule.
You can view the schedule detail s for the week
by time zone. When y ou click o n the set
schedule (Blue), yo u can check and edit the
number of schedule and operation.
You can run
th e s c hedul e
wizard so t hat
th e s c hedul e
can be set by
stage.
You can run
th e s c hedul e
pattern
wizard so t hat
the
weekly/daily
s ch edul e
pattern can
be set by
stage.
You can select the
schedule peri od.
You can select the s chedule set in 1 week
or 1 month unit to view the details.
Reference: Set schedule group and schedule
From the schedule view, you can only check the schedule group and schedule that have been set
up. Therefore, if the schedule group and schedule are not set up, you must first set them up
through the process described in the previous section.
Page 47

Web schedule function
Option function manual
47
ENGLISH
To check or edit the detail of the schedule, proceed as follows.
1. When you select the schedule group and period of the schedule to check from the schedule menu,
you can check the set schedule.
When yo u sel ect the schedule group and
perio d, you can check the schedule.
When yo u cli ck on the set schedule,
you can check and edit the schedule.
2. When you click on the set schedule (Displayed in blue), you can check the schedule set in the
applicable time zone. To edit the applied schedule, press the [Edit] button.
Page 48

Web schedule function
AC Smart II (Advanced Control Smart II)
48
Information: View schedule detail
When you press the [Advanced] button, you
can see the ʻAdvancedʼ screen. In this
screen, you can view the details of the
schedule operation by unit.
3
. The schedule wizard to edit the schedule will be run. When you edit the schedule and press the
[End] button, the editing will be completed.
1. Check and edit the
schedule information
2. Click on the [End] button
Reference: Edit schedule
The setting for the input item of editing the schedule is the same as the setting of the schedule
pattern. For more details on the setting item, refer to the ʻCreate schedule patternʼ section.
Page 49
Option function manual
49
ENGLISH
Web schedule function
Running/Stopping schedule
When you click on the [Run/Stop] button from the schedule menu, the ʻRun/Stopʼ screen will be
displayed. In this screen, you can run or stop the schedule applied to the group.
You can select to sto p
the schedule of an
individual group or all
groups.
To run or stop the schedule,
proceed as fo ll ows.
You can apply the
schedule run/stop setting.
When sto pping the
schedule by group,
you can select the
group to stop.
1. Click on the [Run/Stop] button from the schedule menu.
Click on the [Run/Stop] button
Page 50
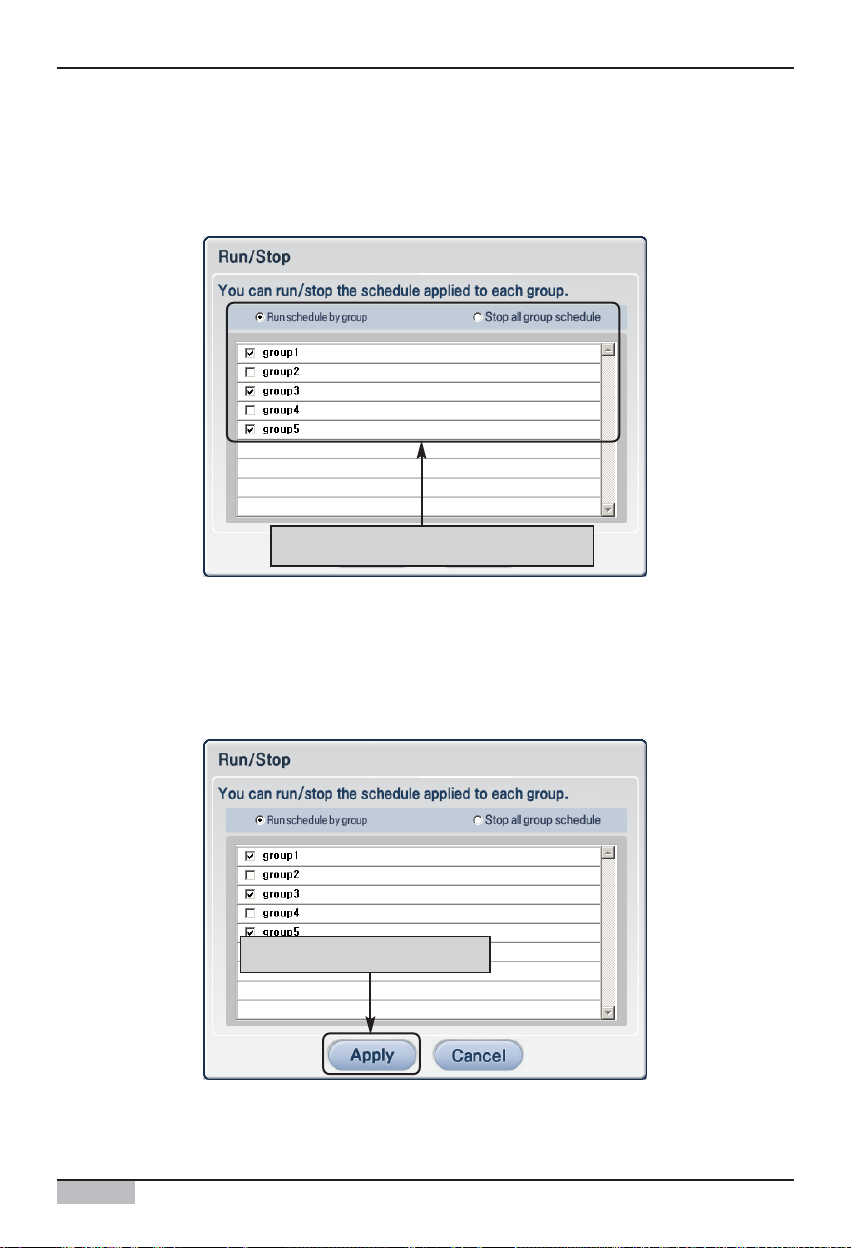
AC Smart II (Advanced Control Smart II)
50
Web schedule function
Set whether the run the schedule
2. ʻRun/Stopʼ screen will be displayed.
When running the schedule by group, select the ʻRun schedule by groupʼ item and check the
schedule group to run.
On the other hand, if you want to stop all schedules, select the ʻStop all group scheduleʼ item.
Click on the [Apply] button.
3. When you click on the [Apply] button, the setting will be completed and the ʻRun/Stopʼ screen will
disappear.
Page 51
Option function manual
51
ENGLISH
Power consumption statistics function
Power consumption statistics function
In AC SMART II, you can check the power consumption of the indoor unit by class, group and unit.
When you select the statistics menu after installing the option function to check the power
consumption, the statistical menu will include and display the 2 functional tabs shown below.
• Accumulative power consumption (By day): This provides the total power consumption information
during a specific period, daily power consumption information, current power consumption
information
• Monthly power consumption: This provides the power consumption information on a monthly basis
for a certain period of time (3 months, 6 months, 1 year).
Reference: Before using the power consumption statistics function,
check the PDI connection
To use the power consumption statistics function, the PDI, device for measuring the power
consumption, and AC SMART II and outdoor/indoor unit must be connected. of the current siteʼ.
You can view the power cons umption
of the indoor unit and statistical
values for a speci fic period of time
You can view the monthly
power cons umption by 3
months, 6 months and 1 year.
Reference: Statistical information
The statistical function provides the operating time information and power consumption information
during the period the indoor unit operates. The operation time information of the ventilator, On/Off
unit and AWHP is not provided.
Page 52

AC Smart II (Advanced Control Smart II)
52
Power consumption statistics function
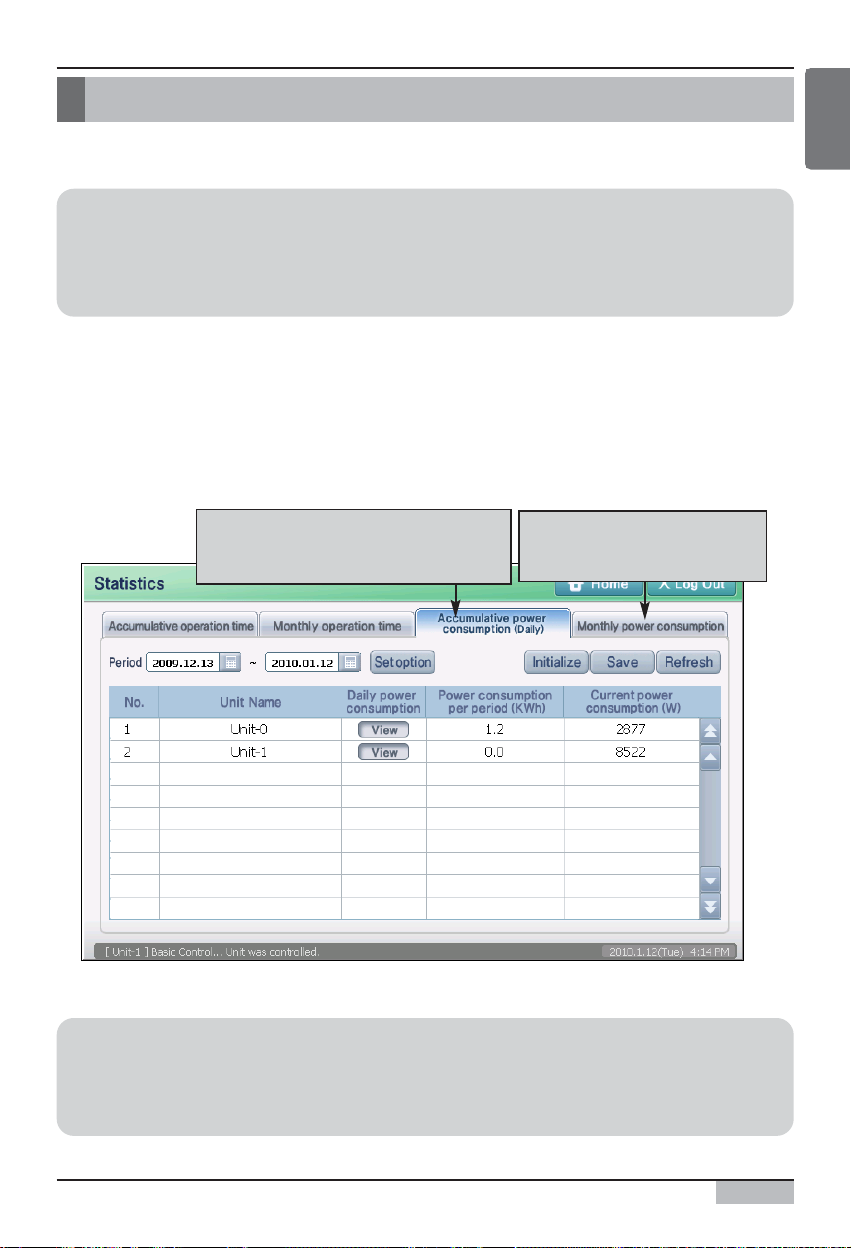
Accumulative power consumption
Accumulative power consumption is the function of calculating and providing the accumulative power
consumption of the indoor unit during a certain period of time the user selected.
When you press the accumulative power consumption tab, the following screen will be displayed.
* [Reset] button will only be displayed when logged on with the installation expert access.
The accumulative power consumption is displayed in table format including the below information.
You can set the perio d to view
the accumul ative po wer
consumption o f the indoor unit.
You can set the vi ew conditi on and
target of the accumulative power
consumption.
You can save the accumul ative
power cons umption information
to a file.
You can reset the
accumul ative po wer
consumption i nformation.
You can refresh and view the
accumul ative po wer consumptio n
to the latest information.
You can view the total accumulative power
consumption and statistical information
for the period you are viewing.
Item Description
This displays the name of the target to view the accumulative operating time of.
Depending on the condition setting, the applicable class, group and indoor unit
is displayed.
When you click on the [View] button, the ʻDaily power consumptionʼ screen will
be displayed and you will be able to view the daily power consumption.
This displays the total power consumption within the set period of time.
This displays the current power consumption of each unit. (Watt/Hour)
Unit Name
Daily power consumption
Power consumption per period
(KWh)
Current power consumption
(W)
Page 53

Option function manual
53
ENGLISH
Power consumption statistics function
■ View accumulative power consumption
You can check the accumulative power consumption of the indoor unit for a specific period of time. To
check the accumulative power consumption, proceed as follows.
1
. When you press the ʻAccumulative power consumptionʼ tab from the statistics menu, you can set
the period to view the accumulative power consumption from the ʻPeriodʼ item. When you press the
button, you can select the date. And then press the [Refresh] button.
Set the perio d to v iew the
accumul ative po wer consumptio n
and press the [Refresh] button.
2
. The following information for the accumulative power consumption is displayed on the screen.
Page 54

Power consumption statistics function
AC Smart II (Advanced Control Smart II)
54
Information: View daily power consumption
When you press the [View] button from the daily power consumption item, the ʻDaily power
consumptionʼ screen will be displayed. In this screen, the user can view the power consumption of
the indoor unit during the period set by the user on a daily basis.
When yo u press the [View]
button, the dai ly power
consumption s creen is displayed.
Page 55

Power consumption statistics function
Option function manual
55
ENGLISH
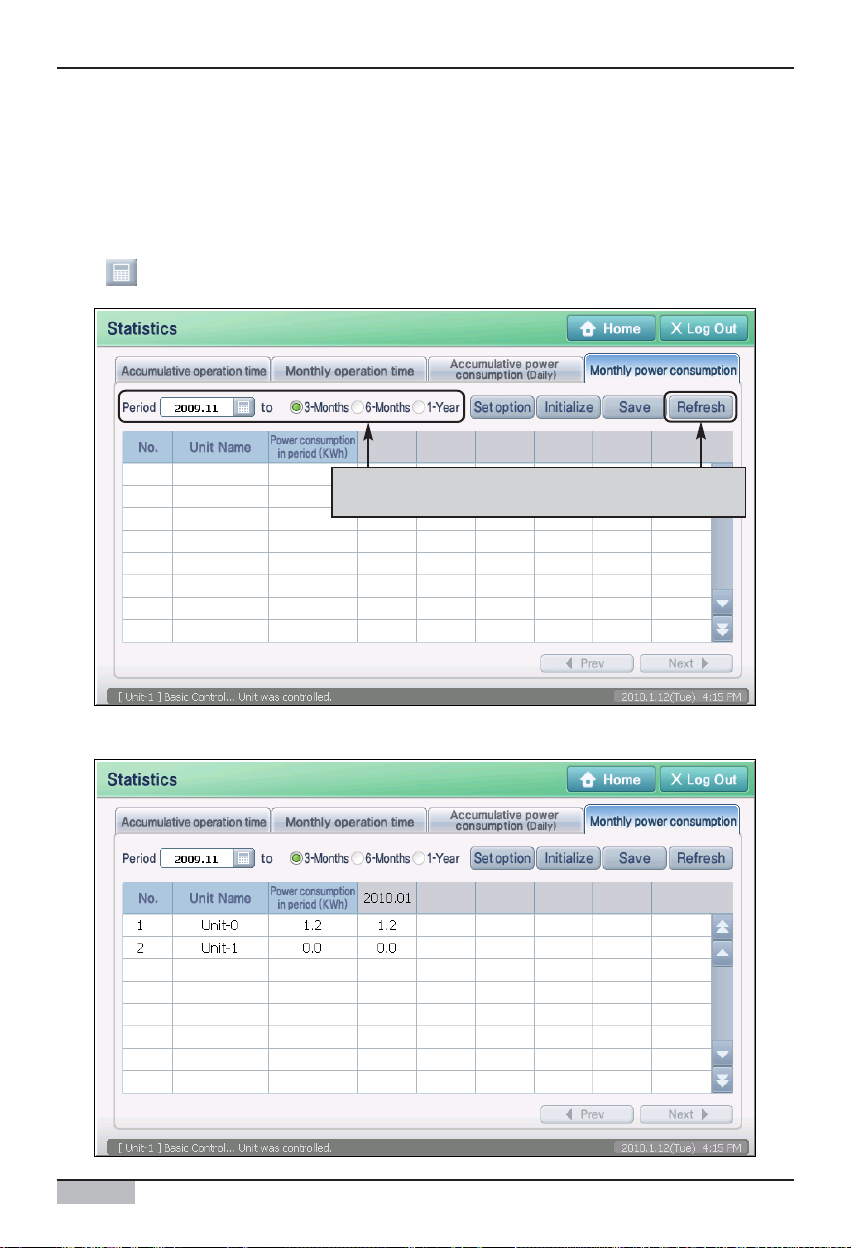
Monthly power consumption
Monthly power consumption is the function of calculating and providing the monthly power
consumption of the indoor unit during a certain period of time (3 months, 6 months, 1 year) from the
specific month selected by the user.
When you press the monthly power consumption tab, the following screen will be displayed.
* [Reset] button will only be displayed when logged on with the installation expert access.
The monthly power consumption is displayed in table format including the below information.
You can s e t y e ar and mon th
to view the monthly power
consumption o f the indoor
uni t.
You can set the view condition
and targ et of the monthl y
power cons umption.
You can s av e th e
monthly power
consumption
information to a file.
You can refresh and view the
monthly power cons umption
to the latest informatio n.
You can reset the
monthly power
consumption
information.
You can view the total po wer consumption
and monthly power consumption of the
indoor unit for the period you are viewing.
You can set the vi ew conditi on and targ et
of the monthl y po wer consumption.
Item Description
This displays the name of the target to view the accumulative operating time of.
Depending on the condition setting, the applicable class, group and indoor unit
is displayed.
This displays the total power consumption within the set period of time.
The power consumption within the set period depending on the condition setting
is displayed on a monthly basis.
Unit Name
Power consumption per period
(KWh)
Monthly statistics
Page 56
AC Smart II (Advanced Control Smart II)
56
Power consumption statistics function
■ View monthly power consumption
You can check the monthly power consumption of the indoor unit for a certain period of time from the
specific month.
1
. When you press the ʻMonthly power consumptionʼ tab from the statistics menu, you can set the
month as criteria to view the monthly power consumption from the ʻPeriodʼ item. When you press
the button, you can select the year and month, and the period to view the power consumption
(3months, 6 months, 1 year). And then press the [Refresh] button.
Set the perio d to v iew the monthly power
consumption and press the [Refres h] button.
2
. The following information for the monthly power consumption is displayed on the screen.
Page 57

Option function manual
57
ENGLISH
Power consumption statistics function
Setting power consumption view condition
You can set the view condition for the accumulative and monthly power consumption. To set the view
condition, proceed as follows. The description uses the accumulative power consumption as the
example from here on. The view condition setting for the monthly power consumption is the same.
1. Press the [Set option] button located on the ʻAccumulative power consumptionʼ tab. ʻCondition
settingʼ screen to set the viewing unit and target will be displayed.
When yo u press the [Set option] butto n, the
‘Condition setting’ screen will be displayed.
2. Set the viewing unit and target, and press the [Apply] button. For more detail on the setting item,
refer to the following table.
After setting the condition, press the [OK] button.
Page 58

AC Smart II (Advanced Control Smart II)
58
Power consumption statistics function
Type Item Description
Zone view Set to display the usage information by zone.
Group view Set to display the usage information by group.
Unit view Set to display the usage information by unit.
Select zone Set the class to display the usage information.
Select group Set the group within the class to display the usage information.
View option
Target setup
3. The message to check that the changed information is saved will be displayed. Press the [Yes]
button.
Press the [Yes]
button.
4. The accumulative power consumption information that fist the set condition is displayed on the
screen.
Page 59

Option function manual
59
ENGLISH
Power consumption statistics function
Saving power consumption information
The accumulative and monthly power consumption that has been viewed can be saved in external
USB memory as Excel file format. To save the view result to the file, proceed as follows. The
description uses the accumulative power consumption as the example from here on. The file saving
method for the monthly power consumption is the same.
1. Connect the external USB memory to AC SMART II and view the accumulative power
consumption. When the results of the accumulative power consumption is displayed on the screen,
press the [Save] button.
2. ʻSave asʼ screen will be displayed. Enter the name of the Excel file to save and then press the [OK]
button.
After entering the name,
press the [OK] button.
After v i ewi n g the statisti cs
information, press the
[Save] button.
Page 60

AC Smart II (Advanced Control Smart II)
60
Power consumption statistics function
3
. A message confirming that the file is saved will be displayed. When you press the [OK] button, the
file saving process will be completed. After that, you can disconnect the USB drive connected to
AC SMART II.
Press the [OK] button.
Information: Reset statistical information
When you have installed AC SMART II for the
first time or after an error has occurred, the
statistical information may not be displayed
correctly. In this case, press the [Initialize]
button to reset the previous statistical
information. The [Initialize] button will be
displayed only when logged on as installation
expert.
Information: Refresh to latest statistical information
While the statistical information is displayed
from the statistics menu, the units connected to
AC SMART II are still in operation. But the
statistical information is not immediately
reflected on the statistics screen.
To view the latest statistics information, press
the [Refresh] button located on the right side of
the accumulative and monthly power
consumption screen.
The statistics information displayed on the
screen will be refreshed to the latest
information.
Page 61

 Loading...