

LG PF391P-P Owner’s Manual [ar]

PF391P
P/NO : MFL42173814(R1)
ENGLISH
PF391P-P-AARELLW-ENG 11/23/07 4:34 PM Page 1

2
CAUTION: TO REDUCE THE RISK OF ELECTRIC SHOCK. DO NOT REMOVE
COVER (OR BACK). NO USER-SERVICEABLE PARTS INSIDE. REFER SERVICING TO QUALIFIED SERVICE PERSONNEL.
This lightning flash with arrowhead symbol within an equilateral triangle is
intended to alert the user to the presence of uninsulated dangerous voltage
within the product’s enclosure that may be of sufficient magnitude to constitute a risk of electric shock to persons.
The exclamation point within an equilateral triangle is intended to alert the
user to the presence of important operating and maintenance (servicing)
instructions in the literature accompanying the product.
WARNING: TO PREVENT FIRE OR ELECTRIC SHOCK HAZARD, DO NOT
EXPOSE THIS PRODUCT TO RAIN OR MOISTURE.
WARNING: Do not install this equipment in a confined space such as a book case or
similar unit.
CAUTION: Do not block any ventilation openings. Install in accordance with the manufacturer's instructions. Slots and openings in the cabinet are provided for ventilation
and to ensure reliable operation of the product and to protect it from over heating.
The openings should be never be blocked by placing the product on a bed, sofa, rug
or other similar surface. This product should not be placed in a built-in installation
such as a bookcase or rack unless proper ventilation is provided or the manufacturer's instruction has been adhered to.
CAUTION: The apparatus should not be exposed to water (dripping or splashing) and
no objects filled with liquids, such as vases, should be placed on the apparatus.
CAUTION concerning the Power Cord
Most appliances recommend they be placed upon a dedicated circuit;
That is, a single outlet circuit which powers only that appliance and has no additional
outlets or branch circuits. Check the specification page of this owner's manual to be
certain.Do not overload wall outlets. Overloaded wall outlets, loose or damaged wall
outlets, extension cords, frayed power cords, or damaged or cracked wire insulation
are dangerous. Any of these conditions could result in electric shock or fire.
Periodically examine the cord of your appliance, and if its appearance indicates damage or deterioration, unplug it, discontinue use of the appliance, and have the cord
replaced with an exact replacement part by an authorized service center.
Protect the power cord from physical or mechanical abuse, such as being twisted,
kinked, pinched, closed in a door, or walked upon. Pay particular attention to plugs,
wall outlets, and the point where the cord exits the appliance.
To disconnect power from the mains, pull out the mains cord plug. When installing the
product, ensure that the plug is easily accessible.
Safety Precaution
CAUTION
RISK OF ELECTRIC SHOCK
DO NOT OPEN
PF391P-P-AARELLW-ENG 11/23/07 4:34 PM Page 2

3
Contents
Safety Precaution . . . . . . . . . . . . . . . . . . . . . . . . . . . . . . . . . . . . . . . . . . . . .2
Contents . . . . . . . . . . . . . . . . . . . . . . . . . . . . . . . . . . . . . . . . . . . . . . . . . . . .3
Features . . . . . . . . . . . . . . . . . . . . . . . . . . . . . . . . . . . . . . . . . . . . . . . . . . . .3
Main Unit . . . . . . . . . . . . . . . . . . . . . . . . . . . . . . . . . . . . . . . . . . . . . . . . . . . .4
Getting Started . . . . . . . . . . . . . . . . . . . . . . . . . . . . . . . . . . . . . . . . . . . . . . .5
• Inserting or removing a memory card . . . . . . . . . . . . . . . . . . . . . . . . . . .5
• Connecting an USB Device . . . . . . . . . . . . . . . . . . . . . . . . . . . . . . . . . . .5
• Connecting the Power Cable . . . . . . . . . . . . . . . . . . . . . . . . . . . . . . . . . .6
• Turning On or Off the Unit . . . . . . . . . . . . . . . . . . . . . . . . . . . . . . . . . . . .6
• Power Save mode . . . . . . . . . . . . . . . . . . . . . . . . . . . . . . . . . . . . . . . . . .6
• Installing the Stand . . . . . . . . . . . . . . . . . . . . . . . . . . . . . . . . . . . . . . . . .6
• Using the Device Menu . . . . . . . . . . . . . . . . . . . . . . . . . . . . . . . . . . . . . .7
Adjust the settings . . . . . . . . . . . . . . . . . . . . . . . . . . . . . . . . . . . . . . . . . . .7-8
Viewing a Photo file . . . . . . . . . . . . . . . . . . . . . . . . . . . . . . . . . . . . . . . . . . . .9
Playing a Movie file . . . . . . . . . . . . . . . . . . . . . . . . . . . . . . . . . . . . . . . . . . .10
Playing a Music file . . . . . . . . . . . . . . . . . . . . . . . . . . . . . . . . . . . . . . . . . . .11
Using a File menu . . . . . . . . . . . . . . . . . . . . . . . . . . . . . . . . . . . . . . . . . . . .12
Viewing the Calendar . . . . . . . . . . . . . . . . . . . . . . . . . . . . . . . . . . . . . . . . . .13
PC Connection (USB) . . . . . . . . . . . . . . . . . . . . . . . . . . . . . . . . . . . . . . . . .14
Troubleshooting . . . . . . . . . . . . . . . . . . . . . . . . . . . . . . . . . . . . . . . . . . . . . .15
Specifications . . . . . . . . . . . . . . . . . . . . . . . . . . . . . . . . . . . . . . . . . . . . . . .15
Features
• Live picture gallery:
High resolution and deep digital color from LCD wide screen.
• Easy power save mode:
Better 1 second power save mode than 15 seconds power off and on.
• Portable digital album:
Share your memories with built-in battery for easy mobility
• Plug-in viewer:
Easy viewing photos via memory card slot and USB port
• 2,000 photo storage:
2,000 precious memories with 256MB built-in flash memory
• Digital calendar & alarm clock:
For your efficient date and time scheduling
• Convenient photo explorer:
Coolest interface navigation for easiest access to your memory
• Premium interior decorator
3 different changeable faceplate to suit various interior
PF391P-P-AARELLW-ENG 11/23/07 4:34 PM Page 3
4
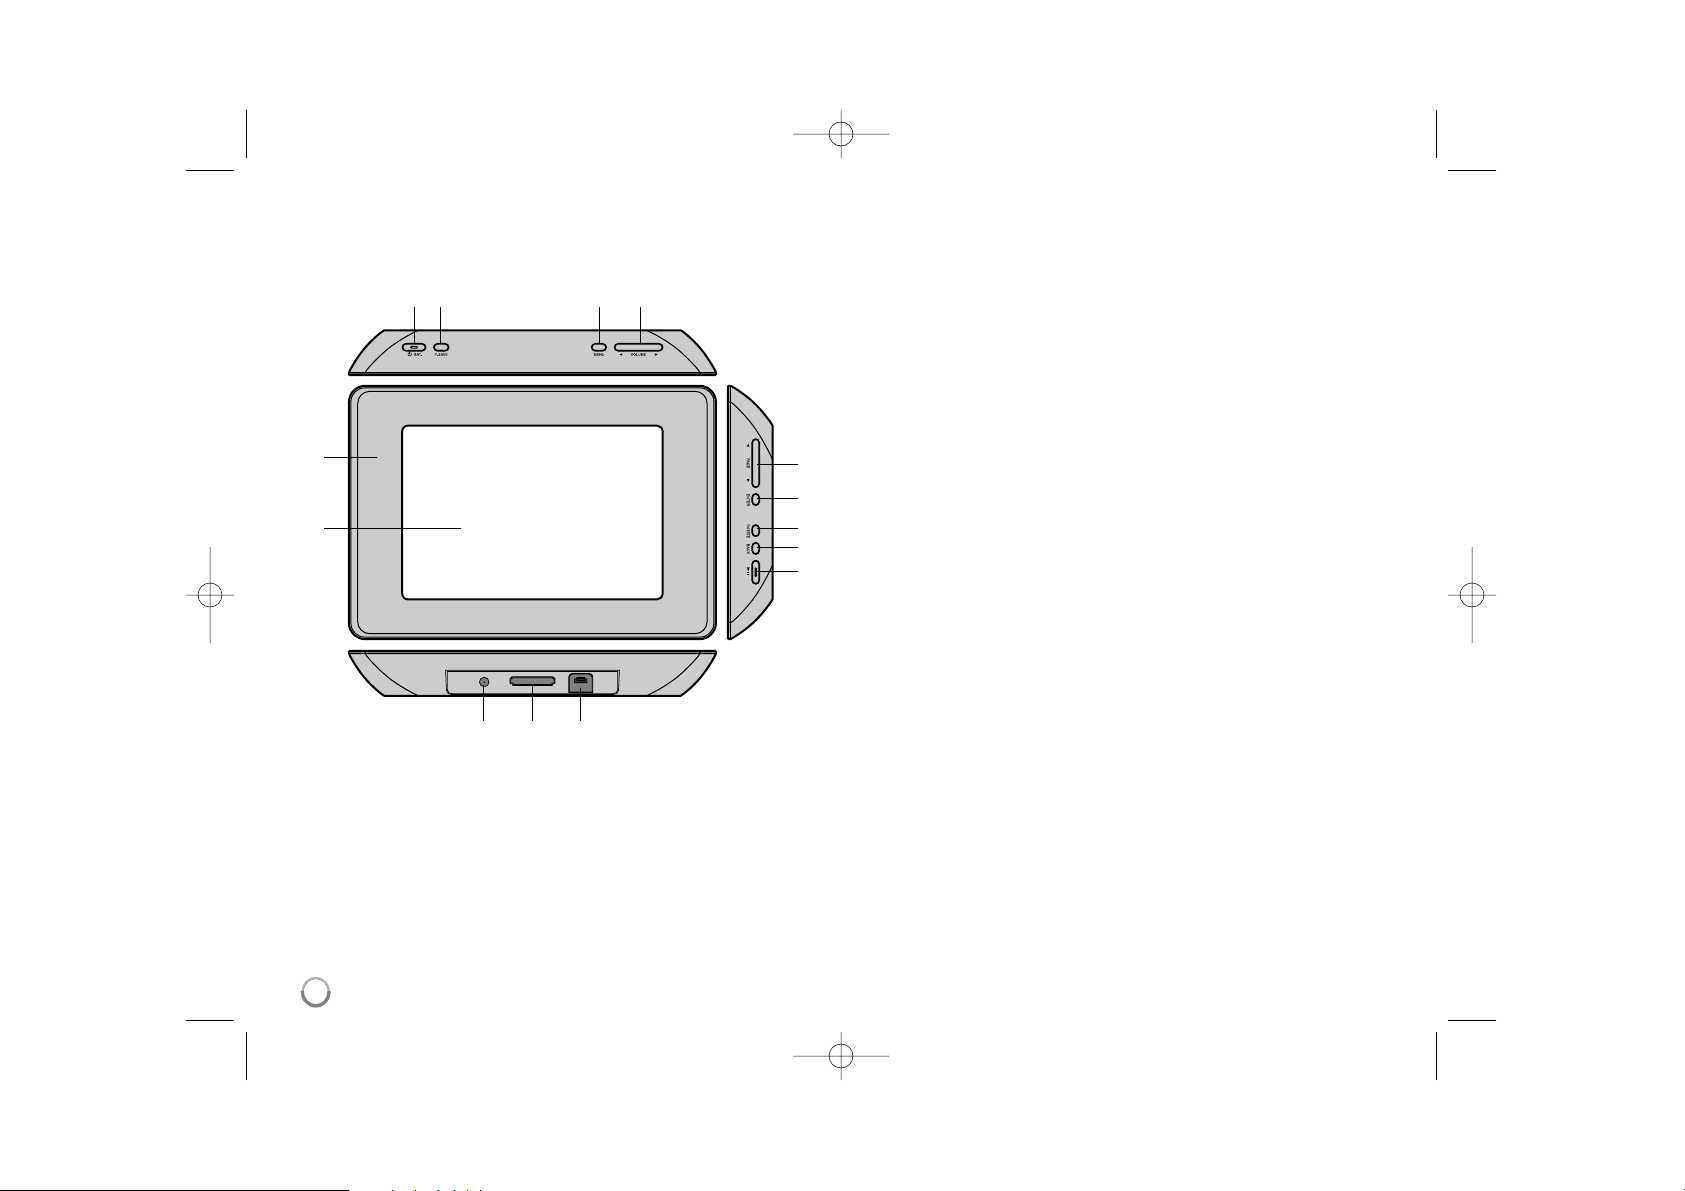
Main Unit
a LCD screen
b Faceplate (interchangeable)
Four edges of the faceplate are magnetic, so that the faceplate can easily
be attached or detached.
c 1 BAT. (Power button and Battery indicator)
Turns the unit ON or OFF and indicates the battery status.
The indicator lights in red during charging the battery.
The indicator lights in green when battery is full.
d P-SAVE (Power Save)
Accesses or exits the power save mode.
e MENU
Accesses or exits the option menu.
f b VOLUME B
Adjusts the volume of the unit. To adjust the volume, press and hold
VOLUME (b or B) during playback of the movie or music file.
Left and Right buttons for selecting an item on the menu.
g b PAGE B
Press and hold for 2 seconds to move to the previous or next page on the
[Photo], [Movie] or [Music] menu.
Up and Down buttons for selecting an item on the menu.
h ENTER
Selects an option or executes a command.
i ROTATE
Rotates the photo in full screen counterclockwise.
j BACK
Returns to a previous menu or screen.
k NX
Starts playback. Press to pause playback; press again to restart.
l USB connector
Connect the supplied USB adapter cable then connect an USB device.
m Memory card slot
Insert a memory card (SD, MMC or MS).
n DC 12V IN
Connect the supplied AC adapter.
cd e f
nml
b
a
g
h
i
j
k
PF391P-P-AARELLW-ENG 11/23/07 4:34 PM Page 4
5
Getting Started
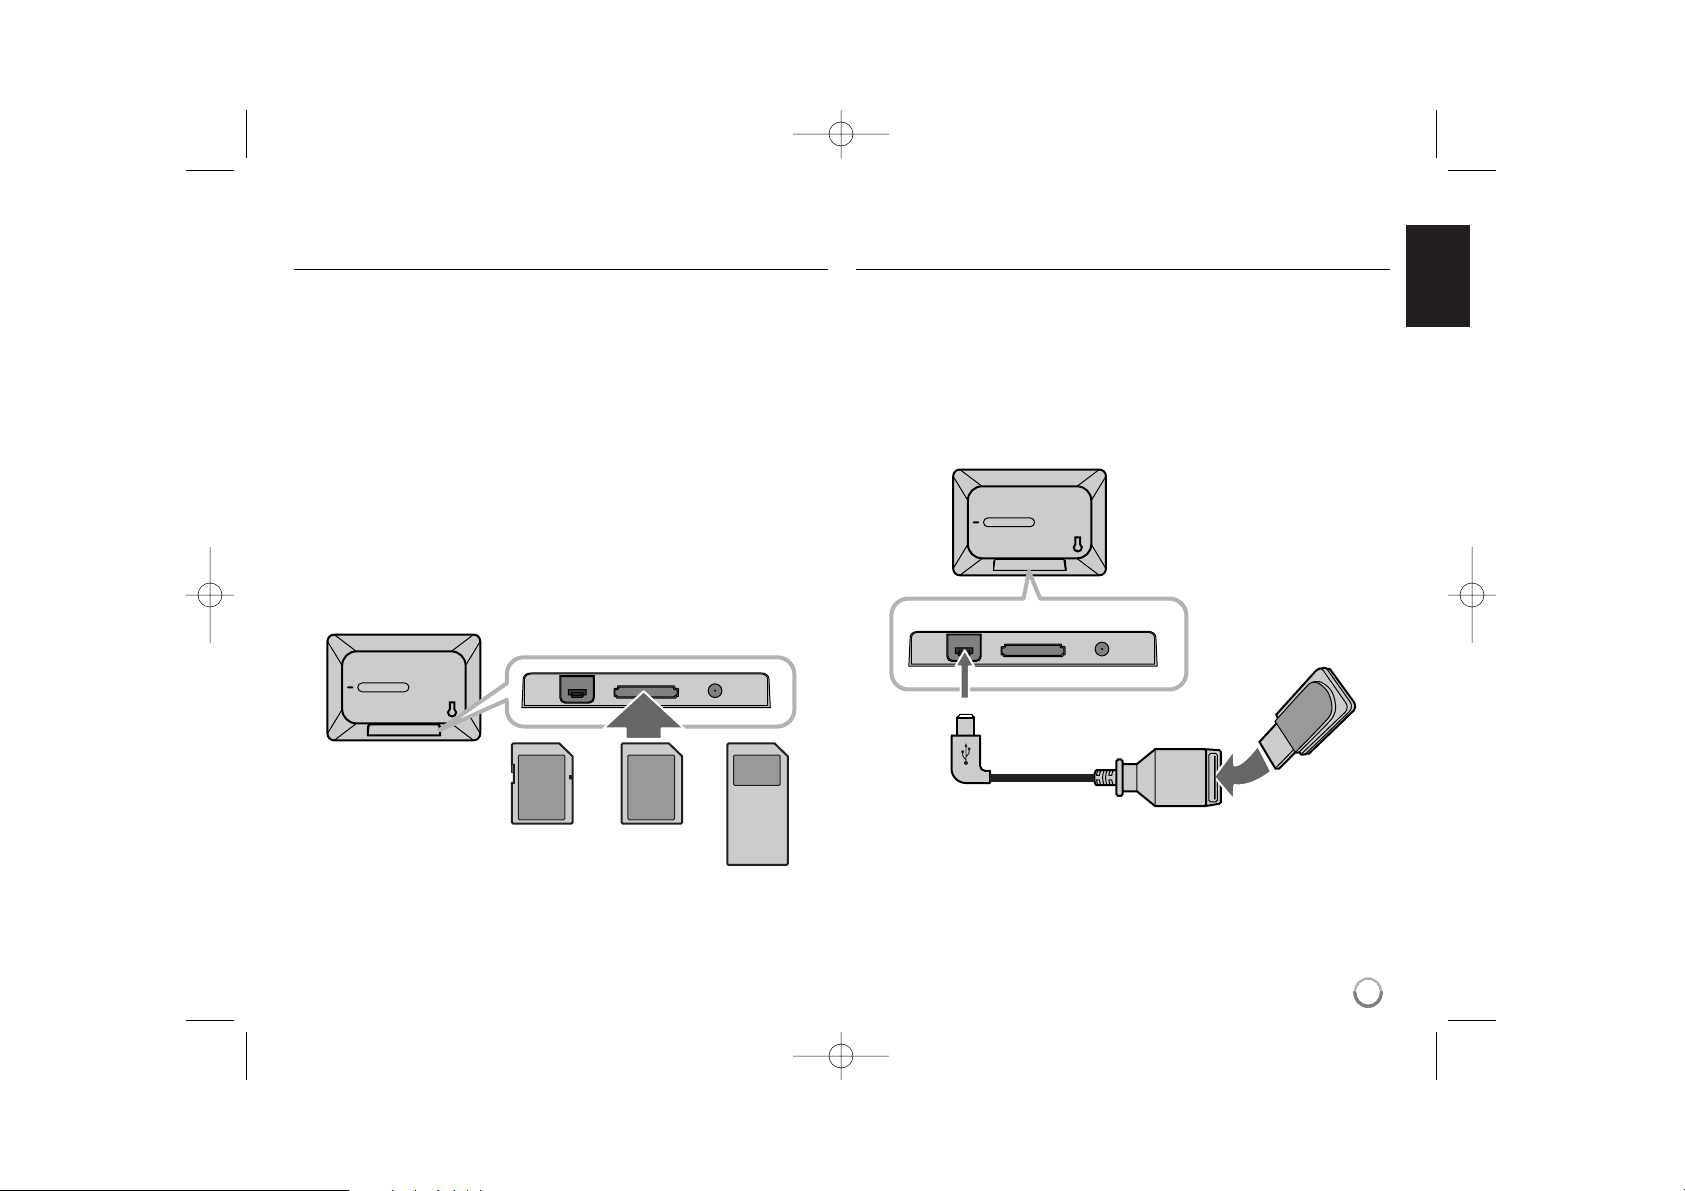
Inserting or removing a memory card
Insert a memory card to the memory card slot on the unit.
To withdraw the memory card from the slot, press on the center of the memory
card then withdraw it carefully.
Card useable on this unit
• Secure Digital Card (SD)
• Multi Media Card (MMC)
• Memory Stick (MS)
• Compatible with: FAT 12, FAT 16, or FAT 32
• Only use the memory cards recommended above.
• The card will only fit in one direction; do not force it.
The card should fit snugly when properly inserted.
• Any memory card may not be available on the unit.
• Do not extract the memory card in operating (play, copy, etc.).
Regarding Write Protect
For cards that have a write protect switch, it will not be possible to write, erase
or format the card if the switch is on.
Connecting an USB Device
Connect the small end of the USB adapter cable to the USB port on the unit.
Connect an USB Device and the USB adapter. Use an USB cable, if you need.
• This unit supports only USB Device with FAT16 or FAT32 format.
• Do not extract the USB Device during operation (play, copy, etc.).
• USB Device: USB Device that support USB 1.1 and USB 2.0.
(For example: USB Flash Drive, Memory Card Reader, Digital Camera, etc.)
• An USB Device which requires additional program installation when you
have connected it to a PC, is not supported.
USB Flash Drive
(For example)
USB Adapter Cable
To USB port
SD
or or
MMC
MS
PF391P-P-AARELLW-ENG 11/23/07 4:34 PM Page 5
6
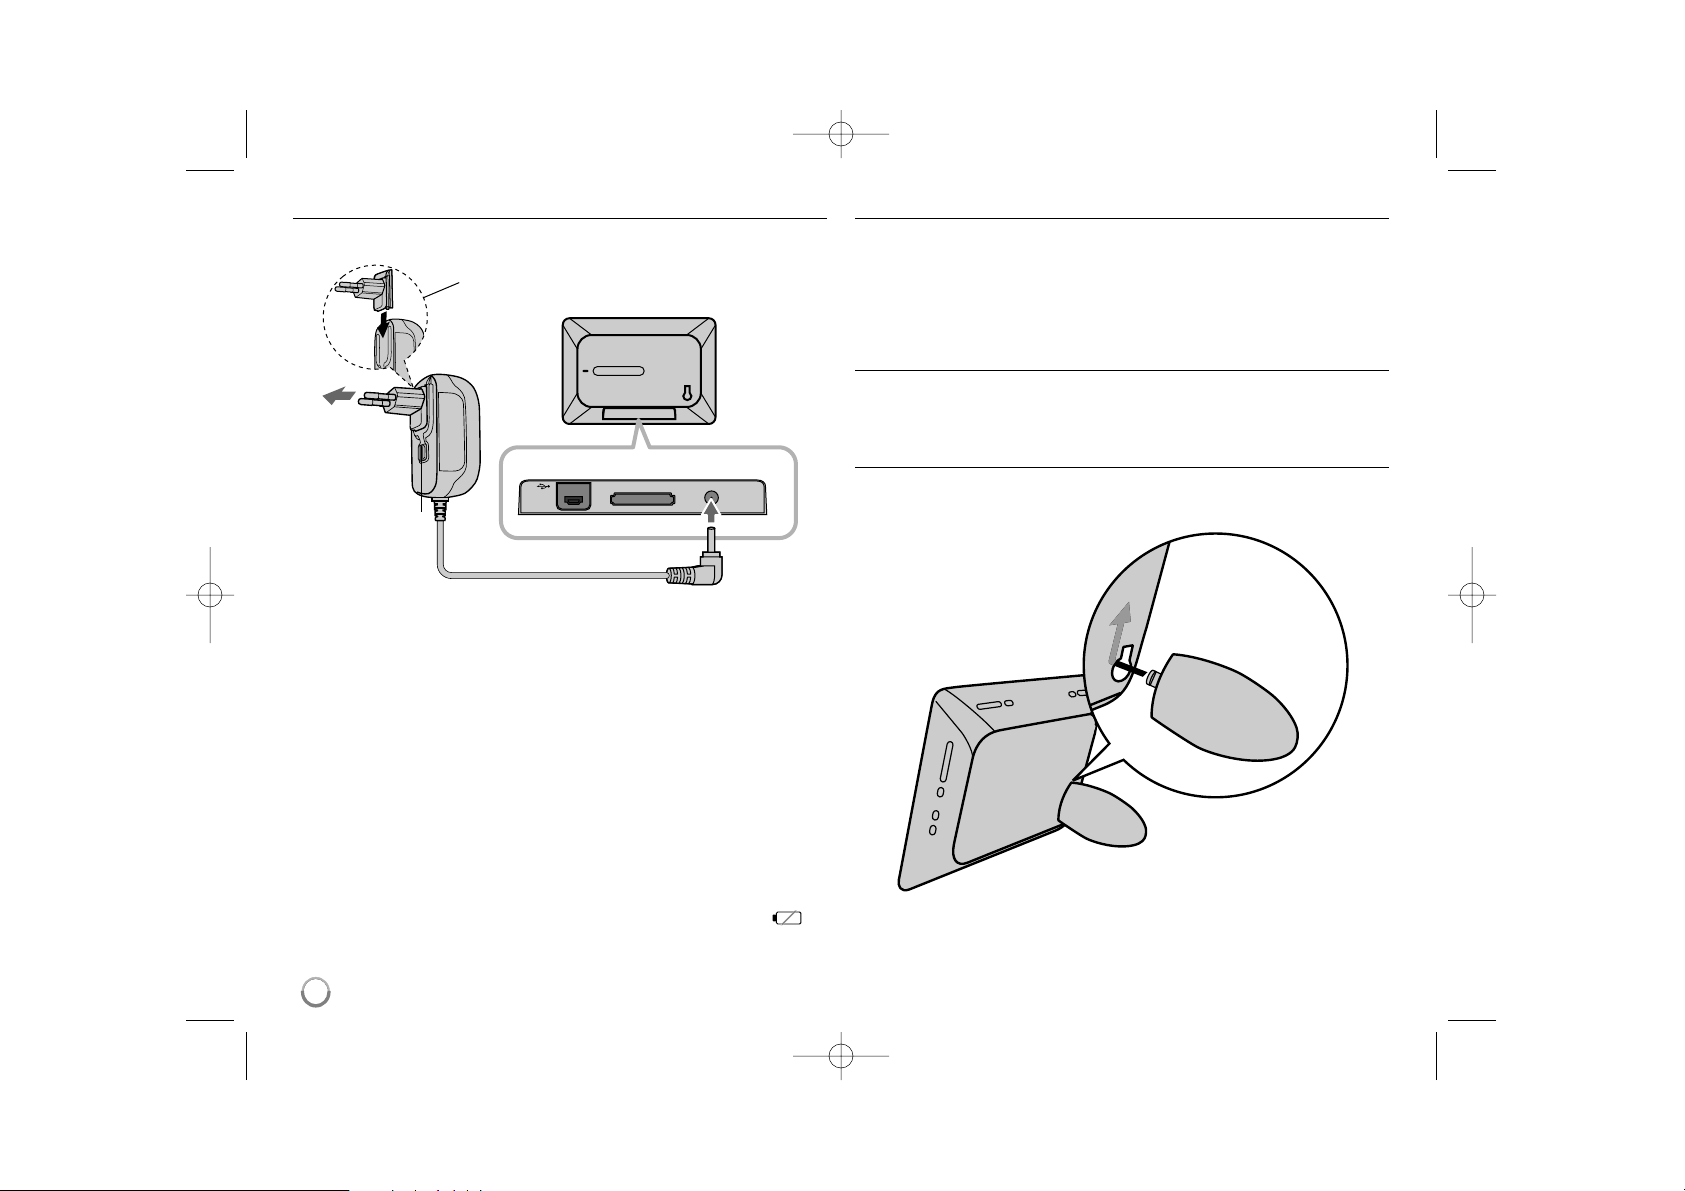
Connecting the Power Cable
Connect the supplied power cable from the unit to a power outlet.
AC adapter
• This AC adapter operates on 100-240V~ 1A 50/60Hz.
• Contact an electrical parts distributor for assistance in selecting a suitable AC
plug adapter or AC cord set.
• Manufactured by WANLIDA GROUP CO., LTD
Rechargeable battery
• Its internal rechargeable battery provides you with the freedom to pass it
around and play the files without the power cord.
• The internal rechargeable battery will start charging only when the unit is
turned off and the AC adapter is connected to a power outlet.
• The charging is stopped if you turn on the unit.
• The charging will take approximately 2 hour.
• The 1 BAT. indicator turns red in charging. If the charging is complete, the
indicator changes to green color.
• When the remaining time of the battery power is under 10 minutes, “ ”
will appear on the screen and the 1 BAT. indicator flashes.
Turning On or Off the Unit
To turn on the unit, press and hold 1 BAT. for 2 seconds.
The demonstration slideshow will start and then the [Device Menu] will appear.
Press any button to skip the demonstration slideshow.
The demonstration photos are located in the internal memory, and you cannot
change or delete them.
Press 1 BAT. again to turn off the unit.
Power Save mode
You can set up the unit into an economic power save mode. Press P-SAVE
and the LCD screen is turned off. To exit the power save mode, press P-SAVE
or 1 BAT.
Installing the Stand
Attach the detachable stand on the back of the unit as below.
To “DC 12V IN” jack
Attach the power plug to the body of the AC adapter.
Power cord
release knob
To AC outlet
PF391P-P-AARELLW-ENG 11/23/07 4:34 PM Page 6
7
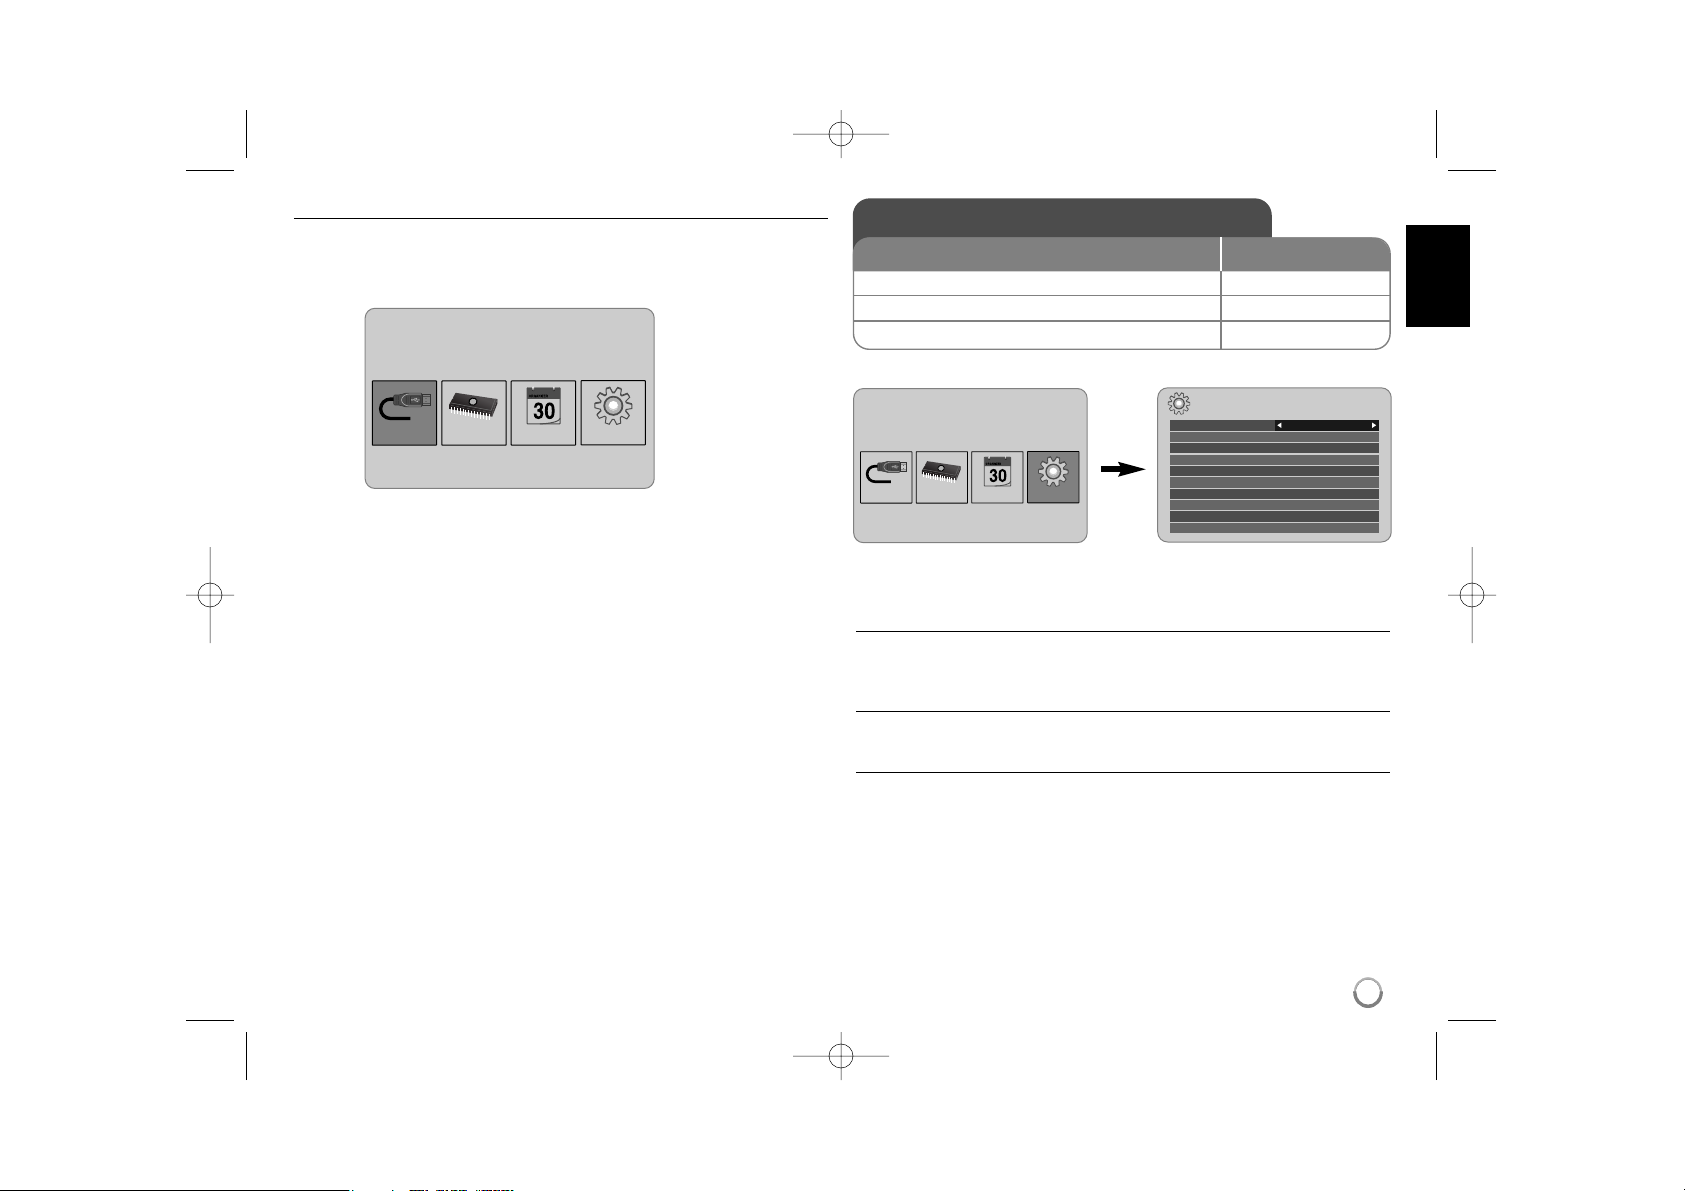
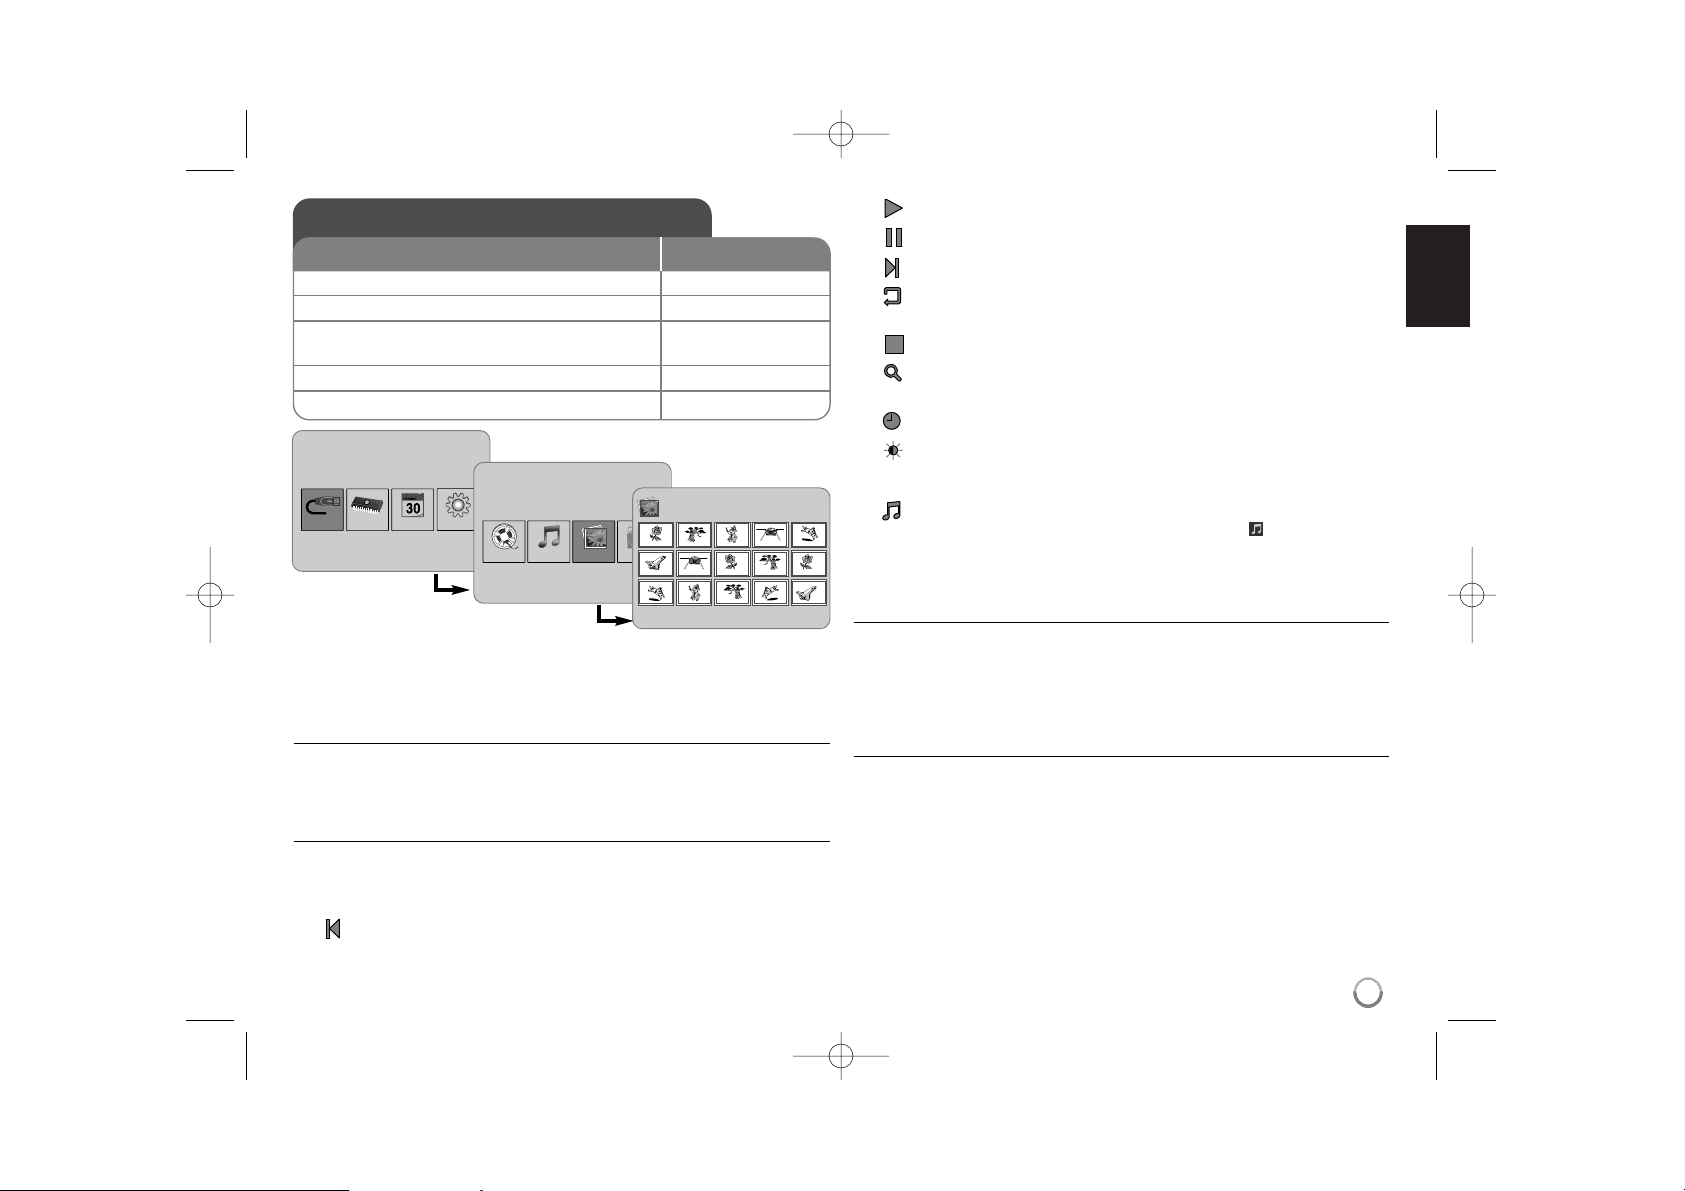
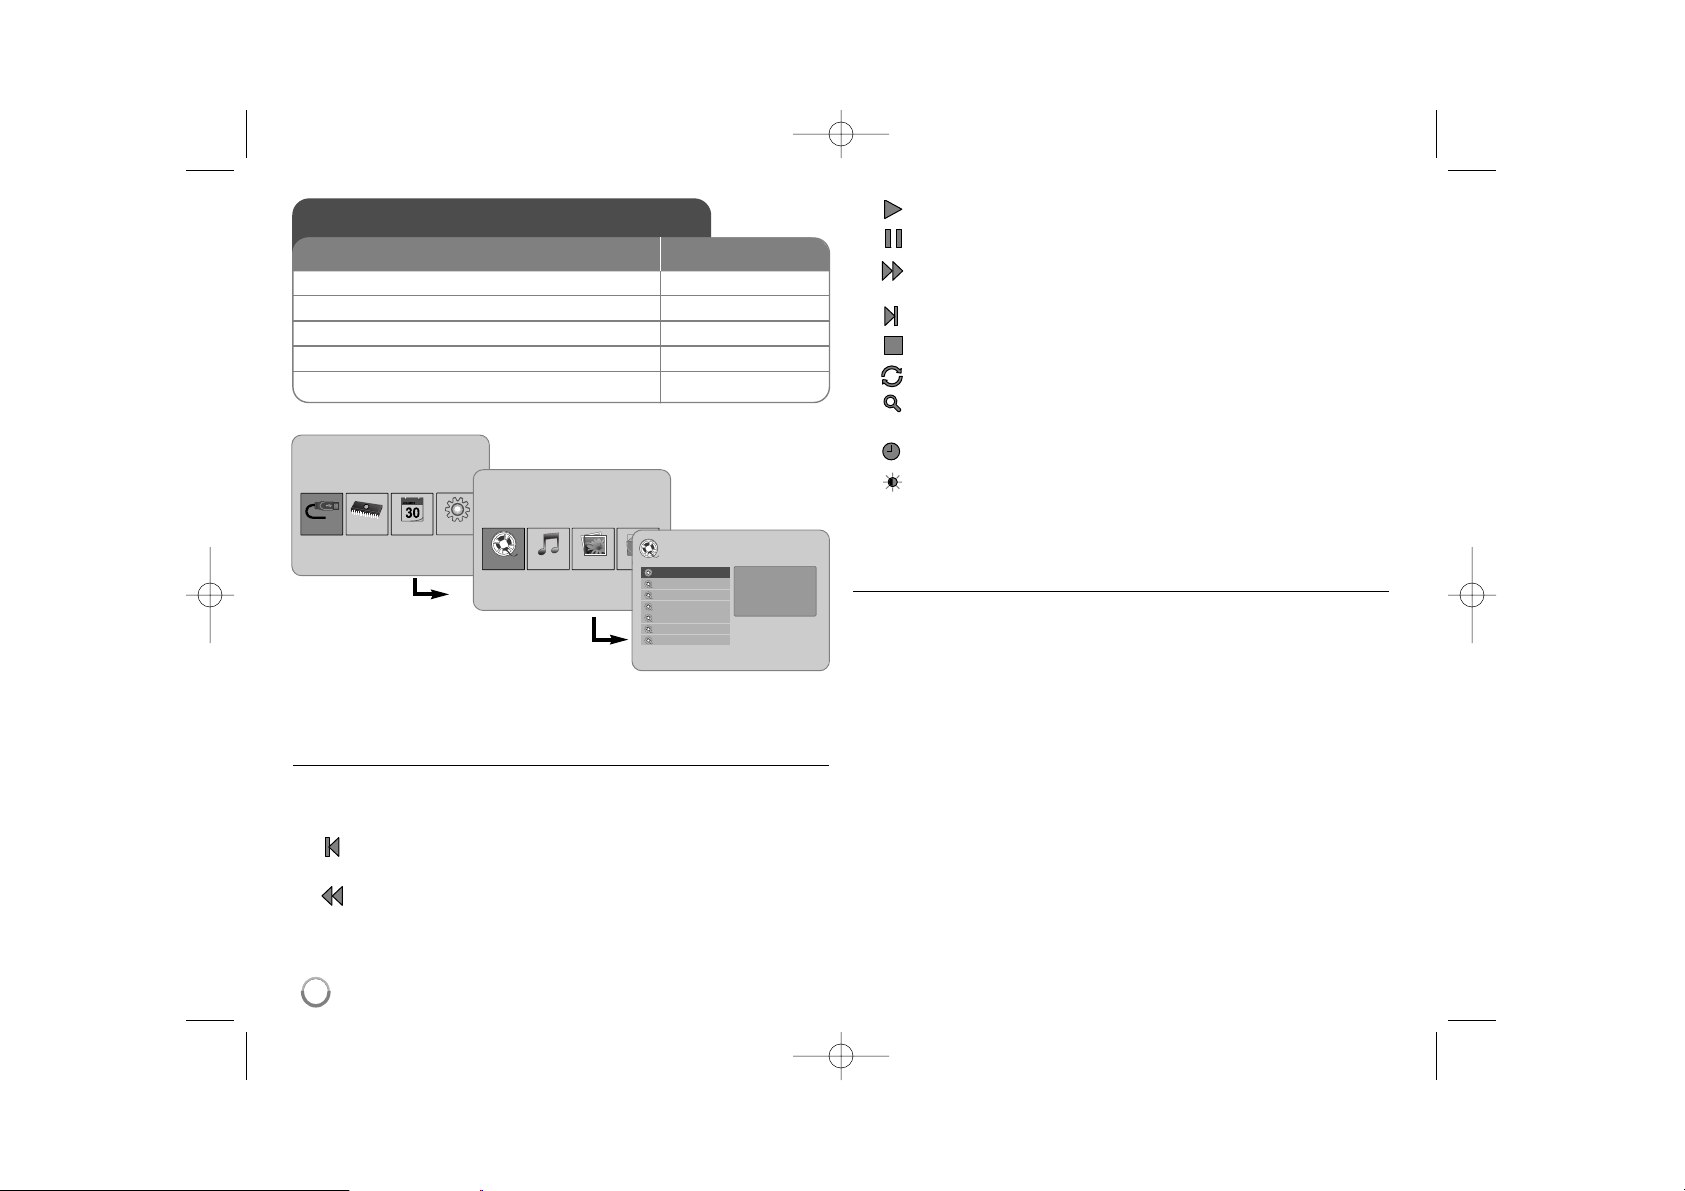
Using the Device Menu
The Device Menu will appear when the unit is turned on and you can display the
Device Menu by pressing BACK repeatedly.
Use b VOLUME B to select an option on the [Device Menu] then press
ENTER.
• USB-C ..... USB-Z
You can play a file(s) in the connected USB device.
• SD/MMC/MS
You can play a file(s) in the external memory card.
• Flash
You can play a file(s) in the internal memory card.
• Calendar
You can view the current date, clock and alarm information through calendar
screen.
• Setup
You can change the settings of the unit on the [Setup] menu.
Adjust the settings - more you can do
To display the [Setup] menu
Use b VOLUME B to select the [Setup] option on the [Device Menu] then
press ENTER.
[Language]
Select a language for the Setup menu and on-screen display.
[Slideshow time]
Specify how long each picture is displayed in a slideshow; 3 seconds,
5 seconds, 15 seconds, 1 minutes, 15 minutes, 1 hour.
Device Menu
USB-C Flash SetupCalendar
Device Menu
USB-C Flash SetupCalendar
Setup
Language
Slideshow time 5s:
Slideshow mode Random:
Display mode Normal:
Time format 24h:
Time 2007 / 11 / 22 21 : 17:
Auto On 2007 / 11 / 22 00 : 00 Off:
Auto Off 2007 / 11 / 22 00 : 00 Off:
Alarm 00 : 00 Ring1 Off:
Default Reset:
English
Adjust the settings
1 Select [Setup] on the [Device Menu]:
bb
VOLUME BB, ENTER
2 Select a desired option:
bb
PAGE
BB
3 Change the setting:
bb
VOLUME
BB
BUTTON
PF391P-P-AARELLW-ENG 11/23/07 4:34 PM Page 7

[Slideshow mode]
Specify the transition style between pictures in a slideshow; Random, Fading,
Off, Bottom-To-Top, Top-To-Bottom, Left-To-Right, Right-To-Left, Door-Close,
Door-Open, Hori-Cross, Verti-Cross.
If you select [Off], the slideshow does not work and the screen is fixed with one
picture.
[Display mode]
Specify the display mode for viewing photo file; Normal, Fit.
[Normal]: Retains the original aspect ratio of the image.
[Fit]: Optimizes the image to fit the screen
[Time format]
Specify the time format for displaying the clock ; 12h, 24h
[12h]: 12-hour display type with am or pm
[24h]: 24-hour display type without am or pm
[Time]
Specify the time and date of the unit to use the various timer features of the
unit.
1. Select [Time] option then press VOLUME B.
2. Enter the necessary information for date and time.
b VOLUME B (left/right): Moves the cursor to the previous or next column.
b PAGE B (up/down): Changes the setting at the current cursor position.
3. Press ENTER to confirm your setting.
[Auto On]
Specify when the unit turns on automatically.
1. Select [Auto On] option then press VOLUME B.
2. Follow step 2 as shown in [Time] above.
3. Choose a desired repeat mode; [Off], [Once] or [Everyday].
Select [Off] if you do not use this function.
4. Press ENTER to confirm your setting.
[Auto Off]
Specify when the unit turns off automatically.
1. Select [Auto Off] option then press VOLUME B.
2. Follow step 2 as shown in [Time] above.
3. Choose a desired repeat mode; [Off], [Once] or [Everyday].
Select [Off] if you do not use this function.
4. Press ENTER to confirm your setting.
[Alarm]
Specify the clock for alarm function. If you set the alarm, the unit will be turned
on automatically at the alarm time and the alarm will sound. To turn off the
alarm sound, press any button on the unit.
1. Select [Alarm] option then press VOLUME B.
2. Enter the necessary information for clock.
b VOLUME B (left/right): Moves the cursor to the previous or next column.
b PAGE B (up/down): Changes the setting at the current cursor position.
3. Choose a ring option; [Ring1], [Ring2] or [Ring3].
For example, if you select [Ring2];
Alarm sound (1 min.) c Mute (15 sec.) c Alarm sound (1 min.) c
Mute (15 sec.) c Normal mode
4. Choose a desired repeat mode; [Off], [Once] or [Everyday].
Select [Off] if you do not use this function.
[Off]: Alarm function is not activated.
[Once]: Alarm function is activated once after setting the alarm.
[Everyday]: Alarm function is activated everyday.
5. Press ENTER to confirm your setting.
[Default]
Reset the unit to its original factory settings. Select [Default] option then press
ENTER.
8
PF391P-P-AARELLW-ENG 11/23/07 4:34 PM Page 8
9
Viewing a Photo file - more you can do
Viewing photo files as a slideshow
On the [Photo] menu, use b VOLUME B and b PAGE B to select a photo file
then press NX to start the slideshow. Press NX to pause the slideshow temporarily, press again to exit pause mode.
Options during viewing a photo file in full screen
You can use various features during viewing a picture in full screen.
1. Press MENU to display the option menu.
2. Use b VOLUME B and ENTER to select an option and execute it.
To view the previous photo file.
To start the slideshow.
To pause the slideshow.
To view the next photo file.
To rotate the photo in 90 degrees clockwise. Press ENTER repeatedly
to select a degrees.
To stop viewing the photo in full screen and returns to [Photo] menu.
To enlarge the photo image. Press ENTER repeatedly to select a zoom
mode or normal mode.
To switch on or off the clock display.
To adjust the brightness of the screen. Press ENTER and the brightness menu will appear, and use b VOLUME B to adjust the brightness
then press ENTER.
You can listen to music during slideshow, if the current media contain
music and photo files together. Press ENTER and will appear lowerright side of the screen. To exit this function, press ENTER again.
3. Use MENU to exit the option menu.
Photo file requirement
JPEG file compatibility with this unit is limited as follows:
• File extensions: “.jpg”
• Photo size: Less than 8,000 x 8,000 (W x H) pixel (baseline)
Less than 100,000 pixel (progressive)
• Maximum Files/Media: Less than 650 recommended
Notes on JPEG file
• Lossless compression JPEG image files are not supported.
• Depending on the size and number of the JPEG files, it may take several
minutes to read the contents of the media.
Viewing a Photo file
1 Select a device on the [Device Menu]:
bb
VOLUME BB, ENTER
2 Select [Photo] on the [Media Menu]:
bb
VOLUME BB, ENTER
3 Select a photo file on the [Photo] menu:
bb
VOLUME BB,
bb
PAGE
BB
4 Display the selected file in full screen: ENTER, NX
5 To return to the [Photo] menu: BACK
BUTTON
Device Menu
USB-C Flash SetupCalendar
Media Menu
Movie
Music
Photo
File
Photo
1/2
DSC_0029.jpg 2007/11/22 12:00:00
PF391P-P-AARELLW-ENG 11/23/07 4:34 PM Page 9
Playing a Movie file - more you can do
Options during playing a movie file
You can use various features during playing a movie file.
1. Press MENU to display the option menu during playback.
2. Use b VOLUME B and ENTER to select an option and execute it.
To return to the beginning of the current file. Press ENTER twice briefly
to play the previous movie file.
To play fast reverse during playback. To change the various playback
speed, press ENTER repeatedly.
To start playback.
To pause playback.
To play fast forward during playback. To change the various playback
speed, press ENTER repeatedly.
To play the next movie file.
To stop playback and returns to [Movie] menu.
To select a repeat mode (TRACK, ALL, OFF).
To enlarge the video image. Press ENTER repeatedly to select a zoom
mode or normal mode.
To switch on or off the clock display.
To adjust the brightness of the screen. Press ENTER and the brightness control menu will appear, and use b VOLUME B to adjust the
brightness then press ENTER.
3. Use MENU to exit the option menu.
Movie file requirement
Movie file compatibility with this unit is limited as follows:
• Available resolution size: 720x576 (W x H) pixel.
• Bit rate: Less than 15 Mbps
• Movie file extensions: “.avi”, “.mpg”, “.mpeg”
• This unit does not support to display the subtitle of the movie file.
• Playable Codec format: “MPEG1”, “MPEG2”, “MJPEG”
• Playable Audio format: “MPEG1”, “MPEG2”, “MPEG3”, “PCM”
• “Not Support” will appear on the screen if the movie file is not playable.
• Maximum Files/Media: Less than 650 recommended
10
Playing a Movie file
1 Select a device on the [Device Menu]:
bb
VOLUME BB, ENTER
2 Select [Movie] on the [Media Menu]:
bb
VOLUME BB, ENTER
3 Select a movie file on the [Movie] menu:
bb
PAGE
BB
4 Start playback: ENTER, NX
5 To return to the [Movie] menu: BACK
BUTTON
Device Menu
USB-C Flash SetupCalendar
Media Menu
Movie
Music
Photo
File
Movie
Movie 1.avi
Movie 2.avi
Movie 3.avi
Movie 4.avi
Movie 5.avi
Movie 6.avi
Movie 7.avi
File Name Movie 1.avi
File Size 14MB
File Type AVI
PF391P-P-AARELLW-ENG 11/23/07 4:34 PM Page 10
 Loading...