


ENGLISH
PF391
P/NO : MFL42173803(R1)
PF391P-P-APRTLLW-ENG 11/19/07 4:23 PM Page 1
2
CAUTION: TO REDUCE THE RISK OF ELECTRIC SHOCK. DO NOT REMOVE
COVER (OR BACK). NO USER-SERVICEABLE PARTS INSIDE. REFER SERVICING TO QUALIFIED SERVICE PERSONNEL.
This lightning flash with arrowhead symbol within an equilateral triangle is
intended to alert the user to the presence of uninsulated dangerous voltage
within the product’s enclosure that may be of sufficient magnitude to constitute a risk of electric shock to persons.
The exclamation point within an equilateral triangle is intended to alert the
user to the presence of important operating and maintenance (servicing)
instructions in the literature accompanying the product.
WARNING: TO PREVENT FIRE OR ELECTRIC SHOCK HAZARD, DO NOT
EXPOSE THIS PRODUCT TO RAIN OR MOISTURE.
WARNING: Do not install this equipment in a confined space such as a book case or
similar unit.
CAUTION: Do not block any ventilation openings. Install in accordance with the manufacturer's instructions. Slots and openings in the cabinet are provided for ventilation
and to ensure reliable operation of the product and to protect it from over heating.
The openings should be never be blocked by placing the product on a bed, sofa, rug
or other similar surface. This product should not be placed in a built-in installation
such as a bookcase or rack unless proper ventilation is provided or the manufacturer's instruction has been adhered to.
CAUTION: The apparatus should not be exposed to water (dripping or splashing) and
no objects filled with liquids, such as vases, should be placed on the apparatus.
CAUTION concerning the Power Cord
Most appliances recommend they be placed upon a dedicated circuit;
That is, a single outlet circuit which powers only that appliance and has no additional
outlets or branch circuits. Check the specification page of this owner's manual to be
certain.Do not overload wall outlets. Overloaded wall outlets, loose or damaged wall
outlets, extension cords, frayed power cords, or damaged or cracked wire insulation
are dangerous. Any of these conditions could result in electric shock or fire.
Periodically examine the cord of your appliance, and if its appearance indicates damage or deterioration, unplug it, discontinue use of the appliance, and have the cord
replaced with an exact replacement part by an authorized service center.
Protect the power cord from physical or mechanical abuse, such as being twisted,
kinked, pinched, closed in a door, or walked upon. Pay particular attention to plugs,
wall outlets, and the point where the cord exits the appliance.
To disconnect power from the mains, pull out the mains cord plug. When installing the
product, ensure that the plug is easily accessible.
Disposal of your old appliance
1. When this crossed-out wheeled bin symbol is attached to a product it
means the product is covered by the European Directive 2002/96/EC.
2. All electrical and electronic products should be disposed of separately from
the municipal waste stream via designated collection facilities appointed by
the government or the local authorities.
3. The correct disposal of your old appliance will help prevent potential negative consequences for the environment and human health.
4. For more detailed information about disposal of your old appliance, please
contact your city office, waste disposal service or the shop where you purchased the product.
This product is manufactured to comply with the EEC DIRECTIVE
2004/108/EC, and 2006/95/EC.
Safety Precaution
CAUTION
RISK OF ELECTRIC SHOCK
DO NOT OPEN
PF391P-P-APRTLLW-ENG 11/19/07 4:23 PM Page 2

3
Contents
Safety Precaution . . . . . . . . . . . . . . . . . . . . . . . . . . . . . . . . . . . . . . . . . . . . .2
Contents . . . . . . . . . . . . . . . . . . . . . . . . . . . . . . . . . . . . . . . . . . . . . . . . . . . .3
Features . . . . . . . . . . . . . . . . . . . . . . . . . . . . . . . . . . . . . . . . . . . . . . . . . . . .3
Main Unit . . . . . . . . . . . . . . . . . . . . . . . . . . . . . . . . . . . . . . . . . . . . . . . . . . . .4
Getting Started . . . . . . . . . . . . . . . . . . . . . . . . . . . . . . . . . . . . . . . . . . . . . . .5
• Inserting or removing a memory card . . . . . . . . . . . . . . . . . . . . . . . . . . .5
• Connecting an USB Device . . . . . . . . . . . . . . . . . . . . . . . . . . . . . . . . . . .5
• Connecting the Power Cable . . . . . . . . . . . . . . . . . . . . . . . . . . . . . . . . . .6
• Turning On or Off the Unit . . . . . . . . . . . . . . . . . . . . . . . . . . . . . . . . . . . .6
• Power Save mode . . . . . . . . . . . . . . . . . . . . . . . . . . . . . . . . . . . . . . . . . .6
• Installing the Stand . . . . . . . . . . . . . . . . . . . . . . . . . . . . . . . . . . . . . . . . .6
• Using the Device Menu . . . . . . . . . . . . . . . . . . . . . . . . . . . . . . . . . . . . . .7
Adjust the settings . . . . . . . . . . . . . . . . . . . . . . . . . . . . . . . . . . . . . . . . . . .7-8
Viewing a Photo file . . . . . . . . . . . . . . . . . . . . . . . . . . . . . . . . . . . . . . . . . . . .9
Playing a Movie file . . . . . . . . . . . . . . . . . . . . . . . . . . . . . . . . . . . . . . . . . . .10
Playing a Music file . . . . . . . . . . . . . . . . . . . . . . . . . . . . . . . . . . . . . . . . . . .11
Using a File menu . . . . . . . . . . . . . . . . . . . . . . . . . . . . . . . . . . . . . . . . . . . .12
Viewing the Calendar . . . . . . . . . . . . . . . . . . . . . . . . . . . . . . . . . . . . . . . . . .13
PC Connection (USB) . . . . . . . . . . . . . . . . . . . . . . . . . . . . . . . . . . . . . . . . .14
Troubleshooting . . . . . . . . . . . . . . . . . . . . . . . . . . . . . . . . . . . . . . . . . . . . . .15
Specifications . . . . . . . . . . . . . . . . . . . . . . . . . . . . . . . . . . . . . . . . . . . . . . .15
Features
• Live picture gallery:
High resolution and deep digital color from LCD wide screen.
• Easy power save mode:
Better 1 second power save mode than 15 seconds power off and on.
• Portable digital album:
Share your memories with built-in battery for easy mobility
• Plug-in viewer:
Easy viewing photos via memory card slot and USB port
• 2,000 photo storage:
2,000 precious memories with 256MB built-in flash memory
• Digital calendar & alarm clock:
For your efficient date and time scheduling
• Convenient photo explorer:
Coolest interface navigation for easiest access to your memory
• Premium interior decorator
3 different changeable faceplate to suit various interior
PF391P-P-APRTLLW-ENG 11/19/07 4:23 PM Page 3
4
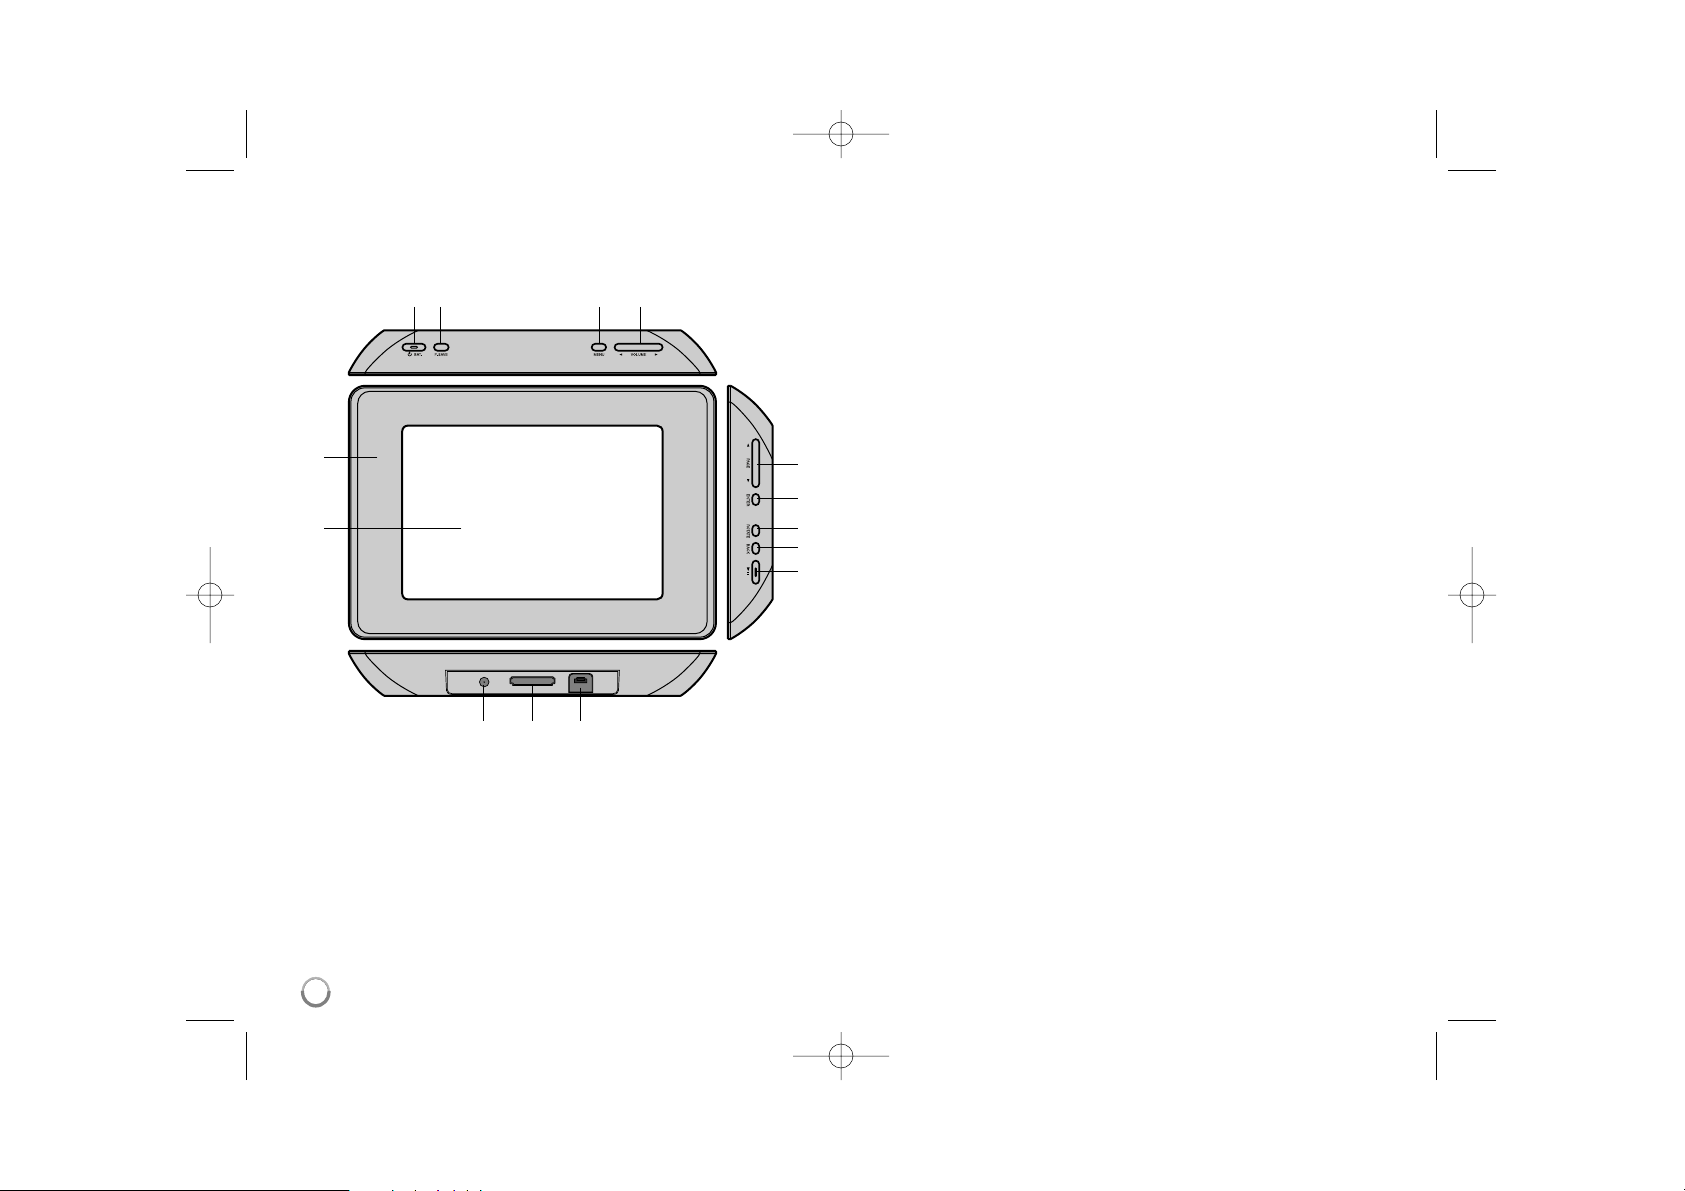
Main Unit
a LCD screen
b Faceplate (interchangeable)
Four edges of the faceplate are magnetic, so that the faceplate can easily
be attached or detached.
c 1 BAT. (Power button and Battery indicator)
Turns the unit ON or OFF and indicates the battery status.
The indicator lights in red during charging the battery.
The indicator lights in green when battery is full.
d P-SAVE (Power Save)
Accesses or exits the power save mode.
e MENU
Accesses or exits the option menu.
f b VOLUME B
Adjusts the volume of the unit. To adjust the volume, press and hold
VOLUME (b or B) during playback of the movie or music file.
Left and Right buttons for selecting an item on the menu.
g b PAGE B
Press and hold for 2 seconds to move to the previous or next page on the
[Photo], [Movie] or [Music] menu.
Up and Down buttons for selecting an item on the menu.
h ENTER
Selects an option or executes a command.
i ROTATE
Rotates the photo in full screen counterclockwise.
j BACK
Returns to a previous menu or screen.
k NX
Starts playback. Press to pause playback; press again to restart.
l USB connector
Connect the supplied USB adapter cable then connect an USB device.
m Memory card slot
Insert a memory card (SD, MMC or MS).
n DC 12V IN
Connect the supplied AC adapter.
cd e f
nml
b
a
g
h
i
j
k
PF391P-P-APRTLLW-ENG 11/19/07 4:23 PM Page 4
5
Getting Started
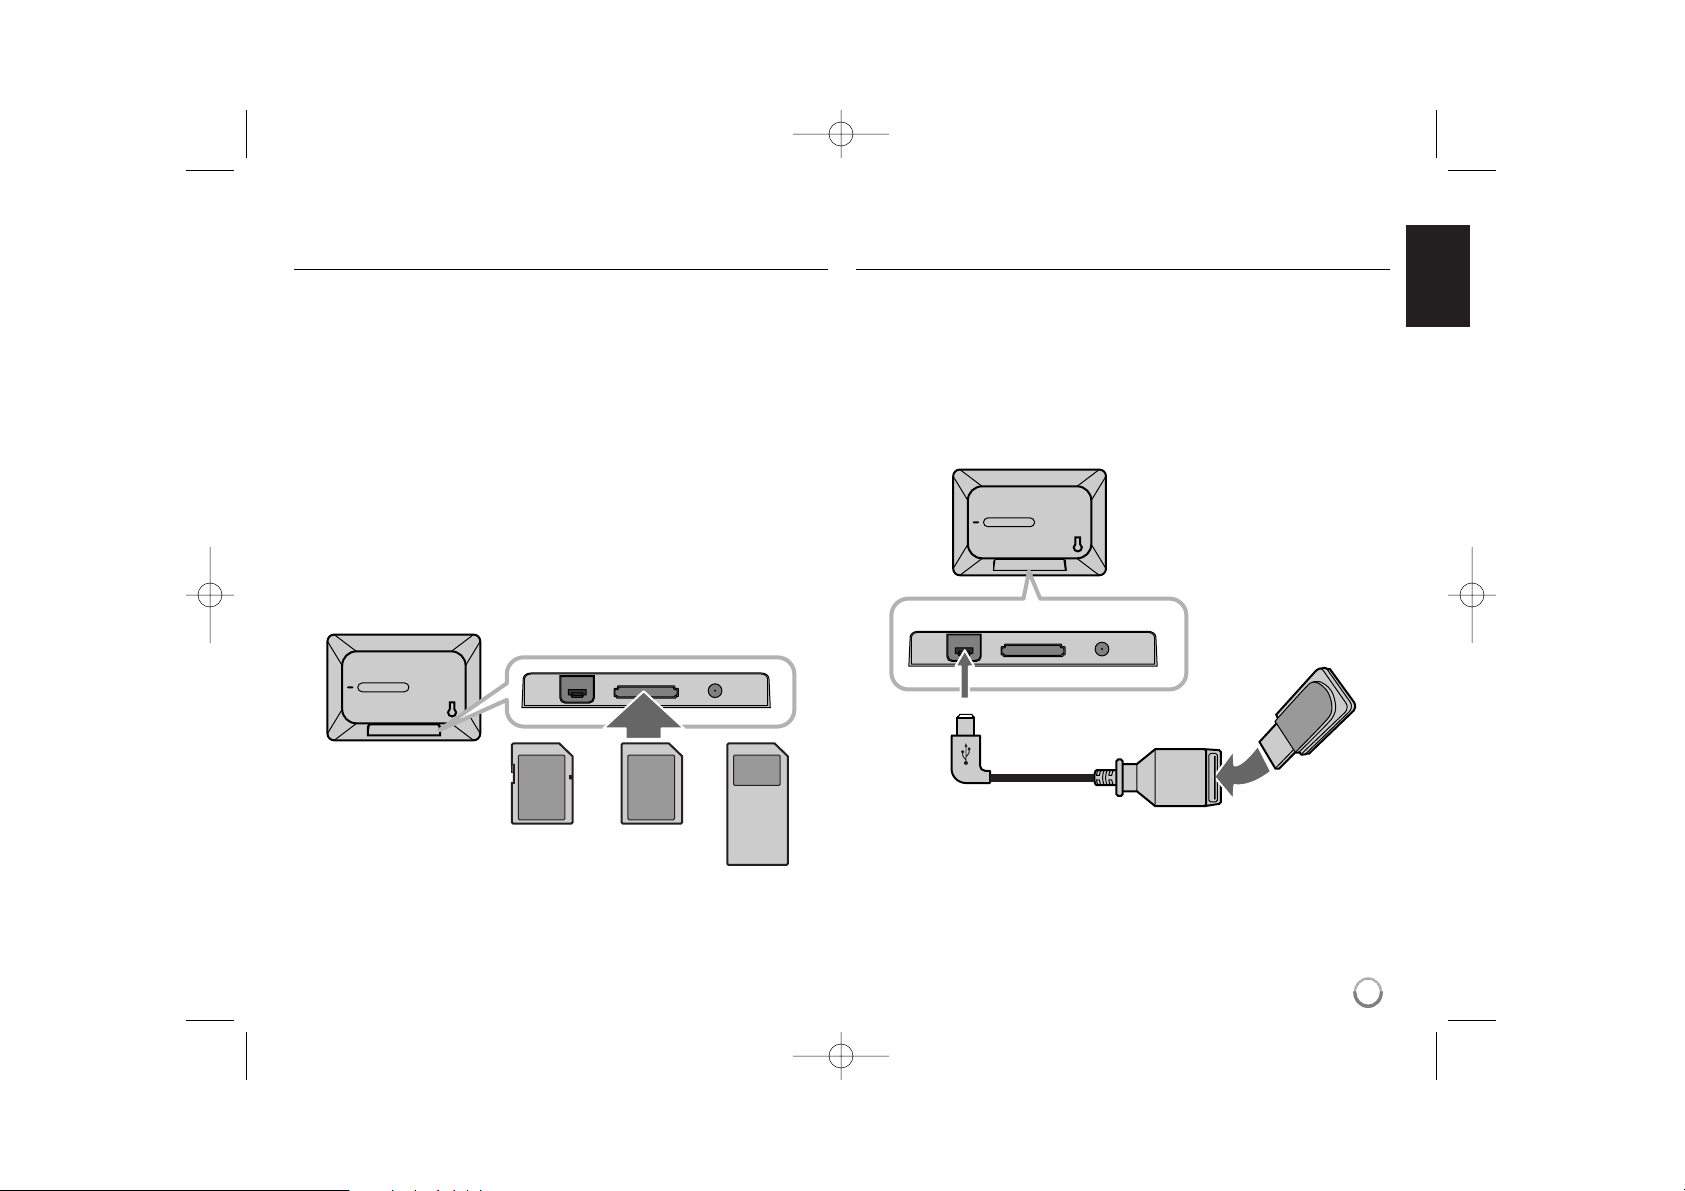
Inserting or removing a memory card
Insert a memory card to the memory card slot on the unit.
To withdraw the memory card from the slot, press on the center of the memory
card then withdraw it carefully.
Card useable on this unit
• Secure Digital Card (SD)
• Multi Media Card (MMC)
• Memory Stick (MS)
• Compatible with: FAT 12, FAT 16, or FAT 32
• Only use the memory cards recommended above.
• The card will only fit in one direction; do not force it.
The card should fit snugly when properly inserted.
• Any memory card may not be available on the unit.
• Do not extract the memory card in operating (play, copy, etc.).
Regarding Write Protect
For cards that have a write protect switch, it will not be possible to write, erase
or format the card if the switch is on.
Connecting an USB Device
Connect the small end of the USB adapter cable to the USB port on the unit.
Connect an USB Device and the USB adapter. Use an USB cable, if you need.
• This unit supports only USB Device with FAT16 or FAT32 format.
• Do not extract the USB Device during operation (play, copy, etc.).
• USB Device: USB Device that support USB 1.1 and USB 2.0.
(For example: USB Flash Drive, Memory Card Reader, Digital Camera, etc.)
• An USB Device which requires additional program installation when you
have connected it to a PC, is not supported.
USB Flash Drive
(For example)
USB Adapter Cable
To USB port
SD
or or
MMC
MS
PF391P-P-APRTLLW-ENG 11/19/07 4:23 PM Page 5
6
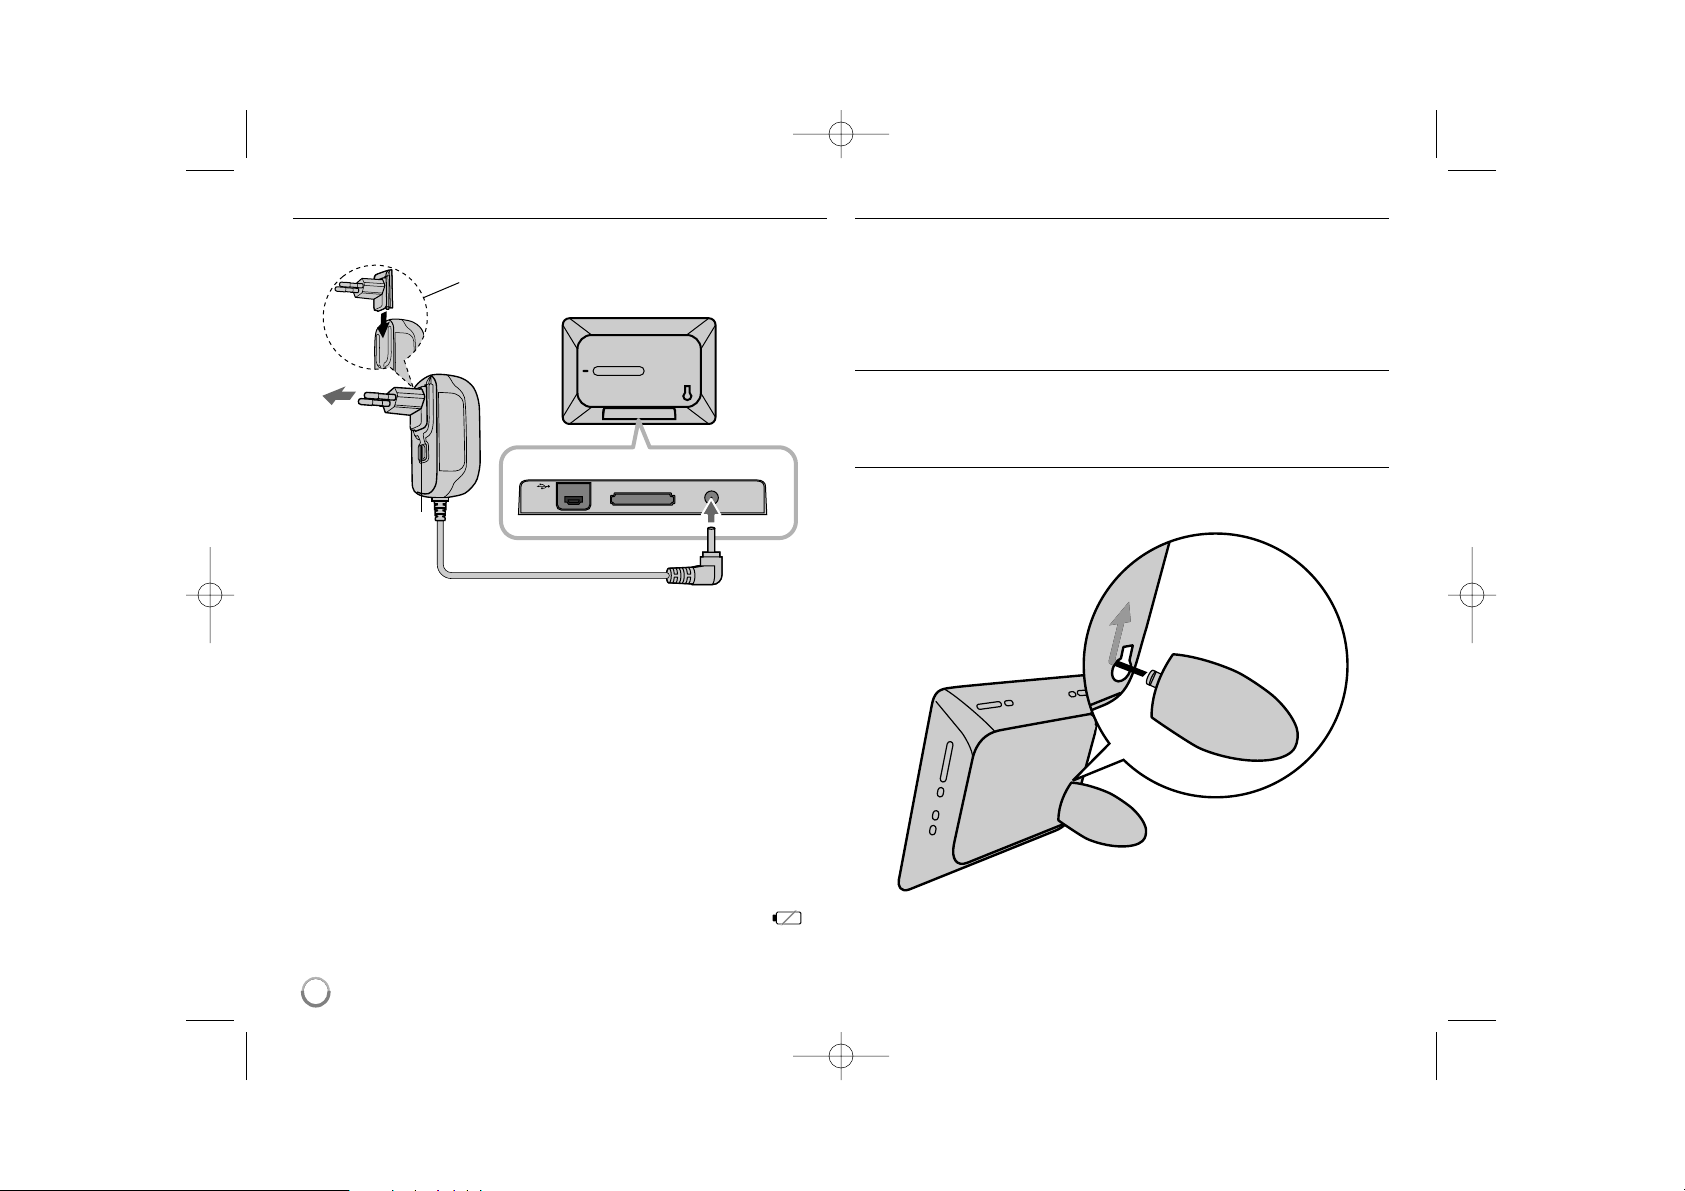
Connecting the Power Cable
Connect the supplied power cable from the unit to a power outlet.
AC adapter
• This AC adapter operates on 100-240V~ 1A 50/60Hz.
• Contact an electrical parts distributor for assistance in selecting a suitable AC
plug adapter or AC cord set.
• Manufactured by WANLIDA GROUP CO., LTD
Rechargeable battery
• Its internal rechargeable battery provides you with the freedom to pass it
around and play the files without the power cord.
• The internal rechargeable battery will start charging only when the unit is
turned off and the AC adapter is connected to a power outlet.
• The charging is stopped if you turn on the unit.
• The charging will take approximately 2 hour.
• The 1 BAT. indicator turns red in charging. If the charging is complete, the
indicator changes to green color.
• When the remaining time of the battery power is under 10 minutes, “ ”
will appear on the screen and the 1 BAT. indicator flashes.
Turning On or Off the Unit
To turn on the unit, press and hold 1 BAT. for 2 seconds.
The demonstration slideshow will start and then the [Device Menu] will appear.
Press any button to skip the demonstration slideshow.
The demonstration photos are located in the internal memory, and you cannot
change or delete them.
Press 1 BAT. again to turn off the unit.
Power Save mode
You can set up the unit into an economic power save mode. Press P-SAVE
and the LCD screen is turned off. To exit the power save mode, press P-SAVE
or 1 BAT.
Installing the Stand
Attach the detachable stand on the back of the unit as below.
To “DC 12V IN” jack
Attach the power plug to the body of the AC adapter.
Power cord
release knob
To AC outlet
PF391P-P-APRTLLW-ENG 11/19/07 4:23 PM Page 6
7
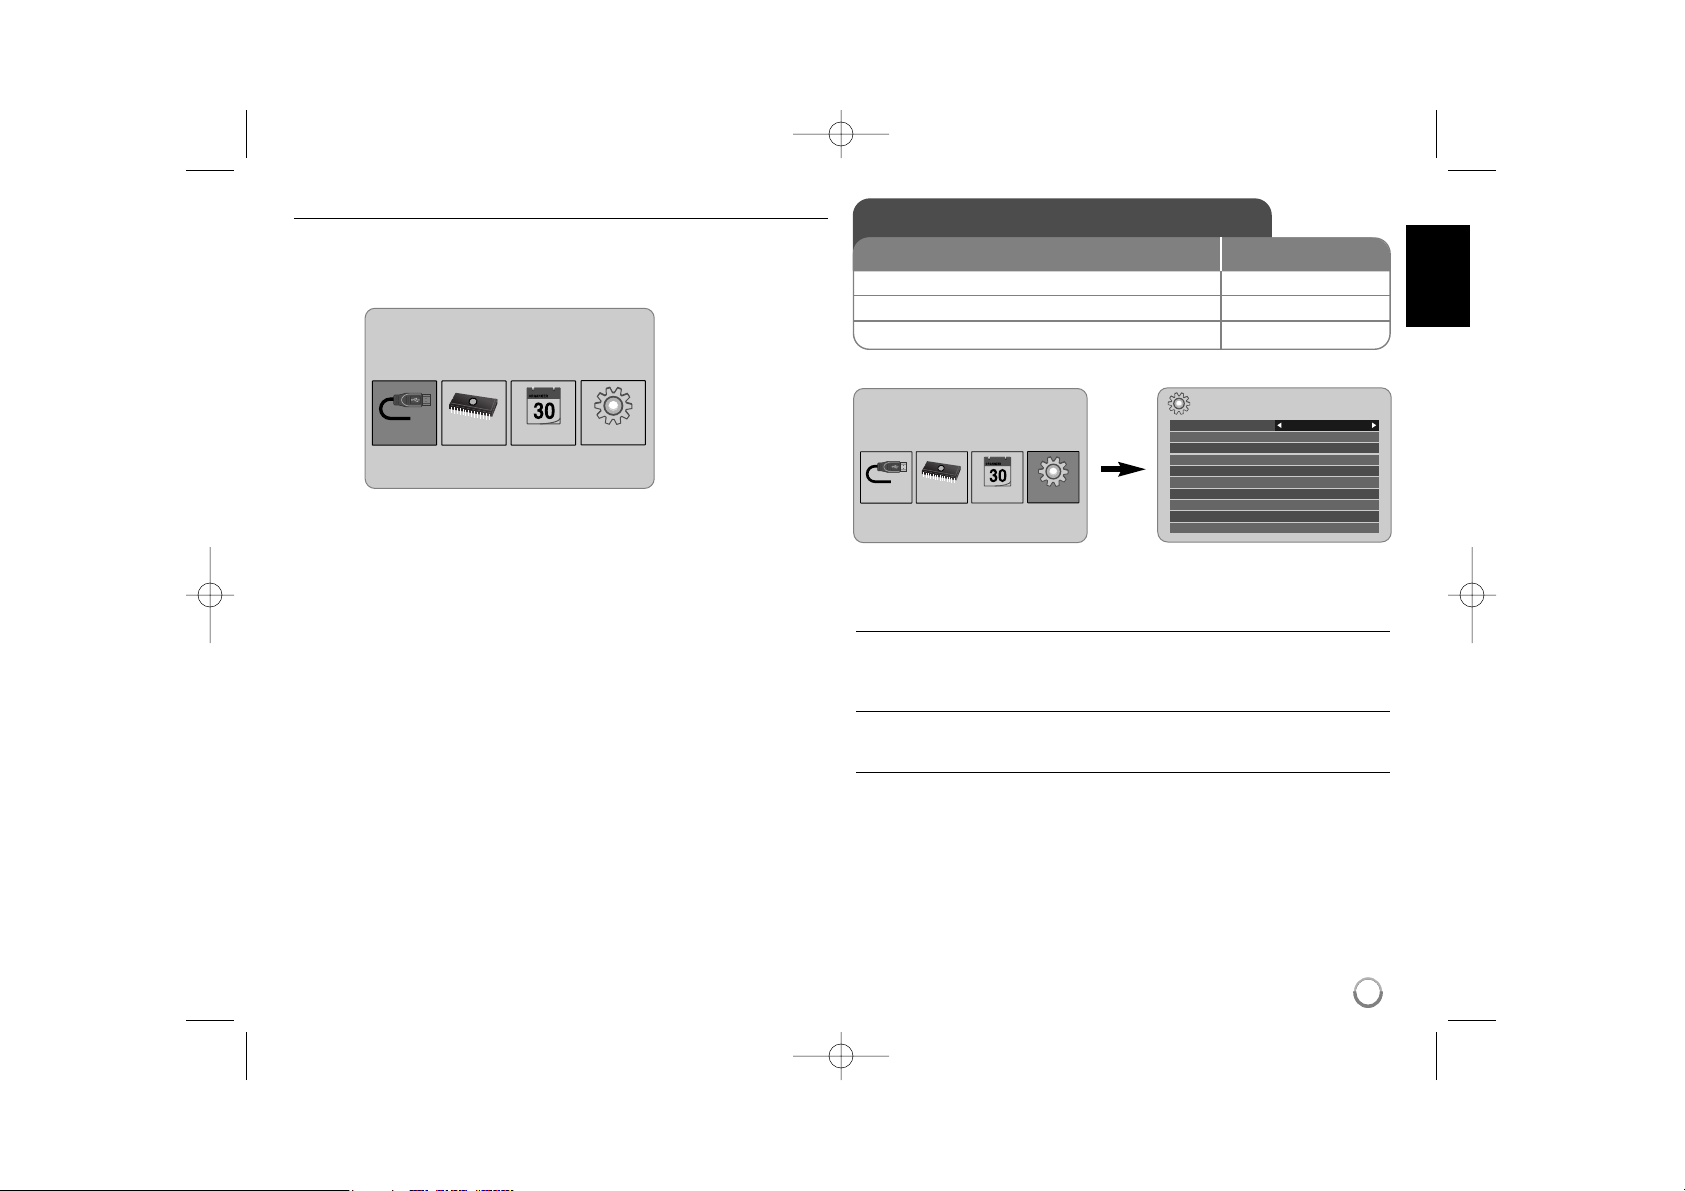
Using the Device Menu
The Device Menu will appear when the unit is turned on and you can display the
Device Menu by pressing BACK repeatedly.
Use b VOLUME B to select an option on the [Device Menu] then press
ENTER.
• USB-C ..... USB-Z
You can play a file(s) in the connected USB device.
• SD/MMC/MS
You can play a file(s) in the external memory card.
• Flash
You can play a file(s) in the internal memory card.
• Calendar
You can view the current date, clock and alarm information through calendar
screen.
• Setup
You can change the settings of the unit on the [Setup] menu.
Adjust the settings - more you can do
To display the [Setup] menu
Use b VOLUME B to select the [Setup] option on the [Device Menu] then
press ENTER.
[Language]
Select a language for the Setup menu and on-screen display.
[Slideshow time]
Specify how long each picture is displayed in a slideshow; 3 seconds,
5 seconds, 15 seconds, 1 minutes, 15 minutes, 1 hour.
Device Menu
USB-C Flash SetupCalendar
Device Menu
USB-C Flash SetupCalendar
Setup
Language
Slideshow time 5s:
Slideshow mode Random:
Display mode Normal:
Time format 24h:
Time 2007 / 11 / 22 21 : 17:
Auto On 2007 / 11 / 22 00 : 00 Off:
Auto Off 2007 / 11 / 22 00 : 00 Off:
Alarm 00 : 00 Ring1 Off:
Default Reset:
English
Adjust the settings
1 Select [Setup] on the [Device Menu]:
bb
VOLUME BB, ENTER
2 Select a desired option:
bb
PAGE
BB
3 Change the setting:
bb
VOLUME
BB
BUTTON
PF391P-P-APRTLLW-ENG 11/19/07 4:23 PM Page 7

[Slideshow mode]
Specify the transition style between pictures in a slideshow; Random, Fading,
Off, Bottom-To-Top, Top-To-Bottom, Left-To-Right, Right-To-Left, Door-Close,
Door-Open, Hori-Cross, Verti-Cross.
If you select [Off], the slideshow does not work and the screen is fixed with one
picture.
[Display mode]
Specify the display mode for viewing photo file; Normal, Fit.
[Normal]: Retains the original aspect ratio of the image.
[Fit]: Optimizes the image to fit the screen
[Time format]
Specify the time format for displaying the clock ; 12h, 24h
[12h]: 12-hour display type with am or pm
[24h]: 24-hour display type without am or pm
[Time]
Specify the time and date of the unit to use the various timer features of the
unit.
1. Select [Time] option then press VOLUME B.
2. Enter the necessary information for date and time.
b VOLUME B (left/right): Moves the cursor to the previous or next column.
b PAGE B (up/down): Changes the setting at the current cursor position.
3. Press ENTER to confirm your setting.
[Auto On]
Specify when the unit turns on automatically.
1. Select [Auto On] option then press VOLUME B.
2. Follow step 2 as shown in [Time] above.
3. Choose a desired repeat mode; [Off], [Once] or [Everyday].
Select [Off] if you do not use this function.
4. Press ENTER to confirm your setting.
[Auto Off]
Specify when the unit turns off automatically.
1. Select [Auto Off] option then press VOLUME B.
2. Follow step 2 as shown in [Time] above.
3. Choose a desired repeat mode; [Off], [Once] or [Everyday].
Select [Off] if you do not use this function.
4. Press ENTER to confirm your setting.
[Alarm]
Specify the clock for alarm function. If you set the alarm, the unit will be turned
on automatically at the alarm time and the alarm will sound. To turn off the
alarm sound, press any button on the unit.
1. Select [Alarm] option then press VOLUME B.
2. Enter the necessary information for clock.
b VOLUME B (left/right): Moves the cursor to the previous or next column.
b PAGE B (up/down): Changes the setting at the current cursor position.
3. Choose a ring option; [Ring1], [Ring2] or [Ring3].
For example, if you select [Ring2];
Alarm sound (1 min.) c Mute (15 sec.) c Alarm sound (1 min.) c
Mute (15 sec.) c Normal mode
4. Choose a desired repeat mode; [Off], [Once] or [Everyday].
Select [Off] if you do not use this function.
[Off]: Alarm function is not activated.
[Once]: Alarm function is activated once after setting the alarm.
[Everyday]: Alarm function is activated everyday.
5. Press ENTER to confirm your setting.
[Default]
Reset the unit to its original factory settings. Select [Default] option then press
ENTER.
8
PF391P-P-APRTLLW-ENG 11/19/07 4:23 PM Page 8
9
Viewing a Photo file - more you can do
Viewing photo files as a slideshow
On the [Photo] menu, use b VOLUME B and b PAGE B to select a photo file
then press NX to start the slideshow. Press NX to pause the slideshow temporarily, press again to exit pause mode.
Options during viewing a photo file in full screen
You can use various features during viewing a picture in full screen.
1. Press MENU to display the option menu.
2. Use b VOLUME B and ENTER to select an option and execute it.
To view the previous photo file.
To start the slideshow.
To pause the slideshow.
To view the next photo file.
To rotate the photo in 90 degrees clockwise. Press ENTER repeatedly
to select a degrees.
To stop viewing the photo in full screen and returns to [Photo] menu.
To enlarge the photo image. Press ENTER repeatedly to select a zoom
mode or normal mode.
To switch on or off the clock display.
To adjust the brightness of the screen. Press ENTER and the brightness menu will appear, and use b VOLUME B to adjust the brightness
then press ENTER.
You can listen to music during slideshow, if the current media contain
music and photo files together. Press ENTER and will appear lowerright side of the screen. To exit this function, press ENTER again.
3. Use MENU to exit the option menu.
Photo file requirement
JPEG file compatibility with this unit is limited as follows:
• File extensions: “.jpg”
• Photo size: Less than 8,000 x 8,000 (W x H) pixel (baseline)
Less than 100,000 pixel (progressive)
• Maximum Files/Media: Less than 650 recommended
Notes on JPEG file
• Lossless compression JPEG image files are not supported.
• Depending on the size and number of the JPEG files, it may take several
minutes to read the contents of the media.
Viewing a Photo file
1 Select a device on the [Device Menu]:
bb
VOLUME BB, ENTER
2 Select [Photo] on the [Media Menu]:
bb
VOLUME BB, ENTER
3 Select a photo file on the [Photo] menu:
bb
VOLUME BB,
bb
PAGE
BB
4 Display the selected file in full screen: ENTER, NX
5 To return to the [Photo] menu: BACK
BUTTON
Device Menu
USB-C Flash SetupCalendar
Media Menu
Movie
Music
Photo
File
Photo
1/2
DSC_0029.jpg 2007/11/22 12:00:00
PF391P-P-APRTLLW-ENG 11/19/07 4:23 PM Page 9
Playing a Movie file - more you can do
Options during playing a movie file
You can use various features during playing a movie file.
1. Press MENU to display the option menu during playback.
2. Use b VOLUME B and ENTER to select an option and execute it.
To return to the beginning of the current file. Press ENTER twice briefly
to play the previous movie file.
To play fast reverse during playback. To change the various playback
speed, press ENTER repeatedly.
To start playback.
To pause playback.
To play fast forward during playback. To change the various playback
speed, press ENTER repeatedly.
To play the next movie file.
To stop playback and returns to [Movie] menu.
To select a repeat mode (TRACK, ALL, OFF).
To enlarge the video image. Press ENTER repeatedly to select a zoom
mode or normal mode.
To switch on or off the clock display.
To adjust the brightness of the screen. Press ENTER and the brightness control menu will appear, and use b VOLUME B to adjust the
brightness then press ENTER.
3. Use MENU to exit the option menu.
Movie file requirement
Movie file compatibility with this unit is limited as follows:
• Available resolution size: 720x576 (W x H) pixel.
• Bit rate: Less than 15 Mbps
• Movie file extensions: “.avi”, “.mpg”, “.mpeg”
• This unit does not support to display the subtitle of the movie file.
• Playable Codec format: “MPEG1”, “MPEG2”, “MJPEG”
• Playable Audio format: “MPEG1”, “MPEG2”, “MPEG3”, “PCM”
• “Not Support” will appear on the screen if the movie file is not playable.
• Maximum Files/Media: Less than 650 recommended
10
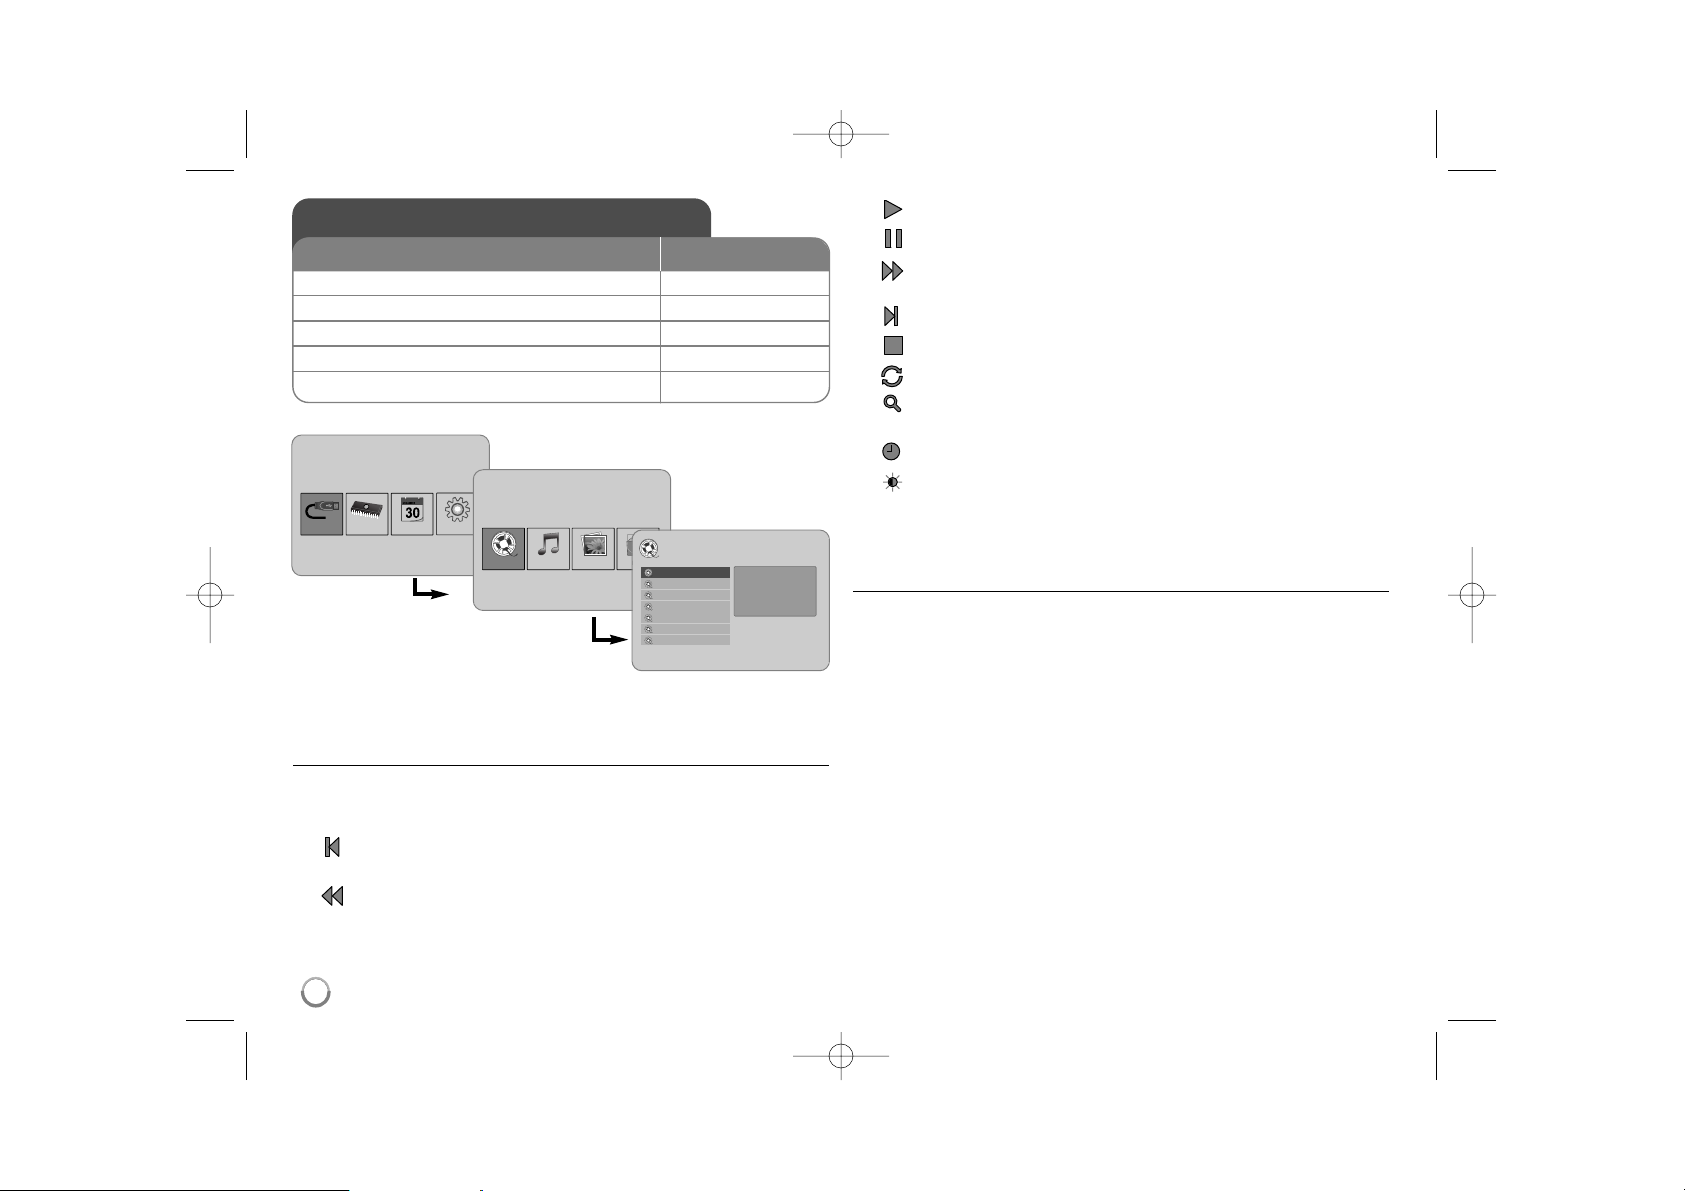
Playing a Movie file
1 Select a device on the [Device Menu]:
bb
VOLUME BB, ENTER
2 Select [Movie] on the [Media Menu]:
bb
VOLUME BB, ENTER
3 Select a movie file on the [Movie] menu:
bb
PAGE
BB
4 Start playback: ENTER, NX
5 To return to the [Movie] menu: BACK
BUTTON
Device Menu
USB-C Flash SetupCalendar
Media Menu
Movie
Music
Photo
File
Movie
Movie 1.avi
Movie 2.avi
Movie 3.avi
Movie 4.avi
Movie 5.avi
Movie 6.avi
Movie 7.avi
File Name Movie 1.avi
File Size 14MB
File Type AVI
PF391P-P-APRTLLW-ENG 11/19/07 4:23 PM Page 10

11
Playing a Music file - more you can do
Options during playing a music file
You can use various features during playing a music file.
1. Press MENU to display the option menu during playback.
2. Use b VOLUME B and ENTER to select an option and execute it.
To return to the beginning of the current file. Press ENTER twice briefly
to play the previous movie file.
To play fast reverse during playback. To change the various playback
speed, press ENTER repeatedly.
To start playback.
To pause playback.
To play fast forward during playback. To change the various playback
speed, press ENTER repeatedly.
To play the next music file.
To stop playback.
To select a repeat mode. (TRACK, ALL, OFF)
3. Use MENU to exit the option menu.
Music file requirement
• File extensions: “.mp3”
• Sampling frequency: 8 - 48 kHz (Layer 1, Layer 2, Layer 3, MPEG 2.5),
8 - 96 kHz (PCM)
• Bit rate: 32 - 448 kbps (Layer 1), 32 - 384 kbps (Layer 2),
32 - 320 kbps (Layer 3), 8 - 160 kbps (MPEG 2.5)
• Maximum Files/Media: Less than 650 recommended
Playing a Music file
1 Select a device on the [Device Menu]:
bb
VOLUME BB, ENTER
2 Select [Music] on the [Media Menu]:
bb
VOLUME BB, ENTER
3 Select a music file on the [Music] menu:
bb
PAGE
BB
4 Start playback: ENTER, NX
5 To return to the [Media Menu]: BACK
BUTTON
Device Menu
USB-C Flash SetupCalendar
Media Menu
Movie
Music
Photo
File
Music
Music 01.mp3
Music 02.mp3
Music 03.mp3
Music 04.mp3
Music 05.mp3
Music 06.mp3
Music 07.mp3
File Name Music 01.mp3
File Size 3MB
File Type MP3
PF391P-P-APRTLLW-ENG 11/19/07 4:23 PM Page 11

12
Using a File menu - more you can do
Using [File] menu
• You can view a list of folders and files in the current media.
• You can delete or copy a file(s) in the current media.
To display a list of subfolders and files
Use b PAGE B to select a folder then press ENTER. The list of the files and
subfolders within the folder. Press BACK to move to the upper folder.
To select multiple files on the [File] menu
You can select not only single file but also multiple files using
VOLUME B
button. Press VOLUME B at the desired files to select multiple files.
To delete a file(s) using the [File] menu
1. Select a file then press VOLUME B and “B” appear on the right of the file
name.
2. Repeat step 1 if you need to select multiple files.
3. Press ENTER and the option menu will appear.
4. Use b PAGE B to select [Delete>] option then press ENTER.
The confirm menu will appear.
5. Use b VOLUME B to select [Yes] then press ENTER and the file will be
deleted from the current media.
6.
When the deleting is completed,
press ENTER to finish.
To copy a file(s) from the current media to another media
1. Select a file then press VOLUME B and “B” appear on the right of the file
name.
2. Repeat step 1 if you need to select multiple files.
3. Press ENTER and the option menu will appear.
4. Use b PAGE B to select [Copy >] option then press ENTER.
5. Use b PAGE B to select a media that you would like to copy to.
The free space of the selected media will be displayed on the upper-right
side of the [File] menu.
6. Use b VOLUME B and b PAGE B to select a folder that you would like
to copy to.
- Press VOLUME B to move to a subfolder.
- Press b VOLUME to move to a upper folder.
7. Press ENTER. The files will be copied to the selected media or folder.
8.
When the copying is completed,
press ENTER to finish.
Using a File menu
1 Select a device on the [Device Menu]:
bb
VOLUME BB, ENTER
2 Select [File] on the [Media Menu]:
bb
VOLUME BB, ENTER
3 Select a file on the [File] menu:
bb
PAGE
BB
4 To return to the previous screen: BACK
BUTTON
Device Menu
USB-C Flash SetupCalendar
Media Menu
Movie
Music
Photo
File
File
D:/
Folder 1
Folder 2
Movie 02.mov
Music 04.mp3
Photo 07.jpg
Photo 09.jpg
Modify Date 22 / 11 / 2007
File type Folder
PF391P-P-APRTLLW-ENG 11/19/07 4:23 PM Page 12

13
Viewing the Calendar - more you can do
Using [Calendar] menu
• You can view the current time and date with slideshow.
• You can change the month and year using b VOLUME B and b PAGE B.
• You can view the alarm information.
Viewing the Calendar
1 Select [Calendar] on the [Device Menu]:
bb
VOLUME BB, ENTER
2 Select a month:
bb
VOLUME
BB
3 Select a year:
bb
PAGE
BB
4 To return to the [Device Menu] menu: BACK
BUTTON
Device Menu
USB-C Flash SetupCalendar
SUN MON TUE WED THU FRI SAT
PF391P-P-APRTLLW-ENG 11/19/07 4:23 PM Page 13

14
PC Connection (USB) - more you can do
Connecting a PC
Connect the unit to your PC using an optional USB cable. Upon connection:
• Your PC will automatically recognize any memory cards installed in the unit.
An icon representing your installed memory cards will appear as
“PF39 Memory” (Internal memory) and “Removable Disks” (External memory
card) when you open “My Computer”.
• It may take Windows several minutes to recognize and set up the device the
first time it is connected depending on your hardware configuration.
• Plug and Play Support: Windows 2000/ME/XP
• PC monitor image will appear on the screen when the unit is connected to
PC and you cannot use any buttons on the unit (Except 11BAT. and P-SAVE
buttons).
Transferring Files
The USB 2.0 High-Speed connection makes it easy to transfer music, video, or
photo files (or any other data) quickly between the unit and PC.
Simply use the unit as you would a USB Flash Drive using basic operating system commands.
Important Notice:
• If you need further assistance with transferring files, please refer to your
operating system’s instruction manual or on-screen help.
• Do not disconnect or otherwise interrupt the unit during transmission - this
could damage or corrupt the unit’s firmware or your files.
• If you want to format the internal memory of the unit using PC, you must
format it with FAT file system.
Double-click the “My Computer” icon on your desktop and then double-click the
“PF39 Memory” or “Removable Disks” icon that corresponds with the unit’s
internal or external memory card.
Drag your media files (or other files) to the “PF39 Memory” or “Removable
Disks”.
• You may choose to use folders/subfolders to organize your media and data.
Disconnecting from a PC
Disconnect the unit as instructed below to prevent data loss or file/firmware corruption.
1. Double-click the green arrow in the task bar located on the lower-right side
of the PC screen (Safely Remove Hardware).
2. Safely Remove Hardware: Select “USB Mass Storage Device” from the list
that appears and then click on “Stop”.
Stop a Hardware Device: Select “USB Mass Storage Device” from the list
that appears and then click on “OK”.
3. When the “Safe to Remove Hardware” window appears, click the OK button
and disconnect the USB cable from the unit and your PC.
PC Connection (USB)
1 Connect the unit and PC: –
2 Turn on the unit: 1 BAT.
3 Transfer Files: –
BUTTON
USB Cable
PF391P-P-APRTLLW-ENG 11/19/07 4:23 PM Page 14

15
Power Supply DC 12 V, 2 A
Power consumption 10 W
Operating time on battery: Approx. 1 hour
Set dimensions (W x H x D) 213 x 147 x 103.5 mm with stand
Net Weight 630g
Operating temperature 5˚C to 45˚C
Operating humidity 5 % to 90 %
Display Type 8” Wide (Full-Color TFT LCD)
Viewing area: 7.18”
Display Resolution 800 x 480 (WVGA)
Internal Memory Flash Memory (256MB*)
Memory Card Slot 1 slot for SD/MMC/MS Card
Interface USB 2.0 High-Speed (device)
Plug and Play Support Windows 2000/ME/XP
* The 21MB is assigned for the unit’s software.
Accessory
• AC Adapter (MPA-630)
• USB Adapter Cable
• USB Cable
• Detachable Stand
• 3 different changeable faceplate
Specifications
Troubleshooting
The power does not turned on.
b Ensure that the power cord has been properly connected to the power outlet.
The sound quality of the music is poor.
b Try playing the file on your PC. If the sound quality is still poor, try downloading the file
again or re-encoding the file yourself.
b Ensure that the bit rate of the file is not too low. The higher the bit rate of the file, the
better it will sound. Refer to “
Music file requirement”
on page 11.
Cannot transfer files to the unit from your PC.
b Ensure that your PC is running a supported operating system.
b Ensure that the USB cable is securely attached to the unit and the PC.
b If you have connected the unit through a USB hub, try connecting the unit directly to
your PC.
b Ensure that the capacity of the memory cards installed in the unit.
Cannot select a memory card.
b Ensure that a memory card has been installed.
b Ensure that the memory card is properly installed.
b Ensure that the memory card is not defective.
Cannot copy files to a target location.
b Ensure that the target media has enough memory to contain the file.
The unit will not play a music file.
b Ensure that the file is in a compatible format (MP3). Refer to “
Music file requirement”
on page 11.
The unit will not play a video file.
b Ensure that the video file is available on the unit. Refer to “
Movie file requirement”
on
page 10.
There is no sound.
b Ensure that the volume has been set to a reasonable level.
The unit has malfunctioned.
b Press 1 BAT. button to turn off the unit then turn the unit back on.
• Designs and specifications are subject to change without prior
notice.
PF391P-P-APRTLLW-ENG 11/19/07 4:23 PM Page 15

PF391P-P-APRTLLW-ENG 11/19/07 4:23 PM Page 16

PORTUGUÊS
PF391
P/NO : MFL42173803(R1)
PF391P-P-APRTLLW-POR 11/19/07 4:23 PM Page 1

2
CUIDADO: PARA REDUZIR O RISCO DE CHOQUE ELÉCTRICO, NÃO REMOVA
A COBERTURA (OU A PARTE DE TRÁS). SEM PARTES REPARÁVEIS PELO
UTILIZADOR. AASSISTÊNCIA DEVE SER EFECTUADA POR PESSOAL
QUALIFICADO.
Esta seta com um raio dentro de um triângulo equilátero pretende alertar o
utilizador para a presença de voltagem perigosa não isolada no interior do
produto, que pode ser de magnitude suficiente para constituir um risco de
choque eléctrico para pessoas.
O ponto de exclamação dentro de um triângulo equilátero pretende alertar o
utilizador para a presença de importantes instruções de funcionamento e
manutenção (assistência) na literatura que acompanha o produto.
AVISO: PARA EVITAR O PERIGO DE INCÊNDIO OU CHOQUES ELÉCTRICOS,
NÃO EXPONHA ESTE PRODUTO À CHUVA OU À HUMIDADE.
AVISO: Não instale este equipamento num espaço confinado, como uma estante ou
uma unidade similar.
CUIDADO: Não bloqueie quaisquer aberturas de ventilação. Instale de acordo com
as instruções do fabricante. As ranhuras e as aberturas na caixa destinam-se à
ventilação e a garantir o funcionamento correcto do produto, e a protegê-lo contra
sobreaquecimento. As aberturas nunca devem bloqueadas, colocando o produto
numa cama, sofá, tapete ou noutra superfície similar. Este produto não deve ser
colocado numa instalação embutida, como uma estante ou uma prateleira, sem
ventilação adequada ou sem cumprir as instruções do fabricante.
CUIDADO: O aparelho não deve ser exposto a água (gotas ou salpicos), nem devem
ser colocados sobre o mesmo objectos com líquidos, tais como jarras.
CUIDADOS com o cabo eléctrico
Muitos fabricantes recomendam a utilização de um circuito dedicado:
trata-se de um circuito individual que fornece corrente apenas a esse aparelho e
não tem tomadas adicionais ou circuitos ramificados. Consulte a página de
especificações do manual do utilizador para ter a certeza. Não sobrecarregue as
tomadas de parede. Tomadas de parede sobrecarregadas, soltas ou danificadas, o
uso de extensões, cabos eléctricos gastos, ou isolamentos dos fios danificados ou
rachados são perigosos. Qualquer uma destas condições pode causar um choque
eléctrico ou incêndio. Inspeccione periodicamente o cabo do seu aparelho e, se a
aparência indicar danos ou deterioração, desligue-o, descontinue a utilização do
aparelho e faça com que o cabo seja substituído exactamente pela mesma peça por
um centro de assistência autorizado. Proteja o cabo eléctrico contra danos físicos ou
mecânicos, como ser torcido, dobrado, comprimido, entalado numa porta ou pisado.
Preste uma atenção particular às fichas, às tomadas eléctricas e ao ponto em que o
cabo sai do aparelho. Para desligar a corrente eléctrica, desligue sempre a ficha da
tomada. Ao instalar o produto, certifique-se de que a ficha está facilmente acessível.
Eliminação do seu velho aparelho
1. Quando este símbolo de caixote do lixo com cruz estiver afixado num
produto, significa que o produto está coberto pela Directiva Europeia
2002/96/CE.
2. Todos os produtos eléctricos e electrónicos devem ser eliminados
separadamente do sistema de recolha de lixo municipal, através de
instalações de recolha designadas pelo governo ou pelas autoridades
locais.
3. A eliminação correcta do seu velho aparelho irá ajudar a evitar
consequências negativas para o ambiente e a saúde humana.
4. Para informações mais detalhadas sobre a eliminação do seu velho
aparelho, por favor contacte os seus serviços municipais, o serviço de
recolha do lixo ou a loja onde adquiriu o produto.
Este produto foi fabricado de acordo com a DIRECTIVA CEE
2004/108/CE, e 2006/95/CE.
Precauções de Segurança
CUIDADO
RISCO DE CHOQUE ELÉCTRICO
NÃO ABRIR
PF391P-P-APRTLLW-POR 11/19/07 4:23 PM Page 2

3
Índice
Precauções de Segurança . . . . . . . . . . . . . . . . . . . . . . . . . . . . . . . . . . . . . .2
Índice . . . . . . . . . . . . . . . . . . . . . . . . . . . . . . . . . . . . . . . . . . . . . . . . . . . . . .3
Características . . . . . . . . . . . . . . . . . . . . . . . . . . . . . . . . . . . . . . . . . . . . . .3
Unidade Principal . . . . . . . . . . . . . . . . . . . . . . . . . . . . . . . . . . . . . . . . . . . . .4
Começar . . . . . . . . . . . . . . . . . . . . . . . . . . . . . . . . . . . . . . . . . . . . . . . . . . . .5
• Inserir ou remover um cartão de memória . . . . . . . . . . . . . . . . . . . . . . .5
• Ligar um Dispositivo USB . . . . . . . . . . . . . . . . . . . . . . . . . . . . . . . . . . . .5
• Ligar o Cabo Eléctrico . . . . . . . . . . . . . . . . . . . . . . . . . . . . . . . . . . . . . .6
• Ligar e Desligar a Unidade . . . . . . . . . . . . . . . . . . . . . . . . . . . . . . . . . . .6
• Modo de Poupança de Energia . . . . . . . . . . . . . . . . . . . . . . . . . . . . . . .6
• Instalar o Suporte . . . . . . . . . . . . . . . . . . . . . . . . . . . . . . . . . . . . . . . . . .6
• Utilizar o Menu do Dispositivo . . . . . . . . . . . . . . . . . . . . . . . . . . . . . . . .7
Ajustar as definições . . . . . . . . . . . . . . . . . . . . . . . . . . . . . . . . . . . . . . . . .7-8
Visualizar um ficheiro de fotografia . . . . . . . . . . . . . . . . . . . . . . . . . . . . . . . .9
Reproduzir um ficheiro de filme . . . . . . . . . . . . . . . . . . . . . . . . . . . . . . . . . .10
Reproduzir um ficheiro de música . . . . . . . . . . . . . . . . . . . . . . . . . . . . . . .11
Utilizar um menu de ficheiros . . . . . . . . . . . . . . . . . . . . . . . . . . . . . . . . . . .12
Visualizar o Calendário . . . . . . . . . . . . . . . . . . . . . . . . . . . . . . . . . . . . . . . .13
Ligação a PC (USB) . . . . . . . . . . . . . . . . . . . . . . . . . . . . . . . . . . . . . . . . . .14
Resolução de problemas . . . . . . . . . . . . . . . . . . . . . . . . . . . . . . . . . . . . . .15
Especificações . . . . . . . . . . . . . . . . . . . . . . . . . . . . . . . . . . . . . . . . . . . . . .15
Características
• Galeria de imagens ao vivo:
Alta resolução e cores digitais profundas do ecrã panorâmico LCD.
• Modo simples de poupança de energia:
É melhor 1 segundo no modo de poupança de energia do que 15 segundos
a ligar e a desligar.
• Álbum digital portátil:
Partilhe as suas memórias com a bateria incorporada, para maior mobilidade
• Visualizador Plug-in:
Visualizar facilmente fotografias através da entrada de cartões de memória e
da porta USB
• Armazenamento de 2.000 fotografias:
Vasta memória para 2.000 fotografias, com memória flash incorporada de
256MB
• Calendário digital e alarme:
Para uma programação eficiente da data e da hora
• Explorador de fotografia conveniente:
A navegação de interface mais agradável para o acesso mais fácil à sua
memória
• Decorador de interiores Premium
3 capas diferentes alternáveis para se adaptarem a vários interiores
PF391P-P-APRTLLW-POR 11/19/07 4:23 PM Page 3

4
Unidade Principal
a Ecrã LCD
b Capa (alternável)
Quatro extremidades da placa frontal são magnéticas, pelo que a placa
frontal pode ser facilmente fixada ou retirada.
c 1 BAT. (Botão Power e indicador de bateria)
Liga e desliga a unidade, e indica o estado da bateria.
O indicador acende-se a vermelho durante o carregamento da bateria.
O indicador acende-se a verde quando a bateria está carregada.
d P-SAVE (Poupança de Energia)
Aceder ou sair do modo de poupança de energia.
e MENU
Aceder ou sair do menu de opções.
f b VOLUME B
Ajustar o volume da unidade. Para ajustar o volume, prima e mantenha
premido VOLUME (b ou B) durante a reprodução do filme ou do ficheiro
de música. Utilize os botões Esquerda e Direita para seleccionar um item
do menu.
g b PAGE B
Prima e mantenha premido durante 2 segundos para se deslocar para a
página seguinte ou anterior no menu [Photo], [Movie] ou [Music].
Utilize os botões Para cima e Para baixo, para seleccionar um item no
menu.
h ENTER
Seleccionar uma opção ou executar um comando.
i ROTATE
Rodar a fotografia em ecrã total no sentido contrário aos ponteiros do
relógio.
j BACK
É retomado o menu ou o ecrã anterior.
k NX
Inicia a reprodução. Premir para fazer uma pausa na reprodução; prima
novamente para reiniciar.
l Conector USB
Ligar o cabo do adaptador USB fornecido e depois ligar um dispositivo
USB.
m Entrada do cartão de memória
Inserir um cartão de memória (SD, MMC ou MS).
n DC 12V IN
Ligar o adaptador AC fornecido.
cd e f
nml
b
a
g
h
i
j
k
PF391P-P-APRTLLW-POR 11/19/07 4:23 PM Page 4

5
Começar
Inserir ou remover um cartão de memória
Inserir um cartão de memória na entrada de cartões de memória da unidade.
Para retirar o cartão de memória da entrada, carregue no centro do cartão de
memória e retire-o cuidadosamente.
Cartões utilizáveis nesta unidade
• Secure Digital Card (SD)
• Multi Media Card (MMC)
• Memory Stick (MS)
• Compatível com: FAT 12, FAT 16 ou FAT 32
• Utilize apenas os cartões de memória recomendados acima.
• O cartão adapta-se apenas numa direcção; não o force.
O cartão deve adaptar-se com facilidade se for inserido correctamente.
• Poderá não estar disponível qualquer cartão de memória na unidade.
• Não retire o cartão de memória durante a operação (reproduzir, copiar, etc.).
Em Relação à Protecção Contra Escrita
Nos cartões com um dispositivo de protecção contra escrita, não será possível
escrever, apagar ou formatar o cartão, se o dispositivo estiver activado.
Ligar um Dispositivo USB
Ligue a extremidade pequena do cabo do adaptador USB à porta USB da
unidade. Ligue um Dispositivo USB e o adaptador USB. Use um cabo USB, se
necessitar.
• Esta unidade suporta apenas Dispositivos USB com formato FAT16 ou
FAT32.
• Não retire o Dispositivo USB durante a operação (reproduzir, copiar, etc.).
• Dispositivo USB: Dispositivo USB que suporta USB 1.1 e USB 2.0.
(Por exemplo: USB Flash Drive, Leitor de Cartões de Memória, Câmara
Digital, etc.)
• Dispositivos USB que requeiram a instalação de programas adicionais,
quando são ligados a um computador, não são suportados.
USB Flash Drive
(por exemplo)
Cabo do Adaptador USB
Para porta USB
SD
or or
MMC
MS
OU OU
PF391P-P-APRTLLW-POR 11/19/07 4:23 PM Page 5

6
Ligar o Cabo Eléctrico
Ligue o cabo eléctrico fornecido da unidade a uma tomada eléctrica.
Adaptador AC
• Este adaptador AC funciona com 100-240V~ 1A 50/60Hz.
• Contacte um distribuidor de artigos eléctricos para assistência ao
seleccionar um adaptador AC adequado ou um cabo AC.
• Fabricado por WANLIDA GROUP CO., LTD
Bateria recarregável
• A sua bateria recarregável interna dá-lhe a liberdade de transportar e
reproduzir os seus ficheiros sem o cabo eléctrico.
• A bateria recarregável interna começará a carregar apenas quando a
unidade estiver desligada e se o adaptador AC estiver ligado a uma tomada
eléctrica.
• O carregamento é interrompido se desligar a unidade.
• O carregamento demorará aproximadamente 2 horas.
• O indicador 1 BAT. acende-se a vermelho ao carregar. Se o carregamento
estiver concluído, o indicador muda para a cor verde.
• Se o tempo restante de carga da bateria for inferior a 10 minutos, “ ”
aparecerá no ecrã e o indicador 1 BAT. fica intermitente.
Ligar e Desligar a Unidade
Para ligar a unidade, prima e mantenha premido 1 BAT. durante 2 segundos.
A apresentação automática de demonstração começa e aparece o [Device
Menu].
Prima qualquer botão para saltar a apresentação automática de demonstração.
As fotografias de demonstração estão localizadas na memória interna e não as
pode alterar ou apagar.
Prima novamente 1 BAT. para desligar a unidade.
Modo de Poupança de Energia
Pode configurar a unidade para um modo de poupança de energia.
Prima P-SAVE o ecrã LCD é desligado. Para sair do modo de poupança de
energia, prima P-SAVE ou 1 BAT.
Instalar o Suporte
Prenda o suporte destacável na parte de trás da unidade, conforme indicado
abaixo.
Para conector “DC 12V IN”
Ligue o cabo eléctrico ao adaptador AC.
Botão de
libertação do
cabo eléctrico
Para tomada
AC
PF391P-P-APRTLLW-POR 11/19/07 4:23 PM Page 6

7
Utilizar o Menu do Dispositivo
O Menu do Dispositivo aparece quando a unidade é ligada; pode visualizar o
Menu do Dispositivo, premindo BACK repetidamente.
Use b VOLUME B para seleccionar uma opção no [Device Menu] e prima
ENTER.
• USB-C ..... USB-Z
Pode reproduzir um ficheiro ou mais no dispositivo USB ligado.
• SD/MMC/MS
Pode reproduzir um ficheiro ou mais no cartão de memória externo.
• Flash
Pode reproduzir um ficheiro ou mais no cartão de memória interno.
• Calendar
Pode ver a data actual, as indicações do relógio e do alarme no ecrã do calendário.
• Setup
Pode alterar as definições da unidade no menu de [Setup].
Ajustar as definições - o que pode fazer mais
Visualizar o menu [Setup]
Use b VOLUME B para seleccionar a opção [Setup] no [Device Menu] e prima
ENTER.
[Language]
Seleccione um idioma para o menu de configuração e para as instruções no
ecrã.
[Slideshow time]
Especifique durante quanto tempo cada imagem será visualizada numa
apresentação automática: 3 segundos, 5 segundos, 15 segundos, 1 minuto,
15 minutos, 1 hora.
Device Menu
USB-C Flash SetupCalendar
Device Menu
USB-C Flash SetupCalendar
Setup
Language
Slideshow time 5s:
Slideshow mode Random:
Display mode Normal:
Time format 24h:
Time 2007 / 11 / 22 21 : 17:
Auto On 2007 / 11 / 22 00 : 00 Off:
Auto Off 2007 / 11 / 22 00 : 00 Off:
Alarm 00 : 00 Ring1 Off:
Default Reset:
English
Ajustar as definições
1 Seleccione [Setup] no [Device Menu]:
bb
VOLUME BB, ENTER
2 Seleccione a opção desejada:
bb
PAGE
BB
3 Alterar as definições:
bb
VOLUME
BB
BOTÃO
PF391P-P-APRTLLW-POR 11/19/07 4:23 PM Page 7

[Slideshow mode]
Especifique o estilo de transição entre imagens numa apresentação automática:
Random, Fading, Off, Bottom-To-Top, Top-To-Bottom, Left-To-Right,
Right-To-Left, Door-Close, Door-Open, Hori-Cross, Verti-Cross.
Se seleccionar [Off], a apresentação automática não é realizada e o ecrã fica
fixo numa única figura.
[Display mode]
Especifique o modo de visualização para ver ficheiros de fotografia; Normal,
Fit.
[Normal]: Retém o rácio de aspecto original da imagem.
[Fit]: Optimiza a imagem para se adaptar ao ecrã
[Time format]
Especifique o formato da hora para ser visualizada no relógio; 12h, 24h
[12h]: Formato de 12 horas com am ou pm
[24h]: Formato de 24 horas com am ou pm
[Time]
Especifique a hora e a data da unidade, para utilizar as várias funcionalidades
da unidade.
1. Seleccione a opção [Time] e prima VOLUME B.
2. Insira as informações necessárias para data e hora.
b VOLUME B (esquerda/direita): Move o cursor para a coluna seguinte ou
anterior.
b PAGE B (para cima/para baixo): Altera a definição na posição actual do
cursor.
3. Prima ENTER para confirmar as suas definições.
[Auto On]
Especifique quando a unidade se deve ligar automaticamente.
1. Seleccione a opção [Auto On] e prima VOLUME B.
2. Siga o passo 2, conforme indicado acima, em [Time].
3. Escolha o modo de repetição desejado; [Off], [Once] ou [Everyday].
Seleccione [Off] se não utilizar esta função.
4. Prima ENTER para confirmar as suas definições.
[Auto Off]
Especifique quando a unidade se deve desligar automaticamente.
1. Seleccione a opção [Auto Off] e prima VOLUME B.
2. Siga o passo 2, conforme indicado acima, em [Time].
3. Escolha o modo de repetição desejado; [Off], [Once] ou [Everyday].
Seleccione [Off] se não utilizar esta função.
4. Prima ENTER para confirmar as suas definições.
[Alarm]
Especifique a hora para a função de alarme. Se definir o alarme, a unidade
será ligada automaticamente na hora de alarme e o alarme é accionado. Para
desligar o som do alarme, prima qualquer botão da unidade.
1. Seleccione a opção [Alarm] e prima VOLUME B.
2. Insira a informação necessária para o relógio.
b VOLUME B (esquerda/direita): Move o cursor para a coluna seguinte ou
anterior.
b PAGE B (para cima/para baixo): Altera a definição na posição actual do
cursor.
3. Escolha uma opção de toque; [Ring1], [Ring2] ou [Ring3].
Por exemplo, se seleccionar [Ring2];
Som de alarme (1 min.) c Sem som (15 seg.) c Som de alarme (1 min.) c
Sem som (15 seg.) c Modo normal
4. Escolha o modo de repetição desejado; [Off], [Once] ou [Everyday].
Seleccione [Off] se não utilizar esta função.
[Off]: A função de alarme não está activada.
[Once]: A função de alarme é activada uma vez depois de definir o alarme.
[Everyday]: A função de alarme é activada todos os dias.
5. Prima ENTER para confirmar as suas definições.
[Default]
Repõe as definições originais de fábrica da unidade. Seleccione a opção
[Default] e prima ENTER.
8
PF391P-P-APRTLLW-POR 11/19/07 4:23 PM Page 8

9
Visualizar um ficheiro de fotografia - o que
mais pode fazer
Visualizar ficheiros de fotografia em apresentação automática
No menu [Photo], use b VOLUME B e b PAGE B para seleccionar um ficheiro
de fotografia e prima NX para iniciar a apresentação automática. Prima NX
para fazer uma pausa temporária na apresentação automática e prima
novamente para sair do modo de pausa.
Opções durante a visualização de um ficheiro em ecrã total
Pode utilizar várias funcionalidades durante a visualização de uma imagem em
ecrã total.
1. Prima MENU para visualizar o menu de opções.
2. Use b VOLUME B e ENTER para seleccionar uma opção e a executar.
Para visualizar o ficheiro de fotografia anterior.
Para começar a reprodução automática.
Para fazer uma pausa na reprodução automática.
Para visualizar o ficheiro de fotografia seguinte.
Para rodar a fotografia em 90 graus no sentido contrário aos ponteiros
do relógio. Prima ENTER repetidamente para seleccionar os graus.
Para parar a visualização da fotografia em ecrã total e voltar ao menu
de [Photo].
Para aumentar a imagem da fotografia. Prima ENTER repetidamente
para seleccionar o modo zoom ou um modo normal.
Para activar ou desactivar a visualização do relógio.
Para ajustar a luminosidade do ecrã. Prima ENTER para aceder ao
menu de luminosidade; use b VOLUME B para ajustar a luminosidade
e prima ENTER.
Pode ouvir música durante a apresentação automática, se o suporte
actual contiver ficheiros de música e fotografia. Prima ENTER
aparece no canto inferior direito do ecrã. Para sair desta função, prima
ENTER novamente.
3. Prima MENU para sair do menu de opções.
Requisitos dos ficheiros de fotografia
A compatibilidade dos ficheiros JPEG com esta unidade está limitada ao
seguinte:
• Extensões dos ficheiros: “.jpg”
• Tamanho da fotografia: Menos de 8.000 x 8.000 (L x A) pixel (baseline)
Menos de 100.000 pixel (progressivo)
• Ficheiros/Suporte Máximo: Menos de 650 recomendado
Notas sobre ficheiros JPEG
• Os ficheiros de imagem JPEG de compressão sem perda de dados
(Lossless) não são suportados.
• Dependendo do tamanho e do número de ficheiros JPEG, pode demorar
vários minutos para ler o conteúdo do suporte.
Visualizar um ficheiro de fotografia
1
Seleccione um dispositivo no [Device Menu]:bbVOLUME BB, ENTER
2 Seleccione [Photo] no [Media Menu]:
bb
VOLUME BB, ENTER
3 Seleccione um ficheiro de fotografia no
bb
VOLUME BB,
menu [Photo]:
bb
PAGE
BB
4
Apresente o ficheiro seleccionado em ecrã total:
ENTER, NX
5 Para voltar ao menu [Photo]: BACK
BOTÃO
Device Menu
USB-C Flash SetupCalendar
Media Menu
Movie
Music
Photo
File
Photo
1/2
DSC_0029.jpg 2007/11/22 12:00:00
PF391P-P-APRTLLW-POR 11/19/07 4:23 PM Page 9

Reproduzir um ficheiro de filme - o que
mais pode fazer
Opções durante a reprodução de um ficheiro de filme
Pode utilizar várias funcionalidades durante a reprodução de um ficheiro de
filme.
1. Prima MENU para visualizar o menu de opções durante a reprodução.
2. Use b VOLUME B e ENTER para seleccionar uma opção e a executar.
Para voltar ao início do ficheiro actual Prima brevemente ENTER duas
vezes para reproduzir o ficheiro de filme anterior.
Para efectuar o retrocesso rápido durante a reprodução. Para alterar
as várias velocidades de reprodução, prima repetidamente ENTER.
Para iniciar a reprodução.
Para fazer uma pausa na reprodução.
Para efectuar o avanço rápido durante a reprodução. Para alterar as
várias velocidades de reprodução, prima repetidamente ENTER.
Para reproduzir o ficheiro de filme seguinte.
Para parar a reprodução e voltar ao menu [Movie].
Para seleccionar um modo de repetição (TRACK, ALL, OFF).
Para aumentar a imagem de vídeo. Prima ENTER repetidamente para
seleccionar o modo zoom ou um modo normal.
Para activar ou desactivar a visualização do relógio.
Para ajustar a luminosidade do ecrã. Prima ENTER para aceder ao
menu de controlo da luminosidade; use b VOLUME B para ajustar a
luminosidade e prima ENTER.
3. Prima MENU para sair do menu de opções.
Requisitos dos ficheiros de filmes
A compatibilidade dos ficheiros de filmes com esta unidade está limitada ao
seguinte:
• Tamanho da resolução disponível: 720x576 (L x A) pixel.
• Taxa de bits: Inferior a 15 Mbps
• Extensões dos ficheiros de filmes: “.avi”, “.mpg”, “.mpeg”
• Esta unidade não suporta a visualização das legendas dos ficheiros de
filmes.
• Formato Codec reproduzível: “MPEG1”, “MPEG2”, “MJPEG”
• Formato Áudio reproduzível: “MPEG1”, “MPEG2”, “MPEG3”, “PCM”
• “Não Suportado” aparecerá no ecrã se o ficheiro de filme não for
reproduzível.
• Ficheiros/Suporte Máximo: Menos de 650 recomendado
10
Reproduzir um ficheiro de filme
1
Seleccione um dispositivo no [Device Menu]:bbVOLUME BB, ENTER
2 Seleccione [Movie] ou [Media Menu]:
bb
VOLUME BB, ENTER
3
Seleccione um ficheiro de filme no menu [Movie]:bbPAGE
BB
4 Inicie a reprodução: ENTER, NX
5 Para voltar ao menu [Movie]: BACK
BOTÃO
Device Menu
USB-C Flash SetupCalendar
Media Menu
Movie
Music
Photo
File
Movie
Movie 1.avi
Movie 2.avi
Movie 3.avi
Movie 4.avi
Movie 5.avi
Movie 6.avi
Movie 7.avi
File Name Movie 1.avi
File Size 14MB
File Type AVI
PF391P-P-APRTLLW-POR 11/19/07 4:23 PM Page 10

11
Reproduzir um ficheiro de música - o que
mais pode fazer
Opções durante a reprodução de um ficheiro de música
Pode utilizar várias funcionalidades durante a reprodução de um ficheiro de
música.
1. Prima MENU para visualizar o menu de opções durante a reprodução.
2. Use b VOLUME B e ENTER para seleccionar uma opção e a executar.
Para voltar ao início do ficheiro actual Prima brevemente ENTER duas
vezes para reproduzir o ficheiro de filme anterior.
Para efectuar o retrocesso rápido durante a reprodução. Para alterar
as várias velocidades de reprodução, prima repetidamente ENTER.
Para iniciar a reprodução.
Para fazer uma pausa na reprodução.
Para efectuar o avanço rápido durante a reprodução. Para alterar as
várias velocidades de reprodução, prima repetidamente ENTER.
Para reproduzir o ficheiro de música seguinte.
Para parar a reprodução.
Para seleccionar um modo de repetição. (TRACK, ALL, OFF)
3. Prima MENU para sair do menu de opções.
Requisitos dos ficheiros de música
• Extensões dos ficheiros: “.mp3”
• Frequência de amostragem: 8 - 48 kHz (Camada 1, Camada 2, Camada 3,
MPEG 2.5), 8 - 96 kHz (PCM)
• Taxa de bits: 32 - 448 kbps (Camada 1), 32 - 384 kbps (Camada 2),
32 - 320 kbps (Camada 3), 8 - 160 kbps (MPEG 2.5)
• Ficheiros/Suporte Máximo: Menos de 650 recomendado
Reproduzir um ficheiro de música
1
Seleccione um dispositivo no [Device Menu]:bbVOLUME BB, ENTER
2 Seleccione [Music] no [Media Menu]:
bb
VOLUME BB, ENTER
3
Seleccione um ficheiro de música no menu [Music]:bbPAGE
BB
4 Inicie a reprodução: ENTER, NX
5 Para voltar ao [Media Menu]: BACK
BOTÃO
Device Menu
USB-C Flash SetupCalendar
Media Menu
Movie
Music
Photo
File
Music
Music 01.mp3
Music 02.mp3
Music 03.mp3
Music 04.mp3
Music 05.mp3
Music 06.mp3
Music 07.mp3
File Name Music 01.mp3
File Size 3MB
File Type MP3
PF391P-P-APRTLLW-POR 11/19/07 4:23 PM Page 11

12
Utilizar um menu de ficheiros - o que mais
pode fazer
Utilizar um menu de [File]
• Pode visualizar uma lista de pastas e ficheiros no suporte actual.
• Pode apagar ou copiar um ficheiro ou mais no suporte actual.
Para visualizar uma lista de subpastas e ficheiros
Use b PAGE B para seleccionar uma pasta e prima ENTER.
A lista dos ficheiros e subpastas dentro da pasta. Prima BACK para passar
para a pasta superior.
Para seleccionar múltiplos ficheiros no menu de [File]
Pode seleccionar, não só, ficheiros individuais, mais também múltiplos ficheiros,
utilizando o botão VOLUME B. Prima VOLUME B nos ficheiros desejados para
seleccionar ficheiros múltiplos.
Para apagar um ficheiro ou mais, utilizando o menu de [File]
1. Seleccione um ficheiro e prima VOLUME B; “B” aparece à direita do nome
do ficheiro.
2. Repita o passo 1, se necessitar de seleccionar múltiplos ficheiros.
3. Prima ENTER aparece o menu de opções.
4. Use b PAGE B para seleccionar a opção [Delete >] e prima ENTER.
Aparece o menu de confirmação.
5. Use b VOLUME B para seleccionar [Yes] e prima ENTER o ficheiro será
apagado do suporte actual.
6. Quando a eliminação estiver concluída, prima ENTER para terminar.
Para copiar um ficheiro ou mais do suporte actual para outro suporte
1. Seleccione um ficheiro e prima VOLUME B; “B” aparece à direita do nome
do ficheiro.
2. Repita o passo 1, se necessitar de seleccionar múltiplos ficheiros.
3. Prima ENTER aparece o menu de opções.
4. Use b PAGE B para seleccionar a opção [Copy >] e prima ENTER.
5. Use b PAGE B para seleccionar o suporte que deseja copiar.
O espaço livre do suporte seleccionado será visualizado no lado superior
direito do menu de [File].
6. Use b VOLUME B e b PAGE B para seleccionar uma pasta que deseje
copiar.
- Prima VOLUME B para mover para uma subpasta.
- Prima b VOLUME para mover para uma pasta superior.
7. Prima ENTER. Os ficheiros serão copiados para o suporte ou a pasta
seleccionada.
8. Quando a cópia estiver concluída, prima ENTER para terminar.
Utilizar um menu de ficheiros
1
Seleccione um dispositivo no [Device Menu]:bbVOLUME BB, ENTER
2 Seleccione [File] on [Media Menu]:
bb
VOLUME BB, ENTER
3 Seleccione um ficheiro no menu [File]:
bb
PAGE
BB
4 Para voltar ao ecrã anterior: BACK
BOTÃO
Device Menu
USB-C Flash SetupCalendar
Media Menu
Movie
Music
Photo
File
File
D:/
Folder 1
Folder 2
Movie 02.mov
Music 04.mp3
Photo 07.jpg
Photo 09.jpg
Modify Date 22 / 11 / 2007
File type Folder
PF391P-P-APRTLLW-POR 11/19/07 4:23 PM Page 12

13
Visualizar o Calendário - o que pode fazer
mais
Utilizar um menu de [Calendar]
• Pode visualizar a hora e a data actuais com a apresentação automática.
• Pode alterar o mês e o ano, utilizando b VOLUME B e b PAGE B.
• Pode visualizar as informações sobre o alarme.
Visualizar o Calendário
1 Seleccione [Calendar] no [Device Menu]:
bb
VOLUME BB, ENTER
2 Seleccione um mês:
bb
VOLUME
BB
3 Seleccione um ano:
bb
PAGE
BB
4 Para voltar ao menu [Device Menu]: BACK
BOTÃO
Device Menu
USB-C Flash SetupCalendar
SUN MON TUE WED THU FRI SAT
PF391P-P-APRTLLW-POR 11/19/07 4:23 PM Page 13

14
Ligação a PC (USB) - o que pode fazer mais
Ligar um PC
Ligue a unidade ao seu PC, utilizando um cabo USB opcional. Após a ligação:
• O seu PC reconhecerá automaticamente quaisquer cartões de memória
instalados na unidade. Um ícone a representar os seus cartões de memória
instalados aparecerá como “PF39 Memory” (Memória interna) e “Removable
Disks” (Cartão de memória externo), quando abrir “My Computer”.
• O Windows pode demorar vários minutos a reconhecer e a configurar o
dispositivo pela primeira vez em que é ligado, dependendo da configuração
do seu hardware.
• Suporte Plug and Play: Windows 2000/ME/XP
• A imagem do monitor do PC aparece no ecrã quando a unidade estiver
ligada ao PC, e não pode utilizar quaisquer botões da unidade (Excepto os
botões 11BAT. e P-SAVE).
Transferir Ficheiros
A ligação de Alta Velocidade USB 2.0 faz com que seja fácil transferir rapidamente ficheiros de música, vídeo ou fotografia (ou quaisquer outros dados),
entre a unidade e o PC. Use simplesmente a unidade, como faria se estivesse
a utilizar comandos básicos do sistema operativo de uma USB Flash Drive.
Nota Importante:
• Se precisar de assistência ao transferir os ficheiros, por favor consulte o
manual de instruções do seu sistema operativo ou a ajuda no ecrã.
• Não desligue nem interrompa de outra forma a unidade durante a
transmissão - tal pode danificar ou corromper o firmware da unidade ou os
seus ficheiros.
• Se desejar formatar a memória interna da unidade utilizando o PC, tem de a
formatar com o sistema de ficheiros FAT.
Clique duas vezes no ícone “My Computer” do seu ambiente de trabalho e
depois clique duas vezes sobre os ícones “PF39 Memory” ou “Removable
Disks” que correspondem ao cartão de memória interno ou externo da unidade.
Arraste os seus ficheiros de media (ou outros ficheiros) para “PF39 Memory” ou
“Removable Disks”.
• Pode optar por utilizar pastas/subpastas para organizar os seus suportes e
dados.
Desligar de um PC
Desligue a unidade conforme indicado a seguir, para evitar a perda de dados
ou a corrupção de ficheiros/firmware.
1. Clique duas vezes sobre a seta verde, na barra de tarefas localizada do
lado inferior direito do ecrã do PC (Remover Hardware em Segurança).
2. Remover Hardware em Segurança: Seleccione “Dispositivo de
Armazenamento em Massa USB” da lista que aparece e clique em “Stop”.
Parar um Dispositivo de Hardware: Seleccione “Dispositivo de
Armazenamento em Massa USB” da lista que aparece e clique em “OK”.
3. Quando aparecer a janela “Seguro para Remover Hardware”, clique no
botão OK e desligue o cabo USB da unidade e do seu PC.
Ligação a PC (USB)
1 Ligar a unidade e o PC: –
2 Ligue a unidade: 1 BAT.
3 Transferir ficheiros: –
BOTÃO
Cabo USB
PF391P-P-APRTLLW-POR 11/19/07 4:23 PM Page 14

15
Alimentação eléctrica DC 12 V, 2 A
Consumo de energia 10 W
Duração de operação da
bateria: Aprox. 1 hora
Dimensões da unidade
(L x A x P) 213 x 147 x 103,5 mm com suporte
Peso líquido 630 g
Temperatura operativa 5°C a 45°C
Humidade operativa 5 % a 90 %
Tipo de Visualização 8” Wide (Full-Color TFT LCD)
Área de visualização: 7.18”
Resolução da Visualização 800 x 480 (WVGA)
Memória Interna Flash Memory (256MB*)
Entrada do Cartão de Memória
1 entrada para cartões
SD/MMC/MS
Interface
USB 2.0 Alta Velocidade (dispositivo)
Suporte Plug and Play Windows 2000/ME/XP
* 21MB são atribuídos ao software da unidade.
Acessórios
• Adaptador AC (MPA-630)
• Cabo do Adaptador USB
• Cabo USB
• Suporte Destacável
• 3 placas frontais diferentes permutáveis
Especificações
Resolução de problemas
A corrente não é ligada.
b Certifique-se de que o cabo eléctrico está devidamente ligado à tomada eléctrica.
A qualidade de som da música é fraca.
b Tente reproduzir o ficheiro no seu PC. Se a qualidade do som continuar fraca, tente
reproduzir o ficheiro novamente ou volte a codificar o ficheiro.
b Certifique-se de que a taxa de bits do ficheiro não é demasiado fraca. Quanto mais alta
a taxa de bits do ficheiro, melhor irá soar. Consulte “Requisitos dos ficheiros de
música” na página 11.
Não é possível transferir ficheiros para a unidade do seu PC.
b Certifique-se de que o seu PC está a funcionar num sistema operativo suportado.
b Certifique-se de que o cabo USB está bem fixado à unidade e ao PC.
b Se tiver a unidade ligada através de um hub USB, tente ligar a unidade directamente
ao seu PC.
b Certifique-se da capacidade dos cartões de memória instalados na unidade.
Não é possível seleccionar um cartão de memória.
b Certifique-se de que está inserido um cartão de memória.
b Certifique-se de o cartão de memória está inserido correctamente.
b Certifique-se de o cartão de memória não está defeituoso.
Não é possível copiar os ficheiros para uma localização alvo.
b Certifique-se de que o suporte alvo tem memória suficiente para conter o ficheiro.
A unidade não reproduz um ficheiro de música.
b Certifique-se de que o ficheiro está num formato compatível (MP3). Consulte
“Requisitos dos ficheiros de música” na página 11.
A unidade não reproduz um ficheiro de vídeo.
b Certifique-se de que o ficheiro de vídeo está contido na unidade. Consulte “Requisitos
dos ficheiros de filmes” na página 10.
Não há som.
b Certifique-se de que o volume foi regulado para um nível razoável.
A unidade apresenta anomalias.
b Prima o botão 1 BAT. para desligar a unidade e depois volte a ligá-la.
• Os modelos e as especificações estão sujeitos a alterações
sem aviso prévio.
PF391P-P-APRTLLW-POR 11/19/07 4:23 PM Page 15

PF391P-P-APRTLLW-POR 11/19/07 4:23 PM Page 16
 Loading...