


ENGLISH
PF391
P/NO : MFL42173809(R1)
PF391P-P-APOLLLW-ENG 11/27/07 9:28 PM Page 1
2
CAUTION: TO REDUCE THE RISK OF ELECTRIC SHOCK. DO NOT REMOVE
COVER (OR BACK). NO USER-SERVICEABLE PARTS INSIDE. REFER SERVICING TO QUALIFIED SERVICE PERSONNEL.
This lightning flash with arrowhead symbol within an equilateral triangle is
intended to alert the user to the presence of uninsulated dangerous voltage
within the product’s enclosure that may be of sufficient magnitude to constitute a risk of electric shock to persons.
The exclamation point within an equilateral triangle is intended to alert the
user to the presence of important operating and maintenance (servicing)
instructions in the literature accompanying the product.
WARNING: TO PREVENT FIRE OR ELECTRIC SHOCK HAZARD, DO NOT
EXPOSE THIS PRODUCT TO RAIN OR MOISTURE.
WARNING: Do not install this equipment in a confined space such as a book case or
similar unit.
CAUTION: Do not block any ventilation openings. Install in accordance with the manufacturer's instructions. Slots and openings in the cabinet are provided for ventilation
and to ensure reliable operation of the product and to protect it from over heating.
The openings should be never be blocked by placing the product on a bed, sofa, rug
or other similar surface. This product should not be placed in a built-in installation
such as a bookcase or rack unless proper ventilation is provided or the manufacturer's instruction has been adhered to.
CAUTION: The apparatus should not be exposed to water (dripping or splashing) and
no objects filled with liquids, such as vases, should be placed on the apparatus.
CAUTION concerning the Power Cord
Most appliances recommend they be placed upon a dedicated circuit;
That is, a single outlet circuit which powers only that appliance and has no additional
outlets or branch circuits. Check the specification page of this owner's manual to be
certain.Do not overload wall outlets. Overloaded wall outlets, loose or damaged wall
outlets, extension cords, frayed power cords, or damaged or cracked wire insulation
are dangerous. Any of these conditions could result in electric shock or fire.
Periodically examine the cord of your appliance, and if its appearance indicates damage or deterioration, unplug it, discontinue use of the appliance, and have the cord
replaced with an exact replacement part by an authorized service center.
Protect the power cord from physical or mechanical abuse, such as being twisted,
kinked, pinched, closed in a door, or walked upon. Pay particular attention to plugs,
wall outlets, and the point where the cord exits the appliance.
To disconnect power from the mains, pull out the mains cord plug. When installing the
product, ensure that the plug is easily accessible.
Disposal of your old appliance
1. When this crossed-out wheeled bin symbol is attached to a product it
means the product is covered by the European Directive 2002/96/EC.
2. All electrical and electronic products should be disposed of separately from
the municipal waste stream via designated collection facilities appointed by
the government or the local authorities.
3. The correct disposal of your old appliance will help prevent potential negative consequences for the environment and human health.
4. For more detailed information about disposal of your old appliance, please
contact your city office, waste disposal service or the shop where you purchased the product.
This product is manufactured to comply with the EEC DIRECTIVE
2004/108/EC, and 2006/95/EC.
Safety Precaution
CAUTION
RISK OF ELECTRIC SHOCK
DO NOT OPEN
PF391P-P-APOLLLW-ENG 11/27/07 9:28 PM Page 2

3
Contents
Safety Precaution . . . . . . . . . . . . . . . . . . . . . . . . . . . . . . . . . . . . . . . . . . . . .2
Contents . . . . . . . . . . . . . . . . . . . . . . . . . . . . . . . . . . . . . . . . . . . . . . . . . . . .3
Features . . . . . . . . . . . . . . . . . . . . . . . . . . . . . . . . . . . . . . . . . . . . . . . . . . . .3
Main Unit . . . . . . . . . . . . . . . . . . . . . . . . . . . . . . . . . . . . . . . . . . . . . . . . . . . .4
Getting Started . . . . . . . . . . . . . . . . . . . . . . . . . . . . . . . . . . . . . . . . . . . . . . .5
• Inserting or removing a memory card . . . . . . . . . . . . . . . . . . . . . . . . . . .5
• Connecting an USB Device . . . . . . . . . . . . . . . . . . . . . . . . . . . . . . . . . . .5
• Connecting the Power Cable . . . . . . . . . . . . . . . . . . . . . . . . . . . . . . . . . .6
• Turning On or Off the Unit . . . . . . . . . . . . . . . . . . . . . . . . . . . . . . . . . . . .6
• Power Save mode . . . . . . . . . . . . . . . . . . . . . . . . . . . . . . . . . . . . . . . . . .6
• Installing the Stand . . . . . . . . . . . . . . . . . . . . . . . . . . . . . . . . . . . . . . . . .6
• Using the Device Menu . . . . . . . . . . . . . . . . . . . . . . . . . . . . . . . . . . . . . .7
Adjust the settings . . . . . . . . . . . . . . . . . . . . . . . . . . . . . . . . . . . . . . . . . . .7-8
Viewing a Photo file . . . . . . . . . . . . . . . . . . . . . . . . . . . . . . . . . . . . . . . . . . . .9
Playing a Movie file . . . . . . . . . . . . . . . . . . . . . . . . . . . . . . . . . . . . . . . . . . .10
Playing a Music file . . . . . . . . . . . . . . . . . . . . . . . . . . . . . . . . . . . . . . . . . . .11
Using a File menu . . . . . . . . . . . . . . . . . . . . . . . . . . . . . . . . . . . . . . . . . . . .12
Viewing the Calendar . . . . . . . . . . . . . . . . . . . . . . . . . . . . . . . . . . . . . . . . . .13
PC Connection (USB) . . . . . . . . . . . . . . . . . . . . . . . . . . . . . . . . . . . . . . . . .14
Troubleshooting . . . . . . . . . . . . . . . . . . . . . . . . . . . . . . . . . . . . . . . . . . . . . .15
Specifications . . . . . . . . . . . . . . . . . . . . . . . . . . . . . . . . . . . . . . . . . . . . . . .15
Features
• Live picture gallery:
High resolution and deep digital color from LCD wide screen.
• Easy power save mode:
Better 1 second power save mode than 15 seconds power off and on.
• Portable digital album:
Share your memories with built-in battery for easy mobility
• Plug-in viewer:
Easy viewing photos via memory card slot and USB port
• 2,000 photo storage:
2,000 precious memories with 256MB built-in flash memory
• Digital calendar & alarm clock:
For your efficient date and time scheduling
• Convenient photo explorer:
Coolest interface navigation for easiest access to your memory
• Premium interior decorator
3 different changeable faceplate to suit various interior
PF391P-P-APOLLLW-ENG 11/27/07 9:28 PM Page 3
4
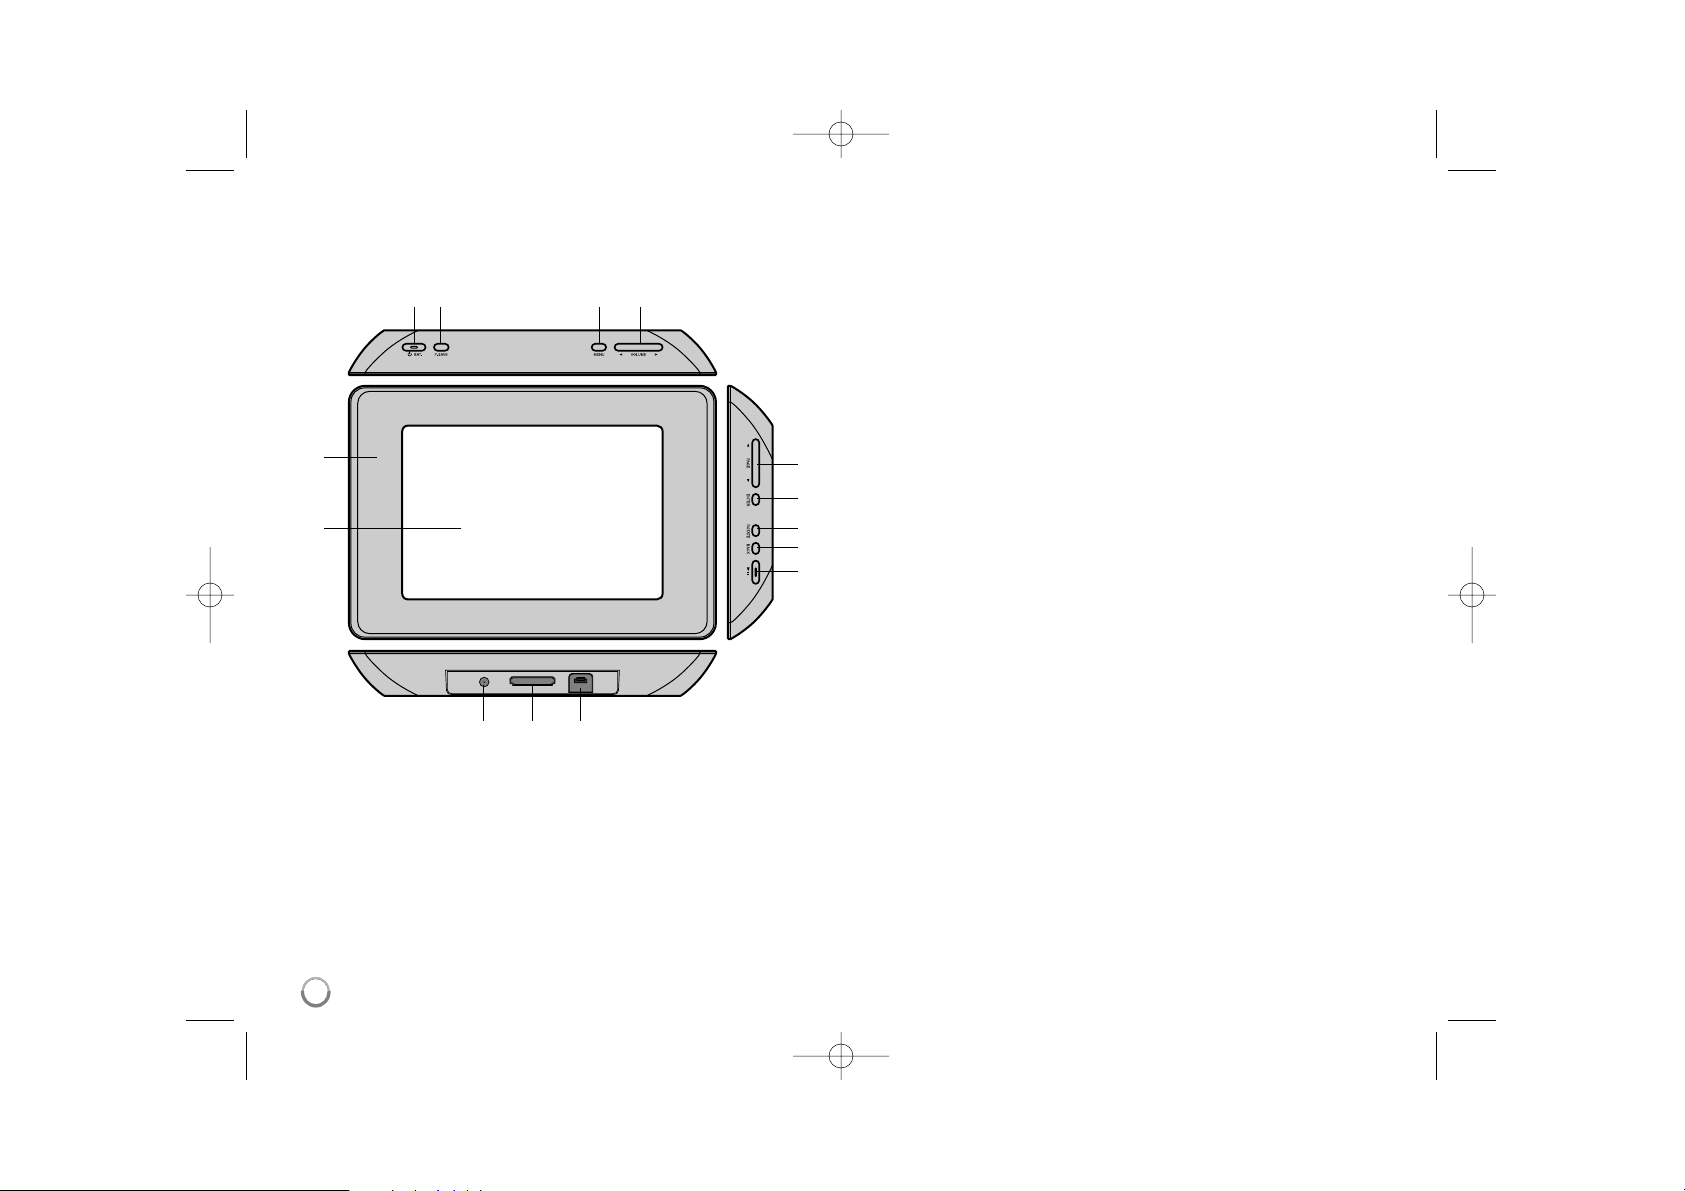
Main Unit
a LCD screen
b Faceplate (interchangeable)
Four edges of the faceplate are magnetic, so that the faceplate can easily
be attached or detached.
c 1 BAT. (Power button and Battery indicator)
Turns the unit ON or OFF and indicates the battery status.
The indicator lights in red during charging the battery.
The indicator lights in green when battery is full.
d P-SAVE (Power Save)
Accesses or exits the power save mode.
e MENU
Accesses or exits the option menu.
f b VOLUME B
Adjusts the volume of the unit. To adjust the volume, press and hold
VOLUME (b or B) during playback of the movie or music file.
Left and Right buttons for selecting an item on the menu.
g b PAGE B
Press and hold for 2 seconds to move to the previous or next page on the
[Photo], [Movie] or [Music] menu.
Up and Down buttons for selecting an item on the menu.
h ENTER
Selects an option or executes a command.
i ROTATE
Rotates the photo in full screen counterclockwise.
j BACK
Returns to a previous menu or screen.
k NX
Starts playback. Press to pause playback; press again to restart.
l USB connector
Connect the supplied USB adapter cable then connect an USB device.
m Memory card slot
Insert a memory card (SD, MMC or MS).
n DC 12V IN
Connect the supplied AC adapter.
cd e f
nml
b
a
g
h
i
j
k
PF391P-P-APOLLLW-ENG 11/27/07 9:28 PM Page 4
5
Getting Started
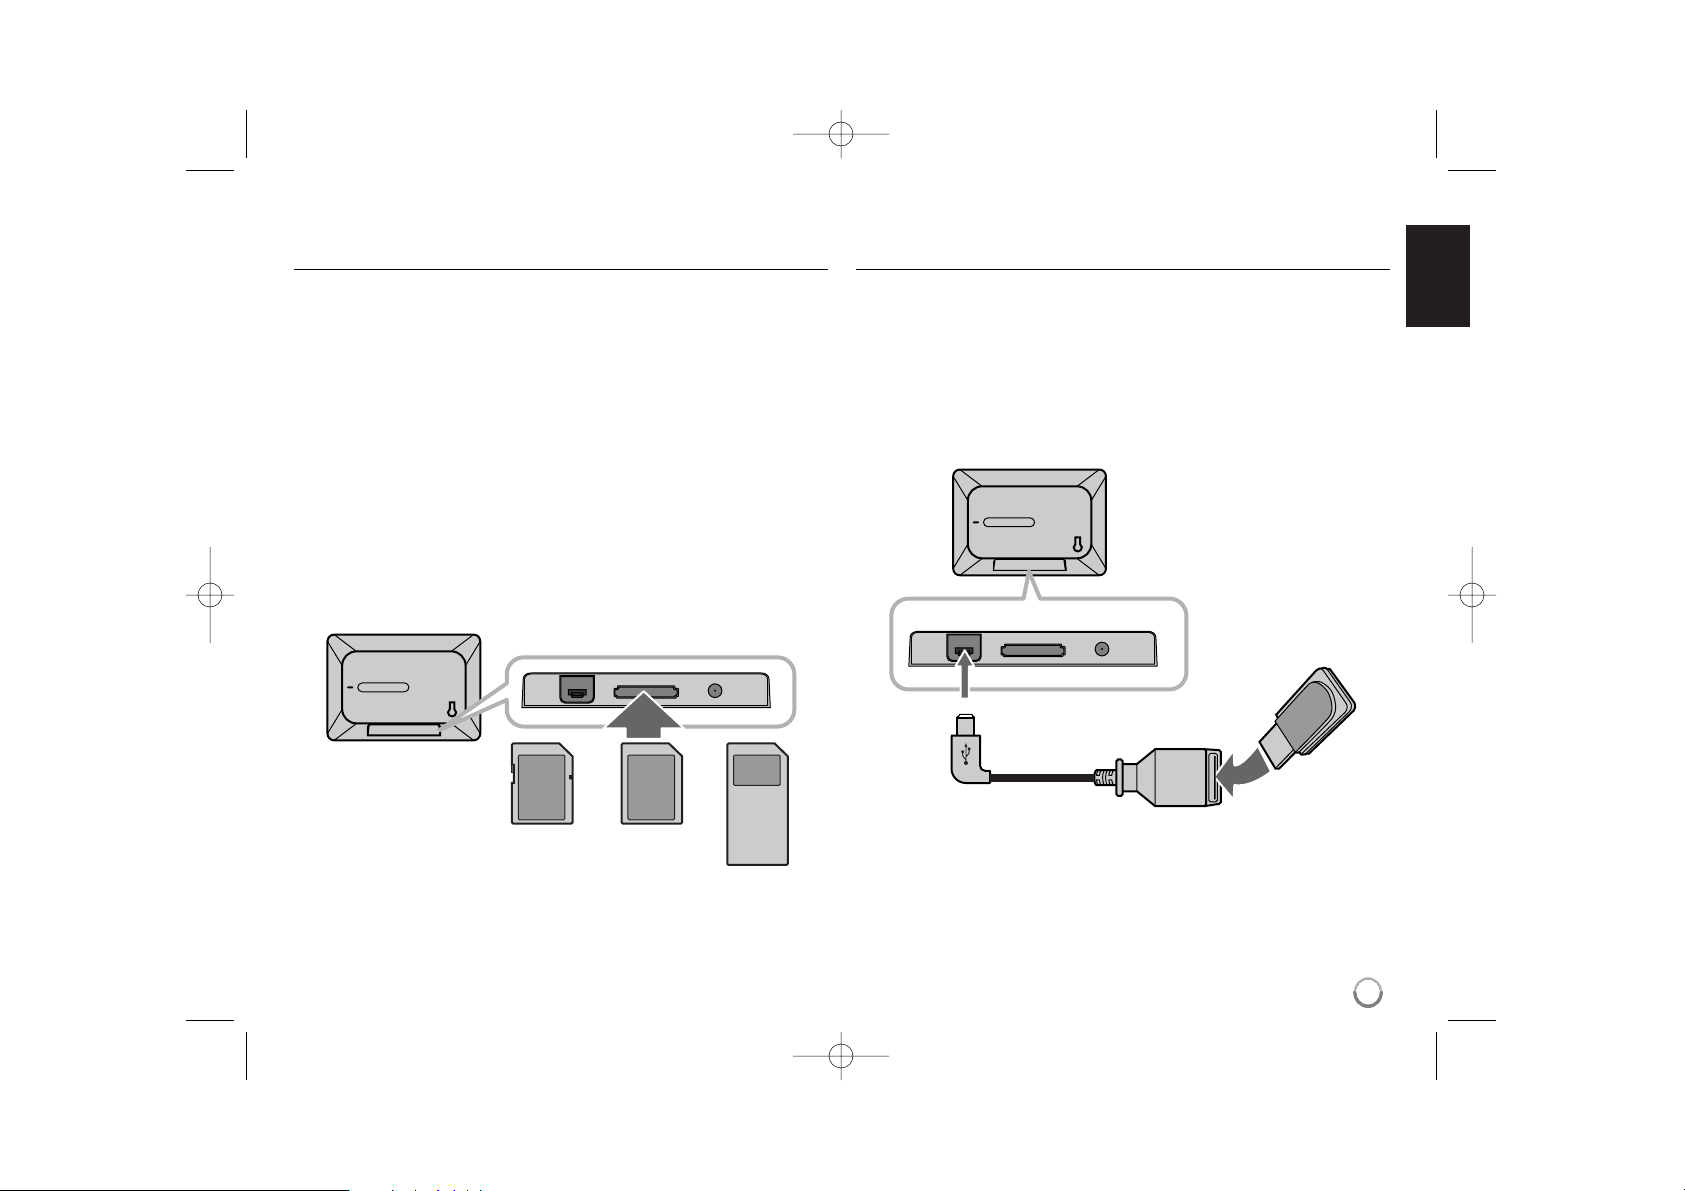
Inserting or removing a memory card
Insert a memory card to the memory card slot on the unit.
To withdraw the memory card from the slot, press on the center of the memory
card then withdraw it carefully.
Card useable on this unit
• Secure Digital Card (SD)
• Multi Media Card (MMC)
• Memory Stick (MS)
• Compatible with: FAT 12, FAT 16, or FAT 32
• Only use the memory cards recommended above.
• The card will only fit in one direction; do not force it.
The card should fit snugly when properly inserted.
• Any memory card may not be available on the unit.
• Do not extract the memory card in operating (play, copy, etc.).
Regarding Write Protect
For cards that have a write protect switch, it will not be possible to write, erase
or format the card if the switch is on.
Connecting an USB Device
Connect the small end of the USB adapter cable to the USB port on the unit.
Connect an USB Device and the USB adapter. Use an USB cable, if you need.
• This unit supports only USB Device with FAT16 or FAT32 format.
• Do not extract the USB Device during operation (play, copy, etc.).
• USB Device: USB Device that support USB 1.1 and USB 2.0.
(For example: USB Flash Drive, Memory Card Reader, Digital Camera, etc.)
• An USB Device which requires additional program installation when you
have connected it to a PC, is not supported.
USB Flash Drive
(For example)
USB Adapter Cable
To USB port
SD
or or
MMC
MS
PF391P-P-APOLLLW-ENG 11/27/07 9:28 PM Page 5

6
Connecting the Power Cable
Connect the supplied power cable from the unit to a power outlet.
AC adapter
• This AC adapter operates on 100-240V~ 1A 50/60Hz.
• Contact an electrical parts distributor for assistance in selecting a suitable AC
plug adapter or AC cord set.
• Manufactured by WANLIDA GROUP CO., LTD
Rechargeable battery
• Its internal rechargeable battery provides you with the freedom to pass it
around and play the files without the power cord.
• The internal rechargeable battery will start charging only when the unit is
turned off and the AC adapter is connected to a power outlet.
• The charging is stopped if you turn on the unit.
• The charging will take approximately 2 hour.
• The 1 BAT. indicator turns red in charging. If the charging is complete, the
indicator changes to green color.
• When the remaining time of the battery power is under 10 minutes, “ ”
will appear on the screen and the 1 BAT. indicator flashes.
Turning On or Off the Unit
To turn on the unit, press and hold 1 BAT. for 2 seconds.
The demonstration slideshow will start and then the [Device Menu] will appear.
Press any button to skip the demonstration slideshow.
The demonstration photos are located in the internal memory, and you cannot
change or delete them.
Press 1 BAT. again to turn off the unit.
Power Save mode
You can set up the unit into an economic power save mode. Press P-SAVE
and the LCD screen is turned off. To exit the power save mode, press P-SAVE
or 1 BAT.
Installing the Stand
Attach the detachable stand on the back of the unit as below.
To “DC 12V IN” jack
Attach the power plug to the body of the AC adapter.
Power cord
release knob
To AC outlet
PF391P-P-APOLLLW-ENG 11/27/07 9:28 PM Page 6
7
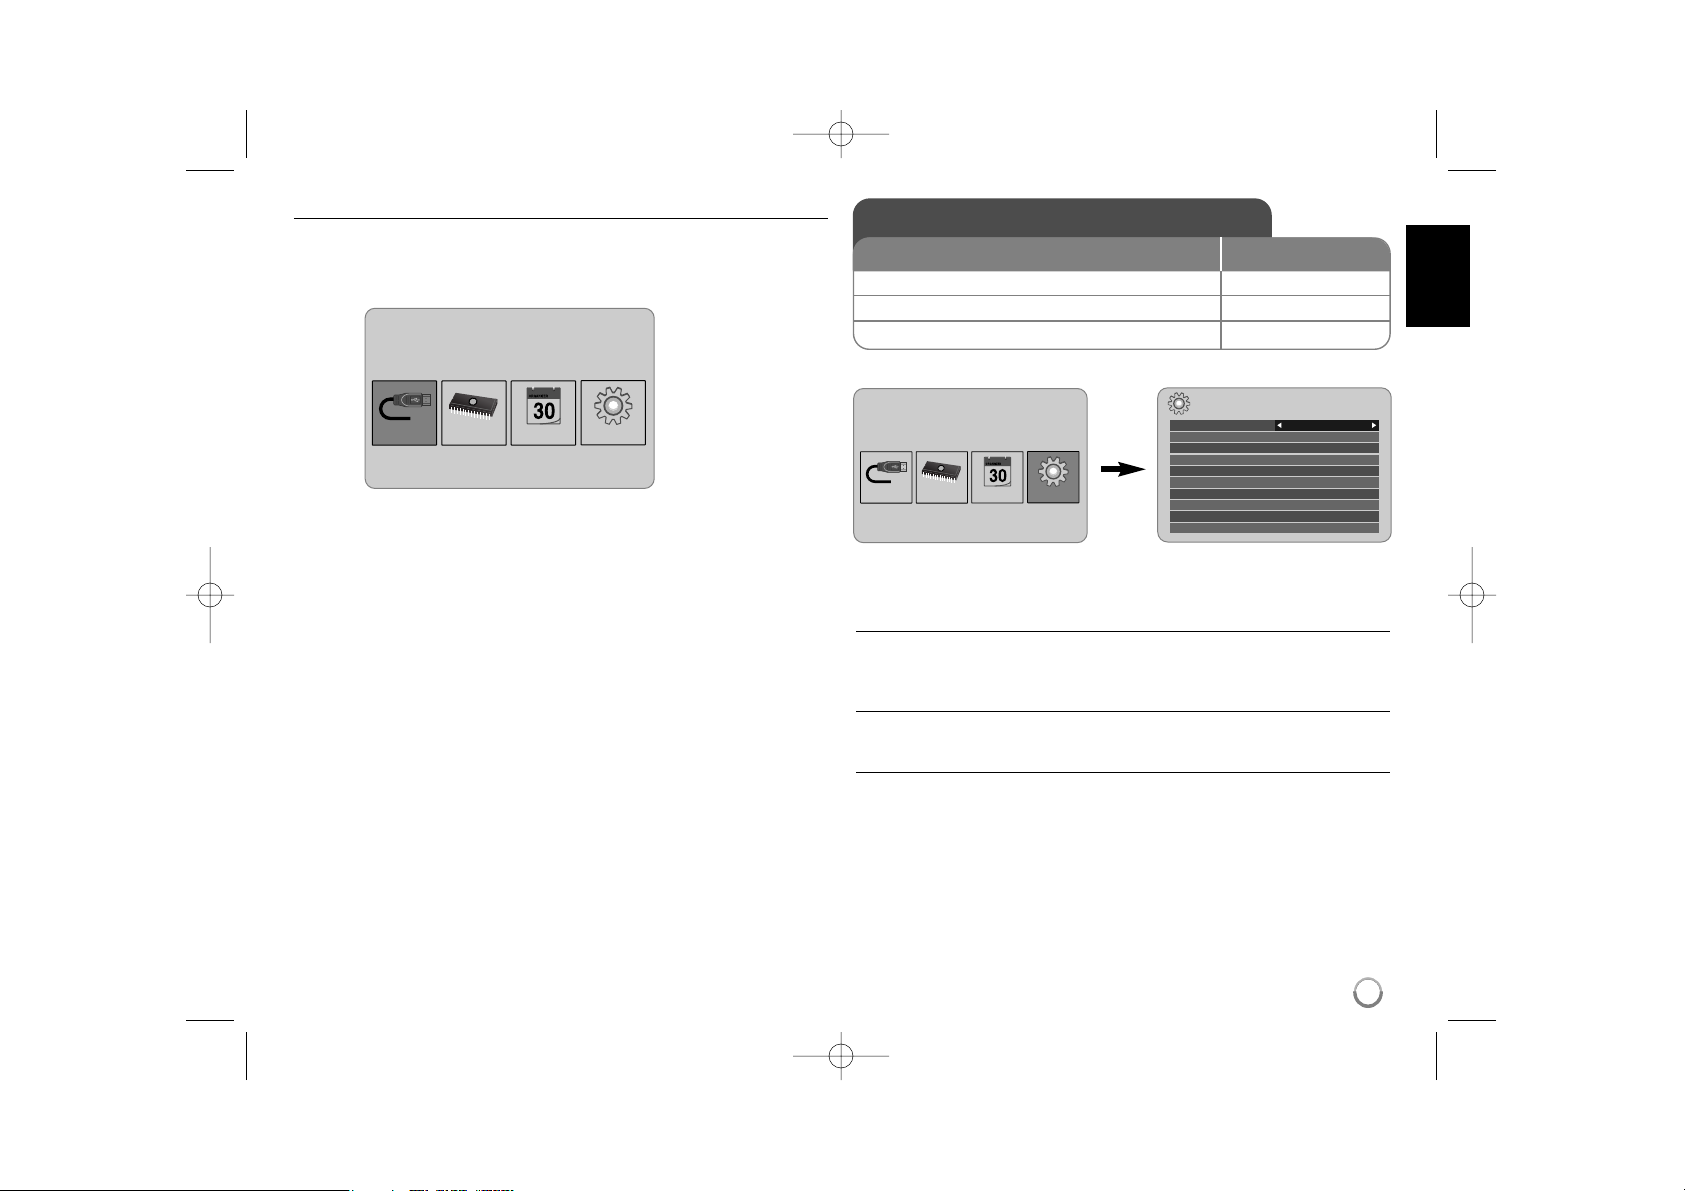
Using the Device Menu
The Device Menu will appear when the unit is turned on and you can display the
Device Menu by pressing BACK repeatedly.
Use b VOLUME B to select an option on the [Device Menu] then press
ENTER.
• USB-C ..... USB-Z
You can play a file(s) in the connected USB device.
• SD/MMC/MS
You can play a file(s) in the external memory card.
• Flash
You can play a file(s) in the internal memory card.
• Calendar
You can view the current date, clock and alarm information through calendar
screen.
• Setup
You can change the settings of the unit on the [Setup] menu.
Adjust the settings - more you can do
To display the [Setup] menu
Use b VOLUME B to select the [Setup] option on the [Device Menu] then
press ENTER.
[Language]
Select a language for the Setup menu and on-screen display.
[Slideshow time]
Specify how long each picture is displayed in a slideshow; 3 seconds,
5 seconds, 15 seconds, 1 minutes, 15 minutes, 1 hour.
Device Menu
USB-C Flash SetupCalendar
Device Menu
USB-C Flash SetupCalendar
Setup
Language
Slideshow time 5s:
Slideshow mode Random:
Display mode Normal:
Time format 24h:
Time 2007 / 11 / 22 21 : 17:
Auto On 2007 / 11 / 22 00 : 00 Off:
Auto Off 2007 / 11 / 22 00 : 00 Off:
Alarm 00 : 00 Ring1 Off:
Default Reset:
English
Adjust the settings
1 Select [Setup] on the [Device Menu]:
bb
VOLUME BB, ENTER
2 Select a desired option:
bb
PAGE
BB
3 Change the setting:
bb
VOLUME
BB
BUTTON
PF391P-P-APOLLLW-ENG 11/27/07 9:28 PM Page 7

[Slideshow mode]
Specify the transition style between pictures in a slideshow; Random, Fading,
Off, Bottom-To-Top, Top-To-Bottom, Left-To-Right, Right-To-Left, Door-Close,
Door-Open, Hori-Cross, Verti-Cross.
If you select [Off], the slideshow does not work and the screen is fixed with one
picture.
[Display mode]
Specify the display mode for viewing photo file; Normal, Fit.
[Normal]: Retains the original aspect ratio of the image.
[Fit]: Optimizes the image to fit the screen
[Time format]
Specify the time format for displaying the clock ; 12h, 24h
[12h]: 12-hour display type with am or pm
[24h]: 24-hour display type without am or pm
[Time]
Specify the time and date of the unit to use the various timer features of the
unit.
1. Select [Time] option then press VOLUME B.
2. Enter the necessary information for date and time.
b VOLUME B (left/right): Moves the cursor to the previous or next column.
b PAGE B (up/down): Changes the setting at the current cursor position.
3. Press ENTER to confirm your setting.
[Auto On]
Specify when the unit turns on automatically.
1. Select [Auto On] option then press VOLUME B.
2. Follow step 2 as shown in [Time] above.
3. Choose a desired repeat mode; [Off], [Once] or [Everyday].
Select [Off] if you do not use this function.
4. Press ENTER to confirm your setting.
[Auto Off]
Specify when the unit turns off automatically.
1. Select [Auto Off] option then press VOLUME B.
2. Follow step 2 as shown in [Time] above.
3. Choose a desired repeat mode; [Off], [Once] or [Everyday].
Select [Off] if you do not use this function.
4. Press ENTER to confirm your setting.
[Alarm]
Specify the clock for alarm function. If you set the alarm, the unit will be turned
on automatically at the alarm time and the alarm will sound. To turn off the
alarm sound, press any button on the unit.
1. Select [Alarm] option then press VOLUME B.
2. Enter the necessary information for clock.
b VOLUME B (left/right): Moves the cursor to the previous or next column.
b PAGE B (up/down): Changes the setting at the current cursor position.
3. Choose a ring option; [Ring1], [Ring2] or [Ring3].
For example, if you select [Ring2];
Alarm sound (1 min.) c Mute (15 sec.) c Alarm sound (1 min.) c
Mute (15 sec.) c Normal mode
4. Choose a desired repeat mode; [Off], [Once] or [Everyday].
Select [Off] if you do not use this function.
[Off]: Alarm function is not activated.
[Once]: Alarm function is activated once after setting the alarm.
[Everyday]: Alarm function is activated everyday.
5. Press ENTER to confirm your setting.
[Default]
Reset the unit to its original factory settings. Select [Default] option then press
ENTER.
8
PF391P-P-APOLLLW-ENG 11/27/07 9:28 PM Page 8
9
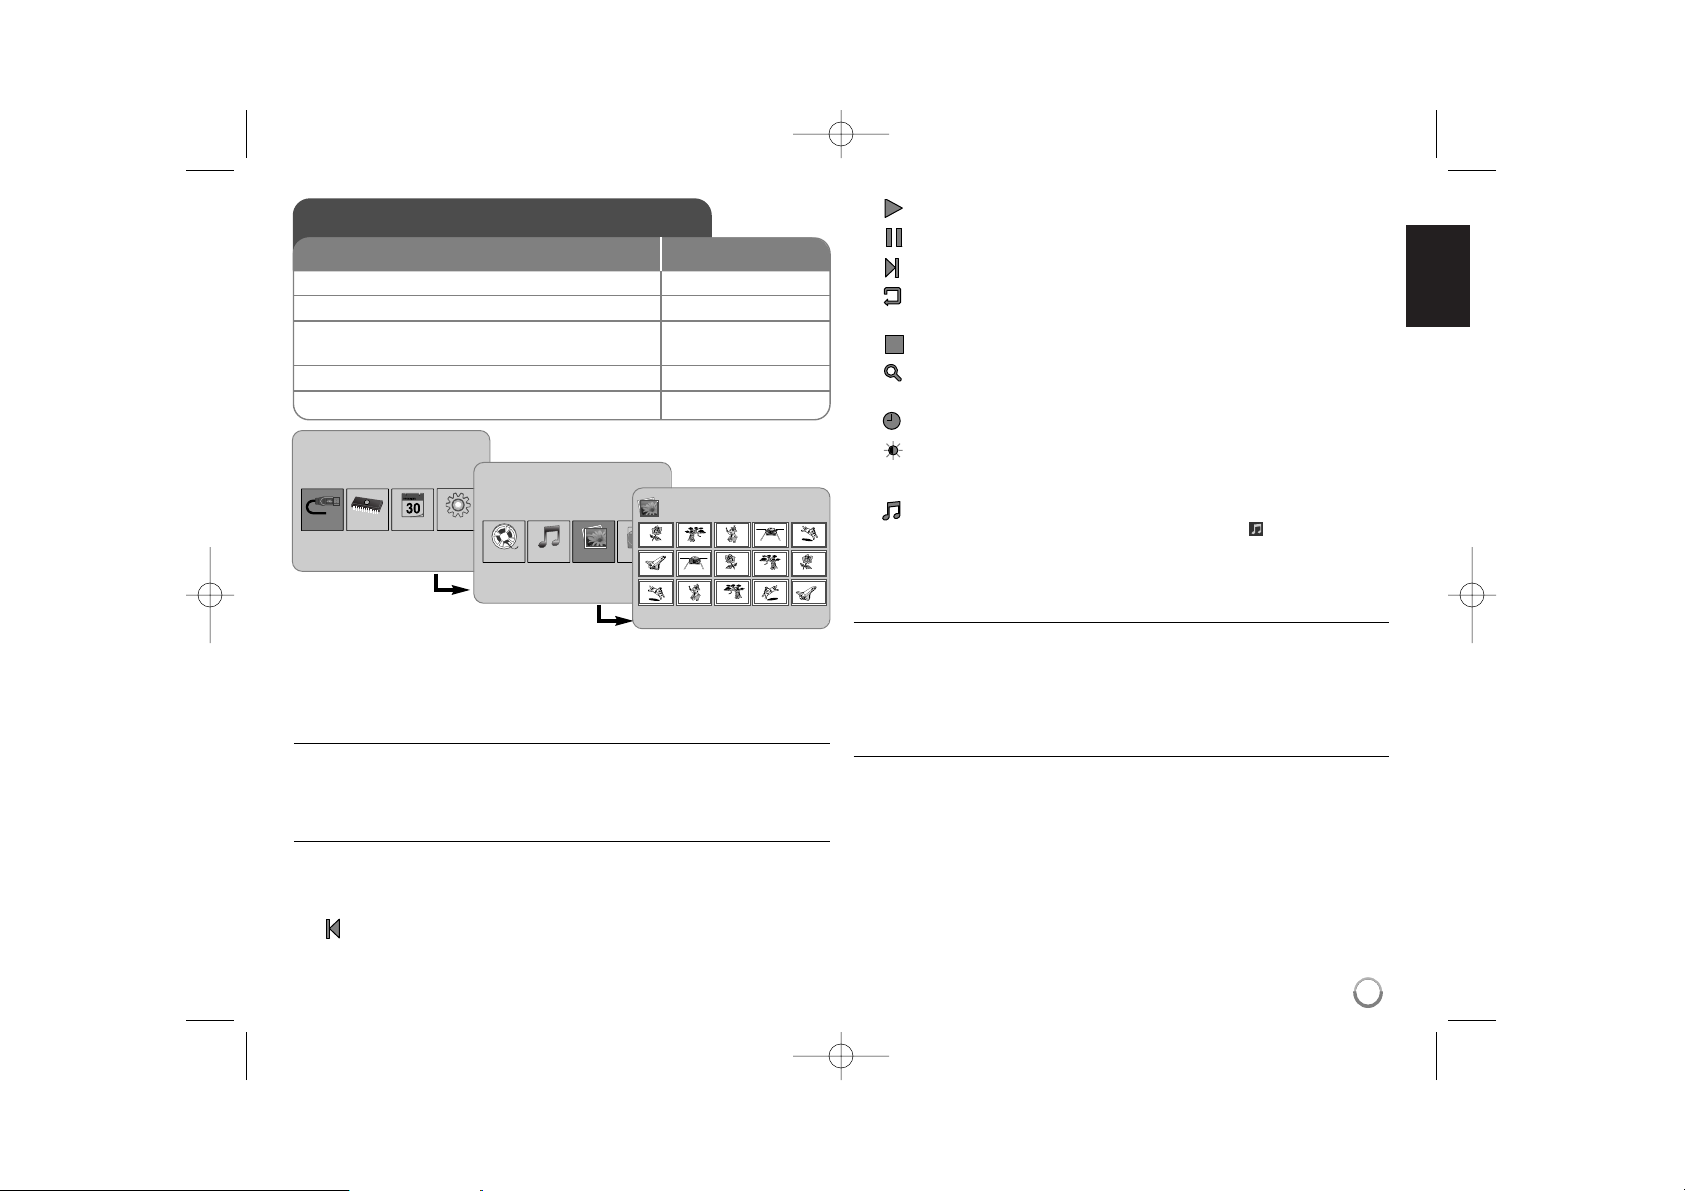
Viewing a Photo file - more you can do
Viewing photo files as a slideshow
On the [Photo] menu, use b VOLUME B and b PAGE B to select a photo file
then press NX to start the slideshow. Press NX to pause the slideshow temporarily, press again to exit pause mode.
Options during viewing a photo file in full screen
You can use various features during viewing a picture in full screen.
1. Press MENU to display the option menu.
2. Use b VOLUME B and ENTER to select an option and execute it.
To view the previous photo file.
To start the slideshow.
To pause the slideshow.
To view the next photo file.
To rotate the photo in 90 degrees clockwise. Press ENTER repeatedly
to select a degrees.
To stop viewing the photo in full screen and returns to [Photo] menu.
To enlarge the photo image. Press ENTER repeatedly to select a zoom
mode or normal mode.
To switch on or off the clock display.
To adjust the brightness of the screen. Press ENTER and the brightness menu will appear, and use b VOLUME B to adjust the brightness
then press ENTER.
You can listen to music during slideshow, if the current media contain
music and photo files together. Press ENTER and will appear lowerright side of the screen. To exit this function, press ENTER again.
3. Use MENU to exit the option menu.
Photo file requirement
JPEG file compatibility with this unit is limited as follows:
• File extensions: “.jpg”
• Photo size: Less than 8,000 x 8,000 (W x H) pixel (baseline)
Less than 100,000 pixel (progressive)
• Maximum Files/Media: Less than 650 recommended
Notes on JPEG file
• Lossless compression JPEG image files are not supported.
• Depending on the size and number of the JPEG files, it may take several
minutes to read the contents of the media.
Viewing a Photo file
1 Select a device on the [Device Menu]:
bb
VOLUME BB, ENTER
2 Select [Photo] on the [Media Menu]:
bb
VOLUME BB, ENTER
3 Select a photo file on the [Photo] menu:
bb
VOLUME BB,
bb
PAGE
BB
4 Display the selected file in full screen: ENTER, NX
5 To return to the [Photo] menu: BACK
BUTTON
Device Menu
USB-C Flash SetupCalendar
Media Menu
Movie
Music
Photo
File
Photo
1/2
DSC_0029.jpg 2007/11/22 12:00:00
PF391P-P-APOLLLW-ENG 11/27/07 9:28 PM Page 9
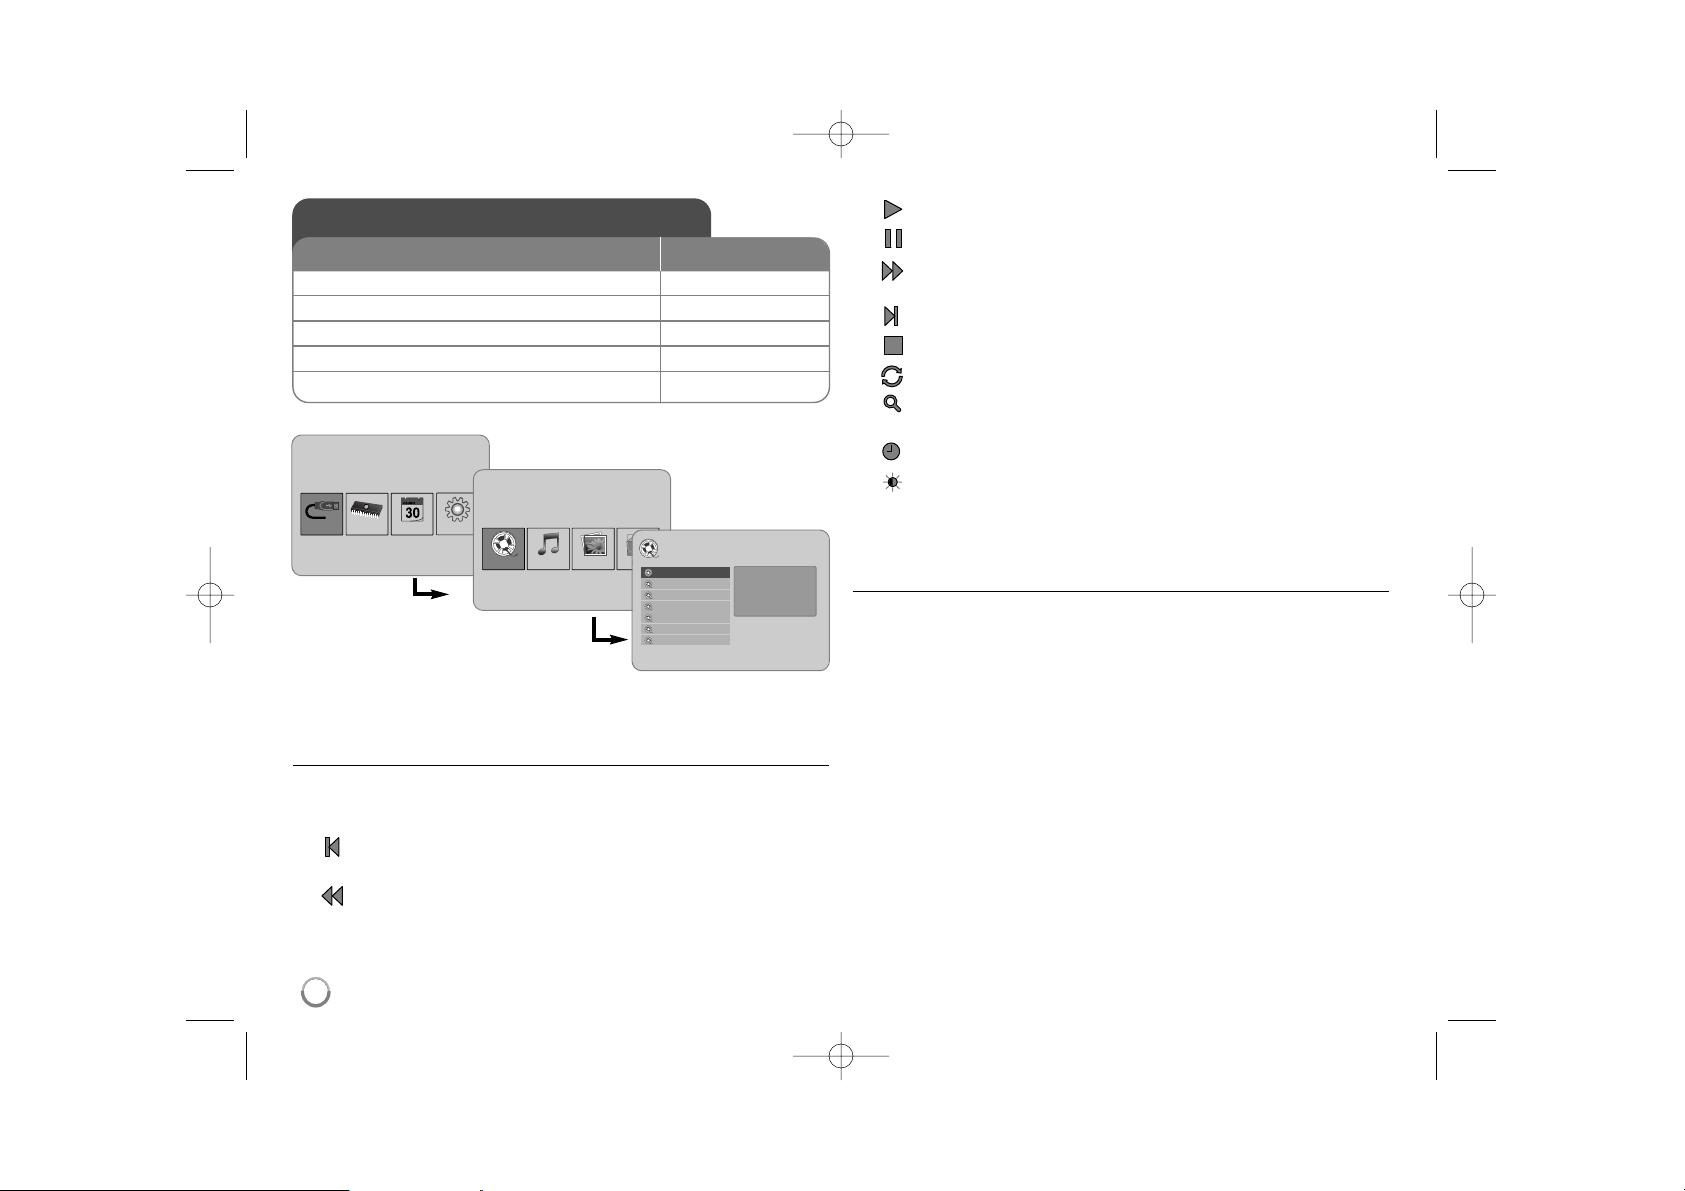
Playing a Movie file - more you can do
Options during playing a movie file
You can use various features during playing a movie file.
1. Press MENU to display the option menu during playback.
2. Use b VOLUME B and ENTER to select an option and execute it.
To return to the beginning of the current file. Press ENTER twice briefly
to play the previous movie file.
To play fast reverse during playback. To change the various playback
speed, press ENTER repeatedly.
To start playback.
To pause playback.
To play fast forward during playback. To change the various playback
speed, press ENTER repeatedly.
To play the next movie file.
To stop playback and returns to [Movie] menu.
To select a repeat mode (TRACK, ALL, OFF).
To enlarge the video image. Press ENTER repeatedly to select a zoom
mode or normal mode.
To switch on or off the clock display.
To adjust the brightness of the screen. Press ENTER and the brightness control menu will appear, and use b VOLUME B to adjust the
brightness then press ENTER.
3. Use MENU to exit the option menu.
Movie file requirement
Movie file compatibility with this unit is limited as follows:
• Available resolution size: 720x576 (W x H) pixel.
• Bit rate: Less than 15 Mbps
• Movie file extensions: “.avi”, “.mpg”, “.mpeg”
• This unit does not support to display the subtitle of the movie file.
• Playable Codec format: “MPEG1”, “MPEG2”, “MJPEG”
• Playable Audio format: “MPEG1”, “MPEG2”, “MPEG3”, “PCM”
• “Not Support” will appear on the screen if the movie file is not playable.
• Maximum Files/Media: Less than 650 recommended
10
Playing a Movie file
1 Select a device on the [Device Menu]:
bb
VOLUME BB, ENTER
2 Select [Movie] on the [Media Menu]:
bb
VOLUME BB, ENTER
3 Select a movie file on the [Movie] menu:
bb
PAGE
BB
4 Start playback: ENTER, NX
5 To return to the [Movie] menu: BACK
BUTTON
Device Menu
USB-C Flash SetupCalendar
Media Menu
Movie
Music
Photo
File
Movie
Movie 1.avi
Movie 2.avi
Movie 3.avi
Movie 4.avi
Movie 5.avi
Movie 6.avi
Movie 7.avi
File Name Movie 1.avi
File Size 14MB
File Type AVI
PF391P-P-APOLLLW-ENG 11/27/07 9:28 PM Page 10

11
Playing a Music file - more you can do
Options during playing a music file
You can use various features during playing a music file.
1. Press MENU to display the option menu during playback.
2. Use b VOLUME B and ENTER to select an option and execute it.
To return to the beginning of the current file. Press ENTER twice briefly
to play the previous movie file.
To play fast reverse during playback. To change the various playback
speed, press ENTER repeatedly.
To start playback.
To pause playback.
To play fast forward during playback. To change the various playback
speed, press ENTER repeatedly.
To play the next music file.
To stop playback.
To select a repeat mode. (TRACK, ALL, OFF)
3. Use MENU to exit the option menu.
Music file requirement
• File extensions: “.mp3”
• Sampling frequency: 8 - 48 kHz (Layer 1, Layer 2, Layer 3, MPEG 2.5),
8 - 96 kHz (PCM)
• Bit rate: 32 - 448 kbps (Layer 1), 32 - 384 kbps (Layer 2),
32 - 320 kbps (Layer 3), 8 - 160 kbps (MPEG 2.5)
• Maximum Files/Media: Less than 650 recommended
Playing a Music file
1 Select a device on the [Device Menu]:
bb
VOLUME BB, ENTER
2 Select [Music] on the [Media Menu]:
bb
VOLUME BB, ENTER
3 Select a music file on the [Music] menu:
bb
PAGE
BB
4 Start playback: ENTER, NX
5 To return to the [Media Menu]: BACK
BUTTON
Device Menu
USB-C Flash SetupCalendar
Media Menu
Movie
Music
Photo
File
Music
Music 01.mp3
Music 02.mp3
Music 03.mp3
Music 04.mp3
Music 05.mp3
Music 06.mp3
Music 07.mp3
File Name Music 01.mp3
File Size 3MB
File Type MP3
PF391P-P-APOLLLW-ENG 11/27/07 9:28 PM Page 11

12
Using a File menu - more you can do
Using [File] menu
• You can view a list of folders and files in the current media.
• You can delete or copy a file(s) in the current media.
To display a list of subfolders and files
Use b PAGE B to select a folder then press ENTER. The list of the files and
subfolders within the folder. Press BACK to move to the upper folder.
To select multiple files on the [File] menu
You can select not only single file but also multiple files using
VOLUME B
button. Press VOLUME B at the desired files to select multiple files.
To delete a file(s) using the [File] menu
1. Select a file then press VOLUME B and “B” appear on the right of the file
name.
2. Repeat step 1 if you need to select multiple files.
3. Press ENTER and the option menu will appear.
4. Use b PAGE B to select [Delete>] option then press ENTER.
The confirm menu will appear.
5. Use b VOLUME B to select [Yes] then press ENTER and the file will be
deleted from the current media.
6.
When the deleting is completed,
press ENTER to finish.
To copy a file(s) from the current media to another media
1. Select a file then press VOLUME B and “B” appear on the right of the file
name.
2. Repeat step 1 if you need to select multiple files.
3. Press ENTER and the option menu will appear.
4. Use b PAGE B to select [Copy >] option then press ENTER.
5. Use b PAGE B to select a media that you would like to copy to.
The free space of the selected media will be displayed on the upper-right
side of the [File] menu.
6. Use b VOLUME B and b PAGE B to select a folder that you would like
to copy to.
- Press VOLUME B to move to a subfolder.
- Press b VOLUME to move to a upper folder.
7. Press ENTER. The files will be copied to the selected media or folder.
8.
When the copying is completed,
press ENTER to finish.
Using a File menu
1 Select a device on the [Device Menu]:
bb
VOLUME BB, ENTER
2 Select [File] on the [Media Menu]:
bb
VOLUME BB, ENTER
3 Select a file on the [File] menu:
bb
PAGE
BB
4 To return to the previous screen: BACK
BUTTON
Device Menu
USB-C Flash SetupCalendar
Media Menu
Movie
Music
Photo
File
File
D:/
Folder 1
Folder 2
Movie 02.mov
Music 04.mp3
Photo 07.jpg
Photo 09.jpg
Modify Date 22 / 11 / 2007
File type Folder
PF391P-P-APOLLLW-ENG 11/27/07 9:28 PM Page 12

13
Viewing the Calendar - more you can do
Using [Calendar] menu
• You can view the current time and date with slideshow.
• You can change the month and year using b VOLUME B and b PAGE B.
• You can view the alarm information.
Viewing the Calendar
1 Select [Calendar] on the [Device Menu]:
bb
VOLUME BB, ENTER
2 Select a month:
bb
VOLUME
BB
3 Select a year:
bb
PAGE
BB
4 To return to the [Device Menu] menu: BACK
BUTTON
Device Menu
USB-C Flash SetupCalendar
SUN MON TUE WED THU FRI SAT
PF391P-P-APOLLLW-ENG 11/27/07 9:28 PM Page 13

14
PC Connection (USB) - more you can do
Connecting a PC
Connect the unit to your PC using an optional USB cable. Upon connection:
• Your PC will automatically recognize any memory cards installed in the unit.
An icon representing your installed memory cards will appear as
“PF39 Memory” (Internal memory) and “Removable Disks” (External memory
card) when you open “My Computer”.
• It may take Windows several minutes to recognize and set up the device the
first time it is connected depending on your hardware configuration.
• Plug and Play Support: Windows 2000/ME/XP
• PC monitor image will appear on the screen when the unit is connected to
PC and you cannot use any buttons on the unit (Except 11BAT. and P-SAVE
buttons).
Transferring Files
The USB 2.0 High-Speed connection makes it easy to transfer music, video, or
photo files (or any other data) quickly between the unit and PC.
Simply use the unit as you would a USB Flash Drive using basic operating system commands.
Important Notice:
• If you need further assistance with transferring files, please refer to your
operating system’s instruction manual or on-screen help.
• Do not disconnect or otherwise interrupt the unit during transmission - this
could damage or corrupt the unit’s firmware or your files.
• If you want to format the internal memory of the unit using PC, you must
format it with FAT file system.
Double-click the “My Computer” icon on your desktop and then double-click the
“PF39 Memory” or “Removable Disks” icon that corresponds with the unit’s
internal or external memory card.
Drag your media files (or other files) to the “PF39 Memory” or “Removable
Disks”.
• You may choose to use folders/subfolders to organize your media and data.
Disconnecting from a PC
Disconnect the unit as instructed below to prevent data loss or file/firmware corruption.
1. Double-click the green arrow in the task bar located on the lower-right side
of the PC screen (Safely Remove Hardware).
2. Safely Remove Hardware: Select “USB Mass Storage Device” from the list
that appears and then click on “Stop”.
Stop a Hardware Device: Select “USB Mass Storage Device” from the list
that appears and then click on “OK”.
3. When the “Safe to Remove Hardware” window appears, click the OK button
and disconnect the USB cable from the unit and your PC.
PC Connection (USB)
1 Connect the unit and PC: –
2 Turn on the unit: 1 BAT.
3 Transfer Files: –
BUTTON
USB Cable
PF391P-P-APOLLLW-ENG 11/27/07 9:28 PM Page 14

15
Power Supply DC 12 V, 2 A
Power consumption 10 W
Operating time on battery: Approx. 1 hour
Set dimensions (W x H x D) 213 x 147 x 103.5 mm with stand
Net Weight 630g
Operating temperature 5˚C to 45˚C
Operating humidity 5 % to 90 %
Display Type 8” Wide (Full-Color TFT LCD)
Viewing area: 7.18”
Display Resolution 800 x 480 (WVGA)
Internal Memory Flash Memory (256MB*)
Memory Card Slot 1 slot for SD/MMC/MS Card
Interface USB 2.0 High-Speed (device)
Plug and Play Support Windows 2000/ME/XP
* The 21MB is assigned for the unit’s software.
Accessory
• AC Adapter (MPA-630)
• USB Adapter Cable
• USB Cable
• Detachable Stand
• 3 different changeable faceplate
Specifications
Troubleshooting
The power does not turned on.
b Ensure that the power cord has been properly connected to the power outlet.
The sound quality of the music is poor.
b Try playing the file on your PC. If the sound quality is still poor, try downloading the file
again or re-encoding the file yourself.
b Ensure that the bit rate of the file is not too low. The higher the bit rate of the file, the
better it will sound. Refer to “
Music file requirement”
on page 11.
Cannot transfer files to the unit from your PC.
b Ensure that your PC is running a supported operating system.
b Ensure that the USB cable is securely attached to the unit and the PC.
b If you have connected the unit through a USB hub, try connecting the unit directly to
your PC.
b Ensure that the capacity of the memory cards installed in the unit.
Cannot select a memory card.
b Ensure that a memory card has been installed.
b Ensure that the memory card is properly installed.
b Ensure that the memory card is not defective.
Cannot copy files to a target location.
b Ensure that the target media has enough memory to contain the file.
The unit will not play a music file.
b Ensure that the file is in a compatible format (MP3). Refer to “
Music file requirement”
on page 11.
The unit will not play a video file.
b Ensure that the video file is available on the unit. Refer to “
Movie file requirement”
on
page 10.
There is no sound.
b Ensure that the volume has been set to a reasonable level.
The unit has malfunctioned.
b Press 1 BAT. button to turn off the unit then turn the unit back on.
• Designs and specifications are subject to change without prior
notice.
PF391P-P-APOLLLW-ENG 11/27/07 9:28 PM Page 15

PF391P-P-APOLLLW-ENG 11/27/07 9:28 PM Page 16

POLSKI
PF391
P/NO : MFL42173809(R1)
PF391P-P-APOLLLW-POL 11/27/07 9:27 PM Page 1

2
UWAGA : ABY ZMNIEJSZYĆ RYZYKO PORAŻENIA PRĄDEM, NIE ZDEJMOWAĆ
POKRYWY (LUB TYLNEJ SCIANY). WEWNĄTRZ NIE MA CZĘŚCI DO
SAMODZIELNEJ NAPRAWY. NAPRAWĘ ZLECIĆ WYKWALIFIKOWANEMU
SERWISOWI.
Symbol błyskawicy w trójkącie ostrzega o niebezpiecznym napięciu obecnym
w urządzeniu, które może narazić użytkownika na ryzyko porażenia prądem
elektrycznym.
Symbol wykrzyknika w trójkącie informuje użytkownika o ważnej instrukcji dot.
działania i konserwacji (serwisowania) w dokumentacji dołączonej do
urządzenia.
OSTRZEŻENIE: CHRONIĆ URZĄDZENIE PRZED DESZCZEM I WILGOCIĄ, ABY
UNIKNĄĆ POŻARU LUB PORAŻENIA PRĄDEM.
OSTRZEŻENIE: Nie instalować urządzenia w przestrzeni zamkniętej, jak np. półki z
książkami, itd.
UWAGA : Nie zasłaniać otworów wentylacyjnych. Instalować zgodnie z zaleceniami
producenta. Szczeliny i otwory wentylacyjne w obudowi, zapewniają niezawodną
pracę urządzenia i chronią je przed przegrzaniem.
Nie należy kłaść urządzenia na łóżku, sofie, dywanie lub na innej podobnej
powierzchni, która mogłaby doprowadzić do zatkania tych otworów. Nie należy
umieszczać urządzenia w zabudowie izolującej, takiej jak półki na książki, stojaki,
chyba że zostanie zapewniona odpowiednia wentylacja, lub jest to zgodne z
instrukcją producenta.
UWAGA : To urządzenie nie może być wystawione na działanie wody (kapiącej lub
rozpryskiwanej) i nie należy kłaść na nim przedmiotów wypełnionych cieczą, takich
jak wazony.
UWAGA dotycząca przewodu zasilania
Dla większości urządzeń zalecane jest, aby były podłączone do osobnego
obwodu;
to znaczy do pojedynczego gniazdka, które zasila tylko dane urządzenie i nie ma
innych wyjść lub odgałęzień. Dla pewności proszę sprawdzić stronę ze specyfikacjami technicznymi w niniejszej instrukcji obsługi. Przeciążone, luźne, uszkodzone lub
przepalone gniazdka, kable zasilające lub przedłużające stwarzają zagrożenie.
Jakakolwiek z powyższych sytuacji może być przyczyną porażenia prądem lub pożaru.
Raz na jakiś czas należy sprawdzać przewód zasilający urządzenia i jeśli pojawią się
oznaki uszkodzenia lub przetarcia się, odłączyć go, zaprzestać korzystania z
urządzenia i wymienić przewód w autoryzowanym serwisie.
Zabezpieczyć przewód zasilania przed fizycznym lub mechanicznym, niewłaściwym
użytkowaniem, tj. przed skręcaniem, zapętleniem, zaciskaniem, przytrzaskiwaniem
drzwiami lub przekraczaniem. Należy zwrócić szczególną uwagę na wtyczki, gniazdka
ścienne oraz miejsce, w którym przewód łączy się z urządzeniem.
Wyjąć wtyczkę przewodu zasilającego, aby odłączyć od zasilania. Podczas instalacji
urządzenia, upewnić się że wtyczka jest łatwo dostępna.
Pozbywanie się starego urządzenia
1. Jeżeli do produktu dołączony jest niniejszy symbol przekreślonego kos,
oznacza to, że jest on objęty Dyrektywą Europejską 2002/96/EU.
2. Wszystkie elektryczne i elektroniczne urządzenia powinny być oddawane
do specjalnych punktów zbiórki wyznaczonych przez miejscowe lub
regionalne władze.
3. Właściwa likwidacja urządzenia pomoże chronić środowisko naturalne i
ludzkie zdrowie przed negatywnymi konsekwencjami.
4. Więcej szczegółowych informacji o likwidacji nieużywanego urządzenia
można uzyskać w urzędzie miasta, punktach uzdatniania odpadów lub w
sklepie, gdzie produkt został kupiony.
To urządzenie zostało wyprodukowane zgodnie z dyrektywą EEC
2004/108/EC i 2006/95/EC
Zalecenia dotyczące bezpieczeństwa
UWAGA
RYZYKO PORAŻENIA
PRĄDEM; NIE OTWIERAĆ
PF391P-P-APOLLLW-POL 11/27/07 9:27 PM Page 2

3
Spis treści
Zalecenia dotyczące bezpieczeństwa . . . . . . . . . . . . . . . . . . . . . . . . . . . . . .2
Spis treści . . . . . . . . . . . . . . . . . . . . . . . . . . . . . . . . . . . . . . . . . . . . . . . . . . .3
Właściwości . . . . . . . . . . . . . . . . . . . . . . . . . . . . . . . . . . . . . . . . . . . . . . .3
Urządzenie główne . . . . . . . . . . . . . . . . . . . . . . . . . . . . . . . . . . . . . . . . . . .4
Na początek . . . . . . . . . . . . . . . . . . . . . . . . . . . . . . . . . . . . . . . . . . . . . . . . .5
• Wkładanie lub wyjmowanie karty pamięci . . . . . . . . . . . . . . . . . . . . . . .5
• Podłączanie urządzenia USB . . . . . . . . . . . . . . . . . . . . . . . . . . . . . . . .5
• Podłączanie przewodu zasilającego . . . . . . . . . . . . . . . . . . . . . . . . . . .6
• Włączanie lub wyłączanie urządzenia . . . . . . . . . . . . . . . . . . . . . . . . .6
• Tryb oszczędności energii . . . . . . . . . . . . . . . . . . . . . . . . . . . . . . . . . . .6
• Mocowanie podstawki . . . . . . . . . . . . . . . . . . . . . . . . . . . . . . . . . . . . . .6
• Korzystanie z menu urządzenia . . . . . . . . . . . . . . . . . . . . . . . . . . . . . . .7
Ustawienia . . . . . . . . . . . . . . . . . . . . . . . . . . . . . . . . . . . . . . . . . . . . . . . . .7-8
Wyświetlanie pliku ze zdjęciem . . . . . . . . . . . . . . . . . . . . . . . . . . . . . . . . . . .9
Odtwarzanie pliku z filmem . . . . . . . . . . . . . . . . . . . . . . . . . . . . . . . . . . . . .10
Odtwarzanie pliku muzycznego . . . . . . . . . . . . . . . . . . . . . . . . . . . . . . . . . .11
Korzystanie z menu File(plik) . . . . . . . . . . . . . . . . . . . . . . . . . . . . . . . . . . .12
Wyświetlanie kalendarza . . . . . . . . . . . . . . . . . . . . . . . . . . . . . . . . . . . . . .13
Podłączenie do komputera (USB) . . . . . . . . . . . . . . . . . . . . . . . . . . . . . . .14
Rozwiązywanie problemów . . . . . . . . . . . . . . . . . . . . . . . . . . . . . . . . . . . . .15
Dane techniczne . . . . . . . . . . . . . . . . . . . . . . . . . . . . . . . . . . . . . . . . . . . . .15
Właściwości
• Ruchoma galeria zdjęć:
Wysoka rozdzielczość i głębia cyfrowego koloru na szerokim wyświetlaczu
LCD.
• Prosty tryb oszczędności energii:
1 sekundowy tryb oszczędzania energii, lepszy niż 15 sekundowe
wyłączenie i włączenie.
• Przenośny album cyfrowy:
Dziel się swoimi wspomnieniami dzięki wbudowanej baterii
• Niezależna przeglądarka:
Łatwe przeglądanie zdjęć za pośrednictwem gniazda kart pamięci lub złącza
USB
• Pamięć na 2000 zdjęć:
2000 cennych wspomnień dzięki wbudowanej pamięci flash 256MB
• Cyfrowy kalendarz i budzik:
Dla bardziej wydajnego planowania czasu
• Wygodny eksplorator zdjęć:
Najwygodniejszy interfejs nawigacyjny zapewnia łatwy dostęp do twojej
pamięci
• Dekorator wnętrz Premium
Dopasuj ramkę do swojego wnętrza dzięki 3 wymiennym nakładkom
PF391P-P-APOLLLW-POL 11/27/07 9:27 PM Page 3

4
Urządzenie główne
a Wyświetlacz LCD
b Nakładka (wymienna)
Cztery rogi płyty czołowej są magnetyczne, dzięki temu można ją łatwo
mocować lub zdejmować.
c 1 BAT. (Przycisk zasilania i wskaźnik baterii)
Włącza lub wyłącza urządzenie oraz wskazuje stan baterii.
Wskaźnik świeci na czerwono w czasie ładowania baterii.
Wskaźnik świeci na zielono, gdy bateria jest pełna.
d P-SAVE (Oszczędzanie energii)
Włącza lub wyłącza tryb oszczędzania energii.
e MENU
Otwiera lub zamyka menu konfiguracji.
f b VOLUME B (GŁOŚNOŚĆ)
Reguluje głośność urządzenia. Aby nastawić głośność, należy nacisnąć
i przytrzymać VOLUME (b lub B) w trakcie odtwarzania pliku z filmem lub
muzyką. Przyciski lewy i prawy służą do wybierania elementu w menu.
g b PAGE B (STRONA)
Należy nacisnąć i przytrzymać przez 2 sekundy, aby przejść do następnej
strony menu [Photo], [Movie] lub [Music].
Przyciski góra i dół służą do wybierania elementu w menu.
h ENTER
Wybiera opcję lub zatwierdza polecenie.
i ROTATE (OBRÓT)
Obraca zdjęcie na pełnym ekranie przeciwnie do ruchu wskazówek
zegara.
j BACK (WSTECZ)
Powrót do poprzedniego menu lub ekranu.
k NX
Rozpoczyna odtwarzanie. Nacisnąć, aby wstrzymać odtwarzanie. Nacisnąć
drugi raz, aby wznowić odtwarzanie.
l Złącze USB
Pdłączyć zewnętrzne urządzenie USB za pomocą dołączonego kabla
USB.
m Gniazdo kart pamięci
Włożyć kartę pamięci (SD, MMC lub MS).
n DC 12V IN
Podłączyć dostarczony zasilacz AC.
cd e f
nml
b
a
g
h
i
j
k
PF391P-P-APOLLLW-POL 11/27/07 9:27 PM Page 4

5
Na początek
Wkładanie lub wyjmowanie karty pamięci
Włożyć kartę pamięci do gniazda kart pamięci urządzenia.
Aby wyjąć kartę pamięci z gniazda, należy ją nacisnąć w środku, a następnie
delikatnie wyjąć.
Karty kompatybilne z urządzeniem
• Secure Digital Card (SD)
• Multi Media Card (MMC)
• Memory Stick (MS)
• Zgodne z: FAT 12, FAT 16, lub FAT 32
• Używać tylko kart pamięci zalecanych powyżej.
• Kartę można włożyć tylko w jednym kierunku; nie wkładać “na siłę”.
Prawidłowo skierowana karta powinna wejść z minimalnym oporem.
• Niektóre karty mogą być niekompatybilne z urządzeniem.
• Nie wolno wyjmować karty pamięci podczas działania (odtwarzanie,
kopiowanie, itp.).
Zabezpieczenie przed zapisem
Jeżeli karta jest wyposażona w przełącznik zabezpieczenia przez zapisem, nie
będzie możliwy zapis, kasowanie oraz formatowanie karty, po aktywowaniu tego
zabezpieczenia.
Podłączanie urządzenia zewnętrznego USB
Podłączyć małą końcówkę adaptera przewodowego USB do złącza
USB jednostki głównej.
Podłączyć urządzenie zewnętrzne USB do adaptera USB. Jeżeli potrzeba, użyć
przewodu USB.
• To urządzenie obsługuje tylko urządzenia zewnętrzne USB w formacie
FAT16 lub FAT32.
• Nie wolno odłączać urządzenia USB podczas działania (odtwarzanie,
kopiowanie, itp.).
• Urządzenie USB: Urządzenie USB zgodne z USB 1.1 lub USB 2.0.
(Na przykład: Pamięć flash USB, czytnik kart pamięci, aparat cyfrowy, itp.)
• Urządzenie zewnętrzne USB, które wymaga instalacji dodatkowego
oprogramowania przy podłączaniu do komputera, nie będzie obsługiwane.
Pamięć USB Flash
(Na przykład)
Adapter kablowy USB
Do złącza USB
SD
or or
MMC
MS
lub
lub
PF391P-P-APOLLLW-POL 11/27/07 9:27 PM Page 5

6
Podłączanie przewodu zasilającego
Za pomocą dostarczonego przewodu zasilającego podłączyć urządzenie do
gniazdka zasilania.
Zasilacz AC
• Zasilacz AC działa przy napięciu 100-240V~ 1A 50/60 Hz.
• Należy skontaktować się z dystrybutorem części elektrycznych, aby uzyskać
pomoc w wyborze odpowiedniego złącza zasilacza AC lub zestawu
okablowania AC.
• Wyprodukowane przez WANLIDA GROUP CO., LTD
Bateria akumulatorowa
• Wbudowana bateria akumulatorowa umożliwia przenoszenie urządzenia i
odtwarzanie plików bez przewodu zasilającego.
• Wbudowana bateria akumulatorowa rozpocznie ładowanie, tylko gdy
urządzanie jest wyłączone, a przewód zasilający jest podłączony do
gniazdka zasilającego.
• Włączenie urządzenia powoduje zatrzymanie ładowania.
• Ładowanie trwa około 2 godziny.
• Wskaźnik 1 BAT. pozostaje czerwony w trakcie ładowania.
Po zakończeniu ładowania wskaźnik zmieni barwę na zieloną.
• Jeżeli pozostały czas zasilania z baterii jest krótszy niż 10 minut, na wyświetlaczu pojawi się komunikat “ ”, a wskaźnik 1 BAT. zacznie migać.
Włączanie lub wyłączanie urzadzenia
Aby włączyć urządzenie, należy nacisnąć i przytrzymać przycisk 1 BAT. na
około 2 sekundy.
Uruchomi się pokaz demonstracyjny oraz pojawi się menu urządzenia [Device
Menu].
Nacisnąć jakikolwiek przycisk, aby wyłączyć pokaz demonstracyjny.
Zdjęcia z pokazu demonstracyjnego znajdują się w pamięci wewnętrznej
urządzenia i nie można ich zmienić lub usunąć.
Nacisnąć ponownie 1 BAT., aby wyłączyć urządzenie.
Tryb oszczędzania energii
Można uruchomić tryb ekonomicznego wykorzystana energii przez urządzenie.
Nacisnąć P-SAVE, a wyświetlacz LCD zostanie wyłączony. Aby wyłączyć
tryb oszczędzania energii, należy nacisnąć P-SAVE lub 1 BAT.
Mocowanie podstawki
Przymocować odłączaną podstawkę do tylnej części urządzenia, tak jak
pokazano poniżej.
Do złącza “DC 12V IN”
Przyłączyć zasilacz AC do przewodu zasilającego.
Dźwignia zwalniania
przewodu
zsilającego
Do gniazdka
prądu zmiennego
PF391P-P-APOLLLW-POL 11/27/07 9:27 PM Page 6

7
Korzystanie z Device Menu (menu urządzenia)
Menu urządzenia pojawia się po włączeniu lub po wielokrotnym wciśnięciu
przycisku BACK.
Za pomocą b VOLUME B wybierz opcję w [Device Menu], po czym nacisnąć
ENTER.
• USB-C ..... USB-Z
Umożliwia odtwarzanie pliku(ów) z podłączonego urządzenia zewnetrznego
USB.
• SD/MMC/MS
Umożliwia odtwarzanie pliku(ów) z zewnętrznej karty pamięci.
• Flash
Umożliwia odtwarzanie pliku(ów) z wewnętrznej karty pamięci.
• Calendar
Można wyświetlić aktualną datę, zegar i budzik na ekranie kalendarza.
• Setup
W menu [Setup] można zmienić nastawy urządzenia.
Ustawienia - dodatkowe możliwości
Aby wyświetlić menu [Setup]
Za pomocą b VOLUME B wybrać opcję [Setup] w [Device Menu], po czym
nacisnąć ENTER.
[Language]
Wybrać język dla menu konfiguracji oraz dla wyświetlacza ekranowego.
[Slideshow time]
Określić jak długo będzie wyświetlane jedno zdjęcie w pokazie slajdów;
3 sekundy, 5 sekund, 15 sekund, 1 minuta, 15 minut, 1 godzina.
Device Menu
USB-C Flash SetupCalendar
Device Menu
USB-C Flash SetupCalendar
Setup
Language
Slideshow time 5s:
Slideshow mode Random:
Display mode Normal:
Time format 24h:
Time 2007 / 11 / 22 21 : 17:
Auto On 2007 / 11 / 22 00 : 00 Off:
Auto Off 2007 / 11 / 22 00 : 00 Off:
Alarm 00 : 00 Ring1 Off:
Default Reset:
English
Ustawienia
1 Wybrać [Setup] w [Device Menu]:
bb
VOLUME BB, ENTER
2 Wybrać żądaną opcję:
bb
PAGE
BB
3 Zmienić ustawienie:
bb
VOLUME
BB
PRZYCISK
PF391P-P-APOLLLW-POL 11/27/07 9:27 PM Page 7

[Slideshow mode]
Określić sposób przejścia między zdjęciami w pokazie slajdów; Random,
Fading, Off, Bottom-To-Top, Top-To-Bottom, Left-To-Right, Right-To-Left, DoorClose, Door-Open, Hori-Cross, Verti-Cross.
Po wybraniu [Off] pokaz slajdów zostanie wyłączony, a na ekranie będzie
wyświetlanie jedno zdjęcie.
[Display mode]
Określić tryb wyświetlania plików ze zdjęciami; Normal, Fit.
[Normal]: Pozostawia oryginalne proporcje obrazu.
[Fit]: Dopasowuje wyświetlany obraz do ekranu
[Time format]
Określić format czasu wyświetlanego przez zegar; 12h, 24h
[12h]: 12-godzinny typ wyświetlania z am lub pm
[24h]: 24-godzinny typ wyświetlania bez am lub pm
[Time]
Nastawić czas i datę, aby wykorzystać różne funkcję czasomierza urządzenia.
1. Wybrać opcję [Time] i nacisnąć VOLUME B.
2. Wprowadzić informacje odnośnie daty i czasu.
b VOLUME B (lewo / prawo): Przesuwanie kursora do poprzedniej lub
następnej kolumny.
b PAGE B (góra / dół): Zmiana ustawienia w aktualnej pozycji kursora.
3. Nacisnąć ENTER, aby potwierdzić ustawienie.
[Auto On]
Należy określić, kiedy urządzenie ma się włączyć samoczynnie.
1. Wybrać opcję [Auto On] i nacisnąć VOLUME B.
2. Należy postępować zgodnie z punktem 2 [Time] powyżej.
3. Wybrać żądany tryb powtórzeń; [Off], [Once] lub [Everyday].
Wybrać [Off], jeżeli funkcja ta nie jest używana.
4. Nacisnąć ENTER, aby potwierdzić ustawienie.
[Auto Off]
Należy określić, kiedy urządzenie ma się wyłączyć samoczynnie.
1. Wybrać opcję [Auto Off] i naciśnij VOLUME B.
2. Należy postępować zgodnie z punktem 2 [Time] powyżej.
3. Wybrać żądany tryb powtórzeń; [Off], [Once] lub [Everyday].
Wybrać [Off], jeżeli funkcja ta nie jest używana.
4. Nacisnąć ENTER, aby potwierdzić ustawienie.
[Alarm]
Należy określić zegar dla funkcji budzika. Jeżeli budzik będzie nastawiony,
urządzenie włączy się samoczynnie o wybranej godzinie i będzie emitowało
dźwięk budzika. Należy nacisnąć dowolny przycisk na urządzeniu, aby
wyłączyć dźwięk budzika.
1. Wybrać opcję [Alarm] i nacisnąć VOLUME B.
2. Wprowadzić potrzebne dla zegara informacje.
b VOLUME B (lewo / prawo): Przesuwanie kursora do poprzedniej lub
następnej kolumny.
b PAGE B (góra / dół): Zmiana ustawienia w aktualnej pozycji kursora.
3. Wybrać typ dzwonienia; [Ring1], [Ring2] lub [Ring3].
Na przykład, jeśli wybierzesz [Ring2];
Dźwięk budzika (1 min.) c Wyciszenie (15 sek.) c Dźwięk budzika ( 1 min.)
c Wyciszenie (15 sek.) c Tryb zwykły
4. Wybrać żądany tryb powtórzeń; [Off], [Once] lub [Everyday].
Wybrać [Off], jeżeli funkcja ta nie jest używana.
[Off]: Budzik jest wyłączony.
[Once]: Budzik włączy się jeden raz po nastawieniu.
[Everyday]: Budzi będzie się włączał codziennie.
5. Nacisnąć ENTER, aby potwierdzić ustawienie.
[Default]
Przywraca oryginalne ustawienia fabryczne urządzenia. Wybrać opcję [Default] i
nacisnąć ENTER.
8
PF391P-P-APOLLLW-POL 11/27/07 9:27 PM Page 8

9
Wyświetlanie zdjęć - dodatkowe mozliwości
Wyświetlanie zdjęć w pokazie slajdów
Za pomocą przycisków b VOLUME B i b PAGE B wybrać plik ze zdjęciem w
menu [Photo], następnie nacisnąć, aby rozpocząć pokaz slajdów. Nacisnąć
NX, aby chwilowo wstrzymać pokaz slajdów. Nacisnąć ponownie NX, aby
wyjść z trybu wstrzymania.
Opcje dostępne podczas wyświetlania zdjęcia na pełnym ekranie
W trakcie wyświetlania zdjęcia na pełnym ekranie, można korzystać z różnych
możliwości.
1. Nacisnąć przycisk MENU, aby wyświetlić menu opcji.
2. Przy pomocy b VOLUME B i ENTER wybrać opcję i zatwierdzić ją.
Wyświetla poprzednie zdjęcie.
Rozpoczyna pokaz slajdów.
Wstrzymuje pokaz slajdów.
Wyświetla następne zdjęcie.
Obraca zdjęcie o 90 stopni przeciwnie do ruchu wskazówek zegara.
Naciskać wielokrotnie ENTER, aby wybrać kąt obrotu.
Zatrzymuje wyświetlanie zdjęcia na pełnym ekranie i powraca do
menu [Photo].
Powiększanie obrazu. Naciskać przycisk ENTER, aby wybrać tryb zoom
lub tryb normalny.
Włącza lub wyłącza wyświetlanie zegara.
Nastawa jasności wyświetlacza. Nacisnąć ENTER, aby przejść do
menu jasności. Nastawić jasność przy pomocy b VOLUME B,po
czym nacisnąć ENTER.
Jeżeli nośnik pamięci zawiera jednocześnie zdjęcia i pliki muzyczne,
można słuchać muzyki w trakcie pokazu slajdów. Nacisnąć ENTER tę
a symbol pojawi się w prawym dolnym rogu ekranu. Aby wyłączyć
tę funkcję, należy nacisnąć ponownie ENTER.
3. Nacisnąć MENU, aby wyjść z menu opcji.
Wymagania odnośnie plików graficznych
Kompatybilność plików JPEG z niniejszym urządzeniem ma następujące
ograniczenia:
• Rozszerzenia plików: “.jpg”
• Wielkość: mniej niż 8000 x 8000 (S x W) pikseli (baseline)
mniej niż 100 000 pikseli (progresywne)
• Maksymalna ilość plików / nośnik: Zalecana mniej niż 650
Uwagi na temat plików JPEG
• Pliki JPEG o bezstratnej kompresji nie są obsługiwane.
• W zależności od wielkości i ilości plików JPEG, może chwilę potrwać zanim
urządzenie odczyta zawartość nośnika.
Wyświetlanie pliku ze zdjęciem
1 Wybrać urządzenie w [Device Menu]:
bb
VOLUME BB, ENTER
2 Wybrać [Photo] w [Media Menu]:
bb
VOLUME BB, ENTER
3 Wybrać plik ze zdjęciem w menu [Photo]:
bb
VOLUME BB,
bb
PAGE
BB
4 Wyświetlić wybrany plik na pełnym ekranie:
ENTER, NX
5 Aby powrócić do menu [Photo]: BACK
PRZYCISK
Device Menu
USB-C Flash SetupCalendar
Media Menu
Movie
Music
Photo
File
Photo
1/2
DSC_0029.jpg 2007/11/22 12:00:00
PF391P-P-APOLLLW-POL 11/27/07 9:27 PM Page 9

Odtwarzanie pliku z filmem - dodatkowe
możliwości
Opcje dostępne podczas odtwarzanie filmu
W trakcie odtwarzania filmu można korzystać z różnych funkcji.
1. Nacisnąć MENU podczas odtwarzania, aby wyświetlić menu opcji.
2. Przy pomocy b VOLUME B i ENTER wybrać opcję i zatwierdzić ją.
Powrót do początku bieżącego pliku. Nacisnąć szybko ENTER dwa
razy, aby odtworzyć poprzedni plik z filmem.
Szybkie odtwarzanie wstecz. Naciskać wielokrotnie ENTER, aby
wybrać prędkość odtwarzania.
Rozpoczęcie odtwarzania.
Wstrzymanie odtwarzania.
Szybkie odtwarzanie w przód. Naciskać wielokrotnie ENTER, aby
wybrać prędkość odtwarzania.
Odtwarzanie następnego pliku z filmem.
Zatrzymanie odtwarzania i powrót do menu [Movie].
Wybór trybu powtarzania (TRACK, ALL, OFF).
Powiększanie obrazu filmu. Naciskać przycisk ENTER, aby wybrać tryb
zoom lub tryb normalny.
Włącza lub wyłącza wyświetlanie zegara.
Jasność wyświetlacza. Nacisnąć ENTER, aby przejść do menu
kontroli jasności. Nastawić jasność przy pomocy b VOLUME B,po
czym nacisnąć ENTER.
3. Nacisnąć MENU, aby wyjść z menu opcji.
Wymagania odnośnie plików z filmami
Kompatybilność plików z filmami z niniejszym urządzeniem ma następujące
ograniczenia:
• Dostępne rozdzielczości: 720 x 576 (S x W) pikseli
• Prędkość danych: mniej niż 15 Mbps
• Rozszerzenia plików z filmami: “.avi”, “.mpg”, “.mpeg”
• To urządzenie nie obsługuje napisów w plikach z filmami.
• Odtwarzane formaty kodowania: “MPEG1”, “MPEG2”, “MJPEG”
• Odtwarzane formaty audio: “MPEG1”, “MPEG2”, “MPEG3”, “PCM”
• Jeżeli film nie może być wyświetlony, na ekranie pojawi się “Not Support”.
• Maksymalna ilość plików/ nośnik: zalecane mniej niż 650
10
Odtwarzanie pliku z filmem
1 Wybrać urządzenie w [Device Menu]:
bb
VOLUME BB, ENTER
2 Wybrać [Movie] w [Media Menu]:
bb
VOLUME BB, ENTER
3 Wybrać plik z filmem w menu [Movie]:
bb
PAGE
BB
4 Rozpocząć odtwarzanie: ENTER, NX
5 Aby powrócić do menu [Movie]: BACK
PRZYCISK
Device Menu
USB-C Flash SetupCalendar
Media Menu
Movie
Music
Photo
File
Movie
Movie 1.avi
Movie 2.avi
Movie 3.avi
Movie 4.avi
Movie 5.avi
Movie 6.avi
Movie 7.avi
File Name Movie 1.avi
File Size 14MB
File Type AVI
PF391P-P-APOLLLW-POL 11/27/07 9:27 PM Page 10

11
Odtwarzanie pliku muzycznego dodatkowe możliwości
Opcje dostępne podczas odtwarzania pliku muzycznego
W trakcie odtwarzania pliku muzycznego można korzystać z różnych funkcji.
1. Nacisnąć MENU podczas odtwarzania, aby wyświetlić menu opcji.
2. Przy pomocy b VOLUME B i ENTER wybrać opcję i zatwierdzić ją.
Powrót do początku bieżącego pliku. Nacisnąć szybko ENTER dwa
razy, aby odtworzyć poprzedni plik.
Szybkie odtwarzanie wstecz. Naciskać wielokrotnie ENTER, aby
wybrać prędkość odtwarzania.
Rozpoczęcie odtwarzania.
Wstrzymanie odtwarzania.
Szybkie odtwarzanie w przód. Naciskać wielokrotnie ENTER, aby
wybrać prędkość odtwarzania.
Odtwarzanie następnego pliku muzycznego.
Zatrzymanie odtwarzania.
Wybór trybu powtarzania. (TRACK, ALL, OFF)
3. Nacisnąć MENU, aby wyjść z menu opcji.
Wymagania odnośnie plików muzycznych
• Rozszerzenia plików: “.mp3”
• Częstotliwość próbkowania: 8 - 48 kHz (Layer 1, Layer 2, Layer 3,
MPEG 2.5), 8 - 96 kHz (PCM)
• Prędkość danych: 32 - 448 kbps (Layer 1), 32 - 384 kbps (Layer 2),
32 - 320 kbps (Layer 3), 8 - 160 kbps (MPEG 2.5)
• Maksymalna ilość plików / nośnik: zalecane mniej niż 650
Odtwarzanie pliku muzycznego
1 Wybrać urządzenie w [Device Menu]:
bb
VOLUME BB, ENTER
2 Wybrać [Music] w [Media Menu]:
bb
VOLUME BB, ENTER
3 Wybrać plik z muzyką w menu [Music]:
bb
PAGE
BB
4 Rozpocząć odtwarzanie: ENTER, NX
5 Aby powrócić do [Media Menu]: BACK
PRZYCISK
Device Menu
USB-C Flash SetupCalendar
Media Menu
Movie
Music
Photo
File
Music
Music 01.mp3
Music 02.mp3
Music 03.mp3
Music 04.mp3
Music 05.mp3
Music 06.mp3
Music 07.mp3
File Name Music 01.mp3
File Size 3MB
File Type MP3
PF391P-P-APOLLLW-POL 11/27/07 9:27 PM Page 11

12
Korzystanie z menu File - dodatkowe
możliwości
Korzystanie z menu [File]
•
Można wyświetlać listę folderów i plików znajdujących się w bieżącym nośniku.
• Można usuwać lub kopiować plik(i) znajdujące się w bieżącym nośniku.
Aby wyświetlić listę podfolderów i plików
Wybrać folder za pomocą b PAGE B i nacisnąć ENTER.
Pojawi się lista plików i podfolderów w wybranym folderze.
Nacisnąć BACK, aby przejść o jeden poziom wyżej.
Aby wybrać wiele plików w menu [File]
Przy pomocy przycisku
VOLUME B można wybrać jeden lub więcej plików.
Nacisnąć
VOLUME B przy wybranych plikach, aby je zaznaczyć.
Aby usunąć plik(i), przy pomocy menu File
1. Wybrać plik i nacisnąć VOLUME B. Po prawej stronie nazwy pliku pojawi
się “B”.
2. Powtórzyć krok 1, aby zaznaczyć więcej plików.
3. Nacisnąć ENTER, aby wyświetlić menu opcji.
4. Przy pomocy b PAGE B wybrać opcję [Delete >] i nacisnąć ENTER.
Pojawi się menu potwierdzenia.
5. Przy pomocy b VOLUME B wybrać [Yes] i nacisnąć ENTER Wybrany
plik(i) zostanie usunięty z bieżącego nośnika.
6. Gdy usuwanie jest zakończone, nacisnąć ENTER, aby potwierdzić.
Aby skopiować plik(i) z bieżącego nośnika do innego
1. Wybrać plik i nacisnąć VOLUME B. Po prawej stronie nazwy pliku pojawi
się “B”.
2. Powtórzyć krok 1, aby zaznaczyć więcej plików.
3. Nacisnąć ENTER, aby wyświetlić menu opcji.
4. Nacisnąć b PAGE B, aby wybrać opcję [Copy >] i nacisnąć ENTER.
5. Przy pomocy b PAGE B wybrać nośnik, do którego chce się skopiować
plik(i).
W górnej części po prawej stronie menu [File] pojawi się ilość wolnej
pamięci w wybranym nośniku.
6. Przy pomocy b VOLUME B oraz b PAGE B wybrać folder, do którego ma
się odbyć kopiowania.
- Nacisnąć VOLUME B, aby przejść do podkatalogu.
- Nacisnąć b VOLUME, aby przejść do katalogu wyższego.
7. Nacisnąć ENTER.
Pliki zostaną skopiowane do wybranego nośnika lub folderu.
8. Gdy kopiowanie jest zakończone, Nacisnąć ENTER, aby potwierdzić.
Korzystanie z menu File(plik)
1 Wybrać urządzenie w [Device Menu]:
bb
VOLUME BB, ENTER
2 Wybrać [File] w [Media Menu]:
bb
VOLUME BB, ENTER
3 Wybrać plik w menu [File]:
bb
PAGE
BB
4 Aby powrócić do poprzedniego ekranu: BACK
PRZYCISK
Device Menu
USB-C Flash SetupCalendar
Media Menu
Movie
Music
Photo
File
File
D:/
Folder 1
Folder 2
Movie 02.mov
Music 04.mp3
Photo 07.jpg
Photo 09.jpg
Modify Date 22 / 11 / 2007
File type Folder
PF391P-P-APOLLLW-POL 11/27/07 9:27 PM Page 12

13
Wyświetlanie kalendarza - dodatkowe
możliwości
Korzystanie z menu [Calendar]
• Można wyświetlać bieżąca datę i czas, wraz z pokazem slajdów.
• Można zmienić miesiąc i rok przy pomocy b VOLUME B i b PAGE B.
• Można wyświetlić informacje budzika.
Wyświetlanie kalendarza
1 Wybrać [Calendar] w [Device Menu]:
bb
VOLUME BB, ENTER
2 Wybrać miesiąc:
bb
VOLUME
BB
3 Wybrać rok:
bb
PAGE
BB
4 Aby powrócić do menu [Device Menu]: BACK
PRZYCISK
Device Menu
USB-C Flash SetupCalendar
SUN MON TUE WED THU FRI SAT
PF391P-P-APOLLLW-POL 11/27/07 9:27 PM Page 13

14
ON REMOTE
Podłączenie do komputera (USB) dodatkowe mozliwości
Podłączanie komputera
Podłączyć urządzenie do komputera przy pomocy opcjonalnego przewodu
USB. Po podłączeniu:
• Komputer automatycznie rozpozna karty pamięci zainstalowane w urządzeniu. W menu “My Computer” pojawi się ikona “PF39 Memory” (pamięć
wewnętrzna) oraz “Removable Disks” (zewnętrzna karta pamięci) reprezentująca karty pamięci zainstalowane w urządzeniu.
• Rozpoznanie i konfiguracja urządzenia w systemie Windows po pierwszym
podłączeniu może potrwać kilka minut. Potrzebny czas zależy od
konfiguracji komputera.
• Obsługiwanie Plug and Play: Windows 2000/ME/XP
• Po podłączeniu do komputera pojawi się PC monitor, nie można wtedy
używać żadnych przycisków urządzenia (za wyjątkiem11BAT. oraz P-SAVE).
Przenoszenie plików
Szybkie połączenie USB 2.0, ułatwia przenoszenie plików muzycznych,
filmowych lub ze zdjęciami (lub innych danych), między urządzeniem a komputerem. Należy używać podstawowych komend systemu operacyjnego, tak jak dla
każdego innego nośnika USB Flash.
Ważna uwaga:
• Proszę zobaczyć instrukcję lub menu pomocy swojego systemu operacyjnego,
aby uzyskać bardziej szczegółowe informacje dotyczące przenoszenia
plików.
• Nie rozłączać i w żaden inny sposób nie zakłócać pracy urządzenia
podczas przesyłania - może to spowodować uszkodzenie firmware’u
urządzenia lub plików.
• Aby sformatować wewnętrzną pamięć urządzenia przy pomocy komputera
PC, należy użyć systemu plików FAT.
Należy kliknąć dwukrotnie ikonę “My Computer” na pulpicie. Następnie kliknąć
dwukrotnie ikonę “PF39 Memory” lub “Removable Disks” odpowiadającą
wbudowanej lub włożonej do gniazda urządzenia karcie pamięci.
Przenieść pliki z mediami (lub inne pliki) na ikony “PF39 Memory” lub “Dyski
wymienne”.
• Można utworzyć foldery / podfoldery, aby uporządkować swoje media i dane.
Odłączanie od komputera
Należy zastosować się do poniższych instrukcji, podczas odłączania
urządzenia, aby zapobiec utracie danych lub uszkodzeniu pliku / firmware’u.
1. Kliknąć dwukrotnie zieloną ikonę strzałki na pasku zadań znajdującym się
w prawym dolnym rogu ekranu komputera (Bezpieczne usuwanie sprzętu).
2. Bezpieczne usuwanie sprzętu: Na widocznej liście zaznaczyć “Masowe
urządzenie magazynujące USB”, poczym kliknij ”Zatrzymaj”.
Zatrzymywanie urządzenia sprzętowego: Na widocznej liście, zaznacz
“Masowe urządzenie magazynujące USB”, po czym kliknąć ”OK”.
3. Po pojawieniu się komunikatu ”Sprzęt może być bezpiecznie usunięty”
kliknąć OK. i odłączyć przewód USB od swojego komputera.
Podłączenie do komputera (USB)
1 Podłączyć urządzenie do komputera: –
2 Włączanie urządzenia: 1 BAT.
3 Przenoszenie plików: –
PRZYCISK
Kabel USB
PF391P-P-APOLLLW-POL 11/27/07 9:27 PM Page 14

15
Zasilanie DC 12 V, 2 A
Pobór mocy 10 W
Czas pracy na zasilaniu z baterii:
około 1 godzina
Wymiary z podstawką (S x W x G)
213 x 147 x 103.5 mm
Masa netto 630 g
Temperatura robocza 5°C do 45°C
Wilgotność robocza 5 % to 90 %
Wyświetlacz 8” typu Wide (szeroki)
(Pełny-kolor TFT LCD)
obszar widzialny: 7.18”
Rozdzielczość wyświetlacza 800 x 480 (WVGA)
Wewnętrzna pamięć Flash (256 MB*)
Gniazdo kart pamięci dla kart SD/MMC/MS
Interfejs USB 2.0 High-Speed
(urządzenie)
Wsparcie Plug and Play Windows 2000/ME/XP
* 21MB jest przypisane dla oprogramowania urządzenia.
Akcesoria
• Adapter AC (MPA-630)
• Adapter kablowy USB
• Kabel USB
• Zdejmowana podstawka
• 3 różne płyty czołowe
Dane techniczne
Rozwiązywanie problemów
Zasilanie nie włącza się.
b Należy upewnić się, że przewód zasilający jest dobrze włożony do gniazdka
zasilającego.
Jakość odtwarzanego dźwięku jest niska.
b Należy spóbować odsłuchać ten sam plik na komputerze. Jeżeli jakość dźwięku jest dalej
niska, spróbować ściągnąć plik ponownie lub samodzielnie go ponownie odkodować.
b Należy upewnić się, czy szybkość transmisji danych pliku nie jest za mała. Im wyższa
szybkość transmisji danych pliku, tym lepsza jakość dźwięku. Zobacz “Wymagania
odnośnie plików muzycznych” na stronie 11.
Nie można przenieść plików z komputera do urządzenia.
b Należy upewnić się, że system operacyjny komputera jest obsługiwany przez
urządzenie.
b Należy upewnić się, że przewód USB jest dobrze podłączony do urządzenia i komputera.
b Gdy urządzenie jest podłączone za pomocą rozgałęziacza USB, należy spróbować
podłączyć je bezpośrednio do komputera.
b Należy sprawdzić, czy przesyłany plik nie jest większy niż pojemność wbudowanej
karty pamięci urządzenia.
Nie można wybrać karty pamięci.
b Należy upewnić się, czy karta pamięci została włożona.
b Należy upewnić się, czy karta pamięci została właściwie włożona.
b Należy upewnić się, czy karta pamięci nie jest uszkodzona.
Nie można skopiować plików do lokalizacji docelowej.
b Należy upewnić się, czy lokalizacja docelowa ma wystarczającą pojemność, by
zmieścić plik.
Urządzenie nie odtwarza pliku muzycznego.
b Należy upewnić się, czy plik jest w formacie obsługiwanym (MP3). Zobacz
“Wymagania odnośnie plików muzycznych” na stronie 11.
Urządzenie nie odtwarza pliku z filmem.
b Należy upewnić się, że plik z filmem jest obsługiwany przez urzadzenie. Zobacz
“Wymagania odnośnie plików z filmami” na stronie 10.
Nie ma dźwięku.
b Należy upewnić się, czy głośność została ustawiona na umiarkowanym poziomie.
Urządzenie działa wadliwie.
b Należy wyłączyć urządzenie, naciskając przycisk 1 BAT., po czym włączyć je ponownie.
• Projekt i specyfikacje mogą ulec zmianom bez powiadomienia.
PF391P-P-APOLLLW-POL 11/27/07 9:27 PM Page 15

PF391P-P-APOLLLW-POL 11/27/07 9:27 PM Page 16
 Loading...